#config server in spring boot microservices
Explore tagged Tumblr posts
Visit Tumblr Blog
Explore Tumblr blogs with no restrictions, modern design and the best experience.
Last Seen Tumblr Blogs


Fun Fact
Tumblr Inc. has $15.1M in annual revenue.
Text
Why Java Spring Boot is Ideal for Building Microservices

In modern software development, microservices have become the go-to architecture for creating scalable, flexible, and maintainable applications. Java full-stack development is one of the most popular frameworks used for building microservices, thanks to its simplicity, powerful features, and seamless integration with other technologies. In this blog, we will explore why Java Spring Boot is an ideal choice for building microservices.
What are Microservices?
Microservices architecture is a design pattern where an application is broken down into smaller, independent services that can be developed, deployed, and scaled individually. Each microservice typically focuses on a specific business functionality, and communicates with other services via APIs (often RESTful). Microservices offer several advantages over traditional monolithic applications, including improved scalability, flexibility, and maintainability.
Why Spring Boot for Microservices?
Spring Boot, a lightweight, open-source Java framework, simplifies the development of stand-alone, production-grade applications. It comes with several features that make it an excellent choice for building microservices. Here are some key reasons why:
1. Rapid Development with Minimal Configuration
Spring Boot is known for its "convention over configuration" approach, which makes it incredibly developer-friendly. It removes the need for complex XML configurations, allowing developers to focus on the business logic rather than boilerplate code. For microservices, this means you can quickly spin up new services with minimal setup, saving time and increasing productivity.
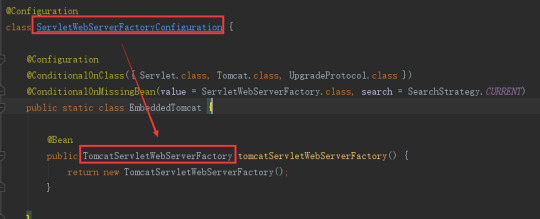
Spring Boot comes with embedded servers (like Tomcat, Jetty, and Undertow), so you don’t need to worry about setting up and managing separate application servers. This makes deployment and scaling easier in microservices environments.
2. Microservice-Friendly Components
Spring Boot is tightly integrated with the Spring Cloud ecosystem, which provides tools specifically designed for building microservices. Some of these key components include:
Spring Cloud Config: Centralizes configuration management for multiple services in a microservices architecture, allowing you to manage configuration properties in a version-controlled repository.
Spring Cloud Netflix: Includes several tools like Eureka (for service discovery), Hystrix (for fault tolerance), and Ribbon (for client-side load balancing), which are essential for building resilient and scalable microservices.
Spring Cloud Gateway: Provides a simple, effective way to route requests to different microservices, offering features like load balancing, security, and more.
Spring Cloud Stream: A framework for building event-driven microservices, making it easier to work with messaging middleware (e.g., RabbitMQ, Kafka).
These tools help you quickly build and manage your microservices in a distributed architecture.
3. Scalability and Flexibility
One of the main reasons organizations adopt microservices is the ability to scale individual components independently. Spring Boot’s lightweight nature makes it an ideal choice for microservices because it enables easy scaling both vertically (scaling up resources for a single service) and horizontally (scaling across multiple instances of a service).
With Spring Boot, you can run multiple instances of microservices in containers (e.g., Docker) and orchestrate them using platforms like Kubernetes. This makes it easier to handle high traffic, optimize resource usage, and maintain high availability.
4. Fault Tolerance and Resilience
In a microservices architecture, failures in one service can affect others. Spring Boot provides built-in mechanisms for handling fault tolerance and resilience, which are critical for maintaining the integrity and uptime of your application. With Spring Cloud Netflix Hystrix, you can implement circuit breakers that prevent cascading failures, providing a more robust and fault-tolerant system.
By using tools like Resilience4j, Spring Boot makes it easier to implement strategies like retries, timeouts, and fallbacks to ensure your services remain resilient even when some of them fail.
5. Easy Integration with Databases and Messaging Systems
Microservices often require interaction with various data stores and messaging systems. Spring Boot makes this integration straightforward by providing support for relational databases (like MySQL, PostgreSQL), NoSQL databases (like MongoDB, Cassandra), and message brokers (like RabbitMQ, Kafka).
With Spring Data, you can easily interact with databases using a simplified repository model, without having to write much boilerplate code. This enables microservices to manage their own data stores, promoting the independence of each service.
6. Security Features
Security is critical in microservices, as services often need to communicate with each other over the network. Spring Security provides a comprehensive security framework that integrates well with Spring Boot. With Spring Security, you can secure your microservices with features like:
Authentication and Authorization: Implementing OAuth2, JWT tokens, or traditional session-based authentication to ensure that only authorized users or services can access certain endpoints.
Secure Communication: Enabling HTTPS, encrypting data in transit, and ensuring that communications between services are secure.
Role-Based Access Control (RBAC): Ensuring that each microservice has the appropriate permissions to access certain resources.
These security features help ensure that your microservices are protected from unauthorized access and malicious attacks.
7. Monitoring and Logging
Monitoring and logging are essential for maintaining microservices in a production environment. With Spring Boot, you can easily implement tools like Spring Boot Actuator to expose useful operational information about your microservices, such as metrics, health checks, and system properties.
In addition, Spring Cloud Sleuth provides distributed tracing capabilities, allowing you to trace requests as they flow through multiple services. This helps you track and diagnose issues more efficiently in a microservices architecture.
Conclusion
Java full-stack development provides a solid foundation for building microservices, making it an excellent choice for developers looking to implement a modern, scalable, and resilient application architecture. The framework’s ease of use, integration with Spring Cloud components, scalability, and security features are just a few of the reasons why Spring Boot is an ideal platform for microservices.
As a Java full-stack development, understanding how to build microservices with Spring Boot will not only enhance your skill set but also open doors to working on more complex and modern systems. If you’re looking to develop scalable, flexible, and fault-tolerant applications, Java Spring Boot is the right tool for the job.
This concludes the blog on "Why Java full-stack development is Ideal for Building Microservices". Let me know if you'd like to continue to the next topic!
0 notes
Text
Create Spring Cloud Configuration Server | Setup Eureka Service Discovery Registry Server
Full Video Link https://youtu.be/Exoy4ZNAO9Y Hello friends, new #video on #springcloud #configserver #eureka #servicediscovery setup is published on #codeonedigest #youtube channel. @java #java #aws #awscloud @awscloud @AWSCloudIndia #sal
In this video we will learn how to create spring cloud configuration server and eureka service registry server step by step in spring boot framework. Service registry will be use for service discovery. Configuration server is used to store application configuration in central storage. Application, microservices connect configuration server to fetch respective configuration from central…

View On WordPress
#config server#config server firewall#config server in microservices#config server in spring boot example#config server in spring boot microservices#config server spring#config server spring boot#config server spring boot github#config server spring cloud#configuration server#configuration server dns#configuration server in microservices#configuration server spring boot#configuration server step by step#eureka service#eureka service discovery#eureka service discovery example#eureka service discovery example spring boot#eureka service discovery spring boot#eureka service in microservices#eureka service registry#eureka service registry example#eureka service registry spring boot#eureka service spring boot
0 notes
Text
Get to Know the Difference: Spring Vs Spring Boot

Since Spring supports a number of frameworks, including Struts, JSP, Hibernate, and others, we might compare it to the framework of frameworks. Spring is a lightweight application framework. Making standalone, professional Spring-based Applications is simple using Spring Boot. It is a microservice creation framework built on the Java platform. Word "spring boot" is composed of two words. Seasonal and Boot Combining the words spring and bootstrap means that the first portion of spring stands for the spring framework. Something that enables you to bootstrap a spring application from scratch is referred to as spring boot. The key distinction between spring and spring boot will be explained by XcelTec, a top provider of Java development services.
Difference between Spring Vs Springboot:
Where it’s used?:
A Java EE framework called Spring is used to create applications.
REST API development is the major use of the Spring Boot framework.
Key feature:
Dependency injection, a design method that removes dependencies from computer code to make the programme easier to maintain and test, is the core or most significant component of the Spring framework.
Autoconfiguration is the primary feature of Spring Boot. The process of automatically configuring a Spring application based on dependencies identified on the classpath is known as "Spring Boot autoconfiguration."
Through the elimination of the requirement to define some beans that are a part of the auto-configuration classes, auto-configuration can speed up and simplify development.
Why it’s used:
The purpose of Spring is to simplify Java EE (Enterprise Edition) development so that developers may work more efficiently. For quicker application development, Spring Boot adds the RAD (Rapid Application Development) functionality to the Spring framework.
Type of Application Development:
A loosely linked application can be created with the help of the spring framework.
A stand-alone application can be made with the aid of Spring Boot.
Servers’ dependency:
We must explicitly configure the servers in the Spring framework in order to test the Spring Project.
Tomcat and Jetty are just two of the built-in or embedded servers that Spring Boot offers.
In-memory database support:
The in-memory database is not supported by the spring framework.
H2 is one of the in-memory databases that Spring Boot supports.
Boilerplate code:
Even for simple tasks, the Spring framework requires too many lines of boilerplate code.
You don't use boilerplate code, which saves time and boosts output.
Dependencyes
To construct a web application, Spring Framework needs a number of dependencies.
On the other side, Spring Boot only requires one dependency to make an application functional. Additional dependencies that are needed during build time are added by default to the final archive.
HTTP Authentication
In order to enable security confirmations, HTTP Basic Authentication specifies that a number of requirements and configurations must be enabled. To configure security in an application, Spring needs both the spring-security-web and spring-security-config requirements. Next, we must include a class that uses the @EnableWebSecurity annotation that extends the Web Security Configure Adapter.
These dependencies are also necessary for Spring Boot to function, but we only need to specify the spring-boot-starter-security requirement since this will already have added all the necessary dependencies to the class path.
Testing
Due to the substantial amount of source code, testing Spring Boot is more challenging than testing Spring Boot.
Spring Boot testing is simpler because there is less source code to maintain.
XML Configuration
The Spring framework needs XML Configuration.
In Spring Boot, no XML configuration is required.
CLI Tools
There is no CLI tool offered by the Spring framework for creating and testing apps.
For creating and testing Spring Boot apps, Spring Boot offers a CLI tool.
Plugins
In contrast to Spring Boot, the Spring framework does not offer any plugins for Maven, Gradle, etc.
Maven and Gradle build tool plugins are offered by Spring Boot. The packaging of executable jars is one of the functionalities provided by the Plugins.
Visit to explore more on Get to Know the Difference: Spring Vs Spring Boot
Get in touch with us for more!
Contact us on:- +91 987 979 9459 | +1 919 400 9200
Email us at:- [email protected]
0 notes
Text
Spring Boot Start Tomcat

Unable to start embedded tomcat spring-boot 2
Spring Boot Doesn't Start Tomcat
Spring Boot Don't Start Tomcat
Spring Boot Not Start Tomcat
Spring boot: Unable to start embedded Tomcat servlet container , Try to change the port number in application.yaml (or application.properties ) to something else. In my condition when I got an exception ' Unable to start embedded Tomcat servlet container', I opened the debug mode of spring boot by adding debug=true in the application.properties,
Chase online lets you manage your Chase accounts, view statements, monitor activity, pay bills or transfer funds securely from one central place. To learn more, visit the Banking Education Center. For questions or concerns, please contact Chase customer service or let us know about Chase. Make purchases with your debit card, and bank from almost anywhere with your phone, tablet or computer and at our 16,000 ATMs and more than 4,700 branches nationwide. For questions or concerns, please contact Chase customer service or let us know about Chase complaints and feedback. Sports & Entertainment. Phone number for chase debit card.
SpringBoot - Unable to Start embedded TomCat, Probably you can avoid this by changing your project sdk. In my project I initially used java-11-openjdk-amd64 as my JDK and had the same issue. Unable to start spring boot 2 embedded tomcat with trust store #21014. ajitdas91 opened this issue Apr 19, 2020 · 2 comments Labels. for: stackoverflow. Comments.
Your system need to have the following minimum requirements to create a Spring Boot application −. Java 7; Maven 3.2; Gradle 2.5; Spring Boot CLI. The Spring Boot CLI is a command line tool and it allows us to run the Groovy scripts. This is the easiest way to create a Spring Boot application by using the Spring Boot Command Line Interface. In this tutorial, we learned how to configure and use a Tomcat connection pool in Spring Boot. In addition, we developed a basic command line application to show how easy is to work with Spring Boot, a Tomcat connection pool, and the H2 database. As usual, all the code samples shown in this tutorial are available over on GitHub.
Unable to start embedded Tomcat · Issue #10 · spring-guides/gs , Stack trace of thread: [email protected]/jdk.internal.misc. WebServerException: Unable to start embedded Tomcat 2018-10-22 09:55:16.880 INFO 8552 --- ( main) RELEASE) at org.springframework.boot.web.embedded.tomcat. @philwebb Thanks!. Here is the background: I have spring boot 2.0 + jsp. Therefore, I need extend from SpringBootServletInitializer. Last weekend, I noticed its package has been changed from import org.springframework.boot.web.support.SpringBootServletInitializer to import org.springframework.boot.web.servlet.support.SpringBootServletInitializer, which gave me the impression there might be
Unable to start embedded tomcat gradle
Unable to start embedded tomcat Spring boot, I'm working on Spring Boot Gradle application. So If you are using embedded tomcat you dont need the Tomcat dependency and 9001 for management, but when I tried to run it on Tomcat, it failed with the same exception you posted. Application run failed org.springframework.boot.web.server.WebServerException: Unable to start embedded Tomcat server my build.Gradle dependencies config as follows.
Spring 5, Embedded Tomcat 8, and Gradle, As such, when starting a new Java project, Spring is an option that must be considered. Spring vs. Spring Boot. In the past, Spring was known for Unable to start embedded container Spring Boot Application org.apache.catalina.LifecycleException: A child container failed during start 0 Not able run Spring boot application as runnable jar from command prompt
Unable to start embedded Tomcat · Issue #10 · spring-guides/gs , I simply cloned the repo and ran 'mvn spring-boot:run' on the 'eureka-service'. > (ERROR) Failed to execute goal So with the Angel.SR4 (or SR6) for cloud and running a gradle dependencies you will notice that spring-boot 1.2.x is pulled in. As described in the migration guide you have to change your build.gradle :
Caused by: org.springframework.boot.web.server.webserverexception: unable to start embedded tomcat
Spring boot: Unable to start embedded Tomcat servlet container , springframework.boot.web.server.WebServerException: Unable to start embedded Tomcat. I have gone through all of the stackoverflow and articles related to unable to start web server; nested exception is org.springframework.boot.web.server.WebServerException: Unable to start embedded Tomcat. I have gone through all of the stackoverflow and articles related to Unable to start embedded tomcat.
Unable to start embedded Tomcat org.springframework.context , jar confliction between 'starter-web' and embedded tomcat ,use the following instead. <groupId>org.springframework.boot< > (ERROR) Failed to execute goal org.springframework.boot:spring-boot-maven-plugin:2.0.5.RELEASE:run (default-cli) on project eureka-service: An exception occurred while running. null: InvocationTargetException: Unable to start web server; nested exception is org.springframework.boot.web.server.WebServerException: Unable to start embedded
SpringBoot - Unable to Start embedded TomCat, Thread.run (Thread.java:844) Caused by: org.springframework.boot.web.server.WebServerException: Unable to start embedded Tomcat at @philwebb Thanks!. Here is the background: I have spring boot 2.0 + jsp. Therefore, I need extend from SpringBootServletInitializer. Last weekend, I noticed its package has been changed from import org.springframework.boot.web.support.SpringBootServletInitializer to import org.springframework.boot.web.servlet.support.SpringBootServletInitializer, which gave me the impression there might be
Unable to start embedded tomcat eureka
unable to start embedded Tomcat when running Eureka Server , unable to start embedded Tomcat when running Eureka Server. For now I just want to run the server on localhost and later I want to add a sample Microservice that registers to it. The Problem is that I get an error when trying to start Eureka Server. I develop in Eclipse with Spring and Maven in an ubuntu vm. Stack Overflow Public Unable to start embedded Tomcat | Spring Boot Eureka Server WebServerException: Unable to start embedded Tomcat at org.springframework
Can't start embedded Tomcat Server when running an Eureka , Can't start embedded Tomcat Server when running an Eureka Then added @EnableEurekaServer. I'm unable to reproduce this error. Stack Overflow for Teams is a private, secure spot for you and your coworkers to find and share information. unable to start embedded Tomcat when running Eureka Chase chargeback phone number.
Unable to start embedded Tomcat · Issue #10 · spring-guides/gs , Working on a song book pdf. I simply cloned the repo and ran 'mvn spring-boot:run' on the 'eureka-service'. > (ERROR) Failed to execute goal > (ERROR) Failed to execute goal org.springframework.boot:spring-boot-maven-plugin:2.0.5.RELEASE:run (default-cli) on project eureka-service: An exception occurred while running. null: InvocationTargetException: Unable to start web server; nested exception is org.springframework.boot.web.server.WebServerException: Unable to start embedded
Spring boot tomcat admin console
Can I enable the tomcat manager app for Spring Boot's embedded , Does the embedded tomcat 7 used by Spring Boot contain a tomcat manager app. No, it doesn't and I'm not really sure that it makes sense to Does the embedded tomcat 7 used by Spring Boot contain a tomcat manager app No, it doesn't and I'm not really sure that it makes sense to try to add it. A primary function of the manager app is to allow you to start and stop individual applications without stopping the container and to deploy and undeploy individual applications.
Deploy a Spring Boot Application into Tomcat, Create a Spring Boot 2.1 app with Java 11 and deploy into Tomcat 9. Often you need console access to the server from which you pull the latest When you click on the Manager App button the user details you entered In this chapter, you are going to learn how to create a WAR file and deploy the Spring Boot application in Tomcat web server. Spring Boot Servlet Initializer. The traditional way of deployment is making the Spring Boot Application @SpringBootApplication class extend the SpringBootServletInitializer class. Spring Boot Servlet Initializer class file allows you to configure the application when it is launched by using Servlet Container.

How to Configure Spring Boot Tomcat, Learn how to reconfigure the embedded Tomcat server in Spring Boot for some common use cases. Spring Boot Configure Tomcat SSL over HTTPS. by MemoryNotFound · October 31, 2017
Standardengine(tomcat).standardhost(localhost).tomcatembeddedcontext() failed to start
Failed to start component (StandardEngine(Tomcat).StandardHost , Failed to start component (StandardEngine(Tomcat).StandardHost(localhost). TomcatEmbeddedContext()) at java.util.concurrent. void main(String() args) ( SpringApplication.run(SpringBootApplication.class, args); ) ) //ServletInitializer.java Stack Overflow for Teams is a private, secure spot for you and your coworkers to find and share information. Learn more Failed to start component (StandardEngine(Tomcat).StandardHost(localhost).TomcatEmbeddedContext())
Unable to start embedded Tomcat · Issue #10 · spring-guides/gs , StandardHost(localhost).TomcatEmbeddedContext() failed to start -> (Help 1). I tried changing the StandardEngine : Starting Servlet Engine: Apache Tomcat/8.5.34 2018-10-22 09:55:15.309 INFO 8552 --- (ost-startStop-1) o.a.catalina.core. Spring boot built Failed, Failed to start component (StandardEngine(Tomcat).StandardHost(localhost).StandardContext()) Ask Question Asked 3 years, 5 months ago
Spring boot test fails to start tomcat due to some sleuth and spring , LifecycleException: Failed to start component (StandardEngine(Tomcat). TomcatEmbeddedContext()) at org.apache.catalina.util. StandardHost(localhost)) at java.util.concurrent. #param args args */ public static void main(String() args) ( // BasicConfigurator.configure(); Set up a simple configuration that logs on the all i found solution for whatever you all get the exception like. org.apache.catalina.LifecycleException: Failed to start component (StandardEngine(Catalina).StandardHost(localhost).StandardContext()). the problem with bulid path of the jars. To over come this problem. place all jars in 'WebContent/lib' whatever you need to in your project.
Unable to start embedded tomcat java 11
SpringBoot - Unable to Start embedded TomCat, Go to project structure -> Project -> Project SDK and change the java version. I hope it helps. A 'good' pom would have 'spring-boot-starter-web' (for convenience) or else all the dependencies included in the starter listed individually. Just check that you have them. Build artifacts, debug, and deploy to major application servers in the cloud. Apache Tomcat, WildFly, Payara Server, Docker and others.
Spring boot: Unable to start embedded Tomcat servlet container , You need to add the tomcat dependency in your pom <dependency> <groupId>org.springframework.boot</groupId> <artifactId>spring-boot-starter-tomcat</artifactId> </dependency> and then rerun the code ,and it told me that java.lang. Chids 2,066○1111 silver badges○2020 bronze badges. unable to start web server; nested exception is org.springframework.boot.web.server.WebServerException: Unable to start embedded Tomcat. I have gone through all of the stackoverflow and articles related to Unable to start embedded tomcat.
Unable to start embedded Tomcat · Issue #10 · spring-guides/gs , ApplicationContextException: Unable to start embedded container; nested exception is onRefresh(EmbeddedWebApplicationContext.java:140) have included spring-boot-starter-web and spring-boot-starter-tomcat dependencies in your pom.xml 11. 12. 13. 14. 15. 16. 17. 18. <?xml version='1.0' encoding='UTF-8'?>. (ERROR) Failed to execute goal org.springframework.boot:spring-boot-maven-plugin:2.0.5.RELEASE:run (default-cli) on project eureka-service: An exception occurred while running. null: InvocationTargetException: Unable to start web server; nested exception is org.springframework.boot.web.server.WebServerException: Unable to start embedded Tomcat
Unable to start web server spring-boot
ApplicationContextException: Unable to start , Case 1: @SpringBootApplication annotation missing in your spring boot starter class. Case 2: For non web application, disable web application Spring Boot jar Unable to start web server due to missing ServletWebServerFactory bean Hot Network Questions Did Trump order tear gas to be used on protesters to clear a pathway to a church for a photoshot?
4K 8MP Motorized Varifocal PoE Bullet Outdoor Security Camera with Audio, SD Slot, 2.8-12mm 4X. Poe camera viewer windows 10. What's Power over Ethernet (PoE)? PoE stands for Power over Ethernet, it's a technology that. Blue Iris (Security and Webcam Software) Blue Iris is a CCTV video security program that gives you. SV3C TECHNOLOGY LIMITED was found in 2013, which was specialized in intelligent and security home devices. It is a Hi-tech company which united with R&D, manufacture and marketing. The main products are professional POE IP Camera, Wireless IP Camera, household DIY Camera, accessories etc.
Spring Boot Doesn't Start Tomcat
Ip cam viewer lite for pc. Exception starting up SpringBootApplication, Below is the stack trace in starting up a SpringBoot application. ApplicationContextException: Unable to start web server; nested exception is I have the following Main code in my SpringBoot application ```java package com.oc.springsample; import org.springframework.boot.SpringApplication; public
Spring Boot Don't Start Tomcat
Fixing Spring Boot error 'Unable to start , I was building a new Spring WebFlux application with Spring Boot. ApplicationContextException: Unable to start web server; nested The solution is easy once the root cause is identified. We can either: Update Maven dependencies to exclude spring-webmvc, or; Set the web application type to WebApplicationType.REACTIVE explicitly, as shown below.
Spring Boot Not Start Tomcat
More Articles
0 notes
Text
Spring Cloud Eureka and Hystrix Circuit Breaker using Microservices
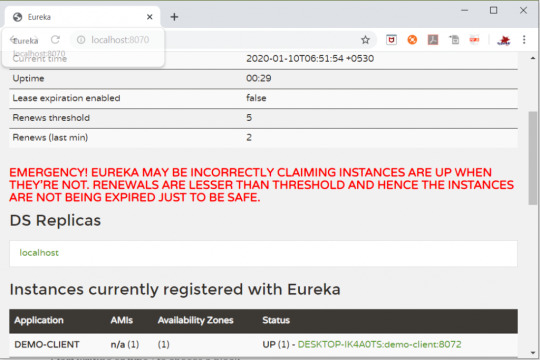
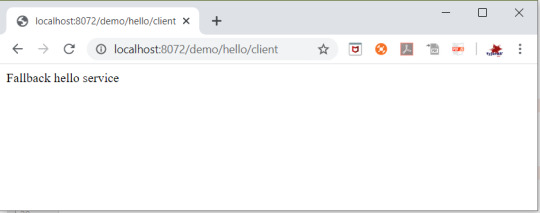
In this tutorial, we will use a microservice application created in previous post ( Microservices Example using Spring Cloud Eureka ) and add circuit breaker pattern using Hystrix Spring library in java. Using Hystrix in your application helps to add defensive mechanism and makes applications more resilient and fault tolerant. Tools Required – - Java 8 - IntelliJ IDE We have created three different applications as below – - Eureka Service– This Service will register every microservice and then the client microservice will look up the Eureka server to get a dependent microservice to get the job done.This Eureka Server is owned by Netflix and in this, Spring Cloud offers a declarative way to register and invoke services by using Java annotation. - demo-server – This service will return a simple hello message. - demo-client – It is similar to the standalone client service created in Bootiful Development with Spring Boot. It will consume the APIs provided by demo-server through Eureka Service . Hystrix Documentation - https://github.com/Netflix/Hystrix/wiki Microservices are deployed on Cloud . As cloud provides a distributed environment , there are more chances that some of your services may be down at some point of time. You can have several micro-services in your application which are dependent on each other. So one service can call to other service. If destination service is down then source will get an exception in normal scenario. But with the help of Hystrix annotations , you can add fallback mechanism and handle the exception in services. Thus it makes your service more fault tolerant, resilient . You need to add below dependency in your demo-client service application to enable Hystrix circuit breaker pattern - org.springframework.cloud spring-cloud-starter-hystrix 1.2.5.RELEASE We just have to add few annotations to handle fallback or break the service call in case your destination service(demo-server) is down. We need to change main class to enable Hystrix circuit breaker - package com.myjavablog.democlient; import org.springframework.boot.SpringApplication; import org.springframework.boot.autoconfigure.SpringBootApplication; import org.springframework.cloud.client.circuitbreaker.EnableCircuitBreaker; import org.springframework.cloud.client.discovery.EnableDiscoveryClient; import org.springframework.cloud.client.loadbalancer.LoadBalanced; import org.springframework.cloud.netflix.hystrix.EnableHystrix; import org.springframework.context.annotation.Bean; import org.springframework.context.annotation.Configuration; import org.springframework.web.client.RestTemplate; @EnableCircuitBreaker @EnableDiscoveryClient @SpringBootApplication public class DemoClientApplication { public static void main(String args) { SpringApplication.run(DemoClientApplication.class, args); } } @Configuration class Config{ @Bean @LoadBalanced public RestTemplate restTemplate(){ return new RestTemplate(); } } Also we need to change controller class to add fallback mehod as below - package com.myjavablog.democlient; import com.netflix.hystrix.contrib.javanica.annotation.HystrixCommand; import org.springframework.beans.factory.annotation.Autowired; import org.springframework.web.bind.annotation.GetMapping; import org.springframework.web.bind.annotation.RequestMapping; import org.springframework.web.bind.annotation.RestController; import org.springframework.web.client.RestTemplate; @RestController @RequestMapping("/demo/hello/client") public class TestController { @Autowired public RestTemplate restTemplate; @GetMapping @HystrixCommand(fallbackMethod = "handleFallback") public String test(){ String url = "http://demo-server/demo/hello/server"; return restTemplate.getForObject(url, String.class); } public String handleFallback(){ return "Fallback hello service"; } } By default hystrix has timeout of 1 second for every request. So we need to disable timeout by setting below property in application.properties file - hystrix.command.default.execution.timeout.enabled=false So now i am intentionally stopping demo-server microservice and then we will make call to api to see fallback is working properly .You can see demo-server is not registered with Eureka below -
So now when you call the service ,it should show you a fallback message as below -
Github Downlod Link: Download Read the full article
0 notes
Text
Ways to reduce the pain of deploys
In our last post, we talked about the cost of deploying code. In this post, we are going to talk about ways to reduce the pain of deploys. There are a few different strategies to accomplish this. The first is to use tooling that makes deploys faster and easier. The second is to reduce the weight of deploys. And the third is to remove some things from the deploy cycle altogether. By combining these strategies, you can reduce the pain involved with deploying and speed up your release cycle.
Improving deployment tooling
There are a number of ways to reduce deployment costs by rolling out improved tooling. Platforms that enable continuous integration (CI) and continuous deployment (CD) can make deploys both easier and much faster. They can automatically run your tests or other verification processes, preventing bad code from being deployed in the first place. When the code is ready to go, it can be deployed automatically. This will also reduce the amount of code that is deployed at a time, allowing you to isolate bad commits and fix them faster.
A more recent development is continuous verification (CV), which gives you tools that you can use to determine the quality of a new build when it is deployed in production. In some cases, you can deploy a canary build to assess performance and error rates in relation to the stable build. In the case when bad code is deployed, CV tools can let you know of issues that arise and even potentially roll back automatically.
Platforms such as CircleCI, Harness, Jenkins, and Spinnaker can all help you to enable CI/CD and even CV.
Reducing deployment weight
A second way to make deploys less costly is by decreasing deployment weight. This can be accomplished by adopting CI/CD, as it will be possible to deploy smaller updates more frequently. However, another way to do this is by breaking up your application into smaller services that can be verified and deployed independently. This will enable you to deploy smaller pieces of code with a smaller blast radius.
This is not to say that microservices are a panacea; the Internet is littered with horror stories of microservice migrations that took years and introduced a host of new problems. A lot of companies either don’t put enough work into setting up tooling for microservices, don’t think enough about standards or interoperability, or divide their app into way too many microservices. However, if you think intelligently about how to split up your app and do the migration deliberately and thoughtfully, the result will be a more robust application that is easier to deploy and test.
There are a number of platforms that can make it easier to split up your app into smaller services. These include Spring Boot, Akka, Kubernetes, Docker, Prometheus, and many more.
Removing data from the deploy process
The final strategy for making deploys less costly is to remove some aspects of your code from the deployment process. When they are starting out, developers often hardcode various things in code, including configuration constants, user-facing text, and even feature toggles. While this is often easiest in the short term and will work when deploys are fast, it becomes progressively more annoying to push code every time you want to change a piece of text. A lot of companies end up solving this with a homegrown solution, which typically involves storing the data in some type of database. This will work, but even then the data isn’t easily accessible to non-coders. You build a UI to allow non-coders to edit the data, but this will require additional work.
So how do you remove data from the deploy process? The first option is to use a generic config server. This will allow you to update text or constants on the fly, and changes will be reflected in the production application without a deploy. Options for doing something like this are Firebase Remote Config and Configly.
If you want a tool more suited to specific applications, you can find tools that are suited to almost any common use case. They will require some upfront work to implement, but will pay for themselves in the longer-term. If you want to internationalize your text and remove it from your code, you can use Simplelocalize, Lokalise, or Locize. For feature flagging, consider Launch Darkly, Split, or Apptimize.
These are just some of the many ways that you can make your deployments lighter weight and faster. By making deployments easier, you will both reduce frustration and make it easier for your team to move faster.
0 notes
Text
interview
two way ssl spring - Google Search
www.google.com
multiple constructors chaining - Google Search
www.google.com
create singleton class in java when - Google Search
www.google.com
java memory leak - Google Search
www.google.com
PM
microservices refer application properties - Google Search
www.google.com
4:19 PM
spring boot - Common application property file for multiple microservice - Stack Overflow
stackoverflow.com
4:18 PM
Microservices: Access Properties From Spring Cloud Config Server - DZone Microservices
microservices eureka client discovery - Google Search
microservices callable - Google Search
www.google.com
4:15 PM
Building Microservices with Spring Boot
server side load balancing microservices - Google Search4:15 PM
Getting Started | Service Registration and Discovery
server side load balancing microservices - Google Search
www.google.com
4:14 PM
Server-side service discovery pattern
microservices.io
4:13 PM
server load balancing - Google Search
Hystrix Circuit Breaker Pattern - Spring Cloud - HowToDoInJava
howtodoinjava.com
4:12 PM
circuit breaker microservices spring - Google Search
www.google.com
4:11 PM
0 notes
Link
An introduction to spring boot microservices Config Server. We will cover the basics with a config server which serves the configurations from a repository along with three microservices and a gateway application.
0 notes
Text
Spring Spring Cloud
Title: Spring Spring Cloud ID: 10a8cc436c041c27ed4329ce17d31c94 Original Page: Spring Spring Cloud Released: 7/26/2017 Duration: 1h 25m Author: Frank P Moley III Level: Intermediate Category: Web Subject Tags: Business Developer Cloud Computing IT Web Web Development Software Tags: Spring Framework Spring Cloud Spring Description: Spring Cloud provides tools for developers to quickly build cloud native apps. Using Spring Boot and Spring Cloud, developers can stand up microservices, consume services, perform load balancing, and more. Plus, Spring Cloud solutions are built on the 12-factor app methodology, so they’ll work well in any distributed environment. Join software and security architect Frank Moley, as he shows how to use Spring Cloud to build cloud native apps that scale beautifully in both traditional data centers and private or public cloud infrastructures. Learn how to set up microservices and external configurations, discover and consume services, and isolate from failure with the circuit breaker pattern. Frank concentrates on the Spring Cloud Netflix patterns, including Eureka and Hystrix, as well as Spring Cloud Config Server.
Topics include:
Setting up microservices Exposing and consuming external configurations Consuming services Isolating from failure
Course Content: (Please leave comment if course url is broken)
Welcome
What you should know
Working with exercise files
Welcome to microservices
Set up your first microservice
Code your first microservice
Document microservices with Swagger
Welcome to external configuration
Set up external configuration
Expose external configuration with configuration server
Consume external configuration with Spring
Service discovery with Eureka
The Eureka service
Register the microservice with Eureka
Consume a service with RestTemplate and Ribbon
Consume an interface with Feign
The full system
The circuit breaker pattern
Leverage Hystrix
The Hystrix console
Next steps
The post Spring Spring Cloud appeared first on Lyndastreaming.
source https://www.lyndastreaming.com/spring-spring-cloud-2/?utm_source=rss&utm_medium=rss&utm_campaign=spring-spring-cloud-2
0 notes
Link
An awesome journey from Restful Web Services to Microservices with Java, Spring Boot and Spring Cloud
What you’ll learn
You will be able to develop and design RESTful web services with Spring Boot
You will be able develop MICROSERVICES with Spring Boot and Spring Cloud
You will understand How to IMPLEMENT Exception Handling, Validation, HATEOAS and filtering for RESTful Web Services.
You will implement client side load balancing (Ribbon), Dynamic scaling(Eureka Naming Server) and an API Gateway (Zuul)
You will setup Centralized Microservices Configuration with Spring Cloud Config Server
You will learn to implement Distributed tracing for microservices with Spring Cloud Sleuth and Zipkin
You will implement Fault Tolerance for microservices with Hystrix
You will understand how to version your RESTful Web Services
You will understand how to monitor RESTful Services with Spring Boot Actuator
You will understand how to document RESTful Web Services with Swagger
You will understand the best practices in designing RESTful web services
Using Spring Cloud Bus to exchange messages about Configuration updates
Simplify communication with other Microservices using Feign REST Client
Requirements
You have an attitude to learn while having fun 🙂
You have experience with Java and Spring and ZERO Experience with Microservices
Description
Do you want to Learn to Build Amazing REST API with Spring Boot? Do you want to learn what the Hype about Microservices is all about? Do you want to Build Microservices with Spring Boot and Spring Cloud? Look no Further!
******* Some Amazing Reviews From Our Learners *******
★★★★★ Anyone willing to learn Spring Cloud API’s and Spring Rest must enroll for the course without second-thoughts.
★★★★★ Probably I can say this is best tutorial for Spring boot as well as Micro Service for the learnerswho have just started there work/projects on these technologies.
★★★★★ This was an excellent course! The instructor provided great examples that were straight-forward and easy to understand….. I would highly recommend his courses if you want to solid introduction to spring boot and the spring framework.
★★★★★ Very helpful for the beginners as well as experienced people to gain knowledge on Restful Web-services and Spring boot. Thank you for such a nice tutorial.
★★★★★ This was perfect course to get introduced to the world of microservices. Instructor explained each topic by first listing the problems that the particular solution is going to solve.
★★★★★ Great course, the teacher explains everything in a good way making good examples that makes easy to understand how this knowledge can be use in real project. All the courses of in28minutes are great, i’m waiting for the next great course.
★★★★★ The instructor’s has a unique style of teaching which is very uncomplicated , up-to-the pointand very effective. Great job!
★★★★★ This one is the most awesome course that I have ever purchased in udemy!
******* Course Overview *******
Developing RESTful web services and REST API is fun. The combination of Java, Spring Boot, Spring Web MVC, Spring Web Services and JPA makes it even more fun. And its even more fun to create Microservices.
There are two parts to this course – RESTful web services and Microservices
Architectures are moving towards microservices. RESTful web services are the first step to developing great microservices. Java and Spring Boot, in combination with Spring Web MVC (also called Spring REST) makes it easy to develop RESTful web services.
In the first part of the course, you will learn the basics of RESTful web services developing resources for a social media application. You will learn to implement these resources with multiple features – versioning, exception handling, documentation (Swagger), basic authentication (Spring Security), filteringand HATEOAS. You will learn the best practices in designing RESTful web services.
In this part of the course, you will be using Spring (Dependency Management), Spring MVC (or Spring REST), Spring Boot, Spring Security (Authentication and Authorization), Spring Boot Actuator (Monitoring), Swagger (Documentation), Maven (dependencies management), Eclipse (IDE), Postman (REST Services Client) and Tomcat Embedded Web Server. We will help you set up each one of these.
In the second part of the course, you will learn the basics of Microservices. You will understand how to implement microservices using Spring Cloud.
In this part of the course, you will learn to establish communication between microservices, enable load balancing, scaling up and down of microservices. You will also learn to centralize configuration of microservices with Spring Cloud Config Server. You will implement Eureka Naming Server and Distributed tracing with Spring Cloud Sleuth and Zipkin. You will create fault toleranct microservices with Zipkin.
******* What You Can Expect from Every in28Minutes Course *******
in28Minutes created 20 Best Selling Courses providing Amazing Learning Experiences to 250,000 Learners across the world.
Each of these courses come with
✔ Amazing Hands-on Step By Step Learning Experiences
✔ Real Project Experiences using the Best Tools and Frameworks
✔ Awesome Troubleshooting Guides with 200+ FAQs Answered
✔ Friendly Support in the Q&A section
✔ Free Udemy Certificate of Completion on Completion of Course
✔ 30 Day “No Questions Asked” Money Back Guarantee!
~~~ Here are a Few Reviews on The in28Minutes Way ~~~
★★★★★ Excellent, fabulous. The way he has prepared the material and the way he teaches is really awesome. What an effort .. Thanks a million
★★★★★ A lot of preparation work has taken place from the teacher and this is visible throughout the course.
★★★★★ This guy is fantastic. Really. Wonderful teaching skills, and goes well out of his way to make sure that everything he is doing is fully understood. This is the kind of tutorial that gets me excited to work with a framework that I may otherwise not be.
★★★★★ The best part of it is the hands-on approach which the author maintained throughout the course as he had promised at the beginning of the lecture. He explains the concepts really well and also makes sure that there is not a single line of code you type without understanding what it really does.
★★★★★ I also appreciate the mind and hands approach of teaching something and then having the student apply it. It makes everything a lot clearer for the student and uncovers issues that we will face in our project early.
★★★★★ Amazing course. Explained super difficult concepts (that I have spent hours on the internet finding a good explanation) in under 5 minutes.
Zero risk. 30 day money-back guarantee with every purchase of the course. You have nothing to lose!
Start Learning Now. Hit the Enroll Button!
******* Step By Step Details *******
RESTful Web Services
Step 01 – Initializing a RESTful Services Project with Spring Boot
Step 02 – Understanding the RESTful Services we would create in this course
Step 03 – Creating a Hello World Service
Step 04 – Enhancing the Hello World Service to return a Bean
Step 05 – Quick Review of Spring Boot Auto Configuration and Dispatcher Servlet – What’s happening in the background?
Step 06 – Enhancing the Hello World Service with a Path Variable
Step 07 – Creating User Bean and User Service
Step 08 – Implementing GET Methods for User Resource
Step 09 – Implementing POST Method to create User Resource
Step 10 – Enhancing POST Method to return correct HTTP Status Code and Location URI
Step 11 – Implementing Exception Handling – 404 Resource Not Found
Step 12 – Implementing Generic Exception Handling for all Resources
Step 13 – Exercise : User Post Resource and Exception Handling
Step 14 – Implementing DELETE Method to delete a User Resource
Step 15 – Implementing Validations for RESTful Services
Step 16 – Implementing HATEOAS for RESTful Services
Step 17 – Overview of Advanced RESTful Service Features
Step 18 – Internationalization for RESTful Services
Step 19 – Content Negotiation – Implementing Support for XML
Step 20 – Configuring Auto Generation of Swagger Documentation
Step 21 – Introduction to Swagger Documentation Format
Step 22 – Enhancing Swagger Documentation with Custom Annotations
Step 23 – Monitoring APIs with Spring Boot Actuator
Step 24 – Implementing Static Filtering for RESTful Service
Step 25 – Implementing Dynamic Filtering for RESTful Service
Step 26 – Versioning RESTful Services – Basic Approach with URIs
Step 27 – Versioning RESTful Services – Header and Content Negotiation Approaches
Step 28 – Implementing Basic Authentication with Spring Security
Step 29 – Overview of Connecting RESTful Service to JPA
Step 30 – Creating User Entity and some test data
Step 31 – Updating GET methods on User Resource to use JPA
Step 32 – Updating POST and DELETE methods on User Resource to use JPA
Step 33 – Creating Post Entity and Many to One Relationship with User Entity
Step 34 – Implementing a GET service to retrieve all Posts of a User
Step 35 – Implementing a POST service to create a Post for a User
Step 36 – Richardson Maturity Model
Step 37 – RESTful Services Best Practices
Microservices with Spring Cloud
Step 01 – Part 1 – Introduction to Limits Microservice and Spring Cloud Config Server
Step 01 – Part 2 – Setting up Limits Microservice
Step 02 – Creating a hard coded limits service
Step 03 – Enhance limits service to pick up configuration from application properties
Step 04 – Setting up Spring Cloud Config Server
Step 05 – Installing Git
Step 06 – Creating Local Git Repository
Step 07 – Connect Spring Cloud Config Server to Local Git Repository
Step 08 – Configuration for Multiple Environments in Git Repository
Step 09 – Connect Limits Service to Spring Cloud Config Server
Step 10 – Configuring Profiles for Limits Service
Step 11 – A review of Spring Cloud Config Server
Step 12 – Introduction to Currency Conversion and Currency Exchange Microservices
Step 13 – Setting up Currency Exchange Microservice
Step 14 – Create a simple hard coded currency exchange service
Step 15 – Setting up Dynamic Port in the the Response
Step 16 – Configure JPA and Initialized Data
Step 17 – Create a JPA Repository
Step 18 – Setting up Currency Conversion Microservice
Step 19 – Creating a service for currency conversion
Step 20 – Invoking Currency Exchange Microservice from Currency Conversion Microservice
Step 21 – Using Feign REST Client for Service Invocation
Step 22 – Setting up client side load balancing with Ribbon
Step 23 – Running client side load balancing with Ribbon
Step 24 – Understand the need for a Naming Server
Step 25 – Setting up Eureka Naming Server
Step 26 – Connecting Currency Conversion Microservice to Eureka
Step 27 – Connecting Currency Exchange Microservice to Eureka
Step 28 – Distributing calls using Eureka and Ribbon
Step 29 – A review of implementing Eureka, Ribbon and Feign
Step 30 – Introduction to API Gateways
Step 31 – Setting up Zuul API Gateway
Step 32 – Implementing Zuul Logging Filter
Step 33 – Executing a request through Zuul API Gateway
Step 34 – Setting up Zuul API Gateway between microservice invocations
Step 35 – Introduction to Distributed Tracing
Step 36 – Implementing Spring Cloud Sleuth
Step 37 – Introduction to Distributed Tracing with Zipkin
Step 38 – Installing Rabbit MQ
Step 39 – Setting up Distributed Tracing with Zipkin
Step 40 – Connecting microservices to Zipkin
Step 41 – Using Zipkin UI Dashboard to trace requests
Step 42 – Understanding the need for Spring Cloud Bus
Step 43 – Implementing Spring Cloud Bus
Step 44 – Fault Tolerance with Hystrix
Zero risk. 30 day money-back guarantee with every purchase of the course. You have nothing to lose!
Start Learning Now. Hit the Enroll Button!
Who this course is for:
You want to learn how to design and develop RESTful web services with Spring Boot
You want to learn how to design and develop Microservices with Spring Cloud
You want to learn Step by Step with a Hands-on Approach
Created by in28Minutes Official Last updated 7/2019 English English
Size: 1.79 GB
Download Now
https://ift.tt/2ZbLEUF.
The post Master Microservices with Spring Boot and Spring Cloud appeared first on Free Course Lab.
0 notes
Text
A Lovely Spring View: Spring Boot & Vue.js
It´s time to shed some light on the integration of Vue.js with the popular Java Enterprise framework Spring Boot! Both frameworks are shining stars in their respective domain – but how could they be set up together properly? What is a practical project structure and build process? How does the development work locally and how is the app deployed? Let´s elucidate these questions!
Vue.js looks like a great choice!
I have to admit: I am not a frontend developer! I really like to play around with “backend stuff” like Spring Boot, web and microservices, automating whole infrastructures with Vagrant, Packer, Ansible and Docker – while I just wanted to scale my apps with Spring Cloud, Docker Swarm and Traefik…
But wait! Isn´t there a frontend I need to build from time to time?! Yeah, there aren´t that many occasions, but sometimes I have to get my hands dirty with some JavaScript code.

Especially when you are giving lectures at university and try to digitize some old paper processes with your students. And if you ask our CTO, this “backend developer” thing won´t be around much longer…

Alright then, we need to choose the “right” frontend framework – having nearly no clue. The last web app I built was based on Angular 1 – and it felt like a good choice! I loved the coding experience and after a day of training, I felt able to write awesome frontends… But now it’s two years later and I heard rumors that there was a complete rewrite of Angular (2), a new kid in town from Facebook (React) and lots of ES201x stuff, dependency managers, linters and more. Whew! But if I get my colleagues right, Vue.js isn´t the worst choice! Just take a look at all those posts that have been written in our blog this spring (especially if you need a deeper dive into Vue.js):
Rapid prototyping with Vue.js Vue.js – it’s simple until you make it complicated Vue.js & React – JavaScript UI Frameworks im Vergleich
Also, other projects move from one of the other big frameworks like Angular to Vue.js. Some of the main points are Vue.js’ much flatter learning curve and the higher coding speed compared to Angular and React. And the introduction phrase sounds really great:
Vue (pronounced /vjuː/, like view) is a progressive framework for building user interfaces. Unlike other monolithic frameworks, Vue is designed from the ground up to be incrementally adoptable. The core library is focused on the view layer only, and is very easy to pick up and integrate with other libraries or existing projects.
Project setup
So I think it could be a good idea to invest some time into Vue.js. As you may know, I strive to write quite comprehensible blog posts – you can find every bit inside the example project on GitHub. So let´s have a quick look into the project´s structure. The project uses Maven´s Multi Module capabilities to achieve a clean setup:

The pom.xml in the project´s root folder spring-boot-vuejs therefore contains the two modules backend and frontend:
frontendbackend
Spring Boot 2.0.x backend
The easiest way to create a new Spring Boot app is – as Josh Long really likes to emphasize – start dot spring dot io! Just initialize a Spring Boot app with the Web dependency and place the generated zip´s contents into the backend folder. There are only two things I had to change for the Vue.js integration. First the spring-boot-starter-parent has to move to our parent pom.xml in the root directory.
Second – and this is a key concept of our project setup here – we need to copy the generated HTML, JavaScript & CSS to a resources folder where it can be served by Spring Boot´s embedded Webserver later easily. This could be done with the maven-resources-plugin:
maven-resources-plugincopy Vue.js frontend contentgenerate-resourcescopy-resourcessrc/main/resources/publictrue${project.parent.basedir}/frontend/target/diststatic/index.html
It just takes the results from the frontend build process (placed in /frontend/target/dist) and places them into /backend/src/main/resources/public folder. With this a simple java -jar backend-0.0.1-SNAPSHOT.jar will run our Spring Boot App and serve all the frontend assets. But first of all let´s build a frontend to serve!
Just for later needs we also create a simple RESTful Service in BackendController.java and use the great testing tooling from rest-assured together with Spring Boot to test our services inside the BackendControllerTest.class:
@RunWith(SpringRunner.class) @SpringBootTest( classes = SpringBootVuejsApplication.class, webEnvironment = SpringBootTest.WebEnvironment.RANDOM_PORT ) public class BackendControllerTest { @LocalServerPort private int port; @Test public void saysHello() { when() .get("http://localhost:" + port + "/api/hello") .then() .statusCode(HttpStatus.SC_OK) .assertThat() .body(is(equalTo(BackendController.HELLO_TEXT))); }
Vue.js 2.5.x frontend
If you want to reproduce every step mentioned here, you´ll need a working Node.js installation as a prerequisite. Just use your preferred package manager and install it – like brew install node on a Mac. We´ll also need the Vue.js command line interface vue-cli, which could be installed with the help of npm, the Node.js Package Manager:
npm install --global vue-cli
To initialize a project skeleton for Vue.js, we only have to execute the following inside the frontend directory:
vue init webpack frontend
This command results in some questions that require answers:
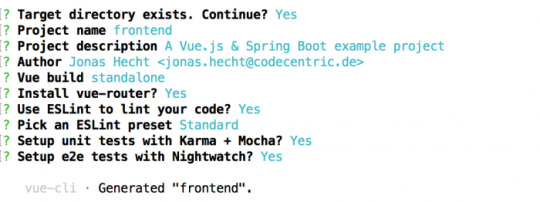
The generated skeleton is a great starting point for your Vue.js experiments. If you want to learn more about installing Vue.js, just head over to the docs.
The frontend-maven-plugin
The easiest way to handle every bit of the quite complex frontend build process with npm, node.js, ESLint, Karma, webpack and so on is to just use the frontend-maven-plugin. If you know Maven, that’s everything you need! Just add the plugin to the frontend’s pom.xml and you can use your well-known Maven commands:
com.github.eirslettfrontend-maven-plugin${frontend-maven-plugin.version}install node and npminstall-node-and-npmv9.11.1npm installnpmgenerate-resourcesinstallnpm run buildnpmrun build
The configuration of the frontend-maven-plugin ensures that the correct Node.js and npm versions are installed – with Node.js version > 4.0.0 the plugin takes care of the corresponding npm version, so you don´t have to explicitly configure it here. Additionally it installs all of our frontend dependencies (via npm install) and runs the full frontend build process with npm run build.
Tell webpack to output build contents to /target
The standard Node.js way is to create a dist directory for builds which contain the minified source code of our web application. But as we use Maven here, we need to have everything in the target directory. Therefore we need to change the generated frontend/config/index.js and replace the following lines:
index: path.resolve(__dirname, '../dist/index.html'), assetsRoot: path.resolve(__dirname, '../dist'),
with
index: path.resolve(__dirname, '../target/dist/index.html'), assetsRoot: path.resolve(__dirname, '../target/dist'),
First app run
Now we already have everything in place to fire up our Spring Boot powered Vue.js application! Just enter the project’s repository and let Maven do its job inside the root spring-boot-vuejs directory:
mvn clean install
This will build our whole app and we can simply do a:
java -jar backend/target/backend-0.0.1-SNAPSHOT.jar
Now let´s open our browser and hit http://localhost:8088/. That´s it, our app should now look like this:

Development process
Although we now have our app successfully running for the first time, we need to take a closer look at how the development process could work with Spring Boot and Vue.js integrated. Because we don´t really want to wait for the full Maven/npm build to complete and wait for our app to be fired up with java -jar until we see a simple frontend element changed in the browser!
We want to get much faster feedback if we change frontend code. Luckily the webpack-dev-server comes to the rescue! This piece of magic will just update and build every change through all the parts of our JavaScript build chain instantly – and is pre-configured in our setup out of the box. The only thing to start the webpack-dev-server is to switch over to the frontend directory and run:
npm run dev
That’s it! Just try it yourself. The command automatically opens your browser. Just enter the Vue.js source in frontend/src and change something. It will instantly be visible
Another neat tool is the Vue.js browser extension. Just install it into your Chrome or Firefox and you should have a deep look into your Vue components inside the Browser´s development tools:
Accessing Spring Boot REST services from Vue.js frontend
As we´re integrating Vue.js with Spring Boot, we for sure want to call some of those nice RESTful web services our Spring Boot backend provides us with. There are many libraries to access web services that one can use with Vue.js. One of them is axios, which is a quite popular Promise API based HTTP client with a huge number of GitHub stars. To use axios in our project, we only have to install the npm dependency:
npm install axios --save
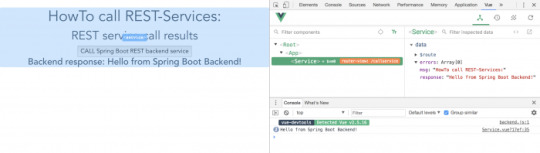
Calling a REST service with Axios is simple. Go into the script area of your component (e.g. in the Service.vue) and add:
import axios from 'axios' data () { return { response: [], errors: [] } }, callRestService () { axios.get(`api/hello`) .then(response => { // JSON responses are automatically parsed. this.response = response.data }) .catch(e => { this.errors.push(e) }) } }
Now inside the template area of your Vue.js component you can request a service call with the callRestService() method – and access the response data accordingly:
CALL Spring Boot REST backend service
Get out of the same-origin policy (SOP) hell
The HTTP calls with axios are working fine – except when we try to use them in our local fast feedback development process with the webpack-dev-server. Why? Because if we start the webpack-dev-server via npm run dev, it will serve our web application on http://localhost:8080. But our Spring Boot REST backend runs on http://localhost:8088! As a core concept of web application security, the same-origin policy (SOP) will then prevent our Vue.js frontend from accessing its Spring Boot backend – resulting in SOP errors.
One way to solve this problem is to use the Cross Origin Resource Sharing Protocol (CORS). Although this isn´t a big deal with both axios and Spring Boot, there´s a much more nifty solution. Thanks to my colleague Daniel who pointed me to the nice proxying feature of webpack-dev-server, we don´t need to configure all the complex CORS stuff!
According to the Vue.js Webpack Template the only thing we need to configure is a Proxy for our webpack-dev-server requests. This can easily be done in the frontend/config/index.js – right inside the dev.proxyTable field:
dev: { ... proxyTable: { // proxy all webpack dev-server requests starting with /api to our Spring Boot backend (localhost:8088) '/api': { target: 'http://localhost:8088', changeOrigin: true } },
With this configuration in place, the webpack-dev-server uses the really handy http-proxy-middleware to proxy all frontend requests with a preceding /api from http://localhost:8080 to http://localhost:8088 – including changing the Origin HTTP header accordingly. Remember that our Spring Boot REST services are configured to serve those requests to /api on class level:
@RestController() @RequestMapping("/api") public class BackendController { @RequestMapping(path = "/hello") public @ResponseBody String sayHello() { return "Hello from Spring Boot Backend!"; }
The proxyTable configuration is finally used in the frontend/build/dev-server.js to configure the proxyMiddleware. We don´t need to change anything here, but I wanted to show the usage of the http-proxy-middleware:
// proxy api requests Object.keys(proxyTable).forEach(function (context) { var options = proxyTable[context] if (typeof options === 'string') { options = { target: options } } app.use(proxyMiddleware(options.filter || context, options)) })
Is the app ready for deployment?
OK, now I can´t really conceal that I love that Continuous Delivery stuff.
So no example project is complete as long as it´s not running anywhere “productively”.
As you may already have found out, the example project has a live deployment configuration for Heroku: With every push into the master branch, our Spring Boot powered Vue.js app is built by TravisCI and deployed to:
https://spring-boot-vuejs.herokuapp.com
In the course of setting up the example project I really fell in love with the great Automatic deploys feature of Heroku and Heroku Pipelines. If the “Wait for CI to pass before deploy” checkbox is selected, we get a fully working pipeline and are able to demonstrate that our example project is also ready for deployment! Thanks again for pointing me to this great platform, Benedikt!
And that´s it!
Now we found a nice way to integrate Vue.js and Spring Boot. As both are really popular frameworks in their respective domain, I hope this introduction is helpful to some of you folks. If you manage to work through all the points shown in this post, you will have a solid project setup that can be used for both local development and deployment – mainly because both Vue.js and Spring Boot bring in such great features. And as “old school” Maven is supported by nearly every platform, this setup is ready for anything you can imagine. Let me know about your great Spring Boot powered Vue.js apps!
Der Beitrag A Lovely Spring View: Spring Boot & Vue.js erschien zuerst auf codecentric AG Blog.
A Lovely Spring View: Spring Boot & Vue.js published first on https://medium.com/@koresol
0 notes
Text
67% off #Microservices with Spring Cloud – $10
A deep-dive into the Microservice architectural style, and how to implement it with Spring technologies.
Intermediate Level, – 4.5 hours, 30 lectures
Average rating 4.5/5 (4.5 (867 ratings) Instead of using a simple lifetime average, Udemy calculates a course’s star rating by considering a number of different factors such as the number of ratings, the age of ratings, and the likelihood of fraudulent ratings.)
Course requirements:
Knowledge of Java programming Knowledge of latest versions of Spring Framework. Familiarity with concepts such as ApplicationContext, Profiles, RestTemplate, @Value, @Autowired, @Component, Java Configuration, etc. Knowledge of Spring Boot helpful, but will be covered in the course. Basic familiarity with Maven. How to specify dependencies, and how to do a “mvn clean package” A Git account, such as GitHub, will be needed. We will cover this in the course if you don’t have one already. Course materials will be downloaded from Git, and you will need to place files in your own Git repository.
Course description:
Microservices with Spring Cloud is an online workshop designed to help you learn the Microservices architectural style, and how to implement it using Spring technologies
This course provides a good, solid introduction to the topic of the Microservices architectural style, and combines this with practical experience gained by working through the exercises featuring Spring Cloud.
Along the way, this course will provides a brief introduction to Spring Boot and Spring Data (enough to get you familiar with these technologies if you have not been immersed in them already).
The course provides exercises that provide you with hands-on experience working with the various components of Spring Cloud.
The goal of this course is to serve as a practical guide through the Spring Cloud projects, so you can see how they are used to implement microservice based architecture.
By the time you finish this course, you will have gained the ability to articulate what the Microservices architectural style is all about, including its advantages and disadvantages.
You will gain familiarity with Spring Boot, and you’ll see how to use it to build web interfaces, REST interfaces, and how to use Spring Data and Spring Data REST.
You will gain the ability to build microservice-based applications utilizing Spring Cloud technologies. You will learn about
Centralized, versioned configuration management using Spring Cloud Config Dynamic configuration updates with Spring Cloud Bus Service discovery with Spring Cloud Eureka Client Side Load Balancing with Ribbon Declarative REST Clients with Feign Software Circuit Breakers with Hystrix.
Full details Articulate the Microservices architectural style; its advantages and disadvantages Build simple Spring Boot applications utilizing web interfaces, REST interfaces, Spring Data, and HATEOAS Build Microservice applications utilizing the different Spring Cloud sub-projects, including Config Server & Bus, Eureka, Ribbon, Feign, and Hystrix Intended for experienced Java software developers comfortable with the latest releases of the Spring framework NOT intended for beginners. However, depending on your technical experience in other technologies, and your learning style, you may find this course a fascinating deep-dive into Microservices, Spring Cloud, and Cloud-Native applications.
Full details
Reviews:
“I love this course. I got a job working as a Microservices developer after this course. But you do need fair amount of interest and motiavation to get going. Also you need to understand the core java before you work with this course” (Prasana Venkat Ramesh)
“Its one of the best concise walkthrough on the microservices stack.” (Amit Saraswat)
“The course covered Microservices in an effective manner, covering all the necessary topics.” (RamaKrishna Ganti)
About Instructor:
Ken Krueger
Over 25 years of experience developing software for a variety of business purposes. Expertise in Java, Spring, and related open source technologies, database and web development, cloud, microservices, and big data. Experience as a software developer, team leader, project manager, and scrum master. My Professional Mission: Guiding individuals and organizations to commercial success through the application of modern technology.
Instructor Other Courses:
…………………………………………………………… Ken Krueger coupons Development course coupon Udemy Development course coupon Software Engineering course coupon Udemy Software Engineering course coupon Microservices with Spring Cloud Microservices with Spring Cloud course coupon Microservices with Spring Cloud coupon coupons
The post 67% off #Microservices with Spring Cloud – $10 appeared first on Udemy Cupón/ Udemy Coupon/.
from Udemy Cupón/ Udemy Coupon/ http://coursetag.com/udemy/coupon/67-off-microservices-with-spring-cloud-10/ from Course Tag https://coursetagcom.tumblr.com/post/155755940143
0 notes
Text
Spring Cloud Eureka and Hystrix Circuit Breaker using Microservices
In this tutorial, we will use a microservice application created in previous post ( Microservices Example using Spring Cloud Eureka ) and add circuit breaker pattern using Hystrix Spring library in java. Using Hystrix in your application helps to add defensive mechanism and makes applications more resilient and fault tolerant. Tools Required – Java 8IntelliJ IDE We have created three different applications as below – Eureka Service– This Service will register every microservice and then the client microservice will look up the Eureka server to get a dependent microservice to get the job done.This Eureka Server is owned by Netflix and in this, Spring Cloud offers a declarative way to register and invoke services by using Java annotation.demo-server – This service will return a simple hello message.demo-client – It is similar to the standalone client service created in Bootiful Development with Spring Boot. It will consume the APIs provided by demo-server through Eureka Service . Hystrix Documentation - https://github.com/Netflix/Hystrix/wiki Microservices are deployed on Cloud . As cloud provides a distributed environment , there are more chances that some of your services may be down at some point of time. You can have several micro-services in your application which are dependent on each other. So one service can call to other service. If destination service is down then source will get an exception in normal scenario. But with the help of Hystrix annotations , you can add fallback mechanism and handle the exception in services. Thus it makes your service more fault tolerant, resilient . You need to add below dependency in your demo-client service application to enable Hystrix circuit breaker pattern - org.springframework.cloud spring-cloud-starter-hystrix 1.2.5.RELEASE We just have to add few annotations to handle fallback or break the service call in case your destination service(demo-server) is down. We need to change main class to enable Hystrix circuit breaker - package com.myjavablog.democlient; import org.springframework.boot.SpringApplication; import org.springframework.boot.autoconfigure.SpringBootApplication; import org.springframework.cloud.client.circuitbreaker.EnableCircuitBreaker; import org.springframework.cloud.client.discovery.EnableDiscoveryClient; import org.springframework.cloud.client.loadbalancer.LoadBalanced; import org.springframework.cloud.netflix.hystrix.EnableHystrix; import org.springframework.context.annotation.Bean; import org.springframework.context.annotation.Configuration; import org.springframework.web.client.RestTemplate; @EnableCircuitBreaker @EnableDiscoveryClient @SpringBootApplication public class DemoClientApplication { public static void main(String args) { SpringApplication.run(DemoClientApplication.class, args); } } @Configuration class Config{ @Bean @LoadBalanced public RestTemplate restTemplate(){ return new RestTemplate(); } } Also we need to change controller class to add fallback mehod as below - package com.myjavablog.democlient; import com.netflix.hystrix.contrib.javanica.annotation.HystrixCommand; import org.springframework.beans.factory.annotation.Autowired; import org.springframework.web.bind.annotation.GetMapping; import org.springframework.web.bind.annotation.RequestMapping; import org.springframework.web.bind.annotation.RestController; import org.springframework.web.client.RestTemplate; @RestController @RequestMapping("/demo/hello/client") public class TestController { @Autowired public RestTemplate restTemplate; @GetMapping @HystrixCommand(fallbackMethod = "handleFallback") public String test(){ String url = "http://demo-server/demo/hello/server"; return restTemplate.getForObject(url, String.class); } public String handleFallback(){ return "Fallback hello service"; } } By default hystrix has timeout of 1 second for every request. So we need to disable timeout by setting below property in application.properties file - hystrix.command.default.execution.timeout.enabled=false So now i am intentionally stopping demo-server microservice and then we will make call to api to see fallback is working properly .You can see demo-server is not registered with Eureka below -

So now when you call the service ,it should show you a fallback message as below -

Github Downlod Link: Download Read the full article
0 notes
Video
youtube
Check out an introduction of Spring Boot microservices Eureka to know the basics with a config server. Don’t forget to click the like button.
0 notes
Text
Microservices ---Centralized Configuration with Spring Cloud
To manage each microservices separately is a very difficult and time consuming task as there are several modules and managing each module with the conventional approach. Central configuration connects with the properties of microservice.
The implementation process:
· Setting up the configuration server project
Setting up the configuration server project is to create the spring boot application by making changes in pom.xml. For more knowledge you can follow the Spring Data JPA Tutorial.
· Adjoin the spring cloud.
As the HTTP resource-based API, the spring cloud server provides external configuration. The Spring Microservices Config Server is embedded in the spring boot application.
· Set up a configuration repository
The setup configuration repository is created in GitHub. The file names should be <application-name>-<profile>.yml/properties.
· Mark application - properties/application.yml
· Formulate the application with application. properties/ application.yml. Then proceed further.
· Being with the configuration server
Being with spring boot application use the Github to make-sure the application is already connected to the external configuration.
· For the client, the project creates a configuration server
In this procedure you have to create the spring boot application with some changes in pom.xml.
· To retrieve the configuration from the server creates the rest endpoint
If the value is unable to populate use the server.url is defaulted to " Unable to connect to configuration server". In case we are able to connect the configuration server then it will respond back through web service.
· Configure the bootstrap.properties/ bootstrap.yml.
While working on Microservices Spring Data JPA, this step is to update the configuration in the client application.
· Start the spring boot application.
In this step start the configuration client. This application can control the missing configuration server and you can run the above client application when the configuration server is not responding.
Features of Microservices
Multiple components
The microservices are divided into various components. You can deploy or even redeploy the components individually without affecting the application. This implies that you don't have to redeploy the whole application when you need to change the service individually. In this process you need high-level complexity, remote calls, coarser-grained remote API that turns to be expensive.
Built for business
Monolithic development is focused on particular aspects like database, UIs, server-side logic, whereas in microservices teams are formed for the functional capabilities. So, from here the team will be responsible for building the product. From here the team builds individual applications throughout its life.
Simple routing
Microservices work as per the requests is received that is exactly opposite how enterprise services buses work. The microservices process information through endpoints and apply logic to it.
Decentralized
Traditional microservices methods have a centralized option for the governance that does not work with the usage with different platforms and technologies. It needs a good number of developers who work on to develop useful tools to resolve the issues and so decentralized governance work for it. Leaving the decentralized governance apart, data management is favored by microservices architecture. Every service comes up with its own uniqueness of the database. But there is a single logical database for monolithic architecture.
0 notes
Video
youtube
Spring Boot Microservices Eureka
Check out an introduction of Spring Boot microservices Eureka to know the basics with a config server. Don’t forget to click the like button.
0 notes