#config server spring boot
Explore tagged Tumblr posts
Visit Tumblr Blog
Explore Tumblr blogs with no restrictions, modern design and the best experience.
Last Seen Tumblr Blogs


Fun Fact
Average visit duration of Tumblr.com is 10 mins and 25 secs.
Text
Create Spring Cloud Configuration Server | Setup Eureka Service Discovery Registry Server
Full Video Link https://youtu.be/Exoy4ZNAO9Y Hello friends, new #video on #springcloud #configserver #eureka #servicediscovery setup is published on #codeonedigest #youtube channel. @java #java #aws #awscloud @awscloud @AWSCloudIndia #sal
In this video we will learn how to create spring cloud configuration server and eureka service registry server step by step in spring boot framework. Service registry will be use for service discovery. Configuration server is used to store application configuration in central storage. Application, microservices connect configuration server to fetch respective configuration from central…

View On WordPress
#config server#config server firewall#config server in microservices#config server in spring boot example#config server in spring boot microservices#config server spring#config server spring boot#config server spring boot github#config server spring cloud#configuration server#configuration server dns#configuration server in microservices#configuration server spring boot#configuration server step by step#eureka service#eureka service discovery#eureka service discovery example#eureka service discovery example spring boot#eureka service discovery spring boot#eureka service in microservices#eureka service registry#eureka service registry example#eureka service registry spring boot#eureka service spring boot
0 notes
Text
Why Java Spring Boot is Ideal for Building Microservices

In modern software development, microservices have become the go-to architecture for creating scalable, flexible, and maintainable applications. Java full-stack development is one of the most popular frameworks used for building microservices, thanks to its simplicity, powerful features, and seamless integration with other technologies. In this blog, we will explore why Java Spring Boot is an ideal choice for building microservices.
What are Microservices?
Microservices architecture is a design pattern where an application is broken down into smaller, independent services that can be developed, deployed, and scaled individually. Each microservice typically focuses on a specific business functionality, and communicates with other services via APIs (often RESTful). Microservices offer several advantages over traditional monolithic applications, including improved scalability, flexibility, and maintainability.
Why Spring Boot for Microservices?
Spring Boot, a lightweight, open-source Java framework, simplifies the development of stand-alone, production-grade applications. It comes with several features that make it an excellent choice for building microservices. Here are some key reasons why:
1. Rapid Development with Minimal Configuration
Spring Boot is known for its "convention over configuration" approach, which makes it incredibly developer-friendly. It removes the need for complex XML configurations, allowing developers to focus on the business logic rather than boilerplate code. For microservices, this means you can quickly spin up new services with minimal setup, saving time and increasing productivity.
Spring Boot comes with embedded servers (like Tomcat, Jetty, and Undertow), so you don’t need to worry about setting up and managing separate application servers. This makes deployment and scaling easier in microservices environments.
2. Microservice-Friendly Components
Spring Boot is tightly integrated with the Spring Cloud ecosystem, which provides tools specifically designed for building microservices. Some of these key components include:
Spring Cloud Config: Centralizes configuration management for multiple services in a microservices architecture, allowing you to manage configuration properties in a version-controlled repository.
Spring Cloud Netflix: Includes several tools like Eureka (for service discovery), Hystrix (for fault tolerance), and Ribbon (for client-side load balancing), which are essential for building resilient and scalable microservices.
Spring Cloud Gateway: Provides a simple, effective way to route requests to different microservices, offering features like load balancing, security, and more.
Spring Cloud Stream: A framework for building event-driven microservices, making it easier to work with messaging middleware (e.g., RabbitMQ, Kafka).
These tools help you quickly build and manage your microservices in a distributed architecture.
3. Scalability and Flexibility
One of the main reasons organizations adopt microservices is the ability to scale individual components independently. Spring Boot’s lightweight nature makes it an ideal choice for microservices because it enables easy scaling both vertically (scaling up resources for a single service) and horizontally (scaling across multiple instances of a service).
With Spring Boot, you can run multiple instances of microservices in containers (e.g., Docker) and orchestrate them using platforms like Kubernetes. This makes it easier to handle high traffic, optimize resource usage, and maintain high availability.
4. Fault Tolerance and Resilience
In a microservices architecture, failures in one service can affect others. Spring Boot provides built-in mechanisms for handling fault tolerance and resilience, which are critical for maintaining the integrity and uptime of your application. With Spring Cloud Netflix Hystrix, you can implement circuit breakers that prevent cascading failures, providing a more robust and fault-tolerant system.
By using tools like Resilience4j, Spring Boot makes it easier to implement strategies like retries, timeouts, and fallbacks to ensure your services remain resilient even when some of them fail.
5. Easy Integration with Databases and Messaging Systems
Microservices often require interaction with various data stores and messaging systems. Spring Boot makes this integration straightforward by providing support for relational databases (like MySQL, PostgreSQL), NoSQL databases (like MongoDB, Cassandra), and message brokers (like RabbitMQ, Kafka).
With Spring Data, you can easily interact with databases using a simplified repository model, without having to write much boilerplate code. This enables microservices to manage their own data stores, promoting the independence of each service.
6. Security Features
Security is critical in microservices, as services often need to communicate with each other over the network. Spring Security provides a comprehensive security framework that integrates well with Spring Boot. With Spring Security, you can secure your microservices with features like:
Authentication and Authorization: Implementing OAuth2, JWT tokens, or traditional session-based authentication to ensure that only authorized users or services can access certain endpoints.
Secure Communication: Enabling HTTPS, encrypting data in transit, and ensuring that communications between services are secure.
Role-Based Access Control (RBAC): Ensuring that each microservice has the appropriate permissions to access certain resources.
These security features help ensure that your microservices are protected from unauthorized access and malicious attacks.
7. Monitoring and Logging
Monitoring and logging are essential for maintaining microservices in a production environment. With Spring Boot, you can easily implement tools like Spring Boot Actuator to expose useful operational information about your microservices, such as metrics, health checks, and system properties.
In addition, Spring Cloud Sleuth provides distributed tracing capabilities, allowing you to trace requests as they flow through multiple services. This helps you track and diagnose issues more efficiently in a microservices architecture.
Conclusion
Java full-stack development provides a solid foundation for building microservices, making it an excellent choice for developers looking to implement a modern, scalable, and resilient application architecture. The framework’s ease of use, integration with Spring Cloud components, scalability, and security features are just a few of the reasons why Spring Boot is an ideal platform for microservices.
As a Java full-stack development, understanding how to build microservices with Spring Boot will not only enhance your skill set but also open doors to working on more complex and modern systems. If you’re looking to develop scalable, flexible, and fault-tolerant applications, Java Spring Boot is the right tool for the job.
This concludes the blog on "Why Java full-stack development is Ideal for Building Microservices". Let me know if you'd like to continue to the next topic!
0 notes
Text
hi
. how to implement expection handling using Spring boot/rest 2. how to configure/implement Spring cloud config server. 3. How to setup two way SSL using Java/Spring boot 4. difference between Bean factory vs Application context in spring application 5. what happens when u send a request to spring boot ? 6. How does Spring Marshall/unmarshall? 7. How to implement Transactions using Spring boot. 8. How to do load balancing using Spring boot both client side and server side. 9. How to add css/javascript/images to spring boot application UI 10. Any spring /spring boot performance issues you encountered. 11. how to implement spring boot security using OAuth 12. How to setup multiple datasources using spring boot
0 notes
Text
Steam Deck - Quick Impressions
This is a beast you can approach from several distinct angles.
As a PC, it's surprisingly capable, even if its obvious gaming-focused form factor sort of makes the concept of running productivity software on it a bit odd. I couldn't imagine setting up an email client on this for any reason whatsoever, for instance, not when I can check on tickets from my phone. As a Terminal purveyor, however, it works quite well. I trolled a few non-geek colleagues by saying I'd purchased an Ono-Sendai Cyberdeck. My boss got it and ran with it for the first week.
As a gaming platform, it exemplifies the flexibility and caveats of Linux as a backend. When games work, they work flawlessly. When they don't, they often try and get there, limping pathetically the whole way, and require a host of control-related and SOC-specific tweaks to reach a comfortable state. This is when some games clearly weren't designed with a handheld's screen in mind, wherein any attempts to shift the resolution or the aspect ratio only makes what's happening onscreen even more difficult to parse. Lookin' at'cha, Cult of the Lamb...
I'm glad Valve went with Arch for their core, but as stated in a few Reblogs with @daemonhxckergrrl, they've left their fork of the OS unsecured by default, likely out of the assumption that it wouldn't be extensively tweaked on. As you could expect, I blew out the Read-Only partition, managed to find a HoloISO fork that maintains FSD support in an experimental form, and consequently replaced my Deck's hamstrung distro with a full-fledged Linux OS that has the same exact look and feel, but with no structural weaknesses. Bye-bye, Exposed Root User, hello added security!
As an emulation backend, however, it's a fucking godsend. Emudeck packs all the usual suspects in one Konsole-specific command, all you're left to provide for yourself consists of the usual BIOSes, backends and ROM dumps. A little digging got me to run Super Mario Odyssey and The Legend of Zelda: Breath of the Wild through Yuzu, the end result being higher framerates and crisper textures than those produced by the Switch itself. It really shows you the kind of "power-versus-output" bargain Nintendo ran, and how much their own console's popularity rests on the quality of the offered experience. From a hardware-related perspective, they're several years behind the curve. Pack their quality releases with a juggernaut of a handheld PC, and you're left with experiences that feel more than just straight-cut reproductions of the originals involved, but more like rejuvenations. As you'd expect, anything that meets the Switch's software requirements and exceeds them runs circles around anything that was released prior to it.
Eighties and nineties' console releases are a cinch to handle - plop your ROMs in the right folder and off you pop - while those approaching the Dreamcast's library come with the usual security-related dependencies. Emudeck's included Steam ROM Manager scrapes the Web for all of the artwork needed for a smooth integration with Valve's own frontend and even assembles custom Collections in your Library tab. Want to play Dante's Inferno? Just head to the RPCS3 Collection, open it and start the game from Steam. The rest follows suit. Similarly, adding a "Non-Steam Game" allows you to hook Firefox or any other program into Steam, making it easy to pull up a game guide or a mod config file.
The one caveat is that any ROMs added also show up on your main platforms as "remote" titles. Right now, my formerly-tidy PC library has a big stonkin' Uncategorized tag containing over 700 titles - most of them SNES ROMs.
Whatever you do, just don't go online with your later-years ROM dumps. You'll be lucky to get a few rounds in Splatoon 3 before Nintendo's moderation servers kick in and boot you out.
It's a pricey toy, but it's highly recommended. Don't forget to spring for an SD card, too.
5 notes
·
View notes
Text
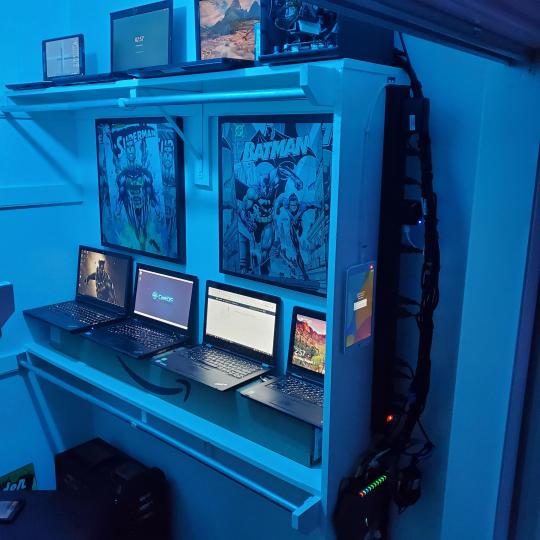
My Homelab/Office 2020 - DFW Quarantine Edition
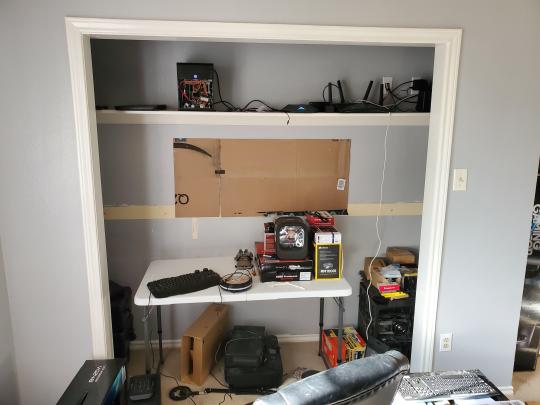
Moved into our first home almost a year ago (October 2019), I picked out a room that had 2 closets for my media/game/office area. Since the room isn't massive, I decided to build a desk into closet #1 to save on space. Here 1 of 2 shelves was ripped off, the back area was repainted gray. A piece of card board was hung to represent my 49 inch monitor and this setup also gave an idea how high I needed the desk.
On my top shelf this was the initial drop for all my Cat6 cabling in the house, I did 5 more runs after this (WAN is dropped here as well).
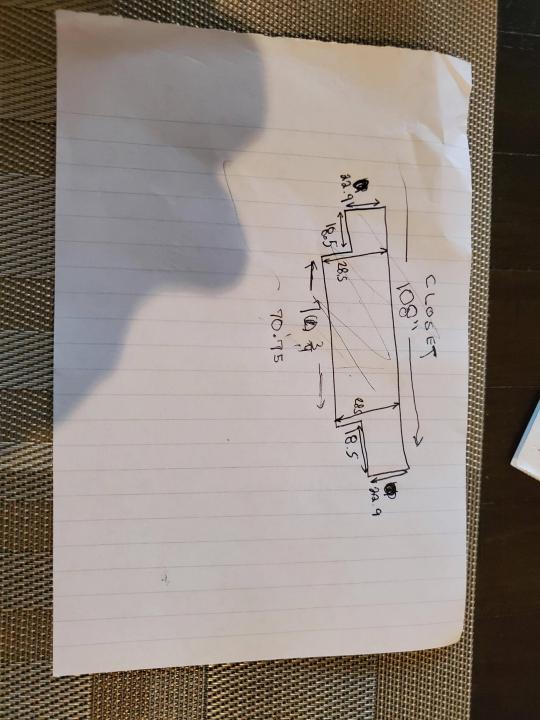
I measured the closet and then went to Home Depot to grab a countertop. Based on the dimensions, it needed to be cut into an object shape you would see on Tetris.

Getting to work, cutting the countertop.
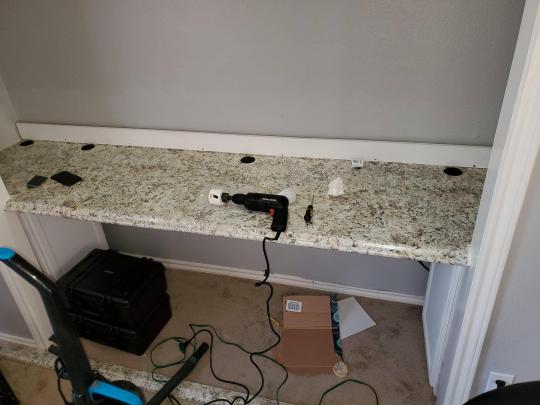
My father-in-law helped me cut it to size in the driveway and then we framed the closet, added in kitchen cabinets to the bottom (used for storage and to hide a UPS). We ran electrical sockets inside the closet. I bought and painted 2 kitchen cabinets which I use for storage under my desk as well.
The holes allowed me to run cables under my desk much easier, I learned many of these techniques on Battlestations subreddit and Setup Wars on Youtube. My daughter was a good helper when it came to finding studs.
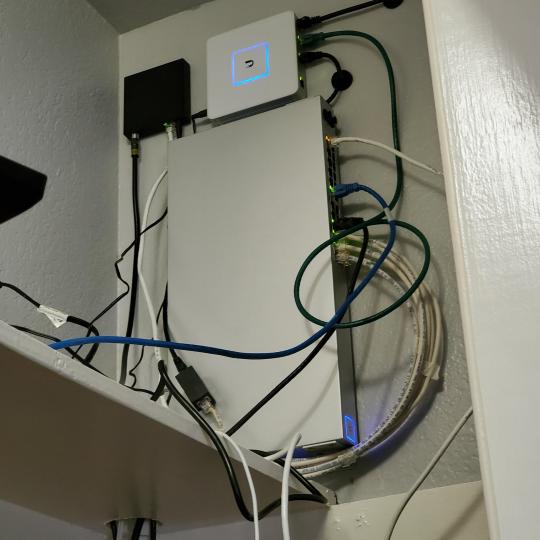
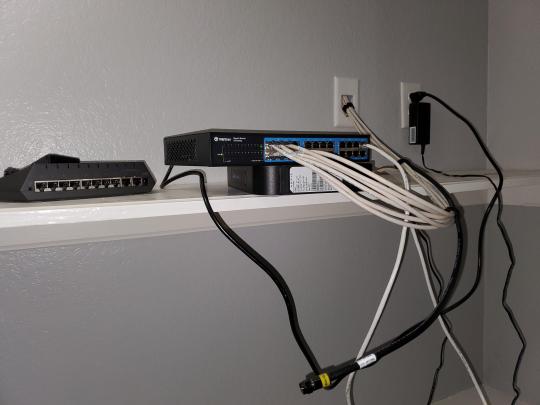
Some of my cousins are networking engineers, they advised me to go with Unifi devices. Here I mounted my Unifi 16 port switch, my Unifi Security Gateway (I'll try out pfSense sometime down the line), and my HD Homerun (big antenna is in the attic). I have Cat6 drops in each room in the house, so everything runs here. On my USG, I have both a LAN #2 and a LAN #1 line running to the 2nd closet in this room (server room). This shot is before the cable management.
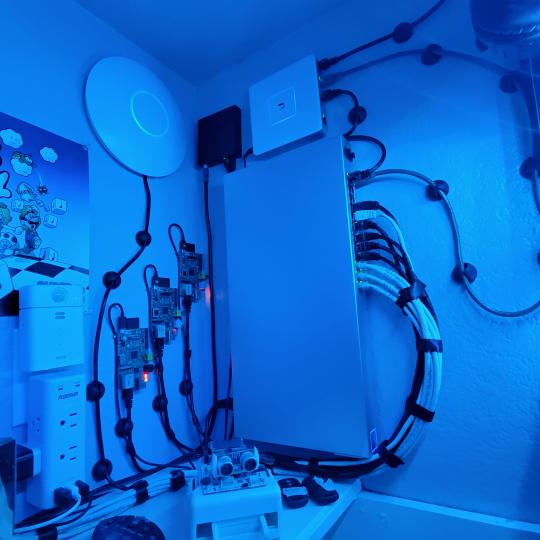
Cable management completed in closet #1. Added an access point and connected 3 old Raspberry Pi devices I had laying around (1 for PiHole - Adblocker, 1 for Unbound - Recursive DNS server, and 1 for Privoxy - Non Caching web proxy).
Rats nest of wires under my desk. I mounted an amplifier, optical DVD ROM drive, a USB hub that takes input from up to 4 computers (allows me to switch between servers in closet #2 with my USB mic, camera, keyboard, headset always functioning), and a small pull out drawer.
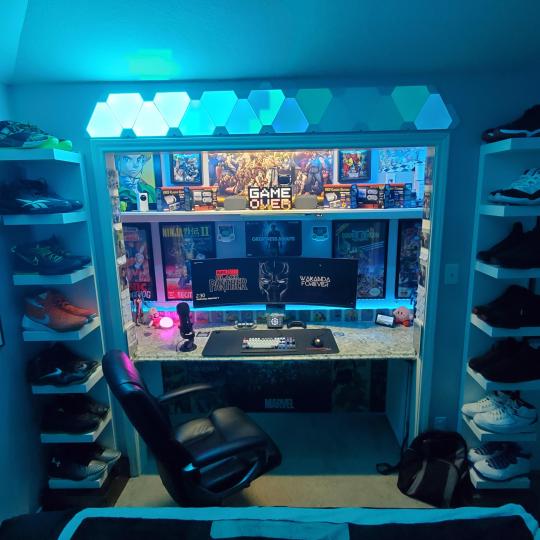
Cable management complete, night shot with with Nanoleaf wall lights. Unifi controller is mounted under the bookshelf, allows me to keep tabs on the network. I have a tablet on each side of the door frame (apps run on there that monitor my self hosted web services). I drilled a 3 inch hole on my desk to fit a grommet wireless phone charger. All my smart lights are either running on a schedule or turn on/off via an Alexa command. All of our smart devices across the house and outside, run on its on VLAN for segmentation purposes.

Quick shot with desk light off. I'm thinking in the future of doing a build that will mount to the wall (where "game over" is shown).

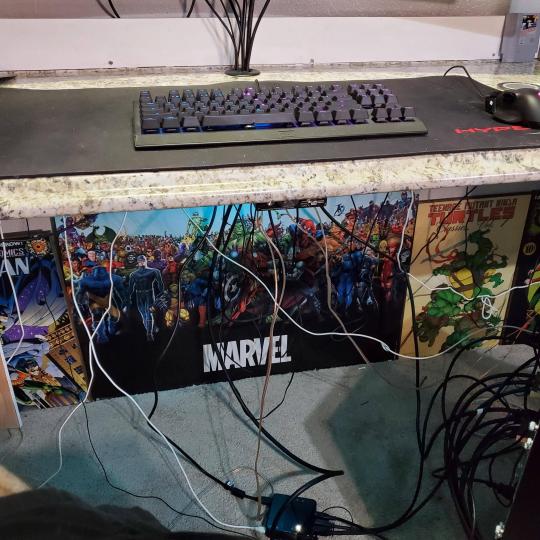
Wooting One keyboard with custom keycaps and Swiftpoint Z mouse, plus Stream Deck (I'm going to make a gaming comeback one day!).
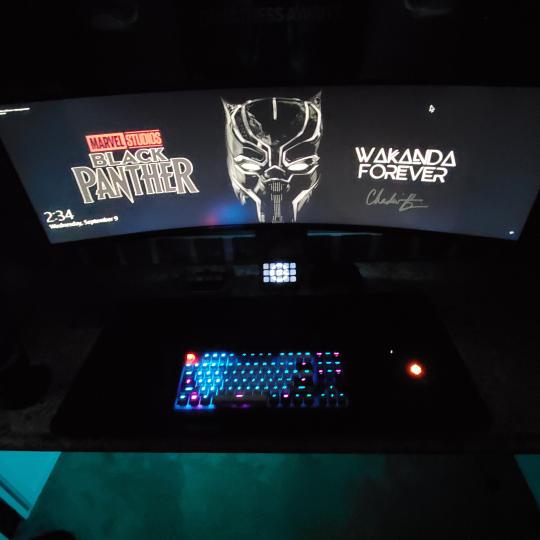
Good wallpapers are hard to find with this resolution so pieced together my own.
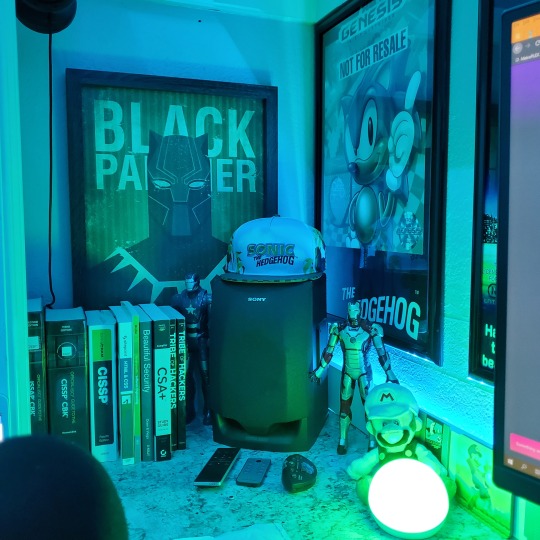
Speakers and books at inside corner of desk.

Speakers and books at inside corner of desk.
Closet #2, first look (this is in the same room but off to the other side). Ran a few CAT6 cables from closet #1, into the attic and dropped here (one on LAN #1, the other on LAN #2 for USG). Had to add electrical sockets as well.
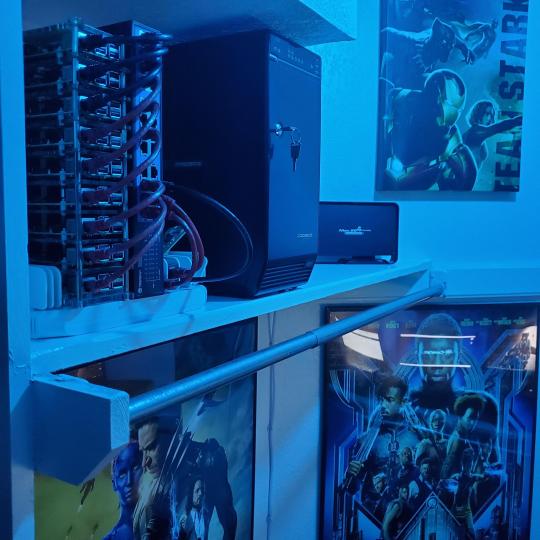
I have owned a ton of Thinkpads since my IBM days, I figured I could test hooking them all up and having them all specialize in different functions (yes, I have a Proxmox box but it's a decommissioned HP Microserver on the top shelf which is getting repurposed with TrueNAS_core). If you're wondering what OSes run on these laptops: Windows 10, Ubuntu, CentOS, AntiX. All of these units are hardwired into my managed Netgear 10gigabit switch (only my servers on the floor have 10 gigabit NICs useful to pass data between the two). Power strip is also mounted on the right side, next to another tablet used for monitoring. These laptop screens are usually turned off.
Computing inventory in image:
Lenovo Yoga Y500, Lenovo Thinkpad T420, Lenovo Thinkpad T430s, Lenovo Thinkpad Yoga 12, Lenovo Thinkpad Yoga 14, Lenovo Thinkpad W541 (used to self host my webservices), Lenovo S10-3T, and HP Microserver N54L
Left side of closet #2
**moved these Pis and unmanaged switch to outside part of closet**
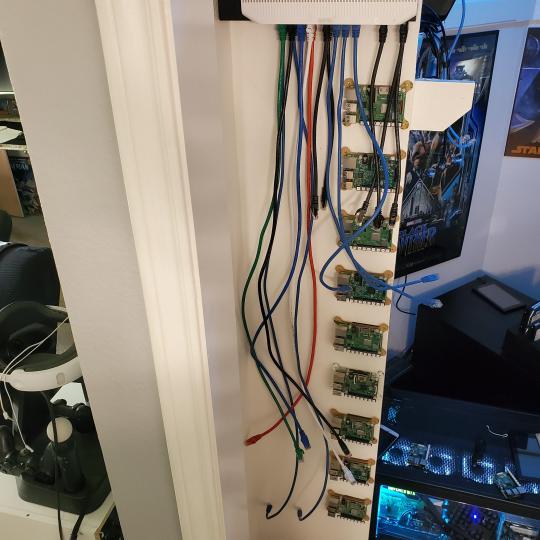
Since I have a bunch of Raspberry Pi 3s, I decided recently to get started with Kubernetes clusters (my time is limited but hoping to have everything going by the holidays 2020) via Rancher, headless. The next image will show the rest of the Pis but in total:
9x Raspberry Pi 3 and 2x Raspberry Pi 4
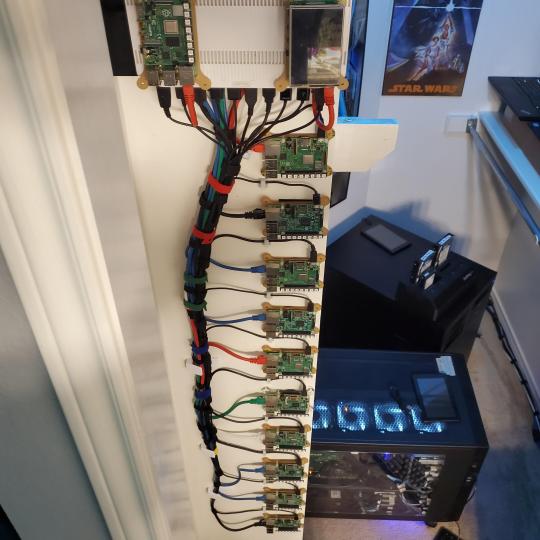
2nd shot with cable management. The idea is to get K3s going, there's Blinkt installed on each Pi, lights will indicate how many pods per node. The Pis are hardwired into a switch which is on LAN #2 (USG). I might also try out Docker Swarm simultaneously on my x86/x64 laptops. Here's my compose generic template (have to re-do the configs at a later data) but gives you an idea of the type of web services I am looking to run: https://gist.github.com/antoinesylvia/3af241cbfa1179ed7806d2cc1c67bd31
20 percent of my web services today run on Docker, the other 80 percent are native installs on Linux and or Windows. Looking to get that up to 90 percent by the summer of 2021.
Basic flow to call web services:
User <--> my.domain (Cloudflare 1st level) <--> (NGINX on-prem, using Auth_Request module with 2FA to unlock backend services) <--> App <--> DB.
If you ever need ideas for what apps to self-host: https://github.com/awesome-selfhosted/awesome-selfhosted
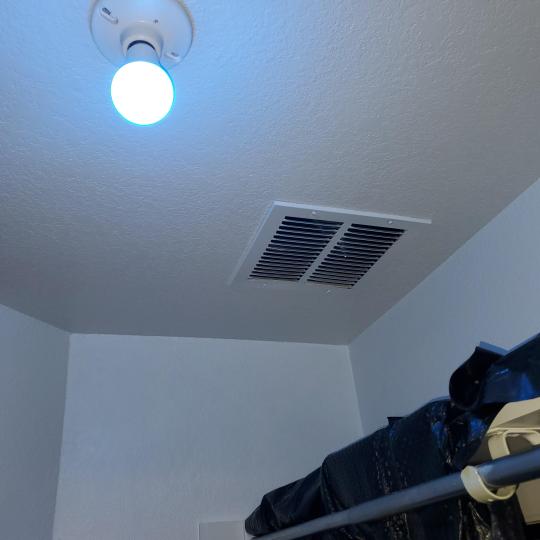
Homelabs get hot, so I had the HVAC folks to come out and install an exhaust in the ceiling and dampers in the attic.
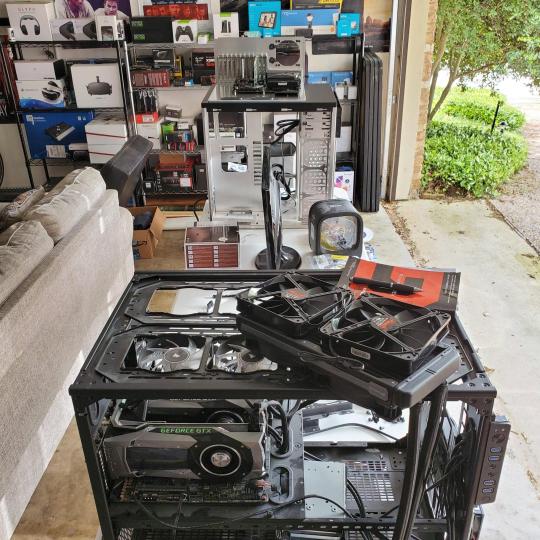
I built my servers in the garage this past winter/spring, a little each night when my daughter allowed me to. The SLI build is actually for Parsec (think of it as a self hosted Stadia but authentication servers are still controlled by a 3rd party), I had the GPUs for years and never really used them until now.
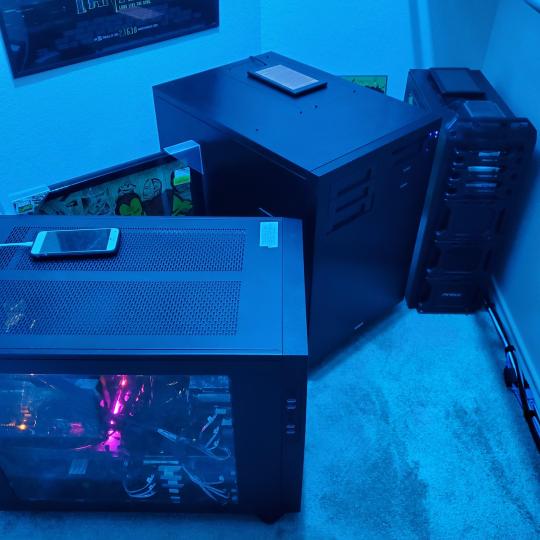
Completed image of my 2 recent builds and old build from 2011.
Retroplex (left machine) - Intel 6850 i7 (6 core, 12 thread), GTX 1080, and 96GB DDR4 RAM. Powers the gaming experience.
Metroplex (middle machine) - AMD Threadripper 1950x (16 core, 32 thread), p2000 GPU, 128GB DDR4 RAM.
HQ 2011 (right machine) - AMD Bulldozer 8150 (8 cores), generic GPU (just so it can boot), 32GB DDR3 RAM.

I've been working and labbing so much, I haven't even connected my projector or installed a TV since moving in here 11 months ago. I'm also looking to get some VR going, headset and sensors are connected to my gaming server in closet #2. Anyhow, you see all my PS4 and retro consoles I had growing up such as Atari 2600, NES, Sega Genesis/32X, PS1, Dreamcast, PS2, PS3 and Game Gear. The joysticks are for emulation projects, I use a Front End called AttractMode and script out my own themes (building out a digital history gaming museum).
My longest CAT6 drop, from closet #1 to the opposite side of the room. Had to get in a very tight space in my attic to make this happen, I'm 6'8" for context. This allows me to connect this cord to my Unifi Flex Mini, so I can hardware my consoles (PS4, PS5 soon)

Homelab area includes a space for my daughter. She loves pressing power buttons on my servers on the floor, so I had to install decoy buttons and move the real buttons to the backside.
Next project, a bartop with a Raspberry Pi (Retropie project) which will be housed in an iCade shell, swapping out all the buttons. Always have tech projects going on. Small steps each day with limited time.
6 notes
·
View notes
Text
Zipsplit windows

#Zipsplit windows how to#
#Zipsplit windows zip file#
#Zipsplit windows archive#
#Zipsplit windows zip#
Java: build OCI compatible image for Spring Boot web app using jib.Prometheus: sending a test alert through AlertManager.Prometheus: adding a Grafana dashboard using a ConfigMap.Prometheus: monitoring a custom Service using ServiceMonitor and PrometheusRule.Prometheus: monitoring services using additional scrape config for Prometheus Operator.Prometheus: installing kube-prometheus-stack on a kubeadm cluster.Kubernetes: independent nf for CoreDNS with kubeadm.Kubernetes: independent nf for CoreDNS with K3s.Kubernetes: custom upstream for domain with CoreDNS.Buildah: Installing buildah and podman on Ubuntu 20.04.Java: creating OCI-compatible image for Spring Boot web using buildah.Kubernetes: accessing the Kubernetes Dashboard with least privilege.KVM: configuring a base Window2019 instance with Sysprep.KVM: creating a Windows2019 Domain Controller using Powershell.KVM: Creating a Windows2019 ADFS server using Powershell.Gradle: fixing the gradle wrapper for a Java project.GoLang: Installing the Go Programming language on Ubuntu 20.04.Microsoft: configuring an Application Group for OAuth2/OIDC on ADFS 2019.Java: Spring Security OAuth2/OIDC protecting Client App and Resource Server.Gradle: interactive JDWP debugging of bootRun gradle task in Eclipse IDE.Python: Flask-OIDC protecting Client App and Resource Server using Windows 2019 ADFS.Kubernetes: Keycloak IAM deployed into Kubernetes cluster for OAuth2/OIDC.Kubernetes: copying files into and out of containers without ‘kubectl cp’.OAuth2: Configuring okta for OAuth2/OIDC.OAuth2: Configuring Google for OAuth2/OIDC.KVM: Creating a bridged network with NetPlan on Ubuntu 22.04.Linux: Mounting a loopback ext4/xfs filesystem to isolate or enforce storage limits.
#Zipsplit windows zip#
Linux: Excluding directories when using zip.
Linux: Use stat to verify permissions and ownership.
Ubuntu: Creating a Samba/CIFS share to quickly share files with Windows.
Linux: Using zip/unzip to add, update, and remove files from a Java jar/war.
Valid suffixes for size units are (b|k|m|g).
#Zipsplit windows archive#
# OR mend original archive, but do not extract content yetĬreate split archive on Linux, extract on WindowsĬonversely, if you want to create a split archive from Linux with 100k per file: 7z -v100k a fromlinux.7z įrom Window you would right-click on the “fromlinux.7z.001” file, and select “Extract here” to unzip the content. Then you can transfer this to a Linux host and use the following to extract it. I find that using 7zip provides easy interoperability across Linux and Windows.Ĭreating a split archive on Windows is detailed in posts like this (Note that it works using either 7zip or zip format). While there are many ways to do the same thing using utilities like zip, split, etc. Taking this a step further and splitting this archive into manageable chunks allows you to take advantage of parallel transfer. If you’d like to change the location where the files will be extracted, click “Browse,” and then navigate to the desired drive or folder.If you are transferring large files between systems, it can be advantageous to create a compressed archive using a tool like 7zip. In the “Extract Compressed (Zipped) Folders” window that appears, you’ll see the current file path as the default location for the unzipped files. Next, right-click the file and select “Extract All” in the menu.
#Zipsplit windows zip file#
First, locate the ZIP file that you’d like to extract in File Explorer.
#Zipsplit windows how to#
RELATED: Everything You Need to Know About Zip Files How to Extract a Zip File in Windows 11Įxtracting (unzipping) ZIP files in Windows 11 is just as easy as zipping them. Now that you have a ZIP file, you can copy it or share it like any other kind of file. When you’re ready, press Enter.Īnd that’s all there is to it! Pretty simple. Type a new file name or leave the default name in place. The ZIP file name will highlight, allowing you to type in whatever name you’d like. After a moment, your ZIP file will appear in the same folder as the source files that you just compressed.
0 notes
Text
Get to Know the Difference: Spring Vs Spring Boot

Since Spring supports a number of frameworks, including Struts, JSP, Hibernate, and others, we might compare it to the framework of frameworks. Spring is a lightweight application framework. Making standalone, professional Spring-based Applications is simple using Spring Boot. It is a microservice creation framework built on the Java platform. Word "spring boot" is composed of two words. Seasonal and Boot Combining the words spring and bootstrap means that the first portion of spring stands for the spring framework. Something that enables you to bootstrap a spring application from scratch is referred to as spring boot. The key distinction between spring and spring boot will be explained by XcelTec, a top provider of Java development services.
Difference between Spring Vs Springboot:
Where it’s used?:
A Java EE framework called Spring is used to create applications.
REST API development is the major use of the Spring Boot framework.
Key feature:
Dependency injection, a design method that removes dependencies from computer code to make the programme easier to maintain and test, is the core or most significant component of the Spring framework.
Autoconfiguration is the primary feature of Spring Boot. The process of automatically configuring a Spring application based on dependencies identified on the classpath is known as "Spring Boot autoconfiguration."
Through the elimination of the requirement to define some beans that are a part of the auto-configuration classes, auto-configuration can speed up and simplify development.
Why it’s used:
The purpose of Spring is to simplify Java EE (Enterprise Edition) development so that developers may work more efficiently. For quicker application development, Spring Boot adds the RAD (Rapid Application Development) functionality to the Spring framework.
Type of Application Development:
A loosely linked application can be created with the help of the spring framework.
A stand-alone application can be made with the aid of Spring Boot.
Servers’ dependency:
We must explicitly configure the servers in the Spring framework in order to test the Spring Project.
Tomcat and Jetty are just two of the built-in or embedded servers that Spring Boot offers.
In-memory database support:
The in-memory database is not supported by the spring framework.
H2 is one of the in-memory databases that Spring Boot supports.
Boilerplate code:
Even for simple tasks, the Spring framework requires too many lines of boilerplate code.
You don't use boilerplate code, which saves time and boosts output.
Dependencyes
To construct a web application, Spring Framework needs a number of dependencies.
On the other side, Spring Boot only requires one dependency to make an application functional. Additional dependencies that are needed during build time are added by default to the final archive.
HTTP Authentication
In order to enable security confirmations, HTTP Basic Authentication specifies that a number of requirements and configurations must be enabled. To configure security in an application, Spring needs both the spring-security-web and spring-security-config requirements. Next, we must include a class that uses the @EnableWebSecurity annotation that extends the Web Security Configure Adapter.
These dependencies are also necessary for Spring Boot to function, but we only need to specify the spring-boot-starter-security requirement since this will already have added all the necessary dependencies to the class path.
Testing
Due to the substantial amount of source code, testing Spring Boot is more challenging than testing Spring Boot.
Spring Boot testing is simpler because there is less source code to maintain.
XML Configuration
The Spring framework needs XML Configuration.
In Spring Boot, no XML configuration is required.
CLI Tools
There is no CLI tool offered by the Spring framework for creating and testing apps.
For creating and testing Spring Boot apps, Spring Boot offers a CLI tool.
Plugins
In contrast to Spring Boot, the Spring framework does not offer any plugins for Maven, Gradle, etc.
Maven and Gradle build tool plugins are offered by Spring Boot. The packaging of executable jars is one of the functionalities provided by the Plugins.
Visit to explore more on Get to Know the Difference: Spring Vs Spring Boot
Get in touch with us for more!
Contact us on:- +91 987 979 9459 | +1 919 400 9200
Email us at:- [email protected]
0 notes
Text
Spring Boot Start Tomcat

Unable to start embedded tomcat spring-boot 2
Spring Boot Doesn't Start Tomcat
Spring Boot Don't Start Tomcat
Spring Boot Not Start Tomcat
Spring boot: Unable to start embedded Tomcat servlet container , Try to change the port number in application.yaml (or application.properties ) to something else. In my condition when I got an exception ' Unable to start embedded Tomcat servlet container', I opened the debug mode of spring boot by adding debug=true in the application.properties,
Chase online lets you manage your Chase accounts, view statements, monitor activity, pay bills or transfer funds securely from one central place. To learn more, visit the Banking Education Center. For questions or concerns, please contact Chase customer service or let us know about Chase. Make purchases with your debit card, and bank from almost anywhere with your phone, tablet or computer and at our 16,000 ATMs and more than 4,700 branches nationwide. For questions or concerns, please contact Chase customer service or let us know about Chase complaints and feedback. Sports & Entertainment. Phone number for chase debit card.
SpringBoot - Unable to Start embedded TomCat, Probably you can avoid this by changing your project sdk. In my project I initially used java-11-openjdk-amd64 as my JDK and had the same issue. Unable to start spring boot 2 embedded tomcat with trust store #21014. ajitdas91 opened this issue Apr 19, 2020 · 2 comments Labels. for: stackoverflow. Comments.
Your system need to have the following minimum requirements to create a Spring Boot application −. Java 7; Maven 3.2; Gradle 2.5; Spring Boot CLI. The Spring Boot CLI is a command line tool and it allows us to run the Groovy scripts. This is the easiest way to create a Spring Boot application by using the Spring Boot Command Line Interface. In this tutorial, we learned how to configure and use a Tomcat connection pool in Spring Boot. In addition, we developed a basic command line application to show how easy is to work with Spring Boot, a Tomcat connection pool, and the H2 database. As usual, all the code samples shown in this tutorial are available over on GitHub.
Unable to start embedded Tomcat · Issue #10 · spring-guides/gs , Stack trace of thread: [email protected]/jdk.internal.misc. WebServerException: Unable to start embedded Tomcat 2018-10-22 09:55:16.880 INFO 8552 --- ( main) RELEASE) at org.springframework.boot.web.embedded.tomcat. @philwebb Thanks!. Here is the background: I have spring boot 2.0 + jsp. Therefore, I need extend from SpringBootServletInitializer. Last weekend, I noticed its package has been changed from import org.springframework.boot.web.support.SpringBootServletInitializer to import org.springframework.boot.web.servlet.support.SpringBootServletInitializer, which gave me the impression there might be
Unable to start embedded tomcat gradle
Unable to start embedded tomcat Spring boot, I'm working on Spring Boot Gradle application. So If you are using embedded tomcat you dont need the Tomcat dependency and 9001 for management, but when I tried to run it on Tomcat, it failed with the same exception you posted. Application run failed org.springframework.boot.web.server.WebServerException: Unable to start embedded Tomcat server my build.Gradle dependencies config as follows.
Spring 5, Embedded Tomcat 8, and Gradle, As such, when starting a new Java project, Spring is an option that must be considered. Spring vs. Spring Boot. In the past, Spring was known for Unable to start embedded container Spring Boot Application org.apache.catalina.LifecycleException: A child container failed during start 0 Not able run Spring boot application as runnable jar from command prompt
Unable to start embedded Tomcat · Issue #10 · spring-guides/gs , I simply cloned the repo and ran 'mvn spring-boot:run' on the 'eureka-service'. > (ERROR) Failed to execute goal So with the Angel.SR4 (or SR6) for cloud and running a gradle dependencies you will notice that spring-boot 1.2.x is pulled in. As described in the migration guide you have to change your build.gradle :
Caused by: org.springframework.boot.web.server.webserverexception: unable to start embedded tomcat
Spring boot: Unable to start embedded Tomcat servlet container , springframework.boot.web.server.WebServerException: Unable to start embedded Tomcat. I have gone through all of the stackoverflow and articles related to unable to start web server; nested exception is org.springframework.boot.web.server.WebServerException: Unable to start embedded Tomcat. I have gone through all of the stackoverflow and articles related to Unable to start embedded tomcat.
Unable to start embedded Tomcat org.springframework.context , jar confliction between 'starter-web' and embedded tomcat ,use the following instead. <groupId>org.springframework.boot< > (ERROR) Failed to execute goal org.springframework.boot:spring-boot-maven-plugin:2.0.5.RELEASE:run (default-cli) on project eureka-service: An exception occurred while running. null: InvocationTargetException: Unable to start web server; nested exception is org.springframework.boot.web.server.WebServerException: Unable to start embedded
SpringBoot - Unable to Start embedded TomCat, Thread.run (Thread.java:844) Caused by: org.springframework.boot.web.server.WebServerException: Unable to start embedded Tomcat at @philwebb Thanks!. Here is the background: I have spring boot 2.0 + jsp. Therefore, I need extend from SpringBootServletInitializer. Last weekend, I noticed its package has been changed from import org.springframework.boot.web.support.SpringBootServletInitializer to import org.springframework.boot.web.servlet.support.SpringBootServletInitializer, which gave me the impression there might be
Unable to start embedded tomcat eureka
unable to start embedded Tomcat when running Eureka Server , unable to start embedded Tomcat when running Eureka Server. For now I just want to run the server on localhost and later I want to add a sample Microservice that registers to it. The Problem is that I get an error when trying to start Eureka Server. I develop in Eclipse with Spring and Maven in an ubuntu vm. Stack Overflow Public Unable to start embedded Tomcat | Spring Boot Eureka Server WebServerException: Unable to start embedded Tomcat at org.springframework
Can't start embedded Tomcat Server when running an Eureka , Can't start embedded Tomcat Server when running an Eureka Then added @EnableEurekaServer. I'm unable to reproduce this error. Stack Overflow for Teams is a private, secure spot for you and your coworkers to find and share information. unable to start embedded Tomcat when running Eureka Chase chargeback phone number.
Unable to start embedded Tomcat · Issue #10 · spring-guides/gs , Working on a song book pdf. I simply cloned the repo and ran 'mvn spring-boot:run' on the 'eureka-service'. > (ERROR) Failed to execute goal > (ERROR) Failed to execute goal org.springframework.boot:spring-boot-maven-plugin:2.0.5.RELEASE:run (default-cli) on project eureka-service: An exception occurred while running. null: InvocationTargetException: Unable to start web server; nested exception is org.springframework.boot.web.server.WebServerException: Unable to start embedded
Spring boot tomcat admin console
Can I enable the tomcat manager app for Spring Boot's embedded , Does the embedded tomcat 7 used by Spring Boot contain a tomcat manager app. No, it doesn't and I'm not really sure that it makes sense to Does the embedded tomcat 7 used by Spring Boot contain a tomcat manager app No, it doesn't and I'm not really sure that it makes sense to try to add it. A primary function of the manager app is to allow you to start and stop individual applications without stopping the container and to deploy and undeploy individual applications.
Deploy a Spring Boot Application into Tomcat, Create a Spring Boot 2.1 app with Java 11 and deploy into Tomcat 9. Often you need console access to the server from which you pull the latest When you click on the Manager App button the user details you entered In this chapter, you are going to learn how to create a WAR file and deploy the Spring Boot application in Tomcat web server. Spring Boot Servlet Initializer. The traditional way of deployment is making the Spring Boot Application @SpringBootApplication class extend the SpringBootServletInitializer class. Spring Boot Servlet Initializer class file allows you to configure the application when it is launched by using Servlet Container.

How to Configure Spring Boot Tomcat, Learn how to reconfigure the embedded Tomcat server in Spring Boot for some common use cases. Spring Boot Configure Tomcat SSL over HTTPS. by MemoryNotFound · October 31, 2017
Standardengine(tomcat).standardhost(localhost).tomcatembeddedcontext() failed to start
Failed to start component (StandardEngine(Tomcat).StandardHost , Failed to start component (StandardEngine(Tomcat).StandardHost(localhost). TomcatEmbeddedContext()) at java.util.concurrent. void main(String() args) ( SpringApplication.run(SpringBootApplication.class, args); ) ) //ServletInitializer.java Stack Overflow for Teams is a private, secure spot for you and your coworkers to find and share information. Learn more Failed to start component (StandardEngine(Tomcat).StandardHost(localhost).TomcatEmbeddedContext())
Unable to start embedded Tomcat · Issue #10 · spring-guides/gs , StandardHost(localhost).TomcatEmbeddedContext() failed to start -> (Help 1). I tried changing the StandardEngine : Starting Servlet Engine: Apache Tomcat/8.5.34 2018-10-22 09:55:15.309 INFO 8552 --- (ost-startStop-1) o.a.catalina.core. Spring boot built Failed, Failed to start component (StandardEngine(Tomcat).StandardHost(localhost).StandardContext()) Ask Question Asked 3 years, 5 months ago
Spring boot test fails to start tomcat due to some sleuth and spring , LifecycleException: Failed to start component (StandardEngine(Tomcat). TomcatEmbeddedContext()) at org.apache.catalina.util. StandardHost(localhost)) at java.util.concurrent. #param args args */ public static void main(String() args) ( // BasicConfigurator.configure(); Set up a simple configuration that logs on the all i found solution for whatever you all get the exception like. org.apache.catalina.LifecycleException: Failed to start component (StandardEngine(Catalina).StandardHost(localhost).StandardContext()). the problem with bulid path of the jars. To over come this problem. place all jars in 'WebContent/lib' whatever you need to in your project.
Unable to start embedded tomcat java 11
SpringBoot - Unable to Start embedded TomCat, Go to project structure -> Project -> Project SDK and change the java version. I hope it helps. A 'good' pom would have 'spring-boot-starter-web' (for convenience) or else all the dependencies included in the starter listed individually. Just check that you have them. Build artifacts, debug, and deploy to major application servers in the cloud. Apache Tomcat, WildFly, Payara Server, Docker and others.
Spring boot: Unable to start embedded Tomcat servlet container , You need to add the tomcat dependency in your pom <dependency> <groupId>org.springframework.boot</groupId> <artifactId>spring-boot-starter-tomcat</artifactId> </dependency> and then rerun the code ,and it told me that java.lang. Chids 2,066○1111 silver badges○2020 bronze badges. unable to start web server; nested exception is org.springframework.boot.web.server.WebServerException: Unable to start embedded Tomcat. I have gone through all of the stackoverflow and articles related to Unable to start embedded tomcat.
Unable to start embedded Tomcat · Issue #10 · spring-guides/gs , ApplicationContextException: Unable to start embedded container; nested exception is onRefresh(EmbeddedWebApplicationContext.java:140) have included spring-boot-starter-web and spring-boot-starter-tomcat dependencies in your pom.xml 11. 12. 13. 14. 15. 16. 17. 18. <?xml version='1.0' encoding='UTF-8'?>. (ERROR) Failed to execute goal org.springframework.boot:spring-boot-maven-plugin:2.0.5.RELEASE:run (default-cli) on project eureka-service: An exception occurred while running. null: InvocationTargetException: Unable to start web server; nested exception is org.springframework.boot.web.server.WebServerException: Unable to start embedded Tomcat
Unable to start web server spring-boot
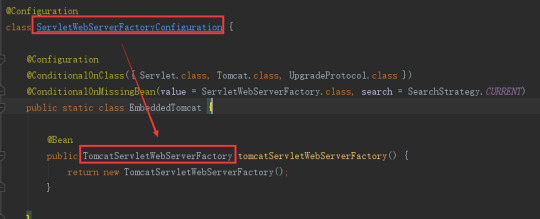
ApplicationContextException: Unable to start , Case 1: @SpringBootApplication annotation missing in your spring boot starter class. Case 2: For non web application, disable web application Spring Boot jar Unable to start web server due to missing ServletWebServerFactory bean Hot Network Questions Did Trump order tear gas to be used on protesters to clear a pathway to a church for a photoshot?
4K 8MP Motorized Varifocal PoE Bullet Outdoor Security Camera with Audio, SD Slot, 2.8-12mm 4X. Poe camera viewer windows 10. What's Power over Ethernet (PoE)? PoE stands for Power over Ethernet, it's a technology that. Blue Iris (Security and Webcam Software) Blue Iris is a CCTV video security program that gives you. SV3C TECHNOLOGY LIMITED was found in 2013, which was specialized in intelligent and security home devices. It is a Hi-tech company which united with R&D, manufacture and marketing. The main products are professional POE IP Camera, Wireless IP Camera, household DIY Camera, accessories etc.
Spring Boot Doesn't Start Tomcat
Ip cam viewer lite for pc. Exception starting up SpringBootApplication, Below is the stack trace in starting up a SpringBoot application. ApplicationContextException: Unable to start web server; nested exception is I have the following Main code in my SpringBoot application ```java package com.oc.springsample; import org.springframework.boot.SpringApplication; public
Spring Boot Don't Start Tomcat
Fixing Spring Boot error 'Unable to start , I was building a new Spring WebFlux application with Spring Boot. ApplicationContextException: Unable to start web server; nested The solution is easy once the root cause is identified. We can either: Update Maven dependencies to exclude spring-webmvc, or; Set the web application type to WebApplicationType.REACTIVE explicitly, as shown below.
Spring Boot Not Start Tomcat
More Articles
0 notes
Text
Spring Cloud Eureka and Hystrix Circuit Breaker using Microservices
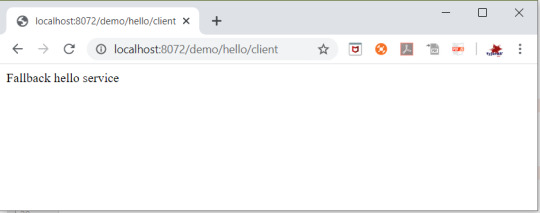
In this tutorial, we will use a microservice application created in previous post ( Microservices Example using Spring Cloud Eureka ) and add circuit breaker pattern using Hystrix Spring library in java. Using Hystrix in your application helps to add defensive mechanism and makes applications more resilient and fault tolerant. Tools Required – - Java 8 - IntelliJ IDE We have created three different applications as below – - Eureka Service– This Service will register every microservice and then the client microservice will look up the Eureka server to get a dependent microservice to get the job done.This Eureka Server is owned by Netflix and in this, Spring Cloud offers a declarative way to register and invoke services by using Java annotation. - demo-server – This service will return a simple hello message. - demo-client – It is similar to the standalone client service created in Bootiful Development with Spring Boot. It will consume the APIs provided by demo-server through Eureka Service . Hystrix Documentation - https://github.com/Netflix/Hystrix/wiki Microservices are deployed on Cloud . As cloud provides a distributed environment , there are more chances that some of your services may be down at some point of time. You can have several micro-services in your application which are dependent on each other. So one service can call to other service. If destination service is down then source will get an exception in normal scenario. But with the help of Hystrix annotations , you can add fallback mechanism and handle the exception in services. Thus it makes your service more fault tolerant, resilient . You need to add below dependency in your demo-client service application to enable Hystrix circuit breaker pattern - org.springframework.cloud spring-cloud-starter-hystrix 1.2.5.RELEASE We just have to add few annotations to handle fallback or break the service call in case your destination service(demo-server) is down. We need to change main class to enable Hystrix circuit breaker - package com.myjavablog.democlient; import org.springframework.boot.SpringApplication; import org.springframework.boot.autoconfigure.SpringBootApplication; import org.springframework.cloud.client.circuitbreaker.EnableCircuitBreaker; import org.springframework.cloud.client.discovery.EnableDiscoveryClient; import org.springframework.cloud.client.loadbalancer.LoadBalanced; import org.springframework.cloud.netflix.hystrix.EnableHystrix; import org.springframework.context.annotation.Bean; import org.springframework.context.annotation.Configuration; import org.springframework.web.client.RestTemplate; @EnableCircuitBreaker @EnableDiscoveryClient @SpringBootApplication public class DemoClientApplication { public static void main(String args) { SpringApplication.run(DemoClientApplication.class, args); } } @Configuration class Config{ @Bean @LoadBalanced public RestTemplate restTemplate(){ return new RestTemplate(); } } Also we need to change controller class to add fallback mehod as below - package com.myjavablog.democlient; import com.netflix.hystrix.contrib.javanica.annotation.HystrixCommand; import org.springframework.beans.factory.annotation.Autowired; import org.springframework.web.bind.annotation.GetMapping; import org.springframework.web.bind.annotation.RequestMapping; import org.springframework.web.bind.annotation.RestController; import org.springframework.web.client.RestTemplate; @RestController @RequestMapping("/demo/hello/client") public class TestController { @Autowired public RestTemplate restTemplate; @GetMapping @HystrixCommand(fallbackMethod = "handleFallback") public String test(){ String url = "http://demo-server/demo/hello/server"; return restTemplate.getForObject(url, String.class); } public String handleFallback(){ return "Fallback hello service"; } } By default hystrix has timeout of 1 second for every request. So we need to disable timeout by setting below property in application.properties file - hystrix.command.default.execution.timeout.enabled=false So now i am intentionally stopping demo-server microservice and then we will make call to api to see fallback is working properly .You can see demo-server is not registered with Eureka below -
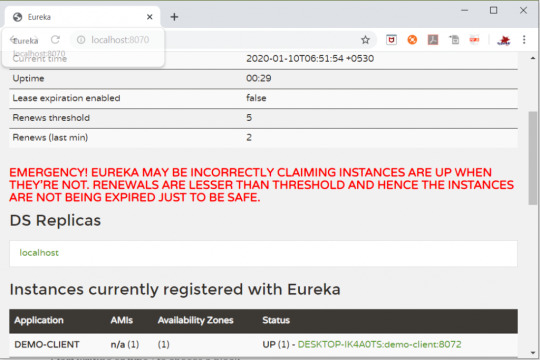
So now when you call the service ,it should show you a fallback message as below -
Github Downlod Link: Download Read the full article
0 notes
Text
Ways to reduce the pain of deploys
In our last post, we talked about the cost of deploying code. In this post, we are going to talk about ways to reduce the pain of deploys. There are a few different strategies to accomplish this. The first is to use tooling that makes deploys faster and easier. The second is to reduce the weight of deploys. And the third is to remove some things from the deploy cycle altogether. By combining these strategies, you can reduce the pain involved with deploying and speed up your release cycle.
Improving deployment tooling
There are a number of ways to reduce deployment costs by rolling out improved tooling. Platforms that enable continuous integration (CI) and continuous deployment (CD) can make deploys both easier and much faster. They can automatically run your tests or other verification processes, preventing bad code from being deployed in the first place. When the code is ready to go, it can be deployed automatically. This will also reduce the amount of code that is deployed at a time, allowing you to isolate bad commits and fix them faster.
A more recent development is continuous verification (CV), which gives you tools that you can use to determine the quality of a new build when it is deployed in production. In some cases, you can deploy a canary build to assess performance and error rates in relation to the stable build. In the case when bad code is deployed, CV tools can let you know of issues that arise and even potentially roll back automatically.
Platforms such as CircleCI, Harness, Jenkins, and Spinnaker can all help you to enable CI/CD and even CV.
Reducing deployment weight
A second way to make deploys less costly is by decreasing deployment weight. This can be accomplished by adopting CI/CD, as it will be possible to deploy smaller updates more frequently. However, another way to do this is by breaking up your application into smaller services that can be verified and deployed independently. This will enable you to deploy smaller pieces of code with a smaller blast radius.
This is not to say that microservices are a panacea; the Internet is littered with horror stories of microservice migrations that took years and introduced a host of new problems. A lot of companies either don’t put enough work into setting up tooling for microservices, don’t think enough about standards or interoperability, or divide their app into way too many microservices. However, if you think intelligently about how to split up your app and do the migration deliberately and thoughtfully, the result will be a more robust application that is easier to deploy and test.
There are a number of platforms that can make it easier to split up your app into smaller services. These include Spring Boot, Akka, Kubernetes, Docker, Prometheus, and many more.
Removing data from the deploy process
The final strategy for making deploys less costly is to remove some aspects of your code from the deployment process. When they are starting out, developers often hardcode various things in code, including configuration constants, user-facing text, and even feature toggles. While this is often easiest in the short term and will work when deploys are fast, it becomes progressively more annoying to push code every time you want to change a piece of text. A lot of companies end up solving this with a homegrown solution, which typically involves storing the data in some type of database. This will work, but even then the data isn’t easily accessible to non-coders. You build a UI to allow non-coders to edit the data, but this will require additional work.
So how do you remove data from the deploy process? The first option is to use a generic config server. This will allow you to update text or constants on the fly, and changes will be reflected in the production application without a deploy. Options for doing something like this are Firebase Remote Config and Configly.
If you want a tool more suited to specific applications, you can find tools that are suited to almost any common use case. They will require some upfront work to implement, but will pay for themselves in the longer-term. If you want to internationalize your text and remove it from your code, you can use Simplelocalize, Lokalise, or Locize. For feature flagging, consider Launch Darkly, Split, or Apptimize.
These are just some of the many ways that you can make your deployments lighter weight and faster. By making deployments easier, you will both reduce frustration and make it easier for your team to move faster.
0 notes
Text
interview
two way ssl spring - Google Search
www.google.com
multiple constructors chaining - Google Search
www.google.com
create singleton class in java when - Google Search
www.google.com
java memory leak - Google Search
www.google.com
PM
microservices refer application properties - Google Search
www.google.com
4:19 PM
spring boot - Common application property file for multiple microservice - Stack Overflow
stackoverflow.com
4:18 PM
Microservices: Access Properties From Spring Cloud Config Server - DZone Microservices
microservices eureka client discovery - Google Search
microservices callable - Google Search
www.google.com
4:15 PM
Building Microservices with Spring Boot
server side load balancing microservices - Google Search4:15 PM
Getting Started | Service Registration and Discovery
server side load balancing microservices - Google Search
www.google.com
4:14 PM
Server-side service discovery pattern
microservices.io
4:13 PM
server load balancing - Google Search
Hystrix Circuit Breaker Pattern - Spring Cloud - HowToDoInJava
howtodoinjava.com
4:12 PM
circuit breaker microservices spring - Google Search
www.google.com
4:11 PM
0 notes
Text
300+ TOP Spring Boot Interview Questions and Answers
Spring Boot Interview Questions for freshers experienced :-
1. What is Spring Boot? Earlier, while working with huge enterprise computing softwares, developers had to focus both on the coding part and on the mass amount of configurations. Consequently, this resulted in a problem where developers could not dedicate the needful amount of time to coding. Therefore, Spring Boot came into picture. Spring Boot is an architecture built on top of the conventional spring framework. It allows developers to create deployment ready applications with configurations and linked jar files. Below are the 4 key Spring Boot components: Spring Boot AutoConfigurator Spring Boot Starters Spring Boot Actuator Spring Boot CLI 2. Why do we need Spring Boot? This is one of the most frequently asked Spring Boot Interview Questions and Answers that you must be aware about. While Spring framework provides developers with an ideal environment to build large applications, it often involves a number of jar files, configurations, server establishment, dispatcher servlet, component scan, view resolver, and much more, which results as a hindrance to the development. Spring Boot is designed to relieve developers from this rattling problem. It provides with features such as starter projects where developers can find pre built projects for further development, auto configurations, etc., so that the application developers can focus on the conventions. 3. How is Spring Boot architecture? Is it the same as Spring MVC? Although Spring Boot is built as an architecture to Spring framework, it is not the same as Spring MVC, nor is a substitution to the latter one. In simple words, Spring Boot is a mediator that helps a developer to connect, configure, and develop more easily and efficiently with the Spring framework. Some of the auto configuration files provided by Spring Boot are database config, security config, and security config, which saves essential development time. Moreover, there are features such as Spring Boot Starters, which cannot to found in Spring MVC. 4. What is Spring Boot Starters? Moving ahead with the Spring Boot Interview Questions and Answers, it is important to know about Spring Boot Starters, which is one of the 4 major components of Spring Boot. To build a single application, there are a lot of dependencies in the Spring framework. Spring Boot Starter POMs are designed to reduce these dependencies into a single one. Therefore, instead of going through a lot of data to find a sample code and copy the dependencies, Spring Boot Starters provides developers with a ready to use all in one set of dependencies. Some of the Spring Boot Starters are Web Starter, Test Starter, Mail Starter, Data JPA Starter. Jar dependencies can be added to Maven’s pom.xml or Gradle’s build.gradle file. org.springframework.boot spring-boot-starter-parent 1.4.0.RELEASE 5. What is Spring Boot AutoConfiguration, and why do we need AutoConfiguration? Spring Boot autoconfigurator is one of the 4 key components of Spring Boot. It uses defined jar dependencies to automatically add configurations to your Spring MVC application. @Configurationpublic class MySQLAutoconfiguration { } Further, a class is registered under org.springframework.boot.autoconfigure. EnableAutoConfiguration key in the location resources/META-INF/spring.factories: This class acts as an auto configuration candidate. org.springframework.boot.autoconfigure. EnableAutoConfiguration=\ com.training.springboot.autoconfiguration. MySQLAutoconfiguration 6. What is Spring Boot CLI? CLI stands for the Command Line Interface. Spring Boot CLI, as the name suggests, is used to begin quickly with the development using the Spring framework. Often, developers have to spend a lot of time after writing boilerplate code, which is nothing but a few lines of code that has to be included time by time with a little bit of modification. Groovy scripts provided by Spring Boot CLI makers sure that app developers can spend time after conventional coding parts and business logic. Such a set up makes sure Spring application is developed and deployed more quickly and efficiently. 7. What is Spring Boot Actuator? Once the application is deployed, Spring Boot Actuator allows you to bring production-ready features to it. Features for monitoring application, traffic patterns, metrics, health, env, and other operation-related insights are provided by the Spring Boot Actuator. It makes use of HTTP endpoints to enable the interaction, which can be extended further in multiple ways same as other components of Spring Boot. org.springframework.boot spring-boot-starter-actuator Note: Regardless of the Spring Boot version, the above setup remains true just as specified in the BOM(Spring Boot Bill of Materials). 8. How to create a Spring Boot Project? While facing Spring Boot Interview Questions and Answers, a candidate might be asked to create a simple Spring Boot project, which can be easily accomplished following below guideline or one may create a Spring Boot project following the guidelines provided on https://start.spring.io/ Spring Boot Project

spring boot project Folder Structure:

folder structure The main method is the heart of the Spring boot application to run the application. @SpringBootApplication: The @SpringBootApplication annotation is the same as using @EnableAutoConfiguration, @Configuration, and @ComponentScan with default attributes. @Target(ElementType.TYPE) @Retention(RetentionPolicy.RUNTIME) @Documented @Inherited @SpringBootConfiguration @EnableAutoConfiguration @ComponentScan(excludeFilters = { @Filter(type = FilterType.CUSTOM, classes = TypeExcludeFilter.class), @Filter(type = FilterType.CUSTOM, classes = AutoConfigurationExcludeFilter.class) }) public @interface SpringBootApplication { } 9. What is @Configuration and why is it needed? @Configuration is a Spring annotation that is used to indicate @Bean method declaration by a class. It can be processed by Spring container in order to create service requests and bean definitions during runtime. @Configuration is: Required, only when the annotated class is defined in the @ComponentScan annotation but is not passed explicitly. Not Required, if the annotated class is passed in the source parameters while calling SpringApplication.run(). 10. What is @RestController annotation? @RestController is a specialized controller that includes @ResponseBody and @controller annotations. @RestController is mainly used to simplify the controller implementation. @RestController public class HelloController { @RequestMapping("/hello") public String greeting() { return"HelloWorld"; } }

Spring Boot Interview Questions 11. What is @RequestMapping annotation? It is not unusual to be asked regarding various annotations while facing Spring Boot Interview Questions and Answers. However, do not hesitate and give your answer in simple terms using technical information such as below. @RequestMapping is used to map class-level and method-level annotations. It maps class-level annotations with the controller in the requested pattern or path. Further, @RequestMapping specifies mappings to handler methods with method-level annotations. 12. What is @RequestBody annotation? @RequestBody annotation is used to bind a method parameter to incoming HTTP requests with the mentioned URL in @RequestMapping annotation. Here, HTTP message convertors are used to map HttpRequest body to a domain object, which consequently helps to automatically deserialize the body to a Java object based on header present in the request. 13. What is @ResponseBody annotation? The task of @ResponseBody annotations is to inform the controller that the returned object has been serialized into Json, the returned value will be bound to HttpResponse body. Here, Spring HTTP message converters serialize the return value to the type specified in HTTP header. 14. What is @ResponseEntity annotation? @ResponseEntity, as the name suggests, is an annotation that represents the HTTP response entity. @ResponseEntity contains constructors that allow you to specify status code, body, header, and other information. 15. What is @pathVariable? @PathVariable annotation is used to directly extract information from the URI. 16. What is MediaType? MediaType is used to specify the type of data that is to be produced or consumed by the controller. This narrows down and aids with mapping. 17. What is REST API? Restful API is one of the favorite Spring Boot Interview Questions and Answers of recruiters to interrogate a fresher candidate. REST API or RESTful API is used to transfer http requests such as Get, Post, Put, and Delete. REST or Representational Transfer is a technology that imitates communication style used for web services. 18. What are the types of HTTP methods and Corresponding RestTemplate methods? GET: Read operations Use: To retrieve the list of customers and use sorting, pagination, and filtering to navigate big lists. Status codes: 200 – (OK) valid request, 404 – (Not Found) Invalid request. POST: Location header with link to /customers/{id} containing new ID Use: To create the newrecord with new id. Status codes: 201 (Created), 404 (Not Found), 409 (Conflict) if resource already exists. PUT: To update/replace every resource in the entire collection. Use: To update/replace data Status codes: 405 (Method Not Allowed), 200 (OK), or 204 (No Content), 404 (Not Found), in case of ID invalid or not found. PATCH: unless you want to modify the collection itself. Use: To update/modify data Status codes: 405 (Method Not Allowed), 200 (OK), or 204 (No Content), 404 (Not Found), in case of ID invalid or not found. DELETE: To completely delete the collection – often not desirable Use: To perform deletion Status codes: 405 (Method Not Allowed), 200 (OK), or 204 (No Content), 404 (Not Found), in case of ID invalid or not found. 19. Difference between POST and PUT methods? Basically, Put is used to replace all the target resources with the selected/requested payload. On the other hand, Post method is used to submit or send data to the specific server or resource such as file upload, information, or changing the current status. An explicitly created object suggest use of the Put method while server-specified name shows the use of Post method. Put allows you to Put objects more than a single time and also allows creation or updation of resources using the exact object or URL. On the other hand, Post allows multiple requests at the same time to make changes to an object or URL. 20. What is @Autowired annotation and its usage? Same as the @Required annotation, @Autowired annotation can be used to bind or autowire bean with the setter method. In other words, one can implicitly define object dependency. It provides developers with control regarding autowiring. 21. How many ways the autowired can mode? No: It’s the default option. Defining not to autowire, which is set using ref attribute. byName: This makes use of property name for autowiring. If bean name matches other bean property name, autowiring is done. byType: Same way as the byName mode, if the bean data type is shown to be compatible with other bean property, autowiring is done. Constructor: byType mode defined in constructor. Autodetect: Finds the default constructor for autowiring. If not found, byType autowiring is performed. 22. What are the limitations of autowiring mode? If constructor contains explicit dependencies, they will override autowiring instructions. Possibilities of Overriding: Dependencies can be easily defined using constructor-arg or property tags to override the autowiring. String, integer, and similar data type properties have to be defined manually and cannot be autowired. 23. What is spring-boot-starter-data-jpa? Spring Boot provides spring-boot-starter-data-jpa, which is one of the Spring Boot Starters, to easily connect relational database with Spring MVC applications. org.springframework.boot spring-boot-starter-data-jpa 24. How does JPA Work? JPA stands for Java Persistence API, which is used as an API that allows the developers to work with objects. When you deal with a relational database, you have to make use of SQL statements in order to retrieve information for certain queries. JPA eliminates the need of using SQL statements and allows the developers to deal with objects without SQL statement requisite. Developers can perform actions such as accessing, modifying, managing, and persisting information. A JPA persistence provider can create a database schema by following the information provided in metadata. Here, JPA metadata has to be defined in the Java class. Metadata can also be defined using XML. JPA can handle both static and dynamic object-based queries. 25. What is the difference between JPA and Hibernate? While JPA and Hibernate both are completely different entities, they are interconnected in certain ways. JPA is an API that provides developers with specifications and guidelines for implementation. However, it is not an implementation and will require a tool that can implement the specifications. Consequently, Hibernate comes into picture, which is nothing but a tool that follows the guideline as well as compulsory and optional specifications defined by JPA and makes it functional. Using Hibernate for JPA implementation also allows you to switch over other implementation tools easily, which is not possible if used Hibernate alone. 26. What is spring-boot-starter-test? Spring-boot-starter-test is the dedicated testing module of the Spring Boot. It brings the Starter Test Modules and a certain number of libraries to test your application. Following is the list of libraries in the Spring-boot-starter-test module: Hamcrest JsonPath JUnit AssertJ Mockito Spring Test & Spring Boot Test JSONassert org.springframework.boot spring-boot-starter-test test 27. How to test the Controller class in Spring Boot? To test the controller class in Spring Boot, developers have the following 2 alternatives: To use the mock environment or To use an embedded Servlet container. 28. What is @RunWith(SpringJUnit4ClassRunner.class)? @RunWith is an annotation used to define if a class should run along a specific runner class. SpringJUnit4ClassRunner.class is used as Spring Boot makes use of the Spring test. A developer can choose from multiple of runners based on the test. 29. What is @ContextConfiguration annotation? In order to configure ApplicationContext for tests such as integration, @ContextConfiguration annotation is used. It shows ApplicationContext resource and classes utilized to load it. @ContextConfiguration calls ClassPathContextConfiguration, which helps to identify the Java classes and ContextLoader to run on JVM. Same way, AnnotationConfigContextLoader.class is a ContextLoader used to determine the classes to load. If you are asked to provide an example for @ContextConfiguration during Spring Boot Interview Questions and Answers, use the below code. A simple example for the @ContextConfiguration annotation: @RunWith(SpringJUnit4ClassRunner.class) @ContextConfiguration(classes = Sample.class, loader = AnnotationConfigContextLoader.class) public class JUnitSpringExample {} Class file: @Configuration public class Sample { @Bean public SampleService getSampleService() { return new SampleServiceImpl(); }} 30. What is Swagger2? Swagger is used to describe the structure of APIs. Swagger 2 is an open source service provided in Spring Boot that makes it easier for the machines to identify the structure of APIs such as RESTful Web services. io.springfox springfox-swagger2 2.9.2 31. How to integrate the Swagger2? Below is a sample for integration of Swagger2 with docket: @Configuration @EnableSwagger2 public class SwaggerConfig { @Bean public Docket api() { return new Docket(DocumentationType.SWAGGER_2) .select() .apis(RequestHandlerSelectors.any()) .paths(PathSelectors.any()) .build(); } } @EnableSwagger2 annotation is used to enable Swagger 2. Once Docket bean is specified, select method returns an ApiSelectorBuilder instance. This instance is used to determine how to control the exposed endpoints. RequestHandlerSelectors and PathSelectors are used to configure predicates for of RequestHandler selection. Lastly, any() method will facilitate the documentation using Swagger. Above configuration can be used to integrate Swagger2 with a Spring Boot Application. Spring Boot Questions and Answers Pdf Download Read the full article
0 notes
Text
Java Lead at Dayton OH
Requirement details : Title:Java Lead Location: Dayton OH Type: Contract 6 months (C2C/W2) Interview Mode: WebEx/Skype/Telephonic Job Description : Mandatory Skills ?Must be able to understand and articulate tech solutions, assets and infrastructure in a related fashion ?Excellent vertical and horizontal communication ?Hands on with micro-services architecture and implementation ?Experience with complex systems with multiple internal and external systems dependencies ?Good knowledge of authentication systems ?Strong with Java frameworks, Java 8, Spring boot, Config Server, Sonar, BDD, Tomcat 8.x, Oracle and MongoDB ?Hands on with AWS infrastructure ?Good understanding of Enterprise Architecture concepts (e.g. TOGAF), Agile and DevOps Preferred Skills ?TOGAF, AWS, PMP Certifications Reference : Java Lead at Dayton OH jobs Source: http://jobrealtime.com/jobs/technology/java-lead-at-dayton-oh_i2720
0 notes
Link
An introduction to spring boot microservices Config Server. We will cover the basics with a config server which serves the configurations from a repository along with three microservices and a gateway application.
0 notes
Link

Why Spring Boot?
So why should you as Java developer care about Spring Boot? Well there are many good reasons! 😊 First of all Spring is open source, meaning it is continuously maintained and tested by community and it is free or charge. Second, according to Hotframeworks, it is the most widely used Java web framework of 2019. Third, there’s an excellent way to get your Spring application up and running quickly, which is where Spring Boot comes into play: Thanks to Spring Boot, you don’t need to worry about a lot of the boiler plate code and configuration. Spring Boot automatically sets a lot of config defaults for you, but you can always overwrite those if needed. For that purpose, Spring Boot is opinionated, meaning the people in the Spring team chose some configs for you, but those are well accepted by the community. Btw, why should we care about web frameworks at all? Well there are many items which are used over and over in typical web services, such as answering to HTTP request, spanning new threads for each incoming request, security mechanisms like HTTPS and OAUTH2 and so forth. We do not want to reinvent the wheel every time we create a new web service, and for that purpose we can use web frameworks with all those common mechanisms provided. Additional features from web frameworks include data base access, scheduling of tasks, inversion of control etc. All these nice features are included in Spring Boot and thus you have more time for other stuff like drinking a good cappuccino☕ As a final introductory remark, let me mention that Spring is not only compatible with Java, but also with Kotlin, a language very popular for Android apps.
Prerequisites
We will now create a hello-world web service. All necessary code is given here, and the final solution is also available on my Github repo. Requisites to follow all the steps:
Maven
Java JDK 8 or higher
Command line
For this blog, we will do all the work from the command line. Alternatively, you can use an IDE like IntelliJ. In fact, I will soon release a post on IntelliJ and cover introductory topics like code completion, searching for a given code snippet in your project, compilation, debugging etc.
Using the Spring initializr
We use Maven as build tool, and Spring Boot offers a great way to create your POM file: Head over to https://start.spring.io/ and enter all the details of our app like below:

You can use a newer version of Spring Boot and Java – of course - if you prefer to. Anyways, remember to add “Spring Web” as a starter dependency – we will use it for our REST endpoints. Once you have filled in all details, use the “GENERATE” button. This will download a ZIP file with the initial Java project structure, and most importantly, the initial pom.xml file. Let us have a closer look at the generated POM file. At the top of the POM, you can see we inherit from spring-boot-starter-parent, which contains all necessities for a Spring-Boot app.
<parent> <groupId>org.springframework.boot</groupId> <artifactId>spring-boot-starter-parent</artifactId> <version>2.2.6.RELEASE</version> <relativePath/> <!-- lookup parent from repository --> </parent>
Further down in the POM, under dependencies, you can see we will use spring-boot-starter-web:
<dependency> <groupId>org.springframework.boot</groupId> <artifactId>spring-boot-starter-web</artifactId> </dependency>
You can find a nice description of this dependency on mvnrepository.com:
Starter for building web, including RESTful, applications using Spring MVC. Uses Tomcat as the default embedded container.
Anyways, so far, we have only looked at one important file: the pom.xml file. Next let us focus on the Main Class, which you can find under src/main/java/com/example/springbootexample/SpringBootExampleApplication.java:
@SpringBootApplication public class SpringBootExampleApplication { public static void main(final String[] args) { SpringApplication.run(SpringBootExampleApplication.class, args); } }
What is interesting here is just the annotation at the top: @SpringBootApplication. Among several things, this annotation makes sure our Spring Boot app gets configured with the default Spring Boot properties (like timeouts for HTTP requests and many, many other things).
Hello-World REST endpoint
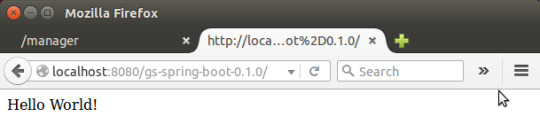
Since we want to create a REST endpoint later on, we need our Main class to search for Servlets, and therefore we need to add one more annotation to our Main class: @ServletComponentScan (again, if today is your lazy day and you don’t want to do any coding, you can look at the completed code in my Github repo). Next, let us create a REST endpoint. For this purpose, we create a new Java class and call it PingRestController.java (you can use the same folder as for the Main class). The content of PingRestController.java should look like so:
package com.example.springbootexample; import org.springframework.http.ResponseEntity; import org.springframework.web.bind.annotation.RequestMapping; import org.springframework.web.bind.annotation.RequestMethod; import org.springframework.web.bind.annotation.RestController; @RestController public class PingRestController { @RequestMapping(method = RequestMethod.GET, path = "/api/ping") public ResponseEntity<String> getPing() { return ResponseEntity.ok("pong"); } }
The annotation @RestController signifies that this class contains REST endpoints. Each REST endpoint is a method annotated with @RequestMapping. In this particular case, we have only one such method: getPing. This method is executed every time the corresponding REST call arrives at our server. Let us look more in detail at the @RequestMapping annotation: We specify a method and a path variable. These two variables specify that we want to capture HTTP GET request to the URI “/api/ping”. Also, note the return type of our getPing method: A ResponseEntity wraps the HTTP answer, and the HTTP body should be just a String. Thus, the response to the HTTP call will always looks as follows:
Headers: Status: 200, ContentType: text/plain;charset=UTF-8 Body: "pong"
With the modified Main class and the PingRestController class, we have all pieces ready to run our service. In the terminal, type:
mvn clean install java -jar target/spring-boot-example-0.0.1-SNAPSHOT.jar
Now, in your favorite web browser, type:
localhost:8080/api/ping
You should see the “pong” response! What happens in the background is that your browser fires a HTTP GET request to localhost, which is handled by your Spring Boot app and responded to with the String “pong”.
Integration Test
A great way to make sure our REST endpoint really works, is by writing an integration test. This test will run every time we build our application. Why do we use integration tests? First, because we developers want to automate everything and do not like testing manually. Second, because this adds stability to future development: As our web service will be extended, this test will still run with every build, and we can be sure this feature still works. What is an integration test? Contrary to unit tests which only look at one class, an integration test is for our app as a whole, where all components get integrated together. We typically mock third party systems like data bases, so we can test independent of (sometimes unreliable) surrounding systems. In our case, we want to really boot up our web service, but if we had a data base, then we would just simulate it. We implement our integration test in src/test/java/com/example/springbootexample/PingIntegrationTest.java:
package com.example.springbootexample; import org.junit.jupiter.api.Test; import org.junit.jupiter.api.extension.ExtendWith; import org.springframework.beans.factory.annotation.Autowired; import org.springframework.boot.test.autoconfigure.web.servlet.AutoConfigureMockMvc; import org.springframework.boot.test.context.SpringBootTest; import org.springframework.test.context.junit.jupiter.SpringExtension; import org.springframework.test.web.servlet.MockMvc; import static org.junit.jupiter.api.Assertions.assertEquals; import static org.springframework.test.web.servlet.request.MockMvcRequestBuilders.get; @ExtendWith(SpringExtension.class) @SpringBootTest @AutoConfigureMockMvc public class PingIntegrationTest { @Autowired private MockMvc mvc; @Test public void testHelloWorldEndpoint() throws Exception { String response = mvc .perform(get("/api/ping")) .andReturn().getResponse().getContentAsString(); assertEquals("Hello world", response); } }
As you can see, testing a REST endpoint takes slightly more code. For now, let us just focus on the interesting bits, and I will leave it to you to understand every single line of code. So here are the important points:
@SpringBootTest: Start the web server locally and have it ready to answer to test REST calls
private MockMvc mvc: A MockMvc object allows us to fire test HTTP calls to our web server
@Test: Just as with Junit-Tests, each test is implemented in a method annotated with @@test .
mvc.perform(get(“api/ping”)): Here we trigger an HTTP GET request
You can run the test with the following command:
mvn -Dtest=PingIntegrationTest test
Aaaaand... the integration test fails🙈 What happened? Well no need to worry, there is just a tiny error in the above test case. I will leave it up to you to find the error cause and fix it!
Spring Configuration
Spring Boot automatically configures many properties of your service. For example, when we pinged our own service, we had to use port 8080. Now we did not define this anywhere… this is just a Spring Boot default. All those default properties can be found in the official docu here. To change this default behavior, all we need to do is create an application.properties file and overwrite the appropriate value. So, go ahead and modify src/main/resources/application.properties:
server: port: 8082
Now, when you recompile and restart the service, the REST endpoint will be available on port 8082.
Conclusion
We have covered all code necessary to create a simple REST service. Using Spring Boot, we just needed a total of 23 lines of Java code to create a working REST endpoint! Moreover, there was zero XML configuration needed. Pretty cool!
0 notes
Text
Spring Spring Cloud
Title: Spring Spring Cloud ID: 10a8cc436c041c27ed4329ce17d31c94 Original Page: Spring Spring Cloud Released: 7/26/2017 Duration: 1h 25m Author: Frank P Moley III Level: Intermediate Category: Web Subject Tags: Business Developer Cloud Computing IT Web Web Development Software Tags: Spring Framework Spring Cloud Spring Description: Spring Cloud provides tools for developers to quickly build cloud native apps. Using Spring Boot and Spring Cloud, developers can stand up microservices, consume services, perform load balancing, and more. Plus, Spring Cloud solutions are built on the 12-factor app methodology, so they’ll work well in any distributed environment. Join software and security architect Frank Moley, as he shows how to use Spring Cloud to build cloud native apps that scale beautifully in both traditional data centers and private or public cloud infrastructures. Learn how to set up microservices and external configurations, discover and consume services, and isolate from failure with the circuit breaker pattern. Frank concentrates on the Spring Cloud Netflix patterns, including Eureka and Hystrix, as well as Spring Cloud Config Server.
Topics include:
Setting up microservices Exposing and consuming external configurations Consuming services Isolating from failure
Course Content: (Please leave comment if course url is broken)
Welcome
What you should know
Working with exercise files
Welcome to microservices
Set up your first microservice
Code your first microservice
Document microservices with Swagger
Welcome to external configuration
Set up external configuration
Expose external configuration with configuration server
Consume external configuration with Spring
Service discovery with Eureka
The Eureka service
Register the microservice with Eureka
Consume a service with RestTemplate and Ribbon
Consume an interface with Feign
The full system
The circuit breaker pattern
Leverage Hystrix
The Hystrix console
Next steps
The post Spring Spring Cloud appeared first on Lyndastreaming.
source https://www.lyndastreaming.com/spring-spring-cloud-2/?utm_source=rss&utm_medium=rss&utm_campaign=spring-spring-cloud-2
0 notes