#config server in spring boot example
Explore tagged Tumblr posts
Visit Tumblr Blog
Explore Tumblr blogs with no restrictions, modern design and the best experience.
Last Seen Tumblr Blogs


Fun Fact
130K people were victims of a chain letter scam that affected Tumblr in May 2011.
Text
Create Spring Cloud Configuration Server | Setup Eureka Service Discovery Registry Server
Full Video Link https://youtu.be/Exoy4ZNAO9Y Hello friends, new #video on #springcloud #configserver #eureka #servicediscovery setup is published on #codeonedigest #youtube channel. @java #java #aws #awscloud @awscloud @AWSCloudIndia #sal
In this video we will learn how to create spring cloud configuration server and eureka service registry server step by step in spring boot framework. Service registry will be use for service discovery. Configuration server is used to store application configuration in central storage. Application, microservices connect configuration server to fetch respective configuration from central…

View On WordPress
#config server#config server firewall#config server in microservices#config server in spring boot example#config server in spring boot microservices#config server spring#config server spring boot#config server spring boot github#config server spring cloud#configuration server#configuration server dns#configuration server in microservices#configuration server spring boot#configuration server step by step#eureka service#eureka service discovery#eureka service discovery example#eureka service discovery example spring boot#eureka service discovery spring boot#eureka service in microservices#eureka service registry#eureka service registry example#eureka service registry spring boot#eureka service spring boot
0 notes
Text
Spring Cloud Eureka and Hystrix Circuit Breaker using Microservices
In this tutorial, we will use a microservice application created in previous post ( Microservices Example using Spring Cloud Eureka ) and add circuit breaker pattern using Hystrix Spring library in java. Using Hystrix in your application helps to add defensive mechanism and makes applications more resilient and fault tolerant. Tools Required – - Java 8 - IntelliJ IDE We have created three different applications as below – - Eureka Service– This Service will register every microservice and then the client microservice will look up the Eureka server to get a dependent microservice to get the job done.This Eureka Server is owned by Netflix and in this, Spring Cloud offers a declarative way to register and invoke services by using Java annotation. - demo-server – This service will return a simple hello message. - demo-client – It is similar to the standalone client service created in Bootiful Development with Spring Boot. It will consume the APIs provided by demo-server through Eureka Service . Hystrix Documentation - https://github.com/Netflix/Hystrix/wiki Microservices are deployed on Cloud . As cloud provides a distributed environment , there are more chances that some of your services may be down at some point of time. You can have several micro-services in your application which are dependent on each other. So one service can call to other service. If destination service is down then source will get an exception in normal scenario. But with the help of Hystrix annotations , you can add fallback mechanism and handle the exception in services. Thus it makes your service more fault tolerant, resilient . You need to add below dependency in your demo-client service application to enable Hystrix circuit breaker pattern - org.springframework.cloud spring-cloud-starter-hystrix 1.2.5.RELEASE We just have to add few annotations to handle fallback or break the service call in case your destination service(demo-server) is down. We need to change main class to enable Hystrix circuit breaker - package com.myjavablog.democlient; import org.springframework.boot.SpringApplication; import org.springframework.boot.autoconfigure.SpringBootApplication; import org.springframework.cloud.client.circuitbreaker.EnableCircuitBreaker; import org.springframework.cloud.client.discovery.EnableDiscoveryClient; import org.springframework.cloud.client.loadbalancer.LoadBalanced; import org.springframework.cloud.netflix.hystrix.EnableHystrix; import org.springframework.context.annotation.Bean; import org.springframework.context.annotation.Configuration; import org.springframework.web.client.RestTemplate; @EnableCircuitBreaker @EnableDiscoveryClient @SpringBootApplication public class DemoClientApplication { public static void main(String args) { SpringApplication.run(DemoClientApplication.class, args); } } @Configuration class Config{ @Bean @LoadBalanced public RestTemplate restTemplate(){ return new RestTemplate(); } } Also we need to change controller class to add fallback mehod as below - package com.myjavablog.democlient; import com.netflix.hystrix.contrib.javanica.annotation.HystrixCommand; import org.springframework.beans.factory.annotation.Autowired; import org.springframework.web.bind.annotation.GetMapping; import org.springframework.web.bind.annotation.RequestMapping; import org.springframework.web.bind.annotation.RestController; import org.springframework.web.client.RestTemplate; @RestController @RequestMapping("/demo/hello/client") public class TestController { @Autowired public RestTemplate restTemplate; @GetMapping @HystrixCommand(fallbackMethod = "handleFallback") public String test(){ String url = "http://demo-server/demo/hello/server"; return restTemplate.getForObject(url, String.class); } public String handleFallback(){ return "Fallback hello service"; } } By default hystrix has timeout of 1 second for every request. So we need to disable timeout by setting below property in application.properties file - hystrix.command.default.execution.timeout.enabled=false So now i am intentionally stopping demo-server microservice and then we will make call to api to see fallback is working properly .You can see demo-server is not registered with Eureka below -
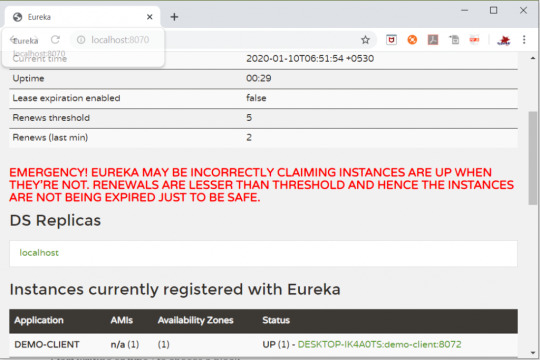
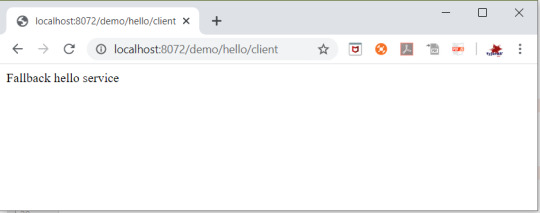
So now when you call the service ,it should show you a fallback message as below -
Github Downlod Link: Download Read the full article
0 notes
Link

Why Spring Boot?
So why should you as Java developer care about Spring Boot? Well there are many good reasons! 😊 First of all Spring is open source, meaning it is continuously maintained and tested by community and it is free or charge. Second, according to Hotframeworks, it is the most widely used Java web framework of 2019. Third, there’s an excellent way to get your Spring application up and running quickly, which is where Spring Boot comes into play: Thanks to Spring Boot, you don’t need to worry about a lot of the boiler plate code and configuration. Spring Boot automatically sets a lot of config defaults for you, but you can always overwrite those if needed. For that purpose, Spring Boot is opinionated, meaning the people in the Spring team chose some configs for you, but those are well accepted by the community. Btw, why should we care about web frameworks at all? Well there are many items which are used over and over in typical web services, such as answering to HTTP request, spanning new threads for each incoming request, security mechanisms like HTTPS and OAUTH2 and so forth. We do not want to reinvent the wheel every time we create a new web service, and for that purpose we can use web frameworks with all those common mechanisms provided. Additional features from web frameworks include data base access, scheduling of tasks, inversion of control etc. All these nice features are included in Spring Boot and thus you have more time for other stuff like drinking a good cappuccino☕ As a final introductory remark, let me mention that Spring is not only compatible with Java, but also with Kotlin, a language very popular for Android apps.
Prerequisites
We will now create a hello-world web service. All necessary code is given here, and the final solution is also available on my Github repo. Requisites to follow all the steps:
Maven
Java JDK 8 or higher
Command line
For this blog, we will do all the work from the command line. Alternatively, you can use an IDE like IntelliJ. In fact, I will soon release a post on IntelliJ and cover introductory topics like code completion, searching for a given code snippet in your project, compilation, debugging etc.
Using the Spring initializr
We use Maven as build tool, and Spring Boot offers a great way to create your POM file: Head over to https://start.spring.io/ and enter all the details of our app like below:

You can use a newer version of Spring Boot and Java – of course - if you prefer to. Anyways, remember to add “Spring Web” as a starter dependency – we will use it for our REST endpoints. Once you have filled in all details, use the “GENERATE” button. This will download a ZIP file with the initial Java project structure, and most importantly, the initial pom.xml file. Let us have a closer look at the generated POM file. At the top of the POM, you can see we inherit from spring-boot-starter-parent, which contains all necessities for a Spring-Boot app.
<parent> <groupId>org.springframework.boot</groupId> <artifactId>spring-boot-starter-parent</artifactId> <version>2.2.6.RELEASE</version> <relativePath/> <!-- lookup parent from repository --> </parent>
Further down in the POM, under dependencies, you can see we will use spring-boot-starter-web:
<dependency> <groupId>org.springframework.boot</groupId> <artifactId>spring-boot-starter-web</artifactId> </dependency>
You can find a nice description of this dependency on mvnrepository.com:
Starter for building web, including RESTful, applications using Spring MVC. Uses Tomcat as the default embedded container.
Anyways, so far, we have only looked at one important file: the pom.xml file. Next let us focus on the Main Class, which you can find under src/main/java/com/example/springbootexample/SpringBootExampleApplication.java:
@SpringBootApplication public class SpringBootExampleApplication { public static void main(final String[] args) { SpringApplication.run(SpringBootExampleApplication.class, args); } }
What is interesting here is just the annotation at the top: @SpringBootApplication. Among several things, this annotation makes sure our Spring Boot app gets configured with the default Spring Boot properties (like timeouts for HTTP requests and many, many other things).
Hello-World REST endpoint
Since we want to create a REST endpoint later on, we need our Main class to search for Servlets, and therefore we need to add one more annotation to our Main class: @ServletComponentScan (again, if today is your lazy day and you don’t want to do any coding, you can look at the completed code in my Github repo). Next, let us create a REST endpoint. For this purpose, we create a new Java class and call it PingRestController.java (you can use the same folder as for the Main class). The content of PingRestController.java should look like so:
package com.example.springbootexample; import org.springframework.http.ResponseEntity; import org.springframework.web.bind.annotation.RequestMapping; import org.springframework.web.bind.annotation.RequestMethod; import org.springframework.web.bind.annotation.RestController; @RestController public class PingRestController { @RequestMapping(method = RequestMethod.GET, path = "/api/ping") public ResponseEntity<String> getPing() { return ResponseEntity.ok("pong"); } }
The annotation @RestController signifies that this class contains REST endpoints. Each REST endpoint is a method annotated with @RequestMapping. In this particular case, we have only one such method: getPing. This method is executed every time the corresponding REST call arrives at our server. Let us look more in detail at the @RequestMapping annotation: We specify a method and a path variable. These two variables specify that we want to capture HTTP GET request to the URI “/api/ping”. Also, note the return type of our getPing method: A ResponseEntity wraps the HTTP answer, and the HTTP body should be just a String. Thus, the response to the HTTP call will always looks as follows:
Headers: Status: 200, ContentType: text/plain;charset=UTF-8 Body: "pong"
With the modified Main class and the PingRestController class, we have all pieces ready to run our service. In the terminal, type:
mvn clean install java -jar target/spring-boot-example-0.0.1-SNAPSHOT.jar
Now, in your favorite web browser, type:
localhost:8080/api/ping
You should see the “pong” response! What happens in the background is that your browser fires a HTTP GET request to localhost, which is handled by your Spring Boot app and responded to with the String “pong”.
Integration Test
A great way to make sure our REST endpoint really works, is by writing an integration test. This test will run every time we build our application. Why do we use integration tests? First, because we developers want to automate everything and do not like testing manually. Second, because this adds stability to future development: As our web service will be extended, this test will still run with every build, and we can be sure this feature still works. What is an integration test? Contrary to unit tests which only look at one class, an integration test is for our app as a whole, where all components get integrated together. We typically mock third party systems like data bases, so we can test independent of (sometimes unreliable) surrounding systems. In our case, we want to really boot up our web service, but if we had a data base, then we would just simulate it. We implement our integration test in src/test/java/com/example/springbootexample/PingIntegrationTest.java:
package com.example.springbootexample; import org.junit.jupiter.api.Test; import org.junit.jupiter.api.extension.ExtendWith; import org.springframework.beans.factory.annotation.Autowired; import org.springframework.boot.test.autoconfigure.web.servlet.AutoConfigureMockMvc; import org.springframework.boot.test.context.SpringBootTest; import org.springframework.test.context.junit.jupiter.SpringExtension; import org.springframework.test.web.servlet.MockMvc; import static org.junit.jupiter.api.Assertions.assertEquals; import static org.springframework.test.web.servlet.request.MockMvcRequestBuilders.get; @ExtendWith(SpringExtension.class) @SpringBootTest @AutoConfigureMockMvc public class PingIntegrationTest { @Autowired private MockMvc mvc; @Test public void testHelloWorldEndpoint() throws Exception { String response = mvc .perform(get("/api/ping")) .andReturn().getResponse().getContentAsString(); assertEquals("Hello world", response); } }
As you can see, testing a REST endpoint takes slightly more code. For now, let us just focus on the interesting bits, and I will leave it to you to understand every single line of code. So here are the important points:
@SpringBootTest: Start the web server locally and have it ready to answer to test REST calls
private MockMvc mvc: A MockMvc object allows us to fire test HTTP calls to our web server
@Test: Just as with Junit-Tests, each test is implemented in a method annotated with @@test .
mvc.perform(get(“api/ping”)): Here we trigger an HTTP GET request
You can run the test with the following command:
mvn -Dtest=PingIntegrationTest test
Aaaaand... the integration test fails🙈 What happened? Well no need to worry, there is just a tiny error in the above test case. I will leave it up to you to find the error cause and fix it!
Spring Configuration
Spring Boot automatically configures many properties of your service. For example, when we pinged our own service, we had to use port 8080. Now we did not define this anywhere… this is just a Spring Boot default. All those default properties can be found in the official docu here. To change this default behavior, all we need to do is create an application.properties file and overwrite the appropriate value. So, go ahead and modify src/main/resources/application.properties:
server: port: 8082
Now, when you recompile and restart the service, the REST endpoint will be available on port 8082.
Conclusion
We have covered all code necessary to create a simple REST service. Using Spring Boot, we just needed a total of 23 lines of Java code to create a working REST endpoint! Moreover, there was zero XML configuration needed. Pretty cool!
0 notes
Link
An awesome journey from Restful Web Services to Microservices with Java, Spring Boot and Spring Cloud
What you’ll learn
You will be able to develop and design RESTful web services with Spring Boot
You will be able develop MICROSERVICES with Spring Boot and Spring Cloud
You will understand How to IMPLEMENT Exception Handling, Validation, HATEOAS and filtering for RESTful Web Services.
You will implement client side load balancing (Ribbon), Dynamic scaling(Eureka Naming Server) and an API Gateway (Zuul)
You will setup Centralized Microservices Configuration with Spring Cloud Config Server
You will learn to implement Distributed tracing for microservices with Spring Cloud Sleuth and Zipkin
You will implement Fault Tolerance for microservices with Hystrix
You will understand how to version your RESTful Web Services
You will understand how to monitor RESTful Services with Spring Boot Actuator
You will understand how to document RESTful Web Services with Swagger
You will understand the best practices in designing RESTful web services
Using Spring Cloud Bus to exchange messages about Configuration updates
Simplify communication with other Microservices using Feign REST Client
Requirements
You have an attitude to learn while having fun 🙂
You have experience with Java and Spring and ZERO Experience with Microservices
Description
Do you want to Learn to Build Amazing REST API with Spring Boot? Do you want to learn what the Hype about Microservices is all about? Do you want to Build Microservices with Spring Boot and Spring Cloud? Look no Further!
******* Some Amazing Reviews From Our Learners *******
★★★★★ Anyone willing to learn Spring Cloud API’s and Spring Rest must enroll for the course without second-thoughts.
★★★★★ Probably I can say this is best tutorial for Spring boot as well as Micro Service for the learnerswho have just started there work/projects on these technologies.
★★★★★ This was an excellent course! The instructor provided great examples that were straight-forward and easy to understand….. I would highly recommend his courses if you want to solid introduction to spring boot and the spring framework.
★★★★★ Very helpful for the beginners as well as experienced people to gain knowledge on Restful Web-services and Spring boot. Thank you for such a nice tutorial.
★★★★★ This was perfect course to get introduced to the world of microservices. Instructor explained each topic by first listing the problems that the particular solution is going to solve.
★★★★★ Great course, the teacher explains everything in a good way making good examples that makes easy to understand how this knowledge can be use in real project. All the courses of in28minutes are great, i’m waiting for the next great course.
★★★★★ The instructor’s has a unique style of teaching which is very uncomplicated , up-to-the pointand very effective. Great job!
★★★★★ This one is the most awesome course that I have ever purchased in udemy!
******* Course Overview *******
Developing RESTful web services and REST API is fun. The combination of Java, Spring Boot, Spring Web MVC, Spring Web Services and JPA makes it even more fun. And its even more fun to create Microservices.
There are two parts to this course – RESTful web services and Microservices
Architectures are moving towards microservices. RESTful web services are the first step to developing great microservices. Java and Spring Boot, in combination with Spring Web MVC (also called Spring REST) makes it easy to develop RESTful web services.
In the first part of the course, you will learn the basics of RESTful web services developing resources for a social media application. You will learn to implement these resources with multiple features – versioning, exception handling, documentation (Swagger), basic authentication (Spring Security), filteringand HATEOAS. You will learn the best practices in designing RESTful web services.
In this part of the course, you will be using Spring (Dependency Management), Spring MVC (or Spring REST), Spring Boot, Spring Security (Authentication and Authorization), Spring Boot Actuator (Monitoring), Swagger (Documentation), Maven (dependencies management), Eclipse (IDE), Postman (REST Services Client) and Tomcat Embedded Web Server. We will help you set up each one of these.
In the second part of the course, you will learn the basics of Microservices. You will understand how to implement microservices using Spring Cloud.
In this part of the course, you will learn to establish communication between microservices, enable load balancing, scaling up and down of microservices. You will also learn to centralize configuration of microservices with Spring Cloud Config Server. You will implement Eureka Naming Server and Distributed tracing with Spring Cloud Sleuth and Zipkin. You will create fault toleranct microservices with Zipkin.
******* What You Can Expect from Every in28Minutes Course *******
in28Minutes created 20 Best Selling Courses providing Amazing Learning Experiences to 250,000 Learners across the world.
Each of these courses come with
✔ Amazing Hands-on Step By Step Learning Experiences
✔ Real Project Experiences using the Best Tools and Frameworks
✔ Awesome Troubleshooting Guides with 200+ FAQs Answered
✔ Friendly Support in the Q&A section
✔ Free Udemy Certificate of Completion on Completion of Course
✔ 30 Day “No Questions Asked” Money Back Guarantee!
~~~ Here are a Few Reviews on The in28Minutes Way ~~~
★★★★★ Excellent, fabulous. The way he has prepared the material and the way he teaches is really awesome. What an effort .. Thanks a million
★★★★★ A lot of preparation work has taken place from the teacher and this is visible throughout the course.
★★★★★ This guy is fantastic. Really. Wonderful teaching skills, and goes well out of his way to make sure that everything he is doing is fully understood. This is the kind of tutorial that gets me excited to work with a framework that I may otherwise not be.
★★★★★ The best part of it is the hands-on approach which the author maintained throughout the course as he had promised at the beginning of the lecture. He explains the concepts really well and also makes sure that there is not a single line of code you type without understanding what it really does.
★★★★★ I also appreciate the mind and hands approach of teaching something and then having the student apply it. It makes everything a lot clearer for the student and uncovers issues that we will face in our project early.
★★★★★ Amazing course. Explained super difficult concepts (that I have spent hours on the internet finding a good explanation) in under 5 minutes.
Zero risk. 30 day money-back guarantee with every purchase of the course. You have nothing to lose!
Start Learning Now. Hit the Enroll Button!
******* Step By Step Details *******
RESTful Web Services
Step 01 – Initializing a RESTful Services Project with Spring Boot
Step 02 – Understanding the RESTful Services we would create in this course
Step 03 – Creating a Hello World Service
Step 04 – Enhancing the Hello World Service to return a Bean
Step 05 – Quick Review of Spring Boot Auto Configuration and Dispatcher Servlet – What’s happening in the background?
Step 06 – Enhancing the Hello World Service with a Path Variable
Step 07 – Creating User Bean and User Service
Step 08 – Implementing GET Methods for User Resource
Step 09 – Implementing POST Method to create User Resource
Step 10 – Enhancing POST Method to return correct HTTP Status Code and Location URI
Step 11 – Implementing Exception Handling – 404 Resource Not Found
Step 12 – Implementing Generic Exception Handling for all Resources
Step 13 – Exercise : User Post Resource and Exception Handling
Step 14 – Implementing DELETE Method to delete a User Resource
Step 15 – Implementing Validations for RESTful Services
Step 16 – Implementing HATEOAS for RESTful Services
Step 17 – Overview of Advanced RESTful Service Features
Step 18 – Internationalization for RESTful Services
Step 19 – Content Negotiation – Implementing Support for XML
Step 20 – Configuring Auto Generation of Swagger Documentation
Step 21 – Introduction to Swagger Documentation Format
Step 22 – Enhancing Swagger Documentation with Custom Annotations
Step 23 – Monitoring APIs with Spring Boot Actuator
Step 24 – Implementing Static Filtering for RESTful Service
Step 25 – Implementing Dynamic Filtering for RESTful Service
Step 26 – Versioning RESTful Services – Basic Approach with URIs
Step 27 – Versioning RESTful Services – Header and Content Negotiation Approaches
Step 28 – Implementing Basic Authentication with Spring Security
Step 29 – Overview of Connecting RESTful Service to JPA
Step 30 – Creating User Entity and some test data
Step 31 – Updating GET methods on User Resource to use JPA
Step 32 – Updating POST and DELETE methods on User Resource to use JPA
Step 33 – Creating Post Entity and Many to One Relationship with User Entity
Step 34 – Implementing a GET service to retrieve all Posts of a User
Step 35 – Implementing a POST service to create a Post for a User
Step 36 – Richardson Maturity Model
Step 37 – RESTful Services Best Practices
Microservices with Spring Cloud
Step 01 – Part 1 – Introduction to Limits Microservice and Spring Cloud Config Server
Step 01 – Part 2 – Setting up Limits Microservice
Step 02 – Creating a hard coded limits service
Step 03 – Enhance limits service to pick up configuration from application properties
Step 04 – Setting up Spring Cloud Config Server
Step 05 – Installing Git
Step 06 – Creating Local Git Repository
Step 07 – Connect Spring Cloud Config Server to Local Git Repository
Step 08 – Configuration for Multiple Environments in Git Repository
Step 09 – Connect Limits Service to Spring Cloud Config Server
Step 10 – Configuring Profiles for Limits Service
Step 11 – A review of Spring Cloud Config Server
Step 12 – Introduction to Currency Conversion and Currency Exchange Microservices
Step 13 – Setting up Currency Exchange Microservice
Step 14 – Create a simple hard coded currency exchange service
Step 15 – Setting up Dynamic Port in the the Response
Step 16 – Configure JPA and Initialized Data
Step 17 – Create a JPA Repository
Step 18 – Setting up Currency Conversion Microservice
Step 19 – Creating a service for currency conversion
Step 20 – Invoking Currency Exchange Microservice from Currency Conversion Microservice
Step 21 – Using Feign REST Client for Service Invocation
Step 22 – Setting up client side load balancing with Ribbon
Step 23 – Running client side load balancing with Ribbon
Step 24 – Understand the need for a Naming Server
Step 25 – Setting up Eureka Naming Server
Step 26 – Connecting Currency Conversion Microservice to Eureka
Step 27 – Connecting Currency Exchange Microservice to Eureka
Step 28 – Distributing calls using Eureka and Ribbon
Step 29 – A review of implementing Eureka, Ribbon and Feign
Step 30 – Introduction to API Gateways
Step 31 – Setting up Zuul API Gateway
Step 32 – Implementing Zuul Logging Filter
Step 33 – Executing a request through Zuul API Gateway
Step 34 – Setting up Zuul API Gateway between microservice invocations
Step 35 – Introduction to Distributed Tracing
Step 36 – Implementing Spring Cloud Sleuth
Step 37 – Introduction to Distributed Tracing with Zipkin
Step 38 – Installing Rabbit MQ
Step 39 – Setting up Distributed Tracing with Zipkin
Step 40 – Connecting microservices to Zipkin
Step 41 – Using Zipkin UI Dashboard to trace requests
Step 42 – Understanding the need for Spring Cloud Bus
Step 43 – Implementing Spring Cloud Bus
Step 44 – Fault Tolerance with Hystrix
Zero risk. 30 day money-back guarantee with every purchase of the course. You have nothing to lose!
Start Learning Now. Hit the Enroll Button!
Who this course is for:
You want to learn how to design and develop RESTful web services with Spring Boot
You want to learn how to design and develop Microservices with Spring Cloud
You want to learn Step by Step with a Hands-on Approach
Created by in28Minutes Official Last updated 7/2019 English English
Size: 1.79 GB
Download Now
https://ift.tt/2ZbLEUF.
The post Master Microservices with Spring Boot and Spring Cloud appeared first on Free Course Lab.
0 notes
Text
A Lovely Spring View: Spring Boot & Vue.js
It´s time to shed some light on the integration of Vue.js with the popular Java Enterprise framework Spring Boot! Both frameworks are shining stars in their respective domain – but how could they be set up together properly? What is a practical project structure and build process? How does the development work locally and how is the app deployed? Let´s elucidate these questions!
Vue.js looks like a great choice!
I have to admit: I am not a frontend developer! I really like to play around with “backend stuff” like Spring Boot, web and microservices, automating whole infrastructures with Vagrant, Packer, Ansible and Docker – while I just wanted to scale my apps with Spring Cloud, Docker Swarm and Traefik…
But wait! Isn´t there a frontend I need to build from time to time?! Yeah, there aren´t that many occasions, but sometimes I have to get my hands dirty with some JavaScript code.

Especially when you are giving lectures at university and try to digitize some old paper processes with your students. And if you ask our CTO, this “backend developer” thing won´t be around much longer…

Alright then, we need to choose the “right” frontend framework – having nearly no clue. The last web app I built was based on Angular 1 – and it felt like a good choice! I loved the coding experience and after a day of training, I felt able to write awesome frontends… But now it’s two years later and I heard rumors that there was a complete rewrite of Angular (2), a new kid in town from Facebook (React) and lots of ES201x stuff, dependency managers, linters and more. Whew! But if I get my colleagues right, Vue.js isn´t the worst choice! Just take a look at all those posts that have been written in our blog this spring (especially if you need a deeper dive into Vue.js):
Rapid prototyping with Vue.js Vue.js – it’s simple until you make it complicated Vue.js & React – JavaScript UI Frameworks im Vergleich
Also, other projects move from one of the other big frameworks like Angular to Vue.js. Some of the main points are Vue.js’ much flatter learning curve and the higher coding speed compared to Angular and React. And the introduction phrase sounds really great:
Vue (pronounced /vjuː/, like view) is a progressive framework for building user interfaces. Unlike other monolithic frameworks, Vue is designed from the ground up to be incrementally adoptable. The core library is focused on the view layer only, and is very easy to pick up and integrate with other libraries or existing projects.
Project setup
So I think it could be a good idea to invest some time into Vue.js. As you may know, I strive to write quite comprehensible blog posts – you can find every bit inside the example project on GitHub. So let´s have a quick look into the project´s structure. The project uses Maven´s Multi Module capabilities to achieve a clean setup:

The pom.xml in the project´s root folder spring-boot-vuejs therefore contains the two modules backend and frontend:
frontendbackend
Spring Boot 2.0.x backend
The easiest way to create a new Spring Boot app is – as Josh Long really likes to emphasize – start dot spring dot io! Just initialize a Spring Boot app with the Web dependency and place the generated zip´s contents into the backend folder. There are only two things I had to change for the Vue.js integration. First the spring-boot-starter-parent has to move to our parent pom.xml in the root directory.
Second – and this is a key concept of our project setup here – we need to copy the generated HTML, JavaScript & CSS to a resources folder where it can be served by Spring Boot´s embedded Webserver later easily. This could be done with the maven-resources-plugin:
maven-resources-plugincopy Vue.js frontend contentgenerate-resourcescopy-resourcessrc/main/resources/publictrue${project.parent.basedir}/frontend/target/diststatic/index.html
It just takes the results from the frontend build process (placed in /frontend/target/dist) and places them into /backend/src/main/resources/public folder. With this a simple java -jar backend-0.0.1-SNAPSHOT.jar will run our Spring Boot App and serve all the frontend assets. But first of all let´s build a frontend to serve!
Just for later needs we also create a simple RESTful Service in BackendController.java and use the great testing tooling from rest-assured together with Spring Boot to test our services inside the BackendControllerTest.class:
@RunWith(SpringRunner.class) @SpringBootTest( classes = SpringBootVuejsApplication.class, webEnvironment = SpringBootTest.WebEnvironment.RANDOM_PORT ) public class BackendControllerTest { @LocalServerPort private int port; @Test public void saysHello() { when() .get("http://localhost:" + port + "/api/hello") .then() .statusCode(HttpStatus.SC_OK) .assertThat() .body(is(equalTo(BackendController.HELLO_TEXT))); }
Vue.js 2.5.x frontend
If you want to reproduce every step mentioned here, you´ll need a working Node.js installation as a prerequisite. Just use your preferred package manager and install it – like brew install node on a Mac. We´ll also need the Vue.js command line interface vue-cli, which could be installed with the help of npm, the Node.js Package Manager:
npm install --global vue-cli
To initialize a project skeleton for Vue.js, we only have to execute the following inside the frontend directory:
vue init webpack frontend
This command results in some questions that require answers:
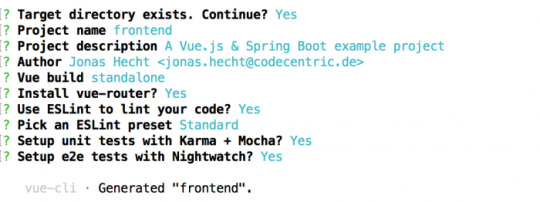
The generated skeleton is a great starting point for your Vue.js experiments. If you want to learn more about installing Vue.js, just head over to the docs.
The frontend-maven-plugin
The easiest way to handle every bit of the quite complex frontend build process with npm, node.js, ESLint, Karma, webpack and so on is to just use the frontend-maven-plugin. If you know Maven, that’s everything you need! Just add the plugin to the frontend’s pom.xml and you can use your well-known Maven commands:
com.github.eirslettfrontend-maven-plugin${frontend-maven-plugin.version}install node and npminstall-node-and-npmv9.11.1npm installnpmgenerate-resourcesinstallnpm run buildnpmrun build
The configuration of the frontend-maven-plugin ensures that the correct Node.js and npm versions are installed – with Node.js version > 4.0.0 the plugin takes care of the corresponding npm version, so you don´t have to explicitly configure it here. Additionally it installs all of our frontend dependencies (via npm install) and runs the full frontend build process with npm run build.
Tell webpack to output build contents to /target
The standard Node.js way is to create a dist directory for builds which contain the minified source code of our web application. But as we use Maven here, we need to have everything in the target directory. Therefore we need to change the generated frontend/config/index.js and replace the following lines:
index: path.resolve(__dirname, '../dist/index.html'), assetsRoot: path.resolve(__dirname, '../dist'),
with
index: path.resolve(__dirname, '../target/dist/index.html'), assetsRoot: path.resolve(__dirname, '../target/dist'),
First app run
Now we already have everything in place to fire up our Spring Boot powered Vue.js application! Just enter the project’s repository and let Maven do its job inside the root spring-boot-vuejs directory:
mvn clean install
This will build our whole app and we can simply do a:
java -jar backend/target/backend-0.0.1-SNAPSHOT.jar
Now let´s open our browser and hit http://localhost:8088/. That´s it, our app should now look like this:

Development process
Although we now have our app successfully running for the first time, we need to take a closer look at how the development process could work with Spring Boot and Vue.js integrated. Because we don´t really want to wait for the full Maven/npm build to complete and wait for our app to be fired up with java -jar until we see a simple frontend element changed in the browser!
We want to get much faster feedback if we change frontend code. Luckily the webpack-dev-server comes to the rescue! This piece of magic will just update and build every change through all the parts of our JavaScript build chain instantly – and is pre-configured in our setup out of the box. The only thing to start the webpack-dev-server is to switch over to the frontend directory and run:
npm run dev
That’s it! Just try it yourself. The command automatically opens your browser. Just enter the Vue.js source in frontend/src and change something. It will instantly be visible
Another neat tool is the Vue.js browser extension. Just install it into your Chrome or Firefox and you should have a deep look into your Vue components inside the Browser´s development tools:
Accessing Spring Boot REST services from Vue.js frontend
As we´re integrating Vue.js with Spring Boot, we for sure want to call some of those nice RESTful web services our Spring Boot backend provides us with. There are many libraries to access web services that one can use with Vue.js. One of them is axios, which is a quite popular Promise API based HTTP client with a huge number of GitHub stars. To use axios in our project, we only have to install the npm dependency:
npm install axios --save
Calling a REST service with Axios is simple. Go into the script area of your component (e.g. in the Service.vue) and add:
import axios from 'axios' data () { return { response: [], errors: [] } }, callRestService () { axios.get(`api/hello`) .then(response => { // JSON responses are automatically parsed. this.response = response.data }) .catch(e => { this.errors.push(e) }) } }
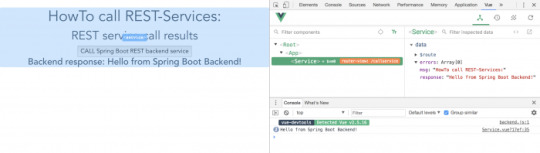
Now inside the template area of your Vue.js component you can request a service call with the callRestService() method – and access the response data accordingly:
CALL Spring Boot REST backend service
Get out of the same-origin policy (SOP) hell
The HTTP calls with axios are working fine – except when we try to use them in our local fast feedback development process with the webpack-dev-server. Why? Because if we start the webpack-dev-server via npm run dev, it will serve our web application on http://localhost:8080. But our Spring Boot REST backend runs on http://localhost:8088! As a core concept of web application security, the same-origin policy (SOP) will then prevent our Vue.js frontend from accessing its Spring Boot backend – resulting in SOP errors.
One way to solve this problem is to use the Cross Origin Resource Sharing Protocol (CORS). Although this isn´t a big deal with both axios and Spring Boot, there´s a much more nifty solution. Thanks to my colleague Daniel who pointed me to the nice proxying feature of webpack-dev-server, we don´t need to configure all the complex CORS stuff!
According to the Vue.js Webpack Template the only thing we need to configure is a Proxy for our webpack-dev-server requests. This can easily be done in the frontend/config/index.js – right inside the dev.proxyTable field:
dev: { ... proxyTable: { // proxy all webpack dev-server requests starting with /api to our Spring Boot backend (localhost:8088) '/api': { target: 'http://localhost:8088', changeOrigin: true } },
With this configuration in place, the webpack-dev-server uses the really handy http-proxy-middleware to proxy all frontend requests with a preceding /api from http://localhost:8080 to http://localhost:8088 – including changing the Origin HTTP header accordingly. Remember that our Spring Boot REST services are configured to serve those requests to /api on class level:
@RestController() @RequestMapping("/api") public class BackendController { @RequestMapping(path = "/hello") public @ResponseBody String sayHello() { return "Hello from Spring Boot Backend!"; }
The proxyTable configuration is finally used in the frontend/build/dev-server.js to configure the proxyMiddleware. We don´t need to change anything here, but I wanted to show the usage of the http-proxy-middleware:
// proxy api requests Object.keys(proxyTable).forEach(function (context) { var options = proxyTable[context] if (typeof options === 'string') { options = { target: options } } app.use(proxyMiddleware(options.filter || context, options)) })
Is the app ready for deployment?
OK, now I can´t really conceal that I love that Continuous Delivery stuff.
So no example project is complete as long as it´s not running anywhere “productively”.
As you may already have found out, the example project has a live deployment configuration for Heroku: With every push into the master branch, our Spring Boot powered Vue.js app is built by TravisCI and deployed to:
https://spring-boot-vuejs.herokuapp.com
In the course of setting up the example project I really fell in love with the great Automatic deploys feature of Heroku and Heroku Pipelines. If the “Wait for CI to pass before deploy” checkbox is selected, we get a fully working pipeline and are able to demonstrate that our example project is also ready for deployment! Thanks again for pointing me to this great platform, Benedikt!
And that´s it!
Now we found a nice way to integrate Vue.js and Spring Boot. As both are really popular frameworks in their respective domain, I hope this introduction is helpful to some of you folks. If you manage to work through all the points shown in this post, you will have a solid project setup that can be used for both local development and deployment – mainly because both Vue.js and Spring Boot bring in such great features. And as “old school” Maven is supported by nearly every platform, this setup is ready for anything you can imagine. Let me know about your great Spring Boot powered Vue.js apps!
Der Beitrag A Lovely Spring View: Spring Boot & Vue.js erschien zuerst auf codecentric AG Blog.
A Lovely Spring View: Spring Boot & Vue.js published first on https://medium.com/@koresol
0 notes
Text
Spring-boot with Docker 설정
Spring-boot with Docker
Docker 설치하기
home brew로 docker 설치
virtualbox 설치하기
brew cask install virtualbox
Docker, docker-compose, docker-machine 설치
brew install docker docker-compose docker-machine
Docker VM 생성
Docker VM 확인
이미 생성된 Docker VM(Virtual Machine)이 있다면 추가로 설치를 하지 않아도 된다. (해도 상관은 없다) 아래의 명령어를 실행하여 이미 생성된 VM이 있는 지 확인한다.
docker-machine ls
Docker VM 생성
사용 가능한 VM이 없다면 아래의 명령어를 실행하여 VM을 생성한다.
docker-machine create --driver virtualbox [vm name] docker-machine env [vm name] eval "$(docker-machine env [vm name])"
위의 첫번째 라인은 virtualbox 드라이버로 vm name에 해당하는 VM을 생성하는 명령이다. 두번째 라인은 생성된 VM의 환경 변수들을 확인하는 명령이다. 마지막 라인은 docker-cli로 필요한 환경 변수들을 가져오기 위한 명령이다.
docker-maven-plugin추가 및 설정
pom 파일 수정
application project를 docker image로 만들기 위해선 docker-maven-plugin를 추가해야 한다.
<build><plugins> ... <plugin><groupid>com.spotify</groupid><artifactid>docker-maven-plugin</artifactid><configuration><skipdockerbuild>false</skipdockerbuild><imagename>${project.artifactId}</imagename><dockerdirectory>${basedir}/src/main/docker</dockerdirectory><resources><resource><targetpath>/</targetpath><directory>${project.build.directory}</directory><include>${project.build.finalName}.jar</include></resource></resources></configuration></plugin> ... </plugins></build>
Dockerfile 추가
Dockerfile은 Docker container image를 생성하기 위한 base image, 포트 및 파일 추가 등의 지시사항들을 포함하고 있는 파일이다. Spring boot application을 실행하기 위해선 일단 컨테이너(base image)를 만들거나 가져와야 하며 packiging된 application(war 혹은 jar)파일을 컨테이너에 복사해야 하는 일련의 작업을 Dockerfile에 기술해야 한다. 내용은 아래와 같다.
FROM frolvlad/alpine-oraclejdk8:slim VOLUME /tmp EXPOSE 8888 ADD [packiging된 application 파일명] app.jar RUN sh -c 'touch /app.jar' ENTRYPOINT ["java","-Djava.security.egd=file:/dev/./urandom", "-Dspring.profies.active=prod","-jar","/app.jar"]
첫번째 라인은 컨테이너를 맨땅에서 생성하는게 아닌 base image를 가지고 만드는데 이때 사용할 base image를 가져오기 위한 명령이다. 두번째 라인은 임시로 volume을 mount하는 명령이며 세번째 라인은 application에서 사용할 port를 지정한다. 네번째 라인은 packiging된 application을 app.jar라는 이름으로 컨테이너에 추가하는 명령이다. 다섯번째 라인은 현재의 컨테이너 image에서 명령어를 실행하기 위한 것이고 마지막은 컨테이너를 실행가능하도록 설정하기 위한 명령어 이다. 내용은 Javar application을 실행하고 옵션을 전달하는 내용이다. Dockerfile에 추가할 수 있는 지시사항들은 Dockerfile reference를 참조하면 된다.
Dockerfile image 생성
applicaiton project의 root 경로로 이동하여 아래의 명령어를 실행하게 되면 이미지가 생성이 된다. 단 아래의 명령어를 실행하기 전에 docker-cli로 필요한 환경 변수들을 가져와야 한다. 즉 아래의 명령어를 이미지 생성 전에 반드시 실행하는 것이 좋다.
eval "${docker-machine env [vm name]}"
maven wrapper 사용
project내에 mvnw(혹은 mvnw.cmd)파일이 있다면 아래의 명령을 실행하면 된다.
./mvnw clean package docker:build -Dmaven.test.skip=true
maven 사용
mvn clean package docker:build -Dmaven.test.skip=true
Docker 컨테이너 실행
생성된 Docker 컨테이너 이미지를 통해 컨테이너를 실행해야 한다. 아래의 명령어를 통해 Docker 컨테이너를 실행한다.
docker run --rm -p 8888:8888 -e spring.profiles.active=prod --name=[컨테이너 이름] [컨테이너 이미지 이름]
--rm옵션은 이미 컨테이너가 존재하면 삭제하기 위한 옵션이다.
--name 옵션은 Docker 컨테이너의 이름을 지정하기 위한 옵션이다.
-p는 Docker 컨테이너를 실행하는 Host의 port와 Docker 컨테이너의 port를 매핑하여 노출시키기 위한 옵션이다. Docker 컨테이너를 생성���때 8888로 지정하였다. 그리고 Host(예 Local 컴퓨터)의 특정 포트를 해당 컨테이너의 포트(8888)로 연결시켜 주어야 한다.
추가적으로 -e옵션을 주어 컨테이너에서 실행할 application에서 사용할 환경 변수를 설정할 수 있다.
마지막으로 실행할 컨테이너의 이미지를 지정해야 한다. 컨테이너 이미지명은 docker-maven-plugin추가 및 설정의 imageName과 동일하게 지정하면 된다.
Docker 컨테이너 실행 확인
docker-cli를 통해 현재 실행중인 컨테이너들을 확인할 수 있다. 확인 명령은 아래와 같다. 아래의 명령어를 실행하여 현재 컨테이너의 상태를 확인 할 수 있으며 application의 api등을 호출하여 application의 실행 상태를 확인 할 수 있다.
docker ps -a
실행 결과
실행 결과는 아래와 같으며 각 항목의 의미는 쉽게 파악할 수 있다.
CONTAINER ID IMAGE COMMAND CREATED STATUS PORTS NAMES cdd0d48aa4d4 config-service "java -Djava.secur..." 3 minutes ago Up 2 minutes 0.0.0.0:8888->8888/tcp config-server
참고
https://github.com/indrabasak/docker-example
https://docs.docker.com
http://chanwookpark.github.io/spring/aws/docker/배포/2016/02/03/springboot-aws-docker/#spring-boot-애플리케이션에-docker-설정하기
0 notes
Text
Deploy a Spring Boot Java app to Kubernetes on GCP-Google Kubernetes Engine

Kubernetes is an open source project, which can run in many different environments, from laptops to high-availability multi-node clusters, from public clouds to on-premise deployments, and from virtual machine (VM) instances to bare metal. You'll use GKE, a fully managed Kubernetes service on Google Cloud Platform, to allow you to focus more on experiencing Kubernetes, rather than setting up the underlying infrastructure. In this post , i will show you the steps to deploy your simple react application to GCP app engine service . Before going for actual deployment you should consider below pre-requisites - GCP account – You need to create at least Free tier GCP account by providing your credit card details which will be valid for 3 months. You can create it using https://cloud.google.com/ Github project - Spring boot project on github (https://github.com/AnupBhagwat7/gcp-examples) Below are the steps to deploy application to App Engine - - Package a simple Java app as a Docker container. - Create your Kubernetes cluster on GKE. - Deploy your Java app to Kubernetes on GKE. - Scale up your service and roll out an upgrade. - Access Dashboard, a web-based Kubernetes user interface. 1. GCP Setup Go to Google cloud console(https://console.cloud.google.com/) and click to open cloud shell -

Run the following command in Cloud Shell to confirm that you are authenticated: gcloud auth list This command will give you below output - Credentialed Accounts ACTIVE ACCOUNT * @ To set the active account, run: $ gcloud config set account `ACCOUNT` Now run the below command to get the list of projects present under your GCP account - gcloud config list project If project is not set then you can do it by using below command - gcloud config set project 2. Package your java application Get the application source code from github - git clone https://github.com/AnupBhagwat7/gcp-examples.git cd gcp-demo-springboot-app Now run the project in gcp cloud shell - mvn -DskipTests spring-boot:run once the application is started , you can click on web preview as shown below -
You will be able to see your application launched in browser as below -

3. Package the Java app as a Docker container Next, you need to prepare your app to run on Kubernetes. The first step is to define the container and its contents. You need to take below steps to package your application as a docker image - Step 1: Create the JAR deployable for the app mvn -DskipTests package Step 2: Enable Container Registry to store the container image that you'll create gcloud services enable containerregistry.googleapis.com Step 3: Use Jib maven plugin to create the container image and push it to the Container Registry mvn -DskipTests com.google.cloud.tools:jib-maven-plugin:build -Dimage=gcr.io/$GOOGLE_CLOUD_PROJECT/gcp-demo-springboot-app.jar Step 4: If all goes well, then you should be able to see the container image listed in the console by navigating to CI/CD > Container Registry > Images. You now have a project-wide Docker image available, which Kubernetes can access and orchestrate as you'll see in next steps .
Step 5: You can locally test the image with the following command, which will run a Docker container as a daemon on port 8080 from your newly created container image: docker run -ti --rm -p 8080:8080 gcr.io/$GOOGLE_CLOUD_PROJECT/gcp-demo-springboot-app.jar Step 6: You can go to web preview feature of cloud shell to check if docker container is started successfully .You will see response in browser -

4. Deploy your application to Google Kubernetes Step 1: Create a cluster You're ready to create your GKE cluster. A cluster consists of a Kubernetes API server managed by Google and a set of worker nodes. The worker nodes are Compute Engine VMs. First, make sure that the related API features are enabled gcloud services enable compute.googleapis.com container.googleapis.com Create a cluster named springboot-java-cluster with two n1-standard-1 nodes using below command - gcloud container clusters create springboot-java-cluster --num-nodes 2 --machine-type n1-standard-1 --zone us-central1-c This will take few minutes to create a cluster. You can see all the clusters by navigating to Kubernetes Engine > Clusters

It's now time to deploy your containerized app to the Kubernetes cluster. You'll use the kubectl command line (already set up in your Cloud Shell environment). The rest of the tutorial requires the Kubernetes client and server version to be 1.2 or higher. kubectl version will show you the current version of the command. Step 2: Deploy app to Kubernetes cluster A Kubernetes deployment can create, manage, and scale multiple instances of your app using the container image that you created. Deploy one instance of your app to Kubernetes using the kubectl run command. kubectl create deployment springboot-java --image=gcr.io/$GOOGLE_CLOUD_PROJECT/gcp-demo-springboot-app.jar To view the deployment that you created, simply run the following command: kubectl get deployments To view the app instances created by the deployment, run the following command: kubectl get pods At this point, you should have your container running under the control of Kubernetes, but you still have to make it accessible to the outside world. Step 3: Allow external traffic By default, the Pod is only accessible by its internal IP within the cluster. In order to make the springboot-java container accessible from outside the Kubernetes virtual network, you have to expose the Pod as a Kubernetes service. In Cloud Shell, you can expose the Pod to the public internet with the kubectl expose command combined with the --type=LoadBalancer flag. The flag is required for the creation of an externally accessible IP. kubectl create service loadbalancer springboot-java --tcp=8080:8080 O/P: service/springboot-java created The flag used in the command specifies that you'll be using the load balancer provided by the underlying infrastructure. Note that you directly expose the deployment, not the Pod. That will cause the resulting service to load balance traffic across all Pods managed by the deployment (in this case, only one Pod, but you'll add more replicas later). The Kubernetes Master creates the load balancer and related Compute Engine forwarding rules, target pools, and firewall rules to make the service fully accessible from outside of Google Cloud. To find the publicly accessible IP address of the service, simply request kubectl to list all the cluster services. kubectl get services O/p: NAME TYPE CLUSTER-IP EXTERNAL-IP PORT(S) AGE kubernetes ClusterIP 10.3.240.1 443/TCP 44m springboot-java LoadBalancer 10.3.250.58 34.123.60.207 8080:32034/TCP 85s Notice that there are two IP addresses listed for your service, both serving port 8080. One is the internal IP address that is only visible inside your Virtual Private Cloud. The other is the external load-balanced IP address. In the example, the external IP address is aaa.bbb.ccc.ddd. You should now be able to reach the service by pointing your browser to http://34.123.60.207:8080
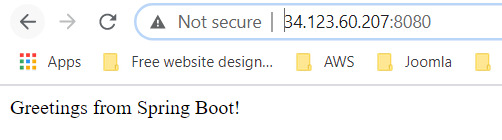
Step 4: Scale your application One of the powerful features offered by Kubernetes is how easy it is to scale your app. Suppose that you suddenly need more capacity for your app. You can simply tell the replication controller to manage a new number of replicas for your app instances. kubectl scale deployment springboot-java --replicas=3 O/P: deployment.apps/springboot-java scaled kubectl get deployment NAME READY UP-TO-DATE AVAILABLE AGE springboot-java 3/3 3 3 23m Step 5: Roll out an upgrade to your service At some point, the app that you deployed to production will require bug fixes or additional features. Kubernetes can help you deploy a new version to production without impacting your users. You can launch editor in CLOUD Shell and update the controller to return a new value as shown below-

Use Jib maven plugin to build and push a new version of the container image. mvn -DskipTests package com.google.cloud.tools:jib-maven-plugin:build -Dimage=gcr.io/$GOOGLE_CLOUD_PROJECT/springboot-java:v2 In order to change the image label for your running container, you need to edit the existing springboot-java deployment and change the image from gcr.io/PROJECT_ID/springboot-java:v1 to gcr.io/PROJECT_ID/springboot-java:v2. You can use the kubectl set image command to ask Kubernetes to deploy the new version of your app across the entire cluster one instance at a time with rolling updates. kubectl set image deployment/springboot-java springboot-java=gcr.io/$GOOGLE_CLOUD_PROJECT/springboot-java:v2 Step 6: Rollback to previous version Perhaps the new version contained an error and you need to quickly roll it back. With Kubernetes, you can roll it back to the previous state easily. Roll back the app by running the following command: kubectl rollout undo deployment/springboot-java This marks the end of this tutorial. Thanks for following. Github link - https://github.com/AnupBhagwat7/gcp-examples/tree/main/gcp-demo-springboot-app Read the full article
0 notes
Text
Monitoring Spring boot applications using actuator and prometheus
In this article ,we will see how we can monitor spring boot applications using actuator spring boot project and prometheus tool . Prometheus Prometheus is a time-series monitoring application written in Go. It can run on a server, in a docker container, or as part of a Kubernetes cluster (or something similar). Prometheus collects, stores, and visualizes time-series data so that you can monitor your systems. You can tell Prometheus exactly where to find metrics by configuring a list of "scrape jobs". Applications that are being monitored can provide metrics endpoints to Prometheus using any one of the many client libraries available; additionally, separate exporters can gather metrics from applications to make them available in Prometheus. Metrics get stored locally for 15 days, by default, and any Prometheus server can scrape another one for data. Additionally, remote storage is another option for Prometheus data - provided there is a reliable remote storage endpoint. Benefits: The option of "service discovery" allows Prometheus to keep track of all current endpoints effortlessly. Outages are quickly detected .The PromQL query language is incredibly flexible and Turing-complete. There's also a very low load on the services monitored (metrics get stored in memory as they get generated), allowing fewer resources to get used. Additionally, Prometheus users can control traffic volumes, access metrics in the browser, and allow for easy reconfiguration. Part 1: Spring boot application configuration We will create a simple spring boot REST application which will expose the metrics to prometheus. Please find below project structure of application -

Project Structure Below is the pom.xml required for project - 4.0.0 com.db spring-boot-prometheus 1.0-SNAPSHOT org.springframework.boot spring-boot-starter-parent 2.1.9.RELEASE 1.8 org.springframework.boot spring-boot-starter-actuator org.springframework.boot spring-boot-starter-web io.micrometer micrometer-registry-prometheus org.springframework.boot spring-boot-starter-test test org.springframework.boot spring-boot-maven-plugin We need spring-boot-starter-actuator dependency ,this would expose the endpoints of our application and makes it available to prometheus server. You can run the application and check the endpoints exposed by actuator by hitting below link in browser - http://localhost:8081/actuator Micrometer micrometer-registry-prometheus dependency is required to register metrics with prometheus server. It exposes Actuator metrics to external monitoring systems such as Prometheus, Netflix Atlas, AWS Cloudwatch, and many more. Similarly, Micrometer automatically exposes /actuator/metrics data into something your monitoring system can understand. All you need to do is include that vendor-specific micrometer dependency in your application. Micrometer is a separate open-sourced project and is not in the Spring ecosystem, so we have to explicitly add it as a dependency. Since we will be using Prometheus, let's add it's specific dependency in our pom.xml: Part 2: Prometheus Server Configuration For this example , i will be installing portable prometheus on local system . You can download the prometheus setup from official prometheus website as below - https://prometheus.io/download/ You need to make below changes in prometheus.yml file of prometheus configuration to scrape the metrices your application .Please add below job to scrape the metrices of your application - # Details to connect Prometheus with Spring Boot actuator end point to scrap the data # The job name is added as a label `job=` to any time series scraped from this config. - job_name: 'spring-actuator' # Actuator end point to collect the data. metrics_path: '/actuator/prometheus' #How frequently to scape the data from the end point scrape_interval: 5s #target end point. We are using the Docker, so local host will not work. You can change it with #localhost if not using the Docker. static_configs: - targets: Run the prometheus server by double clicking prometheus.exe flie . Now prometheus console will open and it will strat gathering the metrices of your application. You can access the prometheus server in browser using http://localhost:9090

Targets for metrics

Classes loaded in JVM prometheus metrics You can gather the metrices of your application by selecting the various parameters provided by prometheus like jvm_classes_loaded_classes, jvm_threads_live_threads, jvm_threads_states_threads ,jvm_threads_states_threads, tomcat_global_request_seconds_count etc. These parameters are useful to monitor your systems. In the next article, we will create a prometheus server using docker and expose the metrices. Github Downlod Link: Download Read the full article
0 notes
Text
Monitoring Spring boot applications using actuator and prometheus
In this article ,we will see how we can monitor spring boot applications using actuator spring boot project and prometheus tool . Prometheus Prometheus is a time-series monitoring application written in Go. It can run on a server, in a docker container, or as part of a Kubernetes cluster (or something similar). Prometheus collects, stores, and visualizes time-series data so that you can monitor your systems. You can tell Prometheus exactly where to find metrics by configuring a list of "scrape jobs". Applications that are being monitored can provide metrics endpoints to Prometheus using any one of the many client libraries available; additionally, separate exporters can gather metrics from applications to make them available in Prometheus. Metrics get stored locally for 15 days, by default, and any Prometheus server can scrape another one for data. Additionally, remote storage is another option for Prometheus data - provided there is a reliable remote storage endpoint. Benefits: The option of "service discovery" allows Prometheus to keep track of all current endpoints effortlessly. Outages are quickly detected .The PromQL query language is incredibly flexible and Turing-complete. There's also a very low load on the services monitored (metrics get stored in memory as they get generated), allowing fewer resources to get used. Additionally, Prometheus users can control traffic volumes, access metrics in the browser, and allow for easy reconfiguration. Part 1: Spring boot application configuration We will create a simple spring boot REST application which will expose the metrics to prometheus. Please find below project structure of application -

Project Structure Below is the pom.xml required for project - 4.0.0 com.db spring-boot-prometheus 1.0-SNAPSHOT org.springframework.boot spring-boot-starter-parent 2.1.9.RELEASE 1.8 org.springframework.boot spring-boot-starter-actuator org.springframework.boot spring-boot-starter-web io.micrometer micrometer-registry-prometheus org.springframework.boot spring-boot-starter-test test org.springframework.boot spring-boot-maven-plugin We need spring-boot-starter-actuator dependency ,this would expose the endpoints of our application and makes it available to prometheus server. You can run the application and check the endpoints exposed by actuator by hitting below link in browser - http://localhost:8081/actuator Micrometer micrometer-registry-prometheus dependency is required to register metrics with prometheus server. It exposes Actuator metrics to external monitoring systems such as Prometheus, Netflix Atlas, AWS Cloudwatch, and many more. Similarly, Micrometer automatically exposes /actuator/metrics data into something your monitoring system can understand. All you need to do is include that vendor-specific micrometer dependency in your application. Micrometer is a separate open-sourced project and is not in the Spring ecosystem, so we have to explicitly add it as a dependency. Since we will be using Prometheus, let's add it's specific dependency in our pom.xml: Part 2: Prometheus Server Configuration For this example , i will be installing portable prometheus on local system . You can download the prometheus setup from official prometheus website as below - https://prometheus.io/download/ You need to make below changes in prometheus.yml file of prometheus configuration to scrape the metrices your application .Please add below job to scrape the metrices of your application - # Details to connect Prometheus with Spring Boot actuator end point to scrap the data # The job name is added as a label `job=` to any time series scraped from this config. - job_name: 'spring-actuator' # Actuator end point to collect the data. metrics_path: '/actuator/prometheus' #How frequently to scape the data from the end point scrape_interval: 5s #target end point. We are using the Docker, so local host will not work. You can change it with #localhost if not using the Docker. static_configs: - targets: Run the prometheus server by double clicking prometheus.exe flie . Now prometheus console will open and it will strat gathering the metrices of your application. You can access the prometheus server in browser using http://localhost:9090

Targets for metrics

Classes loaded in JVM prometheus metrics You can gather the metrices of your application by selecting the various parameters provided by prometheus like jvm_classes_loaded_classes, jvm_threads_live_threads, jvm_threads_states_threads ,jvm_threads_states_threads, tomcat_global_request_seconds_count etc. These parameters are useful to monitor your systems. In the next article, we will create a prometheus server using docker and expose the metrices. Read the full article
0 notes
Text
Spring Cloud Eureka and Hystrix Circuit Breaker using Microservices
In this tutorial, we will use a microservice application created in previous post ( Microservices Example using Spring Cloud Eureka ) and add circuit breaker pattern using Hystrix Spring library in java. Using Hystrix in your application helps to add defensive mechanism and makes applications more resilient and fault tolerant. Tools Required – Java 8IntelliJ IDE We have created three different applications as below – Eureka Service– This Service will register every microservice and then the client microservice will look up the Eureka server to get a dependent microservice to get the job done.This Eureka Server is owned by Netflix and in this, Spring Cloud offers a declarative way to register and invoke services by using Java annotation.demo-server – This service will return a simple hello message.demo-client – It is similar to the standalone client service created in Bootiful Development with Spring Boot. It will consume the APIs provided by demo-server through Eureka Service . Hystrix Documentation - https://github.com/Netflix/Hystrix/wiki Microservices are deployed on Cloud . As cloud provides a distributed environment , there are more chances that some of your services may be down at some point of time. You can have several micro-services in your application which are dependent on each other. So one service can call to other service. If destination service is down then source will get an exception in normal scenario. But with the help of Hystrix annotations , you can add fallback mechanism and handle the exception in services. Thus it makes your service more fault tolerant, resilient . You need to add below dependency in your demo-client service application to enable Hystrix circuit breaker pattern - org.springframework.cloud spring-cloud-starter-hystrix 1.2.5.RELEASE We just have to add few annotations to handle fallback or break the service call in case your destination service(demo-server) is down. We need to change main class to enable Hystrix circuit breaker - package com.myjavablog.democlient; import org.springframework.boot.SpringApplication; import org.springframework.boot.autoconfigure.SpringBootApplication; import org.springframework.cloud.client.circuitbreaker.EnableCircuitBreaker; import org.springframework.cloud.client.discovery.EnableDiscoveryClient; import org.springframework.cloud.client.loadbalancer.LoadBalanced; import org.springframework.cloud.netflix.hystrix.EnableHystrix; import org.springframework.context.annotation.Bean; import org.springframework.context.annotation.Configuration; import org.springframework.web.client.RestTemplate; @EnableCircuitBreaker @EnableDiscoveryClient @SpringBootApplication public class DemoClientApplication { public static void main(String args) { SpringApplication.run(DemoClientApplication.class, args); } } @Configuration class Config{ @Bean @LoadBalanced public RestTemplate restTemplate(){ return new RestTemplate(); } } Also we need to change controller class to add fallback mehod as below - package com.myjavablog.democlient; import com.netflix.hystrix.contrib.javanica.annotation.HystrixCommand; import org.springframework.beans.factory.annotation.Autowired; import org.springframework.web.bind.annotation.GetMapping; import org.springframework.web.bind.annotation.RequestMapping; import org.springframework.web.bind.annotation.RestController; import org.springframework.web.client.RestTemplate; @RestController @RequestMapping("/demo/hello/client") public class TestController { @Autowired public RestTemplate restTemplate; @GetMapping @HystrixCommand(fallbackMethod = "handleFallback") public String test(){ String url = "http://demo-server/demo/hello/server"; return restTemplate.getForObject(url, String.class); } public String handleFallback(){ return "Fallback hello service"; } } By default hystrix has timeout of 1 second for every request. So we need to disable timeout by setting below property in application.properties file - hystrix.command.default.execution.timeout.enabled=false So now i am intentionally stopping demo-server microservice and then we will make call to api to see fallback is working properly .You can see demo-server is not registered with Eureka below -

So now when you call the service ,it should show you a fallback message as below -

Github Downlod Link: Download Read the full article
0 notes
Text
Localization of Spring Security Error Messages in Spring Boot
Spring Security is a framework for easily adding state-of-the-art authentication and authorization to Spring applications. When used in conjuction with Spring Boot, adding basic authentication to a web application is straightforward. Although Spring Boot will take care of configuring Spring Security, localization of Springs Security’s error messages is not autoconfigured. In this blog post I will show how to add localization to Spring Security and show some pitfalls while doing so.
Example
I’ve implemented a very simple application with basic authentication as an example for this blog post. The application has a @RestController handling GET requests to /hello, which returns a “Hello World” message. Furthermore I’ve configured Spring Security with basic authentication and set up an in-memory user with user name “user” and password “password”. All code can be found at GitHub.
When I start the application and try to access the hello resource without authentication, I get:
$> curl -i http://localhost:8080/hello HTTP/1.1 401 X-Content-Type-Options: nosniff X-XSS-Protection: 1; mode=block Cache-Control: no-cache, no-store, max-age=0, must-revalidate Pragma: no-cache Expires: 0 X-Frame-Options: DENY Set-Cookie: JSESSIONID=3E1B7F48E35AC7FEF0A5A66CEAF843D5; Path=/; HttpOnly WWW-Authenticate: Basic realm="Realm" Content-Type: application/json;charset=UTF-8 Transfer-Encoding: chunked Date: Tue, 22 Aug 2017 06:00:37 GMT { "timestamp":1503381637553, "status":401, "error":"Unauthorized", "message":"Full authentication is required to access this resource", "path":"/hello" }
Trying to access the resource with wrong credentials also yields an error (headers omitted this time):
$> curl -u user:wrongPassword http://localhost:8080/hello { "timestamp":1503381723115, "status":401, "error":"Unauthorized", "message":"Bad credentials", "path":"/hello" }
Only if I provide correct authentication, I can access the resource:
$> curl -u user:password http://localhost:8080/hello { "message": "Hello World!" }
As you can see, the error messages returned are all in Englisch. Since I’m developing software for German customers, I sometimes want my application to return German error messages. Let’s see how we can achieve that.
Loading Messages
Localization in Spring relies heavily on the MessageSource facilities. A MessageSource is an abstraction over how to access messages for an application with support for parameterization and localization of those messages. A common way to define a MessageSource is to use a ResourceBundleMessageSource or a ReloadableResourceBundleMessageSource both resolving messages using Java resource bundles. To sum this up: If we want localized Spring Security error messages, we need to provide a message source, which loads the resource bundles defining Spring Security’s error messages.
The Spring Security documentation only describes how to do this with XML configuration. Since we’re writing a Spring Boot application, we want to configure everything using Java config:
@Bean public MessageSource messageSource() { ReloadableResourceBundleMessageSource messageSource = new ReloadableResourceBundleMessageSource(); messageSource.addBasenames("classpath:org/springframework/security/messages"); return messageSource; }
It is important to call the @Bean method “messageSource”. This will replace the existing message source with ID “messageSource” in the application context bootstrapped by Spring Boot, thereby using it throughout the application. If we don’t replace the existing message source and instead configure a new one (for example by calling my @Bean method “myMessageSource”), the configured messages will not be used.
After adding Spring Security’s error messages to my message source, I can retry my request:
$> curl -u user:wrongPassword http://localhost:8080 { "timestamp":1503383024741, "status":401, "error":"Unauthorized", "message":"Ungültige Anmeldedaten", "path":"/hello" }
We’ve loaded the Spring Security error messages and the German message is now returned. Great!
Setting a default Locale
Well, almost great, but not completely. The problem is that now the server’s locale decides which language will be returned. This is because a MessageSource always needs a Locale parameter to resolve a message. If none can be found, Spring falls back to Locale.getDefault(). I have two problems with this:
You never know how the system locale will be set in your production environment running docker containers on Kubernetes in AWS. My guess is that it will be English, but I won’t count on it.
Far more people speak English than German.
For this reasons it’s better to use English as default language and let the client decide which language it can accept. The former can be configured by setting the default Locale, preferably in the messageSource method:
@Bean public MessageSource messageSource() { Locale.setDefault(Locale.ENGLISH); ReloadableResourceBundleMessageSource messageSource = new ReloadableResourceBundleMessageSource(); messageSource.addBasenames("classpath:org/springframework/security/messages"); return messageSource; }
The latter is achieved by setting the Accept-Language header in the client. This changes the request to:
$> curl -u user:wrongPassword http://localhost:8080 { "timestamp":1503381723115, "status":401, "error":"Unauthorized", "message":"Bad credentials", "path":"/hello" } $> curl -u user:wrongPassword -H 'Accept-Language: de-DE' http://localhost:8080/hello { "timestamp":1503383940064, "status":401, "error":"Unauthorized", "message":"Ungültige Anmeldedaten", "path":"/hello" }
There are a lot of languages already shipped with Spring Security. If yours is missing or if you want to change some translations, you can easily do this by following these steps:
copy the english message.properties file from Spring Security to your project.
translate or change the messages you’re interested in.
In your messageSource method, add the new properties file to your message source.
Shortcomings
Remember that we also tried to access the hello resource without any authentication in our first example? Let’s try that again using the Accept-Language header:
$> curl -H 'Accept-Language: de-DE' http://localhost:8080/hello { "timestamp":1503383125672, "status":401, "error":"Unauthorized", "message":"Full authentication is required to access this resource", "path":"/hello" }
Sad but true, this is a shortcoming of Spring Security’s localization. The reason is that the “Bad credentials” message is returned by AbstractUserDetailsAuthenticationProvider from spring-security-core, while the “Full authentication required” message is returned by ExceptionTranslationFilter from spring-security-web. spring-security-core ships with message bundles, and therefore can be localized using a MessageSource. The error messages in ExceptionTranslationFilter are hard coded with no way of using a MessageSource for localization. I think this should be configurable using resource bundles the same way as it is for the messages from spring-security-core. For this reason I created a pull request for Spring Security that will hopefully be merged soon.
Conclusion
By loading Spring Security message bundles using a MessageSource it is pretty easy to add localization to Spring Security error messages. One thing to look for is how the default system Locale is involved while determining the language for localization. My suggestion is to make sure the default is English and let the client decide explicitly using the Accept-Language header. Furthermore, there are still some messages in Spring Security that cannot be localized this way, but hopefully will be in the future.
The post Localization of Spring Security Error Messages in Spring Boot appeared first on codecentric AG Blog.
Localization of Spring Security Error Messages in Spring Boot published first on http://ift.tt/2vCN0WJ
0 notes
Text
Localization of Spring Security Error Messages in Spring Boot
Spring Security is a framework for easily adding state-of-the-art authentication and authorization to Spring applications. When used in conjuction with Spring Boot, adding basic authentication to a web application is straightforward. Although Spring Boot will take care of configuring Spring Security, localization of Springs Security’s error messages is not autoconfigured. In this blog post I will show how to add localization to Spring Security and show some pitfalls while doing so.
Example
I’ve implemented a very simple application with basic authentication as an example for this blog post. The application has a @RestController handling GET requests to /hello, which returns a “Hello World” message. Furthermore I’ve configured Spring Security with basic authentication and set up an in-memory user with user name “user” and password “password”. All code can be found at GitHub.
When I start the application and try to access the hello resource without authentication, I get:
$> curl -i http://localhost:8080/hello HTTP/1.1 401 X-Content-Type-Options: nosniff X-XSS-Protection: 1; mode=block Cache-Control: no-cache, no-store, max-age=0, must-revalidate Pragma: no-cache Expires: 0 X-Frame-Options: DENY Set-Cookie: JSESSIONID=3E1B7F48E35AC7FEF0A5A66CEAF843D5; Path=/; HttpOnly WWW-Authenticate: Basic realm="Realm" Content-Type: application/json;charset=UTF-8 Transfer-Encoding: chunked Date: Tue, 22 Aug 2017 06:00:37 GMT { "timestamp":1503381637553, "status":401, "error":"Unauthorized", "message":"Full authentication is required to access this resource", "path":"/hello" }
Trying to access the resource with wrong credentials also yields an error (headers omitted this time):
$> curl -u user:wrongPassword http://localhost:8080/hello { "timestamp":1503381723115, "status":401, "error":"Unauthorized", "message":"Bad credentials", "path":"/hello" }
Only if I provide correct authentication, I can access the resource:
$> curl -u user:password http://localhost:8080/hello { "message": "Hello World!" }
As you can see, the error messages returned are all in Englisch. Since I’m developing software for German customers, I sometimes want my application to return German error messages. Let’s see how we can achieve that.
Loading Messages
Localization in Spring relies heavily on the MessageSource facilities. A MessageSource is an abstraction over how to access messages for an application with support for parameterization and localization of those messages. A common way to define a MessageSource is to use a ResourceBundleMessageSource or a ReloadableResourceBundleMessageSource both resolving messages using Java resource bundles. To sum this up: If we want localized Spring Security error messages, we need to provide a message source, which loads the resource bundles defining Spring Security’s error messages.
The Spring Security documentation only describes how to do this with XML configuration. Since we’re writing a Spring Boot application, we want to configure everything using Java config:
@Bean public MessageSource messageSource() { ReloadableResourceBundleMessageSource messageSource = new ReloadableResourceBundleMessageSource(); messageSource.addBasenames("classpath:org/springframework/security/messages"); return messageSource; }
It is important to call the @Bean method “messageSource”. This will replace the existing message source with ID “messageSource” in the application context bootstrapped by Spring Boot, thereby using it throughout the application. If we don’t replace the existing message source and instead configure a new one (for example by calling my @Bean method “myMessageSource”), the configured messages will not be used.
After adding Spring Security’s error messages to my message source, I can retry my request:
$> curl -u user:wrongPassword http://localhost:8080 { "timestamp":1503383024741, "status":401, "error":"Unauthorized", "message":"Ungültige Anmeldedaten", "path":"/hello" }
We’ve loaded the Spring Security error messages and the German message is now returned. Great!
Setting a default Locale
Well, almost great, but not completely. The problem is that now the server’s locale decides which language will be returned. This is because a MessageSource always needs a Locale parameter to resolve a message. If none can be found, Spring falls back to Locale.getDefault(). I have two problems with this:
You never know how the system locale will be set in your production environment running docker containers on Kubernetes in AWS. My guess is that it will be English, but I won’t count on it.
Far more people speak English than German.
For this reasons it’s better to use English as default language and let the client decide which language it can accept. The former can be configured by setting the default Locale, preferably in the messageSource method:
@Bean public MessageSource messageSource() { Locale.setDefault(Locale.ENGLISH); ReloadableResourceBundleMessageSource messageSource = new ReloadableResourceBundleMessageSource(); messageSource.addBasenames("classpath:org/springframework/security/messages"); return messageSource; }
The latter is achieved by setting the Accept-Language header in the client. This changes the request to:
$> curl -u user:wrongPassword http://localhost:8080 { "timestamp":1503381723115, "status":401, "error":"Unauthorized", "message":"Bad credentials", "path":"/hello" } $> curl -u user:wrongPassword -H 'Accept-Language: de-DE' http://localhost:8080/hello { "timestamp":1503383940064, "status":401, "error":"Unauthorized", "message":"Ungültige Anmeldedaten", "path":"/hello" }
There are a lot of languages already shipped with Spring Security. If yours is missing or if you want to change some translations, you can easily do this by following these steps:
copy the english message.properties file from Spring Security to your project.
translate or change the messages you’re interested in.
In your messageSource method, add the new properties file to your message source.
Shortcomings
Remember that we also tried to access the hello resource without any authentication in our first example? Let’s try that again using the Accept-Language header:
$> curl -H 'Accept-Language: de-DE' http://localhost:8080/hello { "timestamp":1503383125672, "status":401, "error":"Unauthorized", "message":"Full authentication is required to access this resource", "path":"/hello" }
Sad but true, this is a shortcoming of Spring Security’s localization. The reason is that the “Bad credentials” message is returned by AbstractUserDetailsAuthenticationProvider from spring-security-core, while the “Full authentication required” message is returned by ExceptionTranslationFilter from spring-security-web. spring-security-core ships with message bundles, and therefore can be localized using a MessageSource. The error messages in ExceptionTranslationFilter are hard coded with no way of using a MessageSource for localization. I think this should be configurable using resource bundles the same way as it is for the messages from spring-security-core. For this reason I created a pull request for Spring Security that will hopefully be merged soon.
Conclusion
By loading Spring Security message bundles using a MessageSource it is pretty easy to add localization to Spring Security error messages. One thing to look for is how the default system Locale is involved while determining the language for localization. My suggestion is to make sure the default is English and let the client decide explicitly using the Accept-Language header. Furthermore, there are still some messages in Spring Security that cannot be localized this way, but hopefully will be in the future.
The post Localization of Spring Security Error Messages in Spring Boot appeared first on codecentric AG Blog.
Localization of Spring Security Error Messages in Spring Boot published first on http://ift.tt/2fA8nUr
0 notes