#cosplay svg
Text

For my Horikawa Cosplay i recreated the pattern our lovely singing swordbois have on their collar. It really helped that i stared a lot at the selfies from all the actors and noticed that some have a different section of the patterned fabric. Sadly not enough was visible to made a fully repetitive file. So the file i made is only repetitive in the vertical. I also didn't cut the flowers off that no longer fit on the collar for the seam allowance.
You can download that file here. It includes a svg, dxf and png file of the pattern. The file also contains the ones i changed a little bit with a thicker rim around the flowers for the Suishinshi of my cosplay group. But its just the part that is visible on the collar.
You can use these files for free. If you do - it would make me really happy when you can show/link me a picture of your creation. ♥
Notes:
When you use this pattern make sure you change it to the right section for your sword men like in the picture above. The pattern repeats with the flower at the bottom right corner - it matches up with the cut out in the flower in the top right corner.
If you have some difficulties with the file you can ask me for help.
#touken ranbu#toumyu#srs22#shinken ranbu sai 2022#cosplay svg#project: matsuri swords#toukenranbucosplay#刀剣乱舞
11 notes
·
View notes
Text

9 Stitch Grinch Christmas Png Bundle
#Stitch Png#Stitch Svg#grinch png#grinch clipart#grinchmas png#xmas grinch#christmas png#merry grinchmas#grinch svg#character cosplay#cartoon character#cartoon sublimation#xmas print
1 note
·
View note
Text


//ooc; fuck it, have a mun-day post bc i just finished my homemade YJ jacket (Wiskayok High and Queen of Hearts patches from the-little-nest.com, Yellowjackets logo SVG file for Cricut from unicornhardt on Etsy)
hold onto your butts bc frozen jackie cosplay is coming in a few weeks
12 notes
·
View notes
Text
I made a tribute IWTV crew teeshirt
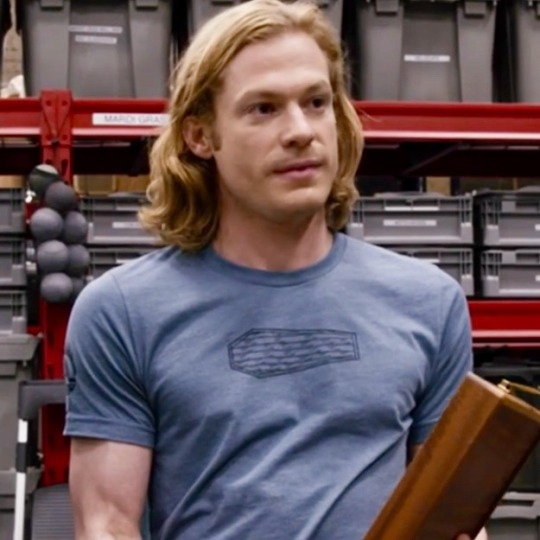

In the official Behind the Scenes documentary, Sam wears a slate blue teeshirt with a coffin drawing on the front, which I really liked, so I did a bit of investigating. It turned out that this was the "crew shirt" for the show - a promo item made and distributed to cast and crew only. Usually these are pretty tacky affairs with just the show logo on a tee or trucker cap, but I really liked the subtlety of this one - it looks like it does have the show name on the sleeve and a bit of text on the back that can't be read (my guess is maybe "Memory is a Monster"?), but mostly, I was into the coffin drawing. I did some cursory searches on eBay but with NDAs these days, I didn't really expect to find anyone selling theirs. So if I wanted one, I'd have to make one myself!

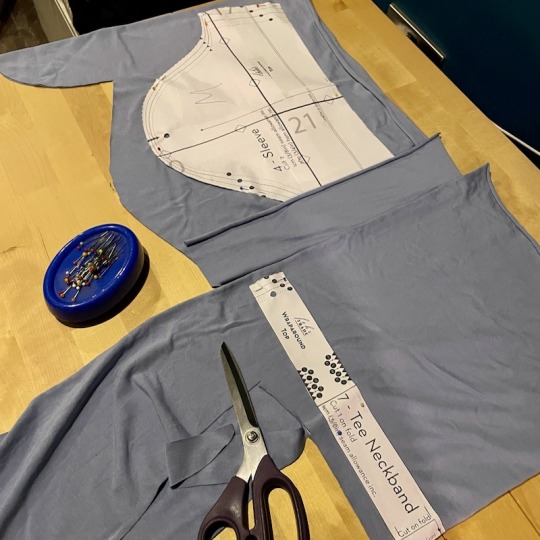
Since I sew, it was honestly easier to just make myself the base tee rather than buy one. I started with the fabric, using this "Powder blue" bamboo jersey from Textile Express. It's not a perfect match, but it's close enough for me and it's light enough that the black coffin stands out.
For the pattern, I used the Fehr Trade Versatili-Tops pattern, because I liked that it would give it a little something extra than just a standard teeshirt (there's no side seams!).
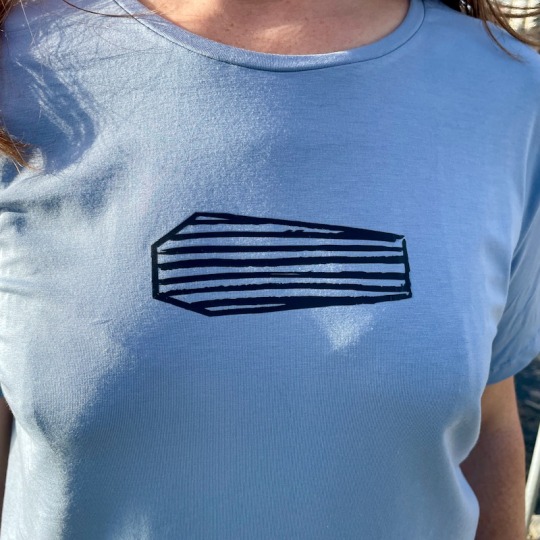
The next step was to design and cut the coffin detail. The only thing I really had to go on was the scant footage from the Behind the Scenes videos since the graphic was never used in any official promotion material. So I had to recreate the coffin from scratch, using Adobe Illustrator and some rough ink brushes to make it look hand drawn.

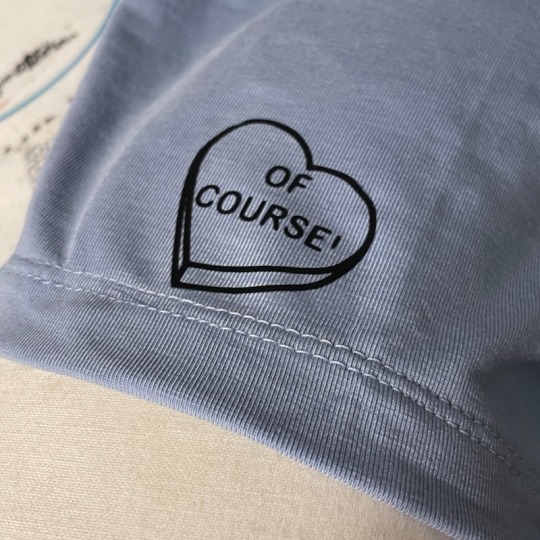
Jacob shared a quick little doodle of Louis ahead of the AMA session on Reddit back in November, and someone on Twitter took his Louis doodle and did Lestat and Claudia in the same style, which I absolutely love (and I wish I took note of who it was that did it so I could attribute - message me if you know!). So I turned this into a vector, as well as recreating the "Of Course!" heart that's one of the most used reactions on my favourite vampire Discord server, and cut these out on my Silhouette Cameo machine in black matte heat set vinyl. I placed the coffin on the front chest, in roughly the same placement as the inspiration tee, with the doodle heads on the right sleeve and "Of course!" on the left sleeve.

I absolutely love how it turned out, and is a totally one-of-a-kind tribute to the show. I have no aptitude for the skill involved in creating fan art or fanfic, and I'm not really into cosplay, so this is a way for me to express my love of the show in my way.
And still look like a fairly normal person (joke's on you - I've never been normal!).
PS: if anyone else has access to a Silhouette or Cricut type cutting machine and wants the svg files, let me know and I'll put them up somewhere to download
#iwtv#interview with the vampire#iwtv 2022#iwtv fandom#iwtv fanart#sewing#sam reid#amc interview with the vampire#i sew my own clothes#fehrtrade#textile express
102 notes
·
View notes
Text


so i taught myself blender. hand made a vector/svg version of the emblem. cross referenced fonts with the full size emblem to figure out the exact font. and put it all together to 3d model the piece for the back of the mask . for a cosplay i decided to do yesterday. for a con that is in less than two weeks
#genloss#LET ME BE PERFECTLY CLEAR: I HAD NEVER TOUCHED A 3D MODELING PROGRAM BEFORE TODAY. I LEARNED THIS FROM SCRATCH#IT TOOK LIKE 8 HOURS
25 notes
·
View notes
Photo


It took me till Free-cam to realize this little guy is legit in the game, and sitting in front of the mural.
Anyways, this is a sudo alert post that I’ve got all the “Discord Emoji’s” done and window clings for them as well. Full style stickers on the other hand, only two of them are done. Pepp’s hair in the pissed emoji is refusing to clear off the lineart so I can’t cheat the details by just hiding it under the lineart and I’m letting it sit for a while.
"Hi-Fi SVG's for all your Cosplay Needs"
16 notes
·
View notes
Text
Blender Tutorial: Extracting Meshes
Before I continue with this tutorial, I want to preface this by saying that I am by no means an expert with Blender. I've learned just enough to do the things I need to do, but I'm not experienced enough to do troubleshooting, especially across different versions of Blender. You'd be better off asking Google.
This tutorial was done in Blender 3.4.1.
With the disclaimer out of the way, let's get onto the tutorial! The models I'll be using in this tutorial are for my Horizon Zero Dawn / Horizon Forbidden West cosplay, but you can perform these steps with any model you have your hands on.
I will be going over the following topics:
Importing your mesh
Scaling your mesh
Splitting your mesh into separate objects
Fixing missing faces in your object
Exporting your object
Read on after the cut for the rest of the tutorial!
Tips:
Save your Blender file as soon as you open it and save often
I am mostly using Blender's default key-binding. If you are not getting the same tools as I am, check your key-binding list under Edit > Preferences > Keymap. You can quickly search for a particular tool with the search bar on the right-hand side
Blender can only import meshes or object files. Make sure the format of the model you're working with is in this list
Collada (.dae)
Alembic (.abc)
Universal Scene Description (.usd, .usdc, .usda)
Scalable Vector Graphics (.svg)
Stanford (.ply)
STL (.stl)
FBX (.fbx)
gITF 2.0 (.glb/.gltf)
X3D Extensible 3D (.xed/.wrl)
Section One: Importing Your Mesh
When you open up a fresh Blender file, a cube will always be present. Take the time to get familiar with Blender and know how to pan (Shift+LMB), rotate (MMB), and zoom (scroll MMB) your view. You can also move, rotate, and scale the cube using the tools on the left side of the Viewport Window. Once you're comfortable,
Select the cube in the Viewport Window or its name in the Scene Collection window, and then delete it
You'll know when you've selected the cube when an orange outline appears around it.


Now that you have a blank working space, go ahead and import your mesh(es).
Select File > Import and choose the file type your model is formatted in
I am using FBX so I will import those meshes into my scene.


And just like that, your model is in Blender! Congratulations! I highly recommend renaming the hierarchies/objects in the Scene Collection window to keep things organized.
Double-click on the object in the Scene Collection window and type away
If your model has an armature (a 'skeleton' that moves your model) like mine, you'll need to click on the 'eye' icon next to each armature object to hide the bones


Take the time to save your work!
Section Two: Scaling Your Mesh
Unless you're the exact same height and proportions as your model, you will need to scale it up or down so that when you print your objects, they'll have a higher likelihood of fitting you.
Select a viewpoint on the coordinate frame so that your model is facing you

Switch to the Measure Tool

Measure out your height by: clicking and holding at a point on the 'ground plane' where the feet are standing on and releasing at your desired height
You can edit the location of the points by hovering over a point until a circle of arrows appears. Click and drag to their desired location.

Blender's default unit system is metric. If you don't work in metric, feel free to change the unit system by going to Scene Properties tab, then the Units section, and then select the system you wish to use.
If your model is not all in one mesh, I recommend starting with the head first so you can easily see when the model is at the desired height. Otherwise, continue onto the remaining steps.
Now that you have a reference measurement set up,
Select the object you wish to scale and go to the Object Properties tab

Type in a value in the Scale X, Y, & Z fields until the model reaches the reference measurement

Note the scaling values and input the same values into the remaining meshes

Wonderful! You've scaled your mesh to your proportions and you're ready for the next step. You can delete your reference measurement now by hovering over a point until the circle of arrows appear and hit 'Delete' on your keyboard.
Remember to save your work!
Section Three: Splitting your Mesh into Separate Objects
You're doing great! I recommend a pat on the back and some snacks because this section is the longest one. Give your eyes a break and look at something 20 feet away for 20 seconds or give your body a stretch with a stroll around the neighborhood; whatever you need to do to take care of yourself.
Prep your work area by expanding all of the hierarchies/objects to reveal the hierarchies/objects nested inside it. Do this by clicking on the small arrow on the left side of the name of the hierarchy/object. The arrow will turn downwards when it is expanded.

Grouping meshes into subgroups is a common practice to keep things a manageable size, if your mesh is all in one piece then you don't need to do this.
Hide/unhide objects to see which meshes have the items you want to extract. Hide meshes that don't have what you want, so that you can stay focused on what you need to work on.
Once you're ready, select the first mesh you want to extract objects from. I'm choosing Aloy's bracers because I want to separate the left from the right side.
Hit 'Tab' on your keyboard

Your selected object will now show a constellation of dots (vertices) and lines (edges). The areas within each border of vertices and edges are called faces.
You'll also notice that you've been switched to Edit Mode (highlighted in image 14). Additionally, there are three small squares next to the object dropdown bar. Those are filters for which objects you'd like to select (vertex, edge, face from left to right). This means if you want to only select edges, activate the edge selection.
Position the part of the mesh you wish to isolate in your Viewport Window so that it's easier to make selections

Switch to the Face Select mode
Select any face
Hit 'L' on your keyboard


This opens the 'Select Linked' tool which will automatically select any adjacent/linked faces that are touching the face you selected. Keep the delimiter type as Seam for now.
The Select Linked tool isn't perfect. There will be faces that aren't automatically recognized. Unselected faces appear as grey while selected faces are orange.

To add additional faces to your selection,
Use 'Shift + LMB' on a face
Hit 'L' to select more linked faces
If you can tell which faces will need to be selected, you can select all those faces first and then use the linked tool.
Select all desired faces with 'Shift + LMB'
Hit 'Ctrl + L' to perform the link operation on all selected faces


Once you're confident with your selection,
Hit 'P' (Separate Tool) and then 'S' (separate by selection)

You should see your selection split off into its own object to which you can manipulate separately from the rest of the mesh. Rename your new object to keep track of it and perform these steps for the rest of the items you need.
When you're done with this mesh, hit Tab to go back to Object Mode, select a different mesh, and repeat the process.

Save! Save! Save!
Section Four: Fixing Missing Faces in Your Objects
You've done it, you've separated out all the objects you need. It's late now and time doesn't feel real, but you're happy that you're finally done. Wait - what's that?

Sometimes meshes are too close together to split into objects neatly. Or sometimes we make mistakes and missed that group of faces hidden behind another object. It happens. Here's how to fix those issues without having to hit 'Ctrl + Z' and undoing all of your great work.
Scenario 1: Missed Faces During Extraction
You've noticed some floaters left behind! However, you can tell which object they're supposed to belong to because you've been doing really well renaming and organizing your objects (right?).
To make your object whole again,
Separate the floating faces as their own object
Exit Edit Mode and return to Object Mode
Select the floating faces object and the object you wish to join it to with 'Ctrl + LMB' ('Shift + LMB' will select everything between the two objects listed in the Scene Collection as well, so be careful!)
Hit 'Ctrl + J' (Join Tool) on your keyboard
Special Note: this only works when your cursor is within the Viewpoint window, not the Scene Collection window
Second Note: objects will merge into the last object you select. So if you wanted to merge PartA and PartB but wanted to preserve the naming of PartA, select in this order PartB > PartA


And voila! Your object doesn't have any missing faces and your floating faces have been reunited with their greater being.
Scenario 2: Open Gaps from Overlapping / Shared Faces
Sometimes you can do everything right and your objects will still have open faces. That's okay! We can still fix that. Take one of the light details in Aloy's skirt as an example. This component of the model just didn't come with the back side filled in.

To fix that,
Switch to Edit Mode and switch to the Edge select mode
Hold 'Alt' and select an edge along the opening with 'LMB'
Hit 'F' (Fill Tool and to pay respects) and the opening should disappear


Some troubleshooting tips:
If you're having trouble selecting your loops, try these methods: Select Loops — Blender Manual
Otherwise, you may have to manually select the edges/vertices
If a face is being filled in unexpected ways, fill in the faces piecewise to help smooth out any strange assumptions Blender is making
Save like your life depends on it!
Section Five: Exporting Your Object
You're at the home stretch! This part is a breeze!
To export your object as its own file, simply
Select the object
Go to File > Export and then select your preferred format
Enable the "Selection Only" checkbox in the 'Include' section of the Options
Name your file and hit Save

Finished!
Congratulations! You've made it to the end and you now have a host of parts to print or use in different projects. Additionally, you're now able to hide and view parts of your model that you wouldn't have otherwise seen.
If this tutorial helped you out, please like or reblog to spread the word! Blender is a beast of a program, so spread the knowledge and help the next person create big things.
#blender#blender3d#tutorial#how to#cosplay#horizon zero dawn#horizon forbidden west#aloy#shield weaver amor#apparently hitting CtrlZ while writing a post undoes way too much stuff#i spent way too long on this
2 notes
·
View notes
Text

Cosplay SVG, Cosplay Characters Play Costume Anime Job Furry SVG. Get here: https://wildsvg.com/product/cosplay-svg-cosplay-characters-play-costume-anime-job-furry-svg/ #Wildsvg #Svg #Svgfile #SvgTrending #Svgfree
Cricut #cricutprojects #cutfiles #cutfilesforcricut #cricuthacks #cricuttutorials #cosplaysvg
#Wildsvg#Svg#Svgfile#SvgTrending#Svgfree#Cricut#cricutprojects#cutfiles#cutfilesforcricut#cricuthacks#cricuttutorials#cosplaysvg
0 notes
Text
Bluey In Wonderland SVG, Funny Bluey Characters Cosplay SVG,Alice in Wonderland SVG PNG Cricut
Bluey In Wonderland SVG, Funny Bluey Characters Cosplay SVG,Alice in Wonderland SVG PNG Cricut
Hey there! These design files are perfect if you’re looking to create a unique logo or graphic. Give them a try! , Discover clip art that offers both uniqueness and allure, with the highest quality assured for your projects. Step right in! Our versatile collection is perfect for custom t-shirts,…
0 notes
Text

Groot, the lovable tree-like creature from Marvel's Guardians of the Galaxy, has captured the hearts of fans with his limited vocabulary and gentle nature. With his iconic catchphrase "I am Groot," Groot has become an endearing and iconic character in the Marvel universe.
If you're a fan of Groot and looking for SVG (Scalable Vector Graphics) files related to this beloved character, look no further than the website freesvg.us. This platform offers a wide range of high-quality Groot SVG files that can be easily downloaded and used for various creative projects.
Freesvg.us is a user-friendly website that provides a seamless browsing experience, making it easy to find and access the Groot SVG files you need. Whether you're a graphic designer, a cosplay enthusiast, or simply a fan looking to add some Groot charm to your projects, freesvg.us is the perfect destination.
Explore the extensive collection of Groot SVG files on freesvg.us and let your creativity blossom. Whether you're creating personalized merchandise, designing digital artwork, or adding a touch of Groot's unique personality to your projects, freesvg.us has got you covered.
Join the community of Groot fans and bring this lovable character to life in your own unique way. Visit freesvg.us today and let your imagination grow with the power of Groot.
0 notes
Link
Funny Candy Security Halloween Costume SVG PNG Cutting Printable Files
0 notes
Link
0 notes
Text


Free! , rin matsuoka
Like or reblog if you save it.
#anime#anime icons#icon anime#anime cosplay#anime style#anime girl#best anime#anime boy#anime icon#animedrawing#download creativity free icons (svg#rin matsuoka#free! iwatobi swim club#free! headcanons#free! icons
76 notes
·
View notes
Text


ZERO TWO ICONS
REBLOG OR LIKE IF U SAVE!!
#zero two#anime gif#anime quotes#anime series#anime bios#anime#anime girl#anime aesthetic#animecore#anime cosplay#animefigure#darling#Darling in the Franxx#code:002#icon anime#anime icons#icons#amazing creativity free icons (svg
95 notes
·
View notes


Last Seen Blogs

tralco71
Untitled

oxis-ondelivered
OXI !!

bjochem-blog
Kerkelijke Bouwkunst

spectraficrequest
Spectra's Fanfic Requests

wake15
AI15