#creating new sharepoint site
Explore tagged Tumblr posts
Visit Tumblr Blog
Explore Tumblr blogs with no restrictions, modern design and the best experience.
Last Seen Tumblr Blogs


Fun Fact
Mobile US users spent an average of 115.8 minutes on Tumblr app monthly.
Text
#sharepoint consulting#sharepoint creation#creating new sharepoint site#sharepoint experts#microsoft 365 intranet#uses for sharepoint#sharepoint consulting services#sharepoint support#sharepoint intranet site#sharepoint companies#copilot ai#microsoft copilot#Sharepoint Lookbook#sharepoint technology#sharepoint design#sharepoint homepage design#sharepoint internal website#sharepoint intranet#company intranet sharepoint#building an intranet in sharepoint#sharepoint designer#sharepoint collaboration#sharepoint company#sharepoint services#sharepoint intranet design
0 notes
Text
One of the problems that came up this week is actually a problem that came up in December.
On December 15th we got a warning about disk health in a server; there is a drive that is at risk of failure.
A ticket was created for me to create a quote to replace the drive.
There was no part number associated with the ticket, and because of the type of server, there was no easy way to access configuration information online and our hardware documentation is a disaster (I have thought it was a disaster since the acquisition; I set up hardware documentation at the old job specifically to avoid issues like this and now all that documentation is gone because we didn't keep any licenses of the old job's CRM). This was not a situation where I could find a part number.
I contacted Tech Alice and asked her to check the part number on the server. Alice reported back that because the drive was part of a RAID array, she couldn't get the part number. She recommended asking Bob, and put her time entry on the ticket.
I contacted Tech Bob and asked him if he could find the part number for the drive on the server; Bob also reported back that he could not find a way to get the part number from the server, he recommended that Charlie collect the part number when he went onsite. Bob added his time to the ticket (still my ticket) and added the status "onsite needed."
Now it is December 23rd. I have messaged Charlie and asked him to check the part number when he is onsite and have added him to the ticket. I'm out of the office today, Charlie is out of the office next week. Charlie does not remember to look at the part number when he is onsite. It is the end of the year.
Now it is January 15th. We lost the first week of the year to assessments, and the second week of the year to the state and our clients being on fire - people were unable to go onsite because of all of that. Charlie is going onsite. I remind him to get the part number when he is at the client site. When he is at the client site he alerts me that actually he is at their other location, not the location with the server.
Now it is January 27th. Charlie is going back onsite, he is on my ticket, the ticket is set to onsite needed. I remind Charlie that we need the part number. Charlie does not remember.
Now it is February 6th. We have created a whole new ticket for Charlie with the *EXPRESS STATED PURPOSE* of going onsite to collect a part number for the failing drive in the server. Charlie marks the ticket as "waiting materials" and makes a note that he can't replace the drive until we order the part.
Now it is February 7th. We have explained, in writing, in Charlie's ticket that we can't order the part until he goes onsite and collects the part number, because we cannot get it because the server won't report the part number if it's in a raid array for reasons that I'll be honest I do not understand.
Now it is February 14th. Charlie closes his ticket and he and Bob pull me into a meeting. The server at the client site is so old they're not sure it's a good idea to replace the drive. Charlie has recommended that the project team quote a migration to sharepoint, which the client has expressed interest in in the past. Bob makes a note of this in my ticket. But I do not close my ticket. I do not close my ticket because I know there must be some fuckery coming. So I put my ticket to "on hold" and set it to reactivate on March 10th so that I can follow up with the project team and see if the migration project is making any progress or if we still need to replace this drive because the server drive is still failing.
It is March 13th. I have a bad week. A very bad week. My manager looks at my open tickets and asks why on earth I still have a server drive failure ticket open from December. I explain that I only have it open to follow up on the migration because the technician suggested server replacement but if there wasn't progress we should still quote a drive, but I still didn't have the part number.
My manager puts me in a chat with me, Charlie, the Project team lead, my manager, and the service team lead and asks what the fuck is going on. I paste Charlie's last update on my ticket and say that I'll be happy to quote a hard drive but I still don't have the part number.
Charlie says "Oh, I put the part number in the ticket" and pastes a photo of a drive (low light, low contrast, and blurry but with a visible part number) in the chat.
"Great!" I say, and immediately assemble a quote and find stock. Then i look back at my ticket. "But I'm actually not seeing the part number on this [my] ticket. Where was that again?"
Charlie has put the part number on his ticket, which I was never on, which he closed.
"Ah, okay. I see."
And here's where the different standards that all of us are used to using work against us.
My old job built RAID servers all the fucking time. It was totally standard, totally easy, totally sensible, and I always knew to double the number of drives we needed for the storage we got because we'd be mirroring. Because we'd be using RAID 10. Because it's robust and can take a lot of failure. A drive failing in a server configured with RAID 10 is not ideal, but it's also not a drop-everything and panic emergency. I *still* wouldn't want to leave it two months in an ideal world but I can't drive up to San Francisco and get a part number, and sometimes the world literally catches on fire.
However, these new folks use RAID 5.
A drive failing in a server configured with RAID 5 *IS* a drop everything emergency, because if one drive goes down the whole system goes down until you can replace the drive and rebuild the array, and because RAID 5 is slower than 10, this can take a very, very long time depending on how much data there is. And if *two* drives fail the data is *gone*
So.
Whose job is it to get the part number, and whose job is it to know that the server is at imminent risk of failure?
Well, now I have properly reconfigured my internal alarms about any failing server drive, but I don't understand why none of the three technicians who worked on this ticket with me didn't at any point say "hey this is an emergency" (Alice is from my old team and used to RAID 10 also, I'm willing to give her a pass) and I'm *really* confused why Bob and Charlie would recommend *not* replacing a drive in a server that is that close to failure.
(And again, I just didn't know. Believe me, I am never, ever going to shut up about drive warning tickets in the future)
And, the thing that scares the shit out of me and my manager and part of the reason why this has been a bad week and I'm having stressful conversations: What if I had just closed that ticket instead of letting it reactivate to follow up on? What if I had just marked it as done when Charlie gave me the update? It wouldn't have been an old-ass ticket in my queue that my manager flagged, it would have been a note in an after-action report when the client's server crashed.
(The client has the quote now with the statement "this failing drive puts your server at risk of failure and we strongly recommend replacing" but they haven't approved it yet because they're really cheap so I'm going to have to send it again and say "this is a mission critical part that you need to replace; your server is at risk as long as the drive is not replaced.")
So. The boss is asking "why is procurement taking so long" and really, now that I'm thinking about it - because he brought it up - how much of this really IS supposed to be my job?
2K notes
·
View notes
Text
If you're new to SharePoint or have recently transitioned from another platform, logging in for the first time can seem confusing. Whether using it for document collaboration, internal portals, or project management, understanding how to access SharePoint is the first step toward using it effectively.
This guide walks you through the login process and helps you understand the essentials—perfect for businesses working with a SharePoint app development company or those undergoing a migration.
To begin, you'll need a Microsoft 365 account or a company email linked to SharePoint—Log on to https://www.office.com with your credentials. Once logged in, click the SharePoint icon to access your company's SharePoint environment.
Depending on your setup, your SharePoint home page might display team sites, communication sites, or a custom dashboard created by your SharePoint solution provider. If your company uses SharePoint integration services, your experience might be customized to specific workflows or tools such as Microsoft Teams, Outlook, or OneDrive.
Sometimes, businesses transition from older systems. In such cases, logging in after a migration may require updated credentials or links. Consult your internal IT team or a trusted SharePoint migration services provider to ensure smooth access if unsure.
Once logged in, explore basic features like document libraries, lists, calendars, and internal announcements. Bookmark your frequently visited SharePoint pages for quicker access in the future.
The SharePoint mobile application can be obtained from the App Store or Google Play. Remotely access the same services with your Microsoft 365 account. A custom mobile solution might also be available for enhanced functionality for companies working with a SharePoint app development company.
In conclusion, logging into SharePoint is simple once you know where to start. With the proper credentials and guidance, you'll have access to powerful collaboration tools designed to make your workflow more efficient. Whether your business is new to SharePoint or is working with experts in SharePoint integration services, this step-by-step guide ensures that you're on the right track from day one
#sharepoint consulting services#sharepoint developers#sharepoint app development company#sharepoint development service#sharepoint migration services#sharepoint expert consultant#sharepoint integration services#sharepoint migration consultant#sharepoint service provider#sharepoint solution provider
0 notes
Text
Automating SharePoint Site Creation with Power Automate
Recently, I had the opportunity to work on an exciting project for one of my clients. They required an automated process for creating SharePoint sites dedicated to their projects. The goal was to streamline the site creation process while ensuring consistency and governance across all project sites. The Requirement The client wanted a self-service approach where users could request a new…
0 notes
Text
The Ultimate Guide to SharePoint Customization in 2025
Introduction
Microsoft SharePoint has evolved into a powerful platform for enterprise content management, collaboration, and digital workplace solutions. While SharePoint offers a wide range of out-of-the-box features, organizations often require SharePoint Customization to meet their specific business needs. Whether it’s building workflows, developing custom web parts, or personalizing the user interface, customizing SharePoint can significantly enhance productivity and user engagement.
In this article, we’ll delve deep into the technical aspects of SharePoint customization, exploring various options for SharePoint Online Customization, strategies for SharePoint Intranet Personalization, and how to develop SharePoint Custom Solutions tailored to unique enterprise requirements.
Why Customize SharePoint?
SharePoint's core strength lies in its flexibility. However, standard features might not align perfectly with your organizational workflow, compliance needs, or branding guidelines. Customization helps:
Streamline business processes through automated workflows.
Improve UI/UX with personalized dashboards and navigation.
Integrate third-party systems and data sources.
Reinforce company branding on intranet portals.
Types of SharePoint Customization
There are two primary methods of customizing SharePoint:
1. No-Code/Low-Code Customizations
These are built using SharePoint's built-in tools and require minimal developer effort:
Power Automate Workflows: Automate business processes.
Power Apps: Create custom forms or apps.
Modern Web Parts: Use reusable web parts like document libraries, calendars, and custom lists.
SPFx (SharePoint Framework): A low-code development model to build client-side extensions using React/TypeScript.
2. Full-Code Customizations
Ideal for complex requirements where out-of-the-box features fall short:
Custom Web Parts and Extensions
Custom APIs using Azure Functions or Azure Logic Apps
Integration with Line-of-Business (LoB) systems
Advanced branding using PnP templates and CSS/HTML
SharePoint Online Customization: Best Practices
SharePoint Online Customization has unique challenges compared to SharePoint Server, primarily due to Microsoft 365's cloud-first model and continuous updates. Here are some best practices:
1. Use the SharePoint Framework (SPFx)
SPFx is the recommended way to create modern web parts and extensions in SharePoint Online. It leverages open-source tools like Node.js, Gulp, and React.
2. Avoid Farm Solutions and Full-Trust Code
These are deprecated in SharePoint Online. Use sandboxed solutions or client-side scripting.
3. Leverage Power Platform
The Power Platform (Power Automate, Power Apps, Power BI) is tightly integrated with SharePoint Online, allowing low-code solutions for automation, analytics, and UI improvements.
4. Use PnP Provisioning Engine
The Patterns and Practices (PnP) Provisioning Engine allows you to define custom site templates and provisioning logic using XML or JSON configurations.
SharePoint Intranet Personalization Techniques
An intranet is often the central hub of internal communication, and SharePoint Intranet Personalization ensures that it remains relevant and user-focused. Here’s how you can technically personalize SharePoint intranets:
1. Audience Targeting
Modern web parts like Quick Links, Hero, and News support audience targeting. This allows you to display content based on Azure AD groups.
Technical Setup:
Enable audience targeting in web part settings.
Assign Azure AD groups to the content block.
2. Personalized Dashboards with Microsoft Graph
Microsoft Graph API can fetch user-specific data (e.g., documents, emails, tasks) and render it dynamically on intranet pages.
Use Case:
Show recent documents or pending tasks for the logged-in user.
3. Custom Navigation and Branding
Use the SharePoint Look Book or create SPFx extensions to control headers, footers, themes, and navigational layouts.
4. Localization and Language Variants
Create multilingual experiences using SharePoint’s multilingual publishing capabilities. Customize content and labels based on user’s preferred language.
Developing SharePoint Custom Solutions
Developing SharePoint Custom Solutions often involves integrating SharePoint with enterprise systems like ERP, CRM, or HR platforms. Here’s a breakdown of technical considerations:
1. External Data Integration via Business Connectivity Services (BCS)
BCS enables the integration of external data sources like SQL, SAP, or custom APIs into SharePoint lists.
2. Custom Forms with Power Apps
Replace InfoPath forms with Power Apps. Customize list forms or create standalone apps that can be embedded in SharePoint pages.
3. Custom Connectors
Use Azure API Management to create custom connectors that integrate third-party platforms like Salesforce, ServiceNow, or SAP with SharePoint.
4. Security and Governance
All custom solutions must adhere to governance policies. Use Microsoft 365 Security & Compliance Center to monitor and control data access.
SEO Optimization Tips for SharePoint Portals
Customizing SharePoint for intranet use doesn’t mean ignoring SEO, especially for public-facing SharePoint sites.
Tips:
Use H1-H5 tags properly in custom master pages or modern site templates.
Optimize images with ALT text and descriptive filenames.
Ensure fast load times with optimized SPFx packages.
Use metadata and page descriptions for better indexing.
Add breadcrumb navigation using SPFx components or PnP libraries.
Common Pitfalls to Avoid
Over-customizing can make migration and updates difficult.
Ignoring mobile responsiveness in custom web parts.
Lack of proper version control in SPFx solutions.
Hardcoding values instead of using dynamic tokens or configuration settings.
Conclusion
SharePoint Customization offers powerful capabilities for building enterprise-grade solutions that are tailored to your business workflows and employee experience. Whether you're enhancing collaboration through SharePoint Online Customization, improving user engagement with SharePoint Intranet Personalization, or building complex SharePoint Custom Solutions, understanding the technical framework is key to long-term success.
Customizing SharePoint the right way ensures scalability, maintainability, and a strong return on investment.
0 notes
Text
How to Integrate PowerApps with SharePoint: A Step-by-Step Guide

Microsoft PowerApps is a powerful tool that enables users to create custom business applications without extensive coding knowledge. When integrated with SharePoint, PowerApps can enhance productivity by streamlining workflows, automating processes, and improving data accessibility. In this guide, we will explore how to integrate PowerApps with SharePoint effectively. PowerApps Online Training
Why Integrate PowerApps with SharePoint?
Integrating PowerApps with SharePoint offers numerous benefits, including:
Seamless Data Management: Users can interact with SharePoint lists and libraries directly from PowerApps.
Enhanced User Experience: PowerApps provides a modern UI to improve data visualization and usability.
Workflow Automation: Streamline business processes by integrating Power Automate with PowerApps and SharePoint.
Mobile Accessibility: Access SharePoint data on mobile devices through PowerApps. PowerApps Online Training
Prerequisites
Before integrating PowerApps with SharePoint, ensure you have:
A Microsoft 365 account with access to SharePoint Online.
Appropriate permissions to create and modify SharePoint lists.
A PowerApps license.
Basic understanding of PowerApps and SharePoint functionality.
Step-by-Step Guide to Integrating PowerApps with SharePoint
Step 1: Create a SharePoint List
Navigate to SharePoint Online and go to the site where you want to create a list.
Click on Site Contents > New > List.
Provide a name for your list and define the necessary columns (e.g., Title, Description, Date, Assigned To, etc.).
Click Create to save the list.
Step 2: Create a PowerApps App from SharePoint
Open PowerApps (https://make.powerapps.com/).
Click on Create and select Start from SharePoint.
Choose SharePoint Online and enter your SharePoint site URL.
Select the list you created in Step 1.
Click Connect to allow PowerApps to retrieve the list data.
Step 3: Customize the PowerApps Form
Once the app is created, PowerApps will generate a default form.
Use the PowerApps Studio to customize the form layout, add controls, and modify fields.
Drag and drop fields to rearrange them and apply formatting options.
Use formulas and expressions to implement logic (e.g., validation rules, calculated fields, etc.).
Click Save and Publish to make the app available.
Step 4: Embed PowerApps in SharePoint
Navigate to your SharePoint list.
Click on Integrate > PowerApps > Customize Forms.
Select Use a Custom Form and choose the PowerApps app you created.
Click Publish to embed the app into the SharePoint list.
Step 5: Test and Deploy the Integration
Open the SharePoint list and test the PowerApps form.
Add new records, update existing entries, and verify the data flow.
Share the PowerApps app with team members to allow collaboration.
Monitor performance and make necessary adjustments.
Best Practices for PowerApps and SharePoint Integration
Optimize Performance: Use delegation in PowerApps to handle large datasets efficiently.
Secure Data Access: Use SharePoint permissions to control user access.
Leverage Power Automate: Automate tasks such as notifications, approvals, and data syncing.
Regular Maintenance: Periodically review and update your PowerApps application to improve functionality and security.
Conclusion
Integrating PowerApps with SharePoint is a game-changer for businesses looking to enhance their workflow automation and data management. By following this step-by-step guide, you can create a powerful, user-friendly application that improves collaboration and efficiency. Start integrating today and unlock the full potential of PowerApps and SharePoint!
By optimizing PowerApps and SharePoint together, organizations can create a seamless digital workspace that drives productivity and innovation.
Visualpath is the Leading and Best Institute for learning in Hyderabad. We provide Power Apps and Power Automate Online Training. You will get the best course at an affordable cost.
Call on – +91-7032290546
Visit: https://www.visualpath.in/online-powerapps-training.html
#PowerApps Training#Power Automate Training#PowerApps Training in Hyderabad#PowerApps Online Training#Power Apps Power Automate Training#PowerApps and Power Automate Training#Microsoft PowerApps Training Courses#PowerApps Online Training Course#PowerApps Training in Chennai#PowerApps Training in Bangalore#PowerApps Training in India#PowerApps Course In Ameerpet
1 note
·
View note
Text
Top 4 Expert Tips for Mastering and Customizing SharePoint Web Parts

Since the last two decades, SharePoint-based intranets have proven to be more than just file management tools for modern organizations. They act as centralized platforms to convey organizational objectives and visions to employees while empowering them to effectively connect, engage, learn, and perform better in their roles.
However, this blog talks about the fundamental building blocks of your intranet, i.e., SharePoint web parts. Indeed, as a modular component, web parts in SharePoint empower organizations to improve information dissemination, streamline operations, and customize user experience. Despite their benefits, figuring out how to effectively utilize and customize them remains challenging for many. Here are a few tips to maximize your SharePoint investment.
Tips to Effectively Use and Customize SharePoint Web Parts
Choosing the right set of web parts: An intranet is a collection of different sites having different purposes. It can be a communication site facilitating internal communication within the organization, while another can be a project site helping teams to collaborate on tasks, access project summaries, and track progress. Certainly, choosing the right set of web parts becomes crucial to fulfilling the whole purpose. You can have news, spotlight, alerts, and directory web part on the communication site to help employees stay updated with the recent and upcoming events or announcements. Similarly, adding quick links, counters, discussions, and a document library in a project site can help employees seamlessly collaborate on a project.
Leveraging custom web parts: While SharePoint out-of-the-box solution comes with standard web parts with limited functionality, creating custom web parts allows users to target dedicated areas like user engagement, collaboration, and productivity. You can add new features, plan their design, or come up with an entirely new idea to enhance your overall intranet experience.
Fully leverage the customization options: The level of customization offered by SharePoint helps organizations reduce the cost of a dedicated IT team required to manage the solution. Certainly, you can customize the site layout, select a specific set of web parts, and arrange them accordingly using easy drag-and-drop features. It also allows users to add, edit, or modify fields, display lists or documents, or add filters to tailor the web part according to their requirements.
Choosing the right theme and design: Evidently, an intranet showcases your organization's branding, vision, and overall workplace culture. You can start by using only necessary web parts to avoid cluttering and following a consistent site layout across the intranet. Furthermore, deciding on the color palette, logo, and fonts and using brand imagery can help you represent your brand's visual identity and offer a more personalized experience to your employees.
Certainly, leveraging the same web part on different sites and with vibrant themes and layouts offers flexibility and power to create an intranet that is truly user-centric and aligns with the organizational requirements. Effectively utilizing the above suggestions would help your organization drive productivity, improve workplace collaboration, and foster a more connected workplace.
0 notes
Text
Controlling app access on a specific SharePoint site collections
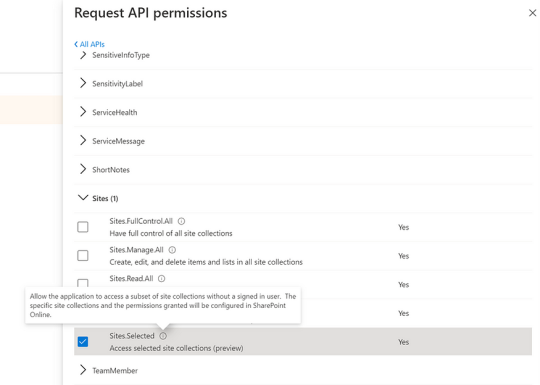
Imagine facing a significant challenge when your automation processes suddenly fail due to expired SharePoint secrets, interrupting access to a key SharePoint site and bringing operations to a halt. After reaching out to the IT team, they promptly replaced the outdated app in Azure Apps with a new one, generating fresh credentials — tenant ID, secrets, and Application (Client) ID. These credentials are vital for our automation workflows, enabling access to the SharePoint platform, including specific sites.
However, a new challenge arose when the IT team assigned the “Sites.Selected” permission under Microsoft Graph Sites. By default, this permission does not grant access to any SharePoint site collections unless explicitly configured. With only the “Sites.Selected” permission assigned, the application was denied access to the necessary SharePoint sites.
To ensure access to specific sites within SharePoint, explicit permissions need to be defined for each site. Both the IT team and your team need to collaborate and follow specific steps when setting up permissions for newly created applications.
In this post, I’ll outline these collaborative steps to help ensure full access to SharePoint sites moving forward.
Steps:
1. Azure App Setup (Initial Configuration)
Azure App Creation: The IT team creates the app in Azure AD and shares App name, App(Client ID), Tenant ID and Secrets with you.
Permission Assignment: The app is assigned the “Sites.Selected” permission. This does not automatically grant access to any SharePoint site but enables specific access to be configured later via the Microsoft Graph API.
2. App Attempts to Access SharePoint Site
App Request: The app attempts to access a SharePoint site collection (e.g., to read/write data).
Initial Denial: Since the app has only the “Sites.Selected” permission, access is denied to any SharePoint site unless permissions are explicitly granted.
3. Admin Grants Site Permissions (via Microsoft Graph API)
You’ve to make and share an API with IT team which SharePoint admin will call to provide access to a specific site(MSSP) with in the SharePoint.
API Call (POST /permissions): Following API will be called on Graph explorer by SharePoint admin:
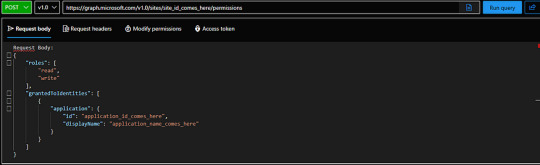
Replace Application ID and display name with the new App data shared by IT team. Get Site ID from IT team if it is handled by IT team, if it is handled by you team you can get it easily by making following API call on Graph Explorer.

Roles & Permissions: The request grants specific roles (e.g., “read” or “write”) for the SharePoint site, defining what actions the app can perform.
4. App Receives Access
Access Granted: Once the API call is successful, the app receives the necessary permissions (e.g write, read) for the specified SharePoint site.

This setup will surely give you required access, you can ask if any assistance is required.
Reference: Microsoft Documentation
0 notes
Text
6 SharePoint Migration Planning Tips For an Efficient Move
Migrating to SharePoint can be a complex process, but with careful planning, you can ensure a smooth transition. Here are six essential tips to help you prepare for an efficient SharePoint migration.
1. Assess Your Current Environment
Before migrating, take stock of your existing data and systems:
Inventory: Catalog all the content, sites, and custom applications you currently use.
Identify Redundancies: Look for duplicate or outdated files that can be archived or deleted.
Understand User Needs: Gather input from stakeholders to understand what features and functionalities are essential for them.
2. Define Your Migration Goals
Establish clear objectives for your migration:
Business Objectives: Determine what you hope to achieve, such as improved collaboration or enhanced data management.
Scope: Decide whether you’re migrating all content at once or in phases.
Success Metrics: Define how you will measure the success of the migration, such as user adoption rates or reduced access times.
3. Choose the Right Migration Tools
Select the appropriate tools to facilitate the migration process:
Microsoft Migration Tools: Consider using tools like SharePoint Migration Tool (SPMT) for simple migrations or third-party solutions for more complex scenarios.
Automation: Leverage automation features to reduce manual effort and minimize errors during the migration.
Backup Solutions: Ensure you have backup solutions in place to protect your data during the transition.
4. Create a Detailed Migration Plan
Develop a comprehensive migration plan that outlines each step of the process:
Timeline: Establish a timeline for each phase of the migration, including testing and go-live dates.
Resource Allocation: Assign roles and responsibilities to team members involved in the migration.
Risk Management: Identify potential risks and create contingency plans to address them.
5. Test Before the Full Migration
Conduct a pilot migration to identify any issues before the full-scale move:
Select a Sample: Choose a small subset of data to migrate first.
Evaluate Performance: Monitor the pilot for any errors, performance issues, or user feedback.
Adjust Accordingly: Use insights from the pilot to refine your migration strategy and address any identified problems.
6. Train and Support Users Post-Migration
Ensure users are prepared for the changes that come with the new system:
Training Sessions: Provide comprehensive training to help users understand how to navigate the new SharePoint environment.
Ongoing Support: Set up a support system for users to ask questions and report issues post-migration.
Feedback Loop: Encourage user feedback to identify areas for improvement and ensure continued engagement.
Conclusion
Migrating to SharePoint doesn’t have to be daunting. By following these six planning tips, you can create a structured approach that minimizes risks and maximizes efficiency. A well-executed migration will lead to improved collaboration and productivity, paving the way for a successful transition to SharePoint.
0 notes
Text
#Sharepoint consultant#sharepoint design#sharepoint lookbook#lookbook sharepoint#uses for sharepoint#sharepoint intranet#sharepoint onboarding app#sharepoint consulting services#onboarding sharepoint#sharepoint creation#creating new sharepoint site#intranet consultants#sharepoint features#sharepoint solutions#sharepoint collaboration#sharepoint document manager#sharepoint technology#Sharepoint online lookbook#intranet design service#sharepoint support
0 notes
Text
How to Customize the News Web Part in SharePoint Online?
The SharePoint modern news web part is a useful way to share announcements and updates in SharePoint Online.
With some simple customizations, you can make this web part stand out and match your site's look and feel.
In this article, we'll walk through customizing various aspects of the news web part like layout, headers, text formatting, and more.

Change the Web Part Layout
The news web part offers three layout options to choose from:
Stacked
Column left
Column right
You can select the layout that best fits your content and page design. Here's how:
Edit the page where the news web part is added and select the web part to open the property pane
Under "Appearance", find the Layout setting
Choose your preferred layout: stacked, column left, or column right
The stacked layout places news posts vertically one under the other. The left and right column layouts show posts side-by-side in columns.
Customize the Headers
By default, the news web part shows the post title, author name, and published date. You may want to change these headers.
To customize headers:
Edit the news web part properties
Navigate to "Headers"
Delete any headers you don't need
Edit existing headers by changing the display text
Add new headers as needed
Some useful headers you can add include category, feature image, summary, etc.
Change Text Formatting
Make your news posts more visually interesting by applying text formatting. Here are some formatting options:
Use Rich Text Column for Body
In list settings, change the body column type to "Multiple lines of text" with "Rich text" formatting
Posts added after this will support text formatting
You can then make words bold, italicize text, add color, and more!
Format Column Values
In the web part properties pane, go to "Posts" > "Columns"
Choose the column and edit its formatting
Columns like Title and Headers can be formatted this way.
Show Featured Images
Adding images helps draw attention to important posts. Here's how to show images in the news web part:
In list settings, add a column called "Feature Image" of type "Hyperlink or Picture"
When creating posts, add the URL of the featured image in this column
In web part properties, go to "Appearance" > Show Featured Image
Set value to "Yes"
The chosen image will now show up prominently at the top of each news post.
Customize the Post Excerpt
The post excerpt shows a short preview. Customize what shows in the excerpt:
In web part properties, go to “Posts” > “Excerpt”
Select one of the following:
None: Do not show an excerpt
Number of sentences: Specify sentences visible
Manual Excerpt: Enter custom excerpt text
Post Body: Show full post content
For a consistent preview length, set a fixed number of sentences. To highlight key points, write a custom excerpt.
Show News Posts Selectively
Show only certain news posts by applying filters:
Under “Filters”, check “Enable post filtering”
Choose either Categories or Tags
Select the specific categories/tags to show
SharePoint will only display posts belonging to the selected categories or tags.
Match Color Theme
Make your news web part blend with site theme colors:
Under “Appearance”, pick a predefined color theme
Or enter custom colors for backgrounds, text, links, borders, etc.
Choosing a lighter background color works best for readability.
Final Touches
Finally, customize these last settings:
Number of posts: Control how many posts display
Sort order: Newest first or oldest first
Info position: Show post info above or below title
Image position: Place image above or below title
Text alignment: Align post text left/center/right
Post space: Add spacing between posts
And that covers how to customize the news web part in SharePoint Online! With these steps, you can tweak the web part to match any site design.
0 notes
Text
Get more done with Microsoft Copilot in SharePoint. For those new to the platform, Copilot is a helpful assistant built into Microsoft 365 tools, including SharePoint. It's designed to simplify everyday tasks using natural language commands, making collaboration and content management smoother for teams of all sizes. Imagine summarizing a long report or creating a project update page without spending hours formatting or searching for content. That's where Copilot steps in. With a simple prompt, it can draft summaries, generate content based on existing files, and even help organize information on a SharePoint site. It removes the learning curve for beginners and allows users to get work done more efficiently. Businesses that want to get the most out of these new capabilities often turn to SharePoint consulting services. These experts help companies plan and implement Copilot features within their SharePoint environment, ensuring everything is configured correctly and works well with existing tools. A SharePoint app development company can also build custom tools that work alongside Copilot to streamline internal processes further. Whether setting up SharePoint for the first time or upgrading from an older version, a SharePoint migration consultant can make the transition smooth and hassle-free. They ensure your content, structure, and permissions carry over correctly so Copilot can work with your existing data from day one. Having an intelligent assistant like Copilot means employees can spend less time searching through folders or writing repetitive content and more time focusing on high-impact tasks. But to gain, it's essential to have the right base. Many organizations rely on a trusted SharePoint solution provider to build a solid, scalable SharePoint environment that effectively supports these new features. Microsoft Copilot is not just for tech-savvy users. It's built to help everyone work smarter, and with the proper support in place, it becomes a powerful tool in any digital workplace. Ready to get started? Partner with a team that understands SharePoint inside and out and unlock a more straightforward way to work.
#sharepoint consulting services#sharepoint developers#sharepoint app development company#sharepoint development service#sharepoint migration services#sharepoint expert consultant#sharepoint integration services#sharepoint migration consultant#sharepoint service provider#sharepoint solution provider
0 notes
Text
Top 5 Cloud Migration Tools Of 2024

Remember the days when we had to back up our mobile data every six months? Back then, smartphone storage struggled to keep up with our habit of constantly capturing photos, videos, and downloading new apps and games. We had no choice but to create folders on our computer hard drives, meticulously organized by month and year.
Although those times were simpler, transferring data from our phones to computers was a daunting task. Now, imagine the immense challenge businesses face when they need to migrate entire datasets between storage services, particularly to the cloud. The very thought can be overwhelming!
Thankfully, Cloud Migration Tools make this process more manageable. With features like automated data discovery, seamless transfer capabilities, and centralized management, these tools facilitate smooth and low-risk cloud migrations at scale. Their advanced replication engines ensure data is transferred with its integrity intact.
If you're on the hunt for a Cloud Migration Tool for your organization, join us as we explore the top 5 Cloud Migration Tools of 2024. Keep scrolling!
Today’s businesses rely on large servers and data centers that store data for millions of users. To optimize costs, enhance performance, and leverage new capabilities, companies often need to overhaul their IT infrastructures and transition to different cloud services.
Migrating mission-critical data and workloads is a highly complex task that can disrupt operations if not handled carefully. This is where Cloud Migration Tools become essential. They automate the entire migration process—from thorough discovery and analysis of current environments to seamlessly transferring and replicating data to the target cloud platform while maintaining its integrity.
The centralized management capabilities of these tools allow for coordinated cross-functional migrations with minimized risks and downtimes. Equipped with these powerful solutions, businesses can modernize confidently, ensuring business continuity.
So, following last year’s top 5 Cloud Migration Tools, let’s dive into our updated list of the top 5 Cloud Migration Tools for 2024. Read on!
Top 5 Cloud Migration Tools Of 2024
By using Cloud Migration Tools, businesses can enjoy enhanced scalability and agility, reduced IT costs, robust security and compliance, and uninterrupted operations while leveraging cutting-edge cloud capabilities. These tools ensure a smooth transition to the cloud, enabling organizations to future-proof their IT infrastructure and drive innovation.
Let’s take a look at the top 5 Cloud Migration Tools for 2024—in no particular order.
Tool 1: ShareGate
ShareGate is a robust cloud migration tool developed by a Montreal-based company specializing in SharePoint migration and management. Founded in 2009, ShareGate employs over 250 people and has offices across North America and Europe, serving major clients like Montblanc, Crocs, Fujitsu, and Ikea. Recently, ShareGate was also recognized as a Winter Leader by G2.
Making its debut on our list this year, ShareGate enables secure and seamless migration of on-premises data to the cloud, including SharePoint sites, file shares, Microsoft Teams, and more. Its centralized dashboard provides complete visibility during migrations, minimizing risks and downtime. ShareGate’s migration capabilities focus on identifying and transferring only changed content for maximum efficiency. Automated tools like bulk editing, permissions mapping, and metadata management simplify the migration process.
Where ShareGate truly stands out is in its AI capabilities, featuring engines that automatically classify and extract meaningful metadata from unstructured content during migration. Its machine learning algorithms can also identify redundant, outdated, and trivial content that can be excluded from migrations, saving significant time and effort.
Tool 2: SkyKick
SkyKick, based in Seattle, Washington, is a leading provider of cloud migration solutions. Founded in 2011, the company has over 320 employees and serves clients worldwide through its partners. Major clients include Kinetix, Sikich, SNP Technologies, and B-FortyOne. In 2023, SkyKick won the IAMCP Americas P2P Awards!
Making its first appearance on our list, SkyKick excels at seamlessly migrating entire on-premises IT environments to the cloud, including email, files, applications, and servers. With its automated discovery, assessing existing infrastructure becomes easier, leading to more predictable cloud migration costs. Its centralized management console provides full visibility, allowing for streamlined, end-to-end management of the migration process.
But there's more! SkyKick's key differentiator is its focus on the entire cloud transition lifecycle, from migration planning to post-migration cloud infrastructure management. Its advanced cloud backup and cloud manager tools help optimize IT operations, security, and costs in the cloud. Additionally, its machine learning capabilities identify storage inefficiencies, security risks, and compliance violations, simplifying your cloud journey.
Tool 3: AWS Migration Hub
This next business needs no introduction! Amazon, founded in 1994, employs over a million people worldwide and serves clients across all industries. AWS has received numerous awards, including being named one of the World’s Most Valuable Brands in the Brand Finance Global 500 and ranking third on the list of Fortune World’s Most Admired Companies in 2024.
Appearing on our list for the second time in a row, AWS Migration Hub offers a centralized location to monitor and manage migrations from on-premises or other cloud providers to AWS. It also provides features to create visualizations for real-time insights across migration workflows, enabling coordination across teams, offices, and workloads.
One of the coolest features of AWS Migration Hub is its integration capabilities. As part of the AWS ecosystem, it allows you to combine data from AWS partner solutions under one unified dashboard, helping you avoid silos and streamline operations across large-scale cloud migration projects. Additionally, it offers automation capabilities that enhance overall operational efficiency.
Tool 4: Quest Migration Manager
Quest Software, a global leader in cybersecurity, data intelligence, and IT operations management, was founded in 1987 and is headquartered in Aliso Viejo, United States. Quest employs over 4,000 people across 39 countries and was acquired by Clearlake Capital in 2021. Its major clients span industries such as healthcare, finance, and manufacturing.
Making its debut on our list, Quest Migration Manager simplifies the process of moving on-premises workloads, including files, SharePoint sites, public folders, and more, to Microsoft 365 or Azure. Its project-based approach makes it easier to scope and manage complex migration projects at scale. Automated discovery, analysis, and reporting tools provide comprehensive insights into cloud infrastructure, enabling precise migration planning.
But that’s not all! Quest offers proprietary Integrated Data Management technology that ensures superior migration fidelity compared to other tools. By capturing and replicating granular file attributes, permissions, and metadata, data integrity is preserved during cloud transitions. Its intelligent content routing and filtering functionalities also optimize what gets migrated, reducing cloud storage needs and costs.
Tool 5: IBM Cloud For VMware Solutions
Founded in 1911 and headquartered in Armonk, United States, IBM is one of the world’s largest technology companies, with over 282,000 employees across 175 countries. IBM’s clients include leading organizations in virtually every industry vertical. In 2024, IBM products earned over 17 placements in G2’s Best Software Awards. A legend for a reason!
Featured on our list for the first time this year, IBM Cloud for VMware Solutions allows for the seamless migration and extension of on-premises VMware workloads to the IBM Cloud without the need for modifications or conversions. VMware's fully software-defined data center stack runs natively on IBM's global cloud bare metal servers, making migration simple while preserving existing operations, tools, and processes.
Moreover, it offers enterprise-grade capabilities for scaling and running mission-critical workloads in the cloud. With advanced automation, self-service management, and predictive analytics, you can optimize cloud performance and costs post-migration. Enterprise-grade security and support services ensure business continuity, allowing your business to transition to and from clouds effortlessly.
In Conclusion
Cloud Migration Tools empower businesses of all sizes to modernize their IT infrastructures, tapping into the scalability, flexibility, and cost-efficiency of the cloud. From automated workload discovery and analysis to seamless migration execution, these tools streamline transitions while minimizing risks and downtime. However, with so many solutions available, organizations need to carefully evaluate their unique requirements around workload profiles, cloud preferences, migration complexities, budgets, and operational needs.
So, why wait? Begin your cloud migration journey today!
0 notes
Text
Power Virtual Agents: Transforming Conversational Artificial Intelligence
The trend in the fast-changing digital landscape is that the majority of organizations have resorted to AI-powered solutions to create customer engagement channels and increase operations productivity. This change is greatly facilitated by the new platform by Microsoft, called Power Virtual Agents, and this is what empowers businesses to easily create sophisticated chatbots.
What Are Power Virtual Agents?
Power Virtual Agents allows the users to create AI-enabled bots without deep coding and AI skills. With a code-free graphical interface, it gets businesses to build bots that converse with natural language understanding, respond to frequently asked questions, tackle common problems, and automate repetitive time-consuming activities.
Key Features and Capabilities:
Unified Bot Building Experience-Microsoft has integrated the advanced functionalities of Azure Bot Framework Composer with that of Power Virtual Agents to create a single platform where both professional developers and subject matter experts can seamlessly work on it to increase efficiencies and effectiveness into their bot development processes.
Advanced Authoring Tools: The extensive authoring tools include the following: multimedia responses using video, images, adaptive cards and quick replies. Additionally, it provides features for managing complex dialog flows, utilizing variables, loops, and integrating with external APIs through Power Automate.
Copilot and AI Innovations: With the introduction of Copilot, Power Virtual Agents leverage next-generation AI to assist in bot building using natural language. This innovation simplifies the creation process, enabling users to describe their needs in natural language, with the AI generating the corresponding bot functionalities.
Generative Answers: This feature allows bots to provide intelligent, conversational responses by accessing existing internal and external knowledge sources, such as SharePoint sites and Dataverse. It eliminates the need for manual topic creation for every possible query, enhancing the bot's responsiveness and relevance.

Recent Updates and Enhancements
Microsoft continually enhances Power Virtual Agents to meet the evolving needs of businesses:
Integration into Microsoft Copilot Studio: As of November 2023, Power Virtual Agents has become part of Microsoft Copilot Studio. This integration offers a comprehensive conversational AI solution, enabling users to connect Copilot to data using pre-built or custom plugins, orchestrate workflows, and manage copilots centrally.
Power Virtual Agents in a Day (PVAiaD) Update: In June 2023, Microsoft released significant updates to the PVAiaD program, introducing a new authoring studio and enhanced content. These updates provide flexible, modular training materials that cater to various domains, facilitating easier adoption and implementation of Power Virtual Agents across organizations.
Benefits of Power Virtual Agents Implementation
Improved Customer Engagement: Businesses can improve customer satisfaction and engagement by deploying intelligent chatbots that will provide immediate answers to customer requests anytime, anywhere.
Operational Efficiency: Human agents should be allowed to focus on complex problems while automating general inquiries and tasks. This could boost productivity in the overall organization.
Scalability: Power Virtual Agents can be deployed across websites, Microsoft Teams, and social media, so that customers can have consistent experience at scale.
Data-driven Insights: Analytics and reporting on bot performance, user interactions, and common inquiries, making continuous improvement, and optimization possible.
Getting Started with Power Virtual Agents
For organizations interested in leveraging Power Virtual Agents, Microsoft provides a wealth of resources:
Microsoft Learn: Comprehensive documentation and tutorials available to guide users through the bot build process.
Power Virtual Agents in a Day Workshops: Actual workshops providing practical experience in creating and deploying chatbots according to varying organizational needs.
Community and Support: Learn from experts and peers through forums and through community events to exchange ideas and best practices.
Conclusion:
Representing a giant leap forward for conversational AI, Power Virtual Agents now enable businesses to construct intelligent, responsive, and efficient chatbots. Keeping them continuously updated and integrated with each new rollout, such as the recent incorporation into Microsoft Copilot Studio, the Power Virtual Agents will continue to hold the front line for AI-enabled customer engagement solutions.
Empower an organization to improve customer interactions, improve organizational efficiency, and keep pace with the increasingly digital marketplace through Power Virtual Agents.
0 notes
Text
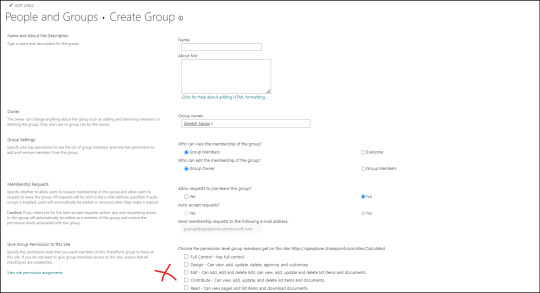
sp: Group permission folder library sharepoint
Go to “Groups” page in your SharePoint site using the URL in below format: https://contoso.sharepoint.com/sites/MySite/_layouts/15/groups.aspx Click New to create a new group: 3. Create a group by filling all information without assigning any permissions to the site: 4. Now go to Manage Access – Advanced settings page for the specific folder in library, break inheritance, and grant access to…
View On WordPress
0 notes
Text
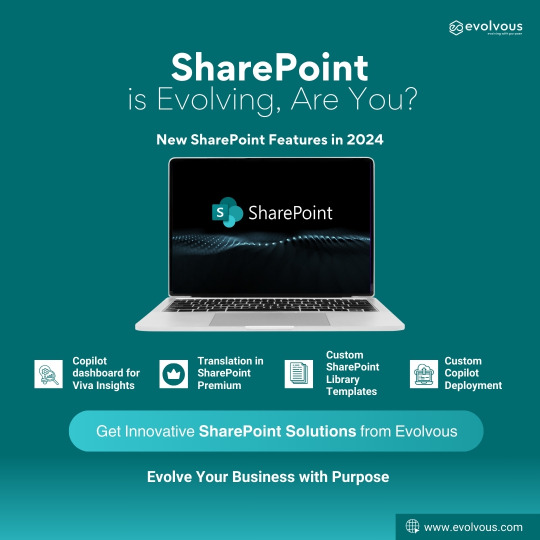
SharePoint is Evolving, Are You?
SharePoint’s Evolution in 2024
SharePoint continues to evolve in 2024, by rolling out smart, new features that are aimed at improving usability, maximizing impact, and increasing productivity.
Here are some of the new features that SharePoint will have in 2024.
Copilot dashboard for Viva Insights:
This dashboard helps organizations maximize the value of Copilot for Microsoft 365 providing actionable insights to get ready to deploy AI, drive adoption, and measure the impact of Copilot, across three metrics: readiness, adoption, and impact.
Translation is now Generally Available with SharePoint Premium
With Translation in SharePoint Premium, you can easily create a translated copy of a selected file (or a set of files) in a SharePoint document library among dozens of languages. At the same time, it preserves as much of the original format and structure of the file(s) as possible.
Custom SharePoint Library Templates
By leveraging the existing PowerShell-based tooling and methods for creating custom list templates, you can create custom library templates. As a Global Administrator or SharePoint Administrator you can establish what your organization needs, specific to your business.
Deploy a custom copilot to SharePoint, with a seamless single sign-on experience
Microsoft recently added a code sample to the Copilot Studio Samples repository. This code sample demonstrates how to publish a custom copilot to a SharePoint site, with a seamless single sign-on experience.
Take the next step in evolving the way you manage and share information across your organization, with all the latest features of SharePoint.
Visit: https://evolvous.com/sharepoint/
0 notes