#custom linearlayout android
Explore tagged Tumblr posts
Visit Tumblr Blog
Explore Tumblr blogs with no restrictions, modern design and the best experience.
Last Seen Tumblr Blogs


Fun Fact
Tumblr has 411 employees.
Link
Introduction In many occasions it is very interesting to create our own personalized controls to be able to reuse them quickly and comfortably in the future. In this tutorial we will see an example aof how to create and use a simple personalized control. Let’s do it! custom control construction Next, we will build a control that allows …
0 notes
Text
CornerCutLinearLayout
CornerCutLinearLayout extends LinearLayout. It allows cutting parent corners with different shapes and build proper shadow for complex shapes. It also allows cutting each child's corners.
Additionally, using available properties and custom providers, those cuts may be turned into cutouts of different shapes, sizes, etc. Widget's sole purpose is to use with children with no transformations (like rotation, scale, matrix transformations).
Additional features:
RTL support
child layout parameters that allow overriding default parent parameters
custom shadow
custom dividers & providers
custom cutouts & providers
custom view visible area provider

from The Android Arsenal https://ift.tt/3cXYk45
2 notes
·
View notes
Text
Taking Care of Your Shoes is an Important Part of How to Look Clean
Taking care of your shoes is an important part of how to look clean. The shoes you wear should be clean and free of stains. You should also avoid wearing shoes with a high heel or with an overly large toe. You should also avoid wearing processed foods and caked-on makeup.
Avoid processed foods
Whether you are looking to lose weight or simply want to look more clean, avoiding processed foods is one of the first things you should do. They are cheap, convenient, and tasty, but they can also be unhealthy. In fact, processed foods are one of the main reasons people are overweight.
Processed foods are often high in sugar and salt, and can contribute to cardiovascular disease and obesity. However, there are some healthy options for those looking to avoid processed foods.
Fruit is a great choice for healthy snacks. Canned fruit is another great option, as are vegetables. You can also find vegetables canned in water or juice, or in a pouch.
Canned fish is another healthy option. Pre-cut vegetables are another quality convenience food for people on the go.
Arrange items in a linear layout
Whether you’re building an Android app or a desktop website, arranging items in a linear layout is a good way to reduce visual clutter. It’s also the smartest way to make use of unused space. The good news is that you can do this with a few clicks of your mouse. However, the downside is that a linear layout can be a bit of a pain to code. If you’re not careful, you may find yourself spending more time resolving thorny layout issues than actually building the app.
It’s important to note that this isn’t an exhaustive list. There’s a reason why the nameplate of the LinearLayout is a bit short on buttons. To achieve the best possible fit, you’ll need to use the standard library or write your own custom buttons. If you’re using custom buttons, you’ll need to make sure they’re in the right spot. You can achieve this by making sure your buttons are inline, which means they’ll be in the same box as the rest of the child controls.
Take care of your shoes
Taking care of your shoes to look clean is an important part of maintaining your footwear. Not only does it keep your shoes looking good and smelling good, it helps to extend the life of your shoes.
Taking care of your shoes can be easy. If you follow a few basic guidelines, you can extend the life of your shoes and ensure that they are always in tip-top condition.
First, it’s important to understand the different types of shoes. For example, sneakers are different than boots. You should also consider how you’re going to store your shoes. If you aren’t fortunate enough to have dedicated shoe shelves in your home, it’s a good idea to put them on the top shelves of your cabinets.
Avoid caked-on makeup
Using the wrong products or application techniques can result in caked-on makeup. However, there are steps you can take to fix this problem and make your makeup look clean and flawless. Here are some tips.
One of the best ways to avoid caked-on makeup is to prep your skin properly before applying your makeup. Start by using a moisturizer or primer to help your skin absorb the makeup. Also, make sure you use clean tools to apply your makeup. This includes a clean makeup brush, a sponge, and a clean mascara wand. Also, make sure you take your time to apply your makeup.
Another thing to do to prevent caked-on makeup is to use the right amount of makeup. This means using a light layer of foundation on your face and blending it with a brush or sponge. Also, try to avoid dragging your foundation across your blemishes or pores. Finally, make sure you sweep off any excess powder after applying your makeup.
Maintain good hygiene
Practicing good hygiene to look clean is an important part of your daily routine. This will keep you healthy and help prevent infections, like gastro and infectious diseases. If you want to learn more about keeping yourself clean, contact your doctor for more information.
A checklist can help you remember all of the steps you need to take to stay clean. You should also write down your personal hygiene routine. This can help you keep track of what you are doing each day. You should also make sure that you are wearing clean clothes every day and keeping your surroundings clean. Keeping your home clean and staying organized will help you stay clean and stay healthy. Practicing good hygiene to look clean will also help you look more presentable.
.video-container {position: relative;padding-bottom: 56.25%;padding-top: 1px; height: 0; overflow: hidden;} .video-container iframe, .video-container object, .video-container embed {position: absolute;top: 0;LEFT: 0;width: 100%;height: 100%;}
youtube
The bathroom is often the most overlooked room in your house. It’s easy to see why it’s usually small and hidden away, and it’s probably the last place you’d expect to spend a significant amount of time. But the truth is, the bathroom is one of the most important rooms in your home. It is a functional space for bathing and washing and a social hub for your entire household. So it makes sense that you want to ensure it looks its best. That’s why Vancouver Kitchen Renovation specializes in bathroom renovations. Whether you’re interested in updating your current bathroom or building a brand new one from scratch, we can help you create the perfect space for your whole family. We believe that bathrooms should look spa-like, sustainable, and modern. In addition to being practical spaces, they should also feel warm and inviting. With that in mind, we strive to incorporate natural materials, open floor plans, and lots of light.
We understand that to be successful is to stay ahead of the curve. That means staying current with the latest technology and design trends. We always want to improve our products or services without breaking the bank. That’s why we stay connected to the latest technologies of NKBA, National Kitchen and Bath Association. In addition, at Vancouver Kitchen renovation, our primary focus is providing sustainable bathroom design and renovation packages, and we believe in sustainable living. Sustainable living is a way of life in harmony with nature. It is a lifestyle which focuses on the preservation of our environment. Sustainable living is a philosophy emphasizing respect for the environment and concern for its well-being. This means we should take care of the planet and treat it as if it were our home. We should try to preserve what we have and protect it from destruction. If we do this, we will enjoy the benefits of the earth’s resources for many generations. Whether you’re planning a major remodel or adding finishing touches to your current bathroom, we’d love to discuss your project. Book your showroom consultation online.
Main Areas of Service in British Columbia:
Vancouver
North Vancouver
West Vancouver
Burnaby
Coquitlam
Squamish
Whistler
Frequently Asked Questions
What is the cost of replacing a shower?
A complete shower re/re project in Vancouver (British Columbia) can cost upwards of $10,000. This price is for a complete job that would include:
Shower base (including drain)
Tiles (floor and walls)
Glass shower door or shower curtain
Fixtures (shower head, taps, soap dish, etc.)
Plumbing work
Waterproofing and tiling
Ventilation
Permits
How can I make my bathroom feel like Zen?
A great bathroom can be a place for reflection and relaxation. It is the place where we can relax after a hard day. So why would anyone choose to be stressed out in a space like this?
The answer is simple; bathrooms are places where we relax. When we shower, we wash away our stresses. We wash our hands and brush our teeth.
You have many options to create a serene and tranquil bathroom while still providing all the amenities.
For example, white paint on the walls makes a room seem brighter and cleaner. White can also reflect light and make rooms appear larger.
A large mirror can be used to view how you look, without the need to turn your back.
Consider adding candles to your bathroom to create a tranquil environment. Candles provide warmth and a feeling of security. Scented candles can promote feelings of calmness and warmth.
You can encourage peace and tranquility by adding plants to your bathroom. It is known that plants can reduce stress and improve focus.
Finally, lighting is another way to set the mood. You can create a warm environment by using lighting. Warm lights such as those from candlelight can create a peaceful environment.
Take some time to rest your body next time you use the bathroom. This is the only place we can truly be free from the outside world.
How long does a complete bathroom remodel take in Vancouver, British Columbia.
A bathroom renovation can take anywhere from four to five months. Permits and inspections can make the project take longer. Bear in mind that the timeline may also be affected by the size and complexity of your renovation.
Which is the most popular color for a bathroom in 2023?
Benjamin Moore has revealed its choice for the colour of the year in 2023 as part of its annual Colour Trends Series. It’s called Raspberry Blush. This vibrant, red-orange shade makes us think bold, brightest, and boldest. This bold hue is the starting point for Colour Trends 2023. Inspired by an artist’s desire to communicate through colour and shape, Colour Trends 2023 is built to envelop you in vibrant shades that make a statement. Benjamin Moore invited Chromeo, an electro-funk band, to help celebrate this year’s selection. They wanted to emphasize the positive tone of the palette as well as the dynamic role that colour plays in everyday life.
PPG & Glidden asked 35 international colour stylists to give their opinions on which colours will be the most influential in 2023. Their responses ranged from the predictable (like a return of earthy neutrals) and the unexpected (like a resurgence in neon pink). They came to the conclusion that acceptance of change was the main theme of all responses.
Glidden & PPG jointly named Vining Ivy their 2023 color of the year. Vining ivy is a vibrant mix of jewel tones as well as natural materials. It’s a bridge between present and future, a then and nows exploration of the colour choices made by PPG and Glidden in their market of DIY home painters.
Statistics
According to the EPA, a conventional toilet uses 1.6 gallons per flush, but that old pink one could use between 3.5 to 7 gallons per flush. (elemental.green)
2023 bathroom design trends: Windows above tubs were favoured by 51% of those surveyed. Skylights were selected by 37% of those surveyed. (https://nkba.org)
2023 bathroom design trends: 82% of those surveyed revealed bathrooms are now designed for two-person use. (https://nkba.org)
2023 bathroom design trends: 82% of those surveyed preferred low-maintenance, nonporous surfaces for their bathroom. (https://nkba.org)
2023 bathroom design trends: Heated floors were favoured by a substantial 75% of those who responded to the survey.(https://nkba.org)
The average midrange bathroom remodels costs $27,164, according to the latest Remodeling Cost versus Value report, and it’s projected that you will recoup 58.9% of that cost when reselling your home. (architecturaldigest.com)
Glass tile is one of the greenest bathroom flooring options because it can be 100% recycled. (caddetailsblog.com)
If possible, allow a 15 to 20% contingency fund so you’re prepared for the unexpected. (loveproperty.com)
2023 bathroom design trends: Bathroom faucet designs reflected wellness concerns, with 61% choosing accessible lever handles, 48% choosing motion and 36% going for the touch or tap options. (https://nkba.org)
2023 bathroom design trends: Large format tiles were favoured by 59% of those surveyed.mSlab surfaces were favoured by 40% of those surveyed. (https://nkba.org)
Other sustainability instruments developed by Noken include an ‘Eco cartridge’ (its two-position switch makes it possible to use 50% less water and energy), and a water ‘flow rate limiter’ (that uses jets and air to reduce water consumption). (decoist.com)
2023 bathroom design trends: Large format tile (59%) was the most popular material for tub and shower surrounds. Slab surfaces (40%) were the next most popular (https://nkba.org)
External Links
thespruce.com
How to Purchase a New Toilet in Your Home
homeadvisor.com
Learn how much it would cost to remodel a Bathroom
Where does your money go for a bathroom remodel? | HomeAdvisor
How To
These are the 10 most important things you should know about remodeling your bathroom.
The bathroom is often neglected when it comes to home improvements. However, this room is an essential part of any house. There are many options for improving your bathroom. Don’t wait until your house is in disarray before you start to transform it into something beautiful and relaxing.
These are some great tips to get your bathroom transformed without spending too much.
Soften the Walls – Paint the walls in pastel colours, such as white, pink, and yellow to make a dramatic difference in the bathroom. It is subtle but adds a lot more charm to the bathroom.
Add Some Lighting – Lighting fixtures come in many different shapes and sizes. If you are looking to give your bathroom a contemporary feel, you should think about adding some lighting. A good lighting fixture will bring out the wall colour and brighten up your bathroom. To achieve the same results, you can always use fluorescent bulbs or string light to save money.
Add Storage Space – If your storage space is limited, shelves can be installed above the toilet or beneath the vanity cabinet to provide additional storage. These shelves are great for storing towels, toiletries or any other items you might need.
Install a shower curtain – Shower curtains are an easy and useful addition to any bathroom. You can choose from a range of designs and styles, and they can be customized to suit your bathroom decor.
Be Creative with Your Towels. Towels can be a great way of bringing life to your bathroom, especially if it has a dull towel rack. Hang some bright towels from the rod instead. This way, you won’t only get fresh towels but also a bit of fun out of your bathroom.
Invite Nature in – While it may seem strange to keep plants in the bathroom’s bathrooms, it creates a nice atmosphere. It is important to avoid insects by choosing plants.
Relaxing in the Bathroom: You can create a relaxed atmosphere by using oils and scented candles. These inexpensive accessories can be used to create a calm ambiance in your bathroom.
Go Green – You don’t necessarily have to install a full-fledged green bathroom to make your bathroom more eco-friendly. One example is to replace your disposable toilet paper roll with a reusable. Switching to green cleaning products is another option.
Transform Your Vanity Cabinet – Vanity cabinets are usually made of plastic, wood, or metal, so you can customize these as you wish. You can alter their design or add new features to the cabinet, or even replace it all.
Make Your Bathroom Look Cleaner and More Organized by Changing the Toilet Paper Holder So, you might as well update its appearance. You have many options to change its appearance, such as changing its size, shape, or colour.
Did you miss our previous article… https://vancouverkitchenrenovation.com/bathrooms/mid-century-modern-bathrooms/
The post Taking Care of Your Shoes is an Important Part of How to Look Clean first appeared on Vancouver Kitchen Renovation.
source https://vancouverkitchenrenovation.com/bathrooms/taking-care-of-your-shoes-is-an-important-part-of-how-to-look-clean/?utm_source=rss&utm_medium=rss&utm_campaign=taking-care-of-your-shoes-is-an-important-part-of-how-to-look-clean
0 notes
Text
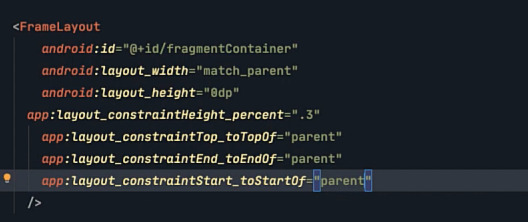
What is FrameLayout: The Ultimate Guide
FrameLayout is an Android layout that has been in use since the start of Android. It has been around since the first Android release way back in 2007. It's been around since the days of the Motorola Droid, HTC Dream and Samsung GALAXY S. It has been around since the initial Android release and will continue to exist for years to be. FrameLayout is one of the top layouts ever since it was mentioned in the Android SDK.
The 5 Best CCNA Certification Books for 2022
1. What is FrameLayout?
FrameLayout is a layout library that helps you design custom layouts for your Android app. The layout library allows users to design layouts that include a footer and header and display them in both landscape and portrait mode. The layout library can be excellent for when you need to design a layout that is different when displayed in the landscape view.
CCNA Routing And Switching All In One Study Guide BOOK
2. What is the process behind FrameLayout function?
FrameLayout is a layout manager for Android and Java application. It's very similar to LinearLayout , and RelativeLayout however it was made to function as the layout manager of default in applications. It works as a wrapper for FrameLayout, the default layout manager for Android. It allows developers to create layouts that aren't limited to the screen size of their application.
Cisco Packet Tracer Tutorial - 4 Router Basic Configuration
3. How to use FrameLayout
FrameLayout has been created to increase the speed of websites on devices that are mobile gadgets. It's a brand new layout that is not just simply a viewport. This layout has been designed with an idea of a viewport, and has been optimized especially for use on smartphones. The layout was designed to ensure that the content is readable and visible even on smartphones. To make the most of this layout, it is recommended to put the most important content on the top and the top. Also, you should ensure that the layout is not too large. This will ensure that it's very easy for you to browse. Also, ensure that you've got a title tag and a meta description.
How To Configure Default Routing On 4 Routers In Cisco Packet Tracer
4. Conclusion.
Once you've acquired a basic understanding of what FrameLayout is, you'll be able use it to your advantage for your next project. FrameLayout is a layout that allows the creation of a frame around an element of your project. This is useful for projects with a lot of information and you need to build a frame around it. It is also helpful when you're trying to create an outline of your project in just few lines of code. There are many other different uses of FrameLayout, which you can read about within the manual. It's an excellent layout to understand and experiment with.
Basic Cisco Router Configuration | Cisco Packet Tracer Tutorial
0 notes
Text
kotlin android 개발 날씨앱 만들기 과정 요약
original source : https://www.youtube.com/playlist?list=PLEPZdzLLJH94Jk_Jz-cTUXYFoObPBH7KB
시애틀에 있는 수염난 안경낀 백인 청년 설명
.

.

.
.
data binding을 위해서 gradle에서 해야할 작업
.
data binding의 장점
.

.
.
3rd party image loading library들 이 강의에서는 coil을 사용

.
toolbar를 app bar로 사용하면서 navigation component를 사용하는 경우

.
tool bar를 app bar로 사용하는 경우 약간의 material 느낌을 주기위해 AppBarLayout를 이용한 경우

.
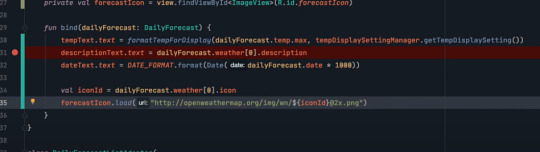
coil를 사용해 image loading한경우
.
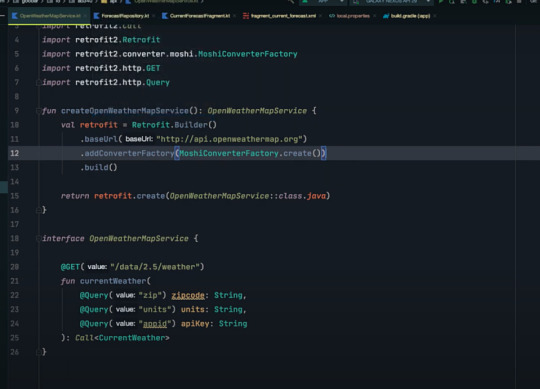
json converting을 위해 moshi를 사용한 경우
.
retrofit

.
.
.
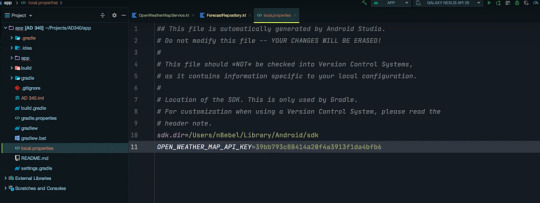
민감한 data를 외부에 놓고 사용하는 방법

.
.
.
외부에서 전달되는 json data의 키와는 다른 field명을 쓰고 싶을때
.
외부와 data 통신시에 보안을 위해 usesCleartextTraffic을 사용한다.

.
.
.
.
1강
0:01 - Week 0 Review
1:22 - Syllabus Review
2:40 - Class Announcements
6:14 - Why Learn App Development?
9:26 - Challenges of App Development
15:34 - Types of Mobile Development
22:36 - Why Android Development?
27:42 - Setting Up Our Android Development Environment
28:34 - Installing Android Studio
36:12 - Creating Your First Android Studio Project
39:17 - Creating An Android Emulator
41:52 - Installing Your First Android App
45:14 - Sharing An Android Studio Project to GitHub
50:06 - Building An Android APK
- What are the unique benefits and challenges of Android app development?
- What are some different ways of building mobile apps?
- What makes Android the most popular mobile operating system?
- What is Android Studio?
- What is the Android Emulator?
- What is Kotlin?
- How do you create a new Android project?
- How do you share code from Android Studio to GitHub?
- How do you add a README to your GitHub repo?
.
.
.
.
2강
0:36 - Outline
1:57 - Android Framework Components
14:07 - What is generated when you create a new Android Studio project?
40:26 - Working with Android Activities
41:20 - Android Activity lifecycle
50:12 - Using the Android Studio debugger // How to set a breakpoint in Android Studio?
59:38 - Creating Interactive User Interfaces
1:01:46 - What is FrameLayout?
1:05:09 - What is LinearLayout?
1:08:34 - What is RelativeLayout?
1:14:22 - What is ConstraintLayout?
1:28:09 - Responding To User Interaction
1:29:00 - ConstraintLayout simple tutorial
1:29:37 - How to create a new Vector Asset in Android Studio?
1:38:46 - How to respond to a Button click in Android
1:40:04 - Android Button setOnClickHandler
1:45:40 - Receiving user input using an EditText
1:54:00 - Customize Material Design theme in Android Studio
- What are the Android app components?
- What is an Android Activity?
- What is generated when we create a new Android Studio project?
- What is the Android Activity lifecycle?
- What is the difference between an Android ViewGroup and a View?
- What is a FrameLayout? LinearLayout? Relative Layout? ConstraintLayout?
- How to build a simple UI using ConstraintLayout?
- How do define an Android click listener?
- How to show a Toast message in an Android Activity?
- How to enable Android developer options?
- How to use an EditText to receive user input?
.
.
.
.
3강
- How to display dynamic content in an app?
- How to display large collections of data?
- How to architect your app to provide data to your Activity?
- What is MVVM?
- What is LiveData?
- How to model data with Kotlin data classes?
- How to create a RecyclerView Adapter?
- How to bind data using a RecyclerView ViewHolder?
- How to define an onClickHandler for your RecyclerView?
- How to format String resources?
.
0:25 - Outline
2:17 - Project Demo
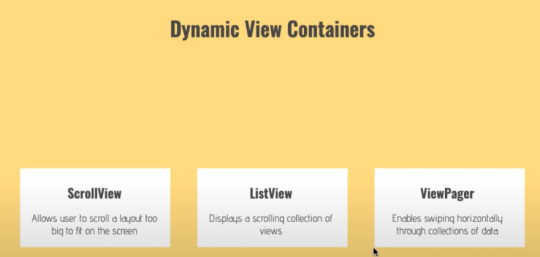
3:56 - Displaying Dynamic Data
5:05 - Dynamic view containers // ScrollView, ListView, ViewPager
6:57 - RecyclerView
7:50 - Why RecyclerView?
16:47 - Defining A Data Model
20:00 - Modeling data with Kotlin data classes
24:25 - What is LiveData?
28:08 - Implementing A RecyclerView
29:23 - Creating a data class to model daily weather forecasts
31:50 - Creating a data repository
32:04 - Using LiveData to expose data from a repository
49:54 - Adding a RecyclerView to your layout xml file
52:37 - How to use Logcat to understand why your app crashed
54:58 - Add RecyclerView dependency to your build.gradle file
57:52 - How to add margin to your RecyclerView using ConstraintLayout design view?
1:01:57 - How to implement a RecyclerView Adapter using Kotlin?
1:30:38 - Add touch feedback to RecyclerView list items
1:40:00 - How to format String resources?
.
.
.
.
4강
- How to create a new Android Activity?
- How to use an Intent to open a new Activity when a button is clicked?
- How to display an options Menu
- How to respond to a Menu item click?
- How to display an AlertDialog?
- How to save a value using SharedPreferences?
.
.
.
.
5강
- How to create a new Fragment
- How to migrate UI/logic from an Activity to a Fragment
- How to communicate between a Fragment and an Activity
- How to add a FloatingActionButton to your UI
.
.
.
.
6강
- What is the Android Navigation Architecture Component?
- What problems is it trying to solve?
- How to create a navigation graph?
- How to add new destinations and actions to your navigation graph?
- How to navigate to a new Fragment using the NavController?
- How to update your AppBar based on navigation changes?
- How to implement a BottomNavigationView?
.
.
.
.
7강
- How to load data from a remote api using Retrofit; an HTTP client library for Android/JVM?
- How to listen to changes in SharedPreferences values?
- How to load and display remote images using the Coil image loading library
.
.
.
.
0 notes
Text
How To Add Header Footer to ExpandableListview ChildView
Contents
1 How To Add Header Footer to ExpandableListview ChildView
1.1 XML layout files
1.2 Model Classes
1.3 Custom adapter for ExpandableListView
1.4 Main activity and sample data for expandable list view
1.5 Output
2 Conclusion
How To Add Header Footer to ExpandableListview ChildView

(11 votes, average: 5.00 out of 5)

Loading...
I recently worked on a project, where I found it challenging initially to add a header and footer to the ExpandableListView childView. Here I document the solution I found to overcome the challenge.
Ho Ngoc Trang, [email protected], is the author of this article and she contributes to RobustTechHouse Blog.
XML layout files
In order to create an expandable list view with header and footer to the child view, we will need five xml layout files. The first one is for displaying the main layout containing the ExpandableListview, the second one is for group item layout, the third is for the child item layout and the other two are for header and footer of the childview.
activity_main.xml
Open activity_main.xml layout in res/layout and add the ExpandableListView element:
<RelativeLayout xmlns:android="http://schemas.android.com/apk/res/android" xmlns:tools="http://schemas.android.com/tools" android:layout_width="match_parent" android:layout_height="match_parent" tools:context=".MainActivity"> <ExpandableListView android:id="@+id/elv" android:layout_width="match_parent" android:layout_height="match_parent"></ExpandableListView> </RelativeLayout>
parent_row.xml
Create another xml file for list view group header and name it as parent_row.xml and copy the following content.
<?xml version="1.0" encoding="utf-8"?> <LinearLayout xmlns:android="http://schemas.android.com/apk/res/android" android:orientation="vertical" android:layout_width="match_parent" android:background="@color/parent_background" android:paddingLeft="@dimen/padding_left" android:layout_margin="5dp" android:layout_height="match_parent"> <TextView android:id="@+id/txtMother" android:layout_marginTop="10dp" android:textStyle="bold" android:layout_marginBottom="5dp" android:layout_width="match_parent" android:layout_height="wrap_content" /> <TextView android:id="@+id/txtFather" android:layout_marginBottom="10dp" android:textStyle="bold" android:layout_width="match_parent" android:layout_height="wrap_content" /> </LinearLayout>
child_row.xml
Create a new layout file child_row.xml in res/layout and copy the following content.
<?xml version="1.0" encoding="utf-8"?> <LinearLayout xmlns:android="http://schemas.android.com/apk/res/android" android:orientation="vertical" android:layout_width="match_parent" android:background="@color/child_background" android:paddingLeft="@dimen/padding_left" android:layout_height="match_parent"> <TextView android:id="@+id/txtChildName" android:textColor="@android:color/holo_orange_dark" android:layout_width="match_parent" android:layout_height="wrap_content" android:layout_marginTop="10dp"/> <TextView android:id="@+id/txtChildAge" android:textColor="@android:color/holo_orange_dark" android:layout_width="match_parent" android:layout_height="wrap_content" android:layout_marginBottom="10dp"/> </LinearLayout>
child_header.xml
Create a new layout file child_header.xml in res/layout and copy the following content.
<?xml version="1.0" encoding="utf-8"?> <LinearLayout xmlns:android="http://schemas.android.com/apk/res/android" android:orientation="vertical" android:layout_width="match_parent" android:layout_height="50dp" android:background="@color/hf_background" android:paddingLeft="@dimen/padding_left"> <TextView android:id="@+id/txtHeader" android:textColor="@android:color/holo_green_light" android:layout_width="match_parent" android:gravity="center_vertical" android:textStyle="bold" android:text="Header" android:layout_height="50dp" /> </LinearLayout>
child_footer.xml
Create a new layout file child_footer.xml in res/layout and copy the following content.
<?xml version="1.0" encoding="utf-8"?> <LinearLayout xmlns:android="http://schemas.android.com/apk/res/android" android:orientation="vertical" android:layout_width="match_parent" android:layout_height="50dp" android:background="@color/hf_background" android:paddingLeft="@dimen/padding_left"> <TextView android:id="@+id/txtFooter" android:textColor="@android:color/holo_green_light" android:layout_width="match_parent" android:layout_height="50dp" android:gravity="center_vertical" android:textStyle="bold" android:text="Footer" /> </LinearLayout>
Model Classes
According to the structure of an expandable list view, we need to have at least two classes, one for the child and another one for group/parent.
ChildObject.java
ChildObject class will hold all fields displayed in the child row view.
public class ChildObject { public String childName; public int age; public ChildObject(String childName, int age) { this.childName = childName; this.age = age; } }
ParentObject.java
ParentObject will hold all fields displayed in the group/parent row view including fields for header and footer.
public class ParentObject { public String mother; public String father; //Header and footer don’t need to be a String, //they can be a class or whatever depend on your need. public String textToHeader; public String textToFooter; //Parent should have a list of their child public List<ChildObject> childObjects; public ParentObject(String mother, String father, String textToHeader, String textToFooter, List<ChildObject> childObjects) { this.mother = mother; this.father = father; this.textToFooter = textToFooter; this.textToHeader = textToHeader; this.childObjects = childObjects; } }
Custom adapter for ExpandableListView
This is the important part of this tutorial where we actually create the header and footer for the ExpandableListView ChildView.
We are going to create a custom adapter named MyExpandableAdapter. This class is extended from BaseExpandableListAdapter, which provides required methods to render the ExpandableListView.
Create a class and name it as MyExpandableListView, then add the following code.
public class MyExpandableAdapter extends BaseExpandableListAdapter { Context context; List<ParentObject> parentObjects; public MyExpandableAdapter(Context context, List<ParentObject> parentObjects) { this.context = context; this.parentObjects = parentObjects; } @Override public int getGroupCount() { return parentObjects.size(); } //Add 2 to childcount. The first row and the last row are used as header and footer to childview @Override public int getChildrenCount(int i) { return parentObjects.get(i).childObjects.size() +2; } @Override public ParentObject getGroup(int i) { return parentObjects.get(i); } @Override public ChildObject getChild(int i, int i2) { return parentObjects.get(i).childObjects.get(i2); } @Override public long getGroupId(int i) { return i; } @Override public long getChildId(int i, int i2) { return 0; } @Override public boolean hasStableIds() { return false; } @Override public View getGroupView(int i, boolean b, View view, ViewGroup viewGroup) { ParentObject currentParent = parentObjects.get(i); if(view ==null) { LayoutInflater inflater =(LayoutInflater) context.getSystemService(Context.LAYOUT_INFLATER_SERVICE); view = inflater.inflate(R.layout.parent_row,null); } TextView txtMother = (TextView)view.findViewById(R.id.txtMother); TextView txtFather = (TextView)view.findViewById(R.id.txtFather); txtMother.setText(currentParent.mother); txtFather.setText(currentParent.father); return view; } @Override public View getChildView(int groupPosition, int childPosition, boolean b, View view, ViewGroup viewGroup) { ParentObject currentParent = getGroup(groupPosition); LayoutInflater inflater = (LayoutInflater)context.getSystemService(Context.LAYOUT_INFLATER_SERVICE); //the first row is used as header if(childPosition ==0) { view = inflater.inflate(R.layout.child_header, null); TextView txtHeader = (TextView)view.findViewById(R.id.txtHeader); txtHeader.setText(currentParent.textToHeader); } //Here is the ListView of the ChildView if(childPosition>0 && childPosition<getChildrenCount(groupPosition)-1) { ChildObject currentChild = getChild(groupPosition,childPosition-1); view = inflater.inflate(R.layout.child_row,null); TextView txtChildName = (TextView)view.findViewById(R.id.txtChildName); TextView txtChildAge = (TextView)view.findViewById(R.id.txtChildAge); txtChildName.setText(currentChild.childName); txtChildAge.setText("Age: " + String.valueOf(currentChild.age)); } //the last row is used as footer if(childPosition == getChildrenCount(groupPosition)-1) { view = inflater.inflate(R.layout.child_footer,null); TextView txtFooter = (TextView)view.findViewById(R.id.txtFooter); txtFooter.setText(currentParent.textToFooter); } return view; } @Override public boolean isChildSelectable(int i, int i2) { return false; } }
There are many methods in this class but there are only two of them we need to focus on:
getChildrenCount: return the count of row of child item in a specific group. Here I’ve added two extra rows to the return method. The first row will be used for header and the second row will be used for footer.
getChildView: render the child list of each group. Here we will check the child position to inflate the appropriate layout to each row. The layout of header and footer will be inflated to the first and last of childPostion and the rest will show all items of the child list.
Main activity and sample data for expandable list view
Once you are done with creating a custom adapter for your expandable list view, open the MainActivity class and copy the following code. In this activity I have also created sample data to display in the expandable list view.
public class MainActivity extends Activity { ExpandableListView elv; @Override protected void onCreate(Bundle savedInstanceState) { super.onCreate(savedInstanceState); setContentView(R.layout.activity_main); LayoutInflater inflater = getLayoutInflater(); elv = (ExpandableListView)findViewById(R.id.elv); elv.setOnGroupExpandListener(onGroupExpandListenser); MyExpandableAdapter adapter = new MyExpandableAdapter(this, getData()); elv.setAdapter(adapter); } ExpandableListView.OnGroupExpandListener onGroupExpandListenser = new ExpandableListView.OnGroupExpandListener() { int previousGroup =-1; @Override public void onGroupExpand(int groupPosition) { if(groupPosition!= previousGroup) elv.collapseGroup(previousGroup); previousGroup = groupPosition; } }; //Sample data for expandable list view. public List<ParentObject> getData() { List<ParentObject> parentObjects = new ArrayList<ParentObject>(); for (int i = 0; i<20; i++) { parentObjects.add(new ParentObject("Mother " +i, "Father " +i, "Header " + i, "Footer " +i, getChildren(i))); } return parentObjects; } private List<ChildObject> getChildren(int childCount) { List<ChildObject> childObjects = new ArrayList<ChildObject>(); for (int i =0; i<childCount; i++) { childObjects.add(new ChildObject("Child " + (i+1), 10 +i )); } return childObjects; } }
Output
Conclusion
I have just showed you how I added a header and footer to the ExpandableListView ChildView. Hope you find this post useful.
The completed project can be downloaded at GitHub HeaderAndFooterForExpandableListview
If you like our articles, please follow and like our Facebook page where we regularly share interesting posts and check out our other blog articles.
RobustTechHouse is a leading tech company focusing on mobile app development in Singapore. If you are interested to have us work with you on your projects, you can contact us here.
How To Add Header Footer to ExpandableListview ChildView was originally published on RobustTechHouse - Mobile App Development Singapore
0 notes
Photo

Google I/O 2017 Aftermath: What's New for Android Wear?
In this series of tips, we’ve been taking a closer look at some of the new Android features and tools announced at this year’s Google I/O.
In this post, we’re going to be focusing on Android Wear.
Google has been providing Android Wear UI components via a dedicated Wearable Support Library for a while now, but this is all about to change!
At this year’s event, Google announced that the various components that make up the Wearable Support Library are going to be deprecated, merged, or migrated into the Android Support Library. In this article, we’ll be taking a look at which components are going to be merged, moved and removed, and how you can start using the Android Support Library’s new Wear module today.
We’ll also be looking at some new tools that are designed to make it easier to work with Android Wear’s Complications API.
New Android Wear UI Library
At this year’s Google I/O, the Android Wear team announced that the bulk of the Wearable Support Library is moving to the Android Support Library. The Wear-specific components will form the basis of a new support-wear module, similar to other modules in the Android Support Library, such as support-recylerview and support-design.
According to the Android Wear sessions at Google I/O, we can expect this new Wear module to graduate out of beta at the same time as Android O officially launches.
However, not all components from the Wearable Support Library will be making the move to the Android Support Library. Google also announced that some components from the Wearable Support Library will be:
Merged. Components that are applicable to both wearable and handheld devices will be merged into either the Android framework or more generic support modules. Components that are due to be merged include CircledImageView, DelayedConfirmationView, and ActionButton.
Deprecated. Google is going to deprecate the Android Wear UI components associated with design patterns that haven’t proven popular with Android Wear users. Specifically, Google will remove the two-dimensional spatial model that allowed Android Wear users to move horizontally and vertically, and will replace it with a vertical LinearLayout. All of the classes associated with the two-dimensional spatial model will be deprecated, including GridViewPager, action buttons, and action layouts.
Although this migration is an ongoing process, Google has already integrated some Android Wear components into version 26.0.0 Beta1 of the Android Support Library.
BoxInsetLayout: This is a screen shape-aware FrameLayout that can help you design a single layout that works for both square and round watch faces. When your layout is displayed on a round screen, a BoxInsetLayout will box all its children into an imaginary square in the center of the circular screen. You can specify how your UI elements will be positioned in this center square, using the layout_box attribute. When your app is displayed on a square screen, Android ignores the layout_box attribute and uses a window inset of zero, so your views will be positioned as though they’re inside a regular FrameLayout.
SwipeDismissFrameLayout: This is a layout that you can use to implement custom interactions for your Views and fragments. You’ll generally use SwipeDismissFrameLayout to enable users to dismiss views and fragments by swiping onscreen, essentially replicating the functionality of the Back button found on Android smartphones and tablets.
WearableRecyclerView: This is a Wearable-specific implementation of RecyclerView that helps you design more effective layouts for round displays. The WearableRecyclerView makes more effective use of the curvature of a round screen, and is typically used for implementing curved lists. WearableRecyclerView also gives you the option to use circular scrolling gestures in your app, via its setCircularScrollingGestureEnabled() method.
Adding the New Android Wear Module
To start using the new Android Wear module, you’ll need to have Android Support Library 26.0.0 Beta1 installed—which leads us on to another Google I/O announcement.
At this year’s event, Google announced that it would be distributing all upcoming versions of the Android Support Library (26.0.0 Beta1 and higher) via the Google Maven repository only.
Downloading the Android Support Library from this repository simply requires you to add the Google Maven Repository to your build.gradle file:
repositories { maven { url 'http://ift.tt/2pXtIH5' } jcenter() }
You can then set up your compile dependencies as usual, so open your wearable module’s build.gradle file and add the Wear library as a project dependency:
dependencies { compile fileTree(dir: 'libs', include: ['*.jar']) //Add the following// compile 'com.android.support:wear:26.0.0-beta1'
To add a component from the Android Wear UI library to your UI, simply open the layout resource file and make sure you use the new, fully-qualified package name. Essentially, this means replacing android.support.wearable.view with android.support.wear.widget. For example, here I’m using the BoxInsetLayout class from the Android Support Library:
<?xml version="1.0" encoding="utf-8"?> <android.support.wear.widget.BoxInsetLayout http://ift.tt/nIICcg" xmlns:app="http://ift.tt/GEGVYd" xmlns:tools="http://ift.tt/LrGmb4" android:layout_width="match_parent" android:layout_height="match_parent" android:background="@color/dark_grey" android:padding="@dimen/box_inset_layout_padding" tools:context="com.jessicathornsby.myapplication.MainActivity" tools:deviceIds="wear"> <FrameLayout android:layout_width="match_parent" android:layout_height="match_parent" android:padding="@dimen/inner_frame_layout_padding" app:layout_box="all"> <TextView android:id="@+id/text" android:layout_width="wrap_content" android:layout_height="wrap_content" android:text="Hi World" /> </FrameLayout> </android.support.wear.widget.BoxInsetLayout>
To import this class into your Java file, you just need to use the same name, so the old:
import android.support.wearable.view.BoxInsetLayout;
Becomes the new:
import android.support.wear.widget.BoxInsetLayout;
Easier Integration With the Complications API
Android Wear users can choose from a huge variety of styles of watch faces, and although the Complications API does give watch faces complete control over how they draw this data, this flexibility can make it difficult to add complications support to your watch faces.
At this year’s Google I/O, the Android Wear team introduced some additions that should make it easier to work with the Complication API.
ComplicationDrawable
ComplicationDrawable is a new solution that promises to handle all of your complication’s styling and layout for you.
If you create a ComplicationDrawable but don't set any style parameters, then you'll get a default look, but you can also use the ComplicationDrawable to style every part of your complication, including its background colour, corner radius, and border.
If your project targets API 24 or higher, then you can define a ComplicationDrawable object by creating a dedicated layout resource file in your project’s /res/drawable folder.
Open your XML file, and then create a ComplicationDrawable using the following tags:
<android.support.wearable.complications.rendering.ComplicationDrawable ... ... ... <ambient //Define the attributes you want to use when the device is in ambient mode// /> </android.support.wearable.complications.rendering.ComplicationDrawable>
Note that attributes defined at the top level apply to both standard and ambient modes, unless you specifically override these attributes in the file’s <ambient> section.
You then need to pass the complication data to your drawable:
@Override public void onComplicationDataUpdate(int id, ComplicationData data) { myComplicationDrawable.setComplicationData(data); }
And finally, draw your complication by calling setBounds on your drawable:
@Override public void onDraw(Canvas canvas, Rect bounds) { if(haveChanged(bounds)) { myComplicationDrawable.setBounds( complicationBoundsWithin(bounds)); } //Call draw on the ComplicationDrawable// myComplicationDrawable.draw(canvas, currentTimeMillis); ... ... ... }
TextRenderer
Most complications include some form of text, and TextRenderer is a new class that makes a number of small but powerful adjustments to the way complication text is drawn on the canvas.
You can use TextRenderer to specify the bounds that your complication text has to work with, and TextRenderer will then resize the text or arrange it over several lines, in order to fit this area. In addition, when the screen enters Android Wear’s “always on” ambient mode, TextRenderer adjusts your text by hiding characters and styling that are not suitable for this mode.
To take advantage of this new class, you need to create a TextRenderer when you initialize your watch face, and then pass it the TextPaint you want to use, which defines style attributes such as the font and text colour:
@Override public void onCreate(SurfaceHolder holder) { ... ... ... myTextRenderer = new TextRenderer(); myTextRenderer.setPaint(myTextPaint(TextPaint);
You need to create a TextRenderer for each field, so you’ll also need to create a TextRenderer for your title text:
myTitleRenderer = new TextRenderer(); myTitleRenderer.setPaint(myTitlePaint); ... ... ... }
When it’s time to draw, you’ll need to set the text on the renderer by calling setText, and then retrieve the text by calling getText:
public void onDraw(Canvas canvas, Rect bounds) { ... ... ... myTextRenderer.setText(myComplicationText.getText( Context, data.getShortText(), currentTimeMillis)); myTextRenderer.draw(canvas, bounds); ... ... ... }
Note that many complications are time-dependent, which is why currentTimeMillis is included in the above code snippet.
Conclusion
In this article, we looked at how to add the new Android Wear UI Library to your project, and how you can start working with a number of components from this library today. We also examined two components that promise to make integrating with Android Wear’s Complications API much easier than it’s previously been.
In the next instalment, we’ll be getting a preview of the up-and-coming features in Android 3.0, by exploring the latest Android Studio Canary build.
In the meantime, check out some of our other tutorials and our video courses on Android app development!
Android
Create a Voice-Controlled Android App
Ashraff Hathibelagal
Android SDK
Serverless Apps With Firebase Cloud Functions
Chike Mgbemena
Android SDK
Reactive Programming Operators in RxJava 2
Jessica Thornsby
by Jessica Thornsby via Envato Tuts+ Code http://ift.tt/2rK2PLj
1 note
·
View note
Text
75% off #Android Development from scratch like a pro – $10
Using Android Studio 2, learn how professionals use code and design good practices
Beginner Level, – 6 hours, 35 lectures
Average rating 4.5/5 (4.5 (52 ratings) Instead of using a simple lifetime average, Udemy calculates a course’s star rating by considering a number of different factors such as the number of ratings, the age of ratings, and the likelihood of fraudulent ratings.)
Course requirements:
Know basic Java or basic Android or some object oriented language
Course description:
From your first empty activity, going through code smells, good practices, design patterns and refactoring, finishing with a CRUD application that uses a local database to store its information.
In this course we will go through all the steps required for you to start your own first application. But we will not do bad code to do that… we are professionals and care about our code since it is our product. Let’s question together the practices and code that we generate throughout our application, trying to improve it step by step.
You can expect to see a lot of API, from RelativeLayout, LinearLayout, ScrollableView, Text and Rating views, Buttons, custom shapes, Intents, extra serializable information, SQLite, SQL, DAO, ArrayAdapter, dynamic ListViews, action menus, context menus and more.
You can also expect the same high quality teaching method that I apply in each and everyone of my 50+ courses at Alura and my other courses here at Udemy (check my ratings and students feedback).
This is not a course for those who want an easy and unmaintainable solution, this is a course for better developing our apps. Welcome to a better software development world!
Full details Use good practices Understand how to develop good and maintanable Android code Developers willing to create their first Android app Android developers who want to question good/bad practices Developers willing to learn good habits NOT recommended for those who want to quickly copy and paste bad code NOT recommended for those wanting to learn in quantity instead of learn what is good for their projects
Full details
Reviews:
“After watching other courses, it good to find a bit of fresh air that explain android with clear instruction and passion.” (Neville Milwood)
“All topics are clarified well. Along with focusing on the android development, the author gives nice hints about creating good quality code, which is really great.” (Arkadiusz Nowakowski)
“Excellent. The teacher was clear, precise and presented the materials excellently. Certainly very professional and well versed in Android, and provided a hands on approach that many other courses only apply as lengthy slides and theory. A very simple approach but effective for both beginners and seasoned developers coming into Android. Even learnt a few general Java coding tips on the way

I shall be looking for more courses from this tutor!” (Stephen Matthew Davies)
About Instructor:
Guilherme Silveira
As a software developer I was tired of “language tutorials” and “bad practices courses”. What about you? I want my students to finish a course and become capable of judging what is good and bad for their software, both on the short and long run. They should understand what they are doing, not just make use, but own their language and tools. I have worked as a software development educator for the past 12 years, with experience in several countries, programming languages and environments. Learning how to program should be done as we learn things in real life: with real examples and a parental guide on what is good and what is bad for us. My mobile experience started with Java ME in the early 2000’s, went through Android and I have finally reached iOS development when Swift was first announced. I was given the task to write our company’s main product iOS version using Swift and that experience together with many other language and API experiences can be seen in my courses. I have closely worked with several user groups and communities in Brazil, where I was lucky to be invited to give talks at many conferences, including QCon, AgileBrazil etc. I am also the co-organizer of a well-known brazilian mobile development conference, MobileConf. I am the cofounder of the biggest Brazilian web site on software development questions and answers, GUJ, creator of VRaptor, a java community expert on some JSRs and cofounder of Brazilian’s tech book publishing company Casa do Código. You can find more information about my career at my linkedin page. Finally, as a personal note, I am a language lover, feel free to find me at twitter and chat in portuguese, korean, english, french or german, or follow my korean weekly blog.
Instructor Other Courses:
Swift and iOS from scratch: coding like a pro 3 Guilherme Silveira, Software development educator at Alura (7) $10 $30 Swift and iOS from scratch: coding like a pro 2 Swift and iOS from scratch: coding like a pro …………………………………………………………… Guilherme Silveira coupons Development course coupon Udemy Development course coupon Mobile Apps course coupon Udemy Mobile Apps course coupon Android Development from scratch like a pro Android Development from scratch like a pro course coupon Android Development from scratch like a pro coupon coupons
The post 75% off #Android Development from scratch like a pro – $10 appeared first on Course Tag.
from Course Tag http://coursetag.com/udemy/coupon/75-off-android-development-from-scratch-like-a-pro-10/ from Course Tag https://coursetagcom.tumblr.com/post/157436014043
0 notes
Link
The custom Calendar in android studio kotlin
_______________________________________________ Xml _______________________________________________ <?xml version="1.0" encoding="utf-8"?> <LinearLayout xmlns:android="https://ift.tt/nIICcg" android:layout_width="match_parent" android:layout_height="wrap_content" android:background="@drawable/bg_bottom_sheet_dialog_fragment" android:orientation="vertical"> <androidx.appcompat.widget.LinearLayoutCompat android:id="@+id/ll_Main" android:layout_width="match_parent" android:layout_height="wrap_content" android:layout_marginTop="@dimen/dp_24" android:orientation="vertical"> <com.android.showMotionRealtor.feature.dasboard.view.schedule.customcalender.CustomCalendar android:id="@+id/custom_calender" android:layout_width="match_parent" android:layout_height="wrap_content" /> </androidx.appcompat.widget.LinearLayoutCompat> </LinearLayout> _______________________________________________ CustomCalendar.kt _______________________________________________ package com.android.showMotionRealtor.feature.dasboard.view.schedule.customcalender import android.app.Dialog import android.content.Context import android.util.AttributeSet import android.view.LayoutInflater import android.widget.ImageView import android.widget.LinearLayout import android.widget.TextView import androidx.recyclerview.widget.GridLayoutManager import androidx.recyclerview.widget.RecyclerView import com.android.showMotionRealtor.R import com.android.showMotionRealtor.core.util.MAX_CALENDAR_COLUMN import com.android.showMotionRealtor.core.util.mEventDateFormat import com.android.showMotionRealtor.model.CalendarData import com.android.showMotionRealtor.model.EventMessage import com.zendesk.util.DateUtils import java.text.ParseException import java.text.SimpleDateFormat import java.util.* import kotlin.collections.ArrayList /** * Created by Jeetesh Surana. */ class CustomCalendar : LinearLayout { // private var mUserSelectedDate: Long? = 0L private var mDialog : Dialog? = null private var mUserSelectedDate: Date? = null private var previousButton: ImageView? = null private var nextButton: ImageView? = null private var currentDate: TextView? = null private var rvCalender: RecyclerView? = null private val formatter = SimpleDateFormat("MMMM yyyy", Locale.ENGLISH) private val cal = Calendar.getInstance(Locale.ENGLISH) private val calendarData = ArrayList<CalendarData>() private val events: ArrayList<EventMessage> = ArrayList() private var mDateAdapter: DateAdapter? = null private val mWeekName = ArrayList<String>() var mCustomCalenderListener: CustomCalenderListener? = null constructor(context: Context) : super(context) constructor(context: Context, attrs: AttributeSet) : super(context, attrs) { setWeekName() initializeUILayout() setRecyclerView() setUpCalenderData() setPreviousButtonClickEvent() setNextButtonClickEvent() } constructor(context: Context, attrs: AttributeSet, defStyleAttr: Int) : super(context, attrs, defStyleAttr) private fun initializeUILayout() { val inflater = context.getSystemService(Context.LAYOUT_INFLATER_SERVICE) as LayoutInflater val mView = inflater.inflate(R.layout.calendar_layout, this) previousButton = mView.findViewById(R.id.previous_month) nextButton = mView.findViewById(R.id.next_month) currentDate = mView.findViewById(R.id.display_current_date) rvCalender = mView.findViewById(R.id.rv_CustomCalender) } private fun setPreviousButtonClickEvent() { previousButton!!.setOnClickListener { cal.add(Calendar.MONTH, -1) setUpCalenderData() } } private fun setNextButtonClickEvent() { nextButton!!.setOnClickListener { cal.add(Calendar.MONTH, 1) setUpCalenderData() } } private fun setUpCalenderData() { calendarData.clear() val dayValueInCells = ArrayList<Date>() val mCal = cal.clone() as Calendar // set month in cal mCal.set(Calendar.DAY_OF_MONTH, 1) // get the start date in week val firstDayOfTheMonth = mCal.get(Calendar.DAY_OF_WEEK) - 1 mCal.add(Calendar.DAY_OF_MONTH, -firstDayOfTheMonth) //getting dates while (dayValueInCells.size < MAX_CALENDAR_COLUMN) { dayValueInCells.add(mCal.time) mCal.add(Calendar.DAY_OF_MONTH, 1) } //set the title of month val sDate = formatter.format(cal.time) currentDate!!.text = sDate //set the week name for (i in mWeekName.indices) { calendarData.add(CalendarData(null, mWeekName[i], 0, false)) } //set the Dates for (i in dayValueInCells.indices) { if (mUserSelectedDate != null && DateUtils.isSameDay(dayValueInCells[i], mUserSelectedDate)) { calendarData.add(CalendarData(dayValueInCells[i], null, 1, true)) mDateAdapter!!.currentSelectedDatePosition(position = i) } else { calendarData.add(CalendarData(dayValueInCells[i], null, 1, false)) } } //notify adapter mDateAdapter!!.notifyDataSetChanged() } private fun setWeekName() { mWeekName.clear() mWeekName.add("S") mWeekName.add("M") mWeekName.add("T") mWeekName.add("W") mWeekName.add("T") mWeekName.add("F") mWeekName.add("S") } private fun setRecyclerView() { val dateToday = Date() val reminderDate = convertStringToDate("31-08-2019") val reminderDate2 = convertStringToDate("25-08-2019") if (reminderDate!!.after(dateToday) || reminderDate == dateToday) { events.add(EventMessage(1, "Birthday", reminderDate)) } if (reminderDate2!!.after(dateToday) || reminderDate == dateToday) { events.add(EventMessage(2, "Friendship Day !", reminderDate2)) } val layoutManager = GridLayoutManager(context, 7, RecyclerView.VERTICAL, false) rvCalender!!.layoutManager = layoutManager mDateAdapter = DateAdapter(context, calendarData, cal, events, object : DateAdapter.ItemClickListener { override fun itemClick(position: Int) { if (mDialog != null){ mDialog!!.dismiss() mUserSelectedDate = calendarData[position].monthlyDates!! } } }) rvCalender!!.adapter = mDateAdapter } private fun convertStringToDate(dateInString: String): Date? { val format = SimpleDateFormat(mEventDateFormat, Locale.ENGLISH) var date: Date? = null try { date = format.parse(dateInString) } catch (e: ParseException) { e.printStackTrace() } return date } /*fun setCurrentDate(userSelectedDate: Date) { mUserSelectedDate = userSelectedDate setUpCalenderData() }*/ fun setCalendar(mCal: Calendar) { mUserSelectedDate = mCal.time cal.time = mCal.time setUpCalenderData() } fun getCurrentSelectedDate(): Date { return calendarData[mDateAdapter!!.mLastSelectedDatePosition].monthlyDates!! } fun setCustomCalenderListener(customCalenderListener: CustomCalenderListener) { mCustomCalenderListener = customCalenderListener } fun dismissDialog(dialog: Dialog) { mDialog = dialog } interface CustomCalenderListener { fun currentSelectedDatePosition(position: Int) } } _______________________________________________ DateAdapter.kt _______________________________________________ package com.android.showMotionRealtor.feature.dasboard.view.schedule.customcalender import android.annotation.SuppressLint import android.content.Context import android.view.LayoutInflater import android.view.View import android.view.ViewGroup import android.widget.TextView import androidx.appcompat.widget.AppCompatImageView import androidx.core.content.ContextCompat import androidx.recyclerview.widget.RecyclerView import com.android.showMotionRealtor.R import com.android.showMotionRealtor.model.CalendarData import com.android.showMotionRealtor.model.EventMessage import java.util.* import kotlin.collections.ArrayList /** * Created by Jeetesh Surana. */ class DateAdapter(var context: Context, var mArrayList: java.util.ArrayList<CalendarData> = ArrayList(), var currentDate: Calendar, val allEvents: ArrayList<EventMessage> = ArrayList(), var mItemClickListener: ItemClickListener) : RecyclerView.Adapter<RecyclerView.ViewHolder>() { var oldPosition: Int = 0 var mLastSelectedDatePosition = -1 private var dateCal = Calendar.getInstance() private var allDate: Int? = null private var displayMonth: Int? = null private var displayYear: Int? = null private var currentMonth: Int? = null private var currentYear: Int? = null override fun onCreateViewHolder(parent: ViewGroup, viewType: Int): RecyclerView.ViewHolder { var view: View? = null when (viewType) { 0 -> { view = LayoutInflater.from(parent.context).inflate(R.layout.list_days, parent, false) return DaysViewHolder(view!!) } 1 -> { view = LayoutInflater.from(parent.context).inflate(R.layout.list_date, parent, false) return DateViewHolder(view!!) } } return null!! } override fun getItemCount(): Int { return mArrayList.size } override fun onBindViewHolder(holder: RecyclerView.ViewHolder, position: Int) { when (holder.itemViewType) { 0 -> { (holder as DaysViewHolder).bind(mArrayList[position].mDays!!) } 1 -> { dateCal.time = mArrayList[position].monthlyDates!! allDate = dateCal.get(Calendar.DAY_OF_MONTH) displayMonth = dateCal.get(Calendar.MONTH) + 1 displayYear = dateCal.get(Calendar.YEAR) currentMonth = currentDate.get(Calendar.MONTH) + 1 currentYear = currentDate.get(Calendar.YEAR) (holder as DateViewHolder).bind(allDate!!, displayMonth!!, displayYear!!, currentMonth!!, currentYear!!) setSelectionUI((holder).txtDate, position) holder.txtDate.setOnClickListener { mItemClickListener.itemClick(position) if (mLastSelectedDatePosition != -1 && mLastSelectedDatePosition != position) { mArrayList[mLastSelectedDatePosition].isDateSelected = false } mLastSelectedDatePosition = position mArrayList[position].isDateSelected = true notifyDataSetChanged() } val eventCalendar = Calendar.getInstance() for (i in 0 until allEvents.size) { eventCalendar.time = allEvents[i].reminderDate!! if (allDate == eventCalendar.get(Calendar.DAY_OF_MONTH) && displayMonth == eventCalendar.get(Calendar.MONTH) + 1 && displayYear == eventCalendar.get(Calendar.YEAR)) { holder.imgEventIcon.visibility = View.VISIBLE } } } } } //set the selected position private fun setSelectionUI(img: TextView, position: Int) { if (mArrayList[position].isDateSelected) { img.background = context.resources.getDrawable(R.drawable.circle_background) img.setTextColor(ContextCompat.getColor(context, R.color.white)) } else { img.background = null img.setTextColor(ContextCompat.getColor(context, R.color.grayBlack)) } } //set the selected position on item Click private fun userSelection(img: TextView, position: Int) { mItemClickListener.itemClick(position) if (position != oldPosition) { mArrayList[position].isDateSelected = true img.setTextColor(ContextCompat.getColor(context, R.color.white)) img.background = context.resources.getDrawable(R.drawable.circle_background) mArrayList[oldPosition].isDateSelected = false notifyItemChanged(oldPosition) oldPosition = position } } inner class DaysViewHolder(view: View) : RecyclerView.ViewHolder(view) { private var txtDays: TextView = view.findViewById(R.id.txt_Days) fun bind(days: String) { txtDays.text = days } } inner class DateViewHolder(view: View) : RecyclerView.ViewHolder(view) { var txtDate: TextView = view.findViewById(R.id.txt_Date) var imgEventIcon: AppCompatImageView = view.findViewById(R.id.imgEventIcon) @SuppressLint("LogNotTimber") fun bind(dayValue: Int, displayMonth: Int, displayYear: Int, currentMonth: Int, currentYear: Int) { if (displayMonth == currentMonth && displayYear == currentYear) { txtDate.visibility = View.VISIBLE } else { txtDate.visibility = View.GONE } txtDate.text = dayValue.toString() } } override fun getItemViewType(position: Int): Int { return mArrayList[position].viewType } interface ItemClickListener { fun itemClick(position: Int) } fun currentSelectedDatePosition(position: Int) { mLastSelectedDatePosition = position + 7 } } _______________________________________________ implementation _______________________________________________ //set Calendar Date val cal = Calendar.getInstance(Locale.ENGLISH) cal.time = getDateObject(currentDate!!)!! customCalender?.setCalendar(cal) //get Calendar Date override fun onDestroy() { if (customCalender?.getCurrentSelectedDate() != null) { EventBus.getDefault().post(CurrentSelectedDate(customCalender?.getCurrentSelectedDate()!!)) } super.onDestroy() } _______________________________________________
0 notes
Text
Android App Widgets Tutorial
The most successful applications are often the simplest to use. This means that users want to see the information they need “at-a-glance” without unlocking their phone or launching the related app. On the Android platform you can achieve this in two different ways. The first, and most recent, is Android Wear, and you can learn more about in Getting Started with Android Wear with Kotlin. The second, the topic of this tutorial, is through the implementation of App Widgets. App Widgets have been available in the Android ecosystem since version Android 1.6 (Donut).
In this tutorial you’ll create an App Widget for a Coffee Log application that will allow you to control your daily usage of caffeine right from your home screen. :]
Note: Most developers love coffee, but we also know that health is very important, so I advise you to read the interesting article Health and Fitness for Developers
You’ll follow the typical process for Widget development and learn how to:
Create the Widget user interface
Get up-to-date information in the Widget
Interact with the Widget
If you’re new to Android Development, I recommended that you read Beginning Android Development with Kotlin before you start, as well as Kotlin for Android. For this tutorial you’ll also need Android Studio 3.1.2 or later.
Getting started
The first thing you should do is to download the sample project for this tutorial using the download button at the top or bottom of the tutorial. The zip file contains Android Studio projects for the starter and final versions of the Coffee Log application.
Unzip the file in a folder of your choice, go to File/Open or choose “Open an existing Android Studio project” from the Welcome to Android Studio window, and select the build.gradle file in the root folder of the starter project.
Once the project finishes loading and performing a Gradle build, you can have a look at the file structure, which should be like this:
Now that you are in the project, take a look around, especially in MainActivity, where all the logging happens. CoffeeTypes is a simple enum class with all the coffee types and their caffeine quantity in grams, while the CoffeeLoggerPersistence class is managing persistence using SharedPreferences.
It’s time to start tracking our caffeine consumption! Build and run the app by going to the Build\Make Project or using the green “play” button from the toolbar. The app will appear in your emulator or device, looking like this:
The app allows you to see how many grams of coffee you drank so far today and select new drinks to update your consumption count. Each selection leads to an update of the total displayed.
To use the app to log your coffee consumption, you have to launch the full application. As always, we can do better. What about making your user’s life simpler with an App Widget like this one?
With a Widget, you can access the same information as the application, and display a powerful motivational quote, just by using your device home screen. As you can see the layout is different because the list is now a set of 3 buttons.
There’s a lot to cover to create an App Widegt, so let’s dig in!
App widget anatomy
As the Android documentation says, an App Widget is a component that can be embedded in other applications, typically the Home screen. Security and performance are very important, so the Android platform has defined a very clear protocol that describes how an App Widget communicates with its own app and interacts with the hosting one. This is why the developer has to provide a configuration file with the following information:
The Widget layout
The Widget screen space
Whether the Widget can resize and how
A preview image that users will see when dragging the Widget on the screen
How often refreshing data can happen
An optional Configuration screen
As you’ll see, the Android system uses this information in different stages of the Widget lifecycle. The layout information is useful when the Widget is running and interacting with the user. Resize, preview and screen space required are useful when the user decides to select the Widget and drag it into the Home screen.
User interface
As you’ve seen in the previous images, apps and Widgets have different UIs. This is because the available space is different, as well as the user interaction modes. For both apps and Widgets, you can define the layout using a resource file.
You have to remember that a Widget is running in a different application and so some restrictions are in place for security and performance reasons. This means that you can only use a subset of the standard components, with which you can then interact only using a specific object of type RemoteViews. In particular, you can use only:
AnalogClock
Button
Chronometer
ImageButton
ImageView
ProgressBar
TextView
ViewFlipper
ListView
GridView
StackView
AdapterViewFlipper
Along with ViewStub, which allows a lazy inflation of a layout, you can only use the following containers:
FrameLayout
LinearLayout
RelativeLayout
GridLayout
Extensions of these classes are not allowed.
The check on these constraints is strong. Because of these restrinctions, a Widget layout has to be very simple and only use simple components like TextView, Button or ImageView.
Resizability and preview
The configuration file is the mechanism used to describe your Widget to the Android system. You can use this for setting the supported Widget sizes, telling the system whether the Widget is resizable or not, and providing an image to display when the user decides to add a Widget to their Home screen. You’ll see all of these when you insert your Widget for the first time.
Refreshing the widget
The data the Widget displays must always be up to date without wasting system resources. This means that the UI should be updated only when the data changes, and this can happen for different reasons. If the user interacts with the Widget, you need a way to update the UI and then send the event to the main app. If something is happening in the main app, you need a way to tell the Widget to refresh.
The Android platform also provides a third way, an automatic refresh of the Widget at an interval that can be set using the configuration file. Performance limitations don’t allow an update frequency greater than 30 minutes.
Widget customisation
In the case of Coffee Log, there are just three different type of coffees. But what if the user is not interested in Long coffee or they just want a different drink instead, or what if they want to simply change the quantity of grams. Or maybe the user wants to customise the background color of the Widget. As you’ll see, it’s possible to provide a configuration screen to allow all the needed customisation.
Create your Widget
Enough theory, now you can start creating your Widget. Creating a Widget requires the definition of some code and configuration files according to the specification defined by the Android platform.
Android Studio makes this process very easy, through the usage of a simple wizard, which you can access by selecting New\Widget\App widget from the File menu. You’ll see the following window:
Add the following input to the window:
Class name: CoffeeLoggerWidget
Minimum Width (cells): 3
Minimum Height (cells): 2
Here you can also see how it’s possible to define whether the Widget is resizable and what its possible destinations are. A Widget is usually part of the Home screen, but it could also part of the Keyguard, which is the screen that appears when the phone is locked.
Select Finish, and Android Studio will create three files for you:
CoffeeLoggerWidget.kt: this is a Kotlin class with the same name used in the wizard, and acts as the controller for the Widget. You’ll learn how to change this code in order to access the UI component through the RemoteViews class and how to receive and manage events from the Widget itself.
coffee_logger_widget_info.xml: this is the configuration file we described earlier with information about the refresh rate, resizability, dimensions, etc. This is the file you’re going to edit in order to provide a configuration Activity for the Widget.
coffee_logger_widget.xml: this file contains the widget’s user interface layout.
It’s important to note where all these files are in the project structure:
In particular, you see how the configuration file has been created as an XML resource file.
As you’ll see later, the wizard also made some changes to the app AndroidManifest.xml file.
Customizing the User Interface
In order to customize the UI for the Widget, open coffee_logger_widget.xml in the app\res\layout folder. The Android Studio wizard generated the following layout that you need to update:
<RelativeLayout xmlns:android="http://schemas.android.com/apk/res/android" android:layout_width="match_parent" android:layout_height="match_parent" android:background="#09C" android:padding="@dimen/widget_margin"> <TextView android:id="@+id/appwidget_text" android:layout_width="wrap_content" android:layout_height="wrap_content" android:layout_centerHorizontal="true" android:layout_centerVertical="true" android:layout_margin="8dp" android:background="#09C" android:contentDescription="@string/appwidget_text" android:text="@string/appwidget_text" android:textColor="#ffffff" android:textSize="24sp" android:textStyle="bold|italic" /> </RelativeLayout>
Remove the TextView and replace the RelativeLayout with a LinearLayout. In Android Studio, you can do this by double-clicking on the old name and typing the new name in its place. After this change you should have this:
<LinearLayout xmlns:android="http://schemas.android.com/apk/res/android" android:layout_width="match_parent" android:layout_height="match_parent" android:background="#09C" android:padding="@dimen/widget_margin"> </LinearLayout>
Note: You’re going to use styles that are already defined in the sample project. They contain text sizes and colors, heights, widths, alignments, and other style values. If you are curious about them, check out styles.xml in the res/values folder.
Next, add three more attributes to the LinearLayout:
... android:id="@+id/widget_layout" android:orientation="vertical" android:gravity="center" ...
The android:orientation and android:gravity attributes give the LinearLayout information about how to align its content. Providing an id is also important in case we need to get a reference to the layout in the Kotlin code.
To achieve rounded corners, change the android:background attribute to @drawable/background, a drawable available in the starter project. Now the root element of the layout looks like this:
<LinearLayout xmlns:android="http://schemas.android.com/apk/res/android" android:id="@+id/widget_layout" android:layout_width="match_parent" android:layout_height="match_parent" android:background="@drawable/background" android:gravity="center" android:orientation="vertical" android:padding="@dimen/widget_margin"> </LinearLayout>
Thinking vertically
For the sake of aesthetics, the user interface should look good regardless of the Widget size. It’s best to have the Widget elements spread over the available space. There are many ways to achieve that, but you should go for the simplest which consists of adding some TextView components that will expand in the remaining space between the rest of the elements.
Here’s a schematic of the layout you’ll create:
The green pattern will be a TextView that expands vertically and the blue pattern will be a TextView that expands horizontally. Keep this schematic in mind as you build the layout to understand why you add each element.
Note:If you’re tempted to fill the empty spaces using a Space instead of TextView, remember that a Widget has some UI restrictions and that a Space is not one of the allowed components.
The first element in the LinearLayout is a vertical space that you can define by adding this code as the first child:
<TextView style="@style/WidgetButtonVerticalSpace" />
Now you can add the TextView components for the amout of coffee:
<TextView android:id="@+id/appwidget_text" style="@style/WidgetTextView.Big" /> <TextView style="@style/WidgetTextView" android:text="@string/grams" />
Then add another TextView for the next vertical space before the buttons:
<TextView style="@style/WidgetButtonVerticalSpace" />
Notice that the first text view needs to have an id because you will need to change the text later on from the Kotlin code. The second one is fixed text. You’re using the predefined styles on the text views.
Next, add a container for the buttons as a LinearLayout with horizontal orientation:
<LinearLayout android:layout_width="match_parent" android:layout_height="wrap_content" android:orientation="horizontal"> <!-- Buttons go here --> </LinearLayout>
Then a TextView for the quote after the last vertical space.
<TextView style="@style/WidgetButtonVerticalSpace" /> <TextView android:id="@+id/coffee_quote" style="@style/WidgetQuote" />
Adding buttons
Now the green part of the layout is fnished and you have to deal with the blue part for the buttons following this schematic:
You’ve already created a container for them so you just need to start with a TextView that expands horizontally and will keep the first button at a distance from the left margin:
<TextView style="@style/WidgetButtonHorizontalSpace" />
Then you can add the first button for smallest coffee in the world:
<LinearLayout android:id="@+id/ristretto_button" style="@style/WidgetBeverageButton" > <ImageView style="@style/WidgetButtonImage" android:src="@drawable/ic_ristretto" /> <TextView style="@style/WidgetButtonText" android:text="@string/ristretto_short" /> </LinearLayout> <TextView style="@style/WidgetButtonHorizontalSpace" />
Each button has a LinearLayout that contains an ImageView and a TextView. After the button, you added another horizontally expanding TextView to help the buttons spread.
Add the next button for Espresso:
<LinearLayout android:id="@+id/espresso_button" style="@style/WidgetBeverageButton"> <ImageView style="@style/WidgetButtonImage" android:src="@drawable/ic_espresso" /> <TextView style="@style/WidgetButtonText" android:text="@string/espresso_short" /> </LinearLayout> <TextView style="@style/WidgetButtonHorizontalSpace" />
And the final button for the Long:
<LinearLayout android:id="@+id/long_button" style="@style/WidgetBeverageButton" > <ImageView style="@style/WidgetButtonImage" android:src="@drawable/ic_long_coffee" /> <TextView style="@style/WidgetButtonText" android:text="@string/long_coffee_short" /> </LinearLayout> <TextView style="@style/WidgetButtonHorizontalSpace" />
Phew! That was long but you’re done with the layout for the widget. :]
Run your Widget
The Widget you’ve created is beautiful, but it’s not doing anything quite yet. Build and run your app to make sure there’s no error in the XML. Just to be sure everything is fine, add the widget to the screen. If you’ve never added a widget to your Home screen before, here are the steps:
Go to the Home screen
Long press on an empty space
Select “Widgets”
Long press on the Coffee Log Widget
Drop it wherever you like on the screen
Your widget looks like this:
Notice how the autogenerated code populated the first TextView with “EXAMPLE”. Later in this tutorial, you will update it with the right number of coffee grams.
Performing actions
Now it’s time to add some interactivity to the Widget. When the user selects a button, you’ll have to open MainActivity, passing information about the selected coffee in order to update the total number of grams in today’s record.
Unfortunately, launching a simple Intent is not enough, because we have to remember that our Widget is running in an application that is different from ours and runs in another Android process. The Android platform has a solution for this called PendingIntent that is basically a way to ask another application to launch an Intent for you.
Open then the CoffeeLoggerWidget.kt file and add this utility function at the end of the companion object:
private fun getPendingIntent(context: Context, value: Int): PendingIntent { //1 val intent = Intent(context, MainActivity::class.java) //2 intent.action = Constants.ADD_COFFEE_INTENT //3 intent.putExtra(Constants.GRAMS_EXTRA, value) //4 return PendingIntent.getActivity(context, value, intent, 0) }
This Kotlin function has the responsibility of creating a PendingIntent for a given coffee:
First you define the Intent to launch as usual using the destination class as argument; in your case it’s the MainActivity class.
The MainActivity can be launched in different ways, and you need something that identifies how much to vary the coffee content. To do this you use an action MainActivity can recognise.
You also need to put into the Intent the quantity to add. Remember, MainActivity doesn’t know what button was pressed on the Widget!
Create the PendingIntent and return it to the caller of the function
Since you now have the action prepared, attach them to the buttons. Go to the updateAppWidget() function in the companion object and add the following code just before its last instruction appWidgetManager.updateAppWidget(...):
views.setOnClickPendingIntent(R.id.ristretto_button, getPendingIntent(context, CoffeeTypes.RISTRETTO.grams)) views.setOnClickPendingIntent(R.id.espresso_button, getPendingIntent(context, CoffeeTypes.ESPRESSO.grams)) views.setOnClickPendingIntent(R.id.long_button, getPendingIntent(context, CoffeeTypes.LONG.grams))
It is worth noting that updateAppWidget() is a convenience method the Android Studio wizard created in order to encapsulate the update logic for a given Widget. Looking at the same Kotlin class, you see that it’s invoked in the onUpdate() method for each Widget that requires an update. This call also happens when the Widget appears in the hosting application for the first time.
override fun onUpdate(context: Context, appWidgetManager: AppWidgetManager, appWidgetIds: IntArray) { // There may be multiple widgets active, so update all of them for (appWidgetId in appWidgetIds) { updateAppWidget(context, appWidgetManager, appWidgetId) } }
The RemoteViews class
Now your code should look like this:
internal fun updateAppWidget(context: Context, appWidgetManager: AppWidgetManager, appWidgetId: Int) { //1 val widgetText = context.getString(R.string.appwidget_text) //2 val views = RemoteViews(context.packageName, R.layout.coffee_logger_widget) //3 views.setTextViewText(R.id.appwidget_text, widgetText) //4 views.setOnClickPendingIntent(R.id.ristretto_button, getPendingIntent(context, CoffeeTypes.RISTRETTO.grams)) views.setOnClickPendingIntent(R.id.espresso_button, getPendingIntent(context, CoffeeTypes.ESPRESSO.grams)) views.setOnClickPendingIntent(R.id.long_button, getPendingIntent(context, CoffeeTypes.LONG.grams)) // 5 appWidgetManager.updateAppWidget(appWidgetId, views) }
Here’s what’s going on:
You’re using the Context in order to access a string resource.
An instance of the RemoteViews class is created and given the widget’s layout id. A RemoteViews is basically a mirror image of what you’re going to display in the Widget.
You set the previous string as content of the TextView with id R.id.appwidget_text. It’s very important to note that you can’t access the TextView directly and that only some operations are allowed using the RemoteViews; in this case you’re setting a text.
Using the RemoteViews instance, you register a PendingIntent to use when the user clicks on a each Widget button.
The last instruction binds the specific instance of RemoteViews to the specific instance of the Widget.
Build and run now. You won’t see any difference in the widget, but clicking the Widget buttons will open the app with an updated value of grams. Great job!
Updating the Widget
Widgets should always display the lastest available information, and the update frequency depends on the specific type of data. A Weather Widget doesn’t need a very frequent update, unlike the score of a football match or the price of a specific stock.
You need a way to invoke the previous onUpdate() method at a specific time interval in order to create the new RemoteViews with the new data.
The following drawing gives you an idea of the process:
The problem is how to send the “I need a refresh!” message to the Widget.
Widget configuration
When the update frequency you need is longer than 30 minutes, you don’t need to write any code and you can simply rely on the configuration file coffee_logger_widget_info.xml Android Studio generated in the res\xml folder.
<?xml version="1.0" encoding="utf-8"?> <appwidget-provider xmlns:android="http://schemas.android.com/apk/res/android" android:initialKeyguardLayout="@layout/coffee_logger_widget" android:initialLayout="@layout/coffee_logger_widget" android:minHeight="110dp" android:minWidth="180dp" android:previewImage="@drawable/example_appwidget_preview" android:resizeMode="horizontal|vertical" android:updatePeriodMillis="86400000" android:widgetCategory="home_screen"> </appwidget-provider>
The Widget refresh rate is the one defined in the attribute android:updatePeriodMillis. The default value is one day in milliseconds.
Managing updates requests
If you understand how the Android platform manages updates to your Widget, you can replicate the same thing at will. The Android Studio wizard created the CoffeeLoggerWidget class that extends AppWidgetProvider, but we didn’t realize that this was a particular implementation of a BroadcastReceiver.
You can see that by looking at the updates the wizard made to the AndroidManifest.xml file:
<?xml version="1.0" encoding="utf-8"?> <manifest xmlns:android="http://schemas.android.com/apk/res/android" package="com.raywenderlich.android.coffeelogs"> - - - - <receiver android:name=".CoffeeLoggerWidget"> <intent-filter> <action android:name="android.appwidget.action.APPWIDGET_UPDATE" /> </intent-filter> <meta-data android:name="android.appwidget.provider" android:resource="@xml/coffee_logger_widget_info" /> </receiver> - - - - </manifest>
Based on the specific Intent‘s action, the AppWidgetProvider dispatches the call to a different methods. Launching an Intent with the android.appwidget.action.APPWIDGET_UPDATE action results in the invocation of the onUpdate() function.
This is exactly what the Android system does at the interval set in the coffee_logger_widget_info.xml configuration file. This means that the updateAppWidget() function is the perfect place for the code to execute on every update.
So add the following line to the beginning of the function:
val coffeeLoggerPersistence = CoffeeLoggerPersistence(context)
and change widgetText to take the value from there:
val widgetText = coffeeLoggerPersistence.loadTitlePref().toString()
Good! Build and run and you’ll see that the widget is periodically updating the “grams” value. Seems like someone had a little too much coffee:
Update the widget manually
If your app needs to update the data in the Widget more frequently, you already have the solution: you can simply periodically launch the same Intent the Android system does. In the case of the Coffee Log application this happens every time the user selects a coffee in the app.
Open MainActivity and add the following code at the end of refreshTodayLabel:
// Send a broadcast so that the Operating system updates the widget // 1 val man = AppWidgetManager.getInstance(this) // 2 val ids = man.getAppWidgetIds( ComponentName(this, CoffeeLoggerWidget::class.java)) // 3 val updateIntent = Intent(AppWidgetManager.ACTION_APPWIDGET_UPDATE) // 4 updateIntent.putExtra(AppWidgetManager.EXTRA_APPWIDGET_IDS, ids) // 5 sendBroadcast(updateIntent)
Since this code has some new elements, let me walk you through it:
Get the AppWidgetManager instance, which is responsible for all the installed Widgets.
Ask for the identifiers of all the instances of your widget (you could add more than one to your homescreen).
Create an Intent with the android.appwidget.action.APPWIDGET_UPDATE action asking for an update.
Add the ids of the widgets you are sending the Intent to as extras of the Intent for the AppWidgetManager.EXTRA_APPWIDGET_IDS key.
Finally, send the broadcast message.
Build and run tha app to check that everytime you add some coffee, the widget also updates.
Communicating via Service
Not all the updates needed for Widgets are a consequence of an action from the user. Typical cases are data from a server through periodic polling and push notification events. In cases like these, the request has to come from a different component, which you usually implement as an Android Service.
Choose File\New\Service\Service and change the name to CoffeeQuotesService.
When you click Finish, Android studio generates a Kotlin file for you for the Service.
In CoffeeQuotesService, replace the current implementation of onBind() with:
return null
Change the return type of onBind to be the nullable IBinder?.
Then add this function, which is the one the Android system invokes at every launch of the service Service:
override fun onStartCommand(intent: Intent?, flags: Int, startId: Int): Int { val appWidgetManager = AppWidgetManager.getInstance(this) val allWidgetIds = intent?.getIntArrayExtra(AppWidgetManager.EXTRA_APPWIDGET_IDS) //1 if (allWidgetIds != null) { //2 for (appWidgetId in allWidgetIds) { //3 CoffeeLoggerWidget.updateAppWidget(this, appWidgetManager, appWidgetId) } } return super.onStartCommand(intent, flags, startId) }
You’ve seen the first two lines before. The others do the following:
Check that the array of allWidgetIds was in the Intent.
Loop through the allWidgetIds list.
Update each widget.
Now, you need to call this service instead of directly updating the widget. Open CoffeeLoggerWidget and replace the content of onUpdate() with the following in order to start the Service:
val intent = Intent(context.applicationContext, CoffeeQuotesService::class.java) intent.putExtra(AppWidgetManager.EXTRA_APPWIDGET_IDS, appWidgetIds) context.startService(intent)
This creates an Intent, puts the Widget ids in the intent, and starts the Service.
In the companion object, add the following function:
private fun getRandomQuote(context: Context): String { //1 val quotes = context.resources.getStringArray(R.array.coffee_texts) //2 val rand = Math.random() * quotes.size //3 return quotes[rand.toInt()].toString() }
This function generates a random coffee quote:
It takes a quote array from the strings file
It picks a random number
Finally, it returns the string at the random position
After you have the string, update the widget. In updateAppWidget() add this before the last call:
views.setTextViewText(R.id.coffee_quote, getRandomQuote(context))
That’s it. Every time the widget updates, you get a new quote!
Making it personal
People like to personalize the look and functionality of their Home screens, and Widgets are no exception. You have to take into account that a general purpose Widget won’t bring much value to a user. To make it personal you need to let the users set up preferences and configurations.
Earlier, when covering the configuration of a Widget, you learned that it can have a Configuration screen. This is an Activity that is automatically launched when the user adds a Widget on the home screen. Note that the preferences are set up per Widget because users can add more than one instance of a Widget. It’s better to think about saving this preferences with the id of the Widget.
In this project, the configuration screen could contain a coffee amount limit. If the user logs more coffee than the limit, the Widget will turn into a soft but alarming pink.
Creating a preferences screen
The preference screen for a Widget is an Activity. Choose New\Activity\Empty activity from the File menu and edit the fields to be
Activity name: CoffeeLoggerWidgetConfigureActivity
Layout Name: activity_coffee_logger_widget_configure
Make sure the Launcher Activity checkbox is unchecked and the Source Language is Kotlin.
When you click Finish, Android Studio will generate the code for the new Activity and a template for the layout file, along with adding the registration of the Activity in the AndroidManifest.xml file.
Now create the layout for the configuration screen. Open activity_coffee_logger_widget_configure.xml and add the following:
<?xml version="1.0" encoding="utf-8"?> <LinearLayout xmlns:android="http://schemas.android.com/apk/res/android" android:layout_width="match_parent" android:layout_height="wrap_content" android:orientation="vertical" android:padding="16dp"> <TextView android:layout_width="match_parent" android:layout_height="wrap_content" android:layout_marginBottom="8dp" android:labelFor="@+id/appwidget_text" android:text="@string/coffee_amount_limit" /> <EditText android:id="@id/appwidget_text" android:layout_width="match_parent" android:layout_height="wrap_content" android:inputType="number" /> <Button android:id="@+id/add_button" android:layout_width="wrap_content" android:layout_height="wrap_content" android:layout_marginTop="8dp" android:text="@string/save_configuration" /> </LinearLayout>
The layout is nothing complicated: a TextView that represents a label to the EditText, and a Button for the user to save the preferences.
Know your limits
Open CoffeeLoggerWidgetConfigureActivity and add these fields above onCreate() (developers usually put fields at the beginning of the class):
private lateinit var appWidgetText: EditText private var appWidgetId = AppWidgetManager.INVALID_APPWIDGET_ID private val coffeeLoggerPersistence = CoffeeLoggerPersistence(this)
You will need to use these fields later to save the limit value for each widget.
In onCreate(), add the following code at the end:
//1 appWidgetText = findViewById(R.id.appwidget_text) //2 val extras = intent.extras //3 appWidgetId = extras.getInt( AppWidgetManager.EXTRA_APPWIDGET_ID, AppWidgetManager.INVALID_APPWIDGET_ID) //4 setResult(Activity.RESULT_CANCELED)
Here’s what the code does:
Find the EditText in the layout.
Get the extras from the Intent that launched the Activity.
Extract the appWidgetId of the widget.
Make sure that if the user doesn’t press the “Save Configuration” button, the widget is not added.
Finally, you need to save the configuration when the user presses the “Save Configuration” button. Below onCreate(), declare the following OnClickListener implementation:
private var onClickListener: View.OnClickListener = View.OnClickListener { // 1 val widgetText = appWidgetText.text.toString() // 2 coffeeLoggerPersistence.saveLimitPref(widgetText.toInt(), appWidgetId) // 3 val resultValue = Intent() resultValue.putExtra(AppWidgetManager.EXTRA_APPWIDGET_ID, appWidgetId) // 4 setResult(RESULT_OK, resultValue) // 5 finish() }
Here you:
Get the text input – the coffee limit.
Save the limit to local storage (using the Widget id).
Create a new Intent to return to the caller of the Activity and add the id of the Widget you’re configuring.
Tell the operating system that the configuration is OK. Do this by passing an Intent that contains the widget id.
Close the configuration screen
Attach this listener to the button by adding the following line below setContentView() in onCreate():
findViewById<View>(R.id.add_button).setOnClickListener(onClickListener)
This is a chained instruction that finds the Button object and sets its listener.
Linking preferences to the widget
It is a good idea to refresh the widget after the user saves the preferences. That’s because the limit might already be exceeded at the moment of adding a new widget. For this reason, write another method at the end of CoffeeLoggerWidgetConfigureActivity to trigger the refresh:
private fun updateWidget() { val appWidgetManager = AppWidgetManager.getInstance(this) CoffeeLoggerWidget.updateAppWidget(this, appWidgetManager, appWidgetId) }
The function retrieves the AppWidgetManager and triggers an update to the corresponding widget. Call this function in the OnClickListener after saving the coffee limit to coffeeLoggerPersistence. It should be before creating the Intent:
updateWidget()
To launch the configuration screen whenever the user adds a widget, you need to add it to the widget configuration file. With this in mind, open coffee_logger_widget_info.xml and add the following attribute to appwidget-provider:
android:configure="com.raywenderlich.android.coffeelogs.CoffeeLoggerWidgetConfigureActivity"
Build and run, then go to the home screen. Long press the widget and drag it to the “Remove” area. Add another widget as before and check that the configuration screen appears. It should look like this:
Enter a value in the field like 10 and press “Save configuration” to add the widget.
To make the widget react to the limit, add this in CoffeeLoggerWidget inside updateAppWidget*(, before the last line:
// 1 val limit = coffeeLoggerPersistence.getLimitPref(appWidgetId) // 2 val background = if (limit <= widgetText.toInt()) R.drawable.background_overlimit else R.drawable.background // 3 views.setInt(R.id.widget_layout, "setBackgroundResource", background)
Step by step:
First, get the limit saved by the user for that widget.
Decide if the user exceeds the limit of coffee and establish one of the two possible backgrounds: pink or blue.
Set the background to the widget's root element.
Finally, build and run. After the app opens log more coffees than the limit you set. Let's say your limit was 10: log three Espresso and go back to the home screen. As a result, your widget is now pink:
Best practices
Some final advice before you start adventuring into the world of Widgets:
Design the smallest Widget size you can. Don't take up screen real-estate if you don't need it. Be aware that the user might resize it into a bigger area.
Don't refresh the Widget too often because it will drain the battery. On the other hand, don't refresh it too rarely because it won't be useful on the screen.
Make sure you read the official guidelines for Widget design and follow the recommendations. Revisit them from time to time because things change and things get added.
Think of Widgets as a shortcut window into your app. Provide the most important information and actions in it.
Where to go from here
Congratulations, you've finished your App Widget! Download the final project using the button at the top or bottom of the tutorial.
You learned how to develop an App widget to track your coffee intake. In summary, some of your new skills are:
Create a widget layout
Link a configuration screen
Communicate via a Service
... and tie them all together. This is impressive!
You can learn more about App Widgets by checking out the official docs.
For a better understanding of Intents, have a look at the Android Intents Tutorial.
You can create a better user interface for your apps and widgets with more Material Design. Get a little knowledge boost from Android: An Introduction to Material Design.
If you have any questions or comments about Android App Widgets, please join the forum discussion below!
The post Android App Widgets Tutorial appeared first on Ray Wenderlich.
Android App Widgets Tutorial published first on https://medium.com/@koresol
0 notes
Link
Envato Tuts+ Code http://j.mp/2AeW48l
While Activity handles user interaction with your app, Layout determines how the app should look. In this post, you'll learn how a layout defines the visual structure for a user interface, such as the UI for an activity or app widget.
The Layout
The Layout file is an XML file that describes the GUI of a screen of your app. For this example, we'll be creating a linear layout, which is used to display GUI components side by side. These components can be displayed vertically or horizontally. When displayed horizontally, they are displayed in a single row. When displayed vertically, they are displayed in a single column.
Here is an example of what a linear layout looks like.
<?xml version="1.0" encoding="utf-8"?> <LinearLayout xmlns:android="http://j.mp/2B8wijc" xmlns:tools="http://j.mp/2AeW5sV" android:layout_width="match_parent" android:layout_height="match_parent" android:padding="16dp" android:orientation="vertical" tools:context="com.tutsplus.code.android.tutsplusupload.MainActivity"> </LinearLayout>
In the image below, you can see the code, and how it displays on an Android device.
The layout starts with an XML declaration. It specifies the XML version and the encoding.
The next line is the opening tag for the linear layout. Inside it, you have a line that looks like this:
xmlns:android="http://j.mp/2B8wijc"
This specifies the XML namespace, used to provide unique names for elements and attributes in an XML document. xmlns:android here describes the Android namespace. This namespacing system was chosen by Google to help Android Studio handle errors during compile time. The Android namespace helps distinguish official Android widgets from custom ones. For example, it lets you distinguish between a custom textview widget and the Android textview widget. The URI of the namespace is http://j.mp/2B8wijc.
The next namespace—xmlns:tools—gives you access to tools attributes. This is not the default namespace: you can build your Android application without making use of it. However, using it helps you add metadata to your resource files that help in the manipulation and rendering of layouts in the Design View. When referencing elements or attributes provided by the tools attributes, you must add the tools prefix. I'll explain later how we use the tools attributes in this code.
For now, let's look at the next part.
android:layout_width="match_parent" android:layout_height="match_parent" android:padding="16dp" android:orientation="vertical"
These attributes are used to determine the width and height of the layout. They also state the amount of padding to be used and whether the components are to be placed vertically or horizontally. Here, vertical orientation is chosen.
Width and Height
android:layout_width and android:layout_height are used to specify the width and height to be used for the layout component. You can use the values wrap_content or match_parent to determine the width and height of your component. wrap_content means the layout (or view) should be big enough for the content. match_parent means it should be as wide as the parent layout.
Padding
Padding is the space between the view or layout and its border. When you make use of android:padding, the space on all four sides of the view or layout will have the specified measurement. If you want to control the individual parts of the padding separately, you can use android:paddingBottom, android:paddingLeft, android:paddingRight, and android:paddingTop. Note that these values are specified in "dp"—density-independent pixels. More on these soon!
Margins
While the padding is applied to the layout or view and its border (within the component), the margin is applied to layout or view border and other surrounding components outside the component. You can use android:layout_margin to specify the margin on all sides at once, or you can control the individual parts of the padding separately with android:layout_marginBottom, android:layout_marginLeft, android:layout_marginRight, and android:layout_marginTop. These are also specified in dp.
What Is dp?
A density-independent pixel, or dp for short, is an abstract unit that is based on the physical density of the screen. Density-independent pixels are used when defining UI layouts. They're used to express the dimensions of the layout or position in a density-independent way. You can read more about density independence in Android here.
Context
The context attribute is used to declare the activity the layout is associated with by default. Here you can see that the sample layout is associated with the MainActivity.
tools:context="com.tutsplus.code.android.tutsplusupload.MainActivity"
You can also write this in a shorter form as:
tools:context=".MainActivity"
This is only used when working in Design View, as a layout can be associated with more than one activity.
Child Components
Layouts contain child components. Actually, that is their whole purpose: to organize and display other components.
Let's add some components to the linear layout—starting with a button view.
<Button android:id="@+id/button" android:layout_width="match_parent" android:layout_height="wrap_content" BeerAdviser android:text="Button" />
We'll also add a text view, which has very similar properties to a button view.
<TextView android:id="@+id/textView" android:layout_width="wrap_content" android:layout_height="wrap_content" android:text="This is a text view" />
We have covered android:layout_height and android:layout_width, so now let's see the others.
Component Id
The android:id property is used to give the component an identifying name. This allows you to access your component from within the Java code of an activity, using the findViewById() method.
Component Text
The android:text attribute is used to tell Android what the text component should display. In the case of the button view, the text Button will be displayed.
Let's run our code so far and see what it looks like.
Recapping, the first element has to be the layout you will be making use of. Here it is LinearLayout. The orientation specified tells Android to display the components in the layout in a single vertical column. The <Button> element is the first element that will be displayed. It will take up the width of the parent, and its height will be determined by its text content.
The second element is a text view which will be displayed underneath the button. Both the height and width will be restricted to the height and width of the content.
String Resources
In our example above, we hardcoded the text for the text view using android:text="This is a text view". This is fine when you start off as a beginner, but it's not the best approach. Suppose you created an app that hits big on Google Play Store, and you don't want to limit yourself to just one country or language. If you hardcoded all the text in your layout files, making your app available for different languages will be difficult. So what is the best approach?
The best approach involves you putting your text values in a string resource file: strings.xml. This makes internationalization for your app easy. It makes it easier to make global changes to your application as you need to edit only one file.
The strings.xml file is located in the app/src/main/res/values folder. When you open it, it should have a structure like this.
<resources> <string name="app_name">Tutsplus Upload</string> </resources>
Here you have one string resource named app_name, with a value of Tutsplus Upload.
You can add other string resources using the same structure. For the button and text in your layout, the structure can look like this.
<resources> <string name="app_name">Tutsplus Upload</string> <string name="main_button">Button</string> <string name="first_text">This is a text!</string> </resources>
To use these string resources in your layout, you have to update the text part of both views with their respective resource.
android:text="@string/main_button" android:text="@string/first_text"
The @string tells Android to look for a text value in the string resource file. After that is the resource name. Android will look up the value of the resource that corresponds to that name and use it for your component.
Wrapping up, here's how your layout will look:
Conclusion
In this post, you've learned some of the basics of working with layouts. As you build more complex applications, you will see how all the parts fit together. After following along with this post, you should be able to understand how to work with linear layouts, text and button views, and string resources.
While you're here, check out some of our other great posts on Android app development.
http://j.mp/2AeQ1kg via Envato Tuts+ Code URL : http://j.mp/2etecmc
0 notes
Text
Android-RatioFillLayout
A custom layout that fills given width or height as per the original ratio of each child.
If given width or height is exceeded, it largely replicates the behavior of LinearLayout.
What RatioFillLayout offers:
Orientation: horizontal, vertical
Gravity: top, bottom, left, right, centerhorizontal, centervertical
from The Android Arsenal http://ift.tt/2zNvd0z
0 notes
Text
Android PopupWindow Example
Here you will get Android PopupWindow example code.
Popup window is a floating view that is displayed on top of an activity. Android provides PopupWindow class for creating a popup window with custom design. Below I have shared code to create simple popup window in android with a text and button to close it.
Android PopupWindow Example
Create an android project with package name com.popupwindow. Add following code in respective files.
res/layout/activity_main.xml
<?xml version="1.0" encoding="utf-8"?> <LinearLayout xmlns:android="http://schemas.android.com/apk/res/android" xmlns:app="http://schemas.android.com/apk/res-auto" xmlns:tools="http://schemas.android.com/tools" android:layout_width="match_parent" android:layout_height="match_parent" tools:context="com.popupwindow.MainActivity" android:id="@+id/linearLayout1"> <Button android:layout_width="match_parent" android:layout_height="wrap_content" android:text="Show Popup Window" android:id="@+id/showPopupBtn"/> </LinearLayout>
res/layout/popup.xml
<?xml version="1.0" encoding="utf-8"?> <LinearLayout xmlns:android="http://schemas.android.com/apk/res/android" android:orientation="vertical" android:layout_width="match_parent" android:layout_height="match_parent" android:gravity="center" android:background="#000" android:padding="10px"> <TextView android:layout_width="wrap_content" android:layout_height="wrap_content" android:text="This is a popup window.." android:textColor="#fff"/> <Button android:layout_width="wrap_content" android:layout_height="wrap_content" android:text="Close" android:id="@+id/closePopupBtn"/> </LinearLayout>
MainActivity.java
package com.popupwindow; import android.content.Context; import android.support.v7.app.AppCompatActivity; import android.os.Bundle; import android.view.Gravity; import android.view.LayoutInflater; import android.view.View; import android.view.ViewGroup.LayoutParams; import android.widget.Button; import android.widget.LinearLayout; import android.widget.PopupWindow; public class MainActivity extends AppCompatActivity { Button showPopupBtn, closePopupBtn; PopupWindow popupWindow; LinearLayout linearLayout1; @Override protected void onCreate(Bundle savedInstanceState) { super.onCreate(savedInstanceState); setContentView(R.layout.activity_main); showPopupBtn = (Button) findViewById(R.id.showPopupBtn); linearLayout1 = (LinearLayout) findViewById(R.id.linearLayout1); showPopupBtn.setOnClickListener(new View.OnClickListener() { @Override public void onClick(View v) { //instantiate the popup.xml layout file LayoutInflater layoutInflater = (LayoutInflater) MainActivity.this.getSystemService(Context.LAYOUT_INFLATER_SERVICE); View customView = layoutInflater.inflate(R.layout.popup,null); closePopupBtn = (Button) customView.findViewById(R.id.closePopupBtn); //instantiate popup window popupWindow = new PopupWindow(customView, LayoutParams.WRAP_CONTENT, LayoutParams.WRAP_CONTENT); //display the popup window popupWindow.showAtLocation(linearLayout1, Gravity.CENTER, 0, 0); //close the popup window on button click closePopupBtn.setOnClickListener(new View.OnClickListener() { @Override public void onClick(View v) { popupWindow.dismiss(); } }); } }); } }
The code is self explanatory as I have added comments wherever required. Save and run the project.
Comment below if you have any queries regarding above android popup window example.
The post Android PopupWindow Example appeared first on The Crazy Programmer.
0 notes
Text
75% off #Android Development from scratch like a pro – $10
Using Android Studio 2, learn how professionals use code and design good practices
Beginner Level, – Video: 5.5 hours, 35 lectures
Average rating 4.7/5 (4.7)
Course requirements:
Know basic Java or basic Android or some object oriented language
Course description:
From your first empty activity, going through code smells, good practices, design patterns and refactoring, finishing with a CRUD application that uses a local database to store its information.
In this course we will go through all the steps required for you to start your own first application. But we will not do bad code to do that… we are professionals and care about our code since it is our product. Let’s question together the practices and code that we generate throughout our application, trying to improve it step by step.
You can expect to see a lot of API, from RelativeLayout, LinearLayout, ScrollableView, Text and Rating views, Buttons, custom shapes, Intents, extra serializable information, SQLite, SQL, DAO, ArrayAdapter, dynamic ListViews, action menus, context menus and more.
You can also expect the same high quality teaching method that I apply in each and everyone of my 50+ courses at Alura and my other courses here at Udemy (check my ratings and students feedback).
This is not a course for those who want an easy and unmaintainable solution, this is a course for better developing our apps. Welcome to a better software development world!
Full details Use good practices Understand how to develop good and maintanable Android code Developers willing to create their first Android app Android developers who want to question good/bad practices Developers willing to learn good habits NOT recommended for those who want to quickly copy and paste bad code NOT recommended for those wanting to learn in quantity instead of learn what is good for their projects
Full details
Reviews:
“All topics are clarified well. Along with focusing on the android development, the author gives nice hints about creating good quality code, which is really great.” (Arkadiusz Nowakowski)
“Excellent course. The best instructor-led course I have attended, by far. The course was exactly what I was hoping for.” (Suresh)
“Excellent. The teacher was clear, precise and presented the materials excellently. Certainly very professional and well versed in Android, and provided a hands on approach that many other courses only apply as lengthy slides and theory. A very simple approach but effective for both beginners and seasoned developers coming into Android. Even learnt a few general Java coding tips on the way I shall be looking for more courses from this tutor!” (Stephen Matthew Davies)
About Instructor:
Guilherme Silveira
As a software developer I was tired of “language tutorials” and “bad practices courses”. What about you? I want my students to finish a course and become capable of judging what is good and bad for their software, both on the short and long run. They should understand what they are doing, not just make use, but own their language and tools. I have worked as a software development educator for the past 12 years, with experience in several countries, programming languages and environments. Learning how to program should be done as we learn things in real life: with real examples and a parental guide on what is good and what is bad for us. My mobile experience started with Java ME in the early 2000’s, went through Android and I have finally reached iOS development when Swift was first announced. I was given the task to write our company’s main product iOS version using Swift and that experience together with many other language and API experiences can be seen in my courses. I have closely worked with several user groups and communities in Brazil, where I was lucky to be invited to give talks at many conferences, including QCon, AgileBrazil etc. I am also the co-organizer of a well-known brazilian mobile development conference, MobileConf. I am the cofounder of the biggest Brazilian web site on software development questions and answers, GUJ, creator of VRaptor, a java community expert on some JSRs and cofounder of Brazilian’s tech book publishing company Casa do Código. You can find more information about my career at my linkedin page. Finally, as a personal note, I am a language lover, feel free to find me at twitter and chat in portuguese, korean, english, french or german, or follow my korean weekly blog.
Instructor Other Courses:
Swift and iOS from scratch: coding like a pro 3 Swift and iOS from scratch: coding like a pro 2 Swift and iOS from scratch: coding like a pro …………………………………………………………… Guilherme Silveira coupons Development course coupon Udemy Development course coupon Mobile Apps course coupon Udemy Mobile Apps course coupon Android Development from scratch like a pro Android Development from scratch like a pro course coupon Android Development from scratch like a pro coupon coupons
The post 75% off #Android Development from scratch like a pro – $10 appeared first on Udemy Cupón.
from Udemy Cupón http://www.xpresslearn.com/udemy/coupon/75-off-android-development-from-scratch-like-a-pro-10/
from https://xpresslearn.wordpress.com/2017/02/23/75-off-android-development-from-scratch-like-a-pro-10/
0 notes
Text
Android wear 개발 방법 (Creating Lists)
original source : http://www.androiddocs.com/training/wearables/ui/lists.html
Creating Lists

Lists let users select an item from a set of choices easily on wearable devices.
The Wearable UI Library includes the WearableListView class .
To create a list in your Android Wear apps:
Add a WearableListView element to your activity's layout definition.
Create a custom layout implementation for your list items.
Use this implementation to create a layout definition file for your list items.
Create an adapter to populate the list.
Assign the adapter to the WearableListView element
Add a List View
<android.support.wearable.view.BoxInsetLayout xmlns:android="http://schemas.android.com/apk/res/android" xmlns:app="http://schemas.android.com/apk/res-auto" android:background="@drawable/robot_background" android:layout_height="match_parent" android:layout_width="match_parent"> <FrameLayout android:id="@+id/frame_layout" android:layout_height="match_parent" android:layout_width="match_parent" app:layout_box="left|bottom|right"> <android.support.wearable.view.WearableListView android:id="@+id/wearable_list" android:layout_height="match_parent" android:layout_width="match_parent"> </android.support.wearable.view.WearableListView> </FrameLayout> </android.support.wearable.view.BoxInsetLayout>
Create a Layout Implementation for List Items
This layout also implements the methods in the WearableListView.OnCenterProximityListener interface to change the color of the item's icon and fade the text in response to events from WearableListView as the user scrolls through the list.
public class WearableListItemLayout extends LinearLayout implements WearableListView.OnCenterProximityListener { private ImageView mCircle; private TextView mName; private final float mFadedTextAlpha; private final int mFadedCircleColor; private final int mChosenCircleColor; public WearableListItemLayout(Context context) { this(context, null); } public WearableListItemLayout(Context context, AttributeSet attrs) { this(context, attrs, 0); } public WearableListItemLayout(Context context, AttributeSet attrs, int defStyle) { super(context, attrs, defStyle); mFadedTextAlpha = getResources() .getInteger(R.integer.action_text_faded_alpha) / 100f; mFadedCircleColor = getResources().getColor(R.color.grey); mChosenCircleColor = getResources().getColor(R.color.blue); } // Get references to the icon and text in the item layout definition @Override protected void onFinishInflate() { super.onFinishInflate(); // These are defined in the layout file for list items // (see next section) mCircle = (ImageView) findViewById(R.id.circle); mName = (TextView) findViewById(R.id.name); } @Override public void onCenterPosition(boolean animate) { mName.setAlpha(1f); ((GradientDrawable) mCircle.getDrawable()).setColor(mChosenCircleColor); } @Override public void onNonCenterPosition(boolean animate) { ((GradientDrawable) mCircle.getDrawable()).setColor(mFadedCircleColor); mName.setAlpha(mFadedTextAlpha); } }
Create a Layout Definition for Items
res/layout/list_item.xml
<com.example.android.support.wearable.notifications.WearableListItemLayout xmlns:android="http://schemas.android.com/apk/res/android" android:gravity="center_vertical" android:layout_width="match_parent" android:layout_height="80dp"> <ImageView android:id="@+id/circle" android:layout_height="20dp" android:layout_margin="16dp" android:layout_width="20dp" android:src="@drawable/wl_circle"/> <TextView android:id="@+id/name" android:gravity="center_vertical|left" android:layout_width="wrap_content" android:layout_marginRight="16dp" android:layout_height="match_parent" android:fontFamily="sans-serif-condensed-light" android:lineSpacingExtra="-4sp" android:textColor="@color/text_color" android:textSize="16sp"/> </com.example.android.support.wearable.notifications.WearableListItemLayout>
Create an Adapter to Populate the List
private static final class Adapter extends WearableListView.Adapter { private String[] mDataset; private final Context mContext; private final LayoutInflater mInflater; // Provide a suitable constructor (depends on the kind of dataset) public Adapter(Context context, String[] dataset) { mContext = context; mInflater = LayoutInflater.from(context); mDataset = dataset; } // Provide a reference to the type of views you're using public static class ItemViewHolder extends WearableListView.ViewHolder { private TextView textView; public ItemViewHolder(View itemView) { super(itemView); // find the text view within the custom item's layout textView = (TextView) itemView.findViewById(R.id.name); } } // Create new views for list items // (invoked by the WearableListView's layout manager) @Override public WearableListView.ViewHolder onCreateViewHolder(ViewGroup parent, int viewType) { // Inflate our custom layout for list items return new ItemViewHolder(mInflater.inflate(R.layout.list_item, null)); } // Replace the contents of a list item // Instead of creating new views, the list tries to recycle existing ones // (invoked by the WearableListView's layout manager) @Override public void onBindViewHolder(WearableListView.ViewHolder holder, int position) { // retrieve the text view ItemViewHolder itemHolder = (ItemViewHolder) holder; TextView view = itemHolder.textView; // replace text contents view.setText(mDataset[position]); // replace list item's metadata holder.itemView.setTag(position); } // Return the size of your dataset // (invoked by the WearableListView's layout manager) @Override public int getItemCount() { return mDataset.length; } }
Associate the Adapter and Set a Click Listener
public class WearActivity extends Activity implements WearableListView.ClickListener { // Sample dataset for the list String[] elements = { "List Item 1", "List Item 2", ... }; @Override protected void onCreate(Bundle savedInstanceState) { super.onCreate(savedInstanceState); setContentView(R.layout.my_list_activity); // Get the list component from the layout of the activity WearableListView listView = (WearableListView) findViewById(R.id.wearable_list); // Assign an adapter to the list listView.setAdapter(new Adapter(this, elements)); // Set a click listener listView.setClickListener(this); } // WearableListView click listener @Override public void onClick(WearableListView.ViewHolder v) { Integer tag = (Integer) v.itemView.getTag(); // use this data to complete some action ... } @Override public void onTopEmptyRegionClick() { } }
0 notes
Text
Custom Calendar in android studio kotlin
https://ift.tt/2p3EFMH
The custom Calendar in android studio kotlin
_______________________________________________ Xml _______________________________________________ <?xml version="1.0" encoding="utf-8"?> <LinearLayout xmlns:android="https://ift.tt/nIICcg" android:layout_width="match_parent" android:layout_height="wrap_content" android:background="@drawable/bg_bottom_sheet_dialog_fragment" android:orientation="vertical"> <androidx.appcompat.widget.LinearLayoutCompat android:id="@+id/ll_Main" android:layout_width="match_parent" android:layout_height="wrap_content" android:layout_marginTop="@dimen/dp_24" android:orientation="vertical"> <com.android.showMotionRealtor.feature.dasboard.view.schedule.customcalender.CustomCalendar android:id="@+id/custom_calender" android:layout_width="match_parent" android:layout_height="wrap_content" /> </androidx.appcompat.widget.LinearLayoutCompat> </LinearLayout> _______________________________________________ CustomCalendar.kt _______________________________________________ package com.android.showMotionRealtor.feature.dasboard.view.schedule.customcalender import android.app.Dialog import android.content.Context import android.util.AttributeSet import android.view.LayoutInflater import android.widget.ImageView import android.widget.LinearLayout import android.widget.TextView import androidx.recyclerview.widget.GridLayoutManager import androidx.recyclerview.widget.RecyclerView import com.android.showMotionRealtor.R import com.android.showMotionRealtor.core.util.MAX_CALENDAR_COLUMN import com.android.showMotionRealtor.core.util.mEventDateFormat import com.android.showMotionRealtor.model.CalendarData import com.android.showMotionRealtor.model.EventMessage import com.zendesk.util.DateUtils import java.text.ParseException import java.text.SimpleDateFormat import java.util.* import kotlin.collections.ArrayList /** * Created by Jeetesh Surana. */ class CustomCalendar : LinearLayout { // private var mUserSelectedDate: Long? = 0L private var mDialog : Dialog? = null private var mUserSelectedDate: Date? = null private var previousButton: ImageView? = null private var nextButton: ImageView? = null private var currentDate: TextView? = null private var rvCalender: RecyclerView? = null private val formatter = SimpleDateFormat("MMMM yyyy", Locale.ENGLISH) private val cal = Calendar.getInstance(Locale.ENGLISH) private val calendarData = ArrayList<CalendarData>() private val events: ArrayList<EventMessage> = ArrayList() private var mDateAdapter: DateAdapter? = null private val mWeekName = ArrayList<String>() var mCustomCalenderListener: CustomCalenderListener? = null constructor(context: Context) : super(context) constructor(context: Context, attrs: AttributeSet) : super(context, attrs) { setWeekName() initializeUILayout() setRecyclerView() setUpCalenderData() setPreviousButtonClickEvent() setNextButtonClickEvent() } constructor(context: Context, attrs: AttributeSet, defStyleAttr: Int) : super(context, attrs, defStyleAttr) private fun initializeUILayout() { val inflater = context.getSystemService(Context.LAYOUT_INFLATER_SERVICE) as LayoutInflater val mView = inflater.inflate(R.layout.calendar_layout, this) previousButton = mView.findViewById(R.id.previous_month) nextButton = mView.findViewById(R.id.next_month) currentDate = mView.findViewById(R.id.display_current_date) rvCalender = mView.findViewById(R.id.rv_CustomCalender) } private fun setPreviousButtonClickEvent() { previousButton!!.setOnClickListener { cal.add(Calendar.MONTH, -1) setUpCalenderData() } } private fun setNextButtonClickEvent() { nextButton!!.setOnClickListener { cal.add(Calendar.MONTH, 1) setUpCalenderData() } } private fun setUpCalenderData() { calendarData.clear() val dayValueInCells = ArrayList<Date>() val mCal = cal.clone() as Calendar // set month in cal mCal.set(Calendar.DAY_OF_MONTH, 1) // get the start date in week val firstDayOfTheMonth = mCal.get(Calendar.DAY_OF_WEEK) - 1 mCal.add(Calendar.DAY_OF_MONTH, -firstDayOfTheMonth) //getting dates while (dayValueInCells.size < MAX_CALENDAR_COLUMN) { dayValueInCells.add(mCal.time) mCal.add(Calendar.DAY_OF_MONTH, 1) } //set the title of month val sDate = formatter.format(cal.time) currentDate!!.text = sDate //set the week name for (i in mWeekName.indices) { calendarData.add(CalendarData(null, mWeekName[i], 0, false)) } //set the Dates for (i in dayValueInCells.indices) { if (mUserSelectedDate != null && DateUtils.isSameDay(dayValueInCells[i], mUserSelectedDate)) { calendarData.add(CalendarData(dayValueInCells[i], null, 1, true)) mDateAdapter!!.currentSelectedDatePosition(position = i) } else { calendarData.add(CalendarData(dayValueInCells[i], null, 1, false)) } } //notify adapter mDateAdapter!!.notifyDataSetChanged() } private fun setWeekName() { mWeekName.clear() mWeekName.add("S") mWeekName.add("M") mWeekName.add("T") mWeekName.add("W") mWeekName.add("T") mWeekName.add("F") mWeekName.add("S") } private fun setRecyclerView() { val dateToday = Date() val reminderDate = convertStringToDate("31-08-2019") val reminderDate2 = convertStringToDate("25-08-2019") if (reminderDate!!.after(dateToday) || reminderDate == dateToday) { events.add(EventMessage(1, "Birthday", reminderDate)) } if (reminderDate2!!.after(dateToday) || reminderDate == dateToday) { events.add(EventMessage(2, "Friendship Day !", reminderDate2)) } val layoutManager = GridLayoutManager(context, 7, RecyclerView.VERTICAL, false) rvCalender!!.layoutManager = layoutManager mDateAdapter = DateAdapter(context, calendarData, cal, events, object : DateAdapter.ItemClickListener { override fun itemClick(position: Int) { if (mDialog != null){ mDialog!!.dismiss() mUserSelectedDate = calendarData[position].monthlyDates!! } } }) rvCalender!!.adapter = mDateAdapter } private fun convertStringToDate(dateInString: String): Date? { val format = SimpleDateFormat(mEventDateFormat, Locale.ENGLISH) var date: Date? = null try { date = format.parse(dateInString) } catch (e: ParseException) { e.printStackTrace() } return date } /*fun setCurrentDate(userSelectedDate: Date) { mUserSelectedDate = userSelectedDate setUpCalenderData() }*/ fun setCalendar(mCal: Calendar) { mUserSelectedDate = mCal.time cal.time = mCal.time setUpCalenderData() } fun getCurrentSelectedDate(): Date { return calendarData[mDateAdapter!!.mLastSelectedDatePosition].monthlyDates!! } fun setCustomCalenderListener(customCalenderListener: CustomCalenderListener) { mCustomCalenderListener = customCalenderListener } fun dismissDialog(dialog: Dialog) { mDialog = dialog } interface CustomCalenderListener { fun currentSelectedDatePosition(position: Int) } } _______________________________________________ DateAdapter.kt _______________________________________________ package com.android.showMotionRealtor.feature.dasboard.view.schedule.customcalender import android.annotation.SuppressLint import android.content.Context import android.view.LayoutInflater import android.view.View import android.view.ViewGroup import android.widget.TextView import androidx.appcompat.widget.AppCompatImageView import androidx.core.content.ContextCompat import androidx.recyclerview.widget.RecyclerView import com.android.showMotionRealtor.R import com.android.showMotionRealtor.model.CalendarData import com.android.showMotionRealtor.model.EventMessage import java.util.* import kotlin.collections.ArrayList /** * Created by Jeetesh Surana. */ class DateAdapter(var context: Context, var mArrayList: java.util.ArrayList<CalendarData> = ArrayList(), var currentDate: Calendar, val allEvents: ArrayList<EventMessage> = ArrayList(), var mItemClickListener: ItemClickListener) : RecyclerView.Adapter<RecyclerView.ViewHolder>() { var oldPosition: Int = 0 var mLastSelectedDatePosition = -1 private var dateCal = Calendar.getInstance() private var allDate: Int? = null private var displayMonth: Int? = null private var displayYear: Int? = null private var currentMonth: Int? = null private var currentYear: Int? = null override fun onCreateViewHolder(parent: ViewGroup, viewType: Int): RecyclerView.ViewHolder { var view: View? = null when (viewType) { 0 -> { view = LayoutInflater.from(parent.context).inflate(R.layout.list_days, parent, false) return DaysViewHolder(view!!) } 1 -> { view = LayoutInflater.from(parent.context).inflate(R.layout.list_date, parent, false) return DateViewHolder(view!!) } } return null!! } override fun getItemCount(): Int { return mArrayList.size } override fun onBindViewHolder(holder: RecyclerView.ViewHolder, position: Int) { when (holder.itemViewType) { 0 -> { (holder as DaysViewHolder).bind(mArrayList[position].mDays!!) } 1 -> { dateCal.time = mArrayList[position].monthlyDates!! allDate = dateCal.get(Calendar.DAY_OF_MONTH) displayMonth = dateCal.get(Calendar.MONTH) + 1 displayYear = dateCal.get(Calendar.YEAR) currentMonth = currentDate.get(Calendar.MONTH) + 1 currentYear = currentDate.get(Calendar.YEAR) (holder as DateViewHolder).bind(allDate!!, displayMonth!!, displayYear!!, currentMonth!!, currentYear!!) setSelectionUI((holder).txtDate, position) holder.txtDate.setOnClickListener { mItemClickListener.itemClick(position) if (mLastSelectedDatePosition != -1 && mLastSelectedDatePosition != position) { mArrayList[mLastSelectedDatePosition].isDateSelected = false } mLastSelectedDatePosition = position mArrayList[position].isDateSelected = true notifyDataSetChanged() } val eventCalendar = Calendar.getInstance() for (i in 0 until allEvents.size) { eventCalendar.time = allEvents[i].reminderDate!! if (allDate == eventCalendar.get(Calendar.DAY_OF_MONTH) && displayMonth == eventCalendar.get(Calendar.MONTH) + 1 && displayYear == eventCalendar.get(Calendar.YEAR)) { holder.imgEventIcon.visibility = View.VISIBLE } } } } } //set the selected position private fun setSelectionUI(img: TextView, position: Int) { if (mArrayList[position].isDateSelected) { img.background = context.resources.getDrawable(R.drawable.circle_background) img.setTextColor(ContextCompat.getColor(context, R.color.white)) } else { img.background = null img.setTextColor(ContextCompat.getColor(context, R.color.grayBlack)) } } //set the selected position on item Click private fun userSelection(img: TextView, position: Int) { mItemClickListener.itemClick(position) if (position != oldPosition) { mArrayList[position].isDateSelected = true img.setTextColor(ContextCompat.getColor(context, R.color.white)) img.background = context.resources.getDrawable(R.drawable.circle_background) mArrayList[oldPosition].isDateSelected = false notifyItemChanged(oldPosition) oldPosition = position } } inner class DaysViewHolder(view: View) : RecyclerView.ViewHolder(view) { private var txtDays: TextView = view.findViewById(R.id.txt_Days) fun bind(days: String) { txtDays.text = days } } inner class DateViewHolder(view: View) : RecyclerView.ViewHolder(view) { var txtDate: TextView = view.findViewById(R.id.txt_Date) var imgEventIcon: AppCompatImageView = view.findViewById(R.id.imgEventIcon) @SuppressLint("LogNotTimber") fun bind(dayValue: Int, displayMonth: Int, displayYear: Int, currentMonth: Int, currentYear: Int) { if (displayMonth == currentMonth && displayYear == currentYear) { txtDate.visibility = View.VISIBLE } else { txtDate.visibility = View.GONE } txtDate.text = dayValue.toString() } } override fun getItemViewType(position: Int): Int { return mArrayList[position].viewType } interface ItemClickListener { fun itemClick(position: Int) } fun currentSelectedDatePosition(position: Int) { mLastSelectedDatePosition = position + 7 } } _______________________________________________ implementation _______________________________________________ //set Calendar Date val cal = Calendar.getInstance(Locale.ENGLISH) cal.time = getDateObject(currentDate!!)!! customCalender?.setCalendar(cal) //get Calendar Date override fun onDestroy() { if (customCalender?.getCurrentSelectedDate() != null) { EventBus.getDefault().post(CurrentSelectedDate(customCalender?.getCurrentSelectedDate()!!)) } super.onDestroy() } _______________________________________________
via Blogger https://ift.tt/2Mzz1Lb
0 notes