#debounceTime
Explore tagged Tumblr posts
Visit Tumblr Blog
Explore Tumblr blogs with no restrictions, modern design and the best experience.
Last Seen Tumblr Blogs


Fun Fact
In Q3 of 2020, 31% of US users access the Tumblr app daily.
Text
🚀 Unleash the Power of RxJS Operators in Angular: Top 17 Must-Know Techniques! 🚀
Ready to supercharge your Angular projects with the magic of RxJS operators? Look no further because Egiz Solution is thrilled to bring you the ultimate guide to mastering RxJS operators in Angular! Get ready to elevate your reactive programming skills and unlock endless application possibilities.
🔍 Explore the Depths of RxJS with Egiz Solution:
Map: Transform your data streams like a pro! With the map operator, you can seamlessly transform values emitted by observables and customize them to suit your needs.
Filter: Say goodbye to unwanted data! Filter out irrelevant values from your observables with the filter operator, ensuring that only the desired data passes through.
Merge: Combine multiple observables into one powerhouse stream! The merge operator allows you to merge various streams, enabling concurrent processing and enhanced efficiency.
SwitchMap: Navigate through asynchronous operations with ease! The switchMap operator is your go-to tool for managing inner observables and flattening nested subscriptions.
DebounceTime: Tame the chaos of user input! With the debounceTime operator, you can control the frequency of emitted values and handle scenarios like user typing with finesse.
TakeUntil: Know when to say when! The take-until operator enables graceful observable completion by specifying a condition upon which the stream should cease emitting values.
DistinctUntilChanged: Keep your data stream clean and concise by filtering out consecutive duplicate values with the distinctUntilChanged operator, ensuring that only unique values are emitted.
Retry: Handle errors like a pro! The retry operator empowers you to gracefully handle errors by resubscribing to the source observable and giving your application a second chance to succeed.
CombineLatest: Sync up your data streams in real time! With the combineLatest operator, you can synchronize multiple observables and trigger updates whenever they emit new values.
And many more!: Explore a plethora of other powerful RxJS operators, including concat, zip, catchError, shareReplay, and more, to unlock a world of reactive programming possibilities.
Ready to revolutionize your Angular development journey? Join us at Egiz Solution as we delve deep into the realm of RxJS operators and empower you to harness their full potential. Let’s collaborate to build reactive, scalable, and efficient Angular applications that set new standards in web development excellence.
🚀 Empower Your Angular Development Journey — Powered by Egiz Solution Web Development Services!
0 notes
Text
Debouncing and Throttling in Angular with RxJS

In this article we'll talk about Debouncing and Throttling, two optimization techniques that we might want to consider whenever we're developing an Angular app that needs features such as autocomplete, real-time filtered searches, and so on: learning how to efficiently use both of them will not only improve our overall knowledge of the Angular (and RxJS) codebase, but will also ensure important performance improvements because it will greatly reduce the number of HTTP requests that our client-side code will issue to the server to retrieve data. Introduction Let's take the following Angular code snippet: As we can see, this is a typical data retrieval method that will fetch a jsonData result from the server using a standard HTTP request using a local http object (most likely an instance of HttpClient instantiated in the constructor using Dependency Injection ) and store it within a local variable; such approach is tipically used by most Angular components (and services) that perform such kind of tasks. Read the full article
#Angular#debounceTime#Debouncing#distinctUntilChanged#HTTP#Observables#RxJS#Subjects#throttleTime#Throttling
0 notes
Text
Type ahead Search
<div class="input-group col-md-5 mrgn-rght-sm">
<label class="wb-inv" for="searchString"
>Search by CSDN, Participant name,To,From</label
>
<input
[(ngModel)]="formModel.searchString"
type="text"
#searchString
name="searchString"
class="form-control"
id="searchString"
placeholder="{{
'ui.body.secMsg.srchstrplaceHolder' | translate
}}"
/>
</div>
Component
----------
@ViewChild("searchString") input: ElementRef;
callApi(searchTerm: string) {
return of(["1", "2", "3"]);
}
ngAfterViewInit() {
this.dataSource.sort = this.sort;
fromEvent<any>(this.input.nativeElement, "keyup")
.pipe(
map((event: any) => event.target.value),
debounceTime(400),
distinctUntilChanged(),
switchMap((search) => this.callApi(search))
)
.subscribe(console.log);
}
0 notes
Link

0 notes
Text
Tutorial de Arduino
Bienvenido al Taller Arduino, donde vas a poder continuar nuestro curso guiado que cubre todo lo que es necesario para ti entender para hacer tus proyectos Arduino y transformarte en un constructor de escenarios. Mi nombre es Sam y aparte de ser un desarrollador mismo, además disfruto enseñando a otros cómo utilizar distintas tecnologías y hacer proyectos pasmantes. Adjuntado con los vídeos del curso en sí, puede hallar todo el material del curso relacionado, como ejemplos de código, diagramas de circuitos, imágenes y otros elementos.
Estamos haciendo un trabajo con Arduino por lo cual precisará una placa Arduino para continuar este curso. Vamos a ingresar varios conceptos distintas, introduciendo el trabajo con numerosos géneros de hardware, como sensores, pantallas y elementos electrónicos en general, y el kit que nos encontramos usando para todo lo mencionado es el kit de inventores Sparkfun. Si no está en Australia, puede agarrar de Sparkfun de manera directa y poseerlo enviado a en algún lugar de este mundo.
En este curso curso:
Entender qué es un Arduino y cómo trabaja
Aprende a usar un Arduino seguramente
Programa tu Arduino con el código que has escrito en el IDE de Arduino (Ámbito de Avance Que viene dentro)
Aprende conceptos de programación con C y C++ adjuntado con la programación concreta de Arduino
Comprender los conceptos de superiores prácticas para la programación y la creación de prototipos
Utilice una extensa diversidad de hardware y elementos y prototipo sus proyectos usando una placa de pan
Crea su emprendimiento revolucionario con Arduino
En el momento en que estés listo, ¡empecemos el Taller Arduino!
Si tiene algún inconveniente durante este taller, póngase en contacto con en nuestro foro de discusión. Somos desarrolladores de tiempo terminado y nos encontramos aquí para asistir.
Capítulo 1: Introducción a Arduino
1.0 Resumen del capítulo
En este capítulo vas a aprender sobre:
Qué es Arduino
Diversos tipos de placas Arduino
Cómo trabaja la placa Arduino Uno y por qué razón es tan habitual
Qué es un microcontrolador
Cómo usar el IDE de Arduino (Ámbito de avance que viene dentro)
Powering y conectar tu Arduino a tu PC
Programas de carga a su placa Arduino
Por el desenlace de este capítulo, va a haber cargado su primer programa a su placa Arduino para vigilar un LED.
1.1 ¿Qué es Arduino?
En esta sección, nos fijamos en lo que es Arduino, lo que es bueno para los desarrolladores, y varios de los diversos tipos de placas Arduino accesibles.
Archanas de la sección:
Ejemplos de varios Arduino Nanos

1.2 ¿Qué es un microcontrolador?
En esta sección, observaremos qué es un microcontrolador (el chip en el corazón de algún placa Arduino), una visión general de cómo trabajan y cómo se integra con el ámbito Arduino.
1.3 El Arduino Uno
En esta sección, va a aprender sobre las peculiaridades y habilidades de la placa Arduino Uno, cómo el diseño de la placa puede perjudicar a su emprendimiento y por qué razón Uno es un enorme todoterreno.
1.4 Arduino IDE y el lenguaje
En esta sección, tiraremos una mirada al IDE de Arduino, que es donde redacta el código para su Arduino, lo carga y se comunica con su placa. Además cubriremos el lenguaje de programación que usa Arduino IDE y dónde descargarlo.
Archanas de la sección:
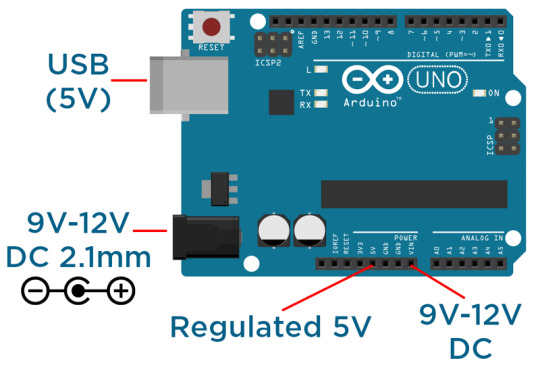
1.5 Encendido y conexión de su Arduino
En esta sección, vas a aprender sobre las distintas formas de dar de comer tu Arduino y c��mo conectarlo a tu PC para cargar tus programas y comunicarte con el PC por medio de el puerto serie.
Archanas de la sección:
Y también predisposición de energía de Arduino
1.6 Hola Ejemplo Mundial
En la sección final de este capítulo, vamos a hablar sobre la utilización del IDE de Arduino para cargar su primer programa en su placa Arduino.
Archanas de la sección:
Código de origen para \'Hello World\'
void setup() á pinMode(13, SALIDA); //setup pin 13 as an output-void loop() ?digitalWrite(13, HIGH); // prenda el LED (HIGH outputs 5V)delay(500); // espere 500 millisecondsdigitalWrite(13, LOW); // apague el LED (salidas LOW 0V)delay(500); // wait for 500 milliseconds.
Capítulo 2: Empleo de entradas y salidas
2.0 Descripción general del capítulo
En este capítulo vas a aprender sobre:
Cómo estructurar de manera correcta el código
Utiloferiendo cambiantes para redactar programas más capaces
Córconocimientos de construcción con una placa de pan
Leer entradas y vigilar salidas por medio de los pines digitales y analógicos
Comunicación a través del puerto serie
Por el desenlace del capítulo, va a haber desarrollado una plataforma de trabajo de entrada para su Arduino, usando el Monitor serie para exhibir los datos.
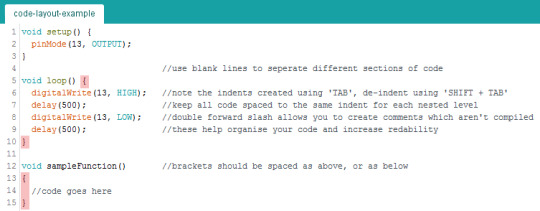
2.1 Composición del programa
En esta sección, vamos a aprender cómo estructurar de manera correcta el código por medio de sangrías, escenarios anidados y punto y coma.
Archanas de la sección:
Emplo del programa del Example
2.2 Empleo de cambiantes
En esta sección, exploraremos la utilización de cambiantes, lo que le dejará redactar código más exclusivo.
Archanas de la sección:
Géneros de datos de referencia de arduino:
Si está entusiasmado en conseguir más información sobre los diferentes géneros de datos que acepta Arduino, consulte la página de referencia.
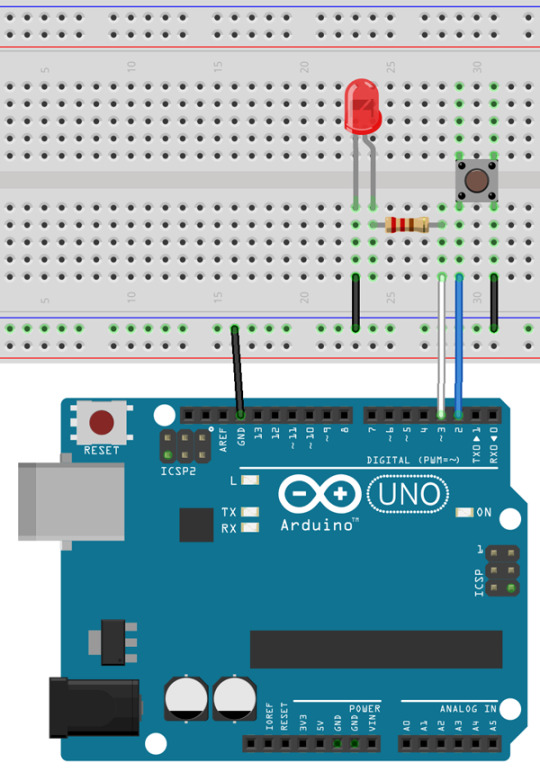
2.3 Crear su primer circuito con una tabla de pan
En esta sección, observaremos la utilización de distintas elementos como LEDs, botones, cables de puente, resistencias y una placa de pan para crear un circuito.
Archanas de la sección:
Trate más leída
Si quiere entender más sobre cómo trabajan los elementos electrónicos, consulte los manuales de Analogue Electronics Crash Course y All About LEDs para conseguir información más descriptiva.
Desarbar

2.4 Empleo de Pines Digitales
En esta sección, vamos a aprender a utilizar los pines digitales para leer entradas y vigilar salidas.
Archanas de la sección:
Código de origen para \'Botón LED\'
int buttonPin á 2;int ledPin á 3;void setup() á// setup pin modespinMode(ledPin, OUTPUT); pinMode(buttonPin, INPUT_PULLUP); void loop() á// leer el estado de buttonPin y almacenarlo como el buttonState variableint buttonState ? digitalRead(buttonPin);// redactar el valor de buttonState a ledPindigitalWrite(ledPin, buttonState);-
Desarclar
para \'Digital Pins\'
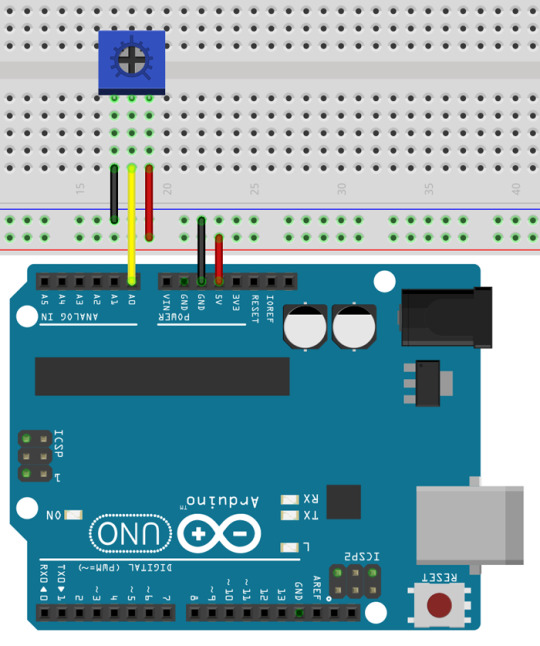
2.5 Empleo de pines analógicos
En esta sección, vamos a aprender a utilizar los pines analógicos para leer entradas y vigilar salidas.
Archanas de la sección:
Código de origen para \'Blink Rate Control\'
int ledPin á 3;int potPin á A0;void setup() á// setup pin modespinMode(ledPin, OUTPUT); pinMode(potPin, INPUT); void loop() á// leer el valor de la cazuela y almacenarlo como potValueint potValue á analogRead(potPin);// encender led y aguardar el tiempo igual a potValuedigitalWrite(ledPin, HIGH);delay(potValue);// releer el valor del pozo y almacenarlo como potValuepotValue á analogRead(potPin);// turn led off and wait for the time equal to potValuedigitalWrite(ledPin, LOW);delay(potValue);-
Código de origen para el
de control de brillo LED
int ledPin á 3;int potPin á A0;void setup() á// setup pin modespinMode(ledPin, OUTPUT); pinMode(potPin, INPUT); void loop() á// leer el valor de la cazuela, dividirlo por 4, y almacenarlo como potValueint potValue á analogRead(potPin) / 4; // turn led on with the value of potValueanalogWrite(ledPin, potValue); ?
Desarclar

2.6 Visualización de información por medio de el puerto serie
En esta sección, observaremos la utilización del puerto serie en el Arduino para estar comunicados con un PC mediante USB.
Sección Elementos:
Código de origen para la
de supervisión en serie
int ledPin á 3;int buttonPin á 2;int potPin á A0;void setup() á// pin de configuración modespinMode(ledPin, OUTPUT);pinMode(buttonPin, INPUT_PULLUP); pinMode(potPin, INPUT);// inicializar el puerto serie con una agilidad en baudios de 9600Serial.begin(9600); void loop() á// leer el estado de buttonPin y almacenarlo como buttonState (0 o bien 1)int buttonState á digitalRead(buttonPin);// leer el valor de la cazuela, dividirlo por 4, y almacenarlo como potValueint potValue á analogRead(potPin);int filteredPotValue á potValue / 4;// turn led on with the value of potValueanalogWrite(ledPin,filteredPotValue);// print the value of the buttonSerial.print("Button: "); Serial.print(buttonState); Serial.print(" ");// imprimir el valor de potSerial.print("Pot: "); Serial.print(potValue); Serial.print(" ");// imprimir el valor de la cazuela / 4 con un retorno de línea en el endSerial.print("Pot/4: "); Serial.println(filteredPotValue
);
Desarbar
Capítulo 3: Toma de elecciones y empleo de la lógica
3.0 Resumen del capítulo
En este capítulo vas a aprender sobre:
Utilo de las normas \'If\'
Utiloar bucles \'while
Utiles de bucles \'for\'
Utilo de los
Utiles de matemáticas en Arduino
Creación de funcionalidades
Hacer código exclusivo
Por el desenlace de este capítulo, va a haber desarrollado su calculadora usando distintas funcionalidades, bucles y funcionalidades seriales.
3.1 Afirmaciones "If"
En esta sección, observaremos la utilización de las afirmaciones \'If\', que son la columna vertebral de la toma de elecciones para los microcontroladores.
Archanas de la sección:
Código de origen para \'Cambiar switch\'
// pin definitionsint ledPin á 3;int buttonPin á 2;// cambiantes globalesint toggleState;int lastButtonState á 1;long unsigned int lastPress;int debounceTime á 20;void setup() á // setup pin modes pin pin(ledPin, OUTPUT); pinMode(buttonPin, INPUT_PULLUP); void loop() á int buttonState á digitalRead(buttonPin); //read the state of buttonPin y guárdelo como buttonState (0 o bien 1) if((millis() - lastPress) > debounceTime) //si el tiempo entre el último botónCamambión es más grande que el botón debounceTime á lastPress á millis(); //update lastPress if(buttonState ? 0 && lastButtonState ? 1) //if botón se presiona y se liberó el último cambio . toggleState; //cambiar el estado de LED digitalWrite(ledPin, toggleState); lastButtonState á 0; //record the lastButtonState á if(buttonState ? 1 && lastButtonState ? 0) //if button is not pressed, y se presionó el último cambio - lastButtonState ? 1; //record the lastButtonState
?
Desarclar
para \'Digital Pins\'
3.2 Bucles \'While\'
En esta sección, va a aprender a utilizar los bucles \'while y cómo utilizarlos para mudar la composición del código.
Archanas de la sección:
Código de origen para la
de \'VELOCIDAD de flash LED\'
// pin definitionsint ledPin á 3;int buttonPin á 2;// cambiantes globalesint toggleState;int buttonState ?1;void setup() á// setup pin modespinMode(ledPin, OUTPUT);pinMode(buttonPin, INPUT_PULLUP); void loop() á buttonState á digitalRead(buttonPin);while(buttonState ?0)-toggleState -! toggleState;digitalWrite(ledPin, toggleState);delay(50);buttonState ? digitalRead(buttonPin);? toggleState ! toggleState;digitalWrite(ledPin, toggleState);delay(200);-
Desarbar
3.3 Bucles \'For\'
En esta sección, verá los bucles \'for\' que puede utilizar para vigilar el fluído de su programa.
Archanas de la sección:
Código de origen para \'LED Pulse\'
// pin definitionsint ledPin á 3;// cambiantes globales rampTime á 2;void setup() á // métodos de pin de configuración pinMode(ledPin, OUTPUT); //initialise serial port Serial.begin(9600);- void loop() á // rampa LED brillo hasta max for(int i á 0; i<256; i++) á analogWrite(ledPin, i); delay(rampTime); Serial.println(i); • // incremento del brillo del LED hasta 0 for(int i á 255; i>0; i--) á analogWrite(ledPin, i); delay(rampTime); Serial.println(i); }}
Desarbar
3.4 Empleo de estuches \'Switch\'
En esta sección, profundizaremos en la utilización de casos de \'switch\' para llevar a cabo listas comparativas y desenlaces.
Archanas de la sección:
Código de origen para \'Caja de interruptores de potenciómetro\'
// pin definitionsint potPin á A0;// declare global variablesint lastPotValue;void setup() á// equipo pin modespinMode(potPin, INPUT);//initialise Serial portSerial.begin(9600);- void loop() á// leer potPin y dividir por 255 para ofrecer 5 lecturas probables potValue á analogRead(potPin) / 255;// si algo cambió desde el último valueif(potValue !- lastPotValue)// entrar switch caseswitch(potValue)-case 0:Serial.println ("Muy bajo");break;case 1:Serial.println("Low");break;case 2:Serial.println("Moderate");break;case 3:Serial.println("High");break;case 4:Serial.println("Extreme");break;default:Serial.println("error!"); romper; lastPotValue á potValue;-
Desarbar
3.5 Empleo de matemáticas
En esta sección, observaremos cómo usar distintas funcionalidades y métodos matemáticos en Arduino.
Archanas de la sección:
Ejemplo para \'Funcionalidades matemáticas\'
x a y + 3;x a y - 7;x a y * 6;x a y / 4;
3.6 Creación de funcionalidades
En esta sección, vamos a aprender a utilizar y hacer sus funcionalidades para redactar código modular y reutilizable.
Archanas de la sección:
Consigo de origen para \'Hypotenuse Calculator\'
*Actualización 8/1/18: I he actualizado el boceto para el ambicioso de hipotenusa que se refleja en el código siguiente. Brinda rechazo para valores no enteros y determinados retroalimentación.
void setup() á //initialise Serial.begin(9600); void loop() á int a; int b; float result; //print instructions, y espere hasta el momento en que haya algo en el búfer serie Serial.print("Entrar a side value: "); while(! Serial.available()); a - readSerial(); if(a -0) - return; Serial.print("Introduzca el otro valor del lado: "); while(! Serial.available()); b - readSerial(); if(b- 0) - return; - findSide(a,b); Serial.println(); readSerial toma el próximo entero en el búfer Serial, borra el búfer y, ahora, devuelve itint readSerial()- int i - Serial.parseInt(); //checks si el valor recibido es un entero válido if(i < 1 ? (i%1 !-0)) • Serial.println("Ese no es un entero válido"); devuelve 0; Serial.println(i); Serial.parseInt(); devolver i; void findSide(int x, int y)- //calcular C al cuadrado por A al cuadrado + B al cuadrado float hypotenuse á sqrt(x*x + y*y); //print out the result Serial.print("Hypotenuse ? "); Serial.println(hypotenuse
);
Capítulo 4: Manipulación de datos y EEPROM
4.0 Resumen del capítulo
En este capítulo vas a aprender sobre:
Utiloar cambiantes en matrices
Herramienta de operadores aritméticos, relacionales, lógicos y de asignación
Manículo de datos por medio de lógica y operadores bit-wise
Sochar información de programación entre restablecimientos por medio de EEPROM
Por el desenlace de este capítulo, va a haber desarrollado un display de secuenciación LED por medio de matrices, operadores y alojamiento EEPROM.
4.1 Arreglos
En esta sección, observaremos la utilización de matrices para guardar datos, lo que facilita una manipulación de cambiantes más fuerte.
Archanas de la sección:
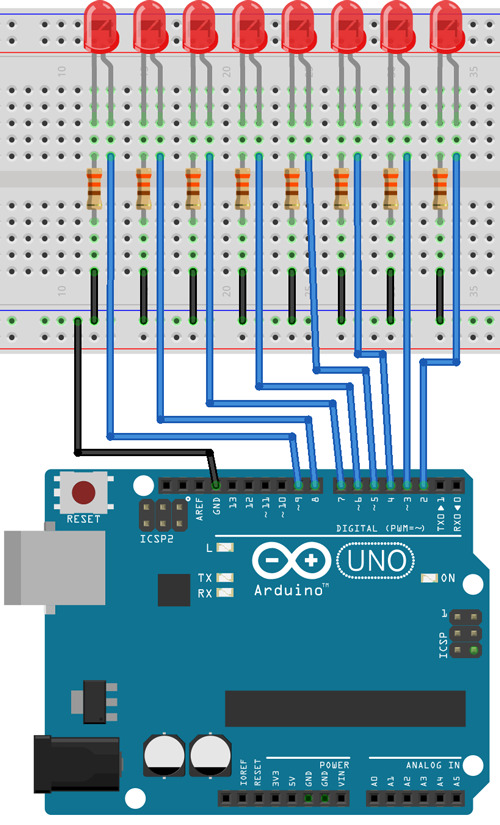
Código de origen para \'SECUENCIAdor LED\'
int ledArray[] á 2,3,4,5,6,7,8,9o;int delayTime á 50;void setup() á //initialise ledArray como salidas for(int i á 0; i<10; i++) á pinMode(led[i], OUTPUT); void loop() á //turn LEDs on from 0-7 for(int i á 0; i <-7; i++) á digitalWrite(ledArray[i], HIGH); delay(delayTime); á //turn LEDs off from 7-0 for(int i á 7; i > i > i--) á digitalWrite(ledArray[i], LOW); delay(delayTime*5
);
Desarbar
4.2 Operadores
En esta sección, veremos la utilización de operadores aritméticos, relacionales, lógicos y de asignación. Todos se usan para contrastar y considerar data.
Archanas de la sección:
Referencia de operadores de relación
x á 4y á 6 (x á y) false(x !o bien y) true(x > y) false(x < y) true(x >-y) false(x <-y) true
Operses
x á 0y á 1(x && y) false(x á y) true x á !x en este momento es igual a 1 (no 0)
Omisarios de asignación
i +- 2 igual que i a i+2i -2 igual que i-2i *-2 que i-i*2i /2 igual que i a i/2
4.3 Matemáticas de bits
En esta sección, va a aprender sobre el control de bits particulares en bytes por medio de operadores bit-wise y logic.
Archanas de la sección:
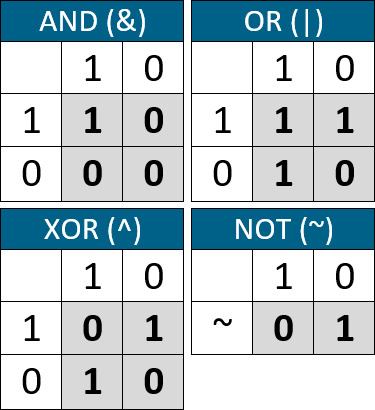
Ejemplos de operador
bitwise
//AND x á 0011 0100 y a 0101 1101x & y a 0001 0100//OR x á 0011 0100 y a 0101 1101x á y a 0111 1101//XOR x á 0011 0101 y á 0101 1101x á y á 0110 1001//NO x á 0011 0100 x á 1100 1011 y a 0101 1101-y a 1010 0010//SHIFT IZQUIERDA x á 0011 0100x << 2 x 1101 0000 y a 0101 1101y << 2 a 0111 0100//SHIFT DERECHO x a 0011 0100x >> 2 a 0000 1101 y a 0101 1101y >> 2 a 0001 0111
Cuestos enserio
Código de origen para \'AND, OR, XOR Calculator\'
const int dataPin á 6;const int clockPin á 7;const int latchPin á 8;byte ledMap á 0b1111111;int delayTime ? 3000;void setup() á // poner el código de configuración aquí, para ejecutarlo una vez: pinMode(dataPin, OUTPUT); pinMode(clockPin, OUTPUT); pinMode(latchPin, OUTPUT); Serial.begin(9600); shiftWrite(0x00); Serial.println("Ingrese un número entre 0-255"); void loop() á if(Serial.available()) á int inputVal á Serial.parseInt(); if(inputVal > 255) ? Serial.println("Uh oh, int try again"); Serial.println("Introduzca un número entre 0-255"); retorno; • Serial.print("DECIMAL: "); Serial.println(inputVal); Serial.print("BINARY: "); Serial.println(inputVal, BIN); Serial.println(); Serial.print("Y resultado: "); Serial.println(ledMap & inputVal, BIN); shiftWrite(ledMap & inputVal); delay(delayTime); Serial.print("O bien resultado: "); Serial.println(ledMap - inputVal, BIN); shiftWrite(ledMap - inputVal); delay(delayTime); Serial.print("Resultado XOR: "); Serial.println(ledMap - inputVal, BIN); shiftWrite(ledMap - inputVal); delay(delayTime); Serial.println(); Serial.println("Introduzca un número entre 0-255"); • .void shiftWrite(byte value)- digitalWrite(latchPin, LOW); shiftOut(dataPin, clockPin, MSBFIRST, value); digitalWrite(latchPin, HIGH);-
Desarbar
4.4 EEPROM
En esta sección, vamos a aprender sobre el alojamiento de datos en la memoria no volátil popular como EEPROM. Esto facilita que los datos se preserven en el momento en que se desconecta y se ingresa a la nutrición más adelante.
Archanas de la sección:
Consigo de origen para el \'contador EEPROM\'
#include // pin definitionsint ledPin á 13;int buttonPin á 2;// cambiantes globales lastButtonState á 1;long unsigned int lastPress;int debounceTime á 20;int counter;void setup() á // setup pin modes pin pinMode(ledPin, OUTPUT); pinMode(buttonPin, INPUT_PULLUP); //initialise Serial.begin(9600); //assign counter el valor de la dirección 0 counter - EEPROM.leer(0); redactar un 0 para la dirección 0. Esto facilita que los reinicios sucesivos reajuste el contador EEPROM.write(0,0); void loop() á int buttonState á digitalRead(buttonPin); //read the state of buttonPin y guárdelo como buttonState (0 o bien 1) if((millis() - lastPress) > debounceTime) //si el tiempo entre el último botónCamambión es más grande que el botón debounceTime á lastPress á millis(); //update lastPress if(buttonState ? 0 && lastButtonState ? 1) //if botón se presiona y se liberó el último cambio - counter++; EEPROM.write(0, contador); contador de escritura para emprender 0 digitalWrite(ledPin, HIGH); LED momentáneo lastButtonState - 0; registrar el lastButtonState //imprimir los desenlaces Serial.print("Contador: "); Serial.println(contador); • el botón if(buttonState ?1 && lastButtonState ? 0) //if no está pulsado, y se ha pulsado el último cambio de la última opción de la marca de la última opción de la marca de la última opción de la letra de la última opción de la letra de la última
Desarma de
Capítulo 5: Bibliotecas, datos serie y hardware
5.0 Resumen del capítulo
En este capítulo vas a aprender sobre:
Utilesar y también integrar bibliotecas en sus proyectos
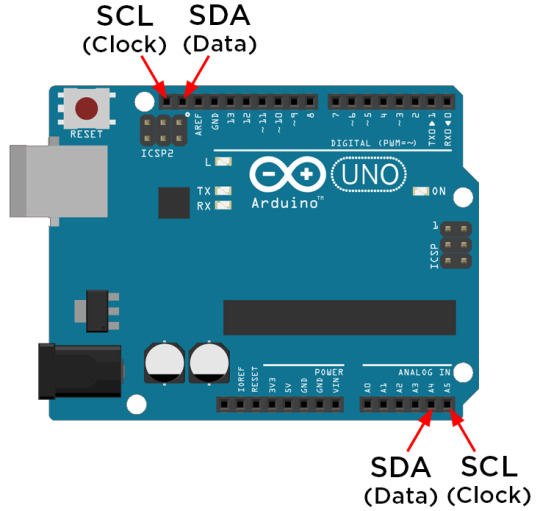
Utilesar el diseño SPI para expedir/recibir datos serie
Utilo de el diseño I2C para expedir/recibir datos serie
Expandar su emprendimiento con el formato de hardware Arduino llamado \'Shields\'
5.1 Empleo y también inclusión de bibliotecas
En esta sección, observaremos la utilización de módulos de código llamados \'bibliotecas\' que se tienen la posibilidad de usar para simplificar apps complicadas.
Archanas de la sección:
Te página de referencia de la biblioteca dearduino
Aquí, puede hallar la página de información de Arduino sobre bibliotecas que cubren varios de los cambios para integrar y añadir bibliotecas con distintas revisiones de Arduino IDE.
5.2 Empleo de SPI
En esta sección, va a aprender a utilizar el diseño SPI para expedir y recibir datos serie para jugar con sensores y otros gadgets.
Archanas de la sección:
Arla SPI de arduino

Código de origen para \'SPI LED Shift Register\'
#include int slaveSelect á 2;int delayTime á 50;void setup() á pinMode(slaveSelect, OUTPUT); SPI.begin(); SPI.setBitOrder(LSBFIRST); •void loop() á para (int i; i < 256; i++) //For loop para entablar los datos a 0 ahora, acrecentarlo en uno para cada iteración del bucle, en el momento en que el contador llegue a la condición (256) se restablecerá - digitalWrite(slaveSelect, LOW); //Write nuestro ciervo escoja low para dejar que el registro SHift empieze a oír los datos SPI.transfer(i); //Transfer el valor de 8 bits de los datos para mudar el registro, recordando que el bit menos importante va primero digitalWrite(slaveSelect, HIGH); //Una vez completada la transferencia, constituya el pestillo otra vez en prominente para parar el registro de turnos que escucha el delay de datos (delayTime); //Delay
.
Desarbar

5.3 Empleo de I2C
En esta sección, verá la utilización de el diseño I2C para expedir y recibir datos serie para jugar con sensores y otros gadgets.
Archanas de la sección:
Y también composición de packs I2C

Arduino I2C
Código de origen para \'Master Reader Arduino Demo (de Arduino)\'
#include <Wire.h>void setup() á Wire.begin(); // join i2c colectivo (dirección opcional para master) Serial.begin(9600); // start serial for output-void loop() ? Wire.requestFrom(8, 6); // pedir 6 bytes desde el gadget ciervo #8 en tanto que (Wire.available()) á // ciervo puede expedir menos de la char necesitada c - Wire.read(); // recibir un byte como carácter Serial.println(c); // imprimir el carácter á delay(500);-
Código de origen para \'Slave Sender Arduino Demo (de Arduino)\'
#include <Wire.h>void setup() á Wire.begin(8); // join i2c autobús con la dirección #8 Wire.onRequest(requestEvent); // register event-void loop() á delay(100); función que se ejecuta siempre que master// esta función pide datos como un acontecimiento, consulte setup()void requestEvent() - Wire.write("hello "); contestar con un mensaje de 6 bytes // según lo que se espera por el profesor-
Teca RTC de La fruta
Puede bajar la biblioteca RTC de Adafruit desarrollada particularmente para el chip DS3231 que vamos a usar, aquí.
Desarque de
para la demostración de Arduino \'I2C-I2C\'

Código de origen para \'Módulo RTC (desde Adafruit)\'
// Funcionalidades de fecha y hora por medio de un DS3231 RTC conectado por medio de I2C y Wire lib-include <Wire.h>#include "RTClib.h"RTC_DS3231 rtc;char daysOfTheWeek[7][12] á"Domingo", "Lunes", "Martes", "Miércoles", "Jueves", "Viernes", "Sábado";configuración de vacío () #ifndef ESP8266 mientras que (! Serie); para Leonardo/Micro/Zero-endif Serial.begin(9600); retardo(3000); aguardar a que la consola se abra si (! rtc.begin()) á Serial.println("No se ha podido hallar RTC"); mientras que (1); - if (rtc.lostPower()) - Serial.println("RTC perdió energía, facilita detallar la hora!"); // la próxima línea establece el RTC en la fecha y hora en que se compiló este boceto rtc .adjust(DateTime(F(__DATE__), F(__TIME__))); // Esta línea establece el RTC con una fecha y hora explícitas, entre otras cosas para detallar // January 21, 2014 a las 3am que llamaría: //.rtc.adjust(DateTime(2014, 1, 21, 3, 0, 0)); void loop () - DateTime en este momento - rtc.now(); Serial.print(now.year(), DEC); Serial.print(\'/\'); Serial.print(now.month(), DEC); Serial.print(\'/\'); Serial.print(now.day(), DEC); Serial.print(" ("); Serial.print(daysOfTheWeek[now.dayOfTheWeek()]); Serial.print(") "); Serial.print(now.hour(), DEC); Serial.print(\':\'); Serial.print(now.minute(), DEC); Serial.print(\':\'); Serial.print(now.second(), DEC); Serial.println(); Serial.print(" desde la medianoche 1/1/1970 "); Serial.print(now.unixtime()); Serial.print("s á "); Serial.print(now.unixtime() / 86400L); Serial.println("d"); calcular una fecha que es 7 días y 30 segundos más adelante DateTime futuro (en este momento + TimeSpan(7,12,30,6)); Serial.print(" en este momento + 7d + 30s: "); Serial.print(future.year(), DEC); Serial.print(\'/\'); Serial.print(future.month(), DEC); Serial.print(\'/\'); Serial.print(future.day(), DEC); Serial.print(\' \'); Serial.print(future.hour(), DEC); Serial.print(\':\'); Serial.print(future.minute(), DEC); Serial.print(\':\'); Serial.print(future.second(), DEC); Serial.println(); Serial.println(); delay(3000);-
Desarbar
5.4 Interrupciones
En esta sección, observaremos cómo utilizar las interrupciones. Posiblemente haya oído charlar de antes, y son una enorme forma de incrementar la eficacia de su programa tratándose de entradas de hardware.
Archanas de la sección:
Consigo de origen para \'Interrumpir Debouncing\'
// pin definitionsint ledPin á 3;int buttonPin á 2;// cambiantes globalesint toggleState;int lastButtonState á 1;long unsigned int lastPress;volatile int buttonFlag;int debounceTime á 20;void setup() á // setup pin modes pin (ledPin, OUTPUT); pinMode(buttonPin, INPUT_PULLUP); attachInterrupt(digitalPinToInterrupt(2), ISR_button, CHANGE); void loop() á if((millis() - lastPress) > debounceTime && buttonFlag) á lastPress á millis(); //update lastPress if(digitalRead(buttonPin) á 0 && lastButtonState á 1) //if botón se presiona y se ha anunciado el último cambio . toggleState; //cambiar el estado de LED digitalWrite(ledPin, toggleState); lastButtonState á 0; //record the lastButtonState - else if(digitalRead(buttonPin) ? 1 && lastButtonState ? 0) //if button is not pressed, y se ha presionado el último cambio - lastButtonState ? 1; //record the lastButtonState ? buttonFlag ? void ISR_button()botónFlag - 1;-
Desarma de ancho para \'Interrumpir debouncing\'
5.5 Escudos Arduino
En esta sección, tiraremos una mirada al empleo de módulos de complementos de hardware populares como \'escudos\'. Son una increíble forma de agrandar fácilmente las habilidades de su emprendimiento.
Capítulo 6: Ingresar en el reino de IoT
6.0 Resumen del capítulo
En este capítulo vas a aprender sobre:
Los conceptos básicos de un marco MQTT
Afruto
Dashboards y piensos
Scribir y divulgar en Adafruit IO
Ebardes de IoT
6.1 MQTT y Adafruit IO
En esta sección, el transporte de telemetría de Message Queue Server (MQTT) se introducirá adjuntado con Adafruit IO.
6.2 Tableros y feeds
En esta sección, construiremos una cuenta de Adafruit para conseguir ingreso a Adafruit IO. Además construiremos un panel de control y determinados feeds para supervisar y vigilar nuestro primer emprendimiento Arduino IoT.
6.3 Elaborar su Arduino Internet
En esta sección, descargaremos las bibliotecas importantes y el código ejemplo para conseguir nuestro Escudo WiFi Arduino y WINC1500 listo para Internet.
6.4 Su primera conexión IoT
En esta sección, exploraremos el código de ejemplo para poder ver cómo trabaja antes de realizar nuestro primer emprendimiento Arduino IoT!
Capítulo 7: ¿A dónde ir desde aquí?
7.0 Elementos complementarios
Es el instante de finalizar el Taller Arduino, de este modo que voy a sugerir unos cuantos mis elementos preferidos para proyectos y cuestiones.
7.1 Placas compatibles Arduino recomendadas
0 notes
Text
RxJSとは何者か
RxJS
RxJS -tutolialspointをザーッと読んだので記録。
overview
RxJSは、observablesを使うjavascriptのライブラ��。Reactive Programmingで使う。Reactive Programmingでは、非同期のデータ呼び出しや、コールバック、イベントベースのプログラムを扱う。
what is RxJS
RxJSは、観測できる配列(observable sequences)による、非同期でイベントベースのプログラムを構成するためのライブラリって定義されている。 中核の型であるObservable、それに付随する型のObserver, Schedulers, Subjectsと、配列拡張の操作(map, filter, reduce...)などから、非同期なイベントをコレクションとして扱う。
features of RxJS
RxJSでは、以下のような概念から、非同期タスクを取り扱う。
Observable
observerを作って、値を期待されたソースにアタッチする関数。
ソースっていうのは、例えばdom操作、httpRequestなどによるclick、マウスのイベントなど。
Observer
next(), error(), complete()メソッドをもったオブジェクト。
Observableと相互にやり取りする。
ソースは、ボタンのクリックや、HttpRequestなど。
Subscription
Observableが作られたあとに、Observableを実行することだよ。これをするために、subscribeする必要がある。
処理の実行をキャンセルする時にも使う。
Operators
Observableを入力として取り入れ、Observableを出力とするpureな関数。
Subject
たくさんのobservarと対話したり(multicastで)できるObservable。
Schedulers
subscriptionが始まったり、通知された時の処理の実行をコントロールする。
まとめるとこんな感じ。みづら。

RxJSの使い所
プロジェクトがたくさんの非同期処理を含んでるとき、RxJSが有用。
Advantages
他のjsライブラリとかフレームワークと一緒に動かせる。
非同期処理を取り扱うライブラリ。
計算のための重い処理や、変換、フィルタリング、エラーハンドリングなどいろんなものを提供している。
Disadvantages
Observableを使ったコードのデバッグはちょっと難しい。
Observablesを使ったら、Observableにラップされた完全なコードになる可能性がある。
install
node/npmが事前に必要。
rxjs
npm initした後に、npm install --save-dev rxjs
nodeに対応
nodeコマンドで、es6表記に対応するためにesmが必要。 nodeコマンドで試さないならいらない。 実行は以下。
$ npm install --save-dev esm $ node -r esm testrx.js
ブラウザに対応
ブラウザでチェックするなら、以下が必要。
$ npm install --save-dev babel-loader @babel/core @babel/preset-env webpack webpack-cli webpack-dev-server
rxjsのバージョンの話
RxJS5と6で変更部分があるらしく、バージョンアップすると、古いコードが壊れるらしい。 6にあげた時に、後方互換性を持たせるために、以下パッケージが必要。
$ npm install --save-dev rxjs-compact
初めから6を使う場合は必要なし。
observable
Observerを作って、domとかhttpRequestなどからのクリックやマウスイベントなどの値をソースとして関連づける関数である。 Observerはコールバック関数を持ったオブジェクトで、Observableと相互作用があるときに呼び出される。ボタンクリックとか、HttpRequestとかから作用する。
create observable
observable constructorか、もしくは、observable createメソッドを使い、subscribe関数を引数として渡すことで作られる。
import { Observable } from 'rxjs'; // var observer = Observable.create( でもok var observer = new Observable( function subscribe(subscriber) { subscriber.next("My First Observable") } );
subscriberは、Observerと同じ扱いで良さげ。
Subscribe observable
observerがsubscribeされた時、Observableの実行を始めるよ。
observer.subscribe(x => console.log(x));
Execute observable
Observableは、subscribeされた時に実行される。 observerは、3つの通知用メソッドをもつオブジェクトである。
next()
このメソッドは、数字や文字列、オブジェクトなどの値を送る。
complete()
このメソッドはなんの値も送らない。
Observableが完了したことを示す。
error()
エラーがあれば、エラーを送ってくれる。
import { Observable } from 'rxjs'; var observer = new Observable( function subscribe(subscriber) { try { subscriber.next("my first observable") subscriber.next("testing observable") subscriber.complete() } catch(e) { subscriber.error(e) } } ); // subscribe(処理, error時の処理, complete時の処理) observer.subscribe(x => console.log(x), (e) => console.log(e), ()=> console.log("observable complete"));
Observable.subscribe()とは、ドキュメントによると。
public subscribe(observerOrNext: Observer | Function, error:Function, complete: Function):ISubscription
らしい。subscriber.next()などで与えられた値に対して、どういう処理をするかっていう部分を決めてる。 ISubscriptionは、subscriptionの、登録されたハンドラへの参照。
subscriptionを停止
Observableが作られて、実行するにはsubscribeする必要がある。
unsubscribeメソッドを使うことで、Observableに使われているリソースを全部消すことができる。つまり、Observableはキャンセルされる。
operators
Observableに取り入れられている純粋関数。入力と出力がObservable。pipe()メソッドで動かす。
基本的にはこんな感じ。
let obs = of(1,2,3); // Observableを作る obs.pipe( operator1(), operator2(), operator3(), operator3(), )
import { of } from 'rxjs' import { map, reduce, filter } from 'rxjs/operators' let test1 = of(1,2,3,4,5,6,7,8,9,10) let case1 = test1.pipe( filter(x => x % 2 === 0), reduce((acc, one) => acc + one, 0) ) case1.subscribe(x => console.log(x))
TODO: ObservableのOperatorまわりをいくつか。詳細は気合いがあったら。
Observableを作成
ajax
from
fromEvent
fromEventPattern
Interval
of
演算
Count
Max
Min
Reduce
結合
concat
forkJoin
merge
race
変換
buffer
bufferCount
bufferTime
bufferToggle
bufferWhen
expand
groupBy
フィルタリング
debounce
debounceTime
distinct
elementAt
fileter
Utility
tap
delay
delayWhen
observeon
条件づけ
defaultIfEmpty
every
find
マルチキャスト
multicast
publish
publishBehavior
エラーハンドリング
catchError
retry
subjectの挙動
subjectはマルチキャスト可能なObservable。つまり、たくさんのObserverと対話することが可能。 イベントリスナーのあるボタンで考えてみる。addlistenerを使ってイベントに関連づけられた関数は、ユーザがボタンをクリックするたびに呼ばれる。 同様の機能がsubjectにも付加される。
create a subject
import { Subject } from 'rxjs'; const subject_test = new Subject();
こんな感じで作られたオブジェクトはObserverで、3つのメソッドを持つ。
next(v)
error(e)
complete()
import { Subject } from 'rxjs' const subject_text = new Subject() // create subject subject_text.subscribe({ next: (v) => console.log(`from subject: ${v}`) }); subject_text.subscribe((v) => console.log(`from subject: ${v}`)); // これでもいける subject_text.next("a"); // subject_text.complete(); subject_text.next("b");
この時、completeしなかったら、こうなる。
$ node -r esm src/testrx.js from subject: a from subject: a from subject: b from subject: b
completeするとこうなる。
$ node -r esm src/testrx.js from subject: a from subject: a
Subject自体は、Observableを継承して作られたクラスだった。
参考: Subjectとは?
ObservableとSubjectの違いとは
Observableは、subscriber(observer)とone2oneで対話する。いつでもObservableにsubscribeして処理を実行できる。
1つのObservableを購読しているsubscriberが2つあって、http callした時のObservableの挙動を見てみると、同じデータが共有されるが、http callを2回行う。つまり、それぞれのsubscriberに向けて一回ずつhttp callしてるってこと。
これを一回にできるのがSubject。前述しているけど、Subjectはマルチキャスト可能なObservable。つまり、たくさんのObserverと一括で会話できる。挙動は、一回のhttp callで、2つのObserverに結果を投げてる感じになる。
Behaviour subject
Behaviour subjectは、呼ばれた時の最新の値を提供するよ。
import { BehaviorSubject } from 'rxjs'; const behavior_subject = new BehaviorSubject("Testing Behaviour Subject"); // 0 is the initial value // start subscribe: observerA behavior_subject.subscribe({ next: (v) => console.log(`observerA: ${v}`) }); // value: testig Behaviour Subject -> Hello behavior_subject.next("Hello"); // start subscribe: observerB behavior_subject.subscribe({ next: (v) => console.log(`observerB: ${v}`) }); // value: Hello -> Last call to Behaviour Subject behavior_subject.next("Last call to Behaviour Subject");
$ node -r esm src/testrx.js observerA: Testing Behaviour Subject observerA: Hello observerB: Hello observerA: Last call to Behaviour Subject observerB: Last call to Behaviour Subject
observerBがsubscribeした時点で、subjectの値はHelloであるため、Helloから購読を開始する。
replay subject
Behaviour subjectと似ている。ただしreplay subjectは値のbufferを取ってくれて、新しいsubscriberにも同じ結果が得られるようにしてくれる。
つまり、valueが書き換わった状態でsubscribeしても、ちょっと古めの情報も取得できるぞってこと。
import { ReplaySubject } from 'rxjs'; const replay_subject = new ReplaySubject(2); // buffer 2 values but new subscribers replay_subject.subscribe({ next: (v) => console.log(`Testing Replay Subject A: ${v}`) }); replay_subject.next(1); replay_subject.next(2); replay_subject.next(3); replay_subject.subscribe({ next: (v) => console.log(`Testing Replay Subject B: ${v}`) }); replay_subject.next(5);
$ node -r esm src/testrx.js Testing Replay Subject A: 1 Testing Replay Subject A: 2 Testing Replay Subject A: 3 Testing Replay Subject B: 2 // 1個前の値から取得できる Testing Replay Subject B: 3 Testing Replay Subject A: 5 Testing Replay Subject B: 5
async subject
最後の値だけがsubscriberに渡される。complete()が呼ばれた後に一回だけ処理する。
import { AsyncSubject } from 'rxjs'; const async_subject = new AsyncSubject(); async_subject.subscribe({ next: (v) => console.log(`Testing Async Subject A: ${v}`) }); async_subject.next(1); async_subject.next(2); async_subject.complete(); async_subject.subscribe({ next: (v) => console.log(`Testing Async Subject B: ${v}`) });
$ node -r esm src/testrx.js Testing Async Subject A: 2 Testing Async Subject B: 2
scheduler
schedulerはsubscriptionがあった時に、いつ処理を実行するかをコントロールできる。
import { Observable, asyncScheduler } from 'rxjs'; import { observeOn } from 'rxjs/operators'; var observable = new Observable(function subscribe(subscriber) { subscriber.next("My First Observable"); subscriber.next("Testing Observable"); subscriber.complete(); }).pipe( observeOn(asyncScheduler) ); console.log("Observable Created"); observable.subscribe( x => console.log(x), (e) => console.log(e), () => console.log("Observable is complete") ); console.log('Observable Subscribed');
$ node -r esm src/testrx.js Observable Created Observable Subscribed My First Observable Testing Observable Observable is complete
.pipe()の処理をカットすると、こうなる。
$ node -r esm src/testrx.js Observable Created My First Observable Testing Observable Observable is complete Observable Subscribed
observeOn()とは
public observeOn(scheduler: IScheduler, delay: number): Observable<t>
指定されたSchedulerにしたがって、元のObservableから再度全通知を行う。
参考: observeOnとは
どんなのがあるかはソース読むしかないのかな...?
http://reactivex.io/rxjs/manual/overview.html#scheduler
http://reactivex.io/rxjs/class/es6/Scheduler.js~Scheduler.html
参考
メインで読んでたもの
https://www.tutorialspoint.com/rxjs/index.htm
公式
http://reactivex.io/rxjs/identifiers.html
http://reactivex.io/rxjs/manual/index.html
0 notes
Text
ESP32 Arduino Tutorial: Shake Sensor Debounce
In this ESP32 tutorial we will learn how to detect shaking in a
digital shaking sensor
and debounce the signal produced by the sensor in our program. The tests were performed using a DFRobot’s
ESP32 module
integrated in a
ESP32 development board
.
IntroductionIn this tutorial we will learn how to detect shaking in a
digital shaking sensor
and debounce the signal produced by the sensor in our program. We will connect the sensor to the ESP32 and use the Arduino core.We have already covered on
this
previous post the connection diagram between both devices and the software needed to interact with it using interrupts and a semaphore. We have also seen that, when a shaking movement is detected, the digital signal produced by the sensor goes from HIGH to LOW.Nonetheless, when testing the code, we realized that shaking the sensor once produced multiple interrupts. This occurs due to the fact that the the shake sensor is a mechanical device and thus, when actuated, there’s a transitory behavior where the signal oscillates between HIGH and LOW, before stabilizing. You can read more about this effect
here
.Since our microcontroller is triggering an interrupt when the signal goes from HIGH to LOW, it means that it will trigger multiple interrupts during this bouncing period. If we just ignore this effect, we will be detecting multiple shakes on the sensor when only one has occurred, which is incorrect.A simple way of solving this bouncing behavior is accounting for it on our software. Since we know that, after shaking the sensor, multiple interrupts will be triggered, we treat the first and we can just ignore subsequent interrupts during a predefined period of time (we will call it debounce time in our program).After that debounce time elapses, if a new interrupt is triggered, we treat it again as a new shake movement and then we ignore the next ones again during the debounce time.Note that there is no global formula to calculate this debounce time, as it depends on the behavior of the device we are using. This time should be set with a value big enough to cover the time interval during which the input signal will be unstable due to the bouncing effect, but also small enough to not discard subsequent shakes on the sensor.I’ll be using a value of 250 milliseconds, which is reasonable for the sensor we are using. Naturally, if you have access to equipment that allows you to analyze in detail the transitory behavior of the signal, you can get to a more precise value.The tests were performed using a DFRobot’s
ESP32 module
integrated in a
ESP32 development board
.
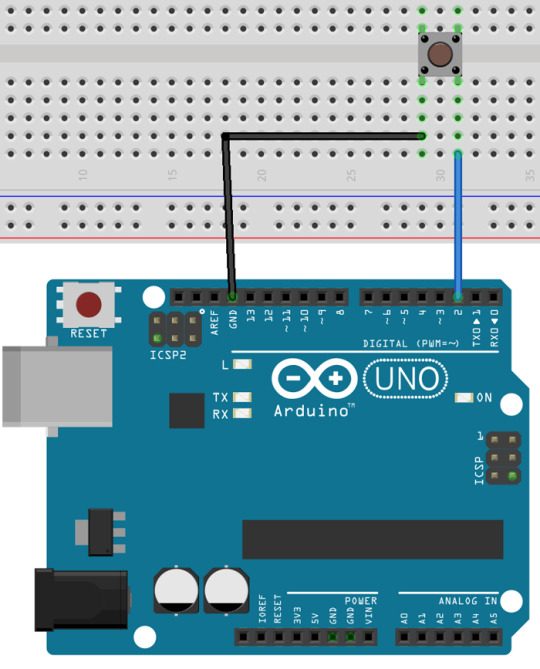
The codeWe will start by declaring a variable to hold the number of the pin that will be connected to the shake sensor.
const byte interruptPin = 22;
Then, we will declare a variable that will store the time when the last shake detection interrupt was detected. This should only store “correct” interrupts and not the discarded ones during the bouncing time.We are going to store the time as milliseconds elapsed since the ESP32 started working, which can be obtained using the millis function. This is much simpler than using actual timestamps (with date and time), since we simply want to check the time interval elapsed since the last interrupt.Note that the millis function returns the elapsed time as an unsigned long, which is the type we should use to our variable.
unsigned long lastDetection = 0;
Additionally, we will store the debounce time that needs to be elapsed in order for us to acknowledge a new interrupt as a shake event, since the last one. Since this corresponds to a time interval, we should also declare it as unsigned.As already mentioned in the introductory section, we will use a value of 250 milliseconds. Nonetheless, you can try to change this value to optimize the results.
unsigned long debounceTime = 250;
Finally, we will declare a variable of type SemaphoreHandle_t, which corresponds to a handle to a semaphore that we will create later. This semaphore will be used to synchronize the main loop with the interrupt handling function.
SemaphoreHandle_t syncSemaphore;
Moving on to the setup function, we will start by initializing a serial connection, to output the results of our program.
Serial.begin(115200);
Then we will create our semaphore with a call to the xSemaphoreCreateBinary function and we will store the returning value in our previously declared SemaphoreHandle_t global variable.
syncSemaphore = xSemaphoreCreateBinary();
After this, we will setup the pin attached to the sensor to work in INPUT_PULLUP mode, which will guarantee that it will be in a HIGH state when no signal is applied to it. This avoids false interrupts from its value floating between HIGH and LOW if it is left unconnected.To finalize, we will attach the interrupt to the mentioned pin. Since the sensor outputs a low level pulse when shaken, we will configure the interrupt to be triggered on a falling edge of the input signal (in order words, when the signal goes from HIGH to LOW).
pinMode(interruptPin, INPUT_PULLUP); attachInterrupt(digitalPinToInterrupt(interruptPin), handleInterrupt, FALLING);
The complete setup function can be seen below.
void setup() { Serial.begin(115200); syncSemaphore = xSemaphoreCreateBinary(); pinMode(interruptPin, INPUT_PULLUP); attachInterrupt(digitalPinToInterrupt(interruptPin), handleInterrupt, FALLING); }
Moving on to the main loop, the first thing we will do is trying to obtain the semaphore, by calling the xSemaphoreTake function.As first input, we will pass our semaphore handle and as second input the value portMAX_DELAY, which means that the task should wait indefinitely until the semaphore can be obtained.With this approach, the main loop task stays blocked while there are no interrupts to handle. Thus, we avoid polling the sensor and the processor is free to execute other useful computation.
xSemaphoreTake(syncSemaphore, portMAX_DELAY);
When this task obtains the semaphore, it will unblock. Thus, we know that an interrupt has occurred and we need to treat it. Our actuation in response to the detection of a shake movement will simply be printing a message to the serial port.Nonetheless, as already mentioned, we need to debounce the sensor, because a single shake of the sensor will trigger multiple interrupts due to the bouncing effect.So, our debouncing logic will simply correspond to checking if the time elapsed since the last time a shake in the sensor was detected is greater than the debounce time.If it is not greater, then we assume that the interrupt was triggered due to the bouncing effect in the signal, and we simply discard it and we do not do anything else.Otherwise, if the elapsed time is greater than the debounce time, then we can acknowledge it as a shake in the sensor and we can treat it properly by printing the “shake detected” message.Note that, in case we acknowledge a new shake event, we need to update the variable that contains the time of the last detection with the current time, returned by the millis function.This way, we will now be able to ignore the next interrupts that will be triggered due to the bouncing effect caused by this new shake event.
if(millis() - lastDetection > debounceTime){ Serial.println("Shake detected"); lastDetection = millis(); }
Important: As shown above, you should do the comparison by subtracting the last shake detection time to the current millis value, and comparing it against the debouncing interval. This way, the code will keep working correctly even when the millis function overflows. You can check here a great explanation about why this works and why using the addition is not recommended.The complete loop code can be seen below.
void loop() { xSemaphoreTake(syncSemaphore, portMAX_DELAY); if(millis() - lastDetection > debounceTime){ Serial.println("Shake detected"); lastDetection = millis(); } }
The interrupt handling function implementation will be very simple and equal to what we have already covered in the previous post. It will simply add a unit to the semaphore to unblock the main loop task.This is done with the xSemaphoreGiveFromISR function, passing as first input the semaphore handle and as second input the value NULL (since we won’t need to make use of this second parameter).
void IRAM_ATTR handleInterrupt() { xSemaphoreGiveFromISR(syncSemaphore, NULL); }
The final complete code can be seen below.
const byte interruptPin = 22; unsigned long lastDetection = 0; unsigned long debounceTime = 250; SemaphoreHandle_t syncSemaphore; void IRAM_ATTR handleInterrupt() { xSemaphoreGiveFromISR(syncSemaphore, NULL); } void setup() { Serial.begin(115200); syncSemaphore = xSemaphoreCreateBinary(); pinMode(interruptPin, INPUT_PULLUP); attachInterrupt(digitalPinToInterrupt(interruptPin), handleInterrupt, FALLING); } void loop() { xSemaphoreTake(syncSemaphore, portMAX_DELAY); if(millis() - lastDetection > debounceTime){ Serial.println("Shake detected"); lastDetection = millis(); } }
Testing the codeTo test the code, simply compile it and upload it to your device. When the procedure finishes, open the Arduino IDE serial monitor. Then, shake the sensor in the direction indicated in the PCB of the module.You should get an output similar to figure 1, which shows the message when the sensor shake is detected. Note however that, every time you shake the sensor, you should only get a single message because the bouncing effect is being treated in our program.

Figure 1 – Output of the shake detection digital sensor, with debouncing.Related posts
ESP32 Arduino Tutorial: Digital shake sensor
0 notes
Text
Using Observables in Ionic 3.9.x and Angular 5
Since Ionic has been using semantic versioning for their updates, as long as the number at the beginning of the version number (i.e. 3.x.x) stays the same, then it means you likely won’t be dealing with any breaking changes that you need to update things in your application for. It also means that when you see the framework transition from 3 to 4, or 4 to 5, it doesn’t mean that the rug is being pulled out from beneath your feet – there will just be a few things that require updating. The next big update scheduled for Ionic, the 4.x update, will be the one that moves the framework over to web components.
This most recent 3.9 update, however, is a little more significant than some of the more recent minor updates and patches. This update bumps the Angular framework version being used to the latest 5.x release. This new version of Angular comes with a range of improvements, including the usual behind the scenes updates to make it smaller and faster, and a range of other features as well. For a full list of the updates, you can take a look at this blog post from the Angular team.
For the most part, you should still be able to upgrade your application without having to worry about making any changes. However, in this article, we are going to take a look at one of the more significant changes in Angular 5 which is an update to RxJS and Observables.
Upgrading to Ionic 3.9.x / Angular 5
Upgrading to the latest version is as simple as ever (assuming your project was up to date previously) just update your node_modules to reflect the following versions by updating your package.json file:
"dependencies" : { ... "@angular/common": "5.0.0", "@angular/compiler": "5.0.0", "@angular/compiler-cli": "5.0.0", "@angular/core": "5.0.0", "@angular/forms": "5.0.0", "@angular/http": "5.0.0", "@angular/platform-browser": "5.0.0", "@angular/platform-browser-dynamic": "5.0.0", "@ionic/storage": "2.1.3", "ionic-angular": "3.9.0", "rxjs": "5.5.2", "zone.js": "0.8.18" ... }, "devDependencies: { "@ionic/app-scripts": "3.1.0", "typescript" : "2.4.2" }
If you’re working on an older project, then you may need to make your way through the changelog.
Observable Changes
The way in which we use RxJS and Observables is the only big change you may notice in the code for applications. Your applications will continue to work even if you do not update to the new syntax that I am about to show you, but there are benefits to doing so. If you’re interested in the why of this change and the kinds of benefits you can expect, this document explains the reasoning in-depth.
For some context, let’s use an example from a previous tutorial on high performance list filtering.
Our observables return values to us, but we can also chain methods onto those observables to modify the results that we get. In the case of that tutorial, we didn’t want to trigger the search every time a user typed a letter, we only wanted to trigger it when the user was done typing. Instead of immediately handling the result from the observable, we would wait for a period of time where the user had not typed for 700ms. To do this, we used the debounceTime operator, which looks like this:
this.searchControl.valueChanges.debounceTime(700).subscribe(search => { // do something here });
In order to chain the debounceTime method on an observable, we would need to import that operator to patch in the functionality:
import 'rxjs/add/operator/debounceTime';
However, this new update introduces something called “lettable operators” where we can import specific operators. We would instead import the operators like this:
import { debounceTime } from 'rxjs/operators/debounceTime';
and then to use the operator we would need to use the new pipe method to run any operators that we want on the observable, like this:
this.searchControl.valueChanges.pipe( debounceTime(700) ).subscribe(search => { // do something here });
Instead of chaining observables together, now we just call the pipe method on the observable, and we supply it with any operators we want to apply. To apply multiple operators, you can just add additional operators to the pipe method:
this.searchControl.valueChanges.pipe( debounceTime(700), somethingElse() ).subscribe(search => { // do something here });
You can also use this new method with the commonly used map operator by importing the map operator like this:
import { map } from 'rxjs/operators';
and then using it as follows:
this.http.get('someurl').pipe( map(res => res.json()) ).subscribe(result => { console.log(result); });
But, for now at least, if you prefer to use the old syntax then that will continue to work fine.
Summary
If you’re using Angular 5 in your Ionic projects then it is a good idea to update to the latest syntax, but there isn’t really any urgency around it. You can continue to use the existing syntax but still get the other benefits of the Angular 5 update if you aren’t willing to do that just yet.
It’s good to understand these changes, though, as you will likely start seeing this syntax used by others now.
What to watch next...
VIDEO
via joshmorony – Build Mobile Apps with HTML5 http://ift.tt/2ikaUAF
0 notes
Text
Hitung-Hitung Pakai Arduino
Hai! Kali ini kami akan mengabarkan mengenai proyek kami, yakni kalkulator menggunakan Arduino. Karena akan panjang, mari kita langsung mulai tanpa basa-basi.
Alat dan bahan yang kamu butuhkan adalah:

Arduino dan kabel USBnya
Kabel jumper. Banyak.
Sebuah LCD 16x2
Potensiometer 1k Ohm
Keypad 4x4
Pada percobaan pertama, kami mencoba menghubungkan Arduino seperti pada gambar berikut menggunakan kode yang berasal dari http://www.microcontroller-project.com/calculator-using-arduino.html. Semuanya berjalan baik sampai kode program dijalankan.

Jika kamu mengikuti tautan di atas dengan keypad yang kami gunakan, maka kamu perlu penutup keypad seperti di atas. Sebenarnya tidak ada gangguan fungsionalitas, namun rasanya ‘gimana gitu’.
Setelah dilakukan penjelajahan lebih lanjut, kami mempelajari kemungkinan lain yang ditawarkan oleh blog Arduino Fania, yang bisa juga kamu temukan di http://arduinofania.tumblr.com/post/80681582379/5th-project-calculator. Kodenya bisa kamu lihat di bawah ini.
#include <LiquidCrystal.h> LiquidCrystal lcd(12, 11, 5, 4, 3, 2); const int inPin = 0;const int numRows = 4; const int numCols = 4; const int debounceTime = 15;const char keymap[numRows][numCols] = { {'1','2','3','A'}, {'4','5','6','B'}, {'7','8','9','C'}, {'*','0','#','D'} };const int rowPins[numRows] = { 0, 1, 6, 7 }; // Rows 0 through 3 const int colPins[numCols] = { 8, 9, 10, 13 };void setup() { lcd.begin(16,2); for (int row = 0; row < numRows; row++) { pinMode(rowPins[row],INPUT); // Set row pins as input digitalWrite(rowPins[row],HIGH); // turn on Pull-ups } for (int column = 0; column < numCols; column++) { pinMode(colPins[column],OUTPUT); // Set column pins as outputs // for writing digitalWrite(colPins[column],HIGH); // Make all columns inactive } lcd.setCursor(1,0); lcd.print("A+ B- Cx D:"); }void loop() { char key1=0; key1 = getKey(); if( key1 != 0) { // if the character is not 0 then //it’s a valid key press if (key1 == '*'){ lcd.clear(); lcd.setCursor(1,0); lcd.print("A+ B- Cx D:"); } else{ char key2 = 0; char key3 = 0; lcd.setCursor(0,1); int a = key1 - '0'; lcd.print(a); while (key3 == 0){ key3 = getKey(); if (key3 != 0 ){ char op = convert(key3); lcd.print(op); } } while (key2 == 0){ key2 = getKey(); if (key2 != 0 ){ int b = key2 - '0'; lcd.print(b); double c = calculate(key3,a,b); lcd.print('='); delay(1000); lcd.print(c); } } } }}int calculate (char key3, int a, int b) { if (key3=='A'){ return(a+b); } else if (key3=='B'){ return(a-b); } else if (key3=='C'){ return(a*b); } if (key3=='D'){ return(a/b); } }char convert (char key3) { if (key3=='A'){ return('+'); } else if (key3=='B'){ return('-'); } else if (key3=='C'){ return('x'); } if (key3=='D'){ return(':'); } }char getKey() { char key = 0; // 0 indicates no key pressed for(int column = 0; column < numCols; column++) { digitalWrite(colPins[column],LOW); // Activate the current column. for(int row = 0; row < numRows; row++) // Scan all rows for // a key press. { if(digitalRead(rowPins[row]) == LOW) // Is a key pressed? { delay(debounceTime); // debounce while(digitalRead(rowPins[row]) == LOW); // wait for key to be released key = keymap[row][column]; // Remember which key // was pressed} } digitalWrite(colPins[column],HIGH); // De-activate the current column. } return key; // returns the key pressed or 0 if none }
Bagaimana rangkaiannya? Rasa penasaran kamu akan terjawab di bawah ini.

Dan hasilnya bisa kamu lihat di video ini
youtube
Voila! Selamat mencoba juga!
0 notes
Text
RxJS 入门指引和初步应用
RxJS是一个强大的Reactive编程库,提供了强大的数据流组合与控制能力,但是其学习门槛一直很高,本次分享期望从一些特别的角度解读它在业务中的使用,而不是从API角度去讲解。
RxJS简介
通常,对RxJS的解释会是这么一些东西,我们来分别看看它们的含义是什么。
Reactive
Lodash for events
Observable
Stream-based
什么是Reactive呢,一个比较直观的对比是这样的:
比如说,abc三个变量之间存在加法关系:
在传统方式下,这是一种一次性的赋值过程,调用一次就结束了,后面b和c再改变,a也不会变了。
而在Reactive的理念中,我们定义的不是一次性赋值过程,而是可重复的赋值过程,或者说是变量之间的关系:
定义出这种关系之后,每次b或者c产生改变,这个表达式都会被重新计算。不同的库或者语言的实现机制可能不同,写法也不完全一样,但理念是相通的,都是描述出数据之间的联动关系。
在前端,我们通常有这么一些方式来处理异步的东西:
其中,存在两种处理问题的方式,因为需求也是两种:
在处理分发的需求的时候,回调、事件或者类似订阅发布这种模式是比较合适的;而在处理流程性质的需求时,Promise和Generator比较合适。
在前端,尤其交互很复杂的系统中,RxJS其实是要比Generator有优势的,因为常见的每种客户端开发都是基于事件编程的,对于事件的处理会非常多,而一旦系统中大量出现一个事件要修改视图的多个部分(状态树的多个位置),分发关系就更多了。
RxJS的优势在于结合了两种模式,它的每���Observable上都能够订阅,而Observable之间的关系,则能够体现流程(注意,RxJS里面的流程的控制和处理,其直观性略强于Promise,但弱于Generator)。
我们可以把一切输入都当做数据流来处理,比如说:
RxJS提供了各种API来创建数据流:
单值:of, empty, never
多值:from
定时:interval, timer
从事件创建:fromEvent
从Promise创建:fromPromise
自定义创建:create
创建出来的数据流是一种可观察的序列,可以被订阅,也可以被用来做一些转换操作,比如:
改变数据形态:map, mapTo, pluck
过滤一些值:filter, skip, first, last, take
时间轴上的操作:delay, timeout, throttle, debounce, audit, bufferTime
累加:reduce, scan
异常处理:throw, catch, retry, finally
条件执行:takeUntil, delayWhen, retryWhen, subscribeOn, ObserveOn
转接:switch
也可以对若干��数据流进行组合:
concat,保持原来的序列顺序连接两个数据流
merge,合并序列
race,预设条件为其中一个数据流完成
forkJoin,预设条件为所有数据流都完成
zip,取各来源数据流最后一个值合并为对象
combineLatest,取各来源数据流最后一个值合并为数组
这时候回头看,其实RxJS在事件处理的路上已经走得太远了,从事件到流,它被称为lodash for events,倒不如说是lodash for stream更贴切,它提供的这些操作符也确实可以跟lodash媲美。
数据流这个词,很多时候,是从data-flow翻译过来的,但flow跟stream是不一样的,我的理解是:flow只关注一个大致方向,而stream是受到更严格约束的,它更像是在无形的管道里面流动。
那么,数据的管道是什么形状的?
在RxJS中,存在这么几种东西:
Observable 可观察序列,只出不进
Observer 观察者,只进不出
Subject 可出可进的可观察序列,可作为观察者
Subscription 订阅关系
前三种东西,根据它们数据进出的可能性,可以通俗地理解他们的连接方式,这也就是所谓管道的“形状”,一端密闭一端开头,还是两端开口,都可以用来辅助记忆。
上面提到的Subscription,则是订阅之后形成的一个订阅关系,可以用于取消订阅。
下面,我们通过一些示例来大致了解一下RxJS所提供的能力,以及用它进行开发所需要的思路转换。
示例一:简单的订阅
很多时候,我们会有一些显示时间的场景,比如在页面下添加评论,评论列表中显示了它们分别是什么时间创建的,为了含义更清晰,可能我们会引入moment这样的库,把这个时间转换为与当前时间的距离:
const diff = moment(createAt).fromNow()
这样,显示的时间就是:一分钟内,昨天,上个月这样的字样。
但我们注意到,引入这个转换是为了增强体验,而如果某个用户停留在当前视图时间太长,它的这些信息会变得不准确,比如说,用户停留了一个小时,而它看到的信息还显示:5分钟之前发表了评论,实际时间是一个小时零5分钟以前的事了。
从这个角度看,我们做这个体验增强的事情只做了一半,不准确的信息是不能算作增强体验的。
在没有RxJS的情况下,我们可能会通过一个定时器来做这件事,比如在组件内部:
tick() {
this.diff = moment(createAt).fromNow()
setTimeout(tick.bind(this), 1000)
}
但组件并不一定只有一份实例,这样,整个界面上可能就有很多定时器在同时跑,这是一种浪费。如果要做优化,可以把定时器做成一种服务,把业务上需要周期执行的东西放进去,当作定时任务来跑。
如果使用RxJS,可以很容易做到这件事:
Observable.interval(1000).subscribe(() => {
this.diff = moment(createAt).fromNow()
})
示例二:对时间轴的操纵
RxJS一个很强大的特点是,它以流的方式来对待数据,因此,可以用一些操作符对整个流上所有的数据进行延时、取样、调整密集度等等。
const timeA$ = Observable.interval(1000)
const timeB$ = timeA$.filter(num => {
return (num % 2 != 0)
&& (num % 3 != 0)
&& (num % 5 != 0)
&& (num % 7 != 0)
})
const timeC$ = timeB$.debounceTime(3000)
const timeD$ = timeC$.delay(2000)
示例代码中,我们创建了四个流:
A是由定时器产生的,每秒一个值
B从A里面过滤掉了一些
C在B的基础上,对每两个间距在3秒之内的值进行了处理,只留下后一个值
D把C的结果整体向后平移了2秒
所以结果大致如下:
A: 0 1 2 3 4 5 6 7 8 9 10 11 12 13 14 15 16 17 18 19 20 21
B: 1 11 13 17 19
C: 1 13 19
D: 1 13
示例三:我们来晚了
RxJS还提供了BehaviourSubject和ReplaySubject这样的东西,用于记录数据流上一些比较重要的信息,让那些“我们来晚了”的订阅者们回放之前错过的一切。
ReplaySubject可以指定保留的值的个数,超过的部分会被丢弃。
最近新版《射雕英雄传》比较火,我们来用代码描述其中一个场景。
郭靖和黄蓉一起背书,黄蓉记忆力很好,看了什么,就全部记得;而郭靖属鱼的,记忆只有七秒,始终只记得背诵的最后三个字,两人一起背诵《九阴真经》。
代码实现如下:
const 九阴真经 = '天之道,损有余而补不足'
const 黄蓉$ = new ReplaySubject(Number.MAX_VALUE)
const 郭靖$ = new ReplaySubject(3)
const 读书$ = Observable.from(九阴真经.split(''))
读书$.subscribe(黄蓉$)
读书$.subscribe(郭靖$)
执行之后,我们就可以看到,黄蓉背出了所有字,郭靖只记得“补不足”三个字。
示例四:自动更新的状态树
熟悉Redux的人应该会对这样一套理念不陌生:
当前视图状态 := 之前的状态 + 本次修改的部分
从一个应用启动之后,整个全局状态的变化,就等于初始的状态叠加了之后所有action导致的状态修改结果。
所以这就是一个典型的reduce操作。在RxJS里面,有一个scan操作符可以用来表达这个含义,比如说,我们可以表达这样一个东西:
const action$ = new Subject()
const reducer = (state, payload) => {
// 把payload叠加到state上返回
}
const state$ = action$.scan(reducer)
.startWith({})
只需往这个action$里面推action,就能够在state$上获取出当前状态。
在Redux里面,会有一个东西叫combineReducer,在state比较大的时候,用不同的reducer修改state的不同的分支,然后合并。如果使用RxJS,也可以很容易表达出来:
const meAction$ = new Subject()
const meReducer = (state, payload) => {}
const articleAction$ = new Subject()
const articleReducer = (state, payload) => {}
const me$ = meAction$.scan(meReducer).startWith({})
const article$ = articleAction$.scan(articleReducer).startWith({})
const state$ = Observable
.zip(
me$,
article$,
(me, article) => {me, article}
)
借助这样的机制,我们实现了Redux类似的功能,社区里面也有基于RxJS实现的Redux-Observable这样的Redux中间件。
注意,我们这里的代码中,并未使用dispatch action这样的方式去严格模拟Redux。
再深入考虑,在比较复杂的场景下,reducer其实很复杂。比如说,视图上发起一个操作,会需要修改视图的好多地方,因此也就是要修改全局状态树的不同位置。
在这样的场景中,从视图发起的某个action,要么调用一个很复杂的reducer去到处改数据,要么再次发起多个action,让很多个reducer各自改自己的数据。
前者的问题是,代码耦合太严重;后者的问题是,整个流程太难追踪,比如说,某一块状态,想要追踪到自己是被从哪里发起的修改所改变的,是非常困难的事情。
如果我们能够把Observable上面的同步修改过程视为reducer,就可以从另外一些角度大幅简化代码,并且让联动逻辑清晰化。例如,如果我们想描述一篇文章的编辑权限:
const editable$ = Observable.combineLatest(article$, me$)
.map(arr => {
let [article, me] = arr
return me.isAdmin || article.author === me.id
})
这段代码的实质是什么?其实本质上还是reducer,表达的是数据的合并与转换过程,而且是同步的。我们可以把article和me的变更reduce到article$和me$里,由它们派发隐式的action去推动editable计算新值。
更详细探索的可以参见之前的这篇文章:复杂单页应用的数据层设计
示例五:幸福人生
人生是什么样子的呢?
著名央视主持人白岩松曾经说过:
赚钱是为了买房,买房是为了赚钱。
这两句话听上去很悲哀,却很符合社会现实。(不要在意是不是白岩松说的啦,不是他就是鲁迅,要么就是莎士比亚)
作为程序员,我们可以尝试想想如何用代码把它表达出来。
如果用命令式编程的理念来描述这段逻辑,是不太好下手的,因为它看起来像个死循环,可是人生不就是一天一天的死循环吗,这个复杂的世界,谁是自变量,谁是因变量?
死循环之所以很难用代码表达,是因为你不知道先定义哪个变量,如果变量的依赖关系形成了闭环,就总有一段定义不起来。
但是,在RxJS这么一套东西中,我们可以很容易把这套关系描述出来。前面说过,基于RxJS编程,就好像是在组装管道,依赖关系其实是定义在管道上,而不是在数据上。所以,不存在命令式的那些问题,只要管道能够接起来,再放进去数据就可以了。所以,我们可以先定义管道之间的依赖关系,
首先,从这段话中寻找一些变量,得到如下结果:
然后,我们来探索它们各自的来源。
钱从哪里来? 出租房子。 房子从哪里来? 钱挣够了就买。
听上去还是死循环啊?
我们接着分析:
钱是只有一个来源吗? 不是,原始积累肯定不是房租,我们假定那是工资。所以,收入是有工资和房租两个部分组成。 房子是只有一个来源吗? 对,我们不是贪官,房子都是用钱买的。
好,现在我们有四个变量了:
我们尝试定义这些变量之间的关系:
工资 := 定时取值的常量
房租 := 定时取值的变量,与房子数量成正比
钱 := 工资 + 房租
房 := 钱.map(够了就买)
调整这些变量的定义顺序,凡是不依赖别人的,一律提到最前面实现。尴尬地发现,这四个变量里,只有工资是一直不变的,先提前。
const salary$ = Observable.interval(100).mapTo(2)
剩下的,都是依赖别人的,而且,没有哪个东西是只依赖已定义的变量,在存在业务上的循环依赖的时候,就会发生这样的情况。在这种情况下,我们可以从中找出被依赖最少的变量,声明一个Subject用于占位,比如这里的房子。
const house$ = new Subject()
接下来再看,以上几个变量中,有哪个可以跟着确定?是房租,所以,我们可以得到房租与房子数量的关系表达式,注意,以上的salary$、house$,表达的都是单次增加的值,不代表总的值,但是,算房租是要用总的房子数量来算的,所以,我们还需要先表达出总的房子数量:
const houseCount$ = house$.scan((acc, num) => acc + num, 0).startWith(0)
然后,可以得到房租的表达式:
const rent$ = Observable.interval(3000)
.withLatestFrom(houseCount$)
.map(arr => arr[1] * 5)
解释一下上面这段代码:
房租由房租周期的定时器触发
然后到房子数量中取最后一个值,也就是当前有多少套房
然后,用房子数量乘以单套房的月租,假设是5
房租定义出来了之后,钱就可以被定义了:
const income$ = Observable.merge(salary$, rent$)
注意,income$所代表的含义是,所有的单次收入,包含工资和房租。
到目前为止,我们还有一个东西没有被定义,那就是房子。如何从收入转化为房子呢?为了示例简单,我们把它们的关系定义为:
一旦现金流够买房,就去买。
所以,我们需要定义现金流与房子数量的关系:
const cash$ = income$
.scan((acc, num) => {
const newSum = acc + num
const newHouse = Math.floor(newSum / 100)
if (newHouse > 0) {
house$.next(newHouse)
}
return newSum % 100
}, 0)
这段逻辑的含义是:
累积之前的现金流与本次收入
假定房价100,先看看现金够买几套房,能买几套买几套
重新计算买完之后的现金
总结一下,这么一段代码,就表达清楚了我们所有的业务需求:
1
2
3
4
5
6
7
8
9
10
11
12
13
14
15
16
17
18
19
20
21
22
23
24
25
26
// 挣钱是为了买房,买房是为了赚钱
const house$ = new Subject()
const houseCount$ = house$.scan((acc, num) => acc + num, 0).startWith(0)
// 工资始终不涨
const salary$ = Observable.interval(100).mapTo(2)
const rent$ = Observable.interval(3000)
.withLatestFrom(houseCount$)
.map(arr => arr[1] * 5)
// 一买了房,就没现金了……
const income$ = Observable.merge(salary$, rent$)
const cash$ = income$
.scan((acc, num) => {
const newSum = acc + num
const newHouse = Math.floor(newSum / 100)
if (newHouse > 0) {
house$.next(newHouse)
}
return newSum % 100
}, 0)
// houseCount$.subscribe(num => console.log(`houseCount: ${num}`))
// cash$.subscribe(num => console.log(`cash: ${num}`))
这段代码所表达出来的业务关系如图:
工资周期 ———> 工资
↓
房租周期 ———> 租金 ———> 收入 ———> 现金
↑ ↓
房子数量 <——— 新购房
注意:在这个例子中,house$的处理方式与众不同,因为我们的业务逻辑是��形依赖,至少要有一个东西先从里面拿出来占位,后续再处理,否则没有办法定义整条链路。
小结
本篇通过一些简单例子介绍了RxJS的使用场景,可以用这么一句话来描述它:
其文简,其意博,其理奥,其趣深
RxJS提供大量的操作符,用于处理不同的业务需求。对于同一个场景来说,可能实现方式会有很多种,需要在写代码之前仔细斟酌。由于RxJS的抽象程度很高,所以,可以用很简短代码表达很复杂的含义,这对开发人员的要求也会比较高,需要有比较强的归纳能力。
本文是入职蚂蚁金服之后,第一次内部分享,科普为主,后面可能会逐步作一些深入的探讨。
蚂蚁的大部分业务系统前端不太适合用RxJS,大部分是中后台CRUD系统,因为两个原因:整体性、实时性的要求不高。
什么是整体性?这是一种系统设计的理念,系统中的很多业务模块不是孤立的,比如说,从展示上,GUI与命令行的差异在于什么?在于数据的冗余展示。我们可以把同一份业务数据以不同形态展示在不同视图上,甚至在PC端,由于屏幕大,可以允许同一份数据以不同形态同时展现,这时候,为了整体协调,对此数据的更新就会要产生很多分发和联动关系。
什么是实时性?这个其实有多个含义,一个比较重要的因素是服务端是否会主动向推送一些业务更新信息,如果用得比较多,也会产生不少的分发关系。
在分发和联动关系多的时候,RxJS才能更加体现出它比Generator、Promise的优势。
0 notes