#descript video editing tutorial
Explore tagged Tumblr posts
Visit Tumblr Blog
Explore Tumblr blogs with no restrictions, modern design and the best experience.
Last Seen Tumblr Blogs


Fun Fact
Tumblr was acquired by Yahoo for $1.1B in 2013.
Text
youtube
#descript tutorials#descript decoded#descript tutorial#descript video editing#how to use descript#descript#learn descript#descript app#descript video editing tutorial#descript review#descript ai#text to speech software#descript overdub#ai video generator#video editing software#video editing#ai video editing software#ai video tools#ai content generator#ai video editing#audio editor#audio to video ai#best ai video editor#ai tools#Youtube
0 notes
Text
Too many carpool drivers? Turn them into townies!
I've had an overpopulation issue with carpool drivers from when I started with Life Stories as my base game. (I didn't have anti redundancy) 42 of them to be exact. And i've never known what was safe to do with them. Till April Blacks new video about npcs! Turns out carpool drivers have complete character data and if you change their interaction table id and npc type they will become a normal sim. No idea if a tutorial exists so I thought i'd share how to do so.
This tutorial will also work on mascots graduated long ago who refuse to take their smelly cow costume off and other npcs that can be turned playable with annoying behaviors. Just skip the part where you move them into the townie bin
Firstly, !!!! ALWAYS MAKE A BACKUP OF YOUR NEIGHBORHOOD IF YOU ARE EDITING IT IN SIMPE !!!!!
What you need: Simpe and a basic knowledge of it (I use version 0.77.69 in the light installer)

Firstly, load up your neighborhood, open up sim browser and find your carpool driver you want to change.
1. Change their npc type to normal sim and press the fix guid button 2. Commit then save.
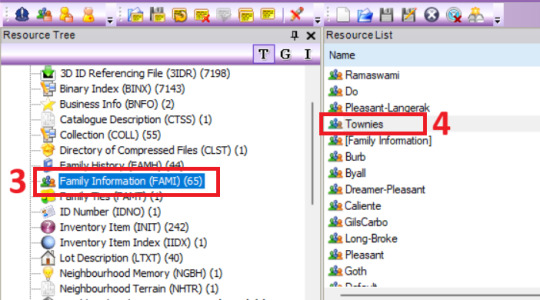
3. Go to the resource tree and click family infomation 4. Find your Townies family

5. Select your sims name from the dropdown box. 6. Press add sim. 7. Commit and save.

Go back to your sim description and go to the more tab and open their character file.

6. Go to object data in the resource tree 7. Click on the sims object data file 8. Go to the raw data tab and change it to decimal. Scroll down till you see interaction table id. Change that number from -1 to 129, 9. commit and save.
Now your carpool driver is a townie and has escaped eternal life trapped in a car!
195 notes
·
View notes
Note
How do you get people to notice your fics? I'm new to actually posting on Tumblr and writing fics and stuff but I feel like no one is looking at them cause I've got zero notes on them, do you have any advice?


ᯓ Write smut in the beginning ↴
⟢ You can branch out to different genres later on but smut gets the most recognition.
⟢ If you're not used to writing smut and don't have a lot of experience, I recommend watching porn on Twitter (why twitter? Because it usually has more amateur/homemade videos which is far better than those, usually, unrealistic porn videos made by big companies). I don't personally do this a lot but it helps a shit ton when I'm having a hard time writing smut (which is a rare occurrence).
ᯓ Write blurbs before bigger fics ↴
⟢ If you're intimidated by the idea of writing long fics. Write a blurb! Always start small.
ᯓ Tags are very much needed ↴
⟢ Add tags appropriate to your fics. Matt tags for Matt fics, Chris tags for Chris fics, and so on. Try adding tags like #fanfic smut and #tumblr writer.
ᯓ Reblogs ↴
⟢ Getting your fics reblogged by bigger blogs helps a lot.
⟢ Reblogging other people's fics helps too. It works, trust me.
ᯓ Make your fics more aesthetic ↴
⟢ Especially if you lack good story telling like me, then making your fics look more aesthetically pleasing will lure people to read your fics. (Sites I use often for symbols –> Here & Here.)
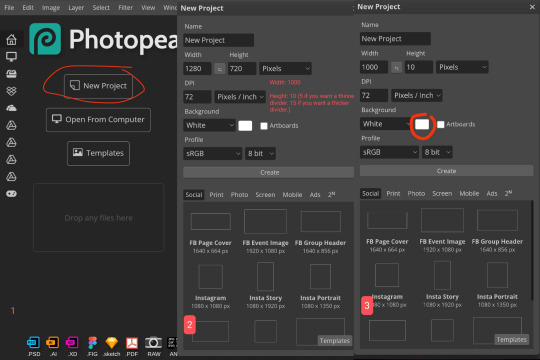
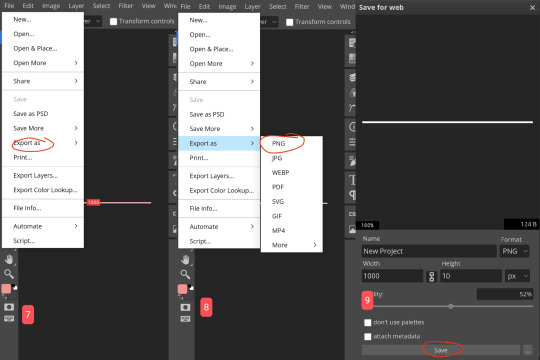
⟢ Photopea and ibis paint x are great free apps (there's a site version for photopea) to make dividers and whatnot. Pixelcut.ai is a site (there's an app too) that removes backgrounds really well. Font Generator is a great site (and app) that has so many fonts.
⟢ Also, making plain line dividers is really easy. Here's a little tutorial because why not :)

ᯓ Add pictures to your fics ↴
⟢ Edit them to change the colouring. I use Lightroom which is available on both app store and Google play. (I also use capcut.)
⟢ I made a «tutorial» on how to get your pic centered.
ᯓ Don't make your paragraphs too long ↴
⟢ It'll become harder to read for those that have short attention span.
ᯓ Creativeness ↴
⟢ Find prompts on Tumblr, insta, twitter, etc. if you're having a hard time coming up with fic ideas.
⟢ Listening to songs and reading the lyrics simultaneously helps too. You'll understand the lyrics more that way and maybe you'll get an idea or two from it.
ᯓ Interact with other blogs ↴
⟢ Heavy on this. Because interacting with other blogs will help you grow—as a person and as a blog.
ᯓ Credits ↴
⟢ Give credits if you're gonna use dividers.
⟢ Give credit if you're gonna write something inspired by other writers' au's.
⟢ Give credit if you're going to copy someone's fic layout, blog theme, etc.
ᯓ Consistency ↴
⟢ I used to write like 2 blurbs a day when I first started and I feel like being consistent is important in the beginning. (Doesn't have to be multiple blurbs a day though! Just one small blurb a day or every other day is more than enough.)
⟢ Writing in advance also helps to keep your consistency.
ᯓ Proofreading ↴
⟢ Read your fic a few hours—or preferably a day—after writing it. That way, you'll be able to see the errors you didn't detect when you first wrote it.
⟢ Proofreading right after writing it won't be that effective in most cases.
ᯓ Imagination ↴
⟢ Last, but not least, try to imagine the fic you're writing. Like, play it out in your head. Your imagination plays a huge role in writing fics. The more vivid your descriptions are, the more people would want to read it.
⟢ If it's hard to imagine it then read more books (or fanfics) and train your ability to imagine what the characters are doing.

ᯓ Misc. ↴
⟢ Em dash (—) has many uses. It can be used to create a pause in a sentence. It can be used if a comma is too weak but a period is too strong. It can be used in place of a parenthesis. It can also be used to emphasize a word. It's usually used without spaces (but you can use it with spaces too).
⟢ A semi-colon (;) is used to connect two sentences that are close in meaning but can't be connected by a comma. It can also be used in place of a comma if there are already commas. For example: Jess had long, golden locks; green eyes; rosy, ample cheeks; and a beaming smile.
⟢ A blurb is supposed to be really short (usually around 100-200 words) but fanfic writer's seem to say fuck it and write 1k words and label it as a blurb, so it's fine to make your blurb longer.
⟢ 100 words is a drabble (200 words is double drabble, 300 words is triple drabble, and so on. It's not that important though, we're just writing fanfiction for fun after all).
⟢ Oneshot is a fic that only has one part (it can be multiple parts, but only if all of them can be read purely as a standalone. Otherwise it'll become a series).
⟢ AU is the abbreviation for "alternative universe" and you can do whatever the fuck you want there. For example: You can make matt a cold-blooded mafia boss, Chris a father of four and Nick an assassin disguised as a harmless baker. And they don't even have to be brothers—they can be rivals. Nick could be trying to assassinate Matt, the cold-blooded mafia boss. Chris might get caught in the crossfire and somehow ends up getting tangled with Matt's wife (who was forced to marry him). The world is your oyster.
At the end of the day, it's just fanfiction. Do what makes you happy. Write what makes you horny.
Everything written above (except for the misc.) are all my own personal preferences so just keep that in mind. What works for me might not work for you. Because everyone is different, and that's why you have to start trying out different things and see what works the best for you.

#˖ ݁𖥔 ݁˖ isa's inbox ˖ ݁𖥔 ݁˖#— anon ۶ৎ#important!!!#sturniolo triplets#sturniolo writer#fanfiction writer#writer 101
77 notes
·
View notes
Text
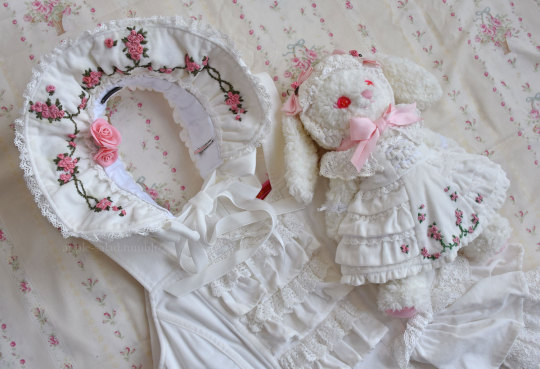
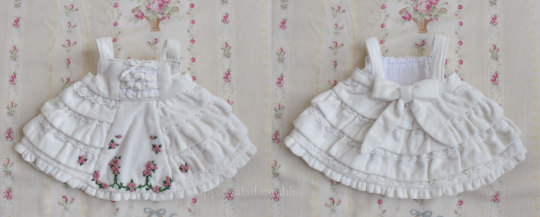
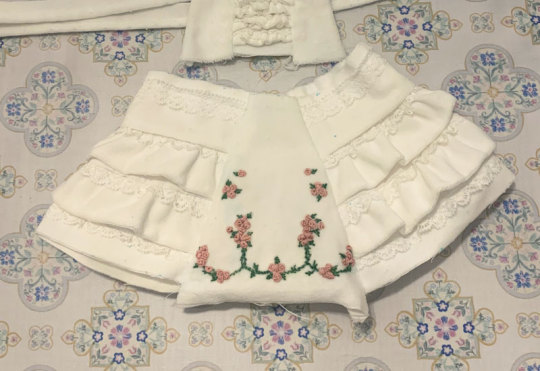
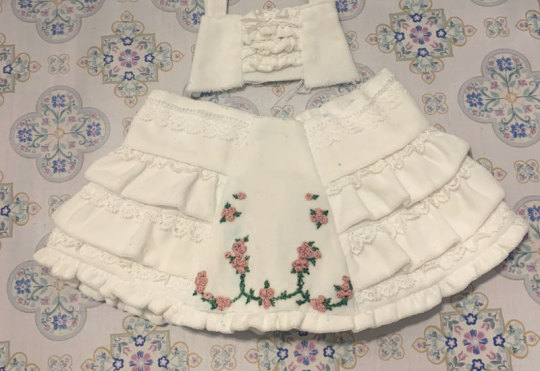
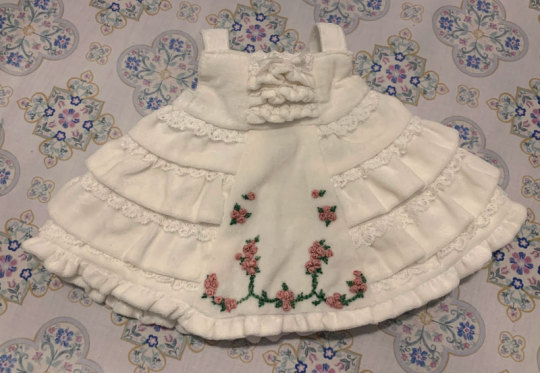
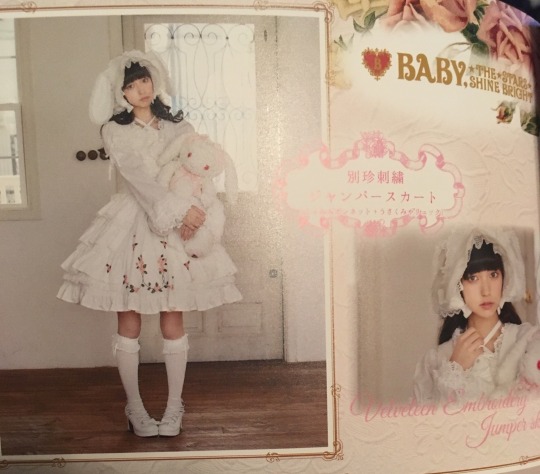
Rose Ribbon Embroidery "Mini" Projects (for BABY NYFW) Part 1: Kumya JSK
I decided semi-last minute to attend BABY's fashion show at NYFW!
BABY had mentioned in their NYFW brand description that their newest collection would be a return to their origins, as well as presenting archival items.
You have to dress to impress for NYFW, right? So of course, I had to pull out all the stops and wear my Rose Ribbon Embroidery.
Also at the last minute, I decided to make a few extra complementing items...
A matching RRE kumya JSK, and a bonnet.

What follows is more of a sew-along/journal rather than a tutorial or guide, mainly for my own memory's sake. But if you enjoy looking at my process (sometimes sloppy), I'm happy!
Also feel free to take a look at the more romantic process video I edited.
Part 1: Kumya JSK
Part 2: Bonnet
To make a matching kumya JSK, I first had to investigate the original dress a little! This I found actually very fascinating because I had never bothered to take a very careful look at the construction details of this JSK (it was, and still is always a precious item that I am afraid will get dusty or dirty if I look at it wrong...)
I actually even found a spot where it looks like the material was torn and someone roughly repaired it by hand (laugh). I have a feeling this was a factory mistake/fix (either from fabric manufacture or sewing) because it's hidden beneath some lace ruffle and I don't really think it's something that an owner would let happen, but who knows.
So here's a few details of RRE~
Many people don't know that RRE is made of velveteen! And further, there is sometimes a misconception that it came in a "cotton" and "velvet" version. As far as I know, there is only one version made out of cotton velveteen.
So the white can get dirty and attract dust super easily :')
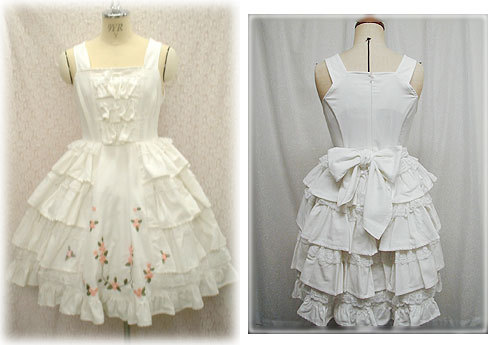
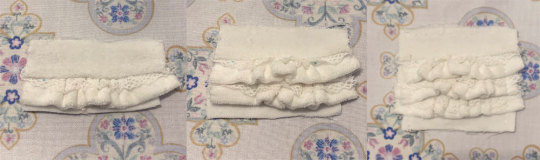
The bodice has a panel of 3 ruffles + upper "hashigo" (ladder) lace part with ribbon. It is also boned (BABY's crap boning with sharp edges and no channels, meh...) but obviously I can skip that for kumya.
The skirt has a trapezoidal embroidered panel, the star of the show, surrounded by 3 tiers of ruffles that extend all the way around the back. The last "tier" is not gathered and has a smaller ruffle all around the skirt.
While thinking about how to construct something similar in kumya-scale, I found it fascinating that the under-material the ruffles are attached to are cotton! Makes sense to reduce bulk, plus you can't tell when the ruffles cover it.
The density of ruffle starts out quite concentrated, and then reduces as the bottom ruffle is reached. The cotton under-material also seems to have less material gathered than the main velveteen ruffle. This also makes sense to not only reduce material usage but also because having a huge amount of gather on the bottom tier can make the skirt look too heavy.
Knowing this, I fussed out some semi-arbitrary ruffle multipliers for each tier (and lining) in my notebook. Very important to keep tabs on how many fabric strips I need and their exact widths!
Also since everything is in kumya-scale the gathering is generally reduced by a lot. Kumya doesn't need much to have a very full skirt, and with such tiny tiers the effect of the gathering can easily look like overkill. The kumya elizabeth OP gathered lace/tiers very lightly:
As reference dimensions for kumya, I have these two kumya dresses which I used lightly (mostly the sugar bouquet one because it's a JSK). I also have the babydoll kumya, but as it was out of commission for a while (on my christmas tree!😅) I didn't use it for checks at all.
The sugar bouquet "bodice" is about 3cm long. I decided to extend it one more cm to 4cm to make it easier for me to calculate for the ruffles and also leave enough space so the ruffles would be visible and not potentially buried.
I use a cotton velvet fabric and a mixture of cluny and torchon lace I have on hand. This velvet has a noticeable twill weave to it and is thinner than the velvet BABY usually uses, but the thinness is perfect for this purpose. I was originally going to just use cotton sateen but remembered I had this!
You can't see the weave from afar so I tolerate it. I wouldn't have wanted to use polyester velvet/suede-like/minky, I think.
Since the material is still a velvet and does have a thickness compared to cotton, I decided to roughly hem any ruffle edges by hand with a simple once-turned whip stitch. it kind of seals the raw edge and hems it at the same time. Note that this is not a great idea for something that would be worn and washed a lot, but this piece in this specific case won't be.
In general, when it comes to mistakes with this piece I mostly ignore them because it's kumya-scale and not only will most people not notice, but as stated above it's also not a piece that will be worn and washed often so quality of construction isn't much of a concern.
Mentally deconstructing and calculating the construction of the ruffle part was a bit of a pain. My lace was wider that I needed so I had to roughly mark out where it should be sewn into the ruffle, not always with great success.
I'm also not great with working at small scale...much respect to doll clothesmakers.
The bodice of the sugar bouquet kumya JSK is made from a front trapezoidal panel with a strip of fabric attached to the sides that extends all the way around the back, and the skirt attached to that. So I cut some slightly angular side panels to attach to my rectangular/square-ish front ruffle panel.
(I threadmarked approximately where I wanted the seam to go because I don't trust myself to attach the side panel in the right area/dimension otherwise with such a wonky panel)
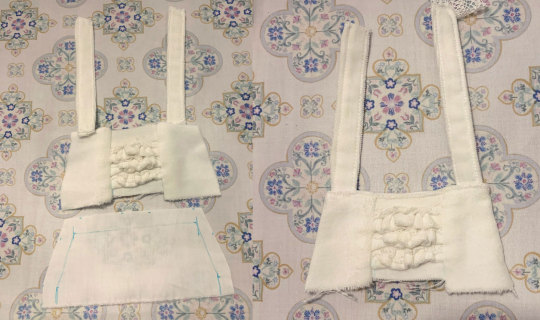
Simple straps made from strips of fabric. I make these slightly thicker than a regular kumya JSK as well because I feel like RRE has thicker straps too (well, the entire construction of the bodice is a bit different, but ignoring that...)
And a facing layer of ordinary cotton is sewn to the front panel.
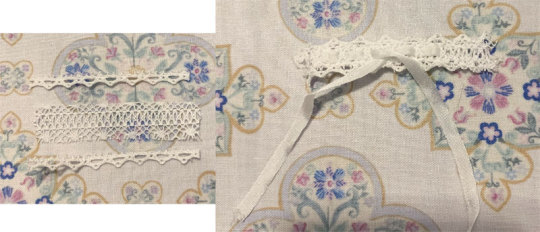
For the section of lace at the top, I frankenstein together 2 types of lace that I trimmed to look more like the lace used on the original JSK. It seems the original JSK also has this lace sewn through the lining layer, so the stitching is visible from the inside.
I use the thinnest ribbon I can find--some silk ribbon in this case. It actually works really well because silk ribbon is very thin/flimsy and can be tied and threaded in nicely with relative ease.
By the way, if you aren't aware already, a yarn needle works very well for threading ribbon through lace.
Bodice portion finished. This took way longer than I was hoping, an entire night. Hopefully the results are worth it.
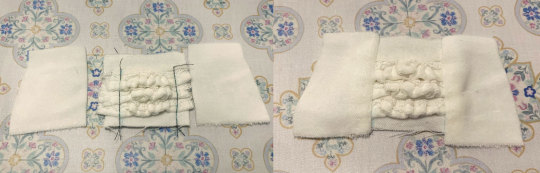
Next I fuss out the skirt. At this point I am working out the calculations and investigations already mentioned previously. I did make a few mistakes and had to re-cut a couple tiers!
I use a different lace from the bodice for the tiers because I thought the shape of this one was closer to what was originally used (it's actually the bilateral ladder lace used for the bodice, but instead of cutting off the lace edges and using the thread-through part, it's just cut in half)

After hemming the ruffle, I attach the lace to the velveteen ruffle with a single gathering stitch (too lazy to use 2, and the thick material makes it hard to gather anyway). The under cotton layer is gathered separately and sandwiched between the cotton layer of the previous tier.
Coming along. I think the lace length for these ruffles is a bit off/uneven/less than ideal, but oh well, can't be bothered to fix it...
After the third tier, a non-gathered velveteen tier is attached with gathered lace.
I also prepare the bottom ruffle, but that will be attached to the completed skirt.
Next, the most exciting but also potentially the most taxing part must be done--the embroidery!
I know that the top of the embroidered panel is basically the same width as the bodice ruffle (referencing the original dress), but the width of the bottom is a bit arbitrary (about 3x the width of the top of the trapezoid)
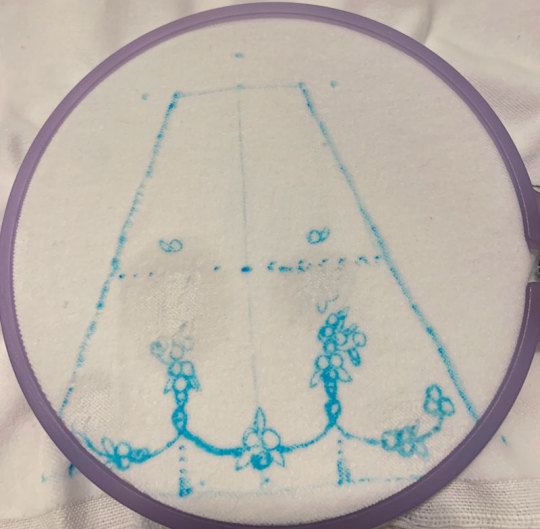
I mark out everything roughly with water soluble marker (the darker patches are where I messed up and used some water to erase, waiting for it to dry...)
The midlines of the panel as well as the 1/3 lines were marked because I 100% do not trust myself to make the embroidery symmetric without doing so. I'm a beginner and not nearly skilled enough in embroidery to freehand...
I carefully investigated the original embroidery and copied the locations of roses and leaves to my mini-panel. Once I have the general shape that I'm happy with, I start embroidering.
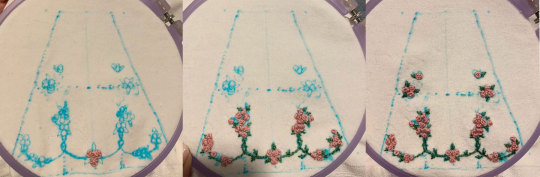
I didn't take too many progress photos of the embroidery, but I also don't think you need them. Because the scale was small, this took an entire evening/night which I think is not too long?
For the roses I use a combination of the "pinwheel" rose method and french knots (+ some additional plain stitches where I wanted more volume).
The nice thing about ribbon embroidery, I think, is that the ribbons add so much texture that even if it's a bit messy it looks very impressive anyways. Plus your mind will mentally interpret some random puffy ribbon lines as a flower anyways.
I use regular DMC 6-strand embroidery thread (split in half, so 3 strands used here) for the vines and leaves. Because I also suck at embroidery and have never embroidered a real project/learned real techniques I mostly kept the leaves simple and slightly abstract with 3 branchlike stitches. I think I currently can't fuss with making nice rounded miniature leaves without messing up every second stitch...
Finished.
I spray water to remove the marker marks and let dry.
Attach embroidered panel to ruffles. I should have double checked where the panel was aligning with the ruffles on each side since it's uneven, but whatever.
Gather bottom ruffle and attach to skirt.
I attach the bodice strip to the front bodice panel as well, and sew the straps down.
I basted the front of the bodice to the skirt by hand because I wanted to make sure they were aligned. Because I messed up sewing the ruffle tiers to the embroidered panel and they are somewhat misaligned, I tried to adjust where the top of the skirt was sewn to the bodice to compensate, it didn't work that well but eh, it's alright.
Gather the skirt and sew to the bodice portion. This was very fiddly and I had to redo some parts several times because the lace wasn't getting sewn down properly. It's still not great but I'll fix any egregious parts by hand.
The gathering is also pretty uneven, but I'm ignoring it...
Looks almost done but not yet!
There is a tiny bit more embroidery on the edges of the middle ruffle tier. I marked approximately where I wanted the roses to be and roughly embroidered them (without a hoop because it's too complicated to figure out alignment before construction, although embroidery is always easier with one).
I also add a back ribbon to simulate waist ties, a detail I notice on a few other BABY kumya JSKs. The waist ties on RRE have a slightly rounded/pointed shape to them, so I freehand this shape for the bow "tails" (because I'm getting tired and lazy, I didn't really measure although I did check that the width was approximately the same throughout). The backside of the waist tie is another layer of cotton, which reduces bulk when turning the shape inside out (the backside of the original JSK is also just lining material). I also folded a long strip over itself and basted it down, creating a loose tube shape to use for the bow part.
It's pretty hard to create defined folds in the bow with such thick fabric, but I tried my best...at least it's likely the back will rarely be seen.
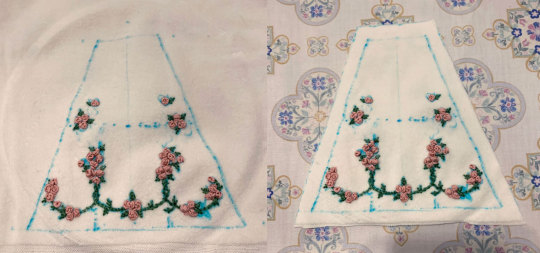
I gave the dress a final allover spray with water to hopefully erase any remaining soluble marker. Also, some interior hand finishing needed to be done (mainly tacking down some unruly seams)

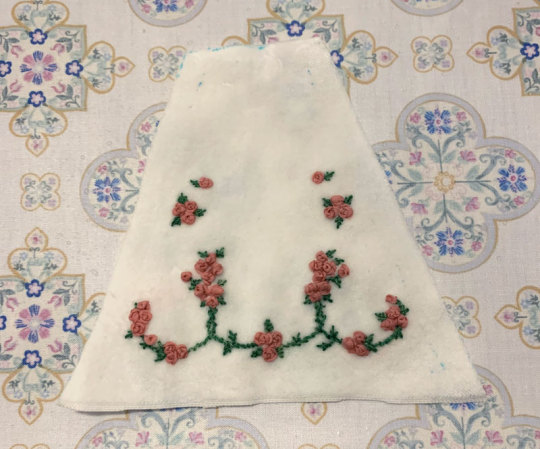
And finally, actually finished. The embroidery thankfully turned out decent enough to distract from any weird spots of construction and so on. It looks quite remarkably like the actual dress, so goal achieved I think!
Extra contents:
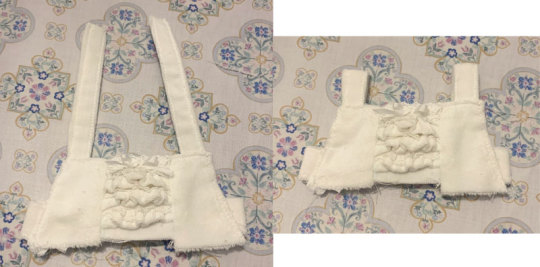
I make kumya little wrist cuffs because some of the kumya variations (such as babydoll kumya) come with them, and that's really cute.
BBD kumya seems to use a type of lace that's already elasticated, but I don't have that on hand so I just sew two pieces of the same lace used for the bodice ruffles together to make it bilateral and stitch on an additional elastic with a stretch stitch. And add on a little ribbon bow (I only have silk ribbon in this narrow width, but I think a ribbon with more body such as poly satin or cotton satin would work better)
And I also make two of those little applique ribbon thingies (you can buy them cheaply from craft stores and so on, but whatever) and stitch them temporarily to kumya's bows for an extra accent.
I'm lazy so I use the bloomers that came with the hawase kumya set underneath (I'm sure making a similar pair of bloomers wouldn't be too much work but I have no idea if these are patterned with some kind of shaping/rise and I don't want to deal with that)
This is actually yuefii's kumya that I am still hoarding for whatever reason and has its eye and mouth fur already trimmed.
And now Usakumya is ready to see the runway :)
Part 2 (bonnet making) is here.
Thank you for reading! If you ever decide to take up a similar project, I'd love to see it!
230 notes
·
View notes
Note
hi! i was wondering if you have any advice/certain programs or anything you use for making gifs, because there’s something i really want to make but i have zero experience 💔💔
hello hello!
ah, yes, I have a TON, let's hope this ADHD girlie can give a somewhat concise description lmao. I will answer this publicly, in case it's useful for anyone else.
Software I use:
To make the screenshots: - for single scenes: KMPlayer 12.22.30 (the newer versions are trash) - for shorter videos, or something you want to get all the screenshots out of Free Video to JPG converter is awesome.
To make the gifs: - Adobe Photoshop 2021 (I don't recommend much later versions, because of the Cloud connection they have)
General gif-maker wisdom: "we spend more time on making sure that something looks serviceable, not pixelated, and good quality, than to get it moving and shit" - Confucius, probably
Useful stuff to make your life easy:
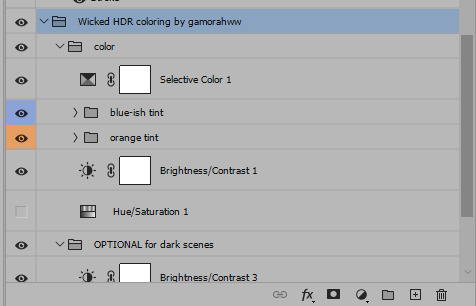
- Squishmoon's action pack for sharpening your screenshots. You can also find their detailed use explained here. - If you are planning to gif Wicked, some scenes are a bit tricky, ngl. But I have two PSDs that you can use, while you're perecting your own craft, and you can edit and update them to make them more "you".
A neutral PSD for mostly indoors and lighter scenes | download

A blue-enhancing PSD for darker scenes | download
Some info on videos to use: - always, always (ALWAYS) use at least HD videos. Otherwise your gif will look like shit. This should be ideally at least 720p in resolution, but go with 1080p for the best results. Coloring gifs in 1080p is easy, but... - if you want to go pro *rolls eyes*, you could go for HDR (2160p) quality. However HDR is a mf to color properly and I would not recommend it for a beginner. When you extract frames from an HDR video, the image colors will end up being washed out and muddy so you will always have to balance those colors out for it to look decent, however, the quality and number of pixels will be larger. If you ar okay with making small/medium sized images, then stick with 1080p. (Storytime, I spent a lot of time making HDR screenshots, only for me to realize that I really hate working with them, so I'm actually considering going back to 1080p, despite that not being "industry standard" on Tumblr lmao. I'm not sure yet But they take up so much space, and if you have a laptop that is on the slower side, you will suffer.)
See the below example of the image differences, without any effects. You will probably notice, that HDR has some more juicy detail and is a LOT sharper, but well... the color is just a lot different and that's something you will have to calculate in and correct for.

The ✨Process✨
Screencaptures
I like to have all screenshots/frames ready for use. So as step one, you need to get the movie file from somewhere. This should definitely be a legal source, and nothing else (jk).
Once I have the movie. I spend a lot of time making and sorting screencaps. Since I mostly work in the Wicked fandom only atm, that means I will only need to make the frames once, and thats awesome, cause this is the most boring part.
For this, I let the Video to JPG Converter run the whole movie while I was aleep, and by morning, it created gorgeous screenshots for me and my laptop almost went up in flames.
You need to make sure you capture every single frame, so my settings looked like this:
Screenshots do take up a lot of space, so unless your computer has a huge brain, I suggest storing the images in an external drive. For Wicked, the entire movie was I think around 200k frames total. I reduced that to about 120k that I will actually use.
And then I spend some time looking through them, deleting the scenes I know I won't do ever (goodbye Boq, I will never gif you, I'm so sorry :((( ) and also, I like to put them into folders by scene. My Wicked folder looks like this:

If you don't want this struggle and you only need a few specific scenes, there is this great tutorial on how to make frames from KMPlayer. Note that some of the info in this tutorial on gif quality requirements and Tumblr's max allowance of size and # of frames are outdated. You are allowed to post a gif that is a maximum of 10 Mb and 120 frames (maybe it can be even more, idk, said the expert) on Tumblr. But the process of screencapturing is accurate. Also ignore the gifmaking process in this tutorial, we have a lot easier process now as well!
Prepping the images
I have a folder called "captures", where I put all of the specific screenshots for a set I want to use. Inside this folder I paste all the shots/scenes I want to work on for my current gifset, and then I create subfolders. I name them 1, 2, 3, etc, I make one folder for each gif file I want to make. Its important that only the frames you want to be in the gif are in the folder. I usually limit the number of images to 100, I don't really like to go above it, and usually aim to go lower, 50-70 frames, but sometimes you just need the 100.
Sidetrack, but: Keep in mind that Tumblr gifs also need to be a specific width, so that they don't get resized, and blurry. (Source) Height is not that important, but witdth is VERY. But since there is a limit on Mb as well, for full width (540px) gifs you will want to go with less frames, than for smaller ones.
Once you have the frames in folders, you will open Photoshop, and go to: File > Scripts > Load files into stack.
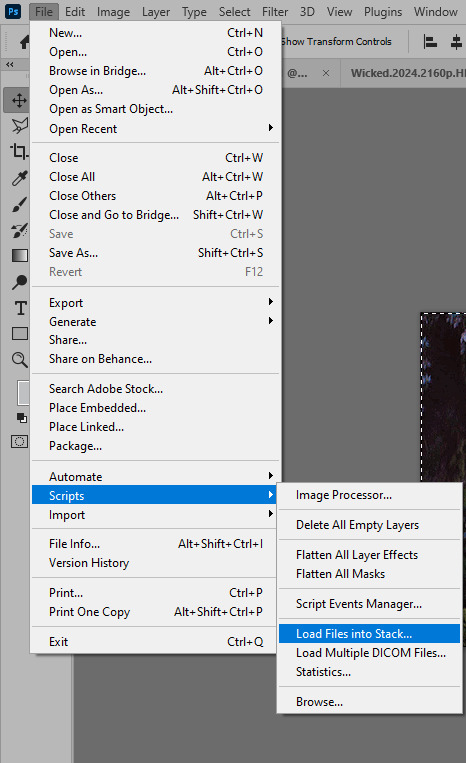
Here you select Folder from the dropdown menu, and then navigate to the folder where you put the frames for your first gif. It will take a moment to load the frames into the window you have open, but it will look like this:

You click "OK" and then it will take anther few moments for Photoshop to load all the frames into a file.
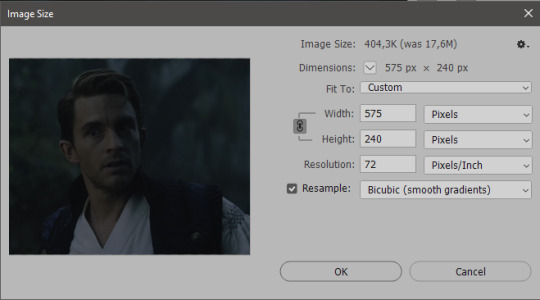
But once that's done, and you have the frames, you next have to resize the image. Go to Image > Image size... When you resize in Photoshop, and save as gif, sometimes you do end up with a light transparent border on the edge that looks bad, so, when you resize, you have to calculate in that you will be cutting off a few pixels at the end. In this example, I want to make a 268px width gif. I usually look at heights first, so lets say I want it to be a close-up, and I will cut off the sides, and it will be more square-ish. So I set height to 240px. Always double check that your width doesn1t run over your desired px numbers, but since 575 is larger than 268 (can you tell I'm awesome at math?), I should be good. I click OK.
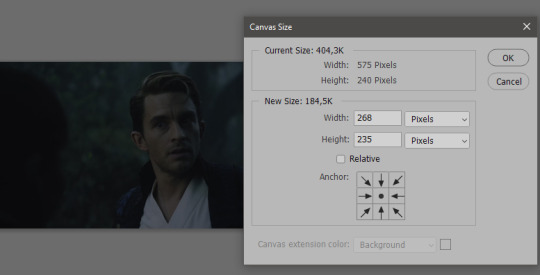
Next, you have to crop the image. Go to Image > Canvas size... At this point we can get rid of those extra pixels we wanted to drop from the bottom as well, so we will make it drop from the height and the width as well. I set the width to 268px, and the height to 235px, because I have OCD, and numbers need to end with 0 or 5, okay?
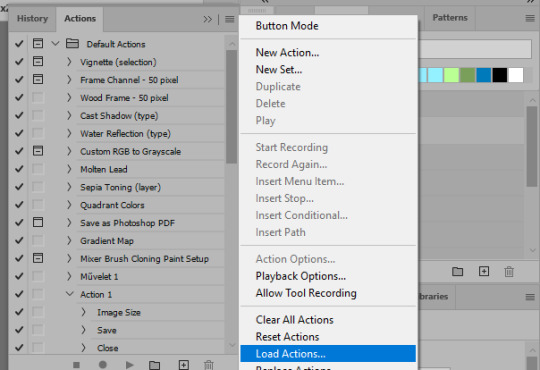
And now, the magic happens! First, go to Window > Actions to have the actions window show up. While you're at it, in the Window menu also select Timeline (this will be your animation timeline at the button) and also Layers. Once you have the Actions window showing up, on the menu in the upper right corner click the three lines menu button, and from the list select "Load Actions". I hope you downloaded the Squishmoon action pack from the start of this post, if not, do it now! So you save that file, and then after you clicked Load, you... well, load it. It will show up in your list like so:
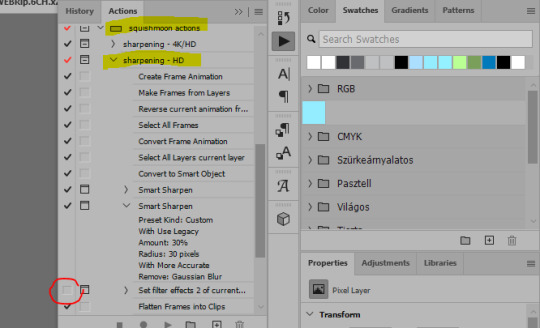
You will want to use the sharpening - HD one, BUT I personally like to go, and remove the tick from the spot I circled above, so leave that empty. This will result in the image having more contrast, which is very much needed for these darker scenes.
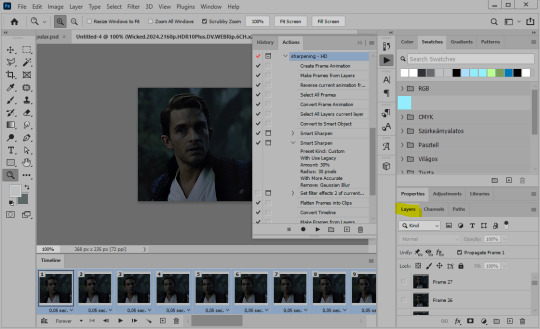
When you have that, you select the action itself like so, and click the play button at the bottom. The action will do everything for you, sharpen, increase contrast and also, create the gif and set the frame speed. You won't need to edit anything, just whatever window pops up, click "OK"

Now it should all look like something like this:
In the Layers window on the side, scroll all the way up to the top. The frame on the top is your last frame. Every effect you want to add to the gif should go to here, otherwise it won't apply to all frames. So at this point I open my PSD for darker scenes, and pull the window of it down, above the gif I'm working on like so:

And then I grab the folder I marked with yellow, left click, hold the click down, and drag that folder over to my current gif. And bamm, it will have the nice effect I wanted! You can click the little play button at the button to see a preview.

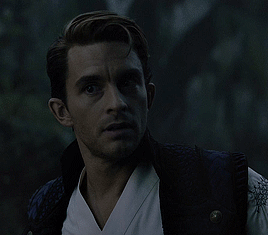
Once you have it sorted, now its time to extract it, but first, here's our before and after view:

Now, if you are happy with this, you can just save and close.
If you want to add subtitles, you can do that as well either manually with the text tool (remember, to add as the TOP layer as we did with the coloring) or you can use a pre-set PSD for that as well, here's mine.
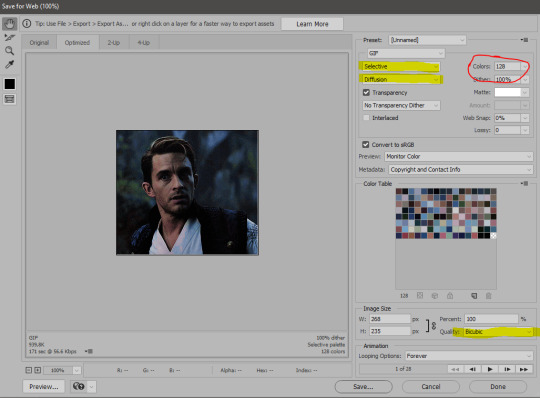
Now, we just need to export it. Go to File > Export > Save for Web (Legacy) and copy my settings here. Others may use other settings, but these are mine, so! I hope you are happy with them :3
In this case, for colors, I picked 128 colors, because on dark sscenes you can get away with using less colors, and the larger that number is, the bigger the filesize. If you use lighter images, you will need to bump that shit up to 256, but that will make your file larger. You can see at the bottom of the screen, how large your file will end up being. So long as you are under 9 Mb, you should be good :3
Conclusion
Look, Gif making and Photoshop in general is a bit scary at first. There are a lot of settings you can mess around on your own, a lot to play with, and also a lot can go wrong. This is a very basic tutorial, and also my current process and preferred coloring. However if you look at "gif psd" or "gif tutorial" or similar tags on Tumblr, you can find a LOT of great resources and steps, for many-many things. Usually people are not too antsy about sharing their methods either. You make 4-5 gifs, and you will have the steps locked down, and then it's all about experimenting.
After you have some muscle memory, your next step should be to explore what is inside a PSD coloring folder that you use. Open them up, try clicking around, click the little eye, to see what happens if they are turned off, and double click them, and play around with the sliders, to see what each does. Most people on Tumblr don't really know what each one does, we all just pressed a few buttons and got really lucky with the results, lol.
If anything is unclear, don't hesitate to ask, I'll gladly help!
Good luck <3
45 notes
·
View notes
Text
what if i wanted to make another insane promo post?
yeah, ik, its promo time again. BUT this time around i do wanna add in the post both my cousin and niece
one thing i did get wrong, heartz is my niece, starz is my cousin! this will basically be going over what each of these 2 do (...and im also adding in a bonus competitor/promoed person, well actually 2 because I GOT A CHANNEL YIPPEE)
each channel will be seperated up so yeah lets go!
first channel:

Starzzz.andgalaxy (my actual cousin, lol) is a great yter who absolutely deserves to be celebrating more then just 170 subs! since shes actually here with me, i can let her say a lil something on the matter:
"hello! I would love to reach 200 subscribers at least, I think my hard work should not be for nothing!" <- her typing
shes very very fun (and also with this i hope all the god damn hate comments shut lol) and does very cool things such as:
Roblox videos
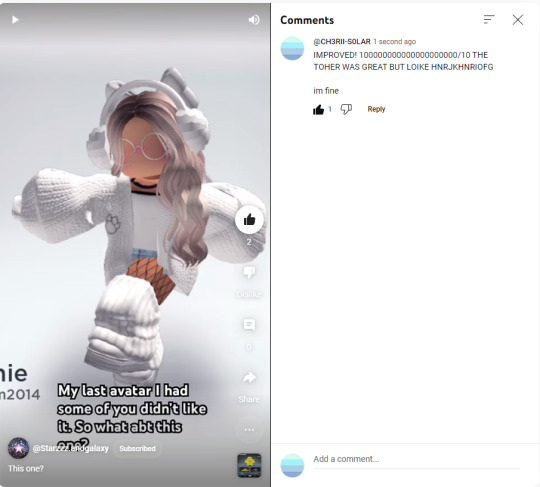
(comment is from me lol, we'll get there soon) For right now these are just rating videos of her avatar, but I find them very fun (plus since I play roblox if needed I can help with filming lol)! Not much to say on it cause it's not a common kind of post, so onto the next form, which is:
2. Art
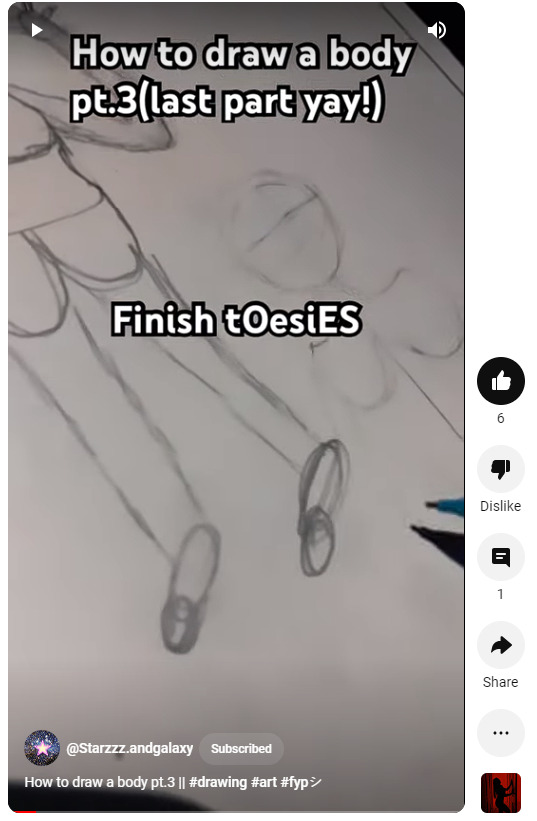
As you can see, she does very cool art, this one in particular is a tutorial on how to draw bodies. Is it the best? No, but the fact she's trying makes it great! (this is also where I've seen a couple hate comments come up, so yeah, I'm trying to be mature enough to not commit violence for her upon them) She does admit this video isn't her best work, but she does A LOT of very very cool drawings! Go check them out and her channel of course! There is one thing she also posts about which I love most of all...
3. Paper Dragons!!
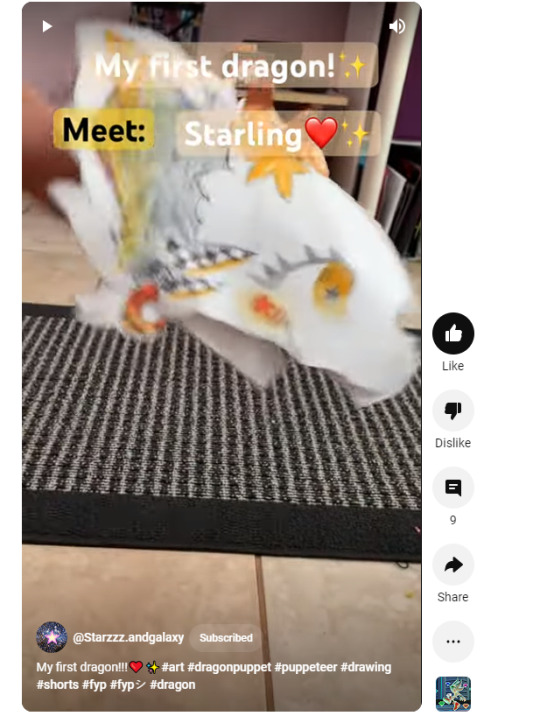
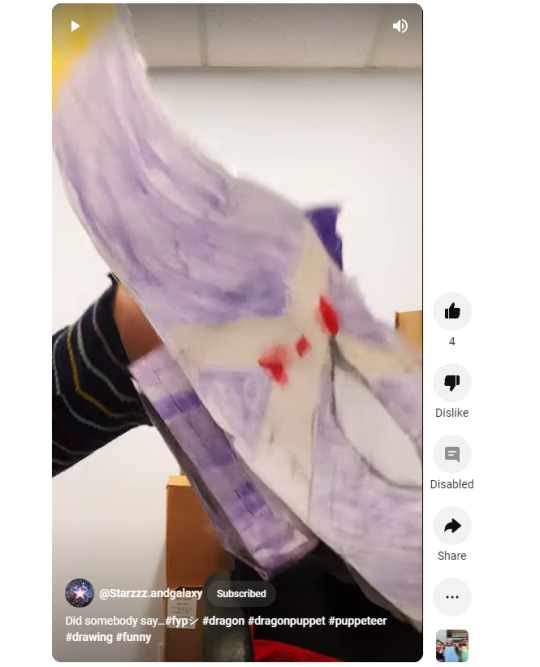
(the first image is her first dragon, second is her most recent i think) I don't get how these things are "paper furries", but I do know THEY ARE SICK AS FUCK. I got to see one in person and they're very cool, all with different stories! I honestly wanna ask for one but right now, I'm gonna stick with watching them.
Channel link can be found here:
(this section was finished on january first of 2024, so at the point of this being posted she wont be over here, but i had her here so yeah :D i love my cousin)
--------------------------------------------------------------------------------------------------------
Second channel:

Heartzzz.❤️ is my niece, and she does similar content, but still does good content! A couple of videos of Starz and Heartz are them promoting each other, so yeah. While she is on vacation and can't be here to give her reasons to subscribe to you, I certainly can!
Memes
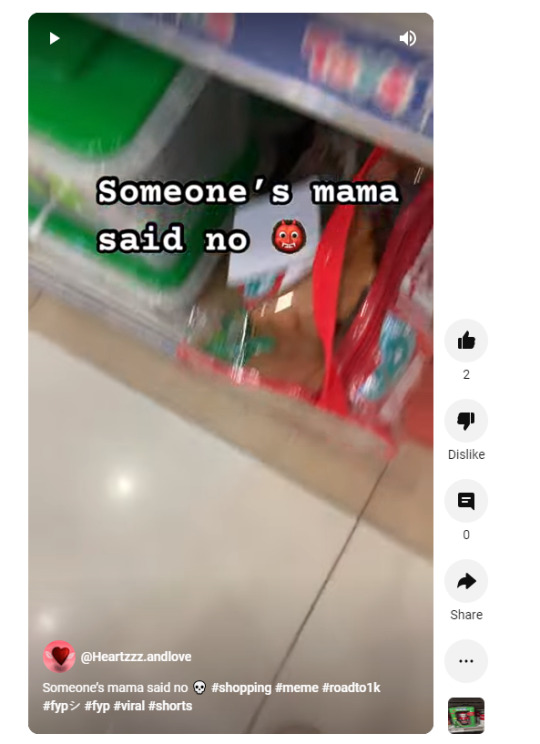
One thing I forgot to mention my cousin doing (well, actually my cousin's section is just kinda old because it's from when she last came over, but she's back to help me again, yay!) is making memes like this. Sometimes they do involve a paper dragon, but I think they're pretty funny and/or relatable (also dragons very cool)!
2. Edits (and Undertale related things)
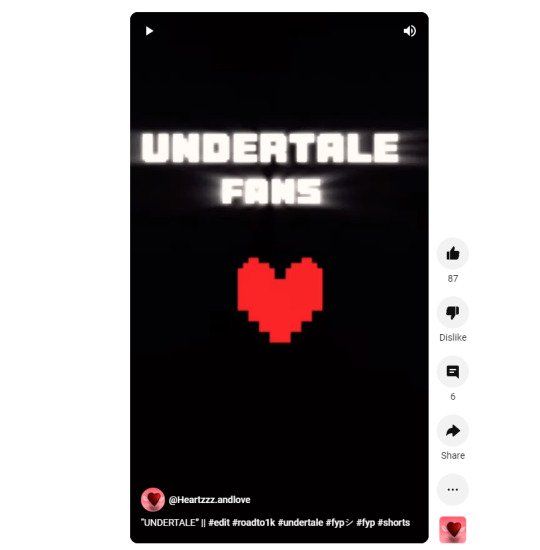
I'm putting these 2 in the same category just because of the example image above. While my cousin has recently started doing edits, Heartz is the only 1 of the 2 to make anything Undertale related. While the Undertale stuff comes once every blue moon it seems, that doesn't make it any less enjoyable.
I actually found in her description a run down on what she does post, so here:

Link to her channel can be found right here:
(okay ik this section was really short, again, she posts similar things to my cousin, and i didnt wanna repeat, so yeah, if you want more reason, here's what the cousin herself says: "[Heartz] is really nice, she's a good artist, and she's creative"; time i finished this section was 1/15/2024 lol)
--------------------------------------------------------------------------------------------------------
third channel:

Boli and gang (or as their original user is + the profile picture says, Boli the bear) is the channel belonging to 2 kids I babysit! They're pretty new to making content, but they have a promising start already! Currently, their content consists of...
Animations
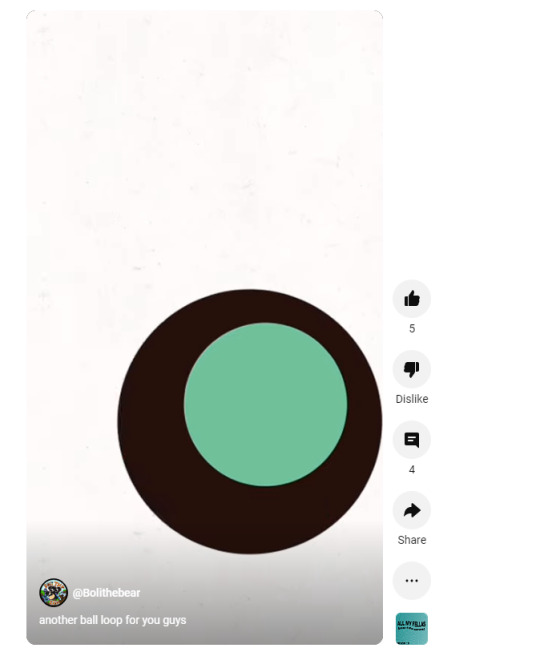
One of them has really been getting into animation, posting things like ball loops and such on their account. They're very interesting to watch personally!
2. Cool places
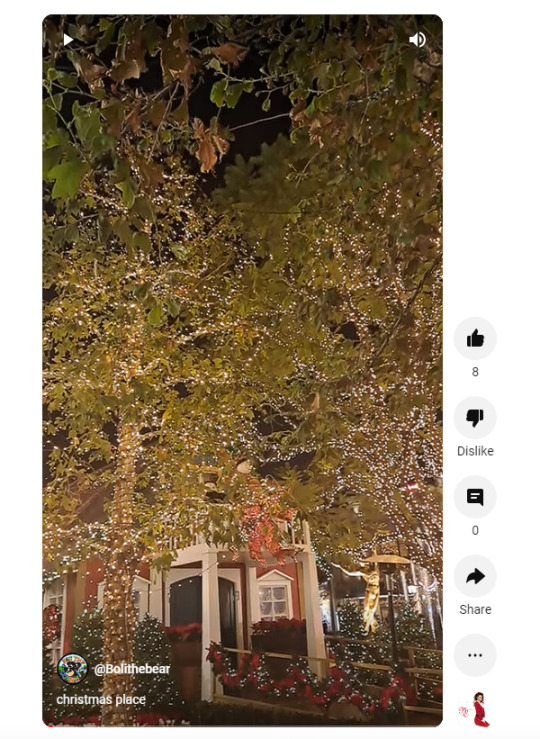
I'm not sure if this is going to be a common theme, but there is around 3-4 videos of places like this one. I have to admit, this has to be the prettiest of them all.
3. Art (+FNAF/Five Nights at Freddy's Content)

This is another one grouped together, but because this is the first drawing related one I've seen. They're very big FNAF fans, of course leading to things like this. Is it the best? No, but they tried very hard of course, and maybe you could leave some tips for them to improve with!
(they also post memes and funny videos, but I'd rather not do repetition; FINISHED THIS ALSO ON THE 15TH LETS GOOOOOOO)
Link to their channel can be found here:
Oh, one final reason, their profile picture is super cool! Can you guess who made it? This actually provides me with the perfect transition into...
--------------------------------------------------------------------------------------------------------
fourth/final channel:

ITS ME!!! FINALLY I CAN STOP DOING PROPER ASS TYPING
yeah, i have a youtube now, and there's like nothing on it minus a couple videos. all of them are made back in like 2021-2022? cant really remember, but i posted them for younger me's sake. i have like a couple more to get through, but afterwards im probs gonna do a bigger variety of content! art videos, jrwi edits, animations, rambles, essays, you name it! (might even stream again on twitch if that seems what the people like lol)
you may want actual reasons to subscribe, but i currently dont have any. i can only make promises of better future content, but right now i can admit theyre shit. i dont post often, its only oc related rn, all very vague, nothing that interests most people on my blog (cause i know a lot of you are here for jrwi content, huh?). this channel, the choice to subscribe is fully up to you, im not gonna sell myself to it, im simply just saying its real.
Link to the channel is found here:
if you at all took the time to read through my part, i appreciate it, but please do actually check out the other 3. after all, you can always find me here, but you cant find the others anywhere else!
(FINISHED THE REST OF THE POST ON 1/15/24 LETS GOOOOOOOOO)
#chilling in solar lights#cheri's art findings#not my usual content#silli promo#dragon puppet#animator#support the artist#digital art#digital artist#digital artwork#digital drawing#puppeteer#just like a cool rock#idk how to tag this#just go check them out please#epic artist#silly billy goose#this will be spam reblogged someday soon#and that will be in this week#be ready guys lol#seperators may look weird#ignore it please
151 notes
·
View notes
Text

My BG3 Modlist
I made my modlist for BG3. It's mostly mods for visual character changes and adding different armor and clothing. I hope this information will be useful to someone. Please don't forget to read the descriptions to the modifications and download additional required mods ⬇️
APPEARANCE MODS
Heads | Face | Eyes | Makeup & Tattoo
Unique Tav Custom Appearance (You must also download and install this mod to work correctly) Vemperen's Other Heads Repaired Tasha's Cauldron of Faces New Character Creation Presets WIP Themia's Sister Preset Mari's tattoo Mari's makeup Astralities' Skintone Expansion - Natural Tones Astralities' Fantasy Skintone Expansion Eyes of the Beholder Aether's Half-Illithid Begone Gale's Wizardly Updo
Hair | Horns | Hair Collections & Colors
Tav's Hair Salon Icon and Race Patches for Tav's Hair Salon Tav's Hair Mixer Astralities' Hair Color Supplement Astralities' Hair Color Collection Vanilla (and NPCs) Hair Mixer Vessnelle's Hair Collection Tasha's Cauldron of Hairstyles Tasha's Cauldron of Hairstyles Pack 2 Horns of Faerun Alternate Horns for Tieflings De-Accessorized NPC Hairstyles Yves Hair Gallery Angel Wings And Halos __ By Ren Angel Wings and Halos _ Solar Race Patch P4 Bangs Bangs Everywhere (a Fringes and Extra Hair mod) Shibariwaluigi's NPC Hair Edits Ghouls Customization Compendium - Custom Heads Horns and Beards Ghouls Simple Braid and Ponytail Hairstyle Long Hairs Silver's Hair Pack Silver's Hair Pack 2 Silver's Hair Mixer REN'S DIVINE HAIR GALLERY Tepkunset Hair Collection Shadowheart Alternate Hair - Updated for Launch Fire Keeper's Hair and Mask
Body (Scars)
Bhaal Scars for All Darker Bhaal Scars for All Vampire Bite Scar
ARMOR AND CLOTHING MODS
Basket Full of Equipment. NSFW version Basket Equipment to Camp Clothing Basket Underwear to Underwear Slot Modular Equipment Citizen Outfits as Camp Clothes Professor's Suit Fancy Camp Clothes Fancy Dresses Epilogue Camp Clothes More Mage Gear Rose Bard Outfit Cambion and Gith Armor Extra Gear Extra Gear as Camp Clothing Druu's Clothes and Armours lokelani's lavish livery Ascendant Astarion Epilogue Clothes Witcher 3 Armor (Keira Ciri Yennefer Margarita) Yennefer's wardrobe Triss' wardrobe Astarion's Wardrobe Astromancer robes Custom Item Pack IO's Outfit Collection Slutty Menswear
Astarion's Gear Nox Male Outfit from Elden Ring Mythral accessories
EARRINGS | ACCESSORIES | GLASS
Mythral accessories Ghouls Custom Piercings Piercing Improvement - Physics Piercing Edits Astarion's Earrings Kylin's Piercings Ellian's trinkets Weeviljester's Accessories Trips' Accessory Collection P4 Blooming Circlets and Piercings - a Valentine Inspired Mod
Dyes
TC Dyes
OTHER MODS
Races
Half angel ( Aasimar 5E ) Aasimar - xx's New Female Head Preset patch Astralities' Tiefling Compendium
Gameplay | Interface
ImprovedUI ReleaseReady Appearance Edit Enhanced Transform into companions and NPCs - Ring of Metamorph Tutorial Chest Summoning Hugs
Misc | Utilities
Norbyte's Baldur's Gate 3 Script Extender (from github) Baldur's Gate 3 Mod Fixer Trips' Old Shader Pack (for Unique Tav Custom Mod)
VIDEO AND SCREENSHOTS TOOLS
Otis Camera (Baldur's Gate III photomode tools) IGCS Connector IGCS Depth of Field ReShade
110 notes
·
View notes
Text
Assembling your Cast in Vidu: "My Reference" First Impressions and Tutorial
(Disclaimer: I am in the Vidu Creative Partner Program)
For a long time, one of the major barriers for any kind of generative video is character consistency. The solutions were either using image-to-video for start frames or having a general reference option, usually the former, sometimes both.
Vidu uses both, but have recently updated their reference system. We're starting to get to the level of complex interface that I've been talking about in previous blogs.
Vidu's reference-to-video and other similar features were a good start, but with important limitations: You only had three images to reference per generation, and the AI had to guess who was what based on your text prompt. Combined with some quirks around how it handles model-sheet type images (more on that later) and it was a good start, but required a lot of finagling.
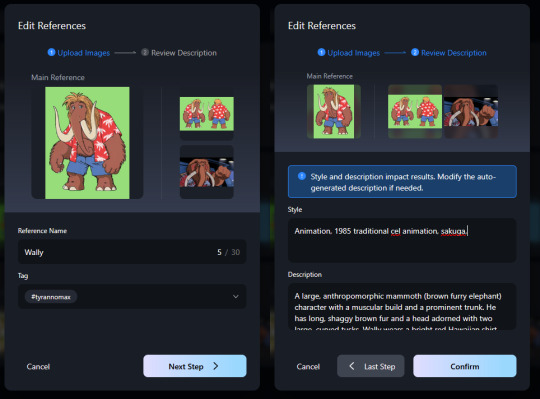
Vidu updated with a major improvement to the reference tool, one that lets you build profiles for each person or location you're using, consisting of up to three images, a short style prompt (about 1 line) and a description-prompt. These are saved to your profile so you can call them up at any time (saving a lot of redundant prompting of character details).
The robot will fill in the description for you, but I suggest editing it to your needs.
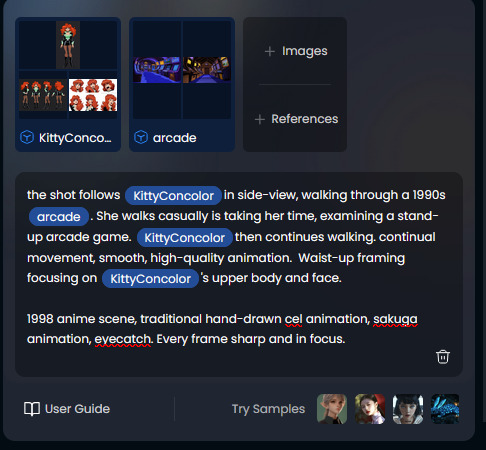
You can use up to three references per shot (scale between references is a little tricky), and, in a very helpful feature, you reference those characters by tag in the prompt body.
In the old reference system you'd tend to have to use a single shot for a character, then a model sheet, because if you did just the model sheet the characters would tend to "twirl" while animating in chaotic and unnatural ways, meaning you'd generally lose two slots to one character, but here you can load everything in one place.
I've only played with it a little bit thus far, but here are my basic recommendations:
The first image should be a single shot of the character, and the second and third images can be model-sheet character assemblages. If you're doing a reference specifically for talking head shots, you'll want the face-shot in the first slot, and full-body reference in the latter ones.
Try and use multiple-angle reference where at all possible. This just increases stability of the character in general, even if they don't show the alternate angles being shown. I have a tutorial for using Vidu to produce this kind of reference here.
Use the extra prompt space for specific visual instruction. The more direction you give, the less chaos and weirdness you get. (Assuming that's your goal.)
#vidu ai#vidu#vidu CCP#ai tutorial#ai video#ai animation#reference prompting#ai assisted art#tyrannomax#kitty concolor
13 notes
·
View notes
Text

I accidentally deleted my entire Tumblr account. I can't guarantee that this won't happen again, so I'm making a rebloggable CC archive with all the useful stuff linked. ALL CC IS FREE as it always was.
❤️DO NOT FOLLOW ME, I DO NOT ACTIVELY POST SIMS CONTENT OR CUSTOM CONTENT ANYMORE. THANK YOU!❤️
SFS ARCHIVE: Poses | Build/Buy | CAS | Simblreen 2024 2024 Updated Poses | Old CC | Misc CC Most MediaFire links still work, but aren't always up-to-date. Patreon (All free, no membership needed) ts4-poses links: here and here Masc posepack for fat Sims
Most of my pose packs have alternative poses or All-in-Ones designed to help lessen clipping on fat Sims.
Sims Emotions UI pose overrides Blank Rigs | Expression .blends from expressions tutorial GShade Preset Mega Collection Tutorials Blog (all my poses are written, no videos) Poses tutorial | Posing expressions | Make pose packs easy to use Make a toy action figure of your sim | Reduce CC file size Make a deco Sim | how I 'made' deco gryphons for a CC set
Terms of Use - No paywalling, no Early Access, no AdFly/similar, no CurseForge - Credit me for the original, both on the download post and in the item / pose pack's in-game description - Do not edit my CC to endorse a real person / product or for hateful / prejudiced purposes. Don't edit my poses to place minors in sexual situations - Conversions are fine, but only The Sims games (2,3, and 4 fine) - Recolours are fine - Editing poses is fine so long as you follow all rules. Child conversions, changing expressions, making them suitable for certain body presets etc, almost anything is fine! - I am not responsible for what other people do with my CC, if you are upset with what someone's done take it up with them.
10 notes
·
View notes
Text
Star stable Creepypasta: Staring Horse
At last, my sso creepypasta is complete! Sorry it took a while, work and Halloween preparation got in the way. But, as promised, it is ready for Halloween!
As stated before, this isnt going to be anything spectacular. Ive never written anything horror related before, and while I tried to do my own thing, I was mostly inspired by creepypastas like Ben Drowned, Sonic.exe, and lot of WildCraft creepypastas Ive been listening to. Its also mostly just a very edited first draft. This was more or less a test of my skills.
As a warning, there is no gore or blood in this, however there is a description of a pretty messed up horse model that may or may not be considered body horror, as well as mentions of a possible mental break? Not 100% sure, but I want to cover my bases.
Without further adieu, enjoy.
And Happy Halloween!
I've never really been obsessed with video games.
That's not to say I don't like them, or even that I don't play them. I game quite a bit in my free time, from action packed first person shooters, to emotional story driven games, even relaxing farming and life simulators. I've always tried to be open to all kinds of games. However, the issue is I never seem to stay interested. I tend to hyperfocus on specific games for weeks, even months at a time, and then, eventually, I just put it down one day, and don't come back. I just tend to lose interest, be it in the story, the mechanics, the characters. I just get bored and move on to new things.
Except for one game.
Star Stable Online. An open world MMORPG horse game where you can create a character, buy horses of varying breeds, coat colours, and patterns, train your horses in races or a variety of other disciplines, talk with friends, join clubs, dress up your character and horses, and complete story quests to save the world and learn about the island. Everything an equine crazed individual like myself could ask for in a horse game. Out of all the games I played in my life, Star Stable was the one that seemed to have a constant grip on my psyche.
It started out as just a way to finally unleash my love of horses, an obsession that had started as a child and only increased in my late teens, without shame or judgement. But over time, it became so much more. It became my comfort. My way to cope with all trials and tribulations of everyday life. No matter how mentally straining school was, how exhausting work was, or how bad my mental state was at any given time, so long as I had wifi, my laptop, and the will to stay awake into the dead of night, I had my escape. I could let my mind wander to a world where I wasn't alone or stressed. Where there was no homework that made me feel like I was going insane, no entitled or argumentative customers, no overbearing managers. Just me and my horses exploring the island of Jorvik, saving the world from evil organisations and dark magic, and living peacefully, knowing the real world couldn't hurt us here.
At least, until recently.
In the game, there are certain areas of the game that are closed off, having both invisible and physical walls around them to prevent players from getting in. They're either areas that aren't done yet, or ones that just never ended up opening up. Not that that stopped anyone though. If there's any area people know they're not supposed to go, they're gonna do everything in their power to get there. This is usually done through knowing the layout of the land, knowing what steps to take, and, often, getting a bit creative. There's countless tutorials online of how to get into closed off areas. Some are no longer working due to patches in the game, but finding one that still works is never too difficult. On days when there are no quests or special events, and training starts to feel repetitive, I've taken to testing these glitches and seeing just how efficient they are. I've glitched into Ashland, Devils Gap, Marchengast Castle, Cape Point, the typical areas that seem of interest to players. I even started trying the techniques in other areas to see if I could glitch myself somewhere no one had seen yet, though my efforts have so far seemed to be in vain.
Late one night, I was attempting to glitch into Mystic valley, like I had before, in hopes of getting some nice photos. I jumped out of the Secret Stone Circle and fell into the purple haze as usual, when I heard a familiar whinny, followed by a black screen with the text “Your horse was badly hurt.”. Great. I must've messed something up, I figured.I waited for my screen to return, expecting I'd be transported back to my home stable and have to start the glitch all over again. But to my surprise, when it did, I was in the Mystic Valley, as though I'd successfully made the fall, only, the area was now covered in a thick fog, like when you entered the Mirror Marshes.
I suspected that it was a glitch, or maybe the area had been updated. Hoping to find something new, I rode around a bit, checking all the edges and open space of the area. But after around 15 minutes running around and bumping into invisible walls, I still found that everything seemed normal. Just the same old rolling hills, sparsely placed bushes and trees, and occasional unfinished textures. After a while, I grew bored, and just started looking for some nice photo spots instead. But as I rode past an indented area in the mountain, I saw something I hadn't before. Something white amongst the trees and shrubs that was just barely visible through the fog. A horse. A grey horse with a black mane, standing perfectly still near the base of the mountain.
I had seen plenty of unused or work in progress models hidden in supposedly unreachable areas to keep them out of sight from players, and although I'd never seen one in Mystic Valley before, that's what I suspected it was. Possibly a new NPC horse or even an unreleased breed or colour the developers had been testing. I tried to get closer to see it better, but was blocked by an invisible wall that hadn't been there the last time I visited. Of course, they had to block off the most interesting thing in the area. I tried a few times to pass the wall, but no matter the angle or area, my horse halted and reared in refusal. I was giving up hope of getting any closer, so I resorted to just taking a photo and zooming in as much as possible. I got off my horse in the slim hope that I could get a little closer for a better angle. Only, this time, the wall didn't stop me. My horse couldn't pass, but I could walk on foot as close as I wanted. It was odd, but I wasnt about to question it.
I started approaching, but the closer I got, the more I realised how odd this horse looked. It didn't look like any breed of horse in the game, or like any breed I knew of. Everything looked… wrong. Like a bunch of different horses merged into one. Its legs were thin and long like a saddlebred, but its body was thick and wide like an ardennes or Jorvik wild horse. Its neck looked like that of the friesian, but it was bent down at an odd angle, like its head was being forcefully pulled against its chest. Its long, dark mane looked twisted and tangled, like a longer version of the mustangs. But what was the most disturbing was its face. It looked like it meant to be shaped like an Arabian, but the eyes were all… wrong. They were angled far more forward than they should have been, placing them more on the front of the face than more to the sides. Not only that, but the eyes themselves looked inverted, making it appear as though there were instead two hollowed out sockets in their place. Even the shading made it seem as though that was the original intent. Everything about this horse was downright creepy. Why the hell would SSE make something like this?
I decided to take a picture and see if anyone online knew anything about this eerie horse or if they had any idea why it looked like this. I pressed the photo button, but the second I entered photo mode, the horse vanished as though it wasn't even there. Was SSO so determined to hide this thing that they even hid it from the photo mode?
Not wanting to leave without evidence of this thing, I resorted to screenshots, taking a few photos before clicking out of the game to check the folder. But when I did, what I saw made no sense. In every screenshot I took, I saw my character, the area, the fog, even my own horse in some shots… but not the NPC horse. How was that even possible? The screenshots weren't in game, they should have just captured what was on the screen. I clicked back to the game to try again, but completely froze.
The horse had moved. It's neck twisted at a harsh angle, as though it had been broken in half. Its previously hollow indents of eyes now had two small pinpricks of light at their centre, barely big enough to make out. And with those tiny dots that made up its eyes, it started.
It started at me.
Not my character.
Me.
Have you ever had someone stare at you so intensely that, even if you had your back to them, you could feel it? Like an almost primal instinct kicks in to warn you that there's danger and to prepare to defend yourself. The moment you notice, you get this split second where your body freezes up, and everything around you goes numb except for that feeling of a pair of eyes. That's what I felt when I saw that things eyes staring back into mine through my computer screen. Those hollow eyes felt as though it was staring straight through to my very soul, making my blood run cold. I wanted to move, to scream, to do anything, but I felt frozen in place, as though that things cold, unblinking stare had me trapped. As I stared, I began to hear the faintest sound in the back of my mind. Almost like a raspy, gargled breathing. The longer it stared, the louder the sound got, slowly becoming the only thing I could hear. As though, even without moving, it was drawing closer.
Finally, after what felt like an eternity, I managed to snap out of my frozen state, quickly slamming my laptop shut, not even caring in the moment if it broke. The second I did, everything stopped, and I found myself gasping for air despite not even realising I had been holding my breath. My eyes flickered around the room, instinctually looking around the room for danger. After a few minutes, I managed to calm myself down a bit. My body trembled as I became drenched in a cold sweat, and questions ran through my mind faster than I could even process any kind of answer.
What the fuck was all that? Why did it feel like that thing was actually staring at me? Like it was actually in my room? What was that messed up breathing sound? Why was that disturbing thing in a game targeted at kids? What the hell was going on? The questions, as well as the lingering adrenaline and paranoia of what just happened, kept me up the rest of the night. My eyes cautiously scanned the darkness, as though that thing would creep around the corner at any moment, until sunlight finally poured in the windows of my room.
I went about my day in an exhausted haze, still mulling over what happened as I tried to find a logical answer. I just couldn't stop thinking about it. Was it a glitched horse model? Or a new scare tactic to keep people from glitching into areas they weren't supposed to, like the old anti-pirating screens of old video games? Maybe even an early model of a new Halloween horse? But why was I so freaked out by it? It was just a pixelated horse in a video game, but when it stared at me, it felt so terrifyingly real, like it would crawl out of the screen or even like it was already in the room with me. Maybe I was just tired from staying up late so often, and I was starting to become paranoid because of it?
The more I thought it over, the more I managed to convince myself. Of course it wasn't staring at me. It was probably just a glitch. Just a bunch of pixels on a screen. It wasn't real. Hell, maybe it wasn't even as scary looking as I thought. My brain was probably just experiencing hallucinations from lack of sleep. That had to be it, right?
Besides, even if that thing was real and as scary as I thought, I wasn't going to let it stop me from playing my favourite game.
That night, after I had dinner and finished my homework, I turned on my computer (which, thankfully, was not broken from the rough treatment last night), and logged on to Star stable again. As I waited for the site to load, I couldn't help but wonder. What if it was real? What if I loaded into Mystic Valley again, and that thing was still there? What if I froze up again? I pushed the feeling away. I had already left the lights on to ease this ridiculous fear, I wasn't backing down. It was just a stupid creepy horse in a video game. It was fake. I was safe. The game opened with the familiar welcoming ring, and I was thankful to see I was back in front of my home stable, and there was no glitched NPC horse anywhere to be seen. I sighed in relief. It was all just in my mind.
I spent the next few hours training my lower level horse, completing race after race as I made my way across the map like always. I even competed in a few championships, despite being one of the only people online at that time of night. However, I couldn't shake this eerie feeling. Everything was normal, but I kept feeling as though I wasn't alone. Like there was always someone or something watching me from just out of my line of sight, and whenever I looked around, it would disappear. I tried to ignore it, telling myself it was my imagination or that I was still just anxious from everything.
At around 4 am, I had finished all the races and decided to call it a night. I called for pickup, and went to enter my stable. But after a few seconds of loading, I noticed something. There was no image of Maya walking through the stable to take care of the horses. Just a pitch black screen with no text. At first, I thought my computer had frozen, and I begrudgingly waited for the “Star Stable.EXE has stopped working” pop up. But, after a minute or so, the loading finished, and I was standing inside the stable. Only, my horse was gone. All of my horses were gone. Was my game crashing? I looked around briefly before clicking the stable button to see where my horse went.
What I saw made my breath catch in my throat. In place of every icon that was meant to be one of my horses was instead replaced by that same, deformed face of that horse, staring back at me with those dark, soulless eyes. And where my horses names should have been, was instead my name. My real name.
How was that even possible? I never used my real name anywhere on star stable, or anywhere online for that matter. I exited the stable menu, and there it was. That mangled, horrifying thing standing in the stable aisle staring at me. I felt my body tense, but I refused to let that thing trap me again. It's not real, I told myself. It's a glitch. That's all.
I pressed the exit button to quit the game, but nothing happened. I kept pressing, but no menu appeared. I started to panic as I heard the distorted breathing begin again, and as it did, I watched in horror as the horse's jaw slowly unhinged, stretching down towards the ground, revealing a set of sharp, fang-like teeth that lined its jaw. I felt its eyes burn into me, like a predator sizing up its prey before going for its throat. This wasn't in my head. This wasn't just a glitch. Whatever this thing was, it was real, it was sentient, and it wanted me. I kept clicking every button I could think of to get the game to close, but still, nothing worked. Even when I finally had enough and slammed my laptop closed again, I could still hear those tortured breaths getting louder and louder in my head. I covered my ears and closed my eyes, begging it to stop, to just go away, but still it persisted till I couldn't even hear my own panicked heartbeat over it.
I was about to scream out of pure fear and desperation when all of a sudden, it stopped. Just as quickly as the breathing had begun, it stopped, leaving me in the silence of my room. I sat motionless for a few moments before slowly opened my eyes, tears threatening to fall as I looked frantically around the room for any sign of danger, but all I saw was my lit bedroom and my computer all but tossed off my lap, teetering near the edge of the bed.
Was it over? Was that thing gone? I sat as still as possible for the longest time, as though waiting for something, anything to happen, but still, nothing. After what felt like hours, I mustered up the courage to reach for my computer. I had to know. Just a quick peak to make sure it was off and that that thing wouldn't come for me. Slowly, I lifted the screen, just enough that I could see the light of the screen.
Nothing.
Inch by inch, I opened the laptop fully, only to be met with a black screen. A sigh escaped me as I confirmed the computer had powered itself off after being closed. So long as I didn't log on to the game, that thing couldn't possibly get me.
But as moved to close it, my eyes caught sight of my reflection in the darkness of the screen.
And I saw it.
In the reflection was that long, grey, mangled face with its dead, hollow eyes staring motionless at me from the shadows, its jaw still unhinged like a snake.
The next thing I remember was my parents rushing into my room as I screamed bloody murder, thrashing violently as I tried to get away from that thing. They practically had to restrain me to get me to finally calm down. I cried in their arms as they frantically pushed for answere to figure out what had happened. When I tried to explain, they chalked it up to a night terror brought on by stress. The more I tried to insist it was real, the more they assured me it wasn't. I only stopped insisting when they started suggesting getting me psychological help and the idea that I was having a mental breakdown. I knew no one would believe me. Even if I got proof, what could they really do about any of this anyway?
It's been months since I last played Star Stable Online. Even the thought of logging on makes me feel anxiety build up in my chest. I want so desperately to have things back to the way they were. To just log on and forget the world again. And yet, I know that I never will. That thing didn't just traumatize me. It stole a part of me. It stole my comfort. My escape from the world. It stole that sense of peace and safety, a part of me I will never get back.
What's worse, it stole my sense of reasoning. I tried researching what I saw and asking around the community. I even emailed Star Stable Entertainment themselves, just hoping for any kind of answer, and still got nothing. I dont have an explanation for what happened or why it affected me so much.
I can't explain why it chose me, or how it was able to do what it did.
I can't explain why I still see it, or why it almost appears to be getting a bit closer everytime I see it in the corner of my eye.
I can't explain why every night since, the moment I start to fall asleep, I hear those same, horrid, gasping breaths in my ears, getting louder and louder.
And, no matter how hard I try, I can never explain why Ive started feeling a cold rush of air run down my neck in time with each breath.
16 notes
·
View notes
Text
Sprang instalment 2: warping and basic stitches (and a reference book)
Time to put those looms to use! :)
Below the cut are links to videos I liked for each warping and weaving style, and a book recommendation at the end. All of these linked youtube channels have tons of videos, so if you aren't vibing with a particular video style you can likely find the same technique taught by one of the other artists.
Warping the loom
There are two ways to warp a loom: flat warp (aka figure eight), or circular warp. Flat warping creates a piece of fabric up to the length of the loom, with looped string at the ends. Circular warping creates a length of fabric that twice the length of the loom, and has cut string at the ends.
Flat warping
youtube
youtube
Setting up a two-colour figure eight warp. Not totally necessary, but might be nice for practising the stitches
youtube
Circular warping
Check out the first three videos on this playlist
Basic stitches
The basic stitches in sprang are interlinking, interlacing, and intertwining. Descriptions and examples of each of these stitches can be found on Solrhizaarts.com
Interlinking
Introduction of interlinking and the fabric structure it creates
youtube
Interlinking tutorial
youtube
youtube
Interlacing
Video with voiceover description but low video quality
youtube
Clearer video but no voiceover
youtube
Intertwining
Basic Intertwining
youtube
Reference book
For a great reference book check out The Techniques of Sprang by Peter Collingwood. It goes into detail on on the techniques we're learning, plus it has a brief history of the craft and timeline of archaeological finds related to sprang. (Read it for free on Open Library at the link below.) Thanks @blatantescapism for the book recommendation :)
59 notes
·
View notes
Text
youtube
#descript tutorials#descript decoded#Descript setup#descript tutorial#descript video editing#descript#digital nomad packing list#digital nomad guide#how to become a digital nomad#digital nomad jobs#digital nomad tips#digital nomad visa#working remotely from another country#remote work#work from home#desk setup#digital nomad#setup#setup tour#work and travel#how to work remotely#minimal desk setup#travel essentials#desk setup with laptop and monitor#Youtube
1 note
·
View note
Text
youtube
Well hello there. I made another tutorial. This time it's about how i make my normal maps. Closed captions are available. Below are the links in the description box but clickable since i R E F U S E to give google a pic of my id or bank account just to get clickable links. Anyway a super free tutorial for all because knowledge should be accessible to EVERYONE. Thanks to @faaeish for some help with audio and video editing!
Gimp
S4S Thread for the guide tutorial i used
Normal map online
Any questions? Ask here or in the comment section of the video.
I'm adding a cut just like last time just in case i forget something. Last time i DID forget something and i DID luckily add a cut! Have a 🍪.
22 notes
·
View notes
Text
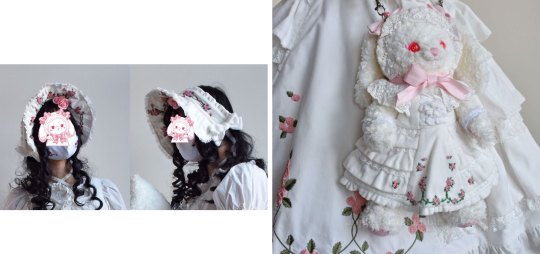
Rose Ribbon Embroidery "Mini" Projects (for BABY NYFW) Part 2: Embroidered Bonnet
I decided semi-last minute to attend BABY's fashion show at NYFW!
BABY had mentioned in their NYFW brand description that their newest collection would be a return to their origins, as well as presenting archival items.
You have to dress to impress for NYFW, right? So of course, I had to pull out all the stops and wear my Rose Ribbon Embroidery.
Also at the last minute, I decided to make a few extra complementing items...
A matching RRE kumya JSK, and a bonnet.


What follows is more of a sew-along/journal rather than a tutorial or guide, mainly for my own memory's sake. But if you enjoy looking at my process (sometimes sloppy), I'm happy!
Also feel free to take a look at the more romantic process video I edited.
Part 1: Kumya JSK
Part 2: Bonnet (you are here)
This post will be my process pictures and notes for the bonnet, as well as a matching mask as a bonus.
I don't believe BABY released matching headwear for Rose Ribbon Embroidery, although I've seen an unknown velveteen headbow with rose lace sold with RRE before.
BABY usually coords RRE with the bunny ear bonnet since Ichigo wears it this way in Kamikaze Girls.
I do own this because I wanted to wear an Ichigo-like outfit at some point, but for this occasion I decided to do something different and make a "matching" embroidered bonnet.
I originally wanted to make a hard bonnet with a very defined brim that could show off the embroidery clearly as I don't really like soft bonnets, but when looking at existing BABY bonnets as a reference, it doesn't look like hard bonnets were a thing back in 2004 (and as it is, BABY rarely releases hard bonnets). So to keep with the oldschool theme, the bonnet is a soft one, although I later make some decisions to make it slightly more structured.
The next decision to make was full bonnet vs half bonnet. The bunny ear bonnet is a full bonnet and I think this is technically more "period accurate", but I am not a fan of how they look like a weird hood from the back so I opted for half (plus, that makes construction and patterning easier for me).
I still used my own bunny ear bonnet as a reference for approximate brim dimensions!
The kumya JSK was a little easier to carelessly sketch out and embroider since I was copying 1:1 from an existing design, but I felt I needed to do at least a bit more careful planning for the embroidery on this. I'm quite bad at creating embroidery designs from scratch, but with the mental image of the rose clusters and swags of vine, as well as referencing the embroidery from the film, I came up with this:

I wanted to emulate the embroidery style of the Momoko's (well, in reality likely the embroidery designer Onoe Megumi--unclear if she did the actual embroidery, but it's likely) embroidery, which I figured wouldn't be too difficult if I was also embroidering by hand.
For material, I am using the same velveteen I used for kumya's JSK. Not my first choice and I actually purchased some thicker looking 100% cotton velvet that I thought would be more similar to the original JSK material, but was worried it wouldn't arrive in time and wanted this project out of the way in case things went wrong/took longer than I expected (it did arrive about a week before the event, but it was totally wrong IRL so I'm glad I just went with this acceptable option). I also bought some more torchon lace, so I used that and another lace from my stash.
The colours of the embroidery in the film also seem to be quite different than BABY's dress. I'm not sure if the pink of the roses has faded over the years, but it has a slight salmon tone whereas the film's roses seem to be more of a pale cool/neutral pink (hard to tell with the yellow tint of the entire film) with some variegation. I love the colour scheme of the film's embroidery, but to keep things coordinated I try to opt for the same colours as the actual dress I have.
I only have white silk ribbon in the width I wanted, so I opted to attempt to dye it to match. Previously I have used alcohol markers to colour the embroidery afterwards, but I find the colour hard to control and it tends to bleed into the fabric. I've also tried colouring the ribbon with the marker before embroidering, but without heat setting the colour transfers onto the fabric as well (and it seems like trying to do so with the amount of ribbon I need would be a waste of ink).
I don't have a lot of experience with it, but since the ribbon is silk, acid dyeing seemed like the way to go.
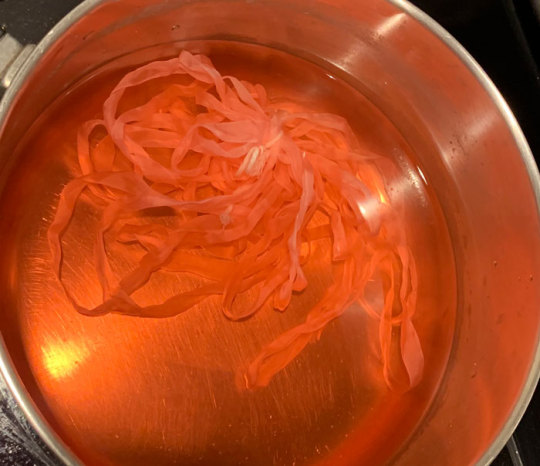
Very interesting photo of ribbon in pot (the pink ribbon gets eaten up by pinwheel roses much faster than I expected so this is the second batch I had to dye--not ideal as they are definitely slightly different in colour but it's not too noticeable). In total, I think I had to dye 3 batches of ribbon and 4 for the pink ribbon as I just barely ran out near the end, and they are all slightly different colours. Thankfully the undertone is the same so it's difficult to tell unless you are really comparing up close.
I thought I would take this opportunity to use the "peach" acid dye that I bought years ago for another project, but this ended up being a mistake as the colour was totally off (maybe the red dye was too expired). I ended up using my regular fiber reactive procion dyes (with heat/acid), because I have many more colours I could mix together, and that was much better. I really should have done this from the start as I wasted perfectly good silk ribbon by making it too dark/off for my purposes (I ended up overdyeing it in pink so it's a usable colour now, but not for this project).
The silk seems to take on dye extremely fast--even just heating up the dyebath will colour it. In some cases I removed the ribbon before adding any acid at all because I felt the ribbon was already getting too dark.
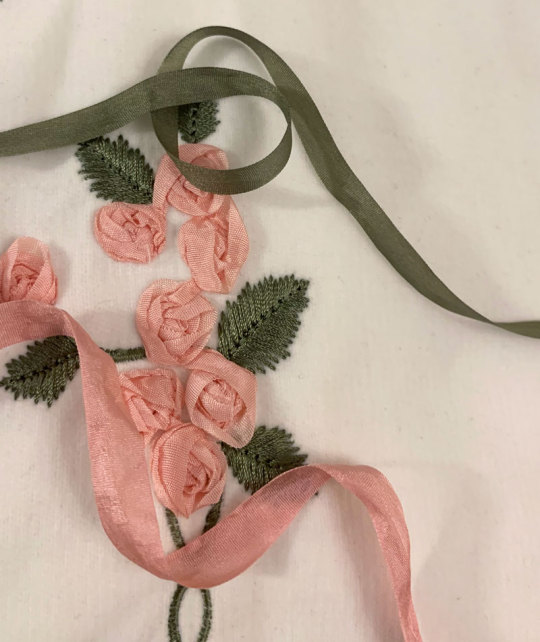
I managed to get a fairly usable mossy green colour for the leaves and vines, however the pink still ended up being a little off/dark compared to whatever BABY used. It's not too bad here as one strand of ribbon, but when many layers are on top of each other in a rose it seems pretty dark. While not ideal, I think it's still okay, especially considering the embroidery colours used in kumya's JSK match nothing else (many pinks will be going on in this coord).
After dyeing and drying, the ribbon is super wrinkled so I ironed it and wound it on some spare card so it's ready to use.
And now I can start the arduous process of embroidery.
Like before, I mainly use a combination of ordinary ribbon stitches, pinwheel roses, and french knot roses. However, this time I try harder to duplicate, or at least evoke the appearance of the embroidery of the film.
It's interesting how plain and somewhat boring the roses look on their own, especially with this monotone colouring. The varied colours of the film's embroidered roses are lovely, but I decided against it here because the BABY dress has monotone ribbon roses.
The roses definitely seem to just be pinwheel style which is very easy and doable, however I am a bit more confused about the leaves. They look like a number of straight stitches in various lengths and directions that fill in a leaf-like shape. I have no idea if this technique has a name and if there is a proper method for it, because I am a silly beginner who is very uneducated in embroidery.
Anyway I do my best and hopefully I got close enough. Ribbon embroidery is really all about the texture, which is really lovely to look at. Except I have trouble looking at my own work for too long because I start nitpicking all the mistakes I made...
Adding the green and leaves really helps the embroidery come to life.
I took even fewer pictures of the embroidery process than kumya's JSK this time because it's not that interesting. I was definitely getting sick of doing the same pinwheel over and over...
I stupidly decided that aside from embroidering the front of the brim, I also wanted a little bit of embroidery on the back of the brim for interest, as well as on the side.
The designs I drafted out for these two pieces is much simpler, but still, more work....
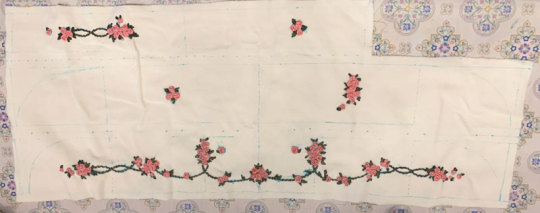
Almost ready for construction! Hopefully a lot faster with the handwork out of the way.
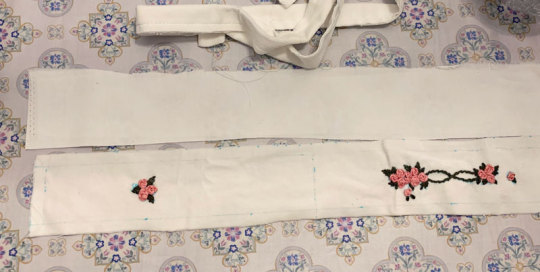
I iron on some interfacing onto the back brim panel and the bonnet band for slight extra stiffness.
The bottom part of the brim is plain cotton sateen because I was worried that the part that touches the head would get dirtier more quickly it if was velveteen.
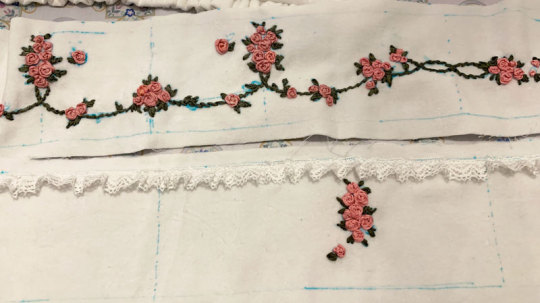
I wanted some lace gathered around the brim and an extra velveteen ruffle on the back of the band, so I prepare that now. The lace is gathered with a single gathering thread and sewn down before sandwiching between the two brim panels.
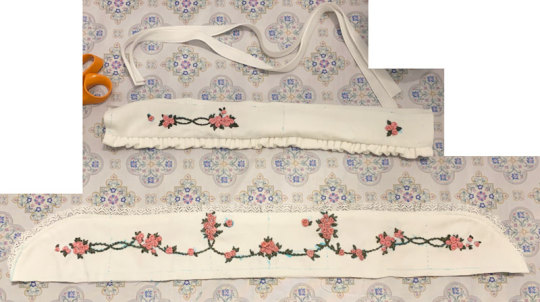
Brim sewn and topstitched (and band is ready for attachment).
The upper flowers ended up a little closer to the top of the band then I intended, but I think it's okay.
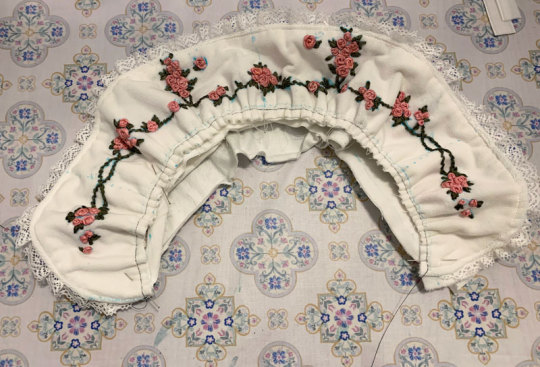
Gathering brim and attaching it to band. Because the velvet fabric is so thick, the usual "sew one line of stitching with a wide stitch length" not only made the fabric incredibly difficult to gather, but the thin polyester thread also continually broke when trying to do so. Therefore, I opted for an alternative method I think I'd remember seeing in my sewing machine manual of all things--a zigzag carefully stitched over a central gathering thread. This worked much better, although I probably should have used a thicker/extra strong thread as the central gathering thread because it did break the second time I had to gather the brim due to a mistake.
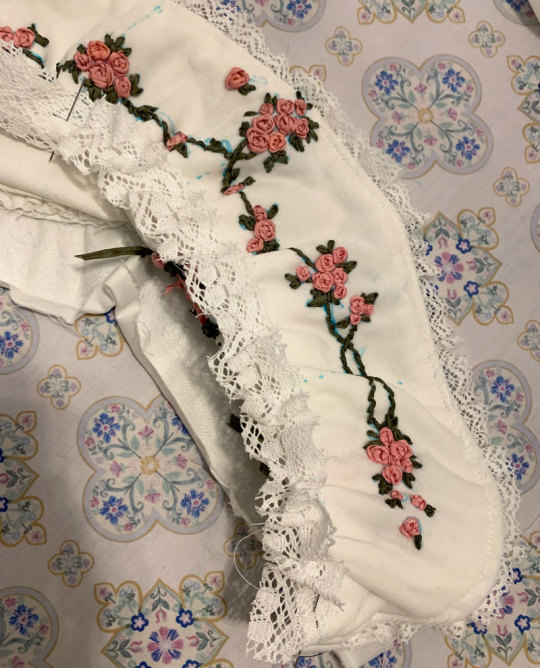
I also add a bit of lace to the inside of the brim. I think this adds some luxury and frilliness between the head and the bonnet's brim, so I wanted to add a small width. I probably could have used even more of the lace's width since it turned out very subtle when worn. But I still think it adds a small amount of interest to the innermost part of the brim and was worth adding.
Unfortunately here after sewing on both brim parts I realize that I gathered both using an incorrectly marked centre line, so I had to rip it out and do it again ;_;
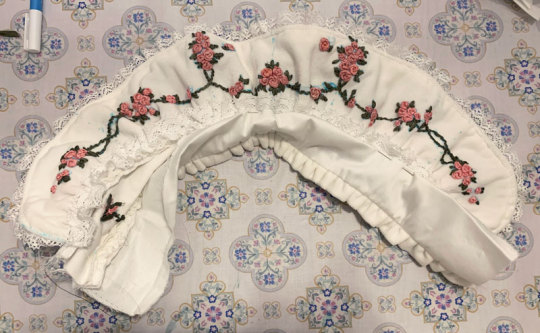
Next, I can carefully align and pin the bottom of the brim to the bonnet and sew it down. I tack this down by hand because I'm not skilled/accurate enough with a sewing machine to topstitch both sides nicely at once (look closely, and my messy stitching is quite visible...)

I also fold in the raw edges and finish the sides of the brim by hand, leaving some openings for ribbon ties.
At this point I spray almost the whole bonnet with water to disperse and fade my markings. Unfortunately, some of the earlier batches of ribbon that I dyed (Can you tell the variance in the 3 dye batches I needed to do?) were probably not washed well after dying and seem to have bled into the fabric from the water...but hopefully it's not too noticeable.
Next I topstitched all around the brim and attached the ribbon ties.
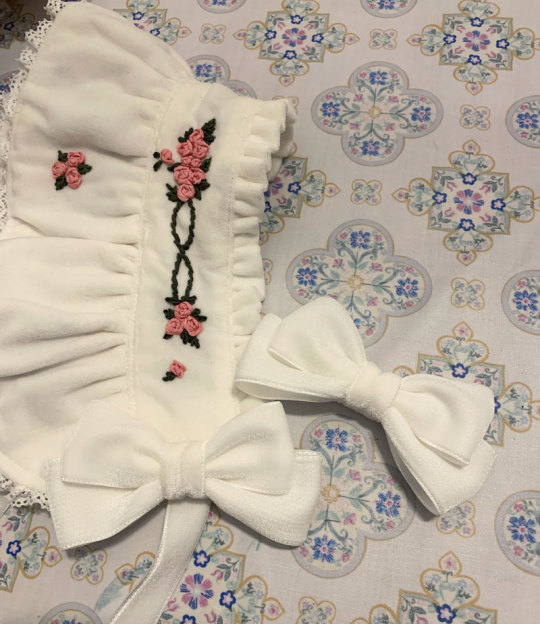
I bought some double sided velvet ribbon in my last minute supplies shipment and made some bows from it. I think the material is a little thick and petersham would have worked alright as well, but the consistent velvet material feels more luxurious, doesn't it? I also think as an added benefit (?) the ribbon being plush and double sided made the bows more puffy looking.
I add some clips to the sides and a toupee clip to the top for security. I opted for a toupee clips because I think it's really the way to go if you don't want the head item to move at all, no matter how thin or slippery your hair.
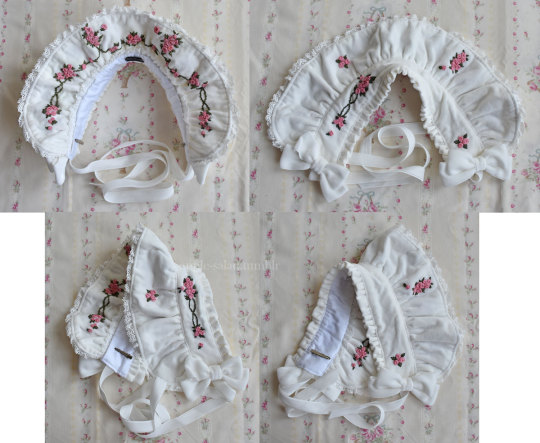
Finished.
Bonus 1: rose accent pin
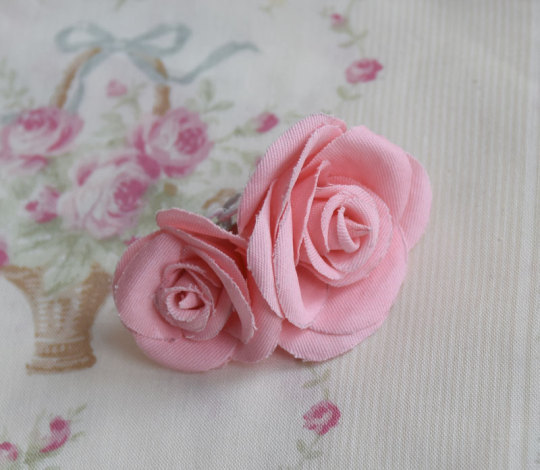
I was in a bit of a rush at this point as it was near the end of the week coming up to the show, so I didn't take any photos of the process here but the technique and templates I used were identical to my handmade faux rose rosettes I made for UM (and the bonus corsages). I have a post with all the details of this sitting in my drafts that I will post eventually, and I will update this post when that happens.
The brooch was just meant to add a bit of 3D faux flower accent to the bonnet, bringing in the rose motif even more. Partially inspired by the faux flowers BABY adds to their bonnets sometimes, like on Milk Tea Doll.
The fabric was "custom dyed" with the same fiber reactive dye I used for the silk. The fabric was further starched, cut out by hand, and shaped with flower iron tools before gluing together.
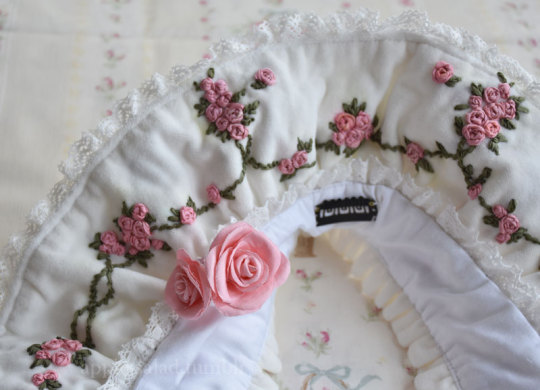
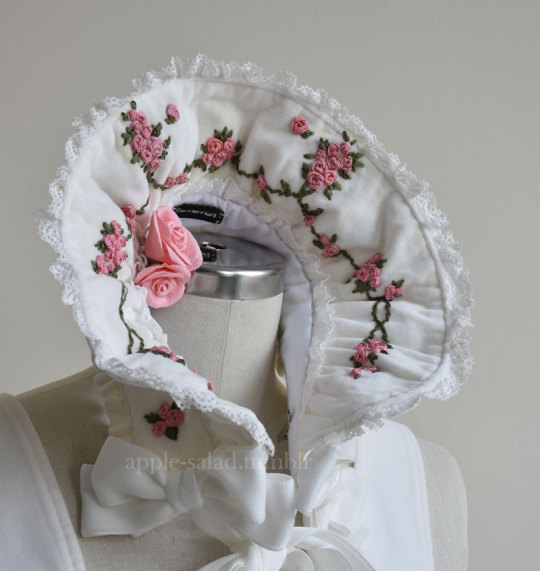
Bonus 2: matching embroidered mask
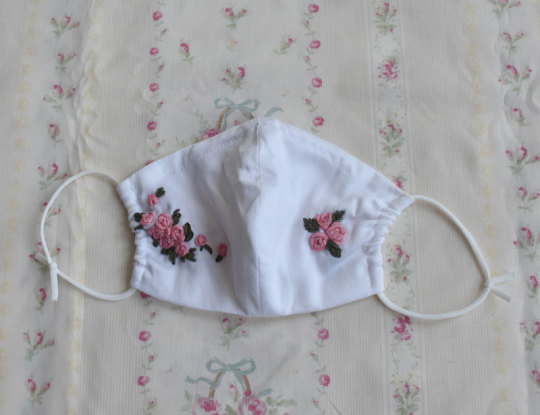
I wasn't sure about whether or not I wanted to wear a matching mask, but decided to do so for situations when I would want my face at least half-covered in public. I didn't really expect to be visible in fashion show pictures as someone in the back, but just in case. (I think this decision was worth it, although my makeup transferred all over the thing and in most pictures my face was even more unflattering. eh well)
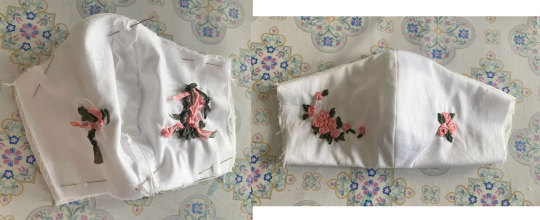
I forgot to take a lot of pictures of my process for this, but it's very uninteresting and not dissimilar from every other mask sewalong from 2020. I draft out a design similar to the bonnet motifs on both of my mask panels (cotton sateen), and embroider.
I should have embroidered closer to the centre of the mask because when worn the embroidery is not very visible/covered by my hair at the sides. What can I do since the panels were already cut though...oh well!
The lining material is some Japanese CLEANSE Ex fabric I had bought previously to make masks during the pandemic. It's supposed to be antibacterial and antiviral, as well as washable, but I have no idea how well supported those claims are.
Sew together normally on both upper and lower sides, turn inside out, add a channel for nose wire and side channels for elastic.
I also have some mask elastic on hand so I use that.
And the finished outfit again with all my items~
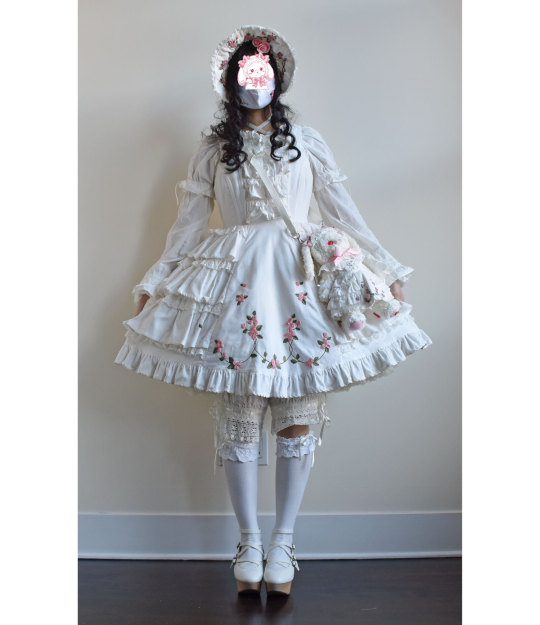
Thank you for reading! If you ever feel inspired to take up a similar project, such as the kumya JSK, I'd love to see it!
237 notes
·
View notes
Text
maciemace: hi everyone! i know i said i wasn't doing music for a while but... it's been a while. presenting from the vault, how to be a woman

src: Greta Isaac ♀︎ Stellar Marianas ♀︎ Darren Brown ♀︎ Simo Harjane ♀︎ Paul Becker ♀︎ special thank you to @praetoravila for creating macie & helping out with the caption!

here's a little teaser trailer i made for the macie edit i posted a few weeks ago :) below, i'll be yapping on how it came together. not quite a tutorial but just laying out my personal workflow, a kind of step-by-step application of the stuff in this mindmap.
-> MAKING OF HTBAW X MACIE
start: 2 feb 2025 | finished: 2 apr 2025
1 - song choice.
when listening to music, i'd keep an ear out if it reminds me of any particular characters. if it passes the vibe check, i'll pick apart every line to make sure it's a fit. then it goes in my giant notes app of songs & characters
late bloomer (macie's seventh album) was fresh on my mind at the time, and i quickly connected the themes of being failed by the people who were meant to protect you in the song to the album/playlist.

sneak peek of some more songs i associate with macie. leak water - bent knee ♀︎ moving on. - valerie hell
usually, the decision to make a video edit comes much later, but i knew almost instantly with this one.
2 - trim song.
i'll identify which section of the song encapsulates the character the most, and if there's certain lines i could visualise/know is present in the source material.

trim to loop, making sure the melody is resolved and the lyrics make sense where it cuts off. i usually go for verse and chorus (with exception of the jennifers edit)
3 - find clips.
i knew i didn't want to use clips from julie and the phantoms. i wanted it to be a music video macie would probably drop in-universe, and jatp footage does not fit with that vision.
at first i wanted to match the original htbaw mv: white wall fashion edit vibes. but i only found 30 seconds of footage of madison reyes that matched that description so i dropped it.


how to be a woman ♀︎ mariposa by madi (2021)
i basically went through madison reyes' entire youtube channel, screencapping shots i think might be useful. i wasn't sure for a long time of what look i was going for. i knew i wanted to include vintage barbie ads as a stand-in for amber (not like in-universe she'd say yes to starring in a vid talking shit about her lol)
once i committed to the scrapbook-y look (as with the roxy/brand new eyes vid), it came much easier.

"shot list". going through line by line to see what clips i need. most of it remained in the final video
the B-section ("remember just as long [...]") is from a different pov, so i made sure to make it visually different than the rest, but doesn't stray too far away that it's jarring.
4 - edit.
the first thing i do is lay down the lyrics and colour code each section (verse1, verse2, pre-chorus, chorus etc). they act as markers & also to break the 1 minute audio into more manageable chunks. the actual style of the text i'd leave as the final step

colour coding helps visualise which sections to work on and complete. i add extra markers within each section for certain beats and ear candy i want to highlight.
then it's basically dragging, dropping, and trimming what i collected in step 3. musicality is a huge priority for me (expanded more in mindmap). i'd stretch and squish the timings to match the song.
fav settings/tools for these scrapbook-y looking videos:
composite mode: lighter colour / darker colour
luma keyer
i like how they both give rough imperfect borders between two overlaid clips
i usually won't have enough clips/the right clips to finish it in one pass, so i'll find alternate shots and revisit the source material multiple times throughout the process (i probably rewatched all of madison reyes' vlogs at least three times over). and it's just rinse and repeat of steps 3 & 4 until i fill up the timeline.
i'd reformat the text, and there you have it, the final htbaw x macie vid :) !

thanks for reading til the end! if you could spare a little bit more time to click here -> daily clicks for palestine. and i'd appreciate if you could also spare some change for this -> isnad. thank you ! <3
6 notes
·
View notes
Note
How do you go about making default presets for eyes / nose etc? I'd like to try myself, but have no idea how to!
Hello, I'm currently dealing with flooding in my house, I lost some items and my laptop's charger is broken. I can't currently explain the process at this moment but wouldn't mind creating some sort of video style tutorial on how to use the face preset editor (Creating custom presets, adding custom sliders, replacing existing presets) in the near future. I'd appreciate if you could be patient.
However, if you read the description of the Face Preset Editor, Lady Duchess already mentions in a brief manner how you can replace an existing preset but you have to have knowledge on how to use S3PE, navigating the game files, knowing how to use the face preset editor in game and out of game.
If you pay great attention she mentions CBLN file tags under the " manual way " and that's what you need to look for inside the original game files. However replacing them without having to modify each and every slider is a method that I figured out myself and isn't shown but as I mentioned, that isn't something I can do right now and only in the near future.
Hope that helps :)
18 notes
·
View notes