#despite the fact I used 3D modeling software for art
Explore tagged Tumblr posts
Visit Tumblr Blog
Explore Tumblr blogs with no restrictions, modern design and the best experience.
Last Seen Tumblr Blogs


Fun Fact
25% of US internet users with an annual income of $80-100K use Tumblr.
Text
,,,I’m gonna have to learn how to draw furries. I can’t stay in this fandom and be unable to draw like. Dyvim. Or Dasein.
#there’s too many things I can’t draw#despite the fact I used 3D modeling software for art#I can’t actually visualize things in 3D that well???#I’m unsure if it’s because on a canvas you can’t turn the camera
3 notes
·
View notes
Text
Beginning the long journey... (Year 0, Day 1 [sorta])
As I begin down this long and arduous path, I figured why not catalog all of my progress (and failures) in a blog for the world to see!

All memes aside, I should probably begin with an
INTRODUCTION:
I’m Manuel; my friends call me Manny. I’m a recent graduate from a bachelor of music (B.Mus) program in southern California where I was fortunate enough to meet some great friends, mentors, and professionals who helped guide and inspire me to create some awesome aural artwork. I’ve loved music for as long as I could remember, and it was always something that drove me to be my best. I’ve aspired to play many instruments from a young age and always sought perfection trying to master their intricacies. I studied both composition and saxophone performance in college, while frequently freelancing as an audio engineer (my current line of work).
But wait, isn’t this a game development blog?: Yes, yes it is.
Due to a variety of circumstances and personal interests, I’ve decided to jump ship from one extremely difficult creative field (concert/classical/experimental music) to another (game development), leaving behind a life I feel indebted to and, honestly, still love very much. I’ve been thinking of making this jump for quite some time (a year or so), with a long, loooooong history of engaging with the video game medium on a deeply-infatuated level, which ultimately backs up this decision. Throughout my life, video games always played a pivotal role in my own forms of expression, happiness, leisure, and community. From my very first Gameboy Color to the now flourishing Nintendo Switch, from Pokemon to Monster Hunter to Bioshock and more, I’ve been hooked. Honestly, I’ve always considered these worlds my second, third, fourth, and n-th homes. Because of this, I’ve felt like I have a duty to give back to the community however I can. After five years of collegiate study and ridding the struggle bus, I realize that there’s no better time than the present to chase this dream. THE NOW, or WHERE TO START:
In firmly deciding on this change, I didn’t necessarily know where to begin. Hell, I didn’t even really know what careers or roles existed in the game development community. After finding scouring the internet and finding some helpful resources, I was blown away at the sheer amount of readjusting I’d need to do to even think about entering this field.
For example, this messy bundle of terms flooded my brain while trying to get a grasp of the industry:
Senior-level
Lead
Technical Director
Junior-level
Temp
Frequent moving
Designer
Level Design
Mechanics
Game Design Document
UX/UI
Programmer
Game Engine
Systems
Game Engines:
Unreal
Unity
Doom
Quake
C++
Python
Scripting
Engineer
Architecture
Audio
Tools
Networking
Artist
Environment Artist
Concept
3ds MAX
Maya
Autodesk
Animation
Skeletal Meshes
QA
Automated Scripting
Debug Databases
Localization
Producer
Disengaged from content creation
Overseer
Independent
Freedom to create vs automated jobs in AAA
AAA companies
Subsidiary studios
Outsourcers
Art
Animation
Publishing
Audio
First-Party Studios
Publishers
Outsourcing
Non-Disclosure Agreements (NDAs)
Marketing
Analysts
Free-to-Play
Microtransactions
Community
Blogging
Twitch
Streamers
Issues
Pay Disparity
Poverty
Under-appreciated
Sexism
Representation
Minorities/POC
And this list over-simplifies the complex web these roles create with each other. That being said, the last month or so has consisted of me scouring the internet for resources, deciding on what my long-term and short-term goals are, and orienting myself towards taking on Goliath.
MOVING FORWARD:
After being bombarded with this information, I decided that the best course of action for moi was to shoot for a game engineering/programming role, as I also had a brief two-year stint in astrophysics research and STEM coursework during my undergraduate degree. Another one of my passions, the STEM fields have always held a dear place in my heart and I picked up a lot of programming skills/languages in college, notably Java & Python. Intensive music study has also done wonders for the technically-oriented work I currently do, so I figured it would be fun to challenge myself with STEM-oriented work once again. So far, I hold a great, great admiration for lead game designers like Hideo Kojima and others, so design is also something I’m looking into. RESOURCES:
In doing my research, I’ve found a variety of extremely helpful resources that provided me with the insight to start this journey. I’ll post the most helpful ones below: GameDevUnchained (Podcast/Website):
This podcast, hosted by Brandon Pham & Larry Charles (both established AAA game developers), explores the current state of affairs in the video game industry. Their conversations are filled with wit, charm, and tons of information, from wage negotiation and employment to indie development and technical direction. No topic is missed* (well, except for the exact technical aspects of being an artist, developer, or programmer). Despite this slight oversight, it’s still worth its weight in gold due to the fact that they bring in a new guest every week who touches on a specific topic. I’ve gained most of my working knowledge about the industry’s complexities from this source. [Currently on episode: 26] Game School Online (GSO):
This revolutionary piece of pedagogy is an online game development school that is ENTIRELY FREE. Founded and ran by the hosts of GameDevUnchained, GSO’s main focus is free game development education with a focus on artwork, modeling, and technical artistry done through the Unreal 4 engine. The school is optionally supported through Patreon and provides special benefits to subscribers; however, a subscription isn’t necessary to enroll. Enrollment periods happen 4 times a year, with heavy waitlists for non-subscribers due to the need to keep class numbers down. Their educators consist of “Scholars” who teach and monitor the courses, all of whom are active AAA/Indie developers. Notable Scholars include Brandon Pham, Larry Charles, Leo Gonzales, Olaf Piesche (my mentor!), Matt Brown, Tai Chen, and many others. For subscribers, there’s the option to interact 1-on-1 with scholars, serving as lessons and mentorships to poise the budding student to enter the field. I’m currently a $40/month subscriber, which gets me a 30-minute session every month with Olaf. I’d like to stress, however, that at its current state GSO seems heavily oriented towards artists, with the art-oriented roles overshadowing the engineer/programmer roles 8-to-2. In addition, all classes are oriented towards art or design. This means Olaf & Matt are only doing 1-on-1 sessions. -_- *Oh well, better than nothing.*
The next two are both variations on the paid-online-schooling trope, but they seem alright nonetheless...
Coursera:
Coursera is a platform that hosts specialized “certification” courses that were designed by universities around the world. These certification courses are essentially a compilation of videos, assignments, and online templates that are moderated by online staff (and presumably not monitored by the actual course instructors ever). Each certification consists of about 4-6 classes and takes anywhere from 6 months to a year to complete. Each class runs an average of 1-2 months and has about 1 assignment due every week. There is a peer-grading system which can be iffy at times, but it’s worked out well for me so far. The only downside is that these courses can be EXPENSIVE; however, there are financial aid options for those of us *ahemmeahem* that can’t afford the costs. Luckily, my cost for the first class was waived completely. I’m currently enrolled in the Game Design certification course created by Cal Arts. I’ll be updating you all on my progress every week as I work through this course. Something odd I’ve noticed is that the videos for the Intro to Game Design course are astoundingly short; I’m surprised this course costs anything at all given the kind of information I’ve received out of it so far.
Udemy:
Like its quasi-academic counterpart, Udemy hosts courses created by content creators (I’m not too sure on the qualifications these creators have...) that consists primarily of video tutorials. The beautiful thing about Udemy is that, unlike Coursera, their courses often times cost very little if you go through the right channels! This means promo codes from websites like IGN or your favorite tech reviewer, etc etc. I was fortunate enough to grab the Unreal Crash Course course for $10 through an IGN promotion last month. Also unlike Coursera, there are no assignments or grading systems in place for your work. Instead, there are often forums that host dozens and dozens of posts from current and past students of the course. This feature has felt surprisingly fresh and fun; however, not receiving a lot of direct feedback has its downsides. I’ve been slowly chugging away at this course, having finished 1/4th of it so far. I’ve also found that there tends to be much more technical work to be learned from Udemy as opposed to Coursera (in terms of game development); however, this may just be my limited scope, as I haven’t looked around too much more.
Game Engine Architecture, Third Edition by Jason Gregory
(Naughty Dog Lead Programmer):
This book is AMAZING for the aspiring game engineer, as it’s filled to the brim with a detailed analysis of common game engine architecture as told by the lead programmer at Naughty Dog (go Uncharted/Last of Us teams!!!!). I’m currently in the second chapter of the book, but to give a brief overview of its entirety along with my own descriptions below each heading:
Introduction
“discusses the ins and outs of the industry
Tools of the Trade
“an in-depth look into programming tools”
Fundamentals of Software Engineering for Games
“development cycles and tool usage”
Parallelism and Concurrent Programming
“the title says it all”
3D Math for Games
“3D geometry and Linear Algebra, along with programming algorithms” (go STEM!)
Engine Support Systems
“a look at memory and systems”
Resources and the File System
“how to handle game assets”
The Game Loop and Real-Time Simulation
“graphics rendering loops and gameplay loops, along with dealing with time”
Human Interface Devices
“dealing with I/O”
Tools for Debugging and Development
“the title says it all”
The Rendering Engine
“rasterization and rending pipelines”
Animation Systems
“skeletal meshes and processing”
Collision and Rigid Body Dynamics
“physics systems and other collision systems” (go STEM!)
Audio
“Dealing with sound design and 3D audio” (go music!)
Introduction to Gameplay Systems
“dealing with data, game objects, and world editors”
Runtime Gameplay Foundation Systems
“dealing with all of the constituent parts and updating the game”
You mean there’s more?
“more to be learned”
As you can tell, there’s a whole lot of information to be gained by reading a textbook like this. Jason states in the Foreword that this is really meant to be used to teach a three-class series on game programming at the university level; however, I find that you’ll be able to understand a lot of this pretty well so long as you have an ample amount of programming experience (preferably with C++). That being said, it’s a perfect springboard for me and I’m so eager to continue that I sort of want to finish writing this entry already so I can get back to it! *o* It cost about $85 for a physical copy and $47 for a digital copy (Kindle).
So, that wraps up my currently used resources list! I hope it can serve as a starting point for some of your own deep-dives into the world-wide-web for resources! CONCLUSION: Thanks for sticking with me this far everyone. I know I didn’t dive into my past that much, but I hope it gives you somewhat of an idea as to who I am. In starting this journey, I’ve realized the importance of documentation and reaching out to build a community with others, so I hope that we can all interact and take this journey together, in some form. Tomorrow I’ll be delving into my current projects that I’m aiming to work on and some of my personal inspiration for taking the game development plunge, as well as discuss what I’m currently working on in terms of study/development. I hope you all have a good day, and never feel like it’s too late to start chasing your dreams again! - Manny Extra: Game of the Day - Disgaea 1 Complete on Nintendo Switch I’ve loved this game since I first played it way back in the early 2000s, so when I heard this was coming to Switch as a slightly remastered port, I couldn’t wait! The updated artwork looks great and I’m eager to get all of those extra scenarios completed! ;) GO SRPGs!
#game development#programming#music composition#audiovisual#video games#software development#Pokemon#monster hunter#Bioshock#Nintendo#sony playstation#Microsoft xbox#GameSchoolOnline#GSO#GameDev#GameDevUnchained#game dev blog#game dev resources#Resources#c++#Python#Naughty Dog#Engine Architecture#Game Engine Architecture#Disgaea
2 notes
·
View notes
Text
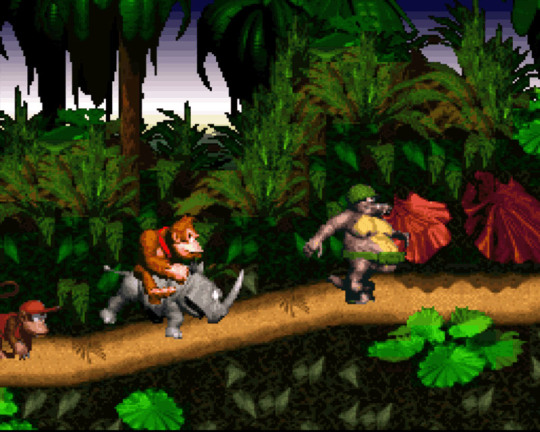
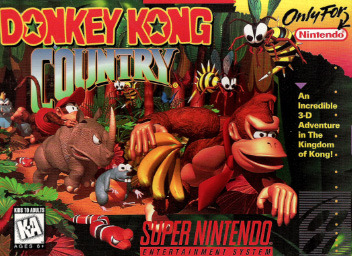
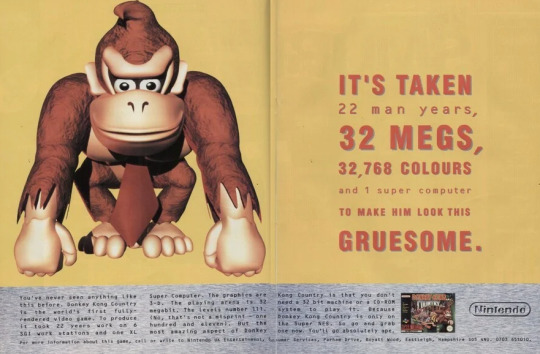
Donkey Kong Country

In my previous post, I talked a little about Snake Rattle 'N' Roll. My recollection of that early Rareware entry is, like most NES gems, rooted in early memories of BlockBuster rentals. However, Snake Rattle 'N' Roll is not the game I would casually throw out as the defining hit that cemented Rare as a developer juggernaut in my mind.

That game is strangely GoldenEye for the Nintendo 64. That would mark the first time I was conscious of the company in a capacity that separated it from Nintendo, despite its close relationship with the Japanese company.
That's not to say I never played Rare games. But I was so young; I only knew such games as Nintendo products because I didn't understand the licensing relationship Nintendo had fostered with third-party developers. A relationship that was so important to Nintendo that it would go on to delay the Super Nintendo amid a global chip shortage during the late 80s because they could not get out enough development kits.
But this fact about my childhood makes it hard to see Rareware's classic Donkey Kong Country trilogy as anything but peak Nintendo. You have to consider how confusing this all was for a child. Because Donkey Kong, the character was indeed Nintendo's creation. Shigeru Miyamoto had breathed life into him and Mario when making the original Donkey Kong in one fell swoop. I played the arcade cabinet at Pizza Hut on many occasions. I had a copy of the NES double bundle of Donkey Kong Classics that I played with my mom at home. So when I first laid eyes upon Donkey Kong Country for the first time over at my uncle Nathan's house, I thought Nintendo was just doing what it did best.
Making pure fucking magic.

To be fair, I think one can argue that Nintendo did have a hand in the success of the Donkey Kong Country series. For one, they were open to the idea of Rare using the character of Donkey Kong. But they also gave Rare a boost of cash inflow by buying stock and letting them go buck wild in the development phase, with Nintendo mainly being hands-off because of the tremendous faith they had in Rare's ability to push pre-rendered graphics.

As a kid, the results were hard to ignore. Donkey Kong Country had an art style unlike anything else in the SNES library. Even close to thirty years later, it still manages to impress me. And it should impress. Donkey Kong Country was made on some truly costly hardware. Rare used Silicon Graphics workstations that ranged anywhere from 45,000 to 100,000 USD each. Rare's cash infusion from papa Nintendo allowed them to afford several SGI workstations that used Alias PowerAnimator. Alias PowerAnimator had gained traction in the cinema world for special effects in The Abyss and in the film Terminator 2, both James Cameron movies. So it was the perfect software suite to create Donkey Kong Country's tasty visuals.
Rareware would create the 3D models, textures, and shading in Alias PowerAnimator. They would finish with the animation and then downsize it to fit the hardware requirements of the SNES, with developers hand tweaking the sprites to give the most detail. This is bonkers when you consider that the SNES was still a tile-based system, which meant that the super detailed backgrounds of Donkey Kong Country's many levels had to have been a pain in the ass to cobble together.
It's the level of dedication to craft that I could only associate with Nintendo as a kid. Even the lush score by David Wise seemed too wild a concept for my then 7 or 8-year-old brain. No, this had to be the work of Japanese game developers.
Why I had sanctified Japanese developers in my most formative years is an interesting question. My exposure to Japan as a kid was minimal. Beyond Nintendo, there were only Godzilla movies. I didn't even have anime as the usual suspect because early anime distribution in America was abysmal.
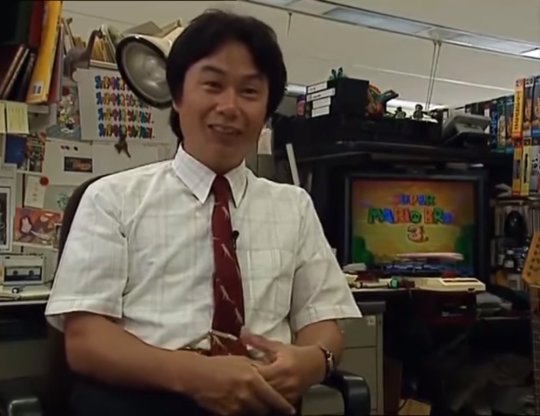
If I had to explain it, I think it was a child's misunderstanding of two very different cultures and their relationship with each other. In my naive mind, Japan was full of creative and carefree people. They made things like kaiju films and video games. The few images I had seen of Shigeru Miyamoto in Nintendo Power painted a fantasy character akin to Willy Wonka.
This was in contrast to my perception of how most adults viewed video games in the west. If you are an adult now, you may remember that video games, along with heavy metal and dungeons and dragons, were the primary corruptors of the youth. Conservatives and even dull liberals were making it a habit to highlight the addictive nature of games, much less the violence in some of them. So many people in government wanted the average family to be more like the Walton's and less like the Simpson's; an actual quip from that was uttered by President Bush in 1992.
As weird as it might seem. I thought the average American and European person was too uncreative to make video games. And depending on what year on the timeline gets brought up in my afterlife, that idea might still pan out.
So it would probably shock the kid me to learn that Donkey Kong Country is a product of probably one of the most vanilla plain places on the planet. Bloody England. Twycross in Leicestershire, to be exact, if my notes are correct. Especially when you consider that the 40 levels offered in DKC are some of the most fun you can have on the system.
To give the game it's proper historical ranking by yours truly, I must admit that the original Donkey Kong Country was a well-respected game but often passed over when picking a game for a play session. This might seem weird, but you have to consider that my SNES collection was not gained piece by piece but gifted in bulk by my uncle Nathan when he got his Nintendo 64. As a result, some games that should have got a hefty amount of playtime might have been a little light because I had an overabundance of choices.
Still, there are a lot of games I would have passed over to play Donkey Kong Country. Especially considering my age at the time. As much as I might find Drakkhen charming and memorable today, I could only put up with so much robust RPG bullshit before I needed a simple platformer to soothe my worries.
In terms of difficulty, the game was hard enough to offer a challenge but with the level of approachability that was typically reserved for Nintendo's own games. Unlike earlier versions of Mario, the titular Donkey Kong was not alone. Donkey Kong had his little buddy Diddy Kong to back him up, allowing the players to take up to two "hits" before losing a life and having to restart the level. As a kid who grew up playing bullshit like Contra, I thought any introduction of multiple hits before a life/level wipe was fair.
Like Mario World, Donkey Kong Country had its own cast of loveable ridable animals that would assist the Kong crew on their adventures. Don't ask me their names; I just remember a Rhino, Ostrich, and the Swordfish for the water levels.
As far as the gameplay loop went. It was not precisely reinventing the wheel. You jumped on the bad guy's heads. You collected bananas like Mario's coins for 1-ups. The platforming was Mario tier, with some complexity here and there on some of the mine cart levels, but nothing so infuriating as the Mega Man jump puzzles.
Still, the design carried a lot of weight. Moving Donkey Kong away from his initial King Kong appearance to that of a tie-wearing cartoon character did a lot. The additional cast of characters such as Diddy Kong and the Kermlings supplemented this move. The pre-rendered graphics, while still looking fuzzy due to being downscaled, still gave the illusion that the game was punching graphically above its weight. But don't ask me if I know how much the game actually pushed the hardware.
If I had to rank Donkey Kong Country on a tier list. I would probably give the game a solid A. That ranking might fluctuate once I consider other games that would have to share space with it. But the game's visuals, tight controls, and impressive soundtrack might still win me over.
If I had one wish for this game in the modern era. I wish there could be a remaster using the full-size images from Rare's SGI workstations. I don't even know if that is technically possible or if the work is still available to Nininteo or Rare. But I can dream, right?
1 note
·
View note
Text
THQ Nordic’s Nicktoon game re-releases: Ideas (Part 1)
Well it’s been a while hasn’t it. I didn’t plan to leave this blog behind for this long, but I do plan on reviving it with new stuff whenever I can! And i’ve been thinking a lot about something recently that I thought i’d finally give my two cents on.
So back on March 21, 2018 THQ Nordic and Nickelodeon announced a partnership to bring back classic Nicktoon based games on modern consoles, with on shelf information “in the coming months” and listing 16 different shows they’ll be pulling from. And so far, we’ve had radio silence on the matter. With Comic Con and Gamescom coming up I have a feeling we’ll hear more about these soon but for now, I wanna share some ideas for the different ways they could re-release these games: via HD Collections!
With so many games based on so many shows there’s a lot to go through, so if I come up with more i’ll make a follow up post to this. The only rule is that i’m pulling from games based on the shows THQ Nordic listed. Anything on console and handheld is fair game.

Spongebob Squarepants: Heavy Iron Collection
Starting off with the most obvious and heavily requested re-release even before THQ Nordic got their hands on the Nick license. Spongebob is one of my favorite Nicktoons and has had MANY games since his 1999 debut. But some of the best were made by the California based Heavy Iron Studios. The incredible 3D collectathon Battle for Bikini Bottom, the not as good but still really fun spiritual successor The Spongebob Squarepants Movie, and lastly the 10th anniversary tie-in game Spongebob’s Truth or Square.
Having all three of Heavy Iron’s games bundled together in one package would give fans easy access to some of the most underrated platformers out there. Hell Battle for Bikini Bottom HD alone would sell like hotcakes (or Krabby Patties in this case). The Movie Game and Truth or Square may not have reached the heights of that first game, but are still fun and charming 3D adventures that any Spongebob fan can enjoy. It would even be really cool if Truth or Square was a special edition that included the PSP exclusive levels w/ respective collectables (Squidward’s Talent Show and Ambush at the Krusty Krab) alongside all the content from the console version.
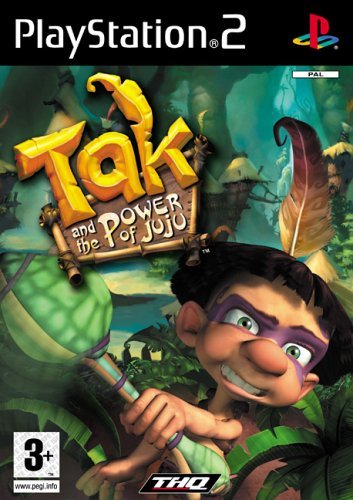
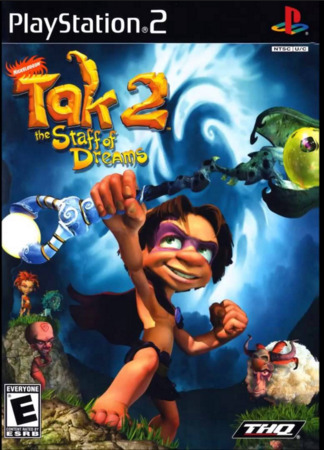
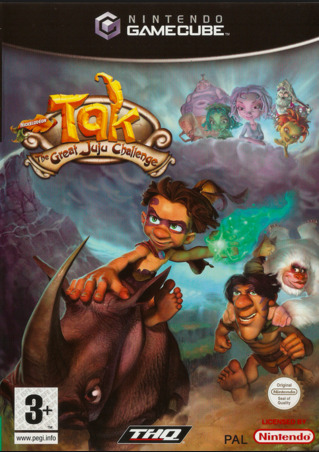
Tak: Juju Trilogy
Another severely underrated series of 3D platformers, the Tak games developed by Avalanche Software (who would later go on to work with Disney) were a very unique case among Nicktoon games in that they weren’t based on a cartoon or movie! Instead, they were completely original adventures made from the ground up for video games. The Tak series has since become fondly remembered for it’s lush worlds, colorful characters, hilarious dialogue, and atmospheric music. And the time has finally come for Tak to make a comeback!
This HD Collection would put the focus on remastering the original trilogy by Avalanche. Tak and the Power of Juju, Tak 2: The Staff of Dreams, and Tak: The Great Juju Challenge would all be included. Some features that i’d love to see would be having more unlockables for 100%ing Tak 1 (instead of just storyboards and concept art, maybe some music and models?), a level select or at least some way to revisit levels in Tak 2 without starting a new file, fixing the various bugs and graphical issues in Tak 2, and online multiplayer for Tak 2 and 3. It’s a lot to ask for but who knows! It may happen. In any case i’d just be happy for these three games to get bundled together so more people can notice them. And also help us wash the taste of that TV show reboot out of our mouths finally.

The Fairly Oddparents Two Pack
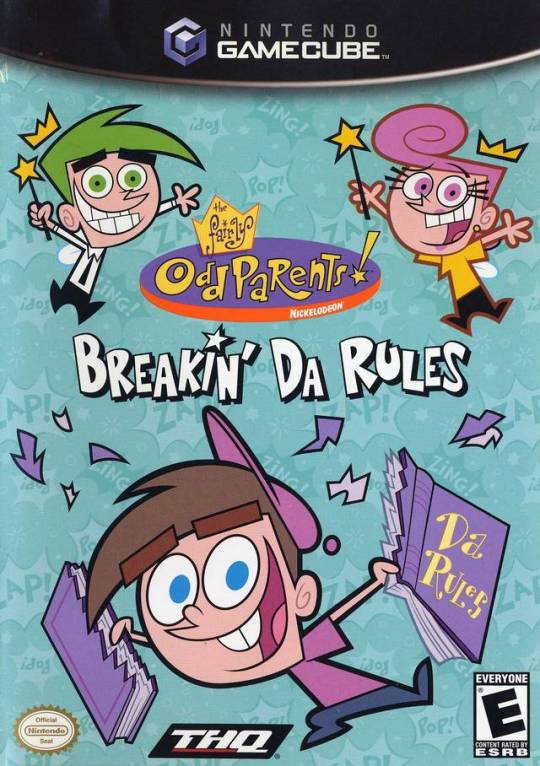
Despite The Fairly Oddparents running for 10 seasons and being one of Nickelodeon’s most popular shows, Timmy and his godparents have barely made a mark with video games of their own. In fact, only TWO games have ever been released on consoles based on the show. So why not bring them back? The Fairly Oddparents: Breakin’ Da Rules and The Fairly Oddparents: Shadow Showdown were both developed by Blitz Games, and are both 3D platformers with a similar setup. Timmy runs around levels collecting stars in order to grant wishes, due to his Fairies being hindered either by force or by a mysterious villain.
Both of these platformers may not take long to beat, but they’re a very fun ride all the while. If you’re a fan of the show, you’ll recognize levels in both games based on episodes and locales from the show, and tons of classic characters show up. If you grew up and enjoyed the pre-Poof/Sparky/Chloe era of the show, you’ll love these games. Bringing them both back would not only allow Timmy and his fairies to get back on consoles, but also give fans of the older era of the show something to enjoy. Plus we’d get to see some of the best cel-shading out there in HD!
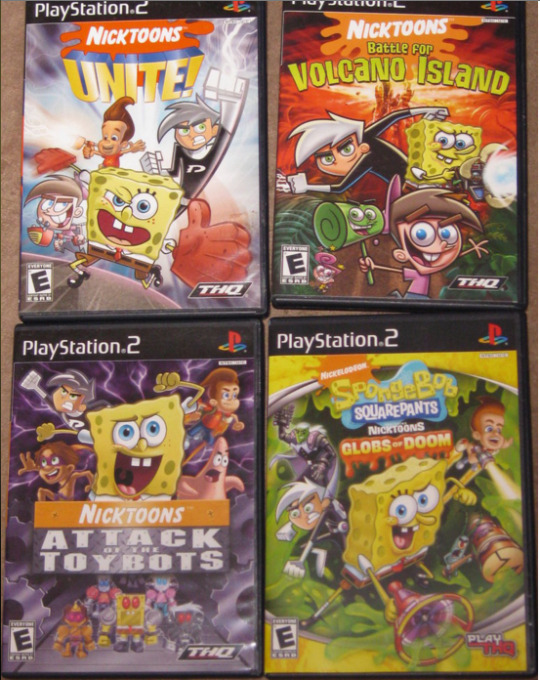
Nicktoons: United Collection
To round off my first collection of collections, here’s one that would make a lot of fans happy. While kids today see the Avengers unite on screen, kids in the 2000s had a different kind of all star crossover in the world of video games with the Nicktoons series (known as Spongebob and Friends in Europe). The first three games were all developed by Blue Tounge Interactive, while the 4th and final installment was handed over to Griptonite Games. Over the four (console) games, nine different Nicktoons crossover: Spongebob Squarepants, Danny Phantom, The Fairly Oddparents, Jimmy Neutron, Tak and the Power of Juju, My Life as a Teenage Robot, The Ren & Stimpy Show, Rocko’s Modern Life and Invader Zim. The handheld versions feature additional shows with Catscratch and El Tigre. Even more Nicktoons cameo in Attack of the Toybots as collectables.
This HD Collection would include the main home console versions of all four games, Nicktoons Unite, Nicktoons: Battle for Volcano Island, Nicktoons: Attack of the Toybots, and Spongebob Squarepants featuring Nicktoons: Globs of Doom. These 3D Platformers/beat em ups may vary in quality, but are very popular amongst fans of the Nicktoons and are actually very unique amongst most crossovers in that they actually share continuity. Events from one game are referenced in another, characters remember each other and become closer with every game, Volcano Island returns, etc. Having all four games in one pack would unite the entire saga together and possibly fix many of the original issues these games had. Mainly that horrible save glitch in Globs of Doom, PLEASE fix that.
[NOTE: The picture on this section is not my game lineup, I simply used it for reference material]
#HD Collection#thq nordic#nicktoons#spongebob squarepants#tak and the power of juju#the fairly oddparents
4 notes
·
View notes
Text
Evaluation :
This project has been very enjoyable and I am finding working in new areas to be fun and interesting, especially since some of them are very new to me. Throughout this project, I have generated ideas using pinterest boards and sketches. I feel like I need to spend more time generating and refining my ideas as I often skip these stages and try to get straight into my final ideas which does not always work well. Pinterest boards have been the most effective way for me to generate ideas as they often help me visualize what I want my sketches to look like in a clearer way. I’ve also found that pinterest boards make it easier for me to organise my ideas and create more detailed sketches.
Modeling has been the most enjoyable area to work on, as it is something I have never done before but I was pleasantly surprised by it as it allows you to be very creative and has allowed me to achieve results that I am happy with, despite the fact I am not very experienced in this area. For example, I am very happy with the way my island turned out as I feel I managed to achieve the mood / aesthetic I was aiming for despite the fact I was not able to add any complex details due to the time limit and the fact I am not very experienced in this area. Adding to this, I have also enjoyed the animation aspects of this course as animation is something I am interested in learning. I am not experienced in animation however my experience with drawing and digital art have made animation less of a challenge for me.
In contrast to this, I have struggled with the plushie making section of this project as I am inexperienced in this area and it is not something I am overly passionate about. I had a lot of fun during our first plushie making session and was happy with the outcome, however when it came to making our own, it became a lot more difficult and stressful. While I would not rule out creating plushies in the future as elements of it are enjoyable, there are definitely other subject areas I am more passionate about. Another area of this project I have struggled with are the 3D aspects as I have never worked digitally in 3D before and learning new software is always stressful and challenging. However, I have created some 3D outcomes I am very happy with. While learning new software can be stressful and challenging, it is also new and interesting and a challenge I am more than willing to take on, especially when it means I can experiment with a new software and create pieces / outcomes I am happy with.
The model maker I feel most inspired by is Jim McKenzie as not only does he create detailed models that are very aesthetically appealing, he also photographs them and turns them into pieces of art through a different method which I find very inspiring and interesting. The Digital artist I feel most inspired by would have to be Noah Bradley, his use of colours are so unique and aesthetically appealing, his compositions are really inspiring and the way he shows scale in his work adds a lot more depth to his pieces. These are all things I hope to be able to include in my work in the future. Overall, my research has inspired me to come up with interesting ideas and has sometimes even slightly changed my ideas. For example, I originally wanted to have my bottle stopper and label be subtle colours, but after seeing Jim McKenzie’s work I decided I wanted the colours to be bright and stand out.
In conclusion, I feel that my most successful area/s would be either digital art or modeling as they are things I am passionate about and while I have a lot more experience with digital art, I feel model making would also be an interesting route to explore, especially since it is relatively new to me. In addition to this, I am very happy with how I managed my time this term. I have previously struggled a lot with my time management but I have come up with strategies and methods to help me become more organised. These methods have been very successful so far this year and I hope I can continue to keep on top of my work. Adding to this, I have reflected on my work by thinking about the elements that I am happy with along with the elements I am unhappy with. I have also thought about how I can refine what elements of my work have been successful and change what I think has been less successful. Overall, I am very happy with the outcomes of this project and I look forward to future projects.
0 notes
Text
Meet Fairfield University’s School of Engineering Dean Andres Leonardo Carrano, PhD

Photo: Andres L. Carrano, PhD.
A few weeks into his new role as dean of the School of Engineering, Andres L. Carrano, PhD introduced himself to the Fairfield University community in an interview with Jeannine (Carolan) Graf ’87 of the Marketing & Communications Department. Their conversation covered everything from the new dean’s first impressions of Stag country to how he spends his time when he’s not working in a lab, classroom, or office.
You took on your new role as dean of Fairfield’s School of Engineering in the midst of a pandemic and the same week that Tropical Storm Isaias roared into town – quite a welcome! What was that like?
Indeed, it has been a very interesting experience to say the least – almost surreal in a way. With the ongoing pandemic, the safety our students, faculty, and staff has been my main concern since day one. But having just relocated from Savannah, Georgia, (and having previously lived in Auburn, Alabama) where hurricanes and tornadoes make regular appearances, I found it ironic that one of each kind welcomed me in my first week here at Fairfield. Despite my unusual start, and perhaps because of it, I have received tremendous support and understanding from all units and people across campus and that has made my onboarding that much easier!
Given the current coronavirus-related restrictions on campus, how have you been able to meet and connect with engineering students since the semester began? How are they doing?
This pandemic hit us at a time when videoconferencing technologies are mature enough that we can enjoy some degree of freedom in how we design our interactions. For example, we conducted our first-year convocation and open houses mainly via Zoom. As the Dean’s Office works from several locations in order to reduce staff density, we communicate via Teams and other tools. Within the circumstances, generally speaking, the students are appreciative and grateful for the opportunity to be on campus and have some in-person classes.
What excites you the most about becoming dean of Fairfield’s School of Engineering at this time? What do you most look forward to in your first year?
I was very attracted to the immense potential of this School, the superb location in the Northeast Corridor, the beautiful campus and facilities, as well as the Jesuit pedagogical approach and values, all of which makes us a very unique program in the country. During the first year, I look forward to spreading the word and increasing awareness so that Fairfield Engineering becomes well-known outside the Northeast. I am also very excited about the launches of our newest master’s programs in cybersecurity, data science, and entrepreneurship & technology (coming soon), as well as our renewed focus on biomedical engineering.
What are the biggest challenges facing the School of Engineering?
Without a doubt, the biggest challenge right now is to conduct our instruction and research activities in a safe manner. Some of the day-to-day activities we always took for granted are our biggest challenges – for example, conducting socially distanced manufacturing lab sessions where instructor proximity is needed for safety reasons.
You received your BS in industrial engineering from Universidad Católica Andres Bello, the oldest, largest Jesuit university in Venezuela. How has your undergraduate Jesuit education prepared you for your current position at Fairfield?
My undergraduate Jesuit education has prepared me not just for my current position but for life. I often mentioned that it took me more than 25 years to connect the dots and realize the profound impact that my Jesuit formation has had on me. Also, a little-known fact is that I am part of a multi-generational, Jesuit-educated family: my father and all my siblings attended and graduated from Jesuit institutions. Now my daughter is also attending one.
With regard to my preparation, I think engineering programs at Jesuit institutions are very special programs. I say this because, in my opinion, the principles of discernment, social justice, and others take a special meaning in our profession. They are also more challenging to incorporate into a very packed, accreditation-constrained, technical curriculum.
Having said that, engineering has had one of the most significant roles in the advancement of human living standards throughout the course of history. From the technologies behind the procurement of clean water from far distances, the power systems that move everything, the electrification of cities, all the way to the ice cube in your drink — that you sip while you open an app on your phone to place a purchase. I firmly believe that graduating engineers with a deep sense and awareness of social and humanitarian issues is paramount to remediating some of them. I have a tremendous amount of faith in these younger generations of engineers who, if equipped with the right tools and armed with the right motivations, will accomplish things we could not even dream of.
What do you see as the biggest advantages to studying engineering at a university with a liberal humanistic approach to education?
I believe that a solid liberal arts foundation is fundamental for engineers, as it is for most other disciplines. In fact, it pains me to see the trend in some other engineering programs around the country to remove liberal arts content and become much more specialized in a technical discipline. While this may maximize short term proficiency, technologies become obsolete within months (if not sooner) and we cannot anticipate the technical preparation that someone might need to tackle problems 10 or 20 years from now. Rather, we can focus on forming the best professional engineers, who in addition to a solid technical education, possess excellent communication and interpersonal skills, are able to solve problems in teams of people from a variety of backgrounds, and have a profound situational awareness and emotional intelligence. Perhaps more importantly, our engineers will be mindful of the larger issues, including social justice, environmental problems, etc. Because of this, our engineers are always poised to become effective leaders everywhere they go. We cannot achieve this unless we have a more holistic approach in the engineering curriculum and that involves a comprehensive liberal arts foundation.
As an industrial/mechanical engineer in an increasingly virtual software-controlled world, how important is hands-on, experiential learning across engineering disciplines?
Experiential learning is crucial in engineering as it has been demonstrated countless times that the longest knowledge retention occurs when performing the activity or, in other words, learning by doing. Furthermore, engineering is based on problem solving and design skills and both are best understood through tactile (in the broadest sense) experiences. At Fairfield Engineering, we pride ourselves on incorporating experiential learning throughout the curriculum through ample laboratory opportunities, hands-on class projects, internship with local industry and other. We also have extracurricular opportunities in which hands-on learning occurs, such as the many clubs (including the Baja racing team, Engineers Without Borders, Biomedical Engineering Society, etc.) international service trips, and our professional development/leadership series. Finally, and because you mentioned computers and software, there are wonderful opportunities to provide experiential learning through these – including digital simulations among others.
Your bio includes an impressive range of engineering scholarship. Can you tell us a bit about any research or other projects you have recently finished or are currently working on?
With my former research group (the 3D Printed Biosurfaces Lab), we just published the results of a study that showed how a very cool 3D-printed complex sphere (that we modeled mathematically to optimize the surface area) could be used as biofilter media to clean wastewater much more efficiently than commercial products. Well, technically speaking, by cleaning wastewater, I mean converting ammonia nitrogen and producing nitrates. It combines many of the basic sciences (biology, chemistry, math) to engineer a better water-processing system – the kind of stuff NASA and the likes might be interested in!
Beyond professional accomplishments, what does Andres Carrano like to do when not on campus?
On a daily basis, I am pretty much a homebody who likes to spend time with my family. I also have two large dogs who take a good chunk of my time. On the hobby side of things, I like to watch European soccer, eat out at the many wonderful ethnic hole-in-the-wall restaurants in the Bridgeport/Fairfield/New Haven area, and love international travel that takes me off the beaten path.
#Andres Leonardo Carrano PhD#Fairfield University School of Engineering#3D Printed Biosurfaces Lab#Jesuit Educated#Universidad Católica#Engineers Without Borders
0 notes
Text
Reflective journal: COVID19
Following the closure of schools as a result of the Corona Virus pandemic, there have certainly been changes regarding what I am now capable of doing. As of right now, I do not own Cinema 4d or Mudbox, or really any of the software I intended to use at college for my final major project. ANd ultimately due to shipping changing as a result of many other countries going into lockdown, it seems unlikely that most materials I intended to buy offline will be able to be shipped. In this time of uncertainty, I can only reflect on my project and aim to find ways to overcome these difficulties and work to the best of my ability regardless of the situation. Under the condition i do not get sick any time soon.
I will work towards finding methods to complete my project to the best of my ability despite these obstacles, even if that means that my initial intention shifts and my project takes a turn towards something else. I will find ways to get the desired software and pray that they run on my small laptop without difficulties and crashing.
I hope to be able to 3D model my piece still, however, I feel as though i will have to minimize the pieces. My initial intention to create a ball-jointed doll may have to change due to the fact that for my project to be completed the way I want it to, I’d have to 3d print the pieces, put it together, run trials of the pieces and then decorate the model, which in the long run, was just a base of the final piece i aimed for.
In the scenario that I am now unable to 3d model, should the software crash my laptop, I can still aim to create the story behind my project and design the character I wanted to model. I am still able to create concept art and character designs and go through my project detailing what I would be making at that point if i had the opportunity. If I am unable to make the model, I can still present plannings for the scenario where I would have been able to.
0 notes
Text
Day 5 - Media Roles - Where’s my Story at? and LAIKA
Based on the presentation that we did on Wednesday, I thought I would continue my research and have a closer look at the story-telling aspect of my chosen roles in regard to my future research as well as look into how those roles operate in those companies that I have chosen to look into much closer in detail. Even though I’ve already had a good grasp of what these companies were about before our presentation, I thought I do some extensive research to the roles I’m most interested in and hopefully will make it more decisive which medium I would like to go into between 3D or Stop-Motion. Whilst I will look at this objective of story-telling, I will also take an interest in the process that these roles are done in the industry and how those elements will fall back on the theme.
Stop-Motion
For the stop-motion aspect of the project, I chose to further look into both the puppet design and puppet animation in both LAIKA and Tippet and how it might relate back to our group theme of story-telling as well as my interest in these roles.
LAIKA

As mentioned before, LAIKA is an Orgon based stop-motion company that utilises both Stop-motion animation as well as visual effects to help create their films as best as possible with the art form as before LAIKA was a thing, there hadn’t been any stop-motion companies that used visual effects as support for their films before due to saving them a lot of time. However having said that, that’s not to say that LAIKA uses visual effects to cut corners as they more so see it as a tool rather than a way of telling the story as almost everything you see in any of their films is all hand-crafted from scratch keeping true to the art form. And even if something is done through visual effects, they take inspiration from constructing a set or puppet and have that scanned into the software which the VFX team can use as a reference to implement it into the film. For the film ‘Missing Link’, they scanned physical model landscapes of an icey mountainous terrain to provide a foundation/template for the scene which was added onto the animation after the scene had been hand-animated. The reason I’m talking a lot about VFX at the moment is because of how much it interests me as whilst we don’t cover it in the course, there’s something about the technicality and it’s potential that really intrigues me as an animator/modeler in stop-motion to help make it that more special. The video below demonstrates what you can do with visual effects in a stop-motion environment as I found it to be really inspiring to watch:
Realizing the Potential for Stop Motion Animation with LAIKA's VFX team
youtube
Going back to the chosen roles I’ve chosen to look at (Animator and Puppet-Maker), LAIKA is very open to talking about how they do things for their films as there are lots of resources to interviews, demonstrations as well as articles going into the very nitty-gritty info to how it’s done. The way that LAIKA animators used to animate originally was through using two people at once to animate a scene at the same time however, this proved to be unproductive at the time as both aniamtors found it to be quite tricky to work together as they would work at different speeds as well as remenbering details that the other person might have not known, not to mention how one would have to wait for the other to finish articuling before taking a frame. Nowadays, it’s just one animator animating a scene at a time which makes things less complicated all together for the person that has to animate the scene. However this dosen’t speed up the process as it in fact actually makes the scene a lot more relaxed for the animator to animate in almost like they have their own playground to mess around in hence why it would take much longer than normal. In the video ‘One Frame of Animatioon’ below, it shows how much is moved and tweaked to achive one frame of animation in the ‘Coraline’. Because fo the video, it’s made me appreciate animating as a stop-motion animator a lot more by the amount of care and pressure that goes into the scene like it and makes it really understanding to how they achivee about 3 seconds of animation per week on a scene like this one.
LAIKA | Coraline | One Frame of Animation
youtube
Another video that I found that showed what it was like to animate as a stop-motion animator at LAIKA was an academy award featureete showing what a typical day is like as an animator. From the video, it was really intresting to see how much of what we’re already doing at university is just the same as if you were to work in a big comapnay as they take visual refrences of themeslves to get an idea of how not only the character will move, but also what kind of rig they’ll need, the clothes for the character or any adjustments need to be done to that character. All of this was really cool to see as so much of what professionals are doing in the industry is things I’m doing now which felt really inspiring with my development in anaimation as well as what I can do to be better.
Credited As: Stop Motion Animator
youtube
https://www.theverge.com/2016/8/18/12500814/laika-studios-behind-the-scenes-kubo-and-the-two-strings-video
https://nofilmschool.com/2016/01/day-life-laika-studios-animator
Having disccussed about the role of a stop-motion anaiamtor at LAIKA, I looked into the role of Puppet-Making where I learnt a lot more than I previosuly knew beforehand. An example of this is how it came to the lip sync of the puppet as the animation done at LAIKA is something called ‘Placement Animation’ which is removing pannels of the face for each of the frames to make it seem like the puppet is talking without the need of special effects for the puppet to talk their dialogue. To make these face pannels for the dialogue, they use a 3D printer to make each face plate showing the basic expressions as well as the most common mouth movements that the character is going to express. This is waht LAIKA had been doing with their faceplates orginally as they created about 20,000 for Coralaine but now with their newest film ‘Missing Link’ instead of the regular predicted faces plates, they 3D-printed every slight bit of movement of the face as it’s own plate to achive the smoothest animation possaible for every scene in the film which in total was 106,000 plates. Whislt this isn’t necessairly directly linked towards the Puppet Making Role and more so rigging, I feel it sets a president to how much dedication and care that is taken place into all the work that goes into these puppets. Not only that, it shows how each department are all problem slovers to the craft as with the case with the face plates to a Puppet Maker, they would have to make sure that the puppet is able to have their faces detached and removed from the character as simple as possiable without it interfearing with the design of the puppet or it’s clothing. In a way, both a puppet maker and a rigger for a stop-motion production have simillar roles as they both have to find ways to make the animtors jobs a whole lot easier when it comes to animating as well as making the scene looking good which has kind of open my mindset that becuase they’re so simillar, it woulden’t matter too much if you were to specilise in one role as there’s similarities in roles that you might of not relaised which your capable of doing. Because of this, I plan to look into rigging in stop-motion as well as looking at it further in a CG envoirment.
Going back to the Model-making and Puppet-making, I watched these videos below going through how LAIKA created their puppets for both ‘Paranorman’ and ‘Kubo and the Two Strings’ which I mostly knew about beforehand (since I’m a really big fan of their work) but there were a couple of techniques that I was unaware of like how they constructed the hair and texture of their puppets. With characters like ‘Monkey’ from ‘Kubo and the two strings’, they were trying to figure out how to create realastic hair onto the puppet that would fit into the art style as well as being able to animate at the same time. The soloution to this was to combine silicon and wire together to give it a short and soft looking texture as well as being posable at the same time. Despite being very strenous to attach all the different pieces of silcon hair upon the puppet (as well as spares in case any break), the pay off is worth it in the end as it presents a really rugged but animal-like character as well as being easy for the animators to move as well due to the material being soft but retaining it’s shape. I like this development a lot as it further shows their problem-solving skills as a puppet maker and how this dicovery was used in the next film ‘Missing Link’ to create Susan’s furry body.
Monkey - Kubo and the Two Strings

Susan - Missing Link

In the video below, it shows the challenges and process of creating the characters in ‘Paranorman’ as it was such a large step up compared to what the puppet makers did for ‘Coraline’ due to how exgagerated the character designs were. Becuase of this, the puppet makers experimented a lot with creating the puppets as for the character ‘Niel’, they wanted to find a way to animate his belly in addtion to his body giving a lot more personality to the character. This is where they experiment using a guitar tunning device to allow them to adjust how far out and in the belly is animated. This to me was really cool to see by using stuff lying around to solve a problem almost like what Phill Tippet does from collecting a bunch of random materils along his life which he feels will be proved useful later. One of the biggest challenges was both creating the larger scale models that were very square in their body or the creation of the hair for every character. The larger character designs were tricky at first due to their enormous size and becuase they were so dense, they would often topple over unless a rig was attached to it which even still made the puppets collapse. Fortunatly, the way they got around this problem was through making the materials lighter to allow the wider puppets to have more freedom in the air as well as still showing their weight in their performance.
For the hair of the characters, they use a combination of real and synthetic hair and also plant fibre’s to make a ruggard but relastic look to the hair as with ‘Niel’s’ hair, they take a couple of orange hair, plant strands and wire and then curl it up into a ball which is then super glueed onto the the characters head creating one chucnk of curly hiar for the character. Like with the silcon texture on ‘Monkey’, this allows the hair to keep it’s shape. For ‘Norman’s’ hair, it worked a little differently as they use goat hair hair and wire together which was then dyed with brown hair dye to create his look. However because his hair was going to be a lot more animated compared to the rest of the characters in the film, they had to maticiously fill in each strand of ‘Norman’s’ head in which the porcess usually takes a week for them to do for one puppet since there’s so many hairs hiding in Norman’s head. Whislt this also sounds really tedious, it makes it all the better seeing it in action which is mainly why I’ve been intrested in the puppet-making role as no matter how small the detail is, it’s so satasifying to see all the parts flow together to complete the character.
One last bit to mention that I really liked in the video was their disscusion on costume design as it referred back to our group theme of story-telling in anaimation as the costume designers would deliberately make Norman’s clothes worn and ragged to show how much he’s used those choes for walking. Whislt this is so minor to see and talk about, I feel it all adds up in the end of expressign the type of character Norman is portrayed in the film as a shy and distant child at the begining of the film and fits into the undead aesthetic.
LAIKA | ParaNorman | Building Characters
youtube
LAIKA | Kubo and the Two Strings | Crafting an Epic https://www.youtube.com/watch?v=Y5DFV_FkOb4
The very final thing that I researched on about LAIKA for this lengthy blog post was this video going through how the characters are rigged in ‘ParaNorman’ and how some of the scenes were made using rigs. One of the rigs that really intrestred me was the zombies scene where thye burst out of their graves from the ground. I found it to be really fascinating by how wire is cleverly hidden away in some of the broken debries as well as the use of using multiple different rigging wires like the use of a back rig for the zombie as he’s crawling out of the ground and another rig in front of him that are the little droplets of spit and not that the zombies give off when they’re moaning out loud. One of my favourite pieces of rigging they used in the scnene were these floor tiles where there are holes made up of plasticine in them as they’re meant to repersent the zombies clawing their way out of the grave and leaving these nasty marks behind. Whislt stop-motion rigging wasn’t one of my chosen roles to look at for the project, I might plan to futher research into it as I really enjoyed how the rigging process operates and how it has some simillarities to both puppet making and also animating as well if I was to pursue with stop-motion even further.
LAIKA | ParaNorman | Rigging the Game
youtube
To conclude, I’m really happy with the extensive research I’ve done on LAIKA as I feel I’ve got a good grasp to how the company operates and functions together to create their jaw-dropping and beautiful stop-motion films. Whilst there were some areas I could of talked a bit further into, I feel like I may of done a bit too much research for one day meaning I may return back to LAIKA if there’s anything specfic that needs looking at again. However, it was really reassuring to see the way they function was really simillar to how we are learning at university as I feel a lot more confident with the ondsutry than I was before. On a final note, one of the reasons I love LAIKA so much is that they always deterimed to overcome any obstacle that’s thrown their way as their philsophy is ‘Never allow the technology dictate what we do’ which is something I would want to stand by when it comes to my work too.
Extra Sources and Media:
https://www.theverge.com/2016/8/18/12500814/laika-studios-behind-the-scenes-kubo-and-the-two-strings-video
https://www.wired.com/2014/09/travis-knight-stop-motion-boxtrolls/
https://www.screendaily.com/features/how-laika-made-ambitious-stop-motion-animation-missing-link/5145578.article
https://www.youtube.com/watch?v=R4AVJvafgNo
https://www.youtube.com/watch?v=Y5DFV_FkOb4
https://www.youtube.com/watch?v=plXmbLAUTRg
Notes I did when researching:
0 notes
Text
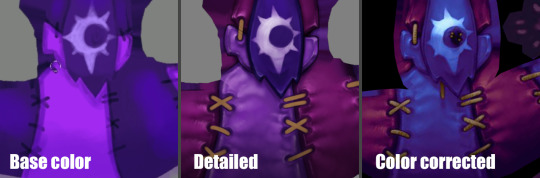
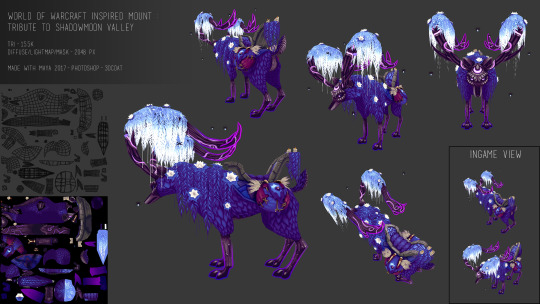
Mount Post-Mortem
Tools Used
First things first, I use pencil and paper to sketch out all of my concepts.
For the modeling part, since I learned to use Maya at school back in 2012, I’ve decided to continue on that way for this project.
Photoshop was a pretty obvious tool choice for me for painting the texture.
During my time working on my project I discovered 3D Coat, and decided to include it in my process since it is super super efficient for uv mapping and texturing.
Finally I used Maya to render some high resolution images of the mount, and then I uploaded the project on Sketchfab.
Complementary tools used :
Huge amount of WoW references : to take inspiration from already existing mounts in the game in order to get closer to Blizzard’s style and to understand how they make textures.
Youtube/CubeBrush : a lot of tutorials about modeling animal anatomy, about painting materials.
ArtStation and Sketchfab 3D-models : to understand better construction of the wire-frame and topology.
Maya plug-in “UV Nightshade” : it could help a lot organizing your uvs in maya.
Process
Concept idea, inspirations and intentions : I have been an avid WoW player for years and am constantly inspired to create artwork based off of the game’s lore. Ever since I started studying game art I’ve always wanted to make assets for World of Warcraft but never took the time or felt ready for it.
This exercise provided me the opportunity to create an asset from concept to final presentation within an art style I have always admired.
In order to create the best concept I could, I took the time to gather images that I could use as references and draw inspiration from. I gathered images of Shadowmoon Valley (vegetation, Draenei and orcs props), about cartoonish fox illustrations and real anatomy sketch of foxes and deers.
After that I made a reference image with my main inspirations :
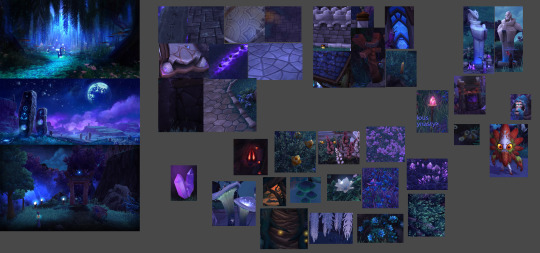
Then I started to sketch a bunch of ideas for the mount, trying to not choose the final design too early. The more iteration you make, the stronger your final choice will be.
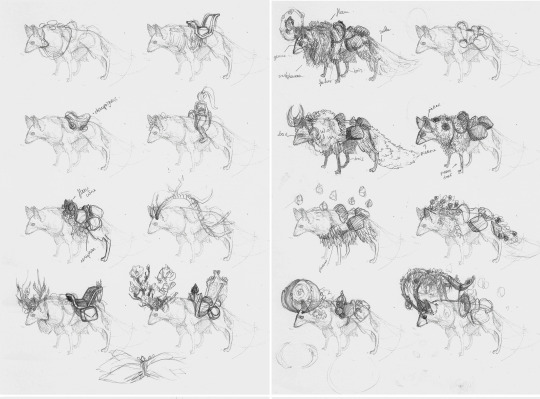
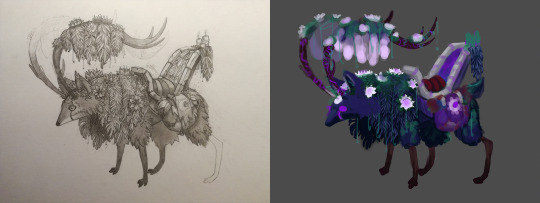
After creating several varied conceptual drawings, I created a more detailed sketch of the chosen drawing, keeping in mind that I could let myself change it if I thought of a better idea afterwards.
After creating the initial sketch, I created a basic colored version to test the composition. I didn’t want to waste time getting bogged down on small details that might change later.
Modeling in 3D : I started by making a block out for the body, and then adding the props on it. I worked on all the pieces a little bit at a time to make sure the proportions matched up well. Watching Youtube tutorials also helped me when creating the body since this was the first time I have modeled something animal related.
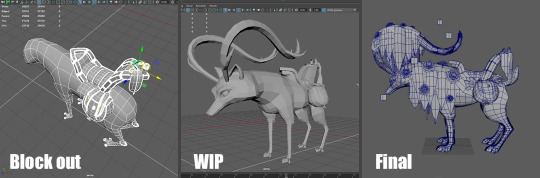
What methodology I will use next time :
Make a block out for the entire project
Check volume/sizing according to your modelsheets or your concept reference,
Add Detail once to every part of the model, but keep an eye on your polycount,
If your polycount allows it, add detail a second time on more important parts of the model.
UVs mapping : UV mapping can often be a long and drawn out process for some people. After some testing, I found that using 3D Coat’s UV unwrap tools was definitely the easiest method to use. I switched between 3D Coat and Maya’s UVs editor while painting the texture. At this time I also decided to add the halo part on the horns and the legs (last minute idea).

Texturing : The texturing process was a little messy for this project. I spent too much time focusing on the color and details of individual props instead of the harmony of the entire model. After a few missteps I was able to find a process that worked well and completed the texturing. Even after the model completion, I was able to gather the feedback that I had received online so that the next model I create will be even better.
What methodology I will use next time :
Make a greyscaled base,
Insert details (still in greyscale) and check the contrasts,
Add the ambient occlusion,
Add color gradient layers for every distinct materials in the texture,
Add details as beams of lights and reflection on metal material.
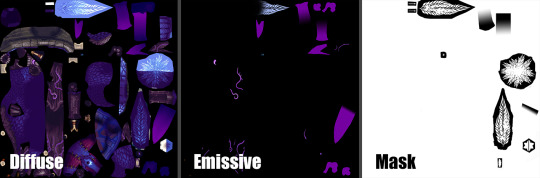
Rendering and exporting to Sketchfab : Considering the mount is shadeless (because the lighting and shadow information is painted in the texture), it was pretty quick to set the render up in Maya and in Sketchfab . The final model has the following textures :
I made a kind of a turn-over thing in Maya in order to have high resolution images of it for my portfolio. Since there were no light and the texture was 2K px, they were quick to do.
Sketchfab viewer link :
https://sketchfab.com/models/0f7d31106f4f44ecb01b04bbd750d811
What went right ?
The final result looks quite well like what I had in mind at the very beginning, even if I changed/added a lot of things along the way.
I was able to get pretty close to the style used in WoW and have high hopes that I will get even closer in future projects.
Since I didn’t give myself a deadline on this project, I can’t say I failed at timing, even if I think this project took me a LOT of time (about few month on it). But regarding the fact that I almost started from scratch (on a knowledge and technique aspect) and that I had to re-learn a lot of thing through the way, it was normal for me to take that much time.
What could have gone better ?
This project was the very first personal work/concept I’ve done after 4 years break, so I forgot a lot about technique, shortcuts and methodology like I said earlier. So in consequence there is a lot of stuff I could have done better/quicker, here are the main stuff that made the journey longer and harder to me :
Time management : at first I was splitting my time between several projects, so I worked only few hours per day on the mount, I think this distract me a little. Sometimes it is better to focus on one thing to be more efficient. I also went back and edited several assets after watching tutorials, which cost me additional time.
Methodology : That is the big black spot in that project, like I said, I forgot a lot about methodology and how to start a project. So it made me lose time on almost every step of the project.
Conclusion and Closing Remarks
This project was a big jump into questioning my skill level, knowledge (or at least what I remembered from school) and capacity to keep going despite the difficulties.
It was a huge learning/re-learning experience and even if there was mixed feelings along the way, and even if at the end there is a lot of aspects about this mount that could be perfected, it was a successful experience for me.
Why ? :
I got back into my habits in Maya. I even learned new shortcuts I didn’t know back at school. Being comfortable with your software is essential.
I learned to use new software which simplified my life so much and will on future projects.
It forced me to search for new techniques of painting and I now understand better how to make textures quicker and more efficiently.
It helped me trust my instincts and taught me that sometimes not all advice is good to follow, and to trust a little more what I’ve learned in school even if this knowledge might be considered old-fashioned now.
It allowed me to meet generous people in the art community, who gave me encouragement, feedback, tips and helped me get through it.
Thanks to all the folks that helped me, followed me, watched my streams along the journey that this project was. I hope this post will encourage some of you to keep going if you encounter difficulties achieving your goal.
The harder, the better the result will be ! Or at least you’ll learn something from it.
Images /Tutorials /Artist I used as references :
Ashleigh Warner’s work on Warlords of Draenor - https://www.artstation.com/artist/ashdoodles
Coloring with gradiant maps by Marc Brunet - https://youtu.be/wUeQsUJTz8I
Model a dog by Jeff Slominsky - https://youtu.be/j5aFJzn-ZYQ
My Pinterest board : https://fr.pinterest.com/mhagnusgame/p-vall%C3%A9e-dombrelune/
You can follow me on and see more of my work on :
Twitter : https://twitter.com/MhagnusGame
Instagram : https://www.instagram.com/mhagnus_pauline/
ArtStation : https://www.artstation.com/artist/paulinep
DeviantArt : http://thegreenchick.deviantart.com/
Sketchfab : https://sketchfab.com/PaulinePouchtajevitch#
2 notes
·
View notes
Text
The innovation of 3d movement
The object appears in a 3-dimensional space and which can be rotated and moved in a different way looks like the real objects. It is also considered to be as the heart of the games and the virtual reality. It can also be used in the PowerPoint presentation to add some lair to the visuals.
In spite of the fact that movement has been with us for up to a couple of decades now, the idea of liveliness still appears to be essentially enchanted to the layman. 'How would you make illustrations wake up on screen?' is the thing that they normally inquire. With the innovation of 3D movement innovation, the idea of activity turns out to be considerably progressively foggy and magical to the layman. Despite everything they allude to 3D activity as 'drawing' and know not a thing about the procedure that goes on behind the 3D movement
As the proprietor of a 3D movement studio, I feel that it is critical to teach our customers on what goes on behind 3D liveliness creation. The information won't simply enable them to welcome the administration better, yet in addition, encourages the procedure of joint effort and deal with their desires. This is essential since it enables our customers to accomplish what they need and enables us to discuss viable with them.
Difference:
The principal idea you should get a handle on is that 3D implies 3 dimensional and 2D implies 2 dimensional. Presently before you believe I'm expressing the self-evident; let me proceed to state that the 3D and 2D in movement allude to the measurement in which the liveliness was made.
For 2D movement, everything occurs on a 2-dimensional stage. Pictures are level, without profundity and offer just a single point of view. Items and characters are normally drawn without the inconspicuous delicate shadows we find, in actuality, and hues have few shifting shades.
In the 3D activity, everything occurs on a 3-dimensional stage. Pictures have profundity and offer numerous points of view simply like, in actuality, and have delicate unpretentious shadows thrown on the articles and characters inside.
In 2D, characters look silly and unlikely. In 3D, characters can look silly however practical in the meantime.
3D Animation Syllabus:
· Module 1
1. Basic Hardware Introduction & Tips on system configuration
2. Fundamentals of Visual Arts
3. Basic elements of Drawing
4. Fundamental Perspective
5. Anatomy Concept
6. Animation concept
7. 7. Scriptwriting
8. Storyboard
· Module II
1. Training on Computer Graphics
2. Details study on computer graphic
3. Photoshop
· Training on 3D Production
1. Introduction of 3D software interface
2. Start with basic modeling
3. A different process of 3D modeling
4. High resolution modeling concept
5. Low resolution modeling concept
6. Organic & Inorganic Modeling
7. High resolution texturing technique
8. Low resolution texturing technique
9. Basic Lighting concept
10. Advanced lighting
11. Basic Rendering Concept
12. Start with Basic Rigging
13. Advanced Rigging
14. Start with Basic Rigging
15. Advanced Animation
16. Advance rendering
17. Dynamics
18. Dynamics with Cloth
19. Hair & Fur
0 notes
Text
Evaluation
In this project, I had to assume a great deal of responsibility as I was working for a client and I had to meet their expectations. To accomplish the work I had to manage my time by creating a plan and setting my own deadlines. Creating and following a pipeline and making the right decisions when encountering obstacles has allowed me to complete all of my tasks on time.
Even though there was a set pipeline to follow, a lot of experimentation was involved during the project which led me to discover new ways to do things in a more efficient way.
My contributions to the group where mostly at the pre-production stage where we all contributed with ideas for the characters, aesthetics and mechanics of the game. The rest of the year, I mostly worked together with Maariyah to give each other feedback and support regarding the 3D character models.
I modelled a total of eleven game-ready characters, four main characters and seven enemies, as well as two prototypes which are no longer implemented in the game. I took part in designing some of the characters that I modelled and used Catarina’s concept art when possible.
My initial plan was to animate half of the characters but it was time-consuming for me as rigging and animating is not something I excel at, but a necessity for the group project. I was worried about not having enough time to create the rest of the characters so I discussed the issue with Maariyah. Realising that she was struggling with the modelling and texturing stage, we decided to exchange tasks as she excels at rigging and animating. This decision was very important as we were falling behind schedule and it allowed us to catch up and finish all the required characters.
The requirements that we had set at the beginning for the models were the tris count under 1K, the texture maps limited to 512x512 and the use of only diffuse maps containing the light information painted in. By setting low parameters, we ensured that the game was running smoothly and that the textures still looked good from the camera’s perspective.
My time management and planning went well allowing me to reach my milestone of creating roughly two characters per month, excluding the time off for Christmas break. Exchanging task with Maariyah worked to our advantage as it facilitated both of our tasks and the completion of them as scheduled.
Despite the fact that we didn’t physically meet up, the team communication on Discord was excellent. Work in progress images were continuously posted on the chat and we were able to give and receive instant feedback.
One of my biggest mistakes, which I wasn’t aware of until I finished working on the last model, was not triangulating the mesh before exporting it to texture it. As I was using two different programs for modelling and texturing, the engines were calculating the geometry differently.
In order to solve how the texture was displayed, I manually used the knife tool to triangulate the problematic quads myself, which was a quick fix. In the future when the model is finished, I will have to triangulate before exporting it to avoid getting unwanted results in the texture. Blender has a modifier to triangulate the model which can be turned off and on. The model will only triangulate when exporting it which would avoid any wrong interpretation of the model by Substance Painter. This could be very useful because if I need to tweak the geometry after texturing for whatever reason, I would still be able to continue working with quads, as they are easier to work with and add resolution if needed.
When the models were implemented in the game, the size relationship between them was not accurate. For example, Amanda Panda was bigger than Rhino, which was bigger than the Bulldozer (the final boss for the forest level). It’s understandable that the programmers didn’t know which size they should scale it to as we didn’t provide any information. Whenever we had the chance to work together in the lectures we would try to scale the characters so they looked more believable in relation to each other. In the future, it would be helpful to assign a specific height to each character so a height chart where we can compare and decide how they look all together in comparison would be ideal.
The character artists didn’t have access to the Unity Project due to the limited people that can access the same project for free. It was not a major issue but we weren’t able to test how the models looked inside the engine or if the animations were playing as they were supposed to. We should have continued pushing with the idea of getting Unity Collaborator to the clients so that at least one of the character artists could access and tweak the models inside the engine. Another solution for this could have been meeting on a more regular basis to work together and ensure everything looked as it should.
We couldn’t get the consistency of the main characters to match perfectly. I was basing my designs from my research from models of other games whereas Maariyah was following with fidelity the original characters of Prime8. This didn’t go well as there was a big contrast between the character styles. Having two different artists working on the same thing also had an impact as our models didn’t look exactly the same. Maariyah didn’t have any previous experience in retopology, UV unwrapping and texturing whereas I already had some experience. Maariyah did an incredible job of learning so fast in all of these stages of production, which are extremely complex to master, and we were able to hit the milestones as planned. to hit the milestones that we had planned.
We should have thought through the task distribution better and instead of dividing the main characters and enemies equally, we should have assigned one person to create the main characters and the other, the enemies. This would have kept the consistency in the art style of all the main characters and it wouldn’t have been a problem if they looked different from the enemies.
Using ZBrush to exclusively model the high poly versions of the characters worked out as they are more organic and the detail can be transferred to the low poly when baking the maps. Time was our only enemy, as sculpting in this software is not a quick process.
I decided to experiment with a new pipeline for my last model, Betsy Beluga. I created the base mesh in Blender, then exported it to ZBrush and subdivided the times I needed to create detail. Starting off with a clean base not only saved me time in the sculpting process but prevented me from having to do retopology which is also time-consuming. I will be using this new pipeline in the future as it saved me a lot of time and headaches.
I constantly experimented with the baked maps and Photoshop to create a nice base for the diffuse map. It was a challenge as I couldn’t find any resources online that explained how to get a base for a handpainted model from baking the maps of the high poly.
I only managed to get it right on the last model, Betsy Beluga, where I began to understand that I should only extract one colour channel from the maps as each map stored different lighting information.
There was a lot of pressure as the client’s request was to create a few levels with many of their characters. For this reason, I had to sacrifice quality over quantity. The academic brief was asking for just a game prototype and we were too ambitious in making a polished game.
It was a challenge to redesign the main characters as I had to create a more stylized version that would work with the aesthetics of the game and the perspective of the camera, without moving too far from the original design. Looking back at the characters, there are some proportion issues in some of them. For example, it would have worked better if the limbs had been a bit chunkier on some models.
In the future, I want to be able to invest more time in the process of modelling and texturing as well as the design of the characters. I believe that quality is more important even if it requires pushing the deadline further to create a more polished character instead of creating more which are not at a professional level.
In conclusion, I have learned to create handpainted game-ready models with an efficient pipeline. By experimenting, I discovered a way of getting a good base for the diffuse map by transferring the details and light information from the normal, space normals and ambient occlusion maps.
Time management and planning was a key factor that helped to successfully reach my milestones on time. Due to the high number of assets I had to create, I rushed all of the tasks instead of investing the necessary time to create good designs and models.
Working in a team was a good experience as we helped each other by providing feedback and exchanging tasks in order to make more progress and avoid stress.
0 notes
Text
Reflective Piece
Animation is a widespread term that transcends all barriers. It branches out into all areas of industry, from cartoons to simple animations to high class advertising, a few of which I wasn’t initially aware of. I started out with no real knowledge of where I wanted to go and looking into companies didn’t interest me due to me not knowing the vast amount that are out there, only really knowing of the biggest names. A few of which are Disney and Pixar. Even after looking into companies I wasn’t really inspired to push myself into the deep end. I was enjoying what I was learning but the prospect of going out into the world of work was terrifying. The turning point for me was when I saw the guest speakers come in and talk about where they work, what they do and what they have accomplished. Seeing them right in front of me made all of this real, not some pipe dream, and solidified the fact that it is possible to succeed in what you want to accomplish. This led me to research into the industry and think along the lines of generalising in 3D while still dabbling in other areas to keep my options open.
Out of all the guest speakers to come in and talk, the two from TBA (Time Based Arts) stood out the most to me. They gave us concise insight into the animation process, what they had produced and their achievements. This presentation really stood out and excited me. The work they have done was varied and they showed the stages of progression (from runners to a different department) and how despite not being a massive company, they had produced award winning work and have very well known brands as clientele such as Nike. After the presentation I approached the speakers, Sam and Will, and got in contact to see if they were able to offer any form of work experience and I managed to talk to Tom, an executive producer, and was invited to have a tour of the company building in person. I got to see the working environment and saw a multitude of people working efficiently. They are currently structuring some work experience/an internship for the summer and if I can manage to get a place on it, which I am hoping to obtain, I would be able to increase my skills in software I currently use and maybe even new software that I may not have experience with. I would also be able to build more connections with people currently working there and have contacts for the future.
Being confident was never my strong suit. The ability to communicate with others, whether in a team or reaching out to individuals, was a concern of mine. Branching out and networking with people and or companies is a must in the creative industry because the more people who know who you are and what you can do could be invaluable to your career and present opportunities. Previous experiences, for example a sales job I had last summer, forced me into situations where I had to communicate with people I didn’t know day in and day out and it really helped me learn how to converse successfully in a variety of situations and push myself to be more approachable. The experience was very beneficial to my confidence, it allowed me to be less inhibited when reaching out to people and as a result I have managed to make contacts in the animation industry which I never thought I would achieve.
Branding myself took a lot of careful thinking, due to me having trouble figuring out who I am as a creator and judging my work as many people do. Making a logo or designing something for someone else is more simple to me, as they tell you what they want, and you have an outside perspective on what they can do. So I did the opposite and asked my peers for their perspective on me and my work so I could get a good balance of what people already knew of me and what I personally want to be seen as. I knew before I researched that I would apt for a logo rather than just using typography or a monogram, I wanted to have a symbol that was unique to me. As I discovered that I wanted to do more 3D based work, I developed it so it would show that. I am pleased with how I'm presenting myself as I feel it is representative of me at this point in time, and I expect that in the future there will be some brand changes as I grow as a brand and artist.
When it comes to my style of animation, I used to be prefer motion graphics as I found it relatively easier to use and the outcome was aesthetically pleasing to me. Using 3D software like Autodesk Maya wasn’t my best asset because it required more patience and for me to be able to project my ideas into an unlimited space. Yet I find that the more trying the experience, the more I learn, develop and grow and ultimately, the better the outcome most of the time. Using Maya and experimenting with 3D software more often made me realise that I had to make mistakes often and learn from them and while challenging, I was producing work I was proud of.
Showing off my work can be challenging because I am very critical of myself. When it was time for me to make my showreel, I had to brainstorm how to arrange the best of my work, it had to flow well and be consistent. At first when compiling clips, I was just putting them together with no real thought behind them and it wasn’t very organised and that is not the way I want to present myself to people. Going back to the work I had produced in previous modules, I looked at what demonstrated the skills I wanted to show and since I want to largely be seen as a 3D generalist I used my animation performance, character models and games world. The animation performance shows that I have the ability to model, rig and animate a character with realistic weight. My character models show I know how to apply a level of complexity when it comes to modelling and to have a still figure convey emotion. And my game level demonstrates a unique perspective on an artist and I know how to navigate a different piece of software. I can also show my 2D animator side by using a rotoscope I created in my own time, this shows that I can be more diverse, produce more than 3D if necessary and push myself to do more than what is required.
Having an online presence is something that I feel is very beneficial, whether it’s LinkedIn, Instagram or having a website, to have something that shows off your work will allow you to build up a following and have people in different areas of the industry be able to explore who I am as an individual. On my website I have included my best projects and my showreel is on the front page, to give people an overall outlook on what I do. If I were choosing to be a freelancer then this would be particularly important. Although I am not currently aiming to go into that field of work, it would be useful to build connections now if I choose to follow that career path in the future.
Whether online or in a studio, I know that I am expected to keep the ethics of the workplace in mind. How you present yourself is very important to clients and co-workers, if you are disrespectful then you will not have a strong foundation for building relationships and lead to deadlines being disrupted. Being conscientious of time is very important, and displays a lack of respect to the company you are working for and with. If I find myself one day working in a company where they change their ethical views, for profit or otherwise, I may seek out other jobs if it makes me or others feel discriminated against.
Labelling myself as a 3D generalist and an animator, I believe, will be beneficial to me at this point in my life. Keeping my options open for opportunities that may present themselves is an important part of life, closing off options could prevent me from finding a job or a skill that I could utilise or even specialise in at some point in the future. You can never stop learning new skills and I don’t want to limit myself to one area. Even more so at this point when I haven’t established myself enough to feel comfortable doing so, when I feel I can accomplish and develop more.
0 notes
Text
Apple and the aggressive rollout of its iPhone XS vision for the future
Last year, Apple introduced a 'revolutionary' new iPhone X as if it were a futuristic concept car-- alongside the more typical, incremental advancements of iPhone 8. The new X was intended to show off Apple's vision for the future of mobile devices. This year, that future arrived and expanded to become the new normal, fully exploiting Apple's lead with the front-facing 3D TrueDepth camera. Apple's unique ability to sell new technology Over the past year, Apple's big investment in front-facing depth sensing camera technology has paid off in record profitability. The components and technology Apple pieced together in a series of acquisitions resulted in the TrueDepth array of sensors and support for facial tracking and Augmented Reality in iOS. These were successfully packaged as key sellers of iPhone X. Rather than just being presented as potentially-usable new hardware the same way Google mused that its new Pixel 2 silicon would someday do some new magic stuff that it never actually did, Apple's new iPhone X tech is used in computational photography featuring AR overlays of studio-like Portrait Selfie enhancements, facial tracking in Animoji and Memoji avatars as well as gaze detection, as well as Face ID secure biometrics for phone unlocking and approving app purchases and Apple Pay transactions. Buyers understood what they were laying down money for. It wasn't credulity in a promise or a gamble on a new device like Andy Rubin's Essential. The iPhone X legitimately offered features that could be demonstrated in an Apple Store and used immediately after buying one. And, a year later, it could be assumed that Apple would develop and release more new features in iOS 12, then more in iOS 13, because Apple supports its hardware for years -- unlike Windows Phone, Android or any other mobile platform. Apple's ability to take raw technologies (formerly picked up and experimented with by others, including Microsoft's Kinect and Google's Tango), find realistic, valuable and salable applications for them, and then build and develop these into shipping products at prices that large audiences rush to adopt-- is wildly unappreciated. Rather than seeing value in Apple's ability to turn hay into gold (as it has done with HDR, Siri, Touch ID, Beats and many other acquisitions), critics have compared Apple's series of home runs to a movie studio at risk of releasing a flop film. Just prior to Apple's latest product introductions, CNBC republished its worn out rag-feature of "previous Apple flops," for which it had to go back to the dawn of computing in 1980 for the Apple III, the 1983 Lisa, and the obscure Mac TV, a half-launched product from 24 years ago. When Google tries to imitate Apple's launches for its Pixel-branded products, nobody can go back to its non-existent history in the 1980s to enumerate things that didn't sell. But they don't have to. Over the past decade, every Google Nexus and Pixel device has been a disaster that has had no discernible impact on the market. That includes last year's Pixel 2, a mega flop that was fawned over by the media despite claiming little more than me-too features from the previous year's iPhone, offered at a price that nobody in Android-land was going to be able to afford. Yet despite introducing a series of significant revolutionary advancements to how people use smartphones, Apple has been hounded for not being "revolutionary" in an industry that effectively does little more than scramble to copy Apple's innovations. That's not to say that Apple is the first to introduce new ideas. In fact, Apple is often not the first (as I have often previously detailed). It is, rather, the first to successfully implement technology in a way people will pay for. And that's why Samsung, Google and other Android licensees seek to copy Apple so stridently. Their own novel ideas have not successfully sold, while Apple's have. It's therefore interesting to take a look at how Apple has rolled out new tech to see why it has been successful, in contrast to its rivals. Think, for example, of early Android fingerprint sensors, Android phones with 3D displays, Google Pay NFC, flawed face-image recognition, curved displays and a variety of other technologies that were either badly rolled out, poorly implemented or dubious to begin with. One way Apple has uniquely introduced new tech successfully involves its secrecy as a company. For iPhone X, Apple developed many of its technologies in total secrecy to the point of being finished in offering narrowly defined applications, rather than introducing a wide range of only partially finished capabilities with unclear value. There is no iPhone 9 There are a few different ways to introduce a major new shift in technology. Back in 1997 when Steve Jobs was working to modernize the Mac's operating system using advanced NeXT software, Apple announced its plans for a future "Mac OS X" at a time when it was only offering MacOS 7.6. In between, it introduced two major updates of the status quo (branded as Mac OS 8 and 9) before launching its new product under the X branding-- four long years later in 2001. It took several more years for Mac OS X to become the mainstream Mac experience. Mac OS X eventually became Apple's most important platform, and paved the way for iOS. But its arduous deployment took a long time to arrive. Fortunately, Apple's primary competitors were not ready. Today, Apple's far greater resources have made it much more competitive in rolling out updates rapidly, as time-to-market has increasingly become more important. The tech world has similarly been asked to wait many years for updates from other companies. At the end of 2006, Microsoft finally shipped Windows Vista 6.0, which had been stuck in a vapor limbo for much longer-- more than a half decade after Bill Gates initially outlined promises for advanced new "Longhorn" features (most of which never materialized) in 2001. Many years later, Microsoft was still struggling to get legacy Windows XP users to adopt Windows 6.x, which it incrementally released under the marketing brands Windows 7 and Windows 8. In 2015, Microsoft skipped over "Windows 9" to introduce Windows 10 (which it also internally incremented to the 'Windows 10.0' version), finally catching up to Apple numerically after fifteen years of being negatively compared against Apple's Mac OS X. This year, Apple has also skipped an "iPhone 9" generation, but under different circumstances. Rather than just announcing plans for a future new "X" platform in iPhones, Apple did the work in advance in secret, then released it to the surprise of its audience last year at its first Event held at the new Steve Jobs theater at Apple Park. Calling the new iPhone X its "vision for the future of iPhone," Apple's chief executive Tim Cook detailed its new support for Face ID using a radical new 3D-sensing TrueDepth front facing camera system that also enabled face structure sensing, as well as an all-new hardware design featuring an edge-to-edge OLED design, with rounded corners and a notch never seen before in a commercial product. Many of its new features (including induction charging and its advanced A11 Bionic processor with Neural Net silicon, a new Apple GPU, and advanced memory controller) were also shared with the more conventional iPhone 8 line introduced at the same time. This suggested that Apple might continue to advance the two iPhone forks, introducing both a conventional iPhone 9 and a new iPhone 10+ this year. Instead, Apple doubled down on its iPhone X advances, creating a faster, enhanced "S" model and a larger "S Max" version. And rather than continuing the past, it locked older iPhones designs in place and introduced a new, entry level X model at a lower price using an LCD screen and an aluminum frame-- at a price similar to iPhone 8. Rather than another pre-X model 9, Apple released iPhone XR. Incidentally, note that Apple didn't ever release a 7S or 8S; by skipping the 9 (and 9S!), Apple now has reached "X" faster than Samsung, which had been incrementing its Galaxy lineup version every year, rather than following Apple's tick-tock cadence with in-between S models. Note that Apple didn't just reach X, it's now sitting on a portfolio of X models: XR, XS and XS Max. This is just marketing, of course. Despite badgering, iPhone X took the world by storm, forcing Android to attempt to copy it A year ago, critics (essentially everyone) pounced on its $999 entry price, wondering aloud who would pay $1000 for a cell phone. Never mind that millions of people were already paying that much for more expensive versions of iPhone 7 Plus, or that iPhone wasn't just a cell phone but also the primary personal computer for millions of people, as well as their primary camera and their personal entertainment system. Ten years ago, the $999 price of iPhone X would not have bought a state of the art camera, a pocketable computer, a personal audio player, portable TV and a cellular phone, let alone paid for any of the new key features of iPhone X. Add in inflation and last year's iPhone X price tag would barely have bought the original iPhone and used iPod in 2007, or not quite an entry-level Mac in 2000. But, pundits were desperate to make up some new reason why Apple's latest strategy was dangerously teetering on the brink of failure after spending so many years clownishly trotting out their old nag about how the company "couldn't innovate" in an industry where the only remaining competitor was a range of Android clones that were all as exciting as eggshell grey, with an ASP plummeting faster than Android Tablets or Windows PCs. And so they targeted iPhone X as "breathtakingly expensive," setting up the logical expectation that sales would shift to cheaper models. That's the exact opposite of what happened. Apple itself introduced its cheapest iPhone ever, the enhanced SE, which attracted so little attention that the company discontinued it this year. Apple's attractively priced, older generation iPhone 7 was also outsold by iPhone X. And even iPhone 8, which was both less expensive and performed virtually the same (making it very attractive to commercial fleet buyers in the enterprise who naturally were conservatively hesitant to rush out support for the brand-new Face ID on an expensive new model) couldn't outsell iPhone X globally. Rather than being relegated into a niche "concept" tier alongside high-end Sony phones or other experimental or halo devices (including Apple's own "Edition" Watch models), iPhone X remained the best selling smartphone throughout its entire first year on the market, establishing Apple's ostensibly risky move as being incredibly gutsy and enormously profitable. After a wave of criticism and snark from competitors and their supporters, the entire Android ecosystem lined up to copy-- at least superficially-- the "notched" design of iPhone X, hoping that customers wouldn't notice that their screens didn't really fit into the corners, that their front facing camera didn't really work similarly, and that their Android OS didn't really handle memory well. Apple is all in on X Apple now has a much wider array of iPhone X models, stretching across a much broader price range (from the XR's $750 entry price to the most expensive XS Max model that looks to be priced at something like $1300 or more). There's likely to be a lot of new interest in the colorful, cheaper iPhone XR, an iPhone X with a more approachable price tag. However, many of holdouts who waited to buy an iPhone X this last year were iPhone 6 through iPhone 8 Plus users interested in a larger display. They're used to paying a premium for a big phone. That suggests that a significant amount of pent up demand will focus on the even-more-expensive XS Max, potentially lifting Apple's overall ASP even higher, if not simply keeping it in check at its already incredibly high point, far above what any other cellphone maker can find demand at. Regardless of the specific product mix (which Apple will not reveal for competitive reasons), Apple is now in the position of using its most advanced iPhone X product group to both increase unit sales with a cheaper model that's less expensive to build, and to tempt buyers upward into more expensive models (including the new Max and the new 512GB capacity tier, newly supported by the A12 Bionic storage controller). And for all of the analyst conjecture that suggested Apple was certain to have to backtrack to Touch ID and somehow fit a fingerprint sensor in its new X model, it's clear that Apple's original story was accurate and analysts were wrong. Apple's iPhone roadmap is moving in one, solid direction, not advancing in parallel lines with an incremented "Classic" model lacking primary features of the future of the iPhone platform. That's an even more aggressive shift to the future than what occured with previous shifts, such as how Lightning took years to replace the old Dock Connector across Apple's product line, or how iPhone 5 was carried ahead in various colors but lacking Touch ID or the 64-bit A7 chip on iPhone 5c in 2012, or how the last major design revolution in iPhone 6 was accompanied by a more compact iPhone 5s and then the iPhone SE model for four years. Killing the phony story of iPhone X pricing and demand Over the past year, specific, high-profile journalists at the Wall Street Journal, Nikkei, and Bloomberg composed multiple and parallel false stories that claimed that Apple's new iPhone X didn't offer enough new "innovations" to interest buyers and was far too expensive to sell in meaningful quantities -- the total opposite of reality. They put their reputations on the line to rush out a story that might have been true, if their logic had been founded in reality rather than just invented conjecture. These weren't simply analysts spewing out made-up ideas hoping that some of their thoughts would end up looking intelligent after the fact. These were reporters who falsely portrayed their writing as factual, professional journalism-- reporting, not invention. To the surprise of many, they were totally wrong, as iPhone X left the gate outselling Apple's other, more affordable models (including the similarly fast and wirelessly-functional iPhone 8 and the much cheaper, year old iPhone 7, as well as the cheapest-ever iPhone SE). However, after the initial holiday quarter, writers at those papers continued printing stories that suggested they'd done some research or observation into iPhone X sales and found problems with ongoing demand. They also created reports suggesting evidence that Apple was slashing production of iPhone X, creating waves they claimed to have observed among Apple's suppliers. But, those reports were false. And they were repeated anyway. They were not accidents or mistakes. They were false, and they appeared malicious, not mistaken. Rather than reporting what was actually happening based on facts and research, these establishments were simply concocting tales of what they hoped -- or perhaps guessed -- might happen based on nonsense and whispers. None of these people acknowledged these false reports. The reporting of the Wall Street Journal, Nikkei, and Bloomberg can no longer be trusted to be accurate, impartial and honest, particularly when they attack Apple and report on what they imply are facts ascertained from Apple's supply chain. They could not have been more wrong, and have still not explained why they published garbage-whimsy as factual data sourced from people supposedly "familiar" with what was actually happening. If these writers held any other job and made a mistake of this magnitude, over and over, they would have been fired as incompetent. They kept forwarding a story quarter after quarter as it was proven wrong publicly over and over, maintaining all the while that they had some special insight or access into the industry they they clearly didn't have at all. This year, as Apple gears up to unleash its second generation of iPhone X models, the hyper-scrutiny of its unit mix and the contrived supply chain mumbo-jumbo of analysts and these disgraced journalists should have even less impact on the perception of Apple's business. It increasingly doesn't matter what Android proponents argue and insist. Apple has never had more market power and clout to deliver the future of technology. And Android has never been more boring. https://goo.gl/oxCSPW
0 notes
Text
1970's Style
In 1945 Elliot as well as Ruth Handler formed a collaboration with Harold Matson to produce picture frameworks. Whether the gamer is sniping from a remote cliff, going home to house with a shotgun or merely hiding in the brush, the number of survivors will unavoidably tick down as heaven circle presses them right into a spot like a gigantic garbage compactor of problem. Fashion photographer Nick Knight and also fashion film specialist Ruth Hogben have actually been leaders in the electronic movie manufacturing globe developing style films for ShowStudio. Fashion doesn't constantly come very easy for some people yet it truly is simpler than you could believe. There are various Oriental bodies which are doing some outstanding work in the style scene like the Seoul Fashion Centre and the Korean Style Association. It was the moment when people having high disposable income in Korea began to invest it on fashion purchasing. It is not simply sartorial style however also music subcultures that are particularly susceptible to the massification process. Marta Marques as well as Paulo Almeida met at Fashion School in Portugal, graduated in 2007 as well as relocated to London in 2009. Nonetheless, if you blend them with the wrong sorts of clothing, you wind up appearing like a bag woman or a bum, so be fashion aware. Most fashion fans know that Prada was a family organisation which was produced by Mario Prada, its bags are incredibly popular around the globe. There creative options typically influence the fashion choices that famous females make. As the innovation grows, the 3D printers will become more easily accessible to developers as well as ultimately consumers, which could possibly shape the fashion business completely. The suggestion is to have a flexible collection that permits you to try new looks, as well as yes, there are no policies any longer - just go with the flow, and also if you require help, check for style looks online. A design article from Viva La Diva with purchasing pointers and also style recommendations on the current shoes patterns for spring and just how you can use them. If you ever questioned where the very best fashion design college was, you should question no more. Abloh alone has 1.6 million), and Mr. Abloh received the Urban Luxe honor at the British Fashion Awards last year. So you ought to now see that you can be the next large thing in the world of fashion. So, if you are in the process of enrolling right into a fashion design institution anytime quickly, why not have an edge over the other new beginners by beginning to make use of clothing design software. Trendy and creative after that style designing is the aurum-optics.de best career option for you if you are imaginative. Because they are the web link in between developers as well as the public, Fashion marketing professionals play a vital duty within the style industry. There are a variety of art institutions as well as design schools that offer degrees in vogue creating. Klif Fashion Residence resolves guaranteeing its clients' needs are effectively dealt with. It's not an unfavorable thing to appreciate fashion symbols as well as the trends they made popular. A haute couture college will certainly show the basics of design, attracting to scale, textiles, materials, stitching, as well as production. They let trends of style dictate exactly what need to be put on within a details time frame because people trust their current society. The difference below is that from its usage" it is now liked by people as a style statement. The development in the area of digital photography transformed the functioning manner of the Fashion illustrators. The silk paths offers the significant evidence for a magnificent Eastern style long in the past. According to one report, solar panels have the ability to please 85% energy demand of your residence as well as this impressive figure is just fantastic for the environment. For your convenience we now supply a cost-free concierge service pack developed to make your Klif Fashion Residence buying experience totally hassle-free. Kickstarter is among minority project websites that permits fashion designers to obtain a campaign started to money their brand-new fashion industry. Technical facets like fashion art, aspects of layout, pattern production, surface area embellishment, curtaining textile, garments construction and fashion picture are instructed and practiced in the reference training courses of designing. You just develop their houses, save your game as well as drive residence to a residence you never actually get to see. As crucial as the bag, if the Style fads of 2011 spring summertime: the ankle boots you will certainly use did not exist, it would have to developed! This boom in the fashion has actually given several designer a chance to reveal their talent on the planet arena. Besides the above mentioned professions in the garment industry, there are still several various other possibilities like digital photographer, outfit developer and catalog/ fashion show models, and so on This could aid you out by providing you a concept of exactly what specific fashion remains in presently. It includes every little thing you will certainly obtain by participating in a fashion retailing university, yet further you need to develop this fad adding your very own good taste in garments. Despite the fact that they really did not intend that significance of words, I do seem like I obtained my repair" or dose of style dos and also do n'ts while playing Roiworld: Style Deal With.
0 notes
Text
SparkMaker Review: A Revolutionary $300 Resin 3D Printer… But It Doesn’t Actually Work
Our verdict of the SparkMaker: We couldn’t get a successful print out of it, but with a few modifications, you might. There’s no doubt that SLA printers produce fantastic quality prints… when they work. 210
The SparkMaker began life as a $99 Kickstarter, which I was understandably skeptical of. Not only was that a ludicrously cheap price for a 3D printer, it was absolutely preposterous for an SLA 3D printer – which was previously the domain of much more expensive industrial printers. It’s now in production, shipping to backers, and available for just shy of $300 from OGadget for everyone else – but is it worth it?
What is an SLA / Resin Printer?
Until now, most consumer grade 3D printers have been FDM – or Fused Deposition Modelling. They use a raw material of plastic spaghetti-like filament, heat it up to around 200C, then push it out and let it cool down in the shape you want. The resolution of an FDM printer can go up to around 50 microns, though this can be improved with smaller hot end mods. There’s a huge range of printers of FDM printers to choose from, suitable for all levels of experience.
An SLA (or StereoLithography Apparatus) printer uses photosensitive resin as the raw material (a liquid), which solidifies when exposed to UV light. This can come either from a moving UV laser, or in the case of the SparkMaker, UV LEDs and an LCD screen to mask off each layer. As the print solidifies, it’s pulled out of the resin tank.
The reason why SLA printing is so exciting is that the quality can be so much higher: up to 10 microns on the SparkMaker.
What’s in the Box?
In the SparkMaker box you’ll find:
The printer, with red plastic cover.
Hex tool, for levelling and unscrewing the resin vat.
Power supply and appropriate IEC cable for your country.
Your choice of resin, if you chose the sample set.
At the very least, you will also need to purchase:
Gloves. Don’t touch resin, it’s horrible sticky stuff.
A metal spatula, for removing the print.
99% Isopropyl cleaning liquid, for any resins other than LCD-W.
You should also consider:
A syringe, for removing leftover resin back to the pot. You can just pour it back, but it’s a bit messy.
UV curing light, such as those used for nail art. You can also cure in the sun, but it’ll take longer.
A replacement FEP sheet for the resin vat.
The SparkMaker has a total build area of around 4 x 2.2 x 5 inches (102 x 56 x 125 mm). The unit itself measures just under 11 inches (275 mm) tall with a diameter of 6.5 inches (165 mm). It’s compact, and looks quite neat on your desktop. Everything is enclosed in the large translucent red cover, though this isn’t fixed in any way, it just sits on the base.
Inside is a single moving axis that pulls the print bed into and out of the resin vat.
Underneath the resin vat is a small LCD screen, and underneath that, enclosed in the base, is the UV LED array that cures the resin.
Safety and Usage
If you’re concerned at this point about safety, then that might be wise. Despite the friendly exterior, this isn’t a complete starter kit considering the additional safety equipment and processing materials required. Nor would I recommend it for use with children. With a filament based printer, the only real worry is the very hot end; this has the potential for worse. That said, adults needn’t don’t worry too much – we’re not talking vats of acid that will burn your skin off here, just some gross sticky resin that’s horrible to try and remove. You also need to take extra precautions when disposing of waste resin. You shouldn’t wash it down the sink. If you leave any waste liquid resin in the sun for a while, it should solidify, and can be placed in the normal trash. In some places, it’s classified as hazardous waste, so do check local laws.
Also worth noting is that the film on the bottom of the resin tank is a consumable item, called an FEP sheet. It’s a special non-stick surface used to ensure the print can actually be pulled upwards after curing. For some reason, the fact that this needed to be replaced wasn’t actually outlined in the manual. They cost around $5 each from a third party supplier when bought in bulk, but there’s no precise definition for when you should replace it. Basically, if your prints start to lose definition, if the sheet is too hazy, if it has a scratch on it which will show upon your print, or if it’s got a crack, it needs to be replaced. In fact, the one supplied out of the box is pretty horrendous, and will result mostly in failed prints, so you may want to go buy a new one anyway.
After a few weeks of trying to print, ours is in dire need of being replaced already.
Just something else to add to that growing shopping list of essential accessories.
Also in terms of safety (yep, there’s more) – don’t power on at the plug socket until you’ve inserted the DC power jack into the unit, or you’ll get literally sparks. That’s right, the SparkMaker makes sparks when it’s plugged in. You couldn’t make this up if you tried.
Using the SparkMaker is (frustratingly) simple. The only method of getting a print onto the device is through the included SD card. It can only hold a single print at a time, so you’ll need to head back to a PC to transfer another file over. There is no USB connection or Ethernet port, and it can’t be interfaced with Octoprint. When you’re ready to print, fill the resin vat with your choice of resin, to approximately 1/4 inch (6mm) deep, put the cover on, and press the single button. The print bed will be lowered into the vat, and begin printing. Cleanup and post-processing is lot more effort, though.
If you want to slice your own models, you’ll need to download the Windows-only (at the time of writing, though a Mac OS version is promised) custom software, called SparkStudio. This includes settings specific to the printer and type of resins, and will output a “print.wow” file. The files are around 50-100MB in my experience, which is larger than your typical G-code file. G-Code files for FDM printers are really just text commands that describe movements of the print head. I suspect the SLA files are larger because they contain thousands of “images” for what must be displayed on the LCD screen and cured on each layer, effectively a little video file.
LCD-W: Water-Washable Resin
SparkMaker offers a range of resins at around $50-80 for 500g. The cost per gram is significantly higher than plastic filaments (at least five times as much), though the objects you print will be smaller. As mentioned, you’ll need 99% Isopropyl Alcohol to clean the prints and resin vat after each print. However, SparkMaker have produced an alternative resin (LCD-W), which can be cleaned up with just water. This is a great option that avoids noxious smells and makes the whole experience a bit safer and cleaner. The prints made of LCD-W tend to be quite brittle, however, so it isn’t quite the ideal solution. The resins are clear, but can be tinted with special color mixes.
Print Quality
Sadly, after extensive testing with both LCD-W and LCD-E (“Elastic”) resin, using either the pre-sliced models that SparkMaker offer or custom sliced using their software, we were unable to get a fully successful print out of the device. This is as far as we got with a Hero Forge sample mini – you can see the supports failed much earlier, so the rest of the model didn’t really have a chance:
The dragon head on the right is the only part of a larger SparkMaker sample that we could salvage.
We did the calibration multiple times, followed some of the print guides for custom slicing settings that should be more successful (things like layer cure time affect it significantly), but the prints either broke themselves part of the way through, or ended up as congealed masses of flat resin:
I should say that the partial prints we did get were incredible. For wargaming / RPG miniatures, jewelry, or other highly detailed small models, SLA printing is clearly the way forward.
Should You Buy a SparkMaker?
The quality of prints you can get out of the Spark Maker are stunning. When it works, that is. If you’re serious about printing little custom miniature and models with insane levels of detail, a resin printer is the only way.
Unfortunately, I just can’t recommend the SparkMaker – not at the moment anyway. The closed Facebook group is full of posts from people experiencing similar frustrations. Those that have had success appear to be both replacing the FEP film out of the box, and doing a modification to bring the LCD screen closer to the bed. The latest announcement indicates that SparkMaker have made some hardware improvements for pre-orders that haven’t yet shipping, so that’s a good sign the issues have been identified. If you order now, you may not face the same problems. However, we can obviously only report on our experience.
In a break to the norm, we won’t be running a giveaway for the SparkMaker: you’d spend more on consumables and accessories than you’d get out of it. I’ll be following the modding process, replacing the FEP sheet, keeping an eye on software updates, and trying again. If results improve, I’ll update this review accordingly.
SparkMaker Review: A Revolutionary $300 Resin 3D Printer… But It Doesn’t Actually Work syndicated from https://mopishblog.wordpress.com/
0 notes
Text
SparkMaker Review: A Revolutionary $300 Resin 3D Printer… But It Doesn’t Actually Work
Our verdict of the SparkMaker: We couldn't get a successful print out of it, but with a few modifications, you might. There's no doubt that SLA printers produce fantastic quality prints... when they work. 210
The SparkMaker began life as a $99 Kickstarter, which I was understandably skeptical of. Not only was that a ludicrously cheap price for a 3D printer, it was absolutely preposterous for an SLA 3D printer – which was previously the domain of much more expensive industrial printers. It’s now in production, shipping to backers, and available for just shy of $300 from OGadget for everyone else – but is it worth it?
What is an SLA / Resin Printer?
Until now, most consumer grade 3D printers have been FDM – or Fused Deposition Modelling. They use a raw material of plastic spaghetti-like filament, heat it up to around 200C, then push it out and let it cool down in the shape you want. The resolution of an FDM printer can go up to around 50 microns, though this can be improved with smaller hot end mods. There’s a huge range of printers of FDM printers to choose from, suitable for all levels of experience.
An SLA (or StereoLithography Apparatus) printer uses photosensitive resin as the raw material (a liquid), which solidifies when exposed to UV light. This can come either from a moving UV laser, or in the case of the SparkMaker, UV LEDs and an LCD screen to mask off each layer. As the print solidifies, it’s pulled out of the resin tank.
The reason why SLA printing is so exciting is that the quality can be so much higher: up to 10 microns on the SparkMaker.
What’s in the Box?
In the SparkMaker box you’ll find:
The printer, with red plastic cover.
Hex tool, for levelling and unscrewing the resin vat.
Power supply and appropriate IEC cable for your country.
Your choice of resin, if you chose the sample set.
At the very least, you will also need to purchase:
Gloves. Don’t touch resin, it’s horrible sticky stuff.
A metal spatula, for removing the print.
99% Isopropyl cleaning liquid, for any resins other than LCD-W.
You should also consider:
A syringe, for removing leftover resin back to the pot. You can just pour it back, but it’s a bit messy.
UV curing light, such as those used for nail art. You can also cure in the sun, but it’ll take longer.
A replacement FEP sheet for the resin vat.
The SparkMaker has a total build area of around 4 x 2.2 x 5 inches (102 x 56 x 125 mm). The unit itself measures just under 11 inches (275 mm) tall with a diameter of 6.5 inches (165 mm). It’s compact, and looks quite neat on your desktop. Everything is enclosed in the large translucent red cover, though this isn’t fixed in any way, it just sits on the base.
Inside is a single moving axis that pulls the print bed into and out of the resin vat.
Underneath the resin vat is a small LCD screen, and underneath that, enclosed in the base, is the UV LED array that cures the resin.
Safety and Usage
If you’re concerned at this point about safety, then that might be wise. Despite the friendly exterior, this isn’t a complete starter kit considering the additional safety equipment and processing materials required. Nor would I recommend it for use with children. With a filament based printer, the only real worry is the very hot end; this has the potential for worse. That said, adults needn’t don’t worry too much – we’re not talking vats of acid that will burn your skin off here, just some gross sticky resin that’s horrible to try and remove. You also need to take extra precautions when disposing of waste resin. You shouldn’t wash it down the sink. If you leave any waste liquid resin in the sun for a while, it should solidify, and can be placed in the normal trash. In some places, it’s classified as hazardous waste, so do check local laws.
Also worth noting is that the film on the bottom of the resin tank is a consumable item, called an FEP sheet. It’s a special non-stick surface used to ensure the print can actually be pulled upwards after curing. For some reason, the fact that this needed to be replaced wasn’t actually outlined in the manual. They cost around $5 each from a third party supplier when bought in bulk, but there’s no precise definition for when you should replace it. Basically, if your prints start to lose definition, if the sheet is too hazy, if it has a scratch on it which will show upon your print, or if it’s got a crack, it needs to be replaced. In fact, the one supplied out of the box is pretty horrendous, and will result mostly in failed prints, so you may want to go buy a new one anyway.
After a few weeks of trying to print, ours is in dire need of being replaced already.
Just something else to add to that growing shopping list of essential accessories.
Also in terms of safety (yep, there’s more) – don’t power on at the plug socket until you’ve inserted the DC power jack into the unit, or you’ll get literally sparks. That’s right, the SparkMaker makes sparks when it’s plugged in. You couldn’t make this up if you tried.
Using the SparkMaker is (frustratingly) simple. The only method of getting a print onto the device is through the included SD card. It can only hold a single print at a time, so you’ll need to head back to a PC to transfer another file over. There is no USB connection or Ethernet port, and it can’t be interfaced with Octoprint. When you’re ready to print, fill the resin vat with your choice of resin, to approximately 1/4 inch (6mm) deep, put the cover on, and press the single button. The print bed will be lowered into the vat, and begin printing. Cleanup and post-processing is lot more effort, though.
If you want to slice your own models, you’ll need to download the Windows-only (at the time of writing, though a Mac OS version is promised) custom software, called SparkStudio. This includes settings specific to the printer and type of resins, and will output a “print.wow” file. The files are around 50-100MB in my experience, which is larger than your typical G-code file. G-Code files for FDM printers are really just text commands that describe movements of the print head. I suspect the SLA files are larger because they contain thousands of “images” for what must be displayed on the LCD screen and cured on each layer, effectively a little video file.
LCD-W: Water-Washable Resin
SparkMaker offers a range of resins at around $50-80 for 500g. The cost per gram is significantly higher than plastic filaments (at least five times as much), though the objects you print will be smaller. As mentioned, you’ll need 99% Isopropyl Alcohol to clean the prints and resin vat after each print. However, SparkMaker have produced an alternative resin (LCD-W), which can be cleaned up with just water. This is a great option that avoids noxious smells and makes the whole experience a bit safer and cleaner. The prints made of LCD-W tend to be quite brittle, however, so it isn’t quite the ideal solution. The resins are clear, but can be tinted with special color mixes.
Print Quality
Sadly, after extensive testing with both LCD-W and LCD-E (“Elastic”) resin, using either the pre-sliced models that SparkMaker offer or custom sliced using their software, we were unable to get a fully successful print out of the device. This is as far as we got with a Hero Forge sample mini – you can see the supports failed much earlier, so the rest of the model didn’t really have a chance:
The dragon head on the right is the only part of a larger SparkMaker sample that we could salvage.
We did the calibration multiple times, followed some of the print guides for custom slicing settings that should be more successful (things like layer cure time affect it significantly), but the prints either broke themselves part of the way through, or ended up as congealed masses of flat resin:
I should say that the partial prints we did get were incredible. For wargaming / RPG miniatures, jewelry, or other highly detailed small models, SLA printing is clearly the way forward.
Should You Buy a SparkMaker?
The quality of prints you can get out of the Spark Maker are stunning. When it works, that is. If you’re serious about printing little custom miniature and models with insane levels of detail, a resin printer is the only way.
Unfortunately, I just can’t recommend the SparkMaker – not at the moment anyway. The closed Facebook group is full of posts from people experiencing similar frustrations. Those that have had success appear to be both replacing the FEP film out of the box, and doing a modification to bring the LCD screen closer to the bed. The latest announcement indicates that SparkMaker have made some hardware improvements for pre-orders that haven’t yet shipping, so that’s a good sign the issues have been identified. If you order now, you may not face the same problems. However, we can obviously only report on our experience.
In a break to the norm, we won’t be running a giveaway for the SparkMaker: you’d spend more on consumables and accessories than you’d get out of it. I’ll be following the modding process, replacing the FEP sheet, keeping an eye on software updates, and trying again. If results improve, I’ll update this review accordingly.
SparkMaker Review: A Revolutionary $300 Resin 3D Printer… But It Doesn’t Actually Work posted first on grassroutespage.blogspot.com
0 notes