#docker networking nginx service
Explore tagged Tumblr posts
Visit Tumblr Blog
Explore Tumblr blogs with no restrictions, modern design and the best experience.
Last Seen Tumblr Blogs


Fun Fact
Kazakhstan’s Minister of Communications and Informatics has blocked the Tumblr site because it contained 60 sites of terrorism, extremism, and pornography in 2015.
Text

Introduction
Nginx is a high-performance web server that also functions as a reverse proxy, load balancer, and caching server. It is widely used in cloud and edge computing environments due to its lightweight architecture and efficient handling of concurrent connections. By deploying Nginx on ARMxy Edge IoT Gateway, users can optimize data flow, enhance security, and efficiently manage industrial network traffic.
Why Use Nginx on ARMxy?
1. Reverse Proxying – Nginx acts as an intermediary, forwarding client requests to backend services running on ARMxy.
2. Load Balancing – Distributes traffic across multiple devices to prevent overload.
3. Security Hardening – Hides backend services and implements SSL encryption for secure communication.
4. Performance Optimization – Caching frequently accessed data reduces latency.
Setting Up Nginx as a Reverse Proxy on ARMxy
1. Install Nginx
On ARMxy’s Linux-based OS, update the package list and install Nginx:
sudo apt update sudo apt install nginx -y
Start and enable Nginx on boot:
sudo systemctl start nginx sudo systemctl enable nginx
2. Configure Nginx as a Reverse Proxy
Modify the default Nginx configuration to route incoming traffic to an internal service, such as a Node-RED dashboard running on port 1880:
sudo nano /etc/nginx/sites-available/default
Replace the default configuration with the following:
server { listen 80; server_name your_armxy_ip;
location / {
proxy_pass http://localhost:1880/;
proxy_set_header Host $host;
proxy_set_header X-Real-IP $remote_addr;
proxy_set_header X-Forwarded-For $proxy_add_x_forwarded_for;
}
}
Save the file and restart Nginx:
sudo systemctl restart nginx
3. Enable SSL for Secure Communication
To secure the reverse proxy with HTTPS, install Certbot and configure SSL:
sudo apt install certbot python3-certbot-nginx -y sudo certbot --nginx -d your_domain
Follow the prompts to automatically configure SSL for your ARMxy gateway.
Use Case: Secure Edge Data Flow
In an industrial IoT setup, ARMxy collects data from field devices via Modbus, MQTT, or OPC UA, processes it locally using Node-RED or Dockerized applications, and sends it to cloud platforms. With Nginx, you can:
· Secure data transmission with HTTPS encryption.
· Optimize API requests by caching responses.
· Balance traffic when multiple ARMxy devices are used in parallel.
Conclusion
Deploying Nginx as a reverse proxy on ARMxy enhances security, optimizes data handling, and ensures efficient communication between edge devices and cloud platforms. This setup is ideal for industrial automation, smart city applications, and IIoT networks requiring low latency, high availability, and secure remote access.
0 notes
Link
#autoSSL#Automation#cloud#configuration#containerization#DevOps#Docker#HTTPS#Let'sEncrypt#Linux#networking#NGINX#proxyserver#reverseproxy#Security#self-hosted#servermanagement#systemadministration#TLS#Traefik#webserver
0 notes
Text
Microservices Programming

Microservices architecture is revolutionizing the way modern software is built. Instead of a single monolithic application, microservices break down functionality into small, independent services that communicate over a network. This approach brings flexibility, scalability, and easier maintenance. In this post, we’ll explore the core concepts of microservices and how to start programming with them.
What Are Microservices?
Microservices are a software development technique where an application is composed of loosely coupled, independently deployable services. Each service focuses on a specific business capability and communicates with others through lightweight APIs, usually over HTTP or messaging queues.
Why Use Microservices?
Scalability: Scale services independently based on load.
Flexibility: Use different languages or technologies for different services.
Faster Development: Small teams can build, test, and deploy services independently.
Resilience: Failure in one service doesn't crash the entire system.
Better Maintainability: Easier to manage, update, and test smaller codebases.
Key Components of Microservices Architecture
Services: Individual, self-contained units with specific functionality.
API Gateway: Central access point that routes requests to appropriate services.
Service Discovery: Automatically locates services within the system (e.g., Eureka, Consul).
Load Balancing: Distributes incoming traffic across instances (e.g., Nginx, HAProxy).
Containerization: Deploy services in isolated environments (e.g., Docker, Kubernetes).
Messaging Systems: Allow asynchronous communication (e.g., RabbitMQ, Apache Kafka).
Popular Tools and Frameworks
Spring Boot + Spring Cloud (Java): Full-stack support for microservices.
Express.js (Node.js): Lightweight framework for building RESTful services.
FastAPI (Python): High-performance framework ideal for microservices.
Docker: Container platform for packaging and running services.
Kubernetes: Orchestrates and manages containerized microservices.
Example: A Simple Microservices Architecture
User Service: Manages user registration and authentication.
Product Service: Handles product listings and inventory.
Order Service: Manages order placement and status.
Each service runs on its own server or container, communicates through REST APIs, and has its own database to avoid tight coupling.
Best Practices for Microservices Programming
Keep services small and focused on a single responsibility.
Use versioned APIs to ensure backward compatibility.
Centralize logging and monitoring using tools like ELK Stack or Prometheus + Grafana.
Secure your APIs using tokens (JWT, OAuth2).
Automate deployments and CI/CD pipelines with tools like Jenkins, GitHub Actions, or GitLab CI.
Avoid shared databases between services — use event-driven architecture for coordination.
Challenges in Microservices
Managing communication and data consistency across services.
Increased complexity in deployment and monitoring.
Ensuring security between service endpoints.
Conclusion
Microservices programming is a powerful approach to building modern, scalable applications. While it introduces architectural complexity, the benefits in flexibility, deployment, and team autonomy make it an ideal choice for many large-scale projects. With the right tools and design patterns, you can unlock the full potential of microservices for your applications.
0 notes
Text
Building Scalable Infrastructure with Ansible and Terraform

Building Scalable Infrastructure with Ansible and Terraform
Modern cloud environments require scalable, efficient, and automated infrastructure to meet growing business demands. Terraform and Ansible are two powerful tools that, when combined, enable Infrastructure as Code (IaC) and Configuration Management, allowing teams to build, manage, and scale infrastructure seamlessly.
1. Understanding Terraform and Ansible
📌 Terraform: Infrastructure as Code (IaaC)
Terraform is a declarative IaaC tool that enables provisioning and managing infrastructure across multiple cloud providers.
🔹 Key Features: ✅ Automates infrastructure deployment. ✅ Supports multiple cloud providers (AWS, Azure, GCP). ✅ Uses HCL (HashiCorp Configuration Language). ✅ Manages infrastructure as immutable code.
🔹 Use Case: Terraform is used to provision infrastructure — such as setting up VMs, networks, and databases — before configuration.
📌 Ansible: Configuration Management & Automation
Ansible is an agentless configuration management tool that automates software installation, updates, and system configurations.
🔹 Key Features: ✅ Uses YAML-based playbooks. ✅ Agentless architecture (SSH/WinRM-based). ✅ Idempotent (ensures same state on repeated runs). ✅ Supports cloud provisioning and app deployment.
🔹 Use Case: Ansible is used after infrastructure provisioning to configure servers, install applications, and manage deployments.
2. Why Use Terraform and Ansible Together?
Using Terraform + Ansible combines the strengths of both tools:
TerraformAnsibleCreates infrastructure (VMs, networks, databases).Configures and manages infrastructure (installing software, security patches). Declarative approach (desired state definition).Procedural approach (step-by-step execution).Handles infrastructure state via a state file. Doesn’t track state; executes tasks directly. Best for provisioning resources in cloud environments. Best for managing configurations and deployments.
Example Workflow: 1️⃣ Terraform provisions cloud infrastructure (e.g., AWS EC2, Azure VMs). 2️⃣ Ansible configures servers (e.g., installs Docker, Nginx, security patches).
3. Building a Scalable Infrastructure: Step-by-Step
Step 1: Define Infrastructure in Terraform
Example Terraform configuration to provision AWS EC2 instances:hclprovider "aws" { region = "us-east-1" }resource "aws_instance" "web" { ami = "ami-12345678" instance_type = "t2.micro" tags = { Name = "WebServer" } }
Step 2: Configure Servers Using Ansible
Example Ansible Playbook to install Nginx on the provisioned servers:yaml- name: Configure Web Server hosts: web_servers become: yes tasks: - name: Install Nginx apt: name: nginx state: present - name: Start Nginx Service service: name: nginx state: started enabled: yes
Step 3: Automate Deployment with Terraform and Ansible
1️⃣ Use Terraform to create infrastructure:bash terraform init terraform apply -auto-approve
2️⃣ Use Ansible to configure servers:bashansible-playbook -i inventory.ini configure_web.yaml
4. Best Practices for Scalable Infrastructure
✅ Modular Infrastructure — Use Terraform modules for reusable infrastructure components. ✅ State Management — Store Terraform state in remote backends (S3, Terraform Cloud) for team collaboration. ✅ Use Dynamic Inventory in Ansible — Fetch Terraform-managed resources dynamically. ✅ Automate CI/CD Pipelines — Integrate Terraform and Ansible with Jenkins, GitHub Actions, or GitLab CI. ✅ Follow Security Best Practices — Use IAM roles, secrets management, and network security groups.
5. Conclusion
By combining Terraform and Ansible, teams can build scalable, automated, and well-managed cloud infrastructure.
Terraform ensures consistent provisioning across multiple cloud environments, while Ansible simplifies configuration management and application deployment.
WEBSITE: https://www.ficusoft.in/devops-training-in-chennai/
0 notes
Text
Building Scalable Web Applications: Best Practices for Full Stack Developers
Scalability is one of the most crucial factors in web application development. In today’s dynamic digital landscape, applications need to be prepared to handle increased user demand, data growth, and evolving business requirements without compromising performance. For full stack developers, mastering scalability is not just an option—it’s a necessity. This guide explores the best practices for building scalable web applications, equipping developers with the tools and strategies needed to ensure their projects can grow seamlessly.
What Is Scalability in Web Development?
Scalability refers to a system’s ability to handle increased loads by adding resources, optimizing processes, or both. A scalable web application can:
Accommodate growing numbers of users and requests.
Handle larger datasets efficiently.
Adapt to changes without requiring complete redesigns.
There are two primary types of scalability:
Vertical Scaling: Adding more power (CPU, RAM, storage) to a single server.
Horizontal Scaling: Adding more servers to distribute the load.
Each type has its use cases, and a well-designed application often employs a mix of both.
Best Practices for Building Scalable Web Applications
1. Adopt a Microservices Architecture
What It Is: Break your application into smaller, independent services that can be developed, deployed, and scaled independently.
Why It Matters: Microservices prevent a single point of failure and allow different parts of the application to scale based on their unique needs.
Tools to Use: Kubernetes, Docker, AWS Lambda.
2. Optimize Database Performance
Use Indexing: Ensure your database queries are optimized with proper indexing.
Database Partitioning: Divide large databases into smaller, more manageable pieces using horizontal or vertical partitioning.
Choose the Right Database Type:
Use SQL databases like PostgreSQL for structured data.
Use NoSQL databases like MongoDB for unstructured or semi-structured data.
Implement Caching: Use caching mechanisms like Redis or Memcached to store frequently accessed data and reduce database load.
3. Leverage Content Delivery Networks (CDNs)
CDNs distribute static assets (images, videos, scripts) across multiple servers worldwide, reducing latency and improving load times for users globally.
Popular CDN Providers: Cloudflare, Akamai, Amazon CloudFront.
Benefits:
Faster content delivery.
Reduced server load.
Improved user experience.
4. Implement Load Balancing
Load balancers distribute incoming requests across multiple servers, ensuring no single server becomes overwhelmed.
Types of Load Balancing:
Hardware Load Balancers: Physical devices.
Software Load Balancers: Nginx, HAProxy.
Cloud Load Balancers: AWS Elastic Load Balancing, Google Cloud Load Balancing.
Best Practices:
Use sticky sessions if needed to maintain session consistency.
Monitor server health regularly.
5. Use Asynchronous Processing
Why It’s Important: Synchronous operations can cause bottlenecks in high-traffic scenarios.
How to Implement:
Use message queues like RabbitMQ, Apache Kafka, or AWS SQS to handle background tasks.
Implement asynchronous APIs with frameworks like Node.js or Django Channels.
6. Embrace Cloud-Native Development
Cloud platforms provide scalable infrastructure that can adapt to your application’s needs.
Key Features to Leverage:
Autoscaling for servers.
Managed database services.
Serverless computing.
Popular Cloud Providers: AWS, Google Cloud, Microsoft Azure.
7. Design for High Availability (HA)
Ensure that your application remains operational even in the event of hardware failures, network issues, or unexpected traffic spikes.
Strategies for High Availability:
Redundant servers.
Failover mechanisms.
Regular backups and disaster recovery plans.
8. Optimize Front-End Performance
Scalability is not just about the back end; the front end plays a significant role in delivering a seamless experience.
Best Practices:
Minify and compress CSS, JavaScript, and HTML files.
Use lazy loading for images and videos.
Implement browser caching.
Use tools like Lighthouse to identify performance bottlenecks.
9. Monitor and Analyze Performance
Continuous monitoring helps identify and address bottlenecks before they become critical issues.
Tools to Use:
Application Performance Monitoring (APM): New Relic, Datadog.
Logging and Error Tracking: ELK Stack, Sentry.
Server Monitoring: Nagios, Prometheus.
Key Metrics to Monitor:
Response times.
Server CPU and memory usage.
Database query performance.
Network latency.
10. Test for Scalability
Regular testing ensures your application can handle increasing loads.
Types of Tests:
Load Testing: Simulate normal usage levels.
Stress Testing: Push the application beyond its limits to identify breaking points.
Capacity Testing: Determine how many users the application can handle effectively.
Tools for Testing: Apache JMeter, Gatling, Locust.
Case Study: Scaling a Real-World Application
Scenario: A growing e-commerce platform faced frequent slowdowns during flash sales.
Solutions Implemented:
Adopted a microservices architecture to separate order processing, user management, and inventory systems.
Integrated Redis for caching frequently accessed product data.
Leveraged AWS Elastic Load Balancer to manage traffic spikes.
Optimized SQL queries and implemented database sharding for better performance.
Results:
Improved application response times by 40%.
Seamlessly handled a 300% increase in traffic during peak events.
Achieved 99.99% uptime.
Conclusion
Building scalable web applications is essential for long-term success in an increasingly digital world. By implementing best practices such as adopting microservices, optimizing databases, leveraging CDNs, and embracing cloud-native development, full stack developers can ensure their applications are prepared to handle growth without compromising performance.
Scalability isn’t just about handling more users; it’s about delivering a consistent, reliable experience as your application evolves. Start incorporating these practices today to future-proof your web applications and meet the demands of tomorrow’s users.
0 notes
Text
5+ Reasons To Use Plesk Control Panel

Want to grow your online business but afraid of interrupted website service then use the Plesk control panel for better website and server management. Nowadays, every business has become online. With the help of websites, people are running their businesses. Along with this, securing and management of the website will also become very challenging. In this regard, the Plesk control panel is a good choice. There are numerous reasons to use Plesk.
Plesk is one of the most popular control panels. It is well-known for its flexible user-friendly interaction and rich set of features. With the help of this blog, we have defined several reasons to use Plesk.
What is Plesk
Plesk is all in one web hosting control panel for VPS and dedicated server. Plesk is designed to provide management solutions to servers, applications and websites. It provides server solutions to both linux and windows based servers. User-friendly interface and rich features of Plesk are the few reasons for the popularity of Plesk.
In the next section, we have defined several reasons to use Plesk.
5+ Reasons to use Plesk Control Panel
Here, we are going to provide reasons to use Plesk. These reasons to use Plesk will explain why Plesk is best.
1. Website Development
Plesk control panel helps developers to design a perfect website. In the world of digital businesses, websites play a vital role. A well-designed website defines the success of your business. Plesk control panel helps web developers to create perfectly designed websites that are compatible with every device. Grow your online business with security features, with regular addition of blogs and product description and share your reviews every day. People with some basic knowledge can use this control panel. So, Web development is one of the reasons to use Plesk.
2. Powerful Server and Site Protection
For every online business, website security is a basic concern. Every online business wants to protect their website from cyber attacks. Plesk control panel is especially designed to fulfil all security needs. It ensures protection of operating systems, applications and networks. Security is one of the best reasons to use Plesk.
3. Consolidated Control Panel
Plesk is a centralised control panel. It is designed to manage multiple websites at one time. With the help of this single control panel, users can develop websites, check updates and examine performance. These are the perfect reasons to use Plesk.
4. Allows to design Applications
Plesk comes with features that allow users to design applications. With this, Plesk offers some additional features for website designing such as addition of applications in the website. Design applications in the control panel is one of the good reasons to use Plesk.
5. Launch of Extension Catalogue
Plesk control panel launched an extension catalogue. It consists of 150+ extensions in its catalogue. It helps to boost performance and improve user experience. There are several applications in the extension store. Platforms such as GitHub, WordPress toolkits, Docker and NGINX allow users to choose any extension in just a few clicks.
6. Highly Adaptable with other platforms
Its highly compatible feature makes Plesk the top choice of developers. Plesk is all in one control panel that comes with a user-friendly interface. Plesk is the leading control panel that runs cloud hosting platforms such as Google Cloud, Azure, AWS and many more. This highly compatible feature is one of the reasons to use Plesk.
7. Designed for both Linux and Windows Operating Systems
While Cpanel is designed to support Linux based servers, Plesk control panel is basically designed to support both linux and windows operating systems. With Plesk, users can migrate the website from other control panels. It is one of the most important reasons to use Plesk.
8. Automatic Backup Solution
Plesk control panel offers automatic backup solution for websites and databases. These backup solutions prevent users from sudden outage, data loss and cyber attack. Every developer is looking for a control panel that provides an automatic backup solution. In this regard, the Plesk backup solution is a great match. Backup solution is one of the reason to use Plesk.
9. Ability To Self-Repair
Plesk control panel comes with an automatic self detection tool. These tools automatically detect complex issues and fix them. With Plesk, the system can identify technical errors and solve them without any support. The self repair feature is one of the reasons to use Plesk.
Conclusion
In this blog, we have defined numerous reasons to use Plesk. These reasons show why the Plesk control panel is a better choice than others. The main reason is that Plesk supports linux and windows based systems. Plesk comes with security features such firewall protection, virus scanning, password protection and many more. Overall, it is all in one solution for website and server management.
Visit our website today to get the best deals on the Plesk licence.
FAQs
What is the purpose of Plesk?
Ans Plesk is a control panel used to offer a user-friendly interface and automatic tools to virtual private or dedicated servers.
Why is Plesk better than Cpanel?
Ans. Both are good control panels but Plesk is good for beginners.
How popular is Plesk?
Ans. Plesk popularity percentage is 88.3%
Who owns Plesk?
Ans. British Oakley Capital Limited owns Plesk.
0 notes
Text
Web App Development: Your Comprehensive Guide from Start to Finish

This article delves into the intricate process of web application development, from conception to deployment. It digs into understanding web application development, its approaches and technology stacks to be used showcasing the ever-changing web development trends landscape.
Understanding Web Application Development:
A web application, sometimes known as a web app, is software that runs on a web server and can be accessed using web browsers. These programmes carry out specific activities or provide services, demonstrating the wide range of web apps available in the digital age.
Web application development is a complex process involving user interface design, backend code development, and database integration to ensure optimal functionality across various web browsers and devices.
Web apps have become important in the ever-changing digital environment. They serve as a link between people and a plethora of internet services and experiences. Web apps, whether for online shopping, social networking, or productivity tools, have transformed the way we engage with the digital world.
Web Application Development Approaches:
The creation of a web application is not a one-size-fits-all approach. It entails a number of techniques and methodologies, each tailored to specific project objectives. Let us look at some of these approaches:
Innovative Web Development Approaches:
PWAs (Progressive Web Apps) give a native app-like experience, speed, offline capabilities, and a seamless user experience. Service workers are used to cache assets and provide offline access.
Single Page Applications (SPAs) are web applications that dynamically update content as users interact, providing a smooth and fast user experience using frameworks like React and Angular.
Serverless architecture, as provided by cloud providers such as AWS, Azure, and Google Cloud, allows developers to focus on writing code rather than managing servers, making it cost-effective and scalable.
Web Assembly is a binary instruction format that enables high-performance code execution in web browsers, allowing developers to run C and C++ code in web applications.
Real-time web applications, commonly used in chat and online gaming, necessitate technologies like WebSocket and WebRTC for immediate communication and collaboration among users.
The Technology Stack: Building the Foundation:
The selection of the appropriate technological stack, which includes tools, frameworks, and languages, is critical in web application development for producing high-performing, quick, and advanced apps.
Front-end Development:
Frontend development is the process of developing a user-friendly online interface with essential technological stacks such as HTML, CSS, JavaScript, React, Angular, and Vue.js to ensure a responsive and user-friendly experience.
Backend development:
The backend, or core of a web application, is in charge of data management, user authentication, and business logic. Backend languages that are popular include Node.js, Ruby on Rails, Python with Django, and PHP with Laravel.
Database Management:
To efficiently store and retrieve data, select the correct database system, including relational, NoSQL, and cloud-based choices, based on data format, scalability, and performance needs.
Web Server:
A web server, like Apache, Nginx, or Microsoft IIS, is crucial for hosting and serving web applications, and its configuration and optimization are vital for application availability and responsiveness.
DevOps and Deployment:
DevOps practises, such as Docker and Kubernetes, use containerization, orchestration, and CI/CD pipelines to improve efficiency and reliability in web application deployment and maintenance.
Conclusion:
This essay delves into the complicated process of web application development, emphasising the ever-changing landscape and the significance of remaining current on the latest developments. It emphasises the importance of agile approaches and a constant transition in technology stacks.
The article urges visitors to visit the blog: Web Application Development: From Concept To Development for unique insights and experiences, appealing to both seasoned and novice developers. The web development world is always changing, so staying ahead of the curve is critical.
#technology#business#web app development#web application development#custom software development#software development
0 notes
Photo
Deploy laravel project with docker swarm We check three major step in this guide Setup laravel project with docker compose Deploy the stack to the swarm Create gitlab-ci Setup laravel project with docker compose we will explore the process of deploying a laravel project using docker swarm and setting up a CI/CD pipline to automate the deployment process. Now let’s start with containerize a laravel project with docker compose we need three separate service containers: An app service running PHP7.4-FPM; A db service running MySQL 5.7; An nginx service that uses the app service to parse PHP code Step 1. Set a env variable in project In root directory of project we have .env file now we need to update some variable DB_CONNECTION=mysql DB_HOST=db DB_PORT=3306 DB_DATABASE=experience DB_USERNAME=experience_user DB_PASSWORD=your-password Step 2. Setting up the application’s Docekrfile we need to build a custom image for the application container. We’ll create a new Dockerfile for that. Docker file FROM php:7.4-fpm # Install system dependencies RUN apt-get update && apt-get install -y \ git \ curl \ libpng-dev \ libonig-dev \ libxml2-dev \ zip \ unzip # Clear cache RUN apt-get clean && rm -rf /var/lib/apt/lists/* # Install PHP extensions RUN docker-php-ext-install pdo_mysql mbstring exif pcntl bcmath gd # Get latest Composer COPY --from=composer:latest /usr/bin/composer /usr/bin/composer # Set working directory WORKDIR /var/www Step 3. Setting up Nginx config and Database dump file In root directory create a new directory called docker-compose Now we need two other directories, a nginx directory and mysql directory So we have this two route in our project laravel-project/docker-compose/nginx/ laravel-project/docker-compose/mysql/ In nginx directory create a file called experience.conf we write nginx config in this file like: server { listen 80; index index.php index.html; error_log /var/log/nginx/error.log; access_log /var/log/nginx/access.log; root /var/www/public; location ~ \.php$ { try_files $uri =404; fastcgi_split_path_info ^(.+\.php)(/.+)$; fastcgi_pass app:9000; fastcgi_index index.php; include fastcgi_params; fastcgi_param SCRIPT_FILENAME $document_root$fastcgi_script_name; fastcgi_param PATH_INFO $fastcgi_path_info; } location / { try_files $uri $uri/ /index.php?$query_string; gzip_static on; } } In mysql directory create a file called init_db.init we write mysql initialization in this file like: DROP TABLE IF EXISTS `places`; CREATE TABLE `places` ( `id` bigint(20) unsigned NOT NULL AUTO_INCREMENT, `name` varchar(255) COLLATE utf8mb4_unicode_ci NOT NULL, `visited` tinyint(1) NOT NULL DEFAULT '0', PRIMARY KEY (`id`) ) ENGINE=InnoDB AUTO_INCREMENT=12 DEFAULT CHARSET=utf8mb4 COLLATE=utf8mb4_unicode_ci; INSERT INTO `places` (name, visited) VALUES ('Berlin',0),('Budapest',0),('Cincinnati',1),('Denver',0),('Helsinki',0),('Lisbon',0),('Moscow',1); Step 4. Creating a multi container with docker-compose We need a building three container that should share networks and data volumes. Ok so create a docker-compose file in root directory of project For craete a network for connecting services we define network in docker-compose file like this: networks: experience: driver: bridge App service: app: build: context: ./ dockerfile: Dockerfile image: travellist container_name: experience-app restart: unless-stopped working_dir: /var/www/ volumes: - ./:/var/www networks: - experience DB service: db: image: mysql:8.0 container_name: experience-db restart: unless-stopped environment: MYSQL_DATABASE: ${DB_DATABASE} MYSQL_ROOT_PASSWORD: ${DB_PASSWORD} MYSQL_PASSWORD: ${DB_PASSWORD} MYSQL_USER: ${DB_USERNAME} SERVICE_TAGS: dev SERVICE_NAME: mysql volumes: - ./docker-compose/mysql:/docker-entrypoint-initdb.d networks: - experience Nginx service: nginx: image: nginx:1.17-alpine container_name: experience-nginx restart: unless-stopped ports: - 8000:80 volumes: - ./:/var/www - ./docker-compose/nginx:/etc/nginx/conf.d networks: - experience So our docker-compose file be like this: version: "3.7" services: app: build: context: ./ dockerfile: Dockerfile image: travellist container_name: experience-app restart: unless-stopped working_dir: /var/www/ volumes: - ./:/var/www networks: - experience db: image: mysql:8.0 container_name: experience-db restart: unless-stopped environment: MYSQL_DATABASE: ${DB_DATABASE} MYSQL_ROOT_PASSWORD: ${DB_PASSWORD} MYSQL_PASSWORD: ${DB_PASSWORD} MYSQL_USER: ${DB_USERNAME} SERVICE_TAGS: dev SERVICE_NAME: mysql volumes: - ./docker-compose/mysql:/docker-entrypoint-initdb.d networks: - experience nginx: image: nginx:alpine container_name: experience-nginx restart: unless-stopped ports: - 8100:80 volumes: - ./:/var/www - ./docker-compose/nginx:/etc/nginx/conf.d/ networks: - experience networks: experience: driver: bridge Step 5. Running application with docker compose Now we can build the app image with this command: $ docker-compose build app When the build is finished, we can run the environment in background mode with: $ docker-compose up -d Output: Creating exprience-db ... done Creating exprience-app ... done Creating exprience-nginx ... done to show information about the state of your active services, run: $ docker-compose ps Well in these 5 simple steps, we have successfully ran our application. Now we have a docker-compose file for our application that needs for using in docker swarm. Let’s start Initialize docker swarm. After installing docker in your server *attention: To install Docker, be sure to use the official documentation install docker check docker information with this command: $ docker info You should see “swarm : inactive” in output For activate swarm in docker use this command: $ docker swarm init The docker engine targeted by this command becomes a manager in the newly created single-node swarm. What we want to use is the services of this docker swarm. We want to update our service like app with docker swarm, The advantage of updating our service in Docker Swarm is that there is no need to down the app service first, update the service, and then bring the service up. In this method, with one command, we can give the image related to the service to Docker and give the update command. Docker raises the new service without down the old service and slowly transfers the load from the old service to the new service. When running Docker Engine in swarm mode, we can use docker stack deploy to deploy a complete application stack to the swarm. The deploy command accepts a stack description in the form of a Compose file. So we down our docker compose with this command: $ docker-compose down And create our stack. ok if everything is ok until now take a rest Deploy the stack to the swarm $ docker stack deploy --compose-file docker-compose.yml For example : $ docker stack deploy --compose-file docker-compose.yml staging Probably you see this in output: Creating network staging_exprience Creating service staging_nginx failed to create service staging_nginx: Error response from daemon: The network staging_exprience cannot be used with services. Only networks scoped to the swarm can be used, such as those created with the overlay driver. This is because of “driver: bridge” for deploying your service in swarm mode you must use overlay driver for network if you remove this line in your docker compose file When the stack is being deployed this network will be create on overlay driver automatically. So our docker-compose file in network section be like this: networks: experience: And run upper command: $ docker stack deploy --compose-file docker-compose.yml staging For now you probably you see this error : failed to create service staging_nginx: Error response from daemon: The network staging_experience cannot be used with services. Only networks scoped to the swarm can be used, such as those created with the overlay driver. Get network list in your docker: $ docker network ls Output: NETWORK ID NAME DRIVER SCOPE 30f94ae1c94d staging_experience bridge local So your network has local scope yet because in first time deploy stack this network save in local scope and we must remove that by: $ docker network rm staging_experience After all this run command: $ docker stack deploy --compose-file docker-compose.yml staging Output: Creating network staging_experience Creating service staging_app Creating service staging_db Creating service staging_nginx Now get check stack by: $ docker stack ls Output: NAME SERVICES staging 3 And get service list by: $ docker service ls Output: If your REPLICAS is 0/1 something wrong is your service For checking service status run this command: $ docker service ps staging_app for example And for check detail of service run this command: $ docker service logs staging_app for example Output of this command show you what is problem of your service. And for updating your a service with an image the command you need is this: $ docker service update --image "<your-image>" "<name-of-your-service>" --force That's it your docker swarm is ready for zero down time deployment :))) Last step for have a complete process zero down time deployment is create pipeline in gitlab. Create gitlab-ci In this step we want create a pipeline in gitlab for build, test and deploy a project So we have three stage: stages: - Build - Test - Deploy Ok let’s clear what we need and what is going on in this step . We want update laravel project and push our change in gitlab create a new image of this changes and test that and after that log in to host server pull that updated image in server, and update service of project. For login to server we need define some variable in gitlab in your repository goto setting->CI/CD->VARIABLES Add variable Add this variables: CI_REGISTRY : https://registry.gitlab.com DOCKER_AUTH_CONFIG: { "auths": { "registry.gitlab.com": { "auth": "<auth-key>" } } } auth-key is base64 hash of “gitlab-username:gitlab-password” SSH_KNOWN_HOSTS: Like 192.168.1.1 ssh-rsa AAAAB3NzaC1yc2EAAAADAQABAAABgQCGUCqCK3hNl+4TIbh3+Af3np+v91AyW4+BxXRtHBC2Y/uPJXF2jdR6IHlSS/0RFR3hOY+8+5a/r8O1O9qTPgxG8BSIm9omb8YxF2c4Sz/USPDK3ld2oQxbBg5qdhRN28EvRbtN66W3vgYIRlYlpNyJA+b3HQ/uJ+t3UxP1VjAsKbrBRFBth845RskSr1V7IirMiOh7oKGdEfXwlOENxOI7cDytxVR7h3/bVdJdxmjFqagrJqBuYm30 You can see how generate ssh key in this post: generate sshkey SSH_PRIVATE_KEY: SSH_REMOTE_HOST: root@ This is your variables in gitlab. So let’s back to gitlab-ci In root directory of project create a new file .gitlab-ci.yml and set build stage set test stage And in the last set deploy stage like: stages: - Build - Test - Deploy variables: IMAGE_TAG: $CI_REGISTRY_IMAGE:$CI_COMMIT_REF_SLUG-$CI_COMMIT_SHORT_SHA build: stage: Build image: docker:20.10.16 services: - docker:dind script: - docker login -u $CI_REGISTRY_USER -p $CI_REGISTRY_PASSWORD $CI_REGISTRY - docker build --pull -f Dockerfile -t $IMAGE_TAG . - docker push $IMAGE_TAG preparation: stage: Test image: $IMAGE_TAG needs: - build script: - composer install artifacts: expire_in: 1 day paths: - ./vendor cache: key: ${CI_COMMIT_REF_SLUG}-composer paths: - ./vendor unit-test: stage: Test image: $IMAGE_TAG services: - name: mysql:8 alias: mysql-test needs: - preparation variables: APP_KEY: ${APP_KEY} MYSQL_ROOT_PASSWORD: ${MYSQL_ROOT_PASSWORD} MYSQL_DATABASE: ${MYSQL_DATABASE} DB_HOST: ${DB_HOST} DB_USERNAME: ${DB_USERNAME} DB_PASSWORD: ${DB_PASSWORD} script: - php vendor/bin/phpunit staging-deploy: stage: Deploy extends: - .deploy-script variables: APP: "stackdemo_app" STACK: "travellist-staging" only: - develop needs: - unit-test environment: name: stage .remote-docker: variables: DOCKER_HOST: ssh://${SSH_REMOTE_HOST} image: docker:20.10.16 before_script: - eval $(ssh-agent -s) - echo $IMAGE_TAG - echo "$SSH_PRIVATE_KEY" | tr -d '\r' | ssh-add - - mkdir -p ~/.ssh - chmod 700 ~/.ssh - echo "HOST *" > ~/.ssh/config - echo "StrictHostKeyChecking no" >> ~/.ssh/config - echo -n $CI_REGISTRY_PASSWORD | docker login -u $CI_REGISTRY_USER --password-stdin $CI_REGISTRY .deploy-script: extends: - .remote-docker script: - cp $develop_config /root/project/core - docker pull $IMAGE_TAG - docker service update --image "$IMAGE_TAG" "$APP" --force dependencies: [] Change something in your project and push to gitlab and wait for it To see all pipeline pass like this : And this is beautiful. https://dev.to/holyfalcon/deploy-laravel-project-with-docker-swarm-5oi
0 notes
Text
Immich and 2x Sharkey with 1 matching nginx server for extra files. Another VPS holds a minecraft server and I'm planning to use that vps for acceptance as well.
One of the sharkey instances is down rn and will maybe be replaced by yet another sharkey instance or a forum idk.
The http services are going through traefik and the whole thing runs in docker (including traefik which I have very mixed feelings about but at least this way it's reproducible without having to learn Ansible)
Also prometheus node exporter which is read by a server in my local network
2 blogs and another 2 webpages are hosted elsewhere.
I have vague plans to add conduwuit to the mix, might get another domain name for that
Id like to thank @debian-official, if it wasnt for them this idea wouldnt have come to me.
What projects is everyone working on? Im curious and want to see what the IT community is bashing their heads against.
Ill start, I am setting up a personal website for my homelab! The site is through nginx. I dont have any experience with html or css or anything like that and for me its a fun little challenge. It has also allowed my to get my "cdn" going again which I am quite pleased about ^~^
37 notes
·
View notes
Link
#Automation#backup#cloudstorage#collaboration#dataprivacy#database#Docker#filesharing#HTTPS#Install#Linux#networking#Nextcloud#Nextcloudsetup#open-source#reverseproxy#Security#self-hosted#Server#systemadministration
0 notes
Text
Step-4
Minikube is local Kubernetes, focusing on making it easy to learn and develop for Kubernetes.
https://storage.googleapis.com/minikube/releases/latest/minikube-installer.exe
installed the stable version with this link for windows


Step 5
Installation of kubectl on windows locally

HELM installation
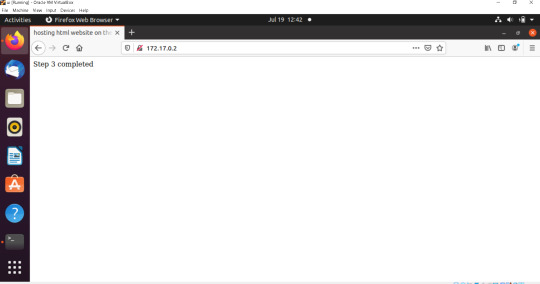
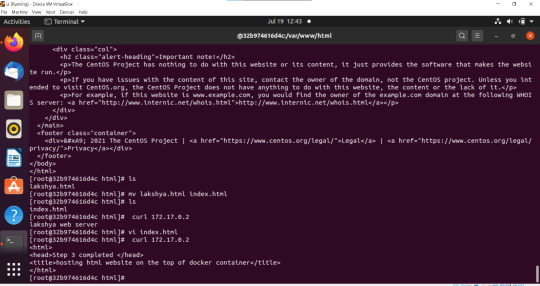
STEP 3 hosting website on top of the docker
Docker image file of mysql


Configure nginx ingress controller with SSL certificate in minikube cluster

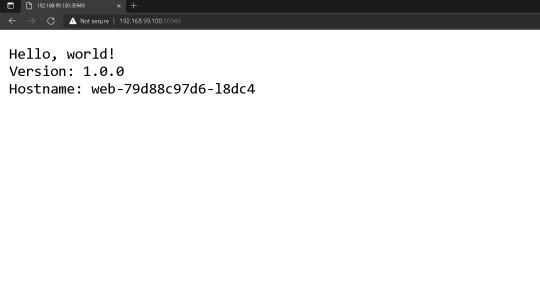


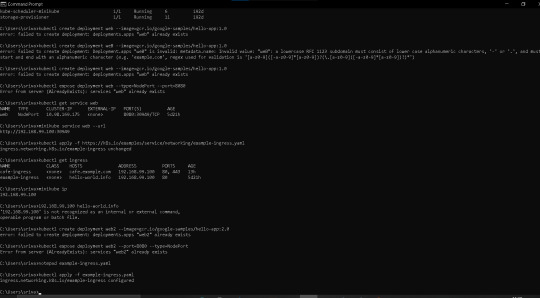
Configure nginx ingress controller with SSL certificate in minikube cluster First we start minikube command 1.minikube start then we have to enable ingress controller 2.minikube addons enable ingress Verify that the NGINX Ingress controller is running 3.kubectl get pods -n kube-system Create a Deployment 4,kubectl create deployment web --image=gcr.io/google-samples/hello-app:1.0 Expose the Deployment 5.kubectl expose deployment web --type=NodePort --port=8080 Verify the Service is created and is available on a node 6.kubectl get service web Created example-ingress.yaml 7.kubectl apply -f https://k8s.io/examples/service/networking/example-ingress.yaml Verify the IP address 8.kubectl get ingress adding this line to the bottom of /etc/hosts file 192.168.99.100 hello-world.info This sends requests from hello-world.info to Minikube Verify that the Ingress controller is directing traffic 9.curl hello-world.info
Create Second Deployment
a v2 Deployment
10.kubectl create deployment web2 --image=gcr.io/google-samples/hello-app:2.0
Expose the Deployment
10.kubectl expose deployment web2 --port=8080 --type=NodePort
add this lines in the example-ingress.yaml file
- path: /v2 pathType: Prefix backend: service: name: web2 port:
number: 8080
Apply the change
11.kubectl apply -f example-ingress.yaml
testing the ingress accessing the first version of hello world app
12.curl hello-world.info
2 notes
·
View notes
Text
My Homelab/Office 2020 - DFW Quarantine Edition

Moved into our first home almost a year ago (October 2019), I picked out a room that had 2 closets for my media/game/office area. Since the room isn't massive, I decided to build a desk into closet #1 to save on space. Here 1 of 2 shelves was ripped off, the back area was repainted gray. A piece of card board was hung to represent my 49 inch monitor and this setup also gave an idea how high I needed the desk.
On my top shelf this was the initial drop for all my Cat6 cabling in the house, I did 5 more runs after this (WAN is dropped here as well).

I measured the closet and then went to Home Depot to grab a countertop. Based on the dimensions, it needed to be cut into an object shape you would see on Tetris.

Getting to work, cutting the countertop.

My father-in-law helped me cut it to size in the driveway and then we framed the closet, added in kitchen cabinets to the bottom (used for storage and to hide a UPS). We ran electrical sockets inside the closet. I bought and painted 2 kitchen cabinets which I use for storage under my desk as well.

The holes allowed me to run cables under my desk much easier, I learned many of these techniques on Battlestations subreddit and Setup Wars on Youtube. My daughter was a good helper when it came to finding studs.
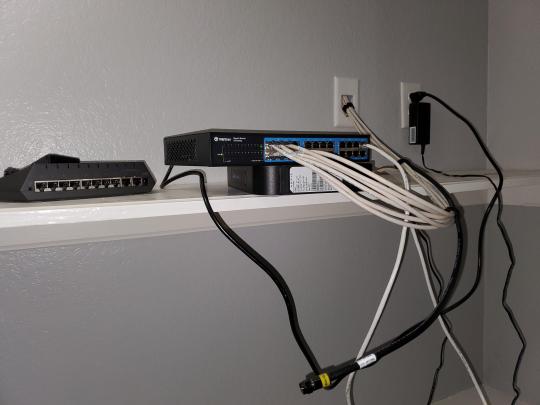
Some of my cousins are networking engineers, they advised me to go with Unifi devices. Here I mounted my Unifi 16 port switch, my Unifi Security Gateway (I'll try out pfSense sometime down the line), and my HD Homerun (big antenna is in the attic). I have Cat6 drops in each room in the house, so everything runs here. On my USG, I have both a LAN #2 and a LAN #1 line running to the 2nd closet in this room (server room). This shot is before the cable management.

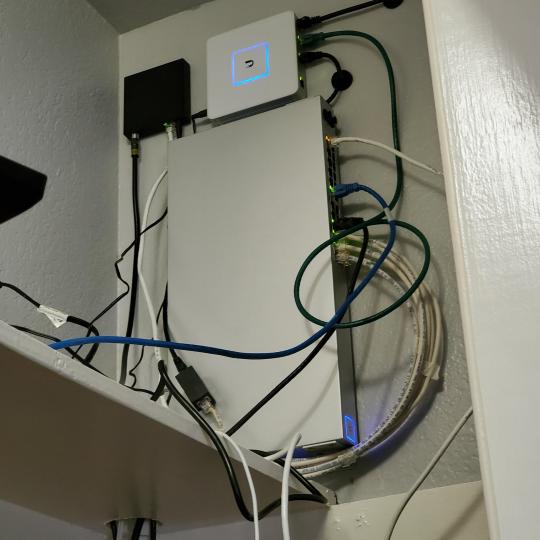
Cable management completed in closet #1. Added an access point and connected 3 old Raspberry Pi devices I had laying around (1 for PiHole - Adblocker, 1 for Unbound - Recursive DNS server, and 1 for Privoxy - Non Caching web proxy).

Rats nest of wires under my desk. I mounted an amplifier, optical DVD ROM drive, a USB hub that takes input from up to 4 computers (allows me to switch between servers in closet #2 with my USB mic, camera, keyboard, headset always functioning), and a small pull out drawer.

Cable management complete, night shot with with Nanoleaf wall lights. Unifi controller is mounted under the bookshelf, allows me to keep tabs on the network. I have a tablet on each side of the door frame (apps run on there that monitor my self hosted web services). I drilled a 3 inch hole on my desk to fit a grommet wireless phone charger. All my smart lights are either running on a schedule or turn on/off via an Alexa command. All of our smart devices across the house and outside, run on its on VLAN for segmentation purposes.

Quick shot with desk light off. I'm thinking in the future of doing a build that will mount to the wall (where "game over" is shown).

Wooting One keyboard with custom keycaps and Swiftpoint Z mouse, plus Stream Deck (I'm going to make a gaming comeback one day!).

Good wallpapers are hard to find with this resolution so pieced together my own.

Speakers and books at inside corner of desk.

Speakers and books at inside corner of desk.

Closet #2, first look (this is in the same room but off to the other side). Ran a few CAT6 cables from closet #1, into the attic and dropped here (one on LAN #1, the other on LAN #2 for USG). Had to add electrical sockets as well.

I have owned a ton of Thinkpads since my IBM days, I figured I could test hooking them all up and having them all specialize in different functions (yes, I have a Proxmox box but it's a decommissioned HP Microserver on the top shelf which is getting repurposed with TrueNAS_core). If you're wondering what OSes run on these laptops: Windows 10, Ubuntu, CentOS, AntiX. All of these units are hardwired into my managed Netgear 10gigabit switch (only my servers on the floor have 10 gigabit NICs useful to pass data between the two). Power strip is also mounted on the right side, next to another tablet used for monitoring. These laptop screens are usually turned off.
Computing inventory in image:
Lenovo Yoga Y500, Lenovo Thinkpad T420, Lenovo Thinkpad T430s, Lenovo Thinkpad Yoga 12, Lenovo Thinkpad Yoga 14, Lenovo Thinkpad W541 (used to self host my webservices), Lenovo S10-3T, and HP Microserver N54L

Left side of closet #2

**moved these Pis and unmanaged switch to outside part of closet**
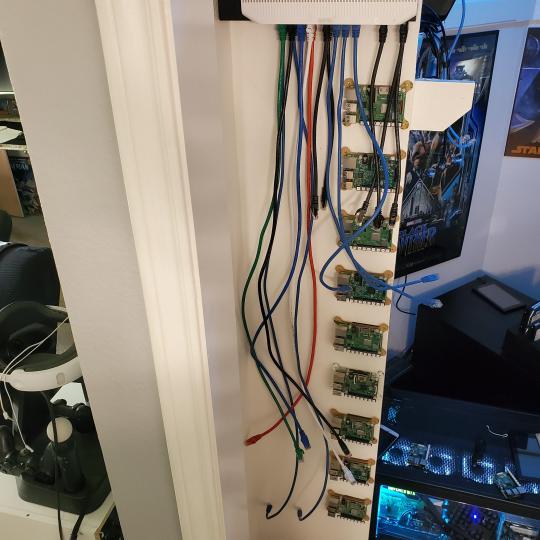
Since I have a bunch of Raspberry Pi 3s, I decided recently to get started with Kubernetes clusters (my time is limited but hoping to have everything going by the holidays 2020) via Rancher, headless. The next image will show the rest of the Pis but in total:
9x Raspberry Pi 3 and 2x Raspberry Pi 4
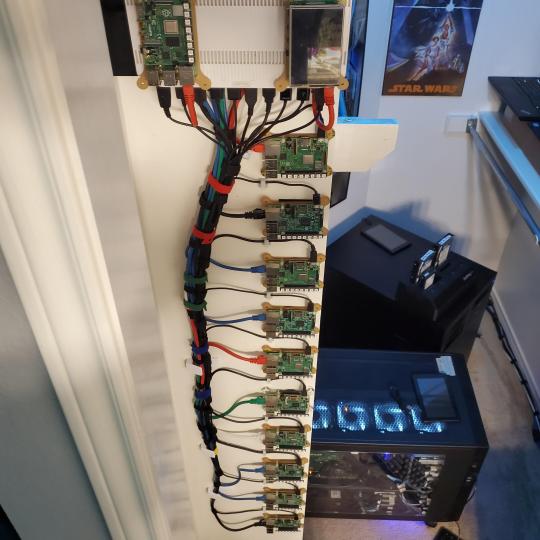
2nd shot with cable management. The idea is to get K3s going, there's Blinkt installed on each Pi, lights will indicate how many pods per node. The Pis are hardwired into a switch which is on LAN #2 (USG). I might also try out Docker Swarm simultaneously on my x86/x64 laptops. Here's my compose generic template (have to re-do the configs at a later data) but gives you an idea of the type of web services I am looking to run: https://gist.github.com/antoinesylvia/3af241cbfa1179ed7806d2cc1c67bd31
20 percent of my web services today run on Docker, the other 80 percent are native installs on Linux and or Windows. Looking to get that up to 90 percent by the summer of 2021.
Basic flow to call web services:
User <--> my.domain (Cloudflare 1st level) <--> (NGINX on-prem, using Auth_Request module with 2FA to unlock backend services) <--> App <--> DB.
If you ever need ideas for what apps to self-host: https://github.com/awesome-selfhosted/awesome-selfhosted

Homelabs get hot, so I had the HVAC folks to come out and install an exhaust in the ceiling and dampers in the attic.

I built my servers in the garage this past winter/spring, a little each night when my daughter allowed me to. The SLI build is actually for Parsec (think of it as a self hosted Stadia but authentication servers are still controlled by a 3rd party), I had the GPUs for years and never really used them until now.

Completed image of my 2 recent builds and old build from 2011.
Retroplex (left machine) - Intel 6850 i7 (6 core, 12 thread), GTX 1080, and 96GB DDR4 RAM. Powers the gaming experience.
Metroplex (middle machine) - AMD Threadripper 1950x (16 core, 32 thread), p2000 GPU, 128GB DDR4 RAM.
HQ 2011 (right machine) - AMD Bulldozer 8150 (8 cores), generic GPU (just so it can boot), 32GB DDR3 RAM.

I've been working and labbing so much, I haven't even connected my projector or installed a TV since moving in here 11 months ago. I'm also looking to get some VR going, headset and sensors are connected to my gaming server in closet #2. Anyhow, you see all my PS4 and retro consoles I had growing up such as Atari 2600, NES, Sega Genesis/32X, PS1, Dreamcast, PS2, PS3 and Game Gear. The joysticks are for emulation projects, I use a Front End called AttractMode and script out my own themes (building out a digital history gaming museum).

My longest CAT6 drop, from closet #1 to the opposite side of the room. Had to get in a very tight space in my attic to make this happen, I'm 6'8" for context. This allows me to connect this cord to my Unifi Flex Mini, so I can hardware my consoles (PS4, PS5 soon)

Homelab area includes a space for my daughter. She loves pressing power buttons on my servers on the floor, so I had to install decoy buttons and move the real buttons to the backside.

Next project, a bartop with a Raspberry Pi (Retropie project) which will be housed in an iCade shell, swapping out all the buttons. Always have tech projects going on. Small steps each day with limited time.
6 notes
·
View notes
Link
0 notes
Text
Kubernetes, abbreviated as K8s is an open-source tool used to orchestrate containerized workloads to run on a cluster of hosts. It is used to automate system deployments, scale, and manage containerized applications. Normally, Kubernetes distributes workloads across the cluster and automates the container networking needs. It also allocates storage and persistent volumes and works continuously to maintain the desired state of container applications. There are several tools one can use to set up a Kubernetes cluster. These tools include Minikube, Kubeadm, Kubernetes on AWS (Kube-AWS), Amazon EKS e.t.c. In this guide, we will walk through how to deploy HA Kubernetes Cluster on Rocky Linux 8 using RKE2. What is RKE2? RKE stands for Rancher Kubernetes Engine. RKE2 also known as the (RKE Government) is a combination of RKE1 and K3s. It inherits usability, ease-of-operations, and deployment model from K3s and close alignment with upstream Kubernetes from RKE1. Normally, RKE2 doesn’t rely on docker, it launches the control plane components as static pods that are managed by the kubelet. The diagram below will help you understand the RKE2 cluster topology. RKE2 ships a number of open-source components that include: K3s Helm Controller K8s API Server Controller Manager Kubelet SchedulerSet up Linux Nodes Proxy etcd containerd/cri runc Helm Metrics Server NGINX Ingress Controller CoreDNS CNI: Canal (Calico & Flannel), Cilium or Calico System Requirements Use a system that meets the below requirements: RAM: 4GB Minimum (we recommend at least 8GB) CPU: 2 Minimum (we recommend at least 4CPU) 3 Rocky Linux 8 Nodes Zero or more agent nodes that are designated to run your apps and services A load balancer to direct front-end traffic to the three nodes. A DNS record to map a URL to the load balancer Step 1 – Set up Rocky Linux 8 Nodes For this guide, we will use 3 Rocky Linux nodes, a load balancer, and RKE2 agents(1 or more). TASK HOSTNAME IP ADDRESS Server Node 1 server1.computingpost.com 192.168.205.2 Server Node 2 server2.computingpost.com 192.168.205.3 Server Node 3 server3.computingpost.com 192.168.205.33 Load Balancer rke.computingpost.com 192.168.205.9 Agent Node1 agent1.computingpost.com 192.168.205.43 Agent Node2 agent2.computingpost.com 192.168.205.44 Set the hostnames as shown: ##On Node1 sudo hostnamectl set-hostname server1.computingpost.com ##On Node2 sudo hostnamectl set-hostname server2.computingpost.com ##On Node3 sudo hostnamectl set-hostname server3.computingpost.com ##On Loadbalancer(Node4) sudo hostnamectl set-hostname rke.computingpost.com ##On Node5 sudo hostnamectl set-hostname agent1.computingpost.com ##On Node6 sudo hostnamectl set-hostname agent2.computingpost.com Add the hostnames to /etc/hosts on each node $ sudo vim /etc/hosts 192.168.205.2 server1.computingpost.com 192.168.205.3 server2.computingpost.com 192.168.205.33 server3.computingpost.com 192.168.205.43 agent1.computingpost.com 192.168.205.44 agent2.computingpost.com 192.168.205.9 rke.computingpost.com Configure the firewall on all the nodes as shown: sudo systemctl stop firewalld sudo systemctl disable firewalld sudo systemctl start nftables sudo systemctl enable nftables Step 2 – Configure the Fixed Registration Address To achieve high availability, you are required to set up an odd number of server plane nodes(runs etcd, the Kubernetes API, and other control plane services). The other server nodes and agent nodes need a URL they can use to register against. This is either an IP or domain name of any of the control nodes. This is mainly done to maintain quorum so that the cluster can afford to lose connection with one of the nodes without impacting the functionality cluster. This can be achieved using the following: A layer 4 (TCP) load balancer
Round-robin DNS Virtual or elastic IP addresses In this guide, we will configure NGINX as a layer 4 (TCP) load balancer to forward the connection to one of the RKE nodes. Install and configure Nginx on Node4 sudo yum install nginx Create a config file: sudo mv /etc/nginx/nginx.conf /etc/nginx/nginx.conf.bak sudo vim /etc/nginx/nginx.conf Create a new Nginx file with the below lines replacing where required: user nginx; worker_processes 4; worker_rlimit_nofile 40000; error_log /var/log/nginx/error.log; pid /run/nginx.pid; # Load dynamic modules. See /usr/share/doc/nginx/README.dynamic. include /usr/share/nginx/modules/*.conf; events worker_connections 8192; stream upstream backend least_conn; server :9345 max_fails=3 fail_timeout=5s; server :9345 max_fails=3 fail_timeout=5s; server :9345 max_fails=3 fail_timeout=5s; # This server accepts all traffic to port 9345 and passes it to the upstream. # Notice that the upstream name and the proxy_pass need to match. server listen 9345; proxy_pass backend; upstream rancher_api least_conn; server :6443 max_fails=3 fail_timeout=5s; server :6443 max_fails=3 fail_timeout=5s; server :6443 max_fails=3 fail_timeout=5s; server listen 6443; proxy_pass rancher_api; upstream rancher_http least_conn; server 192.168.205.2:80 max_fails=3 fail_timeout=5s; server 192.168.205.3:80 max_fails=3 fail_timeout=5s; server 192.168.205.33:80 max_fails=3 fail_timeout=5s; server listen 80; proxy_pass rancher_http; upstream rancher_https least_conn; server 192.168.205.2:443 max_fails=3 fail_timeout=5s; server 192.168.205.3:443 max_fails=3 fail_timeout=5s; server 192.168.205.33:443 max_fails=3 fail_timeout=5s; server listen 443; proxy_pass rancher_https; Save the file, disable SELinux and restart Nginx: sudo setenforce 0 sudo systemctl restart nginx Step 3 – Download installer script on Rocky Linux 8 Nodes All the Rocky Linux 8 nodes intended for this use need to be configured with the RKE2 repositories that provide the required packages. Instal curl tool on your system: sudo yum -y install curl vim wget With curl download the script used to install RKE2 server on your Rocky Linux 8 servers. curl -sfL https://get.rke2.io --output install.sh Make the script executable: chmod +x install.sh To see script usage options run: less ./install.sh Once added, you can install and configure both the RKE2 server and agent on the desired nodes. Step 4 – Set up the First Server Node (Master Node) Install RKE2 server: sudo INSTALL_RKE2_TYPE=server ./install.sh Expected output: [INFO] finding release for channel stable [INFO] using 1.23 series from channel stable Rocky Linux 8 - AppStream 19 kB/s | 4.8 kB 00:00 Rocky Linux 8 - AppStream 11 MB/s | 9.6 MB 00:00 Rocky Linux 8 - BaseOS 18 kB/s | 4.3 kB 00:00 Rocky Linux 8 - BaseOS 11 MB/s | 6.7 MB 00:00 Rocky Linux 8 - Extras 13 kB/s | 3.5 kB 00:00
Rocky Linux 8 - Extras 41 kB/s | 11 kB 00:00 Rancher RKE2 Common (stable) 1.7 kB/s | 1.7 kB 00:00 Rancher RKE2 1.23 (stable) 4.8 kB/s | 4.6 kB 00:00 Dependencies resolved. ====================================================================================================================================================================================================== ....... Transaction Summary ====================================================================================================================================================================================================== Install 5 Packages Total download size: 34 M Installed size: 166 M Downloading Packages: ..... Once installed, you need to create a config file manually. The config file contains the tls-sanparameter which avoids certificate errors with the fixed registration address. The config file can be created with the command: sudo vim /etc/rancher/rke2/config.yaml Add the below lines to the file replacing where required. write-kubeconfig-mode: "0644" tls-san: - rke.computingpost.com - 192.168.205.9 Replace rke.computingpost.com with your fixed registration address and 192.168.205.9 with its IP address. Save the file and start the service; sudo systemctl start rke2-server sudo systemctl enable rke2-server Confirm status of the service after starting it: $ systemctl status rke2-server ● rke2-server.service - Rancher Kubernetes Engine v2 (server) Loaded: loaded (/usr/lib/systemd/system/rke2-server.service; disabled; vendor preset: disabled) Active: active (running) since Sat 2022-08-27 10:17:17 UTC; 1min 32s ago Docs: https://github.com/rancher/rke2#readme Process: 3582 ExecStartPre=/sbin/modprobe overlay (code=exited, status=0/SUCCESS) Process: 3576 ExecStartPre=/sbin/modprobe br_netfilter (code=exited, status=0/SUCCESS) Process: 3573 ExecStartPre=/bin/sh -xc ! /usr/bin/systemctl is-enabled --quiet nm-cloud-setup.service (code=exited, status=0/SUCCESS) Main PID: 3587 (rke2) Tasks: 163 Memory: 1.8G CGroup: /system.slice/rke2-server.service ├─3587 /usr/bin/rke2 server .... Install kubectl curl -LO "https://storage.googleapis.com/kubernetes-release/release/$(curl -s https://storage.googleapis.com/kubernetes-release/release/stable.txt)/bin/linux/amd64/kubectl" chmod +x kubectl sudo mv kubectl /usr/local/bin Export the config: $ vim ~/.bashrc #Add line below export PATH=$PATH:/var/lib/rancher/rke2/bin export KUBECONFIG=/etc/rancher/rke2/rke2.yaml #Source bashrc file $ source ~/.bashrc After some time, check if the node and pods are up: kubectl get nodes kubectl get pods -A Sample Output: Obtain the token: $ sudo cat /var/lib/rancher/rke2/server/node-token K1079187d01ac73b1a17261a475cb1b8486144543fc59a189e0c4533ef252a26450::server:33f5c1a2b7721992be25e340ded19cac Accessing the Cluster from Outside with kubectl Copy /etc/rancher/rke2/rke2.yaml on your machine located outside the cluster as ~/.kube/config. Then replace 127.0.0.1 with the IP or hostname of your RKE2 server. kubectl can now manage your RKE2 cluster. scp /etc/rancher/rke2/rke2.yaml user@ipaddress:~/.kube/config Step 5 – Set up additional Server Nodes (Master Nodes) Now install RKE2 on the other two server nodes; curl -sfL https://get.rke2.io --output install.sh chmod +x install.sh sudo INSTALL_RKE2_TYPE=server ./install.sh Once installed, create the config file: sudo vim /etc/rancher/rke2/config.yaml Add the below lines to the file server: https://rke.computingpost.com:9345
token: [token from /var/lib/rancher/rke2/server/node-token on server node 1] write-kubeconfig-mode: "0644" tls-san: - rke.computingpost.com If you don’t have DNS server map A record for Load Balancer in /etc/hosts file: $ sudo vi /etc/hosts 192.168.205.9 rke.computingpost.com Save the file and restart the rke2-server each at a time sudo systemctl start rke2-server sudo systemctl enable rke2-server After some time, check the status of the nodes We have 3 master nodes configured. Step 6 – Set up Agent Nodes (Worker Nodes) To set up an agent node, install the RKE2 agent package using the commands below: curl -sfL https://get.rke2.io --output install.sh chmod +x install.sh sudo INSTALL_RKE2_TYPE=agent ./install.sh If you don’t have DNS server map A record for Load Balancer in /etc/hosts file: $ sudo vi /etc/hosts 192.168.205.9 rke.computingpost.com Create and modify configuration file to suit your use. $ sudo vim /etc/rancher/rke2/config.yaml server: https://rke.computingpost.com:9345 token: [token from /var/lib/rancher/rke2/server/node-token on server node 1] Start and enable the service: sudo systemctl start rke2-agent sudo systemctl enable rke2-agent Check the nodes: From the output, we have one agent node added to the cluster. Check pods. This output shows all the pods available, we have pods for the rke2 ingress and metrics deployed by default in the kube-system namespace. Step 7 – Deploy an Application. Once the above configurations have been made, deploy and application on your cluster. For this guide, we will deploy a demo Nginx application. kubectl apply -f -
0 notes
Text
The Top 7 Information Security Courses for a Promising Career

Businesses are eager to hire highly skilled professionals to safeguard their sensitive data, fueling rapid growth in the information security job sector. According to some experts, by the end of 2021, this sector will employ more than 3 million people. In addition to high demand, employers are offering high pay scales. As a result, it's no surprise that cyber security certification are among the most in-demand courses.
If you want to pursue it as a professional career, you should think about taking introductory courses that will help you get started in information security.
As a result, we've compiled a list of the top seven courses that will teach you the fundamentals and advanced concepts of cyber security, information security, and cloud security.
Course on Ethical Hacking Boot Camp:
Hacker with values Bootcamp is a must-attend course if you want to break into this burgeoning industry. Current and prospective students can use this course to prepare for interviews and certification exams in order to advance their careers.
Furthermore, you will be able to learn from highly knowledgeable professionals in an interactive setting, giving you the best learning experience possible.
Students will become acquainted with critical issues affecting the information security industry, as well as penetration testing and incident management procedures. You will also be able to research high-demand professional information security roles.
Cloud Security Professional (CCSP):
You can demonstrate to your employer that you have advanced technical knowledge and skills for designing, managing, and securing data, infrastructure, and applications in the cloud by earning the title of CCSP.
Furthermore, the certification will provide you with career guidance from cybersecurity professional leader communities.
Fundamentals of Information Security Management:
With this certification, you will learn how to protect your system and business-critical data from cyber attackers. You'll also learn about key aspects of software, hardware, and network security. In addition, you will learn about well-known security technology, concepts, and controls. In addition, there will be a brief training on incident response, risk management, and disaster recovery. It is one of the most effective types of online cyber security training courses.
NGINX: From Novice to Expert by 2021:
This is the course for you if you want to master NGINX. WordPress, Netflix, and Dropbox are just a few of the well-known business websites that use the HTTP server. By taking this course, you will learn how to create complex environments such as reverse proxy, load balancing, and caching.
Docker Certified Professional:
This course will assist your potential employer in comprehending your knowledge and experience with Docker server application implementation. Docker also aids in containerization, which is the grouping of applications into modules that the system can easily mimic and scale autonomously.
With more applications migrating to the cloud, having docker expertise will undoubtedly make you a sought-after candidate in today's technological world.
Splunk's Ascension from Beginner to Architect
This course will teach you how to search, use fields and look-ups, create alerts, dashboards, and basic statistical reports in Splunk cloud and Splunk enterprise.
You will also demonstrate your ability to navigate and use Splunk software with the entry-level certification. Splunk certifications are also known for getting people hired quickly and for a good salary. Aside from that, the majority of employers seek candidates with Splunk experience.
AWS Solutions Architect Certification
It is one of the most important and sought-after cloud computing certifications, and anyone considering a career in information security should consider getting one.
This course will provide you with hands-on experience with the most recent AWS technology, allowing you to use a wide range of AWS services such as computing, networking, database, and storage. You'll also learn how to use the AWS management and deployment services.
You will also learn about running workloads on AWS and deploying security compliance and controls.
In this course, you will learn how to use the AWS command-line interface as well as the AWS management console. Companies typically seek candidates who can comprehend the technical requirements of an AWS-based application that they use in the workplace. You may become a valuable asset to the company as a result of your assistance.
Conclusion
There are numerous cyber security certifications online courses available to assist you in furthering your information security career. Employers, on the other hand, are always looking for the seven courses mentioned above. As a result, it's a good idea to limit your certifications to the absolute necessities.
To stay up to date on such important information, follow the GLOBAL TECH COUNCIL.
#cyber security training certification#cyber security professional#cyber security engineer certifications#cyber security training online#online training#online certification courses
0 notes
Text
Tips to Hire Expert ASP.Net Developers

ASP.NET is an open-source server-side web application framework designed for web development that produces dynamic websites. Developed and introduced in 2002 by Microsoft, ASP.NET helps developers build expert websites, web apps, and web-based services. Hire dot net developer.ASP.NET enhances the .NET developer platform by providing tools and libraries designed specifically for building web-based applications. .NET is an application platform for developers made up of programming languages, tools, and libraries that can be used to create various kinds of applications. Hire Asp.Net Developer
Services of ASP.NET
Fast and Scalable
Hire .net developer. ASP.NET offers the highest performance and speed compared to other web frameworks.
Make Secure Apps
They are offering industry-standard authentication protocols. ASP.NET built-in features provide vital protection for applications against Cross-site scripting (XSS) and cross-site request forgery (CSRF). ASP.NET supports multi-factor authentication as well as external authentication via Google, Twitter, and many more.
Active Community and Open Source
Get fast answers to your questions by joining an engaged community of programmers in Stack Overflow, ASP.NET forums, and many others.
Cross-Platform
Code can run natively on any operating system that supports it, including C#, F#, or Visual Basic. A variety of .NET implementations do the bulk of the work. The .NET framework offers a robust guide for desktop applications and more for Windows.
Libraries
Microsoft and others keep an active package ecosystem based around the .NET Standard to improve and increase capabilities.
Evolved Framework
There are millions of applications that have been developed with .NET in various fields. Build native applications for Windows, iOS, and Android using existing C# skills. You could even employ an expert C# programmer to meet your requirements.
Writing in a language that is continuously evolving and stable is essential. It makes life easier and more enjoyable, but it can also boost employees' productivity and, in certain instances, helps avoid expelled errors and bugs.
Model Binding
Do you know that due to model binding, Razor controllers and pages can work using data derived directly from requests made via HTTP? Concerning this, you will be able to instantly and effortlessly obtain valuable information, with no need to code once more.
This model binding technique extracts information from various sources, such as routes, fields, or inquiry strings. Also, this program provides details to razor pages and controllers within the public domain, as well as parameters and properties.
Asynchronous programming patterns
When you use ASP.NET, you can enjoy excellent help with Asynchronous programming patterns. Async is present across every class in the .NET Framework and most of the libraries.
One of the primary reasons why ASP.NET Core is quicker is the extensive use of synchronous patterns within the developed MVC Frameworks.
Simple to keep
You don't need to think of a lot to grasp this part. The reason for this is easy and sensible. The logic is that it's simple to maintain a smaller amount of code than complicated ones.
It might not be easy for those who have just started as a developer to master this technique. However, for an experienced developer, he knows how to optimize all code within ASP.NET The Core.
It is essential to stay up-to-date with all the most current improvements for language development. Continuously research and study the latest changes to the programming language.
Optimize Data Access
Have you ever thought about the fact that accessing data is among the slowest tasks in any program? It is exhausting and dropping for many developers at times.
One must connect all data access to APIs asynchronously. It is necessary to cut down on roundtrips to the database and retrieve only the needed data. Try not to use projection queries in a collection. In a place where you're using Entity Framework Core to connect to data, be sure that you adhere to the rules and guidelines within Entity Framework Core.
However, on the other side, if you're using a program that does not allow data to be changed by the program, It is suggested that you use the non-tracking query.
Characteristics of ASP.Net
Cross-platform support
With the development of technology today, developers can benefit from cross-platform features through ASP.Net and use the solution for Windows, Linus, and Mac OS.
More reliable performance
Performance is the first aspect when developing projects with the most recent update to the ASP. Net framework. Developers are now able to enjoy improved performance and speed when creating web-based applications. An ASP.Net specialist will notice the changes in the performance of applications developed using ASP. Net technology in comparison to other options. Other features such as networking and concurrency, compression, and serialization can compute with more incredible speed in the latest version.
Additionally, it reduces it is also smaller in size. HTTP request size has been decreased to 2Kb, which further improves the performance.
Applications hosted by self-hosted
ASP.net developers can now build self-hosted applications with the technology without relying on the Internet Information Service(IIS). The applications are hosted by themselves. When it is about Linux systems, web applications are hosted with Nginx. IIS and Nginx provide opposite proxy support for these types of applications.
Support of SignalR Java Client
SignalR Java client is comprised of components of Javascript on both the client as well as server sides. Designed especially for .Net Framework, The SignalR Java Client library permits the server to send out asynchronous notifications to applications installed on the client-side. Developers can utilize this client to include features in the application in real-time. Besides this, the client chooses the most appropriate method of transportation depending on the available resources on both the server and the client-side.
The razor page's introduction
A new feature in ASP.Net includes the creation of razor pages. The pages simplify the coding process and increase efficiency. With these pages, developers cannot develop self-sufficient views for controllers that allow them to create scenarios that are related to development. The ease of making these scenarios lets developers get a good overview of the entire architecture of the software.
Development Models
Web
Develop web-based applications and services on various platforms, including Windows, Linux, macOS, and Docker.
Mobile
A single codebase enables you to create native mobile applications on iOS, Android, and Windows.
Desktop
Create stunning and persuasive desktop applications designed for Windows or macOS.
Microservices
Microservices that can be individually used and are run by Docker container.
Gaming
Design engaging and well-known 2D and 3D-based games agreeable with the most popular PCs, smartphones, consoles, and desktops.
Machine Learning
Use different vision algorithms, prediction models, speech processors, and much more to your applications.
Cloud
Consume cloud services that are already available or design and launch an app of your own.
Internet of Things
Create IoT applications that have an integrated support system as well as other single-board computers.
Here are Tips to Hire Remote ASP.NET Developers
Professional technical screening of .NET developer abilities in a video or phone interview.
It is essential to screen ASP.NET developers to draw what skills they possess. To employ committed remote ASP.Net developers, you must know the candidate's background and technical knowledge by asking them direct questions about the skills you're looking to confirm. You can ask questions regarding ASP.NET MVC and know developers' capabilities to build reliable and secure web-based apps. The questions you ask must be different based on the job you're looking to fill and the skills you are looking to approve.
Online Coding Test
Online coding tests can be an excellent method of explaining the experience of ASP.NET developers. Performing online coding tests could assist in evaluating applicants more effectively than interview screening or resume screening.
Based on your business's strategy, coding tests can are an excellent method for screening .NET developer abilities or an additional option, in addition to an analysis of the resume and a phone meeting. Keep examining to find programming tests that will simplify your screening process for technical skills and what should be included to give precise details.
Many companies are turning to coding tests as the primary screening method, as they offer IT recruiters two significant advantages:
Tests on the internet should prove not just .NET developer abilities but also the knowledge of buildings and frameworks.
.NET Coding tests must include programming tasks that are to the roles that candidates are expected to fulfill when they are hired.
They are thinking about creating .NET programming tasks that are based on the code of the company. This is one of the best methods to imitate the job candidates' problems when they are hired.
A programming task that will review challenges in coding.
.NET Developer skills provide information on the applicant's background, his approach to code quality, and how effectively they debug and identify the traps.
Coding tests demonstrate an interest in the selection process, which has an impact that is positive on the candidate's involvement.
Measure the Experience Level
Experience working on massive projects that require a large amount of information. This suggests that the candidate may be able to tackle problems that may arise during every IT project.
Developers are invited to gatherings and programming events is an indication that the applicant is aware of the latest trends and best practices. It is possible to be a skilled and passionate developer.
Suppose a developer is involved in Open-source projects or is a member in meetings. The candidate is informed of .NET technology and is likely to be a part of the project.
0 notes