#webserver
Explore tagged Tumblr posts
Visit Tumblr Blog
Explore Tumblr blogs with no restrictions, modern design and the best experience.
Last Seen Tumblr Blogs


Fun Fact
Average visit duration of Tumblr.com is 10 mins and 25 secs.
Text
How Does VPS Hosting Works?
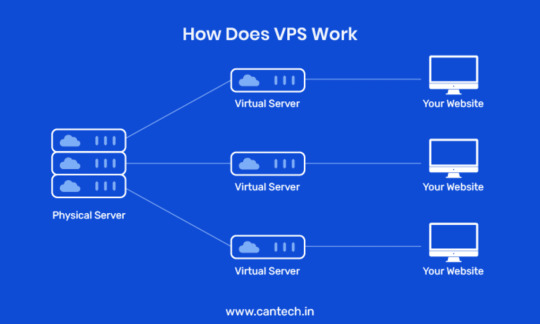
VPS hosting divides a powerful physical server into multiple virtual servers. This gives you exclusive access to your own dedicated resources (CPU, RAM, and disk space), providing greater control and flexibility than shared hosting. With root or admin access, you can customize your server environment, install software, and optimize performance to fit your specific website or application needs.
2 notes
·
View notes
Text
Follow me on my road to success part 2
For this part I have done some research and came up with a couple ways to start generating money with the blog.
Since I have some posts on the blog already I can add Google Adsense to my page. This gives me a way to generate Money from incoming traffic that views my advertisements. This is the most common way but this takes a lot of time since you will not be allowed to start right away. Your website needs to have a certain amount of content and it needs to be unique and not generated as far as I can tell.
I have send my website in for approval, and when you start seeing advertisements on this website you can see that it works, but I will post an update once it approves.
The Progress so far.
Configure a webserver on an old computer
Install wordpress
Start blogging on https://prosperitytactics.com and on https://www.tumblr.com/blog/every-penny
Write articles and keeping score.
For now I am at a 10 hour time investment and have invested my 10 dollar into the domain name.
I really hope that this works out. Keep you updated.
#Road to success#Online success#online business#blog#website#webserver#web series#monitize website#make money#online money making#moneyyourney#online#business#bloggin#money making#print money
2 notes
·
View notes
Text
Project Zomboid Dedicated Server: Easy Steps to Becoming an Expert!
Project Zomboid Dedicated Server: A Complete Guide for Beginners :
Project Zomboid is a popular survival horror video game set in an apocalyptic future plagued by zombies. It offers a unique multiplayer experience, and one way to further improve the gameplay is by setting up a dedicated server. This article aims to provide beginners with an in-depth understanding of dedicated servers for Project Zomboid and assist them in developing their own dedicated server.
6 notes
·
View notes
Text
Meaning of Bare Metal Server?
To understand the meaning of a bare metal server let’s understand the meaning of a web server, A web server can be said to be software or hardware that stores all the website’s files responds to client requests, and delivers the required files accordingly via the internet. The Meaning of Bare Metal server in simplest words can be said as a server that is created for a single person only with the most premium technology that can be availed in a physical server only i.e. it cannot be available virtually.
Meaning of Bare Metal Server
A bare metal server is a physical server, it is a kind of server that is dedicated to a single tenant, In a virtualized server the hardware resources such as CPU, RAM, Storage etc. are shared while here all of the resources are used by a single person only and are chosen as per our choice, as there is no co-dependency in this kind of server it not only facilitates the increased performance of the server but also reduces hustle as it removes additional layers of software that are put into making server services available virtually.
Here there’s also an additional benefit of making the server as customized as possible, As there is only a single user and the server is available physically, It can be created to please and cater to your needs. let’s understand how it can be customised to an extent:
Personalized selection of hardware components such as CPU, type of RAM, and Storage.
There can be an option to choose any kind of Operating System that is compatible with your website
In a bare metal server, you can have firewall rules to suit your application’s requirements which include defining IP addresses, setting up virtual LANs (VLANs), managing network security policies, etc.
In a bare metal Server, there is access to the server’s BIOS (Basic Input/Output System), which allows for low-level hardware configurations, such as hardware virtualization settings, and power management options.

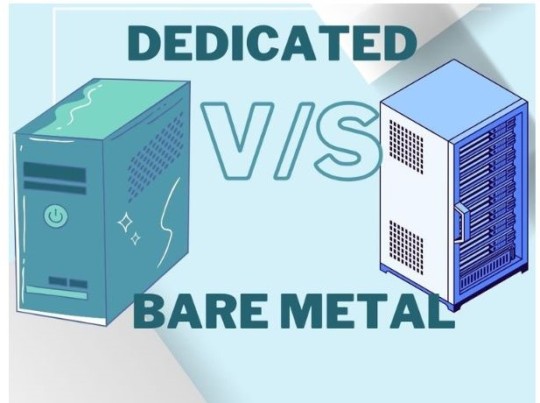
Understanding the Difference between a Dedicated Server and a Bare Metal Server
As the working of bare metal server and dedicated server is quite similar, they both have resemblance such as they both are dedicated to a single tenant but they can’t be said as the same, The root difference doesn’t lie in the product but the working of the server the concept of bare metal servers arrived after some drawbacks of a dedicated server.
While a dedicated server provides multiple benefits it has some inevitable drawbacks such as dated hardware and long provisioning times. However, bare metal servers typically come with the most advanced hardware and software. They are a hosting provider’s prized asset or flagship because bare metal servers are specifically made to automate the provisioning process, they may be put up more quickly.
The hardware provided by bare metal servers is considerably more similar to a cloud service framework, with installation durations measured in minutes or hours and hardware ranging from low-cost to Top-of-the-line components, including graphics processing units (GPU). When it comes to hardware, bare-metal servers have an advantage thanks to their use of the most recent Intel Xeon processors, DDR4 RAM with Error Correcting Code (ECC), and NVMe solid-state drives (SSDs) rather than SATA SSDs and hard drives. Because of the combination of these components, In conclusion, bare-metal servers stand out as a high-performance hosting solution.
2 notes
·
View notes
Text
Automating My Server Management with Ansible and GitHub Actions
Managing multiple servers can be a daunting task, especially when striving for consistency and efficiency. To tackle this challenge, I developed a robust automation system using Ansible, GitHub Actions, and Vagrant. This setup not only streamlines server configuration but also ensures that deployments are repeatable and maintainable. A Bit of History: How It All Started This project began out…
0 notes
Link
#autoSSL#Automation#cloud#configuration#containerization#DevOps#Docker#HTTPS#Let'sEncrypt#Linux#networking#NGINX#proxyserver#reverseproxy#Security#self-hosted#servermanagement#systemadministration#TLS#Traefik#webserver
0 notes
Text

#OpenLiteSpeed vs. #LiteSpeedEnterprise: nejrychlejší webservery dneška
zevrubná #studie: https://danielberanek.cz/studie-webserveru-openlitespeed-vs-litespeed-enterprise/
#SEO #technickeSEO
#openlitespeed#litespeedenterprise#webserver#server#seo#technicalseo#seospecialistaacopywriterdanielberanek
1 note
·
View note
Text
What is a web server?
A web server is the backbone of the internet! It stores, processes, and delivers web pages to your browser.
#WebServer#TechExplained#WebDevelopment#ServerBasics#InternetTech#TechTalk#WebHosting#DigitalWorld#ITEssentials
0 notes
Text
⚙️ Cách cài đặt và kích hoạt cURL trên máy chủ OpenLiteSpeed
-- OpenLiteSpeed là một phiên bản mã nguồn mở của LiteSpeed Web Server, một trong những máy chủ web hiệu suất cao, phổ biến dành cho việc lưu trữ trang web. Bài viết này sẽ giúp các bạn biết cách cài đặt và kích hoạt cURL trên máy chủ OpenLiteSpeed, một công cụ vô cùng mạnh mẽ và hữu ích -- cURL là một công cụ mạnh mẽ giúp máy chủ OpenLiteSpeed giao tiếp với các dịch vụ web khác. Nó thực hiện các yêu cầu HTTP để trao đổi dữ liệu, tải tệp, kiểm tra kết nối và gỡ lỗi mạng, hỗ trợ phát triển các ứng dụng web có khả năng tích hợp tốt với nhiều dịch vụ trực tuyến khác.
0 notes
Text

Host Your Videos Without Limits with QloudHost
0 notes
Text
What is Bare Metal Hypervisor?
A bare-metal hypervisor is a virtualization platform that runs directly on physical hardware, without the need for a host operating system. It allows multiple virtual machines (VMs) to run independently on the same physical server, with each VM having its own operating system. This type of hypervisor offers high performance and efficiency by providing direct access to the hardware, making it ideal for data centers and environments requiring resource-intensive applications. Examples of bare-metal hypervisors include VMware vSphere, Microsoft Hyper-V, and Xen.
0 notes
Text
Follow me on my road to success part 1
I have successfully started the computer and made it into a webserver. I have connected it to the internet.
I got a DM from someone telling me that I could buy or rent a server online but I try to keep it as cheap as possible since I don’t know if this will work out or not.
Then I installed a Wordpress with a theme that I downloaded for free. I have put on some interesting posts about differences between rich and poor people and some basic tips and tricks that I will try out in this series.
Now that this website is up and I spend almost 10 hours of writing articles for on the blog I need a way to get this website known to people and to monetise the website.
I think the website will be interesting since I post this series on there too. The idea is to show you what I do while I do it and you can follow along. Maybe we will both benefit from each other.
If someone has a good tip or a way to monetise the website please let me know in a direct message and maybe I will try it out.
#Road to success#Online success#online business#blog#website#webserver#web series#monitize website#make money#online money making
2 notes
·
View notes
Text
What is a Web Server?

Learn how web servers send websites to your devices! A quick and easy guide to understanding this key part of the internet.
0 notes
Text
Who cares about IBM i Webservers?
Why should I learn about webservers on the IBM i System? Do you ever lay in bed asking yourself that question? I did. But now I lay in bed asking myself more annoying questions like “Why is my webservice not able to read that location in the IFS?” or even the nightmare scenario of suddenly jerking awake with a realisation that you are using the wrong CCSID and that’s what has cost you 2 days of…
0 notes
Text
MicroPython mit ESP32: Einrichten eines HTTP-Servers

In diesem Beitrag zeige ich dir, wie du mit deinem ESP32 und MicroPython einen einfachen HTTP-Server einrichtest und eine kleine Webseite auslieferst. Im letzten Beitrag habe ich bereits gezeigt, wie man einen Access Point erstellt und sich mit dem Handy verbindet. Hier möchte ich nun den nächsten Schritt wagen und eine kleine Webseite ausliefern, die zunächst eine Begrüßung anzeigt und anschließend die Sensordaten eines DHT11-Sensors vom Rich Shield von Open Smart darstellt. Dadurch erhältst du eine interaktive Möglichkeit, die Daten deines ESP32 über das Web zu überwachen und anzuzeigen. https://youtu.be/klbPSt14XbA
Was ist ein HTTP-Server?
Ein HTTP-Server ist ein Programm, das auf einem Computer oder Mikrocontroller läuft und Anfragen von Webbrowsern entgegennimmt. Wenn du eine Webseite in deinem Browser öffnest, sendet der Browser eine Anfrage an den HTTP-Server, der die gewünschte Seite zurückschickt. Der Server sorgt also dafür, dass Webseiten und Daten an deinen Browser geliefert werden. Für deinen ESP32 bedeutet das, dass du mit einem HTTP-Server die Daten deines Mikrocontrollers über eine Webseite anzeigen kannst. So kannst du zum Beispiel Sensordaten in Echtzeit überwachen und auf einer Webseite anzeigen lassen.
Was du benötigst
Um dieses Projekt durchzuführen, benötigst du die folgenden Komponenten und Werkzeuge: - ESP32 D1 R32 Board* - MicroPython Firmware auf dem ESP32 - Entwicklungsumgebung (z.B. Thonny oder uPyCraft) - DHT11 Sensor (zbsp. vom Rich Shield von Open Smart) - Ein Gerät (z.B. Smartphone oder Laptop) zur Verbindung mit dem Access Point Im ersten Schritt richten wir einen Access Point (AP) ein, damit du eine direkte Verbindung zu deinem ESP32 herstellen kannst. Ein Access Point ermöglicht es, dass dein ESP32 ein eigenes WLAN-Netzwerk erstellt, mit dem du dich verbinden kannst. Dies ist besonders praktisch, wenn kein anderes WLAN in der Nähe verfügbar ist oder du eine isolierte Verbindung für dein Projekt benötigst. Hinweis von mir: Die mit einem Sternchen (*) markierten Links sind Affiliate-Links. Wenn du über diese Links einkaufst, erhalte ich eine kleine Provision, die dazu beiträgt, diesen Blog zu unterstützen. Der Preis für dich bleibt dabei unverändert. Vielen Dank für deine Unterstützung!
Programmieren eines kleinen HTTP-Server mit MicroPython auf dem ESP32
Im ersten Schritt richten wir einen Access Point (AP) auf dem ESP32 ein, damit du eine direkte Verbindung zu deinem Mikrocontroller herstellen kannst. Dazu verwenden wir den folgenden MicroPython-Code aus dem letzten Beitrag: import network # Access Point erstellen ap = network.WLAN(network.AP_IF) ap.active(True) ap.config(essid='ESP32', password='12345678', authmode=network.AUTH_WPA_PSK) while ap.active() == False: pass print('Access Point aktiv') print(ap.ifconfig()) try: while True: pass except KeyboardInterrupt: ap.active(False) Dieser Code aktiviert einen abgesicherten Access Point mit dem Namen / der SSID "ESP32" und dem Passwort "12345678". Sobald der AP aktiv ist, kannst du dich mit deinem Gerät verbinden. Im nächsten Schritt programmieren wir einen einfachen HTTP-Server, der eine kleine Webseite ausliefert, die "Hallo Welt!" anzeigt: import network import socket # Access Point erstellen ap = network.WLAN(network.AP_IF) # WLAN-Objekt für den Access Point erstellen ap.active(True) # Access Point aktivieren # SSID und Passwort für den Access Point festlegen ap.config(essid='ESP32', password='12345678', authmode=network.AUTH_WPA_PSK) while ap.active() == False: # Warten bis der Access Point aktiv ist pass # Access Point aktiv und Konfiguration anzeigen print('Access Point aktiv') print(ap.ifconfig()) # HTTP-Server einrichten addr = socket.getaddrinfo('0.0.0.0', 80) # Adresse und Port für den HTTP-Server festlegen (Port 80) s = socket.socket() # Socket erstellen s.bind(addr) # Socket an die Adresse binden s.listen(1) # Socket für eingehende Verbindungen vorbereiten # HTTP-Server gestartet und Adresse angezeigt print('Server läuft auf', addr) while True: cl, addr = s.accept() # Auf eine eingehende Verbindung warten print('Client verbunden von', addr) r = cl.recv(1024) # Daten von der Verbindung empfangen (hier nicht verwendet) # HTTP-Antwort erstellen response = """ HTTP/1.1 200 OK ESP32 Webserver
Hallo Welt!
""" cl.send(response) # HTTP-Antwort an den Client senden cl.close() # Verbindung schließen Dieser Code richtet zunächst einen gesicherten Access Point mit der SSID "ESP32" und dem Passwort "12345678" ein. Sobald der Access Point aktiv ist, startet er einen HTTP-Server auf Port 80. Der Server antwortet auf eingehende Anfragen mit einer einfachen HTML-Seite, die "Hallo Welt!" anzeigt. Wenn das kleine Programm gestartet wird, dann werden die Daten des AP in der Kommandozeile ausgegeben sowie dass der Server läuft. MPY: soft reboot Access Point aktiv ('192.168.4.1', '255.255.255.0', '192.168.4.1', '0.0.0.0') Server läuft auf ('0.0.0.0', 80) Wenn wir nun den Browser öffnen und die IP-Adresse des Access Point eingeben, erhalten wir als Antwort eine kleine Webseite mit dem Text "Hallo Welt!".

Erstellen einer kleinen Webseite mit Sensordaten des DHT11 Sensors mit MicroPython auf dem ESP32
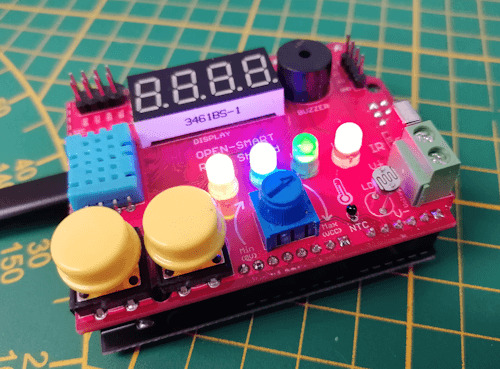
In den letzten Beiträgen habe ich dir das Rich Shield von Open Smart schon detailliert vorgestellt und auch gezeigt, wie man den DHT11 Sensor ausließt.

Rich Shield von Open Smart Wenn du dieses kleine, nützliche Shield nicht hast, dann kannst du dir recht einfach die Schaltung auch selber nachbauen, du benötigst hierzu: - einen ESP32 D1 R32*, - einen DHT11 Sensor*, - drei Breadboardkabel*, - ein 170 Pin Breadboard*
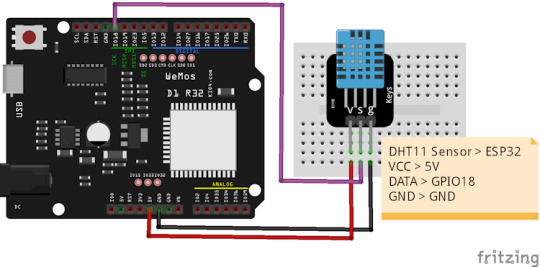
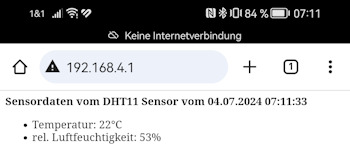
Schaltung - ESP32 D1 R32 mit DHT11 Sensor als Baustein auf einer Platine Nachfolgender Code erstellt einen Access Point und baut einen HTTP-Server auf. Wenn man auf die Adresse des Servers 192.168.4.1 zugreift werden die Sensordaten ermittelt und auf einer Seite ausgeliefert. import network import socket import dht from machine import RTC, Pin dht11 = dht.DHT11(Pin(19, Pin.IN)) # Liefert einen Zeitstempel def getTimestamp(): rtc = RTC() currentDateTime = rtc.datetime() year = currentDateTime month = currentDateTime day = currentDateTime unknown = currentDateTime hour = currentDateTime minutes = currentDateTime seconds = currentDateTime #prüfen ob die Werte kleiner 10 sind, #wenn ja wird eine führende Null angefügt if int(month) < 10: month = "0" + str(month) if int(day) < 10: day = "0" + str(day) if int(hour) < 10: hour = "0" + str(hour) if int(minutes) < 10: minutes = "0" + str(minutes) if int(seconds) < 10: seconds = "0" + str(seconds) textFormat = "{0}.{1}.{2} {3}:{4}:{5}" return textFormat.format(day, month, year, hour, minutes, seconds) # erstellt und öffnet einen Access Point def openAccessPoint(): # Access Point erstellen ap = network.WLAN(network.AP_IF) # WLAN-Objekt für den Access Point erstellen ap.active(True) # Access Point aktivieren # SSID und Passwort für den Access Point festlegen ap.config(essid='ESP32', password='12345678', authmode=network.AUTH_WPA_PSK) while ap.active() == False: # Warten bis der Access Point aktiv ist pass # Access Point aktiv und Konfiguration anzeigen print('Access Point aktiv') print(ap.ifconfig()) # HTTP-Server einrichten addr = socket.getaddrinfo('0.0.0.0', 80) # Adresse und Port für den HTTP-Server festlegen (Port 80) s = socket.socket() # Socket erstellen s.bind(addr) # Socket an die Adresse binden s.listen(1) # Socket für eingehende Verbindungen vorbereiten # HTTP-Server gestartet und Adresse angezeigt print('Server läuft auf', addr) openAccessPoint() while True: # eine Messung durchführen dht11.measure() txtTimestamp = getTimestamp() txtTemperatur = "Temperatur: " + str(dht11.temperature()) + "°C" txtLuftfeuchtigkeit = "rel. Luftfeuchtigkeit: "+ str(dht11.humidity()) + "%" cl, addr = s.accept() # Auf eine eingehende Verbindung warten print('Client verbunden von', addr) r = cl.recv(1024) # Daten von der Verbindung empfangen (hier nicht verwendet) # HTTP-Antwort erstellen response = """ HTTP/1.1 200 OK ESP32 Webserver Sensordaten vom DHT11 Sensor vom {timestamp} - {temperatur} - {luftfeuchtigkeit} """.format(timestamp=txtTimestamp, temperatur=txtTemperatur, luftfeuchtigkeit=txtLuftfeuchtigkeit) cl.send(response) # HTTP-Antwort an den Client senden cl.close() # Verbindung schließen Bei jedem Zugriff auf den Server wird die IP-Adresse des Clients auf der Kommandozeile ausgegeben. MPY: soft reboot Server läuft auf ('0.0.0.0', 80) Access Point aktiv ('192.168.4.1', '255.255.255.0', '192.168.4.1', '0.0.0.0') Client verbunden von ('192.168.4.2', 37230) Client verbunden von ('192.168.4.2', 37238) Client verbunden von ('192.168.4.2', 37244) Client verbunden von ('192.168.4.2', 37252) Auf der kleinen Webseite werden jetzt die Sensordaten inkl. einem Zeitstempel ausgegeben. Jedes Mal, wenn wir jetzt die Webseite aktualisieren, werden auch neue Sensordaten ausgelesen und ausgeliefert.
Automatisches Aktualisieren nach x Sekunden Wir können mit einem Meta-Tag refresh auch die Webseite automatisch nach x-Sekunden aktualisieren lassen. Der nachfolgende Code läßt eine Seite alle 60 Sekunden aktualisieren: Um jetzt die Webseite alle 5 Sekunden zu aktualisieren, müssen wir die Antwort vom Server wiefolgt anpassen: # HTTP-Antwort erstellen response = """ HTTP/1.1 200 OK ESP32 Webserver Sensordaten vom DHT11 Sensor vom {timestamp} - {temperatur} - {luftfeuchtigkeit} """.format(timestamp=txtTimestamp, temperatur=txtTemperatur, luftfeuchtigkeit=txtLuftfeuchtigkeit)
Troubleshooting
Nachfolgend möchte ich dir ein paar Fehler und deren Lösungen aufzeigen welche in zusammenhang mit diesem Beitrag aufgetreten sind. Fehler: OSError: EADDRINUSE Die Fehlermeldung "OSError: EADDRINUSE" tritt in der Regel auf, wenn ein Programm versucht, einen Netzwerkport zu öffnen, der bereits von einem anderen Prozess verwendet wird. Traceback (most recent call last): File "", line 53, in OSError: EADDRINUSE Die Lösung ist hier recht einfach, es muss einmal die Verbindung des Mikrocontrollers vom Computer getrennt werden und ein paar Sekunden gewartet werden. Danach sollte es wieder funktionieren. Fehler: Connection lost -- GetOverlappedResult failed (PermissionError(13, 'Zugriff verweigert', None, 5)) Diese Fehlermeldung tritt häufig auf, wenn Programme unter Windows mit Dateien, Netzwerkressourcen oder anderen Systemressourcen interagieren und die erforderlichen Berechtigungen nicht korrekt konfiguriert oder gegeben sind. Connection lost -- GetOverlappedResult failed (PermissionError(13, 'Zugriff verweigert', None, 5)) Use Stop/Restart to reconnect. Process ended with exit code 1. Die Lösung ist hier das zum einen das Tool Thonny neugestartet wird, manchmal ist auch ein Rechnerneustart notwendig. Eine weitere Lösung kann in diesem Fall der austausch des USB-Datenkabel sein. Ich bekomme den Fehler ebenso wenn der Mikrocontroller mit einem normalen Micro-USB Datenkabel über eine Dockingstation mit dem PC verbunden ist. Wenn ich den Mikrocontroller nun direkt mit einem höherwertigen Kabel mit dem PC verbinde dann klappt die Verbindung.
Ausblick auf Teil2
In diesem Beitrag habe ich dir nun gezeigt wie einfach es ist einen kleinen HTTP-Server auf dem ESP32 mit MicroPython zu erstellen und Webseiten auszuliefern. Im nächsten Beitrag möchte ich dir zeigen wie du die auf dem Rich Shield von Open Smart verbauten LEDs über die Webseite steuern kannst.
Rich Shield mit aktivierten LEDs Bleib also gespann was noch alles folgt... Read the full article
0 notes
Text

#OpenLiteSpeed a #LiteSpeedEnterprise zdarma k tarifům #hosting.u specializovaného na WP
OpenLiteSpeed pro sdílený #webhosting a LiteSpeed Enterprise pro virtuální a dedikované #server.y
Nejrychlejší technologie pro dynamické #web.y s vysokou návštěvností
1 note
·
View note