#easiest-to-use video editing software
Explore tagged Tumblr posts
Visit Tumblr Blog
Explore Tumblr blogs with no restrictions, modern design and the best experience.
Last Seen Tumblr Blogs


Fun Fact
12.7% of mobile users access Tumblr.
Text

oh so this is FUN.jpg
got me some DVD-Rs :)
#i did not expect it to be this much fun#the free software i'm using is 32 bit which turns out means it can only use 3 gb of ram at a time#which it turns out means it takes 12 hours to encode 4 hours of video#but i'm not in a hurry!#the forums assure me it will eventually succeed if i just let it chug#and now that i've figured out i can edit the menus to have backgrounds from the show i am determined to see it through#(i tried using a flash drive last night and plugged into ps4 but it didn't even recognize it! this can probably also be figured out)#the free software is ConvertXtoDVD btw! i tried a few different ones#but this one seemed the easiest specifically for making sure the subtitles carry over#it's indeed very user friendly
13 notes
·
View notes
Text
How to record videos with Sims 2 in-game camera (HD, no UI, no lag, no file format issues)
I originally planned to include this information in the behind-the-scenes video about Bring Me To Life that I'm currently working on, but it's overly technical and not that interesting. It still might be useful to some people (mostly machinima creators), so I decided to make a separate post about it.
There are two ways to record videos in The Sims 2:
Using screen recording software
This is the most common and probably the easiest way. You just need a program like OBS that will capture whatever happens on your screen exactly as it happened. If this method works for you, it's perfectly fine. No need to follow this guide then.
Using the in-game video capture tool
This way involves capturing videos directly in the game by clicking the video camera icon or pressing V on your keyboard. This method is perfect for machinima creators. It automatically hides the UI, but more importantly, the video will always be perfectly smooth, regardless of the actual performance of your game, i.e. even if it runs like a literal slide show, any videos you capture this way will look perfectly fine.
Okay, so if this method is so great, why do we need a tutorial for it? Well, as is usually the case with this game, the feature works fine, it's just a little bit outdated.
To fix it, we need to do 3 simple* things.
*If you're a Sims 2 player, you're probably used to this kind of stuff anyway
Step 1: Installing a modern codec
In the Camera settings, the game lets you choose if you want the videos to be compressed. I highly recommend choosing that option, as uncompressed videos take up way too much storage space.
The codec that the game uses to handle compression is outdated and most video editing programs will not be able to edit such files. To fix this problem, we need to download and install x264vfw, which is a free an open source codec.
Once installed, open the Configure x264vfw app. No need to change anything there (unless you want to test different settings of course), except for this one small thing:
In the Debug section, go to Log level and change it to None. Otherwise the codec will display a pop-up window each time you record in the game, which is pretty annoying.

Step 2: Making the game use the codec
Locate the VideoCapture.ini file in the installation folder with your latest expansion pack. I have Ultimate Collection, so for me the path looks like this:
D:\Program Files (x86)\Origin Games\The Sims 2 Ultimate Collection\Fun with Pets\SP9\TSData\Res\UserData\Config
Back up your file and open the original version with Notepad. You can either replace the whole thing with my settings, or just update the highlighted parts.
While you're at it, make sure to update the LargeSettings value to 1920x1080 so that the videos are captured in HD (no need to worry about it if you're copying the whole thing):
[Config] PreferredCodec=x264vfw Folder is relative to Res/Userdata Folder=Movies FilenameBase=movie NoFillFrames=0 AudioStereoOutput=0 AudioRateDivisor=4 GlobalSettings = reset, vbr:1, fps:10, keyinterval:30, mode:1, datarate:0 SmallSettings = size: 128x128 MediumSettings = size: 320x240 LargeSettings = size: 1920x1080 LowQualitySettings = minq: 6, maxq: 16, mode:0 MediumQualitySettings = minq: 4, maxq: 10, fps:15, mode:0 HighQualitySettings = minq: 2, maxq: 8, fps: 30, keyinterval: 60 SmallLowSettings = datarate: 75 SmallMediumSettings = datarate: 150 SmallHighSettings = datarate: 300 MediumLowSettings = datarate: 150 MediumMediumSettings = datarate: 300 MediumHighSettings = datarate: 600 LargeLowSettings = datarate: 300 LargeMediumSettings = datarate: 600 LargeHighSettings = datarate: 1200 AllowAntialiasing=0 # some drivers have issues with capture when AA is enabled [Codecs] 0=VP61 # On2 VP6.1 1=VP62 # On2 VP6.2 2=VP60 # On2 VP6.0 3=x264vfw # x264vfw
Save your file.
When in game, go to Camera Options and make sure Video Capture Size is set to Large and Video Quality is set to High.
Also, you might want to change the Maximum Video Recording Time to something higher than 60 seconds.

Credit for this solution goes to this person who left the following comment under this video
Step 3: Changing the file format from avi to mp4
Before doing this step, test if everything works correctly when you try to capture videos in the game. The videos will go to the Movies folder in your Documents folder for TS2.
Try to import the videos into your editing software. If it doesn't work, e.g. the program does not recognize the file or the file appears to be corrupted, you'll need to change the file format from avi to mp4.
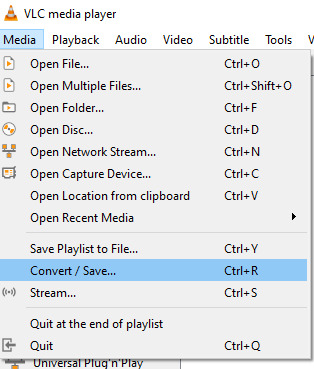
I personally use VLC media player for that, as it's free and open-source.
Go to Media > Convert / Save...
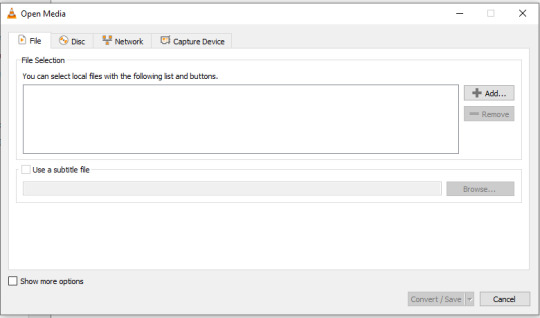
Drag your files into the File Selection section or select them by clicking the + Add button.
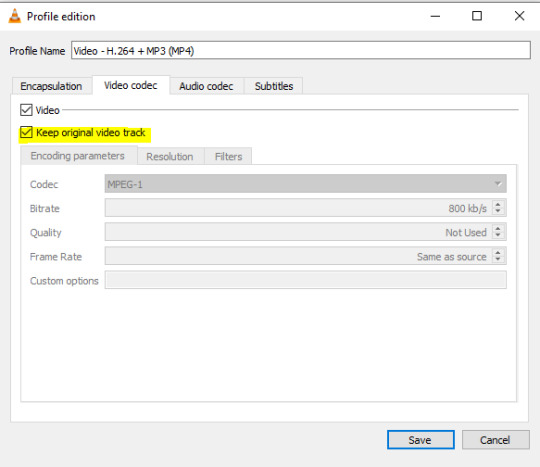
Select the Video - H.264 + MP3 (MP4) profile and click the wrench icon to edit its settings.

In the Video tab, make sure to check the box next to Keep original video track. Go to the Audio tab and check the analogous box.
Save and in the next window specify the destination folder and click Start. VLC will go through each of the files you added.
IMPORTANT:
While Steps 1 and 2 only need to be done once, Step 3 needs to be done for every new video you record (unless, your video editing software doesn't struggle opening the avi files). The good news is, this step is really fast, no more than a second per a single video. This is because we're keeping the original video track intact. The only thing that is changed is the container. That's why this change is fast and does not affect video quality in any way. Ideally, this step wouldn't be needed if we figured out a way to force the game to use mp4 when saving those videos, but I'm not sure if this is possible.
Like I said, outside of machinima creation, it probably makes more sense to just record your screen with OBS. Especially if you want to capture videos in 4K, which I don't think would be possible with this method. But it works for me and as it took me a while to figure it all out, I just wanted to share all the info in a single post!
#sims 2 machinima#ts2#sims2#sims 2 tutorial#ts2 tutorial#sims 2 guide#ts2 guide#my stuff#ts2 simblr#machinima#ts2 machinima
11 notes
·
View notes
Text
hi everyone! I've gotten several requests to make a tutorial on how to make gifs for someone just starting out and I finally got around to slapping a tutorial together.
This tutorial will cover:
software recommendations
choosing what to gif
creating a gif step by step with probably a lot of unnecessary detail
some tips and tricks:)
(This particular tutorial will not cover how to find tv and movies to download and gif, or any specific instructions on coloring. only the basic gif making process.)
so for the purposes of this tutorial, we will be using Adobe Photoshop, which is the most common program for making gifs, and the one I recommend. the version you have doesn't make a major difference in terms of capabilities but the interface may be slightly different looking if you have an older version or a different type of device. you cannot make or edit gifs in any mobile version of the photoshop application. Optionally, we will also be using Adobe Premiere Rush/Pro or another video editing software of your choice. wherever you are downloading Photoshop, whether from Adobe or a third party, you should easily be able to acquire Premiere as well. I am aiming to be as detailed as possible in this tutorial, so it may sound more time consuming than it really is. once you get the hang of things, it goes fast. the most time consuming part by far is the editing and coloring. in my opinion, one thing that majorly saves time while giffing is knowing your keyboard shortcuts and using your mouse/trackpad as little as possible. I will be going over these in this tutorial as well.
before we begin, some general tips:
gifs of single shots that do not cut between angles or subjects generally will look the best, barring exceptions
for a single gif set, choosing scenes and shots with similar lighting will be easiest to get to look uniform when compiled together, since editing wildly different looking scenes to have similar coloring and lighting is hard and takes some practice!
avoid shots that will require you to majorly crop or zoom to properly frame the subject, as this will greatly diminish quality
speaking of quality, gifs will look best using 1080p video, but you can get away with 720p as well. I would not recommend giffing with anything lower resolution than that
Tumblr's upload capacity for image and gif files is 10mb. be sure when exporting your finished gif that it is under that size. if it is a bit over, you can try trimming a few frames off your gif in the video timeline.
if you get frustrated, don't give up! giffing is hard and complicated especially if you are new to photoshop. I tried to make this tutorial as detailed as possible so it's easy to understand (although im sure I still forgot some stuff)
ok onto the tutorial!!!
STEP ONE: choose what range of frames you want to gif, and how.
once you have decided what you want to gif, there are two main way to convert your episode into a range of frames to make into a gif. the first is by screencapping. this involves downloading a program like mplayer or vlc which can be used to convert video files into "stacks" of screencaps, which can then be separated into whatever range of frames you want and imported into photoshop. this is seemingly by far the most common method I have seen amongst gifmakers*, but personally I don't care for it and I think it's more confusing and time consuming overall, so I will be explaining the second method: importing video frames to layers.
now, normally what this would mean is opening the full episode in photoshop and using the pathetic little playheads on either end of the scrub bar to trim the file into a clip. this is where your video editing software comes into play.
open whatever episode or movie you want to gif in your program. if it is a large file like a long movie in 1080p, this may take a few seconds. like I said, I am using Premiere Rush. I will be using a random episode of 9-1-1 for my example gif.
in your media browser, hover over whichever episode you want (you can also just add the whole episode to your project and scrub through, but that can take longer unless you know what time stamp you're after). click the fullscreen button by the bottom righthand corner.
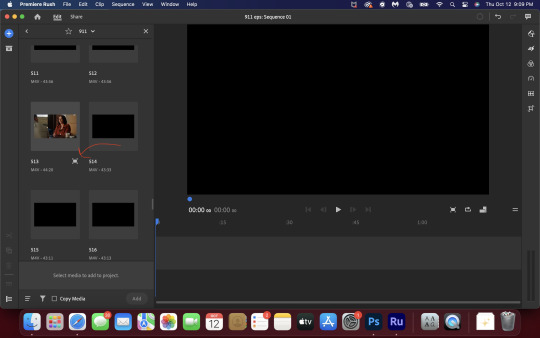
now you can scrub through and trim the episode before you even import it to premiere. this makes trimming your clip even easier.
use the trim bar (yellow outlines) to trim as close as you can around the scene you want to gif.
then click this plus, and then "add" below. this will add the clip to your project.
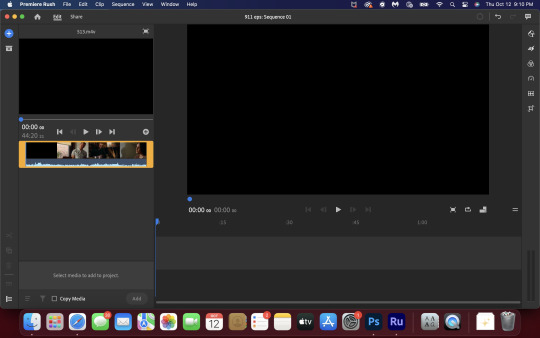
now, move the blue playhead up to the frame you want your gif to start on. then, use the scissors button off to the left to slice the clip. select the portion before the playhead, and delete it.
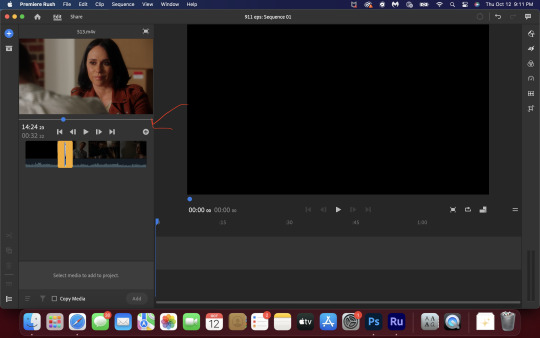
now move the playhead to where you want the gif to stop. a good length for most gifs is around 1.5-2 seconds in my opinion. some may be shorter depending on how long the shot is, or longer if you plan on making them smaller (remember, the uploading capacity on Tumblr is 10mb per file.) trim again, now delete the portion after the playhead. you can also use the left and right arrows beside the play button to move frame by frame, and you can adjust the side of the horizontal scroll bar below your clip to “zoom” in on it and make scrubbing easier.
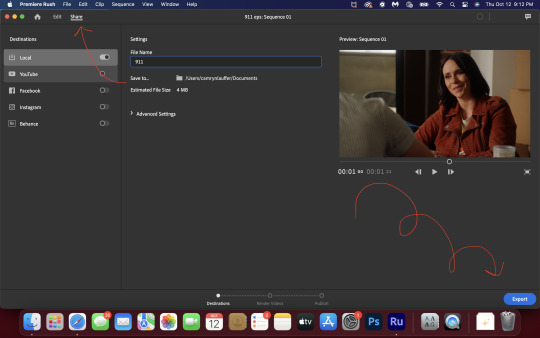
once you have your clip, go up to where it says "share". your clip will be rendered, and then you can click export to save it.
repeat step one as many times as you want for each gif. I know this may sound complicated, but like I said above once you get in the rhythm this step takes only a few seconds.
STEP TWO: create your gif!
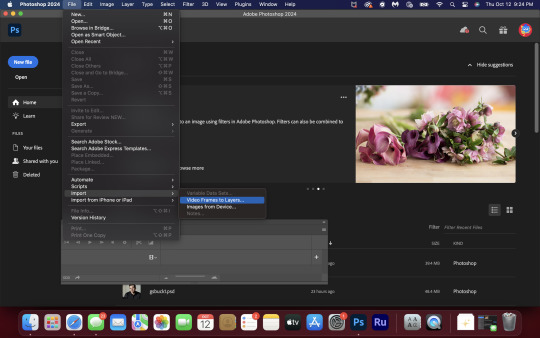
close premiere. open photoshop. head to the control bar at the top. select file > import > import video frames to layers.
navigate to whatever folder you exported your clip to. select it, and hit enter. a second popup will appear asking you to select your range of frames. since you have already trimmed your clip to your liking, simply hit enter a second time.
now your screen looks like this, and we are going to crop and resize our gif! (troubleshooting: if you do not see the timeline bar at the bottom, select window from the control bar, scroll down, and make sure timeline is selected as part of your workspace. Adjustments and layers should be there automatically but if not add them too).

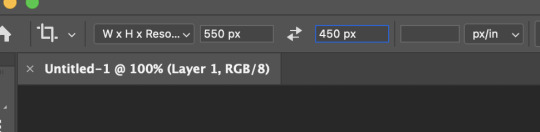
Tumblr posts are 540px wide, so in order to make my gifs as small as possible while maintaining quality, I typically crop my gifs to be around 550-600px wide, with varying heights depending on what shape I want the gif to be. experiment with this a little and decide what works for you. just don't make the width lower than 540px. once you have the portion of the frame you want inside the cropping grid, hit enter again. sometimes you have to hit it twice.
here are the measurements I am using for this gif
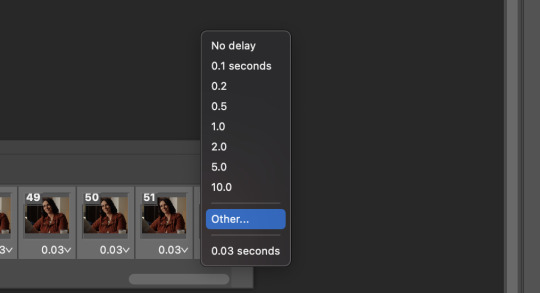
now in your timeline, select frame 1. hold down the shift key and scroll to the end to select the very last frame, thereby highlighting them all. from here we will edit our frame delay rate. photoshop will automatically set it to .03s, which will make your finished gif awkwardly fast. I typically use .05s, or .06s if I want a gif to be subtly slower (this comes in handy if the shot you are trying to gif is very short). anything longer than .06s will look weird though. choose "other" from this menu and type in your delay rate. make sure not to miss the zero after the decimal.
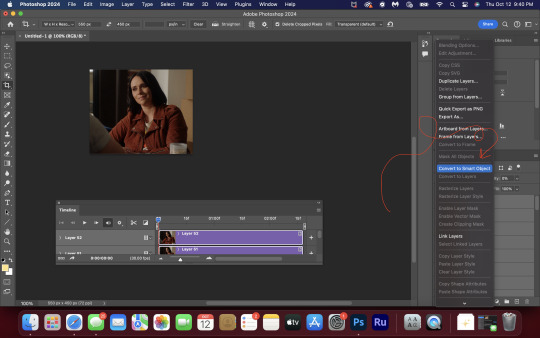
once you've set your frame rate, go to the other end of your timeline and click here to convert your frames into a video timeline.

then press option + command + A (on Mac) or windows + alt + A (on PC) to select all layers. then right click (control + click with a trackpad) on any one of the highlighted layers in your layers tab off to the right. scroll down in the popup menu and select Convert to Smart Object.
THAT'S IT!! CONGRATULATIONS!!!!! WE HAVE GIF!!!
from here comes the fun part!! you will begin adding action filters like sharpening as well as adjustment layers to color and edit your gif. experiment with different adjustments and styles until you find something you like. too many adjustment layers will up the size of the finished gif though, so I tend to keep mine to 3-4 layers max unless its a really hard to color scene. if anyone is interested in a separate coloring tutorial, please let me know!
once you are finished editing your gif, click file > export > save for web (legacy) OR hit shift + option + command + S. play your gif in the export window to make sure it looks okay, and then hit save!
I hope you guys find this helpful and informative! please hit up my in box if you have any questions or if anything doesn't make sense. happy giffing!!!
*one reason people seem to prefer screencapping to this method, is saving all the individual clips as video files does take up a lot of space on your scratch drive, which in turn can cause your computer to work slowly or crash programs. this can be rectified by making sure to delete the clips from your computer once you are done making the gifs. another space hoarder to look out for is the proxy files of your episodes that will be automatically saved to your hard drive whenever you add an episode to your project in Premiere. Periodically, go through your storage and delete all the .proxy video files. this will not delete the original episode files, only the proxy files created by Premiere.
tagging some mutuals to sb hehe: @shitouttabuck @lover-of-mine @honestlydarkprincess @eddiediaaz @compactdiscmp3 @eddiebabygirldiaz @bigfootsmom @callaplums @athenagranted @firemedicdiaz @sibylsleaves @loserdiaz @buck2eddie @diazass @eddiediaztho @giddyupbuck @monsterrae1 @icecreampotluck @sunflowerdiaiz @swiftfootedachilles @singlethread @aziraaphales @911onabc
145 notes
·
View notes
Note
sorry i couldn't find out how to ask on your other blog.
that book binding you posted is gorgeous btw !!
I noticed that in one of the photos you included the disclaimer that you also edited it. I just had a question about how you formatted the text.
one of my biggest gripes with AO3 is text formatting (i often feel like i'm reading a legal document vs a novel/story) . Did you change how it is formatted on AO3 compared to printed?
I feel like i'm in the 0.5% that hate AO3 formatting but i thought i might as well ask in case you have any tips for that. >,>
(also how do you decide on the page size, do you just choose a standard size for all your projects? or do you vary it depending on what you are binding?)
thanks so much for taking the time to answer and for sharing your projects :) !!!!!!!!!!!
hey anon! I have asks turned off for the sideblog, but happy to answer here. Thanks very much!
I'm taking this opportunity to info-dump and link a lot of resources. I think they're useful for people new to either typesetting or bookbinding, but not all are directly related to your queries. That said, hope this is of use!
one of my biggest gripes with AO3 is text formatting (i often feel like i'm reading a legal document vs a novel/story) . Did you change how it is formatted on AO3 compared to printed?
I do a fair bit of editing when I'm binding a fic; typesetting is often the longest part of the process. Your mileage will vary depending on your experience with using word processor software, particularly the paragraph style and page style settings. Another factor is how simple/complicated you want your typeset to look. Replicating a published novel in format is difficult but learnable for a complete beginner.
I'm not equipped to give a full tutorial on how to typeset, but I'll point you towards some useful resources for ficbinding then talk about my own process.
ArmouredSuperHeavy has a tutorial on how to make Ao3's HTML downloads into a printable book in Microsoft Word. I use LibreOffice Writer myself, so this adaptation of the same tutorial is what I follow. Both are very helpful to reference as you're learning the typesetting ropes.
Personally, I don't mess around with HTML. I find it easiest to start by doing a Ctrl+A copy of the Entire Work fic view on Ao3 then pasting that into my word processor. This video tutorial by Beautifully Bound runs through how to do this in Microsoft Word using an AO3 fic as an example, including the associated steps needed to make the fic look novel-like. This is probably the best tutorial to address your gripe with AO3 formatting. Other than that, I'd recommend looking into videos or tutorials about typesetting novels for print. Same idea, and you may get more hits than searching for fanbind/ficbind typesetting tutorials.
More under the cut! Once I start yapping, it's hard to shut me up 🤷♀️
As a point of comparison, here's one of my fics on Ao3 and the corresponding typeset side by side:


Beautifully Bound explains this in far better detail than I will, but off the top of my head, the steps involved:
making a new document and setting the default page size to whatever size I want the book's pages to be (A5 or A6 usually). You can also set the margins at this point, taking account of your printer settings.
CTRL+A and copying the entire work's text on AO3 then pasting it into the document.
removing all hyperlinks and AO3 frontmatter, things like the author tags, summary, notes, etc as well as any website text that got copied over alongside the fic.
(optional) running a spell check and ensuring grammar usage is consistent. For me that's substituting em dashes for hyphens between clauses, enforcing curly double quotation marks for dialogue, etc. LibreOffice Writer automates a lot of this with customisable settings, via Tools -> Auto-Correct. Here's also where to make sure character names are all spelled right, convert the text to or from US to UK English, etc.
picking out fonts for the body text, headers, page numbers, etc. This is where you'll want to use paragraph style settings. Page style settings also comes in clutch if, for example, you'd like different headers on alternating pages. I like having the author on the right, the fic title on the left.
setting the body text first line indent to whatever makes sense visually). This in particular helps make the fic feel more like a novel. You can also play around with line spacing and space between paragraphs at this stage. For this A6 typeset, I had a 0.75cm first line indent, 1.15 line spacing, and 0.15 spacing between paragraphs.
(optional) formatting the first line of the work to use small capitals and to add a drop caps to the first letter of the first word. Again, this is a convention in publishing which add a novel-like feeling to a printed fanwork.
Inserting page numbers, adding images, coming up with how I wanted the "copyright" page to look—optional for the most part, but these are details that make a fic appear more like a novel.
For multi-chapter works, there's extra work in formatting chapter titles as headings so that they're referenced correctly in the automatic table of contents word processors can generate.
Once you have a typeset you're happy with, and if you're considering printing and binding it as a book, then you'll need to look into how to create and print signatures. Personally, this is something I had to actually try (and mess up a bunch of times) before I got to grips with it. Understanding how both your printer and your PDF reader work, particularly printer margins and booklet print settings, is key.
I won't go into as much detail on this, but if it's something you have an interest in, I'd recommend starting with DAS Bookbinding's tutorial. DAS has tutorials for everything bookbinding related so when in doubt, check his channel! Plenty of other YouTubers also have good videos on making signatures.
This resource is extremely useful once you've got your head around how to print signatures manually, so here's a link for anyone in that space: GitHub Bookbinding Imposer. Essentially, this does the signature creation for you, removing the need for booklet print settings in your PDF reader.
also how do you decide on the page size, do you just choose a standard size for all your projects? or do you vary it depending on what you are binding?
I have access to both A4 and A5 sized paper and my printer can handle printing on either size. In bookbinding, normally two pages are printed per side of the paper (which are then folded in half as part of a signature). That is, when I print on A4 paper, it's to make an A5 sized book. Printing on A5 paper will yield an A6 sized book.
Before I begin typesetting, I'll usually know what paper I plan to use, so the typeset will be one size down from the paper. So far, I've made softcover pamphlets at A6 size and casebound books in A5. No real method of choice for me, it's whatever I feel most suits the project.
---
If you made it this far anon, thanks for reading! Here's links to a few general resources if bookbinding is something you'd like to explore more:
DAS Bookbinding (YouTube, bookbinding in all forms)
Sea Lemon DIY (YouTube, bookbinding and other crafts)
bitter melon bindery (YouTube, bookbinding, particularly beginner friendly!)
Jess Less (YouTube, demonstrations of fanbinding and re-binding existing novels)
Papercraft Panda (blog, lots of detailed tutorial on bookbinding)
Renegade Bookbinding Guild (collective and website, loads of fanbinding-specific resources from their members and they have a helpful Discord).
24 notes
·
View notes
Note
Hey Rontra, I'm properly digging through the archives, but I will forever love this animatic you did for Offal Hunt: https://www.tumblr.com/actualbampot/190639258301/rontra-cinder-voice-im-so-stressed-that?source=share
I really want to try making an animatic, but I have no idea what the workflow for this is. Was it a million still images fed into video editing software, or is there anything I'm missing/do you have any helpful tips?
Thanks so much.
ah, thank you, i'm glad you like it!
now i dont Usually really make animatics specifically, i just "make videos", so most of my experience is in PMVs (and adjacent fields) and that shows. but the act of Assembling them can be similar so the experience is relevant :p
there's lots of ways to do it and ultimately depends on what you find easiest for your idea. drawing images in your art software and then assembling them in a video editor is probably the simplest way, especially if it's a longer video (more numerous (or elaborate) "shots" = probably easier to organize in a video editing timeline)
if your preferred drawing software doesn't have audio import, you're probably better off arranging them in a video editor as well... especially if you have parts with animation in them! clip studio paint for example didn't always have audio importing, so before then you had to just kinda guess at the timing and keep tweaking your animation until it worked--or, more conveniently (though it doesn't feel like it), save each frame individually and time them in a separate program
and if youre using a non-linear video editor you can easily add/replace placeholders too which is convenient. i often put text placeholders that describe what i need to draw for the missing part, so i don't forget xD
religion of loneliness was made this way because it's elaborate and long and has a lot of parts and effects i wanted to do. a video editing software is usually more comfortable for that kind of thing (depending on which softwares are available to you ofc)... even the small bits of animation it has are individual pngs i assembled in the video editor
but for no particular reason, so was therefore you and me -- this video's super simple! i just felt like taking it into the video editor because i'm more comfortable there. the characters were drawn in clip studio and the text/bg/whatever was done in the video editor, even though it could've easily all just been baked into the same pngs bdfhjgfdjk
in this workflow you can also use finished animation cuts as separate gifs/mp4s/whatever where needed ofc, depending. i sometimes mix and match
on the other hand, your link in particular ("what's gonna happen") was made entirely in one clip studio paint file, after csp added the ability to import audio into its animation timeline. this video is a very simple mix of animation and tweening, which are both doable from inside clip studio now, so i said fuck it and crammed everything into one file
it looks like this in clip studio paint*
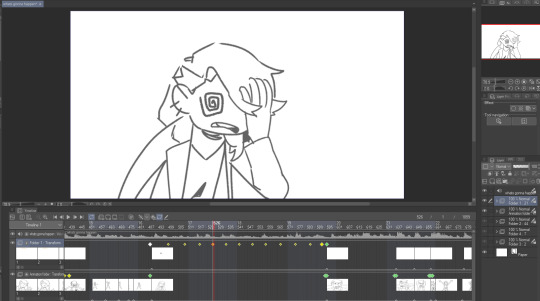
that kind of thing works for me because im a little messy and i like being able to redraw or adjust stuff inside the same software instead of switching back and forth. but for more elaborate project it will probably start wearing on your sanity to have everything crammed into one file (not to mention the file size might become unwieldy depending on what you're working with)
not all drawing programs will have animation features or audio import as part of their kit, which can make things troublesome. but if you're using animation software or an art software with animation features, it's possible to just do it all inside that program with relative ease like that (though some of them can be quirky to Learn)
as an aside, the original black eyes was made entirely in photoshop of all things because csp didn't have as many tools back then, and you can tell because . that is not a brush ive ever used and the pans/crossfades are Occasionally Very Weird JHBHSJK i could've just used a video editor but noooo. photoshop timeline tools ONLY No Assists
and that video is All still images so it could've easily been handled either way. important part is it worked out and i had fun messing around in there
i'm sure there's some other workflows out there someone finds super useful but i think the Main Branches are definitely
drawing software + video software (tag team)
drawing/animation software with audio import capability (solo job)
the first one tends to be more accessible i think? not only like Generally Speaking because there are more free drawing programs and more free video editors than there are free programs with drawing + animating + timeline editing all together (which . is true) BUT ALSO because even when we already have our programs ready the learning curve is usually sharper for the all-in-one and can be challenging to figure out, depending
but for me when im just playing around in there i find working all in the same program gives me a lot of flexibility. since i don't have to keep taking an image back and forth between the drawing room and the video editing room if i have to change something. yknow
it depends on the project. just try stuff out idk :)
my advice is definitely to start smaller and don't jump into making like a 3-minute video right away until you're more comfortable with your developing workflow. but that's about it. i think beyond that its Fuck Around And Find Out HAHAH i dunno
if theres anything specific i missed im sorryyy but you can ask and i can try 😂 good luuuuck!!
*to compare i guess, RoL looks like this -- behold the filenames of a genius

17 notes
·
View notes
Text
YouTube and Stuff by u/SecondhandCoke
YouTube and Stuff First, I'm trying to get my YouTube channel up in the next couple of weeks... just for those who care. If you have naming suggestions, I'm all ears. If there are things you like to regularly hear from me, let me know. I know y'all want "tea" when I've got it, and I will provide that from time to time, when appropriate. I plan to do a lot of debunking using the logical fallacies and an insider's look at PR strategies. I plan to do a lot of Markle Snarkle, but if you've enjoyed things I've done in the past like the Handwriting Analysis, I can do that once a week, I can do tarot spreads (for fun only, ovbs), I can critique in a constructive and friendly way other content creator's assertions (if y'all ask and direct my attention to it). Also, thanks to TRG for ALREADY giving me a lot of great advice. I also need advice on the easiest way to manage graphics, editing, etc. I'd LOVE to be able to animate my little Secondhand Coke avatar to say what I'm voicing over, but don't know how. Music is set. I'm a musician, and I've gotten my little instrumental zinger almost read to go... I really just have to figure out how to edit it together. Like using a macbook pro or iphone. Any helpful hints would be appreciated. Inexpensive or free editing software recs, places where I can get images and video that are free, even other music blurbs... I can use all the help I can get. Anyway, re: Prince Harry, the impression I am getting is that the people around Harry want to be worthy of Harry's trust. They won't leak his location, but if I'm reading between the lines accurately, he reportedly gave Meghan a fake locale that only she had, and she leaked it. So I think the scales continue to fall from his eyes. It's been weeks since we've seen Harry, at least 21 days since we've gotten a verified location. (I think). I get the feeling the people around him are looking after his best interests while he focuses on getting himself together. That's just my read based on what little bit of info I could get. But for those of you who've encouraged me to do a channel in the past, I'm pretty much ready to get her going and would love your advice and input. post link: https://ift.tt/x3bpoes author: SecondhandCoke submitted: October 21, 2024 at 05:25PM via SaintMeghanMarkle on Reddit disclaimer: all views + opinions expressed by the author of this post, as well as any comments and reblogs, are solely the author's own; they do not necessarily reflect the views of the administrator of this Tumblr blog. For entertainment only.
#SaintMeghanMarkle#harry and meghan#meghan markle#prince harry#fucking grifters#grifters gonna grift#Worldwide Privacy Tour#Instagram loving bitch wife#duchess of delinquency#walmart wallis#markled#archewell#archewell foundation#megxit#duke and duchess of sussex#duke of sussex#duchess of sussex#doria ragland#rent a royal#sentebale#clevr blends#lemonada media#archetypes with meghan#invictus#invictus games#Sussex#WAAAGH#american riviera orchard#SecondhandCoke
8 notes
·
View notes
Text
adobe products I know how to use from easiest to hardest to learn. really interesting stuff I know
acrobat pro - easy, intuitive, helpful. -1 point for being very hard to download illegally.. something about the software makes it only stay cracked for a few days so I download/crack it once a year when I really need to edit a pdf
lightroom - haven't used for anything very complicated but used it to compile high def photos of flies from a microscope for a whole summer. straightforward
dreamweaver - had to use it for website design in college once.. totally useless application, but not too difficult. could figure it out in a few hrs
audition - ive used this to edit podcasts for a school project... not too bad, but have never used it for actual music purposes, so hard to judge
indesign - I love you adobe indesign, so good for poster design, definitely easier to use if you come in with prev. experience from other adobe applications. kind of a learning curve if you haven't though. started using it middle school for a journalism class and now use it for making figures and posters— blends super well with illustrator
premiere pro - starting to get into the ones that have driven me to tears. I came into it with 0 experience from any other video editing software. I still don’t understand how to truly use keyframes. that said I have successfully edited and captioned videos multiple times with it, useful app
photoshop - by far the most experience with photoshop. I love you adobe photoshop but definitely takes practice. spent weeks watching tutorials when I was 11 just so I could make some horse edits and use it to this day all the time
illustrator - what’s a vector, really, and why does the pen tool never work like I think it should. what do you mean that didn’t form a path. extremely powerful software that is truly top of the line for figure making but requires more study than I ever have time to give it since i’m always using it super rushed
after effects - homer simpson am I disabled meme. like all the difficulties of photoshop combined with all the difficulties of premiere pro and then you also have to check every frame. total nightmare that I spent a solid week trying to learn one summer
8 notes
·
View notes
Note
hi! I'm sorry if you've talked about this before, but I've been wondering how you enhance the spn con videos. like, how does it work? cause your videos look amazing, especially in comparison to the previous footage!
Thank you so much for being interested enough to ask!
At a very high level, the visual enhancements to the original videos themselves are made by running an upscaling program and then manually adjusting color-related settings in my video editing software. Sometimes I also fix aspect ratios if the original videos are squished.
Below are way more details than you probably ever wanted. 😅 I’ll put my very long answer after a break...
Upscaling
The very first thing I do when I start a new video is to take all the video sources I can find, pick out the ones I think I'm most likely to want to use, and see if I can get them to upscale. This is actually one of the easiest parts of the whole process, at least in terms of the actual time that I myself have to put into it. The computer does most of the work.
The upscaling is done through a software program. I don't actually have any idea, but I imagine it might be a dumbed down version of the type of software that movie studios use when they create upscaled Blu-ray releases of older films. I know the obvious question is, “What’s the software program?” I’m a little scared to say it without some explanation first, because it has “AI” in the title. I know and understand (and agree with) why AI is such a hot button today. However, this is not generative AI where it generates a new work out of nothing, and it’s performing a function that a human could not reasonably do.
The way I understand it, it runs an algorithm to analyze all the frames in the video and figure out how it can remove some of the visual “noise” and also add missing details to some frames based on what it finds in other frames. It then updates every single frame in the video. The videos I’m currently working with have 30 frames per second. A 30-minute video would therefore have 54,000 frames. For a human to compare 54,000 frames and make all the tiny changes required to each one would be… impossible I think. So anyway, after that long preamble, the name of the software I’m using is “Topaz Video AI”.
There are a variety of settings you can tweak, so I focus on upscaling one video source at a time because the same settings that work with one source may not work for a different source recorded with different equipment. I try different combinations of settings to small sections of the video until I find settings that seems to return noticeably improved results without adding any weird distortions. Sometimes I have to give up and proclaim the task impossible. If the video has too much noise and/or not enough good detail already there for it to work with, then it won’t upscale well. I get much, much better results with original video files than I do with files from YouTube. I think the videos were compressed when they were uploaded to YouTube and lost some of their quality.
If I find a setting that works, I tell the software to apply those settings to all of the videos from the source I'm currently working on and then leave my computer to crunch through them. That can take hours, and it makes my computer sound like it's preparing for liftoff, but it doesn’t require my involvement. I’ll often let it run overnight, then check it the next day to see if it came out ok. Sometimes I have to go back to the drawing board because I find parts of it didn’t come out well at all, but usually if the sample looked good then the full result also looks good.
Then I take my next video source (another set of videos recorded by a different person on different equipment) and repeat the process.
Color Corrections
This is all done in my video editing software. I’ve been using Adobe Premiere Pro. There’s free software out there that might be a better choice. I tried one early on and didn’t do very well with it, but I had no idea what I was doing. Video editing is new to me. So for me, the advantage of using a very popular software program was that there are tons of answers out there for just about every question I’ve ever thought to ask. Now that I have more experience, maybe I’ll give some of the free options another try. I have to decide whether or not to renew my current license at the end of the year and the price is pretty crazy, especially considering it's only for a limited period of time.
So… back to color corrections. My original attempts at this did not start out well. My first set of videos were the CHICON 2007 videos and those colors looked fine to me, so it never even occurred to me to adjust colors. When I moved on to Comic-Con 2008, I was confronted by a bunch of badly red-tinted and green-tinted videos and I thought, “Hmm, I wonder if this video editing software can do anything about that.”
And I tried. I drove myself absolutely mad. I’m not good with colors in general, I’d never worked with color adjustment settings before, and my eyes were going crazy trying to figure out if I was making things better or if I was just creating a new variety of bad. I put out a plea for opinions/advice here on Tumblr with some screen shots showing what I’d done so far, and sensitivehandsomeactionman came to my rescue. They took one of my screen shots and adjusted the colors in their own software to show me what could be achieved. And it looked amazing. Having that example to reference was a huge help. It was still a challenge for me, but I eventually got pretty close to what they did.
I’m not as good at it on my own, but I learned a lot through that process that I’ve been able to apply to my subsequent videos. I think every video I’ve worked with since then has had at least slightly wonky colors, so I've had a lot more practice. There are a bunch of complicated color-related settings in Adobe, but eventually I found the “Lumetri Color” panel which has a simpler set of set of controls consisting of a few sliders that let you adjust between two opposites until you find the right balance.
One slider is for Exposure and it basically changes the lighting from darker to lighter. Then there are two color-related sliders. One shifts between blue and orange and the other shifts between green and purple. I play around with those sliders until I think the colors look more natural, focusing mostly on their skin tone. Then if needed, I’ll adjust the Saturation slider a little to tone things down. For the most part, playing with those 4 sliders usually gets me something that I think looks decent.
Some videos are more difficult than others though, and I still consider this to be very much outside my wheelhouse. When I announce a new video on Tumblr, I usually display a comparison image of the original video versus the enhanced. Those help me see that the end result does in fact look at least a little better than the original. Sometimes after staring at the video for hours on end, I start to doubt.
If there are any wonky aspect ratios making the video look squished, that’s a really easy fix by just changing the scale percentages for that video in my video editing software.
All The Rest of the Work
All those things I just babbled about probably take up only 25% of the time I spend on each video. Less if the videos don't give me much trouble with upscaling or color adjusting. I could write another book about the rest of the process, but what I've already typed is probably overkill as it is so I'll try to be brief since this stuff isn't as much about the visuals anyway.
This is when I move on to the process of choosing which videos to display at which times and editing everything together into one (hopefully) cohesive video. I also try to choose the clearest audio that covers most of the panel. Audio changes are very noticeable, so I try to minimize them and use a single audio throughout the whole video as much as possible. Often the audio you’re hearing was from a different video than the one you’re seeing.
Once I have all the footage edited together, that’s when I start adding the subtitles and the extra content. These things are by far the most time-consuming part of the process, especially the subtitles.
I hope this answered your question. Thanks again for asking! If I didn't answer your question and if you want to risk having another book typed to you, let me know. 😅
8 notes
·
View notes
Text
Here, have some Uni Bullshit

Courtesy of Maya; the INFERIOR Blender 💅
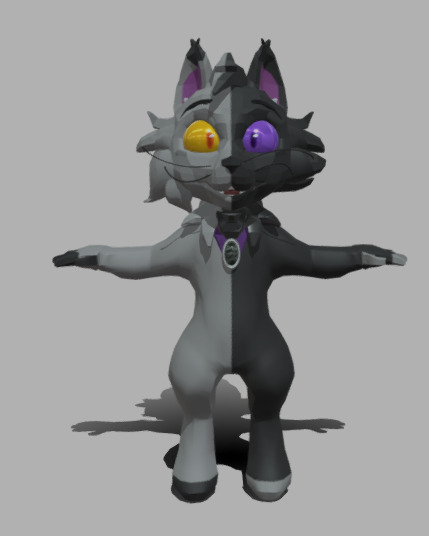
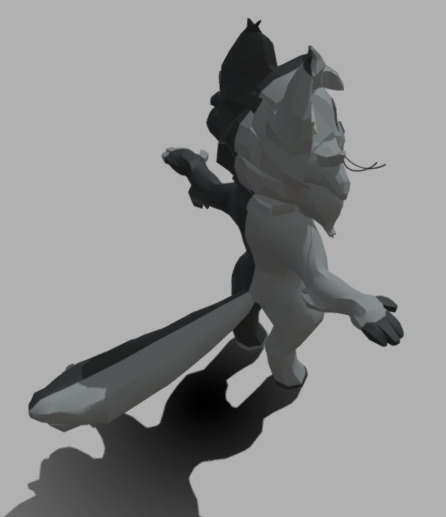
This is Chroma. She belongs to @hellsfawnart . Without their ref sheet, I'd prolly be locked away somewhere for arson.
I just got done bitching about this on insta, but I can go for seconds.
Maya is a right pain in the ass for some very specific reasons; the most prominent to me being how EVERY SINGLE TUTORIAL VIDEO FOR THIS SOFTWARE IS OLD ENOUGH TO BE IN NURSERY. And given Maya updates YEARY??? You'd be impressed just how many of those tutorials have been made redundant.
Best part about this is, I know I'm gonna get a mid grade because my report was informal and got progressively less cohesive the further along I got. This is why you have a word counter people, it tells me if I should be writing for brevity or writing to drown someone.
From the video, you can see that the model's face, fur and amulet lack textures. Don't look to me, cuz I have no answers. It literally makes no sense. The body had more broken geometry, AND YET. Turns up fine. The latter pics were taken from Sketchfab, where the textures show up perfectly. Can't spell Maya without L amirite lads.
I would say I hated the textures the most for this reason alone, but no. Nononono you haven't met my friend, WEIGHT PAINTING. Not to be confused with Rigging either, I did that manually with some guidance, and honestly I can wrap my head around it. But WEIGHT PAINTING. Would probably have been easier if I didn't model a furry. My downfall was the shoulders, they needed to be aligned with the rest of the arm, but didn't figure that out till much later. Whoopsiedoodle.
Despite how bad I am at it, video editing was def the easiest part, most peaceful activity after dealing with cosmic horrors beyond your comprehension.
The moral of the story is USE BLENDER. Industry standard my ass.
4 notes
·
View notes
Note
Hi!! How did you learn to make maxis match clothes? I would like to start doing it uwu
Hi ! So to be fair I don't remember exactly how I went about starting making CC at the very beginning except from reading tutorials and downloading Sims4Studio but here are the steps I more or less followed in my CC making journey.
First off I was already quite used to some picture editing softwares (namely Gimp and Photoshop) which definitely helped so I would recommend familiarising yourself with one of these.
Then comes the gateway drug to CC creation that are ✨recolors✨. For those you just need S4S and a picture editing software of your choice. Recolors can be quite simple : maybe you just want to change an item's color or add patterns to it. But with a little more editing/drawing skills you can also remove/add some details to the diffuse texture.
Here is a link to a short tutorial for a simple recolor using gimp by @smubuh
To keep the maxis match aesthetic the easiest way to go is to be a 🙌scavenger🙌 : you want to add buttons / belts / lace / embroidery / whatever to your texture ? Steal it from an other Sims 4 item ! Just look at your CAS and BB in game as a catalogue of all the details and textures you could frankenstein onto your project.
Maybe you'll be content with making recolors forever but if like me you start wanting to make something with a shape that doesn't already exist in game or in the CC world out there, you will have to deal with mesh. (the mesh is the 3D shape of the item as opposed to the 2D texture that is applied onto it) Meshing has a steeper learning curve than recoloring for sure so arm yourself with as much calm and patience as you can muster. First you'll need to download Blender, I recommend downloading the same Blender version as the one used in the tutorial you choose to follow because if you're anything like me you'll get lost otherwise. Also use a mouse, the scroll wheel makes moving around in blender so much easier than using a laptop touch pad like I did at the start 🤡.
And now that you have blender and a mouse time to mess around with meshes and for that like everyone I started (and honestly I mostly still stick to it nowadays) by frankenmeshing. Sticking to the frankenstein/scavenger theme from earlier, this is quite similar to what I described with scavenging textures, except this time we're combining meshes aka shapes : see a collar you like on that blouse, a sleeve you like on that dress ? Bam put them together !
For example here is a handydandy frankenmesh tutorial by @deetron-sims
Outside of frankenmeshing other ways to tranform meshes are to inflate and stretch parts of it (want a bigger skirt ? a shorter jacket ? the O key is your friend). And if you want to go beyond what I have you can also learn how to create meshes from scratch.
That being said dealing with meshes is full of surprises (mostly bad ones unfortunately), since you may have to deal with distorted weights, UV1 and whatever else, so it involved a lot of trouble shooting and trial & error. Being part of the S4S forum or the Creator Musing discord can be very helpful when you're at a loss (but always google and search for yourself before going around asking people).
Finally it's important to keep in mind that it takes time to learn how to make CC so don't be too hard on yourself and take breaks when it gets too frustrating. Personally it took me many months to graduate from recolors to frankesmeshing, I had to give up and try again many times before I finally got what I wanted.
Here are some more tutorials and resources :
@myshunosun made this great post about Maxis matched CC : Tips: components of creating Maxis Match objects for The Sims 4
@powluna has great video tutorials for beginners, especially this well rounded one that goes in details throught all of CAS CC creation (from the use of S4S all the way to blender) with neat little chapters so you can watch only the parts that you're focusing on at a time
S4S forum in addition to the S4S software itself this forum provides plenty of tutorials and a CC creator community
The Creator Musing discord is also full of links to various tutorials and resources (and once again a community of peers)
Specifically for Blender :
@ravasheencc's Resources Archive, I remember especially her Blender Basics Video being quite helpful when I was starting out
@surely-sims's Edutainment Lives which you can find on her twitch, mainly focused on Build&Buy CC
PS : I didn't mention the normal/bump map and the specular map because they are very much optional. I honestly didn't use these until a few months ago and even now I don't bother with them most times
16 notes
·
View notes
Note
Hey! I have a couple of questions whenever you have the time for them...
First off I've started sometimes recording timelapses on csp, but as far as I can tell you have to export every single time before you fully exit the program (I've had to lose the footage to learn this lesson 😭), but the clips also always seem to start with the final frame? Idk if you record them long enough to need to merge clips but if so I'd appreciate any guidance you'd have to make that merging seamless, bc I tried cuttting the beginning of the clips and it still does a stupid lil jump to that final image :(
And second, I thiiiink it was you that mentioned having a "gas arm" that you mount your tablet to? If so I can NOT find that post but it's something I'm interested in investing in!
the ask where i talk abt my tablet mount is here!
as for the timelapse, i'm afraid i can't help bc i've never experienced the specific issue you're describing -- my experience has always been that the timelapse footage saves when you save the file! the only thing i really use the timelapse function on is my monthly sketchbook/warmup files, and i don't splice clips for that, i just pile up a bunch of folders on one canvas that i draw in all month, and then i export the whole thing at the end! i've never exported multiple times thruout the 'lifespan' of a file so to speak. if u would like to have multiple different drawings all strung together in one long timelapse, i think the easiest thing to do is what i do for my sketchbooks: just have those all in one clip studio file, hiding things as you finish them. (this DOES make file size balloon a LOT, so if ur computer can't handle that u might have no choice but to do smaller bursts.)
if you're losing footage in a saved document (that has the "record timelapse" function checked, which you can do when u first create the file but u can also switch on from the file menu if u forgot at first), that sounds to me like a bug, and it may be something u want to email support about! i also don't think u can control the fact that the opening frame is the final, i think you'd have to trim that off manually after export in a different video editing software; the actual options u have for fiddling w the timelapse in clip studio natively are extremely limited.
#to clarify if u forget to check 'record timelapse' at the beginning and flip it on later from the file menu#it WILL NOT retroactively restore any timelapse info from anything before u flipped it on. iirc
10 notes
·
View notes
Note
What video editing software do you prefer?
I was using Final Cut at one time but personally I like Premiere pro the most and I find it easiest to deal with
10 notes
·
View notes
Note
was there anything cursed that happened in the making of your game not game?
oh jeez, a decent amount of stuff that was kind of cursed happened during mostly editing. like sounds getting fucked by some adjustments to the point where the first text sound (taken from phoenix wright) had sounded like a machine gun. uhhhh the instrumental version of Just The Two of Us still had some lyrics in it, and on the youtube video i had gotten it from, wasnt that loud, but my editing software really said "oh???? you want that out more???" so it go SO LOUD as i was figuring out the lengths for text and expressions, im vibing and i just get the choral background THE TWWWOOO OF US~ those were mostly just bad edits on my end that got fixed
as for the script, nothing cursed happened there really. outside of days of exhaustion between Anime Boston and the Eclipse, the script was probably the easiest thing to work on for the entire project
and for the drawing, while im not a fan of cals lightsaber shocked face (i think i made his eyes too far apart?) i did have a moment when working on his front facing expressions my circle lines to get his eyes lined up ended up getting erased in a way that gave cal eye lashes and made him look like shaileene woodley. THAT i actually still have a pic of:
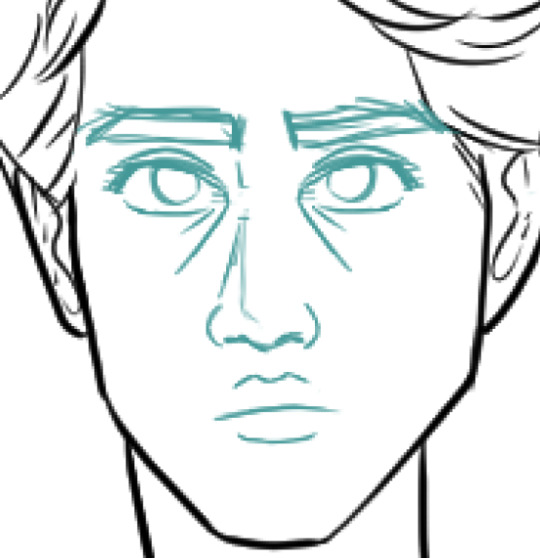
like, i thought it was because i hadnt added in his scar yet but NO, i just made him look like an actress who's never been in a star wars before. after some adjustments i got him to look LESS like her and i think i ended up removing the "eyelashes" and adjusted the eye shape a bit too.
5 notes
·
View notes
Text
Kawaii Town Prints Review 2025
Get into this profitable niche with DFY prompts, editable interior templates, editable book covers, video masterclass and DFY keyword targets! EVERYTHING YOU NEED TO SUCCEED!
Never Been Easier: Unlock Passive Earnings with the Kawaii Town Coloring Book Bundle!
Have you ever dreamed of generating passive income without having to build a website, learn advanced design skills, or invest in pricey software? With Ike Paz’s Kawaii Town Coloring Book Profit Bundle, you’re about to discover a game-changing opportunity to tap into the lucrative world of Kawaii-themed coloring books. Whether you’re a complete newbie or a seasoned publisher, this done-for-you (DFY) bundle has all the tools you need to succeed in creating and selling unique, high-quality coloring books — without any of the guesswork!
🌐 Get Kawaii Town Software Bundle + Discount Today!
Why Choose Kawaii Town Coloring Book Bundle?
Kawaii-themed coloring books are more than just adorable. They’re a growing niche with massive potential for earning royalties. This trend caters to a global audience that loves cute and charming designs, ensuring a steady stream of buyers for your creations. Ike Paz, a seasoned expert in passive income generation, has meticulously crafted this bundle to make it simple, quick, and profitable for anyone to break into the market.
Here’s what sets this bundle apart:
100% Unique Creations: Unlike PLR products, every coloring book you create is uniquely yours. With this bundle, you’ll produce completely original content that stands out.
No Need for Specialized Skills: No design expertise? No problem. If you can copy and paste, drag and drop, and have an internet connection, you’re ready to succeed.
Access to Passive Income: With minimal effort, you can generate daily royalties on the world’s largest buyer traffic search engines.
The Easiest 4-Step Process for Creating a Kawaii Town Coloring Book
Ike Paz’s method makes it incredibly simple to create and publish your first coloring book:
Step 1: Use Ready-Made Prompts
Take advantage of the 65 done-for-you Kawaii Town coloring book prompts included in the bundle. These prompts allow you to quickly create unique and attractive coloring pages with free AI tools.
Step 2: Customize Editable Templates
With fully editable interior templates, you can effortlessly arrange your pages to perfection. Drag and drop elements to create a polished, professional-quality book.
Step 3: Design Your Book Cover
Grab your audience’s attention with the ready-made, editable book cover templates. These designs are crafted specifically for the Kawaii niche and ensure your book stands out in a competitive marketplace.
Step 4: Publish for Free
Publish your completed book on popular platforms like Amazon KDP, gaining access to free buyer traffic. Once live, watch your passive sales roll in!
What’s Inside the Kawaii Town Coloring Book Bundle?
The Kawaii Town Coloring Book Profit Bundle includes every essential tool and resource you’ll need:
Full Kawaii Town Coloring Book Masterclass ($97 value): A comprehensive video guide that walks you through the entire process, from creating pages to publishing.
65 DFY Kawaii Coloring Book Prompts ($27 value): Professionally written prompts designed for maximum royalties.
DFY Editable Book Cover Templates ($47 value): Customizable book cover designs tailored to the Kawaii niche.
DFY Editable Interior Templates ($47 value): Beautifully designed, professional interior layouts.
Essential Page Templates ($19 value): Includes title, copyright, and dedication pages to make your book complete.
Keyword Target List ($47 value): Get access to highly targeted, profitable keywords that drive free buyer traffic.
Massive Software Bonus ($97 value): Generate stunning coloring page prompts with just a few clicks.
Exclusive Bonuses:
Video Tutorial on Hard-Lining Illustrations ($77 value)
Video Tutorial on Whitening Grey Illustrations ($77 value)
Additional Coloring Book Prompt Styles ($97 value)
Total Value: $553
Original Sales Price: $167 (Today Price
$27 Limited-Time Offer!)
Why Kawaii Town Coloring Books Are a Lucrative Niche
The Kawaii niche is a proven money-maker. Its broad appeal spans across age groups and regions, tapping into a loyal fan base that actively seeks out new content. With this bundle, you won’t need to spend months researching trends or guessing what works. Every component — from templates to keywords — is optimized to give you the best chance of success.
High Demand: Buyers are actively searching for fresh and unique Kawaii-themed books.
Global Appeal: The cute and whimsical style of Kawaii is universally loved.
Evergreen Niche: Kawaii designs never go out of style, making them a reliable source of income year-round.
Testimonials From Real Users
Don’t just take our word for it! Here’s what some users of the Kawaii Town Coloring Book Bundle are saying:
Sarah M.: “I created and published my first Kawaii book in just a few days, and I’ve already made my first sales!”
John D.: “The step-by-step guide and templates made the process effortless. I’m already planning my second book!”
Emily R.: “The bundle’s free AI tools and prompts saved me so much time. It’s worth every penny!”
Who Is This Bundle For?
The Kawaii Town Coloring Book Profit Bundle is perfect for:
Newbies: If you’ve never created a book before, this bundle gives you everything you need to start and succeed.
Side Hustlers: Looking to add another income stream? This bundle is a quick and low-effort way to do it.
Busy Professionals: Create passive income streams in your spare time with this streamlined process.
Meet Ike Paz: The Mind Behind the Bundle
Ike Paz’s journey is an inspiring testament to perseverance and innovation. From working in a meat factory to pursuing online entrepreneurship, Ike has mastered the art of creating digital products that generate consistent income. He’s now on a mission to help others achieve financial freedom through simple, effective tools like the Kawaii Town Coloring Book Bundle.
Take the First Step Toward Passive Earnings
Imagine having your first coloring book live and earning royalties by the end of the week. With Ike Paz’s proven system, this isn’t just possible; it’s almost guaranteed if you follow the steps.
Don’t wait! The clock is ticking on this limited-time offer. Secure your Kawaii Town Coloring Book Profit Bundle now and start building your passive income empire today.
🌐 Get Kawaii Town Software Bundle + Discount Today!
#kawaiitownprintslegitorscam#kawaiitownprintsreview#kawaiitownprintsreviews#kawaiitownprintsreviewOTO#kawaiitownprintsreviewbonuses#kawaiitownprintsikepaz#coloring books#kawaiitownprints#kawaiitownprintsscam#kawaiitownprintsbyIKEPAZ#kawaiitownprintsAPP#kawaiitownprintssoftware
1 note
·
View note
Text
A JOURNEY THROUGH WEEK 6: INTRODUCTION TO DESIGN SOFTWARE
We started the week in the MGA lab, where we were introduced to various design and animation softwares, such as: Photoshop, Illustrator, Maya, After Effects and such.
After the introduction to the softwares, we were asked to experiment with them.
Firstly, we were asked to work with Maya. We had so much of trouble familiarising around the tools. To get us to an easy start we were asked to animate a bouncing ball and it being the easiest start to animation, makes me terrified as to just how much more complicated it is gonna get in the future. But for now, I’ll chill.


Next, we were shown videos of different types of animation, such as: stop motion, clay motion, 3D, motion graphics and more. Our submission was based on stop motion animation.
Moreover, we had to experiment with illustrator and photoshop. We were given little activities of which we were asked to follow. It was fast-paced but still fun. We were asked to edit images, add elements, design something using shapes and more.


For the rest of the week, we had to work on our submission, the stop motion animation. We were allowed to pick any topic and get the animation done on it. We were split into 2 groups of 4 yet again. Our team chose to be heavily inspired by the ‘Starry Night’ by Vincent Van Gogh. We changed a few elements from the original painting and also used a different colour palette for our animation.
Here’s the process of the stop-motion animation and the final animation.


To me, it was one of the few weeks I enjoyed most. Especially, the process of getting the stop motion done.
THIS CONCLUDES WEEK 6.
2 notes
·
View notes
Note
Hey do you have any tips to get into editing vids? I have the strongest urge to edit Eric and Ariel to o can see you😭😭 it’s too good to not try
you definitely need a good video editing software! i haven’t made a video in over a year but i use sony vegas pro 10. it’s super expensive though, so i downloaded it through a t*rrent lol. also it’s best to use 1080p episodes or movies for the best quality clips. again, i use t*rrents for this. t*rrents are the fastest and easiest way to download things but i’d also recommend using a vpn while downloading things. i also suggest looking up video editing for beginners tutorials on youtube.
i hope this helps a little. i’d love to see an eric/ariel video to i can see you ❤️🔥 i think eric/ariel will definitely inspire me to create a new video after so long 🥰
4 notes
·
View notes