#editingsoftware
Explore tagged Tumblr posts
Visit Tumblr Blog
Explore Tumblr blogs with no restrictions, modern design and the best experience.
Last Seen Tumblr Blogs


Fun Fact
Average visit duration of Tumblr.com is 10 mins and 25 secs.
Text
🎥 Attention Media and Communications Students in Finland! 🇫🇮
Are you ready to level up your Media and Communications skills? Whether you’re studying journalism, digital media, advertising, or public relations, we have all the essential tools to help you succeed!
📚 From textbooks, media equipment, editing software, to online resources—our collection of essential shopping items will support you throughout your studies and beyond.
💡 Stay ahead of the curve and start your shopping today! 👇 Visit: https://cotxapi.com/assignment/?token=token_67cde3ca444658.17156189#products
#MediaAndCommunications#MediaStudents#CommunicationStudies#FinlandStudents#Journalism#DigitalMedia#PublicRelations#AdvertisingStudents#MediaEquipment#EditingSoftware#MediaBooks#CommunicationsBooks#MediaProduction#MediaResources#CommunicationsTools#Broadcasting#Filmmaking#SocialMedia#DigitalContent#MediaCareer#PRProfessionals#CreativeStudents#FilmStudies#JournalismBooks#MediaSkills#MediaTechnology#CommunicationExams#DigitalMarketing#MediaResearch#AdvertisingTools
14 notes
·
View notes
Text
Discover the power of Movavi Video Suite for Mac, your all-in-one solution for creating captivating content!
Best Features of Movavi Video Suite for Mac Hey there, fellow Mac users! If you’re on the hunt for a reliable video editing software that packs a punch, look no further than Movavi Video Suite for Mac. Whether you’re a budding filmmaker, a content creator, or just someone who loves to edit videos for fun, this suite has something to offer everyone. In this post, we’ll dive into the best…

View On WordPress
#ContentCreation#CreativeTools#DigitalContent#EditingSoftware#Filmmaking#Mac#Movavi#VideoEditing#VideoProduction#VideoSuite#ai#artificial intelligence#business#content-creation#digital-marketing#marketing#photography#software#technology
0 notes
Text
DaVinci Resolve: Free vs. Paid – Which Version is Right for You?

DaVinci Resolve Free vs. Paid—what’s the difference? Explore key features and decide which version fits your video editing needs.
🔗 Read more: DaVinci Resolve: Free vs. Paid
0 notes
Text
Unlock Creativity with CapCut — Limited-Time Cashback Offer!

Are you ready to take your video editing skills to the next level? CapCut has the perfect deal to get you started!
✨ Exclusive Cashback Offer ✨
💰 45.45% Cashback for New Customers — Your creative journey starts here! 💰 40.4% Cashback for Existing Customers — Keep creating and save big!
Why Choose CapCut?
✅ Powerful Editing Tools — Seamlessly create professional-grade videos. ✅ User-Friendly Interface — Perfect for beginners and pros alike. ✅ Endless Creative Possibilities — From dynamic effects to precision editing.
How to Claim Your Cashback
1️⃣ Sign Up or Log In to your CapCut account. 2️⃣ Subscribe to one of our premium plans. 3️⃣ Receive up to 45.45% Cashback on your purchase.
📅 Hurry! Offer valid for a limited time only. Don’t miss your chance to save and create like never before!
👉 Start Editing Today at CapCut.com
#UnlockCreativity#CapCut#CashbackOffer#LimitedTime#VideoEditing#CreativeTools#CapCutDeals#FilmEditing#ContentCreation#EditingSoftware
0 notes
Text
CapCut Exclusive Cashback Promotion 🎬✨
Are you ready to take your video editing to the next level? CapCut, the trusted name in video montage and editing, is offering an unbeatable cashback promotion for all customers!
Here’s the Deal:
📣 New Customers: Enjoy a massive 45.45% cashback on your first purchase! 🎉 Existing Customers: Get rewarded with an incredible 40.4% cashback on your next purchase!
Why Choose CapCut?
Intuitive tools for creating stunning videos.
Professional-grade features that make editing simple.
Perfect for content creators, marketers, or personal projects.
How to Claim Your Cashback:
Sign up or log in to your CapCut account.
Choose the plan or feature that suits your needs.
Complete your purchase — your cashback will be credited instantly!
⚡ Hurry — This is a limited-time offer! Don’t miss your chance to save big and create amazing videos with CapCut.
Start Editing. Save Big. Create More.
👉 Visit CapCut Now

0 notes
Text
The Essential Role of Adobe Software in the Modern Photographer's Workflow
Image editing with adobe : Q & A Tutorial
1.Do photographers use Adobe?
Yes, many photographers use Adobe software, particularly Adobe Lightroom and Adobe Photoshop, for editing and processing their images. These tools provide a wide range of features for enhancing photos, organizing images, and performing detailed retouching, making them popular choices among both amateur and professional photographers.
2. Which Adobe allows editing?
Adobe Acrobat allows editing of PDF files. For image editing, Adobe Photoshop is the go-to software. Adobe Illustrator is used for vector graphics and can also be edited. Additionally, Adobe InDesign is used for layout design and allows editing of text and images within that context. Each program specializes in different types of editing tasks.
3. Is Adobe Lightroom free?
Adobe Lightroom is not free. It offers a subscription-based model with different pricing tiers, including a free trial for new users. After the trial period, users must pay to continue accessing the full features of the software. There are also limited free mobile versions with basic editing tools available, but these do not include all functionalities.
4. How do I edit a file in Adobe?
To edit a file in Adobe, open the appropriate Adobe application (like Adobe Acrobat for PDFs or Adobe Photoshop for images). Use the editing tools available in the toolbar to make changes, such as adding text, images, or annotations. After editing, save the file by clicking "File" and then "Save" or "Save As" to keep your changes.
5. What is Adobe editor called?
Adobe's primary editing software is called Adobe Acrobat, which is used for creating, editing, and managing PDF documents. For photo editing, Adobe offers Adobe Photoshop. For video editing, Adobe Premiere Pro is the go-to application. Each of these tools serves different purposes within Adobe's suite of creative software.

Visit: VS Website See: VS Portfolio
0 notes
Text
youtube
#VideoEditing#EasyVideoEditingTricks#ProEdits#DavinciResolve#AdobePremierePro#VideoEditingTips#SmoothEdits#CreativeEditing#Filmmaking#VideoProduction#ColorGrading#AudioEditing#ContentCreation#YouTubeEditing#VideoTips#EditingSoftware#HowToEditVideo#Youtube
0 notes
Text
Corel VideoStudio Review

🎬Thinking about editing your videos with Corel VideoStudio? 🎥✨ Here’s a quick review!
This user-friendly software is perfect for both beginners and experienced editors, offering a wide range of features like easy drag-and-drop editing, stunning effects, and powerful audio tools.
🎬🔊 Plus, the 360-degree video editing and screen recording capabilities make it
#CorelVideoStudio#VideoEditingSoftware#VideoEditing#EditingTips#YouTubeEditing#EditingSoftware#VlogEditing
0 notes
Text
Getting started with popular video editing software like Adobe Premiere Pro, Final Cut Pro, or DaVinci Resolve can be an exciting journey. Here’s a step-by-step guide for each software to help you begin:
1. Adobe Premiere Pro
Installation:
Download and Install: Visit the https://exe.io/bDTJDm and download Premiere Pro. It requires a subscription, but you can start with a free trial.
Getting Started:
Create a New Project: Open Premiere Pro and select "New Project." Name your project and choose a location to save it.
Import Media: Go to File > Import or drag and drop your media files (video, audio, images) into the project panel.
Understanding the Workspace: Familiarize yourself with the interface, including:
Timeline: Where you assemble your clips.
Program Monitor: Where you preview your edits.
Source Monitor: For previewing clips before adding them to the timeline.
Basic Editing Steps:
Cutting Clips: Use the Razor Tool (C) to cut clips on the timeline.
Trimming Clips: Select a clip and drag the edges to trim it.
Adding Transitions: Go to the Effects panel and drag a transition (like Cross Dissolve) between two clips.
Exporting Your Video: When you're done editing, go to File > Export > Media, select the format, and click "Export."
Resources:
Adobe Tutorials: Check out https://exe.io/5RmK8ztx for in-depth learning.
2. Final Cut Pro
Installation:
Download and Install: Visit the https://exe.io/CwMVha to download Final Cut Pro. A free trial is also available.
Getting Started:
Create a New Library: When you first open Final Cut Pro, create a new library (File > New > Library) to store your projects.
Import Media: Click on the Import Media button or drag and drop files directly into the media library.
Understanding the Interface:
Timeline: Where you arrange your clips.
Viewer: For previewing your edits.
Inspector: For modifying clip properties.
Basic Editing Steps:
Cutting Clips: Use the Blade Tool (B) to cut clips on the timeline.
Trimming Clips: Click and drag the edges of a clip to trim it.
Adding Effects and Transitions: Go to the Effects Browser (Command + 5) to find effects and transitions, then drag them onto clips in the timeline.
Exporting Your Video: Go to File > Share to export your finished project.
Resources:
Apple's User Guide: Check out the https://exe.io/25qzd for comprehensive tutorials.
3. DaVinci Resolve
Installation:
Download and Install: Go to the https://exe.io/wtDBT5 and download DaVinci Resolve, which is free with an option to upgrade to a paid version.
Getting Started:
Create a New Project: Open DaVinci Resolve and create a new project in the Project Manager.
Import Media: Use the Media tab to import your video and audio files.
Understanding the Interface:
Cut Page: For quick editing and assembling clips.
Edit Page: For more detailed editing tasks.
Color Page: For color correction and grading.
Fairlight Page: For audio editing.
Deliver Page: For exporting your project.
Basic Editing Steps:
Cutting Clips: Use the blade tool (B) on the Cut or Edit page to cut clips.
Trimming Clips: Select a clip and drag its edges to trim.
Adding Transitions: Go to the Effects Library and drag transitions between clips on the timeline.
Exporting Your Video: Go to the Deliver page, select your export settings, and click "Add to Render Queue" to export.
Resources:
Blackmagic Design Training: Explore https://exe.io/T8iEpr for in-depth tutorials.
General Tips for All Software
Practice: The best way to learn is through hands-on experience. Start with simple projects and gradually take on more complex edits.
Tutorials: Utilize YouTube and other platforms for tutorial videos that guide you through specific techniques or effects.
Community: Join forums or social media groups related to video editing where you can ask questions and share your work.
With these steps, you should be well on your way to getting started with video editing in your chosen software. Do you have a specific software in mind, or would you like more detailed information about any of these tools?
For more vidéo:MONTAGE Vidéo / Premiere Pro - Tuto COMPLET pour DEBUTANTS (2024) https://exe.io/RBf7S6j
LES MEILLEURS RÉGLAGES D’EXPORTS sur Adobe Premiere Pro 2024 [TUTO]
https://exe.io/XLNsR

#VideoEditing#VideoEditingTutorial#VideoEditingTips#HowToEditVideos#BeginnerVideoEditing#AdobePremierePro#FinalCutPro#DaVinciResolve#EditingSoftware#PremiereProTutorial#CinematicEditing#ColorGrading#EditingTechniques#CreativeEditing#FilmEditing#YouTubeTutorial#LearnVideoEditing#EditingForBeginners#VideoProduction#ContentCreation#YouTubeGrowth#VideoMarketing#EditingSkills#VideoContent
0 notes
Text
Photo Editing
Introduction to Photo Editing
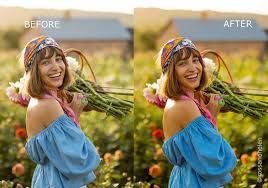
Photo editing has become an essential part of modern photography, enabling photographers and hobbyists to enhance their images and bring out the best in their shots. Whether you're a professional photographer, a social media influencer, or just someone who enjoys taking pictures, understanding the fundamentals of photo editing can dramatically improve the quality of your photos. This comprehensive guide will explore various aspects of photo editing from basic adjustments to advanced techniques, providing you with the knowledge to create stunning images.
The Importance of Photo Editing
In the digital age, capturing a great photo is only half the battle. Even the best cameras can produce images that need a little tweaking to reach their full potential. Factors like lighting, color balance, and composition often require post-processing to ensure that the image looks as vibrant and professional as possible.
Enhance Colors and Lighting: Adjust brightness, contrast, and saturation to make your photos more visually appealing.
Correct Imperfections: Remove blemishes, correct red-eye, and fix other flaws that detract from the image.
Alter Composition: Crop, straighten, and reframe images to improve their composition.
Create Artistic Effects: Apply filters, overlays, and textures to give your photos a unique, creative look.
Before diving into specific editing techniques, it's essential to understand the tools at your disposal. Various photo editing software options range from beginner-friendly apps to professional-grade programs.
Popular Photo Editing Software
Adobe Photoshop:
Overview: The industry standard for photo editing, offering a vast array of tools for everything from basic adjustments to complex image manipulation.
Key Features: Layers, masks, advanced retouching tools, and support for plugins.
Best For: Professionals and serious hobbyists who need advanced features and flexibility.
Adobe Lightroom:
Overview: A powerful tool designed for organizing and editing large collections of photos.
Key Features: Non-destructive editing, presets, and robust organizational tools.
Best For: Photographers who need to manage and process large numbers of images.
GIMP (GNU Image Manipulation Program):
Overview: A free, open-source alternative to Photoshop.
Key Features: Comprehensive tools for editing and manipulating images, supports layers and plugins.
Best For: Users who need advanced editing features without the cost.
Affinity Photo:
Overview: A budget-friendly alternative to Photoshop, offering many of the same features.
Key Features: High-end photo editing tools, RAW editing, and a user-friendly interface.
Best For: Photographers who want professional-level tools at an affordable price.
Canva:
Overview: A user-friendly online platform for basic photo editing and graphic design.
Key Features: Drag-and-drop interface, templates, and basic editing tools.
Best For: Beginners and casual users looking for quick edits and design work.
Basic Photo Editing Techniques
Once you've chosen your editing software, it's time to start enhancing your photos. Here are some basic techniques that form the foundation of photo editing.
Cropping and Straightening:
Purpose: Improve composition by removing unnecessary elements and straightening horizons.
How-To: Use the crop tool to trim the edges of your photo. Many tools also offer a grid overlay to help you straighten the image by aligning key elements with the grid lines.
Adjusting Exposure:
Purpose: Correct the overall brightness of your image.
How-To: Use the exposure slider to increase or decrease the brightness. Be careful not to overexpose (too bright) or underexpose (too dark) your image.
Contrast and Brightness:
Purpose: Enhance the difference between the light and dark areas of your photo, making it more dynamic.
How-To: Adjust the contrast slider to increase or decrease the difference between shadows and highlights. Use the brightness slider to fine-tune the overall lightness of the image.
Color Correction:
Purpose: Ensure that the colors in your photo are accurate and appealing.
How-To: Use the white balance tool to correct any color cast (e.g., too warm or too cool). Adjust saturation and vibrance to enhance colors without oversaturating them.
Sharpening:
Purpose: Enhance the clarity of your image by making edges appear more defined.
How-To: Apply the sharpening tool carefully to avoid creating a grainy or unnatural look. Focus on areas that need more definition, like eyes in a portrait or the edges of objects in landscapes.
Noise Reduction:
Purpose: Minimize graininess or “noise,” particularly in low-light photos.
How-To: Use the noise reduction slider to smooth out the grain, but be careful not to overdo it, as it can lead to a loss of detail.
Advanced Photo Editing Techniques
Once you've mastered the basics, you can explore more advanced techniques to take your photo editing to the next level.
1. Layering and Masking:
Purpose: Allows you to make non-destructive edits, combine multiple images, and apply adjustments selectively.
How-To: Use layers to separate different elements of your photo (e.g., background, subject) and apply masks to control where adjustments are applied. This technique is powerful for compositing images or making complex adjustments.
2. Dodging and Burning:
Purpose: Enhance or darken specific areas of your photo to add depth and focus.
How-To: The dodge tool lightens areas of your photo, while the burn tool darkens them. Use these tools selectively to draw attention to key parts of your image or to create a more balanced exposure.
3. Cloning and Healing:
Purpose: Remove unwanted elements or imperfections from your photo.
How-To: The clone stamp tool allows you to copy pixels from one part of your image to another, effectively “erasing” unwanted objects. The healing brush works similarly but blends the copied area with the surrounding pixels for a more natural look.
4. Advanced Color Grading:
Purpose: Apply a specific mood or aesthetic to your photo through color adjustments.
How-To: Use curves, selective color, or split toning to fine-tune the colors in your image. This technique is often used in cinematic photography to create a specific atmosphere.
5. Working with RAW Files:
Purpose: RAW files contain more data than JPEGs, giving you greater flexibility in editing.
How-To: Open RAW files in a program like Adobe Lightroom or Photoshop. From there, you can adjust exposure, white balance, and other settings with minimal loss of quality. RAW editing is essential for professional photographers who need the highest quality results.
Creative Photo Editing
Beyond enhancing and correcting photos, editing can also be used creatively to produce artistic images. This involves thinking outside the box and using various tools and techniques to transform your photos in unique ways.
1. Applying Filters and Presets:
Purpose: Quickly change the look and feel of your photo.
How-To: Many editing programs come with built-in filters and presets. These are pre-defined adjustments that can dramatically alter the appearance of your image. You can also create your own presets for a consistent style across multiple photos.
2. Adding Textures and Overlays:
Purpose: Enhance your photos with additional visual elements.
How-To: Apply textures (like grunge, paper, or fabric) as an overlay to add depth and interest to your photo. You can also use light leaks, lens flares, or bokeh effects to create a specific mood.
3. Photo Manipulation:
Purpose: Combine multiple images or elements to create a surreal or fantasy composition.
How-To: Use techniques like compositing, where you blend multiple images, or digital painting, where you paint directly onto your photo. This requires a good understanding of layers, masking, and perspective to achieve a believable result.
4. Black and White Conversion:
Purpose: Create timeless, classic images by converting color photos to black and white.
How-To: Use the black and white adjustment layer or desaturation tool to remove color from your image. You can then adjust the contrast and apply filters to enhance the tonal range and bring out details.
Tips for Effective Photo Editing
Work Non-Destructively:
Always use layers, masks, and adjustment layers to ensure that your original image remains untouched. This allows you to experiment and make changes without permanently altering your photo.
Use Shortcuts:
Familiarize yourself with keyboard shortcuts in your editing software. This will speed up your workflow and make the editing process more efficient.
Keep It Natural:
While it's tempting to push adjustments to the extreme, subtlety is often more effective. Aim to enhance your photos without making them look overly edited.
Learn from Others:
Study the work of professional photographers and editors. Tutorials, online courses, and forums are valuable resources for learning new techniques and improving your skills.
Practice Regularly:
The more you edit, the better you'll become. Experiment with different styles and techniques to develop your unique editing style.
The Future of Photo Editing
Photo editing technology is constantly evolving, driven by advancements in software and artificial intelligence (AI). Here’s a glimpse of what the future holds:
1. AI-Powered Editing:
AI is making photo editing faster and more accessible. Tools like Adobe's Sensei and Laminar AI can automatically enhance photos, suggest edits, and even retouch portraits with a single click. As AI technology advances, we can expect more intuitive and powerful editing tools.
2. Augmented Reality (AR) in Editing:
AR is starting to influence photo editing, allowing users to visualize edits in real-time or apply effects that interact with the environment. This technology could lead to new creative possibilities and more immersive editing experiences.
3. Mobile Editing:
With the increasing power of smartphones, mobile editing apps are becoming more sophisticated. Professionals and amateurs alike are turning to mobile apps like Adobe Lightroom Mobile and Snapseed for on-the-go editing. The convenience and accessibility of mobile editing will continue to grow.
4. Collaborative Editing:
As cloud-based tools become more prevalent, collaborative editing is becoming easier. Multiple users can work on the same project simultaneously, whether they are in the same room or across the globe. This is particularly useful for professional teams and creative agencies.
The Importance of Photo Editing
In the digital age, capturing a great photo is only half the battle. Even the best cameras can produce images that need some tweaking to reach their full potential, and post-processing is often required in elements such as lighting, color balance and composition to make your images look as vibrant and professional as possible.
Enhance Colors and Lighting: Adjust brightness, contrast, and saturation to make your photos more visually appealing.
Correct Imperfections: Remove blemishes, correct red-eye, and fix other flaws that detract from the image.
Alter Composition: Crop, straighten, and reframe images to improve their composition.
Create Artistic Effects: Apply filters, overlays, and textures to give your photos a unique, creative look.
Before diving into specific editing techniques, it's important to become familiar with the tools available to you. Various photo editing software options range from beginner-friendly apps to professional-grade programs.
Popular Photo Editing Software
Adobe Photoshop:
Overview: The industry standard for photo editing, offering a vast array of tools for everything from basic adjustments to complex image manipulation.
Key Features: Layers, masks, advanced retouching tools, and support for plugins.
Best For: Professionals and serious hobbyists who need advanced features and flexibility.
Adobe Lightroom:
Summary: A powerful tool for organizing and editing large photo collections.
Key Features: Non-destructive editing, presets, and robust organizational tools.
Best For: Photographers who need to manage and process large numbers of images.
GIMP (GNU Image Manipulation Program):
Overview: A free, open-source alternative to Photoshop.
Main features: Comprehensive tools for image editing and manipulation, support for layers and plugins.
Best For: Users who need advanced editing features without the cost.
Affinity Photo:
Overview: A budget-friendly alternative to Photoshop, offering many of the same features.
Key Features: High-end photo editing tools, RAW editing, and a user-friendly interface.
Best For: Photographers who want professional-level tools at an affordable price.
Canva:
Overview: A user-friendly online platform for basic photo editing and graphic design.
Key Features: Drag-and-drop interface, templates, and basic editing tools.
Best For: Beginners and casual users looking for quick edits and design work.
Once you've chosen your editing software, you're ready to start enhancing your photos. Here are some basic techniques to help you start editing your photos.
Cropping and Straightening:
Purpose: Improve composition by removing unnecessary elements and straightening horizons.
How-To: Use the crop tool to trim the edges of your photo. Many tools also offer a grid overlay to help you straighten the image by aligning key elements with the grid lines.
Adjusting Exposure:
Purpose: Correct the overall brightness of your image.
How-To: Use the exposure slider to increase or decrease the brightness. Be careful not to overexpose (too bright) or underexpose (too dark) your images.
Contrast and Brightness:
Purpose: Enhance the difference between the light and dark areas of your photo, making it more dynamic.
How-To: Adjust the contrast slider to increase or decrease the difference between shadows and highlights. Use the Brightness slider to optimize the overall brightness of your image.
Color Correction:
Purpose: Ensure that the colors in your photo are accurate and appealing.
How-To: Use the white balance tool to correct any color cast (e.g., too warm or too cool). Adjust saturation and vibrance to enhance colors without oversaturating them.
Sharpening:
Purpose: Enhance the clarity of your image by making edges appear more defined.
How-To: Apply the sharpening tool carefully to avoid creating a grainy or unnatural look. Focus on areas that need more definition, such as eyes in a portrait or the edges of objects in a landscape.
Noise Reduction:
Purpose: Minimize graininess or “noise,” particularly in low-light photos.
How to: Use the Noise Reduction slider to smooth out grain, but be careful not to overdo it as this can result in loss of detail.
Advanced Photo Editing Techniques
Once you've mastered the basics, you can explore more advanced techniques to take your photo editing to the next level.
1. Layering and Masking:
Purpose: Allows you to make non-destructive edits, combine multiple images, and apply adjustments selectively.
How-To: Use layers to separate different elements of your photo (e.g., background, subject) and apply masks to control where adjustments are applied. This technique is great for compositing images or making complex adjustments.
2. Dodging and Burning:
Purpose: Enhance or darken specific areas of your photo to add depth and focus.
How-To: The dodge tool lightens areas of your photo, while the burn tool darkens them. Use these tools selectively to draw attention to key parts of your image or to create a more balanced exposure.
3. Cloning and Healing:
Purpose: Remove unwanted elements or imperfections from your photo.
How-To: The clone stamp tool allows you to copy pixels from one part of your image to another, effectively “erasing” unwanted objects. The healing brush works similarly but blends the copied area with the surrounding pixels for a more natural look.
4. Advanced Color Grading:
Purpose: Apply a specific mood or aesthetic to your photo through color adjustments.
How-To: Use curves, selective color, or split toning to fine-tune the colors in your image. This technique is often used in film photography to create a particular atmosphere.
5. Working with RAW Files:
Purpose: RAW files contain more data than JPEGs, giving you greater flexibility in editing.
How-To: Open RAW files in a program like Adobe Lightroom or Photoshop. From there, you can adjust exposure, white balance and other settings with minimal loss of quality. RAW editing is essential for professional photographers looking for the highest quality results.
Creative Photo Editing
Beyond enhancing and correcting photos, editing can also be used creatively to produce artistic images. It's all about thinking outside the box and using different tools and techniques to transform your photos in a unique way.
1. Applying Filters and Presets:
Purpose: Quickly change the look and feel of your photo.
How-To: Many editing programs come with built-in filters and presets. These are predefined adjustments that can drastically change the look of your image. You can also create your own presets to create a consistent style across multiple photos.
2. Adding Textures and Overlays:
Purpose: Enhance your photos with additional visual elements.
How-To: Apply textures (like grunge, paper, or fabric) as an overlay to add depth and interest to your photo. You can also use light leaks, lens flares, or bokeh effects to create a specific mood.
3. Photo Manipulation:
Purpose: Combine multiple images or elements to create a surreal or fantasy composition.
How-To: Use techniques like compositing, where you blend multiple images, or digital painting, where you paint directly onto your photo. This requires a good understanding of layers, masking, and perspective to achieve a believable result.
4. Black and White Conversion:
Purpose: Create timeless, classic images by converting color photos to black and white.
How-To: Use the black and white adjustment layer or desaturation tool to remove color from your image. You can then adjust the contrast and apply filters to enhance the tonal range and bring out details.
Conclusion
Image editing is an essential skill in today's visually driven world. Whether you want to fix small mistakes or create stunning visual art, image editing tools and techniques offer endless possibilities. By understanding the basics and exploring advanced techniques, you can turn your photos into something truly stunning. Remember, image editing is both a science and an art. It requires technical knowledge, creativity and practice. With the right tools and the willingness to keep learning, you can master photo editing and realize your creative vision. Whether you're enhancing snapshots for social media or creating a professional portfolio, photo editing is key to making your images stand out in a crowded digital environment. Photo editing has become an essential part of modern photography, allowing photographers and amateurs alike to enhance their images and get the most out of them. Whether you're a professional photographer, a social media influencer, or simply someone who enjoys photography, understanding the basics of photo editing can greatly improve the quality of your photos. This comprehensive guide will explain the various aspects of photo editing, from basic adjustments to advanced techniques, giving you the knowledge to create amazing images.
#PhotoEditing#PhotoEditor#PhotoRetouching#CreativeEditing#EditMyPic#PhotoManipulation#EditingTips#PhotographyEditing#BeforeAndAfter#EditLikeAPro#EditingSoftware#Retouching#DigitalArt#CreativeRetouch#PhotoshopSkills
0 notes
Text
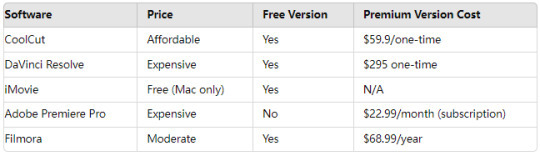
Looking for the best low price video editor? CoolCut offers powerful features at an unbeatable price. Compare with competitors and see the difference! Check it out: https://coolcut.tv/vip.html
0 notes
Text
how to edit videos like a pro
How to Edit Videos Like a Pro: A Journey Through the Lens In a world where video content reigns supreme, having the ability to edit videos like a pro is not just a skill; it’s an art form. Imagine standing in front of your computer, the glow of the screen illuminating your face as you transform raw footage into a masterpiece. Whether you’re an aspiring filmmaker, a vlogger, or someone wanting…

View On WordPress
#ColorGrading#ContentCreator#DigitalMedia#EditingSoftware#EditingTips#FilmProduction#SoundDesign#VideoEditing#VideoProduction#VideoTutorial#artificial intelligence#business#content-creation#marketing#software#start-up#technology
0 notes
Text
How to Edit Videos for YouTube
🎥 Want to edit YouTube videos like a pro? Learn the step-by-step process of cutting and adding transitions, music, and effects to create engaging content. Perfect for beginners! 🚀 🔗 Read more
0 notes
Text
VidProAI Studio Review: The Game-Changing Tool for Personalized Video Messaging!
Welcome to my VidProAI Studio Review. Videos serve as powerful marketing tools, and incorporating animation can significantly boost their attractiveness and engagement. Nevertheless, it is a common sentiment that uninteresting videos are not enjoyable to watch.
Despite the benefits, producing video content can be a time-consuming endeavor. The process involves tasks such as identifying popular topics, writing scripts, and editing visuals, which can be overwhelming and does not guarantee success. Online marketers often face these obstacles.
Hence, I am pleased to present a solution that utilizes artificial intelligence to simplify the video creation process. This innovative product offers a range of impressive features that handle the majority of the work for you.
In this blog post, we’ll dive deep into everything you need to know about VidProAI Studio – from its creator and features to how it works, its benefits, and why you should choose it. Let’s get started!
Read the full review here>>>

#VidProAIReview#VidProAI#VidProAIFeatures#VidProAISoftware#VidProAIStudio#VideoEditing#AIEditing#VideoProduction#TechReview#SoftwareReview#VidProAITool#AIStudio#EditingSoftware#VideoEditingAI#VidProAIExperience
0 notes
Text

Free Useful Assets For Video Editors | Stock Photos and Essentials
🎬 Ready to take your video content to the next level? Explore the ultimate guide to video editing! From essential tools to advanced techniques, unleash your creativity and captivate your audience! 🌟✨
1) Discover essential video editing tools 🛠️
2) Master advanced techniques 🎬
3) Unleash your creativity 🌟
4) Elevate your video content 🚀
4) Stay updated with industry trends 📈
Read Full Article: https://rb.gy/u8c5t0
Link to the Website: https://shorturl.at/hryAT
Earn Money Online: https://shorturl.at/cdinu
Visit the website: https://zentechia.blogspot.com/
( This website is related to Affiliate Marketing, Blogging, Online Earning, and the latest technology )
Comment Assets to get these for free
VideoEditing, ContentCreation, CreativeSkills, DigitalMedia, EditingTools, VideoProduction, VisualStorytelling, CreativeProcess, TechTrends, VideoCreators, EditingSoftware, FilmMaking, YouTubeEditing, SocialMediaContent, DigitalArtistry, CreativeCommunity, ContentCreators, OnlineLearning, VideoMarketing, VisualEffects, FilmEditor, ContentStrategy, EditingTips, CreativeJourney, VideoSkills
#VideoEditing#ContentCreation#CreativeSkills#DigitalMedia#EditingTools#VideoProduction#VisualStorytelling#CreativeProcess#TechTrends#VideoCreators#EditingSoftware#FilmMaking#YouTubeEditing#SocialMediaContent#DigitalArtistry#CreativeCommunity#ContentCreators#OnlineLearning#VideoMarketing#VisualEffects#FilmEditor#ContentStrategy#EditingTips#CreativeJourney#VideoSkills
0 notes
Text
Unlock Your Creative Potential: Final Cut Pro 2023 Full Version Download
Step into the future of video editing with Final Cut Pro 2023, the ultimate tool for creators, filmmakers, and editors. Our full version download grants you access to unparalleled features and enhancements, empowering you to bring your vision to life with precision and flair.
With Final Cut Pro 2023, every aspect of the editing process is streamlined for efficiency and creativity. Seamlessly navigate your projects, from importing raw footage to crafting polished masterpieces, thanks to the intuitive interface and powerful editing tools at your fingertips. Experience lightning-fast performance and real-time playback, ensuring that your workflow remains smooth and uninterrupted even with the most demanding projects.
Enhance your storytelling with stunning visual effects and immersive audio capabilities. Whether you're adding dynamic transitions, manipulating colors with precision, or fine-tuning audio to perfection, Final Cut Pro 2023 provides the tools you need to captivate your audience and elevate your productions to new heights.
Stay ahead of the curve with cutting-edge innovations and updates exclusive to Final Cut Pro 2023. Our commitment to continuous improvement means that you'll always have access to the latest features and advancements, keeping your editing toolkit relevant and future-proof.
Take the next step in your creative journey and unlock the full potential of your projects with Final Cut Pro 2023. Download the full version now and experience the difference firsthand.
Download Final Cut Pro 2023 Full Version
Tags:
#FinalCutPro2023
#VideoEditing
#CreativeTools
#Filmmaking
#FullVersionDownload
#EditingSoftware
#VisualEffects
#AudioEditing
#FutureOfEditing
#DownloadNow
#FinalCutPro2023#VideoEditing#CreativeTools#Filmmaking#FullVersionDownload#EditingSoftware#VisualEffects#AudioEditing#FutureOfEditing#DownloadNow
0 notes