#eeprom-programmer
Explore tagged Tumblr posts
Visit Tumblr Blog
Explore Tumblr blogs with no restrictions, modern design and the best experience.
Last Seen Tumblr Blogs


Fun Fact
28.6 is the average number of monthly visits per US mobile user.
Text

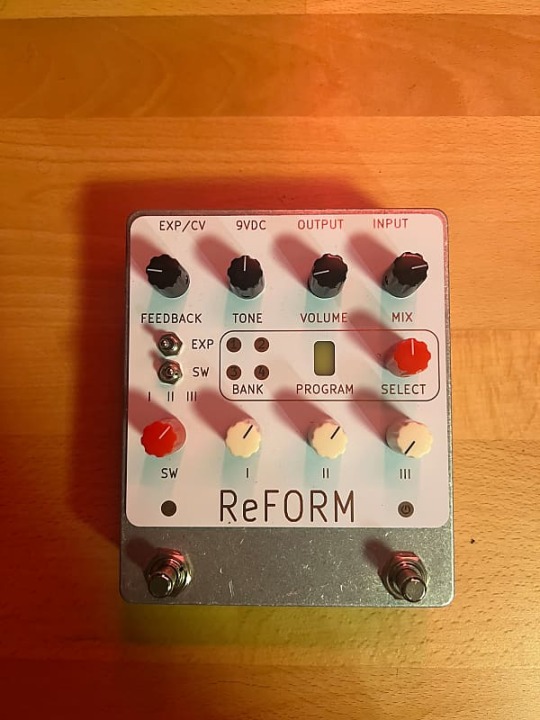

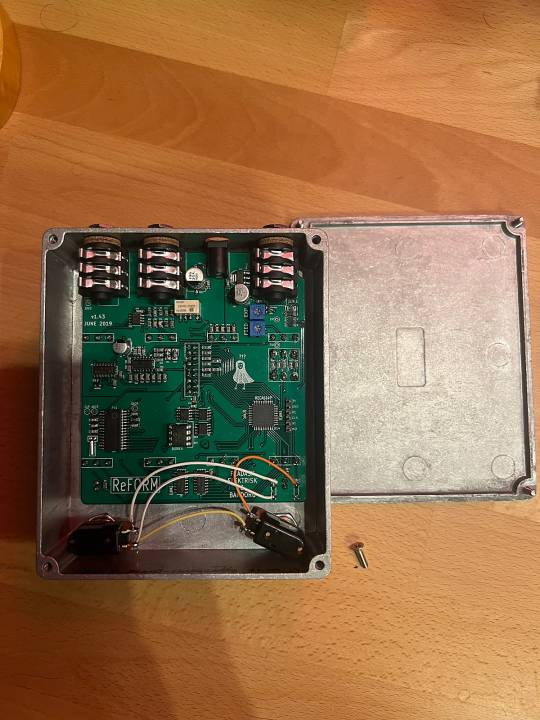
Pladask Elektrisk - ReFORM
"ReFORM is an experimental multi-effects processor featuring 24 algorithms focusing on granular synthesis and modified sample playback. Among its algorithms you’ll find granular time stretching, pitch shifting time stretching, freeze and shuffling effects, glitching sample playback and a beat repeater. It´s built around the Spin FV-1 digital signal processor (DSP). The pedal is made up of a DSP core, a “wrapper” consisting of an analog dry/wet mixer with various parameters and two mappable expression functions for overriding its three digital parameter knobs. ReFORM is also a programmable effect pedal. There is an empty EEPROM-slot for your own programs (8)."
cred: reverb.com/Patrick's Gear Garage
27 notes
·
View notes
Text
EEPROM chip, EPROM programmer, non-volatile memory, non-volatile memory
AT27C256R Series 5.5 V 256 Kb (32 K x 8) 70 ns Through Hole EPROM OTP - PLCC-32
0 notes
Text
https://www.futureelectronics.com/p/semiconductors--memory--RAM--eeprom--i2c-interface-protocol/cat24c64wi-gt3-onsemi-8463176
Random Access Memory, what is an EEPROM, programmable EEPROM manufacturers, ROM
CAT24C64 Series 64 Kb (8K X 8) 1.8 - 5.5 V I2C CMOS Serial EEPROM - SOIC-8
#RAM#EEPROM#I2C Interface Protocol#CAT24C64WI-GT3#onsemi#Random Access Memory#programmable EEPROM manufacturers#ROM#EEPROM microchip programming#EEPROM memory chip#flash EEPROM#electrically erasable programmable read only memory
1 note
·
View note
Text
Robot girl, finally back online after a year and a half, looking at the newly outfitted soldering station. There's a lot more tools on it than there were when she last closed her eyes: Inspection microscopes, hot air reflow, EEPROM programmers, logic analyzers, thermal cameras and regulated power supplies. She starts to tear up when she sees the video history of her partner (and repairperson): months and months of electronic tutorials, starting simple ("what is a circuit?") and towards the end there's PCB design classes and CCC videos about reverse engineering secure processor firmware.
"You did all this, for me?" she asks, her voice sounding different from how she remembers it, lacking the stutterglitch and 8-bit audio harshness. Her partner smiles. "I thought I'd lost you... I couldn't live with that. I had to!"
She hugs them in a pile of spare parts, servos moving smoothly for the first time in decades, pressure sensors finally accurate enough to hold them without risk of crushing them.
Sometimes, love is stored in the soldering iron.
976 notes
·
View notes
Text
Stepping Backwards a Bit (or 24)
I was looking for a simpler project. My recent 68030 work has been challenging and really pushing the limits of what I can do. I wanted something I could work on, but perhaps where someone else has already worked out the hardest parts.
I find laying out PCBs to be rather relaxing. It's one of those repetitive, almost meditative tasks, like needlepoint or whittling. The kind of hobby where I can turn on some music or a comfortable old TV show, zone out for a few hours, and wake up to this new thing that I created.
Debugging however is very mentally taxing, and the design work required to have a functional schematic to create a PCB for is an active whole-mind prices. So what I really needed was an existing project I could design a board for.
Enter [Grant Searle]. If you're not familiar with [Grant Searle], he has excellent designs for breadboard computers with a very minimal parts count. I studied his minimal Z80 design when I was first starting to build my own computers and learned a lot from it. I highly recommend his work for anyone who is interested in learning how to build their own computer but doesn't know where to start.
I was recently given a Rockwell 6502 CPU pulled from a dead LED marquee. I've never actually worked with 6502, so this seemed like a good time to try building Grant's 8-chip (or 7-chip) 6502 computer.
A few hours later, I had a PCB design completed, gerbers generated, and an order placed. Less than $5 for 5 boards, including shipping. A couple weeks later they arrived in the mail.


I did end up making a few modifications to [Grant]'s design. Instead of a clock circuit made from a discrete crystal and a couple inverter gates, I used a TTL oscillator because I've always found them to be more reliable. I also added support for an FTDI USB Serial adapter chip so that the board can be used with a modern computer as a terminal. And finally, since a PCB is much harder to add new components to relative to a solderless breadboard, I added an expansion header. All of it wrapped up in a compact PCB with lots of helpful silkscreen marking.

I realized after I had ordered the PCBs that the 16kB ROM chips [Grant] used are no longer manufactured or readily available. I have plenty of 8kB EEPROM chips on hand however. Thankfully the OSI BASIC interpreter [Grant] ported to this design fits within 8kB, so I was able to make a few adjustments and re-assemble it to work with the ROM chips I have on hand.
After a small glitch with my EEPROM programmer, it works!

It's quite a change going from my 33MHz+ 68030 to this tiny 6502 running at just under 2MHz. The BASIC text-based Mandelbrot renderer that completes in seconds on my 68030 takes four and a half minutes on the 6502. Not bad at all, considering my bus-impaired 68000 build takes 9 minutes to do the same.
This was a fun little project. It was a nice little break from some of the more difficult projects I've been working on. I have shared the project on GitHub for anyone who might want to take a look.
I hope to have this project with me this weekend, June 14-16, 2024 at Vintage Computer Festival Southwest. I'll be at table 207 in the Tandy Assemble hall, just across the street from the main exhibit hall.
30 notes
·
View notes
Text
Got my eeprom programmer set up easily with this guide:
Unfortunately you do have to use a windows machine (virtual or otherwise) but that's one step closer to adding Halow to the list of protocols PierMesh can use
12 notes
·
View notes
Text
hmm. there is smthn so stupid intriguing abt EEPROM parts. Electronically erasable programmable read only memory. It’s hard embedded ‘memory’ that has a limit to how many cycles it can edit bytes. w ultraviolet light.
2 notes
·
View notes
Text
FormulaFlash V1.0.4.0 Update: Adds ECU Data Cloud Processing Platform New Feature
FormulaFlash ECU Programmer will release the new software V1.0.4.0 on JUNE 13, 2025. This version addedECU Data Cloud Processing Platform (Beta version).DTC/DPF/GPF/OPF/EGR/EVAP/AdBlue are free and available to all users in the beta version. By ticket system, engineers will manually process the data for you for free.
1.NEW PROTOCOLS
DELPHI DCM7.1AP SERIES EEPROM DATA READ AND WRITE
PORSCHE SDI6, SDI7, SDI8 BENCH READ AND WRITE
CKS+ IDLE SPEED ADJUSTMENT
BAIC 1.5L R15C1 (AECS FC-34)
CHANGAN 1.2L LJ469QAECS (AECS FC-34)
CHANGAN 15DAM15KL (AECS FC-34)
DONGFENG 1.5L 4A15Q6 (AECS FC-34)
DONGFENG/FENGXING 1.5T 4J15T (AECS FC-34)
DONGFENG/FENGXING 1.6L 4A92FR (AECS FC-34)
JAC 1.6L DAM16KL/HFC4GB3 (AECS FC-34)
JAC 1.8L, 2.0L, 2.0T
LJ4A18Q6/LJ481Q/HFC4NA3 (AECS FC-34/FC-51)
JINBEI/SWM/BRILLIANCE 1.5L SWC15M (AECS FC-34)
JINLU/INLONG 2.0L LJ481 (AECS FC-34)
KING LONG/JINLONG 1.8L LJ4A18 (AECS FC-34)
LDV/SAIC 1.5LLJ4A15 (AECS FC-34)
SGMW 1.8L, 2.0L LJ479Q6/LJM20B (AECS FC-34/FC-50)
SHANDONG KAMA 1.6L DAM16KR (AECS FC-34)
XIAMEN GOLDEN DRAGON 1.8LLJ4A18 (AECS FC-34)
GEELY 010690492 1 (EASY U2)
SGMW 1.2L N12 (EASY U2.5)
SGMW 1.5L B15 (EASY U2W)
SGMW 1.5L N15A (EASY U3.6)
SGMW 1.5L N15T (EASY U3D/U3E)

FormulaFlashDTC OFF New Update
(The database is updated daily)
Depending on the improvement of the ticket system, users will get free ECU data processing services in the beta system version.
--VW Audi Porsche Seat Skoda BOSCH: MED(ME)17.1.7.5_17.6.x_17.1.X, 17.1.XX_17.5.XXSeries, including: MED17.5.20, MED17.5.22, MED17.1, MED17.1.1, MED17.1.6, MED17.1.10, MED17.1.27, MED17.1.61, MED17.5.2, MED17.5.5, MED17.5
--Hyundai / Kia Bosch: ME, MED(G) 17.9.8 17.9.2 17.9.21 17.9.01 (11 12 13) (TC1724 TC1764 TC1762 TC1767) MB 1.5MB
--Volkswagen / Audi / Porsche: SIMOS 8.1, SIMOS 8.2, SIMOS 8.3, SIMOS 8.4, SIMOS 8.5, SIMOS 8.6, SIMOS 10, SIMOS 11, SIMOS 12, PCR2.1, SIMOS18.x, SI-MOS16.x, SIMOS19.x, Temic AL551, Temic AL552, Temic DQ200, Temic DQ250, Temic DQ380/DQ381, Temic DQ400, Temic DQ500
--Mercedes-benz: SIM271DE/SIM271DE20, SIM271KE/SIM271KE2.0
--Porsche: SDI6 SDI7 SDI8 SDI9VAG Bosch ME(D)17.5/17.5.2/17.5.2/17.5.22/17.5.25/17.5.6
--Delphi: DCM7.1AP
--Delphi China: MT62 MT62.1 MT62.3 SPC5634 1.5MB, MT80 TC1762, MT92/MT92.1/MT92.1E TC265 2.5MB, MT95.1, MT20U/MT20U2/MT22U1/MT22U2 256KB (METAL CASING) 德保福 MT22.3 MT22.5 SPC5644 1.5MB, MT22.1 512kB, MT22.1 768kB, MT22.1.1 256kB, MT20U 1 EDC17C55, EDC17C81, EDC17C63, EDC17C35, EDC17C183, EDC1793 4M
--Bosch china: ME17.8.3 TC1728, MED17.8.1D TC1728, MED17.8.2 TC1767, MG1US008 UD8 TC277 4MB, MG1US708 080 TC387 10MB, MG1UA008 UP8 SPC574 2.5MB BMW NWS9, MSV70, MSV70N, MS80/81/85/87
--Delco: E83, E39, E80
--Delphi China: DCM6.2, DCM6.2AP, DCM3.2, DCM3.2AP, DCM3.7, DCM3.7AP
--China AECS: FC-50 (BETA), FC-51 (BETA)
--Lindian: LEC4AP 1.5MB, LEC4AF
--Geely: 010490292 (Easy U2)
--Wuling: SIM2K-DS1, SIM2K-51.4, SCE60, SGMGW 1.2LN12 (Easy U2.5) SGMGW 1.5L B15 (Easy U2W) SGMV 1.5L N15A (Easy U3.6) SGMGW 1.5L N15T (Easy U3D/U3E)
--Bosch CHINA: MD1CS089 8MB, MD1C6878 4MB, MD1CE108 6MB

3.How to use DTC OFF by FormulaflashECU Data Cloud Processing Platform?
Run Formulaflash software
Select “User Center”

Select “Data Processing”

Then you can see the following functions are supported:
DTCoff- Beta
GPFoff- Beta
DPFoff- Beta
OPFoff- Beta
Immo off-Beta
EGRoff-Beta
AdBlue-Beta
Kindly notice:
The current FormulaFlash software version is V1.0.3.3 Beta. Except for the DTC OFF function, all other features are disabled (greyed out). Please update to version V1.0.4.0 to access the full functionality.
Here takes DTC OFF as an example
Click “DTC off- Beta”

Select your device and upload the data file to be processed, click the “Analyze File” button, and wait for the system to return the detailed information

Select the DTC and click “DTC off-Beta”

After the processing is completed, the system will return the corresponding successfully processed data file.

Done!
0 notes
Text
EEP ROM is some masterful typography. It's cute and technically accurate!
See at first we had mask ROMs: this is where you have a chip that's designed from the start to only have some specific data on it. That's why it's Read Only Memory: it's memory, but you can only read it. This is what, like, NES games were built on: the game is on the ROM chip, and can't be changed.
Then someone figured out you could make the chip so that it starts out blank, then you can program it once (like burning a CD-R), so we called these Programmable ROMs: PROMs.
And then another clever engineer worked out how to make them re-erasable, by using ultraviolet light that causes the bits to weaken. You have to take out the chip, expose it in a special box (you can't just have a flashlight, because UV light will give you skin cancer and sunburns on your eyes), then program it and put it back in. But hey, it's erasable and reusable now! This is how a lot of games were developed for cartridge consoles: you'd have a special cartridge that has exposed chips, which you program and put back in the console to test. This new erasable and programmable ROM was obviously called the Erasable Programmable ROM, or an EPROM.
But then a very clever trick was figured out: if you use quantum mechanical effects you can trap charge in a tiny cell and get it out using quantum tunneling, which means you can erase it in-situ! Now you have a reusable (for a while) rewritable chip, so it was called Electrically Erasable Programmable Read Only Memory: EEPROM!
But by putting a space in it, they made it an EEP ROM, which is a much cuter name.
BTW EEPROMs are what flash memory grew out of: this is a 1985 SD card.

957 notes
·
View notes
Text
A Comprehensive Guide to Firmware Development

In the world of embedded systems and smart devices, firmware plays a critical role in enabling hardware to function effectively. Whether you're developing IoT devices, automotive systems, or industrial machinery, firmware development is the backbone that bridges hardware and software.
In this blog post, we’ll explore what firmware is, its importance, the development process, tools used, and best practices to ensure efficient and secure firmware solutions.
What is Firmware?
Firmware is a specialized type of software that provides low-level control for a device's specific hardware. Unlike regular software applications, firmware is tightly coupled with the hardware and is often stored in non-volatile memory such as ROM, EEPROM, or flash memory.
Examples of devices with firmware include:
Smartphones
Routers
Smart TVs
Medical devices
Automotive control units (ECUs)
Why is Firmware Important?
Firmware is essential because it:
Controls hardware operations: Without firmware, the hardware components of a device would be non-functional.
Ensures device functionality: It manages startup routines, I/O operations, sensor integration, and communication protocols.
Supports software-hardware integration: Firmware acts as a middle layer, allowing high-level software applications to interact with low-level hardware components.
Enables updates: Firmware can often be updated to fix bugs, enhance performance, or add features.
The Firmware Development Process
1. Requirements Gathering
Understanding the hardware specifications and the device’s purpose is crucial. Developers need to gather requirements from both hardware engineers and end users.
2. Architecture Design
This involves deciding on the architecture and communication protocols (e.g., I2C, SPI, UART), memory usage, and timing constraints.
3. Choosing a Development Platform
Most firmware is written in C or C++ due to their efficiency and hardware-level access. You’ll also need:
Microcontroller/microprocessor datasheets
Board Support Packages (BSPs)
RTOS (Real-Time Operating System), if required
4. Coding and Integration
Firmware code is written to interface directly with hardware. This includes writing drivers for peripherals (LEDs, sensors, motors) and managing power consumption, timing, and interrupts.
5. Testing and Debugging
Testing includes:
Unit testing
Hardware-in-the-loop (HIL) testing
Simulation and emulation tools
Debugging tools such as JTAG and SWD are used to step through code and analyze performance.
6. Deployment
Once tested, firmware is compiled and flashed onto the device using programmers or over-the-air (OTA) update mechanisms.
Tools Used in Firmware Development
Integrated Development Environments (IDEs): Keil µVision, MPLAB X, STM32CubeIDE
Compilers and Toolchains: GCC, IAR Embedded Workbench
Debuggers/Programmers: JTAG, ST-LINK, AVR ISP
Version Control Systems: Git
Simulators/Emulators: QEMU, Proteus
Best Practices for Firmware Development
Write modular and reusable code
Follow coding standards (e.g., MISRA C for safety-critical systems)
Optimize for memory and power consumption
Document thoroughly for maintainability
Implement fail-safes and watchdog timers
Secure your firmware (e.g., with encryption and secure boot loaders)
Plan for firmware updates with mechanisms like OTA updates
0 notes
Text
Baseband Chip EEPROM Integrated Programmer Compatible For iPhone X - 12 Pro Max (JCID)
Baseband Chip EEPROM Integrated Programmer Compatible For iPhone X to 12 Pro Max (JCID)
0 notes
Text
The future of smart home control begins with one sleek, powerful interface — the Nextion NX8048P050-011R 5.0” Intelligent Resistive HMI Touchscreen. Ideal for automation projects, this display offers unmatched user experience, intelligent processing, and seamless integration. If you're planning to level up your smart home or automation setup in 2025, this intelligent touchscreen should be on your radar.
Available now at www.sonoff.in, this module is a must-have for developers, hobbyists, and smart home enthusiasts.
Power-Packed 5.0” Intelligent Display for Smart Control
The Nextion NX8048P050-011R boasts a 5.0-inch resistive touchscreen, offering sharp visuals and precise touch response. Designed without an enclosure, this screen gives flexibility in mounting it into custom panels, enclosures, or control stations.
The resistive touch feature supports usage even when wearing gloves — making it practical for industrial, automation, and DIY applications. It’s a display that adapts to your environment, not the other way around.
Advanced HMI Capabilities Built for Efficiency
This is more than just a screen. It's a powerful HMI (Human Machine Interface) equipped with:
Onboard microcontroller for fast UI rendering
Rich GUI design with Nextion Editor
Easy drag-and-drop interface development
Support for static images, buttons, sliders, and dynamic text
Integrated flash memory for storing UI pages
You can build multi-layered smart interfaces without relying on external MCUs for rendering. Control everything from HVAC to lighting systems — with just a touch.
Streamlined Communication with Embedded Systems
The Nextion NX8048P050-011R communicates using UART serial communication, making it compatible with Arduino, Raspberry Pi, ESP32, and more. Developers love how it simplifies hardware-software interaction.
Commands are sent via a simple serial interface, which dramatically reduces processing load on your main MCU. This allows developers to allocate power where it truly matters.
Why It’s Perfect for Home and Industrial Automation
Here’s why the Nextion NX8048P050-011R is a game changer:
Compact but powerful – Fits in tight spaces while delivering advanced UI functionality.
Customizable UI – Create polished, user-friendly interfaces tailored to your smart home design.
Responsive Touch – Reliable performance in both residential and industrial settings.
Highly Compatible – Works seamlessly with Sonoff smart switches and automation modules from www.sonoff.in.
Whether you’re managing lighting, thermostats, or entire smart systems, this touchscreen gives you intuitive and elegant control.
Nextion Editor – No Code? No Problem.
The Nextion Editor software is a dream for non-programmers. You don’t need advanced coding skills to build dynamic user interfaces. Just drag and drop components onto your screen canvas.
From progress bars to image sliders, your interface can be as simple or complex as your imagination allows. With built-in event triggers, automation becomes a breeze.
Technical Specs at a Glance
Let’s dive into the core specs that make this touchscreen a powerhouse:
Display Size: 5.0” resistive touch panel
Resolution: 800x480 pixels
Flash Memory: 16MB
RAM: 3584 bytes
EEPROM: 1024 bytes
MCU: 48MHz
Serial Port: TTL UART
Operating Voltage: 5V
These specifications ensure smooth performance, fast response, and consistent reliability in demanding automation environments.
Installation and Custom Integration
Thanks to its open-frame design, you can install the NX8048P050-011R in custom enclosures or panels. Whether it’s a wall-mounted control panel or embedded into a furniture piece, the flexibility is unbeatable.
Pair it with Sonoff Wi-Fi switches or smart relays to create a smart home interface that looks and feels professional.
Smart Solutions, Smarter Shopping with www.sonoff.in
Looking for a reliable supplier in India? www.sonoff.in is the trusted destination for Nextion displays, Sonoff smart devices, and complete home automation solutions.
They offer fast delivery, excellent customer service, and authentic products backed by warranty. Get access to India’s top smart home gadgets — all in one place.
Conclusion: Smart Control Starts Here
The Nextion NX8048P050-011R 5.0” intelligent touchscreen is the perfect HMI solution for next-gen smart home setups. Its seamless performance, rich feature set, and compatibility with Sonoff devices from www.sonoff.in make it a standout choice.
Don't settle for clunky switches and outdated interfaces. Take control of your environment — the smart way.
Explore the future of home automation at www.sonoff.in and power up your smart living journey today.
#sonoff#smarthome#smartappliances#googlehomeintegration#alexacompatible#sonoffpowr3#homeautomation#sonoffindia#wifismartswitch
0 notes
Text
Cấu trúc của hệ thống nhúng?
Hệ thống nhúng có thể được chia thành bốn thành phần chính:
Bộ Vi Xử Lý (Processor)
🔹 Vi điều khiển (Microcontroller - MCU): 🔹 Vi xử lý (Microprocessor - MPU): 🔹 FPGA (Field Programmable Gate Array): 2. Bộ Nhớ (Memory)
🔹 RAM (Random Access Memory): Lưu trữ dữ liệu tạm thời khi hệ thống hoạt động. 🔹 ROM (Read-Only Memory): Chứa phần mềm nhúng (firmware) không thay đổi. 🔹 Flash Memory: Lưu trữ dữ liệu không bị mất khi mất điện (ví dụ: thẻ SD, EEPROM).
3. Thiết Bị Ngoại Vi (Peripheral Devices)
🔹 Cảm biến (Sensors): Thu thập dữ liệu từ môi trường (nhiệt độ, áp suất, gia tốc, ánh sáng,...). 🔹 Bộ truyền động (Actuators): Điều khiển cơ cấu chấp hành như motor, servo, van, relay. 🔹 Giao tiếp I/O (Input/Output Interfaces): UART, SPI, I2C, CAN, USB, Ethernet, Wi-Fi, Bluetooth
4. Phần Mềm Nhúng (Embedded Software)
🔹 Firmware: Chương trình điều khiển phần cứng, chạy trực tiếp trên vi điều khiển. 🔹 Hệ điều hành nhúng (RTOS - Real-Time Operating System): Quản lý tác vụ trong hệ thống phức tạp, đảm bảo thời gian thực. Ví dụ: FreeRTOS, VxWorks, Zephyr. 🔹 Ứng dụng nhúng (Embedded Application Software): Các thuật toán điều khiển, xử lý tín hiệu, AI.

0 notes
Text
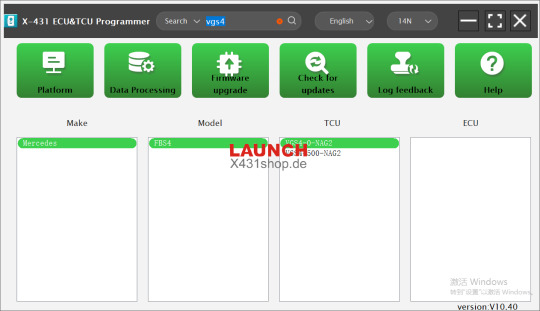
How to use Launch X431 ECU Programmer to Virgin Mercedes VGS4 NAG2 Gearbox?
Launch X431 V10.40 PC Clone Software is released, here is the update info:
1. Added read and write, personalization, clearing function for BOOT mode Benz transmission ECU VGS4-0-NAG2, VGS4-500-NAG2. 2. Added BENCH mode Cadillac, Chevrolet transmission ECU T87A read and write function. 3. Added read and write function for BENCH mode Great Wall transmission ECU 7DCT450. 4. Added read and write function for BENCH mode Great Wall, Geely engine ECU MG1US008/MG1UA008. 5. Optimized BMW E83 data read issue. 6. Optimize the expired device usage status so that when the device is in the expired state, the functions released before the expiration can still be used. New updates are restricted to download when the free subscription is expired.

The update is suitable for:
Launch X-431 ECU TCU programmer, X-prog3 and GIII PC adapter, Launch X431 Series Tools with X-prog3
Here is the guide about Launch X431 ECU Programmer to Virgin Mercedes VGS4 NAG2 Gearbox
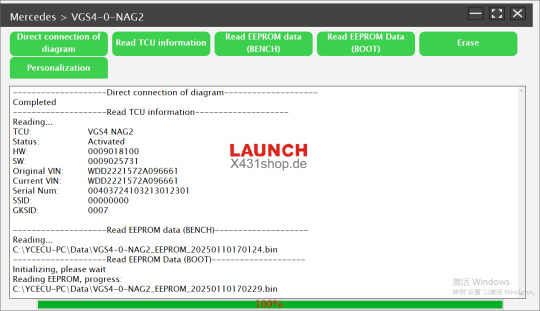
Fourth generation 7-speed Mercedes Benz gearbox wiped clean

The original car computer can still read data normally. Replace the second-hand gearbox computer for wiping and authorization
1. First, enter the ECU model to enter
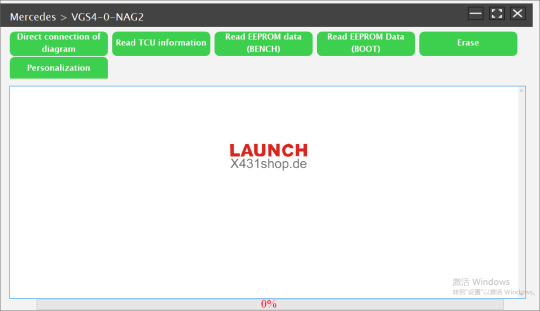
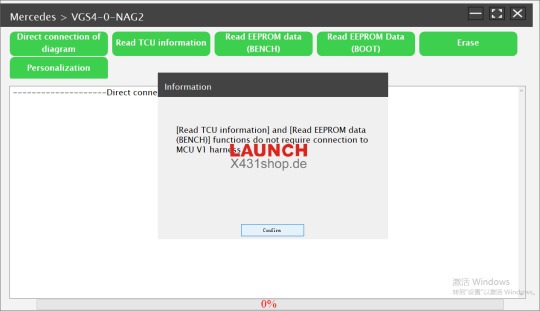
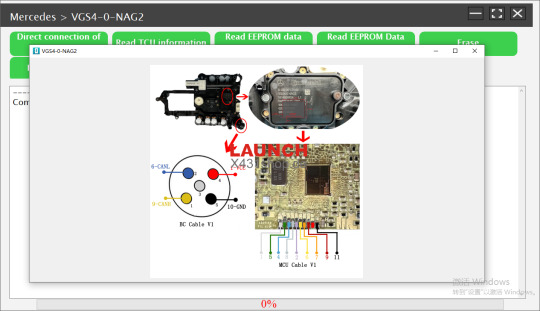


Click to read EEPROM data (BENCH), if BENCH mode cannot read, select (BOOT) mode
7. After the original vehicle ECU computer data is read, connect the external ECU computer (both BENCH mode and BOOT mode need to be connected at the same time), and then click on erase


8. Click on Personalization and select Original Car EEPROM Data Write
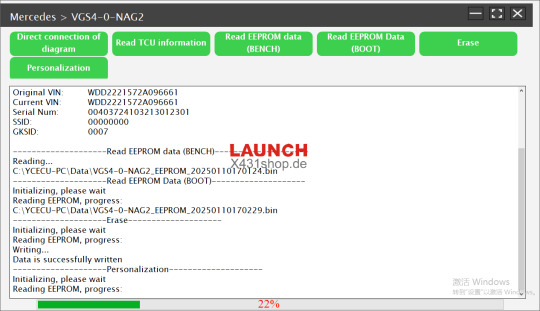
9. Click OK after successful personalization
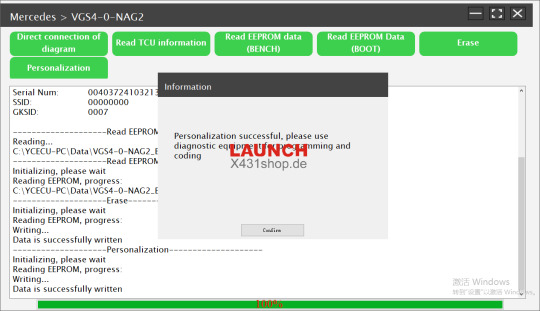
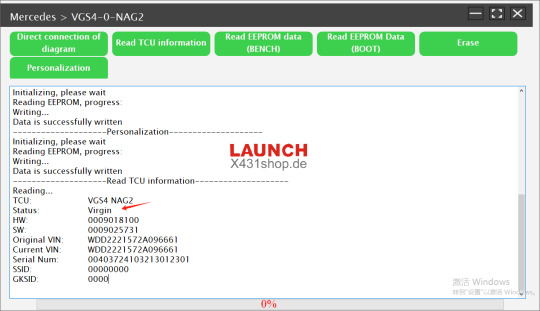
10. After personalization, click to read the TCU information to see if the ECU has been successfully erased, and then install the vehicle for programming and coding
0 notes
Text
The eeprom programmer came in today so I should be able to get the halow board set up soon
11 notes
·
View notes
Text
Price: [price_with_discount] (as of [price_update_date] - Details) [ad_1] Brand new and high quality EEPROM stands for electrically erasable programmable read only memory. It is a secondary storage device that once written (programmed) can hold data even when the power is removed. If you need more storage for your project, or you want to learn how to use EEPROM, then this module is designed for you. It supplies an extra 256k byte for your project. You only need simply wire them via I2C. Size: 3.7x 1.7cm 1 x AT24C256 256K Serial EEPROM Data Storage Module Onboard 8P-chip carrier, can support AT24C256 series chips; Pin power supply, on-board power indicator; on-board pull-up resistor for I2C communications required ; AT24C256 I2C Interface Memory Module 8P chip seat, installation of AT24C256 chip [ad_2]
0 notes