#emailform
Explore tagged Tumblr posts
Visit Tumblr Blog
Explore Tumblr blogs with no restrictions, modern design and the best experience.
Last Seen Tumblr Blogs


Fun Fact
Celebrities use Tumblr as well.
Link
Guys believe me! if you are working online and doing work hard but still don’t have an email marketing list then, you are missing a lot because having an email list is very important for your Websites Traffic. And the best way to collect Emails is to add an email subscription form to your website.
And if you want your email subscription form then, follow this tutorial as it is.
#add#addemail#emailmarketing#email#emailsubscription#emailsubscriptionform#emailform#freedomain#freeemail#freeemailsubscription#freehosting#freewebsite#free software#free#freewebsite2021#freewordpresswebsite#freewordpress#freewordpressplugins#free wordpress themes#subscriptionform#makeafree#makeafreewordpresswebsite
0 notes
Video
youtube
how to send an email using php | send an email using php | email sending...
0 notes
Note
Hi, it my be late but I was just wondering if you take art requests?? I don’t know how to explain it, but I’m looking for a artist to make me a piece of a woman. You don’t have to worry it’s not anything weird, but it is hard to explain. 😅
Hi,
I do take on paid commissions, you can contact me about your project, through the emailform on my website www.sylviastrijk.nl
4 notes
·
View notes
Text
Premium data center
A section of Old St Johns Road, by the Little Sisters of the Poor, is closed to through traffic to replace a public light. If you need to get to properties north of the works, you can go via the cemetery entrance. If you need to get just below the works, you can go via St Aubins Road.
wholesale nfl jerseys At first such verbal incontinence irritated the precise, ever disciplined Obama. But gradually the two forged a close bond. The vice presidency was once likened to a "bucket of warm p" ("spit" in the bowdlerised version) by an earlier incumbent. ESPN has posted astory quoting an anonymous broker on cheap jerseys saying he was approached by Johnny Manziel's assistant last year with the messagethat Texas A star quarterback would no longer be signing autographs for free. ESPN, quoting anonymous sources Sunday,reported that the NCAA was investigating whether Manziel was compensated for signing his autograph on sports memorabilia. If proven to be true, Manziel could be suspended or ruled ineligible.
wholesale nfl jerseys It covering is expanded metal instead of plate and is angled slightly upward. The last 4 to 6 inches bends upward at an angle. I kept dragging the rear footboard alot when going through ditches etc so I took the rear seat off for now.. Piscataway data center is well positioned to be the premier carrier neutral facility south of New York City, said Erik Levitt, CEO of Open Data Centers. A market populated with high priced data center space and expensive cross connects, Open Data Centers offers affordable alternatives wholesale jerseys compromising on the class of service. Premium data center provides an ideal location for carriers to establish additional points of presence, with low latency routes for financial applications and cloud computing services..
Cheeky Lukas Podolski takes credit for Bastian Schweinsteiger's return to Manchester United trainingThe midfielder had been exiled to the fridges at Carrington, https://www.ccmjerseys.com but returned to the first team picture on Monday morningByJoe Mewis15:29, 31 OCT 2016Look who's back: Bastian Schweinsteiger has returned to training (Photo: Man Utd via Getty) Get FC updates directly to your inbox+ SubscribeThank you for subscribing!Could not subscribe, try again laterInvalid EmailFormer Arsenal striker Lukas Podolski has taken the credit for Bastian Schweinsteiger's return to training with the Manchester United first team squad.Former Bayern Munich star Schweinsteiger had been exiled from the first team picture this season, as Jose Mourinho forced the veteran midfielder to train either on his own or with the Under 23 squad.He was even missing from United's annual team photograph which was published last week.But the former Chelsea boss appears to have had a change of heart, as the World Cup winner joined the rest of the first team squad for training on Monday morning.And one man has taken all the credit for Schweinsteiger's return.Cheap Jerseys free shipping his former Germany team mate Podolski, who took to Twitter on Monday afternoon to tweet the hashtag 'PoldiKnowsBest' and a snap of his old pal back in training at Carrington.That latest social media missive came after the former Arsenal forward tweeted 'schweinsteiger please' during Manchester United's 4 0 loss to Chelsea on October 23.It is unclear about whether the move will mean a return to the squad for Schweinsteiger, who earlier this season said that United would be his last club in Europe, hinting at a move to China or America.Back in August, Mourinho was asked if Schweinsteiger would play for United this season.Liverpool FCJamie Carragher and Liverpool fans go into Twitter MELTDOWN as Reds pull out of deal to sign Virgil van DijkAfter Liverpool released a statement www.cheapjerseyschinatrade.com for their conduct in chasing the Dutchman and pulling out of the deal, the club's fans were not a happy bunchSummer transfer windowTransfer news LIVE: Liverpool end interest in Virgil van Dijk, plus latest on Kylian Mbappe, Hector Bellerin and every dealThe summer sales are on the way as clubs look forward to a busy few months. Keep up to date with all the latest hereSummer transfer windowTransfer news LIVE: Liverpool end interest in Virgil van Dijk, plus latest on Kylian Mbappe,Hector Bellerin and every dealThe summer sales are on the way as clubs look forward to a busy few months. Keep up to date with all the latest hereMichy BatshuayiChelsea refusing to allow wantaway Michy Batshuayi's transfer until they sign a new strikerClubs across Europe are after the 33m Belgian, who confirmed he wants to be playing more next season in a World Cup yearWayne RooneyManchester United's Wayne Rooney costing himself a Premier League transfer with refusal to take a pay cutEverton, Newcastle and more are interested, but cannot match Chinese offers that could double his current 12m a yearLiverpool transfer cheap nfl jerseys still hopeful on Mohamed Salah transfer despite making a move for fellow winger Gelson Martinsing Lisbon man will remain Plan B unless it emerges there is ZERO chance of a deal with for Reds' first choice England football teamHugely talented England aren't up to it mentally, claims Hull City bound ex Russia boss Leonid SlutskyThe 46 year old saw that frailty first hand at last summer's Euros as his men snatched late draw with the Three Lions Cheap Jerseys free shipping.
0 notes
Text
Using Netlify Forms and Netlify Functions to Build an Email Sign-Up Widget
Building and maintaining your own website is a great idea. Not only do you own your platform, but you get to experiment with web technologies along the way. Recently, I dug into a concept called serverless functions, starting with my own website. I’d like to share the results and what I learned along the way, so you can get your hands dirty, too!
But first, a 1-minute intro to serverless functions
A serverless function (sometimes called a lambda function or cloud function) is a piece of code that you can write, host, and run independently of your website, app, or any other code. Despite the name, serverless functions do, indeed, run on a server; but it’s a server you don’t have to build or maintain. Serverless functions are exciting because they take a lot of the legwork out of making powerful, scalable, apps.
There’s lots of great information on serverless functions out there, and a great place to start is CSS Trick’s own guide: The Power of Serverless Front-End Developers.
The Challenge: Build a Mailing List Sign Up Form
I started my journey with a challenge: I wanted to have an email list sign-up form on my site. The rules are as follows:
It should work without JavaScript. I’d like to see how much I can get by with just CSS and HTML. Progressive enhancements are OK.
It shouldn’t require external dependencies. This is a learning project, so I want to write 100% of the code if possible.
It should use serverless functions. Instead of sending data to my email list service client-side, let’s do it server(less)-side!
Meet the team: 11ty, Netlify, and Buttondown
My website is built using a static site framework called 11ty. 11ty allows me to write templates and components in HTML, so that’s how we’ll build our email form. (Chris recently wrote a great article about his experience with 11ty if you’re interested in learning more.)
The website is then deployed using a service called Netlify) and it is the key player on our team here: the point guard, the quarterback, the captain. That’s because Netlify has three features that work together to produce serverless excellence:
Netlify can deploy automatically from a GitHub repo. This means I can write my code, create a pull request, and instantly see if my code works. While there are tools to test serverless functions locally, Netlify makes it super easy to test live.
Netlify Forms handles any form submissions my site gets. This is one part of the serverless equation: instead of writing code to collect submissions, I’ll configure the HTML with a few simple attributes and let Netlify handle the rest.
Netlify Functions allows me to take action with the data from my forms. I’ll write some code to send emails off to my email list provider, and tell Netlify when to run that code.
Finally, I’ll manage my email list with a service called Buttondown. It’s a no-frills email newsletter provider, with an easy-to-use API.
Bonus: for personal sites like mine, 11ty, Netlify, and Buttondown are free. You can’t beat that.
The form
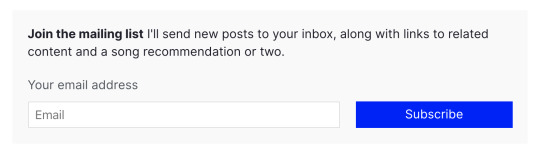
The HTML for my email subscription form is very minimal, with a few extras for Netlify Forms to work.
<form class="email-form" name="newsletter" method="POST" data-netlify="true" netlify-honeypot="bot-field"> <div hidden aria-hidden="true"> <label> Don’t fill this out if you're human: <input name="bot-field" /> </label> </div> <label for="email">Your email address</label> <div> <input type="email" name="email" placeholder="Email" id="email" required /> <button type="submit">Subscribe</button> </div> </form>
First, I set the data-netlify attribute to true to tell Netlify to handle this form.
The first input in the form is named bot-field. This tricks robots into revealing themselves: I tell Netlify to watch for any suspicious submissions by setting the netlify-honeypot attribute to bot-field. I then hide the field from humans using the html hidden and aria-hidden values — users with and without assistive technology won’t be able to fill out the fake input.
If the form gets submitted with anything in the bot-field input, Netlify knows it’s coming from a robot, and ignores the input. In addition to this layer of protection, Netlify automatically filters suspicious submissions with Askimethttps://ift.tt/2LXyCDl). I don’t have to worry about spam!
The next input in the form is named email. This is where the email address goes! I’ve specified the input-type as email, and indicated that is required; this means that the browser will do all my validation for me, and won’t let users submit anything other than a valid email address.

Progressive enhancement with JavaScript
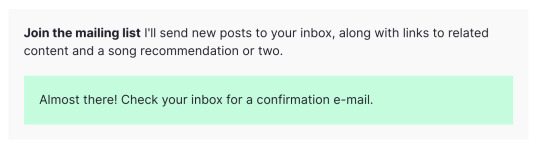
One neat feature of Netlify Forms is the ability to automatically redirect users to a “thank you” page when they submit a form. But ideally, I’d like to keep my users on the page. I wrote a short function to submit the form without a redirect.
const processForm = form => { const data = new FormData(form) data.append('form-name', 'newsletter'); fetch('/', { method: 'POST', body: data, }) .then(() => { form.innerHTML = `<div class="form--success">Almost there! Check your inbox for a confirmation e-mail.</div>`; }) .catch(error => { form.innerHTML = `<div class="form--error">Error: ${error}</div>`; }) }
When I provide the content of my email form to this function via the form value, it submits the form using JavaScript’s built-in Fetch API. If the function was successful, it shows a pleasant message to the user. If the function hits a snag, it’ll tell my users that something went wrong.
This function is called whenever a user clicks the “submit” button on the form:
const emailForm = document.querySelector('.email-form') if (emailForm) { emailForm.addEventListener('submit', e => { e.preventDefault(); processForm(emailForm); }) }
This listener progressively enhances the default behavior of the form. This means that if the user has JavaScript disabled, the form still works!

The serverless function
Now that we have a working email submission form, it’s time to do some automation with a serverless function.
The way Netlify functions work is as follows:
Write the function in a JavaScript file in your project.
Tell Netlify where to look for your function via the netlify.toml file in your project.
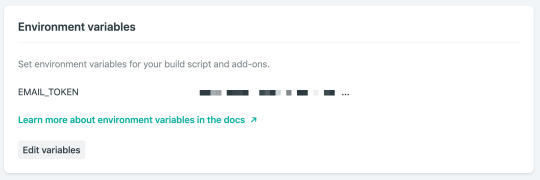
Add any environment variables you’ll need via Netlify’s admin interface. An environment variable is something like an API key that you need to keep secret.
That’s it! The next time you deploy your site, the function will be ready to go.
The function for my site is going to be in the functions folder, so I have the following in my netlify.toml file:
[build] base = "." functions = "./functions"
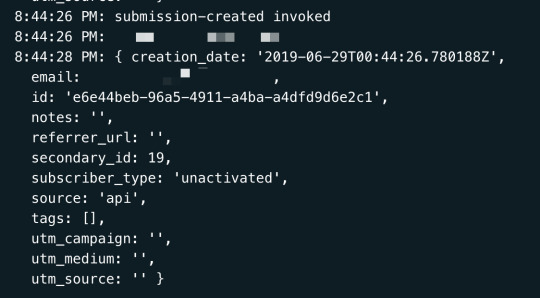
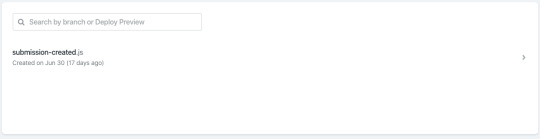
Then, I’ll add a file in the functions folder called submission-created.js. It’s important to name the file submission-created so that Netlify knows to run it every time a new form submission occurs. A full list of events you can script against can be found in Netlify’s documentation. If you’ve correctly named and configured your function, you should see it on Netlify’s Functions dashboard:

Netlify’s Functions dashboard shows I’ve correctly configured my submission-created function
The content in submission-created.js looks like this:
require('dotenv').config() const fetch = require('node-fetch') const { EMAIL_TOKEN } = process.env exports.handler = async event => { const email = JSON.parse(event.body).payload.email console.log(`Recieved a submission: ${email}`) return fetch('https://api.buttondown.email/v1/subscribers', { method: 'POST', headers: { Authorization: `Token ${EMAIL_TOKEN}`, 'Content-Type': 'application/json', }, body: JSON.stringify({ email }), }) .then(response => response.json()) .then(data => { console.log(`Submitted to Buttondown:\n ${data}`) }) .catch(error => ({ statusCode: 422, body: String(error) })) }
Let’s look at this line-by-line.
Line 1 includes a library called dotenv. This will help me use environment variables. Environment variables are useful to hold information that I don’t want to make public, like an API key. If I’m running my project locally, I set my environment variables with a .env file in the repo, and make sure it’s listed my .gitignore file. In order to deploy on Netlify, I also set up environment variables in Netlify’s web interface.
On line 2, I add a small library called node-fetch. This allows me to use Javascript’s Fetch API in node, which is how we’ll send data to Buttondown. Netlify automatically includes this dependency, as long as it’s listed in my project’s package.json file.
On line 3, I import my API key from the environment variables object, process.env.
Line 4 is where the function is defined. The exports.handler value is where Netlify expects to find our function, so we define it there. The only input we’ll need is the event value, which will contain all of the data from the form submission.
After retrieving the email address from the event value using JSON.parse, I’m ready to send it off to Buttondown. Here’s where I use the node-fetch library I imported earlier: I send a POST request to https://api.buttondown.email/v1/subscribers, including my API key in the header. Buttondown’s API doesn’t have many features, so it doesn’t take long to read through the documentation if you’d like to learn more.
The body of my POST request consists of the email address we retrieved.
Then (using the neat .then() syntax), I collect the response from Buttondown’s server. I do this so I can diagnose any issues that are happening with the process — Netlify makes it easy to check your function’s logs, so use console.log often!
Deploying the function
Now that I’ve written my function, configured my netlify.toml file, and added my environment variables, everything is ready to go. Deploying is painless: just set up Netlify’s GitHub integration, and your function will be deployed when your project is pushed.
Netlify projects can also be tested locally using Netlify Dev. Depending on the complexity of your code, it can be faster to develop locally: just run npm i netlify -g, then netlify dev. Netlify Dev will use the netlify.toml file to configure and run the project locally, including any serverless functions. Neat, right? One caveat: Netlify Dev currently can’t trigger serverless functions on form submissions, so you’ll have to test that using preview builds.
An idea for the future
Buttondown’s API has a few possible responses when I submit a new email. For instance, if a user submits an email that’s already subscribed to the list, I’d love to be able to tell them as soon as they submit the form.
Conclusion
All in all, I only had to write about 50 lines of code to have a functional email newsletter sign-up form available on my website. I wrote it all in HTML, CSS, and JavaScript, without having to fret with the server side of the equation. The form handles spam, and my readers get a nice experience whether they have JavaScript enabled or not.
The post Using Netlify Forms and Netlify Functions to Build an Email Sign-Up Widget appeared first on CSS-Tricks.
via CSS-Tricks https://ift.tt/2YEuPRd
0 notes
Text
Using Netlify Forms and Netlify Functions to Build an Email Sign-Up Widget
Building and maintaining your own website is a great idea. Not only do you own your platform, but you get to experiment with web technologies along the way. Recently, I dug into a concept called serverless functions, starting with my own website. I’d like to share the results and what I learned along the way, so you can get your hands dirty, too!
But first, a 1-minute intro to serverless functions
A serverless function (sometimes called a lambda function or cloud function) is a piece of code that you can write, host, and run independently of your website, app, or any other code. Despite the name, serverless functions do, indeed, run on a server; but it’s a server you don’t have to build or maintain. Serverless functions are exciting because they take a lot of the legwork out of making powerful, scalable, apps.
There’s lots of great information on serverless functions out there, and a great place to start is CSS Trick’s own guide: The Power of Serverless Front-End Developers.
The Challenge: Build a Mailing List Sign Up Form
I started my journey with a challenge: I wanted to have an email list sign-up form on my site. The rules are as follows:
It should work without JavaScript. I’d like to see how much I can get by with just CSS and HTML. Progressive enhancements are OK.
It shouldn’t require external dependencies. This is a learning project, so I want to write 100% of the code if possible.
It should use serverless functions. Instead of sending data to my email list service client-side, let’s do it server(less)-side!
Meet the team: 11ty, Netlify, and Buttondown
My website is built using a static site framework called 11ty. 11ty allows me to write templates and components in HTML, so that’s how we’ll build our email form. (Chris recently wrote a great article about his experience with 11ty if you’re interested in learning more.)
The website is then deployed using a service called Netlify) and it is the key player on our team here: the point guard, the quarterback, the captain. That’s because Netlify has three features that work together to produce serverless excellence:
Netlify can deploy automatically from a GitHub repo. This means I can write my code, create a pull request, and instantly see if my code works. While there are tools to test serverless functions locally, Netlify makes it super easy to test live.
Netlify Forms handles any form submissions my site gets. This is one part of the serverless equation: instead of writing code to collect submissions, I’ll configure the HTML with a few simple attributes and let Netlify handle the rest.
Netlify Functions allows me to take action with the data from my forms. I’ll write some code to send emails off to my email list provider, and tell Netlify when to run that code.
Finally, I’ll manage my email list with a service called Buttondown. It’s a no-frills email newsletter provider, with an easy-to-use API.
Bonus: for personal sites like mine, 11ty, Netlify, and Buttondown are free. You can’t beat that.
The form
The HTML for my email subscription form is very minimal, with a few extras for Netlify Forms to work.
<form class="email-form" name="newsletter" method="POST" data-netlify="true" netlify-honeypot="bot-field"> <div hidden aria-hidden="true"> <label> Don’t fill this out if you're human: <input name="bot-field" /> </label> </div> <label for="email">Your email address</label> <div> <input type="email" name="email" placeholder="Email" id="email" required /> <button type="submit">Subscribe</button> </div> </form>
First, I set the data-netlify attribute to true to tell Netlify to handle this form.
The first input in the form is named bot-field. This tricks robots into revealing themselves: I tell Netlify to watch for any suspicious submissions by setting the netlify-honeypot attribute to bot-field. I then hide the field from humans using the html hidden and aria-hidden values — users with and without assistive technology won’t be able to fill out the fake input.
If the form gets submitted with anything in the bot-field input, Netlify knows it’s coming from a robot, and ignores the input. In addition to this layer of protection, Netlify automatically filters suspicious submissions with Askimethttps://ift.tt/2LXyCDl). I don’t have to worry about spam!
The next input in the form is named email. This is where the email address goes! I’ve specified the input-type as email, and indicated that is required; this means that the browser will do all my validation for me, and won’t let users submit anything other than a valid email address.
Progressive enhancement with JavaScript
One neat feature of Netlify Forms is the ability to automatically redirect users to a “thank you” page when they submit a form. But ideally, I’d like to keep my users on the page. I wrote a short function to submit the form without a redirect.
const processForm = form => { const data = new FormData(form) data.append('form-name', 'newsletter'); fetch('/', { method: 'POST', body: data, }) .then(() => { form.innerHTML = `<div class="form--success">Almost there! Check your inbox for a confirmation e-mail.</div>`; }) .catch(error => { form.innerHTML = `<div class="form--error">Error: ${error}</div>`; }) }
When I provide the content of my email form to this function via the form value, it submits the form using JavaScript’s built-in Fetch API. If the function was successful, it shows a pleasant message to the user. If the function hits a snag, it’ll tell my users that something went wrong.
This function is called whenever a user clicks the “submit” button on the form:
const emailForm = document.querySelector('.email-form') if (emailForm) { emailForm.addEventListener('submit', e => { e.preventDefault(); processForm(emailForm); }) }
This listener progressively enhances the default behavior of the form. This means that if the user has JavaScript disabled, the form still works!
The serverless function
Now that we have a working email submission form, it’s time to do some automation with a serverless function.
The way Netlify functions work is as follows:
Write the function in a JavaScript file in your project.
Tell Netlify where to look for your function via the netlify.toml file in your project.
Add any environment variables you’ll need via Netlify’s admin interface. An environment variable is something like an API key that you need to keep secret.
That’s it! The next time you deploy your site, the function will be ready to go.
The function for my site is going to be in the functions folder, so I have the following in my netlify.toml file:
[build] base = "." functions = "./functions"
Then, I’ll add a file in the functions folder called submission-created.js. It’s important to name the file submission-created so that Netlify knows to run it every time a new form submission occurs. A full list of events you can script against can be found in Netlify’s documentation. If you’ve correctly named and configured your function, you should see it on Netlify’s Functions dashboard:
Netlify’s Functions dashboard shows I’ve correctly configured my submission-created function
The content in submission-created.js looks like this:
require('dotenv').config() const fetch = require('node-fetch') const { EMAIL_TOKEN } = process.env exports.handler = async event => { const email = JSON.parse(event.body).payload.email console.log(`Recieved a submission: ${email}`) return fetch('https://api.buttondown.email/v1/subscribers', { method: 'POST', headers: { Authorization: `Token ${EMAIL_TOKEN}`, 'Content-Type': 'application/json', }, body: JSON.stringify({ email }), }) .then(response => response.json()) .then(data => { console.log(`Submitted to Buttondown:\n ${data}`) }) .catch(error => ({ statusCode: 422, body: String(error) })) }
Let’s look at this line-by-line.
Line 1 includes a library called dotenv. This will help me use environment variables. Environment variables are useful to hold information that I don’t want to make public, like an API key. If I’m running my project locally, I set my environment variables with a .env file in the repo, and make sure it’s listed my .gitignore file. In order to deploy on Netlify, I also set up environment variables in Netlify’s web interface.

On line 2, I add a small library called node-fetch. This allows me to use Javascript’s Fetch API in node, which is how we’ll send data to Buttondown. Netlify automatically includes this dependency, as long as it’s listed in my project’s package.json file.
On line 3, I import my API key from the environment variables object, process.env.
Line 4 is where the function is defined. The exports.handler value is where Netlify expects to find our function, so we define it there. The only input we’ll need is the event value, which will contain all of the data from the form submission.
After retrieving the email address from the event value using JSON.parse, I’m ready to send it off to Buttondown. Here’s where I use the node-fetch library I imported earlier: I send a POST request to https://api.buttondown.email/v1/subscribers, including my API key in the header. Buttondown’s API doesn’t have many features, so it doesn’t take long to read through the documentation if you’d like to learn more.
The body of my POST request consists of the email address we retrieved.
Then (using the neat .then() syntax), I collect the response from Buttondown’s server. I do this so I can diagnose any issues that are happening with the process — Netlify makes it easy to check your function’s logs, so use console.log often!

Deploying the function
Now that I’ve written my function, configured my netlify.toml file, and added my environment variables, everything is ready to go. Deploying is painless: just set up Netlify’s GitHub integration, and your function will be deployed when your project is pushed.
Netlify projects can also be tested locally using Netlify Dev. Depending on the complexity of your code, it can be faster to develop locally: just run npm i netlify -g, then netlify dev. Netlify Dev will use the netlify.toml file to configure and run the project locally, including any serverless functions. Neat, right? One caveat: Netlify Dev currently can’t trigger serverless functions on form submissions, so you’ll have to test that using preview builds.
An idea for the future
Buttondown’s API has a few possible responses when I submit a new email. For instance, if a user submits an email that’s already subscribed to the list, I’d love to be able to tell them as soon as they submit the form.
Conclusion
All in all, I only had to write about 50 lines of code to have a functional email newsletter sign-up form available on my website. I wrote it all in HTML, CSS, and JavaScript, without having to fret with the server side of the equation. The form handles spam, and my readers get a nice experience whether they have JavaScript enabled or not.
The post Using Netlify Forms and Netlify Functions to Build an Email Sign-Up Widget appeared first on CSS-Tricks.
Using Netlify Forms and Netlify Functions to Build an Email Sign-Up Widget published first on https://deskbysnafu.tumblr.com/
0 notes
Text
How to Create an HTML Form That Sends You an Email
Sometimes, improving UX can cost a lot of money. And oftentimes, some of the problems website visitors have are easy, simple fixes. That begs the question: How can you find out if customers are enjoying their website experience? The answer may be simpler than you think. Having forms on your website is an effective way to get customer feedback about their experience during their visit. These forms give you insight about how to improve your website’s UX for higher conversions in the long run.
Whether you want to convert more visitors to leads, collect information for your sales team, or create more loyal brand advocates, forms are imperative to an inbound strategy. Ultimately, forms are critical for solving dissatisfaction in a customer’s experience, which ensures stronger customer relationships. If you don’t have a form on your website, you could be missing out on more leads, higher conversions, and happier long-term customers. Here, we’re going to walk you through how to create a certain type of form — one that sends an email to you, as well as the customer, to ensure the form was received. How to Create a Form in HTML and Send it to Email It is possible to create an HTML form that sends emails, but it depends on how you work and on what platform you’re working. This is to say that things are a little different if the plan is to use a mix of HTML and different scripts. Using the Basics Using just HTML? We’ve got you covered. From starting fresh, here is a sample code for use: <form action=”mailto:[email protected]” method=”POST” enctype=”multipart/form-data” name=”EmailForm”> Name:<br> <input type=”text” size=”19″ name=”ContactName”><br><br> Message:<br> <textarea name=”ContactCommentt” rows=”6″ cols=”20″> </textarea><br><br> <input type=”submit” value=”Submit”> </form> This code will create a form that asks for the contact’s name, message, and includes a submit button. Note that this code is basic — it won’t look super snazzy. For a more beautiful one, you’ll have to add some more lines of code specific to your needs. Another thing to note with this code is that it doesn’t directly send to email addresses, but it can open in an email client or tool window to submit the form. To make it so the form can work with your email server and send it to a mailbox, PHP is the answer — let’s explore that option now. Making a Complete Form To create a form subscribers can contact you with, the PHP script is going to be your best friend. I know, another acronym. This one stands for Hypertext Preprocessor, and this language collaborates with HTML to process the form. If you need to make a complete form, follow the steps below.
How to Make an HTML Form that Sends Email
Use PHP to create a page. Make the form using code. Make forms send email.
When you’re creating a webpage, instead of using the “.html�� extension, type “.php” instead. This is similar to what happens when you save an image as “jpg” versus “png”. By doing this, the server will know to host the PHP you write. Instead of saving the empty HTML page as such, save it as something like this: “subscriberform.php”. After your page is created and saved, you’ll then be able to create the form. In this step, you’ll write the code to create the form. The following code is what’s needed for a basic form: <form method=”post” action=”subscriberform.php”> <textarea name=”message”></textarea> <input type=”submit”> </form> Because this is similar to the HTML-only write-up, these lines will also create a name for the form and an area for subscribers to type a custom message and send it to you. An important difference is the “action=contact.php” part. This portion of code is what will make the page send the form when submitted. Recall that in the first example, that wasn’t an option. After you create the form and add all the proper fixings depending on your design preferences, it’s time to create the email portion. For this, you’re going to scroll to the beginning of the page (the very beginning). To enable sending data in the email, we have to add code that will process the data. Copy this code or create something similar: <?php if($_POST[“message”]) { mail(“[email protected]”, “Here is the subject line”, $_POST[“insert your message here”]. “From: [email protected]”); } ?> Recall that everything inside the first and last lines will tell the webpage to make these functions perform as PHP. This code also checks to see if a subscriber uses the form. From there, it checks to see if the form was sent. Further breaking it down, “mail” sends the completed form as an email to “[email protected],” and the subject line is what follows. In the next line, you can write copy of the email message inside the quotes, to be sent from whichever email address you choose. With that, you have the basic code you need to create the form. Note that this is just one way to do this — alternatively, you can also create a form using a CRM like HubSpot. If you’re a HubSpot customer, keep reading to learn how to use HubSpot’s tool to create an HTML form that sends you an email. Using HubSpot HubSpot Forms is part of the Marketing Hub, and doesn’t require any previous technical knowledge. If you want to learn how to receive an email after a form submission, take a look at our Knowledge Base article. When you’re using HubSpot Forms, you can build custom forms that connect to your contacts list. You can also customize those forms and trigger automatic emails based on the completion of your forms. Note that the latter requires a premium upgrade. Click here for more information about HubSpot’s forms. HTML forms are a fairly simple process and an excellent way to connect with subscribers. Having these on your site gives customers an easy way to contact your company or sign-up for emails. Forms that send an email back to you keeps information in your inbox for reference and ease. Remember that these aren’t your only options for building forms. If you want a list of tools that help build forms, check out our post here.
Source link
source https://www.kadobeclothing.store/how-to-create-an-html-form-that-sends-you-an-email/
0 notes
Text
And what the Liverpool youngster must do next
Chandrayaan 2 Will Have No Impact on Gaganyaan Mission: ISRO Official Zomato Lays Off 541 Employees, Points to Automation Chandrayaan 2: ISRO Says 95 Percent of Mission Objectives Accomplished Huawei P30 Pro Colour Variants With Dual Tone Finish Unveiled at IFA Nintendo Switch Teased to Get Mysterious New Accessory on September 12 NASA Data Shows Less Than 60 Percent Lunar Missions Have Been Successful Google Bans Ads for 'Unproven' Therapies, Including Stem Cells OnePlus 7T Pro Protective Cases Leak, Tipping Its Design Parts of Wikipedia Offline fake yeezys for kids After 'Malicious' Attack BSNL Unveils Rs. A company with a large global footprint, Nike supply chain affects not only the company revenues, but the environment as well.. Si les Franais choisissent de ne pas partir trop loin de leur domicile, 56% dclarent galement partir chaque anne au mme endroit pour les vacances d't. The NCAA already lets athletes accept money in some instances. Doing laundry Nice try. Please see ourPrivacy Noticefor details of your data protection rightsThank you for subscribingWe have more newslettersShow meSee our privacy noticeCould not subscribe, try again laterInvalid EmailFormer Birmingham City and West Bromwich Albion midfielder Darren Carter and double Commonwealth Games gold medal winner Craig Heap have announced their intentions to take on the Great Birmingham 10K in May.As the sportsmen limber up for the challenge, we taking a look ahead to the brilliant Brum runs coming up in 2018.Whether you want to half run/half dance your way around the Great Birmingham 10K, or you have a personal best to smash in our Simplyhealth Great Birmingham Run half marathon, the city is ready to welcome you. Remediation of an infestation Cheap Fake Yeezys can be as simple as going to your local home supply store. The first month we had 300 uni students sign up and a couple of clubs running on it, she says, when I knew I needed a proper website. A doctor is supposed to visit the sub centre at least once a month.. Hours later, she announced in another tweet that she was joining the Congress.. "Consequently, more and more youngsters are making 'stress free' life choices of self love self growth. One woman, Elizabeth Macias, gained notoriety after a video surfaced of her pepper spraying her fellow shoppers at a Wal Mart. Please see ourPrivacy Noticefor details of your data protection rightsThank you for subscribingWe have more newslettersShow meSee our privacy noticeCould not subscribe, try again laterInvalid EmailAn airport minibus operator punched a safety official in the face knocking off his glasses after finding out his illegal vehicle would be impounded.Michael Whitty flew into a rage when he heard his minibus would be seized for not having a valid Public Service Vehicle (PSV) operator's licence.The 46 year old attacked the traffic examiner close to Liverpool John Lennon Airport on July 11, Liverpool Magistrates court heard.The driver, from Whitty company, was also found not to have a correct driving licence.The same firm had another vehicle impounded for the same offence in June and the vehicle was also found to have a fuel leak, a bald tyre and a safety door jammed shut.Whitty, of Formosa Drive, Fazakerley, admitted assault when he appeared before magistrates on Tuesday.The police were called and a warrant for Whitty's arrest was made cheap yeezy shoes after he fled the scene.Woman stabbed man moment of panic as he walked her home from pubIn court, this week, a judge sentenced Whitty to a 12 month community order involving 120 hours unpaid work as well as 10 rehabilitation days.He was also ordered to pay 100 to the victim, a 90 victim surcharge and 85 costs.DVSA enforcement manager Steve Brougham said: "Our priority is to protect everyone from unsafe drivers and vehicles."Our staff need to be able to protect the public without fear of violence, we will always press for the strongest penalties."Thanks goes to my DVSA colleagues who never tire of promoting road safety as well as Merseyside Police who acted promptly."At a Public Inquiry held separately on August 21 the Traffic Commissioner told Whitty that the minibuses would not be returned to him and will be sold or crushed.The Traffic Commissioner had previously refused to grant the company an operator's licence, in part due to them operating illegally prior to the licence application.Angry staff without pay as hotel chain suddenly goes into administrationTo operate a minibus for profit, drivers must have the correct entitlement on their driving licence and a Certificate of Professional Competence (CPC) card.. Its former site is now covered in hoardings.(Image: Anna Gowthorpe/PA Wire) closed its store in Liverpool city centre in August 2018, with the site yet to be filled by another retailer.The closure was due to the retailer going into administration and also saw its Belle Vale, Speke, Birkenhead, Bootle, Widnes, St Helens and Southport stores close too.Dunnes Dunnes, the Irish based clothing retailer, shut its store based inside St Johns Shopping Centre back in 2012 which came as a huge shock to both staff and shoppers.Staff were called in on Good Friday in 2012 to be told of the shock closure.At the time, Land Securities, which owned the St Johns Centre, re acquired the lease of the Dunnes store ahead of a major refurbishment of the first floor area.A spokeswoman said Land Securities were very keen to redevelop the space, which was a major unit in a prime location, close to the busy Queen Square.. In these cases, the athletes didn adhere to the commitment they made to the organizing committee and the USOPC. PGA, which desegregated in 1961, created a policy in 1990 stating it would not play tournaments at country clubs that did not welcome African American members.. On Zhihu, a question and answer website similar to Quora, one user wrote that people posed questions every day about what might have happened to Li, but these posts always disappeared the next morning if nothing had happened at all.
0 notes
Text
Garlic Aioli Mayo - an easy, tasty spread for sandwiches and burgers
"); $.get("/ajax/blog/get_comments.php?BlogPostId=489", function(Data) $('.CommentPlaceholder').html(Data); if(window.location.hash.lastIndexOf("#Comment_", 0) === 0) setTimeout("ScrollToHash()", 500); setTimeout("ScrollToHash()", 1000); setTimeout("ScrollToHash()", 1500); ); function ScrollToHash() element_to_scroll_to = $(window.location.hash).get(0); element_to_scroll_to.scrollIntoView(); $(window).scrollTop($(window).scrollTop()-50); /*$(document.body).animate( 'scrollTop': $(window.location.hash).offset().top-50 , 2000); */
Looking for holiday gifts for the foodie in your life? Here are a few gift guides I made to help:
Stir together a few simple ingredients to make this spread that will elevate the flavor of any sandwich or burger. It's a "must have" on our table. Once I started making this, plain ol' mayo simply wouldn't do any more.
Step-by-step photos for making Garlic Aioli Mayo
Step 1. Assemble the ingredients:
mayonnaise
olive oil
fresh lemon juice
fresh garlic
salt and pepper
Step 2. Mince the garlic using a knife or garlic press.
view on Amazon: my favorite garlic press (it has a built-in cleaner!)
Step 3. Combine all ingredients in a small bowl and stir until evenly mixed.
Step 4. Cover and refrigerate for at least 1 hour to allow the flavors to blend. It will keep in the refrigerator for 3-4 days.
DONE! How easy, right? I spread this yumminess on all my sandwiches, paninis and burgers. It's so simple to make, and it tastes amazing!
Make it a Yummy day!
Monica
You might also like my Spicy Mayo Sauce.
Garlic Aioli Mayonnaise
By Monica Servings: makes 1/2 cup
Ingredients
6 tablespoons mayonnaise
2 tablespoons olive oil
1 teaspoon lemon juice
3 garlic cloves, minced
1/4 teaspoon freshly ground black pepper
1/8 teaspoon salt
In small bowl, stir ingredients together until uniformly mixed. Cover and chill for 1 hour.
May be made a day ahead and refrigerated. Keeps in refrigerator for 3-4 days.
Posted on Tuesday, September 4th, 2018
Looking for holiday gifts for the foodie in your life? Here are a few gift guides I made to help:
", 760); $('#ShareDialogDiv').find('.SendEmailButton').bind("click", function() SendShareRecipeEmail(RecipeId); ); clicky.log('#show_sharing_options', "Show Sharing Options"); function SharePost(PostId) Dialog("
"+$('#ShareDialogSource').html()+"
", 760); $('#ShareDialogDiv').find('.SendEmailButton').bind("click", function() SendSharePostEmail(PostId); ); clicky.log('#show_sharing_options', "Show Sharing Options"); function SendShareRecipeEmail(ThisRecipeId) ThisName = $('#ShareDialogDiv').find('.ShareName').val(); ThisEmail = $('#ShareDialogDiv').find('.ShareEmail').val(); ThisMessage = $('#ShareDialogDiv').find('.ShareMessage').val(); if(ThisName == '') alert("Please enter your name so that we can tell your friend who you are"); else if(ThisEmail == '') alert("Please enter the email address of the person you want to send this email to"); else $('#ShareDialogDiv').find('.EmailForm').hide(); $('#ShareDialogDiv').find('.EmailLoading').show(); $.post('/ajax/sharerecipe.php', Name:ThisName, Email:ThisEmail, Message:ThisMessage, RecipeId:ThisRecipeId, function(data) if(data == 'TRUE') $('#ShareDialogDiv').find('.EmailLoading').hide(); $('#ShareDialogDiv').find('.EmailSent').show(); $('.EmailToName').html(ThisEmail); $('#ShareDialogDiv').find('.ShareEmail').val(''); $('#ShareDialogDiv').find('.ShareMessage').val(''); clicky.log('#send_sharing_email', "Sent Sharing Email"); else $('#ShareDialogDiv').find('.EmailLoading').hide(); $('#ShareDialogDiv').find('.EmailForm').show(); alert("The email address you entered was invalid. Please double-check it, and try sending the email again."); ); function SendSharePostEmail(ThisPostId) ThisName = $('#ShareDialogDiv').find('.ShareName').val(); ThisEmail = $('#ShareDialogDiv').find('.ShareEmail').val(); ThisMessage = $('#ShareDialogDiv').find('.ShareMessage').val(); if(ThisName == '') alert("Please enter your name so that we can tell your friend who you are"); else if(ThisEmail == '') alert("Please enter the email address of the person you want to send this email to"); else $('#ShareDialogDiv').find('.EmailForm').hide(); $('#ShareDialogDiv').find('.EmailLoading').show(); $.post('/ajax/sharerecipe.php', Name:ThisName, Email:ThisEmail, Message:ThisMessage, PostId:ThisPostId, function(data) if(data == 'TRUE') $('#ShareDialogDiv').find('.EmailLoading').hide(); $('#ShareDialogDiv').find('.EmailSent').show(); $('.EmailToName').html(ThisEmail); $('#ShareDialogDiv').find('.ShareEmail').val(''); $('#ShareDialogDiv').find('.ShareMessage').val(''); clicky.log('#send_sharing_email', "Sent Sharing Email"); else $('#ShareDialogDiv').find('.EmailLoading').hide(); $('#ShareDialogDiv').find('.EmailForm').show(); alert("The email address you entered was invalid. Please double-check it, and try sending the email again."); ); function SendAnotherEmail() $('#ShareDialogDiv').find('.EmailForm').show(); $('#ShareDialogDiv').find('.EmailSent').hide(); function PrintRecipe(RecipeId) /* Dialog("
"+$('#PrintDialogSource').html()+"
", 760); $('#PrintDialogDiv').find('.PrintRecipeCard').bind("click", function() PrintRecipeCard(RecipeId); ); $('#PrintDialogDiv').find('.PrintFullPage').bind("click", function() PrintFullPage(RecipeId); ); */ clicky.log('#show_print_options', "Show Print Options"); function ClosePrintDialog() CloseDialog($('#PrintDialogDiv')); function CloseShareDialog() CloseDialog($('#ShareDialogDiv')); function PrintFullPage(RecipeId) window.open('/recipes/print/'+RecipeId,'','toolbar=1,location=1,directories=1,status=1,menubar=1,scrollbars=1,resizable=1'); ClosePrintDialog(); clicky.log('#print_full_page', "Print Full Page"); function PrintRecipeCard(RecipeId) window.open('/recipes/pdf/'+RecipeId,'','toolbar=1,location=1,directories=1,status=1,menubar=1,scrollbars=1,resizable=1'); ClosePrintDialog(); clicky.log('#print_recipe_card', "Print_Recipe_Card"); function LogSidebarClickGoal(GoalName) GoalName == '') GoalName = "Clicked Sidebar" clicky.goal( GoalName , '0.10' ); var clicky_custom = ; clicky_custom.split = name: 'Sidebar Test', version: 'Amazon_Button_Highlight', ;
Garlic Aioli Mayo. Elevate sandwiches and burgers with this fast, easy, tasty spread. From TheYummyLife.com #aioli #mayo #spread #sandwiches #burgers
Source: https://www.theyummylife.com/Garlic_Aioli_Mayonnaise
0 notes
Quote
Werbung, die wirklich verkauft - 15 kostenfreie Insidertipps Du möchtest nie mehr erfolglos Produkte oder Services bewerben?Sondern Neukunden gewinnen und mehr Umsatz mit Bestandskunden generieren? Dann ist dieser kostenfreie Kurs mit 15 Werbetext-Insidertipps in Emailform eine der wichtigsten Infoquellen für dein Business in diesem Jahr. Ohne verkaufs-starke Werbetexte bleiben deine Produkte Ladenhüter und deine Services werden nicht gebucht. Die Fähigkeit, fesselnde, mitreißende und elektrisierende Verkaufstexte zu schreiben ist daher einer der entscheidenden Erfolgsfaktoren im Internetbusiness! Mein Onlinemarketingkollege Oliver Corzilius verrät dir 15 Insidertipps inklusive Textvorlagen und Praxisbeispielen für Werbetexte, mit denen du deine Umsätze steigern und deutlich mehr Neukunden gewinnen kannst. In diesem brandneuen kostenfreien, per Email ausgelieferten Kurs entdeckst du: 25 Eyecatcher-Werbetext-Überschriften, mit denen du deine Verkaufsquote massiv erhöhen kannst 3 der besten Werbetext-Anfänge wie du in nur 3 Schritten eine überzeugende Werbebotschaft gestaltest, indem du verkaufswirksam den Nutzen statt der Eigenschaften betonst, jeweils mit 4 Praxisbeispielen nachvollziehbar verdeutlicht 3 Praxistipps für einen starken Call to Action 6 schlagkräftige Headline-Formeln und wie sie in der Praxis funktionieren wie du deinen Kunden-Avatar erstellst (als Stellvertreter für die Zielgruppe, die du ansprechen möchtest) mit einem konkreten Praxisbeispiel eine komplette Vorlage, wie du in 12 Schritten deinen eigenen verkaufs-starken Online-Werbebrief aufbaust und viele weitere Insidergeheimnisse, Vorlagen und Praxisbeispiele! Oliver Corzilius, Internetmarketer mit 7-jähriger Werbetexter-Erfahrung, verrät dir in diesem Onlinekurs äußerst effiziente Verkaufstext-Geheimnisse, mit denen du ab sofort nur noch Werbetexte erstellst, die mit hoher Wahrscheinlichkeit wirklich Umsätze erzeugen! Der Kurs hat einen Wert von 67,- Euro, aber du erhältst ihn heute kostenfrei, wenn du dich jetzt anmeldest. Sichere dir Werbetext-Vorlagen zum Sofort-Übernehmen, Insidertipps zum Direkt-Umsetzen und Verkaufstext-Praxisbeispiele als Ideenanregung, um ab heute nur noch umsatz-starke Werbetexte zu schreiben - und das viel schneller als bisher! Mit den Informationen aus diesem Werbetext-Kurs bist du deiner Konkurrenz den entscheidenden Schritt voraus! --> Melde dich daher jetzt hier an und profitiere von dem geballten Verkaufstext-Know-how: https://magic-copywriting.de/ Mit Emails wirklich verkaufen? - 15 kostenfreie Insidertipps Du willst nie wieder wirkungslose Emails versenden? Dafür Neukunden gewinnen und mehr Umsatz mit Bestandskunden generieren? Dann ist dieser kostenfreie Kurs mit 15 Emailmarketing-Insidertipps eine der wichtigsten Infoquellen für dein Business in diesem Jahr. Denn Emailmarketing bleibt der effektivste und preiswerteste Kundengewinnungs-Faktor für dein umsatzstarkes Internetbusiness. Das Wissen um die Techniken, aufmerksamkeits- und klick-starke Emails zu schreiben, ist damit einer der entscheidenden Erfolgsfaktoren im Internetbusiness! Mein Onlinemarketingkollege Oliver Corzilius verrät dir 15 Insidertipps inklusive Textvorlagen und Praxisbeispielen für Emails, mit denen du deine Umsätze steigern und deutlich mehr Neukunden gewinnen kannst. In diesem brandneuen kostenfreien, per Email ausgelieferten Kurs entdeckst du: 20 der besten Betreffzeilen-VORLAGEN für umsatz-starke Emails wie du dein Email-Anmeldegeschenk (Freebie) unwiderstehlich gestaltest 25 Eyecatcher-Email-Betreffzeilen-PRAXISBEISPIELE wie du Emails erstellst, die Lust auf deine Angebote machen 7 effektive Ideen für deine Email-Kampagnen was du beim Aufbau deines Mail-Einstiegs-Satzes ("Opener") berücksichtigen musst wie du eine starke Email-Betreffzeile erstellst, die Nutzen vermittelt und Neugier weckt eine einfache, aber wirkungsvolle Vorlage für eine komplette Email, die mit hoher Wahrscheinlichkeit zur gewünschten Aktion führt und viele weitere Insidergeheimnisse, Vorlagen und Praxisbeispiele! Oliver Corzilius, Internetmarketer mit langjähriger Erfahrung als Emailspezialist und Werbetexter, verrät dir in diesem Onlinekurs äußerst effiziente Emailmarketing-Geheimnisse, mit denen du ab heute mit hoher Wahrscheinlichkeit nur noch Emailkampagnen erstellst, die wirklich Umsätze erzeugen! Der Kurs hat einen Wert von 67,- Euro, aber du erhältst ihn heute kostenfrei, wenn du dich jetzt anmeldest. Sichere dir Emailmarketing-Vorlagen zum Sofort-Übernehmen, Insidertipps zum Direkt-Umsetzen und Email-Praxisbeispiele als Ideenanregung, um ab sofort nur noch verkaufs-starke Mails zu schreiben - und das viel schneller als bisher! Mit den Informationen aus diesem Emailmarketing-Kurs bist du deinen Mitbewerbern den entscheidenden Schritt voraus! > Melde dich daher jetzt hier an und profitiere von dem geballten Emailmarketing-Know-how: https://emailmarketing-rockstar.de
http://blog.twitt-erfolg.de/2018/02/werbung-die-wirklich-verkauft-15.html
0 notes