#emeraldcatears's rmmz learnalong blog
Text
It* begins.


*It = making walksprites of my fakemon original monsters.
5 notes
·
View notes
Text
There's a lot to learn/explain about RPG Maker. Like, so much.
Anyone have preferences/recommendations to what my next post(s) should delve into?
6 notes
·
View notes
Text
Character Creation (graphics)
While MZ gives you some starting actors you'll probably want to make your own. There are a few ways to do that, but the easiest is probably by using the built-in character generator.

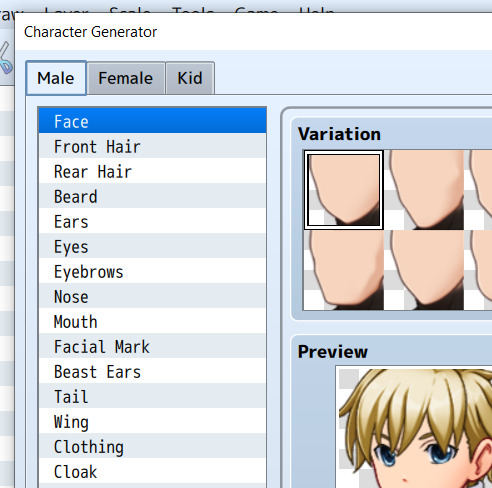
The generator that comes with MZ is intuitive enough. I've made a halfling with the child model that you may have seen in some of my screenshots before now. I'm going to make a new character for this example. It's Dracula season again, so let's go with a vampire.

Whether you randomize or carefully craft a character, there are a few things you need to do to get them from being a pretty face in the generator to becoming a member of the team (or an enemy, or a custom NPC).
Save Settings might seem like the intuitive way to go, but that just saves the settings so you can pull the character up again in the generator to make it easier to adjust them in the future. You'll actually need to save the character in separate parts as png images to use them in the game.

Clicking the Face Image button isolates the face I've created and puts it in a set of up to 8 face images. You can then Export the image...

... and the game will prompt you to save it in the faces folder. Convenient!
Now, you can save up to 8 faces this way so you can put together a set of eight characters or...

... you can save the same character with different expressions so you can change their image in text boxes based on how they're reacting to the events around them.
To add another image to an existing sheet, simply Import the image you want and click to move the newest face to the slot where you want it. Then Export it again and repeat the steps until you have a full set of eight faces.
You can also make your own in any art program, of course, rather than using the generator to make faces. Each face is 144x144 pixels and as long as they're placed into two rows of four columns the game will know how to divide up the individual faces.
Next is the Walking Character.

This is the character as they'll appear walking around on the map. The generator automatically puts them together in a way that MZ knows how to animate. Unlike XP, which used 4 poses across and 4 down, MZ animates with three across and four down.
The middle column is the character standing and the right and left columns are the animations of the character stepping. The game will alternate between the middle and side frames to show a walking character. The four rows are divided into the directions the character can face down, left, right, and up in order from top to bottom.
Whether you've got a humanoid character, an animal, a chest that opens, or a puff of smoke all animations pretty much work by "turning" down, left, right, and up and cycling between stepping animations. This is why you'll find stuff like fire animations in the Characters folder. Looking at the example images that come with MZ will give you ideas about how to create the effect you want. Here we're just making a "human" character so we'll just use what the generator gave us as export it to the right folder (img > characters).
You'll also notice that, like the face image, the walking character only takes up a small portion of the whole png that you create. You have room to add other characters (or different outfits for the same character) on a sheet like this. The game will divide the png image into 96 evenly sized sections so it understands that whatever you put in the character folder has eight characters with twelve poses each.
It'll do this with any sized png file you put together as a character, btw. If you're building a character completely from scratch rather than using the generator you can make them way taller/shorter than the generator's standard size. It divides the png into 8 characters with 12 poses unless you specifically tell the game otherwise.

The Big Monsters are examples that come with MZ for how to make a single character on an image instead of eight. Putting a $ in front of the file name tells MZ that this is an image of a single character (easy enough to recall - a dollar sign is an S shape for Single).
(note that for the big monsters that come with MZ, "turning" directions will change the image with one of the other monsters since the samples are made of four forward facing monsters).
Damaged character poses work more or less like the walking character in that they're saved in the character image folder and are read by the program the same way as described above.
The Battler, as saved in img > sv_actors, is a bit more involved.

MZ allows you to have side-view battles with animated battlers, and the character generator is kind enough to make these super easy to just export into the right folder with a click. But if you're making your own images from an art program instead of using the generator you'll want to have a better understanding of how all this is broken down.
As the asset standards page describes, the battler sprites are read as one character with several poses. You can't stack multiple characters together in one image like the faces and walking sprites.
The battler is made of 54 evenly divided images to make the animation frames in 6 rows and 9 columns. These display eighteen different motions that the game will play in battles.
You can probably intuit from the way the poses are laid out that these are also split into main and stepping frames for each pose with the three poses in a row being frames of the same "motion".

That's a lot of art if you're using the side-view battles and want to draw completely original sprites for everyone!
Regardless of whether you're using the generator or making your own sprites, making one of these guys into a character is a relatively simple matter once the files are all saved to the right places.

Open the database and go to Actors to add your custom character to the game. You can replace an existing actor with your own images, of course, but you can also just add a new actor by increasing the maximum number.
(Also the eight characters that come with RMMZ spell out RPG MAKER with the first letters of their names. Cute!)

From there just fill in the blank images with the actor you made. You can also name them and change their class and the like (which will be it's own thing and this post is already quite long).
I think he'd be a good Sorcerer.
4 notes
·
View notes
Text
Making a Grass Autotile (part 3)
It's time to see how the tiles look in the game.
The first thing to determine is where to put them. I made a grass tile and a dirt path that are intended to be ground autotiles so those should be put in the game as part of the A2 block - the second group of the A tab.
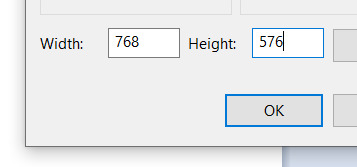
The full image for this needs to be 768x576 pixels in size. I'll go ahead and open a new picture for this step.
The RPG Maker assets standards page shows how this is meant to be laid out.

These can be further adjusted in the database to be designated field or area type. If I'm reading this correctly this can determine how they interact with other tiles in the A2 portion of the tileset.
If Block A is "Field" then the transparent parts of the second and fourth tiles will autofill with the first and third tiles respectively. Otherwise, these designations seem to refer to how the tiles stack on the layers when mapping with auto-layering.
I believe "Field" is outdated and changed to "World" type in the most current MZ version I have.

Since World Type seems to be used for, well, overworld maps I'll go ahead and just make this Area Type and lay the tiles out without worrying about how the transparencies fill in like I would if I used World.
In short all that is to say I'll just paste my two tiles in next to eachother in the first two slots.
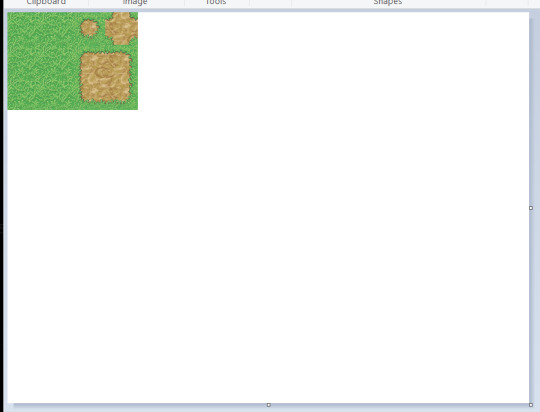
They look so lonely!
The beauty of things here is that I don't need a full set of tiles to start testing how they look in-game. I just have to have the ones I've made so far and can always save over this with a larger set later.
I'll go ahead and save this as Custom A2 and put it into the project.
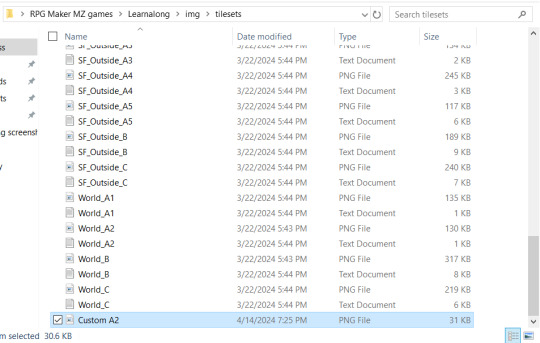
Simply go to wherever you've got the project you're adding a your tiles to saved and open the img folder and find the tilesets to add your own. Make sure it's a PNG file.
Then open RPG Maker and open the project you saved the new tiles into and open the Database.
From here go to the tilesets button and the available sets appear. In this case I'll create a new set rather than just adding mine into an existing one.
At the bottom of the screen I can make room for a new set by changing the maximum and increasing it as needed.

Then find where you want to put the tilesheet. In this case I want it in A2 (Ground) so I select the image from the dropdown. Instead of appearing as the full image I made it displays the two tiles as just their representative pieces (the 48x48 section in the top left of the six-tile pattern that makes an autotile).

I honestly don't need to do much else at this point since this is just about putting them into the game to see how they look, but this is also the part where things like passability and terrain tags are set. They don't matter at this stage of the learnalong, though. I could also put other tilesheets in teh A1-E slots but I'm not worried about that at the moment.
Next I go to a map (in this case MAP001) and select my custom set for the tileset.

From there I can just draw the tiles I made into patterns the way I would the default assets!
Now, that took a while. While I know part of the time came from pausing to explain each step for the sake of the learnalong and that I'll get faster with drawing tiles with practice, it is important to take time to consider how long an original tileset takes to put together.
In other words, it takes hours upon hours to make a workable set of original tiles. If that's something you find doable then this post is also an appreciation of the time and effort that goes into it! It's "simple" in theory but it takes time and making them look good is a skill honed by practice. To everyone who puts the effort in: seriously, you all rock.
If you're not the type to put your own set together there are loads of other options for both free-to-use and paid tilesets made by others. Please appreciate the work put into each and every one of them and credit them as you use them.
5 notes
·
View notes
Text
Switches & Self Switches
I'm drained from a short-but-somehow-long-anyway work week so I'm just going to properly cover switches this time.
I already talked about switches with the bridge and at the time I promised to explain them more.

Switches are super simple but they're also pretty much the most potent tool in the box when it comes to determining game progression. They're what tells you whether something has happened yet in the story in order to unlock the next part of the plot at the right time. They can control different parts of puzzles. They can be turned on and off again as needed like a light switch. They can even be used multiple times over.
To change whether a switch is on you just need an event that triggers it. Decide what the trigger event is (something you step on, someone you talk to, etc.) and add a control switches command.
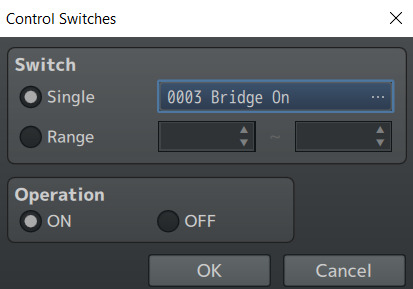
Under the switch command you'll see that you can choose to control a single switch or a range of switches at once. They can only be in one of two states: ON or OFF.
The ability to control a range of switches can have uses such as resetting a puzzle to it's default settings all at once, for example.
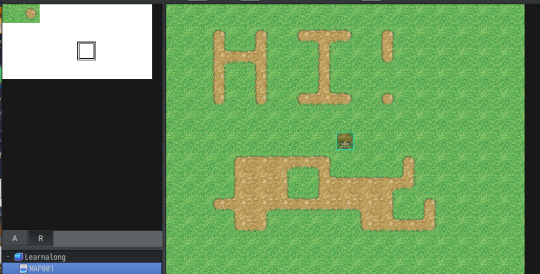
We've already looked at the benefits of turning a switch ON and OFF at different points to make an event change behavior in relation to a bridge you can walk under and over. The other lovely thing about this is that that one single switch can be used for any bridge on any map so long as you also put the trigger events to actually operate the switch on the map as well. One switch can control as many events as you need it to. Just make sure to name it properly so you can find it.
Especially if you use a lot of them.

You can have a maximum of 5000 switches and navigating them will pretty much require naming them in ways you can recall easily and sorting them in appropriate groups.
Thankfully, you can also do other things to organize them.

An unused switch can just be used as a header to indicate that the switches after it are all related to the same thing, for example. Just because the switch is named doesn't mean it has to actually do anything. (Conversely, you can use a switch before you name it. The switch technically already exists even without a name. It's just not practical for remembering what it does.)
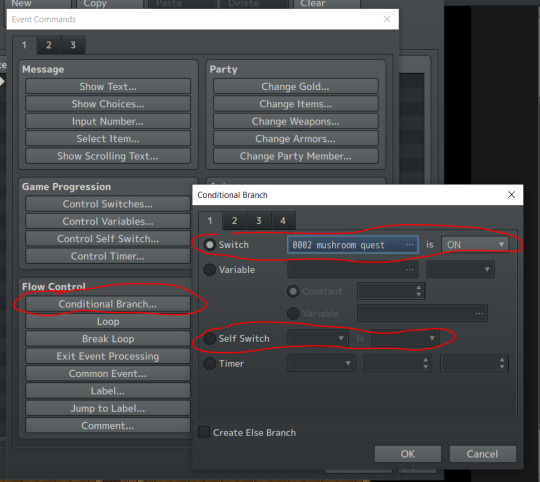
Events can check if a switch is on in the condition field.

If you want, say, the event's page to play only when a quest has been activated you just need to include that switch in the conditions and the game will check whether the event is ON.
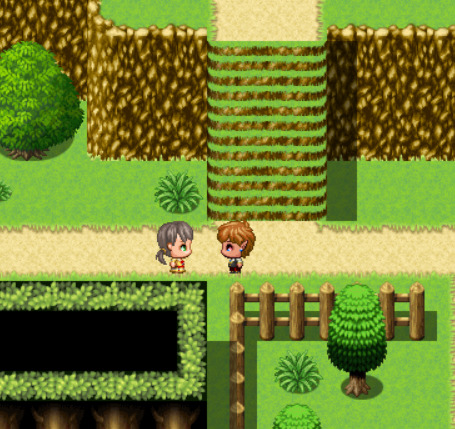
In this case I have a kid blocking the player's path on the first page of the event (when no conditions are set). The second page checks if a quest to collect mushrooms has been activated. If it has, then the second page plays instead of the first one and the child is absent so the player can pass.

The game tries to play the highest numbered page first (page two) and if it finds the condition is not met (the switch is OFF) then it moves to the next highest page instead (page one).
Switches are best used when you want one event to affect another event. If you want everything to happen in the same event you can use a Self Switch instead.

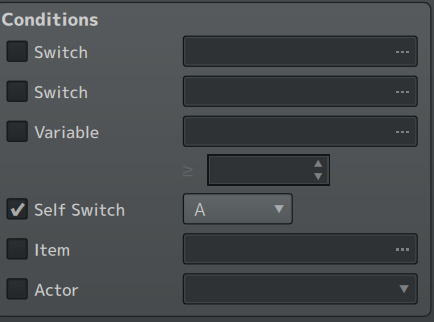
While Switches work across as many events and as many maps as you want, Self Switches are switches that activate within an event. These can't reach across different maps. These are used to, for example, make sure a character gives you an item only once. Like regular switches they can be turned ON and OFF. You can have up two four on an event: A, B, C, and D.
Use the command to turn a switch on/off and the game can check it in the conditions field.
These can be used separately from or in conjunction with regular switches and other conditions.
You can also check Switches and Self Switches with Conditional Branches.
Finally, there is a way to use one event to control another event's Self Switch.
youtube
Among the various tutorials I've been watching I found this one where the youtuber explains how to use scripts to control any event's self switch from another event! It adds yet another way to keep your switch organization under control.
$gameSelfSwitches.setValue([mapId, eventId, 'A'], true)
(I'm honestly not sure about following all the advice from this tutorial series because he uses Parallel Process a lot and most other tutorials I've looked into say to avoid PP unless you need it because it can cause undue lag, but this doesn't involve PP so that particular question doesn't come up here.)
2 notes
·
View notes
Text
Character animations for stationary objects.
Okay then. Since the poll was inconclusive (three-way tie) I guess I'll just alternate between things.
I'll start with a mini-clarification on event animations since that's sort of two categories at once (graphics and events).
So we know from making a character with the character generator that all character sprites animate a certain way...

by Stepping and by Turning.

That is to say that the columns represent the character's stepping animations. When on a character like our vampire, this means it'll animate so the character will put a foot forward (a) when moving from one tile to the next, display the standing animation frame (b) when on a tile, and put the other foot forward (c) when taking the next step. The pattern repeats itself each time the character moves: B-A-B-C-B-A-B-C.
This is also how certain stationary events animate in place.
If you go through the "Characters" that come with RPG Maker, you'll notice some of them, such as the example below (!Other2 under characters)...
... appear to not quite fit the typical three column/four row format at first glance. For example, the smoke plumes that make up the 7th "character" in this set.

That's because they're meant to be stationary objects that move by "stepping" only.

You can place character events like this on the map as decoration to liven things up with motion. Select "Stepping" and even though the event is stationary on the map it will cycle through the a-b-c-b-a frames of animation to appear in motion.

If this smoke plume character "turned" it would cycle through the white, brown, bluish, and fiery smoke plumes, so you also want to turn on "Direction Fix" in any cases where the player might touch the event and cause it to turn to face a new direction (though it's a good practice to just select it for a stationary event even if there's no way for the player to touch it).
This Stepping event animation is used for flickering candle flames, the splash at the bottom of waterfalls, and any other number of three-frame animations you might want on a still object. If you want to make your own graphics for any such events just remember that you can make up to four different (same-sized) events in one sheet this way. They'll animate across the three columns without whatever is in the row above or below them ever showing up if you use stepping/direction fix to just let them do their thing.

Turning works the same way with the four rows.
Most often used for doors, chests, and switches, the turning animation tends to be used when the player interacts with a stationary object.

For events like this, "stepping" would cycle through three different door images which isn't what you would typically want. Instead when the player interacts with them you want to set the move route of the event to turn different directions. Even though the graphic shows a door opening, the game reads each graphic as a turning animation the same way it reads the humanoid characters. A closed door is "turned" up. "Turning" that door to the left changes the graphic to slightly open. Another "turn" to the right causes the game to display the door as more open. Finally being "turned down" shows it fully open.

For something like a door you'd probably want to have the event set to being triggered by the player touching it. For a chest you'd want the player pressing the action button.
You can technically have it sit idle and cycle through the turning animations with a custom move route under autonomous movement as well - something like the geyser/lava plume in the character set I got the smoke from might use both stepping and turning to animate while otherwise staying decoratively in place on a map.
Direction fix is your friend for making sure items like chests and switches don't animate in unwanted ways, too. You can turn it on and off as part of the Set Move Route options.
When making animated background objects just remember:
Across columns - animates by stepping.
Up and down the rows - animates by turning.
One last thing: You may notice that the "characters" used in this example have a ! before their names. This tells the game to put them directly on the ground as objects/items. Otherwise they'll be treated like a normal character and be placed a few pixels up from the edge of a tile to look more naturally like they're standing on it.
! = the letter I = Item is how I remember it.
You can also combine the dollar sign for single characters with the exclamation point for items, such as with the large gate that comes with RMXP.

If you do the ! comes before the $.
2 notes
·
View notes
Text
Whether you're making your own tiles or using an existing set, there is a little bit more to using them than just placing them on the map. Here's where we get into the database.
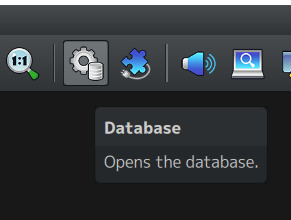
As a refresher, you can get to the database under Tools, by pressing F9, or by selecting the gear icon at the top of the screen.
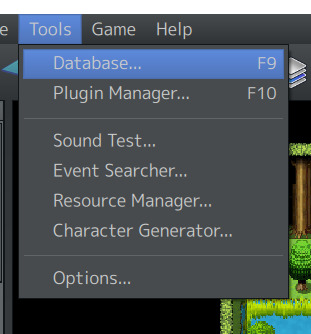

You can tell that a lot of the magic happens here because there are a lot of ways to get to it.
There's a lot in the database, but we're still focused on tiles for now so I'll pop down to the tilesets button. It'll bring up your tilesets.
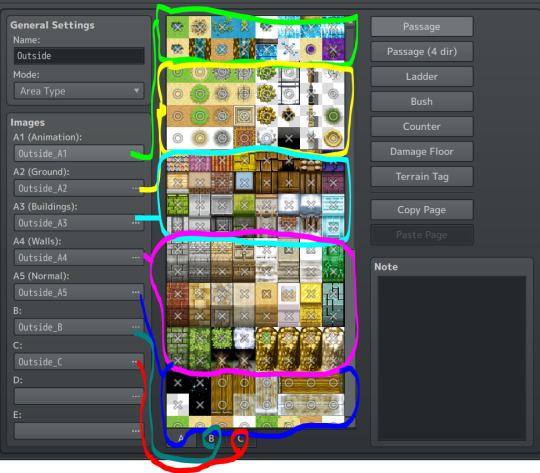
As shown above, all parts of a tileset can be adjusted here, from the separate parts of the A tab through the B-E tabs (though the sample set shown here only goes through C).
Outside here is made of a few different subgroups so a set can mix and match from your available assets for flexibility. For example, the Outside and SF Outside sets that comes with RMMZ both use the same A1 and A2 tiles but have different A3-C tiles.
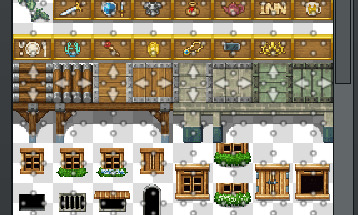
Once you've got the tiles you want to work with put together, the important stuff is that column of buttons on the right. That's where you tell RPG Maker how to make the tiles behave in the game.
The first one is Passage and it actually has three possible settings.

An X, as shown on the barrel and gravestones, means that the player cannot walk on the tile. Whether it's a solid object like a building or a hole the character cannot just jump down, an X is used to prevent the player from walking where you don't want them. An O means the tile is passable and the player can walk on it, as with the clumps of grass and stepping stones.
Finally the star, as shown on the upper tile of the tree, means that the player can pass the tile and whatever is shown on the tile will appear above the player. This allows the player to walk behind tall trees or under hanging signs.
Passage (4 dir) is that but more nuanced. It's for tiles you want the player to be able to walk on in some directions but be blocked in others. Think like a bench the player can "sit" on or a bridge over a gap of land.

If I kept the passage as it was in the default settings for this set, the player would be able to walk north or south off the bridge directly onto the grass "below". Likewise they could just walk onto a bridge high "above" them from the ground and destroy the illusion of elevation in a 2D environment.
So to fix this all I have to do is go into the B tab...
... and make the bridges 4-direction passability match how I want the tile to work in-game. Now I can build bridges over land as well as over already impassable tiles like water.
Next is Ladder.
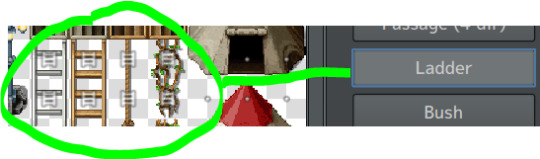
Basically, this setting being on indicates that the player will always face up when standing on this tile regardless of the direction they're moving up or down it (so you don't climb down a rope and just look like you're walking).
In XP if you wanted this effect you'd have to make direction fix events. MZ allows you to build it into the tile and call it a day.

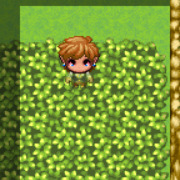
Whether it's to indicate sinking into shallow water or trudging through deep snow (or, you know, walking through tall grass where wild Pokemon are ready to jump out), this setting makes it so the lower part of the player becomes semi-transparent when standing on the tile.
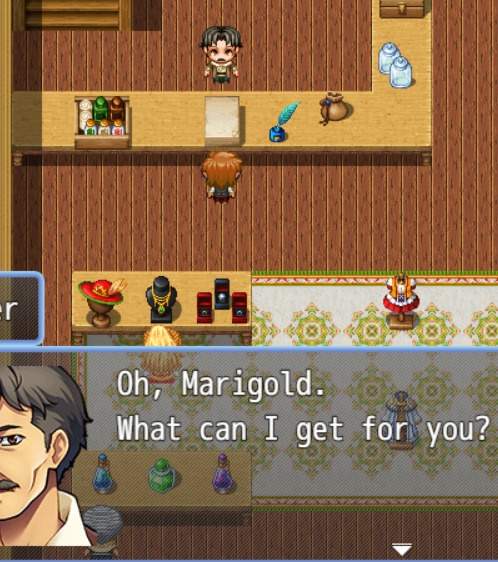
Counter is for if you want a tile to be a solid object but still allow you to interact with an event on the other side.
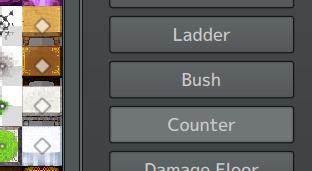
You can "talk" over a counter if there is a one-tile width counter between you and the event you're trying to talk to (like a businessman seated behind a desk or a shopkeeper behind their counter).
A counter will also extend the A2 autotiles a little to extend the legs down a bit to look more natural.
Damage Floor

This one's pretty neat to have built in. Damage floor is for stuff that drains HP from walking on it, such as swamps of poisonous goop.
I honestly don't remember whether this existed in XP or not.
Elsewhere in the database you can also control whether the player can reach 0HP from floor damage or if it instead only drops to 1HP. That's for later, though. We're still here for tiles. When I say I'm doing a learnalong I'm going into painful detail here.
Finally there's Terrain Tag.
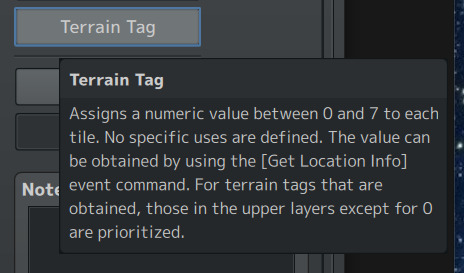
Basically you get a default of 0 and up to seven other tags you can assign to tiles. Terrain tags were a big thing in determining encounters back when I played around in Pokemon Essentials (think Tall Grass) but I never played much with them otherwise. They allow custom versions of the aforementioned ways to assign special rules to a tile that automatically works when put on a map.
That last bit about priority basically refers to the layer the tile is placed on.

In other words, a table (counter) placed on layer 2 would be read by the game over whatever the floor or ground below it is. However, if a tile on a higher layer has a default 0 chosen and the ground below it has a numerical tag added, the 0 tile will be ignored in favor of the one with a terrain tag assigned.
Even if you're not building all your own resources these are pretty useful to know for if you want to change something up, like I did with the 4-directional passage on the bridges.
3 notes
·
View notes
Text
Making a Grass Autotile (part two)
There's a reason that I stacked the grass from last time into a rectangle, and that is to make it an autotile. Instead of just a single tile, this tile will go into the "A2" tilesheet (for ground tiles) and basically work like a brush instead of like a stamp the way a regular tile does. This is because the program reads this 96x144 rectangle not as six 48x48 pieces but as a group of 24x24 mini-tiles that interact with each other in specific ways when placed next to each other or next to a different group of tiles.
The RPG Maker website has links to their own tutorials that explain this way better than I can, but this is a learnalong so I'm going to paraphrase as I make another tile to go with this one that better demonstrates the principle. I just think it helps me to learn if I can also explain it back to the void.

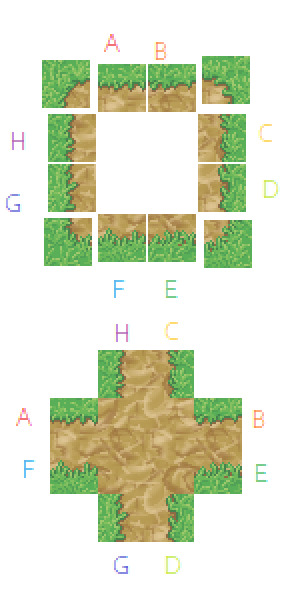
The way RPG Maker MZ reads the whole autotile causes it to think of the tile in pieces. The top two 48x48 blocks are a "representative" piece and the inner corners. The representative tile that in the upper left displays in the program so the user can see what tile they're working with. It's basically the four corners of the base tile if you think of the base as made of four mini-tiles.
Below that are the four other tiles that the program knows to read as the middle, edges, and corners. You may notice that the middle "tile" is actually the original tile but with the four mini-tiles inverted (that is to say the top right of the original tile is the bottom left of the center of the lower set and so on). The program will know how to loop them as per the link explaining autotiles I included a two paragraphs back.
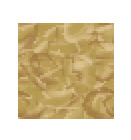
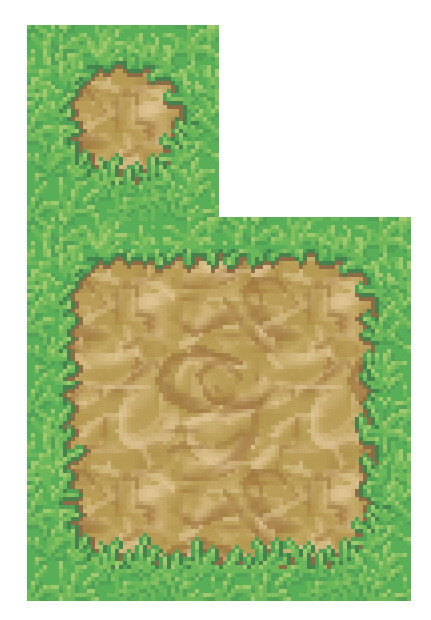
To better demonstrate how the edges and corners work I'll make a dirt path through the grass.
I begin by making a repeating dirt tile using the same cutting half off and moving it to the opposite side method I used for the grass.
Then I made a grid of four of them and created a border around the edges and erased everything outside that border. I copied the remaining group onto a copy of a grid of four grass tiles so the amount of space between the dirt border and the ends of the tiles were even on all four sides.
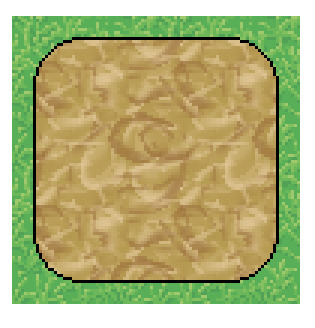
As long as the border parts stay within 24 pixels of the outside edges the edits I make to them will only effect the mini-tiles that make up the edges without interfering with the repeating pattern made by the middle 48x48 square.
The straight lined border looks unnatural, but it's just a guideline. I'll edit it with more grass clumps to make the real border. Again, something better than Paint will have grid functions but I'm just going to separate out the mini-tiles from the center to show how this works.

Now I'll just edit the borders so the grass overlaps the dirt. As I do this I want to copy and paste the edges to make sure they still loop nicely - here I've got an example with a 48 pixel tall section pasted next to itself but I also check that the top and bottom of that section work when swapped for each other as mini-tiles (not shown in the above sample).
Once I've worked my way around the outside I have 16 mini-tiles of dirt path altogether. MZ will draw the edges with the outside blocks and continuous dirt with the middle four.

Remember how I said the "representative" tile was just the four corner mini-tiles when you thought about it? Yep All I have to do to put that tile together is put the four mini-corners together. All that's left to make is the inner corners.
At this point the inner corners are easy. I'll rearrange the edge tiles I've already made next to the plain dirt tile so I can be sure the corners loop well.
The inner corners are where the tile attaches to the sides, so when I put my dirt in the middle I want to make sure the sides are attached the way MZ would connect them.
Remember we want the initial dirt tile in the middle - not the center of the path we made - to make sure it patterns well.
Then just draw in the borders to match up with the exit paths!

Once all the inner corners are bordered with grass it's just a matter of copying that and pasting it into the remaining corner of the autotile.

Join us next time to see how we get this from a bunch of pixels in MS Paint to actual tiles in an RPG Maker game!
6 notes
·
View notes
Text
Making a Grass Autotile (part 1)
While RPG Maker gives you some tiles to play with, I find that really understanding how they work works best if you also know how to make your own. That and, well, I actually like making custom tiles. It takes a while - especially to make a whole set - but I just lose track of time while doing it and it helps me de-stress.
I won't claim to be good at it, mind you, but this is a learnalong so I'll go ahead and explore my process.
I'm using MS Paint. Yep. The basic art program that comes with Windows. There are a lot of tools in more sophisticated art programs that make this faster or easier, but for the sake of this example I want to show that you don't have to know anything more complicated than Paint to make an autotile that works in RPG Maker.
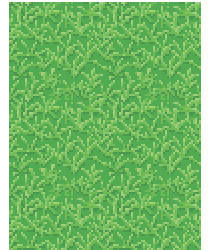
First I pick some greens since I'm making some grass.

This way I have a consistent set of colors to work with to make the tile. I'm no color expert and I'm sure someone experienced in that area would be better at explaining how to pick a good pallet. I just picked some that I thought looked nice together without being overly saturated.
Since RPG Maker MZ uses 48x48 tiles the next step is to make a square.

And I'm done!
Okay, not really. I could actually make a tile that's just a single color and save the details that make it look like jagged, growing grass for the parts where it borders other tiles if I wanted, though. For a simpler style that might be ideal - this is just the stuff your player walks on after all. It shouldn't look so busy as to be distracting. Variation could be done via decorative tiles like flowers added on top the base grass.
But I'm not leaving it here. I might experiment with a simpler style later but this is a learnalong so I'll make it more interesting.

I like to make an asterisk shape of grass. Here I used the middle green for the shape and highlighted the tips with the lighter greens. I added some dark green under the lower edges as shadows.
I also only made a few in the center of the tile. None of these touch the edges. That's because to make sure it loops nicely...

... I cut the tile in half and move the right side to become the left and vice-versa. If I were to copy this tile and paste it next to itself on either the right or left side, the edges would line up perfectly to recreate the first clumps.
Since I know it repeats horizontally I can fill the middle in with more clumps of grass.

And from there it's a matter of repeating the cut-and-paste process with the top and bottom halves to make a tile that loops vertically.

Huh. That bare patch actually kind of looks like part of the grass has been worn down from foot travel. I'll keep this in mind if I want to make a path like this sometime later.
For now...

More filling up the middle.
I want to do one more switcharoo of the left and right sides to make sure those last bare bits repeat correctly.

And once that last part is nice and clumpy...

I know it loops with itself, but I'll go ahead and place copies of this 48*48 tile next to each other so I have three tiles vertically and two horizontally. If I just wanted this patch on it's own I'd be done, but to make it an autotile I need the arrangement of six.
One last thing...

After letting it sit for a bit I decided the initial greens I picked blended together almost too much. I recolored the tile with a bit more contrast between the light and dark shades.
Again, that can be done in Paint if you'd prefer not using a fancier art program. While the tools available in a more sophisticated program can get the job done in a number of more efficient ways I do want to show that Paint can recolor things too. And I don't mean using the fill bucket on each of the different pixels.

Normally, Color 1 is the color of your brush and Color 2 is the color you erase with. But if you hold down the right mouse button while moving the eraser tool it’ll replace any Color 1 pixels with the second color. In the example above I’ve started replacing the lightest green with my new set’s lightest green.
While I do actually have a complete autotile with just this one tile in a group of six of itself, to really show why this is an autotile and not just, ya know, a tile, I'll have to make something with clear corners.
Join me later for a path.
2 notes
·
View notes
Text
Seeing what's new.
I used RPG Maker XP before (though mainly only used Pokemon Essentials) so MZ has a lot new that folks who used the RPG Makers in between like VX and MV are probably already familiar with.
For example:
It comes with a character generator that makes easy-to-use sprites!
While I intend to use my own resources eventually you know I have to play with this...
Also? Children exist beyond gender! In that case...

There's also a dark theme (as well as two high contrast ones that... don't appeal to me.
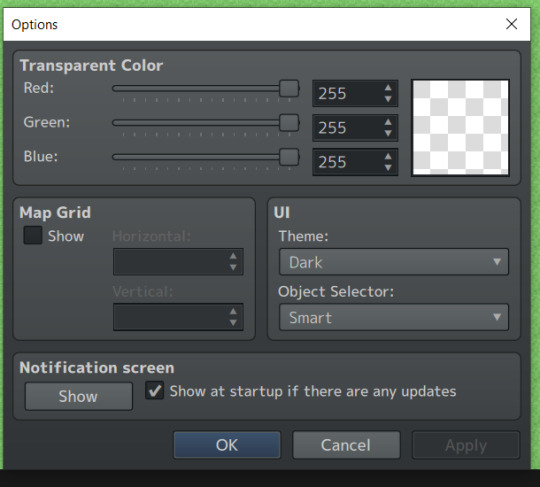
That should be easier on the eyes after staring at a computer screen at work all day.
Another thing I noticed right away is that the tilesets give you a lot more autotiles than XP. XP maxed at 8. This one has loads!

Autotiles, for those newer to this than I am, are tiles that automatically draw corners and the like based on what tiles they're drawn next to rather than needing to be put together with individual tiles. These can also be animated to show the motion of waves or waterfalls.
The tilesets are also broken into tabs! Looks like the bases are in the A tab and the details to add on top are in B and C. I'll have to look more into this when I eventually import my own tiles but it already seems nice for organizing.
Another thing?

Four layers for mapping! XP had three. Apparently they took away layers for some of the iterations between XP and MZ? That sounds irritating. Good thing MZ has them again.

MZ defaults to 48x48 tiles but has options for others as well. Again, I'll worry about that when I play with my own resources.
Those are just what I noticed right away. Apparently another difference is that XP used the Ruby programming language and MZ uses Java JavaScript. I never touched the code back in my Pokemon Essentials days so anything involving that is going to be new to me.
Oh, man. I'm already getting ideas for things to make with this. I plan on using the default resources to start with while I'm learning (for the most part) but when I start putting my own in I'll probably record the process here.
2 notes
·
View notes
Text
An Introduction
Main blog is @emeraldmew
I finally decided to check out RPG Maker MZ, so this blog will be a sort of note-taking tool for me to keep track of how I'm learning. Feel free to learn alongside me, but be warned I am a noob.
Some background:
I'm not completely new to RPG maker but I'm going into this as though I'm starting fresh because I honestly haven't used it in a long time. I first got RPG Maker XP back when Pokemon Essentials was a thing. I pretty much never touched the base program and instead just played with the Pokemon Essentials specific stuff. But I ended up giving up on it.
There were a few factors involved in that. Real Life stressors kind of left me in a funk for a decade a while so I didn't practice much. Then other things cropped up. For one, the tutorial series I was following deciding to showcase a fangame that opened with picking an attack helicopter for the player sprite when asked their gender (the humor only circled the drain from there). A lot of the resources also tended to expect you to come in knowing the right terminology. There was just so much to learn that I couldn't actually decide where to start and ended up just making maps instead. Then Nintendo Nintendo'd Pokemon Essentials and I just sort of fell out of love with the idea of making a Pokemon fangame altogether (idk it felt like a bit of a betrayal for the thing you enjoy to discourage creativity related to it, ya know?). In short, I got discouraged.
But I still kept getting the itch to make a game. I debated for years over whether to just try with XP or try to learn with a newer version and finally made the decision to use MZ.
So why the sideblog?
I figure if I keep something external that I update it'll act as motivation to keep learning when things don't go well. I sort of think of it as an old-fashioned commonplace book used for storing notes in a way others can also use.
It's not a tutorial - I'm a noob myself - but I'll be recording things as I figure them out. Feel free to join me on this journey.
2 notes
·
View notes
Text
Making a Scene
Once you start figuring out cutscenes they're actually one of the easiest parts of RPG Maker. But believe it or not, it's not all just about setting move routes and putting dialogue boxes in at the right point.
There are a few tricks to make your cutscenes cleaner so you can make them work for what you need.
You probably already know that when making a simple scene (not even really a proper cutscene) where your player talks to an NPC all the talking and dialogue for both the NPC and the player are controlled in the same event.

For example, this kid character acts as a simple roadblock, but I can have Marigold (the player) say different things when speaking with her before other events cause her to move out of the way. The text commands for both Daisy (the NPC) and Marigold (the Player) are all set up in Daisy's event contents. Even the Show Choices command that gives Marigold's player say in the conversation is actually in Daisy's contents, not Marigold's.
The same general principle is used in a full cutscene: everything is controlled all in one place. Other events in play will typically be empty aside from a graphic and the controlling event will cause the other events to move around the screen as directed by the commands.
The Actors:

The events the main controller moves about can even include a fake version of the player that gets to star in the scene!
You'll make empty versions of the events you need in the scene - NPCs, doors, etc. Place these somewhere on the map out of the way until they're needed. You move them into place during the scene itself. Turning Through (in options) on is a pretty good idea, too. It prevents these empty events from getting hung up on anything unexpected.
As per this explanation from the RPG Maker blog, a cutscene can use a Switch (or a few) to make the events the main controller commands visible. I'll be honest: I am a noob who doesn't understand why these events are switch activated other than maybe they don't use as much processing power while they're in "standby" before being turned visible in scenes that involve a larger number of events (a guess on my part, I'll admit).
The Stage:

While you can have a cutscene on the same map you play the game on, you can also make a copy of the map (or even just the parts of the map you need) just for the scene. It'll look identical to the players and it keeps any other events on the usual version of the map (such as free roaming NPCs) from getting in the way.
The event itself is controlled by an Autorun trigger. Upon entering the cutscene version of the map, it's time to just watch the show until control is given back to the player. Simply set up a map transfer to get the player to the cutscene version of the map when the time is right. When the play is done you'll transfer them back to a normal map.
The Curtains:

The next important thing to note is that you'll want some control over the curtains for your play. Fadeout the screen to make everything black while you set things up and Fadein to reveal the actors in their places. Even if it only takes a few frames to get everything where you want it it's better to have things where you want them before the curtains rise so the player doesn't see actors blinking into existence for a split second.
Getting the player out of the way:

You'll also want the actual player to be out of the way - especially if you're also using a fake version of them to walk around in the scene. While you can set the move route of the actual player instead of a fake version, it's good to get used to turning the player "off" for a bit so you can be used to it. After all, you might not want the player front and center in every story you want a cutscene to tell.
This can be done by changing the player's transparency. This command button operates on a simple ON or OFF binary so don't expect to use this particular command to make the player translucent like a ghost.
The Director:

Now to fill in the controlling event. First we apply the basic principles of a cutscene by hiding the player and moving the actors to their places on the stage. In this example the curtains are already down - the fadeout was handled in the event transfer to this map (which is another way you can do it). If it wasn't already in that state from another event the first command would be to Fadeout Screen.
Next we hide the player and get them out of the way by making them both transparent and turning Through on. While I previously showed a button among the event commands to make the player transparent this can also be done though setting the move route.
Turn the Cutscene Switch on next to make the actors hanging out at the bottom of the screen visible and Set Event Location for the guys we want to see on screen next. Once the actors are in place FadeIn Screen to lift the curtains and set the stage directions!

Basically all of page two of the main Event Commands will have something useful for making a scene play out the way you want. Set Event Location (the third button under Movement in the first column) puts an event instantly in a location on the map of your choice. You can show animations and balloon icons to add emphasis (like a pokemon trainer's "!" balloon). You can add life to a scene by changing the music and sound effects. You can change the screen tint and weather. You can control the timing with Wait.
And of course you can access Set Movement Route.

There's honestly a lot you can do with move routes. You can pick what event is being controlled through the dropdown menu in the upper left. It defaults to the player so if a scene isn't working as expected you might want to check that the right event is being told to move about (an invisible player moving left three tiles will look pretty much like nothing's happening, after all.)
Pay attention to options such as Wait For Completion. If you want to make sure one thing is done before another starts, check the box. Leave it unchecked to allow multiple events to move around at the same time.
Changing the speed/frequency of movement can allow events to walk or run as needed. You can Jump either in place or to another spot on the map. You can control Switches, Through, Transparent, and more. There are pretty much limitless options when you also notice that "Script" command in the lower right.
Which also means things might look a little weird if you miscount the number of steps needed in any direction or add/drop a Wait for Completion. Playtest the scene again and again to make adjustments as needed.
Scroll Map (back out on the Event Command page right above Set Movement Route) controls the camera so you can move it about to follow your cutscene or look at part of the map the player isn't centered on.
All the map's a stage - and you can even swap to another map during the cutscene!

For example I created a scene where a cloaked figure goes into Marigold's house and Marigold gives chase. While the fake Marigold interacts with the door, they can't actually go "through" it to the next scene. Instead I turn the fake Marigold invisible and transfer the real player to the next map, which also has an autorun event controlling the next part of the scene. I also take the opportunity to tell this event not to play again by turning it's Self Switch on, but considering we'll never visit this version of the map again it's basically just there as housekeeping.
Another tip:

You might want the player to open the game in a scene before they're able to do anything else. One thing you can do to make this smoother is to open the game with the player transparent.

Starting in Transparent will hide the player until you make them visible - perfect for opening scenes.
Just remember to give control back to the player when everything is said and done.

Transfer the player back to the "real" maps and make a simple autorun event that makes them visible again and fades the screen back in once the cutscene is over. Have the cutscene turn a Switch On to show that the particular scene you're returning from has been played and set that as the condition to make this event autorun upon being transferred back to the "real" map. Then tell it to turn itself off with a Self Switch.
0 notes
Text
Wait, was this always a thing?

I vaguely remember the Color Index and maybe the Icon Index being the only options but having access to the Control Characters this easy wasn't a thing before.... was it? Did I just overlook something that makes my life so much simpler?

0 notes
Text
The Select Item command (and also Labels)
Now that we've explored both items and variables to a degree, it's probably a good time to step back and look at one of the event commands in the message section: Select Item.
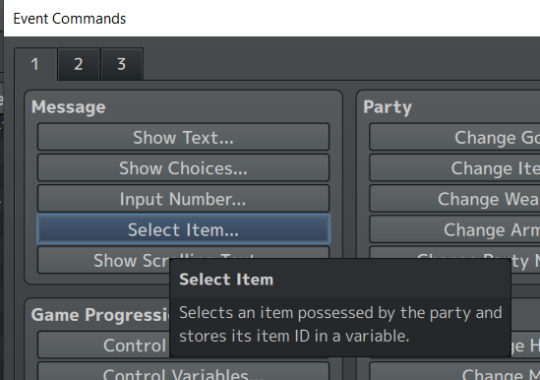
So what does this do and why is it under Message with things like Show Text?
It may not be intuitive from the way the tooltip describes it, but calling a Select Item command allows the player to select an item from their inventory to be checked against whatever other event commands you're using, allowing things like letting the player choose a gift for an NPC or pick an item based on a description to solve a riddle.
It's probably easiest to show with an example so I made an NPC who wants an apple. When talking to the NPC while in possession of at least one apple (how to check that is described in variables) I want the player's inventory to open so they can select an apple and give it to the NPC. I also want them to not be able to give a different item to this NPC.
Once I've set up the initial conditional branch to see if the player has an apple it's time to make the Select Item part of the event.
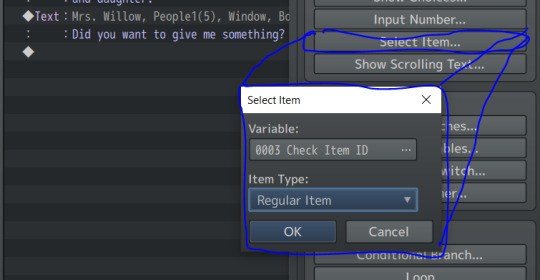
I'll just call the Variable it asks me to pick Check Item ID since all I need it to do is check what the item the player selects is. Once the player actually clicks on an item from their menu this variable will be set to equal the Item ID of whatever they selected. The variable is then stored so the game can compare it against the rest of the event.
You can select what part of the inventory the player is prompted to select an item from next. The options are Key Items, Regular Items, and two Hidden Item categories. These are the same categories in the dropdown when creating an item in the database. I made the apple I want to give the NPC a regular item so I'll pick that one.

Now if the player interacts with the NPC they'll encounter a point where the regular item section of the inventory opens and they can pick any item from within.
At this point the player can click on whichever item they want and... nothing else happens. The item menu will just close. The item ID of whichever item they picked is now stored in the variable, but that's not really part of the game the player sees.
So now I make a new conditional branch where I check Variable "0003 Check Item ID". The variable is currently set to the item the player picks, so I need to check if the item they picked is the apple.
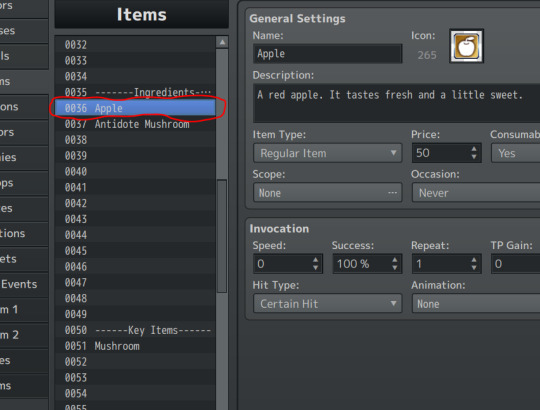
Every item made in the database has a number. I made an apple item in the 36th item slot, so the apple's Item ID is 36.
That means that in my conditional branch I need to check how the variable the player sets Check Item ID to when they pick an item compares to 36.
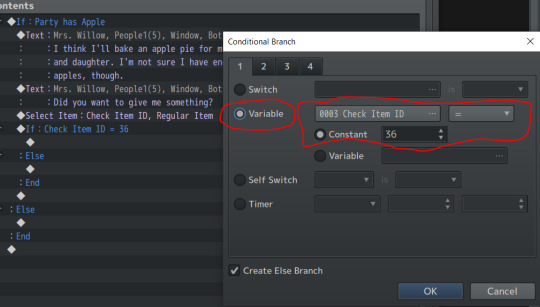
Now the game can actually check if the item the player selected is the apple or something else. All I have to do now is fill in the rest of the event after it with the follow up to actually give the NPC the item.
I can also put whatever I want in the else branch for if the player picks the potion instead. But what if I want to make it so nothing happens upon picking the potion?
It's Label time!
As it is now, if the player picks an item other than the apple the select item menu just closes and they have to restart the conversation to pick the apple next time. That's... inconvenient. If I want the select item command to just come up again right away after the wrong item is selected I can make a mini-loop using the Label command (not the Loop command, I'm not touching that just yet and I don't need it for something this small).
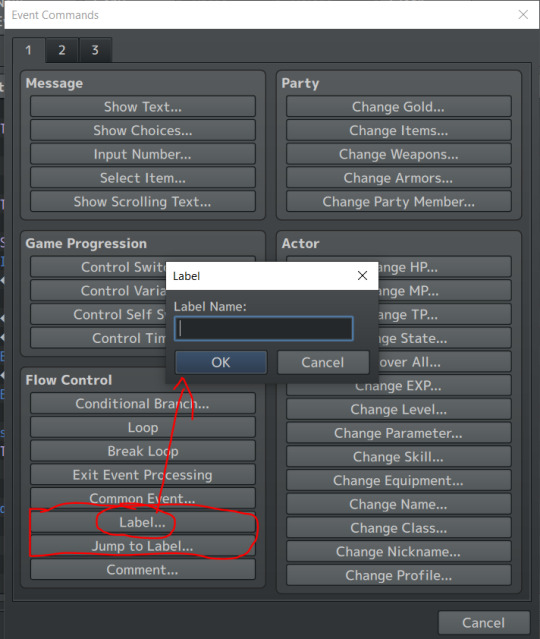
Labels are really two commands at once: Label and Jump to Label. Unlike Switches and Variables, Labels don't have a list where they're stored so you have to type in the name for the label in both the label and jump to label commands. This also means they're not "global" like Switches and Variables so they only act within the event rather than being accessed from any map or any event. I believe this means you don't have to worry about whether you've reused a name elsewhere.

I'll call this label "TryAgain" and put it above the initial Select Item command. This means this is where the second event Jump to Label will go to when it's called, opening the item menu for the player again immediately if they trigger the Else branch by picking the Potion.
If I put it above the Show Text for her asking for an item it'll replay from there instead so her question will remain visible, which may look nicer if I decide to pretty this up. It just has to go before Select Item or the player won't be able to choose a new item to fill the variable the conditional branch is checking.
Picking an inventory item like this can be a neat way to make puzzles that require the player to determine what item is needed from clues. If I wanted to have, say, a buzzer sound or a monster attack, I could have evented that instead of the Label/Jump to Label commands. But I figured exploring the Label commands was a good exercise as well so I combined the two here.
#emeraldcatears's rmmz learnalong blog#rpg maker mz#rpg maker#select item command#label command#jump to label command#event commands
0 notes
Text
Intro to Variables
So last time I made a mushroom for a quest. How does RPG Maker know when the player has collected all five of the required mushrooms for their friend?
Variables.

Variables are how you store numbers for the game to call on and compare. While a Switch is only ON or OFF, Variables have a lot more, er, variety. On the one hand, all they do is store numbers. On the other hand those stored numbers can be used for almost anything.
To use a Variable, you have to define it. Like Switches, the variable technically already exists before you've named it or added anything to it but it's not really going to do anything on its own. Just naming it doesn't tell it how to work, either, so you can also organize them by naming unused variables with category names like you can with Switches. You can make up to 5000 Variables and like Switches these can be reused or called upon in multiple occasions.

You can adjust what value is stored in a variable with the Control Variable command (and can even have one variable reference another for this purpose). They can be set to a specific value or can use math to adjust the current value (the default they all start at is zero) and store the new value in its place.
Since this is an introduction to Variables, we'll just be looking at two easy ways to use these for the moment to track the player's progress on the mushroom collection quest.

One of the easiest ways to track the progress of a quest is through adding 1 to your variable as you make headway towards your goal. Since I'm tracking the collection of an item in the player's inventory there is also a more efficient way I can do this that I will detail later - I'm just including the "add one" method for completeness. You can extrapolate on how to use this for anything you want to track, such as number of NPCs you've spoken to in order to trigger the next event.

The command does what it says on the tin. It adds one to the Variable I've designated for the mushroom collection counter. I can add this command to each mushroom event and check when the counter reaches five. I could also use this to, say, increase/decrease how much an NPC trusts the hero based on their actions or other countable factors.

This also means I can have the character make a comment about how many mushrooms are left to collect no matter which order I collect the mushrooms in the way, say, your Animal Crossing character does when collecting Wisp pieces.

For this I'd make nesting conditional branches in the second page of the event that plays once I turn Self Switch A on (which triggers upon collecting the mushroom). The second page autoruns so the appropriate message displays and then turns on Self Switch B to turn to the third page where the event is empty, allowing the player to continue onward.

If I copy these nested conditional branches to all 5 mushroom events I can display the correct message no matter which mushroom I pick up in which order.
These have all been using the method of adding one to the variable each time I pick up a mushroom, but there is an easier way to track how many items I've collected in a case like this where the item is also added to the player's inventory.

Instead of adding to a variable each time I collect an item, I can instead control the Variable to be Set to the count of the item I have in my inventory. First I call the Command to Control the variable so the game knows how to define the number stored in the variable. The Set tells it to be equal to the Operand. Under Operand I just need to pick the Game Data option. From there I can have the game check how many mushrooms are possessed in the inventory at the time of calling the Control Variable command. It will stay that number until the next time I use Control Variable to modify that particular variable.
This can also be used to store how many of an item you have, have someone steal the item, and later return the item to the player in the exact amount that was taken, for example. Game Data can store the numbers from a wide variety of option as a variable so you can use it for all kinds of things you want to check or store for later use.

Now I can simply have my quest giver 1) set the variable number to the current number of mushrooms I have and 2) check whether that variable is sufficient to complete the quest. Just make sure to define the number with the Control Variables command before doing the comparing (remember it is set when Control Variables is called for that variable, so in this case you want the game to know how many you have first, then follow up with comparing that number to how many you need).
From here I can continue the contents of the event to remove the mushrooms from the inventory (to complete the quest) or give the player a reward.
1 note
·
View note
Text
Intro to Items
Time to dive into making items and the events that control the player actually obtaining them!
That's right, we're starting with the database.

The items that come with RPG Maker give you a good starting point. For example, the potion shown above gives you an idea about how the item is sorted (Regular Item - meaning it will appear in the regular items part of the inventory rather than in the Key Items part), that the item disappears upon use (Consumable is set to Yes), who the item can effect (Scope: 1 Ally), and other such details. Looking at these allows you to get an idea about how to create your own items or modify existing ones for your own game.
I mentioned a character giving a quest to collect mushrooms in a previous post, so now I'll actually make the mushrooms.

As with Switches, you can organize your item list by naming an item you'll never use with a category name such as "Key Items" or "Ingredients". The items will appear in the inventory in the order of their number, so keep that in mind when determining where on the list they end up. I'm basically just playing around with learning the system at this point but if I was making something more focused I would probably plan out ideas in a spreadsheet to determine how I want to organize them before actually making them.

You can change the icon for the item to make it more obvious what the item is. There's already a mushroom in the database (and an apple, too, for another quest I have in mind) but you can also make your own icons (I'll probably go over that at some later date). You can also enter the item's description in the box below the name and icon.

Since this is going to be an item collected for a quest I don't want the player eating it, selling it, or otherwise losing it. Therefore I set the Price to zero and state that the item is not Consumable. A price of zero means it cannot be sold. Any price above zero allows the item to be bought for that price in a shop and sold for half that price.

Scope determines who the item can target. Setting that to None means this item cannot be used on any target. You can change this from a menu of options starting with the Side being targeted (None, Enemy, Ally, Enemy & Ally, or User) to make things like a healing potion to be used on your friends or a bomb to throw at an enemy.
From there you can adjust how many allies/enemies the item effects and whether if matters if the ally is currently alive or dead.

Occasion determines whether you can use the item from the menu while on the field, in battle, or in the case of an item like this that you only collect: never.
I will explore the Invocation category and the rest at a later date as this all has to do with how the game determines whether the item hits its target and what animation it plays when used and the like, which I don't need for a collectable. This is pretty much the step you'd end at if you're making a game without a battle system and items are simply used to solve puzzles or be collected as evidence in a murder mystery, as examples. This is just the intro to items and there's a lot of overlap with the other parts and skills so I feel it makes more sense to explore that in another post.
There's just one more thing to explain about items in the database before I get into the event part:

In the System 1 tab you'll find a number of options available. The one we care about at the moment is the option to Show the Number of Key Items. If you check it, the Key Item pocket of the inventory will show how many of the item you have. If it isn't checked the Key Items will only display the name of the item without a number. The latter can look cleaner if you're making a game where all the key items are unique items. If you want to show how many of the item the player has for a quest about collecting a set number of them you want to either have the item be a Regular Item (those can also be un-usable and un-sellable the same way as key items) OR check the Show Number of Key Items box, depending on your preference.
Now that the item is made, the event to give the item to the player is quite simple.

You can, of course, look at the Quick Event to make a chest with an item inside. Doing this will give you a quick way to see how it's done.
But there's also a mushroom in the tileset so I'm going to just make an event with that as the image for this example.

The Change Items command can be used to increase or decrease the amount of any item in the party's inventory. Usually you'll want something like this triggered by the action button (upon interacting with the item or a chest containing it). You can also add items through other means, though, such as slipping a potion into your character's inventory via an autorun event when they first start the game (just remember to turn it off when you're done).
You can then prevent the player from getting infinite mushrooms by setting a Self Switch after the item is obtained and using the second page to play when the switch has been flipped to on that does nothing. To display a message that the player got the item you would use a Show Text command. It's usually a good idea to add a sound effect, too.
You can check if a player has an item in a couple of ways as well.

If you just need to check that the player has the item in any amount the conditions portion of the event page or a Conditional Branch event command can check this easily.

Again, if you're making a game that calls on you using unique items to progress this would be enough. If you need to know how many of an item the player has you'll need to start exploring what will probably be my next topic: Variables.
0 notes
Last Seen Blogs

ostermalm
ÖSTERMALM

zadehworldanimation-blog
Júlia Zadeh

thloveholic-blog
thloveholic
ecstatickiddo-blog
Chasing our love

pingponger
About Table Tennis