#emulationstation
Text

Clean-looking splashscreen for retropie.
#retropie splashscreens#retropie#retro gaming#snes#nes#gbc#gba#ps1 games#n64#digital art#art#my art#retro#retroarch#emulationstation#emulation#roms#artwork
17 notes
·
View notes
Photo

EmulationStation Desktop Edition 2.2
EmulationStation Desktop Edition - это интерфейс для просмотра и запуска игр из вашей коллекции мультиплатформенных игр. Он очень хорош, а последняя версия 2.2 уже вышла с большим количеством улучшений и новых системных дополнений.
https://www.gamebuntu.ru/news/emulationstation-desktop-edition-2-2/
0 notes
Text

ICYMI: EmulationStation Desktop Edition (ES-DE) v2.1.0 released, brings dark mode, PDF manuals & more https://gbatemp.net/threads/emulationstation-desktop-edition-es-de-v2-1-0-released-brings-dark-mode-pdf-manuals-more.636328/
0 notes
Text
Yeah, I make chiptune *whips out Steam Deck and opens LSDJ from EmulationStation*
1 note
·
View note
Photo

[Disgaea 4 Complete +] More at my blog blisscast.wordpress.com, link in bio. . Some more @cex_italy finds! Since I'm a fan of Fire Emblem I thought I might like this. The cover art is amazing indeed! . #naritaboy is free to keep on GOG if you redeem it within 40 hours! It's DRM free, so you can keep it and play it wherever you want. It's the PC version, works amazingly with Proton and doesn't require a gaming PC. I reviewed it in my Journal Page 12, link in bio. . I'm really enjoying .hack//G.U. Vol 1! Although I wish the protagonist stayed as edgy as in the beginning, but oh well, he might become dark again XD. . Yesterday I worked on setting up a new 1TB sd card on my Steam Deck, and now I have plenty of room for my ps2 games. I could already fit smaller games, but I was having trouble with the rest. If you need a nice front-end for emulators on Linux, I recommend Emulationstation, which gets installed by EmuDeck, or at least it was when I got it. I wanted to use LaunchBox but it doesn't work with Proton, so rip. . #disgaea #disgaea5 #disgaea4 #disgaea4complete #disgaea2 #nisamerica #ps4 #playstation4 #ps5 #steam #playstation5 #gamergirl #gamergirls #sakuraaesthetic🍒 #sakura #pinkgaming #sony #playstationfan #tacticgames https://www.instagram.com/p/ClUQ9_WIrK5/?igshid=NGJjMDIxMWI=
#naritaboy#disgaea#disgaea5#disgaea4#disgaea4complete#disgaea2#nisamerica#ps4#playstation4#ps5#steam#playstation5#gamergirl#gamergirls#sakuraaesthetic🍒#sakura#pinkgaming#sony#playstationfan#tacticgames
0 notes
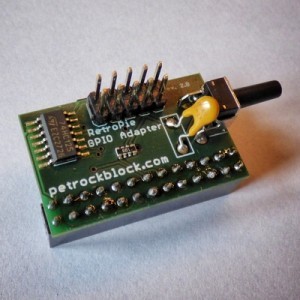
Text
Ps1 controller raspberry pi


Physically putting the system together is the easy part, but without an operating system you can't actually do anything with it. It's the easiest way to put games on the console. Any size (bigger is better), any design, any speed. One final detail: You should get yourself a standard USB drive. It generally won't be necessary, but it will help if you want to navigate system menus or change settings on your retro system. You can also order retro-styled game controllers, with or without analog sticks, wireless connectivity, or other features, from manufacturers like Retro-bit and 8Bitdo. RetroPie is robust in terms of controller compatibility, and if you have a PlayStation 4 or Xbox One, you can use their controllers easily. These cases can run from $10 to $25, bringing the total price for your retro game system to, at most, around $90. You can also order cases separately, with options for creative or nostalgic designs, like the very NES Classic-like Retroflag NESPie. If you want to get fancier, you can 3D print your own Raspberry Pi case from a slew of creative models on Thingiverse and other 3D printing sites. Raspberry Pi cases are cheap and plentiful, and you can even find Raspberry Pi starter sets that include the board, the power supply, a case, and usually a memory card all in one bundle. It ships as a plain computer board, and it will run just fine naked, but you should really get some sort of plastic shell to protect it from dust, moisture, and getting knocked around. You can pick one up for around $11.įinally (for the device itself), you need a place to put the Raspberry Pi. You can get by on a 16GB microSD card, but we recommend at least a 32GB card just to be on the safe side. The RetroPie software doesn't take up a lot of space, and most older games aren't particularly large, so you don't need a huge card. Again, this is a very inexpensive investment. The Raspberry Pi doesn't have any onboard storage to speak of either, so you need to get a microSD card. Don't skimp here even if you can power on the Raspberry Pi with your phone charger, the inconsistent current can lead to glitches and poor performance. Any micro USB power supply that can output 2.5A should work, and the official power supply costs just $11. On its own, the Raspberry Pi doesn't come with a power supply, so you'll need to supply your own. Don't worry about a premium price for the premium Pi at $35, it's literally pocket change more than the lower-end models. It has the fastest processor of all the Raspberry Pi boards, and includes wireless features like Bluetooth and dual-band Wi-Fi. There are several different versions of Raspberry Pi, and for video games we recommend the most advanced model, the Raspberry Pi 3 Model B+. It will serve as the core of your retro game system everything else will feed the Raspberry Pi data, power, or input/output capabilities. If you're not familiar with Raspberry Pi, it's a series of inexpensive ARM-based microcomputers designed for education and experimentation. If you aren't afraid to poke around computer settings, you'll be fine. There are plenty of options to explore and menus to dive into, though, so you should have some computer savvy before you begin. You don't need to solder anything, or write any code, or even deal with command lines unless you really want to. Thanks to the developers of open-source software RetroPie, the LibRetro emulation API backbone, and the EmulationStation front-end, turning a $35 computer board into every video game system made before 2000 is (relatively) fast and easy. And, of course, some form of game controller. All you need is a Raspberry Pi board, a microSD card, a micro USB power adapter, and a case to put it all in.
It's inexpensive, powerful, and easier to set up than you might think. You can also build your own emulation-based retro game system with a Raspberry Pi. You can even find an original classic game system and plug it into your TV's legacy video connectors, or into an analog-to-HDMI upconverter. You can get a cartridge-playing retro game system like the Super Retro Trio+. You can get a first-party classic game system like the SNES Classic Edition. You can find plenty of older video games ported to newer systems and the PC (the Nintendo Switch is great for Neo Geo games, but oddly not for NES and SNES games). If you like retro video games, you have several options.
How to Set Up Two-Factor Authentication.

How to Record the Screen on Your Windows PC or Mac.
How to Convert YouTube Videos to MP3 Files.
How to Save Money on Your Cell Phone Bill.
How to Free Up Space on Your iPhone or iPad.
How to Block Robotexts and Spam Messages.
0 notes
Text
Github desktop windows

#GITHUB DESKTOP WINDOWS HOW TO#
#GITHUB DESKTOP WINDOWS INSTALL#
#GITHUB DESKTOP WINDOWS WINDOWS#
NTFS, the default filesystem for Windows, does not support many features that the more modern filesystems Linux supports such as symlinks, file attributes (including the extremely important executable bit), etc. Windows users should take some extra precautions when editing Linux-spawned files.
Write themes for batocera-emulationstation.
Redirect upgrades from any board to my own builds.
Latency reduction and optimizing performance.
Raspberry Pi: Add power buttons/switches.
Sync files across multiple devices (Syncthing).
PCman built-in file manager (for Xorg-powered devices).
If you keep that in mind, the GitHub Desktop app makes working with the five basic Git commands a simple and straightforward process. My assumption is that GitHub's goal with this application is to keep this DevOps tool as simple as possible so as not to confuse the new Git users for whom it is designed. There is an option to specifically edit the name and email address properties that are attached to each commit, which are stored within Git configuration files, but the tool does not provide any facilities to edit any other configuration settings. The biggest drawback I see with the tool in this capacity is its limited support for the git config command. The tool covers the five basic Git commands. With the GitHub Desktop app, it is extremely simple to initialize a repository, stage files and issue commits. The blue button below the input fields (see above) issues a new commit to the current branch. In terms of issuing a commit, the tool provides two input fields where a user can provide a message and a description.
10 Git quiz questions to test your distributed version control skills.
Five ways to fix Git's 'fatal: repository not found' error.
How Atomist's Rod Johnson works with pull requests.
#GITHUB DESKTOP WINDOWS WINDOWS#
Where system, global and local Windows Git config files are saved.Follow these Git commit message guidelines.Where Git fits in your distributed version control system tool belt.Use the Jenkins OAuth plug-in to securely pull from GitHub.Jenkins Git environment variables list: A working shell script example.
#GITHUB DESKTOP WINDOWS HOW TO#
How to use the Jenkins Git Plugin: Tips and tricks.
Jenkins Git integration: GitHub pull request via the Git plugin.
How to 'Git cherry-pick' from another branch to your own.
Learn to Git cherry-pick a commit with this easy example.
Don't Git revert that last commit, Git reset instead.
A Git reset hard example: An easy way to undo local commits and shift head.
How to revert a Git commit: A simple undo changes example.
Tough sample GitHub interview questions and answers for job candidates.
How to Git started and use the Github Desktop app tool.
Want a private GitHub repository? It comes with a catch.
Microsoft-GitHub acquisition shakes up DevOps market.
GitHub: What is the difference between them?
How to set Notepad++ as the default Git editor for commits instead of Vim.
5 basic Git commands developers must master: Tutorial with examples.
#GITHUB DESKTOP WINDOWS INSTALL#
Step-by-step guide: How to install Git on Windows desktop computers.IT pros weigh Git version control against the competition.
0 notes
Text
Windows 10 make google default search engine in firefox

#Windows 10 make google default search engine in firefox install#
#Windows 10 make google default search engine in firefox manual#
#Windows 10 make google default search engine in firefox password#
#Windows 10 make google default search engine in firefox download#
#Windows 10 make google default search engine in firefox windows#
Some packages also have additional configurations.
#Windows 10 make google default search engine in firefox install#
By selecting a package you can choose to install it, or remove it. The packages are ordered first by type (emulators / libretro cores / ports), then alphabetically. Stable additional packages are under the “Optional” section, with more unstable packages listed under experimental. In each section are lists of packages that can be installed (and it will show what is currently installed). Once there you can navigate to “Manage Packages” where you will see various sections. Software can be installed from the RetroPie-Setup script – which is accessible from the RetroPie menu on EmulationStation. Ports like quake and doom and some other emulators like ScummVM can be installed later. This should cover everything most users would be doing. The pre-made images contain the best working emulators for each system supported by the hardware. On RetroPie 4.0+, not everything is installed by default. Once configured you will see your IP addressįor more WiFi configuration options see this page HERE Installing additional Emulators
#Windows 10 make google default search engine in firefox password#
Type your Wifi Password (may take a moment to connect) If you wish to use wifi to transfer roms over the network rather than a USB stick or Ethernet cable you’ll need to setup your wifi- which can also be done from the Retropie menu in emulationstation: Connect to Wifi Network: Transferring roms are described in the following steps. When you first see EmulationStation you may wonder why you don’t see systems like the SNES or Game Boy- worry not- they are installed on the system, roms just need to be added to their respective rom folders before they will become visible. Note that hotkeys are only specific to the retroarch/libretro based emulators. By default, the hotkey is select so that means you hold down select while pressing another button to execute a command. The following chart shows the default hotkey combinations. Hotkeys enable you to press a combination of buttons to access functions such as saving, loading, and exiting emulators. See the following diagrams for reference: SNES Controller
#Windows 10 make google default search engine in firefox manual#
For more details on manual controller configurations see this page Here. If you wish to configure more than one controller, you can do so from the start menu of emulationstation. When you get to OK press the button you have configured as “A”. Hold down any button on your keyboard or gamepad and the name will appear at the bottom and then open up into a configuration menu:įollow the onscreen instructions to configure your gamepad- if you run out of buttons just hold down a button to skip each unused button. On first boot your filesystem will be expanded automatically, you will then be welcomed with the following screen- this menu will configure your controls for both Emulationstation and RetroArch Emulators: If you’re updating from a previous version of retropie see HERE Configure Controllers You will be able to access the filesystem over the network as described in the transferring roms section below.
#Windows 10 make google default search engine in firefox windows#
Note RetroPie is built on top of Raspbian (a linux based OS for the Raspberry Pi) and as such the partition on the SD card is EXT4 (a linux filesystem) which is not visible on windows systems, so the card will show up as a smaller size than usual and you wont be able to see everything on the card, but it is all there. See the official Raspberry Pi “WRITING AN IMAGE TO THE SD CARD” instructions. For Linux you can use dd command or Etcher.For Windows you can use a program called Win32DiskImager.(You may need a MicroSD card reader to plug it into your computer) To install the RetroPie SD image on your MicroSD card. To extract from the command line, you can type the following into a Terminal window, placing X with version you downloaded: gz file and the extracted file will be a. Once you have downloaded your SD card image you need to extract it using a program such as 7-Zip.
#Windows 10 make google default search engine in firefox download#
If you get the error Illegal Instruction when it boots or if it just boots into the terminal, you picked the wrong SD image or the image was corrupted on download or extraction. If you are unsure which version of Raspberry Pi you have just count the raspberries on boot: Raspberry Pi 0/1 There is one version for Raspberry Pi 0/1 (Model A, A+, B, B+) and there is a version for Raspberry Pi 2/3.ĭownload the SD image for your version of Raspberry Pi from the following page: There are currently two versions of RetroPie. Below is a guide directly from RetroPie’s GitHub page, linked here. This is a companion guide to my RetroPi Cart and will outline the steps for installing RetroPie on your Raspberry Pi Zero-W.
0 notes
Text
How to install retropie on raspberry pi zero

#How to install retropie on raspberry pi zero install
View the official Raspberry Pi Power documentation for each model.4-Pole RCA to 3.5mm is also an option for older screens.Pi Zero will need a Mini HDMI to HDMI cable.Pi 1, 2, and 3 will need a full-size HDMI cable.Pi 4 will need a Micro HDMI to HDMI cable.Screen (TV, computer monitor, projector, etc) - anything with HDMI or RCA.A USB MicroSD card reader can be plugged into any USB port.Some laptops have this functionality in the form of an SD card slot ( example #1, example #2).MicroSD card reader - a way to plug the MicroSD card into your computer or laptop.The simplest way to get most of these components is through an all-in-one kit such as the Canakit. The following video will also walk you through the installation process. This guide will give you the very basics to get you up and running from a blank MicroSD card to first boot into EmulationStation.
#How to install retropie on raspberry pi zero install
Alternatively, advanced users can install RetroPie manually. The easiest way to install RetroPie is the SD image which is a ready to go system built upon top of the Raspberry Pi OS - this is the method described in the following guide. This page is for people just getting started on RetroPie. Universal Controller Calibration & Mapping Using xboxdrvĬonvert RetroPie SD Card Image to NOOBS ImageĬongratulations! You have discovered the wonderful world of RetroPie- your entire childhood is within reach! RetroPie is a combination of multiple projects including RetroArch, EmulationStation, and many others. Validating, Rebuilding, and Filtering Arcade ROMs
0 notes
Text
How to install mme video on hootoo

HOW TO INSTALL MME VIDEO ON HOOTOO INSTALL
Finally, make the launch script executable: sudo chmod +x /home/pi/RetroPie/roms/kodi/kodi.shįinally, reboot your Pi. Sudo nano /home/pi/.emulationstation/es_systems.cfgĪfter es_systems.cfg opens in the Nano editor, add the following entry anywhere between and : Īll EmulationStation systems must have a ROM directory: mkdir /home/pi/RetroPie/roms/kodi Make the Kodi launch scriptĮdit the following file using the Nano editor: sudo nano /home/pi/RetroPie/roms/kodi/kodi.sh Please tell me whether the mime type video/mp4 for. Can anyone please help me to resolve the issue. With the below text code, you can resolve the commonly faced issue of SWF or MP3 files not getting played. MIME type is specified by the second part, in the above case, its HTML or text, and the file extension is the last part which is ‘htm0’ in the example above. DOWNLOAD MMEffects (MME Effects) with English Instructions from the LearnMMD Downloads page Be sure that you get the MME that matches your MMD The 64-bit MMD requires the 64-bit MME and the regular MMD (32-bit) requires the. The added MIME type is specified by ‘AddType’.
HOW TO INSTALL MME VIDEO ON HOOTOO INSTALL
To install MME, you first have to download MME. mp4 file in iPad I am seeing a dark black screen with cross arrow on it. Where can I get MME Download and Install MME MikiMikuEffects. Ma chère, elles me font rougir de jalousie. As of now I have added mime type video/mp4 for. Ne trouvez-vous pas mes pivoines éclatantes, lance-t-elle toute excitée. sudo cp /etc/emulationstation/es_systems.cfg /home/pi/.emulationstation/es_systems.cfg En bonne maîtresse de maison, Mme Pivot fait passer le plateau de flûtes, afin que chacun y joue de sa musique. How to Connect to a Raspberry Pi Remotely via SSH The preferred (and most common) method of connecting to your Pi to run commands.
0 notes
Text

Splashscreen for retropie.
#retropie splashscreens#retropie#art#emulation#emulationstation#retroarch#emulators#retro gaming#japan#snes#nes#snes gaming#gameboy#gameboy color#gameboy advance#gba#gbc#playstation#nintendo 64#n64#sega#sega cd#sega master system#sega genesis#sega 32x#atari#digital art#splash screen
16 notes
·
View notes
Photo
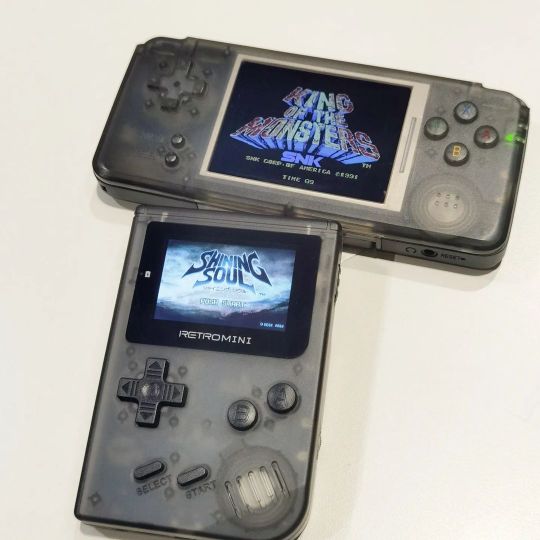
Resurgence of "quality" (by quality meaning the hardware and software of products able to decently run games up to 32bits) retro gaming hand-helds started in 2017 with these two devices. The RetroGame RS-97 & RetroMini. I used to own a Dingoo A320 but never got it back when I'd borrowed it to my nephew 😅 So the horizontal form-factor of the RS-97 filled the empty void that the Dingoo A320 had left many years ago 😅 I really love this two handhelds with it's matching transparent smoke color, these device gave me some comfort when I was going through some rough times in 2018. I also have a matching RetroAracade which is a NeoGeo mini clone. I'll make a post of it next time. There are many over-priced nasty retro hand-helds in the market which could only run 8Bit games and sometimes even struggling at doing that! So do your research before picking one up. Thankfully the ones I have here has decent hardware which the online community has build apps and improved on the firmware. The original firmware although functional, isn't great and has bugs. The good news is that in 2022, fans have created brand new firmware that optimizes the software experience even better and unlock new game emulators! They're no ANBERNIC or PowKiddy devices, but the RetroGame RS-97 & RetroMini is a an important piece of the Chinese retro gaming handheld history #retrogame #retromini #retrogames #retro #dingoo #dingooa320 #games #ゲーム #chinesehandheld #rs97 #psp #psvita #emulation #emulationstation #mame #gameboyadvance #gameboy #arcade #retroarcade #anbernic #powkiddy #aliexpress (at JEWEL at Changi Airport) https://www.instagram.com/p/CezXSbQhWuq/?igshid=NGJjMDIxMWI=
#retrogame#retromini#retrogames#retro#dingoo#dingooa320#games#ゲーム#chinesehandheld#rs97#psp#psvita#emulation#emulationstation#mame#gameboyadvance#gameboy#arcade#retroarcade#anbernic#powkiddy#aliexpress
3 notes
·
View notes
Text

EmulationStation Desktop Edition (ES-DE) v2.1.0 released, brings dark mode, PDF manuals & more https://gbatemp.net/threads/emulationstation-desktop-edition-es-de-v2-1-0-released-brings-dark-mode-pdf-manuals-more.636328/
0 notes
Photo

This is a project I’ve been neglecting for a long time! It’s a Pi Grrl 2 from Adafruit! As you can see I’ve run into a slight problem I’ve download, burned, and tested Retropie on this Raspberry Pi 3. I’ve even downloaded all the necessary files from Adafruit for the PiTFT display. Starts with a white screen and then switches to a dark screen😢 Has anyone run into a similar problem with the PiTFT display? What am I missing?? - - - - - #raspberrypi #diyelectronics #retropie @retropie.bhr #retrogaming #retrogaminglife #gameboy #adafruit #pigrrl2 #makerfaire #diyproject #codingheroes #emulationstation #videogames #handhelds #arcade #maker #maker #makerspace #makersgonnamake @raspberrypifoundation #raspberrypi3 (at Busan, South Korea) https://www.instagram.com/p/B2_-1PinQ00/?igshid=80oc1p9bildp
#raspberrypi#diyelectronics#retropie#retrogaming#retrogaminglife#gameboy#adafruit#pigrrl2#makerfaire#diyproject#codingheroes#emulationstation#videogames#handhelds#arcade#maker#makerspace#makersgonnamake#raspberrypi3
1 note
·
View note
Text
Arcade Bartop with Raspberry Pi & RetroPie DIY tutorial (with pictures) - Part 4 of 6 - Painting and T-Molding

Welcome to part four of my six-post long Arcade Bartop DIY tutorial. In case you've missed the previous posts, here are the links to the whole guide:
Part 1 of 6: Introduction & Raw Materials
Part 2 of 6: Tools, Design & Prototype
Part 3 of 6: Building the Cabinet
Part 4 of 6: Painting & T-Molding
Part 5 of 6: Installing the Hardware
Part 6 of 6: Configuring the Software (Raspberry PI & Retropie)
In this part I had to deal with any aspect of the wood: from spackling to sanding, from fonding to painting, and - most importantly - hammering.
Preparing the Wood
Before starting the painting process, I took my time to prepare the wood for painting. This is probably the most overlooked part of any painting wood, and in many ways is the most critical. Your work is only as good as the canvas upon which your creation takes life: paint will not fill in cracks, dents, holes or other imperfections in the wood and keep them hidden after it dries. In fact, those imperfections will probably be even more apparent.
That's why I had to fill all dings, gouges and scratches with wood putty and spackle. I used a flexible putty knife and filled in all the areas needing attention. I wasn't afraid of using too much spackle there, as I knew I would have sand down the whole cabinet right after that - after it was completely dry.

Here's a picture showing some spackling while it was still in progress: as you can see, I also spackled all the screw holes.
Applying the Fond
Before performing this task, be sure to sand everything again to remove bulges and irregularities from the spackle.
Applying the fond is an easy task: I put 2 layers of water fond on the wood, waiting 4-6hrs for each one and carefully sanding both of them.


As you can see from the picture below, applying the fond could emphasize the bulges created from the spackling process, as it behaves differently over them. Luckily enough, all these imperfections can be easily fixed with proper sanding.

Don't forget to sand and apply the fond on the Monitor Cover frame as well:


Painting it Up
When the second hand of fond was fully dry, I could proceed with the painting phase. Since I made two cabinets, I used a different color pattern: total-white for one of them and a black-and-white mix for the other one. I still couldn't say which one is better, as they both looked great in the end, to my eyes at least!


... And that's it!
Three hands of paint where more than enough for the total white cabinet, yet the black-and-white one required as much as five hands to achieve the desired "pitch black" effect I wanted.
Inserting the T-Molding
The T-Molding "insertion" was arguably the most difficult task of the whole process: that was mostly due to the fact that I used the Dremel chainsaw tool to cut its slot instead of using a proper slot cutter, thus ending up with a slightly irregular cut that prevented the T-Molding from easily fitting in. To work around it I had to:
Adjust the slots with the Dremel and/or with the help of a slot-head screwdriver & an iron hammer.
Use the Rubber Hammer like there was no tomorrow on the damn red thing to firmly push it inside the slot.


I also had to use some bi-component epoxy glue in a single point where the slot ended up being too big so that I could have the T-Molding properly fit and also stay firmly put everywhere.
Conclusion
This is the end of Part 4: our cabinet is now fully painted and the T-Molding is (hopefully) firmly in place.
In the next part of the tutorial we'll deal with the hardware & electric components setup, leaving the software configuration for the sixth (and last) episode.
As always, if you have any question or want to leave your feedback, you're more than welcome to do that using the comment section below!
In case you've missed the previous posts, here are the links to the whole guide:
Part 1 of 6: Introduction & Raw Materials
Part 2 of 6: Tools, Design & Prototype
Part 3 of 6: Building the Cabinet
Part 4 of 6: Painting & T-Molding
Part 5 of 6: Installing the Hardware
Part 6 of 6: Configuring the Software (Raspberry PI & Retropie)
Check out all the pictures of the Arcade Bartop (all those used in this tutorial + more) on my Arcade Bartop album on Flickr.com.
Read the full article
#Arcade#ArcadeBartop#ArcadeCabinet#DIY#EMU#EmulationStation#Fond#MAME#Painting#RaspberryPI#retrogaming#RetroPie#ROMs#Spackle
2 notes
·
View notes
Photo
Time Machine #retroconsole is now available at @amazonespana Prime. Play it again all the classic games with our #handmade #retrocomputer Time Machine by TOAD. Available through all #europeanunion on www.toadtimemachine.com #Features SD 128Gb, 49 #emulators, thousands of games, #raspberrypi 3B+, #emulationstation, #kodi, and #scratch all ready to use! #retrocomputing #retrogaming #mame #retroconsole #homecomputer #8bit #16bit #neogeo #msx #amstrad #commodore 64 #nintendo #sega #gameboy #playstation #arcade #zxspectrum #atari #mac https://www.instagram.com/p/CXRGoS2ITD9/?utm_medium=tumblr
#retroconsole#handmade#retrocomputer#europeanunion#features#emulators#raspberrypi#emulationstation#kodi#scratch#retrocomputing#retrogaming#mame#homecomputer#8bit#16bit#neogeo#msx#amstrad#commodore#nintendo#sega#gameboy#playstation#arcade#zxspectrum#atari#mac
0 notes
Last Seen Blogs

ainiwaffles
Ainiwaffles

shinkoscribbles
Shinko's Scribbles

goddessmegasus
goddess of war

nerdynakedtoyblog
Nerdy Naked Toy Blog #1!

perfectwitch
22:22