#fabrickindfriday
Note
Hi! So I'll be cosplaying Victor from Yuri on ice very soon, and I'd like to know how can I style the wig to look like his. I bought one that has the hair towards the front but if I try to give it some volume shows the start of the wig (a beige strip) very clearly, and since it's not a lace front I don't know how I can make it look better, any suggestions? Thanks!!
Hello there!
There are a few things you can do to change the hairline or to help mitigate the issue of the edge of the wig showing.
Perhaps the most time-consuming and expensive, but also the most realistic, would be to ventilate the wig and turn it into a lace front. This involves adding a strip of wig lace to the front and typing the hairs on yourself. Here is a tutorial, but there are many many more out there. The advantage of this is that you can get the natural-looking hairline that a lace front wig provides, but keep in mind that there is a high startup cost (though once you have a supply of wig lace and the needles, the cost per wig goes down drastically) and that it takes a lot of time.
Another option would be to do a glued hairline. This involves gluing a bit of loose wig fiber to the front of the wig in a way that imitates hair growing out of the scalp. For a wig like Victor’s, this might be overkill, as it tends to look best with heavily styled wigs rather than natural-looking styles, but it is much cheaper than ventilating a lace front, and may take you less time. This is also something that needs to be fit exactly to your own hairline and head shape, or else it won’t sit right. Here is a tutorial, but again, there are many more out there.
If the wig is constructed in a way that doesn’t have the front wefts wrapping up and around the front beige strip, you can also sew a weft or two underneath the front of the wig, hanging downward, so that when the hair is pushed up and back, it covers the edge a little better.
Your third option would be to leave the wig as-is, but to make it so that the strip is less visible. You can do this with a bit of styling -- making sure that when you style the front of the wig, you don’t pull the wig fibers up too far in the front, and adding volume further back instead, and making sure that the bang in the front hangs down over the hairline if possible -- but mostly this is done in the wearing of the wig. If you use a little spirit gum or lacefront tape on the hairline, it will help hold that area down to your forehead, and will make the beige strip less likely to pull up and show. This is the least realistic of your options, as you aren’t changing the hairline at all, but it requires little to no extra effort or cost on your part, and will help in a pinch.
Regardless of method you use, make sure that you glue or tape the wig’s hairline to your skin so that it stays in place without lifting away or shifting, which will also ruin the illusion of the wig.
I hope that helps! Good luck. :]
—Fabrickind / Q&A Staff
#lemorycosplay#cosplay#asks#wigs#wig styling#lace front wigs#glued hairlines#victor nikiforov#fabrickindfriday
38 notes
·
View notes
Note
Hi! I'm a super new cosplayer, with fairly limited resources, and i was wondering if someone could tell me some simple and easy/innovative ways to make armor of some kind? Or at least hook me up with some tutorials on the subject? Thanks for all the rad cosplay tips by the way!
Hello there!
For armor on limited resources, craft foam/EVA foam (same material, but usually in the cosplay community we refer to the thinner stuff as “craft foam” and the thicker stuff as “EVA foam) is going to be your best friend. You can make a decent armor build for fairly cheap with some skill in shaping and painting.
Here’s our list of craft foam armor tutorials, and if you scroll down a little, EVA foam armor. I would also recommend checking out The Evil Ted for a wealth of foamsmithing information.
If you’re really strapped for cash, you can also use cardboard! Here’s our list of cardboard tutorials.
I would recommend investing in an inexpensive heat gun and some good cutting implements and appropriate glues at the very least. With these types of materials, you can do everything from very simple armor to very complex armor, though it does take time and practice to do the more complex shapes. I would recommend doing something with simple shapes for your first armor build (bracers are a popular choice) before jumping into full body suits and wacky or oversized JRPG shapes that defy physics.
I hope that helps! Good luck :]
—Fabrickind / Q&A Staff
#anon#armor#armor materials#cosplay on a budget#craft foam#eva foam#cardboard#cosplay 101#cosplay#asks#fabrickindfriday
555 notes
·
View notes
Note
Hey there! I was wondering if you could give me a few tips on creating a cosplay with lots of details? I am trying to cosplay Mei from overwatch but the designs on her outfit seem a little daunting. Her props are also very large and detailed. Any recommendations?
Hello there!
For a cosplay with lots of small details, I find that what helps most it to really break it down into its component parts before starting.You can do this in several ways, or combine ways.
One way is to draw everything out. Make a quick sketch of the character and outfit and make sure that you copy every single detail over from the art. This way, you are forced to think about what each item is and where it belongs. This can be especially useful in some outfits where things like attachment points are ambiguous, or where there might be partially-hidden details.
Another way to go about this is to label a reference image. I like to print out images and do this by hand, though you can do it digitally as well. Draw an arrow to each piece and label what it is, what the color is, and what material you think it is. If you have ideas on how to make the items, you can write that down, as well.
You can also make a list of all the items, which is helpful once you’ve broken it all down visually. Some people also make collages of different reference images so that they can see the items from different angles. It might also be helpful to compile tutorial or purchase links in with your collages or lists, if that seems useful.
As for actually tackling the details, do it one part at a time. Give yourself plenty of time to work on the costume, and take it slowly if you have to. It helps to see things not as a daunting whole, but as small parts – for example, not a large and complex garment, but a set of sleeves, and a torso, and some embroidery on the sleeves, and this trim sewn to the neck, and that trim sewn to the center front, etc.– so that you know that you can tackle the costume one piece at a time. I find that making detailed to-do lists helps with this, and the more I break down the steps, the more it helps (and the more satisfying it is when I work on the costume for an hour and can check off 3 things from the list!). Don’t think of it as “I need to make Mei’s prop,” but instead take it slowly and think “I need to make this one specific part of Mei’s prop.” It may seem daunting to look at that long list of things to do, but even then, you can break it down further and only make a list for the prop, or only for the top, etc., as you go.
It also helps to take a break, even if it’s just taking a break from one part to work on another part. Sewing can happen while paint is drying, for example. Looking at things with fresh eyes can also help if you start to become frustrated with a piece.
I hope that helps! Good luck :]
—Fabrickind / Q&A Staff
348 notes
·
View notes
Text
Hello everyone!
This is a quick update on the status of your Q&A staff member on this blog. As you may have noticed, the 'Fridays with Fabrickind' feature has lapsed somewhat in recent months. This is not due to a lack of interest, or not wanting to answer your questions, but rather an inability on my part to have time and energy to answer.
Over the past few months, I've had some major life changes, including a changing work situation that leaves me with less time on Fridays to answer questions, and some chronic illness issues, which has left me with little energy for answering cosplay help questions, as much as I would love to be able to.
Know that this is not me stepping down as staff -- I love this blog and I love helping everyone -- but rather an apology for my inactivity, as well as an official notice of the reasons why so that all of you lovely cosplayers don't think that you've been abandoned. Know that I'm trying my best to answer the questions I can, but often, I simply can't answer any.
I'll be back to regular question answering once I'm able to get the issues preventing me from doing so currently under control.
Thank you for your understanding, and happy costuming!!
—Fabrickind / Q&A Staff
18 notes
·
View notes
Note
Hello! I'm Morgan! I started following you not too long ago and I'm very impressed with your blog. I just wanted to ask. More than anything in the world, I want to be a cosplayer. However, I just have no idea where to start. It all seems to daunting, it's terrifying really. Im at such a loss, and I just really want the satisfaction of making my own costume. Of just going. "I made this." Is there anything you can offer to help me? Thank you so much!
Hello there!
Cosplay can seem pretty daunting before you start, but if you break it into smaller bits or start with small things, you’ll be able to start before you know it.
As with anything, learning to craft your own cosplays takes time and practice. Almost no one is able to whip out amazing and complicated cosplays on their first try. There’s two components to this: practicing and working your way up to more complex costumes, and having patience with your own learning.
I would start small. Is there a costume you want to do where you can make some components and buy or modify others? Or a cosplay with a relatively simple garment that you can make, like a shift dress? If you have someone who can teach you to sew, or a way to take sewing lessons (look at fabric stores, local parks districts and libraries, and local community colleges for classes), that will get you started a lot faster and easier than learning on your own. If you don’t have anyone to teach you, start with a beginner-level pattern and watch video tutorials on how to operate your sewing machine.
As for starting a cosplay, it helps to break down all of the components and figure out what they are before you begin. A lot of costumes aren’t practical for daily wear and have a lot of unusual detailing, so making a list or sketching out all of the pieces can help you with not only keeping track of each item, but also so that you can look at the costume not as a big, daunting entire Thing, but instead as “pleated skirt” and “button-up blouse,” etc. You can then take it slowly and tackle each item one at a time rather than getting overwhelmed by the whole.
Once you gain more experience, you’ll start to figure out a good workflow and order of operations for each costume you do, as well. Since this varies by costume and personal working style, I can’t help you much with that, but it’s something that will come with experience.
As for the steps of starting on a costume, I give panels on this subject! Here is the powerpoint.
Mostly, it’s about hanging in there, choosing a costume that will teach you skills but also not be too difficult as to frustrate you, and starting small. I believe in you! We all have to start somewhere, after all.
I hope that helps! Good luck :]
—Fabrickind / Q&A Staff
76 notes
·
View notes
Note
Hi! I'm a totally new cosplayer, and I'm currently working on Daenerys Targaryen's blue embroidered dress. I can do the embroidery just fine, but I'm very nervous about putting the actual garment together and having it fit well. The dress seems to have a lot of structure in it. Do you have any tips for good, clean, form-fitting sewing, and any tips for putting boning/structure into a dress?
Hello there!
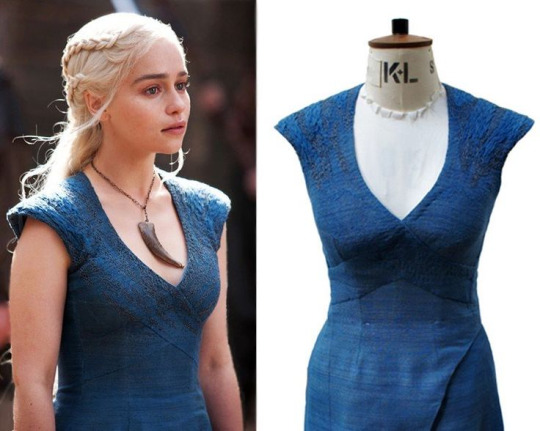
When making anything that needs to have perfect fit, I will always recommend making a mockup. Or several mockups, because you might need them. When doing your mockups, be sure to mark any fit issues, correct for them, transfer them to your pattern, and then do another mockup before doing the final outfit. This will ensure a good fit. Check for any signs that it is too large (gapping, fabric standing away from the body, etc.) or too small (fabric pulling in horizontal wrinkles, etc.), or the wrong shape (this is harder to determine, but make sure that the bust curve is correct and sits at your bust curve, make sure the neckline shape is correct, etc.), and correct these when possible.You can also practice with your structure on a mockup, which will help with both technique and with making sure that it fits once the structure is inside.
For something like this, most of your work is going to be in the tailoring, not in the interior, though some interior structure will help. If you look at the worn photo, the dress appears to be structured through the torso, underneath the breasts and above the waist. You can use a firmer interlining to help keep that shape (something like a silk organza or a hair canvas will get the structure without a lot of bulk). Using a fusible interfacing on the fashion fabric would also create more structure in that area, though I would recommend the interlining.
There is quite possibly boning in the dress underneath the darts, starting at the waist and ending at the underbust. I would do spiral steel boning there, at the side seams, and in the same location in the back. Attach your boning channels to an interior layer so that they hide better. You can do a mockup with cheap plastic boning or with plastic cable ties to make sure you have the placement and fit right before proceeding.
I would guess that this has bra cups built in, though I can’t see the inside to know for sure.
Mostly, this is going to be a project that requires practice. Be sure to cut your pieces well with sharp scissors, and be sure to sew your seams nice and straight, and to press them when you are done. It may help to have a dressform that you can drape this on in the patterning phase, or have a friend help you pin it while worn, so that you can get the fit just right.
Also, if you can find notes from the costumers or photographs of the inside of the dress, that will help quite a bit. Look around for GoT-specific costuming sites to see if that is available.
I hope that helps! Good luck :]
—Fabrickind / Q&A Staff
73 notes
·
View notes
Note
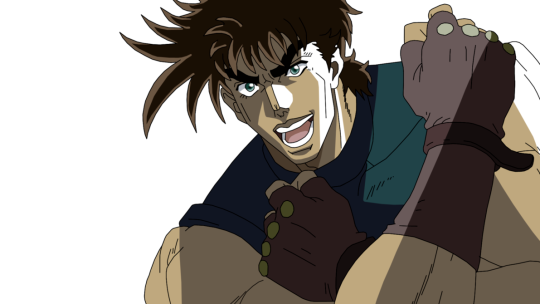
I have a question about wig spiking. How do you know when you should make a foam core/insert to help with stability? Im making a Joseph Joestar wig from Jojos (his brown hair with the big front spike) and I have no idea if I should try and make a support inside?
Hello there!
Nice!
When trying to decide between regular spiking and foamcore spiking, there’s a few things you can keep in mind. I’ll break down the differences, and hopefully that can help you decide.
Foamcore:This is good for outlandish, gravity-defying styles. If it is something that is very clean-looking or cartoony, you can get smoother shapes and more complex shapes with foamcore. Foamcore is also a more permanent method, so if you want the wig to stay in place for a long period with minimal touchup, it’s a good method. I personally find it harder to do than traditional spiking, but that depends on your particular set of skills.
Spiking:This would be the traditional method of using some type of glue or heavy-duty hairspray, some light teasing, and a hairdryer to spike wig fibers without internal support. This provides a more realistic look, since you are using the wig’s own fiber for support and not a smooth interior piece. You can also do more realistic spiking on the rest of the wig to match, but it is much harder to get good-looking absurd anime spikes with this method. This is best with a wig with grippy fibers, rather than smooth and silky fibers. The other part of this is that if the hair can’t support itself when you try traditional spiking, you will need a support. this is also less permanent, which means that you can possibly wash and reuse the wig, but you may have to do more touchup down the road.
With both methods, you may have to do some dewefting and/or rewefting, depending on the arrangement and density of wefts in your base wig, so that the netting doesn’t show.
For this particular costume, I’d say that you can go either way. If you are amping up the cartoony elements, that will be easier to do with foamcore, and if you are going for a more realistic hair look, that will be easier with traditional spiking.
I hope that helps! Good luck :]
—Fabrickind / Q&A Staff
46 notes
·
View notes
Note
Im trying to learn about resin casting and how to make your own designs. do you have any tutorials on casting? just trying to learn the basics
Hello there!
Resin tutorials are this way!
Hope that helps! Good luck :]
—Fabrickind / Q&A Staff
169 notes
·
View notes
Note
Hi I was hoping to cosplay Link in his Sheikah Armor Set from Breath of the Wild, and I was wondering how to go about making his bodysuit. I'm not quite sure what materials/fabrics would work best. Would the top be more like a breast plate or would it be more stretchy/fitted to the body? How would one go about making something more like a bodysuit? (if that's the case) Sorry for so many questions and thank you for your help! :D
Hello there!
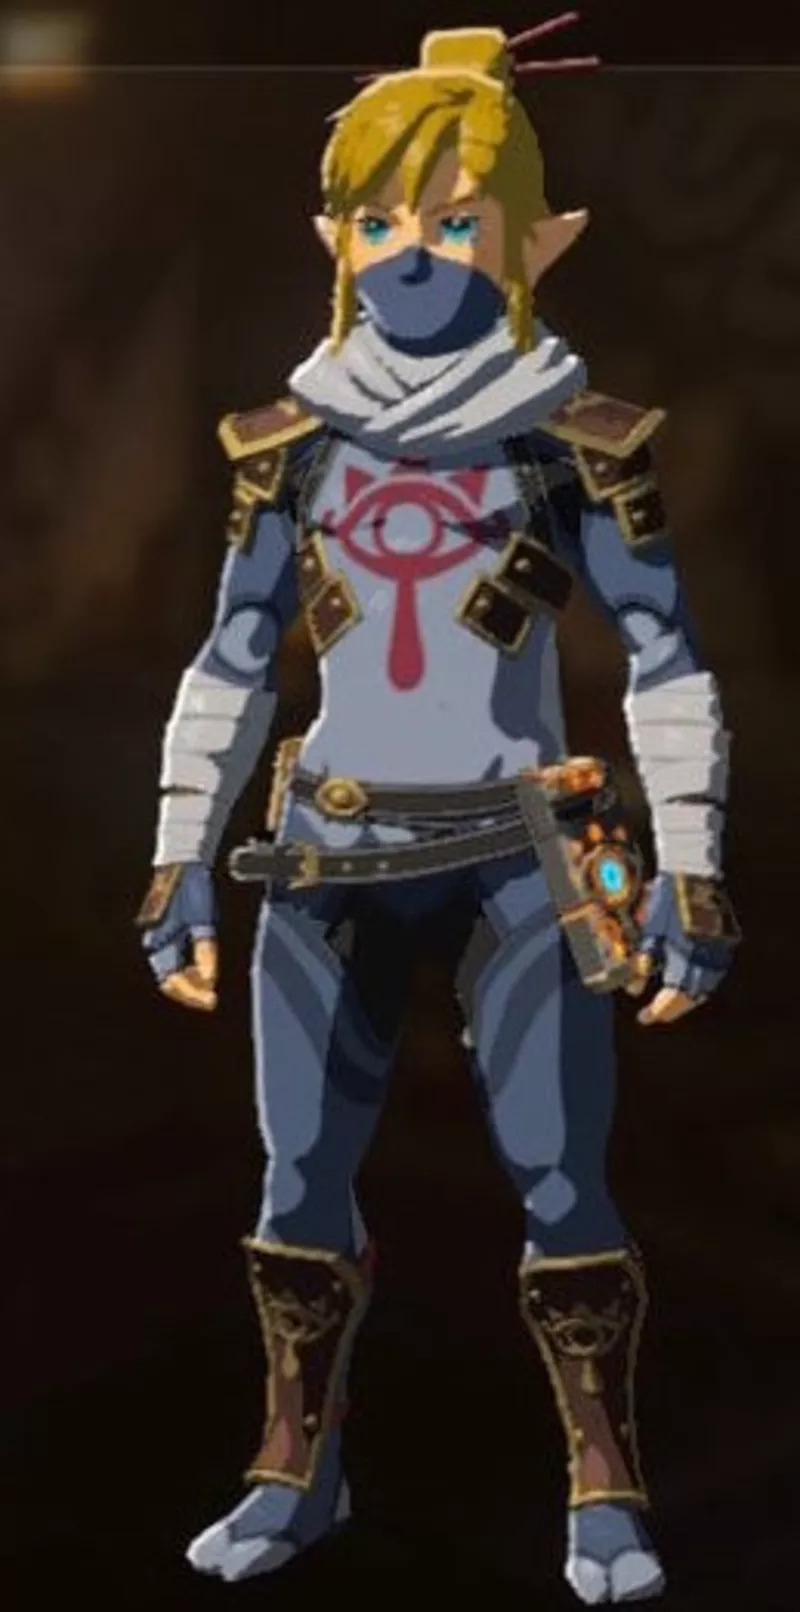
I read this as a bodysuit, not a chestplate, but I also haven’t seen the model in action.
For bodysuits, I would recommend using a pattern, especially if this is your first time making one. Several commercial patterns are available, and we have some tutorials over here.
As for fabrics, you want a fabric with two things: good stretch (4-watch stretch over 50~70% in each direction) and good recovery. Stretch is how far the fabric can be pulled apart without straining, and recovery is how easily it snaps back into shape after you let go. Without both, you’ll end up with an ill-fitted, saggy suit. Here’s some tips on sewing with stretch fabrics.
For this, I would recommend a matte milliskin. This is a stretch material that is very matte in texture and a bit thicker than a ‘regular’ spandex, so it’ll create a slightly heavier look than a thinner material.
I hope that helps! Good luck :]
—Fabrickind / Q&A Staff
104 notes
·
View notes
Note
Hi there! I'm planning on cosplaying Motoko Kusanagi from Ghost in The Shell and I would really like to try to make my own thermoptic suit (specifically the one used in the 2017 live action movie). Do you have any suggestion? I was thinking to use a nude colored morphsuit as a base and then sew over it but I'm not really sure. Greetings from Italy!
Hello there!
The suit from the movie was cast in silicone. You can see the costumers talking about the suit in this video:
https://www.youtube.com/watch?v=nbCyXVEVpKk
(It won’t let me embed it, so there’s the link)
However, this is likely not feasible unless you have access to industrial shop equipment, so here are some alternatives.
You can possible sew over a morphsuit. I would recommend creating a layer underneath that has a bit of loft so that when you sew through it, it creates a slight “pillowing” effect that allows for it to imitate the sections of the original suit. Alternatively, you can use a material that already gives this effect when topstitched, such as a spacer fabric. (I know that Spandex World should carry this in a beige ‘nude’ that will work if you are light skinned, though I’m not sure about shipping to Italy)
You can also use a combination of fabric and latex to get a similar texture effect. I would experiment with brushing liquid latex over a fabric suit to get the texture. You can use something to block the latex and build up a few layers for the areas with sections.
If you wanted to go with the classic 1995 film suit, I would recommend a skin tone bodysuit with a looser-fitting bodysuit of a material like glisenette over it, to create the look of having a translucent layer over a nude body.
As always with this type of costume, be sure to check with your local conventions for their rules of nudity and faux-nudity. Even if you’re fully covered, some cons don’t allow for costumes that make you appear nude or partially nude, so check on that before you invest in your costume.
I hope that helps! Good luck :]
—Fabrickind / Q&A Staff
38 notes
·
View notes
Note
Hi, I'm fairly new to cosplay, and I'm trying to cosplay Estinien Wyrmblood from Final Fantasy XIV. I can't seem to get over my costume not being "perfect". How do I get over this feeling? Many thanks for the valuable resources!
Hello there!
My advice may sound bleak at first, but in my experience, if you are the perfectionist type, you never really will get over that feeling. And that’s okay.
What you need to learn is how to use that feeling productively rather than stewing in what you’re seeing as some type of failure.
Here’s the secret: no costume is ever perfect. There’s always going to be some small thing that’s going to be off somehow. Sometimes there will be a big thing that’s off somehow. The vast majority of the time, you’re going to be the only one who will notice, and the rest of time, you’re going to be the only one who will care. I know that when you’re the type to be hard on yourself that doesn’t help as much, but know that most people see an amazing cosplay, even if you only see wobbly stitching and messy paint jobs.
Also, when things aren’t perfect, that’s where you can learn. In your next costume, you can take that experience and apply it to a different build, or you can come back and redo parts of the old costume, or remake it altogether. Use the feeling of imperfection and inadequacy to push yourself to improve.
Also, since you’re fairly new -- know that you’ll improve. You’ll learn new techniques as you go. Everyone is always improving, and you can’t compare yourself to someone who has been in the hobby for years and has dozens of costumes under their belt.
Here’s some things you can do to help this feeling.
- Do what you can and hide the rest. As long as it holds up to your satisfaction and the outside looks fine, learn to embrace things like not hemming pants that are going to be tucked into boots because you ran out of time, or not lining things, or leaving a piece unpainted that’s going to be worn on the inside and will never be seen except when removing or putting on the piece. You can hide a lot of mistakes with good photography, as well, and a lot of things may not even be noticed when worn or from a distance.
- Focus on the details you find most important. If you feel like you don’t have the time, money, or skills to do every component to your 100% satisfaction, then do a bit of triage. Which parts are most important to the overall look? Which parts are most important to you, personally? If you leave off that one piece of trim, or fudge it a bit, how much impact will it have? If the shape of your armor isn’t exactly like the reference, will it throw off the whole look, or is it not noticeable unless you have the reference right next to you? Making sure that you put your resources into the parts that you will find most rewarding is more important than trying to reach an arbitrary standard of perfection.
- Help prevent burnout by varying your costume types and intensity. If you are only doing larger armor builds, try something smaller and simpler. If you are only doing complex sewing projects, try for something that’s easier to sew. Even if you remain a perfectionist, it can help to have, for example, a very simple design that you’re sewing and make that perfect rather than tackling a very elaborate or complex design every time. Something less complex will also have less pressure on you, since there’s fewer elements to worry about. Try different skills, as well, such as switching between armor and sewing, or making a different type of garment like a tailored suit instead of a ballgown. You’ll often find yourself wishing to be more ‘perfect’ in making the new thing because you’re aware that you have lower skills, but you can always remind yourself that you’re now a beginner at [insert different technique] and can’t expect perfection your first try.
- Train yourself out of it (to a degree). It’s hard, but you can learn to let things go a bit. If it’s getting in the way of your fun with cosplaying, then remind yourself what it is about cosplay that you enjoy, and focus on those elements instead. If competing is too much pressure (and some of these tips are obviously unsuitable for competition), or if doing groups is too much pressure, or needing to get it done by a certain date, then don’t. If you need a hard deadline so that you can do what you can in that time and then leave the rest, set a hard deadline and let the rest go.
- Learn what you can and should improve on and what you should let go. Sometimes, you just need to look at what you are making and say “you know, this really isn’t worth the stress.” Sometimes you need to look at what you’re making and say “I really am not going to be satisfied until I get that part to my satisfaction. Sometimes you need to learn the difference.
- Figure out how to improve what you have. This may be a matter of costume choice – choosing a simpler sewing project rather than jumping into a very complex one, for example – or a matter of going back later and fixing things up or totally remaking things. I know that I have older costumes that I would love to remake from scratch because I know that I can do better now. Learn what you did right and what didn’t work, and put those skills to use in the next costume.
I hope that helps! Good luck :]
—Fabrickind / Q&A Staff
141 notes
·
View notes
Note
Do you have any tutorials on how to make a cloak?
Hello there!
We have several to choose from over here.
I hope that helps! Good luck :]
—Fabrickind / Q&A Staff
126 notes
·
View notes
Note
So I'm thinking of getting into cosplay, and though I haven't decided on a character yet, do you have any advice or a masterpost of things that first-time cosplayers should know?
Hello there!
We don’t have a single masterpost, but I can point you in the direction of a whole bunch of beginner resources. :]
Our Cosplay Tips section has links to several beginner cosplay masterposts by other people.
Our Cosplay 101 tag has a lot of great beginner resources as well. So does our Beginner Cosplay tag.
I have a panel here about how to get started on a cosplay – costume choice, planning, budgeting, etc.
I hope that helps! Good luck :]
—Fabrickind / Q&A Staff
201 notes
·
View notes
Note
Hello! Im going to be cosplaying The Final Pamfrim in a couple months and she's a character with a lot of rough skin and scars. Can you point me in the direction of any costume makeup tips or tutorials I can use to try and replicate those effects?? (This blog is so helpful, i love it) Thank you!!
Hello there!
We have a bunch of scar tutorials over here. For this character, I would recommend a combination of colored makeup and rigid collodion. This is a product that is brushed onto skin and as it dries, it shrinks in a way that, when combined with makeup, creates realistic-looking ‘rough skin’ type scars. It takes a little practice, but is relatively beginner-friendly, and would be great for the scars on her cheeks. If you want a more intense peeling skin look, liquid latex is a good option.
I hope that helps! Good luck :]
—Fabrickind / Q&A Staff
58 notes
·
View notes
Note
Is it okay to cosplay original characters?
Hello there!
OF COURSE it is!
There’s a bit of unfortunate stigma against original characters, and before you begin you should keep in mind that you’ll be less likely to get recognition at a con, especially if the OC isn’t part of an established franchise and/or doesn’t have a super eye-catching design, simply because people won’t know what it is. That’s something you’ll have to decide if it is personally worth it to you to dedicate resources to this costume.
That said, the stigma against OCs is completely unfounded. The fact that people even have to ask the question of whether it is okay to cosplay them makes me sad, since people should feel free to cosplay what they like without worrying about if it’s ~cringe~ or not. Who cares if someone kinds it “cringey” or not. We’re all nerds in costume. If you’re the type who enjoys coming up with your own characters and designs and flexing your creativity in that way, do it. It can be really empowering to be able to say “I came up with this thing from start to finish and now look, I actually made it in real life,” if that’s the type of creative work you enjoy doing. Don’t let anyone stop you or tell you that it’s not ~real cosplay~ (whatever that even means) or that it’s lazy or that your ideas and your creativity are somehow wrong.
Want to cosplay the most Mary Sue self-insert overdesigned costume OC you can come up with (or did when you were 12)? Go for it. Want to cosplay an OC with fairly normal-looking clothing that no one will recognize, but it makes you happy? Do it. Want to cosplay an OC that’s entirely an excuse to make particular costume elements? Don’t let anyone stop you. Want to cosplay a character you like from a media work you are hoping to publish? Go get yourself that publicity! Want to cosplay fanmade characters from existing series, even if it’s somewhat passe (like a Homestuck fantroll)? If it’s something you like, why wouldn’t you? Cosplay all of the OCs you want and don’t listen to any haters.
And really...Ren faires? LARP? Certain forms of historical reenactment? These are largely OCs, just under a different name. It shouldn’t matter if you’re doing your original concept for a 14th century English noblewoman at a faire or if you’re doing your original concept for a sparkly magical girl at an anime con, and it’s unfortunate that one of these things is often seen as an “acceptable” form of costuming and one isn’t. It’s a false distinction.
Cosplay is a hobby, and it’s about enjoying yourself. If it’s something you enjoy doing and you aren’t harming anyone, there’s no right or wrong way to do it.
—Fabrickind / Q&A Staff
784 notes
·
View notes
Note
Hi! I was just wondering if you had any tips on making a mowhawk wig, with the sides shaved. Im trying to cospplay as Sombra from overwatch, but her Los Muertos skin (also this blog is so amazingly helpful and thank you for all the hard work put into every post/response).

Two for the price of one today!
There’s a few ways to go about a wig like this. I’m going to be pulling from undercut wig tutorials, since it’s the same concept, just a different shape on top.
One way to do this is to splice together two wigs, one very short, and one longer on top. If you use a wig that’s a bit closer to your skin tone for the short one, it’ll be a better illusion.
Another way is to use faux fur for the buzzed parts.
If you want it more skin-like, you can use a bald cap with a partial wig.
If you don’t mind doing a bit of rewefting and/or dying in your styling, you can purchase a wig with a small mohawk or an undercut wig from Arda to use as your base.
What you are basically looking for is either a wig with wefts that are very short but long and dense enough to cover the tracks where the wefts are sewn in, or a wig that uses another material to imitate skin that you can either leave plain (use makeup to blend it into your own skin, but don’t add any hair) or stipple with makeup for a buzzcut look.
I hope that helps! Good luck :]
—Fabrickind / Q&A Staff
79 notes
·
View notes
Last Seen Blogs

bufiland
Maruko in Bufiland

jyosoero
徒然なるままにリブログ

alvarezs18
Alaska.

goldpharm
Sans titre

ham-nico
HAM-NICO