Cosplay Tutorial Official tumblr of CosplayTutorial.com
Don't wanna be here? Send us removal request.
Statistics
We looked inside some of the posts by cosplaytutorial and here's what we found interesting.
Average Info
Notes Per Post
624K
Likes Per Post
334K
Reblog Per Post
289K
Reply Per Post
111
Time Between Posts
1 month
Number of Posts By Type
Text
7
Link
1
Photo
2
Video
1
Note
6
Last Seen Tumblr Blogs


Fun Fact
Tumblr was the first site to host the blog for President Barack Obama in 2011.
Text
Get yourself a fabric store that will light your fabric on fire for you
No but legit I asked what the fiber content of something was and the guy didn’t know so he cut a chunk off and lit it on fire and felt the ashes and was like. Yeah this is mostly cotton with a lil bit of silk. And that was the moment I knew. This is it. This is the fabric store for me. Also that guy is marriage material. Not for me but damn some person is gonna be so happy with him.
154K notes
·
View notes
Link
Experiencing a mushroomed Magnum? How about a deflated Derek? Bag hair happens, but it can be fixed with your hair dryer! Our quick how-to video will get your wig looking fresh out the bag. ✨
117 notes
·
View notes
Photo
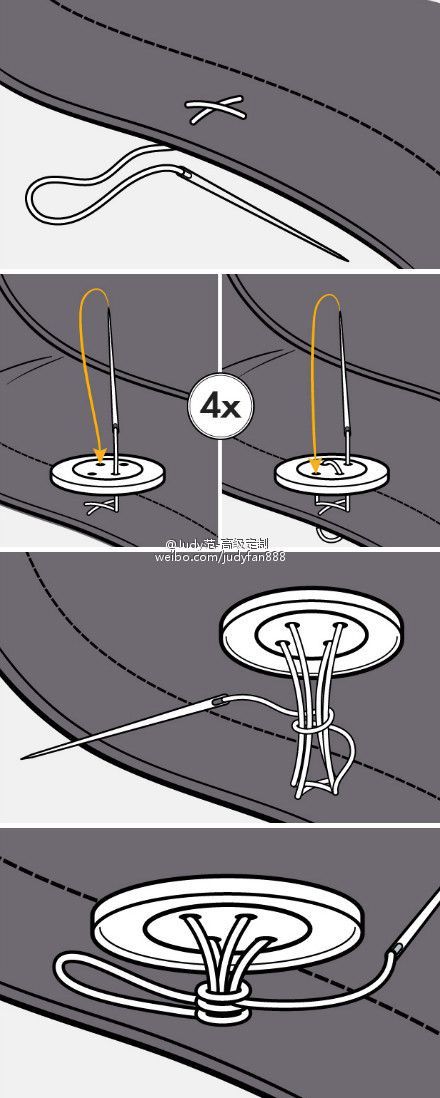
It’s never too late to learn the right way to do things: button sewing technique via imgur → more…
233K notes
·
View notes
Video
youtube
For cosplayers and steampunkers !
I can’t wait to try this, it looks so flexible and realistic while baked !
81 notes
·
View notes
Note
Hello hello! Out of curiousity, what do you think is a good way to go about making a cosplay of Loop from In Stars and Time (specifically the head since I imagine their body could done with a painted bodysuit)? I’ve been trying to work that out since I feel like cardboard/foam would keep the head shape but probably not work as well in a 3D space (unless you get really detailed with angles and such), and I can’t quite think of other directions to go for. (The light aspect is also complicated but could maybe work with LED strips or sequins maybe?) Thanks in advance, and happy to see that this blog is back!

Hello there!
Several ideas:
One is what you mentioned with translating it to 3D, that is, making it with angles that jut out into space all around your head. that doesn't sound like the direction you want to go in, though.
Another is to make it soft. Use a material like tulle or a chiffon tricot to create a fireball type look. This would also help a lot with the lighting, since it would diffuse any lights you put inside it. (Battery powered fairy lights would be great for that) Look at how people make flames or flame wigs and adapt to a different shape. Cotton or poly batting might also work for this.
Another option that seems a bit wild but I thought of it so now I have to say it is to use foil. Crumpled foil. It wouldn't be very durable and wouldn't diffuse lights well, but it would be reflective, so any light shone on it would be reflected back and it might look fun in photos, but probably more fun in photos and controlled lighting situations than irl.
I don't think fiber optic fabric is a good contender here but I have to mention it anyway. You might be able to have some fun with fiber optics, though, like those light up fiber optic toys. Bunches of fiber optic fiber that you frost the sides of (to diffuse the light and have it come out the sides a bit) basically styled into the spikes like a wig might just work.
Just put a really bright miner's light on your forehead to dazzle everyone
Even wilder method: remember those silicone lightbulbs from the late 90s?

It would be hard to build up enough silicone to create spikes that big, but this over some sort of base would work well, if heavy.
I wonder if you could do the 3D method with angled pieces but make it out of a translucent white or frosted plastic? Like the stuff used for corrugated signs or Sintra. It would diffuse the lights inside and create a fun look. Honestly, this is the method I would do.
For the lights, LED strips, fairy lights, or any other bright battery operated light. It would depend on the type of helmet you make for it, though, depending on what you can fit inside it. Typically, a bunch of smaller lights will end up with a more even look than one super bright light over a larger area, since the light needs to travel too far around your head to light the whole thing up, but that does create hot spots of light that you need to diffuse.
and yes, that can easily be a painted bodysuit.
I hope this helps! Good luck :]
—Fabrickind / Q&A Staff / Ko-Fi
22 notes
·
View notes
Text
Okay so update:
I am not reviving this blog! Sorry for the false alarm, but I got word from @apurpleduckie about reviving the blog and we've decided for now to direct people who want questions answered to my own blog.
I'll also make a sideblog just for questions that my partner has access to as well, so if you want some wig help, send those questions on over to @fabrickind for now and watch for future developments. :]
If you want to support THIS blog, go send the Admin a Ko-fi
Thanks for all the good questions and excitement about this blog over the years!
-- fabrickind / Q&A Staff
It's Been A While!
Hello everyone!
It's been ages since this dusty old blog was used. I have no idea what happened to our admin (hope she's okay), but I'll be reopening the blog for questions.
I'll probably clear out anything super old from the inbox for a fresh start, but anything that is old but still currently relevant or of particular interest I will go back and answer.
So! Askbox is open and we are accepting cosplay help questions again, and since I'm active, they will get answered to the best of my ability.
-- fabrickind / Q&A Staff
126 notes
·
View notes
Text
Oh yes, for people asking about the masterlists:
I only have control over the tumblr blog, so I can try to clean that up as much as possible. If it's on the tumblr blog, I can do it. I have no control over the website, so any broken links there will stay broken unless Admin returns haha
I'm basically just taking over the blog even though I'm just staff because I'm the only staff aside from Admin and I feel like it and I can.
-- fabrickind / Q&A Staff
It's Been A While!
Hello everyone!
It's been ages since this dusty old blog was used. I have no idea what happened to our admin (hope she's okay), but I'll be reopening the blog for questions.
I'll probably clear out anything super old from the inbox for a fresh start, but anything that is old but still currently relevant or of particular interest I will go back and answer.
So! Askbox is open and we are accepting cosplay help questions again, and since I'm active, they will get answered to the best of my ability.
-- fabrickind / Q&A Staff
#blog stuff#i have gotten out of practice with switching between my main blog and this as a sideblog lol
126 notes
·
View notes
Note
I'm cosplaying Adam from Hazbin Hotel, and I'm not quite sure how to make the halo look good and have it be above my head.
I'm also cosplaying Vox and not sure how to do his TV head in a good way?
Any and all tips would be appreciated, honestly
Hello there!

The most common way to do a halo is to make the halo itself and then use a headband or similar with some sort of thin rod or wire that can hold it up. Make sure whatever you use for the halo is lightweight enough and the support strong enough that it actually holds.
This halo seems like it would work well with a foam disc with strips of clear plastic going towards the middle to hold the two floating middle pieces. This would be fairly lightweight and not show much. You could also make the whole thing a plastic disc, but that would be heavier. I'm sure there's also something you can rig up with fishing line that will be even more invisible for the middle parts, but it won't be as stable as something more solid and rigid.
Wire is the classic for halos, and if you go that route, matte black would hide the best against the costume, imo. You might be able to use some tape to wrap the bottom in a matching purple if it shows too much. There's also kits you can buy from Assist that have a clear plastic rod, and you can purchase that kit or source your own rod. this tends to hide the best, but is a bit more expensive than wire, since you need to source the plastic.
For the headband, wear it underneath the hood and find a way to either have it permanently in there (this is how I did wigs with giant horns like Ultimecia and Condesce) or make it detachable (screws in? I wouldn't trust magnets or tension).
For a TV head, there's a LOT of tutorials out there from the object head boom about a decade ago, but most of these assume you can source a CRT monitor or small CRT TV to harvest for the shell. These days, you can get 3D print files for TV heads. There are services that can print them for you, or you can find a friend/makerspace/public library with a 3D printer and get one printed if you don't own one yourself. Worst case, study the shape of a CRT monitor and build one out of foamboard (like the stuff for science fair presentations). It's mostly flat panels, and for any curved ones aside from the front, you can use a thicker craft foam.
I hope that helps! Good luck :]
—Fabrickind / Q&A Staff / Ko-Fi
3 notes
·
View notes
Text
It's Been A While!
Hello everyone!
It's been ages since this dusty old blog was used. I have no idea what happened to our admin (hope she's okay), but I'll be reopening the blog for questions.
I'll probably clear out anything super old from the inbox for a fresh start, but anything that is old but still currently relevant or of particular interest I will go back and answer.
So! Askbox is open and we are accepting cosplay help questions again, and since I'm active, they will get answered to the best of my ability.
-- fabrickind / Q&A Staff
126 notes
·
View notes
Text
Hey i’m a fashion design student so i have tons and tons of pdfs and docs with basic sewing techniques, pattern how-tos, and resources for fabric and trims. I’ve compiled it all into a shareable folder for anyone who wants to look into sewing and making their own clothing. I’ll be adding to this folder whenever i come across new resources
https://drive.google.com/drive/folders/16uhmMb8kE4P_vOSycr6XSa9zpmDijZSd?usp=sharing
125K notes
·
View notes
Text
Prevent third-party sharing
This option will prevent your blog's content, even when reblogged, from being shared with our licensed network of content and research partners, including those that train AI models.
In the app:
Tap your account settings (the little human), and select the blog (if not already selected) in the top, left-hand corner of the screen.
Tap the gear icon, select "Visibility," and turn on the "Prevent third-party sharing for [your blog name]" switch.
On the web:
Visit your blog settings.
In the "Visibility" section, turn on the "Prevent third-party sharing for [your blog name]" switch.
If you've already chosen to discourage searching of your blog, we've automatically enabled the "Prevent third-party sharing" option.
---
CosplayTutorial has 3rd party sharing turned off.
Hi, Tumblr. It’s Tumblr. We’re working on some things that we want to share with you.
AI companies are acquiring content across the internet for a variety of purposes in all sorts of ways. There are currently very few regulations giving individuals control over how their content is used by AI platforms. Proposed regulations around the world, like the European Union’s AI Act, would give individuals more control over whether and how their content is utilized by this emerging technology. We support this right regardless of geographic location, so we’re releasing a toggle to opt out of sharing content from your public blogs with third parties, including AI platforms that use this content for model training. We’re also working with partners to ensure you have as much control as possible regarding what content is used.
Here are the important details:
We already discourage AI crawlers from gathering content from Tumblr and will continue to do so, save for those with which we partner.
We want to represent all of you on Tumblr and ensure that protections are in place for how your content is used. We are committed to making sure our partners respect those decisions.
To opt out of sharing your public blogs’ content with third parties, visit each of your public blogs’ blog settings via the web interface and toggle on the “Prevent third-party sharing” option.
For instructions on how to opt out using the latest version of the app, please visit this Help Center doc.
Please note: If you’ve already chosen to discourage search crawling of your blog in your settings, we’ve automatically enabled the “Prevent third-party sharing” option.
If you have concerns, please read through the Help Center doc linked above and contact us via Support if you still have questions.
95K notes
·
View notes
Photo
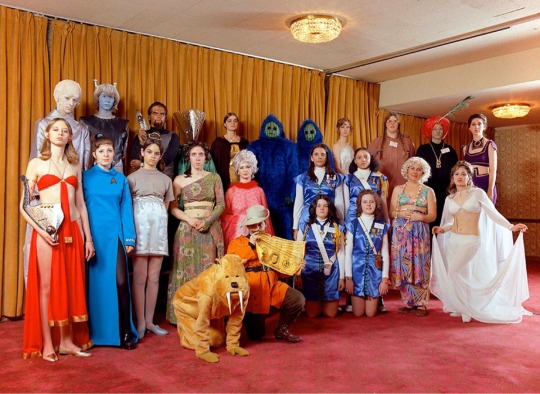
Cosplayers at a Star Trek Convention, 1976
15K notes
·
View notes
Text
taking some time today to discuss xiao! specifically the upgrades i made to him for metrocon 2023. i did so much experimenting with new techniques and materials, so i wanted to share that here to document, and maybe inspire some of my fellow artists/cosplayers!

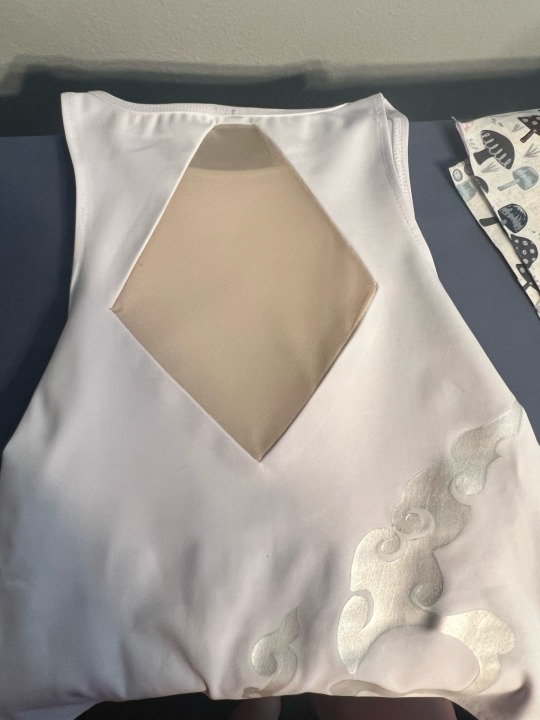
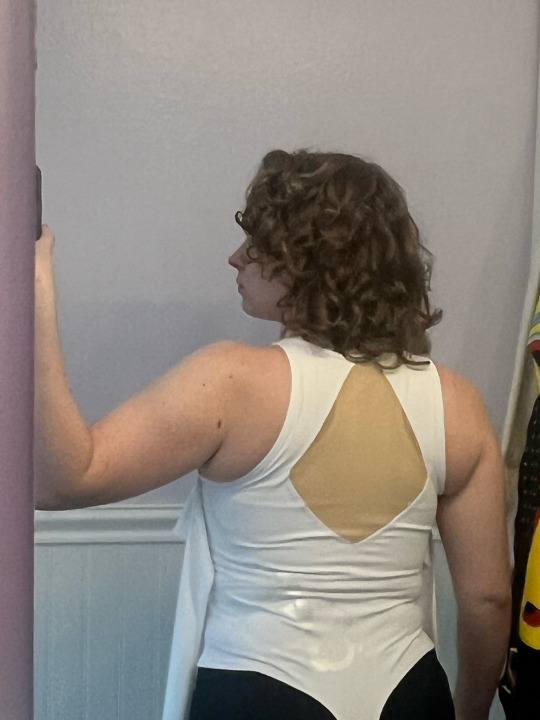
i don’t think i could ever properly explain how happy i was after remaking xiao’s shirt. the previous version (which was purchased) fit really poorly, and the fabric was not great. it constantly pulled out from the waist of the pants and it practically blocked any airflow. the solution was simple: remake it from a bodysuit. that way the shirt not only stayed in place but also already gave me a much better form-fitting base to start out with. the mesh panel in the back was the part i worried about the most but ended up being the part i’m happiest with! i used power mesh that i hand dyed to be close to my skin tone (though the color isn’t very clear due to my binder’s color).
the swirling pattern on the bodysuit is a metallic white fabric paint. i made a digital drawing of the pattern on procreate, then printed it onto freezer paper. after cutting it out with an exacto knife, you can actually iron freezer paper onto fabric (shiny side facing the fabric) and it creates a nearly seamless stencil for fabric paint! i see myself using this technique a lot in the future, it’s literally perfect!!
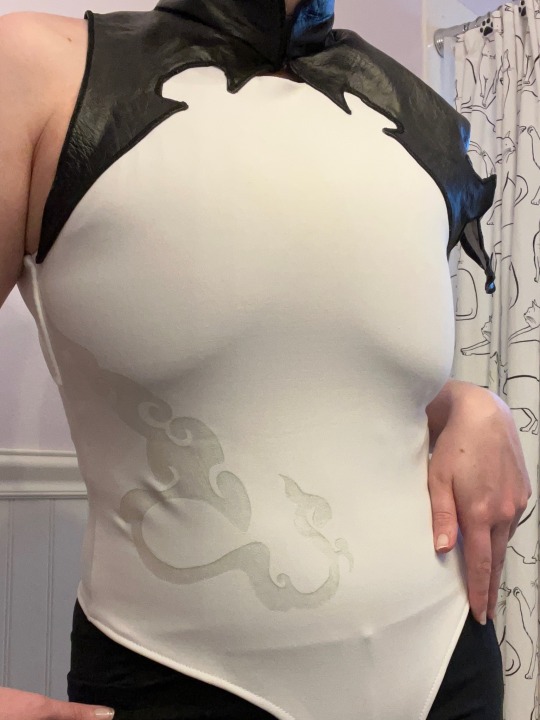
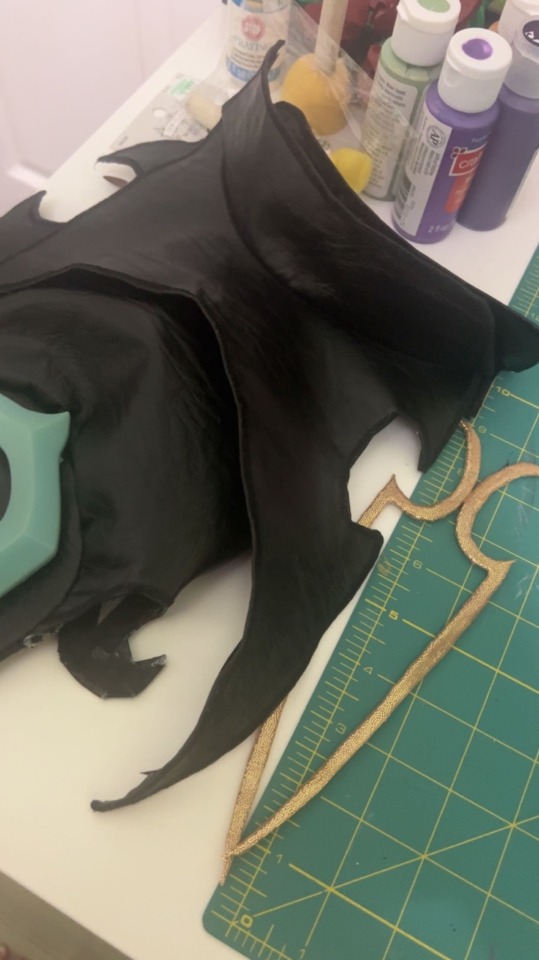
the black leather piece at the neck and shoulders was my biggest obstacle. not only have i never worked with leather, but it is also a non-stretch material i’d be attaching to the collar/neck portion that very much needed to be able to stretch to be pulled on. thankfully the design worked out that i could have 2 closure points, one on the back of the neck and one at the front of the neck. the entire piece is hemmed by folding over and gluing the raw edge to the inside, then i glued hem tape over those raw edges to cover them and make them softer on the skin (the entire leather piece is unlined, due to its complex shape). all the visible edges of the leather were satin stitched to give them a clean, crisp edge. the gold appliqués on the front and back are 2mm eva foam covered in a gold stretch fabric, then glued onto the bodysuit with e6000!
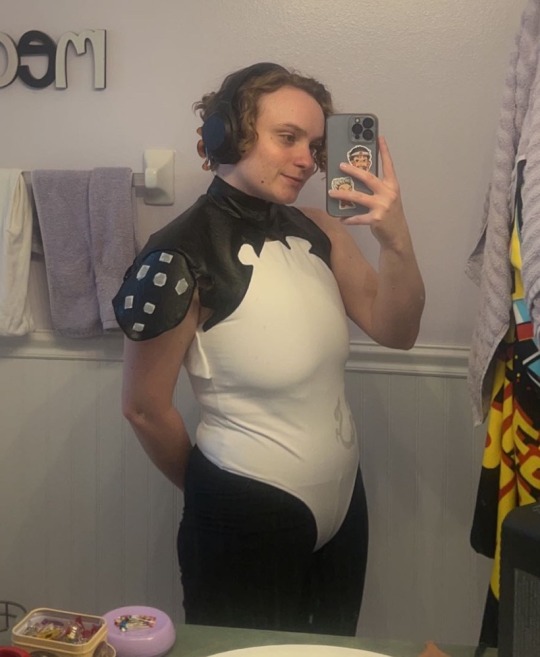

the two white pieces that frame the mesh panel on the back gave me more difficulty than i expected. their shape is a bit deceiving, and needing them to lie flat on my back without sacrificing the stretch of the main garment meant i couldn’t just top stitch them onto the back. and while i’m not super happy with how they ended up aligning (where they meet at the top is much further down than i was aiming for), i still think it came out really nice!
and that’s the finished top!
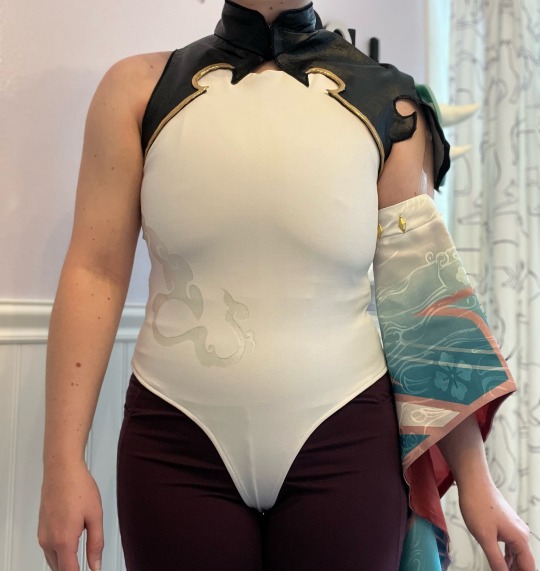
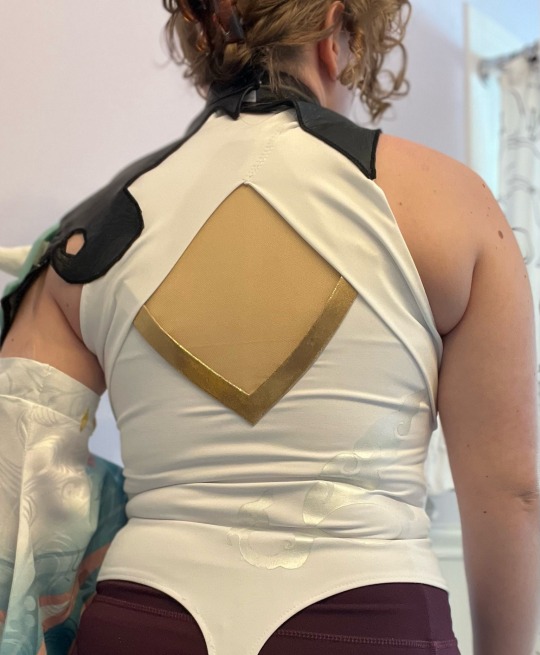
here’s a front and back of the finished top! the sleeve is held up with clear bra straps that hook onto the inside of the shirt at the shoulder. all in all, i absolutely love how this newer shirt came out.
besides the shirt/bodysuit, the boots also got an upgrade! i snagged some boots on sale on amazon for $20, which was an insane steal! this style is very universal for so many costumes, and it also helps that the boots are comfortable and flat too! all of the accessories on the boots are affixed temporarily or from the inside (velcro, snaps, and elastic) so that the integrity of the outer boot remains untouched and i can reuse them for several costumes and even everyday wear. i also replaced the gold piece around the neck that holds the “scarf.” just like the pieces on the shirt, it is 2mm foam covered in gold fabric. this not only helps the gold elements feel more cohesive but also lies a lot more comfortably on my neck!
111 notes
·
View notes
Note
Any advice for unusual-shaped ahoges? I want to cosplay Suletta Mercury from Mobile Suit Gundam: the Witch from Mercury, and she has a larger than average ahoge that’s also at an awkward angle since it’s supposed to start below and peak out from underneath a headband. Like, I don’t think any amount of hairspray would allow an ahoge at that angle and size to win against gravity and still maintain its shape. I’m guessing it would need some type of support to keep it up?
Hello there!
For Suletta, you will likely need to add some kind of structure in there, but you miiiiight be able to get away with just heat styling.
I would first try heating with a hair dryer or flatiron and teasing, and using that heat and teasing to get a nice base for the shape. Smooth some fiber over it with a flatiron to get it into shape, and spray it.
I have a feeling that won't be enough to hold the shape, so I'd recommend putting in some structure. Depending on what you are comfortable with and the effect you want, you can try putting a piece of wire in a heat-and-tease ahoge to hold the shape, you can use a longer piece of wire and bend it into the shape of the ahoge, anchor the wire in the wig, and do the heat-and-tease around that to get a more structured look, or if you want full structure, you can glue wefts down to a piece of wired stiff felt or craft foam to create the most structure possible. Doing the latter with the drill curl packing tape and wire method would also work -- just shape it differently.
Here's a few tutorials that may help. You basically just need to scale up a narrower ahoge tutorial, or adapt a drill curl tutorial to be an ahoge shape instead.
Hope that helps! Good luck :]
—Fabrickind / Q&A Staff / Twitter
56 notes
·
View notes
Note
Hey! I found this blog while looking for cosplay tips
I'm going to start making my first ever cosplay soon, so I'm looking for some tips!
I'm hoping to thrift as much of the outfit as I can but I'm guessing I'm gonna have to alter a lot.
But of course I have to choose a character with so many details. . . (I may simplify)
Anyways, any tips for this character? If you wanna look into him more it's Martin from Rune Factory 5 but I have refs all around

Hello there!
I love to see that you are doing Rune Factory cosplay!
That said, some parts of this will be very easy to thrift and modify, and others will need a little creativity and perhaps sacrificing of accuracy. I'd suggest something with fewer armor details for a first cosplay, but that's still doable with some work.
I'm coming at this from the angle that you are thrifting due to both skill level and budget.
From the top:
The grey shirt will be quite easy. Find a white or light grey ribbed shirt or sweater, cut off the sleeves and sew the edges so they don't fray. If you got a white shirt, check the fiber content -- I'd recommend a natural fiber like cotton -- and dye it to light grey. Use the cutoff sleeves to test the dye.
If you can't find a sweater with ribs, you can get one without the ribs and sew with a twin needle to fake it.
The vest is going to be difficult to get from a thrift store and alter due to the shape. You MIGHT be able to get a blazer or vest in the correct color and alter it, but that would probably be more difficult than making it from scratch.
If altering: remove the sleeves. Cut off the lapels and the collar. Cut open the front to the correct shape, and add the side dart to fit it, as well as fitting from the side seams.
If making: Alter a pattern to have the correct front opening shape, do a mockup, and take it in to fit.
Either way, you will need to sew on the brown leather portion and then line the vest. You can add the straps yourself by sewing them out of the same fabric as your vest.
The apron is easy -- simply take a rectangle of fabric, hem it, and sew a strip of fabric onto it so you can tie it around your waist. For the pockets, I'd do patch pockets and glue on fake rivets (painted googly eyes, anyone?). The zigzags can be done just with topstitching.
For the pants, you can buy the widest leg pants you can find, paint on the stripes, and take in the bottoms. You can use the excess fabric you cut off the length of the pants to create the cuffs.
For the armor, look through our website for armor tutorials -- I'd recommend foam for budget reasons.
Good luck! This will be a challenge to thrift most of, but with some mods, you can probably get something close enough.
—Fabrickind / Q&A Staff / Twitter
33 notes
·
View notes
Note
Hello! I'm looking to cosplay Noah's black military uniform from Xenoblade 3, but I'm unsure how to go about patterning the outerwear. The sweater and pants won't be an issue, but something about the jacket ensemble is really throwing me off. Any advice for someone new to patterning would be appreciated. Thank you!


Hello there!
This seems to be based off an Inverness coat, like the kind Sherlock Holmes is traditionally depicted as wearing.
I assume the part you are having trouble with is the cape assembly, which is exactly what an Inverness cape pattern will get you. The front needs to be open, which is easy to modify from almost any coat pattern with a center front opening (even a double breasted coat would be easy enough to modify to that center front opening), and it is held together in front by the belts.
The cape assembly will be the same as your pattern, but you will likely need to shorten the length of it. It also appears that the coat in question has a double cape -- I would shorten the cape pattern even further and shape it into that shape, and sew it to the longer undercape at the neck. When you sew the collar on, the edge there should be hidden.
The rest is basically changing the shapes of hems and such and adding surface decorations.
I hope that helps! Good luck :]
—Fabrickind / Q&A Staff / Twitter
23 notes
·
View notes
Note
So, I'm not quite sure how to describe what I'm trying to make. (Which shows how lost I am on how to do it) I want to cosplay Old Woman Josie from Welcome to nightvale, but I want to make her Angel's following/standing around me as props. Im planning on two angels (right and left). I think the main thing stumping me is figuring out how to make a harness that will hold a decent amount of weight, how to connect the angels discreetly, and how to pull off a decent form on the angels while not weighing them down. If you have any suggestions I would appreciate it so much!
Hello there!
I would look into wing and tail harnesses for this (I'm thinking the big Ahri type tails, not just a single cat tail). You can adapt these types of harnesses depending on how close to your body you want the figures -- You can use them pretty much as-is if you want them very close to you, but might need to create some structure (additional wire? PVC pipe? Dowels? This will depend on your harness and how heavy your figures are) that holds them away from you and is hidden somehow by the figures themselves if you want a little distance.
Some ideas on the angels themselves:
Starch and cheesecloth, like those Halloween ghosts. Would need at least some internal structure to hold the shape, but might get a cool draped effect.
Fosshape, which is a fabric thermoplastic, but a bit pricey. This can make hollow forms without a lot of weight.
Inflatable dolls that get clothed. Also very cheap and light and wouldn't need much extra skill to sculpt.
Sculpt out of foam like a puppet or fursuit. (Fursuit tutorials might be a good place to look here)
A wire form with paper mache, foam, fabric, or other covering (chicken wire, perhaps?). This would be a bit heavier but would allow more flexibility.
It really depends on the look you want, your skill level, and budget, so hopefully one of these ideas sparks something in you.
I hope this helps, and good luck! :]
—Fabrickind / Q&A Staff / Twitter
12 notes
·
View notes