#files Azure devops copy files
Explore tagged Tumblr posts
Visit Tumblr Blog
Explore Tumblr blogs with no restrictions, modern design and the best experience.
Last Seen Tumblr Blogs


Fun Fact
70% of Tumblr users say the Dashboard is their favorite place to spend time online.
Text
Cloud services seem to be a requirement for modern businesses, particularly if you wish to reach global customers. To meet this demand, several cloud providers have emerged including some of the biggest names around, Amazon, Google, and Microsoft. Here, we'll look at Microsoft Azure and focus on one service in particular: Azure Backup. Azure Overview Azure is an enterprise-grade cloud PaaS that focuses on hybrid cloud environments and has been adopted by organizations such as Bank of America and Toyota. Azure specializes in integration with Windows-based devices and is used for a variety of workloads, including DevOps, blockchain, and big data analytics. 5 Useful Features of Azure Backup With any cloud use, it’s important to make sure that your data remains available and protected. Microsoft knows this, which is why they created Azure Backup as a solution for your cloud and hybrid data needs. Multiple Storage Options With Backup, you have the option of two types of storage, depending on your pricing and availability needs. Azure recommends using Geo-Redundant Storage (GRS), which stores your duplicate data in a secondary region. This is the default location of your backups. By storing your data in a separate region, you can protect yourself against regional outages or natural disasters and have the option of redirecting at least some of your workflows to a new region during these times. Although this option is more expensive, it provides greater protection than the alternative. Your second option is Locally Redundant Storage (LRS), which allows you to store your backups in the same region as your production data. In LRS, you keep three data copies for greater redundancy but if something were to happen to that data center you all of your data would be inaccessible. This is provided as a lower-cost option and is meant to protect your data from hardware failures. Granular Backups This feature allows you to restore individual files as well as entire machines, which is very different from AWS snapshots, which only allow all or nothing restorations. By allowing you to restore individual files, Backup mimics traditional file system backups and speeds data recovery time. Being able to select files piecemeal means that you don’t have to be concerned about losing data in other applications that have been added since the backup you wish to restore from was taken. Restoring your files is a simple process in which you connect the desired recovery point to your machine as a local drive via a script provided by Azure. Once connected, you just search for the files you need to restore and copy them to the machine. Complementary Protection Backup is intended to complement and be used in combination with Azure Site Recovery, forming a full business continuity and disaster recovery strategy. In combination, these services will allow you to ensure your data is retained and that you do not experience productivity loss in the event of a disaster. Site Recovery serves as a disaster recovery solution for both VMs and on-premise machines. It lets you replicate data across multiple locations so that when a disaster occurs, you can quickly fail machines from your primary storage to your secondary storage. This is different from GRS in that you have full VM replication, as opposed to simple read-access of your data. Multiple Interfaces Backup allows you to create and manage your data duplication in three ways, allowing you to easily fit the process into your existing workflows. The simplest way is through Azure Portal, which is a browser-based dashboard that can be used to manage all of your Azure services in a centralized way. Portal has a user-friendly interface from which you can access reporting, support, monitoring, configuration, and more. Alternatively, you have the option of accessing Backup functions through Azure Cloud Shell, a browser-based Command Line Interface (CLI), or through a shell, such as Azure PowerShell or Bash. These methods
allow you greater flexibility and are much faster, provided you are already using them in your workflows. Both shell and CLI access allow you to use custom scripts and API calls to orchestrate your backups, granting you the ability to easily schedule or automate the process. Built-In Security Provided you are using a Recovery Services Vault, Backup gives you access to incident prevention, alerting, and recovery features, to ensure that your data remains secure. For incident prevention, an authentication layer can be applied to higher-risk functions, such as backup deletion or passphrase modification. This minimizes the chances that backups or passwords are accidentally modified and makes it more difficult for attackers to destroy or restrict access to backups, as in the case of ransomware. For alerts, you can enable email notifications to be sent when operations or actions are taken that affect backup availability, such as the deletion of data. With the notification, you know exactly when changes are made and who made them. While this in itself may not prevent data loss, it can help you more quickly identify and repair issues. For recovery, Backup will automatically retain deleted backups for a minimum specified number of recovery points for 14 days to eliminate damage caused by accidental or malicious backup deletion. Final Thoughts Azure Backup is a solid solution that can help you ensure that your data remains available when and where you need it but it’s not perfect. When backing up your data, it’s important to remember that Azure Backup is unable to handle the following cases: removable devices, Volume Shadow Copy Service (VSS) or offline volumes, non-NTFS file systems, or volumes protected by BitLocker. For these, you will need to find another backup solution or perform a manual backup. As long you take this gap into account, the features covered here can help you get the most out of your backup solution, maximizing your ROI with Azure and letting you rest easy that your productivity and valuable data will be protected.
0 notes
Text
Cloud Native Storage Market Insights: Industry Share, Trends & Future Outlook 2032
TheCloud Native Storage Market Size was valued at USD 16.19 Billion in 2023 and is expected to reach USD 100.09 Billion by 2032 and grow at a CAGR of 22.5% over the forecast period 2024-2032
The cloud native storage market is experiencing rapid growth as enterprises shift towards scalable, flexible, and cost-effective storage solutions. The increasing adoption of cloud computing and containerization is driving demand for advanced storage technologies.
The cloud native storage market continues to expand as businesses seek high-performance, secure, and automated data storage solutions. With the rise of hybrid cloud, Kubernetes, and microservices architectures, organizations are investing in cloud native storage to enhance agility and efficiency in data management.
Get Sample Copy of This Report: https://www.snsinsider.com/sample-request/3454
Market Keyplayers:
Microsoft (Azure Blob Storage, Azure Kubernetes Service (AKS))
IBM, (IBM Cloud Object Storage, IBM Spectrum Scale)
AWS (Amazon S3, Amazon EBS (Elastic Block Store))
Google (Google Cloud Storage, Google Kubernetes Engine (GKE))
Alibaba Cloud (Alibaba Object Storage Service (OSS), Alibaba Cloud Container Service for Kubernetes)
VMWare (VMware vSAN, VMware Tanzu Kubernetes Grid)
Huawei (Huawei FusionStorage, Huawei Cloud Object Storage Service)
Citrix (Citrix Hypervisor, Citrix ShareFile)
Tencent Cloud (Tencent Cloud Object Storage (COS), Tencent Kubernetes Engine)
Scality (Scality RING, Scality ARTESCA)
Splunk (Splunk SmartStore, Splunk Enterprise on Kubernetes)
Linbit (LINSTOR, DRBD (Distributed Replicated Block Device))
Rackspace (Rackspace Object Storage, Rackspace Managed Kubernetes)
Robin.Io (Robin Cloud Native Storage, Robin Multi-Cluster Automation)
MayaData (OpenEBS, Data Management Platform (DMP))
Diamanti (Diamanti Ultima, Diamanti Spektra)
Minio (MinIO Object Storage, MinIO Kubernetes Operator)
Rook (Rook Ceph, Rook EdgeFS)
Ondat (Ondat Persistent Volumes, Ondat Data Mesh)
Ionir (Ionir Data Services Platform, Ionir Continuous Data Mobility)
Trilio (TrilioVault for Kubernetes, TrilioVault for OpenStack)
Upcloud (UpCloud Object Storage, UpCloud Managed Databases)
Arrikto (Kubeflow Enterprise, Rok (Data Management for Kubernetes)
Market Size, Share, and Scope
The market is witnessing significant expansion across industries such as IT, BFSI, healthcare, retail, and manufacturing.
Hybrid and multi-cloud storage solutions are gaining traction due to their flexibility and cost-effectiveness.
Enterprises are increasingly adopting object storage, file storage, and block storage tailored for cloud native environments.
Key Market Trends Driving Growth
Rise in Cloud Adoption: Organizations are shifting workloads to public, private, and hybrid cloud environments, fueling demand for cloud native storage.
Growing Adoption of Kubernetes: Kubernetes-based storage solutions are becoming essential for managing containerized applications efficiently.
Increased Data Security and Compliance Needs: Businesses are investing in encrypted, resilient, and compliant storage solutions to meet global data protection regulations.
Advancements in AI and Automation: AI-driven storage management and self-healing storage systems are revolutionizing data handling.
Surge in Edge Computing: Cloud native storage is expanding to edge locations, enabling real-time data processing and low-latency operations.
Integration with DevOps and CI/CD Pipelines: Developers and IT teams are leveraging cloud storage automation for seamless software deployment.
Hybrid and Multi-Cloud Strategies: Enterprises are implementing multi-cloud storage architectures to optimize performance and costs.
Increased Use of Object Storage: The scalability and efficiency of object storage are driving its adoption in cloud native environments.
Serverless and API-Driven Storage Solutions: The rise of serverless computing is pushing demand for API-based cloud storage models.
Sustainability and Green Cloud Initiatives: Energy-efficient storage solutions are becoming a key focus for cloud providers and enterprises.
Enquiry of This Report: https://www.snsinsider.com/enquiry/3454
Market Segmentation:
By Component
Solution
Object Storage
Block Storage
File Storage
Container Storage
Others
Services
System Integration & Deployment
Training & Consulting
Support & Maintenance
By Deployment
Private Cloud
Public Cloud
By Enterprise Size
SMEs
Large Enterprises
By End Use
BFSI
Telecom & IT
Healthcare
Retail & Consumer Goods
Manufacturing
Government
Energy & Utilities
Media & Entertainment
Others
Market Growth Analysis
Factors Driving Market Expansion
The growing need for cost-effective and scalable data storage solutions
Adoption of cloud-first strategies by enterprises and governments
Rising investments in data center modernization and digital transformation
Advancements in 5G, IoT, and AI-driven analytics
Industry Forecast 2032: Size, Share & Growth Analysis
The cloud native storage market is projected to grow significantly over the next decade, driven by advancements in distributed storage architectures, AI-enhanced storage management, and increasing enterprise digitalization.
North America leads the market, followed by Europe and Asia-Pacific, with China and India emerging as key growth hubs.
The demand for software-defined storage (SDS), container-native storage, and data resiliency solutions will drive innovation and competition in the market.
Future Prospects and Opportunities
1. Expansion in Emerging Markets
Developing economies are expected to witness increased investment in cloud infrastructure and storage solutions.
2. AI and Machine Learning for Intelligent Storage
AI-powered storage analytics will enhance real-time data optimization and predictive storage management.
3. Blockchain for Secure Cloud Storage
Blockchain-based decentralized storage models will offer improved data security, integrity, and transparency.
4. Hyperconverged Infrastructure (HCI) Growth
Enterprises are adopting HCI solutions that integrate storage, networking, and compute resources.
5. Data Sovereignty and Compliance-Driven Solutions
The demand for region-specific, compliant storage solutions will drive innovation in data governance technologies.
Access Complete Report: https://www.snsinsider.com/reports/cloud-native-storage-market-3454
Conclusion
The cloud native storage market is poised for exponential growth, fueled by technological innovations, security enhancements, and enterprise digital transformation. As businesses embrace cloud, AI, and hybrid storage strategies, the future of cloud native storage will be defined by scalability, automation, and efficiency.
About Us:
SNS Insider is one of the leading market research and consulting agencies that dominates the market research industry globally. Our company's aim is to give clients the knowledge they require in order to function in changing circumstances. In order to give you current, accurate market data, consumer insights, and opinions so that you can make decisions with confidence, we employ a variety of techniques, including surveys, video talks, and focus groups around the world.
Contact Us:
Jagney Dave - Vice President of Client Engagement
Phone: +1-315 636 4242 (US) | +44- 20 3290 5010 (UK)
#cloud native storage market#cloud native storage market Scope#cloud native storage market Size#cloud native storage market Analysis#cloud native storage market Trends
0 notes
Text
Terraform IAC Development: Build Infrastructure Effortlessly
Terraform IAC Development is quickly becoming a hot topic in the world of cloud computing and infrastructure automation. Why? Because Infrastructure as Code (IAC) lets you manage, configure, and deploy infrastructure simply by writing code, which transforms the traditional, manual setup into an automated, scalable solution. Whether you're a beginner in DevOps or an experienced developer looking to simplify your infrastructure, Terraform offers an intuitive and efficient approach.
Let’s dive into why Terraform stands out, how you can get started with it, and the best practices for Terraform IAC Development.
Why Terraform for IAC?
Terraform, developed by HashiCorp, has made a name for itself as a go-to tool for cloud infrastructure management. It’s known for its platform independence and support for multiple cloud providers like AWS, Azure, and Google Cloud, allowing you to manage all your infrastructure with a single language and platform. Unlike other IAC tools, Terraform uses a declarative approach, meaning you only need to specify what your infrastructure should look like, and Terraform takes care of the rest.
Key Benefits of Terraform:
Platform Independence: Use it with any cloud provider, making it a versatile tool for multi-cloud environments.
Resource Management: Provision, modify, and destroy resources seamlessly.
Code Consistency: Easily replicate your infrastructure setup across different environments.
Automation: Automate the creation, modification, and deletion of infrastructure resources.
Scalability: Ideal for managing large-scale infrastructures.
Getting Started with Terraform IAC Development
1. Setting Up Your Environment
Before jumping into the code, you need to set up your development environment.
Install Terraform: Head over to the official HashiCorp website and download Terraform for your operating system.
Sign up with a Cloud Provider: If you don’t already have an account, set up an account with a cloud provider like AWS, Google Cloud, or Azure. AWS is often recommended for beginners due to its comprehensive documentation.
Create IAM Roles (for AWS): Ensure you have the proper IAM (Identity and Access Management) roles and policies configured to allow Terraform to create and manage resources on your behalf.
2. Writing Your First Terraform Configuration File
A configuration file in Terraform (with a .tf extension) is a straightforward way to define your infrastructure setup. Start with a simple file to create an EC2 instance (for AWS users) or a Compute Engine instance (for Google Cloud).
Example Code for Creating an EC2 Instance:
hcl
Copy code
# main.tf
provider "aws" {
region = "us-west-2"
}
resource "aws_instance" "my_first_instance" {
ami = "ami-12345678"
instance_type = "t2.micro"
}
Here’s a breakdown of what’s happening:
Provider block specifies the cloud provider and region.
Resource block tells Terraform to create an EC2 instance using the ami (Amazon Machine Image) ID provided.
3. Initialize Terraform
Once you have your configuration file ready, initialize Terraform by running:
bash
Copy code
terraform init
This step downloads necessary plugins for the providers specified in your configuration.
4. Apply Your Configuration
To create your resources, use the following command:
bash
Copy code
terraform apply
Terraform will prompt you for confirmation. Once you approve, it will proceed to set up your defined infrastructure.
Key Concepts in Terraform IAC Development
Understanding a few core concepts can take you far with Terraform:
Providers
Providers are plugins that Terraform uses to interact with APIs. You’ll often work with providers like AWS, Azure, and Google Cloud. Each provider comes with its own set of resources and configurations, making it easier to manage infrastructure across different platforms.
Resources
Resources are the core components you define in your Terraform files. They include services like EC2 instances, VPCs (Virtual Private Clouds), and S3 buckets on AWS, or their equivalents on other cloud providers.
Variables
Variables let you make your configurations more flexible. Instead of hardcoding values, you can define variables that can be reused across multiple files. For example:
hcl
Copy code
variable "region" {
default = "us-west-2"
}
provider "aws" {
region = var.region
}
State Files
Terraform keeps track of your infrastructure using state files. When you run terraform apply, Terraform records the current state of your infrastructure in a local or remote state file. This state file is essential for Terraform to track changes over time.
Best Practices for Terraform IAC Development
To get the most out of Terraform, here are a few best practices to keep in mind:
1. Organize Your Code
Separate environments (e.g., development, testing, production) by using different files or directories.
Use modules to create reusable code blocks, making your configurations more manageable.
2. Implement Version Control
Use a version control system like Git to manage your Terraform files. This approach allows you to track changes and collaborate more effectively.
3. Use Remote State Storage
For larger teams or projects, store your state files in a remote location (e.g., Terraform Cloud, AWS S3, or Azure Blob Storage). This ensures everyone is working with the latest version of the infrastructure.
4. Run Regular Plan Commands
Before making any changes to your infrastructure, run:
bash
Copy code
terraform plan
This command lets you review potential changes without actually applying them.
5. Enable Locking on State Files
If multiple people are working on the same infrastructure, enable locking on state files to prevent conflicts.
Advanced Terraform IAC Development: Modules and Workspaces
Modules
Modules are a powerful way to organize and reuse code in Terraform. By breaking down your configuration into modules, you can simplify complex infrastructure and maintain consistency across environments.
Workspaces
Workspaces allow you to manage multiple instances of your infrastructure from a single configuration. For example, you could use workspaces to create separate instances for development, testing, and production.
Terraform in Real-World Scenarios
1. Multi-Cloud Environments
With Terraform, you can easily manage infrastructure across different cloud providers without needing separate tools for each. This makes it highly advantageous for multi-cloud strategies, allowing you to combine services from AWS, Azure, and Google Cloud for a best-of-breed approach.
2. Automated Scaling
Terraform’s declarative language makes it ideal for scaling infrastructure. You can define load balancers, auto-scaling groups, and even monitoring solutions like CloudWatch in your Terraform files. Terraform’s automation capabilities save countless hours and help ensure consistent deployment across environments.
Conclusion: Mastering Terraform IAC Development
Learning Terraform IAC Development can be transformative for anyone involved in infrastructure management, DevOps, or cloud computing. By leveraging the power of Infrastructure as Code, you can achieve unparalleled flexibility, scalability, and efficiency. Once you’re comfortable with the basics, the possibilities with Terraform are virtually limitless, from multi-cloud management to fully automated infrastructure.
With Terraform in your skillset, you'll not only gain confidence in deploying infrastructure consistently but also open doors to advanced cloud computing roles and opportunities
0 notes
Text
How to Build CI/CD Pipeline with the Azure DevOps

Building a Continuous Integration and Continuous Deployment (CI/CD) pipeline with Azure DevOps is essential for automating and streamlining the development, testing, and deployment of applications. With Azure DevOps, teams can enhance collaboration, automate processes, and efficiently manage code and releases. In this guide, we'll walk through the process of building a CI/CD pipeline, including key components, tools, and tips. Along the way, we'll integrate the keywords azure admin and Azure Data Factory to explore how these elements contribute to the overall process.
1. Understanding CI/CD and Azure DevOps
CI (Continuous Integration) is the process of automatically integrating code changes from multiple contributors into a shared repository, ensuring that code is tested and validated. CD (Continuous Deployment) takes this a step further by automatically deploying the tested code to a production environment. Together, CI/CD creates an efficient, automated pipeline that minimizes manual intervention and reduces the time it takes to get features from development to production.
Azure DevOps is a cloud-based set of tools that provides the infrastructure needed to build, test, and deploy applications efficiently. It includes various services such as:
Azure Pipelines for CI/CD
Azure Repos for version control
Azure Boards for work tracking
Azure Artifacts for package management
Azure Test Plans for testing
2. Prerequisites for Building a CI/CD Pipeline
Before setting up a CI/CD pipeline in Azure DevOps, you'll need the following:
Azure DevOps account: Create an account at dev.azure.com.
Azure subscription: To deploy the app, you'll need an Azure subscription (for services like Azure Data Factory).
Repository: Code repository (Azure Repos, GitHub, etc.).
Permissions: Access to configure Azure resources and manage pipeline configurations (relevant to azure admin roles).
3. Step-by-Step Guide to Building a CI/CD Pipeline
Step 1: Create a Project in Azure DevOps
The first step is to create a project in Azure DevOps. This project will house all your CI/CD components.
Navigate to Azure DevOps and sign in.
Click on “New Project.”
Name the project and choose visibility (public or private).
Select a repository type (Git is the most common).
Step 2: Set Up Your Code Repository
Once the project is created, you'll need a code repository. Azure DevOps supports Git repositories, which allow for version control and collaboration among developers.
Click on “Repos” in your project.
If you don’t already have a repo, create one by initializing a new repository or importing an existing Git repository.
Add your application’s source code to this repository.
Step 3: Configure the Build Pipeline (Continuous Integration)
The build pipeline is responsible for compiling code, running tests, and generating artifacts for deployment. The process starts with creating a pipeline in Azure Pipelines.
Go to Pipelines and click on "Create Pipeline."
Select your repository (either from Azure Repos, GitHub, etc.).
Choose a template for the build pipeline, such as .NET Core, Node.js, Python, etc.
Define the tasks in the YAML file or use the classic editor for a more visual experience.
Example YAML file for a .NET Core application:
yaml
Copy code
trigger: - master pool: vmImage: 'ubuntu-latest' steps: - task: UseDotNet@2 inputs: packageType: 'sdk' version: '3.x' - script: dotnet build --configuration Release displayName: 'Build solution' - script: dotnet test --configuration Release displayName: 'Run tests'
This pipeline will automatically trigger when changes are made to the master branch, build the project, and run unit tests.
Step 4: Define the Release Pipeline (Continuous Deployment)
The release pipeline automates the deployment of the application to various environments like development, staging, or production. This pipeline will be linked to the output of the build pipeline.
Navigate to Pipelines > Releases > New Release Pipeline.
Choose a template for your pipeline (Azure App Service Deployment, for example).
Link the build artifacts from the previous step to this release pipeline.
Add environments (e.g., Development, Staging, Production).
Define deployment steps, such as deploying to an Azure App Service or running custom deployment scripts.
Step 5: Integrating Azure Data Factory in CI/CD Pipeline
Azure Data Factory (ADF) is an essential service for automating data workflows and pipelines. If your CI/CD pipeline involves deploying or managing data workflows using ADF, Azure DevOps makes the integration seamless.
Export ADF Pipelines: First, export your ADF pipeline and configuration as ARM templates. This ensures that the pipeline definition is version-controlled and deployable across environments.
Deploy ADF Pipelines: Use Azure Pipelines to deploy the ADF pipeline as part of the CD process. This typically involves a task to deploy the ARM template using the az cli or Azure PowerShell commands.
Example of deploying an ADF ARM template:
yaml
Copy code
- task: AzureResourceManagerTemplateDeployment@3 inputs: deploymentScope: 'Resource Group' azureResourceManagerConnection: 'AzureServiceConnection' action: 'Create Or Update Resource Group' resourceGroupName: 'my-adf-resource-group' location: 'East US' templateLocation: 'Linked artifact' csmFile: '$(System.DefaultWorkingDirectory)/drop/ARMTemplate.json' csmParametersFile: '$(System.DefaultWorkingDirectory)/drop/ARMTemplateParameters.json'
This task ensures that the Azure Data Factory pipeline is automatically deployed during the release process, making it an integral part of the CI/CD pipeline.
Step 6: Set Up Testing
Testing is an essential part of any CI/CD pipeline, ensuring that your application is reliable and bug-free. You can use Azure Test Plans to manage test cases and run automated tests as part of the pipeline.
Unit Tests: These can be run during the build pipeline to test individual components.
Integration Tests: You can create separate stages in the pipeline to run integration tests after the application is deployed to an environment.
Manual Testing: Azure DevOps provides manual testing options where teams can create, manage, and execute manual test plans.
Step 7: Configure Notifications and Approvals
Azure DevOps allows you to set up notifications and approvals in the pipeline. This is useful when manual intervention is required before promoting code to production.
Notifications: Set up email or Slack notifications for pipeline failures or successes.
Approvals: Configure manual approvals before releasing to critical environments such as production. This is particularly useful for azure admin roles responsible for overseeing deployments.
4. Best Practices for CI/CD in Azure DevOps
Here are a few best practices to consider when building CI/CD pipelines with Azure DevOps:
Automate Everything: The more you automate, the more efficient your pipeline will be. Automate builds, tests, deployments, and even infrastructure provisioning using Infrastructure as Code (IaC).
Use Branching Strategies: Implement a branching strategy like GitFlow to manage feature development, bug fixes, and releases in a structured way.
Leverage Azure Pipelines Templates: If you have multiple pipelines, use templates to avoid duplicating YAML code. This promotes reusability and consistency across pipelines.
Monitor Pipelines: Use Azure Monitor and Application Insights to keep track of pipeline performance, identify bottlenecks, and get real-time feedback on deployments.
Security First: Make security checks part of your pipeline by integrating tools like WhiteSource Bolt, SonarCloud, or Azure Security Center to scan for vulnerabilities in code and dependencies.
Rollbacks and Blue-Green Deployments: Implement rollback mechanisms to revert to the previous stable version in case of failures. Blue-Green deployments and canary releases are strategies that allow safer production deployments.
5. Roles of Azure Admin in CI/CD

An Azure admin plays a vital role in managing resources, security, and permissions within the Azure platform. In the context of CI/CD pipelines, the azure admin ensures that the necessary infrastructure is in place and manages permissions, such as creating service connections between Azure DevOps and Azure resources (e.g., Azure App Service, Azure Data Factory).
Key tasks include:
Resource Provisioning: Setting up Azure resources like VMs, databases, or storage that the application will use.
Security Management: Configuring identity and access management (IAM) to ensure that only authorized users can access sensitive resources.
Cost Management: Monitoring resource usage to optimize costs during deployments.
6. Conclusion
Building a CI/CD pipeline with Azure DevOps streamlines software delivery by automating the integration, testing, and deployment of code. Integrating services like Azure Data Factory further enhances the ability to automate complex workflows, making the pipeline a central hub for both application and data automation.
The role of the azure admin is critical in ensuring that resources, permissions, and infrastructure are in place and securely managed, enabling development teams to focus on delivering quality code faster.
#azure devops#azurecertification#microsoft azure#azure data factory#azure training#azuredataengineer
0 notes
Text
Azure devops copy files
Azure devops copy files
Azure devops copy files Azure devops copy files Today’s big news Azure devops copy files How to Copy Files From an Azure App Service with PowerShell Creating your own tools through PowerShell makes transferring content locally exponentially simpler. Here’s how to do it yourself. Once an Azure app service has been created and all content uploaded, we sometimes need a way to download those files…

View On WordPress
0 notes
Text
Create a custom work item control with Azure DevOps extension SDK
The Azure DevOps Web Extension SD or Azure DevOps Extension SDK is a client SDK for developing extensions for Azure DevOps. In this example I will show you how to make a custom work item control using this SDK.
Here is an example of a small project with a custom work item.
Prerequisites
We will need the following before we get started with building our extension:
NodeJS
Setting up the project
We start setting up the project by running the following NPM command in your project directory:
npm init
You can configure these settings as you wish. These can be found in package.json.
we need to install the following packages a dependencies:
npm i azure-devops-extension-api azure-devops-extension-sdk azure-devops-ui react react-dom
as well as the following dev dependencies:
npm i @types/react @types/react-dom copy-webpack-plugin cross-env css-loader loader-utils node-sass rimraf sass sass-loader style-loader tfx-cli ts-loader typescript webpack webpack-cli --save-dev
Now your package.json should look something like, the packager versions might be different:
{ "name": "testextension", "version": "1.0.0", "description": "", "main": "index.js", "scripts": { "test": "echo \"Error: no test specified\" && exit 1" }, "author": "", "license": "ISC", "dependencies": { "azure-devops-extension-api": "^1.158.0", "azure-devops-extension-sdk": "^2.0.11", "azure-devops-ui": "^2.167.49", "react": "^16.14.0", "react-dom": "^16.14.0" }, "devDependencies": { "@types/react": "^18.0.25", "@types/react-dom": "^18.0.8", "copy-webpack-plugin": "^11.0.0", "cross-env": "^7.0.3", "css-loader": "^6.7.1", "loader-utils": "^3.2.0", "node-sass": "^7.0.3", "rimraf": "^3.0.2", "sass": "^1.56.0", "sass-loader": "^13.1.0", "style-loader": "^3.3.1", "tfx-cli": "^0.12.0", "ts-loader": "^9.4.1", "typescript": "^4.8.4", "webpack": "^5.74.0", "webpack-cli": "^4.10.0" } }
Create two directories inside your root directory: src and static. in this example we won’t be adding anything to the static folder, but it is meant for, for example image files that your project uses. For now, you can add a file named .gitkeep instead.
Next up is configuring TypeScript. Create tsconfig.json in your root folder and put the following inside it:
{ "compilerOptions": { "charset": "utf8", "experimentalDecorators": true, "module": "amd", "moduleResolution": "node", "noImplicitAny": true, "noImplicitThis": true, "strict": true, "target": "es5", "rootDir": "src/", "outDir": "dist/", "jsx": "react", "lib": [ "es5", "es6", "dom", "es2015.promise", "es2019" ], "types": [ "react", "node" ], "esModuleInterop": true } }
Now we configure Webpack. Create webpack.config.js in your root folder and put the following inside it:
const path = require("path"); const fs = require("fs"); const CopyWebpackPlugin = require("copy-webpack-plugin");
const entries = {};
const ComponentsDir = path.join(__dirname, "src/Components"); fs.readdirSync(ComponentsDir).filter(dir => { if (fs.statSync(path.join(ComponentsDir, dir)).isDirectory()) { entries[dir] = "./" + path.relative(process.cwd(), path.join(ComponentsDir, dir, dir)); } });
module.exports = { entry: entries, output: { filename: "[name]/[name].js" }, resolve: { extensions: [".ts", ".tsx", ".js"], alias: { "azure-devops-extension-sdk": path.resolve("node_modules/azure-devops-extension-sdk") }, }, stats: { warnings: false }, module: { rules: [ { test: /\.tsx?$/, loader: "ts-loader" }, { test: /\.s[ac]ss?$/, use: ["style-loader", "css-loader", "azure-devops-ui/buildScripts/css-variables-loader", "sass-loader"] }, { test: /\.css?$/, use: ["style-loader", "css-loader"], }, { test: /\.woff?$/, type: 'asset/inline' }, { test: /\.html?$/, loader: "file-loader" } ] }, plugins: [ new CopyWebpackPlugin({ patterns: [ { from: "**/*.html", context: "src/Components" } ] }) ] };
The last configuration we need to make is specifically for Azure DevOps extensions. Again, in the root directory, create a new file, this time it’s called azure-devops-extension.json:
{ "manifestVersion": 1.0, "id": "textextension", "publisher": "your Visual Studio Marketplace publisher here", "version": "0.0.1", "public": false, "name": "testextension", "description": "custom control", "categories": [ "Azure Boards" ], "targets": [ { "id": "Microsoft.VisualStudio.Services" } ], "icons": { "default": "logo.png" }, "content": { "details": { "path": "README.md" } }, "scopes": [ "vso.work" ], "files": [ { "path": "static", "addressable": true }, { "path": "dist", "addressable": true } ] }
Now, you might notice how this configuration file needs two files: README.md and logo.png. You can add these files in your root folder.
Making the custom control
inside the src directory, create a new React component, let’s name the file Common.tsx.
import "azure-devops-ui/Core/override.css" import "es6-promise/auto" import * as React from "react" import * as ReactDOM from "react-dom" import "./Common.scss"
export function showRootComponent(component: React.ReactElement<any>) { ReactDOM.render(component, document.getElementById("root")) }
It is important we import "azure-devops-ui/Core/override.css", so that we can use standardized UI styling.
This component is more or less our root component, which renders our other components inside a HTML element with id “root”.
Also create a Common.scss file. All we’re going to add to this is:
body { margin: 0; padding: 0; }
Inside the src folder, let’s make another directory named Components and inside that folder create another one named TestExtensionComponent.
src │ Common.scss │ Common.tsx │ └───Components └───TestExtensionComponent
Inside the TestExtensionComponent folder, we’re going to add a few files. First off is TestExtensionComponent.html, this will be our html that will contain the component(s) of your custom control.
<!DOCTYPE html> <html xmlns="http://www.w3.org/1999/xhtml"> <body> <div id="root"></div> <script type="text/javascript" src="TestExtensionComponent.js" charset="utf-8"></script> </body> </html>
Next is TestExtensionComponent.scss.
@import "node_modules/azure-devops-ui/Core/_platformCommon.scss";
This will import the Azure DevOps styling.
Now add TestExtensionComponent.json, this is our component configuration file. Let’s add an input to the configuration, let’s call it SampleInput
{ "contributions": [ { "id": "TestExtensonComponent", "type": "ms.vss-work-web.work-item-form-control", "targets": [ "ms.vss-work-web.work-item-form" ], "properties": { "name": "cusom control", "uri": "dist/TestExtensonComponent/TestExtensonComponent.html", "inputs": [ { "id": "SampleInput", "name": "sample input", "description": "sample input", "validation": { "dataType": "String", "isRequired": true } } ] } } ], "scopes": [ "vso.work" ] }
Next is TestExtensionComponent.tsx
import React, { Component } from 'react' import * as SDK from "azure-devops-extension-sdk" import { IWorkItemFormService, WorkItemTrackingServiceIds, WorkItemOptions } from "azure-devops-extension-api/WorkItemTracking"
import "./TestExtensionComponent.scss"
import { showRootComponent } from "../../Common"
class TestExtensionComponent extends Component<{}, {}> {
constructor(props: {}) { super(props) }
public componentDidMount() { SDK.init({}) }
public render(): JSX.Element { return ( <></> ) } }
export default RESTRequestButton showRootComponent(<RESTRequestButton />)
The component doesn’t do much for now. What is important is the SDK.Init() inside the ComponentDidMount(). This makes sure we can use the Azure DevOps Extension SDK in our component.
So, what if we want to get input data? For example, our SampleInput we configured in the json. We can use the Azure DevOps Extension SDK for that.
To the constructor add:
this.state = { displayText: "default text", }
and to the Component after the extends keyword:
class TestExtensionComponent extends Component<{}, { displayText : string }>
SDK.Init() inside ComponentDidMount() is a Promise so, we can use then-chaining to set our state values there.
public componentDidMount() { SDK.init({}) .then( () => { this.setState({ displayText: SDK.getConfiguration().witInputs["SampleInput"] }) }) }
Now in our render() we can display the input data
public render(): JSX.Element { return ( <>{this.state.displayText}</> ) }
You might also want the data of the current Work Item, we can do this with the IWorkItemFormService interface.
const workItemFormService = await SDK.getService<IWorkItemFormService>( WorkItemTrackingServiceIds.WorkItemFormService )
Then we can use this to get specific fields
const fieldValues : Promise<{[fieldName: string]: Object}> = workItemFormService.getFieldValues(fields, options)
fields here is an array of strings containing key names of the work item, for example: System.Title, System.AssignedTo or Custom.HasPineapple
options is a class that implements WorkItemOptions, which can be done quite easily like
class Options implements WorkItemOptions { returnOriginalValue: boolean = true }
Now, the variablefieldValues is a Promise, so you can use then-chaining to get the data.
Say, we want to display the title of the work item instead on the SampleInput, we could modify our code to look like this:
public componentDidMount() { SDK.init({}) .then( () => { const workItemFormService = await SDK.getService<IWorkItemFormService>( WorkItemTrackingServiceIds.WorkItemFormService ) const fieldValues : Promise<{[fieldName: string]: Object}> = workItemFormService.getFieldValues(fields, options)
fieldValues.then( data =>
this.setState({ displayText: data["System.Title"] }) ) }) }
0 notes
Text
Docker Announces Open Source Compose for AWS ECS & Microsoft ACI
Docker has announced that the code for the Microsoft Azure Container Instances (ACI) and Amazon Elastic Container Service (ECS) integrations will be open-sourced. For the first time, Docker has made Compose available for the cloud, in addition to enabling an open community for evolving the Compose standard.
Docker is an open-source containerization platform. It allows programmers to bundle applications into containers, standardized executable components that combine application source code with the OS libraries and dependencies needed to run that code in any context.
Containers make distributing distributed programs easier, and they’re becoming more popular as companies move to cloud-native development and hybrid multi-cloud setups. Developers can develop containers without Docker, but the platform makes building, deploying, and managing containers easier, simpler, and safer.
Docker is a free toolkit that enables developers to make use of a single API to build, operate, update, deploy, and stop containers using simple commands and work-saving automation. Docker containers are live instances of Docker images that are currently executing.
Containers are ephemeral, live, executable content, whereas Docker images are read-only files. It enables the users to interact with them, and admins can use Docker commands to change their settings and circumstances.
Why are containers popular, and how do they work?
Docker adoption surged and continues to grow as a result of these factors. According to the reports from Docker, there are 11 million developers and 13 billion monthly container images downloaded. Process isolation and virtualization characteristics provided into the Linux kernel enable containers.
These features, like control groups (Cgroups) for allocating resources among methods and namespaces for restricting a process’ access or visibility into other resources or areas of the system, allow multiple application components to start sharing the resources of a single instance of the host operating system, similar to how a hypervisor allows multiple virtual machines (VMs) to share resources of a single instance of the host OS.
As a result, container technology provides all of the functionality and benefits of virtual machines (VMs), as well as significant additional benefits: cost-effective scalability, application isolation, and disposability.
Lighter
Containers are lighter than VMs because they don’t carry the payload of a whole OS instance and hypervisor; instead, they take the OS processes and dependencies required to run the code.
Container sizes are measured in megabytes (as opposed to gigabytes for specific VMs), allowing for greater utilization of hardware resources and speedier startup times.
Greater resource efficiency
You can execute many more copies of a program on the same hardware with containers than you can with VMs. This can help you save money on cloud storage.
Effortless operation
Containers are faster and easier to deploy, provision, and restart than virtual machines, which improves developer productivity. This makes them a better fit for development teams following Agile and DevOps approaches, as they can be used in continuous integration and continuous delivery (CI/CD) pipelines.
Reliable docker deployment consultation can make the implementation process easier. Other advantages cited by container users include higher app quality, faster market reaction, and much more.
Open Source Compose
Docker is working on two fronts to make it easier to get programs running on the cloud. The Compose specification was first transferred into a community effort. This will allow Compose to grow with the community, allowing it to meet the demands of more users better while remaining platform agnostic.
Second, we’ve been working with Amazon and Microsoft on CLI connectors for Amazon ECS and Microsoft ACI that let you deploy Compose applications directly to the cloud using Docker compose-up.
The company wanted to ensure that existing CLI commands were not affected when we implemented these connectors. They also desire an architecture that would allow adding more backends and SDKs in popular languages.
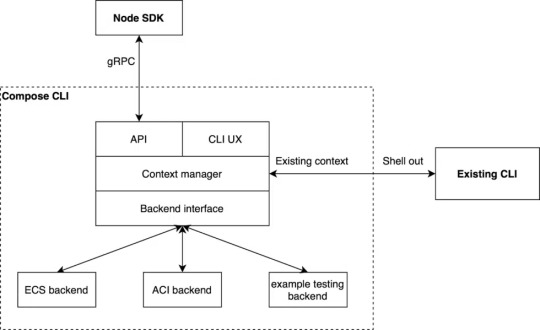
Image Source: Docker Blog
The Compose CLI switches which backend is utilized for the command or API call based on the Docker Context that the user selects. This allows transparently transmitting commands to the existing CLI that use existing contexts.
The back-end interface enables creating a backend for any container runtime, allowing users to enjoy the same Docker CLI UX as before while also taking advantage of the new APIs and SDK. To give equivalent functionality to the CLI commands, the Compose CLI can serve a gRPC API.
They also utilize gRPC because it allows creating high-quality SDKs in popular languages such as Node.js, Python, and Golang. While the firm now only has a Node SDK that provides single container management on ACI, they also have plans to add Compose support, ECS support, and more language SDKs in the near future.
VS Code has already implemented its Docker experience on ACI using the Node SDK.Microsoft Windows Server now supports Docker containerization. Most cloud providers also provide services to assist developers in creating and running Docker-based applications.
Source: 9series
#docker#Docker Consulting#Docker Services#Docker Solutions#docker consulting#docker container#docker consulting services#docker deployment services#9series
0 notes
Text
Azure Solutions Architect Expert AZ-305 Exam Questions
A new exam AZ-305 is available for Microsoft Certified: Azure Solutions Architect Expert certification,AZ-303 and AZ-304 exams still can be taken until March 31, 2022.PassQuestion provides the latest Azure Solutions Architect Expert AZ-305 Exam Questionswhich will help you to get high score in your Microsoft AZ-305 exam in first attempt. PassQuestion includes only those questions and answers in its Azure Solutions Architect Expert AZ-305 Exam Questions which are highly expected to be asked in actual exam.
Microsoft Certified: Azure Solutions Architect Expert Certification Path Exam AZ-303 and exam AZ-304 will be retired on March 31, 2022. A new exam AZ-305 is available in beta.The Microsoft Certified: Azure Solutions Architect Expert certification will be earned by completing the following requirements: 1.Earn the Microsoft Certified: Azure Administrator Associate certification (AZ-104) and pass Exam AZ-305, or 2.Pass Exam AZ-303 and Exam AZ-304 (before they retire on March 31, 2022), or 3.Pass Exam AZ-303 (before it retires on March 31, 2022) and Exam AZ-305
Designing Microsoft Azure Infrastructure Solutions (AZ-305)
Candidates for this exam should have advanced experience and knowledge of IT operations, including networking, virtualization, identity, security, business continuity, disaster recovery, data platforms, and governance. A professional in this role should manage how decisions in each area affect an overall solution. In addition, they should have experience in Azure administration, Azure development, and DevOps processes.
Exam Topics
Design identity, governance, and monitoring solutions (25-30%) Design data storage solutions (25-30%) Design business continuity solutions (10-15%) Design infrastructure solutions (25-30%)
View Online Azure Solutions Architect Expert AZ-305 Free Questions
You have 100 servers that run Windows Server 2012 R2 and host Microsoft SQL Server 2012 R2 instances. The instances host databases that have the following characteristics: The largest database is currently 3 TB. None of the databases will ever exceed 4 TB. Stored procedures are implemented by using CLR. You plan to move all the data from SQL Server to Azure. You need to recommend an Azure service to host the databases. The solution must meet the following requirements: Whenever possible, minimize management overhead for the migrated databases. Minimize the number of database changes required to facilitate the migration. Ensure that users can authenticate by using their Active Directory credentials. What should you include in the recommendation? A.Azure SQL Database single databases B.Azure SQL Database Managed Instance C.Azure SQL Database elastic pools D.SQL Server 2016 on Azure virtual machines Answer: BYou have an Azure subscription that contains an Azure Blob storage account named store1. You have an on-premises file server named Setver1 that runs Windows Sewer 2016. Server1 stores 500 GB of company files. You need to store a copy of the company files from Server 1 in store1. Which two possible Azure services achieve this goal? Each correct answer presents a complete solution. NOTE: Each correct selection is worth one point A.an Azure Batch account B.an integration account C.an On-premises data gateway D.an Azure Import/Export job E.Azure Data factory Answer: DEYou have an Azure subscription that contains two applications named App1 and App2. App1 is a sales processing application. When a transaction in App1 requires shipping, a message is added to an Azure Storage account queue, and then App2 listens to the queue for relevant transactions. In the future, additional applications will be added that will process some of the shipping requests based on the specific details of the transactions. You need to recommend a replacement for the storage account queue to ensure that each additional application will be able to read the relevant transactions. What should you recommend? A.one Azure Service Bus queue B.one Azure Service Bus topic C.one Azure Data Factory pipeline D.multiple storage account queues Answer : BThe application will host video files that range from 50 MB to 12 GB. The application will use certificate-based authentication and will be available to users on the internet. You need to recommend a storage option for the video files. The solution must provide the fastest read performance and must minimize storage costs. What should you recommend? A.Azure Files B.Azure Data Lake Storage Gen2 C.Azure Blob Storage D.Azure SQL Database
0 notes
Text
The Best Visual Studio Pro Features

Visual Studio has come a long way in the past several years and it has become an excellent tool to develop software with many different programming languages like C#, Visual Basic, Java, JavaScript, Python and more. It's free to download and use from Microsoft so if you're looking to learn how to code or need to update your skillset, check out some of the best visual studio pro features below. Whether you are an absolute beginner or have been coding for years, there is something here for everyone.
Deployment Options
Deployment Options is one of the favorite Visual Studio Pro features because it allows you to deploy to multiple locations without having to copy over your code each time. It saves a lot of time and makes your deployment process much more efficient. This allows you to do things like automatically send builds directly to your QA team's test environments, or create entirely new drop locations with unique login credentials and project configurations so that multiple developers can access the same shared repository at different times. The best part is that it integrates seamlessly with other project services like Azure DevOps Services, Team Foundation Server, Amazon Web Services, GitHub, or BitBucket so you have lots of flexibility when deciding where you want build packages deployed.
Intellisense
IntelliSense shows you context-sensitive code completions while you’re typing in your project. It’s hard to describe what a boon IntelliSense is without just going out and using it, but we can say that it saves us loads of time over using Notepad or even other development tools like Eclipse. You get both contextual assistance as well as suggestions for related items, so when you type something like an if statement, your cursor moves down and to the right with suggestions for control statements like if else while switch and case.
Code Navigation
Code navigation is one of the favorite features in Visual Studio Pro. It allows you to quickly jump between classes, methods, and properties (including getters and setters) in your source code files. To navigate to a specific line, move your cursor to that line number and select Navigate To from your menu bar (Ctrl+.) From there, you can search for different parts of a method or function name by clicking on Search, then typing whatever string you'd like to search for. Once you have what you're looking for selected, click Go to be taken directly to that part of your codebase. Be careful not to create too many navigation mappings when designing new solutions—you don't want it taking forever for solution load times!
Class Designer
The Class Designer feature allows for a visually rich development environment that lets you create and manage classes using an actual visual representation. When you create a class in your code, Class Designer makes it easy to add fields, methods, and other members (such as constructors). It also provides smart editing tools to help you configure properties and relationships. You can even generate implementations automatically from your Class Designer diagram.
Version Control
The best feature of any code editor is an integrated version control system that allows you to easily and safely collaborate with other developers. Microsoft’s Visual Studio offers a fantastic option for experienced users who prefer its integrated solution to simpler services such as GitHub.
Editing Tools
The best Visual Studio Pro feature for professional developers is definitely editing tools. The smart IntelliSense in these products makes it quick and easy to code without a ton of trial-and-error. For example, when you start typing code, it's smart enough to automatically autocomplete your commands or variables with potential matches as you type. This can make coding faster than ever before, especially since there are usually several options available based on what you've already typed.
0 notes
Text
Azure Solutions Architect Expert AZ-305 Exam Questions
A new exam AZ-305 is available for Microsoft Certified: Azure Solutions Architect Expert certification,AZ-303 and AZ-304 exams still can be taken until March 31, 2022.PassQuestion provides the latest Azure Solutions Architect Expert AZ-305 Exam Questions which will help you to get high score in your Microsoft AZ-305 exam in first attempt. PassQuestion includes only those questions and answers in its Azure Solutions Architect Expert AZ-305 Exam Questions which are highly expected to be asked in actual exam. Make sure that you are using up to date Azure Solutions Architect Expert AZ-305 Exam Questions so you can easily clear the Microsoft AZ-305 exam on the first shot.
Microsoft Certified: Azure Solutions Architect Expert Certification Path
Exam AZ-303 and exam AZ-304 will be retired on March 31, 2022. A new exam AZ-305 is available in beta.The Microsoft Certified: Azure Solutions Architect Expert certification will be earned by completing the following requirements: 1.Earn the Microsoft Certified: Azure Administrator Associate certification (AZ-104) and pass Exam AZ-305, or 2.Pass Exam AZ-303 and Exam AZ-304 (before they retire on March 31, 2022), or 3.Pass Exam AZ-303 (before it retires on March 31, 2022) and Exam AZ-305
Designing Microsoft Azure Infrastructure Solutions (AZ-305)
Candidates for this exam should have advanced experience and knowledge of IT operations, including networking, virtualization, identity, security, business continuity, disaster recovery, data platforms, and governance. A professional in this role should manage how decisions in each area affect an overall solution. In addition, they should have experience in Azure administration, Azure development, and DevOps processes.
Exam Topics
Design identity, governance, and monitoring solutions (25-30%) Design data storage solutions (25-30%) Design business continuity solutions (10-15%) Design infrastructure solutions (25-30%)
View Online Azure Solutions Architect Expert AZ-305 Free Questions
You have 100 servers that run Windows Server 2012 R2 and host Microsoft SQL Server 2012 R2 instances. The instances host databases that have the following characteristics: The largest database is currently 3 TB. None of the databases will ever exceed 4 TB. Stored procedures are implemented by using CLR. You plan to move all the data from SQL Server to Azure. You need to recommend an Azure service to host the databases. The solution must meet the following requirements: Whenever possible, minimize management overhead for the migrated databases. Minimize the number of database changes required to facilitate the migration. Ensure that users can authenticate by using their Active Directory credentials. What should you include in the recommendation? A.Azure SQL Database single databases B.Azure SQL Database Managed Instance C.Azure SQL Database elastic pools D.SQL Server 2016 on Azure virtual machines Answer: B
You have an Azure subscription that contains an Azure Blob storage account named store1. You have an on-premises file server named Setver1 that runs Windows Sewer 2016. Server1 stores 500 GB of company files. You need to store a copy of the company files from Server 1 in store1. Which two possible Azure services achieve this goal? Each correct answer presents a complete solution. NOTE: Each correct selection is worth one point A.an Azure Batch account B.an integration account C.an On-premises data gateway D.an Azure Import/Export job E.Azure Data factory Answer: DE
You have an Azure subscription that contains two applications named App1 and App2. App1 is a sales processing application. When a transaction in App1 requires shipping, a message is added to an Azure Storage account queue, and then App2 listens to the queue for relevant transactions. In the future, additional applications will be added that will process some of the shipping requests based on the specific details of the transactions. You need to recommend a replacement for the storage account queue to ensure that each additional application will be able to read the relevant transactions. What should you recommend? A.one Azure Service Bus queue B.one Azure Service Bus topic C.one Azure Data Factory pipeline D.multiple storage account queues Answer : B
The application will host video files that range from 50 MB to 12 GB. The application will use certificate-based authentication and will be available to users on the internet. You need to recommend a storage option for the video files. The solution must provide the fastest read performance and must minimize storage costs. What should you recommend? A.Azure Files B.Azure Data Lake Storage Gen2 C.Azure Blob Storage D.Azure SQL Database Answer : C
You ate designing a SQL database solution. The solution will include 20 databases that will be 20 GB each and have varying usage patterns. You need to recommend a database platform to host the databases. The solution must meet the following requirements: * The compute resources allocated to the databases must scale dynamically. * The solution must meet an SLA of 99.99% uptime. * The solution must have reserved capacity. * Compute charges must be minimized. What should you include in the recommendation? A.20 databases on a Microsoft SQL server that runs on an Azure virtual machine B.20 instances of Azure SQL Database serverless C.20 databases on a Microsoft SQL server that runs on an Azure virtual machine in an availability set D.an elastic pool that contains 20 Azure SQL databases Answer: D
0 notes
Text
Terraform with Ansible: A Powerful Duo for Infrastructure Management

Managing infrastructure has evolved into a seamless, automated process with tools like Terraform and Ansible. These two technologies are often paired together, allowing developers, DevOps teams, and system administrators to tackle complex cloud infrastructure challenges efficiently. But why use Terraform with Ansible, and how do they complement each other?
Let's dive into what makes these tools so powerful when combined, covering the best practices, Terraform setup steps, Ansible configurations, and real-world use cases.
What is Terraform?
Terraform is a popular infrastructure-as-code (IaC) tool developed by HashiCorp. It allows users to define infrastructure in a declarative manner, which means specifying the desired state rather than writing scripts to achieve it. By creating Terraform configurations, teams can automate the provisioning and management of cloud resources across multiple providers like AWS, Azure, and Google Cloud.
Terraform is especially valuable because:
It provides a single configuration language that can be used across different cloud providers.
It manages resources using a state file to keep track of current infrastructure and applies only necessary changes.
It’s ideal for infrastructure that requires scaling and flexibility.
What is Ansible?
Ansible is an open-source automation tool that excels in configuration management, application deployment, and task automation. Developed by Red Hat, Ansible works by using playbooks written in YAML to define a series of tasks that need to be performed on servers or other resources.
With Ansible, you can:
Automate repetitive tasks (like software installation or server configurations).
Control complex deployments with a simple, human-readable language.
Avoid the need for agents or additional software on servers, as it operates over SSH.
Why Combine Terraform with Ansible?
While Terraform and Ansible are powerful tools individually, using Terraform with Ansible creates a more holistic solution for infrastructure and configuration management.
Here’s how they work together:
Terraform provisions the infrastructure, creating cloud resources like virtual machines, networks, or databases.
Ansible then configures those resources by installing necessary software, setting configurations, and managing deployments.
By using Terraform with Ansible, DevOps teams can automate end-to-end workflows, from setting up servers to configuring applications. This combination is also beneficial for ensuring consistency and repeatability in deployments.
Setting Up Terraform with Ansible: Step-by-Step Guide
Here’s a simplified approach to setting up Terraform with Ansible for an automated infrastructure.
1. Define Your Infrastructure with Terraform
Start by creating a Terraform configuration file where you define the resources needed. For example, let’s say you’re deploying a web application on AWS. You could use Terraform to create:
An EC2 instance for the application server.
A VPC (Virtual Private Cloud) to isolate resources.
Security groups for controlling access.
Here’s an example of a Terraform configuration for creating an EC2 instance on AWS:
hcl
Copy code
provider "aws" {
region = "us-west-2"
}
resource "aws_instance" "app_server" {
ami = "ami-0c55b159cbfafe1f0"
instance_type = "t2.micro"
tags = {
Name = "Terraform-Ansible-Server"
}
}
After defining the configuration, initialize and apply it with:
bash
Copy code
terraform init
terraform apply
2. Generate an Inventory File for Ansible
Terraform can output details about the resources it creates, such as the public IP addresses of EC2 instances. This information is essential for Ansible to know where to connect and perform tasks. You can use Terraform's output variables to create a dynamic inventory file for Ansible.
Add an output block in your Terraform configuration:
hcl
Copy code
output "instance_ip" {
value = aws_instance.app_server.public_ip
}
To use this information in Ansible, run terraform output and direct it to a file that Ansible can read.
3. Write Ansible Playbooks
Now, create a playbook that will handle the configurations on the EC2 instance. For instance, you might want to:
Install web servers like Apache or NGINX.
Set up firewall rules.
Deploy application code.
Here’s a sample Ansible playbook that installs NGINX on the server:
yaml
Copy code
---
- name: Configure Web Server
hosts: all
become: yes
tasks:
- name: Update apt packages
apt:
update_cache: yes
- name: Install NGINX
apt:
name: nginx
state: present
- name: Start NGINX
service:
name: nginx
state: started
4. Run Ansible to Configure the Server
With your inventory file and playbook ready, run the following command to configure the server:
bash
Copy code
ansible-playbook -i inventory_file playbook.yml
This command instructs Ansible to read the inventory file and execute the playbook tasks on each server listed.
Best Practices When Using Terraform with Ansible
Combining Terraform with Ansible requires a few best practices to ensure smooth, scalable, and reliable automation.
Separate Infrastructure and Configuration Logic
Use Terraform strictly for creating and managing infrastructure, while Ansible should handle software configurations and tasks. This clear separation of concerns minimizes errors and makes debugging easier.
Maintain Version Control
Store both Terraform configuration files and Ansible playbooks in a version-controlled repository. This allows teams to roll back to previous configurations if issues arise and track changes over time.
Use Terraform Modules and Ansible Roles
Modules and roles are reusable pieces of code that can make your configurations more modular. Terraform modules allow you to encapsulate resources and reuse them across multiple environments, while Ansible roles organize playbooks into reusable components.
Manage State Carefully
With Terraform’s state file, ensure it’s securely stored, ideally in a remote backend like AWS S3 or Google Cloud Storage. This practice prevents conflicts in multi-user environments and keeps the state consistent.
Plan and Test Changes
Terraform and Ansible changes can sometimes have far-reaching effects. Always use terraform plan before applying changes to preview what will be modified, and test Ansible playbooks in a development environment.
Real-World Applications of Terraform with Ansible
The Terraform-Ansible combo is used by organizations worldwide to manage cloud infrastructure efficiently.
Multi-Cloud Deployments: Terraform’s support for various cloud providers enables teams to deploy across AWS, Azure, and GCP, while Ansible ensures that configurations remain consistent.
Continuous Integration and Deployment (CI/CD): Terraform and Ansible are often integrated into CI/CD pipelines to automate everything from resource provisioning to application deployment. Tools like Jenkins, GitLab CI, or CircleCI can trigger Terraform and Ansible scripts for seamless updates.
Scaling Applications: By using Terraform with Ansible, teams can scale infrastructure dynamically. Terraform provisions additional instances when needed, and Ansible applies the latest configurations.
Dev and Test Environments: Development and testing teams use Terraform and Ansible to create isolated environments that mirror production. This process allows teams to test configurations and deployments safely.
Top Benefits of Terraform with Ansible
Consistency Across Environments: Terraform ensures infrastructure is defined consistently, while Ansible guarantees configurations remain uniform across instances.
Reduced Manual Effort: Automate repetitive tasks, leading to time savings and fewer errors.
Scalability: Easily adapt and expand your infrastructure based on demand.
Flexibility with Multi-Cloud: Terraform’s multi-cloud support means you’re not locked into one provider.
Improved Reliability: Automation reduces human error, making deployments and configurations more reliable.
Final Thoughts
Using Terraform with Ansible creates a synergy that takes your automation and cloud infrastructure management to new heights. Whether you’re setting up environments for development, managing complex multi-cloud setups, or automating application deployments, this combination streamlines operations and reduces the risk of errors.
By integrating these two tools, you’re setting the stage for scalable, reliable, and efficient infrastructure that’s well-suited for today’s dynamic cloud environments. For any team looking to improve their infrastructure management practices, Terraform with Ansible is a match made in automation heaven.
0 notes
Text
Azure devops copy files
Azure devops copy files
Azure devops copy files Azure devops copy files New Azure devops copy files Copy Files to Azure VM using PowerShell Remoting There are a couple of different cases you want to copy files to Azure virtual machines. To copy files to Azure VM, you can use PowerShell Remoting. This works with Windows and Linux virtual machines using Windows PowerShell 5.1 (Windows only) or PowerShell 6 (Windows and…

View On WordPress
0 notes
Text
Docker Explained – An Introductory tutorial for Docker
What is Docker?
In this Docker tutorial, I will try to make You understand what is docker? Why use it? What are containers and what are docker images? and in the end, will come to know about compose and swarm.
So, let's begin with - what is docker?
Docker is capable of building and running our application in tiny lightweight containers.
All the libraries that are used by the application are compacted in tiny containers and then they become OS independent.
Dockers are considered as the options against VM and often have advantages over VM. Let us check out those in this docker tutorial.
Released on March 20, 2013, it has seen a tremendous increase in popularity and usage in a short duration.
All the big cloud providers now back it up such as AWS, Azure, and GCP which now provide support to docker on their respective platforms and many customer-centric
products are running on these cloud providers where the customer application facing a lot of traffic is running on these dockers.
Dockerhub has a huge collection and is also the largest source of docker images. It contains more than 1.5 million docker images for free.
developers use containers for deploying their application on a machine having any Linux flavor, that is other than the parent machine of the application code.
What are Virtual Machines ?
Virtual machines use the resources of the host machine but are represented as a separate machine.
All Virtual machines have their OS.
Virtual machines use their separate OS and memory. The virtual machine uses the resources in isolation hence running many OS in parallel.
Using containers increases the outcome of the application and minimizes its size.
Virtual machines use a separate OS for itself, on top of the host OS, hence they are very heavy in size but containers use resources of host OS, hence light in weight.
3 virtual machines mean 3 different OS installed.
Docker containers lack security as compared to the virtual machines as all the containers share the same OS kernel, but virtual machines have a different OS kernel among themselves.
Docker containers are portable as they all use the same OS, but the virtual machines are not portable as they all use different operating systems.
History Before Containerisation
Monolithic Approach
Monolithic is the software development approach where all the interworking separate components were clubbed as one application and treated as one.
say for example we have an e-commerce website, which consists of different modules like user interface, product inventory, authorize user, authorize payments, and then delivery.
These modules are compacted and clubbed as a single application in a monolithic architecture.
DevOps Training & Certification Course
No cost for a Demo Class
Industry Expert as your Trainer
Available as per your schedule
Customer Support Available
Enrol For a Free Demo Class
In this architecture, the applications were considered as a single entity clubbing all its components as one. They usually consist of the client, server, and database. Hence all the requests are processed at a single place. The disadvantage of this approach was a common code base, and to make a component change means the whole application was supposed to be built again.
Advantages:
1. Less impacted components:
Due to its compact nature, components like logs and monitoring, if required were modified as a whole application and not as many distributed components, this made the life of developers easy to handle the changes as one component.
2. Ease of testing:
As monolithic applications are considered as a single entity hence it was easy to test them as compared to the microservice application.
3. Ease of deployment:
As monolithic applications are a single entity, hence any change made produced a single file or directory of the application and it was only needed to be deployed again and again.
4. Ease of Development:
As all developers work on a common code base, it is easy to develop applications using a monolithic approach.
Disadvantages:
1. Complexity:
As the code base increases, the complexity increases.
2. New changes:
As the changes and new features are introduced, it becomes difficult to manage as it affects the complete application, and also the development time increases.
3.Technology:
It is difficult to implement new technology to a component as the complete code base needs to be changed.
Microservice Architecture
In contrast to the monolithic approach where the application is a single entity, in microservices, the application is broken down into multiple modules. Here each module serves a separate purpose and has its separate database.
1. Individual components
As stated above, all modules in the application are individual components, which makes development an easy process and easy to troubleshoot in case a bug arrives, as only the faulty module is rechecked.
2. New Features:
As the code is broken down in small modules, new features can be introduced at regular intervals.
3. Scalable:
In high traffic or better performance conditions, only the responsible component can be scaled up or down and no need to unnecessarily scale all the components as in the monolithic approach.
So I am sure, reading this docker tutorial until now must have given you some basic idea about the History Before containerization and how microservices have changed the way development was done.
So why to use containers?
Let’s understand in detail why we should use containers.?
Containers are small units that are used for running applications. They do not contain any OS and use the host OS.
1. Lightweight :
As we know that containers do not contain any OS and just have the required libraries and resources to run the application, they are light in weight and use the host OS.
2. Portable:
Containers and their contained applications can be deployed on any OS or hardware.
3. Efficient:
Applications are easily deployed and can be upgraded, reducing the time to market.
4. Easy development:
As the application is broken down as modules, each developer just needs to focus on its components and all such components can run in a container cluster to work as a complete application.
Dockerfile, Images & Containers
In this docker tutorial let’s understand some more components :
What is a Dockerfile?
Dockerfile is a text file that contains the set of instructions for the Docker.
Docker uses these instructions to build an image. Build command is used to create an image from this Dockerfile. These instructions are the set of commands that are run in order when a container is created from this image. Each line in a docker file is considered as a separate layer.
Example of a Dockerfile :
FROM alpine
WORKDIR /my work
COPY . /mywork
RUN apt-get -y update && apt-get install -y wget
CMD echo hello
What is a Docker Image?
A set of commands or instructions that are executed to start a container is called an image.
It is a collection of files that have no state.
This is in a read-only format. An Image consists of a list of commands that are executed in sequence when a container is formed out of it. You can use docker images to install applications that run within a container and pass the commands to them even at run time.
What is a Docker Container?
Docker container is a package that contains the application code and libraries that are required to run the application. Containers also make the application environment independent. Docker images when executed are called Docker containers.
Docker Compose
In this docker, tutorial let's further discuss other important tools provided by docker.
Till now we have seen how to run a single container but, even multiple container applications can be run.
This can be done with the help of docker-compose.
It helps us to define and run multiple containers as a single service.
It uses a YAML file for configuring the application. We then use this YAML file to start the application and all its services.
With the use of docker-compose, we can set up a complete environment to run our applications and also bring it down easily.
It separates the environment with the use of different project names.
Remember: When a container is brought down the data in it is lost. To avoid this situation user-specific volumes are the best solution.
Docker Swarm
Hosts that contains many masters and worker nodes is called a docker swarm. Here master node is responsible for managing the worker nodes.
In case a worker node goes down all tasks performed by it are transferred to another healthy node. This group of hosts is called a cluster.
Benefits :
1. Management of Cluster:
Master and many worker clusters are handled by docker swarm.
2. Scalable:
Scaling up and down of tasks are done easily.
3. Load-balancing:
In Swarm, manager ingress exposes services to the outer world.
Services are assigned a port number, using which it can be accessed from the outside world.
An internal DNS is responsible for assigning the services an entry.
0 notes
Text

The cosmos DB Emulator is a custom action available on the Azure DevOps portal, however, that doesn’t exactly make it turnkey to use. The custom task will spin up a container running Cosmos DB, however it does so with a specific local DNS / port that you need to pipe into your test running.
There is documentation but it’s a bit dated.

It will output a pipeline variable called "$(CosmosDbEmulator.Endpoint)". This isn’t exactly clear from the output variables GUI within the task editor. The trick is getting this into a variable that you future tasks can use. I prefer using Environment Variables over Test Runner configuration files as the dated documentation from Microsoft advises.
Those of you familiar with Azure DevOps will know that it’s a bit tricky working with Environment Variables. Some tasks support them, some don’t. Unfortunately the DotNetCoreCLI task type, you know the one that executes my .NET Core Xunit tests does not support environment variables. Therefore I have to ensure the environment variable is made available before that task is executed.

I do that in my "Setup Cosmos DB Endpoint" task. Which is simply there to grab the pipeline variable and set it up as an Environment Variable so that future steps can use it.
The data flow is like this:
$(CosmosDbEmulator.Endpoint) –> EMULATOR_ENDPOINT –> COSMOS_DB_ENDPOINT
I’m jamming in an Environment Variable using an Environment Variable? Weird, I know right? But that’s because how the Environment Variables work within Tasks. If I pipe in the pipeline variable $(CosmosDbEmulator.Endpoint) as an Environment Variable "EMULATOR_ENDPOINT" then it is only available within the scope of that task!
I have to use some special syntax to ensure I setup an Environment Variable that will be available across all tasks (going forward). That’s where this comes into play:
echo Task.setvariable
echo ##vso[task.setvariable variable=COSMOS_DB_ENDPOINT]%EMULATOR_ENDPOINT%
When we analyze the Azure DevOps pipeline execution we see what’s happening:
image005
image006
Notice that during the Setup of the CosmosDB Endpoint the values look like this:
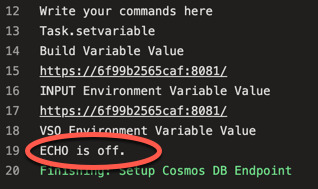
$(CosmosDbEmulator.Endpoint) https://6f99b2565caf:8081/ EMULATOR_ENDPOINT https://6f99b2565caf:8081/ COSMOS_DB_ENDPOINT NULL
Now we move onto the confirmation step…
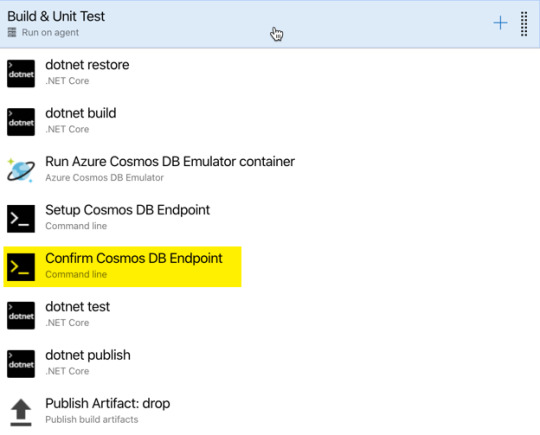
Notice in the next step things have changed:
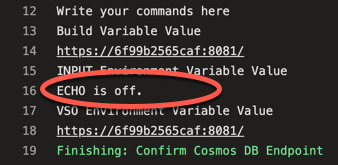
$(CosmosDbEmulator.Endpoint) https://6f99b2565caf:8081/ EMULATOR_ENDPOINT NULL COSMOS_DB_ENDPOINT https://6f99b2565caf:8081/
Notice that the change I requested to COSMOS_DB_ENDPOINT does NOT take into effect in the CURRENT task where the value is set. This can be very perplexing but it is available in all subsequent steps.
You might be asking, why not just use the pipeline variable. The answer is simple. This whole approach, is designed to make the Unit Tests and Unit Test configuration SIMPLER. Therefore, the unit tests should not have to worry about where or how the CosmosDB Endpoint URL gets into the "COSMOS_DB_ENDPOINT" Environment Variable it will work the same way. Developers can set the variable themselves on their environment if they want to use a different endpoint for testing, or you can do NULL checks in your Unit Test and use the local emulator settings when running the tests locally.
Now your test running will execute and connect to a REAL Cosmos DB server without issue. Isn’t that wonderful?! Yes and no.
Unfortunately, CosmosDB takes a hella long time to load.

Like 10 bloody minutes long.
The conspiracy theorist in me might suspect that this was an obnoxious attempt by Microsoft to increase the build minutes incurred on Azure DevOps to drive an increase in build minutes per month or parallel builds unit which of course are the main monetization strategy. But it’s a new Microsoft, right? Maybe they will fix the Cosmos DB emulator so it isn’t so ridiculously long to boot….a dev can dream, no?
DISCLAIMER ========== This e-mail may contain privileged and confidential information which is the property of Persistent Systems Ltd. It is intended only for the use of the individual or entity to which it is addressed. If you are not the intended recipient, you are not authorized to read, retain, copy, print, distribute or use this message. If you have received this communication in error, please notify the sender and delete all copies of this message. Persistent Systems Ltd. does not accept any liability for virus infected mails.
Cosmos DB Emulator on Azure DevOps The cosmos DB Emulator is a custom action available on the Azure DevOps portal, however, that doesn't exactly make it turnkey to use.
0 notes
Text
Adding a git commit hash and Azure DevOps Build Number and Build ID to an ASP.NET website
A few months back I moved my CI/CD (Continuous Integration/Continuous Development) to Azure DevOps for free. You get 1800 build minutes a month FREE and I'm not even close to using it with three occasionally-updated sites building on it. Earlier this week I wrote about making a cleaner and more intentional azure-pipelines.yml for an ASP.NET Core Web App
I was working/pairing with Damian today because I wanted to get my git commit hashes and build ids embedded into the actual website so I could see exactly what commit is in production.
That's live on hanselminutes.com righ tnow and looks like this
© Copyright 2020, Scott Hanselman. Design by @jzy, Powered by .NET Core 3.1.2 and deployed from commit 6b48de via build 20200310.7
There's a few things here and it's all in my ASP.NET Web App's main layout page called _layout.cshtml. You can look all about ASP.NET Core 101, .NET and C# over at https://dot.net/videos if you'd like. They've lovely videos.
So let's take this footer apart, shall we?
<div class="copyright">© Copyright @DateTime.Now.Year, <a href="http://feeds.hanselman.com/~/t/0/0/scotthanselman/~https://www.hanselman.com">Scott Hanselman</a>. Design by <a href="http://feeds.hanselman.com/~/t/0/0/scotthanselman/~www.8164.org/">@@jzy</a>, Powered by @System.Runtime.InteropServices.RuntimeInformation.FrameworkDescription and deployed from commit <a href="http://feeds.hanselman.com/~/t/0/0/scotthanselman/~https://github.com/shanselman/hanselminutes-core/commit/@appInfo.GitHash">@appInfo.ShortGitHash</a> via build <a href="http://feeds.hanselman.com/~/t/0/0/scotthanselman/~https://dev.azure.com/hanselman/Hanselminutes%20Website/_build/[email protected]&view=results">@appInfo.BuildNumber</a> </div>
First, the obvious floating copyright year. Then a few credits that are hard coded.
Next, a call to @System.Runtime.InteropServices.RuntimeInformation.FrameworkDescription which gives me this string ".NET Core 3.1.2" Note that there was a time for a while where that Property was somewhat goofy, but no longer.
I have two kinds of things I want to store along with my build artifact and output.
I want the the Git commit hash of the code that was deployed.
Then I want to link it back to my source control. Note that my site is a private repo so you'll get a 404
I want the Build Number and the Build ID
This way I can link back to my Azure DevOps site
Adding a Git Commit Hash to your .NET assembly
There's lots of Assembly-level attributes you can add to your .NET assembly. One lovely one is AssemblyInformationalVersion and if you pass in SourceRevisionId on the dotnet build command line, it shows up in there automatically. Here's an example:
[assembly: AssemblyConfiguration("Release")] [assembly: AssemblyFileVersion("1.0.0.0")] [assembly: AssemblyInformationalVersion("1.0.0+d6b3d432970c9acbc21ecd22c9f5578892385305")] [assembly: AssemblyProduct("hanselminutes.core")] [assembly: AssemblyTitle("hanselminutes.core")] [assembly: AssemblyVersion("1.0.0.0")]
From this command line:
dotnet build --configuration Release /p:SourceRevisionId=d6b3d432970c9acbc21ecd22c9f5578892385305
But where does that hash come from? Well, Azure Dev Ops includes it in an environment variable so you can make a YAML task like this:
- task: DotNetCoreCLI@2 displayName: 'dotnet build $(buildConfiguration)' inputs: command: 'build' arguments: '-r $(rid) --configuration $(buildConfiguration) /p:SourceRevisionId=$(Build.SourceVersion)'
Sweet. That will put in VERSION+HASH, so we'll pull that out of a utility class Damian made like this (full class will be shown later)
public string GitHash { get { if (string.IsNullOrEmpty(_gitHash)) { var version = "1.0.0+LOCALBUILD"; // Dummy version for local dev var appAssembly = typeof(AppVersionInfo).Assembly; var infoVerAttr = (AssemblyInformationalVersionAttribute)appAssembly .GetCustomAttributes(typeof(AssemblyInformationalVersionAttribute)).FirstOrDefault(); if (infoVerAttr != null && infoVerAttr.InformationalVersion.Length > 6) { // Hash is embedded in the version after a '+' symbol, e.g. 1.0.0+a34a913742f8845d3da5309b7b17242222d41a21 version = infoVerAttr.InformationalVersion; } _gitHash = version.Substring(version.IndexOf('+') + 1); } return _gitHash; } }
Displaying it is then trivial given the helper class we'll see in a minute. Note that hardcoded paths for my private repo. No need to make things complex.
deployed from commit <a href="http://feeds.hanselman.com/~/t/0/0/scotthanselman/~https://github.com/shanselman/hanselminutes-core/commit/@appInfo.GitHash">@appInfo.ShortGitHash</a>
Getting and Displaying Azure DevOps Build Number and Build ID
This one is a little more complex. We could theoretically tunnel this info into an assembly as well but it's just as easy, if not easier to put it into a text file and make sure it's part of the ContentRootPath (meaning it's just in the root of the website's folder).
To be clear, an option: There are ways to put this info in an Attribute but not without messing around with your csproj using some not-well-documented stuff. I like a clean csproj so I like this. Ideally there'd be another thing like SourceRevisionID to carry this metadata.
You'd need to do something like this, and then pull it out with reflection. Meh.
<ItemGroup> <AssemblyAttribute Include="System.Reflection.AssemblyMetadataAttribute" Condition="$(BuildNumber) != ''" > <_Parameter1>BuildNumber</_Parameter1> <_Parameter2>$(BuildNumber)</_Parameter2> </AssemblyAttribute> <AssemblyAttribute Include="System.Reflection.AssemblyMetadataAttribute" Condition="$(BuildId) != ''" > <_Parameter1>BuildId</_Parameter1> <_Parameter2>$(BuildId)</_Parameter2> </AssemblyAttribute> </ItemGroup>
Those $(BuildNumber) and $(BuildId) dealies are build variables. Again, this csproj messing around is not for me.
Instead, a simple text file, coming along for the ride.
- script: 'echo -e "$(Build.BuildNumber)\n$(Build.BuildId)" > .buildinfo.json' displayName: "Emit build number" workingDirectory: '$(Build.SourcesDirectory)/hanselminutes.core' failOnStderr: true
I'm cheating a little as I gave it the .json extension, only because JSON files are copying and brought along as "Content." If it didn't have an extension I would need to copy it manually, again, with my csproj:
<ItemGroup> <Content Include=".buildinfo"> <CopyToOutputDirectory>Always</CopyToOutputDirectory> </Content> </ItemGroup>
So, to be clear, two build variables inside a little text file. Then make a little helper class from Damian. Again, that file is in ContentRootPath and was zipped up and deployed with our web app.
public class AppVersionInfo { private static readonly string _buildFileName = ".buildinfo.json"; private string _buildFilePath; private string _buildNumber; private string _buildId; private string _gitHash; private string _gitShortHash; public AppVersionInfo(IHostEnvironment hostEnvironment) { _buildFilePath = Path.Combine(hostEnvironment.ContentRootPath, _buildFileName); } public string BuildNumber { get { // Build number format should be yyyyMMdd.# (e.g. 20200308.1) if (string.IsNullOrEmpty(_buildNumber)) { if (File.Exists(_buildFilePath)) { var fileContents = File.ReadLines(_buildFilePath).ToList(); // First line is build number, second is build id if (fileContents.Count > 0) { _buildNumber = fileContents[0]; } if (fileContents.Count > 1) { _buildId = fileContents[1]; } } if (string.IsNullOrEmpty(_buildNumber)) { _buildNumber = DateTime.UtcNow.ToString("yyyyMMdd") + ".0"; } if (string.IsNullOrEmpty(_buildId)) { _buildId = "123456"; } } return _buildNumber; } } public string BuildId { get { if (string.IsNullOrEmpty(_buildId)) { var _ = BuildNumber; } return _buildId; } } public string GitHash { get { if (string.IsNullOrEmpty(_gitHash)) { var version = "1.0.0+LOCALBUILD"; // Dummy version for local dev var appAssembly = typeof(AppVersionInfo).Assembly; var infoVerAttr = (AssemblyInformationalVersionAttribute)appAssembly .GetCustomAttributes(typeof(AssemblyInformationalVersionAttribute)).FirstOrDefault(); if (infoVerAttr != null && infoVerAttr.InformationalVersion.Length > 6) { // Hash is embedded in the version after a '+' symbol, e.g. 1.0.0+a34a913742f8845d3da5309b7b17242222d41a21 version = infoVerAttr.InformationalVersion; } _gitHash = version.Substring(version.IndexOf('+') + 1); } return _gitHash; } } public string ShortGitHash { get { if (string.IsNullOrEmpty(_gitShortHash)) { _gitShortHash = GitHash.Substring(GitHash.Length - 6, 6); } return _gitShortHash; } } }
How do we access this class? Simple! It's a Singleton added in one line in Startup.cs's ConfigureServices():
services.AddSingleton<AppVersionInfo>();
Then injected in one line in our _layout.cshtml!
@inject AppVersionInfo appInfo
Then I can use it and it's easy. I could put an environment tag around it to make it only show up in staging:
<environment include="Staging"> <cache expires-after="@TimeSpan.FromDays(30)"> <div class="copyright">© Copyright @DateTime.Now.Year, <a href="http://feeds.hanselman.com/~/t/0/0/scotthanselman/~https://www.hanselman.com">Scott Hanselman</a>. Design by <a href="http://feeds.hanselman.com/~/t/0/0/scotthanselman/~www.8164.org/">@@jzy</a>, Powered by @System.Runtime.InteropServices.RuntimeInformation.FrameworkDescription and deployed from commit <a href="http://feeds.hanselman.com/~/t/0/0/scotthanselman/~https://github.com/shanselman/hanselminutes-core/commit/@appInfo.GitHash">@appInfo.ShortGitHash</a> via build <a href="http://feeds.hanselman.com/~/t/0/0/scotthanselman/~https://dev.azure.com/hanselman/Hanselminutes%20Website/_build/[email protected]&view=results">@appInfo.BuildNumber</a> </div> </cache> </environment>
I could also wrap it all in a cache tag like this. Worst case for a few days/weeks at the start of a new year the Year is off.
<cache expires-after="@TimeSpan.FromDays(30)"> <cache>
Thoughts on this technique?
Sponsor: This week's sponsor is...me! This blog and my podcast has been a labor of love for over 18 years. Your sponsorship pays my hosting bills for both AND allows me to buy gadgets to review AND the occasional taco. Join me!
© 2019 Scott Hanselman. All rights reserved.


Adding a git commit hash and Azure DevOps Build Number and Build ID to an ASP.NET website published first on https://deskbysnafu.tumblr.com/
0 notes
Text
Azure devops copy files
Azure devops copy files
Azure devops copy files Azure devops copy files America latest news Azure devops copy files Azure devops copy files GitHub is home to over 50 million developers working together to host and review code, manage projects, and build software together. GitHub is where the world builds software Millions of developers and companies build, ship, and maintain their software on GitHub — the largest and…

View On WordPress
0 notes