#firestore emulator
Explore tagged Tumblr posts
Visit Tumblr Blog
Explore Tumblr blogs with no restrictions, modern design and the best experience.
Last Seen Tumblr Blogs


Fun Fact
The most popular pages on Tumblr are about Minecraft, GIFs, and David J. Peterson.
Text
python firestore API에서 에뮬레이터 사용하기
import grpc import firestore from google.cloud.firestore_v1.services.firestore import client as firestore_client from google.cloud.firestore_v1.services.firestore.transports.grpc import FirestoreGrpcTransport channel = grpc.insecure_channel("localhost:8080") transport = FirestoreGrpcTransport(channel=channel) firestore_db = firestore.Client() firestore_db._firestore_api_internal =…
View On WordPress
0 notes
Text
Flutter Tutorials for Web and Mobile App Developers

In today’s fast-paced digital world, developers are constantly searching for efficient, modern, and scalable solutions to build high-performance applications. Enter Flutter — Google’s open-source UI toolkit that allows developers to build beautiful, natively compiled applications for mobile, web, and desktop from a single codebase. This blog, "Flutter Tutorials for Web and Mobile App Developers," is designed to provide a comprehensive, hands-on learning experience tailored for both aspiring and experienced developers who want to master cross-platform development using Flutter.
Flutter is revolutionizing app development with its simplicity, flexibility, and speed. Unlike traditional native development that requires separate codebases for iOS, Android, and the web, Flutter uses the Dart programming language to compile apps into native machine code for multiple platforms. The result is faster development cycles, less maintenance, and a consistent user experience across devices.
Why Choose Flutter?
Before diving into the tutorials, it’s essential to understand why Flutter stands out:
One Codebase, Multiple Platforms: With Flutter, you write once and deploy to Android, iOS, web, and desktop — all from the same codebase.
Rich UI and Fast Performance: Flutter uses its own rendering engine (Skia), offering fast, smooth, and pixel-perfect UI rendering.
Hot Reload: Developers can instantly see changes in code without restarting the app, making development faster and more efficient.
Growing Community and Ecosystem: With robust support from Google and a large open-source community, Flutter has a wealth of plugins and packages for rapid development.
Built-In Testing Support: Flutter includes built-in testing tools for unit, widget, and integration tests, ensuring reliable and maintainable code.
Whether you're a mobile app developer looking to build for the web, or a web developer interested in expanding into mobile, Flutter is the perfect tool to bridge that gap.
What You'll Learn in These Flutter Tutorials
Our Flutter Tutorials for Web and Mobile App Developers take a practical, project-based approach to learning. Rather than just covering theory, you’ll apply what you learn by building real-world applications.
1. Getting Started with Flutter
What is Flutter and why it matters
Installing Flutter SDK and Dart
Setting up your development environment (VS Code, Android Studio)
Running your first Flutter app on web and mobile emulators
Understanding project structure and main.dart file
2. Dart Programming Basics
Introduction to Dart language
Variables, data types, and functions
Object-oriented programming in Dart
Asynchronous programming with async, await, and Future
3. UI Design and Widgets
Understanding the widget tree
Stateless vs Stateful widgets
Layouts using Rows, Columns, Containers, and Stack
Navigation and routing between screens
Building responsive UIs for web and mobile
4. State Management
Local state management using setState()
Scoped state management using Provider
Introduction to Bloc, Riverpod, and GetX
Best practices for managing state in large-scale applications
5. Working with APIs and JSON
Fetching data from REST APIs using http package
Parsing JSON and displaying data in lists
Error handling and loading indicators
Building reusable service layers for API communication
6. User Interaction and Forms
Building interactive forms with validation
Handling gestures, buttons, and user input
Authentication screens: Login and Register UI
Navigation drawer, bottom navigation bar, and tabs
7. Database and Storage
Local storage using SharedPreferences
Storing data with SQLite and Moor
Integration with Firebase Firestore and Realtime Database
Uploading and downloading files
8. Building for Web and Desktop
Adapting layout for larger screens
Handling responsiveness and browser compatibility
Deploying Flutter web apps to Firebase Hosting
Introduction to Flutter desktop apps
9. Testing and Debugging
Writing unit and widget tests
Debugging Flutter apps efficiently
Using DevTools and performance monitors
10. Deployment and Publishing
Preparing apps for Android and iOS release
Generating web builds and deploying to GitHub Pages or Firebase
App Store and Play Store submission guidelines
Version control and CI/CD integration using GitHub Actions
Who Should Follow These Tutorials?
These tutorials are ideal for:
Mobile Developers looking to expand into web development
Web Developers wanting to create mobile apps without learning Swift or Kotlin
UI/UX Designers interested in turning designs into functional apps
Students and Beginners starting their app development journey
Freelancers and Entrepreneurs building MVPs or full-scale applications
Regardless of your background, this guide provides a smooth learning curve that transitions from basic to advanced concepts using real-world examples.
Benefits of This Practical Approach
Unlike dry, textbook-style learning, our tutorials emphasize:
Hands-On Projects: Learn by building apps like a to-do list, weather app, login system, and e-commerce interface.
Code-First Lessons: Write, debug, and run code with each new concept introduced.
Cross-Platform Focus: Learn how to build applications that work seamlessly on both mobile and web platforms.
Real-World Skills: Gain experience with Flutter packages, responsive design, API integration, and testing — skills that are in high demand.
Final Thoughts
Flutter is one of the most exciting and efficient tools available today for cross-platform development. By following our Flutter Tutorials for Web and Mobile App Developers, you’ll unlock the potential to create beautiful, fast, and scalable applications from a single codebase.
0 notes
Text
Building a WhatsApp Clone: A Comprehensive Guide to the Source Code

In today’s digital age, messaging apps have come to be a fundamental part of conversation. Among them, WhatsApp sticks out as one of the most famous. With billions of users globally, it’s no wonder that many developers want to recognize the way to construct a comparable app. In this submission, we’ll delve into the system of building a WhatsApp-like app, especially focusing on the WhatsApp clone supply code. By breaking down the center components of the app, we'll provide you with a comprehensive manual to knowledge and constructing your personal WhatsApp clone for Android.
Understanding the WhatsApp Clone Source Code
Before jumping into development, it's important to understand the middle structure of a WhatsApp clone supply code. Messaging apps like WhatsApp are complicated structures that take care of user authentication, actual-time verbal exchange, media sharing, and more. The intention of a WhatsApp clone is to copy those functions with the use of an optimized codebase.
The WhatsApp clone Android supply code consists of various elements:
User Interface (UI/UX)
This entails creating the look and sense of the app, ensuring a continuing user revel in.
Real-Time Messaging
The core of any messaging app is its capacity to send and get hold of messages instantly.
User Authentication
WhatsApp makes use of phone numbers for authentication, regularly using OTP (one-time password) verification.
Media Sharing
Users must be able to share photos, videos, and documents with their contacts.
Once you understand these additives, you're ready to dive into the improvement procedure.
Setting Up the Development Environment
To start building a WhatsApp clone, you need the proper improvement surroundings. Here’s the way to install your system to work with the WhatsApp clone Android source code.
1. Install Android Studio
Android Studio is the most popular IDE (Integrated Development Environment) for Android development. It offers all the necessary tools for constructing, testing, and debugging your WhatsApp copy.
Download Android Studio from the reputable internet site.
Install the Android SDK and vital build equipment.
Make certain you have a working emulator to test the app or use a bodily Android device.
2. Set Up Firebase or Backend
A vital part of any messaging app is its backend. While a few developers pick using their very own servers, Firebase is a first-rate option for novices and skilled builders alike. Firebase offers actual-time databases, cloud garage, and user authentication services.
Set up a Firebase Realtime Database or Firestore for storing consumer records.
Enable Firebase authentication for telephone range sign-in.
Use Firebase Cloud Messaging (FCM) to deal with notifications.
Once the surroundings are installed, you’re equipped to explore the WhatsApp clone supply code in element.
Breaking Down the WhatsApp Clone Android Source Code
The WhatsApp clone Android supply code may be divided into various key components. Each issue serves a particular cause and works in concord to create a completely useful messaging app.
User Registration and Authentication
One of the primary things a person does in any app is to register. In a WhatsApp clone source code, the app uses smartphone quantity-based authentication. Firebase makes this method easy by way of imparting an out-of-the-container OTP authentication system.
Phone Number Input: The user enters their telephone number, which's dispatched to Firebase for validation.
OTP Verification: Firebase sends an OTP to the user's telephone. Once the OTP is entered, the consumer is authenticated.
By using Firebase Authentication, builders can capitalize on the app’s features as opposed to demanding approximately security vulnerabilities.
Real-Time Messaging Implementation
The coronary heart of any WhatsApp clone is real-time messaging. To put in force this, you could use Firebase Realtime Database or Firestore. Here’s how real-time messaging works inside the WhatsApp clone supply code:
Send and Receive Messages: When a consumer sends a message, it's uploaded to the Firebase Realtime Database, and all related gadgets acquire it in real-time.
WebSocket Protocol: This protocol guarantees a non-stop connection between the purchaser and server, making actual-time conversation possible.
Delivery Status: You can put in force study receipts and message shipping statuses the usage of Firestore’s built-in functions.
Contact List and User Presence
A seamless contact listing is vital for a pleasant revel in. In a WhatsApp clone, the app must routinely sync with the user's phone contacts and display which contacts are also the usage of the app. The WhatsApp clone Android source code normally handles this through:
Accessing Phone Contacts: Using Android’s contacts API to get right of entry to and sync the cellphone’s contact listing.
Online/Offline Status: Implementing consumer presence to show whether or not a touch is online or offline.
Media Sharing (Photos, Videos, Files)
Media sharing is another critical function of any WhatsApp clone. The app must allow customers to ship and receive multimedia files without interruptions. This method is dealt with through Firebase Cloud Storage:
Upload Files: Users can upload pics, videos, and files to Firebase Cloud Storage.
Download and View: Once the document is uploaded, a link is generated, permitting other users to download and look at the report inside the chat.
Group Chats and Broadcasts
Group chats are a ought-to-have function in any WhatsApp clone. The WhatsApp clone Android source code permits customers to create groups, upload participants, and broadcast messages.
Group Creation: Users can create agencies, and organization chats further to 1-on-one chats.
Broadcast Messaging: A broadcast message lets customers send a message to more than one contact concurrently.
Enhancing Security and Privacy in a WhatsApp Clone
Security is paramount in messaging apps. Implementing encryption is an important step to ensure records privateness. A WhatsApp clone supply code typically makes use of end-to-end encryption to stabilize the verbal exchange between customers.
End-to-End Encryption: This ensures that messages are encrypted at the sender’s tool and might simplest be decrypted by means of the recipient.
Data Encryption: All facts, along with media and messages, are encrypted during garage and transmission.
By incorporating these protection capabilities, you can construct a WhatsApp clone that prioritizes consumer privacy.
Customizing the WhatsApp Clone for Android
A vast benefit of working with the WhatsApp clone Android supply code is the potential to personalize it for your needs. From UI tweaks to adding new functionalities, the opportunities are countless.
UI Customizations
To create a unique experience, you can alter the app's layout:
Change Themes: Modify the app’s hues, fonts, and format to align together with your logo.
Custom Chat Backgrounds: Allow customers to choose custom backgrounds for their chats.
Adding New Features
Once the bottom capabilities are in vicinity, you can increase the functionality of your WhatsApp clone. Some popular additions encompass:
Voice and Video Calls: Implementing voice and video calls through the use of WebRTC.
Status Updates: Adding a feature much like WhatsApp's popularity in which customers can put up pictures or updates that disappear after 24 hours.
Testing and Debugging Your WhatsApp Clone
Thoroughly checking out is important before launching your app. Android Studio provides sturdy debugging tools that assist you to simulate numerous gadgets and network situations. Make certain to test the app across distinct Android variations to ensure compatibility.
Deploying Your WhatsApp Clone to the Google Play Store
Once your WhatsApp clone is complete, the final step is deploying it to the Google Play Store. Here’s a short checklist:
Optimize Your App: Reduce the app length and optimize for numerous Android devices.
Adhere to Google Play Policies: Ensure your app complies with Google’s regulations, especially regarding personal information and security.
App Store Optimization (ASO): Optimize your app listing with applicable keywords, outstanding pix, and an engaging description.
Conclusion
Building a WhatsApp clone from scratch would possibly seem difficult, but with the right tools and knowledge of the WhatsApp clone source code, you could expand a completely purposeful messaging app. Whether you're using Firebase or custom again-stop offerings, the center components stay the same. This manual gives the essential steps to create a WhatsApp-like experience. If you need help customizing your WhatsApp clone or building one from scratch, don't hesitate to touch us at AIS Technolabs.
FAQs
Q: Can I customize the WhatsApp clone to consist of new functions?
A: Yes, the WhatsApp clone Android supply code is completely customizable. You can add functions including voice calls, video calls, and status updates.
Q: Do I want a backend for the WhatsApp copy?
A: Yes, the backend is important for actual-time messaging, user authentication, and media garage. Firebase is a popular preference; however, you could additionally use your personal server.
Q: Is it important to implement encryption in a WhatsApp clone?
A: Yes, encryption is critical for securing user records and ensuring privacy in messaging apps.
Blog Source: https://medium.com/@aistechnolabspvtltd/building-a-whatsapp-clone-a-comprehensive-guide-to-the-source-code-93288b2a21e9
0 notes
Text
🌟 10 Must-Have Android Development Tools & Libraries That Will Revolutionize Your Coding Game! 🚀

As an Android developer, having the right set of tools and libraries can significantly enhance your productivity and the quality of your applications. In this blog post, we'll explore ten essential tools and libraries that will take your Android development to the next level.
1. Android Studio
The official Integrated Development Environment (IDE) for Android development, Android Studio is packed with features like code editing, debugging, and testing tools. With its robust IntelliJ IDEA foundation, it provides a seamless and powerful environment for building high-quality Android apps.
Key Features:
Intelligent code editor with auto-completion
Advanced code refactoring and analysis tools
Visual layout editor
Built-in emulator for testing
Support for Kotlin, Java, and C++
2. Kotlin
Kotlin is a modern, statically typed programming language that is fully interoperable with Java. It offers concise syntax, improved type inference, and enhanced null safety, making it a favorite among Android developers.
Key Benefits:
Reduced boilerplate code
Improved readability and maintainability
Fully supported by Google for Android development
3. Retrofit
Retrofit is a type-safe HTTP client for Android and Java, developed by Square. It simplifies the process of making API calls, handling responses, and parsing JSON data.
Key Features:
Easy integration with REST APIs
Supports request and response serialization
Built-in support for authentication and headers
4. Room
Room is a part of the Android Jetpack suite, providing an abstraction layer over SQLite to allow fluent database access while harnessing the full power of SQLite.
Key Features:
Simplified database operations
Compile-time verification of SQL queries
Integration with LiveData and Flow for reactive programming
5. Dagger
Dagger is a fully static, compile-time dependency injection framework for Java and Android. It helps manage complex dependency graphs in large applications.
Key Benefits:
Compile-time validation of dependencies
Reduction in boilerplate code
Improved performance with optimized generated code
6. Glide
Glide is a fast and efficient image loading library for Android. It focuses on smooth scrolling and supports fetching, decoding, and displaying video stills, images, and animated GIFs.
Key Features:
Memory and disk caching
Automatic image resizing and transformations
Simple API for loading images from various sources
7. Firebase
Firebase is a comprehensive app development platform provided by Google. It offers a suite of cloud-based tools and services to help you build high-quality apps.
Key Features:
Real-time database and Firestore for data storage
Authentication services
Analytics for tracking user behavior
Cloud messaging for push notifications
8. RxJava
RxJava is a library for composing asynchronous and event-based programs using observable sequences. It helps manage asynchronous operations in a clean and concise way.
Key Benefits:
Simplifies threading and scheduling
Composable operations for handling complex asynchronous logic
Integration with Retrofit for API calls
9. LeakCanary
LeakCanary is a memory leak detection library for Android. It automatically detects memory leaks in your app and provides detailed information to help you fix them.
Key Features:
Automatic detection and reporting of memory leaks
Easy integration and setup
Detailed leak trace to identify the source of the leak
10. Espresso
Espresso is a testing framework for Android that makes it easy to write reliable user interface tests. It provides a simple and consistent API to simulate user interactions.
Key Features:
Fast and reliable UI tests
Automatic synchronization with the UI thread
Support for writing concise and readable tests
Conclusion
Incorporating these tools and libraries into your Android development workflow will not only improve your coding efficiency but also enhance the performance and quality of your applications. Whether you're a seasoned developer or just starting, these must-have tools will revolutionize your coding game and help you build better Android apps. Happy coding! 🚀
Feel free to share your experiences with these tools or suggest any other essential tools in the comments below!
#AndroidDevelopment#CodingTools#DevLibraries#MobileDev#AndroidTips#AppDevelopment#DeveloperTools#CodeBetter#TechInnovation#ProgrammingEssentials
0 notes
Video
youtube
You don’t have to compromise the aesthetic of your home just to make it safer. With wall mounted electric fires, you can emulate the feeling and overall vibe of having an electric fire in your home without having to increase the fire hazard. Choose the favorite wall mounted electric fire that you can see at the Wall Mounted Electric Firestore. For more information, visit https://www.wallmounted-electricfires.co.uk/
1 note
·
View note
Text
Dolby Audio For Windows 10 Free Download

Dolby Audio For Windows 10 free. download full Version
Dolby Digital Plus Advanced Audio Windows 10 Free Download
Dolby Audio Driver Windows 10 Download
Related searches
» baixar dolby advanced áudio windows 10
» dolby advanced audio windows 10 скачать
» pilote dolby advanced audio windows 10
» dolby advanced audio windows 10 acer
» driver dolby advanced audio windows 10
» dolby advanced audio windows 10 driver
» dolby advanced audio windows 10 gratis
» dolby advanced audio windows 10 hp
» download dolby advanced audio windows 10
» windows 10 dolby advanced audio 下载
dolby advanced audio windows 10
at UpdateStar
More
Dolby Advanced Audio 7.2.8000.16
Dolby Advanced Audio is a suite of technologies specifically designed to adjust and tune audio output through the built-in PC speakers to provide the best possible listening experience. more info..
More
Dolby Digital Plus Advanced Audio 7.3.2.2
More
Realtek High Definition Audio Driver 6.0.9030.1
REALTEK Semiconductor Corp. - 168.6MB - Freeware -
Audio chipsets from Realtek are used in motherboards from many different manufacturers. If you have such a motherboard, you can use the drivers provided by Realtek. more info..
More
Advanced SystemCare 14.1.0.210
Advanced SystemCare is an all-in-one yet easy-to-use PC optimization software to clean, optimize, speed up, and protect your system, as well as secure your online privacy. more info..
More
Windows Live Essentials 16.4.3528.0331
Windows Live Essentials (previously Windows Live Installer) is a suite of freeware applications by Microsoft which aims to offer integrated and bundled e-mail, instant messaging, photo-sharing, blog publishing, security services and other … more info..
More
Dolby Audio X2 Windows API SDK 0.8.8.88
More
NVIDIA HD Audio Driver 1.3.38.40
High Definition Audio Driver for NVIDIA devices. more info..
More
Microsoft Silverlight 5.1.50918.0
Silverlight is essentially nothing more than Microsoft's vision of a cross-browser, cross-platform plug-in designed to be the source of rich online user experiences and to dislodge Flash from its current dominant position on the market. more info..
More
Dolby Audio X2 Windows APP 0.8.8.76
More
Dolby Digital Plus Home Theater 7.6.5.1
Dolby Digital Plus is an advanced surround sound audio technology that enables the Dolby Audio experience across home theaters, smartphones, operating systems, and browsers. more info..
Descriptions containing
dolby advanced audio windows 10
More
Realtek High Definition Audio Driver 6.0.9030.1
REALTEK Semiconductor Corp. - 168.6MB - Freeware -
Audio chipsets from Realtek are used in motherboards from many different manufacturers. If you have such a motherboard, you can use the drivers provided by Realtek. more info..
More
Mozilla Firefox 84.0.2
Coupon Search Plugin for Firefox, find some of the best discounts and deals around from the best retailers on the net. Coupons, discount codes and more. CouponMeUp have thousands of the best coupons from hundreds of online retailers. more info..
More
Microsoft Silverlight 5.1.50918.0
Silverlight is essentially nothing more than Microsoft's vision of a cross-browser, cross-platform plug-in designed to be the source of rich online user experiences and to dislodge Flash from its current dominant position on the market. more info..
More
VLC media player 3.0.11
VLC Media Player Foot Pedal allows VLC Media Player to be used as transcription software for transcription of all types of media files with full foot pedal support. more info..
More
Google Chrome 87.0.4280.141
Chrome is a web browser developed by Google. It is characterized by its speed and many innovative features. more info..
More
CyberLink PowerDVD 20.0.2216.62
PowerDVD 9 is simply the best video playback software for enjoying HD and Blu-ray movies. PowerDVD allows you to enjoy and remix movies as well as to store and organize your movie information. more info..
More
iTunes 12.11.0.26
An audio player for playing and organizing digital music files. Buy music, movies, TV shows, and audiobooks, or download free podcasts from the iTunes Store 24 hours a day, 7 days a week. more info..
More
CCleaner 5.76.8269
CCleaner is a freeware system optimization, privacy and cleaning tool. CCleaner is the number-one tool for cleaning your Windows PC. Keep your privacy online and offline, and make your computer faster and more secure. more info..
More
Microsoft Visual C++ 2008 Redistributable 11.0.61030.0
The Microsoft Visual C++ 2008 Redistributable Package installs runtime components of Visual C++ Libraries required to run applications developed with Visual C++ on a computer that does not have Visual C++ 2008 installed. more info..
More
Mozilla Maintenance Service 84.0.2
Firefox now installs an optional service called the Mozilla Maintenance Service. This service allows Firefox to install updates without requiring you to click yes in the Windows User Account Control (UAC) dialog. more info..
Looking for audio drivers for Dolby Home Theater® v4, Dolby Advanced Audio™ v2, Windows® 8, or Windows 10? You can find them by visiting the support section of your PC or tablet manufacturer's website. Every manufacturer's computer or tablet model is custom-tuned to deliver an optimized audio experience for the device.
Download dolby for windows 10 for free. Multimedia tools downloads - Dolby Home Theater by Dolby Laboratories, Inc. And many more programs are available for instant and free download.
Dolby Advanced Audio v2 addresses the shortcomings of PC audio with technologies that provide crisp, clear surround sound over a PC's built-in speakers and improve the clarity of connected headphones, too. Dolby Advanced Audio v2 borrows from the pioneering work Dolby engineers have done in the cinema and the home theater. Dolby Advanced Audio v2 addresses the shortcomings of PC audio with technologies that provide crisp, clear surround sound over a PC's built-in speakers and improve the clarity of connected headphones, too. Dolby Advanced Audio v2 borrows from the pioneering work Dolby engineers have done in the cinema and the home theater. Dolby Audio X2 Windows APP is a Shareware software in the category Miscellaneous developed by Dolby Laboratories, Inc. It was checked for updates 2,199 times by the users of our client application UpdateStar during the last month. Interarms walther ppk s serial number lookup. The latest version of Dolby Audio X2 Windows APP is 0.8.8.76, released on.
Additional titles containing
dolby advanced audio windows 10
More
Realtek High Definition Audio Driver 6.0.9030.1
REALTEK Semiconductor Corp. - 168.6MB - Freeware -
Audio chipsets from Realtek are used in motherboards from many different manufacturers. If you have such a motherboard, you can use the drivers provided by Realtek. more info..
More
Dolby Digital Plus Advanced Audio 7.3.2.2
More
Dolby Audio X2 Windows API SDK 0.8.8.88
More
Dolby Advanced Audio 7.2.8000.16
Dolby Advanced Audio is a suite of technologies specifically designed to adjust and tune audio output through the built-in PC speakers to provide the best possible listening experience. more info..
More
Dolby Audio X2 Windows APP 0.8.8.76
Most recent searches
» exls wop 2007 download
» lightroom version 6.14
» instalacion de software morpho
» smartaccsess ifd driver
» programm stamp 0.85 kaufen
» notepad2-mod portugues
» ventoy 1.0.30
» firestore dv file converter download
» istart browserfree. software download
» silverlight player download 日本語
» docking station drivers
» lancher epic
» tisfera design 3.2
» iptv per windows download italiano
» pobiesz doradcs uaktualnienia
» xvideo search
» sono lexis
» dawnload torach
» smarte gaga leve
» lenpwo easycamera
Dolby Audio provides a unique sound experience by enhancing digital audio output. It enables the user to tweak the sound system to provide an experience which only one can witness at a theater. If you want to install Dolby Audio in your Windows 10 computer, simply follow this article to do so.
Note: – Instead of moving ahead to method given below , you can also choose to install Dolby audio as microsoft store product here.
How to install Dolby Audio in Windows 10-
STEP-1 Install the Dolby Digital Plus AA driver
Follow these steps to download and install Dolby Audio in Windows 10.
1. Download “Dolby Digital Plus Advance Audio“. Click on “Download“.
Close the browser window.
2. Now, go to the download location on your computer.
3. Extractthe “Dolby Digital Plus Advanced Audio” to a location of your choice.
Close File Explorer window.
4.Press Windows Icon+I to open the Settings window.
5. Now, click on “Update and Security“.
6. Then, click on “Recovery“.
7. After that, under the “Advanced Startup” section, click on “Restart Now“.
8. After that, click on the “Troubleshoot” option.
9. To troubleshoot the issue, click on the “Troubleshoot“.
10. Then click on the “Advanced options“.
11. You can access the “Startup Settings“.
12. To restart your computer in safe mode, click on “Restart”
13. Press “4” to ‘Enable SafeMode‘.
14. Press Windows key+X and then click on “Device Manager“.

15. You need to click on “Sound, video and game controllers“.
Ultraman fighting evolution 3 ps2 iso download android. Download Ultraman Fighting Evolution- Rebirth. Playstation 2 Isos @ The Iso Zone. The Ultimate. The third Fighting Evolution game for the PS2 and the fifth. Nov 27, 2017 So I just bought Battlefront 2 and when I started playing it randomly during gameplay the screen will go black. Ultraman Fighting Evolution 3 is an Action game, published by Banpresto, which was released in Japan in 2004. DOWNLOAD Google Drive: Ultraman Fighting Evolution 3. Untuk memainkan game Ultraman Fighting Evolution 3 ini di PS2 teman-teman bisa langsung menginstallnya ke hardisk dengan USButill.Jika ingin memainkannya di android teman-teman jangan gunakan emulator ppsspp meskipun filenya iso karena Ultraman Fighting Evolution 3 bukan game untuk psp tapi khusus untuk ps2 jadi gunakan emulator damonps2 tapi androidnya harus yang speknya.
16. Now, right-click on “Realtek(R) Audio” and then click on “Update driver“.
17. Simply click on “Browse my computer for driver software“.
18. In the next window, click on “Let me pick from a list of available drivers“. Gta 5 pc download full game free.
19. Now, click on “Have Disk“.
20. After that, click on “Browse“.
21. In Locate File window, click on “Dolby Digital Plus Advance Audio“.
22. Choose the folder according to the CPU architecture.
23. Now, double click on “64 bit“.
24. Now, double click on the “Drivers” folder to access it.
25. Then, select the “Digital Plus AA“.
26. Now, click on “Open“.
27. Click on “OK“.
28. Now, select “Dolby Digital Plus Advance Audio“.
29. Then, click on “Next“.
30. If there is any warning message, click on “Yes“.
You will need to restart your computer to complete the update process.
STEP-2 Install the setup file for Dolby Digital Plus AA-
After rebooting your computer, follow these steps to install the Dolby Digital Advanced Audio on your computer.
1. Again, go to the location where you have extracted the zip file for the first time.
2. Double clickon the “Dolby Digital Plus Advanced Audio” folder to access it. Service tool v 4905 keygen download.

3. Now, double click on “64 bit“.
Dolby Audio For Windows 10 free. download full Version
4. In 64 bit folder, double clickon “Setup” folder.
5. Next, double clickon “DolbyDigitalPlusAAx64” to run the setup on your computer.
6. Follow the on-screen instructions to install the Dolby Digital Plus on your computer.
Dolby Digital Plus Advanced Audio Windows 10 Free Download
7. Upon completion, click on “Finish” to finish the installation process.
You have installed the Dolby Digital Advanced Audio on your computer. Check it out by playing any music or video.
Sambit is a Mechanical Engineer By qualification who loves to write about Windows 10 and solutions to weirdest possible problems.
Dolby Audio Driver Windows 10 Download
Recommended for You:
0 notes
Text
Build a 100% Serverless REST API with Firebase Functions & FaunaDB
Indie and enterprise web developers alike are pushing toward a serverless architecture for modern applications. Serverless architectures typically scale well, avoid the need for server provisioning and most importantly are easy and cheap to set up! And that’s why I believe the next evolution for cloud is serverless because it enables developers to focus on writing applications.
With that in mind, let’s build a REST API (because will we ever stop making these?) using 100% serverless technology.
We’re going to do that with Firebase Cloud Functions and FaunaDB, a globally distributed serverless database with native GraphQL.
Those familiar with Firebase know that Google’s serverless app-building tools also provide multiple data storage options: Firebase Realtime Database and Cloud Firestore. Both are valid alternatives to FaunaDB and are effectively serverless.
But why choose FaunaDB when Firestore offers a similar promise and is available with Google’s toolkit? Since our application is quite simple, it does not matter that much. The main difference is that once my application grows and I add multiple collections, then FaunaDB still offers consistency over multiple collections whereas Firestore does not. In this case, I made my choice based on a few other nifty benefits of FaunaDB, which you will discover as you read along — and FaunaDB’s generous free tier doesn’t hurt, either. 😉
In this post, we’ll cover:
Installing Firebase CLI tools
Creating a Firebase project with Hosting and Cloud Function capabilities
Routing URLs to Cloud Functions
Building three REST API calls with Express
Establishing a FaunaDB Collection to track your (my) favorite video games
Creating FaunaDB Documents, accessing them with FaunaDB’s JavaScript client API, and performing basic and intermediate-level queries
And more, of course!
Set Up A Local Firebase Functions Project
For this step, you’ll need Node v8 or higher. Install firebase-tools globally on your machine:
$ npm i -g firebase-tools
Then log into Firebase with this command:
$ firebase login
Make a new directory for your project, e.g. mkdir serverless-rest-api and navigate inside.
Create a Firebase project in your new directory by executing firebase login.
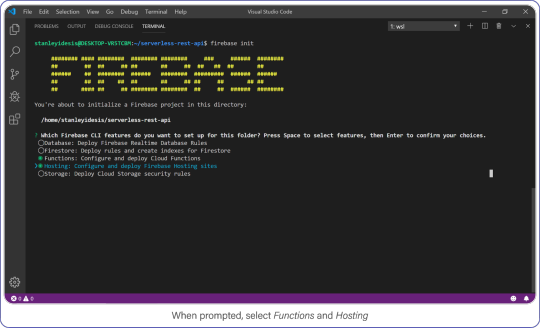
Select Functions and Hosting when prompted.
Choose "functions" and "hosting" when the bubbles appear, create a brand new firebase project, select JavaScript as your language, and choose yes (y) for the remaining options.
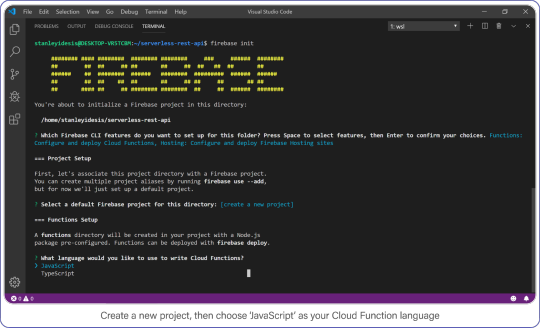
Create a new project, then choose JavaScript as your Cloud Function language.
Once complete, enter the functions directory, this is where your code lives and where you’ll add a few NPM packages.
Your API requires Express, CORS, and FaunaDB. Install it all with the following:
$ npm i cors express faunadb
Set Up FaunaDB with NodeJS and Firebase Cloud Functions
Before you can use FaunaDB, you need to sign up for an account.
When you’re signed in, go to your FaunaDB console and create your first database, name it "Games."
You’ll notice that you can create databases inside other databases . So you could make a database for development, one for production or even make one small database per unit test suite. For now we only need ‘Games’ though, so let’s continue.

Create a new database and name it "Games."
Then tab over to Collections and create your first Collection named ‘games’. Collections will contain your documents (games in this case) and are the equivalent of a table in other databases— don’t worry about payment details, Fauna has a generous free-tier, the reads and writes you perform in this tutorial will definitely not go over that free-tier. At all times you can monitor your usage in the FaunaDB console.
For the purpose of this API, make sure to name your collection ‘games’ because we’re going to be tracking your (my) favorite video games with this nerdy little API.
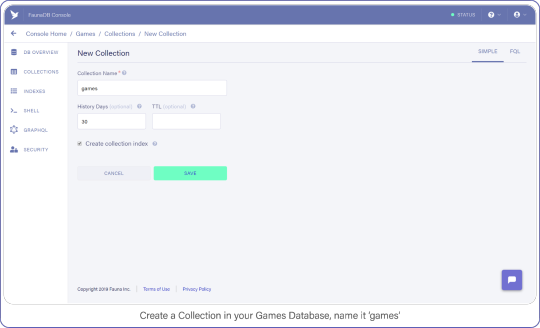
Create a Collection in your Games Database and name it "Games."
Tab over to Security, and create a new Key and name it "Personal Key." There are 3 different types of keys, Admin/Server/Client. Admin key is meant to manage multiple databases, A Server key is typically what you use in a backend which allows you to manage one database. Finally a client key is meant for untrusted clients such as your browser. Since we’ll be using this key to access one FaunaDB database in a serverless backend environment, choose ‘Server key’.
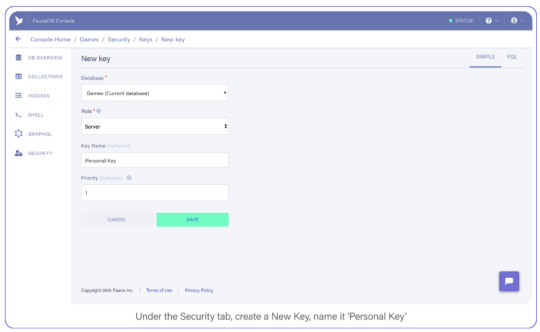
Under the Security tab, create a new Key. Name it Personal Key.
Save the key somewhere, you’ll need it shortly.
Build an Express REST API with Firebase Functions
Firebase Functions can respond directly to external HTTPS requests, and the functions pass standard Node Request and Response objects to your code — sweet. This makes Google’s Cloud Function requests accessible to middleware such as Express.
Open index.js inside your functions directory, clear out the pre-filled code, and add the following to enable Firebase Functions:
const functions = require('firebase-functions') const admin = require('firebase-admin') admin.initializeApp(functions.config().firebase)
Import the FaunaDB library and set it up with the secret you generated in the previous step:
admin.initializeApp(...) const faunadb = require('faunadb') const q = faunadb.query const client = new faunadb.Client({ secret: 'secrety-secret...that’s secret :)' })
Then create a basic Express app and enable CORS to support cross-origin requests:
const client = new faunadb.Client({...}) const express = require('express') const cors = require('cors') const api = express() // Automatically allow cross-origin requests api.use(cors({ origin: true }))
You’re ready to create your first Firebase Cloud Function, and it’s as simple as adding this export:
api.use(cors({...})) exports.api = functions.https.onRequest(api)
This creates a cloud function named, “api” and passes all requests directly to your api express server.
Routing an API URL to a Firebase HTTPS Cloud Function
If you deployed right now, your function’s public URL would be something like this: https://project-name.firebaseapp.com/api. That’s a clunky name for an access point if I do say so myself (and I did because I wrote this... who came up with this useless phrase?)
To remedy this predicament, you will use Firebase’s Hosting options to re-route URL globs to your new function.
Open firebase.json and add the following section immediately below the "ignore" array:
"ignore": [...], "rewrites": [ { "source": "/api/v1**/**", "function": "api" } ]
This setting assigns all /api/v1/... requests to your brand new function, making it reachable from a domain that humans won’t mind typing into their text editors.
With that, you’re ready to test your API. Your API that does... nothing!
Respond to API Requests with Express and Firebase Functions
Before you run your function locally, let’s give your API something to do.
Add this simple route to your index.js file right above your export statement:
api.get(['/api/v1', '/api/v1/'], (req, res) => { res .status(200) .send(`<img src="https://media.giphy.com/media/hhkflHMiOKqI/source.gif">`) }) exports.api = ...
Save your index.js fil, open up your command line, and change into the functions directory.
If you installed Firebase globally, you can run your project by entering the following: firebase serve.
This command runs both the hosting and function environments from your machine.
If Firebase is installed locally in your project directory instead, open package.json and remove the --only functions parameter from your serve command, then run npm run serve from your command line.
Visit localhost:5000/api/v1/ in your browser. If everything was set up just right, you will be greeted by a gif from one of my favorite movies.
And if it’s not one of your favorite movies too, I won’t take it personally but I will say there are other tutorials you could be reading, Bethany.
Now you can leave the hosting and functions emulator running. They will automatically update as you edit your index.js file. Neat, huh?
FaunaDB Indexing
To query data in your games collection, FaunaDB requires an Index.
Indexes generally optimize query performance across all kinds of databases, but in FaunaDB, they are mandatory and you must create them ahead of time.
As a developer just starting out with FaunaDB, this requirement felt like a digital roadblock.
"Why can’t I just query data?" I grimaced as the right side of my mouth tried to meet my eyebrow.
I had to read the documentation and become familiar with how Indexes and the Fauna Query Language (FQL) actually work; whereas Cloud Firestore creates Indexes automatically and gives me stupid-simple ways to access my data. What gives?
Typical databases just let you do what you want and if you do not stop and think: : "is this performant?" or “how much reads will this cost me?” you might have a problem in the long run. Fauna prevents this by requiring an index whenever you query. As I created complex queries with FQL, I began to appreciate the level of understanding I had when I executed them. Whereas Firestore just gives you free candy and hopes you never ask where it came from as it abstracts away all concerns (such as performance, and more importantly: costs).
Basically, FaunaDB has the flexibility of a NoSQL database coupled with the performance attenuation one expects from a relational SQL database.
We’ll see more examples of how and why in a moment.
Adding Documents to a FaunaDB Collection
Open your FaunaDB dashboard and navigate to your games collection.
In here, click NEW DOCUMENT and add the following BioShock titles to your collection:
{ "title": "BioShock", "consoles": [ "windows", "xbox_360", "playstation_3", "os_x", "ios", "playstation_4", "xbox_one" ], "release_date": Date("2007-08-21"), "metacritic_score": 96 } { "title": "BioShock 2", "consoles": [ "windows", "playstation_3", "xbox_360", "os_x" ], "release_date": Date("2010-02-09"), "metacritic_score": 88 }
? And...
{ "title": "BioShock Infinite", "consoles": [ "windows", "playstation_3", "xbox_360", "os_x", "linux" ], "release_date": Date("2013-03-26"), "metacritic_score": 94 }
As with other NoSQL databases, the documents are JSON-style text blocks with the exception of a few Fauna-specific objects (such as Date used in the "release_date" field).
Now switch to the Shell area and clear your query. Paste the following:
Map(Paginate(Match(Index("all_games"))),Lambda("ref",Var("ref")))
And click the "Run Query" button. You should see a list of three items: references to the documents you created a moment ago.
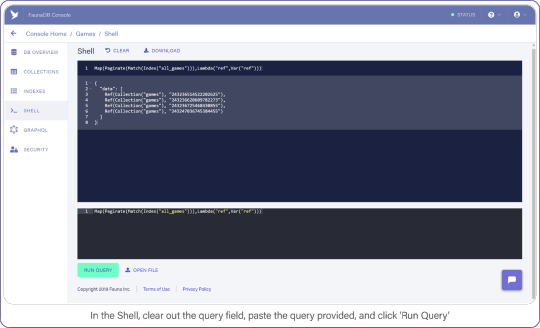
In the Shell, clear out the query field, paste the query provided, and click "Run Query."
It’s a little long in the tooth, but here’s what the query is doing.
Index("all_games") creates a reference to the all_games index which Fauna generated automatically for you when you established your collection.These default indexes are organized by reference and return references as values. So in this case we use the Match function on the index to return a Set of references. Since we do not filter anywhere, we will receive every document in the ‘games’ collection.
The set that was returned from Match is then passed to Paginate. This function as you would expect adds pagination functionality (forward, backward, skip ahead). Lastly, you pass the result of Paginate to Map, which much like its software counterpart lets you perform an operation on each element in a Set and return an array, in this case it is simply returning ref (the reference id).
As we mentioned before, the default index only returns references. The Lambda operation that we fed to Map, pulls this ref field from each entry in the paginated set. The result is an array of references.
Now that you have a list of references, you can retrieve the data behind the reference by using another function: Get.
Wrap Var("ref") with a Get call and re-run your query, which should look like this:
Map(Paginate(Match(Index("all_games"))),Lambda("ref",Get(Var("ref"))))
Instead of a reference array, you now see the contents of each video game document.
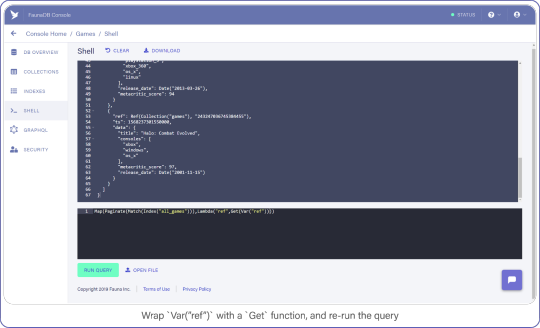
Wrap Var("ref") with a Get function, and re-run the query.
Now that you have an idea of what your game documents look like, you can start creating REST calls, beginning with a POST.
Create a Serverless POST API Request
Your first API call is straightforward and shows off how Express combined with Cloud Functions allow you to serve all routes through one method.
Add this below the previous (and impeccable) API call:
api.get(['/api/v1', '/api/v1/'], (req, res) => {...}) api.post(['/api/v1/games', '/api/v1/games/'], (req, res) => { let addGame = client.query( q.Create(q.Collection('games'), { data: { title: req.body.title, consoles: req.body.consoles, metacritic_score: req.body.metacritic_score, release_date: q.Date(req.body.release_date) } }) ) addGame .then(response => { res.status(200).send(`Saved! ${response.ref}`) return }) .catch(reason => { res.error(reason) }) })
Please look past the lack of input sanitization for the sake of this example (all employees must sanitize inputs before leaving the work-room).
But as you can see, creating new documents in FaunaDB is easy-peasy.
The q object acts as a query builder interface that maps one-to-one with FQL functions (find the full list of FQL functions here).
You perform a Create, pass in your collection, and include data fields that come straight from the body of the request.
client.query returns a Promise, the success-state of which provides a reference to the newly-created document.
And to make sure it’s working, you return the reference to the caller. Let’s see it in action.
Test Firebase Functions Locally with Postman and cURL
Use Postman or cURL to make the following request against localhost:5000/api/v1/ to add Halo: Combat Evolved to your list of games (or whichever Halo is your favorite but absolutely not 4, 5, Reach, Wars, Wars 2, Spartan...)
$ curl http://localhost:5000/api/v1/games -X POST -H "Content-Type: application/json" -d '{"title":"Halo: Combat Evolved","consoles":["xbox","windows","os_x"],"metacritic_score":97,"release_date":"2001-11-15"}'
If everything went right, you should see a reference coming back with your request and a new document show up in your FaunaDB console.
Now that you have some data in your games collection, let’s learn how to retrieve it.
Retrieve FaunaDB Records Using a REST API Request
Earlier, I mentioned that every FaunaDB query requires an Index and that Fauna prevents you from doing inefficient queries. Since our next query will return games filtered by a game console, we can’t simply use a traditional `where` clause since that might be inefficient without an index. In Fauna, we first need to define an index that allows us to filter.
To filter, we need to specify which terms we want to filter on. And by terms, I mean the fields of document you expect to search on.
Navigate to Indexes in your FaunaDB Console and create a new one.
Name it games_by_console, set data.consoles as the only term since we will filter on the consoles. Then set data.title and ref as values. Values are indexed by range, but they are also just the values that will be returned by the query. Indexes are in that sense a bit like views, you can create an index that returns a different combination of fields and each index can have different security.
To minimize request overhead, we’ve limited the response data (e.g. values) to titles and the reference.
Your screen should resemble this one:

Under indexes, create a new index named games_by_console using the parameters above.
Click "Save" when you’re ready.
With your Index prepared, you can draft up your next API call.
I chose to represent consoles as a directory path where the console identifier is the sole parameter, e.g. /api/v1/console/playstation_3, not necessarily best practice, but not the worst either — come on now.
Add this API request to your index.js file:
api.post(['/api/v1/games', '/api/v1/games/'], (req, res) => {...}) api.get(['/api/v1/console/:name', '/api/v1/console/:name/'], (req, res) => { let findGamesForConsole = client.query( q.Map( q.Paginate(q.Match(q.Index('games_by_console'), req.params.name.toLowerCase())), q.Lambda(['title', 'ref'], q.Var('title')) ) ) findGamesForConsole .then(result => { console.log(result) res.status(200).send(result) return }) .catch(error => { res.error(error) }) })
This query looks similar to the one you used in your SHELL to retrieve all games, but with a slight modification.This query looks similar to the one you used in your SHELL to retrieve all games, but with a slight modification. Note how your Match function now has a second parameter (req.params.name.toLowerCase()) which is the console identifier that was passed in through the URL.
The Index you made a moment ago, games_by_console, had one Term in it (the consoles array), this corresponds to the parameter we have provided to the match parameter. Basically, the Match function searches for the string you pass as its second argument in the index. The next interesting bit is the Lambda function. Your first encounter with Lamba featured a single string as Lambda’s first argument, “ref.”
However, the games_by_console Index returns two fields per result, the two values you specified earlier when you created the Index (data.title and ref). So basically we receive a paginated set containing tuples of titles and references, but we only need titles. In case your set contains multiple values, the parameter of your lambda will be an array. The array parameter above (`['title', 'ref']`) says that the first value is bound to the text variable title and the second is bound to the variable ref. text parameter. These variables can then be retrieved again further in the query by using Var(‘title’). In this case, both “title” and “ref,” were returned by the index and your Map with Lambda function maps over this list of results and simply returns only the list of titles for each game.
In fauna, the composition of queries happens before they are executed. When you write var q = q.Match(q.Index('games_by_console'))), the variable just contains a query but no query was executed yet. Only when you pass the query to client.query(q) to be executed, it will execute. You can even pass javascript variables in other Fauna FQL functions to start composing queries. his is a big benefit of querying in Fauna vs the chained asynchronous queries required of Firestore. If you ever have tried to generate very complex queries in SQL dynamically, then you will also appreciate the composition and less declarative nature of FQL.
Save index.js and test out your API with this:
$ curl http://localhost:5000/api/v1/xbox {"data":["Halo: Combat Evolved"]}
Neat, huh? But Match only returns documents whose fields are exact matches, which doesn’t help the user looking for a game whose title they can barely recall.
Although Fauna does not offer fuzzy searching via indexes (yet), we can provide similar functionality by making an index on all words in the string. Or if we want really flexible fuzzy searching we can use the filter syntax. Note that its is not necessarily a good idea from a performance or cost point of view… but hey, we’ll do it because we can and because it is a great example of how flexible FQL is!
Filtering FaunaDB Documents by Search String
The last API call we are going to construct will let users find titles by name. Head back into your FaunaDB Console, select INDEXES and click NEW INDEX. Name the new Index, games_by_title and leave the Terms empty, you won’t be needing them.
Rather than rely on Match to compare the title to the search string, you will iterate over every game in your collection to find titles that contain the search query.
Remember how we mentioned that indexes are a bit like views. In order to filter on title , we need to include `data.title` as a value returned by the Index. Since we are using Filter on the results of Match, we have to make sure that Match returns the title so we can work with it.
Add data.title and ref as Values, compare your screen to mine:

Create another index called games_by_title using the parameters above.
Click "Save" when you’re ready.
Back in index.js, add your fourth and final API call:
api.get(['/api/v1/console/:name', '/api/v1/console/:name/'], (req, res) => {...}) api.get(['/api/v1/games/', '/api/v1/games'], (req, res) => { let findGamesByName = client.query( q.Map( q.Paginate( q.Filter( q.Match(q.Index('games_by_title')), q.Lambda( ['title', 'ref'], q.GT( q.FindStr( q.LowerCase(q.Var('title')), req.query.title.toLowerCase() ), -1 ) ) ) ), q.Lambda(['title', 'ref'], q.Get(q.Var('ref'))) ) ) findGamesByName .then(result => { console.log(result) res.status(200).send(result) return }) .catch(error => { res.error(error) }) })
Big breath because I know there are many brackets (Lisp programmers will love this) , but once you understand the components, the full query is quite easy to understand since it’s basically just like coding.
Beginning with the first new function you spot, Filter. Filter is again very similar to the filter you encounter in programming languages. It reduces an Array or Set to a subset based on the result of a Lambda function.
In this Filter, you exclude any game titles that do not contain the user’s search query.
You do that by comparing the result of FindStr (a string finding function similar to JavaScript’s indexOf) to -1, a non-negative value here means FindStr discovered the user’s query in a lowercase-version of the game’s title.
And the result of this Filter is passed to Map, where each document is retrieved and placed in the final result output.
Now you may have thought the obvious: performing a string comparison across four entries is cheap, 2 million…? Not so much.
This is an inefficient way to perform a text search, but it will get the job done for the purpose of this example. (Maybe we should have used ElasticSearch or Solr for this?) Well in that case, FaunaDB is quite perfect as central system to keep your data safe and feed this data into a search engine thanks to the temporal aspect which allows you to ask Fauna: “Hey, give me the last changes since timestamp X?”. So you could setup ElasticSearch next to it and use FaunaDB (soon they have push messages) to update it whenever there are changes. Whoever did this once knows how hard it is to keep such an external search up to date and correct, FaunaDB makes it quite easy.
Test the API by searching for "Halo":
$ curl http://localhost:5000/api/v1/games?title=halo
Don’t You Dare Forget This One Firebase Optimization
A lot of Firebase Cloud Functions code snippets make one terribly wrong assumption: that each function invocation is independent of another.
In reality, Firebase Function instances can remain "hot" for a short period of time, prepared to execute subsequent requests.
This means you should lazy-load your variables and cache the results to help reduce computation time (and money!) during peak activity, here’s how:
let functions, admin, faunadb, q, client, express, cors, api if (typeof api === 'undefined') { ... // dump the existing code here } exports.api = functions.https.onRequest(api)
Deploy Your REST API with Firebase Functions
Finally, deploy both your functions and hosting configuration to Firebase by running firebase deploy from your shell.
Without a custom domain name, refer to your Firebase subdomain when making API requests, e.g. https://{project-name}.firebaseapp.com/api/v1/.
What Next?
FaunaDB has made me a conscientious developer.
When using other schemaless databases, I start off with great intentions by treating documents as if I instantiated them with a DDL (strict types, version numbers, the whole shebang).
While that keeps me organized for a short while, soon after standards fall in favor of speed and my documents splinter: leaving outdated formatting and zombie data behind.
By forcing me to think about how I query my data, which Indexes I need, and how to best manipulate that data before it returns to my server, I remain conscious of my documents.
To aid me in remaining forever organized, my catalog (in FaunaDB Console) of Indexes helps me keep track of everything my documents offer.
And by incorporating this wide range of arithmetic and linguistic functions right into the query language, FaunaDB encourages me to maximize efficiency and keep a close eye on my data-storage policies. Considering the affordable pricing model, I’d sooner run 10k+ data manipulations on FaunaDB’s servers than on a single Cloud Function.
For those reasons and more, I encourage you to take a peek at those functions and consider FaunaDB’s other powerful features.
The post Build a 100% Serverless REST API with Firebase Functions & FaunaDB appeared first on CSS-Tricks.
Build a 100% Serverless REST API with Firebase Functions & FaunaDB published first on https://deskbysnafu.tumblr.com/
0 notes
Text
Ionic Social App (Mobile)
This Social app has all the feature of Social Network used to get connected with family & friends via messages,posts & many more.The app is developed on Ionic 3,Angular & Firestore. It comes with all the service and business.App is created in such a way that helps developer to customize the things easier. We are committed to keep adding new feature and enhance app and keep updating to latest ionic.We are providing a complete document that will help you in installation & running the application, although You are free to ask any question related to product.
Note :
This is our first release so if you fing any issues or want some new features get in touch with us via email and we get back to you ASAP ( Please include app name in Email subject ) .
Email to [email protected] Visit our official website: https://ionicfirebaseapp.com
Please Follow below command:
#Install Latest Ionic Framework $ npm install -g ionic@latest #Browse the App Navigate to project directory #Install package.json dependencies $ npm install #Test your app on multiple screen sizes and platform types by starting a local development server $ ionic serve or $ ionic serve --lab #Build iOS ( you need Xcode to make IOS build ) $ ionic cordova platform add ios $ ionic cordova build ios --prod --aot #Build Android $ ionic cordova platform add android ( Make sure android studio and there SDK install correctly) $ ionic cordova build android --prod --aot #Deploying/Running on emulator $ ionic cordova run android --prod OUR PRODUCTS https://www.ionicfirebaseapp.com/products
CHANGE LOG : # RELEASE 1.0.0 - ( 22nd May 2018 ) - Initial Release.
OTHER PRODUCTS
from CodeCanyon new items https://ift.tt/2IQHm98 via IFTTT https://goo.gl/zxKHwc
0 notes
Text
SQL-like joins in Cloud Firestore #6: Rendering the restaurant cards
We take the data we received from our cloud function and display it to the user! Along the way, we also restart the emulator, copy-and-paste a lot of code, refactor some of it, and Todd finally gets a new shirt.
source https://morioh.com/p/f4778233978b
View On WordPress
0 notes
Text
Multi Restaurant App With Firestore (Mobile)
This Multi-Restaurant Firestore app has all the feature of e-commerce ( based on location ) shop needs to sell their item online. App is developed with ionic 3 and angular . It comes with all the service and business logic written . You are free to use your own backend or get our backend. You are developers who are challenged to develop store mobile application in shorter time it’s best starter app to get started. We are committed to keep adding new feature and enhance app and keep updating to latest ionic.
Dashboard Demo: https://multirestaurant-firestore-dash.firebaseapp.com
Note :
This is our first release so if you find any issues or wanted some new feature get in touch by email and we will get back to you ASAP ( Please include app name in Email subject ) .
Email to [email protected] Visit our official website: https://ionicfirebaseapp.com
Please Follow below command:
#Install Latest Ionic Framework $ npm install -g ionic@latest #Browse the App Navigate to project directory #Install package.json dependencies $ npm install #Test your app on multiple screen sizes and platform types by starting a local development server $ ionic serve or $ ionic serve --lab #Build iOS ( you need Xcode to make IOS build ) $ ionic cordova platform add ios $ ionic cordova build ios --prod --aot #Build Android $ ionic cordova platform add android ( Make sure android studio and there SDK install correctly) $ ionic cordova build android --prod --aot #Deploying/Running on emulator $ ionic cordova run android --prod OUR PRODUCTS https://www.ionicfirebaseapp.com/products
CHANGE LOG : # RELEASE 1.0.0 - ( 20th April 2018 ) - Initial Release
OTHER PRODUCTS
from CodeCanyon new items https://ift.tt/2HQeZuw via IFTTT https://goo.gl/zxKHwc
0 notes
Text
SQL-like joins in Cloud Firestore #5: Fetching documents with a callable function
In this Firebase Semi-live series, we fetch all of the restaurants from a user’s favorite list. Then we turn our function into a callable function so that we can call it more easily from our client app! Along the way, we also resolve multiple promises running in parallel, learn a valuable lesson in JavaScript variable scoping, and get callable functions working in the emulator.
source https://mor…
View On WordPress
0 notes
Text
SQL-like joins in Cloud Firestore #4: Talking to Cloud Firestore from our Cloud Function
In this Firebase tutorial, we create a Cloud Function that can be called directly through a REST call. Then we set up our emulators so that we can run local instances of Cloud Functions and Cloud Firestore, and have them talk to each other
source https://morioh.com/p/46251f82b6d0
View On WordPress
0 notes
Text
SQL-like joins in Cloud Firestore #3: Running a Cloud Function in the emulator
SQL-like joins in Cloud Firestore #3: Running a Cloud Function in the emulator
In this third episode of our Firebase Semi-live series, we add a button to our sample app! If that isn’t enough excitement for you, we also call our first Cloud Function, and get the Firebase emulator up and running so we can iterate on our Cloud Functions locally.
source https://morioh.com/p/9d7bffd627b9
View On WordPress
0 notes