#generatereports
Explore tagged Tumblr posts
Visit Tumblr Blog
Explore Tumblr blogs with no restrictions, modern design and the best experience.
Last Seen Tumblr Blogs


Fun Fact
69% of Tumblr users are millennials.
Photo

Google PageSpeed Insight is a tool used to generate reports on the performance of a webpage. The most important feature is to analyze real time website speed.
#googlepagespeedtools#googlepagespeedinsight#generatereports#performance#serverresponsetime#leverage#optimizeimage
0 notes
Photo

Your marketing goal defines your key strategy to solve the customer problems. Make your solution crystal clear for best results. The customer wants optimum results only. Implement strategies which are unique,able to thrive in this competitive market. Great marketing plans are built on a foundation of goals that represent your most pressing business needs. Steps for getting marketing goals are: Set your marketing goals. ... Conduct a marketing audit. ... Conduct market research. ... Analyze the research. ... Identify a target audience. ... Determine a budget. ... Develop marketing strategies. ... Develop an implementation schedule Dats it .It is simple.. #airportskyinn #marketinggoal #marketingbandwidth #marktingaudience #ruchikakachhawaha #provensolution #solution #marketingaudit #researchgoals #targetaudience #budget #maintheme #designgoals #definemarket #identifygoals #research #analyse #analyze #implementation #audit #schedule #generatereport #authenticreport #consultant #follow #followers (at Jaipur, Rajasthan) https://www.instagram.com/p/CDDyopagu8X/?igshid=1llohjfuy0ata
#airportskyinn#marketinggoal#marketingbandwidth#marktingaudience#ruchikakachhawaha#provensolution#solution#marketingaudit#researchgoals#targetaudience#budget#maintheme#designgoals#definemarket#identifygoals#research#analyse#analyze#implementation#audit#schedule#generatereport#authenticreport#consultant#follow#followers
0 notes
Text
API Testing with Karate
You heard it right, we are going to learn on how to create a API Testing suite using Karate, Let’s go.....

So what is Karate ?
Well, Karate is an Automation Framework with which we can perform API Test Automation, mocks, performance-testing and even UI automation into a single, unified framework. Moreover Karate is open source, and it follows Cucumber BDD styled syntax.
Advantages of Karate
Easy to start automating
Even non-programmers can start using Karate with just very minimal learning curve
powerful JSON and XML assertions are inbuilt
you just have to create ‘.feature’ files, no need to create step definitions.
If you're new to programming or automation testing Karate is easy to use since no Java knowledge is required. If this is you, Karate might be the perfect choice for your team.

How to start using Karate?
prerequisite:
Java JDK
Maven
IDE
First you should be creating a project, will be better if its a maven project
Start your IDE, I’ll be using intellij
Create a new maven project
To make use of Karate in the created project, you need two dependencies, and those are
Karate itself
<dependency>
<groupId>com.intuit.karate</groupId>
<artifactId>karate-apache</artifactId> <version>0.6.0</version>
</dependency>
next we need Junit to facilitate Junit testing
<dependency>
<groupId>com.intuit.karate</groupId> <artifactId>karate-junit4</artifactId> <version>0.6.0</version>
</dependency>
that’s it, we have all the basic things to start writing automation tests. That’s simple right, yes it is
For testing purpose I am going to make use of Open source weather API(’https://www.metaweather.com/api/’)
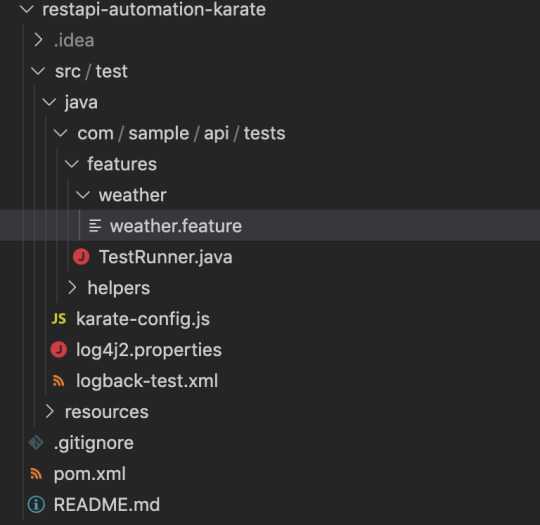
In the newly created project, create a new file called ‘karate-config.js’ in the main src folder then, Create a package and add a feature file in it like I have done below,
Lets begin our testing by configuring the test suite, for that we need to add our test details(app url, environment details, etc) in “karate-config.js” file. I have added the following details for our test suite,

Whats next ? yes, we can start writing tests..
how to write test using karate ? will it be like rest-assured or jersey ? no.... nothing is complicated in karate, you don’t need to write even a single line of code to write basic tests, then how can we define our tests ? Cucumber feature files.. yeah, you heard me right. We just need to have cucumber feature files.
Shall we write our first test using Karate ?
Our first test is to do a location search and get the lat long details from the API and assert the values.

it’s not big, just normal Cucumber feature file with karate keywords in them.
“path” - this is the place where we give the URL and API Endpoints
“param query” - this is where we can specify URL params
“method” - this is where we need to specify the type of request
“status” - Using this keyword we can assert the response code
Assertions:
And response.city == 'Chennai'
And response.latt_long == '13.05939,80.245667'
assertions are plain simple, you get the entire response json object, which you can traverse and do your assertions, like the ones that I have added in the above script
What we have to do when we need to do complex assertions or request body creation ? Karate covers that as well, you can create your own custom functions either in Java or Javascript and then use those functions within your feature files.. Shall we try one such custom utility function ?
We will make use of the Endpoint “location/search/” and pass lat and long as params, which will give us list of cities that comes under same lat long co-ordinates, and then we can assert the response cities with our custom assertion method. This is how I have written the scenario for this test,

did you see the step which says,
* def responseLength = returnLength(response)
where does this returnLength comes from ? yup, that’s our custom function. Create a utility.js file within your src folder and write the following code in it,
function () {
function returnLength(payload)
{
karate.log(payload.length);
return payload.length;
}
return {
returnLength : returnLength
};
}
Next we need to make sure that Karate knows about this custom function, for that we have to add this utility function in the karate-config.js file, make the following entry in your karate-config file,
config = karate.call('file:src/test/java/com/sample/api/tests/helpers/utility.js',config);
This will make sure that your custom function is known to karate. Thats it, you can call your function in feature files. Easy isn’t it ? yup sooooo easy.
How to execute our test ?
The next big this is execution, Karate makes use of Junit. We need to have a Junit runner class within our project which points to our feature file, nothing more is needed.

instead of cucumberoptions you can see that we are making use of the annotation “KarateOptions” and passing the feature files in it. And then we have a method with @Test annotation in it, which is making use of the Karate runner to execute the tests. And then we have a “generateReport” method which is used to create Cucumber HTML reports,. We can execute this class as an Junit Test, and the results will be in Target folder.

We are done... Simple right ?
I have made use of Karate for our API regression suite, which has around 700 tests in them. We have our tests connected to our CI pipeline and our tests have been very efficient without any flakiness in it. I am so happy that I moved over to Karate from Rest-Assured. Hope you guys will also enjoy by making use of Karate. You can reach out to me if you need help while implementing Karate.
0 notes
Text
Estimote introducing Low Power Asset Tracking API
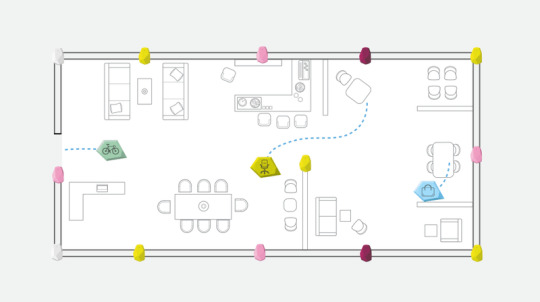
At Estimote, we keep adding building blocks for truly intelligent locations. Our vision of the future involves workplaces and offices that make lives easier, thanks to a sophisticated mixture of sensors, location algorithms, and communication over low-power mesh networks. Today, we’re adding another layer on top this strong foundation. We want to introduce you to Estimote’s Asset Tracking API.
This technology allows you to create an asset tracking solution in a matter of hours, not days, with elements of our stack you likely already have.
Why are we building Asset Tracking technology?
Asset Tracking API is an answer to real life problems. We hear a lot about them from our community. This kind of technology can be used in a factory to track the position of particular hardware or, say, at an assembly line where plane components have to be found and installed in an extremely efficient manner. Another interesting real-life example is tracking medical equipment at hospitals. We know that efficiency in locating crucial tools is a good way to save time and money from day one.

We attempted to tackle this problem earlier, with an initial version of asset tracking based on our beacons with Indoor and Nearables. Even in that first version, we had no need for gateways and wires. That doesn’t mean it was perfect: the core principle was the same (track the placement of a Nearable using beacons), but there was much more overhead in the process. In practice, it only collected data about the Nearables’ placement when an Internet-connected device with an app was around. This meant that someone had to walk around the entire space quite frequently, or the Nearables’ position wouldn’t be updated. Naturally, this wasn’t good enough for us long term. We wanted to take things further, and build something smarter.
Estimote’s new way of tracking assets
We began with a very specific focus, the same we have for our mesh networking: low power usage. We built Asset Tracking on top of our low-power BLE mesh, in fact. It’s cheaper and easier to deploy—and to maintain, since there’s no power supply needed at any point of the entire process.
How does it work?
It’s actually pretty simple: take some Estimote Stickers and place them on the items you’d like to track. They need to be within range of a single Location beacon or in a location that’s mapped using Location beacons. The only requirement is that you have firmware 4.13.2 or newer installed on the Location Beacons with F3.3 or I1.2 hardware version.

After a straightforward, cloud-based configuration process, the beacons scan for Stickers in their vicinity. By default, beacons are scanning for stickers every 3 minutes. To get the current location of Stickers, just send a request to the Estimote Cloud API — this triggers a scan and data collection over mesh. You can use a Swift helper method in Estimote iOS SDK:
func generateReport() { let meshManager: ESTMeshManager = ESTMeshManager() meshManager.prepareNearablesScanReportCommand(forNetworkIdentifier: meshIdentifier, completion: { (error) in if let error = error { print("Generate nearable scan report failed with error: \(error)") return } print("Generate nearable scan report success!") }) `</pre> } <pre>` The data is then read from any of the beacons by either an iOS or Android device. This operation can be performed manually <script src="https://gist.github.com/martinklimek/7463a55b69bad66ed68b19d0e668e10b.js"></script> `</pre> func readReportFromDevice(device: ESTDeviceLocationBeacon) { <pre>` // Connection is required to read Asset Tracking report if device.connectionStatus != ESTConnectionStatus.connected { return } device.scanReports?.readScanReport(completion: { (report: ESTMeshNearablesScanReportVO, error: Error) in guard let error = error else { return } // You should use first 4 bytes of Nearable identifier // Returned string contains first 4 bytes of beacon identifiers let closestDeviceIdentifier: String = report.closestDeviceIdentifier(forNearableIdentifier: "aabbccdd") }) `</pre> } <pre>` or with the help of a Mesh Gateway. With several dozen beacons in the space, you'll get the results in a matter of minutes with the [Estimote Cloud API]([https://cloud.estimote.com/docs/](https://cloud.estimote.com/docs/)). Ask yourself: how long would it take you to walk around a warehouse and check every nook and cranny for that one particular box you're looking for? For 25 beacons, it's well under 10 minutes. <script src="https://gist.github.com/martinklimek/df46fd5a8e4db30d78f29b715f03a60d.js"></script> `</pre> class ViewController: UIViewController { <pre>`let meshGateway: ESTMeshGateway = ESTMeshGateway() override func viewDidLoad() { super.viewDidLoad() self.meshGateway.start() } `</pre> } <pre>` Instead of creating a dedicated hardware gateway, we’re introducing gateway functionality in our SDK. Any phone with the right software can now work as a gateway. To make things sweeter, every beacon collects data from the entire mesh, so even a single phone, at any point in the range of the mesh, is enough to get the full picture. Isn’t that better than buying, say, 400 additional devices you need to configure and maintain? The cherry on top? To get this setup, you don't even have to map out the space yourself. Thanks to [Location Beacons with UWB]([http://blog.estimote.com/post/154460651570/estimote-beacons-with-uwb-can-now-automatically](http://blog.estimote.com/post/154460651570/estimote-beacons-with-uwb-can-now-automatically)), Estimote does the mapping for you. Just follow our setup wizard and place the beacons around the location, then watch the map get drawn with inch-perfect precision. ### Try it now! We're really excited to get this technology into your hands. If you want to know more just drop us a line at [[email protected]](mailto:[email protected]?subject=Asset%20Tracking). [Rafał Ociepa](mailto:[email protected]), Content Manager at [Estimote]([http://estimote.com/](http://estimote.com/)) [Marcin Klimek]([https://twitter.com/klimek_marcin](https://twitter.com/klimek_marcin)), Product Manager at [Estimote]([http://estimote.com/](http://estimote.com/))
1 note
·
View note
Photo

One of my favorite memories of our Carterville Community is when we participated to bring Old Glory from Chester, IL to Carterville, IL. The community really came together and we honored our local Veterans and the ones that were no longer with us. . It is this community pride that I want to continue to focus on and show our community what we can do when we stand together united. . I Believe WE have more that unites us than separates us. Let me earn your VOTE on Tuesday, April 2nd. . . . . . #southernillinois #illinois #618hh #chicago #618 #siu #siue #618hiphop #carbondale #midwest #celebrate618 #worldstar #rickeearts #xxl #discover618 #cartervilleillinois #supportyourlocalartists #goodmusic #trap #siuc18 #chicagomusic #musicvideo #tmz #health #artist #brakes #healthierlifestyle #city #generatereport http://bit.ly/2FbPyBR
0 notes
Text
Reports and Accounting - Easy report management
MANAGE ACCOUNTS AND REPORTS IS EASY NOW
Reports are effective medium to check society progress. It is easy to track society improvement and progress through reports. Managing report and accounting is therefore very important and high priority job for societies

0 notes
Quote
What are Streams in GRPC Streams in GRPC help us to send a Stream of messages in a single RPC Call. In this article, we will be focussing on the following streams Server Streaming GRPC: In this case, the client makes a single request to the server and the server sends a stream of messages back to the client. Client Streaming GRPC: In this case, the client sends a stream of messages to the server. The server then processes the stream and sends a single response back to the client. Server Streaming GRPC Now let us create the server and client codes for a Server Streaming GRPC Creating the .proto file create a folder called proto. In the folder create a file called employee.proto. Copy the following into employee.proto syntax = "proto3"; package employee; service Employee { rpc paySalary (EmployeeRequest) returns (stream EmployeeResponse) {} } message EmployeeRequest { repeated int32 employeeIdList = 1; } message EmployeeResponse{ string message = 1; } Refer to my grpc basics article to know more about .proto files and Protocol Buffers. Here we are creating an rpc called paySalary which accepts EmployeeRequest as the request and sends stream of EmployeeResponse as the response. We use the keyword stream to indicate that the server will send a stream of messages EmployeeRequest and EmployeeResponse are defined above as well. repeated keyword indicates that a list of data will be sent. In this example, the request to paySalary will be a list of employee Ids. The server will respond with a stream of messages telling if Salary has been paid to an employee or not. Creating Dummy data for the Server Create a file called data.js and copy the following code into it. //Hardcode some data for employees let employees = [{ id: 1, email: "[email protected]", firstName: "First1", lastName: "Last1" }, { id: 2, email: "[email protected]", firstName: "First2", lastName: "Last2" }, { id: 3, email: "[email protected]", firstName: "First3", lastName: "Last3" }, ]; exports.employees = employees; We will use it as the data source for the server. Creating the Server Create a file called as server.js. Copy the following code into server.js const PROTO_PATH = __dirname + '/proto/employee.proto'; const grpc = require('grpc'); const protoLoader = require('@grpc/proto-loader'); let packageDefinition = protoLoader.loadSync( PROTO_PATH, { keepCase: true, longs: String, enums: String, defaults: true, oneofs: true }); let employee_proto = grpc.loadPackageDefinition(packageDefinition) Refer to my grpc basics article to understand what the above script does. Next, add the following piece of code into server.js let { paySalary } = require('./pay_salary.js'); function main() { let server = new grpc.Server(); server.addService(employee_proto.Employee.service, { paySalary: paySalary } ); server.bind('0.0.0.0:4500', grpc.ServerCredentials.createInsecure()); server.start(); } main(); In the above script, we are starting the GRPC Server and adding Employee Service into it along with paySalary implementation. But paySalary function is defined in pay_salary.js file. Let us create a pay_salary.js file. Add the following script into pay_salary.js file let { employees } = require('./data.js'); const _ = require('lodash'); function paySalary(call) { let employeeIdList = call.request.employeeIdList; _.each(employeeIdList, function (employeeId) { let employee = _.find(employees, { id: employeeId }); if (employee != null) { let responseMessage = "Salary paid for ".concat( employee.firstName, ", ", employee.lastName); call.write({ message: responseMessage }); } else{ call.write({message: "Employee with Id " + employeeId + " not found in record"}); } }); call.end(); } exports.paySalary = paySalary; paySalary function takes call as the input. call.request will have the request sent by the client. call.request.employeeIdList will have the list of employee Ids sent by the client. We then loop over the EmployeeId's and for each employee Id we do some processing. For each employee Id, we call the call.write function at the last. call.write will write a single message in a stream back to the client. In this case for each employee, call.write will send back whether salary has been paid or not. Once all the Employee Id's have been processed we call the call.end function. call.end indicates that the stream is complete. Here is the final server.js file const PROTO_PATH = __dirname + '/proto/employee.proto'; const grpc = require('grpc'); const protoLoader = require('@grpc/proto-loader'); let packageDefinition = protoLoader.loadSync( PROTO_PATH, { keepCase: true, longs: String, enums: String, defaults: true, oneofs: true }); let employee_proto = grpc.loadPackageDefinition(packageDefinition) let { paySalary } = require('./pay_salary.js'); function main() { let server = new grpc.Server(); server.addService(employee_proto.Employee.service, { paySalary: paySalary } ); server.bind('0.0.0.0:4500', grpc.ServerCredentials.createInsecure()); server.start(); } main(); Creating the Client Create a file called client_grpc_server_stream.js. Copy the following code into the file. const PROTO_PATH = __dirname + '/proto/employee.proto'; const grpc = require('grpc'); const protoLoader = require('@grpc/proto-loader'); let packageDefinition = protoLoader.loadSync( PROTO_PATH, {keepCase: true, longs: String, enums: String, defaults: true, oneofs: true }); let employee_proto = grpc.loadPackageDefinition(packageDefinition).employee; The above script has already been explained in my grpc basics article. Next, add the following piece of the script to the client. function main() { let client = new employee_proto.Employee('localhost:4500', grpc.credentials.createInsecure()); let employeeIdList = [1,10,2]; let call = client.paySalary({employeeIdList: employeeIdList}); call.on('data',function(response){ console.log(response.message); }); call.on('end',function(){ console.log('All Salaries have been paid'); }); } main(); client variable will have the stub which will help us call the function in the server. employeeIdList is the input given to the server. let call = client.paySalary({employeeIdList: employeeIdList}); script calls the paySalary function in the server and passes employeeIdList as the request. Since the server is going to send a stream of messages, call object will help us listen to the stream events We listen to the 'data' event in call object for any message coming from the server in the stream. This is shown in the below script call.on('data',function(response){ console.log(response.message); }); Here we just print the response message whenever we receive anymessage from the server We listen to the 'end' event in the call object to know when the server stream ends. This is shown in the below script call.on('end',function(){ console.log('All Salaries have been paid'); }); Here when the stream ends we are printing 'All Salaries have been paid'. Here is the complete code for client_gprc_server_stream.js const PROTO_PATH = __dirname + '/proto/employee.proto'; const grpc = require('grpc'); const protoLoader = require('@grpc/proto-loader'); let packageDefinition = protoLoader.loadSync( PROTO_PATH, {keepCase: true, longs: String, enums: String, defaults: true, oneofs: true }); let employee_proto = grpc.loadPackageDefinition(packageDefinition).employee; function main() { let client = new employee_proto.Employee('localhost:4500', grpc.credentials.createInsecure()); let employeeIdList = [1,10,2]; let call = client.paySalary({employeeIdList: employeeIdList}); call.on('data',function(response){ console.log(response.message); }); call.on('end',function(){ console.log('All Salaries have been paid'); }); } main(); Running the Code Open a Command prompt and start the server using the following script. node server.js open a new command prompt and run the client using the following script. node client_grpc_server_stream.js On running the client we will get the following output. Salary paid for First1, Last1 Employee with Id 10 not found in record Salary paid for First2, Last2 All Salaries have been paid In this case, the client has sent 3 Id's 1,10,2 to the server. The Server processes the Id's one by one and sends a stream of messages to the client. Once all the messages in the stream are completed, the message 'All Salaries have been paid' is printed. Client Streaming GRPC Now let us create the server and client codes for a Client Streaming GRPC. Creating the .proto file In the previously created employee.proto file add the following service Employee { rpc paySalary (EmployeeRequest) returns (stream EmployeeResponse) {} rpc generateReport (stream ReportEmployeeRequest) returns (ReportEmployeeResponse) {} } message ReportEmployeeRequest { int32 id = 1; } message ReportEmployeeResponse{ string successfulReports = 1; string failedReports = 2; } Here we have added a new rpc called generateReport which accepts a stream of ReportEmployeeRequest as request and returns ReportEmployeeResponse as the response. so the input to the rpc is a stream of employee Id's and the response from the server will be a single response which says how many reports were generated and how many reports failed. Here is the complete employee.proto file after our changes syntax = "proto3"; package employee; service Employee { rpc paySalary (EmployeeRequest) returns (stream EmployeeResponse) {} rpc generateReport (stream ReportEmployeeRequest) returns (ReportEmployeeResponse) {} } message EmployeeRequest { repeated int32 employeeIdList = 1; } message EmployeeResponse{ string message = 1; } message ReportEmployeeRequest { int32 id = 1; } message ReportEmployeeResponse{ string successfulReports = 1; string failedReports = 2; } Creating the Server Here is the complete server.js code with the new rpc added const PROTO_PATH = __dirname + '/proto/employee.proto'; const grpc = require('grpc'); const protoLoader = require('@grpc/proto-loader'); let packageDefinition = protoLoader.loadSync( PROTO_PATH, { keepCase: true, longs: String, enums: String, defaults: true, oneofs: true }); let employee_proto = grpc.loadPackageDefinition(packageDefinition).employee; let { paySalary } = require('./pay_salary.js'); let { generateReport } = require('./generate_report.js'); function main() { let server = new grpc.Server(); server.addService(employee_proto.Employee.service, { paySalary: paySalary , generateReport: generateReport } ); server.bind('0.0.0.0:4500', grpc.ServerCredentials.createInsecure()); server.start(); } main(); In the above script, we can see that we have added generateReport function as well to the grpc server.Also we can see that generateReport function comes from generate_report.js file. Create a file called as generate_report.js. Add the following script into the file let { employees } = require('./data.js'); const _ = require('lodash'); function generateReport(call, callback){ let successfulReports = []; let failedReports = []; call.on('data',function(employeeStream){ let employeeId = employeeStream.id; let employee = _.find(employees, { id: employeeId }); if (employee != null) { successfulReports.push(employee.firstName); } else{ failedReports.push(employeeId); } }); call.on('end',function(){ callback(null,{ successfulReports: successfulReports.join(), failedReports: failedReports.join() }) }) } exports.generateReport = generateReport; The generateReport function takes two inputs, call and callback In order to get the stream of messages from the client, we need to listen to the data event in the call object. This is done in the following script. call.on('data',function(employeeStream){ let employeeId = employeeStream.id; let employee = _.find(employees, { id: employeeId }); if (employee != null) { successfulReports.push(employee.firstName); } else{ failedReports.push(employeeId); } }); The data event is called for every single message coming from the client. The message is present in the employeeStream variable. On receiving the message we try to generate a report and find out if it succeeded or failed. The end event on the call object indicates that the client stream has ended. The following code shows how to listen to the end event. call.on('end',function(){ callback(null,{ successfulReports: successfulReports.join(), failedReports: failedReports.join() }) }) In this case, when the end event happens, we combine all the success and failure reports into a single response object and send it back to the client using the callback object. Creating the Client Create a file called as client_grpc_client_stream.js. Add the following script into it. const PROTO_PATH = __dirname + '/proto/employee.proto'; const grpc = require('grpc'); const protoLoader = require('@grpc/proto-loader'); const _ = require('lodash'); let packageDefinition = protoLoader.loadSync( PROTO_PATH, { keepCase: true, longs: String, enums: String, defaults: true, oneofs: true }); let employee_proto = grpc.loadPackageDefinition(packageDefinition).employee; The above script does the same functionality as we saw in the server code. Add the following script as well to the client_grpc_client_stream.js. function main() { let client = new employee_proto.Employee('localhost:4500', grpc.credentials.createInsecure()); let call = client.generateReport(function (error, response) { console.log("Reports successfully generated for: ", response.successfulReports); console.log("Reports failed since Following Employee Id's do not exist: ", response.failedReports); }); let employeeIdList = [1, 10, 2]; _.each(employeeIdList, function (employeeId) { call.write({ id: employeeId }); }) call.end(); } main(); Let us see what the script above is doing. let call = client.generateReport(function (error, response) { console.log("Reports successfully generated for: ", response.successfulReports); console.log("Reports failed since Following Employee Id's do not exist: ", response.failedReports); }); In this portion of the script, we are creating a call object and calling the generateReport function. Also inside the generateReport function, we are indicating what the client should do once it receives the response from the server. In this case, we are printing the successful and failed reports which the server sends back. let employeeIdList = [1, 10, 2]; _.each(employeeIdList, function (employeeId) { call.write({ id: employeeId }); }) In the above portion of the script, we are looping over the employee IDs and sending a stream of messages to the server. We use call.write to send the message in a stream to the server. Finally, once we have sent all the messages in a stream, we indicate that the stream is complete using the call.end function as shown below call.end(); The complete code for client_grpc_client_stream is given below. const PROTO_PATH = __dirname + '/proto/employee.proto'; const grpc = require('grpc'); const protoLoader = require('@grpc/proto-loader'); const _ = require('lodash'); let packageDefinition = protoLoader.loadSync( PROTO_PATH, { keepCase: true, longs: String, enums: String, defaults: true, oneofs: true }); let employee_proto = grpc.loadPackageDefinition(packageDefinition).employee; function main() { let client = new employee_proto.Employee('localhost:4500', grpc.credentials.createInsecure()); let call = client.generateReport(function (error, response) { console.log("Reports successfully generated for: ", response.successfulReports); console.log("Reports failed since Following Employee Id's do not exist: ", response.failedReports); }); let employeeIdList = [1, 10, 2]; _.each(employeeIdList, function (employeeId) { call.write({ id: employeeId }); }) call.end(); } main(); Running the Code Open a Command prompt and start the server using the following script. node server.js open a new command prompt and run the client using the following script. node client_grpc_client_stream.js On running the client we will get the following output. Reports successfully generated for: First1,First2 Reports failed since Following Employee Id\'s do not exist: 10 In this case, the client has sent 3 Id's 1,10,2 to the server as a stream of messages. The server then processes the messages in the stream and sends a single response back to the client showing how many reports succeeded and how many reports failed. Code The Code discussed in this article can be found here References GRPC official Documentation : https://grpc.io/ Protocol Buffers Proto3 documentation : https://developers.google.com/protocol-buffers/docs/proto3 Congrats 😄 You now know how to use GRPC Streams in a NodeJS Application. Happy Coding
http://damianfallon.blogspot.com/2020/04/how-to-effectively-use-grpc-streams-in.html
0 notes
Video
youtube
How to Run Test on #CommandPrompt, #GenerateReport in #Selenium #Tutoria...
0 notes