#germinal 1.5
Text
i dont really care about anything in my garden except my taters can everyone manifest that they grow 🙏
#been exclusively referring to my potatoes as taters#i also hope my lettuce and spinch grow they havent germinated and its been like 1.5 weeks 😬#i have no faith my peppers will germinate but i bought a pepper seedling today so hopefully it does well
3 notes
·
View notes
Text


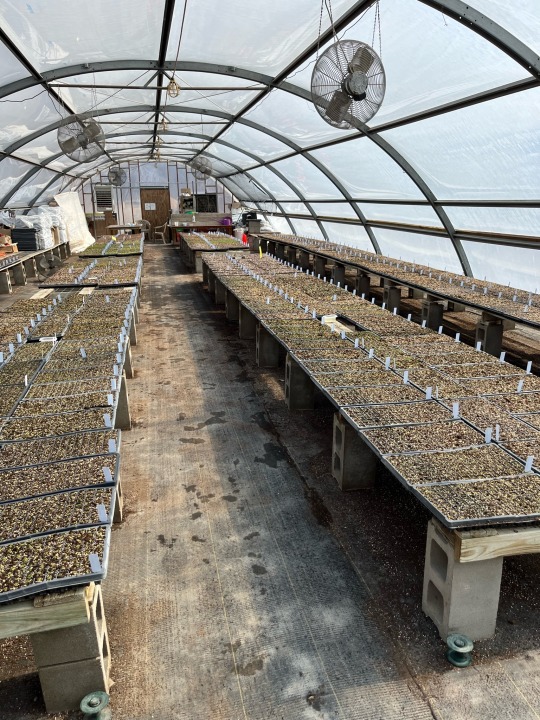
All the babies. Of the ~550 trays here, I personally seeded about 240 of them. Only the very early stuff is coming up, mostly the alliums and violets. Every single one of these was seeded by hand from seeds we stratified (unless they don’t require stratification). There are 70,040 cells in here and our germination rate is very high, we usually have just as many finished plants as there are cells started. So around 70,000 native plants will be sold to the public and some local government programs but they’ll all get planted somewhere. 70,000 more links in the chain for the ecosystem. 70,000 more chances a pollinator finds the plant they need to survive. 70,000 more root systems anchoring degraded soils. 70,000 more reminders that the earth is home for all of us, including those who cannot speak and are easily ignored.
This is the 5th season my boss has grown native plants for sale at this scale. So there may be as many as 350,000 plants out there that he ushered along into existence. To do all this work, stratifying and hand seeding, takes about two weeks (not including the 90 days the seeds just sit in the fridge). It’s not impossible, there’s very little mystery, once you find your rhythm it’s all very doable. You take the time to tediously tweezer a little gooey clump of seeds into a seedling cell 128 times and that’s one tray. You do that for 20 trays, that takes about 5 hours. You go to lunch. Repeat for two weeks. Your coworkers come in after you and do the same thing. Three people make enough plants to cover about 1.5 acres of land. It’s not changing the world but it is changing my town.
#native plants#nature#plants#gardening#greenhouse content#seeds#seed starting#spring#north america#great plains
53 notes
·
View notes
Text
Discography Deep Dive: GY!BE
Part 3
Slow Riot for New Zero Kanada (1999)
Label: Constellation, Kranky
Producers: Dale Morningstar

Scores
Ranking: 7
Overall Average Score: 2.9
Mixing: 2.5
Pacing: 2.5
Track Ordering: 3
Orchestral/Textural variety: 1.5
Melodic Ingenuity: 3
Aesthetic Consistency: 5
Stand-out track: Moya
Slow Riot for New Zero Kanada is a huge moment in the early discog of Godspeed. Its long two track arc ebbs and flows gorgeously as a sonic journey checking all the boxes of true Godspeed style: the long minimalistic crescendo built upon evolving and unfurling textures of strings, drums and guitars, with interspersions of "vox pop" field recordings (the extensive interview of Blaise Bailey Finnegan III being the central character).
Throughout "Moya" (one of the stand-out tracks in Godspeed's canon) we hear gorgeous melodic fragments germinate from the seeds of a twelve-note passacaglia. As this movement builds and transforms, the textures remain rather homogenous. While the pings of the glockenspiel are initially welcomed as a bright touch to the introduction of the twelve-note ostinato they become more awkward and out of place when the texture thickens, especially when they become tremolos. Despite this attempt of textural variety, what remains consistent is exemplary melodic ingenuity and symmetry that is consistent with Godspeed's minimalistic approach to building textures. The twelve-note ostinato doesn't show up in its complete form until 3'45" into the movement. Preceding this is a haunting seven-note motive introduced by the strings. As the twelve-note passacaglia proceeds several countermelodies spin out in a neo-baroque style finally give way to a five-note descent into the requisite field recording moment of "BBFIII". Thus, a twelve-note passacaglia is symmetrically bookended by patterns of seven (at the beginning) and five (at the end): 7+5=12.
Although less poetic than other field recordings, "BBFIII" stands out as a dramatic documentarian style, undergirded by the deft touches of guitar harmonics with a melodramatic string tremolos and drum fills. The inevitable forces of the instruments take over to create a compelling climax of riff-like power chords and four-on-the-floor drumming. This would be a fantastic ending, yet the strings enter again in a coda-like fashion with washed-out reverb more in a neo-baroque style . This seems to be a blurred and all-too-short hazy memory of the opening moments of "Moya." Although aesthetically consistent, this use of coda seems almost perfunctory when heard within the context of Godspeed's innovative endings where entire movements act as dedicated codas. To round off the structure of this diptych, Slow Riot really needs to be a triptych. This would be consistent with the baroque style alluded to throughout (which are often in three parts) and proportional to what is asked of the listener in this sonic journey. The aesthetic and imaginative demands upon the listener in this EP is one of the main reasons why it is included in this discography deep dive. It is simply unfair to attach a diminutive EP label upon this transcendent record.
Additional Listening
Symphony No. 3, Op.36: A Symphony of Sorrowful Songs, String Quartet no.2 "Quasi una fantasia" Henryk Górecki
Passacaglia in C minor (BWV 582) Johann Sebastian Bach
"Passacaglia" from Peter Grimes Benjamin Britten
#music#music criticism#godspeed you! black emperor#discography#post rock#art rock#experimental rock#canadian music#montreal#avant garde#Bandcamp#discography-deep-dive
7 notes
·
View notes
Text
HOW NEHRU CAN TRULY BE CALLED 'THE ARCHITECT OF INDIA'S BIMARU ECONOMIC STRUCTURE'. ................................................................................. - HOW NEHRU INCOMPETENTLY, & PER MANY HISTORIANS, MALICIOUSLY, RUINED EASTERN INDIAN ECONOMIES, LIKE BENGAL, BIHAR, JHARKHAND, MADHYA PRADESH, CHHATTISGARH, & ORISSA, BY HIS ONE SIDED (SUBSIDIZED/EQUALIZED FREIGHT COST OF RAW MATERIAL ONLY & NOT FOR FINISHED GOODS) FREIGHT EQUALIZATION POLICY. - HOW NEHRU IN THE GARB OF A SOCIALIST INDIA, MANAGED TO CREATED A REGRESSIVELY CAPITALISTIC INDIA INSTEAD.
Here are India's 60 yr Share of Wealth stats, from 1961-2020, taken from the 'World Inequality Database'.
Looking at which, most would be forced to ask, why is it that in a wholly socialized state like India (& heavily publicized so at that for 60 yrs)....that our Top 1% 's share in wealth goes up 3 times, Top 10%'s share goes up 1.5 times, BUT SHARE OF THE BOTTOM 50% IS LITERALLY HALVED?
The answer to this lies largely in one man, Nehru, & his policies, either incompetently unintentional or maliciously intentional, policies directly responsible for creating a deeply disparate & heavily lopsided yet overall non-flourishing economic structure, for the entire first half century of the 'Dominion (of Britain) India'.
And the biggest mishap-causing misadventure, being 1951's infamous FREIGHT EQUALIZATION POLICY.
👇
https://en.wikipedia.org/wiki/Freight_equalisation_policy#:~:text=Freight%20equalisation%20policy%20was%20adopted,subsidised%20by%20the%20central%20government.
☝
Above is the Russian Govt+military reaction, to Indian 'independence' in mid 1947. This article was published in the Russian central military newspaper 'Red Star' on July 31, 1947, just 2 weeks before the official date of India's so-called Independence.
"Chief economic positions still remain in British hands–railways,marine transport,port economy,irrigation systems,finance,basic part of jute,industry,almost whole mining industry etc"
“The defence of economic positions and interests is not possible without political power. That power will be secured in the person of the capitalists, landowners and businessmen who are dependent upon British capital.”
“The partition, does not affect the feudal power of the Princes who have always supported British domination.”
"The British Govt plans to artificially separate industrial from agricultural areas,turning it to a agrarian & raw material appendage of Britain."
Exactly what Nehru's Freight Equalization Policy achieved 4 yrs later!


And to add to what y'all I assume would already have read from above, as to it's evil designs & effects, it created a reverse-reward scenario, whereby all the resource-rich states were essentially penalized for their natural advantages, by taking away all incentive for processing-industries & final transportation industries, that are a logical next step from the extraction industries, to germinate & set base in these places. Thereby creating a scenario where the South-western & western coastal states like Maharashtra, Gujarat & Tamil Nadu, & parts of Punjab in North India, were able to find logical easy base for all the processing & transportation industries in their states, for industries like steel, cement, heavy manufacturing, & power, all enabled via raw materials from the other far-off states, like iron ore, coal, limestone, bauxite, copper etc, even w/o any personal natural resources to rely on themselves, merely by virtue of being easy locations to set up ports in for exports, & w/o industries having to compromise on higher transportation & value-added processing costs, that cost aspect equalized & protected for all distances from the resource point. All this, with resource states not finding even some respite in terms of return benefits from any possibly subsidized finished product costs, finished goods not covered by this policy!
These 4-5 states effectively thus became the parasites, for atleast 7 of the traditionally god-gifted states of today like Bihar, Jharkhand, Madhya Pradesh, Chhattisgarh, Orissa, Bengal & Uttar Pradesh, killing all their hope at industrial development & economic progress, & where there is economic (or lotsa times attached) spiritual hopelessness, springs leftism in all it's devious forms, giving birth to intense communism & it's shameful offsprings of caste-divide & gang-culture, literally turning these states HOUSING HALF OF INDIA'S POPULATION, into the pot-holes of the Indian Union -the BIMARU (for Bihar, Madhya Pradesh, Rajasthan, Uttar Pradesh) states of India.
Now in all of this, it's not as if the above-mentioned coastal states were turning themselves into heavens of prosperity either, merely relatively well-off & with a hopeful disposition of the future, that in itself enough to attract large-scale migration from the above BIMARU states, particularly Maharashtra with a more traditionally Hindi-friendly ambience, but also in TN, creating a new urban housing problem, giving birth anew to Mumbai's infamously gargantuan chawl (dingy hutment) lifestyle.
And the reasons for these states, given all these special privileges, not able to take off well enough, aren't directly visible, yet that we can now, on basis of our analysis of Nehru & his so-called Independent India, over innumerable blogs prior, safely interpret, to be an India yet functioning in 1950s & till mid-1960s as some sort of a vassal state of Britain. Only natural then for a supreme state in such a relationship, to not be assumed to desire nations other than itself any sorta economic or strategic base in it's territory, thus curtailing more robust foreign economic to-and-fro.
A utterly class-subservient bent, not seen just for the British race, but per historians, eg Kanchan Gupta, in his hateful sense of complex & hatred of dark-skinned & skinny Bengali community, even worse passionate Hindu Durga-lovers, & per many, all largely borne of his hatred for Bose.
And thus ends yet another inglorious chapter from the life of the self-confessed Last British Ruler of India.
The Tale of the Internal Destruction of India, & it's Premier at it.


2 notes
·
View notes
Text
MAR. 7 '23
iiii ammm STARVINGGGG what is it that suddenly made me, who eats the exact same meals every single day, suddenly start burning extra calories in the midday and during the evening enough that my stummy starts RUMBLINGGG

BIOLOGY: photosynthesis test today so not much classwork done but i finished pretty fast & i'm pretty confident about my performance so i'm happy :) i started transcribing the questions that i got docked marks on or didn't get right from the mock marking scheme so i'll hopefully be organizing these better soon enough. here's some experiment questions (problem area) to stare at for now... starting structure & sexual reprod of flowering plants next!

AG .SCIENCE: free class again </3 so i kind of worked on kale a bit more and i think im slowly getting the hang of it umm heres some recall spam really quick -> fertilizer application 1/2 at sowing & 1/2 2-3 weeks after germination; 4-6 month growth period; 6-7 optimum 6.5 pH soil; 8 weeks prior to sowing soil testing; 10mm seed sowing; 15-20kg/ha sulfur; 70 plants per m^2 target; up to NEVER ABOVE 70% of diet.... catch crop = crop planted in field that would otherwise lay bare, + soil structure + prevent against nutrient leaching + biodiversity - pests - poaching if grazed during wet winter months; club root main disease threat 2 kale causes roots to swell inhibiting water and nutrient uptake = wilting = low yield, spores can lay dormant in soil for 20 yrs so avoid any land with history of club root; have to crop rotate so dont plant any brassica crops for 4 years in that same area...ummm ya lol:)
BUSINESS: went over something but it wasnt much and it was more just videowatching and stuff so i worked on breakevens cuz i have a test on breakeven charts and marketing at 9 am tmrw ahhh!!! which i spent 1.5-2hrs on afterwards as well cuz i was actually having issues with graphing stuff but i think i worked out the tangles enough to do okay tomozzz.revised over PROMOTION & PLACE of marketing mix!!! promotion = personal vs. nonpersonal; adverts (nonpersonal) informational, competitive, generic (ads for broader industry, not specific brands i.e. got milk), persuasive, reminder ads; PR (nonpersonal) functions to create and maintain a positive brand image done thru events, news conferences & briefings, sponsorships and public service activities; sales promotion = enticing increased purchasing activity (larger items or greater amount of items bought) done thru free samples, free gifts, loyalty cards, membership programs, competitions; personal selling (personal) face to face selling in order to build relationship with customer, important in stores like computer stores where average consumer doesnt have as much information as sellers, increases knowledge trust and repeat purchases....... PLACE = CHANNEL OF DISTRIBUTION!!! manufacturer -> customer = direct; manufacturer -> retailer -> customer = alternative; manufacturer -> wholesaler -> retailer -> customer = traditional; each new party makes end price higher for consumer (all need to take profit); consider location of customers (close = cheaper), chararcteristics of item (perishable, heavy), image (luxury vs. cheap)......
ENGLISH: we actually went over a few articles that were treated kind of like open-ended discussion comprehensions = dont have to do much except the first one was about technology so of course it got my attention lol:) not much 2 say here but i am definitely not going to have my comparative essay done for tomorrowww 4give me ms lee

3 notes
·
View notes
Text
How many pumpkin seeds per hole to plant: A guide to an optimal plantation

Planting Guide: How Many Pumpkin Seeds per Hole?
Pumpkin is a fun crop that both those of us growing our own Jack-o'-lanterns and seasoned gardeners like to plant. A fertile yield, however that is the detail and placing an emphasis on how many pumpkin seeds per hole. In this guide, you will come to know how to plant pumpkin seeds that would give best yield and healthy plants.
How Pumpkin Plants Grow
But, before we talk about the nitty-gritties of planting seeds you should know some basic growth habit information about pumpkin plants. Pumpkins are sprawling vines that need a lot of room to spread out. Each plant can expand to a width of 10 feet, which means you must consider the layout of your garden carefully!
Pumpkin Pumpkin seeds are best to sow direct in the soil as like cucumbers they do not transplant well. Because they are big and the roots need to be left alone. Plant in well-drained, organically rich soil and keep it evenly moist but not wet.
How Many Seeds to Plant in a Hole
Most of the usual advice does suggest planting 2 to 3 seeds per hole when you are sowing pumpkin. If some seeds don’t sprout, this method will improve germination rates in general — and it gives you a handy backup! That is why this approach matters:
Higher germination rate: not every seed will earnacles to successfully sprout. An increased density of 2 to 3 seeds per hole would theoretically result in at least one sprouting seedling for each location which guarantees you get a plant.
The Right Amount of Space: A minimum of 4-6 feet is generally required between pumpkin plants for them to grow. Be sure to plant 2–3 seeds per hole—you can always thin the seedlings later, once you know which of your plants will perform best. From here, you can easily choose for the strongest seedlings and provide each plant more space to grow.
Keeping Gaps Full: Having multiple seeds in one hole lessens the likelihood of having an empty spot due to poor germination or seedling failures. It is especially beneficial in environments that are not optimal for growth.
How to Plant Pumpkin Seeds
Prepare the Soil – Start by preparing the soil where you intend to plant. Make sure it is loose, well drained and rich in compost or other organic substances. Pumpkins grow best in soil that is slightly acidic to neutral (pH 6.0—7.0).
Planting Depth & Spacing — Sow the seeds 1 -to-1.5 inches deep Separate the holes by 3 to 4 feet in both directions. This is to accommodate the sprawling growth habit of pumpkin vines and stop crowding.
Sow the Seeds : 2-3 seeds per hole and equally spaced Sprinkle seeds over the surface and cover with a fine layer of soil, gently water to dampen without washing seeds away. Water the soil so that it stays continuously wet until seeds germinate.
Thin Seedlings: After the seedling begin to grow and reaches 2 or more inches in height, thin them. Choose the strongest seedling between all plants in each hole and remove rest. This is part of the process to make sure that each plant has enough resource to mature well and give you good crop.
Common Mistakes and Tips
Crowding: When too many seeds are planted or seedlings not thinned, crowding occurs, which inhibits development and decreases production. Root for the strongest plants and even if it hurts: thin excess seedlings to let room.
Over or under watering: Seeds need consistent moisture in order to germinate and develop properly. But remember, never let the soil stay submerged in water — it may cause root rot and other disorders. Good drainage is required, so water well and check moisture levels frequently.
Combatting Pests and Diseases: Pumpkins have there problems (ax-wielding man bad), which include pests such as squash bugs, diseases like powdery mildew. Follow good gardening practices such as rotating crops, spacing plants correctly and monitoring for pests to reduce these problems.
Nutrients Needs: Pumpkins are heavy feeders and need plenty of nutrients throughout the growing season. In addition, you might want to use some balanced fertilizer on it or even throw away a few compost pieces for your plant to start taking all the nutrients they need and so enhance their lush development.
0 notes
Text
Do Sunflowers Need a Lot of Water?
Sunflowers, with their bright yellow petals and towering stems, are one of the most cheerful additions to any garden. But if you’re considering growing these sunny blooms, you might be wondering about their water needs. After all, keeping plants hydrated is crucial for their health and vitality. So, do sunflowers need a water? Let’s dive into the details to help you keep your sunflowers thriving.
Understanding Sunflower Water Requirements
Sunflowers (Helianthus annuus) are known for their impressive size and vibrant colors. These beauties are native to North America and are well-adapted to various climates. When it comes to water, sunflowers are relatively low-maintenance compared to some other plants. They don’t require excessive amounts of water to grow strong and healthy. However, providing them with the right amount of water is essential for optimal growth and blooming.
Watering Needs of Sunflowers
Initial Planting Stage: When you first plant sunflowers, they need consistent moisture to establish their root systems. Water them thoroughly right after planting and keep the soil consistently moist until the seeds germinate and the seedlings begin to grow. This usually takes about 7 to 10 days. During this period, it’s important to ensure the soil does not dry out completely.
Growth and Maturity: Once your sunflowers are established, their water needs change. Sunflowers have deep roots that help them access water from deeper soil layers. Generally, they are quite tolerant of drought conditions and can manage with less frequent watering once established. However, for optimal growth and to promote the production of large, vibrant flowers, regular watering is beneficial.
Frequency of Watering: Typically, sunflowers need about 1 to 1.5 inches of water per week. This can be provided through rainfall or irrigation. In hot and dry climates, you may need to water more frequently, while in cooler, more humid areas, you might not need to water as often. It’s important to adjust your watering schedule based on the weather conditions and the specific needs of your sunflowers.
Watering Technique: When watering sunflowers, it’s best to water deeply but infrequently. This encourages the roots to grow deeper into the soil, which helps the plants become more drought-tolerant. Avoid shallow watering, as it can lead to shallow root systems and increased vulnerability to drought stress. Water the base of the plants rather than the foliage to reduce the risk of fungal diseases.
Signs of Over-Watering and Under-Watering
Both over-watering and under-watering can affect the health of your sunflowers. Here’s how to recognize and address these issues:
Under-Watering: If your sunflowers are not getting enough water, you might notice wilted leaves, dry and cracked soil, and reduced flower size. In severe cases, the plants may start to droop and show signs of stress. To remedy this, increase the frequency of watering and ensure the soil is consistently moist.
Over-Watering: On the flip side, too much water can lead to root rot and other issues. Signs of over-watering include yellowing leaves, a soggy or waterlogged soil surface, and fungal diseases. If you notice these symptoms, reduce the amount of water you provide and ensure proper drainage to prevent water from pooling around the roots.
Soil and Drainage
Proper soil and drainage play a crucial role in the watering needs of sunflowers. Sunflowers prefer well-draining soil that allows excess water to escape. Heavy clay soils or areas with poor drainage can lead to waterlogged conditions, which are detrimental to sunflower health. Incorporating organic matter into the soil can improve drainage and provide essential nutrients to your sunflowers.
Conclusion
In summary, while sunflowers do not require an excessive amount of water, they do benefit from a consistent watering regimen, especially during their initial growth stages and in hot, dry weather. By understanding and monitoring their water needs, you can ensure your sunflowers grow tall and strong, producing the vibrant blooms that bring a touch of sunshine to any garden.
So, keep an eye on your sunflowers and their surroundings, and adjust your watering routine as needed. With a little attention and care, your sunflowers will reward you with their stunning display of color and beauty. Happy gardening!
0 notes
Text
Mastering the Art of Growing Parsnips: A Fun and Informative Guide

Parsnip is a root vegetable from the Apiaceae family that is similar in flavor to carrots and is often used in stews and other dishes. It has a sweet, nutty taste and can be eaten raw, baked, boiled, mashed, and roasted. It is a great source of fiber and antioxidants, and can be a low-calorie, nutritious alternative to other vegetables.
How To Grow Parsnip: An Entertaining And Educational Guide
So you want to grow some parsnips, huh? Well buckle up, because I'm about to take you on a wild ride through the magical world of root vegetables. Growing parsnips may not sound as sexy as, say, growing heirloom tomatoes, but let me tell you, there's a certain satisfaction that comes from pulling a big, gnarly parsnip out of the ground.
First things first, you're going to need some seeds. **Make sure to choose a variety that is suitable for your climate**. Parsnips like cool weather and can take a while to germinate, so be patient. I recommend starting your seeds indoors and then transplanting them outside once the weather warms up.
Remember, parsnips have a long taproot, so make sure to plant them in loose, well-drained soil. **They won't do well in compacted or rocky soil**.
Once you've got your seeds in the ground, it's time to play the waiting game. Parsnips are slow growers, so be prepared to wait anywhere from 100 to 120 days before you can harvest them. Keep the soil consistently moist but not waterlogged, and make sure to weed regularly to give your parsnips the best chance at success.
When it comes time to harvest, you'll know your parsnips are ready when they reach about 1 to 1.5 inches in diameter. **Don't wait too long to harvest, or they'll become tough and woody**. Use a garden fork to gently loosen the soil around the plant and then pull the parsnip out by hand.
Wash your parsnips thoroughly to remove any dirt, and then store them in a cool, dark place until you're ready to use them.
Parsnips are incredibly versatile in the kitchen. **You can roast them, mash them, or even make a delicious parsnip soup**.
If you find yourself with an abundance of parsnips, you can also freeze them for later use.
So there you have it, a crash course in growing parsnips. **It may not be the most glamorous vegetable in the garden, but it sure is tasty**. Happy gardening!
For more in-depth tips on growing parsnips, check out this article on Parsnip Growing Secrets.
Learn more about gardening with Taim.io!
0 notes
Text
Introduction to Halatool 1.5 Inch Rockwool Cubes
For gardeners and hydroponic enthusiasts, finding the right medium for seedlings and cuttings can make all the difference in their growth and success. One popular option is the Halatool 1.5 Inch Rockwool Cubes, which provide an ideal environment for plants to thrive.
Overview of Halatool 1.5 Inch Rockwool Cubes
The Halatool 1.5 Inch Rockwool Cubes are made from high-quality stonewool, a type of rockwool that is specifically designed for hydroponics and soilless cultivation. Each sheet contains 49 cubes, totaling to 196 plugs in the package.
These cubes are perfect for starting seeds, germinating plants, and propagating cuttings. They provide excellent water retention and aeration, allowing roots to develop and grow strong. The cubes also have a neutral pH level, ensuring optimal nutrient uptake by the plants.
With a size of 1.5 inches, these rockwool cubes are suitable for a wide range of plant varieties, including vegetables, herbs, flowers, and more. They offer a convenient and efficient way to start your garden or expand your existing one.
SaleSoilless Cultivation Perfected: Halatool's Garden Stonewool Cubes!8.5Our ScoreI recently started using Halatool's 1.5 Inch Rockwool Cubes, and let me tell you, they've been a game-changer for my hydroponic gardening journey. Gone are the days of messy soil and unpredictable growth. With these Stonewool Grow Cubes, my seedlings and cuttings have thrived like never before. The convenience of having 196 plugs spread across 4 sheets ensures I have ample supply for all my planting needs. The germination rate? Simply outstanding! If you're serious about soilless cultivation and want to give your plants the best start, you absolutely must try these. Don't just take my word for it; experience the Halatool difference for yourself. Dive into the future of gardening and elevate your hydroponic game. Click here and transform your green space today!
Shop Amazon Today For the Best Deals
Benefits of using Rockwool Cubes in gardening
Using rockwool cubes like the Halatool 1.5 Inch Rockwool Cubes offers several advantages for gardeners:
Excellent water retention: The rockwool material holds water well while still allowing excess moisture to drain away, preventing overwatering.
Aeration: The porous structure of rockwool promotes oxygenation of the root zone, ensuring healthy root development.
Uniformity: The consistent size and shape of the cubes provide a standardized environment for plants, making it easier to manage and monitor their growth.
Reusable: Rockwool cubes can be reused for multiple growing cycles, making them a cost-effective option for gardeners.
Whether you are a beginner or an experienced gardener, Halatool 1.5 Inch Rockwool Cubes offer a reliable and efficient solution for starting your plants and ensuring their healthy growth in hydroponic or soilless cultivation systems.
Features and Specifications of Halatool 1.5 Inch Rockwool Cubes
Size and quantity of the Rockwool Cubes
The Halatool 1.5 Inch Rockwool Cubes are a reliable choice for hydroponics and soilless cultivation. Each package contains 4 sheets, with a total of 196 plugs, providing you with ample cubes to start your seedlings, cuttings, or clone plants.
Measuring at 1.5 inches, these rockwool cubes are the perfect size for germination and early plant growth. They provide a stable and supportive environment for your plants to develop strong roots and thrive.
Material and durability of the cubes
Made from high-quality stonewool, these rockwool cubes offer excellent water retention and air circulation properties. The material is designed to hold moisture while allowing excess water to drain away, preventing overwatering and root rot.
Furthermore, the Halatool 1.5 Inch Rockwool Cubes are durable and long-lasting. They maintain their structure even after repeated watering, ensuring that your plants receive consistent support throughout their growth cycle.
The rockwool material also provides insulation, protecting the roots from extreme temperatures and fluctuations in the environment.
In conclusion, the Halatool 1.5 Inch Rockwool Cubes are a reliable choice for starting your hydroponics or soilless cultivation journey. With their optimal size, quantity, and durable material, these rockwool cubes provide a stable foundation for your plants' growth and development.
A picture of a green plant growing in a greenhouse. Halatool 1.5 Inch Rockwool Cubes Garden Stonewool Grow Cubes Starter Plugs
How to Use Halatool 1.5 Inch Rockwool Cubes for Hydroponics
For aspiring hydroponic gardeners, the Halatool 1.5 Inch Rockwool Cubes are a game-changer. These starter plugs provide the perfect environment for seedlings, cuttings, and clone plants to thrive in a soilless cultivation system. Here's a step-by-step guide on how to use them effectively:
Step-by-step guide on using Rockwool Cubes for hydroponic cultivation
Soak the cubes: Before use, soak the rockwool cubes in pH-balanced water for about an hour. This helps to remove any impurities and ensures optimal water retention.
Prepare your seeds or cuttings: While the cubes are soaking, prepare your seeds or cuttings for planting. Ensure they are clean and healthy.
Create a hole: Gently create a small hole in the center of each cube using a pencil or your finger.
Plant your seeds or cuttings: Place one seed or cutting into each hole and lightly cover it with the surrounding rockwool.
Provide proper lighting and moisture: Place the cubes in a tray or container and provide adequate lighting and moisture for optimal growth. Monitor the moisture levels regularly and adjust as needed.
Tips for successful seedlings, cuttings, and clone plants
Maintain proper pH levels: Regularly check and adjust the pH levels of your nutrient solution to ensure optimal absorption by the plants.
Monitor temperature and humidity: Keep an eye on the temperature and humidity levels in your growing area to create an ideal environment for your plants.
Follow recommended nutrient schedules: Use a high-quality hydroponic nutrient solution and follow the recommended feeding schedules for your specific plants.
Prune and train your plants: Regularly prune and train your plants to encourage healthy growth and maximize yields.
With the Halatool 1.5 Inch Rockwool Cubes, you can kickstart your hydroponic gardening journey with confidence. Happy growing!
Advantages of Using Halatool 1.5 Inch Rockwool Cubes in Soilless Cultivation
For those venturing into soilless gardening, Halatool 1.5 Inch Rockwool Cubes are an excellent choice for starting your plants. These starter plugs offer numerous advantages that can help you achieve successful germination and growth.
Benefits of using Rockwool Cubes in soilless gardening
Optimal water retention: Rockwool Cubes have excellent water retention properties, ensuring that your plants receive a consistent water supply without becoming waterlogged. This helps prevent overwatering and root rot.
Enhanced root development: The fibrous structure of Rockwool Cubes provides an ideal environment for root growth. The cubes provide ample oxygenation and drainage, allowing roots to develop strong and healthy.
Pest and disease resistance: Rockwool is an inert material, meaning it does not harbor pests or diseases that can harm your plants. This reduces the risk of plant damage and promotes a healthier growing environment.
Comparison with other starter plugs and growing mediums
When compared to other starter plugs and growing mediums like peat pellets or coco coir, Halatool 1.5 Inch Rockwool Cubes offer several advantages:
Durability: Rockwool Cubes are sturdy and long-lasting, making them a cost-effective choice for multiple plant cycles.
Consistent pH levels: The pH level of Rockwool Cubes is neutral, providing a stable environment for your plants' nutrient uptake.
Versatility:
Rockwool Cubes can be used in various hydroponic systems, including NFT, DWC, and aeroponics, as well as traditional soil-based gardening.
Overall, Halatool 1.5 Inch Rockwool Cubes are a reliable and efficient option for soilless cultivation, offering optimal water retention, enhanced root development, and resistance to pests and diseases.
A person is holding a lettuce plant in a pot. Halatool 1.5 Inch Rockwool Cubes Garden Stonewool Grow Cubes Starter Plugs
Germination and Seedling Development with Halatool 1.5 Inch Rockwool Cubes
When it comes to germinating seeds and nurturing healthy seedlings, Halatool 1.5 Inch Rockwool Cubes are a game-changer for hydroponics and soilless cultivation. These starter plugs provide the perfect environment for your plants to thrive, whether you're growing from seeds or cuttings.
Optimal conditions for germinating seeds in Rockwool Cubes
To ensure successful germination, it's important to create the right conditions for your seeds. Here's how you can maximize the potential of Halatool 1.5 Inch Rockwool Cubes:
Moisture: Soak the Rockwool cubes in water for a few minutes until they are fully saturated. This will provide the necessary moisture for seed germination.
Temperature: Keep the cubes in a warm environment, ideally between 70-75°F (21-24°C), to promote faster and healthier seed germination.
Promoting healthy seedling growth and root development
Once your seeds have germinated, it's time to focus on promoting strong seedling growth and root development. Here's how Halatool 1.5 Inch Rockwool Cubes can help:
Aeration: The porous structure of Rockwool allows for excellent airflow, ensuring that your seedlings receive sufficient oxygen for optimal growth.
Water retention: Rockwool has excellent water retention properties, preventing overwatering and providing a consistent water supply to the roots.
Root support: The firm structure of the cubes provides stability and support for developing roots, allowing them to grow straight and strong.
With Halatool 1.5 Inch Rockwool Cubes, you can confidently start your hydroponic or soilless cultivation journey, knowing that your seeds and seedlings are in good hands. These starter plugs offer the perfect balance of moisture, pH, temperature, aeration, and root support for successful germination and healthy plant growth.
Hydroponic lettuce growing in a cube.
Transplanting and Rooting Cuttings with Halatool 1.5 Inch Rockwool Cubes
Gardeners and hydroponics enthusiasts looking for a reliable and effective way to start their seedlings and clones should consider using Halatool 1.5 Inch Rockwool Cubes. These starter plugs are perfect for hydroponics and soilless cultivation, providing the ideal environment for germination and root development. With 4 sheets and a total of 196 plugs, you'll have plenty of cubes to work with.
Techniques for transplanting seedlings from Rockwool Cubes to other growing mediums
When your seedlings have developed strong roots in the Rockwool Cubes, it's time to transplant them to their permanent growing medium. Here are a few techniques to ensure a successful transition:
Gently remove the seedling from the Rockwool Cube, being careful not to damage the roots.
Prepare the new growing medium, whether it's soil, coco coir, or another hydroponic system.
Create a small hole in the new medium and carefully place the seedling with its roots intact.
Gently firm the medium around the seedling to provide stability.
Methods for rooting cuttings and clones using Rockwool Cubes
Rockwool Cubes are also excellent for rooting cuttings and clones. Follow these steps for successful propagation:
Take a healthy cutting or clone from your desired plant.
Insert the cutting into a pre-soaked Rockwool Cube, ensuring that it is secure.
Place the cube in a tray or container with a clear lid to create a humid environment.
Keep the cube moist but not overly saturated, allowing air circulation to prevent mold or rot.
Once roots have developed, transplant the rooted cutting into its permanent growing medium.
With Halatool 1.5 Inch Rockwool Cubes, you can confidently start your hydroponic or soilless cultivation journey, knowing that your seedlings and clones will have the best possible start.
Maintenance and Care of Halatool 1.5 Inch Rockwool Cubes
For gardeners and hydroponic enthusiasts, maintaining and caring for your Halatool 1.5 Inch Rockwool Cubes is essential to ensure healthy plant growth and successful cultivation. Here are some key points to consider:
Proper watering and nutrient management for Rockwool Cubes
Watering: Rockwool Cubes have excellent water retention properties, but it's important not to overwater. Allow the cubes to dry out slightly between waterings to prevent root rot. Monitor the moisture level by gently squeezing the cubes - they should be moist but not saturated.
Nutrient solution: Rockwool Cubes provide a neutral pH environment, making it easier to manage nutrient levels. Use a balanced hydroponic nutrient solution and follow the manufacturer's instructions for dilution ratios. Regularly check the pH levels to ensure optimal nutrient absorption by the plants.
Preventing common issues such as mold or algae growth
Air circulation: Proper airflow is crucial in preventing mold or algae growth on the Rockwool Cubes. Use fans or ventilation systems to maintain good air circulation in your growing area.
Sterilization: Before using Rockwool Cubes, it's recommended to sterilize them by soaking in a mild bleach solution or using a sterilizing agent specifically designed for hydroponic systems. This helps eliminate any potential pathogens or contaminants.
Cleanliness: Regularly inspect and clean your growing area, removing any dead plant material or debris that may promote mold or algae growth.
By following these maintenance and care tips, you can ensure the longevity and effectiveness of your Halatool 1.5 Inch Rockwool Cubes, providing an optimal environment for seedlings, cuttings, and clone plants to thrive and grow.
A diagram showing how to grow lettuce in a pot.
Customer Reviews and Feedback on Halatool 1.5 Inch Rockwool Cubes
Testimonials from users who have tried the product
Customers who have used Halatool 1.5 Inch Rockwool Cubes for their hydroponics and soilless cultivation have shared their positive experiences. One user mentioned that these starter plugs provided excellent support for seedlings and cuttings, promoting healthy root development. Another customer praised the high quality of the rockwool cubes, stating that they held moisture well and allowed for easy transplanting.
Pros and cons based on customer experiences
Based on customer feedback, here are some pros and cons of using Halatool 1.5 Inch Rockwool Cubes:
Pros:
The cubes are easy to work with and provide a stable growing medium.
They have a good water retention capacity, ensuring proper hydration for plants.
The rockwool material promotes air circulation, preventing root rot.
The cubes are durable and can be reused multiple times.
Cons:
Some users found the cubes to be slightly expensive compared to other alternatives.
It is important to follow proper soaking and pH balancing instructions to prevent nutrient imbalances.
Overall, customers have found Halatool 1.5 Inch Rockwool Cubes to be reliable and effective for starting seeds, cuttings, and clones in hydroponics and soilless cultivation systems. With proper care and maintenance, these rockwool cubes can provide a solid foundation for healthy plant growth.
Conclusion
Summary of the benefits and uses of Halatool 1.5 Inch Rockwool Cubes
Halatool 1.5 Inch Rockwool Cubes are versatile and efficient tools for hydroponics and soilless cultivation. These starter plugs are designed to provide optimal conditions for seedlings, cuttings, and clone plants to germinate and grow successfully. With 196 plugs in total, you have plenty of cubes to work with.
The benefits of using Halatool Rockwool Cubes include their excellent water retention capabilities, which ensure consistent moisture levels for healthy plant growth. The cubes also provide good aeration, promoting root development. They are pH neutral, allowing for easy nutrient absorption by the plants.
These rockwool cubes are suitable for a wide range of plants, making them ideal for gardeners looking to start their hydroponic or soilless cultivation projects. They are easy to use and can be customized to fit your specific needs.
Final thoughts and recommendations for gardeners
If you're a gardener interested in hydroponics or soilless cultivation, Halatool 1.5 Inch Rockwool Cubes are worth considering. They offer numerous benefits such as water retention, aeration, and pH neutrality that contribute to successful plant growth.
When using these cubes, it's important to follow the instructions provided by the manufacturer to ensure optimal results. Additionally, consider pairing them with high-quality nutrients and proper lighting to maximize your plant's potential.
Overall, Halatool 1.5 Inch Rockwool Cubes are a reliable choice for starting your plants in a controlled environment. With their convenience and effectiveness, they can help you achieve successful germination and healthy growth for your hydroponic or soilless cultivation endeavors.
⭐️⭐️⭐️⭐️ (3.9)
Advantages:
Customers appreciate the fast delivery from Amazon. Many users have found the rockwool cubes to be perfect for hydroponics, especially for tower gardens. The product is also praised for being better than other mediums they've used before, and some users have had success in using them for sprouting seeds in hydro gardens.
Disadvantages:
Some users have experienced challenges with the rockwool cubes, mentioning they can be fragile and might fall apart easily, especially when trying to cut or handle them. There are also concerns about the pH being off, affecting the growth of seedling vegetables.
0 notes
Text
The Magical Journey from Bean to Brew: Unveiling the Secrets of How Coffee Is Made


How Coffee is Made? From These Cherries.
Ever Wondered: How Coffee Is Made?
Imagine this: the first sip of your morning coffee. The rich aroma fills your senses, the warmth soothes your tired soul, and the caffeine jolt kickstarts your day. But have you ever stopped to wonder where this magical drink comes from? How coffee is made? What kind of journey does your coffee bean take before landing in your mug? Let’s trace the fascinating life cycle of our favorite morning brew.
Bean, Bean, Bean, Is It All About the Beans?
Our story begins not in a bustling Starbucks, but in the heart of distant lands, where lush greenery and misty mountains converge, a magical journey unfolds—one that captivates the senses and energizes the soul. Here, under the dappled sunlight filtering through tall trees, tiny coffee seedlings patiently wait their turn to become the towering trees that produce those coveted beans. Did you know that coffee isn't a bean, but rather the pit of a cherry-like fruit? Yep, your morning cup holds the ground-up seeds of a delicious fruit!Coffee trees are finicky creatures, demanding specific climates and care. Most thrive in a swathe of land between the Tropic of Capricorn and the Tropic of Cancer, encompassing countries like Colombia, Brazil, and Ethiopia, so-called the "coffee belt." In the quiet embrace of the mountains, coffee plants find their home, thriving at elevations between 2,000 to 6,000 feet. It's here that the coffee journey commences with the planting of seeds, carefully nurtured by dedicated farmers. Here, the perfect blend of warm temperatures, ample rainfall, and well-drained soil nurtures these delicate plants.According to the International Coffee Organization (ICO), coffee plants flourish in regions with temperatures ranging between 60-70°F (15-24°C) and an annual rainfall of 60-100 inches (150-250 cm). These conditions provide the perfect backdrop for the germination of the coffee seed.As the coffee plant emerges from its cozy cocoon, it enters a crucial phase known as the maturation period. Patience is key during these early years. After about three to four years of patient growth, the trees burst into fragrant white blossoms, eventually transforming into bright red coffee cherries. But don't be fooled by their tempting appearance – these cherries are quite tart and bitter! Inside each cherry lie two precious green seeds, destined to become your aromatic coffee beans.Facts from the ICO suggest that a healthy coffee plant can yield an average of 1 to 1.5 pounds of coffee cherries per year. This statistic may vary based on factors such as plant health, weather conditions, and cultivation practices.
Transformation: Cherry To Bean
Picture a lush coffee plantation—rows upon rows of vibrant green coffee trees adorned with clusters of fruit resembling cherries. These coffee plants produce two main species of beans: Arabica and Robusta.Arabica, celebrated for its nuanced flavors and lower caffeine content, grows at higher elevations. On the other hand, Robusta, known for its robust taste and higher caffeine levels, flourishes at lower altitudes. This diversity in species adds to the rich variety of the coffee world.Now comes the crucial harvest. Depending on the terrain and resources, this can be done by hand, meticulously picking each cherry at its peak ripeness, or mechanically, using special rakes or shakers. It's a meticulous process, as unripe or overripe cherries affect the final coffee's flavor. The timing of the harvest is critical—too early, and the beans lack flavor complexity; too late, and the cherries may overripen.Once harvested, the cherries then would be processed. There are two main methods – wet and dry. The wet method, popular in countries like Colombia, involves soaking the cherries to remove the pulp, leaving the coffee beans encased in a parchment layer. This method produces cleaner, brighter-tasting coffee.The dry method, often used in Brazil and Ethiopia, simply lays the cherries out to sun-dry on large patios. This traditional technique imparts a more earthy, rustic flavor to the final brew.
From Beans To Your Cup
After drying, the beans are hulled and polished, shedding their remaining layers to reveal the familiar brown beans we recognize. But they're not quite ready for your cup yet! The next step is roasting, where the magic truly happens. Roasting transforms the green beans, unlocking their hidden flavors and aromas. Depending on the roast level, from light and bright to dark and intense, the beans develop unique characteristics that cater to different palates.Finally, the roasted beans reach their ultimate destination – your hands! Whether you grind them fresh or buy pre-ground, the brewing method you choose unlocks the final chapter in this amazing journey. From the pour-over’s slow, deliberate extraction to the French press's full-bodied immersion, each method brews a unique cup that reflects the care and craftsmanship invested at every stage.
Now We Know How Coffee Is Made
So, the next time you drink that invigorating cup of coffee, remember the incredible journey it took to get there. From the meticulous cultivation to the precise processing and roasting, countless hands and elements come together to bring you that perfect cup. As you take that sip, here are my questions to you: what nuances of flavor do you detect, and how do you appreciate the effort that goes into each sip? Share your thoughts in the comment section below, as we celebrate the magical journey of how coffee is made, a journey that enriches our days and connects us to the heart of distant lands.
Sources:
National Coffee Association: https://www.ncausa.org/Your-Coffee-Business/Connect/How-to-Get-Involved
World Coffee Organization: https://icocoffee.org/
Fairtrade Foundation: https://www.fairtrade.net/
Data:
Over 2.25 billion cups of coffee are consumed worldwide each day. (Fairtrade Foundation)
Coffee is grown in over 70 countries around the world. (International Coffee Organization)
The global coffee industry is worth over $200 billion annually. (World Coffee Organization)
Email
Twitter
Pinterest
Facebook
LinkedIn
Reddit
Keep In Touch If You Like My Articles.
As much as I like to share my knowledge and skills with you, I love to hear from you. If you have any suggestions or comments, please click here. Also don't forget to subscribe to our quarterly newsletters if you like my blogs and like to keep in touch.Of course, read more blog posts I post now and then, such as "Which Coffee Is The Healthiest".
Read the full article
0 notes
Text
New Year’s resolutions lets go
1 More awareness of what the physical body is doing. How is it feeling what is it doing what does it want where is it in space what’s around it etc. New york city babey
1.5 attempt what the youth seem to call “intuitive eating.” No more binge eating once or twice a day we’re talking snacks we’re talking nibbles we’re talking get more food later if you want to but you don’t have to eat it all now
2 Practice meditation even if you don’t feel like it even though youre bad at it. Every day. 10 minutes. Or 5, or 1. Not 0
3 Expend your minutes deliberately, i.e. no more doomscrolling
4 Actuate your creative energy, it’s been germinating long enough, now it’s time to write make do something like you used to as a kid. Write four or more lines every day. It’s allowed to not be good
2+3=5 Attention span. Get one. Listening to albums all the way through doesn’t count if you aren’t actually listening to the music
6 Try to be a little bit more normal by trying a little less when you want to and trying a little more when you need to. C’est a dire be okay with wearing the masks that normal adults put on to do normal adult things and be aware of the ones you put on unnecessarily because you like the way they look better than your own face. you aren’t fooling anyone. Trust that you can maintain whatever you define as “authenticity” without fetishizing it to your detriment
3+4=7 If quitting tumblr is a no go then reblog less and Post more. try to use Posting as an exercise for finding a creative voice or at the very least mediating a productive relationship between author and audience that doesn’t necessarily require feedback approval. Find your sweet spot between expressing your ideas with the complexity they deserve without weighing them down with the trappings of what you think they need to sound like.
1+2+5=8 Discover the name(s) of God and cast it as a spell to destroy overcome the empty carapace that is your ego. (Maybe this one will have to wait for next year)
8.5 read more Jung
9 Replace what ifs with what nows
And uhhh that’s it ! Oh well except try to be more punctual also
0 notes
Text
Microbes could help reduce the need for chemical fertilizers
New Post has been published on https://thedigitalinsider.com/microbes-could-help-reduce-the-need-for-chemical-fertilizers/
Microbes could help reduce the need for chemical fertilizers

Production of chemical fertilizers accounts for about 1.5 percent of the world’s greenhouse gas emissions. MIT chemists hope to help reduce that carbon footprint by replacing some chemical fertilizer with a more sustainable source — bacteria.
Bacteria that can convert nitrogen gas to ammonia could not only provide nutrients that plants need, but also help regenerate soil and protect plants from pests. However, these bacteria are sensitive to heat and humidity, so it’s difficult to scale up their manufacture and ship them to farms.
To overcome that obstacle, MIT chemical engineers have devised a metal-organic coating that protects bacterial cells from damage without impeding their growth or function. In a new study, they found that these coated bacteria improved the germination rate of a variety of seeds, including vegetables such as corn and bok choy.
This coating could make it much easier for farmers to deploy microbes as fertilizers, says Ariel Furst, the Paul M. Cook Career Development Assistant Professor of Chemical Engineering at MIT and the senior author of the study.
“We can protect them from the drying process, which would allow us to distribute them much more easily and with less cost because they’re a dried powder instead of in liquid,” she says. “They can also withstand heat up to 132 degrees Fahrenheit, which means that you wouldn’t have to use cold storage for these microbes.”
Benjamin Burke ’23 and postdoc Gang Fan are the lead authors of the open-access paper, which appears in the Journal of the American Chemical Society Au. MIT undergraduate Pris Wasuwanich and Evan Moore ’23 are also authors of the study.
Protecting microbes
Chemical fertilizers are manufactured using an energy-intensive process known as Haber-Bosch, which uses extremely high pressures to combine nitrogen from the air with hydrogen to make ammonia.
In addition to the significant carbon footprint of this process, another drawback to chemical fertilizers is that long-term use eventually depletes the nutrients in the soil. To help restore soil, some farmers have turned to “regenerative agriculture,” which uses a variety of strategies, including crop rotation and composting, to keep soil healthy. Nitrogen-fixing bacteria, which convert nitrogen gas to ammonia, can aid in this approach.
Some farmers have already begun deploying these “microbial fertilizers,” growing them in large onsite fermenters before applying them to the soil. However, this is cost-prohibitive for many farmers.
Shipping these bacteria to rural areas is not currently a viable option, because they are susceptible to heat damage. The microbes are also too delicate to survive the freeze-drying process that would make them easier to transport.
To protect the microbes from both heat and freeze-drying, Furst decided to apply a coating called a metal-phenol network (MPN), which she has previously developed to encapsulate microbes for other uses, such as protecting therapeutic bacteria delivered to the digestive tract.
The coatings contain two components — a metal and an organic compound called a polyphenol — that can self-assemble into a protective shell. The metals used for the coatings, including iron, manganese, aluminum, and zinc, are considered safe as food additives. Polyphenols, which are often found in plants, include molecules such as tannins and other antioxidants. The FDA classifies many of these polyphenols as GRAS (generally regarded as safe).
“We are using these natural food-grade compounds that are known to have benefits on their own, and then they form these little suits of armor that protect the microbes,” Furst says.
For this study, the researchers created 12 different MPNs and used them to encapsulate Pseudomonas chlororaphis, a nitrogen-fixing bacterium that also protects plants against harmful fungi and other pests. They found that all of the coatings protected the bacteria from temperatures up to 50 degrees Celsius (122 degrees Fahrenheit), and also from relative humidity up to 48 percent. The coatings also kept the microbes alive during the freeze-drying process.
A boost for seeds
Using microbes coated with the most effective MPN — a combination of manganese and a polyphenol called epigallocatechin gallate (EGCG) — the researchers tested their ability to help seeds germinate in a lab dish. They heated the coated microbes to 50 C before placing them in the dish, and compared them to fresh uncoated microbes and freeze-dried uncoated microbes.
The researchers found that the coated microbes improved the seeds’ germination rate by 150 percent, compared to seeds treated with fresh, uncoated microbes. This result was consistent across several different types of seeds, including dill, corn, radishes, and bok choy.
Furst has started a company called Seia Bio to commercialize the coated bacteria for large-scale use in regenerative agriculture. She hopes that the low cost of the manufacturing process will help make microbial fertilizers accessible to small-scale farmers who don’t have the fermenters needed to grow such microbes.
“When we think about developing technology, we need to intentionally design it to be inexpensive and accessible, and that’s what this technology is. It would help democratize regenerative agriculture,” she says.
The research was funded by the Army Research Office, a National Institutes of Health New Innovator Award, a National Institute for Environmental Health Sciences Core Center Grant, the CIFAR Azrieli Global Scholars Program, the MIT J-WAFS Program, the MIT Climate and Sustainability Consortium, and the MIT Deshpande Center.
#Abdul Latif Jameel Water and Food Systems Lab (J-WAFS)#Accounts#agriculture#air#aluminum#ammonia#approach#armor#Bacteria#carbon#carbon footprint#career#career development#Cells#chemical#Chemical engineering#climate#coatings#corn#Deshpande Center#Design#development#Emissions#energy#engineering#engineers#Environmental#FDA#fertilizer#Food
1 note
·
View note
Text
I toured King’s and Webster’s theatre during the open doors week and in the end I probably should have just gone on paid tours of Glasgow’s big theatre’s sooner.
They made me happy because theatre but a tad anxious because I’m back to square one maybe 1.5 in finding a backstage theatre role.
I’m also stressed because studying is starting and stressful circumstances mean I will soon be unemployed.
I know people say it’s easier to get employed if you currently have a job but my current job is mostly irrelevant to my current aspirations.
I will study and I will try volunteer in relevant positions, it’s the best I know how to do for now.
I’ll hope the offer of casual work was genuine and I’ll keep trying to “plant seeds that may someday germinate into an opportunity” or whatever.
0 notes
Text
Using Australian Native Dry Flowers in Your Floral Arrangement

Almost all Australian native dry flowers are beautiful, but there are some that are really special. These include Acacia Pycnantha, Anigozanthus flavidus, and Banksia.
Acacia Pycnantha
Known as the golden wattle, Acacia pycnantha is a native of Victoria. It grows up to eight metres tall and produces large puffy golden-yellow flower blossoms in late winter. The flowers are pollinated by honeyeaters and thornbills.
The Golden Wattle is a member of the legume family, the Acacia genus. The leaves are palm-like, with dark green foliage.
The bark of the Golden Wattle has been cultivated for tannins, and is also used for honey production in humid regions. The flowers are bright yellow and are packed into globular clusters.
The flower heads are arranged in showy sprays of six to twenty heads. The golden wattle is most commonly found near Sydney in central New South Wales, but is also found farther inland near Kalgoorlie.
When the wattle is young, the tree produces yellow flower balls. It is an Australian native shrub that flowers from June to October.
It is often naturalised along roadsides and in woodlands. It grows from three to eight metres tall. It has smooth, dark brown bark. It also grows in fynbos shrublands.
Anigozanthus flavidus
Known as the evergreen kangaroo paw, Anigozanthos flavidus is a native Australian plant. This clumping plant can grow up to 1 metre wide and has strap-like leaves. It grows in sandy and drained soils. It also does well in clay soils. It grows well in pots and borders and makes a lovely cut flower.
Anigozanthos flavidus can be grown from seed. It can also be started from cuttings. It is a hardy native plant that grows well in many climatic zones. In the right conditions, germination can occur in just 21 days. It can grow to about two metres tall.
Anigozanthos flavidus has a wide range of colouration and can be very attractive. The flowers have a tubular shape and are generally yellow-green in colour. The flowers have thick red or green hairs on them that can be a problem if they come into contact with skin or eyes.
The flowers have a distinctive kangaroo paw look and are often used as cut flowers. The flowering season runs from November to February. The flowers are produced in clusters on stems that are a little shorter than the leaves.
Actinotus helianthi
Known as the Flannel Flower, the Actinotus helianthi is an Australian native dry flower that grows in southern New South Wales and Queensland. The flower is usually found growing in sandy soils or coastal heaths.
This plant is a popular choice for cut flower arrangements. The small creamy-white flowers are surrounded by velvety bracts. The flowers last for several weeks in a vase. They are also popular for garden settings and courtyards.
This plant is hardy and can tolerate a variety of conditions. However, it is not suitable for colder areas. It thrives in a variety of soil conditions, including sandy and rocky soils. Actinotus helianthi is also tolerant of mild frost once it has been established.
Actinotus helianthi is a small shrub that can reach a height of 0.5 to 1.5 meters. It can also be grown as a potted plant. Actinotus helianthi can be planted in sunny, exposed sites. The leaves are deeply lobed and crinkled, and the foliage reduces moisture loss in dry conditions.
Banksia
Using Australian native dry flowers in your floral arrangement is a fun and functional way to pay tribute to our country's unique flora. Australian native flowers are also a nice way to add texture and colour to your floral creation. They are easy to maintain and will last for months to come.
The best way to keep your dried flowers fresh is to use a glycerin solution. This is a simple process of mixing glycerin with water to create a solution. Place the flowers in the solution and leave them for up to three weeks. If you notice tiny beads on the leaves, take them out and re-pot them.
For the most part, drying your Australian native flowers will not harm them. In fact, some natives can stand the heat. For example, the everlasting strawflower is a great choice. The flower produces non-stop blooms in summer and tolerates most soil types.
The best place to dry your Australian native flower is in a dark, dry area of your home. You can also hang them in the bathroom or your bedroom.
#australian native dry flowers#dry flowers wholesale#dry flowers shop#dry flower arrangements near me#dry native flowers#dry flower delivery sydney#dry flowers#dry flowers near me
0 notes
Link
1 note
·
View note
Last Seen Blogs

m4lw4r3-png
˚₊‧꒰ა M4LW4R3 ໒꒱ ‧₊˚


joshban-hot-yaoi
Jumbo Josh

acalmaocoracao-blog
Coisas Da Alma
joshban-hot-yaoi
Jumbo Josh