#glaumbaer post
Text
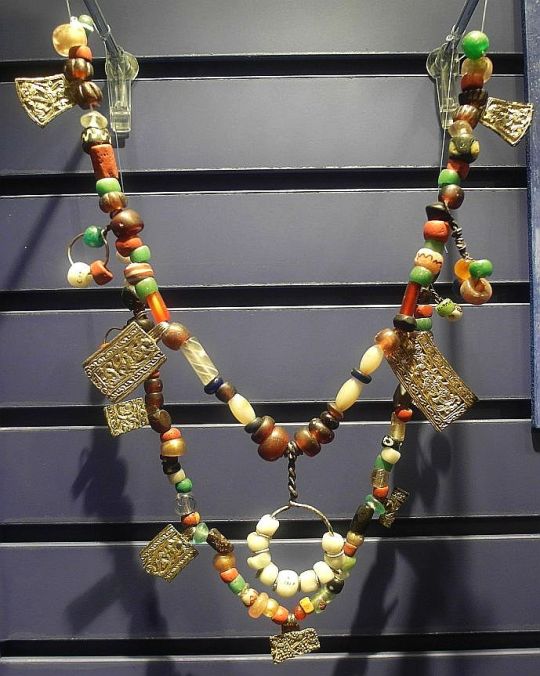
Viking, Nationalmuseet, Copenhagen, Denmark, 2013, Part 4


Various bronze brooches and figurines.


33 notes
·
View notes
Text
“Asphalt is the earth’s last crop”
I read that in an article a while back (it’s posted somewhere below, #soilcrisis) and it has HAUNTED me so much!
So my dad was being a butt about climate change and I just did one of those impatient-bomb things and was like: yo, da, everywhere there is a city is a patch that used to be covered in green forests n’shit. So if you think of it that way, the earth is at like, a 60% burn, and generally humans can’t live past 80%, so maybe we work on regrowing some surface-area skin for our girl mother nature, yeah?
And THAT stuck with him. All the facts and numbers had no context, he was of the “humans can’t have that much of an impact” mind, but that stuck. I think because in his life, he’s seen the cities grow and the parking lots get bigger and the rooftops get taller and all the housing developments cut down forests. That was the thing that he’d seen change. Michigan is pretty insulated with the lakes, freak snowstorms in W. Mich have been pretty normal, so it’s difficult to attribute them to climate change when 50 years ago they happened too. Until, of course, you start to point out that it’s not just one, it’s many and it’s every year.
Anyway, my point was just... may I introduce you to earth shelters! ^-^

And a map!

(These images came from a book called Earth Shelter Technology by Lester L. Boyer, Walter T. Grondzik, available on Google Books).

Parliament House, Canberra, AUS (Photo from Australian Parliamentary Education Office)
There are some issues with it, sure, but not many that some basic adaptions in human habit, community places, or new construction tech can’t take care of.
“The desirability of unobstructed views and natural illumination often results in problems with control of solar radiation.” (Boyer, Grondzik, pg19)

Icelandic Turf House of Glaumbaer (photo from Wikipedia Commons), which can be found across northern Europe and Scandinavia.

A traditional log-house/log cabin with a green roof, also from N.Europe/Scandinavia.

Earthlodge of upper Missouri tribes, including the Mandan, Hidatsa, and Arikara.
My German teacher’s son was part of the initial push of engineers in Germany constructing green-roofs and leading the initiative to change policy, so we got yearly updates and have followed the idea for a while.
So far, tons of people have articles about it, so go find them, but a few key features the green-roof initiative has yielded throughout Europe: a decrease in pollution, greater economic stability as development, construction, and maintenance companies provide stable jobs, better air quality, better mood/stability in urbanized areas, more community efforts to maintain and interact in green spaces and to clean up other aspects of communities, less storm-water runoff (and thereby less urban flooding), increase in biodiversity of plants and animals, more stable ecosystems that decrease the high populations of insects and pests, stable populations of urban wildlife, better thermo-regulation of buildings (and thereby less use of energy and fuels to heat or cool the location).
Okay, so, TL;DR:
Earth-shelters and half-efforts (like green roofs and other nature-urban-integration efforts) may take some getting used to but bruh, they awesome af and we should talk about them so important people know we think they’re cool and then start building them, cus like, that’s how we get shit done now I guess.
#earth shelters#greenroofs#sustainability#ecology#biodiversity#future#climate change#traditional housing
11 notes
·
View notes
Link
ISLANDIA: 60 POSTS QUE AYUDAN PARA VIAJAR [5]
Foto: Pixabay
Le Cercle d'Or en Islande : guide complet pour visiter le Cercle d'Or | Voyage Way
Skogafoss: A Comprehensive Guide | Iceland In 8 Days
ISLANDIA DÍA 5 - Fiordos del este, naufragio, Seydisfjordur, etc... | Viajando con Princesas
Qué ver en Reikiavik ¡25 IMPRESCIDIBLES! | Viviendo de Viaje
ISLANDIA DÍA 6 - Cascadas Dettifoss y Selfoss, Hverir, Godafoss, etc... | Viajando con Princesas
ISLANDIA DÍA 7 - Granja Glaumbaer, Deildartunguhver, Reikiavik, etc... | Viajando con Princesas
La pequeña viajera: ISLANDIA EN UNA SEMANA (INVIERNO)
La pequeña viajera: CONSEJOS ISLANDIA EN INVIERNO
Unique Hotels In Iceland: Surprising And Special Places To Stay | Wanderlust Chloe
Islandia en 9 días: Península de Snaefellsness. | | Mi mundo en una maleta
Las 5 mejores excursiones desde Reikiavik | Viajeros Callejeros
ISLANDIA CON NIÑOS POR LIBRE | VIAJANDO CON PRINCESAS
The Ultimate Guide To North Iceland | Iceland In 8 Days
Qué ver en ISLANDIA en una semana | VIAJANDO CON PRINCESAS
Islandia en 9 días: Kolugljúfur, Hvitsekur, Glaumbaer, Akureyri, Godafoss y Myvatn | Mi mundo en una maleta
Consells per a viatjar a Islàndia amb nens ~ Quaderns de bitàcola
Islandia en 9 días: ballenas en Husavik, Dettifoss y aurora boreal en Egilsstadir. | | Mi mundo en una maleta
Quel itinéraire pour un séjour en Islande ? - Récit & conseils pratiques | Voyages etc
Islandia en 10 días: fiordos del este, Stokness y Höfn. | | Mi mundo en una maleta
Misconceptions About Iceland - Travel Myths Busted | elizabeth everywhere
The Best Waterfalls in Iceland you simply MUST visit | Wandermust Family
Iceland in June: Managing Expectations and Adventure | Iceland In 8 Days
On the Hunt for the Best Pizza in Reykjavik | Iceland In 8 Days
Golden Circle Iceland: 7 Stops You Cannot Miss | Divergent Travelers
10 Tips for Your First Trip to Iceland • The Blonde Abroad
14 Things No One Tells You About Iceland's Blue Lagoon | Jasmine Alley
Fjadrargljufur, il canyon d’Islanda chiuso per colpa di una canzone | SiViaggia
Islandia en 10 días: Jokursalon, Svinafellsjokull, Skaftafell y Fjaðrárgljúfur | | Mi mundo en una maleta
Les plus belles cascades d'Islande | Escale de nuit
When Is The Best Time To Visit Iceland? Seasons & Weather • Expert Vagabond
Ruta de 7 días por Islandia | Pedalear Y Viajar
Viajar a Islandia: Super Guía para viajar barato, por libre y verlo todo | Mi equipaje de mano
Qué visitar, ver y hacer en un viaje a Islandia. | ANDORREANDO POR EL MUNDO
Alojamiento en Islandia. Las mejores zonas donde dormir | La Gran Escapada
Islandia en 10 días: Keldur, Gulfoss y Geysir. | Mi mundo en una maleta
Islandia en una semana con el mejor aliado | Viaje con Pablo
Islandia en 10 días: Kerid, Thingvellir y Reykjavik en unas horas. | Mi mundo en una maleta
Alla scoperta di Reykjavík | ViaggiAutori
Itinéraire de 4 jours en Islande : Cercle d'Or et Road trip dans le Sud | Clo et Chem
Escapada a Islandia por libre. Consejos e información útil | La Gran Escapada
7 + 1 motivos para viajar a Islandia | Turiscurioseando
Conducir en Islandia, reglas y consejos imperdibles | El Blog de Viajes
Qué ver en Islandia: 7 lugares en este paraiso natural que te van a flipar | El viaje me hizo a mi
Islandia en 10 días: la península de Reykjanes. | | Mi mundo en una maleta
Curiosidades de Islandia por las que debes animarte a conocerla
Avistamiento de ballenas en Islandia. Surcamos el Mar de Groenlandia | La Gran Escapada
[Qué ver en ISLANDIA 2019] Megaguía para no perderte nada | Inteligencia Viajera
Cómo alquilar una campervan en Islandia | El Blog de Viajes
Fotografiando los simpàticos Puffins en uno de los mejores lugares de Islandia | Sal y descubre
Península de Vatnsnes: la Islàndia salvatge. | Viatjar pel Món
Que faire en Islande : Top 15 des activitées incontournables | Vizeo.net
Visit Iceland's Three UNESCO World Heritage Sites: A sustainable travel ideology | TravelingMel
Cómo preparar un roadtrip en furgoneta por Islandia | Viajar Lo Cura Todo
Islandia entre icebergs, en zodiac por Jökulsárlón! | Beats of my trip
10 consejos para viajar a Islandia imprescindibles | Viajeros Callejeros
Islandia en verano: 25 lugares que no te puedes perder | Con billete de vuelta
Islandia y el efecto low cost | Blog de Viajes
Descubriendo la única cueva de hielo natural de Islandia abierta en verano - Beats of my trips
Guía básica para visitar Islandia | Alan x el Mundo
Lugares imprescindibles en un viaje fotográfico a Islandia | Viajar Lo Cura Todo
0 notes
Text
Historic Musuem Oslo, 2013, Part 4
Viking Age
Glass beads, Kaupang, Norway


.
Brooches

Tortoise brooch from a grave in Grimmimgdalskampen,
Vågå, Oppland, NO, 9th century
.

Tortoise brooches with a string of glass beads, Viking Age, Norway
(There was no indication whether the brooches and beads were part of the same burial / found in this particular arrangement.)

Woman's grave, tortoise brooches with string of beads and silver spiral, 9th century.
Hundorp, Sør-Fron, Oppland, Norway

Tortoise brooches, 9th century, Ringsaker, Hedmark, Norway
Glass beads, Viking Age, Hovland, Larvik, Vestfold, Norway
(Brooches and beads were NOT found in the same place!)
#glass beads#tortoise brooches#viking age#living history#viking age reenactment#historic museum oslo#glaumbaer post
52 notes
·
View notes
Text
Historic Musuem Oslo, 2013, Part 2
Viking Age
Hoard Finds

Silver hoard
11th century A.D.
Tråen, Rollag, Buskerud, NO
Hoard find
Hon, Øvre Eiker, Buskerud, NO
late 9th century
Silver hoard
Ringnes, Stange, Hedmark, NO
11th century
Fibulae/Booches, Viking Age, Urnes style, Norway
.
Swords, Viking Age, Norway
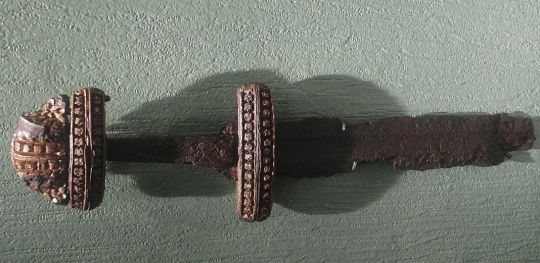
.
Helmet
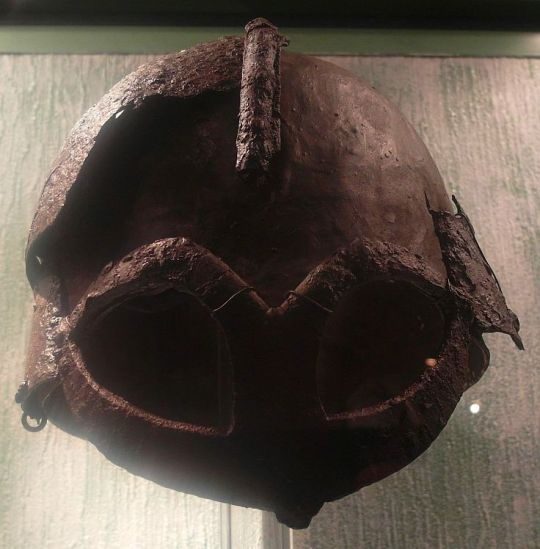
Man's grave, Gjermundbu, Ringerike k., Buskerud, Norway
10th century
.
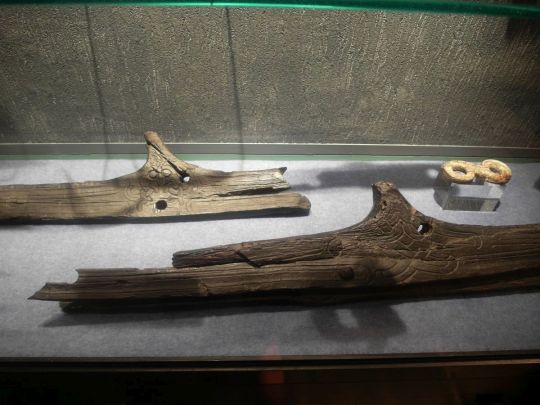
Wooden Boat Fragments, Viking Age
#viking age#viking swords#glass beads#historic museum oslo#viking age reenactment#living history#glaumbaer post
43 notes
·
View notes
Text


Fringed scar. Nålbinding. Wool. Length: approx. 2 metres.
29 notes
·
View notes
Text
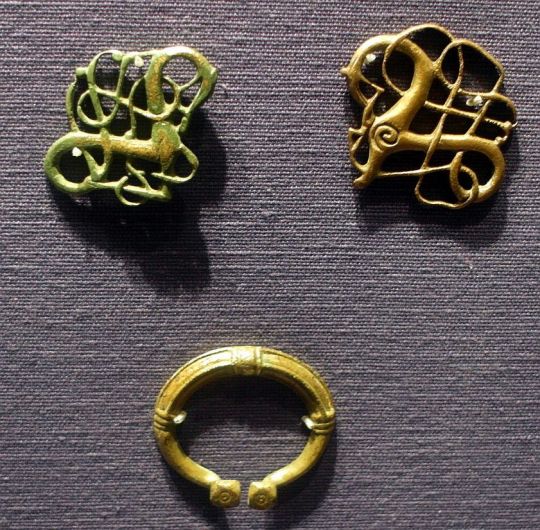
Historic Musuem Oslo, 2013, Part 5
Viking Age
Tortoise brooches and dress clasps


9th century Norway
Detailed descriptions:


Viking age tortoise brooches and trefoil brooch, Norway

Tortoise brooches, Jellinge style
Morberg, Røyken k., Buskerud, Norway
10th century

Animal brooch
Kaupang, Larvik, Vestfold, Norway
9th century

Borry style jewelry, Norway
#totroise brooches#viking age#historic museum oslo#viking age reenactment#living history#glaumbaer post
27 notes
·
View notes
Text

Nålbinding, triangular scarf. Wool.
23 notes
·
View notes
Text
Dyeing wool with madder / onion / birch leaves
Safety Instructions
To prepare the dyeing agent, I put madder, onion peels and birch leaves each in a pot of cold water for one night. If you don’t have the time to let the dyeing agents sit overnight, you can also cook them but I recommend the first method. It conserves energy.

In order to prepare the wool for dyeing I recommend to use a mordant. I usually use alum because it is non-toxic.
The first step is to dissolve 10-15g of alum in warm water in a big pot and to add the wool. I used 300g of wool and usually do my dyeing in enamel pots. This is for the simple reason that the dyes don’t react with the material of the pot.

I let the wool simmer in the alum water for about an hour. Then you simply throw the water out. Don’t wring out the wool, just let it sit wet. Wringing out wet, warm wool can cause it to felt and you want to avoid that as much as possible.
Try not to cook the wool too much and don’t use too much alum as it can make the fibers brittle. You may have to experiment a bit.
Before dyeing, I usually sift the dyeing agents and put them in a small sachet. You can also put the wool directly in the water with the dyeing agent but then you’ll have to get the leaves out of your wool afterwards. Do not recommend.


Put the dyed water, the sachet with dyeing agent and 100g wet wool into an enamel pot; now let it simmer for at least an hour. The temperature for the madder dye should not exceed 80°C.
Stir regularly to ensure that the wool takes on color evenly.

You can use three big pots with 100g wool each simultaneously or do one dye after the other of course.
Onion peels will dye yellow, madder will dye your wool red. Birch leaves will make a yellow dye. You can add 1 teaspoon of iron vitriol (Iron(II)Sulfate) to turn the dye from yellow to olive green.

After an hour of simmering, let the wool sit in the pot until it is cooled down.
You can either throw out the water and dying agent or use it for a second round of dying if you prepared more than 300grams of wool. Each time you re-use the water, the dying effect will lessen. With madder, for example, this can lead to reds from bright red with a first dye to salmon colored effects with a second or third dye.
Rinse the wool with cold water until the water stays fairly clear. Then hang it up to dry.

Some people “conserve” the wool by putting it in vinegar but that is not necessary. If the alum mordant opens the fibers first, the resulting chemical bonds between wool and dye are fairly stable.


PS: Note that this works only with 100% wool. Plant-based fibers and synthetic fibers need different mordants and dyes and lead to different results. Wool is very easy to dye and the effects are more long lasting because the chemical bonds are stronger.
PPS: Onion dyes are not Viking age dyes as far as I know. Histoorically correct dyes are madder and birch ;D.
#wool#plant based dyes#viking age#viking age reenactment#living history#my art#glaumbaer post#wool dye
17 notes
·
View notes
Text
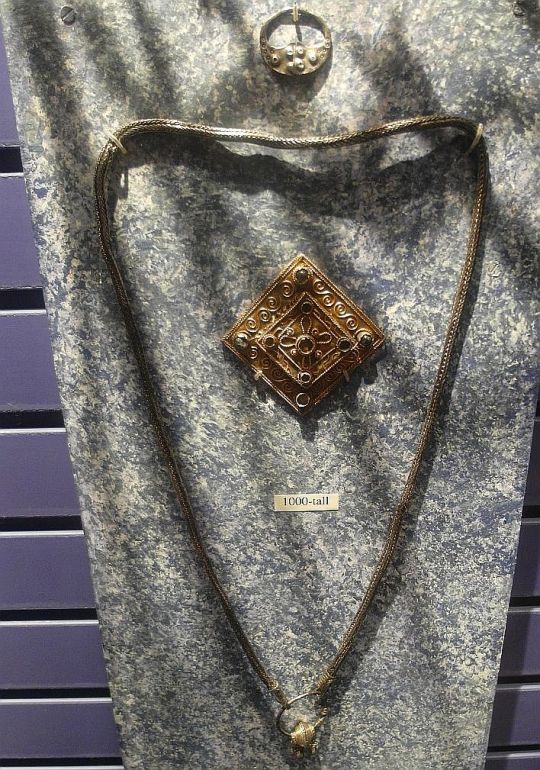
Viking, Nationalmuseet, Copenhagen, Denmark, 2013, Part 2
Viking Age (glass) beads


Beads and a cross-shaped pendant from a woman's grave in Kaupang, Norway, 10th century.
.

Tiny dragon's head from Islandbridge, Dublin, Ireland.


Runestone of Harold Bluetooth (Jelling stone), recolored copy. One side shows the depiction of a serpent wrapped around a lion, the other shows the crucifixion of Christ.

The third side shows the following runic inspription:
"King Haraldr ordered this monument made in memory of Gormr, his father, and in memory of Thyrvé, his mother; that Haraldr who won for himself all of Denmark and Norway and made the Danes Christian."
13 notes
·
View notes
Text
Historic Museum Oslo, 2013, Part 1
Bronze Age / (Pre-)Roman Iron Age

Bronze Age animal figurines

gold ring, glass beads
Roman Iron Age (250-300 A.D.)
Buskerud, Norway

amber beads, glass beads
Roman Iron Age, 400 A.D.
Tune store, Sarpsborg, Østfold, Norway

glass beads, amber beads
Roman Iron Age, 400-450 A.D.
Lunde, Nome, Telemark, NO

glass beads, Pre-Roman Iron Age, Norway
#historic museum oslo#glass beads#roman iron age#viking reenactment#bronze age#norway#living history#glaumbaer post
13 notes
·
View notes
Text
Dyeing wool with walnut peels
Safety Instructions
In order to dye wool with walnut peels, you need to collect the fresh green peels, not the brown ones that form the actual walnut. The best season to collect these in Europe is in September but you can also buy them online. The fresh green peels work best and give the darkest color but dried ones work, too.
If you want to collect peels yourself, you should wear gloves because they can dye your hands brown. The green peels turn brown quickly on the ground when open and exposed to air.
You can keep additional leftover walnut peels fresh and ready in the freezer, by the way.
Please also be careful not to get brown color from the peels on your clothes as it doesn't wash out well.

(Source: Böhringer Friedrich, CC BY-SA 2.5 https://creativecommons.org/licenses/by-sa/2.5, Wikimedia Commons)
Put your fresh or frozen walnut peels in a pot with water over night. I used 500g green peels for 100g wool. To dye I recommend enamel pots because they don't react with the dyeing agents.
The next day you can sift the peels out, put them in a little sachet and put that back in the (now brown) water. Let simmer on a stove for about an hour to get even more dyeing agent dissolved.
Because walnuts contain a natural mordant (tannin / tannoids), it is not necessary to prepare the wool with alaun. The tannin will make sure that the dye builds a solid chemical bond with your wool.
Put your wool in the pot with the dyeing agent and the sachet with walnut peels. Let it simmer for about an hour. I recommend about 80°C.
Take the wool out and rinse it with cold water until the water is clear and no brown color leaks out. Don't use warm water because wool tends to felt easily and you don't want that at this point.
Hang your wool up to dry.
If you like, you can use the leftover dyeing agent to dye more wool. The second dye works just like the first, put wool in water, let simmer for about an hour. Usually, the first dye comes out darker than the second.
Here are my results.
First dye:

Second dye:

PS: Note that this works only with 100% wool. Plant-based fibers and synthetic fibers need different mordants and dyes and lead to different results. Wool is very easy to dye and the effects are more long lasting because the chemical bonds are stronger.
8 notes
·
View notes
Text
Historic Musuem Oslo, 2013, Part 6
Viking Age glass beads

No. 4 & 5

No. 36-55

No. 18-34


No. 1 & 2


No. 8 & 10

No. 9
Detailed descriptions:

.

63 Beads
Ommestad, Hof, Hedmark, Norway, Viking age

Glass beads and charms, 10th century, Kaupang, Larvik, Vestfold, Norway
8 notes
·
View notes
Text
Dyeing Wool with Tansy
Safety Instructions
The common tansy can be used easily to dye wool a bright, almost neon, yellow.
The whole plant can be used for dyeing, not just the flowers but it is best to collect them when they are in bloom of. You can also buy dried tansy online but I used fresh plants.

(Source: Slickers, Georg, CC BY-SA 2.5 https://creativecommons.org/licenses/by-sa/2.5, Wikimedia Commons)
To prepare the dyeing agent, put the tansies in a pot of cold water for one night. Before dyeing, I usually sift the plants out and put them in a small sachet. The sachet goes back into the water!
Let the sachet simmer in the pot with the dyeing agent / water for about an hour. I recommend you use an enamel pot because those do not react with the chemicals inside.
When you cook tansies, please be aware that they will create a rather distinctive stench. This is due to essential oils in the plant. Please be careful and make sure you do this either outside or have a window open at all times! The room you dye in needs to be properly ventilated. I recommend to not stand beside the pot for an hour but to come back now and then to check on the dyeing agent.
In order to prepare your wool for dyeing you need a mordant. I usually use alum because it is non-toxic.
The first step is to dissolve 10g of alum in warm water in another big pot and to add the wool. I used 100g of wool for and armful of tansies.
Let the wool simmer in the alum water for about an hour. Then simply throw the water out. Don’t wring out the wool, just let it sit wet. Wringing out wet, warm wool can cause it to felt and you want to avoid that at this point.
Try not to cook the wool too much and don’t use too much alum as it can make the fibers brittle. You may have to experiment a bit.
Now put the wet wool into the pot with your dyeing agent; let it simmer for two hours. The temperature should not exceed 80°C. Stir regularly to ensure that the wool takes on color evenly.
Now let the water cool down, take out the wool and rinse it carefully under cold water until no more color leaks out. Hang up to dry.
My result was a bright yellow:

PS: Note that this works only with 100% wool. Plant-based fibers and synthetic fibers need different mordants and dyes and lead to different results. Wool is very easy to dye and the effects are more long lasting because the chemical bonds are stronger.
6 notes
·
View notes
Text
Historic Musuem Oslo, 2013, Part 3
Viking Age
Household Items

“Ironing board” (bone) and glass weights

Frying pan

Scales, Viking Age, Norway


Viking Age keys, Norway

5 notes
·
View notes
Text
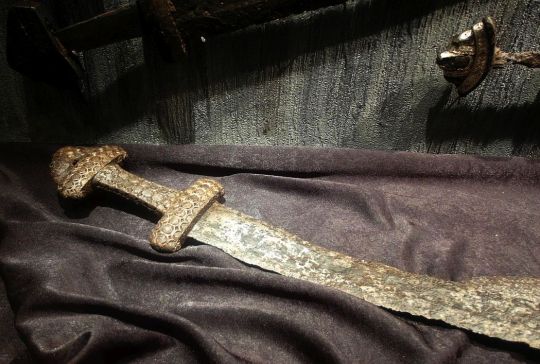
Viking, Nationalmuseet, Copenhagen, Denmark, 2013, Part 3


Brooches and pendants of women with swords and shields, probably depictions of Vakyries.

.

Viking age swords and stirrups.

Axe heads. Center: Axe head with the depiction of a serpent.

Axe with silver inlay in the Mammen style, from Zealand, Denmark, second half of the 10th century.

Two helmets fount at Chernigov, Ukraine, 10th century, and an eyebrow ornament from a helmet found at Gevninge, Zealand, Denmark, Viking age or earlier.

Bronze strap and belt fittings.

The Lewis Chessmen, found on the Isle of Lewis, probably made in Norway, second half of the 12th century.

3 notes
·
View notes
Last Seen Blogs


mcavoytaylor12
VoidGodfrey

prettyinplasticla
Pretty In Plastic

luttiart
Morgan Photography and art

recklessrock
💽🎸🎧🤘🏻