#glue plotter
Explore tagged Tumblr posts
Visit Tumblr Blog
Explore Tumblr blogs with no restrictions, modern design and the best experience.
Last Seen Tumblr Blogs


Fun Fact
Hackers stole 65M passwords from Tumblr in 2013.
Text
Bickers GlueJet Joins Image Data in Landmark Deal at FESPA 2025!
Bickers is thrilled to announce the successful sale of their cutting-edge GLUEJET® XY glue plotter to Image Data, a prominent graphic services company based in Howden, UK. This significant transaction took place during the FESPA 2025 exhibition in Berlin, a prominent international event showcasing innovations in the printing, signage, and visual communication industries. The GLUEJET® XY glue…
0 notes
Text
Smartplot xy plotter | Automatic xy glue plotter Machine
The Smartplot XY Plotter from Mahisa is a highly precise and efficient plotting machine, crafted for industries that demand accuracy in adhesive and packaging applications. Whether you’re creating patterns for glue application or automating repetitive layout tasks, this plotter delivers consistency, versatility, and speed. Its user-friendly interface and adaptable features make it a must-have for manufacturers seeking cost-effective automation. The Smartplot XY Plotter seamlessly integrates with a variety of packaging and adhesive systems, optimizing workflow while reducing manual errors. Backed by Mahisa’s innovation and engineering excellence, it enhances productivity by performing complex plotting tasks with minimal setup time. As businesses continue embracing automation, tools like the Smartplot XY Plotter ensure they stay ahead of the curve. With advanced control systems and reliable support from Mahisa, this machine represents a leap forward in plotter technology tailored for adhesive and packaging sectors.
0 notes
Text
Book Progress 17: Did I do a great job? Who knows? I don't. The peg game told me I am an eg-no-ra-moose.


This wound up being 1119 pages across two books. The expense was approximately 70 bucks in materials and printing costs, altho' I had a lot of costs deferred from items purchased for 'Haden'. I'd say closer to 130, if I don't count the expense of the used plotter. Obviously, that's a lot of goddamned money but there are Considerably cheaper ways to go about this. One can pay in time or effort, in lieu. Or better yet, fewer fucks.
I want to say I'm very much a beginner. I did all this endless talking because I would have liked it when I was working on My first book. Having the ripe and full number of Three books under my belt (non-affectionate), it's still very much in the 'If I can do it, so can you' region of skill. My spine joints- dogshit. My glue control- dogshit. My dogshit- dogshit. But! It's extremely fun and I've learned a thing or two. I hope that's helpful.
Oh. And here's the fic in question. I'm proud of it by virtue of the goofball pleasure it gave me.
https://archiveofourown.org/works/53457154/chapters/135304645
I have an idea for another book cover but I have to write the dang story first.
125 notes
·
View notes
Text
Writing tag by @bonecarversbestie !
Describe your writing process from idea to posting/publishing?
I usually have a very simple concept to start with but I can pick it up pretty quickly and go from there. I start writing a chapter by doing a very quick blurb that summarizes what will happen: “Lucien is walking back to the forest house after a Winter trip.” Where is he walking? What are his emotions? I can write a pretty long summary and then write the actual chapter when I get inspired. I’ll end up separating the summary into sections and eventually I’ll have a draft! My issue is editing haha I despise editing because I overthink. But I have gotten better. This is fanfic, so usually I will finish up my draft and glue parts together, go over some words I think I repeated too much, and then I say fuck it and go!
Are you a plotter or a pantser?
DEFINITELY a plotter. I got a huge huge spreadsheet of my plot for A Court of Embers and Sunlight which includes keeping track of my words, having a little summary, who’s POV, what I need to add etc to each chapter.
What do you listen to when you are writing?
I got a playlist for my Court of Embers and Sunlight fic, but I mainly listen to this classical playlist.
What’s your drink of choice(while writing)?
I often write at my local coffee shop and I either get a honey comb latte (honey, cinnamon, vanilla with oat milk) or a cafe mocha. When I’m at home, I usually just have water.
Promote yourself! What’s your favorite thing you’ve written?
A Court of Embers and Sunlight will always have my heart! It’s a 2 year project with over 140,000 words! About Lucien’s life in the Autumn court with Jesminda and how they tragically ended. I also have LoA plots, and Eris plots! I’m proud of my worldbuilding and the emotional stories that I tell. It’s taking me forever to get out though 😭 I have SO MANY chapters and plots I want everyone to read!!
Share a fic of yours that you think is underrated/deserves more love.
The Tree Have Eyes! 3 chapter fic of Eris and little 8 year old Lucien going on a hunting trip!! It’s sweet and emo and fun and full of cool nature.
Do you have any advice for new writers?
I would say don’t think too much about other’s work. This is coming from someone who thinks A LOT, but a lot of people worry that their writer isn’t as good as someone else’s, or they aren’t getting a lot of kudos so it must be bad, etc. Don’t beat yourself up! It’s hard to stop comparing but this writing is for you, and there will ALWAYS be someone who loves to read your stuff. Also make friends with other writers! You get like minded people who can support you and help you out. I’m often a loner but I get so excited when I get friends sharing their work or talking about their work, talking about my work etc! It is very motivating.
What is a writing style/technique that others do really well that you'd like to get better at?
Oh god, dialogue…this is me thinking too much but I never feel very confident in when writing dialogue. So many people write it so naturally and it’s always the first thing they start when drafting! I can start with dialogue but I always enjoy prose and descriptions more.
Is there a character you were surprised you enjoyed writing as much as you did?
Rhysand! He jumped on me when I was first drafting ACOEAS and he was very very fun. Difficult sometimes (because I am not as hot or clever as Rhys lmao) but still very fun.
Thank you for tagging me @yaralulu @sad-scarred-sassy and thank you for starting this @bonecarversbestie ! I feel like most of my writing friends already did this haha.
But no pressure tags: @sadiegirl2021 @ennawrite @jules-writes-stories @clockwork-ashes @highlordofkrypton
14 notes
·
View notes
Text


Ian Waelder
Flügel (Side Window), 2025
Plotter print on canvas covered with a layer of raw linen with air-dry porcelain, pencil, stained with diluted ink, glue, detergent, oil, collaged prints and tissue paper
2 notes
·
View notes
Text
Cutting out shirt pattern. Maybe I should've asked our IT guy if he was fine with me using their plotter for sewing patterns because it's a bitch and a half to cut out and glue together so far :(
2 notes
·
View notes
Text
get to know the author!

name : ferre
pronouns : they/them
preference of communication : discord, but i can do tumblr ims. honestly, i’m slow on both but i’m a tad quicker to get back to ppl on discord….although again, these days i prefer to keep my discord to solely those whom i feel ooc wise comfortable around!
most active muse : this guy ( patrick ) clawed his way into single muse blog status with the number of times he gave me brainrot on my multimuse so i’d say it’s probably patrick :’D
experience / how many years : like about on-and-off for about 8 years? i did do a little bit back in 2013 in quizilla ims which was my introduction to rp before i started formally on tumblr in 2015….that being said i was on-and-off for about the first three years until in 2018 when i made calum- he was the first muse of mine that actually like, stuck :’D that being said, i did also take like a year hiatus in 2020 before coming back in 2021 so uh….eight years might not be the most accurate number jfksdljfkl
best experience : this attempt so far?? Has been so wonderful and i wouldn’t change any of what has happened for the world- my mutuals and writing partners are so skilled and friendly and patient and LITERALLY some of their muses have managed to elicit responses and character development from my muses that i would have NEVER imagined :’D but if we have to go specific….maybe it’s the hunger games au verse i dragged some ppl into?? the plotting and characters they have come up with is PHENOMENAL and wow, i’m gonna stuck to them all like super glue for 5ever <3
rp pet peeves : so many! my biggest ones, however, are self-centered and inconsiderate partners: those who disregard my rules, those who talk only about their own muses in every thread and plotting interaction, those who only seem to take interest in my blog(s) when it involves receiving writing from me. That and blogs that follow first but never make a move/any indication of interest, not even a like on my posts….no offense, but i’m not chasing after you. Other pet peeves include facechasing, trauma dumping ( ooc and ic ), and drama. oh, and partners who just don’t?? Respond to my attempts at some kind of ooc interaction- it can even be in tags, but if you’re not saying anything then that kills my enthusiasm very quickly.
fluff, angst, or smut : see, i want character development and exploration in my threads so i don’t think it’s fair to split up threads into these categories bc if done with intention, you can learn something new about your muse and your partner’s muse in any thread ( and yes, that includes the crack threads- DON’T UNDERESTIMATE ME :D ) i will say though, smut is highly unlikely here just bc patrick is demisexual + it’s gonna take like 2839402384098 years for him and hyuk to look at and act on each other in that manner :’D
plots or memes : plotting <3 but memes are good for starting off plotted dynamics tho!! most times, however, i’m not a fan of first meetings either. I like to have some kind of dynamic/backstory to go off of and would rather not overstep any boundaries so you’re not really a plotter… we might not be a good match.
long or short replies : see, patrick is a literature professor. for someone softspoken and reserved, he has a TON of thoughts and opinions so whenever i do try to keep things short and sweet, he bucks against it and will give me at least three paragraphs….over 1000 words too. we’re very ( not ) sorry :’D
time to write : depends on what’s happening at work and what my mood is. I do try to do my writing in the afternoon/morning though as most days i feel like i haven’t done anything productive/meaningful until i’ve written at least something.
are you like your muses : hahahaha, nah. I mean, we do have similar interests ( ie. literature and working in higher ed ), but personality-wise he’s much more stiff and erudite than me :’D i will say i think all characters we write do have pieces of ourselves in them, otherwise they’d never be able to grow, but for the most part, no i don’t think i’m really like patrick <3 at the very least, i'm not nearly as repressed as him fjskdlfjsl
tagged by: @wynterlanding ( thank you so much ♡ )
tagging: take it if you would like!! i'm would be curious to see how you describe your own rp style :3
#the hope in change ( about ferre. )#whelp i'm back.....#hopefully i can get another draft or two out either here or elsewhere :'D
3 notes
·
View notes
Text
Why Customers Choose Auto Style PPF for Paint Protection Film
At Auto Style PPF, located in Sugar Grove, IL, we've been protecting vehicles with precision and passion for over 8 years. Our small but highly specialized team is trusted across the Chicagoland area from Naperville to Aurora, Batavia, St. Charles, Elgin, and beyond because we deliver high-end results without dealership pricing.
Experience You Can Trust With nearly a decade of hands-on experience, we’ve seen it all and we’ve perfected our process. Every vehicle we touch gets our full attention, whether it’s a daily driver or a high-end exotic. In fact, we’re proud to handle PPF installations for The Porsche Exchange in Illinois, along with a number of other dealerships and private collectors.
Premium Rayno PPF Better Than the Big Names We exclusively use Rayno PPF, a premium-grade paint protection film manufactured in Korea and trusted in Europe, California, and across the U.S. Through our certified dealer in Schaumburg, IL, we receive fast and reliable shipments thanks to our dedicated rep Miguel—shoutout to him for always coming through!
We’ve tested many brands over the years, including the industry giant Xpel and in our experience, Rayno beats them all in price, clarity, gloss, stretchability, and resistance to glue marks. The result? A flawless finish that protects your paint while keeping your car looking brand new.
Precision-Cut for a Perfect Fit Every PPF job at Auto Style PPF is precision-cut using software and a plotter. This ensures a clean, factory-like fit on every panel no cutting on the car, no guesswork, no compromises.
Real Warranty. Real Coverage. We don’t just offer a product we stand behind it. Our 10-year warranty covers defects like yellowing, bubbling, peeling, or fading. And unlike many shops, we also include a 10-year installation warranty, because we believe your car deserves long-lasting protection.
Competitive Prices & Ongoing Discounts We know PPF is an investment but it doesn’t have to break the bank. At Auto Style PPF, we consistently beat competitor pricing while offering ongoing seasonal discounts, making high-end protection affordable for more drivers.
Protect Your Car the Right Way Whether you're in Naperville, Aurora, Elgin, St. Charles, or right here in Sugar Grove, we’re ready to help you transform, protect, and enhance your vehicle with professional-grade PPF. Schedule your free estimate today and see why so many car owners choose Auto Style PPF.


youtube
0 notes
Text
How to Make Card on Cricut: A Stepwise Tutorial
With Mother's Day around the corner, I am getting really confused about how to make her feel on top of the world on that day. Right now, thousands of handmade ideas are running in my mind, but I always end up choosing a custom card as the final choice. Whether you are already an expert or just a newbie, making this project is the best decision as it is easy to make and can be formed within a few minutes.
If you just added a new Cricut machine to your art room, then get started with how to make card on Cricut. Without a doubt, the Cricut machine can craft various types of cards from any material within a few minutes. With the help of this blog, you will be able to design this project with ease.
Step 1: Sign in to Cricut Software & Make a Design
With your PCs or smartphones, log in to your Cricut Design app or create your account. After doing that, connect your devices and go to the Uploads button. Now, tick the Upload Image > choose your image from the Downloads folder and then hit the Insert Images option.

Also, select the whole card and click the ungroup option present under the Layers panel. Next, select the entire text and then click the Weld option visible at the bottom of the panel. At this stage on how to make card on Cricut method, you will notice that all the card materials will be divided into four different layers.

At this point, you will see a line inside the blue card and change the Operation from Basic Cut to Score. To be on the safe side while scoring the lines, pick both lines and tick the Duplicate option. Then, change the line alignment to Center from the drop-box.

Step 2: Write Text on Your Card
Now, tick the Text toolbox and start writing your text inside the box. After completing the text, move it inside the particular card portion and make the necessary changes. Next, change the operation to Draw-Pen and instruct the machine to start writing by selecting the Attach box.
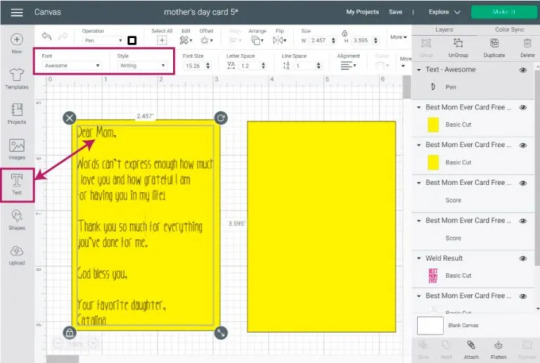
Carry forward the how to make card on Cricut process by flattening the text and then moving it to the card portion. After that, select all the layers and change the size of the card if you want. At this time, tap the Make It on the top-right corner of the canvas.
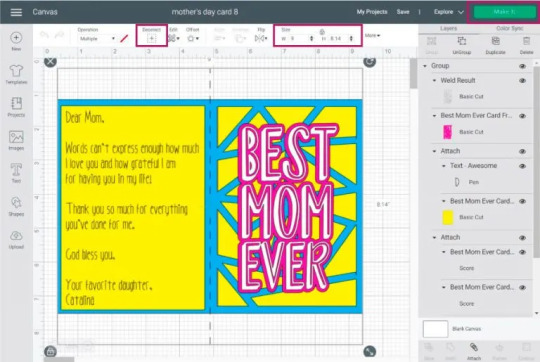
Step 3: Set Your Material on the Mat
Tick the Mirror icon on the left-hand side to ensure that the text has been placed properly on the mat. Then, click the Continue option and choose the material you will use for the project.
In addition, hit the C button and let Cricut products do the rest of their work without making any changes in the middle of the process. When the machine is done with cutting, carry on with the next step of how to make card on Cricut.

Step 4: Show off Your Cricut Card
At this stage of creating a custom card on a craft plotter, assemble the text using a household iron and the remaining material using a Cricut Glue gun. And then, keep it aside and let the glue settle down. Once the glue has dried, surprise your mom by giving her this handmade card with breakfast on her bed.

Compliments to you! You've now learned how to make card on Cricut,with all the steps that are part of the process. Apart from this style, you can also try some new styles of cards that you can design out of your Cricut machine.
FAQs
Question: What Are Cricut Card-Making Tips for Beginners?
Answer: To make the best Cricut card by yourself, you need to follow certain tips shared below:
Use the correct cutting machine and tools while making a card
Choose bold fonts with color, style & size
Write heart-warming text that will express your feelings
Create a background and design from the Cricut Design app.
Question: What Different Card Styles Can I Make With My Cricut?
Answer: The various card styles that you can easily make out of your machine are as follows:
Pop-up card
Handbag card idea
3d style
Layered style
Shaker card
Shaped card
Shadowbox style
P.S. I Love You style card
Question: Which Cricut Machine Is Best for Making Cards?
Answer: Several Cricut models are known for creating every project, especially cards. Cricut Joy is a compact cutting machine for creating DIY cards as it supports the Cricut card mat, which can make four cards at the same time. It is highly preferred for making last-minute crafts, especially cards.
0 notes
Text
8 Best Cricut Accessories to Elevate Your Crafting Experience
If there is one thing that comes with a craft machine, it’s Cricut accessories. Indeed, a craft plotter can design any project with ease and precision. I have been making a ton of DIY projects out of the Cricut machine for various events and occasions. In the beginning, it was hard for me to learn about each item and what role they played while creating projects. After doing a lot of research, I came to know about the importance of each product.
No doubt, it was going to take a little time, but now I have a good idea of what supplies I’m going to use to make the project. Have you recently got a Cricut machine and are going to complete the craft room with a compatible craft item? Then, keep reading the blog, as you will get to know about the foremost tools.
1. Cricut Brayer
Beginning with the Cricut Brayer is an ideal choice in the Cricut accessories when it comes to extending the life of the FabriCGrip cutting mat. Following this, this tool removes unwanted dust, dirt, wrinkles, and kirk from the material. Also, the Brayer tool is best for pressing down fabric, vinyl, or iron-on on the cutting mat.
2. Cricut Roll Holder
Equally important, you can also include a Cricut Roll Holder as a primary tool that is used for making DIY projects. This tool has the precise aim of keeping Smart Materials organized and aligned for precise cuts. Its built-in trimmer ensures a straight edge every time while use it for crafting purposes. You can attach these tools to the Cricut machine within seconds.
3. Cricut Scoring Stylus
In addition to the Cricut accessories list comes Scoring Stylus. Through this supply, the DIYer can precisely fold the lines in the correct alignment. It is probably used by the DIYer while creating cards, envelopes, 3D projects, and many more. Apart from that, the Explore machine can handle a scoring stylus and cutting blade at the same time.
4. Cricut Machine Mat Variety Pack
Furthermore, cover all your crafting needs with a variety of cutting machine mats. Each mat comes with a solid adhesive glue that sticks to all kinds of materials. The materials include delicate paper to balsa wood, and they are reusable as well. Plus, the Cricut machine mat holds the materials tightly in place while cutting them down.
5. Cricut Heat Resistant Tape
Also, add Heat Resistant Tape to the list of Cricut accessories by keeping your design in its place during the heat transfer process. This tool can take the pressure of a heat press and is perfect for positioning HTV and other materials. At the same time, the tape doesn’t leave any residue and is temperature-resistant upto 400*F (205*C).
6. Cricut Glue Gun
Furthermore, you are going to love this high-temperature Cricut Glue Gun to complete any DIY project. Talking about one of these Cricut accessories is designed beautifully for the user’s comfort, precision, and control over the glue. Made with a smooth trigger and small-diameter tip, the glue gun lays down the glue on the edges of the project. Moreover, the LED indicator lets the user come across when the glue is ready to be used.
7. Cricut Essential Tool Set
Moreover, take advantage of this golden opportunity and start your craft in style with the Cricut Essential tool set. Inside the set, you will get seven pieces that will assist you in slicing, sniping, scoring, weeding, and modifying a variety of materials. Also, each piece available inside the set is compatible with the Cricut machine and offers perfect performance.
8. Pen Set, Metallic (5 ct.)
Following this, don’t hesitate and add a Cricut metallic pen set as one of your primary Cricut accessories. Inside this set, you will get five different colors of metallic pen that will help you design invitations, cards, banners, gift tags and many more. Other than that, the pens inside the set are acid-free, non-toxic and can cut and write at the same time.
Conclusion
It doesn’t matter whether you are a beginner or an experienced crafter; if you have the enthusiasm to learn something new, then it’s obvious to be curious and always be on your toes to learn something new. Cricut accessories are worthwhile as they help crafters design DIY projects, as per reference. Apart from earlier mentioned supplies, there are other tools that the user can buy before starting the crafting process.
Source : https://designaccessoriesmart.wordpress.com/2024/01/06/8-best-cricut-accessories-to-elevate-your-crafting-experience/
0 notes
Text
What are Smart Materials for Cricut Joy? [A Complete Guide]
To answer your question about what are smart materials for Cricut? We are here to help you out. In simple words, Smart Materials can be expressed as one of the cleverest materials directly loaded into an electric cutting machine without a cutting mat. It directly means you just have to load the material, and the machine will do the rest of the work.
Other than that, these materials are compatible with the Cricut Joy model and available in different varieties, including Smart Vinyl, Smart Iron-On & Smart Paper Sticker Cardstock. With the assistance of this item, this craft plotter can cut an individual, continuous shape up-to 4.5 inches wide and 4 feet long.
You’ll find some of the prominent supplies needed to complete the assigned project in this blog.
1. Cricut Joy Smart Vinyl Glossy-Permanent
Accompanied by this clever crafting material, you can add a bit more personal touch to your project. Through this material, it isn’t a big task to design a label on the fly or a banner with a big impact. Other than that, you can also design your water bottle & mailbox, which last up up-to 3 years.
2. Transfer Tape (21 ft)
Furthermore, with this respective tape, you can transfer the customized vinyl cuts to different surfaces with ease and precision. This transfer tape is also specially designed for types of vinyl such as Patterned, Holographic, Matte Metallic, and many more. Moreover, it also creates custom decals, labels, decor, and many more.
3. Cricut Joy Smart Paper Sticker Cardstock, Pastels
Another supply that can be the solution for smart materials for Cricut is Smart paper sticker cardstock. You won’t need any glue while using this item during the crafting. This adhesive-backed paper operates without the cutting mat, so you just have to load and go. Within the blink of an eye, you’ll get the project in front of your eyes.
4. Cricut Joy Smart Iron-On Holographic
Along with this Iron-On Holographic smart material, you’ll get a glimmer, shiner, and groovy look on your project. By choosing this specific material, you can include a little personality in a T-shirt, jeans, jacket, or backpack. On the other hand, this particular supply works mind-blowing on a wide range of materials.
5. Cricut Joy Smart Label Paper-Dissolvable
Let us introduce you to label-making material designed to dissolve without sticky waste. This smart label paper is the perfect choice for labeling leftovers, party cups, kid’s sundries, and many more. If you are ready to repurpose the surface, run water over the label or place the item inside the dishwater for a residue-free result.
6. Cricut Joy Smart Iron-On Bundle
Along with this bundle, you can wear creativity on your sleeves, pocket, or pant leg. This crafting item operates without the cutting mat, so you just have to load it and let the machine do the rest of the work. Moreover, these items work fabulously on various materials whose results last until 50+ washes.
Suppose you will create any new project in the forthcoming days of the year. In that case, you must refer to all the earlier-mentioned cutting machine supplies. It will assist you in knowing about what are smart materials for Cricut and the application process. =
Tips for Working With Cricut Smart Materials
Some of the important tips & tricks that every crafter needs to know while working with clever crafting items are penned down below:
Frequently Asked Questions
Question: How Should I Prepare Smart Materials for Cutting?
Answer: Smart Materials come ready to be loaded into the machine. If you don’t use all the materials, trim the unwanted section and save it for future projects. You must trim the material straight rather than making an angle if you will load it without the mat. Additionally, the loading mechanism doesn’t engage until sensors on both sides detect the material.
Question: What Can I Do With Cricut Smart Materials Leftover Scraps?
Answer: Cricut Smart Materials must be at least 4 inches long to feed through the machine without the mat. However, you can use a cutting mat for scraps shorter than that. You have to remember that Cricut Joy permits 1 inch of material at the top of the design and 0.5 inches at the bottom. The maximum design length that can be cut down with a 4-inch piece of Smart Material would be 2.5 inches.
Question: What Are the Benefits of Cricut Joy Smart Materials?
Answer: With Smart Materials, Cricut Joy can cut a single, continuous shape up-to 4.5 inches wide and 4 feet long, making repeated cuts (stars, hearts & confetti) up-to 20 feet long. On the other hand, the size of your mat will limit your design size for other materials. In addition, the smart material adds a much more finishing touch to the project, making it look more classy than other projects.
Visit: Cricut.com/setup Cricut.com setup mac Cricut New Machine Setup
Source: https://cricut.designspace.space/what-are-smart-materials-for-cricut-joy-a-complete-guide/
0 notes
Text
0 notes
Text
Book Progress 03: The thing about this build is that it requires A Lot of thinking about the order of doing. The construction feels closer to building Ikea chairs (a thing I adore) than painting. Flat tho it may be, it's 3D enough to be an asshole.
It's time for me, in this build, to work on Some of the heat transfer vinyl. As I said, I have a plotter but the stuff can be cut by hand, no sweat.


If you fucking remember to invert your text. Holy shit. Ugh.
All the same. Heat vinyl is fun and pretty cheap for its uses. 8' for 9 bucks on Amazon. A good deal since all one needs is a clothes iron and something that needs ruined. After it comes out of the cutter, one gets to do a thing called weeding and it's the best ever. I recommend vinyl just to weed. It's scab-pickers gone to therapy. Brilliant. This to this.


I really need you to ignore why I already had dental tools.
And does it work all the time? No, it fucking does not. Here my iron was too hot and the vinyl fused to the transfer paper while leaving a glue ghost on the cloth. Irritating but I re-cut and re-afixed. There's still some ghosting- and it's slightly off center, both of which I hate- But Frailties.


Oh, yeah. Before the vinyl, I cut and wrapped the coffin shape. How's that for order of doing? Just immediately chronologically wrong. Nice. Wrapping irregular voids like such is surprisingly straightforward as long as you go slow and don't cut right up to the edge of the board. One must leave enough cloth to poke, stab, and jam into the corners with my dearest heart, BONE FOLDER. Ask me how I know.


2 notes
·
View notes
Note
Do you have any Kya II headcanons
Yes!! Here you go!!
When Kya was 15 she got a nose ring to match her favorite Probending player. (I wrote a fic about this one)
Kya travels the world as an adult because she’s fascinated by the nomadic lifestyle of her ancestors. She wants to travel the world to help people and learn as much as she can about her lost culture.
When Kya falls in love, she falls in love hard. She wears her heart on her sleeve and isn’t ashamed of showing her emotions.
She has a couple long term girlfriends but she never really settles down until she’s older. (with Lin)
Aang definitely took Kya and Bumi on vacation with him (he’s a busy parent not an asshole) bc they love spending whatever quality time they could with their dad.
Kya and Katara are definitely closest. Katara tries not to play favorites but she can’t help bonding with her little girl and getting to do all the things she never got to do with her own mother.
Kya and Bumi traveled with their parents from the southern water tribe to Republic City and the southern air temple. It wasn’t until Tenzin was born that the family officially lived on Air Temple Island.
Kya and Lin start a long distance relationship while she’s living in the Southern water tribe. She visits Republic City often but refuses to leave her mother to live by herself in her old age.
When her and Izumi were really little their parents sometimes dressed them up the same and Aang called them the ‘twins’ because they were so close in age.
Kya is a vegetarian like her father. It’s a challenge to recreate a lot of Southern Water Tribe foods as vegetarian but she’s able to make some really good substitutes.
Bumi and Kya are especially close as siblings. She cries a lot after he leaves to the united forces because she misses him so much.
She is the glue between her brothers relationship and never lets them go more than a few months without speaking.
Bumi, Izumi, and Kya got into a lot of shenanigans when they were together. Bumi was the master plotter and Izumi and Kya just went along with his plans. (until they were old enough to realize he was using them to do his bidding)
Katra only asks Kya once if she ever plans on settling down and having kids. She doesn’t want to pressure her kids into having kids but she really really really wants grandkids.
#Kya#Bumi#Tenzin#Katara#Aang#Atla#Lok#Headcanon#Ask#Kya II#Lin#Izumi#Princess Izumi#Anon#Anonymous#Kyalin
89 notes
·
View notes
Text
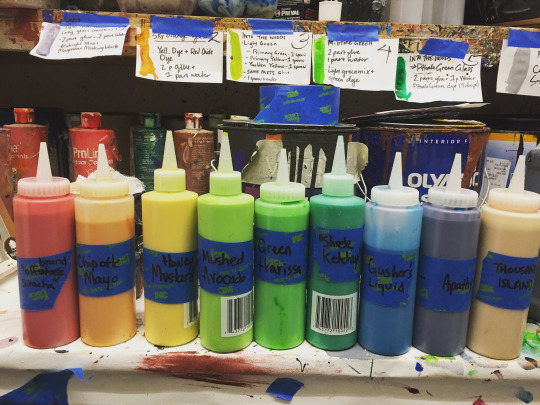
Faux Stained Glass
I posted a while back and a portion of yall mentioned you wanted to see some of my work, so here’s one of my best pieces...Faux Stained Glass. This was for my university’s production of Into the Woods.
Looks like hundreds of individual pieces right? Yeah. Its actually 8 pieces of plexiglass. The process was one of the smoothest I had ever done, and I am really proud of my management skills as the charge artist for this production. This took a crew of 4 dedicated painters, and anywhere for 4-6 shifts of students completing hours for their courses. In total man hours, this took a week to complete.

So how did we do it? Well I got the draftings and renderings and looked at the designer and said, “so this is a translucency right?” A translucency is a process of stretching fabric with starch instead of white paint or sizing mixture (glue and water), which allows light to pass through the piece. Translucencies are challenging because you have to get the painting right on the first try- any layers inhibit the light passing through. Additionally, the watery consistency of the paint required has a tendency to bleed onto other areas. Regardless, I sat down and started formulating plans to make this and the designer looked me in the eye and said,
“No. It’s on plexi-glass.”
“Glass?”
“Glass.”
“How is the paint supposed to stick? It’ll just peel off!”
“Figure it out.”
So I got to work. I began testing how to make the paint translucent yet thick enough to bind onto the glass. The process involved “roughing up” the surface of the glass with sandpaper- this would give the paint something to “grip” and hopefully allow it to last longer through the show.
I eventually came to the conclusion that the paint needed to be mostly white glue, which when dried yellowed a touch. This helped “age” the glass. And then I could add dyes and liquid pigment to create the colors I needed.
For at home recipes it is a 2 to 1 ratio. For every 2 cups of glue you needed 1 cup of water. And then add your dye (drops!!). At home, you can use food dye or vivid acrylics, since I assume it isn’t normal to have 165$ worth of liquid pigments on hand (self drag). If you use paint, you will need more than drops for the color to show and you might want to switch to clear glue- as it might get too opaque or crack. However much pigment you add, whether spoonfuls or drops, you start by adding the same amount of sealer. This helped create a “shine” to the paint that my designer wanted. Once I had it all figured out, I put it in bottles. You’ll see why in a sec.
Once the paint mixture was finalized and tested to the designer’s liking, I was simultaneously figuring out how to make this process as simple as possible for a bunch of first year students to work on. A lot of the students were actors looking to fulfill their one semester requirement of a tech class. And stagecraft is an easy twice a week lecture and 2 hours of studio a week. So a lot of them haven’t taken an art class in a while.
So I made it a giant paint by number.
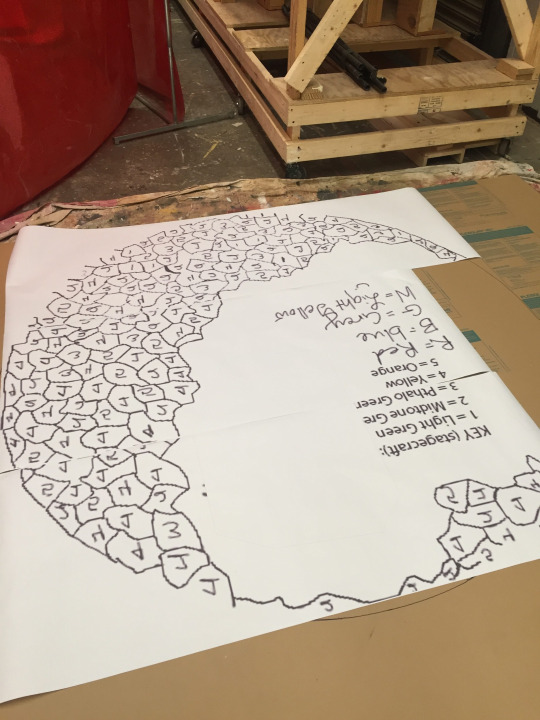
I spent about two days redrafting the piece in scale and printed it on the plotter (which has a max width of 2′6″) and lined it up. We laid the plexi on top and traced the lines with black caulk (easily available at your local hardware store). We let the caulk dry overnight.
In reality, the caulk doesnt need overnight to dry. It really needs like... 4 hrs to be workable. However, if for whatever reason it is not set properly, the color will bleed underneath it- and we don’t want that!
Before we can color, we have to make sure the surface we are working on is perfectly level. I came by with my yardstick level and checked before they started and made slight adjustments by propping parts of the glass up.
If the surface is not level, the paint will run and pool unevenly, ruining the illusion of stained glass.
Then came coloring. I printed out a big Key and labeled all the paints with numbers. I taught them how to flood as if we were making pancake or cookie art (most of them had seen those on instagram). You start on the outside, outlining, and work your way in. The paint should ooze a bit, so one student was given a variety of toothpicks, brushes, (i discouraged using fingers but some still did) to “smooth” the flood. It is very important that the colors don’t bleed or overflow the black caulk leading.


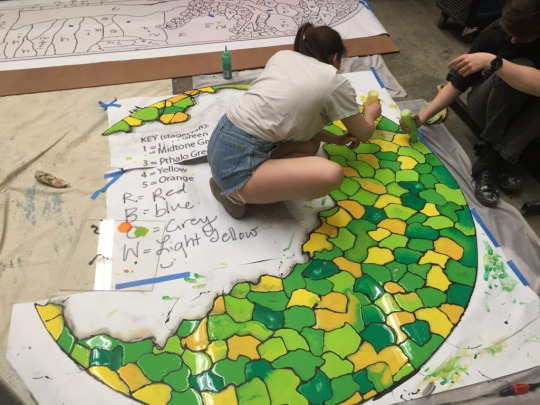
Some of the glass had “gradations” in their coloring. I had my skilled painters handle those. It was all about how the paint swirled together and was agitated (poked with a stick) as it was drying.
The trees were the most difficult and I ended up supervising those.
Once the piece is done, it is left to dry overnight. And this is where it needs to not be touched. At all. Dont look at it, dont touch it, dont breathe on it, dont think about it. I ended up taking over a far corner of the tiny shop. I pulled the welding guards (no one was welding anymore, it was all assembly for the carp crew at this stage) to block any debri and shield off the area.
You should monitor the piece as it dries, check every couple of hours to make sure nothing is pooling in strange ways, nothing got stuck to the surface, and nobody moved it. I had keys to places and abused that power, and would wake up in the middle of the night to check on them. Don’t tell my professors.
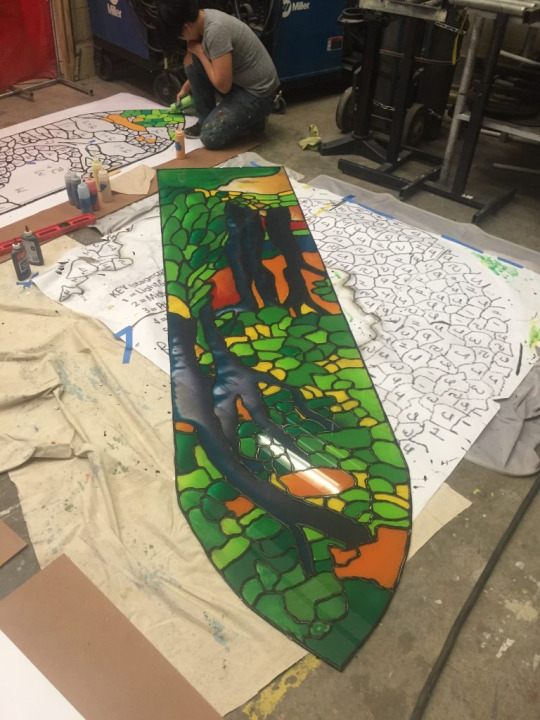
This image above is a partially dry one.
Once everything was dry and moveable, I handed them to my Technical Director and said they are ready for install. And after a nail biter of watching them precariously dangle in the air to their new home...they were in!
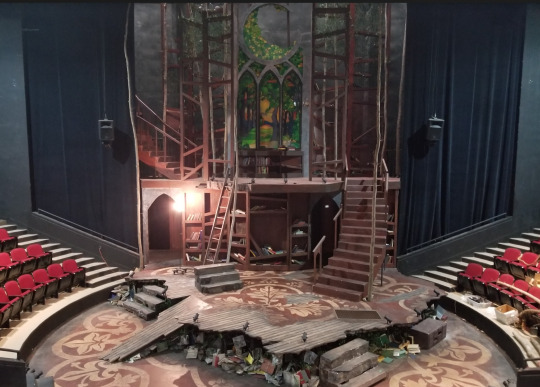
And the show went up! I felt so relieved when I finally got to see the glass lit up, I made sure I got gifts for my fellow students and went a little wild at the tech party on opening night.


Feel free to ask questions about this process! Asks are open! If yall want an at home tutorial, I can make that happen in the new year.
#into the woods#stained glass#scenic art#scenic art stuff#theatre stuff#stephanie's sketchbook#my art#long post#scenic painting#scenic artist#i miss painting i dont miss the deadlines
39 notes
·
View notes
Text
Is Soursee Company Capable Of Top-Class China Factory Sourcing?

The Soursee Company is a leading supplier of China Factory Sourcing services and cost-effective options for China Procurement Solutions Company at a much better service rate than other agents. The company has over years of experience in the primary field of product sourcing and providing potential clients with reliable Sourcing Goods and Suppliers in China. As you know sourcing companies have the best goods supply for new emerging industries as well as small to large startups that require raw materials for their products establishment.
The best quality of products is only available with least of the China Sourcing and Procurement Company agents that are open to raw material suppliers in their stated prices. The emerging companies that require products including Tablets, PC parts and similar types of electrical devices, Laser Systems and equipment, Cutting Plotters, Digital Signage Solutions, Glue Dispensers, Cissor Lift, CNC and Automation systems, Mask Making Machines and related items can benefit from the source company that has expertise in these items.
Looking for your China Factory Sourcing agent with a strain in the retail price of the products to buy in bulk? The Soursee is highly reputed when it comes to being a top-rated China Sourcing and Procurement Company with brilliant sourcing product sourcing solutions as well as the right experience.
#Sourcing Goods and Suppliers in China#China Factory Sourcing#China Procurement Solutions Company#China Sourcing and Procurement Company
1 note
·
View note