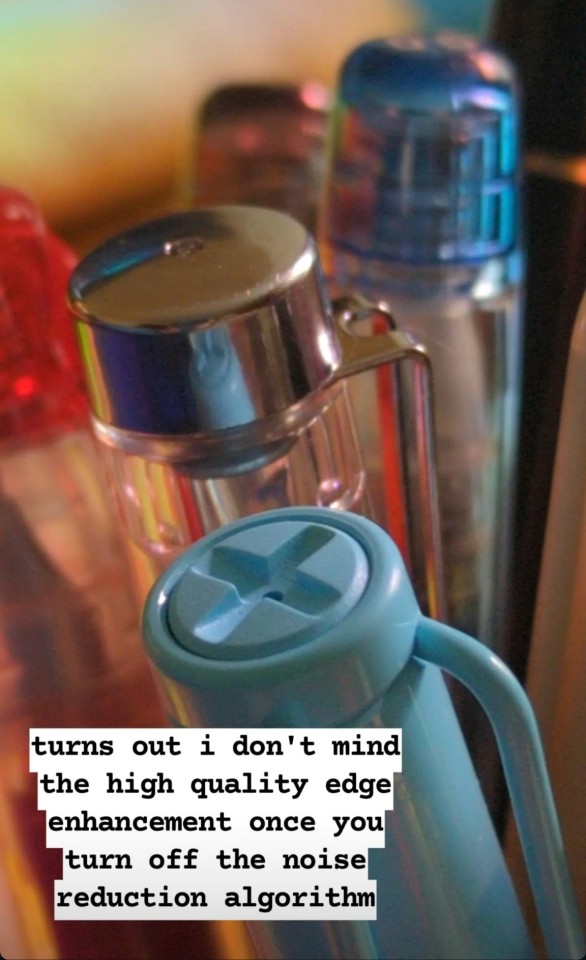
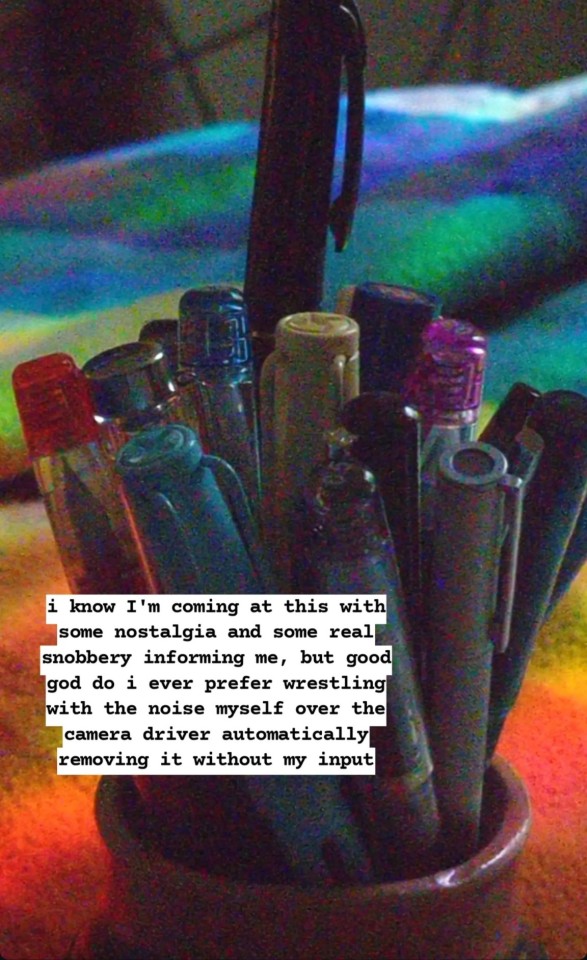
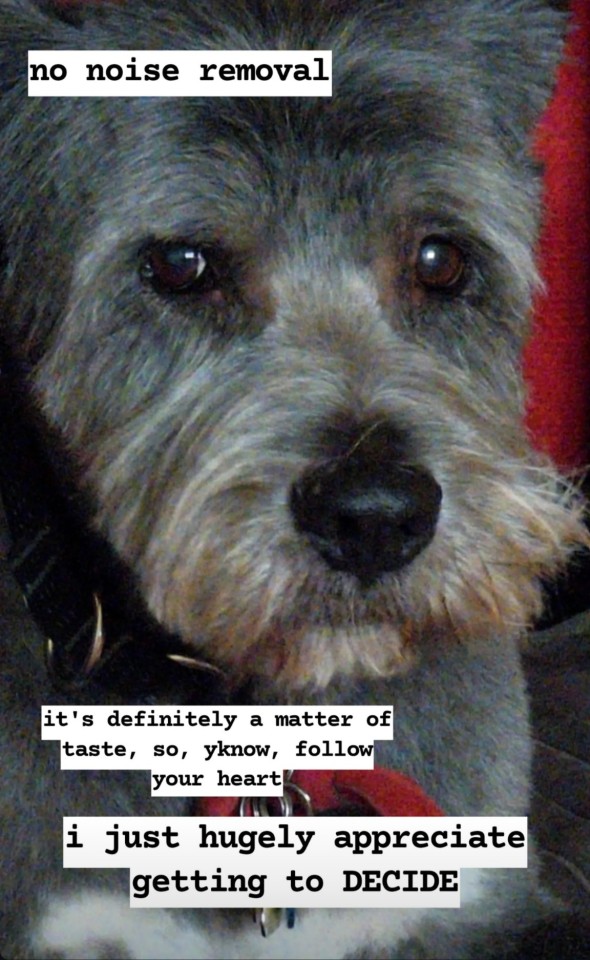
#having to use upscaled twitter video....
Explore tagged Tumblr posts
Visit Tumblr Blog
Explore Tumblr blogs with no restrictions, modern design and the best experience.
Last Seen Tumblr Blogs


Fun Fact
In 2020, 44% of users from Denmark used Tumblr daily.
Text
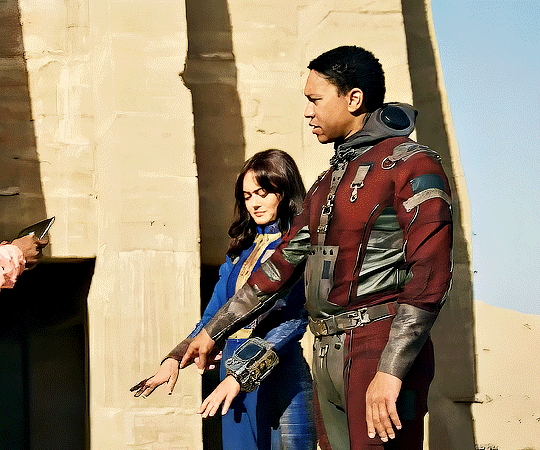
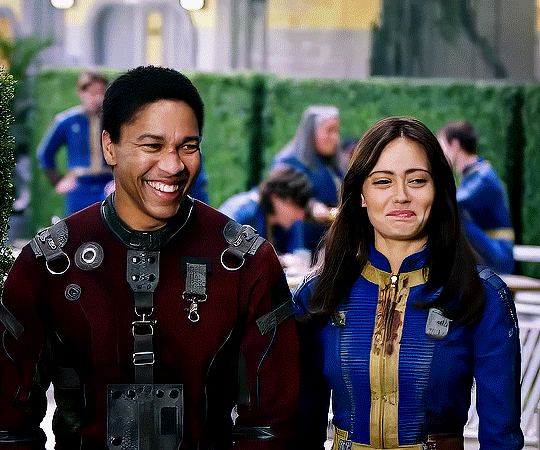
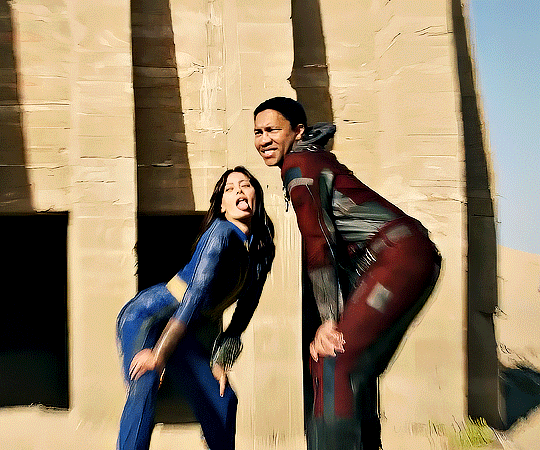
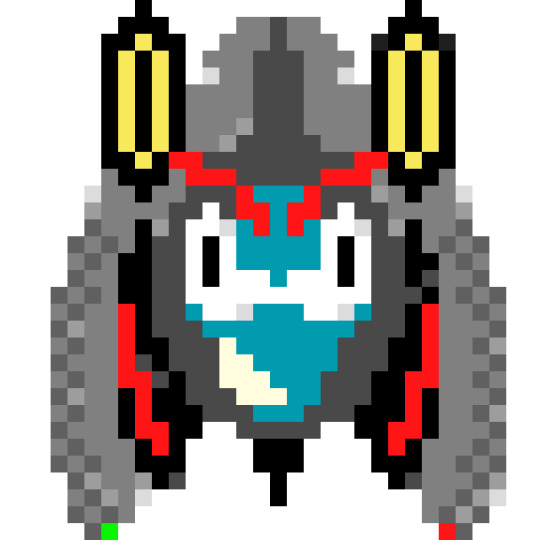
ELLA PURNELL and AARON MOTEN Fallout (2024 - ) Behind the Scenes
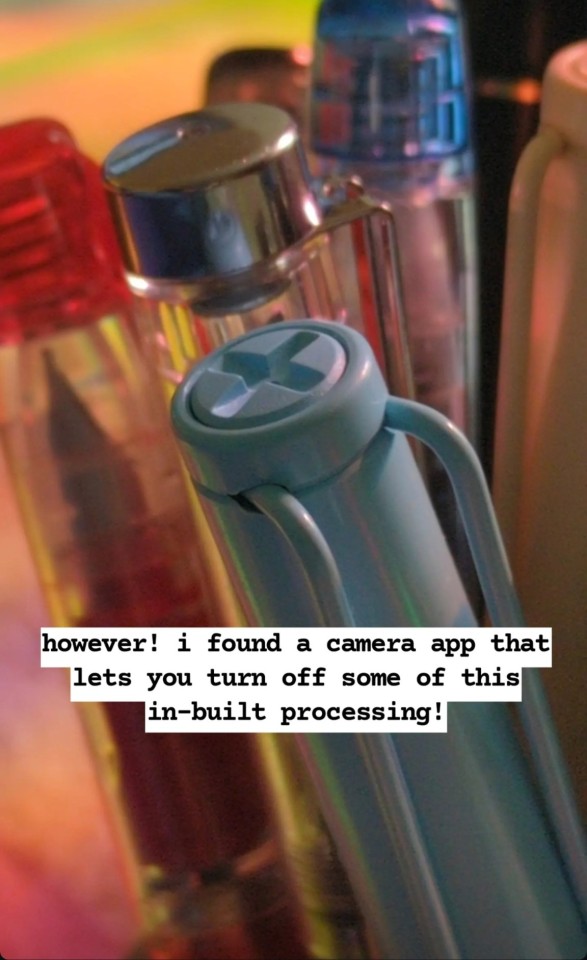
#falloutedit#epurnelledit#amotenedit#userfalloutprime#fallout#fallout prime#vaultknight#**elysiaedits#**elysia's gifs#1k+#3k#5k#ella purnell#aaron moten#fallout bts#fallout cast#having to use upscaled twitter video....
6K notes
·
View notes
Text
complete beginner's guide to [kpop] giffing, as explained by me!
keep in mind everyone has a different style and process, so there are some things in mine that may not feel intuitive or helpful - if so, don't include it! if you can make the gif, and have fun doing it, that's good enough. this post also assumes interest in specifically kpop giffing, but can for the most part apply to other content as well. i would just recommend different sharpening and coloring for those.
separated by headings (not images, since i need those... for examples) - if you are skipping to a specific section, look for the orange text of what you are looking for!
table of contents: - picking your programs - additional tools and programs (optional) - finding files - importing to photoshop (vapoursynth, screencaps, etc) - photoshop shortcuts and actions - sharpening - coloring - export settings - posting on tumblr
programs:
if you already have photoshop / your giffing program installed and set up, go ahead. if you don't, i would recommend looking here to get photoshop. please make sure you follow instructions carefully and safely! i do know photopea is an alternative people use, and i'm sure there are others. i unfortunately don't know any tutorials to link and probably won't be much help in regards to those programs, but i'm sure there are some floating around on tumblr!
my gif process uses photoshop, so this tutorial assumes that as well. if you use a different one, you might be able to transfer this to what you use, i'm not really sure :(
additional tools and programs: - handbrake: upscaler, found here. i make my own settings and generally only use this on lower quality sources to give vapoursynth a better chance with encoding in higher quality. - davinci resolve: a program i use to make clips appear 60fps when they are choppy or too few frames for the gif to look nice, and occasionally to do pre-photoshop coloring! i use the free version. i do not use this all the time and it is a big program, so definitely don't get it if you think you'd forget to / not want to use it. - yt-dlp: open source, downloads pretty much any file i could want quite well. i use this for most of my downloads and for subtitles as well. does require some knowledge of code, or, at the very least, willingness to troubleshoot set-up. find it here! i can share the command lines i run for: video, audio, vid + sub. - 4k+ downloader: what most people use for youtube-source sets, i believe. you have a limited number of downloads per day on the free version, thus the other downloading programs. - jdownloader2: no limit but sometimes a little slow or will refuse to download because of not being logged into an account, etc. a good download alternative if you plan on downloading a lot and yt-dlp is too much. - vlc: free program, standard on some devices, good for viewing files. - mpv: excellent file viewing, can also deinterlace and screencap (if you do not have / use vapoursynth) - vapoursynth: mac users beware, it's not optimized or set up and is a huge headache. windows users, once you get it set up, it's golden.
finding files, what to look for, and how to use them: how to use is explained here, with a focus on smooth and nice speeds! but finding the file is the first step, so let's head there.
stages: k24hrs (invite only, feel free to private dm or send an ask off anon for a file - i will do my best to get it to you); kpopbuzzhub; sharing korea torrent (requires a torrent app); twitter (shrghkqud (only has recent files) and a few other uploaders, requires much more active searching). there are a few other places you can look, but it is often more trouble than it is worth (or costs $). i am also always willing to help people find materials, so you can ask me to help you look for something or to link a source i used for whatever set.
music videos: also sometimes on k24hrs. i use vimeo a lot (color graders, directors, etc., will upload clearer versions). sharemania.us has some kpop mvs, typically bigger groups (i.e. blackpink). this is a place i check for ggs. and if none of these places or searching for torrents on btdigg, or on google in korean works, i just download the highest quality setting from youtube.
other types: like vlogs and fancams, normally directly downloaded from youtube, instagram, or twitter using yt-dlp or sites specifically for the app (i.e. twittervideodownloader).
what do i look for? 1080i for stages (or 1080p) are often super nice as they're a .ts. 2160p/4k is often ideal, but it also depends on your computer and what you are comfortable working with! generally - not always due to ai upscale - a bigger file size (in the gbs, high mbs like 800) is better and has more detail that will look clear when you work on it. older stages (2nd gen and before, some 3rd gen) and music videos often always are lower quality due to camera quality, and much harder to find. if you have to use the youtube upload for a stage, it is definitely doable, but it may be slightly disappointing in the quality you want to achieve. it depends on what you're comfortable posting and making!
how do i use them? if you use vapoursynth, scenedetect (encode/process whole video) or timestamp (just a small clip) your file - if upscaling, using davinci resolve, or any other pre-processing, do that first. it will pull up a resizer and a program and once you encode, it will give you an output file using the size and settings you put. this will import to photoshop. if using mpv or another screencapping method, take your screencaps (again, all pre-processing first) and prepare to import. there are two ways to do that for screencaps. you can also just watch whatever you downloaded, i'm guilty of downloading concert files just for fun 😅
in the next sections, i will be using four different files of varying quality and sources to explain my steps. hopefully that is helpful!
example file 1 (4k and 60fps, obtained using yt-dlp) example file 2 (1080i, obtained from k24hrs) example file 3 (1080p HD, obtained using yt-dlp) example file 4 (pulled from the gg archive i use, master)
importing to photoshop (vapoursynth and mpv explained): using example file 1, i am processing in vapoursynth - i always do one extra second before and after the clip i actually want so it doesn't cut off any frames i'd like. i adjust my sizes based on what works best for tumblr (540px for wide, 268px for 2 column, and 178 for 3 column). i always use finesharp 1.5 (this setting is up to you! i used to use .7, so totally ok if it changes over time, too!) when you export in vapoursynth, you need the y4m header. i use export to mov preset.
when importing to photoshop using a video (so vapoursynth, video files, not screencaps):


i recommend making your selected range a little bigger than the frames you want so they don't accidentally not get included. delete any extra frames while in the frame animation and then turn it into video timeline. i turn all my layers into a smart object (select them all by clicking the bottom layer and then shift-clicking the top one, or use (on windows) ctrl + alt + a to have it select faster). set timeline framerate (if you want to, i always use 60).


now your smart object is ready to sharpen and color!
using example file 2, i am processing mpv - i hit 'd' until deinterlace is on 'auto'. find the clip you'd like and hit your screencap shortcut (alt+s) for me - your screencaps should be super clear, it depends on how you set up your software (if mpv, what compression you told it). screencaps can take up a ton of storage so i recommend only screencapping what you need and deleting them after. when you hit your shortcut, play the file to the end of the clip you went and hit the screencap shortcut again to stop. your frames should be in the folder you designated as pngs now. delete extra frames now!
you now have two options: import as is, which can be a little slow, or turn them into dicom files. importing as is is done through stack. it will prompt you to select what is being loaded - change Use: to folder, and let it process. it will be slow. hit ok when the file list updates.

when it is done loading: create frame animation -> make frames from layers -> reverse frames. i would crop now using the crop tool for processing speed, and then proceed to do video timeline, smart object, and frame rate. when cropping: on the top, above your document names, the second image should show up on the crop tool - this can set your dimensions. i zoom and crop screencaps using this.


the other option is DICOM files, and what i use. when you have your pngs, do alt + d in the folder (windows), type cmd, and run this command: ren *.* *.dcm. press enter. it will update the files. on macOs, just rename the file type to .dcm.

then, import as so (it will prompt you to select the folder your .dcm are in, and will not work if the files are not actually DICOM). i find it much faster than the stack import. crop when it is done importing for processing time, like the other screencap import style.

create frame animation -> make frames from layers -> video timeline -> smart object from layers -> 60 fps.
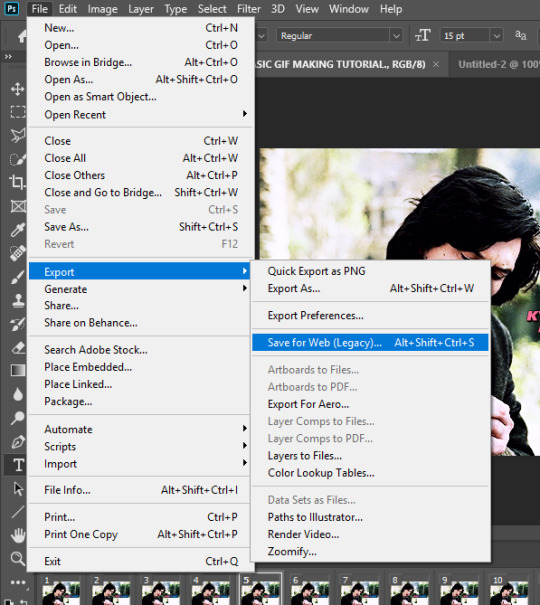
photoshop shortcuts and actions: (windows) - ctrl + alt + a: select all layers - ctrl + shift + alt + w: export as image - ctrl + alt + shift + s: save for web (legacy) - this is the gif one!
actions are imported or created, i've shared my sharpening ones before. there are plenty you can find (or make) for a variety of things, such as aligning objects to a fixed position on all docs, doing the screencap reverse and import for you, etc. they are imported using load actions - select the [downloaded] .atn file and it'll pop up.

sharpening: explained here, and has my actions (feel free to use). very important to the quality and clarity of the gif. the better the file, the clearer a gif looks, sharpening can only do so much. play around during this step!
coloring: very much the most personal taste stage of giffing. i explain my process here. in kpop giffing, we tend to focus on unwhitewashing. other giffing tends to be more aesthetic tastes and fun since the source has better colors to work with.
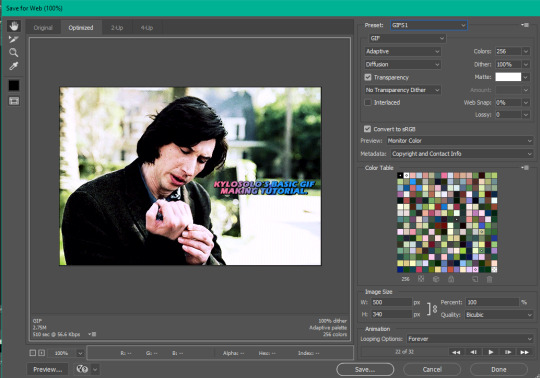
export settings: these are what i use! you need the 256 colors. i do not recommend lossy or interlaced. i think bicubic sharper is the clearest i have tried.

posting on tumblr: use these dimensions FOR GIFS. edits can be different. height is up to you - i would not go over 800, but i think my quality looks weird past 600 range anyways.

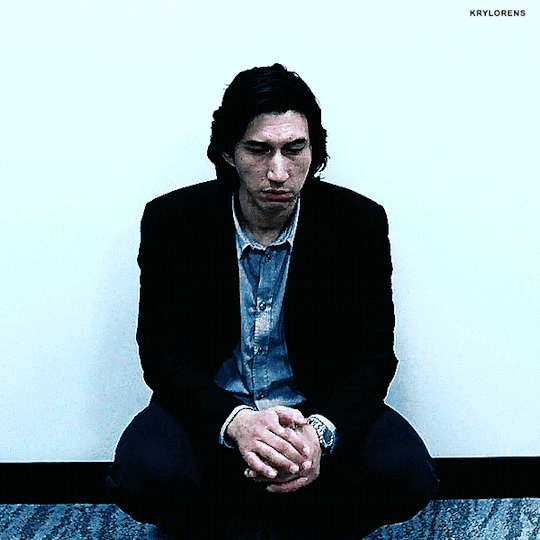
example gifs: yeji, from example file #1, imported using vs. uses no. 1 sharpening (altered) from my pack. colored. zhanghao, from example file #2, imported using mpv and the load via stack. uses no. 4 sharpening (altered) from my pack. colored. taeyeon, from example file #3, imported using mpv and the load via dicom. uses no. 1 sharpening from my pack. colored. eunbi, from example file #4, imported using vs. uses no. 2 sharpening from my pack. colored.


if your gifs don't look how you want right away, that's okay! it takes time. my first ones were not great either. i am always improving on and working on my gifs. good luck and have fun hehe ♡
#i do not feel that qualified to answer this so caveat im not the best. and please also take ideas from my lovely moots and their resource#tags and tutorials / shared things. they are all so good#m:tutorial#resources#long post#flashing tw#userdoyeons#awekslook#ninitual#useroro tuserflora#useranusia#userchoi
81 notes
·
View notes
Note
A podcast recently talked about how some games, like Contra Operation Galuga are struggling to run on Nintendo Switch, because they developed it for higher end systems(PS5, Xbox series, PC) first then port it to Nintendo Switch. They suggested it should have been done the other way around, so every platform has a version of the game that runs perfectly(barring AAA high quality titles like God of War and Spider-Man). How true is this?
There are always tradeoffs when making decisions like this. It's true that developing with the Switch as the primary platform would make it work well on the Switch and perform well on other platforms. However, the tradeoff is that the game would look like an upscaled version of a Switch game on the higher-end platforms. The source assets like animation rigging and motions, textures, character and environment models, and so on would be built at a lower fidelity. The world created using those assets would be built with those assets in mind, meaning that things would lack the sense of visual cohesion that one would expect, even if they built high resolution textures and ran at 4k instead of the Switch's native 720p.

Consider a game that launched on Switch first and later came to other platforms is Monster Hunter Rise. Take a look at that game and you'll see what I mean. Rise runs at a rock-solid 60 fps on higher end PC, but you can still see the kind of visual style built with lower poly models in place because we just don't have the time to rebuild everything. It really depends on the kind of game and visual fidelity the developer is aiming for - games with highly stylized visuals like Octopath Traveler work out just fine because of the visual expectations set, while MHR's more realistic visual style is what holds it back.
Comparison screenshot taken from [Digital Foundry's excellent comparison video].
[Join us on Discord] and/or [Support us on Patreon]
Got a burning question you want answered?
Short questions: Ask a Game Dev on Twitter
Long questions: Ask a Game Dev on Tumblr
Frequent Questions: The FAQ
15 notes
·
View notes
Note
hi! i noticed you said you were fairly new to making gifs, and i'm also kind of new and still struggling on how to make the quality crisp/how to get good coloring. is it possible for you to provide some advice / tips for me?
ah hello !! yes, i started last year spring but i'm feeling a lot more confident these days so hopefully i'll have some insights that are of use to you 💜
i yapped a lot, so i'm putting most of this under a readmore
first: tutorials are your friend. gifmakers sharing things are your friend! we gotta look out for each other lmao. how else will we keep our timeconsuming hobby on dying website alive. try to find resource blogs like usergif tutorials section or these sorts of things. im sure lots of us muddled our way through like that. if you have a favorite gifmaker see if they have like a photoshop help or a ref tag, too, that's nice (i dont on this blog, but lots of folks do)
second: quality generally is going to be a lot bit down to your source video. u can sharpen and do everything you like to 480p and it will still be 480p you know? so for kpop, most mvs and that kinda stuff will be in 4k which you can download from youtube and that's nice enough. if you want to have better you can look for masters (which i do, i have a huge list of hoarded mvs). for performances ideally you want either like nice 1080p .ts files or uhd - there are places you can look for that like on twitter or on different sites. basically you want to use the nicest you can get (that wont brick your computer - 4k can be troublesome for this reason sometimes)
third: once you have nice quality video source, a lot of crispiness and prettiness is down to individual sharpen settings and coloring, especially contrast and white balance. curves tool is your friend for fixing tints/white balance/contrast. here's a good sharpen actions set from my mutual @/sugurugetos (and thats her resource blog so it may be worthwhile to poke around in there). i use a combination of my own sharpen settings + photoshop camera raw filter most of the time.
(aside: there are some other more complicated things you can do to nice-ify your footage, like vaporsynth/avisynth or handbrake or topaz upscale or whatever, and im here to tell you i dont use any of those things and i still make it out okay hehe. but there are many tutorials for them too if you like)
fourth: it is a learning curve like any other creative hobby so give it time & keep trying hehe. most gifmakers have their own style of coloring/sharpening and yours will become more apparent once you figure out how you like to do it. i believe in u
#rowan asks#gifmaking#long post#side note: one of the most important coloring skills for kpop gifmaker compared to regular is that you Need to know how to make things#less white and overexposed esp when stage lighting is super duper bright and/or filters are involved#curves + gradient maps on soft light low opacity + selective color white are your friends#hopefully any of this is of some use to you hehe#if you have a more specific question let me know and i can try to answer that too !
5 notes
·
View notes
Text
Reposters, read this to understand me
What's crazy about the reposters that disrespect my wishes to give me an ounce of credit, practically run their accounts on my stuff, and continue to do so maliciously even after I ask them (before one specific person gets mad, this has happened multiple times) -
is that my videos on my YouTube channel like my cutscene compilations and stuff are free to use. I don't watermark my videos like that and never plan to. You're allowed to use the footage for your own stuff as much as you want (credit is appreciated but not required, as I've said to those who asked first to use it in their videos)
And you can screenshot it to high heaven, make edits out of it, whatever you want. So long as you don't just straight up reupload the entire video for the same purpose I already uploaded it of course. I recorded the footage and played through the games again to get it when theatre mode isn't available,
but it's an effort I don't mind being used transformatively after I've uploaded it, I'm happy to know it's useful. That's the point of my channel being a collection and archive. I never liked people slapping watermarks just on top of recorded cutscenes when there's not even personal gameplay in it because they didn't animate them themself (unlike how gif making and edits and such is a lot more personalized and wouldn't exist at all without that creative effort)
Even though a lot of effort goes into the compiling and editing, if you want to take screenshots and clips from my YouTube videos for any reason, you can. It's an archive and that's the point. The end product is identical to the official product, compiling aside, therefore I don't feel protective ownership, unless someone reuploaded my entire video as a copy with no changes or other purpose
But my blog isn't an archive. It's a personalized expression of my passion that my YouTube account isn't (aside from the long ass gushing descriptions on there lol), my gifs, screenshots, upscales, edits, compilations, collages, etc are not for people to just steal and practically run their account on with no credit. It makes me feel used and taken for granted
But here's the thing, I actually don't mind the odd screenshot or gif being used by people every now and then- especially if they don't know it's mine. Official Sega accs have used my gifs. Popular meme accounts have used them. I've just recently seen an artist you all love that hates my guts and blocked me use my Lost World Eggman CG "if you insist" gif on Twitter and I bet she didn't know it was me that made it.
(It was this one, just before I added this watermark)
And does it make me angry? No
I can always tell when people use images and gifs that have been on my blog from the frames and duration of the gif to the exact dimensions of a crop in an image. Then some people even take edits where I've made the arrangement myself from erasing backgrounds, upscaling, and compiling or have even drawn on it and so it's not even subtle and literally did not exist before I made it
But I know it's not always malicious and sometimes it might just be useful and a one off- or it's at least being used transformatively, for the sake of evidence or analysis of their own, or has interesting commentary, or something like that. I don't mind this. But if you're practically just remaking my exact posts or reposting my images without any transformative efforts and commentary at all, it becomes a problem
Especially when you run an account where it's practically just all my stuff back to back, with no commentary, or commentary where you're repeating things I've said or trying to talk like me because that's creepily happened before on Instagram while they were reposting my stuff. I know that if you do that then you're just visiting my blog and grabbing every image I post. I don't want to run your account for you
A lot of effort goes into what I make. people act like it doesn't matter if it isn't art but it does to me. I put a lot of effort into recording my own footage and compiling it, then turning them into gifs, making edits, taking screenshots etc. I have constant chronic pain and fatigue too to the point I've had fainting attacks when it becomes too overwhelming. And still I give what I make my all for my blog
It feels like a slap in the face when people download and repost knowingly and spitefully when I politely ask them to stop. I put my heart and soul into what I create and it hurts to see it taken for granted, especially when I don't get an ounce of credit and they get more traction and praise for the things I myself created. You think making it yourself is too much effort compared to stealing? Well try having chronic pain and fatigue and still making it yourself
If you're wondering what makes taking stuff from my blog different to my videos, it's because the final product of the stuff on my blog is more personalized and very different to the official product. The gifs, edits, upscales, compiling, and transformative efforts in my work is vastly different to me just recording cutscenes and slapping my watermark on the whole video
And that's the reason why I don't want the stuff on my blog to be taken and mass reposted, compared to my videos where you can screenshot and clip as much as you want because that's why they're there. Choosing to steal everything I personalized like that on my blog when you could literally just go to my videos and screenshot them as much as you want bothers me
Because then it seems like total laziness to me. Because they already take a lot of work to record and compile, yet I'll allow you to screenshot and clip them without watermarks and credit, but you'd rather just take them from my blog because you can't even be bothered to take screenshots or make gifs- when I do all of the above myself- and with chronic pain and fatigue making it extra effort
I deeply regret that I didn't watermark the contents of my blog from the start but I'm going out of my way to change that since people don't respect when I ask them not to repost
And to those who have just happened to use my images or gifs unintentionally a couple of times or you just had them on hand, I don't mind because I know you didn't do it maliciously. They're also free to save for personal use off the internet, I just don't want everything I ever make being reposted like some people do on purpose so they can practically run their whole account on me
But here malicious reposters, if you need content so bad, screenshot/gif/make edits/whatever you want out of these videos yourself. Because at least then you actually did part of it yourself and have something to be proud of instead of using my blog to run your account-
even when even at that it's using some of my efforts in my game recording and video editing/compiling :P
8 notes
·
View notes
Note
You make such beautiful gifs, the quality and coloring are simply wonderful.... I'm slowly getting into making gifs myself but I'm really struggling since my results come out looking muddy/low quality whenever I upload them (for example, uploading on twitter) .
And so I was wondering if you were ever up to making a tutorial on what your process is to get the results that you get.
Thank you for sharing your work with us, always a pleasure to see.
Thank you! Happy you like my gifs!
Learning to gif is a journey, and most people's first gifs don't turn out as nice as they want them to, so you're not alone. There's a lot of trial and error involved.
As for tutorials, I follow the same steps as most of the gif tutorials you'll find on tumblr. If you're not using Photoshop to make your gifs, you might want to try it. I'd recommend just finding a tutorial on how to make gifs in Photoshop on tumblr and working from that. Aside from one caveat, which I'll get to later, I don't have much to add about the gif making process that hasn't already been said.
The requirements for Twitter are a bit different than Tumblr as Twitter processes gifs differently than tumblr (and Twitter is worse). I don't make twitter gifs very frequently, so I can't give you the best advice for that. What I can say is that you'll need your gifs to be large enough for Twitter. You'll want to look up the optimal size for gifs on twitter because the last time I posted gifs to Twitter, the optimal size was larger than Tumblr. Once you figure this out, you should be able to make pretty good gifs for Twitter.
In terms of general gif making, for best results you should use HD files. This is going to be key. You want to use either 1080p or 4k, and in my experience, 4k doesn't significantly improve gifs unless you want to zoom in, in which case the extra resolution of a 4k file helps a lot. I use 1080p unless I want to zoom in.
You also want to make sure the file you download isn't overly compressed because overly compressed video is much more difficult to brighten and color. If you're looking to download an episode of a tv show, you may find a few different files. I usually go for the largest 1080p version because that will give me the best quality. The smaller 1080p files are noticeably worse quality than the larger 1080p files. They both say 1080p, but they are not the same - that smaller file size came with sacrifices. Ripping straight off a blu ray will usually give you great results, but the files can be very large.
Now on to the one thing I do differently than what you'll see in a lot of gif tutorials - I don't sharpen in Photoshop. I use Topaz Video AI. This is a resource-intensive program, and I run it on an expensive laptop which allows it to run quickly. It's not going to run well on everyone's computer, so if you're working with 1080p files, it's absolutely not necessary. I use it a lot because I like it, but sharpening in photoshop will be fine if you're gifing an HD file.
If you're working with standard definition content, Topaz Video AI makes a world of difference. If you're asking me about my gifs because you saw my Scrubs gifs, then, unfortunately, Topaz Video AI is the secret to how they're much higher quality than anything you'd make from the SD/DVD files that are available.
I do know that a lot of people have used Topaz Video AI (or a similar program) to upscale many older series, so if you're looking to gif a standard definition series, someone out there may have already done the work for you. For example, I know you can find upscaled Xena episodes pretty easily these days, which was not the case when I first started using topaz to make my gifs.
And if you can't find an HD file, you just have to make the best with what you have. Sometimes that's the only option.
Hope this is helpful!
#reply#i know it's not super specific#but the gif tutorials on tumblr are usually pretty good for the basics#and this is what I have to add that might not be in there
5 notes
·
View notes
Text
About time I blew some dust off here.
It would seem with the recent updates from Twitter, the original Moments I had on my Rekkit account are broken. Meaning that all the tweets I had for all the episodes for each season release are no longer showcased but the tweets still exist deep within the site.
I may take the time to dig deep in finding them again, but that would get in the way of the bigger project at hand.
Speaking of which, I should explain more about that.
Back when I was diving in the deep web to obtain the episodes nearly a decade ago, the video quality was passable but not true HD. In fact, it was more like 480p upscaled to 1080p as you could see some jpeg artifacts in some scenes.
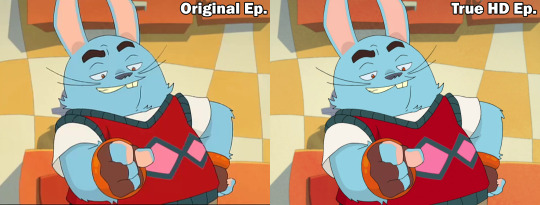
The new project is essentially a true HD replacement but with an added bonus. It will have subtitle files for each episode, as no "official" service has ever provided it as an option. It'll also allow people to use the files to make their own fan made subs for their preferred language, if they have strong willpower to do so.

I've currently have done only one episode with English subs, as it is a very long and tedious process to not only type out a transcript from scratch but to make sure what you're typing is exactly what they are saying, as well as constantly pause and playing scenes over and over again.
I hope those who attempt to make fan subs in other languages will make things a bit easier, due to following the English transcript as a base reference and taking the time to localize it to translate it better in said desired language.
While I still have a lot on my plate, the Rekkit Returns Project will continue on. I just wish I had a lot more time dedicated to it.
4 notes
·
View notes
Text
The PlayStation 5 Pro Will Be Three Times Faster and May Launch Holiday 2024

In keeping with a current video from the YouTube channel Moore’s Legislation is Useless, the PlayStation 5 Professional console will launch within the vacation interval of 2024. The Youtuber claims to have gotten entry to a technical overview doc for the PlayStation 5 Professional. Moreover, these claims have been backed by a recent report from Insider Gaming’s Tom Henderson, who cites nameless sources which are conversant in Sony’s plan. In keeping with the report, the leaked doc got here from a PlayStation developer portal which was despatched to third-party builders. Moreover, the report confirms that the console will render 45 p.c quicker than the bottom PS5, can have 2-3x Ray-tracing (x4 in some instances), 33.5 Teraflops, PSSR (PlayStation Spectral Tremendous Decision Upscaling) upscaling/antialiasing answer, Customized machine studying structure, AI Accelerator, help of 300 TOPS of 8 bit computation / 67 TFLOPS of 16-bit floating level, and that help for resolutions as much as 8K is deliberate for future SDK model. The report additionally confirms that “devkits have been obtainable to first-party studios since September 2023”. Lastly, it additionally states that whereas the PlayStation 5 Professional is aiming for a vacation 2024 launch window, that might change “as a result of lack of first-party video games launched on the PlayStation 5 this 12 months.” It’s price noting none of those claims have been confirmed by Sony. Earlier in July 2023, authorized paperwork from the Microsoft FTC court docket case revealed that Sony will launch a PlayStation 5 Slim and a PlayStation 5 Professional console “within the close to future.” The PlayStation 5 Slim console was launched in 2023. Particulars for the newest PS5 mannequin, The PS5 Slim: As the vacation season approaches, we're excited to share that we've got a brand new PS5 mannequin launching. To deal with the evolving wants of gamers, our engineering and design groups collaborated on a brand new type issue that gives larger selection and suppleness. The identical know-how options that make PS5 the perfect to play are packed right into a smaller type issue, together with an attachable Extremely HD Blu-ray Disc Drive and a 1TB SSD for extra inside storage. The brand new PS5 has been decreased in quantity by greater than 30%, and weight by 18% and 24% in comparison with the earlier fashions. There are 4 separate cowl panels, with the highest portion in a shiny look, whereas the underside stays in matte. If you buy the PS5 Digital Version, you possibly can add the Extremely HD Blu-ray Disc Drive for PS5 later, as it should even be bought individually for 79.99 USD | 119.99 EURO | 99.99 GBP | 11,980 JPY. The brand new PS5 mannequin will probably be obtainable beginning this November within the U.S. at choose native retailers and direct.ps.com the place obtainable. It can proceed to roll out globally within the following months. As soon as stock of the present PS5 mannequin has bought out, the brand new PS5 will develop into the one mannequin obtainable. The really useful retail costs for the brand new PS5 mannequin are as follows starting with the rollout in November at collaborating retailers. Keep tuned at Gaming Instincts through Twitter, YouTube, Instagram, TikTok, and Facebook for extra gaming information. Source link Read the full article
0 notes
Text
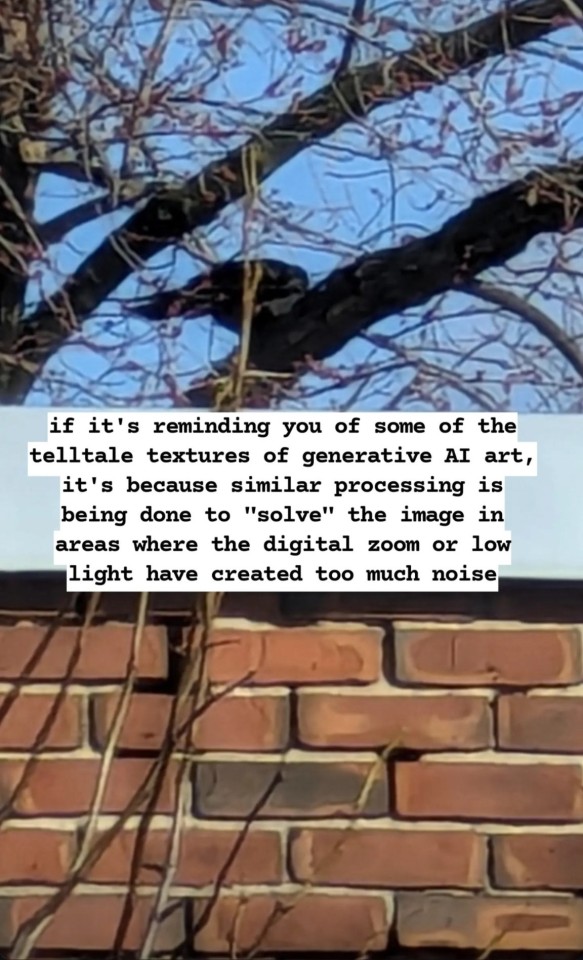
Thanks lav. Disclaimer: I'm not a photo expert, and I'm speaking from the perspective of a consumer/buyer, so do take the following with a grain of salt.
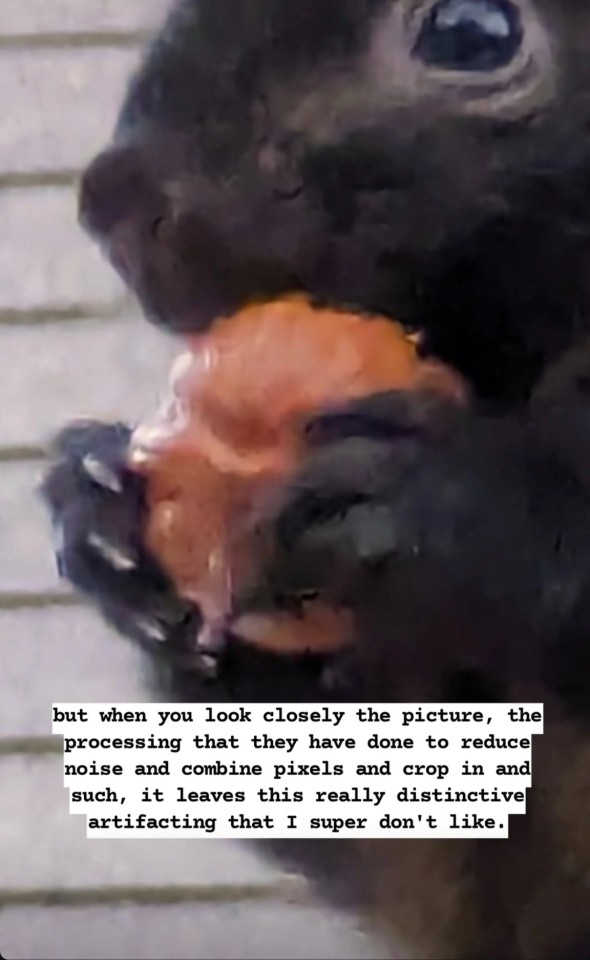
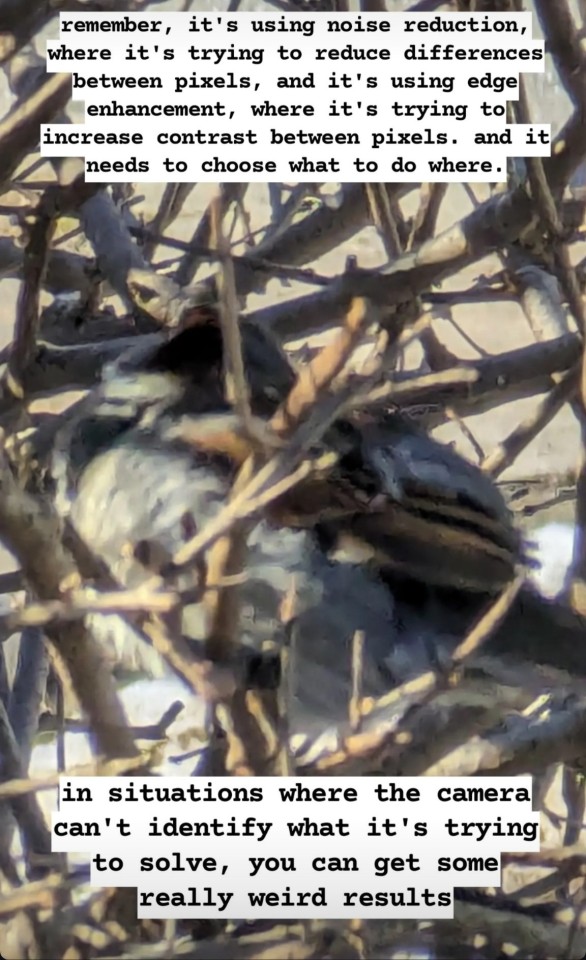
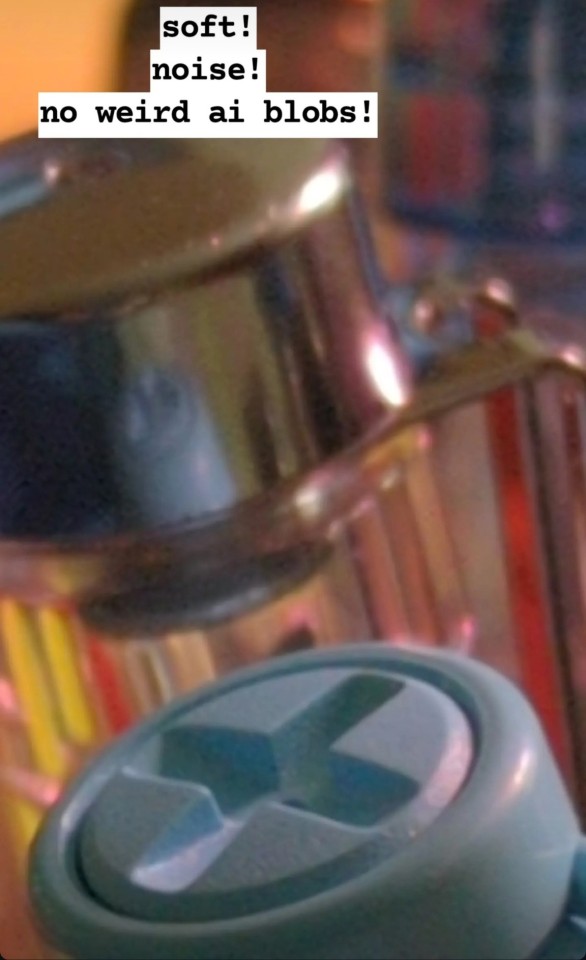
@shelandsorcery — Very keen insights here and it does track with what I've been experiencing on my own Pixel 6a these past (almost) 2 years. Google's very good computational photography, HDR+, seems almost "goopy" on Pixel phones 6 and up. I used to have a Pixel 3a which less aggressive processing and boy do I wish I appreciated it more. The upscaling does look suspiciously like diffusion models/manipulation, kind of watery and smeary. As you've pointed out the artifacts look too fine and regular to be HDR+ artifacts:

One of my Twitter mutual-in-laws, tautologer, noticed this as well the other day. "wtf is this deep-fried shit"?


I believe the Pixel 4 series were the last of the OG processing, as that was the last model Marc Levoy contributed to. Mark Levoy is the real deal and really put the magic in the OG Pixel and Pixel XL (and I think also the Nexus phones, even earlier). David Imel's wonderful video essay from December 2021 explains how Levoy tried to fine-tune these algorithms in the style of Italian Renaissance sfumato and chiaroscuro techniques. It is not just merging many exposures together (already very good) but merging them in a way that optimizes the contrast and tonality of the entire image. (Photographers will immediately recognize sfumato as that elusive creamy highlight rolloff from film negatives/slides/prints, and on certain sensors like the Canon 5D Classic.) So Levoy knew what he was doing, and really knocked it out of the park.
The other point Imel makes, which circles back to the original topic, is that this trend in overprocessing has actually been happening for some time. Imel at 15 minutes shows us 3 photos of the same scene from the Pixel 1, 2, and 4 and notes the "almost linear fashion" in which Google has been steadily lifting shadows and saving highlights with successive phone generations.

I don't know about you but those Pixel 1 and 2 images still look great today.
The degree of overprocessing gets even more absurd with the 6, as we're seeing now — Imel compares two Pixel 6 processed JPEGs to their analogous RAW files (the latter of which he processes/edits by hand, like in Lightroom or Darktable, you can enable RAWs in the app settings) ... and the final hand-edited RAW literally looks identical to the Pixel 1 and 2 photos, if not a little bit better, with rich shadows and rolling highlights.
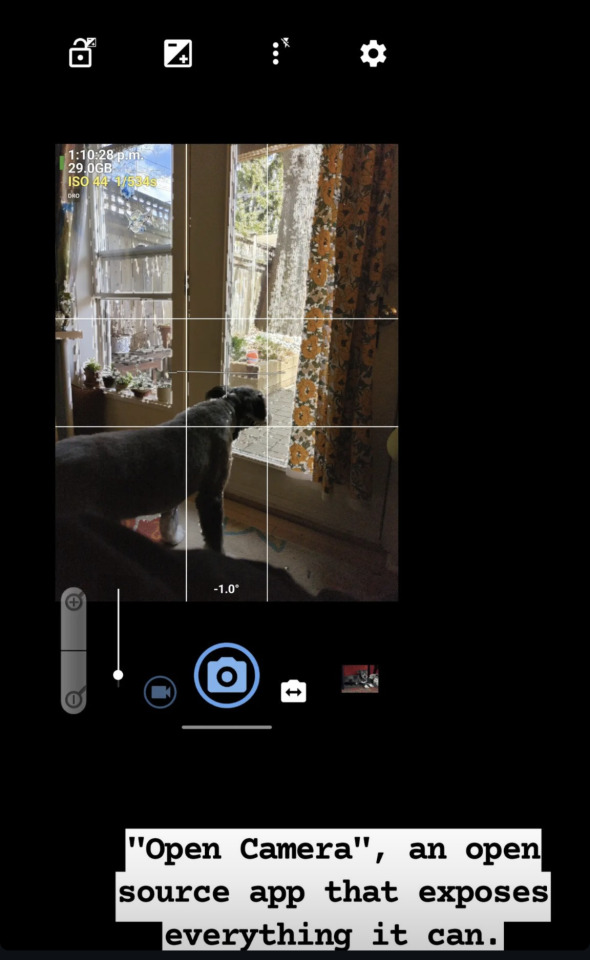
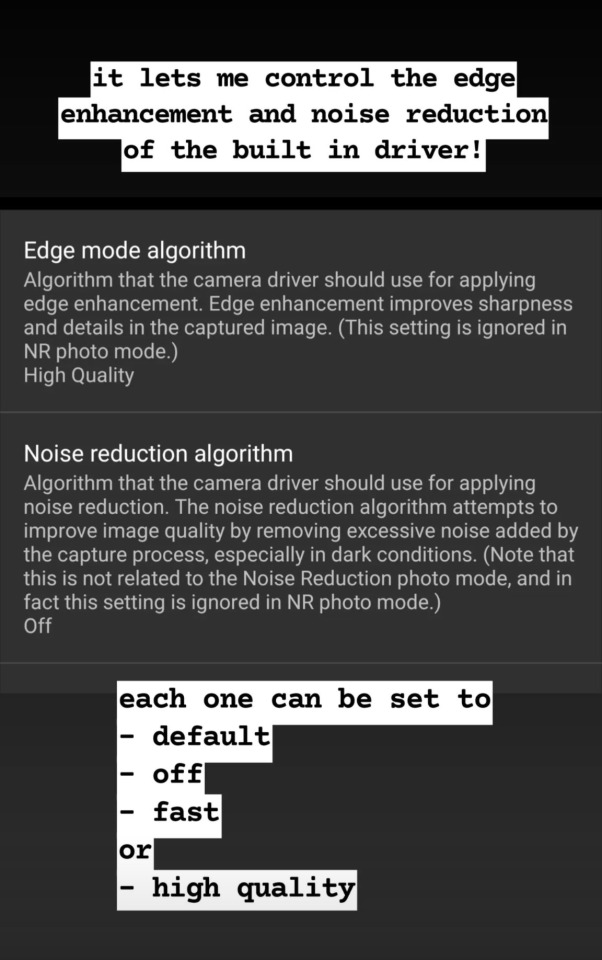
Naturally Imel is a skilled videographer and photo editor and probably has his own techniques. But it also seems to me Google still has their "OG" computational photography underneath all of this overprocessing that's really only apparent in the RAWs, or in alternative apps like Open Camera.
There are 3 conclusions I can make here:
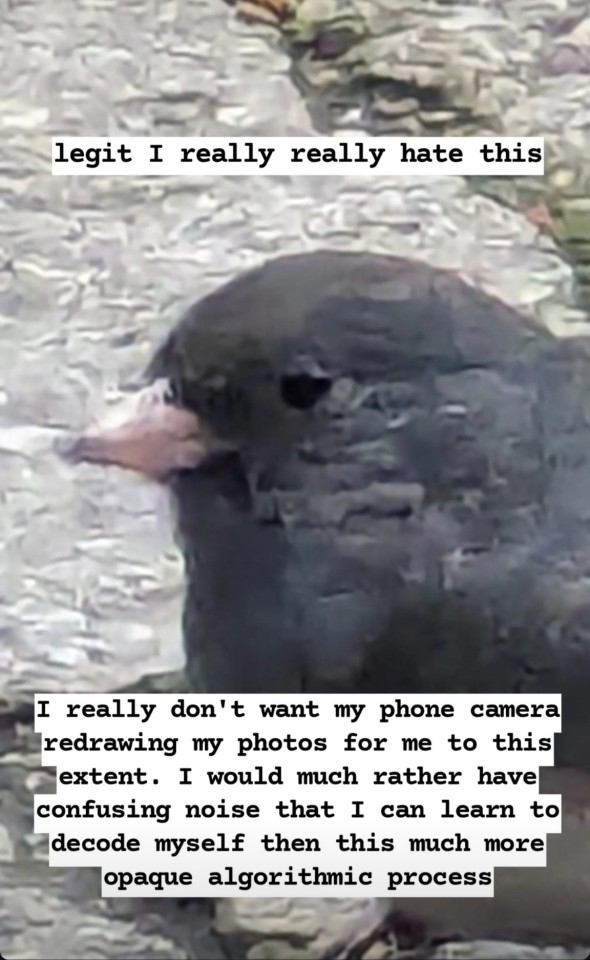
"Google knows best" ��� Overprocessing does not occur in a vacuum and most likely is driven by product managers overseeing usage analytics or direct feedback from users who want to make photos "better". Does feedback complaining about overprocessing work? I can't really say.
"Peas in a pod" — Overprocessing matches pace with glitzy hyperstimuli trends of social media like Instagram and possibly TikTok if the videos are overprocessed as much as photos. And this isn't even until you apply additional filters yet. Ay yai yai.
"Reflex ain't for the SLRs" — Overprocessing, if continued, may force a kneejerk reaction where people suddenly take up dedicated cameras again — if it hasn't happened already. Film photography really picked back up around 2019/2020, and cheap 2000s digicams were (are?) a thing in 2022 and 2023. And DSLRs are getting cheap (more later).
Personally, I adore my Canon RP and adapted FL 55mm f/1.2. No goopiness here! :-)

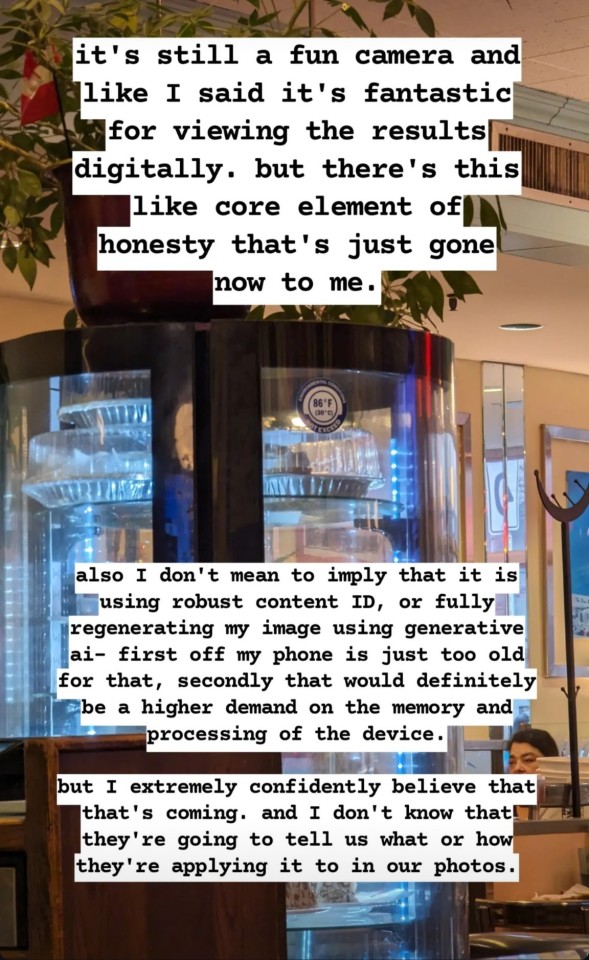
Final note... If you're interested in buying a dedicated camera, check out second-hand and/or refurbished DSLRs. Manufacturers have been moving to mirrorless systems, but DSLRs still offer great value, a bit better battery life, and a bit better ergonomics for less. And you get that iconic mirror-slap.
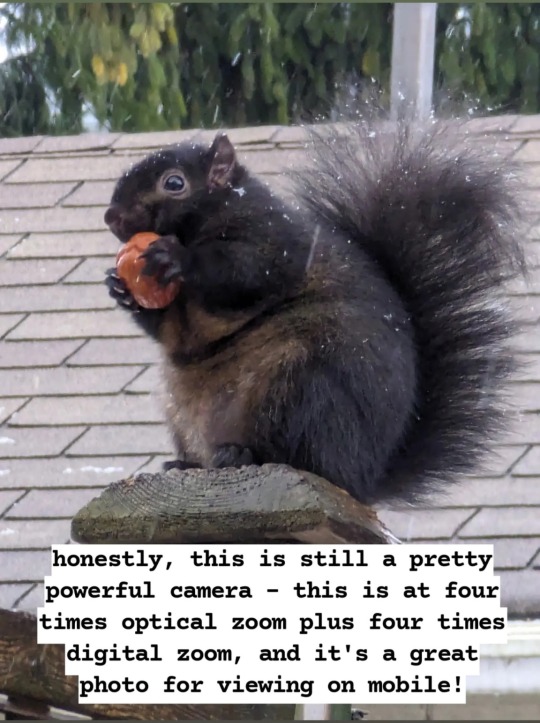
I am mad about cellphone cameras hiding the processing they do, and I am glad about software that lets me control it and opt in and out, and I dictated this rant on insta so I am resharing the images here and will attempt to turn this into a useful text post on my blog in future, when my hand is working better 🤘👍

29K notes
·
View notes
Text
My Avatar History
This is the post the last month of content has been building up to. It doesn't really mean anything to anybody but me, but I want to document this info as a fun little project. This will be going through all the variations and changes in my online avatar since I first started using custom avatars. Let me weave you a tale.
So sometime in the past, around August of 2020, I was a player of the now shuttered game Club Penguin Rewritten. The owners of Club Penguin Rewritten held an art contest, and I decided to participate. I drew a pixel art version of the Astro Barrier ship from the minigame Astro Barrier. I don't have that file anymore, so I can't show it here, but imagine the astro barrier ship (which was already pixelated) but with a bit more graphical fidelity. Like taking something 8-bit and making it sixteen bit. I really enjoyed drawing that space ship, and so I decided to make another, fully original, top down spaceship image. After a bit of tinkering, and a lot of use of the "make rectangle" and "make circle" tools, I came up with something that looked like this:
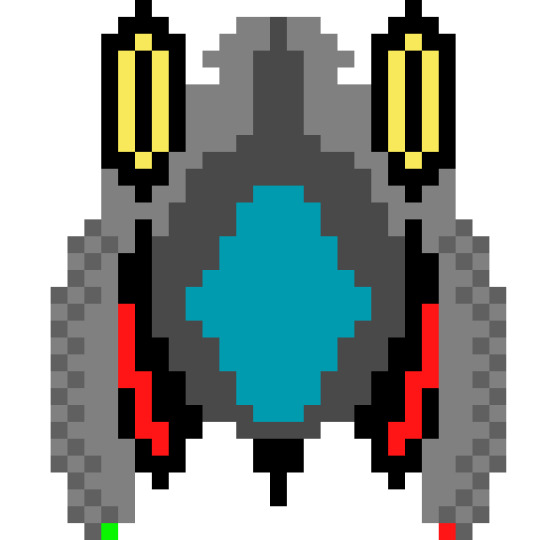
(This is a recreation based on my memory) At that time, I realized that it vaguely looked like a face. So I made it a face.
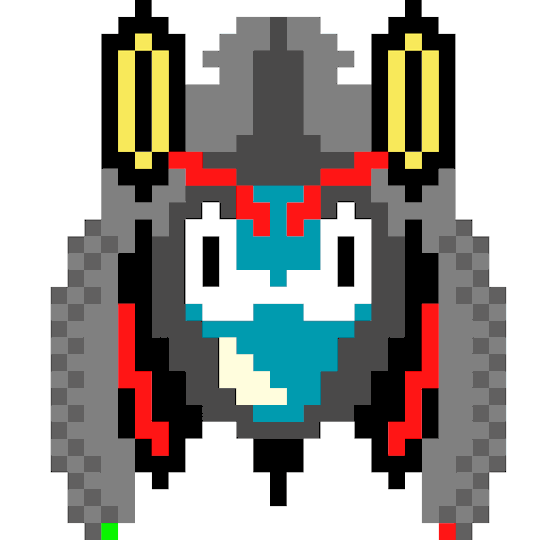
At the time, I thought this looked really cool, and based on my desire to have a custom avatar on youtube, I chose this to be my avatar. (Fun Fact: The green and red lights were holdovers for the idea of this being a flying ship of some kind.) One of the next days, I decided to make this not just a head, and gave it a body.
This thing looked really bad, and not long after making it I decided to shelve the idea of giving this thing a body. (Fun Fact: This is the first time I recorded the light on his face red rather than green. This would not be done consistently afterwards, but I did it here first.) The only thing I would keep from this design was the little blue glowing hands, though they never appeared in any official capacity.
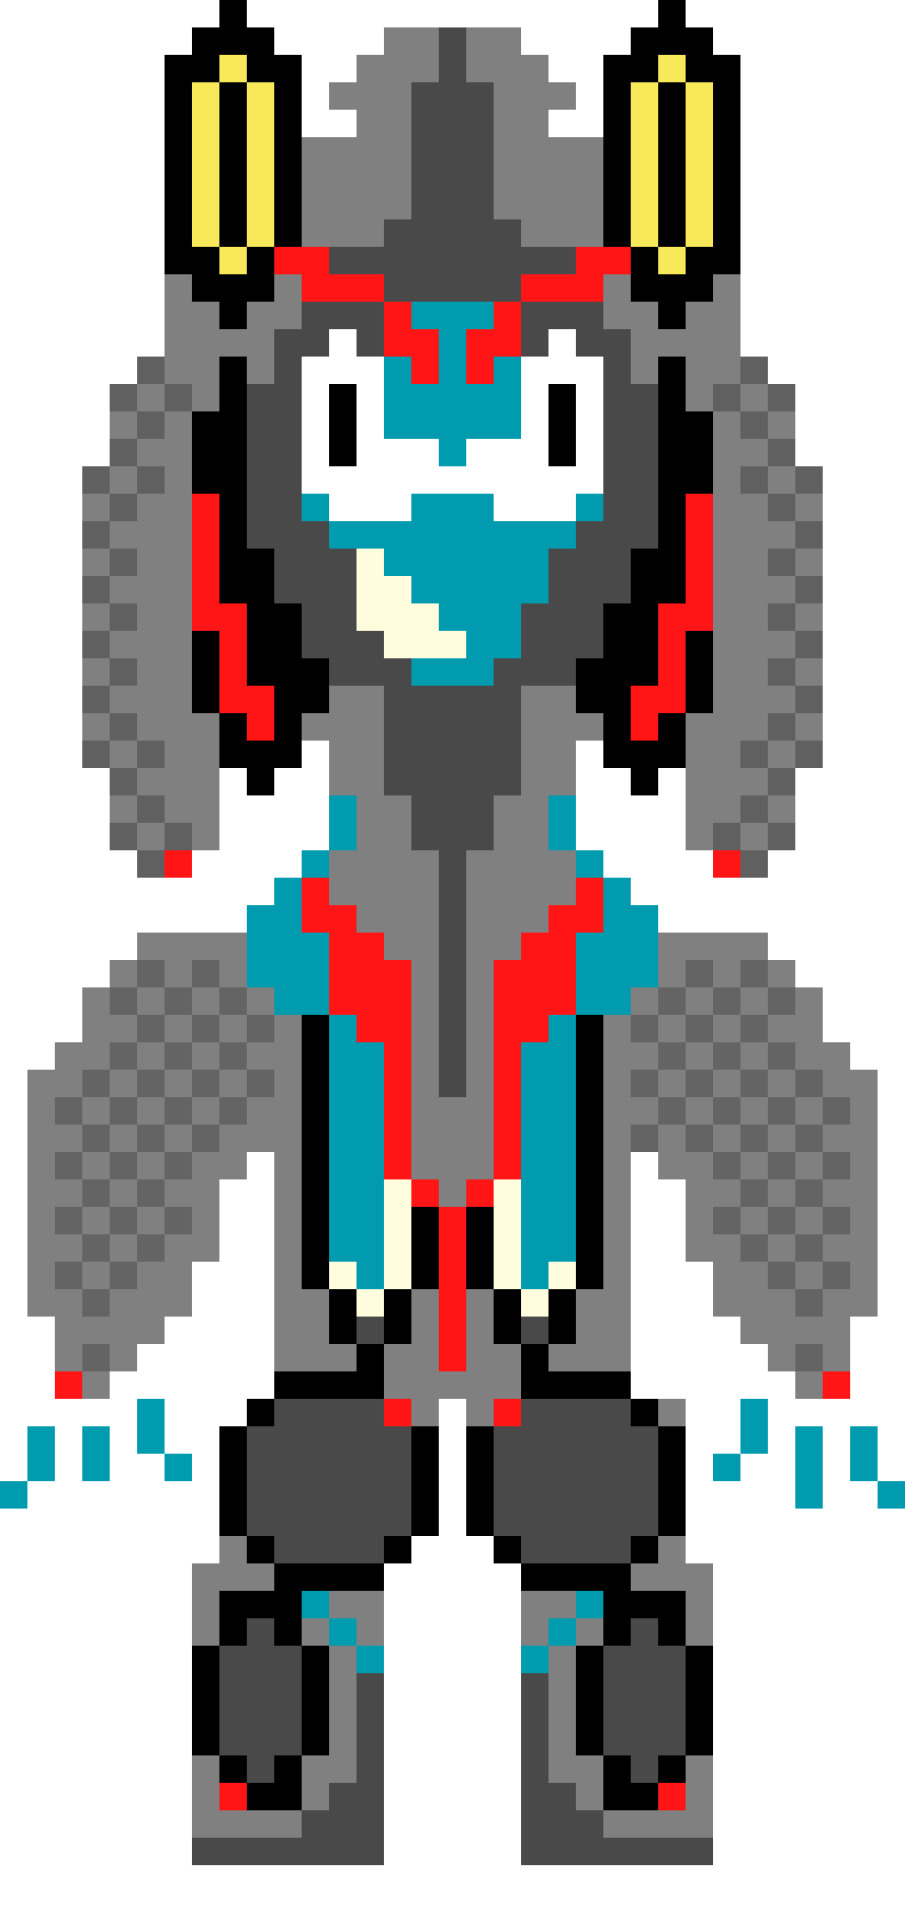
After this, I wanted to go back and make some changes to the avatar, or at least I think I did. I don't remember. In any case, due to the way I used to save my pixel art files, when I brought the avatar back into the editing program, it made some weird color blurring changes. For some reason, I liked how said changes looked at the time, and decided to use them in the actual version. I christened this version the "Hi-Rez" version, despite that making no sense.
(I think I thought that it looked like it was shaded better, but it really just looks messy.)
After this, I made some variations for holidays, Halloween and Christmas specifically.
The Halloween avatar is supposed to look like a Jack-O-Lantern, and the Christmas one should be self explanatory. I think I only used the Christmas avatar once, but the Halloween Avatar got used a couple of times. Now for a quick diversion: My original tumblr avatar. The avatars I've shown thus far were only being used on Youtube and Twitter, and maybe some other places that have since stopped existing. When I created my Tumblr, I initially planned on keeping my Tumblr and Twitter separate, though I've now gone back on that decision. When deciding on an avatar, I picked a random file I had lying around, and that was this:
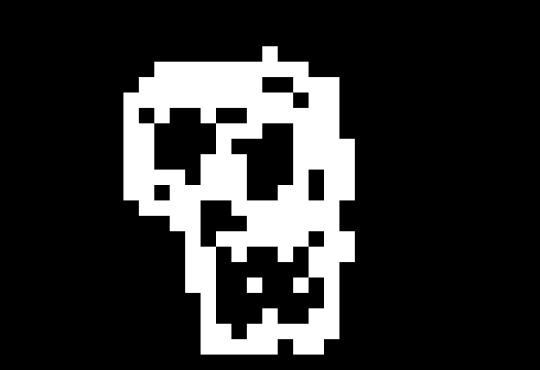
This is a design made inside the Nitrome game "Steamlands," which includes a rudimentary flag designer tool. The resolution on them isn't great, and this is an upscaled version. It's supposed to be a skull, but it looks crappy. I figured it would suffice. At this point, my avatars are stable for a while. To get into why they changed, we first have to talk about my twitter banner. Here is my old twitter banner:
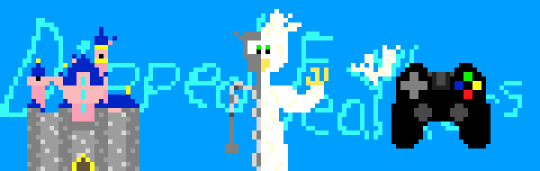
It's the name "Dipped Feathers, with what are supposed to be feathers in the "t", with Sleeping Beauty Castle, a really squashed game controller, and a half animatronic, half bird thing in the foreground. These were chosen to represent my main interests at the time, theme parks, video games, and animatronics. I don't have the file anymore, but the original version of this banner had a dog instead of a bird for the animatronic; I changed it when I realized that a bird made more sense with the name. (Fun Fact: I will not disclose where the name "Dipped Feathers'' comes from.) Here is the Christmas version:

There is snow and the controller is now hot chocolate. This probably also got used only once. (Why there isn't snow on the roof of the castle, I don't know.)
Cut to September of 2023, and I realize that I really didn't like how this banner looked. So I decided to make a new one. Here it is:
I decided to focus more on wavy letters for this one, which are something I have a fondness for. The weird divot at the beginning of "Dipped" is so that the banner doesn't overlap the twitter avatar space. I made the background for this black, which I like because it looks seamless to the rest of the twitter interface when in dark mode. I was really satisfied with this logo, and left it like that for a while. Cut to late September, I became really interested in The Amazing Digital Circus by @gooseworx and Glitch Productions. Even now, I remain obsessed. Knowing that the pilot would be released on October 13th (go watch it), I decided to prepare something to show my excitement. In addition to a group shot of all the characters from the show, I also made this:

It's my avatar with Pomni's Jester hat. (Note: I made the light red instead of green when designing this one, along with cleaning up the blurred details of the "Hi-Rez" version). I used this avatar from October 13th to October 23, before switching back to my halloween avatar for the rest of the month. But while I was designing this variant of the avatar, I realized I really didn't like the avatar base. For one thing, I'd never given it a name (the file name is just "yeet") or even figured out what it was. It wasn't really an OC because it didn't have character. It's a gormless face thing. So I began to make some new ideas, staying in line, color wise, with the new banner I had made. Here are those:
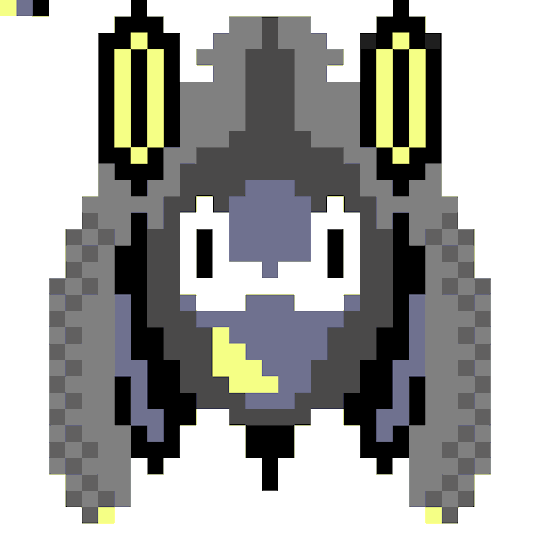
These were all pretty bad. My first attempt was just recoloring the old avatar with the new colors. It didn't look good, but it did lead somewhere. I now share with you, in gif form, the process of getting from my old avatar to my new avatar:

I realized while messing with the colors that the central teal part of the old avatar was basically a little ghost shape. So I gave them the colors of the new banner, and almost immediately I loved how it looked. It's definitely simpler than the old avatar, but it has potential to actually be a character, and it actually looks like something. I couldn't tell you what the old avatar was. This one is a ghost. Simple as that.
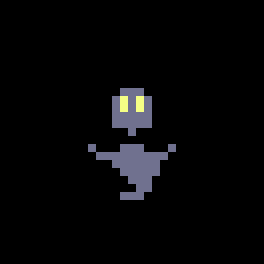
I've used this avatar since I made it here on Tumblr and on Youtube, but I've waited till today to use it on twitter. I actually made this avatar on the same day as the Pomni version of the old avatar, and had I not made that avatar, I would have started using this on twitter immediately. I really wanted to use that avatar (and the Halloween one, one more time) before saying goodbye to the avatar design, so I waited until the beginning of November. Which is now, as of me writing this. Thanks for reading!
1 note
·
View note
Link
India’s Chandrayaan-3 lunar lander and rover are quickly checking all the boxes of planned tasks for the mission. Time is short, as the duo are expected to last just 14 days on the Moon’s surface, or one lunar day, the amount of time the solar-powered equipment is built to last. Therefore, we likely only have until about September 6 or 7 to follow any action. But what a joy to watch the updates coming in from ISRO, the Indian Space Resource Organization. Last week, India became only the fourth country to land on the Moon, and the first to ever make a soft landing near the Moon’s south pole. Shortly after touchdown, the Vikram lander began sending back images from its surroundings. Then, the six-wheeled rover named Pragyan rolled down a ramp to begin its explorations, looking for evidence of ice and other minerals. One video shows the rover “doing a donut” – or spinning around in a circle on the lunar surface (although ISRO phrased it, “It feels as though a child is playfully frolicking in the yards of Chandamama, while the mother watches affectionately.”) The frame rate from the rover is quite low, so thankfully video and image editing expert Simeon Schmauss was able to upscale the data and provide an improved version. Two days ago the Lander imager camera on #Vikram captured the #Pragyan rover doing a 360 turn. You can see it pushing up a lot of lunar regolith with its wheels. I upscaled and interpolated the official video by @isro. https://t.co/d4XBbG9VXU pic.twitter.com/WBUwbD4Rmi— Simeon Schmauß (@stim3on) August 31, 2023 The 57-lb (26 kg) rover also came upon a 13-foot (4-meter) shadowed crater of unknown depth that could have posed an extreme hazard for Pragyan if it had entered it. Thankfully, a team on the ground saw the danger via the rover’s navigation camera. The rover moves at just 10 centimeters per second to allow ground control to monitor the terrain, as well as to minimize any vibrations on the vehicle from the rough lunar terrain. “On August 27, 2023, the Rover came across a 4-meter diameter crater positioned 3 meters ahead of its location,” ISRO wrote in a post on X, formerly Twitter. “The Rover was commanded to retrace the path. It’s now safely heading on a new path.” The lunar crater the Chandrayaan-3 rover encountered on August 27, 2023, as seen by the navigation camera. Credit: ISRO. Pragyan is studying the composition of the lunar surface, measuring the presence of water in the regolith, and gathering data on the history of impacts in the region as well as the Moon’s tenuous atmosphere. And the rover hit paydirt. This week, ISRO announced the rover had confirmed the presence of sulfur and several other elements. Pragyan’s laser-induced spectroscope detected the sulfur, as well as aluminum, iron, calcium, chromium, titanium, manganese, oxygen and silicon on the lunar surface. Chandrayaan-3 Mission:In-situ scientific experiments continue …..Laser-Induced Breakdown Spectroscope (LIBS) instrument onboard the Rover unambiguously confirms the presence of Sulphur (S) in the lunar surface near the south pole, through first-ever in-situ measurements.… pic.twitter.com/vDQmByWcSL— ISRO (@isro) August 29, 2023 The rover “unambiguously confirms the presence of sulfur,” ISRO said. It is also searching for signs of frozen water. Water ice could be a source of oxygen, fuel, and water for future missions, or perhaps even for a future lunar base or colony at the Moon’s south pole. The tracks made on the lunar surface by the Chandrayaan-3 rover on August 27, 2023, as see by the navigation camera. Credit: ISRO. Meanwhile, the Vikram lander is using its suite of instruments to measure the thermal conductivity and temperature of the lunar surface, search for seismic activity around the landing site, and estimate the near-surface plasma density over time. Chandrayaan-3 Mission:In-situ Scientific Experiments Radio Anatomy of Moon Bound Hypersensitive Ionosphere and Atmosphere – Langmuir Probe (RAMBHA-LP) payload onboard Chandrayaan-3 Lander has made first-ever measurements of the near-surface Lunar plasma environment over the… pic.twitter.com/n8ifIEr83h— ISRO (@isro) August 31, 2023 We’ll keep you updated the mission’s status and its findings. Meanwhile, follow ISRO on X for their posts, and here is a gallery of images from the mission. The post So Much to Do, So Little Time. Chandrayaan-3 Makes the Most of Its Time at the Moon’s South Pole appeared first on Universe Today.
0 notes
Photo


I've made a google doc collection of 150 useful design and art resources! Whether youre just starting commissions or want to make your workflow more streamlined, I recommend checking it out
The full list is below the read more, but I suggest looking at the google doc as well sincce it will be updated more often.
This list was created by @MagicalMeily
I encourage you to share this list with other designers, artists, or even students via this tumblr post, the google doc, or my tweet. Links marked as ‘Free/Paid’ usually means the free version has a lot of features anyway and the paid just has some extra templates or storage space. *Disclaimer - I haven’t used all of these services myself, so please let me know if anything dodgy slipped through the cracks, or if you have any others I should add.
I do not support NFTs or AI Art generators, so hopefully you won’t find any listed. Always double check commercial usage rights
---------------------------------------------------------------------------
COMMISSION SETUP
Collection of designers rates - Graphic Design Rates Master Sheet
TOS Example, Free to use (by kawa_kunn) - Twitter / kawa-kun.art
Tiktok walkthrough of a commission TOS form - artofthecatt
Longer Video of commission TOS form - How to Create a Commission Form
Commission Advice (by AerlyaGraphics) - Aerlya Graphics
Merchandise/printing services (by @sunshinehoney6) - Merchandise Resources
COMMISSION TRACKERS/MANAGEMENT
(Free/Paid) Clients can see your progress - Trello
(Free/Paid) Single user or collaborative project tracker - Notion
(Free) General Commission Management - Commiss.io
TEAM DESIGN/COLLABORATION
(Free/Paid) - Zeplin
(Free/Paid) - Notion
(Free/Paid) - Figma
(Free for Individuals) - Box
(Paid) - Sketch
FILE SHARING
(Free) - Google Drive
(Free/Paid) - WeTransfer
(Free/Paid) - Jumpshare
(Free for individuals) - Box
(Free) - Blindsend
MOODBOARDS
Design Inspiration
Image search for inspiration - Muzli Search
Makes and automatically sets out moodboards - Visualist
DESIGN PROGRAMS
2d Animation (Free/Paid) - Cavalry
Graphics, Photo editing, Publishing (One -off payment) - Affinity
Graphics, Audio, Video (Free, Browser) - Artboard Studio
Graphics (Free) - Inkscape
Graphics/Layout (Free/Paid, Browser) - Canva
Graphics, Photo Editing (Free, Browser. Can open Adobe files) - Photopea
Vector making (Free, Browser) - Vectr
Vector making (Free, Browser) - Vector Ink
Wireframing (Free, Browser) - Moqups App
GENERAL HELPFUL TOOLS/PROGRAMS
Bulk file renamer - Bulk Rename Utility
Bulk image resizer - ImageResizer
File Converters - FreeConvert
Image Upscaler - Waifu2x
Floating view of reference images - PureRef
Timezone converter - World Time Buddy
Twitter image crop guide by @dripchirp - Twitter Crop Guide
Learning how to use the pen tool - The Bézier Game
PORTFOLIO HOSTING/WEBSITE MAKERS
Portfolio hosting (Free) - Foriio
Portfolio hosting (Free with Adobe Subscription) - Adobe Portfolio
Portfolio hosting (Paid) - Portfoliobox
Website builder (Free) - Carrd
Website builder (Free) - Google Sites
Website builder (Free) - Weebly
Website builder (Free) - Wix
Website builder (Paid) - Squarespace
Make a blog you can use as a folio - Tumblr
(Posts Selective Folios) - Bestfolios
(Posts Selective Folios) - PFolios
(Posts Selective Folios) - Pafolios
(Posts Selective showreels) - Showreelz
LINK AGGREGATORS
(Free) Linktree
(Free) Lnk.Bio
(Paid/Free) Later
(Free) Solo.to
(Free) Campsite.bio
DESIGN MARKETPLACES
BOOTH
Gumroad
Ko-fi Shop
COLOUR
Various colour palette tools - Adobe Color
Colour palette search and generator - Coolors
Colour palette generator - Color Space
Colour converter, make colour palettes - RGB.to
Displays big brands colour schemes - BrandColors
ACCESSIBILITY
General design accessibility tips - Lemonly Infographics
Font accessibility tips - UXdesign.cc
Accessible colour combination generator 1 - Accessible color palette builder
Accessible colour combination generator 2 - Color Safe
FONTS FOR DOWNLOAD
Google Fonts
Adobe Fonts
Pixel Surplus
Fontesk
Befonts
Behance
Gumroad
Free Japanese Fonts
BOOTH
TYPE TOOLS
Displays inputted text in fonts installed on your computer - Wordmark
Identifies fonts on a web page - Fonts Ninja
Typography Resources - Typewolf
Font Pairing Help - Fontjoy
Examples of fonts in context - Fonts In Use
Font Management - FontBase
MOCKUPS
Mockup World
Mr.Mockup
Unblast
ls.graphics
Anthonyboyd.graphics
Anagram Design
DesignHooks
Mockups-Design
STOCK PHOTOS/TEXTURES
Pexels
Unsplash
Barnimages
LostAndTaken
Freepik
Rawpixel
PATTERNS
Pattern Inspiration - Pattern Collection
Customisable Repeating SVG Patterns - Pattern Monster
Seamless background pattern maker - Patternico
Mesh Gradient Maker - Mesh Gradient
Make and print your own grids - Gridzzly.com
Downloadable Patterns - Subtle Patterns
ILLUSTRATION LIBRARIES
Toools Design
Irasutoya / いらすとや
Open Peeps
Humaaans
Open Doodles
ICON LIBRARIES
Paid/Free - Streamline Icons
Paid/Free - Flaticon
INSPIRATION GATHERING
abdz
Mindsparkle Mag
Behance
Dribbble
Muzli Search
100 Archive
Design Inspiration
BP&O
Pentagram
It's Nice That
DESIGN ADVICE/EXAMPLES/BLOGS/ ARTICLES
(Free) - World Brand Design Society
(Free) - AIGA Eye on Design
(Free) - Creative Boom
(Free) - The Design Team
(Paid) - UnderConsideration
LOGO/BRANDING DESIGN
Company logos categorised by letter/number/symbol etc - Logobook
Logo/Branding Examples - Logoed
PACKAGING DESIGN
Kawacolle
Packaging Design Archive
Packaging Of The World
WEB DESIGN
Siteinspire
Httpster
Lapa Ninja
Best Website Gallery
Dark Mode Design
Awwwards
Dribbble
(Wireframing) Moqups App
PUBLICATION/EDITORIAL DESIGN
Zine Creation Tips Masterpost - How to Organize a Zine 101
Editorial Design Examples 1 - Formagramma
Editorial Design Examples 2 - Pentagram
POSTER DESIGN
Typographic Poster Design Examples - Typographic posters
Poster Design Examples - Poster Poster
CHARACTER DESIGN
Character Design Library, Challenges, etc - Character Design References
Anime Settei/Reference Sheets - Settei Dreams
Historical Costume references - OSF Costume Rentals
V-DESIGNER/V-ARTIST
‘How to Design Your Own Vtuber Logo’ (by the-tragic-heroine) - The-tragic-heroine
Discover V-artists/V-designers - Heartist
V-Artist/V-designers Catalogue (Hiatus) - VTuber Catalog
Vtuber Resource Collection (by VTResources) - VTuber Resources
View badges/emotes will look like on Twitch - Twitch Elements
Resize badges/emotes to actual sizes - Twitch Emote Resizer
Vtuber based commission hub (beta) - VGen
PAYPAL ALTERNATIVES
Square
Stripe
Wise (previously TransferWise)
Kofi
Direct Bank Transfer
OTHER RESOURCE COLLECTIONS
Vtuber Resource Collection (by VTResources) - VTuber Resources
Designer Resources Collection - Design Resources
Merchandise/printing services (by sunshinehoney6) - Merchandise Resources
Typography Resources - Typewolf
343 notes
·
View notes
Note
Hi, don't you think one of Jikook biggest mysteries is their rings. They have matching ones, they were spotted together in a jewellery store, Jungkook wearing Jimin's pinky ring as earring, Jungkook saying that the ring (Jimin was wearing) is precious and no one can touch it, in his graduation day, he said look at the ring in Jimin finger, and in that same day, Hobi hold Jimin hand to look at it and Jimin got shy.
I have some bad news for you. You have fallen victim to some misinformation. Jikook were NOT spotted in a jewelry store. In Toyko, they were spotted in a Gucci store. The sign people saw was backwards and the reason for that was that it was the reflection from the jewelry store sign across the street from the Gucci store in the shops windows. You can clearly see the Gucci label on all the items inside the store with jikook too.

And the rings they get spotted wearing are NOT men's wedding rings from that jeweler. Those rings have a cross in them, and it looks like jikooks rings have just a straight line, no cross. They aren't the same


The first time we saw them wearing the rings together, on the ring fingers at fourth muster

Again, when looking up close. No cross, no extra jewel. This is NOT Bvlgari wedding bands. Lmao they are matching rings though yes. That they tend to wear at the same time. Yes. That also look like Jimins ring was used in whatever that 5th muster ring speech was too. Yes. But it's NOT them in an upscale jewelry shop buying wedding bands in Toyko.
My Post over the 5th muster ring mystery:
The other times you mentioned took place in February of 2017. JKs graduation dinner and the 3J vlive after his graduation too. And they went to Toyko in October of 2017. So we are all aware they did not buy THOSE rings from those moments together in Toyko, yes? Okay great 🥰
Plus, those have been different rings during the other moments you mentioned. The first time we saw the rings above (the rumored wedding rings lol) were at 4th muster, which was in January of 2018. This was AFTER the toyko trip which is probably why that wedding band rumor got fueled even farther, but there is still a 2.5 month time period after their toyko trip where they could have gotten them, and if they DID get them in Toyko, they didn't get them at Bvlgari and they weren't spotted doing so. Lol but regardless, Jimins hands from JKs graduation ceremony, where JK points out the ring and then Jhope later looks at his rings during their vlive. (The 3J vlive here, 11:50 in)


None of those rings are the same rings as the ones above from 4th muster or other times they were matching with the rings. Nor did JK appear to be wearing any that matched. So for those, it simply could have been that JK had gifted Jimin one of the 5 rings he was wearing. Or he just really liked one of them. Or they picked it out together. But these are not related events or related rings. Lol OR maybe Jimin got shy because Hobi was playing with his fingers and you know all the members tease Jimin about his cute small fingers and pinky constantly. The point is, you don't know Hobi was Making a reference to his rings there because no comment was made about said rings. And even if he was, the rings Jimin is wearing is not the same ring from the musters or the ones they would match.
So I do agree that the 5th muster little ring skit/speech jikook decided to do was and still is a mystery, which you can read about in the post I linked. I don't think the rings themselves necessarily are or have so many linked events. And they are not wedding bands. It's clear they are special rings to jikook and they got them to match and tend to wear them together more often then not. It's cute and it's sweet. I wouldn't think too much about it though, the mystery lies in the whatever the heck JK was talking about during 5th muster 🤣 It's clear the rings mean something to them, whatever that something may be.
Sorry! Hope this was helpful though! And the 5th muster thing is definitely a mystery. I Still am waiting for answers that we were promised we would be told later 😂 Thanks for the ask!!
#jikook#kookmin#jikook bvlgari rings#jikook 5th muster rings#jikook matching rings#jikook moments debunked
102 notes
·
View notes
Text
KYLOSOLO’S/KRYLORENS’ STEP BY STEP BASIC GIFFING TUTORIAL, inc. ALL RESOURCES:
this is part one out of two not don’t worry, part two is just me filming the process, i just had to put it onto a separate tumblr post since i can’t place it in this one. PART TWO HERE: [x]
i’ve been giffing for about over six years and it’s only very recently that i feel i’ve got a grasp on a pretty good method, for me at least. if you’re reading this you probably have prior knowledge already but this tutorial is also going to go over the basics as if you know nothing. → this is just how i do everything and my ordering process, there are way better gif-makers out there but i know how finicky the process can be so i wanted to give out all my tricks! it might seem like a lot but it becomes second nature easily. (let me know of any broken links and or questions.) just to note i use windows not mac.
SORRY FOR SPELLING AND GRAMMAR ISSUES, i really pushed myself and i struggle with articulation.
things you will need/learn: (it’s all free!) →the ones in bold are essential. —adobe photoshop; i use cc2020 which you can get here: [x] —mpv; (a frame captures, i’ve used pretty much every type over the years, even ps’ inbuilt one but this is my favourite & this tutorial on how to use/dl it is the best) [x] —***at least 1080p footage; if you don’t have any you can still use this frames folder to follow along with me :) [x]*** —4k video downloader [x] —a megasync account [x]
actions: —@kylos tumblr sharpening; (these are just my favourites you can use any you find/make really but this makes your gifs look even more hq) [x] —@kylos twitter sharpening: [x] —@rory-amy tumblr/twitter save; (i just use the save action out of this pack and it’s a LIFESAVER) [x] —if you’re not sure how to put these into your ps i’ll show you how later on in this tutorial.
how to learn colouring + how to add subtitles correctly + how to make hq twitter gifs: —all later on in this tutorial with links to my own resources and might have my twitter watermark by mistake.
*what this tutorial isn’t including: —how to t*rrent. —how to upscale footage. —how to make multiple gifs/gifset are crop them the same way/move frames over to a new document; (i’m just focusing on how to make one simple gif) —how to use gradient/html text for captions but here’s a great tutorial on it. [x]
i just want to give a big shout out to @kylos because all her tips are just amazing and top-tier!!!
‧͙⁺˚*・༓☾ ☽༓・*˚⁺‧͙ ok now onto the good stuff! ‧͙⁺˚*・༓☾ ☽༓・*˚⁺‧͙
★ how to load in and sort out your layers: [1/2] ★ —once you’ve dl the frames or gotten your own you’ll need to load them into ps like this;
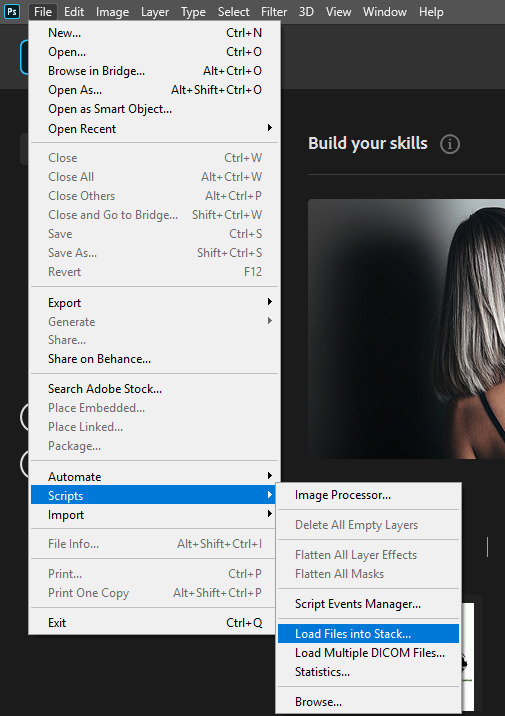
when load layers pops up, you can select individual files (for a more complicated set this is good) but i prefer to just use the folder option. now select your captures folder from wherever you saved it. depending on how many frames/how hq they are will effect how long the loading time is. it can really vary. —ONE THING YOU SHOULD NEVER DO: is take EVERY OTHER FRAME when making your gifs this destroys the flow of them and is an older method to gifs that isn’t needed.

—if your ps is brand new you’re going to have to add some stuff, which i’ll show you how to do. — first go to window and select TIMELINE and ACTIONS. then move your ADJUSTMENTS bar up and close the tab it came from since you won’t need those. (if you ever do, just click workspace and then RESET ESSENTIALS) and next you’re going to click on your timeline bar, then CREATE FRAME ANIMATION. — *your screen should now look like this:*

—then on your timeline bar at the right top corner there’s three little lines, click that. then select MAKE FRAMES FROM LAYERS and after SELECT ALL FRAMES and next REVERSE ALL FRAMES. (depending on the ps you use your frames might be like mine and need to be reversed, just click the play icon on your timeline to make sure). —i always play through the gif before doing anything and i noticed the gif frames are a bit long for my taste so i’m going to press my shift key and then select up to frame ten by right clicking (they should now be highlighted) and click the trashcan icon on the TIMELINE bar to delete them. you can trim your gifs at the end doing this if the mb is too high and your gif doesn’t load when uploading. currently tumblr is up to 10mb and twitter is around past 15mb. —after deleting your frames you then need to SELECT ALL FRAMES again and then CONVERT TO TIMELINE.
★ how to crop your gifs: ★ ***here is when i like to do it: (4th icon on the bar on your left)*** —however, you can do this before or after, just as long as it isn’t after making it a SMART OBJECT or sharpening. —there should now be a new a bar on top of your gif and next to RATIO is where you should put your dimensions in (as in width:height)

—there are tumblr dimensions but i find you can be more lax with them, i like to change it up a lot but for now i make square gifs around 450px x 450px and rectangular ones around 500px x 340px but it’s up to you. if you’re really struggling and see a set with a size you want to use yourself you can study the size of it by inspecting its elements on desktop, and rounding up. but i would recommending doing it yourself. making your own style is the fun of it!!! —for twitter the best size is 600px x 600px. this is a square, sometimes frames can’t just fit neatly into this shape/sizing so find what’s best or copy my tumblr dimensions if you’re struggling.
***note: when cropping your gif you can get weird transparent lines around it. → to get rid of those when cropping your gif, you have to: crop inwards a bit, (or as much as you want) and move the cropping square/shape a bit into the middle.
now, make sure you go to IMAGE on top bar select and put in your gif dimensions.***
‧͙⁺˚*・༓☾ ☽༓・*˚⁺‧͙
★ back to your layers: [2/2] ★ —now go to your LAYERS bar and select every frame with an eye icon next to it, right click and select on top of them and select CONVERT TO SMART OBJECT. this should leave all the frames you have deleted earlier and those have no eye icon, you can select those akin to how you did it on your TIMELINE bar, just use the trashcan icon on your LAYERS bar or just select DELETE LAYERS when right clicking.
★ how to insert and use actions: ★ —to do this you need to locate your actions folder. so, go to your adobe photoshop file, right click on the ps icon and then click ‘FILE LOCATION’ then search in it for ACTIONS. next if your action(s) are downloaded go open another file explorer tab:
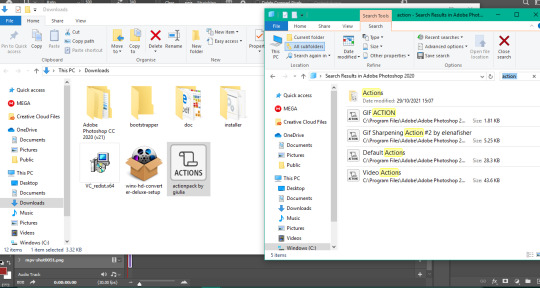
then drag and drop it like this: —if it says administer permission is needed click yes.

—once you’ve done this head back into ps to use the ACTIONS, first to sharpen, then to save: —you’re going to click the arrow icon on the sidebar on the left side to your LAYERS and then the three lines as shown here:
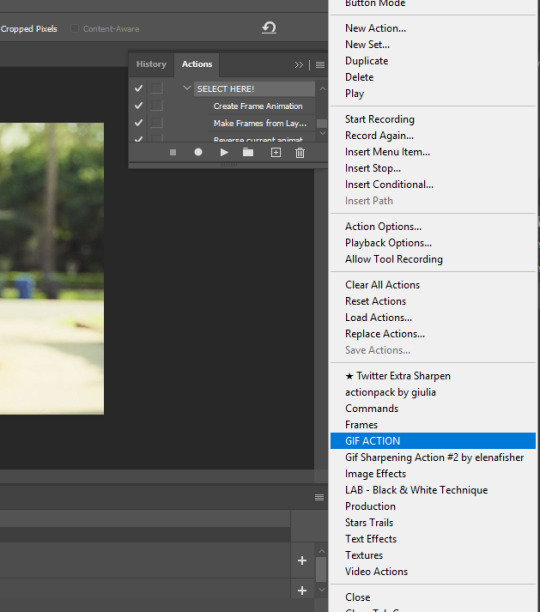
—you’ll see where it says SELECT HERE, do that and then click the arrow icon below it and just click continue if you get the make layers error, this won’t affect anything. (sometimes gifs can glitch at this stage but just undo or you may need to restart your gif.) —ok now your gif is sharpened! if you think it’s too much you can add gaussian blur from the FILTERS bar at the top but i just prefer to lower the opacity by double clicking the bars next to the word SMART SHARPENED which has now appeared x2. —for me gif colouring at this stage is hard because playing the gif in this mode blurs it and i like having the individual layers so this is where the action pack (save) comes in handy! *it also saves you from having to open your gif at the end and adjusting to 0.07 sec bug to 0.05 gif speed the action auto does it to 0.05 for you (which i’ll explain next.) just select the action the exact way you did sharpening. just scroll down to where it says save. —now your ps should look like this (this is a good point to save, but i’m the worst and do it after i colour usually.)
adjust the gif speed by double clicking the numbers if you want to change it from 0.05 speed but even if your gif is short making it anything more slower or even faster can mess up your flow. the best range imo is around 0.04-0.06, although i usually never stray from 0.05. i also like to put do not dispose on all the frames (which you again can do by shift clicking or the three lines on your timeline to get select them all and then any frame right clicking to do that should work for both things.)
★ how to colour (basic not colourful): ★ —now this is the best part for me, however it’s the most tricky and vague in a way. one psd (your saved photoshop document that contains your colouring and usually the gif too) might not work for the next gif even if it’s the same film or ‘footage’ and getting your own style can take a long, long time. you can use other peoples psds but i find making your own is the most rewarding. but! i have studied those psds given out and incorporated them into my own style over time. —*so, what i have decided to do is just that. i have made a base psd for this gif for you to study. but i really recommend looking at other tutorials to teach you how to do that. i’m just gonna get you started, which i hope no one minds. i did try and make it less my very blue-toned grunge style and more ‘normal’. [x] —note 1: select all of the adjustment layers on the side and then to put them into a multi-set just select DUPLICATE LAYERS and put them onto your document/next gif. be smarter than me and don’t name randomly or keyboard smash your psds, sorting out your psds makes life so much easier trust me and you can reuse them!!! (i keep ALL of mine in folders in my documents and then they are sub-dived). —note 2: i like to go more extreme and lessen the vibrancy/saturation and then constantly edit and mess with the opacity rather than being subtle, there’s so many ways to do this. so again, it’s just messing around. however, even if you all your frames selected sometimes this can bug out and mess up one of the frames. so, keep watch on that and either undo or just duplicate the new version of your adjustment layer and delete the bugged one.
*if you do want me to make a how to on my colouring that goes more in-depth/colourful please let me know.
★ how to add perfectly in the middle subtitles: ★ —here i’m going to give you my subtitles with its settings preset, but edit it to your own liking! [x] —if you’re loading it in, different sizes/factors effect your subtitle placement and your text can looks random like this:
so what you’re going to do this: drag it into the place you want and then make sure your text bar looks like this:
—since this is also an adjustment layer you can get the same bug of it being fixed on one frame only and then the rest are how it used to be. so, just duplicate it into a new file like this:
—and after duplicating it back onto your main gif and get rid of the old one.it should be good. (again, this is just my own learned solution) —this is also applicable to twitter watermarking which i’ll mention later on.
now that you’ve done all of that and hopefully saved your gif it’s time to export it!
the save settings i use:
★ how to make hq twitter gifs: ★ —read this tutorial, already linked above but: [x] —if you’ve read everything above then making a hq twitter gif won’t be a hard adjustment, you just need to change and add a few things. —first: make sure it’s 600px x 600px (you can change this but to get the best result) —second: use the twitter sharpening action!!! you can adjust this, but twitter can really repress the quality if you use just the tumblr one, or your preferred method. although some footage needs you to lower the sharpening or else it can look like a lot, but don’t be afraid it’s an easy fix! —if you’re adding subtitles make them a bigger than you would for tumblr just make sure it doesn’t go through the bottom left side of your gif. —before posting, make sure you have watermarked it! which you can only do on the top left/right corner and bottom right or else it’ll get covered up! you can also place in somewhere else if you’d like it’s up to you. —the video of me making a gif will be one for twitter so if you’re unsure about anything from this or the entire tutorial hopefully it clears that up. :)
it should look something like this, just in your style!:
✨✨✨ now that should be everything!!! if you have made it this far, thank you for bareing with me and let me know if there’s anything confusing!!! this took a very long time of planning and making so if it helped, interact with this post? <3 ✨✨✨
#big shout out to everyones resources mentioned!!!#gif tutorial#mine#mine: tutorial#mine: gifs in txt#ft. charlie barber
125 notes
·
View notes
Text
see the thing about the stuff I make is that I always specifically open up the games or use videos I've personally already recorded of it myself which can always take a while to set up and record let alone use it to create something, I paid for a lot of digital Archie issues that aren't available digitally on pirate sites and are only physical scans, I pay for IDW issues to crop and compile and upscale every single panel Eggman is in to post, my gif sets can take up to three hours at times, the upscaling of images I do also takes a lot of effort to get just right, and I'm always vigilant when it comes to new Eggman stuff so I can immediately jump on it to get it out asap etc
hours of effort goes into what I do and it hurts to see all of that reposted commonly without additional comment (if it did have that and is only done occasionally then I don't mind that much) or credit or links back or anything. it's making me consider really going for putting watermarks on everything as much as I don't want to
the only things of mine that are free to use without credit are my YouTube videos like my cutscene compilations because in that case they are intended to be an open archive/resource
my posts of my collages/compilations, upscaled images, and especially my gifs aren't, unless you get them on the gif search on here (which will still be attached to my blog name so that's more than fine) or the more occasional ones that pop up on the Twitter gif search
8 notes
·
View notes
Link
Kabul: The Taliban swept into Afghanistan's capital Sunday after the government collapsed and the embattled president joined an exodus of his fellow citizens and foreigners, signaling the end of a costly two-decade U.S. campaign to remake the country.
Heavily armed Taliban fighters fanned out across the capital, and several entered Kabul's abandoned presidential palace. Suhail Shaheen, a Taliban spokesman and negotiator, said that the militants would hold talks in the coming days aimed at forming an "open, inclusive Islamic government."
Earlier, a Taliban official said the group would announce from the palace the restoration of the Islamic Emirate of Afghanistan, the formal name of the country under Taliban rule before the militants were ousted by US-led forces in the wake of the 9/11 attacks, which were orchestrated by al-Qaida while it was being sheltered by the Taliban. But that plan appeared to be on hold.
Kabul was gripped by panic. Helicopters raced overhead throughout the day to evacuate personnel from the US Embassy. Smoke rose near the compound as staff destroyed important documents, and the American flag was lowered. Several other Western missions also prepared to pull their people out. Fearful that the Taliban could reimpose the kind of brutal rule that all but eliminated women's rights, Afghans rushed to leave the country, lining up at cash machines to withdraw their life savings. The desperately poor — who had left homes in the countryside for the presumed safety of the capital — remained in parks and open spaces throughout the city.
Though the Taliban had promised a peaceful transition, the US Embassy suspended operations and warned Americans late in the day to shelter in place and not try to get to the airport.
Commercial flights were suspended after sporadic gunfire erupted at the Kabul airport, according to two senior US military officials. Evacuations continued on military flights, but the halt to commercial traffic closed off one of the last routes available for fleeing Afghans.
Many people watched in disbelief as helicopters landed in the US Embassy compound to take diplomats to a new outpost at the airport. US Secretary of State Antony Blinken rejected comparisons to the U.S. pullout from Vietnam.
"This is manifestly not Saigon," he said on ABC's This Week.
The American ambassador was among those evacuated, officials said. He was asking to return to the embassy, but it was not clear if he would be allowed to. The officials spoke on condition of anonymity to discuss ongoing operations.
As the insurgents closed in, President Ashraf Ghani flew out of the country.
"The former president of Afghanistan left Afghanistan, leaving the country in this difficult situation," said Abdullah Abdullah, the head of the Afghan National Reconciliation Council and a longtime rival of Ghani. "God should hold him accountable."
Ghani later posted on Facebook that he left to avert bloodshed in the capital, without saying where he had gone.
As night fell, Taliban fighters deployed across Kabul, taking over abandoned police posts and pledging to maintain law and order during the transition. Residents reported looting in parts of the city, including in the upscale diplomatic district, and messages circulating on social media advised people to stay inside and lock their gates.
In a stunning rout, the Taliban seized nearly all of Afghanistan in just over a week, despite the billions of dollars spent by the US and NATO over nearly 20 years to build up Afghan security forces. Just days earlier, an American military assessment estimated that the capital would not come under insurgent pressure for a month.
The fall of Kabul marks the final chapter of America's longest war, which began after the 11 September, 2001, terror attacks. A US-led invasion dislodged the Taliban and beat them back, but America lost focus on the conflict in the chaos of the Iraq war.
For years, the US sought an exit from Afghanistan. Then-President Donald Trump signed a deal with the Taliban in February 2020 that limited direct military action against the insurgents. That allowed the fighters to gather strength and move quickly to seize key areas when President Joe Biden announced his plans to withdraw all American forces by the end of this month.
After the insurgents entered Kabul, Taliban negotiators discussed a transfer of power, said an Afghan official. The official, who spoke on condition of anonymity to discuss details of the closed-door negotiations, described them as "tense."
It remained unclear when that transfer would take place and who among the Taliban was negotiating. The negotiators on the government side included former president Hamid Karzai, leader of Hizb-e-Islami political and paramilitary group Gulbudin Hekmatyar, and Abdullah, who has been a vocal critic of Ghani.
Karzai himself appeared in a video posted online, his three young daughters around him, saying he remained in Kabul.
"We are trying to solve the issue of Afghanistan with the Taliban leadership peacefully," he said. Afghanistan's acting defense minister, Bismillah Khan Mohammadi, did not hold back his criticism of the fleeing president.
"They tied our hands from behind and sold the country," he wrote on Twitter. "Curse Ghani and his gang."
The Taliban earlier insisted that their fighters would not enter people's homes or interfere with businesses and said they would offer "amnesty" to those who worked with the Afghan government or foreign forces.
But there have been reports of revenge killings and other brutal tactics in areas of the country the Taliban have seized in recent days. Reports of gunfire at the airport raised the specter of more violence. One female journalist, weeping, sent voice messages to colleagues after armed men entered her apartment building and banged on her door.
"What should I do? Should I call the police or Taliban?" Getee Azami cried. It wasn't clear what happened to her after that.
An Afghan university student described feeling betrayed as she watched the evacuation of the US Embassy.
"You failed the younger generation of Afghanistan," said Aisha Khurram, 22, who is now unsure of whether she will be able to graduate in two months. She said her generation was "hoping to build the country with their own hands. They put blood, efforts and sweat into whatever we had right now."
In another development, the United States lowered the flag on its embassy in Kabul and has relocated almost all staff to the airport, where US forces are taking over air traffic control, officials said Sunday.
"We are completing a series of steps to secure the Hamid Karzai International Airport to enable the safe departure of US and allied personnel from Afghanistan via civilian and military flights," the Pentagon and State Department said in a joint statement.
"Almost all" personnel from the embassy have relocated to the airport including the acting ambassador, Ross Wilson, who remains in touch with Secretary of State Antony Blinken, a State Department spokesperson said.
"The American flag has been lowered from the US embassy compound and is now securely located with embassy staff," the spokesperson said.
The shuttering of the US embassy, which was one of the largest in the world, comes nearly 20 years after the United States returned following the defeat of the Taliban regime.
With stunning speed, the Taliban retook the country in little more than a week after President Joe Biden began the final withdrawal of troops, closing America's longest war.
The United States has sent 6,000 troops to the airport to fly out embassy personnel as well as Afghans who assisted the United States as interpreters or in other support roles and now fear retribution.
Their mission will be "focused solely on facilitating these efforts and will be taking over air traffic control," the joint statement said.
On Monday "and over the coming days, we will be transferring out of the country thousands of American citizens who have been resident in Afghanistan, as well as locally employed staff of the US mission in Kabul and their families and other particularly vulnerable Afghan nationals," it continued.
Witnesses on social media have complained about disruptions to commercial flights as priority was given to the US airlifts out of Kabul.
Sunday began with the Taliban seizing Jalalabad, the last major city besides the capital not in their hands. Afghan officials said the militants also took the capitals of Maidan Wardak, Khost, Kapisa and Parwan provinces, as well as the country's last government-held border post.
Later, Afghan forces at Bagram Air Base, home to a prison housing 5,000 inmates, surrendered to the Taliban, according to Bagram district chief Darwaish Raufi. The prison at the former US base held both Taliban and Islamic State group fighters.
With inputs from AP and AFP
from Firstpost World Latest News https://ift.tt/3g3QeKY
1 note
·
View note