#homemade patches
Text

Junimo patch!
#junimo#stardew valley#stardew fanart#stardew#crafts#diy#embroidery#cross stitch#hand embroidery#handmade patches#sewing#embroidelicious#crossstichlove#homemade patches
204 notes
·
View notes
Text

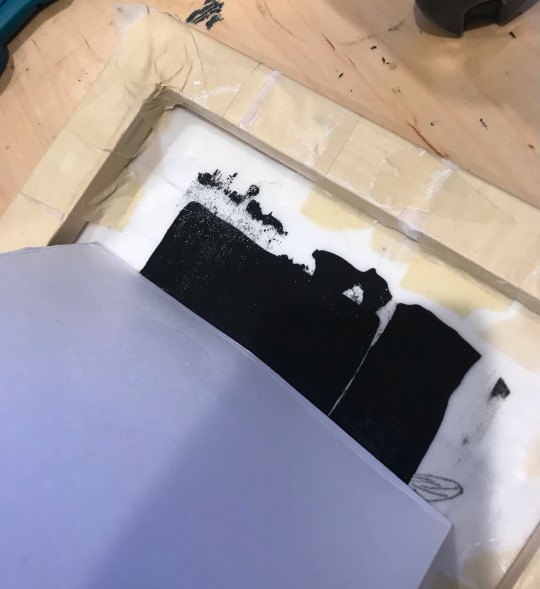
Couldn’t find any patches of my favorite album cover so I made a linocut to print my own. Definitely not a one to one re-creation but I still think it’s charming :]
#The album is volume one by Amigo the devil btw#amigo the devil#my art#traditional art#crafts#linoprint#linocut#homemade stamps#homemade patches#The stamp doesn’t line up with the print bc I altered it after making the print#I’m running out of ink tho so this is the only one that came out coherent :’]
7 notes
·
View notes
Text

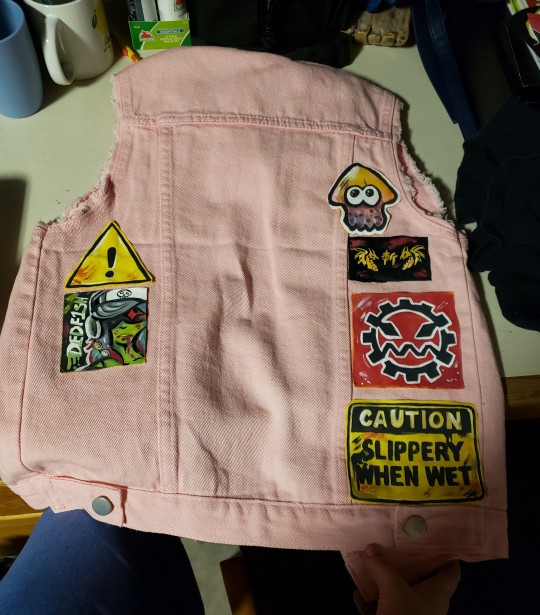
battlejacket progress
#my art#jellyfishdraws#tagging this as art because I painted all the patches#homemade patches#battle jacket
7 notes
·
View notes
Text

Started a pair of patch pants since I needed to patch up some holes in my favorite pants.
I’m using fabric from clothes that were too damaged to donate, fabric scraps I already had, sharpies, and some really bad novice embroidery skills to make homemade patches- my friend actually made two of the three that I currently have sewn onto the pants.
This is one my friend made with fabric from a pair of ruined bike shorts, and sharpies! (She embroidered some sprinkles onto the icing as well.)
I can’t wait to cover these pants in patches.
#patch pants#pants#sewing#embroidery#patches#homemade patches#diy#fashion#diy fashion#fashion diy#reusefashion#reused fabric#fabric scraps#sustainability
1 note
·
View note
Text
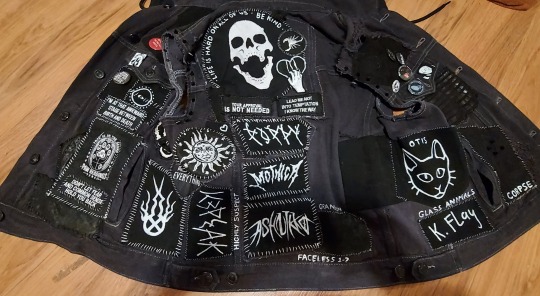
PROGRESS
#The battle jacket is slowly revamped into a battle vest#Most of the patches are homemade ♡#It's been slow going and a few upcycled parts have gone missing#But it should be ready in time to see my mom#Yay#Teaboot
396 notes
·
View notes
Text

Has anyone told @markiplier or @lady-raziel about these monstrosities yet?
#markiplier#memes#sour patch kids#sour patch kids cream cheese meme#markiplier memes#I feel like I’m living in the darkest timeline#lady raziel#one of them has to eat this with he homemade sour patch kids cream cheese#I need reviews
281 notes
·
View notes
Text
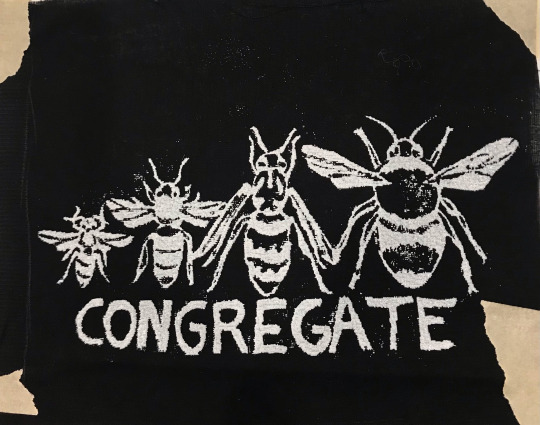
How to Make a Printing Screen from Home
I wanted to share a quick cute little tutorial for how I made my own screen for making patches (and other things that don't require exact measurements). Cute lil how-to under the cut >:)
Disclaimer: I have absolutely no idea what I'm doing at any given moment. There could be a better tutorial out there for you. I'm just guessing for a lot of the things I do and this is no exception. With that out of the way:
THE SUPPLIES YOU DEFINITELY ABSOLUTELY NEED:
a small/medium canvas (depending on what you have and how big your design will be)
paintbrushes
a tight-woven sheer fabric (preferably not stretchy and STRONG)
a fine-tip pen
water-resistant gloss of some kind (mod podge works, but make sure it's a waterproof kind if you want to make more than one print)
paint that won't come off in the wash (acrylic/spray paint work)
good strong tape
a good sturdy card-like thingy
an easy/cool design for your print :)
THE SUPPLIES THAT ARE RECCOMENDED BUT NOT NECESSARY (aka things I like to use):
a good canvas fabric/thick cotton for printing on
fabric paint (will stay on the fabric best duh)
a 1/2in, 1/3in, and fine tip paintbrush for details (depending on your design)
some company for fun :)
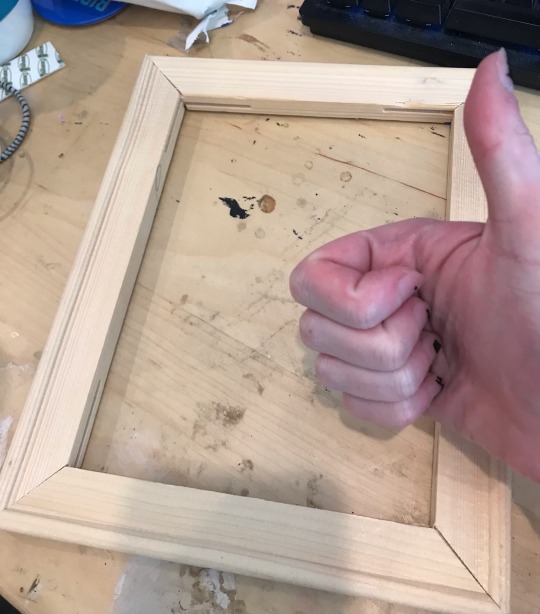
Alright, so first you'll want to figure out the design you want to print out and get a good sketch over it. I'm a detail freak so I like sketching out my design then going over it in a black pen. The ideal is hard contrast and clear and discernable lines/fill-in spots, like pictured below:
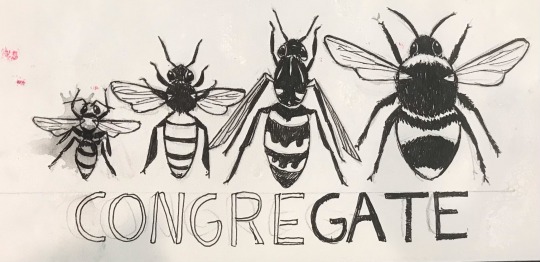
(Note how I emphasized which spots were to have thicker lines, which parts of the stripes were to be printed, etc. I tried to think a lot about which portions I wanted to show up on the finished design and how they would look on the fabric as a whole.)
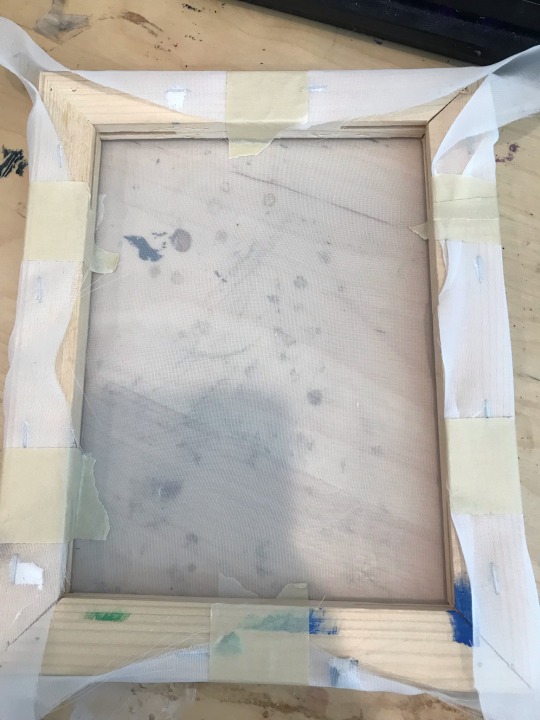
So you've got your design. Great! Next step is a fun one: Grab a canvas you are willing to part with (this one was a painting I made when I was 16. I hate it), and rip all the fabric off of that fucker!! If you pull off some staples in the process, don't worry. Just make sure you can retain the shape of the frame, since that's the part you'll need to keep. You don't need to take off every single bit of the fabric, but as previously stated, I'm a freak, so I did. You'll come out with something like this:
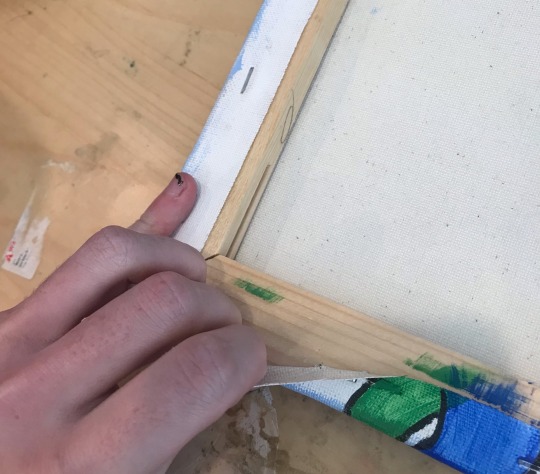
For the next steps you'll need a good pair of scissors as well as your pen and your sheer fabric. You're going to want to set the frame on your fabric and cut about an inch and a half around it so there's extra to wrap around the frame and tape down. You can draw a guideline for where to cut if you want, but once again, I'm a freak:
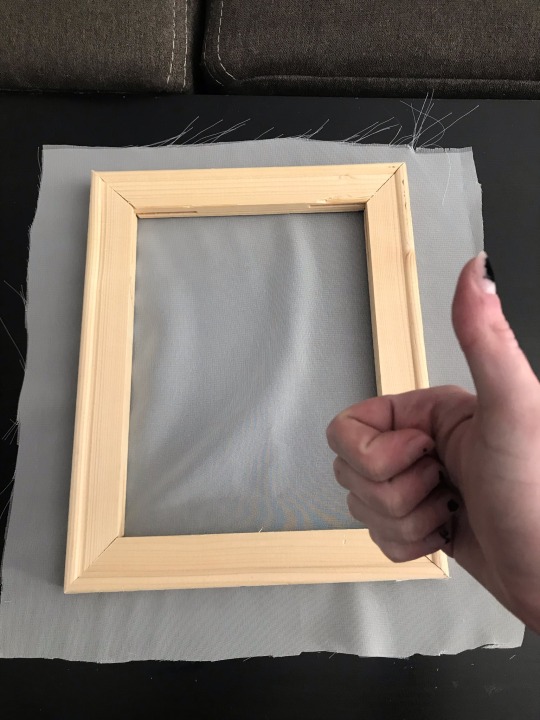
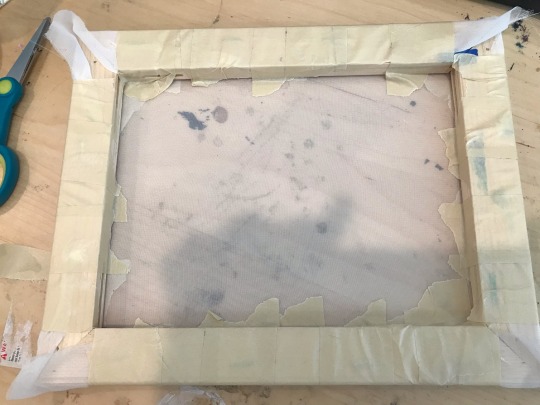
Now lay the front of the canvas frame (the part without staples on it) face down on the fabric and grab your tape! Now we're going to tape down each end of the frame so the sheer lays taut on the frame. I like to put one or two strips of tape on the ends parallel to each other and pull them tight, then do the same with the other side, then continue adding tape until the whole outside of the frame is covered. See below:
(Note: your goal in this step is to stretch the sheer as tight as it can comfortably go so there are no wrinkles or depressions in the fabric.)
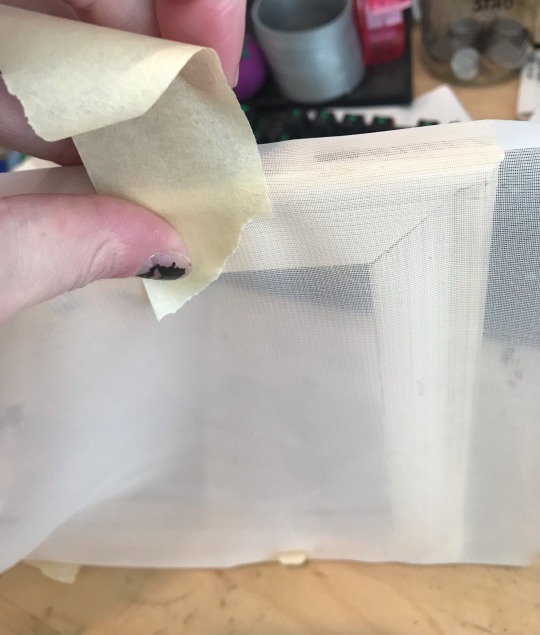
So now you have you're frame. Fuck yes!!! Go ahead and grab the design you came up with as well as your pen (you can use a pencil too, but the pen shows up much better through the fabric so I definitely prefer it), and put the frame front side down onto the sketch.
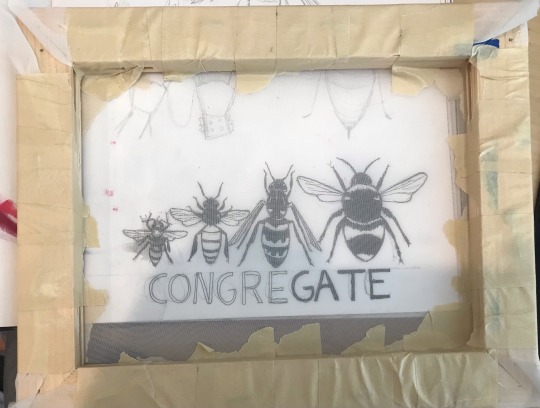
If you're worried about keeping the frame steady, feel free to tape the frame down and go ahead and trace over the design with your pen. Make sure to fill in all the dark parts enough that you can differentiate them from the light parts.
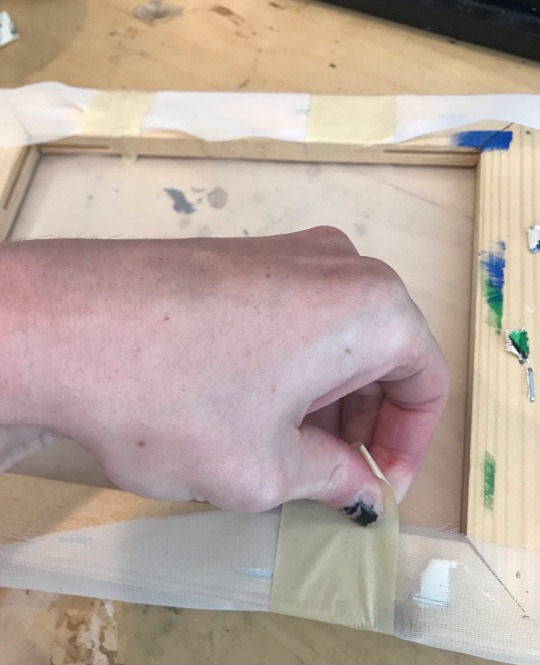
Once you have your sketch copied to the frame, now you can grab your gloss!!! Hurry!!! You're almost done!!!!
With this step I like to start big and go into the details once all the larger portions of the sheer are covered. Pretty much you're going to paint over every part that isn't the black of the pen with your waterproof gloss. This ensures that once you start printing, the only parts that are going to bleed through the fabric will be the black parts that weren't painted over with gloss/varnish/mod podge/whatever you used as long as it's waterproof!!! Take all the time you need, it's not a race. Once you're done and the gloss has dried, your screen is going to look something like this when put up to a light:
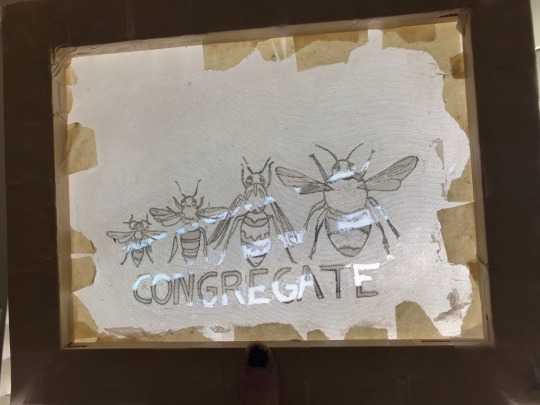
Now that this step is over with, congratulations - you have just made a mesh screen!!! Keep reading to learn how to use it lol
So for the patches that I make I just went with black and white paint, and black and white fabric to keep it traditional, but you can use any colors of paint and fabric you want, truly! The world is your oyster! I do not care! That being said, we're keeping it simple today.
Grab your screen, a piece of fabric that can cover the design and leave at least an inch of space around it, and a surface you won't mid getting paint on on accident. You'll also want to grab that card-like thingy for this as well. It can really be anything that can provide a sturdy, even pressure across the screen consistently. Go ahead and pick up that fabric paint too, I guess. We'll probably need that.
At this point, this is what your workspace might look like:

Next up you are going to center your design onto your piece of fabric-

-and grab your fabric paint. put a thin little stripe over the top (start slow and add more - as you can see I added a little too much and kinda fucked up my design) then grab your card thingy. Make sure you have even pressure on it and swipe it down at a medium speed so you're dragging the paint down the screen:


Once you've got everything covered I like to go over it a few more times for even coverage. Then you pull it up from the screen (which you might want to rinse off so no paint sticks to it!!!), wait for that bitch to dry, and you're done!! Congratulations, you have your very own fun silly patch! Go sew it on something! Or not! I do really do not care!!!!!!

#blog post#cant-shake-it#patches#homemade#punk#punk diy#punk patches#tutorial#how to#screen printing#diy#fashion#if i get hate for this im prepared bc i ride life on the seat of my pants#there are no rules and i am so inefficient
141 notes
·
View notes
Text


progress on the battle jacket so far
ive never sewn before but its lowkey super therapeutic lmao
94 notes
·
View notes
Text


Hi I don’t have too much content for this account rn but here’s a few patches I made for my first battle jacket project.
It’s just self indulgent stuff so far, mostly fish themed. Which may be a little odd but idk, I’m enjoying the process a lot. Taking cheap things and making something that makes me happy.
41 notes
·
View notes
Text


It’s done! Embroidered the patch on felt and then blanket stitched it onto the tote bag. It’s for my mom for her birthday. Her favorite flowers and bird!
#bird#crafts#embroidery#flowers#bird of paradise#floral#hand embroidery#hand stitching#floral embroidery#bird crafts#grandmacore#cottagecore#tote bag#handmade#homemade#handmade gifts#patches#handmade patch
18 notes
·
View notes
Text

Just finished my first ever embroidery patch!!! It’s sleepy puppy snoopy :..)
#snoopy#snoopy puppy#embroidery#diy#cross stitch#crossstichlove#hand embroidery#homemade patches#sewing#crafts#fiber art
98 notes
·
View notes
Text


From completely unwearable to both sturdy and sexy in one day, ain't too shabby I reckon
[ID: front and back pictures of black zipped cargo trousers with patches sewn on. On the front, the fly has a pink triangle and embroidery reading 'XXX', a medium sized patch reading 'ANGRY YOUNG AND POOR', and a large patch reading 'QUEER ANARCHY NOW!' over drawings of nature. On the side of one leg is a large patch reading 'TORIES MAKE ME FUCKING SICK'. On the back, one pocket has a black paisley bandana design and the other has a light floral patch reading 'TOUCH ME AGAIN AND I WILL FUCKING KILL YOU'. Near the crotch, covering the enormous hole previously rendering these trousers unusable, is a patch with a picture of a cactus captioned 'EVERYTHING IS A DILDO IF YOU'RE BRAVE ENOUGH'. End ID]
#crust punk#queer punk#i love a good knackered clothes rescue#all these patches are either homemade or salvaged from other scrap [the big ones are misprints my mate nicked from the print shop waste bin#+ angry young and poor i rescued from my old jacket when i was redoing it its originally from chaoscreations.scot highly recommend em]#except touch me again which i got in exchange for donating to an abortion fund at a punk gig
37 notes
·
View notes
Text

Planning out how to sew these patches and shit on this hoodie i messed up 💅🧚♂️
8 notes
·
View notes
Text
Another panel edit.
Don't tag as kin, thanks.
#Patch update: removed Jake from the panel#dirk strider#dave strider#homestuck#homestuck panel edit#homestuck^2#homemade#I want more HS kins to see my posts but I'm too scared to put the Homestuck kin tag on these.#Heartbreaking dilemma.
81 notes
·
View notes
Text

Wip patch pants
#all the patches so far are homemade 🙃#I like em#punk#punk butch#butch#call me Gideon nav the way I cut the sleeves off all my shirts
22 notes
·
View notes
Text
I did a lil gabe saporta doodle while I'm on "family vacation" cause gabe world never ends
+ Bonus color version I spent 2 seconds on
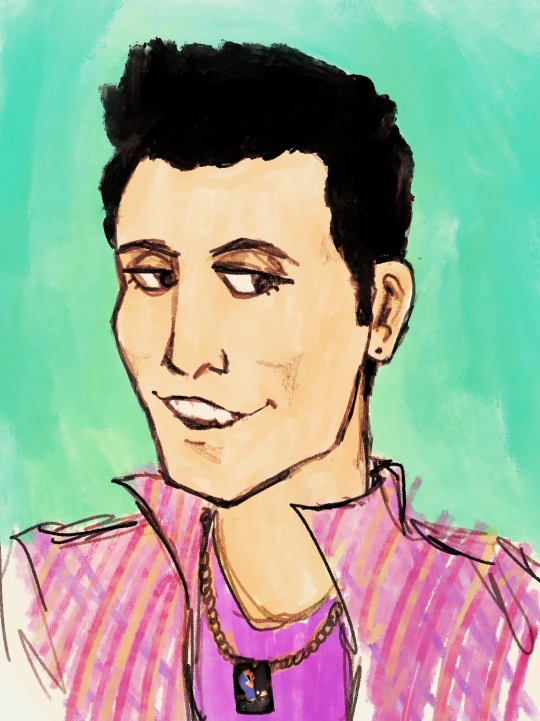
Anyways go bad
#i spent like 10 minutes on this im just gonna post it before the Hate sets in lmao#gabe saporta#cobra starship#im wearing my midtown shirt and my pants with my homemade cobra starship patch.... gabe world permanent resident#my posts#my art#??? i guess#im in another state due to a death in my family and this is how i spend my time#cobra starship fanart
46 notes
·
View notes
Last Seen Blogs

xstarrydawnx
The Mess of a Multifandom-Indulgent Teen

hildeiazam
Hilde i azam

transrightsremy
trans remy rights
trans rights remy

diego--simon
diego simón.disidencia sexual

kurashikimisaki
psyncin' in the scatterbrAIn