#horizontallayout
Explore tagged Tumblr posts
Visit Tumblr Blog
Explore Tumblr blogs with no restrictions, modern design and the best experience.
Last Seen Tumblr Blogs


Fun Fact
69% of Tumblr users are millennials.
Photo

Cinderella loses her shoe at Midnight on New Year’s in my #cinderellaball #newyearseve themed spread! 😁 I’m using the new @thedisneyprincesses @the_happy_planner collab #horizontallayout #minihappyplanner #cinderella #disney #disneyprincess #happyplannerhorizontal #happyplannerdisney #happyplannerdisneyprincess #thehappyplanner #planahappylife #imahappyplanner #plannercommunity #beforethepen https://www.instagram.com/p/CJUFuyAJ1s7/?igshid=1410inij8ipga
#cinderellaball#newyearseve#horizontallayout#minihappyplanner#cinderella#disney#disneyprincess#happyplannerhorizontal#happyplannerdisney#happyplannerdisneyprincess#thehappyplanner#planahappylife#imahappyplanner#plannercommunity#beforethepen
1 note
·
View note
Photo

Summer bucket challenge on-the-go! I made a second bucket list because it was such fun the first time! I'm keeping this one in my mini @the_happy_planner so I can check things off on-the-go to! #summerbucketlist #seasonalbucketlistchallengesummer #minihappyplanner #thehappyplanner #horizontallayout #horizontalplanner #plannerjunkie #nixieplans #happynotes https://www.instagram.com/p/CB1VdrsjigP/?igshid=9yrm0r54tm2i
#summerbucketlist#seasonalbucketlistchallengesummer#minihappyplanner#thehappyplanner#horizontallayout#horizontalplanner#plannerjunkie#nixieplans#happynotes
0 notes
Photo

Protection scriptures in my Horizontal Happy Planner. #happynotes #horizontallayout #horizontalplanner #faithplanner #creativeChristian #creativefaith #bibleart #journalingbible #scriptureart #faithinspired #journalingbible #bibleart #createdtocreate #trustGod #calltobecreative #creativebible #faithjournaling #embracethediscs #whitespaceplanning #achristiangirlslife #achristiangirlpics #achristiangirl (at Alabama) https://www.instagram.com/p/B9xaPjYpBFs/?igshid=c5jnh36nc3g9
#happynotes#horizontallayout#horizontalplanner#faithplanner#creativechristian#creativefaith#bibleart#journalingbible#scriptureart#faithinspired#createdtocreate#trustgod#calltobecreative#creativebible#faithjournaling#embracethediscs#whitespaceplanning#achristiangirlslife#achristiangirlpics#achristiangirl
0 notes
Link
For just $3.00 Digital Student Notebook | Daily Writing Journal | Subject Notebook - Horizontal Layout Keeping with a paperless lifestyle and those fabulous digital pens (shout out to the Apple Pencil 👏🏼) you get the uncomparable feel of pen/pencil on paper for your thoughts, dreams, experiences, and life events recorded in the moment. Complete your daily writing tasks with this digital notebook. Don't worry about looking for your old notebooks. 👎🏼 This notebook is your new tool for note-taking, planning, and impromptu journaling. Perfect for prolific writers, students, and digital decluttering the KonMari way! This notebook has a hyperlinked area in the spine for easy navigation to the first inside page. Here you can add your own personal index. (Don't forget to bookmark your pages!) Filled with ruled paper styled pages, there is plenty of room for you to write, jot, and/or scribble. Every page is the same design throughout the notebook. Pages can be added, deleted, and rearranged. Add your own images, text, and/or writings. 🤝🏼As always, THANK YOU! for visiting my shop and taking a look at the listings. REMINDER - THIS IS A DIGITAL PRODUCT FOR INSTANT DOWNLOAD
#PersonalNotebook#HorizontalLayout#DigitalPlanner#StudentNotebook#DailyJournal#SubjectNotebook#DailyWritingIpad#PaperlessMovement#CalendarAndPlanner#JournalForKids
0 notes
Photo

I figured that I would post my #weeklyspread today in my #minihaplyplanner #weeklyminispread #mambiminiplanner #miniplanner #planneraddicts #plannercommunity #planneraddict #horizontallayout #horizontalweeklyspread #weeklylayout https://www.instagram.com/p/B32yuWip3Di/?igshid=1eign1ezazd81
#weeklyspread#minihaplyplanner#weeklyminispread#mambiminiplanner#miniplanner#planneraddicts#plannercommunity#planneraddict#horizontallayout#horizontalweeklyspread#weeklylayout
0 notes
Photo

Easy weeklyspread #bulletjournal # bujo #bulletjournalbr #bulletjournalbeginner #weeklyspread #horizontallayout #bulletjournalminimalist #bujobrasil #pink #washitape
#bulletjournalbr#horizontallayout#pink#bulletjournalbeginner#bulletjournalminimalist#bujobrasil#washitape#weeklyspread#bulletjournal
0 notes
Photo

#rainydayfun well my kind of fun ... #plannergirl #planwithme @the_happy_planner #minihappyplanner weekly #horizontalplanner layout . I love my #horizontallayout so much but saw no need to purchase a new #bighappyplanner that I well created my own daily pages..., the design I wanted was not available in that the #pineapple layout that I well made my own #discboundplanner using @canva @adobeillustrators @officialcricut for custom #plannerstickers and a new #laminator a #heavydutycutie #10mil #laminating is what is needed for #happyplannercover there's tricks ... as much as I adore @meandmybigideas the HO punch can't go through it so @staples #arcnotebook #arcplanner #arcpunch breezes through even 10 mil laminate... using @rhonnafarrer I've made custom monogrammed covers using my printer ... it's so easy ... #acupfulofgrateful #plannerpost to come I've tried them all so let me share my finds and show you how to create your ideal #planner for less than 15 bucks .... plus who's a #plannerstickeraddict have you tried canva to make free stickers ... demo to come . (at Sanborn, New York)
#happyplannercover#rainydayfun#horizontalplanner#horizontallayout#plannerstickeraddict#laminator#10mil#planwithme#arcnotebook#arcplanner#plannerpost#pineapple#plannergirl#discboundplanner#acupfulofgrateful#laminating#minihappyplanner#plannerstickers#arcpunch#heavydutycutie#planner#bighappyplanner
0 notes
Photo

Build a JavaScript Command Line Interface (CLI) with Node.js
As great as Node.js is for “traditional” web applications, its potential uses are far broader. Microservices, REST APIs, tooling, working with the Internet of Things and even desktop applications: it’s got your back.
Another area where Node.js is really useful is for building command-line applications — and that’s what we’re going to be doing in this article. We’re going to start by looking at a number of third-party packages designed to help work with the command line, then build a real-world example from scratch.
What we’re going to build is a tool for initializing a Git repository. Sure, it’ll run git init under the hood, but it’ll do more than just that. It will also create a remote repository on GitHub right from the command line, allow the user to interactively create a .gitignore file, and finally perform an initial commit and push.
As ever, the code accompanying this tutorial can be found on our GitHub repo.

Why Build a Command-line Tool with Node.js?
Before we dive in and start building, it’s worth looking at why we might choose Node.js to build a command-line application.
The most obvious advantage is that, if you’re reading this, you’re probably already familiar with it — and, indeed, with JavaScript.
Another key advantage, as we’ll see as we go along, is that the strong Node.js ecosystem means that among the hundreds of thousands of packages available for all manner of purposes, there are a number which are specifically designed to help build powerful command-line tools.
Finally, we can use npm to manage any dependencies, rather than have to worry about OS-specific package managers such as Aptitude, Yum or Homebrew.
Tip: that isn’t necessarily true, in that your command-line tool may have other external dependencies.
What We’re Going to Build: ginit
For this tutorial, we’re going to create a command-line utility which I’m calling ginit. It’s git init, but on steroids.
You’re probably wondering what on earth that means.
As you no doubt already know, git init initializes a Git repository in the current folder. However, that’s usually only one of a number of repetitive steps involved in the process of hooking up a new or existing project to Git. For example, as part of a typical workflow, you may well:
initialize the local repository by running git init
create a remote repository, for example on GitHub or Bitbucket — typically by leaving the command line and firing up a web browser
add the remote
create a .gitignore file
add your project files
commit the initial set of files
push up to the remote repository.
There are often more steps involved, but we’ll stick to those for the purposes of our app. Nevertheless, these steps are pretty repetitive. Wouldn’t it be better if we could do all this from the command line, with no copy-pasting of Git URLs and such like?
So what ginit will do is create a Git repository in the current folder, create a remote repository — we’ll be using GitHub for this — and then add it as a remote. Then it will provide a simple interactive “wizard” for creating a .gitignore file, add the contents of the folder and push it up to the remote repository. It might not save you hours, but it’ll remove some of the initial friction when starting a new project.
With that in mind, let’s get started.
The Application Dependencies
One thing is for certain: in terms of appearance, the console will never have the sophistication of a graphical user interface. Nevertheless, that doesn’t mean it has to be plain, ugly, monochrome text. You might be surprised by just how much you can do visually, while at the same time keeping it functional. We’ll be looking at a couple of libraries for enhancing the display: chalk for colorizing the output and clui to add some additional visual components. Just for fun, we’ll use figlet to create a fancy ASCII-based banner, and we’ll also use clear to clear the console.
In terms of input and output, the low-level Readline Node.js module could be used to prompt the user and request input, and in simple cases is more than adequate. But we’re going to take advantage of a third-party package which adds a greater degree of sophistication — Inquirer. As well as providing a mechanism for asking questions, it also implements simple input controls: think radio buttons and checkboxes, but in the console.
We’ll also be using minimist to parse command-line arguments.
Here’s a complete list of the packages we’ll use specifically for developing on the command line:
chalk — colorizes the output
clear — clears the terminal screen
clui — draws command-line tables, gauges and spinners
figlet — creates ASCII art from text
inquirer — creates interactive command-line user interface
minimist — parses argument options
configstore — easily loads and saves config without you having to think about where and how.
Additionally, we’ll also be using the following:
@octokit/rest — a GitHub REST API client for Node.js
@octokit/auth-basic — an implementation of one of GitHub’s authentication strategies
lodash — a JavaScript utility library
simple-git — a tool for running Git commands in a Node.js application
touch — a tool for implementing the Unix touch command.
Getting Started
Although we’re going to create the application from scratch, don’t forget that you can also grab a copy of the code from the repository which accompanies this article.
Create a new directory for the project. You don’t have to call it ginit, of course:
mkdir ginit cd ginit
Create a new package.json file:
npm init -y
And edit it to look like so:
{ "name": "ginit", "version": "1.0.0", "description": "'git init' on steroids", "main": "index.js", "scripts": { "test": "echo \"Error: no test specified\" && exit 1" }, "keywords": [ "Git", "CLI" ], "author": "<YOUR NAME>", "license": "ISC" }
Now install the dependencies:
npm install chalk clear clui figlet inquirer minimist configstore @octokit/rest @octokit/auth-basic lodash simple-git touch
Now create an index.js file in the same folder and require the following dependencies:
const chalk = require('chalk'); const clear = require('clear'); const figlet = require('figlet');
Adding Some Helper Methods
We’re going to create a lib folder where we’ll split our helper code into modules:
files.js — basic file management
inquirer.js — command-line user interaction
github.js — access token management
repo.js — Git repository management.
Let’s start with lib/files.js. Here, we need to:
get the current directory (to get a default repo name)
check whether a directory exists (to determine whether the current folder is already a Git repository by looking for a folder named .git).
This sounds straightforward, but there are a couple of gotchas to take into consideration.
Firstly, you might be tempted to use the fs module’s realpathSync method to get the current directory:
path.basename(path.dirname(fs.realpathSync(__filename)));
This will work when we’re calling the application from the same directory (for example, using node index.js), but bear in mind that we’re going to be making our console application available globally. This means we’ll want the name of the directory we’re working in, not the directory where the application resides. For this purpose, it’s better to use process.cwd:
path.basename(process.cwd());
Secondly, the preferred method of checking whether a file or directory exists keeps changing. The current way is to use existsSync. This returns true if the path exists, false otherwise.
Finally, it’s worth noting that when you’re writing a command-line application, using the synchronous version of these sorts of methods is just fine.
Putting that all together, let’s create a utility package in lib/files.js:
const fs = require('fs'); const path = require('path'); module.exports = { getCurrentDirectoryBase: () => { return path.basename(process.cwd()); }, directoryExists: (filePath) => { return fs.existsSync(filePath); } };
Go back to index.js and ensure you require the new file:
const files = require('./lib/files');
With this in place, we can start developing the application.
Initializing the Node CLI
Now let’s implement the start-up phase of our console application.
In order to demonstrate some of the packages we’ve installed to enhance the console output, let’s clear the screen and then display a banner:
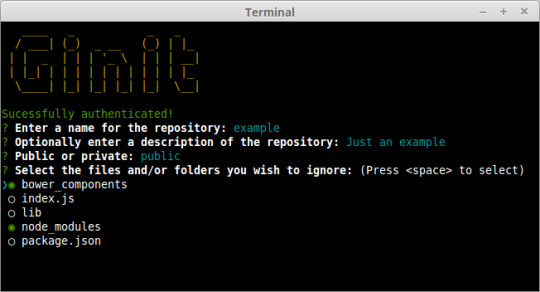
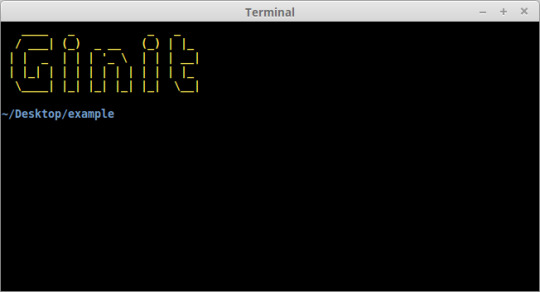
// index.js clear(); console.log( chalk.yellow( figlet.textSync('Ginit', { horizontalLayout: 'full' }) ) );
You can run the application using node index.js. The output from this is shown below.

Next up, let’s run a simple check to ensure that the current folder isn’t already a Git repository. That’s easy: we just check for the existence of a .git folder using the utility method we just created:
//index.js if (files.directoryExists('.git')) { console.log(chalk.red('Already a Git repository!')); process.exit(); }
Tip: notice we’re using the chalk module to show a red-colored message.
The post Build a JavaScript Command Line Interface (CLI) with Node.js appeared first on SitePoint.
by Lukas White via SitePoint https://ift.tt/2OzcaA2
0 notes
Text
300+ TOP ADOBE FLEX Objective Questions and Answers
ADOBE FLEX Multiple Choice Questions :-
1. Which two statements about Spark and MX components are true? A. For each MX component, there is a corresponding Spark component B. For many MX components, there is a corresponding Spark component C. Spark components implement functionality and appearance in separate classes D. Spark components are extended to customize layout, just like MX components E. Spark and MX components CANNOT be used within the same application Answer:- B,C 2. Which statement about Spark components is true? A. SkinnableComponent is a superclass of all Spark components B. UIComponent is NOT a superclass of Spark components C. Spark components CANNOT be used in the same application with MX components D. NOT all Spark components are skinnable Answer:- D 3. Which approach allows you to specify a layout for a Spark container? A. Each Spark container class defines a specific layout, so you must choose the Spark container corresponding to the layout you desire B. You must specify a CSS layout style corresponding to the id of the Spark container C. You must specify a value of "absolute", "horizontal" or "vertical" within the layout attribute of the Spark container D. You must specify one of the Spark layout classes within the layout attribute of the Spark container Answer:- D 4. Which statement comparing Spark and MX layouts are true? A. Spark layouts use layout classes, while MX layouts do not B. Spark and MX share the same layout attribute values C. Spark layouts do NOT support absolute positioning, unlike MX layouts D. Spark components do NOT have default layouts, so a layout must be specified Answer:- A 5. You want to create a sub class of LayoutBase. Which method must be overridden to specify positioning? A. layout() B. measure() C. commitProperties() D. updateDisplayList() Answer:- D 6. You want to create a custom layout to display a number of images in a carousel. Which superclass should you extend to create your custom layout? A. HorizontalLayout B. VerticalLayout C. LayoutBase D. TileLayout Answer:- C 7. Given the following code Adobe 9A0-182 Exam Which will allow you to set the content that will be displayed in the control? A. myTextInput.label B. TextInput.label C. myTextInput.text D. TextInput.text Answer:- C 8. Which property of the NumericStepper gives you access to the number that is displayed? A. text B. value C. index D. number Answer:- B 9. You want to use a field to capture a single line of typed input, with an approximate width of 30 characters. Which statement should you use? A. B. C. D. Answer: C 10. Which two statements about the Spark DataGrid are true? (Choose two.) A. The Spark DataGrid is implemented as a skinnable wrapper around the SparkGrid B. The Spark DataGrid is a skinnable component that uses a Grid control as a skin part C. The component requires a dataField property D. The component requires a dataField property E. The component must be implemented to enable Spark DataGrid scrolling Answer:- A,B

ADOBE FLEX MCQs 11. Which property of the Group component allows you to specify which orientation its children will have? A. layout B. position C. direction D. orientation Answer:- A 12. Which properly defines an ItemRenderer for a Spark DataGrid column? A. B. C. D. Answer: A 13. Which Spark container will allow you to display its children with a horizontal orientation? A. HBox B. VBox C. VGroup D. HGroup Answer:- D 14. Which components can a Spark Group take as child objects? A. Components that derive from the Component class B. Components that implement the IVisualElement interface C. Components that derive from the GraphicElement class D. Components that implement the IUIComponent interface Answer:- D 15. Which one of the following is true about the typicalItem property? A. By defining a typicalItem, a container does not have to size each child as it is drawn on the screen B. The typicalItem may only be used with the Spark Grid and Spark DataGrid C. If no typicalItem is used, by default a control will use the last item in the dataProvider as the typical data item D. The typicalItem is defined inline, and not as an object to which the typicalItem is bound Answer:- A ADOBE FLEX Objective type Questions with Answers 16. Which two sets of skin classes does the Flex framework provide for the Spark Form and Spark FormItem controls? (Choose two.) A. Default horizontal layout B. Stacked C. Default vertical layout D. Basic E. Sequential Answer:- A,B 17. You want to create a CSS rule that styles the Spark TextInput component. Your CSS document has the following namespace declaration: @namespace s "library://ns.adobe.com/flex/spark"; Which correctly declares a CSS rule for the Spark TextInput component? A. s|TextInput {} B. s-TextInput {} C. spark|TextInput {} D. spark-TextInput {} Answer:- A 18. Which declaration uses the correct syntax to define a style namespace for the components in the components.view package? A. namespace|comp components.view.* B. namespace comp "components.view.*" C. @namespace comp components.view.* D. @namespace comp "components.view.*" Answer:- D 19. You want to create a drop shadow on the Spark label myLabel. Which syntax is correct? A. myLabel.setStyle(dropShadow, "true"); B. C. D. Answer: D 20. Which two choices will allow you to apply a skin to a component at compile time? (Choose two.) A. Use the setStyle method in a Script block B. Use the skin attribute in the MXML used to instantiate the component C. Use the skinClass attribute in the MXML used to instantiate the component D. Use the skin property in the CSS attached to the application E. Use the skinClass style in the CSS attached to the application Answer:- C,E 21. Which two classes can be extended to create a skin? (Choose two.) A. ComponentSkin B. Skin C. SkinSpark D. SkinClass E. SparkSkin Answer:- B,E 22. Which MXML attribute specifies the visual implementation that a Spark component will display? A. skin B. skinClass C. layout D. displayClass Answer:- B 24. You want to animate the x, y, and alpha properties of an object in your application. Which Spark Effect class can handle animating multiple properties? A. Animate B. AnimateProperty C. AnimateFilter D. AddAction Answer:- A 25. Which declaration properly sets the x property in a state named detail? A. detail.x="0" B. detail:x="0" C. x:detail="0" D. x.detail="0" Answer:- D 26. Which two approaches could be used to show a component only within a specified Spark view state? (Choose two) A. Set the includeIn attribute on that component's MXML declaration and specify the name of the state B. Set the excludeFrom attribute on that component's MXML declaration and specify the names of all other states C. Use the AddChild class within the State's MXML declaration, and specify the component declaration within AddChild D. Set the state attribute on that component's MXML declaration and specify the value of the state E. Set the includeIn attribute within the root element of the component Answer:- A,B 27. What must you do extend Event class? A. invoke the superclass constructor within your custom constructor B. define an Event metadata keyword within your custom Event class C. override the clone() method of the parent class D. define an object to contain all contain all custom properties passed to the event Answer:- A 28. You are defining a User class with username and password properties to encapsulate data. Which design pattern is being utilized? A. Observer B. Factory C. ValueObject D. Mediator Answer:- C 29. You have a created a custom component called MyComp.Which two statements could be used to create an instanceof MyComp? (Choosetwo) A. B. MyComp C. var comp:M/Comp = new MyComp(); D. var comp MyComp = new DisplayObject(); E. var comp:MyComp = createClass("MyComp"); Answer:- A,C 30. You want to play a transition effect whenever you press the enter key. Which of the following triggers will you use? A. focuslnEffect B. hideEffect C. creationComplete Effect D. moveEffect Answer:- A 31. Which of the following containers is used to arrange its children in a single vertical stack,or column? A. ViewStack B. VBox C. TabNavigator D. Accordion Answer:- B 32. Which of the following metadata tags is used to define the allowed data type of eachelement of an array? A. B. C. D. Answer:- D ADOBE FLEX Questions and Answers pdf Download Read the full article
0 notes
Photo

Here’s my #christmas spread for this week in my #minihappyplanner using a new Christmas themed sticker book from Recollections at @michaelsstores ⛄️🎅🎄 #thehappyplanner #horizontalhappyplanner #horizontallayout #horizontalplanner #planner #plannercommunity #plannerstickers #recollections #recollectionstickers #christmasstickers https://www.instagram.com/p/CXrMwdpJ64z/?utm_medium=tumblr
#christmas#minihappyplanner#thehappyplanner#horizontalhappyplanner#horizontallayout#horizontalplanner#planner#plannercommunity#plannerstickers#recollections#recollectionstickers#christmasstickers
0 notes
Photo

I'm playing around with washi tape. How did I do? I don't know what I am going to write on these pages but I'm ready to use my white gel pen. The Happy Planner Half Sheet Having fun with supplies. #allblack #scrapbookpaper #washitape #beautiful #horizontallayout #useallthethings #plannerspread #beforethepen #weeklylayout #plannersheets #happyplanner #beforethepenspread #mambi #planahappylife #happyplanner #classichp #planner #plannercommunity #bwwpc #blackgirlsplantoo #blackgirlsplan #thehappyplanner #plannerstuff #plannerfun #plannerinspiration #plannerlove #plannercommunity #achristiangirlslife #achristiangirlpics #achristiangirl #AlabamaPlanner #achristiangirlplans (at Alabama) https://www.instagram.com/p/B6W9W1IJhYK/?igshid=11hem0l53zvmz
#allblack#scrapbookpaper#washitape#beautiful#horizontallayout#useallthethings#plannerspread#beforethepen#weeklylayout#plannersheets#happyplanner#beforethepenspread#mambi#planahappylife#classichp#planner#plannercommunity#bwwpc#blackgirlsplantoo#blackgirlsplan#thehappyplanner#plannerstuff#plannerfun#plannerinspiration#plannerlove#achristiangirlslife#achristiangirlpics#achristiangirl#alabamaplanner#achristiangirlplans
0 notes
Photo

Build a JavaScript Command Line Interface (CLI) with Node.js
As great as Node.js is for “traditional” web applications, its potential uses are far broader. Microservices, REST APIs, tooling, working with the Internet of Things and even desktop applications: it’s got your back.
Another area where Node.js is really useful is for building command-line applications — and that’s what we’re going to be doing in this article. We’re going to start by looking at a number of third-party packages designed to help work with the command line, then build a real-world example from scratch.
What we’re going to build is a tool for initializing a Git repository. Sure, it’ll run git init under the hood, but it’ll do more than just that. It will also create a remote repository on GitHub right from the command line, allow the user to interactively create a .gitignore file, and finally perform an initial commit and push.
As ever, the code accompanying this tutorial can be found on our GitHub repo.

Why Build a Command-line Tool with Node.js?
Before we dive in and start building, it’s worth looking at why we might choose Node.js to build a command-line application.
The most obvious advantage is that, if you’re reading this, you’re probably already familiar with it — and, indeed, with JavaScript.
Another key advantage, as we’ll see as we go along, is that the strong Node.js ecosystem means that among the hundreds of thousands of packages available for all manner of purposes, there are a number which are specifically designed to help build powerful command-line tools.
Finally, we can use npm to manage any dependencies, rather than have to worry about OS-specific package managers such as Aptitude, Yum or Homebrew.
Tip: that isn’t necessarily true, in that your command-line tool may have other external dependencies.
What We’re Going to Build: ginit

For this tutorial, We’re going to create a command-line utility which I’m calling ginit. It’s git init, but on steroids.
You’re probably wondering what on earth that means.
As you no doubt already know, git init initializes a git repository in the current folder. However, that’s usually only one of a number of repetitive steps involved in the process of hooking up a new or existing project to Git. For example, as part of a typical workflow, you may well:
initialise the local repository by running git init
create a remote repository, for example on GitHub or Bitbucket — typically by leaving the command line and firing up a web browser
add the remote
create a .gitignore file
add your project files
commit the initial set of files
push up to the remote repository.
There are often more steps involved, but we’ll stick to those for the purposes of our app. Nevertheless, these steps are pretty repetitive. Wouldn’t it be better if we could do all this from the command line, with no copy-pasting of Git URLs and such like?
So what ginit will do is create a Git repository in the current folder, create a remote repository — we’ll be using GitHub for this — and then add it as a remote. Then it will provide a simple interactive “wizard” for creating a .gitignore file, add the contents of the folder and push it up to the remote repository. It might not save you hours, but it’ll remove some of the initial friction when starting a new project.
With that in mind, let’s get started.
The Application Dependencies
One thing is for certain: in terms of appearance, the console will never have the sophistication of a graphical user interface. Nevertheless, that doesn’t mean it has to be plain, ugly, monochrome text. You might be surprised by just how much you can do visually, while at the same time keeping it functional. We’ll be looking at a couple of libraries for enhancing the display: chalk for colorizing the output and clui to add some additional visual components. Just for fun, we’ll use figlet to create a fancy ASCII-based banner and we’ll also use clear to clear the console.
In terms of input and output, the low-level Readline Node.js module could be used to prompt the user and request input, and in simple cases is more than adequate. But we’re going to take advantage of a third-party package which adds a greater degree of sophistication — Inquirer. As well as providing a mechanism for asking questions, it also implements simple input controls: think radio buttons and checkboxes, but in the console.
We’ll also be using minimist to parse command-line arguments.
Here’s a complete list of the packages we’ll use specifically for developing on the command line:
chalk — colorizes the output
clear — clears the terminal screen
clui — draws command-line tables, gauges and spinners
figlet — creates ASCII art from text
inquirer — creates interactive command-line user interface
minimist — parses argument options
configstore — easily loads and saves config without you having to think about where and how.
Additionally, we’ll also be using the following:
@octokit/rest — a GitHub REST API client for Node.js
lodash — a JavaScript utility library
simple-git — a tool for running Git commands in a Node.js application
touch — a tool for implementating the Unix touch command.
Getting Started
Although we’re going to create the application from scratch, don’t forget that you can also grab a copy of the code from the repository which accompanies this article.
Create a new directory for the project. You don’t have to call it ginit, of course:
mkdir ginit cd ginit
Create a new package.json file:
npm init
Follow the simple wizard, for example:
name: (ginit) version: (1.0.0) description: "git init" on steroids entry point: (index.js) test command: git repository: keywords: Git CLI author: [YOUR NAME] license: (ISC)
Now install the dependencies:
npm install chalk clear clui figlet inquirer minimist configstore @octokit/rest lodash simple-git touch --save
Alternatively, simply copy-paste the following package.json file — modifying the author appropriately — or grab it from the repository which accompanies this article:
{ "name": "ginit", "version": "1.0.0", "description": "\"git init\" on steroids", "main": "index.js", "scripts": { "test": "echo \"Error: no test specified\" && exit 1" }, "keywords": [ "Git", "CLI" ], "author": "Lukas White <[email protected]>", "license": "ISC", "bin": { "ginit": "./index.js" }, "dependencies": { "@octokit/rest": "^14.0.5", "chalk": "^2.3.0", "clear": "0.0.1", "clui": "^0.3.6", "configstore": "^3.1.1", "figlet": "^1.2.0", "inquirer": "^5.0.1", "lodash": "^4.17.4", "minimist": "^1.2.0", "simple-git": "^1.89.0", "touch": "^3.1.0" } }
Now create an index.js file in the same folder and require the following dependencies:
const chalk = require('chalk'); const clear = require('clear'); const figlet = require('figlet');
Adding Some Helper Methods
We’re going to create a lib folder where we’ll split our helper code into modules:
files.js — basic file management
inquirer.js — command-line user interaction
github.js — access token management
repo.js — Git repository management.
Let’s start with lib/files.js. Here, we need to:
get the current directory (to get a default repo name)
check whether a directory exists (to determine whether the current folder is already a Git repository by looking for a folder named .git).
This sounds straightforward, but there are a couple of gotchas to take into consideration.
Firstly, you might be tempted to use the fs module’s realpathSync method to get the current directory:
path.basename(path.dirname(fs.realpathSync(__filename)));
This will work when we’re calling the application from the same directory (e.g. using node index.js), but bear in mind that we’re going to be making our console application available globally. This means we’ll want the name of the directory we’re working in, not the directory where the application resides. For this purpose, it’s better to use process.cwd:
path.basename(process.cwd());
Secondly, the preferred method of checking whether a file or directory exists keeps changing.The current way is to use fs.stat or fs.statSync. These throw an error if there’s no file, so we need to use a try … catch block.
Finally, it’s worth noting that when you’re writing a command-line application, using the synchronous version of these sorts of methods is just fine.
Putting that all together, let’s create a utility package in lib/files.js:
const fs = require('fs'); const path = require('path'); module.exports = { getCurrentDirectoryBase : () => { return path.basename(process.cwd()); }, directoryExists : (filePath) => { try { return fs.statSync(filePath).isDirectory(); } catch (err) { return false; } } };
Go back to index.js and ensure you require the new file:
const files = require('./lib/files');
With this in place, we can start developing the application.
Initializing the Node CLI
Now let’s implement the start-up phase of our console application.
In order to demonstrate some of the packages we’ve installed to enhance the console output, let’s clear the screen and then display a banner:
clear(); console.log( chalk.yellow( figlet.textSync('Ginit', { horizontalLayout: 'full' }) ) );
The output from this is shown below.
Next up, let’s run a simple check to ensure that the current folder isn’t already a Git repository. That’s easy: we just check for the existence of a .git folder using the utility method we just created:
if (files.directoryExists('.git')) { console.log(chalk.red('Already a git repository!')); process.exit(); }
Tip: notice we’re using the chalk module to show a red-colored message.
The post Build a JavaScript Command Line Interface (CLI) with Node.js appeared first on SitePoint.
by Lukas White via SitePoint https://ift.tt/2VN31GE
0 notes
Photo

#beforethepen in my #minihappyplanner #horizontallayout using the @rongrong_devoe_illustration seasonal sticker book by @the_happy_planner 😁 #thehappyplanner #rongrongdevoeillustration #rongronghappyplanner #planner #plannercommunity #plannerstickers #plannerbabe #minihorizontalhappyplanner #horizontalplanner #horizontalhappyplanner https://www.instagram.com/tabrownwv/p/CXZJvGWJJf7/?utm_medium=tumblr
#beforethepen#minihappyplanner#horizontallayout#thehappyplanner#rongrongdevoeillustration#rongronghappyplanner#planner#plannercommunity#plannerstickers#plannerbabe#minihorizontalhappyplanner#horizontalplanner#horizontalhappyplanner
0 notes
Photo
For this week’s mini horizontal planner spread I used the new happy and grateful sticker book from @the_happy_planner Be Happy box and combined it with this craft smart floral sticker book from @michaelsstores #thehappyplanner #imahappyplanner #planahappylife #minihappyplanner #minihorizontalhappyplanner #horizontalplanner #horizontallayout #planner #plannercommunity #plannerbabe #plannerstickers #happyandgrateful #behappybox #craftsmartstickers #craftsmart #makeitwithmichaels #michaels https://www.instagram.com/p/CWRMx3gpByl/?utm_medium=tumblr
#thehappyplanner#imahappyplanner#planahappylife#minihappyplanner#minihorizontalhappyplanner#horizontalplanner#horizontallayout#planner#plannercommunity#plannerbabe#plannerstickers#happyandgrateful#behappybox#craftsmartstickers#craftsmart#makeitwithmichaels#michaels
0 notes
Photo

For this week’s planner spread, I decided to participate in the #hpprincesschallenge hosted by @wineandaplan & @planyourtruth 😁🌹🥀 #beforethepen #thehappyplanner #imahappyplanner #planahappylife #embracethediscs #minihappyplanner #horizontallayout #horizontalplanner #planner #plannercommunity #plannerspread #plannerstickers #plannerbabe #disney #disneyprincess #disneybelle #princessbelle #beautyandthebeast https://www.instagram.com/p/CTu3cf5JCZv/?utm_medium=tumblr
#hpprincesschallenge#beforethepen#thehappyplanner#imahappyplanner#planahappylife#embracethediscs#minihappyplanner#horizontallayout#horizontalplanner#planner#plannercommunity#plannerspread#plannerstickers#plannerbabe#disney#disneyprincess#disneybelle#princessbelle#beautyandthebeast
0 notes
Photo

For this week’s planner spread I paired the Belle stickers with some pink flowers and I love how it turned out! 👸🏻🌸 #thehappyplanner #planahappylife #embracethediscs #imahappyplanner #beforethepen #minihappyplanner #horizontallayout #horizontalplanner #planner #plannercommunity #plannerbabe #plannerstickers #disney #disneyprincess #belle #princessbelle #beautyandthebeast https://www.instagram.com/p/CRM0aIcptn9/?utm_medium=tumblr
#thehappyplanner#planahappylife#embracethediscs#imahappyplanner#beforethepen#minihappyplanner#horizontallayout#horizontalplanner#planner#plannercommunity#plannerbabe#plannerstickers#disney#disneyprincess#belle#princessbelle#beautyandthebeast
0 notes