#host website on Raspberry Pi
Explore tagged Tumblr posts
Visit Tumblr Blog
Explore Tumblr blogs with no restrictions, modern design and the best experience.
Last Seen Tumblr Blogs


Fun Fact
Tumblr was acquired by Yahoo for $1.1B in 2013.
Text
How to Host a Website on a Raspberry Pi
If you’re a tech enthusiast or DIYer, hosting a website on a Raspberry Pi is a great project. It’s cost-effective, energy-efficient, and gives you control over your hosting environment. Here’s how to get started: 1. Set Up Your Raspberry Pi Begin by setting up your Raspberry Pi with a clean installation of Raspberry Pi OS. Make sure you have an internet connection and the necessary peripherals…
#affordable web hosting#host website on Raspberry Pi#Raspberry Pi projects#Raspberry Pi server#Raspberry Pi web hosting
0 notes
Text
i just think it’s funny that raspberry pi seems to plan their releases around that of apple’s
#stream#both cult followings ….#that im apart of ………#idk i’ve always been an apple fanthem i guess#perhaps it’s also due to me growing up poor & seeing it as a status symbol but by the time the 5s or so was released they had started being#subsidized for the poors following the monopoly breakup w at&t so i had an what was it it was either an 8 or 16gb 4s for 99c in#it was 2014/2015 or so i don’t remember i still have that fucking phone the back cracked bc my sexy fatass geometry teacher fucking stepped#on my binder on accident during a test u know when in school u had to put ur bag or binder at the front of class during tests#but i also got an ipod touch in like 2012 i think loved it it was green my mother got it for my brother & i for christmas#& that’s when i hopped on the Dual Phone Train#never grew out of it#i had an 14 & se 1st gen now i’m triple wielding bc i got robbed so ptsd ive got 12 mini 15 ? 16 ? idk i dont use it it just stays home that#the tx phone bc it doesn’t have a sim card slot as american so it’s esim only therefore literally an ipod#& that’s what i use it as - i also have my us whatsapp on there & i use it to call my banks#but that’s like once a month#so#triple wielding w the se#i hate the new ios like ios 18 it’s gotten too complicated#literally loved apple bc of its simplicity idk as if i didn’t get a pi to get into software & webhosting as was my dream as a child#literally in elementary school i wanted to build my own website so bad i literally went to the library & was reading books on how to build a#server then i asked my parents & they were like ‘wow that’s so cool :) we don’t have any money :) that’s why u were at the library :) & know#so much about libraries :) bc they’re free :) bc ur poor :)’ ALSKALSKALKSLAKSLALSASL#MORE PPL NEED TO USE LIBRARIES#blessed to live like down the street from a library#actually blessed to literally be living in a ‘15 minute city’#also accidentally ordered a compute module 4 so :/#i thought i was ordering the module 5 ALSJALKSLAKSLAKSLAKSLAKSLKSLA#RASPBERRY DROP THE 5S I KNOW U GOT STOCK FUCK U#i’m literally going to make a dual cloud hosting server & also a website host so i can finally provide my family back home w a website for#them to see when i take pics & stuff
1 note
·
View note
Note
if you have a spare computer or laptop or whatever, that can be used to host a website too I think. It's just the domain that's the problem I think. I've only got surface level knowledge tho because I've considered turning my old laptop into a server so I can self host my own fucking cloud for writing (I hate Google docs)
Yea! I know a person who's hosting their whole website off a raspberry pi somehow. I'll admit I'm not all quite that advanced with it just yet. That's mostly why I stick to things like Neocities/NekoWeb but I know you can (somehow) absolutely host a website off a spare computer/laptop/pi.
I really want to learn more about that because it sounds really cool honestly. I love what all can be done with the indie web. I worry that people often see what I say as me pointing a finger at people going "you're lazy, you're complacent, you're part of the problem!" When in reality what I'm TRYING to say is "hey the internet is YOURS and centralized web wants you to believe it's THEIRS and you could have so much more than this if you just take a little while to understand how."
---| EDITOR'S NOTE HERE: I'M ABOUT TO GO OFF ON A MAJOR TANGENT ABOUT THIS I'M SO SORRY |---
Like I have had to explain how web surfing works to people, and I think there's this sense of like, I don't want to say guilt but almost like people think you're looking down on them? Because I grew up during a time when we didn't have centralized web, Facebook and MySpace were considered this kinda new and weird thing. I remember when the norm on the internet was "why would I ever want to tell strangers online what I've been doing? That's my business!" Now it's more of like "why wouldn't you? Do you have something to HIDE?!" Which is just... ugh.
The thing that's often difficult for people is that we've almost grown so used to having this "feed" or "dashboard" of content to look at. We want to see exclusively our specifically curated list of content creators. I don't necessarily have anything against that, but modern internet users just have lost the knowledge of how we used to surf the web. If it's not "on google" and it's not "on my dashboard" it may as well be hidden behind 8 layers of encryption, in a language they can't read. That sounds like judgement or like I'm saying "I'm so much better than those modern internet plebs" but in reality it's just an observation that makes me sad.
I recently met a fellow netizen who recently found the indie web, and I was talking to them about how they learned to actually surf the indie web. Specifically how difficult it was for them to grasp the idea because of two big things. The first being that they didn't know where to find "content" and the second being that they didn't want to leave the sphere of their "mutuals."
All of which is Social Media brained thinking, but that's just "the internet" for most modern internet users. If you go on Twitter/X, Tumblr, YouTube, whatever; you're going to find people talking about "Content" whether it's making content, viewing content; they're talking about a product essentially. It's the idea of like "I want new art to look at" or "I want a new video to watch" or "I want a funny meme to laugh at" but it's become "I want content from this content creator I follow to fuel my enjoyment of the internet." Which isn't necessarily an inherently bad thing, but becomes a little bit of a problem when we realize that people creating things for the love of creating; isn't seen as valuable, because it's not monetizable content. You can't say "hey guys subscribe to my patreon and get an exclusive behind the scenes look at my About Me page on my website." That just doesn't work. If you run ads on your website, people just find it annoying; and just won't use your website outright.
I've been asked what the purpose of having your own website is, to which I was kinda stumped because I kinda sat there like "why do you want your own anything?" Would you settle for exclusively renting a car, where you couldn't paint it or decorate it or do anything with it that your rental company doesn't approve of? I mean hell look at how much people hate the HOA right? Centralized web is the HOA of the internet. If you have your own website, with your own webrings, and you frequent forums that foster a community around your interests; then you're not being censored or controlled by some CEO with different ideals. You're not being told what can or cannot be on your blog. You're not being told "this post has adult content" when it says the "T Word" that tumblr hates so much. People always tell me they hate tumblr but they refuse to get off it. Unless of course they can go to Bluesky or Mastodon, or whatever other Centralized Website makes it easy and hassle free. The problem then becomes that those websites are just as controlling and censor what they have to say or outright ban users for speaking their mind.
But like, the biggest thing for me is that a lot of people just don't even know how to really START with the indie web. They don't know how to find forums, they don't know how to build a website; they don't know how to host a website or code a website. I cannot tell you how many people are told they can go from having a page that looks like this:

You know, header image, profile picture; random little blurb and title, no personality; blank colored borders; "look at my content" kinda shit.
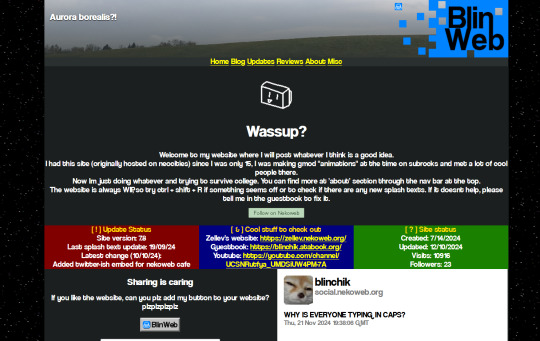
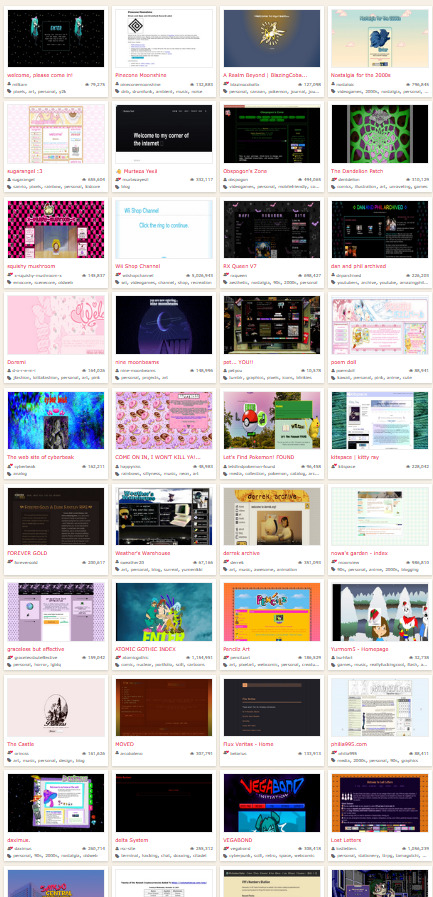
To having a website that looks however they want, like:
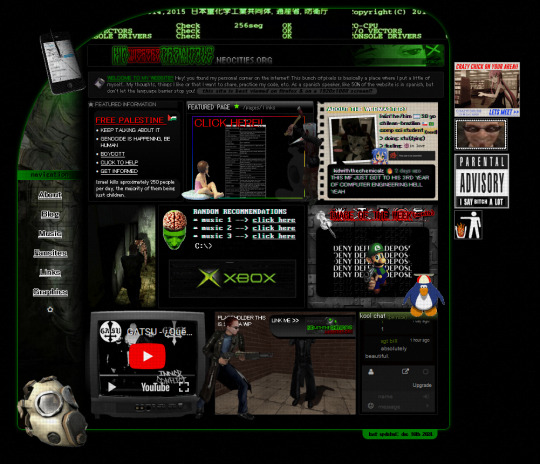

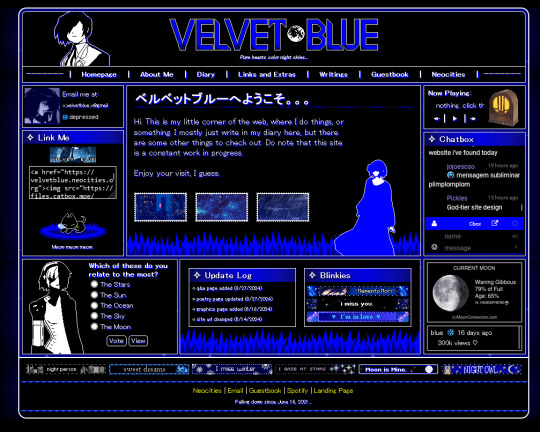

and then they get all excited because like, hell yea man look how much personality there is here! These are just 4 websites I pulled randomly. Each looks entirely different, each has it's own personality and navigation style and each is full of stuff to explore and check out.
Then they hear that all you need to do is learn HTML and as soon as they hear that it's over, I've lost them; they're GONE because they think "ok but I'm not smart enough to learn CODING" and it's like, dude chill.
I can't explain to people that big centralized web really do want to keep you stupid. You aren't stupid, you can learn HTML EASILY, I promise you if you sit down and pay attention to like a half hour video on coding; you'll be able to make a website. If you listen to a 4 hour video on coding you'll be able to make such a cool unique website you're genuinely happy with it.
But the big thing people don't get is that you don't NEED a fancy website or graphics or navigation or whatever. I'm part of a webring and I have 2 websites currently. One that I run personally, one that I run with a few other people. The thing about those is that they're both constantly under construction and almost never actually look like the examples you see above because myself and the others I work with are all still learning HTML.
I'm still in a webring, I still have people who actually use my button to link back to my website and vice versa. I have internet "neighbors" despite the fact my website is not at all impressive. Because the internet isn't for content it's creation for the love of creation.
I get people all the time who tell me they LOVE Hypnospace Outlaw and "wish the internet was really like that" to which I say, "oh you mean indie websites hosted by a webmaster rather than a company with everyone having a unique aesthetic and they're all connected via webrings and categories of their interests?" To which people go "yea that's not real" and I'm sitting here like:


^ They're the same picture.


I mean okay hell come on THIS is part of a website I found:

The indie web is so incredible to me, and it doesn't end with just exploring various websites. I've found forums, I've found webrings for video games or apps; I've found CSS scripts to turn my discord into THIS without needing nitro:

Which I fully admit is a matter of preference; but I enjoy it having more personality without having to pay monthly or whatever for discord of all things. All because I happened to stumble across a website that was part of a webring that lead to another website where I checked the personal projects of the individual and found this old CSS script they were working on; and thought it was cool.
The internet isn't just boring social media that we have to refresh every 5 minutes to get more funny memes; it's a communal place where anyone and everyone can create whatever they want and share it with the world. It's unfortunately very hard for me to explain to people that the Web Revival Movement isn't some like, hardcore manifesto down with the corporations communism thing. It's literally a set of values that a LOT of people on the indie web have. It's not even really a "movement" in the traditional sense. I've seen a lot of youth who get involved quickly lose steam with it, because they're expecting something that it's just, not.
There's a post on a forum from a user that basically said they didn't care for the Web Revival Movement and what's interesting is their reason why:
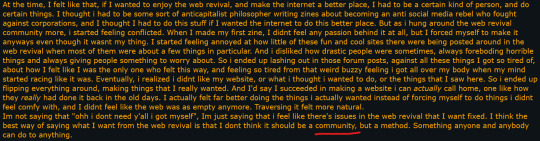
This user is still a minor and it's very likely they grew up with social media and "communities" when the Web Revival Movement IS actually just a method. It's a mindset, it's a ideal that a lot of people have and that we tend to follow; it is NOT a community, it is NOT a group of people fighting some fight against social media or whatever.
Another user talking about the web revival "community" likely doesn't help this feeling any, seeing as how some DO view it as a community; but pay attention to what they're saying here:
"The community of Web Revivalists" Alright, let's see if we can find them!

Huh... wait hold on let me just try searching in general for websites being created by people...
Huh okay there's a lot, but none of these websites are specifically talking about a "Web Revival Movement" none of them are out here preaching about some community or anti-capitalist ideals or how they hate social media. They're just, websites. So then how are they part of the Web Revival Movement exactly?!
Well the thing about the Web Revival is that it's about reclaiming tech and figuring out what it is we want from the tech/tools in our lives.
To put it really simply:

What this is saying is that all those websites are technically part of the "Web Revivalist Community" because they simply put, are online spaced that express the ideals by just... being created.
It's not that this is some community in the sense that You and I belong to The Movement. It's a community in the same way I live in a community, because I live on the same street as my neighbors. It's a community in the same way you could call a group of people who all play an MMORPG a "community" or a fandom a "community" or whatever.
You don't NEED to take any specific action, we're not fighting to make the web a better place through some kind of radical action, we view simply existing in a world that is so centralized; a radical action.
Which is why you have these young activists coming in going "okay I need to abandon everything that isn't anti-capitalist, anti social media, and anti-web3 I need to be an activist, I need everyone to know that I'm creating TO REBEL, I need to make the web a better place, I need to do this I need to do that even though I don't find it fun! Hey guys the internet isn't really fun :("
Personally I do my best to spread the word about webhosts like Neocities, Nekoweb, Teacake, Leprd.space, tiiny.host, ichi.city, tilde.town, and DigitalOcean for more advanced webhosting.
I genuinely feel like people would enjoy the indie web if they knew where to look for it, or knew how to explore it better. I mean look at the way people talk about it in comparison to social media:


That being said allow me to try to lend a hand to anyone and everyone who may have read this and thought "well I'd love to start exploring websites but I don't know how!" It's easy I promise, just follow these easy steps:
Find whatever hosting website you want to start with; for me it's gonna be Neocities because I am most familiar with it, just find the first website that looks interesting or do what I'm going to do for this example and click random and then click the first website it recommends. In this case we're looking at this:
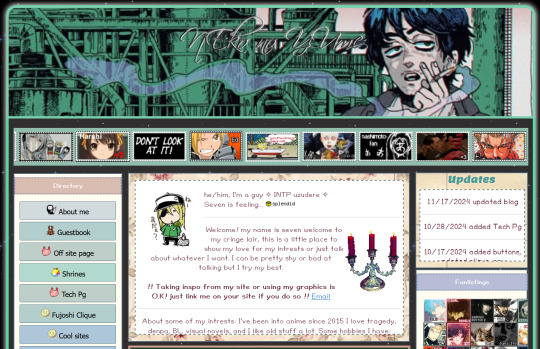
Alright it seems we've landed on a yaoi enthusiast website, hey why not. Now here's the thing, you can freely explore this website as you see fit, check out the about, sign the guest book (that's where you can leave a little comment saying whatever, they're fun.) Look through some shrines, explore the site; because someone put effort and work into this, but you're looking as well for a part of the website with some kind of link to a webring or another website.
In this case if we scroll right past the yaoi paddle and look at the bottom middle of the site we see this:

So these little buttons are essentially personalized links to websites. They're fairly common to have, in fact you can see the webmaster of this site offers their button if you want to link back to them. This isn't something exclusively for mutuals. If I like your website a lot and want to link to it, I use that button there to embed your button on my site and now whenever I access my homepage I have a direct, fast, and fancy link to your website just kinda... there. However for our purposes today we're just exploring the web, so any of these site buttons will do. If none of these interest you, use them as a sort of in between to get to the next; typically though if you're looking at sites that you actually have an interest in, you'll be able to find corresponding websites that are also on the topic of that kind of thing. The best part about this is that it typically leads to a webring which contains a bunch of websites all featuring the same sort of aesthetic, interest; or thing. You can even become a member of that webring.
That's it. It's a 2 step process you repeat for however long you want.
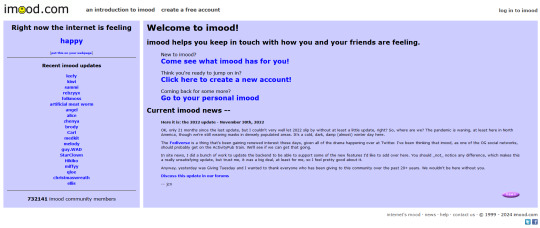
You'll often see people using either imood:
Or Status.cafe:
to have some kind of "this user is feeling this kind of way" thing. This is another big thing on the indie web. We tend to embed a lot of off-site features onto our sites. So get familiar with what other people use. You can easily find these sorts of things by just clicking around. For example that bit above in the first image that says "Seven is feeling... Splendid" if clicked, will take you to imood.
Remember, these sites use HTML, and your site uses HTML, and HTML can literally be viewed, edited, copied, etc. By just using inspect element on something and then looking through all the source code.
It's that thing that looks like this:

You can literally try this right now here on tumblr if you're curious about it. But I say this because it means that while you're out exploring the web, anything you see that you like; you can just kinda... copy the source code for. Why not? You're not hurting anyone! I promise. Learn from other webmasters like this.
The big thing about the indie web is that you get out what you put in. A site like Tumblr or Twitter or Facebook makes it very easy to make an account, but that's all you get; an account. You can't really customize it much, you can't really make it your own. You get out what you put in, you can't really put a lot of effort into it, and you'll not really get a lot out of it either. The indie web gives you literally a blank page and says "hey, code whatever you want in here!" So you can really just... code whatever you want into your website.
I'm more than happy to help explain HTML to people or help provide links to YouTube videos that sort of go over the very basics. If anyone is actually interested in getting their own website I'm happy to help however I can.
3 notes
·
View notes
Text
If I disappear from society, don't be surprised.
I am so so so tired of capitalism.
For Christmas I got a Raspberry Pi. The goal was to host my own website off it. This was entirely for fun.
Step one: set up raspberry Pi so I can host a site on it. Easy. Ubuntu is free (thank fuck), I know how to set it up, but hold on! According to xfinity, I cannot change dmz or dms rules on their router. I can't even REQUEST it. I can't even use a workaround because I'm not allowed to edit the port forward that was automatically added to my router. I dig through years old forums and find out that this is because I'm using the modem provided by xfinity. I now have to buy a new modem from xfinity's "approved list".
Step two: get a domain. I swim through 4 million outrageous prices that say shit like "pay $0.01 for the first year!" with the text below saying "with purchase of 3 year agreement". I finally get to godaddy and am able to convince the stupid checkout to give me 1 year of my domain (after, of course, it corrected my awful mistake to 3 years and, if I hadn't been hyper-vigilant, I wouldn't have noticed. I have to dig through 5 pages in settings to find a way to turn off auto pay because I know better by now. While I'm there I also turn off all email notifications, which were all automatically on. It also didn't tell me that I can't transfer my domain outside of godaddy for 60 days, so I just essentially paid for something I can't use for 2 months. Great. (out of curiosity, I dug through godaddy for some time. The 60 day thing appears nowhere except on the help center page when specifically searching for it.)
Step three: create a site. WordPress, once my most beloved website creation software, now slams subscription fees on me like cardi B audios on teenager girls's tiktoks. Unrelenting. Bloodthirsty. I power through to just get past "let AI design your site!" and "pick one of our patterns" so I can reach the point where I can edit the template. I already have a free template zip file. I drop it in the box. "wait!" says WordPress, in a screen-covering popup "upgrade to the creator plan to access the theme install features!" I click the only button on the screen. It takes me IMMEDIATELY to a filled out checkout page. WordPress Creator is $300 per year. Per. Year.
I read through the "features included with your purchase" to see things like "sftp/SSH certificates", "github deployments", "free staging site", and "install plugins and themes". All of these were free 5 years ago. "Save 20% by paying for two years!" No, I don't think I will.
Out of pure spite against the demon that is modern capitalism, I'm teaching myself html and css. I would kiss the creator of w3schools on the mouth, right after I kiss the creator of Ubuntu. I'm so angry. The internet is useless now.
5 notes
·
View notes
Text
This is an awesome guide and I want to add a few of my personal choices to it and provide more resources.
Note: I am, by no means, an expert.
Disclaimer: Some of the suggestions below may be missing features you are used to. It's free, roll with it. 😎
Level 1:
Another browser extension you should know about is LibRedirect. With it, you can pass links over to alternative sites to view the content. Be aware that the majority of the alternative sites are run by volunteers and enthusiasts; they don't always work 🙁 Small note: The name "Libre" gets used a lot by privacy-respecting and open source alternatives where previously they might have used "Free" or "Open".
Level 2:
Adobe Alternatives DuckDuckGo uses Bing for results, I also use StartPage for Google results. There is a desktop app for watching Youtube content called FreeTube that I recommend. It's a front-end for YouTube and Invidious servers (which re-stream YouTube content).
Level 3:
AdGuard is fine but if you are setting up a Raspberry Pi anyway, consider Pi-hole as an alternative option.
Level 4:
If, for some strange reason, you disregard the above guide and think that putting AdGuard on your phone is a reasonable alternative to the suggestions here, I would suggest that you DON'T. It may be different now but when I tried it the Android app it asked me to install a certificate. It does this so that it can modify websites you visit to block more ads. The downside is that it also allows them to read everything that would normally be encrypted. They may not be doing anything nefarious with it, but it's a risk I'm not taking. So, if a third-party you don't trust asks you to install a certificate, DON'T.
Level 5:
Awesome Piracy If you don't want to sign up for usenet and prefer to use torrents, get a good VPN and lock the torrent client down to only use the VPN connection. There are torrent tests you can do to see if your IP is exposed. In your VPN client, pick a country where copyright isn't a word! 😉
Level 6:
In addition to ReVanced, I want to also promote the app NewPipe which can be downloaded from the F-Droid store. F-Droid is an app store for your Android phone that hosts open-source apps and tells you every dirty detail of what each app does, privacy-wise. NewPipe is a YouTube alternative/Invidious front-end for Android.
Level 7:
Custom Windows playbooks are awesome and while I don't know Revi very well, but I will definitely check it out! Just browsing the docs I noticed that they default to the Brave browser. This is a personal opinion but I don't trust Brave as much as open-source alternatives. They have tried some interesting attempts at monetization in the past that make me suspect. Use the browser you are comfortable with instead and use a well-known, good adblock like uBlock Origin or uBlock Origin Lite. In addition to Firefox and its derivatives there is also Chromium and Ungoogled-Chromium if you want something familiar to Chrome.
Level 8:
Seriously, use Linux if you can (and if you do, make backups of your important files first!). Ignore Linux users that tell you to use Arch or an Arch derivative, it's not for beginners. When stuff breaks you just have to figure it out. Ubuntu, Mint, and Pop! are great for beginners but if you play games they may not be the most up-to-date for that. (Pop is especially behind at the moment 😭 but I'm hoping that changes soon) I personally use Fedora which is also great for beginners, is very up-to-date, and never gives me problems. However it does require one post-install setup step to replace the media codecs with "non-free" ones to make some media playback situations work. Other than that, it works so well that I actually find it boring compared to the usual amount of tinkering I'm used to! Fedora has two notable derivatives: Nobara, which is slightly tweaked for improved gaming performance and includes the media tweaks, and Bazzite which is similar to SteamOS but for general hardware (it's for gaming-specific setups like handhelds and living room gaming where you need a controller-focused interface).
Level ???:
You can host your own websites (webapps) made by others! I fell down this rabbit hole after Google killed Reader and I found self-hosted RSS alternatives. Later, I set up Docker and now I run dozens of useful webapps for all sorts of things! Try stuff out!
Hopefully this is helpful to someone. Feel free to ask me general questions about any of the above. If you have setup questions or technical issues, please contact the creators of the above projects first, as I can't cover everything everywhere. I try to, though! 😂
In case anyone is curious, I'm a software developer (mostly in web development) with a lot of general IT skills and troubleshooting experience and I spend a lot of my time tinkering with Linux, FreeBSD, self-hosted apps, open-source software, and supporting Windows systems that are all over the place. I have experience going back to MS-DOS, using Linux since the late 90's and have been running Linux as my primary system for over 5 years now (since Valve released Proton).
Thanks for reading!
genuinely wild to me when I go to someone's house and we watch TV or listen to music or something and there are ads. I haven't seen an ad in my home since 2005. what do you mean you haven't set up multiple layers of digital infrastructure to banish corporate messaging to oblivion before it manifests? listen, this is important. this is the 21st century version of carving sigils on the wall to deny entry to demons or wearing bells to ward off the Unseelie. come on give me your router admin password and I'll show you how to cast a protective spell of Get Thee Tae Fuck, Capital
#open source#microsoft windows#linux#self hosted#software#computing#if buying isn't owning then piracy isn't stealing#support small creators whenever possible
67K notes
·
View notes
Text
Beyond the Books: Real-World Coding Projects for Aspiring Developers
One of the best colleges in Jaipur, which is Arya College of Engineering & I.T. They transitioning from theoretical learning to hands-on coding is a crucial step in a computer science education. Real-world projects bridge this gap, enabling students to apply classroom concepts, build portfolios, and develop industry-ready skills. Here are impactful project ideas across various domains that every computer science student should consider:
Web Development
Personal Portfolio Website: Design and deploy a website to showcase your skills, projects, and resume. This project teaches HTML, CSS, JavaScript, and optionally frameworks like React or Bootstrap, and helps you understand web hosting and deployment.
E-Commerce Platform: Build a basic online store with product listings, shopping carts, and payment integration. This project introduces backend development, database management, and user authentication.
Mobile App Development
Recipe Finder App: Develop a mobile app that lets users search for recipes based on ingredients they have. This project covers UI/UX design, API integration, and mobile programming languages like Java (Android) or Swift (iOS).
Personal Finance Tracker: Create an app to help users manage expenses, budgets, and savings, integrating features like OCR for receipt scanning.
Data Science and Analytics
Social Media Trends Analysis Tool: Analyze data from platforms like Twitter or Instagram to identify trends and visualize user behavior. This project involves data scraping, natural language processing, and data visualization.
Stock Market Prediction Tool: Use historical stock data and machine learning algorithms to predict future trends, applying regression, classification, and data visualization techniques.
Artificial Intelligence and Machine Learning
Face Detection System: Implement a system that recognizes faces in images or video streams using OpenCV and Python. This project explores computer vision and deep learning.
Spam Filtering: Build a model to classify messages as spam or not using natural language processing and machine learning.
Cybersecurity
Virtual Private Network (VPN): Develop a simple VPN to understand network protocols and encryption. This project enhances your knowledge of cybersecurity fundamentals and system administration.
Intrusion Detection System (IDS): Create a tool to monitor network traffic and detect suspicious activities, requiring network programming and data analysis skills.
Collaborative and Cloud-Based Applications
Real-Time Collaborative Code Editor: Build a web-based editor where multiple users can code together in real time, using technologies like WebSocket, React, Node.js, and MongoDB. This project demonstrates real-time synchronization and operational transformation.
IoT and Automation
Smart Home Automation System: Design a system to control home devices (lights, thermostats, cameras) remotely, integrating hardware, software, and cloud services.
Attendance System with Facial Recognition: Automate attendance tracking using facial recognition and deploy it with hardware like Raspberry Pi.
Other Noteworthy Projects
Chatbots: Develop conversational agents for customer support or entertainment, leveraging natural language processing and AI.
Weather Forecasting App: Create a user-friendly app displaying real-time weather data and forecasts, using APIs and data visualization.
Game Development: Build a simple 2D or 3D game using Unity or Unreal Engine to combine programming with creativity.
Tips for Maximizing Project Impact
Align With Interests: Choose projects that resonate with your career goals or personal passions for sustained motivation.
Emphasize Teamwork: Collaborate with peers to enhance communication and project management skills.
Focus on Real-World Problems: Address genuine challenges to make your projects more relevant and impressive to employers.
Document and Present: Maintain clear documentation and present your work effectively to demonstrate professionalism and technical depth.
Conclusion
Engaging in real-world projects is the cornerstone of a robust computer science education. These experiences not only reinforce theoretical knowledge but also cultivate practical abilities, creativity, and confidence, preparing students for the demands of the tech industry.
0 notes
Text
Internships for CSE Students in Bangalore: Your Gateway to a Bright Tech Career
Bangalore, India’s tech capital, is a dream destination for Computer Science Engineering (CSE) students seeking top-notch internship opportunities. With a thriving IT ecosystem, the city hosts global tech giants, innovative startups, and renowned research centers, making it the perfect place to gain real-world experience and boost your career.
Why Choose Bangalore for a CSE Internship?
Bangalore is home to some of the world’s biggest IT firms, including Google, Microsoft, Infosys, TCS, Wipro, and IBM, along with a booming startup scene in AI, fintech, cybersecurity, and cloud computing. The city provides a unique platform for students to gain hands-on experience, work on live projects, and interact with industry experts. Interning in Bangalore not only enhances technical skills but also provides valuable networking and job placement opportunities.
Top Domains for CSE Internships in Bangalore
As a CSE student, choosing the right domain can shape your career. Some of the most in-demand fields include:
Software Development & Full Stack Development – Learn web and mobile app development using Java, Python, React, Node.js, and Angular.
Artificial Intelligence & Machine Learning – Work on deep learning, NLP, and data-driven models using TensorFlow, PyTorch, and OpenCV.
Cybersecurity & Ethical Hacking – Gain expertise in network security, penetration testing, and cryptography.
Data Science & Big Data Analytics – Learn data processing and visualization using Python, R, Hadoop, and SQL.
Cloud Computing & DevOps – Work with AWS, Azure, Kubernetes, and Docker for cloud-based solutions.
Blockchain Development – Explore smart contracts, decentralized applications, and cryptocurrency technologies.
IoT & Embedded Systems – Integrate AI with smart devices using Raspberry Pi, Arduino, and edge computing.
Top Companies Offering CSE Internships in Bangalore
Bangalore offers a plethora of internship opportunities at leading MNCs and startups. Some top companies hiring CSE interns include:
Google – Software engineering, AI, and cloud computing internships.
Microsoft – Data science, software development, and cybersecurity.
Amazon – Cloud computing, AI, and big data internships.
Infosys & Wipro – IT services, software development, and machine learning projects.
Flipkart & Swiggy – E-commerce and AI-driven analytics.
Startups like Zerodha, Razorpay, and Freshworks – Cutting-edge technology and innovative solutions.
How to Secure a CSE Internship in Bangalore?
With high competition, securing an internship requires a proactive approach. Here’s how you can improve your chances:
Build a Strong Portfolio – Showcase your coding projects on GitHub, Kaggle, and personal websites.
Master Data Structures & Algorithms – Participate in coding contests on Leetcode, CodeChef, and HackerRank.
Network with Professionals – Attend hackathons, tech meetups, and LinkedIn networking events.
Apply on Job Portals – Use Internshala, LinkedIn, AngelList, and Naukri for internship listings.
Leverage College Placement Cells – Many companies offer internships through campus recruitment.
Benefits of Doing an Internship in Bangalore
Interning in Bangalore offers more than just technical skills. You gain exposure to corporate culture, teamwork, problem-solving, and innovation. Many interns receive pre-placement offers (PPOs), securing full-time jobs even before graduation.
Final Thoughts
A CSE internship in Bangalore can be the stepping stone to a successful tech career. With abundant opportunities in AI, cloud computing, cybersecurity, and software development, students can explore their interests, gain hands-on experience, and build strong industry connections.
0 notes
Text
How to get started with an Atal Tinkering Lab in your school ?

Imagine a space where students can transform their wildest ideas into real-world innovations. That’s the magic of an Atal Tinkering Lab (ATL). Designed to nurture creativity and foster scientific temper, ATLs are becoming a vital part of schools across India. If you’re wondering how to bring this revolutionary lab to your school, you’re in the right place. Let’s dive into the step-by-step process to set up an ATL and empower young minds to dream big.
What Is an Atal Tinkering Lab?
An Atal Tinkering Lab is an initiative by the Atal Innovation Mission (AIM) under NITI Aayog, aimed at creating an environment for innovation and entrepreneurship in schools. These labs provide students with tools and technologies like 3D printers, robotics kits, and electronics to tinker, experiment, and innovate.
Why Should Your School Set Up an ATL?
Encourage Innovation: ATLs cultivate problem-solving and critical thinking skills in students.
Hands-on Learning: Students learn by doing, which is essential for STEM education.
Career Readiness: Exposure to advanced technologies prepares students for future career opportunities.
Community Impact: Your school becomes a hub for local innovation, benefiting students and the community.
Steps to Get Started
1. Understand the ATL Guidelines
Visit the Atal Innovation Mission website to access the official guidelines and eligibility criteria. Ensure your school meets the basic requirements:
Your school must be affiliated with a recognized education board.
You need a minimum space of 1,500–2,000 sq. ft. to set up the lab.
The school should show a commitment to fostering innovation.
2. Apply for the ATL Grant
The Government of India provides a grant of INR 20 lakhs over five years to approved schools. Here’s how to apply:
Go to the AIM website and fill out the online application form.
Provide detailed information about your school, infrastructure, and vision for the ATL.
Submit supporting documents such as your school’s affiliation certificate, building layout, and commitment letter.
3. Prepare the Infrastructure
Once your application is approved, focus on setting up the physical space:
Allocate a well-lit, ventilated room measuring at least 1,500 sq. ft.
Ensure the space has basic amenities like electricity, internet connectivity, and storage facilities.
Design the lab to foster creativity with flexible seating and display areas.
4. Procure Equipment
The ATL grant includes funds for purchasing equipment. Make a list of essential tools, such as:
3D Printers for prototyping.
Robotics Kits to explore automation.
Electronics Development Boards like Arduino and Raspberry Pi.
Tools and Consumables for crafting and experimentation.
Collaborate with vendors listed on the AIM website to ensure quality and compliance.
5. Hire and Train Staff
Select passionate teachers or staff to manage the lab. Provide them with training on using ATL equipment and mentoring students. AIM often conducts workshops and webinars to upskill ATL coordinators.
6. Engage Students
Organize workshops, hackathons, and challenges to spark interest among students. Encourage them to participate in initiatives like ATL Marathons and Innovation Challenges to showcase their ideas.
7. Collaborate with Mentors and Industry Experts
Build a network of mentors, including engineers, scientists, and entrepreneurs, to guide students. Partner with local industries and universities for technical support and funding.
8. Monitor and Evaluate
Use AIM’s monitoring tools to track the lab’s performance. Regularly assess:
The number of projects developed.
Student participation and engagement.
Feedback from teachers and mentors.
Tips for Sustaining the ATL
Involve the Community: Host open houses to showcase student projects to parents and local stakeholders.
Secure Additional Funding: Seek sponsorships or grants from private organizations to expand your lab.
Promote Peer Learning: Encourage students to share knowledge and work on collaborative projects.
0 notes
Text
25 października 2024

◢ #unknownews ◣
Zapraszam do lektury dzisiejszego zestawienia.
Pobierz raport "Jak pracować, by nie żałować? Pokolenia X, Y, Z o dopasowaniu do pracy" od firmy Just Join IT, która jest sponsorem tego wydania newslettera.
1) Solarna i samodzielnie hostowana strona WWW na Raspberry Pi https://dri.es/my-solar-powered-and-self-hosted-website INFO: Autor postanowił postawić własny serwer webowy na Raspberry Pi Zero 2, hostować na nim swoją stronę internetową i zasilać całość energią słoneczną. Artykuł opisuje, jak to wszystko działa i jakie problemy pojawiły się przy realizacji tego rodzaju przedsięwzięcia.
2) System rozdający czapki - bazujący na AI, DIY https://dropofahat.zone/ INFO: Kolejny z serii dziwnych pomysłów "zrób to sam". Tym razem autor pokazuje, w jaki sposób z użyciem sztucznej inteligencji (rozpoznawanie obrazu z kamery), Raspberry Pi, sterownika Adafruit i kilku linii kodu zbudował urządzenie zrzucające na przechodniów czapki z okna. Nie pytaj, w jakim celu. Skup się na interesującej implementacji tego pomysłu.
3) Nagrania z konferencji Oh My Hack 2023 (31 filmów) https://www.youtube.com/playlist?list=PLnKL6-WWWE_W9ChomFoIYUe0R2e6KI5cc INFO: Już za miesiąc rusza kolejna edycja OMH, czyli konferencji dla wielbicieli tematyki cybersecurity. Ta playlista to kolekcja wystąpień z ubiegłorocznej edycji. Jeśli lubisz posłuchać o błędach w bezpieczeństwie, o pentestach, o atakach socjotechnicznych itp., to znajdziesz tutaj coś dla siebie.
4) Jak korzystam z gita? - ciekawy workflow https://registerspill.thorstenball.com/p/how-i-use-git INFO: Artykuł opisuje podejście do pracy z Gitem oparte na 12-letnim doświadczeniu autora w małych zespołach programistycznych. Autor dzieli się swoimi preferencjami, dotyczącymi użycia interfejsu CLI, aliasów w Git oraz zasadami organizowania commitów i pull requestów, z naciskiem na zrozumiałość, odwracalność i możliwość debugowania commitowanych zmian.
5) Dlaczego ta strona jest tak szybka!? - analiza (film 14m) https://www.youtube.com/watch?v=-Ln-8QM8KhQ INFO: Analiza dość starej strony internetowej McMaster Carr i technik, które stosują, aby strona ta by��a niesamowicie szybka. Wygląd strony nie zachwyca, ale szybkość jej działania może być imponująca. Autor analizuje wszystkie zabiegi, które zostały zastosowane w celu osiągnięcia takiego działania.
6) Workspaces - inspirujące stanowiska pracy https://www.workspaces.xyz/ INFO: Serwis gromadzi biurka wraz z wyposażeniem, przy których pracują głównie osoby z branży IT. Wszystkie one wyglądają skrajnie 'instagramowo', ale tym się nie przejmuj. Warto za to zwrócić uwagę na to, jak zaprojektowane są te miejsca pracy, jakie gadżety zostały użyte do ich aranżacji i jak to wszystko zostało złożone w całość.
7) Jak pracować, by nie żałować? (PDFF, 76 stron) – raport [sponsorowane] https://rocketjobs.pl/jakpracowacbyniezalowac/?utm_source=newsletter&utm_medium=social-jjit&utm_campaign=jakpracowacbyniezalowac-influ-jm INFO: Sprawdź, co jest dziś najważniejsze dla polskich pracowników, jak oceniają swój poziom dopasowania do pracy. Co dla różnych pokoleń oznacza "dobry zawód"? Co myślą o swojej przyszłości zawodowej i czy osiągnęłi to, co zaplanowali?
8) Trusted computing to ograniczenia wyboru i zagrożenia dla użytkowników? https://www.ciemnastrona.com.pl/cyfrowy_feudalizm/2024/10/22/trusted-computing-kajdany INFO: Trusted computing brzmi jak coś naprawdę pozytywnego dla użytkownika. Istnieje jednak druga strona medalu. Dzięki tej koncepcji duże korporacje mogą ograniczać wolność swoich użytkowników. Autor szczegółowo opisuje działanie takich mechanizmów jak szyfrowanie HTTPS, secure boot czy DRM, wskazując na różnice między teoretyczną ochroną i podnoszeniem bezpieczeństwa a praktycznymi zagrożeniami dla wolności użytkowników.
9) Walka z banem Discorda w Turcji i wyzwania związane z VPN https://blog.orhun.dev/cant-trust-any-vpn/ INFO: Autor opowiada o swoich doświadczeniach po zablokowaniu dostępu do Discorda w całej Turcji. Autor walczył z blokadami DNS, posługiwał się VPN-em i stawiał nawet swoją konfigurację opartą na OpenVPN. Użyteczna wiedza na wypadek blokady dostępu do niektórych usług w Twojej firmie czy kiedyś... w naszym kraju.
10) Chrome umożliwi Ci prostsze debugowanie błędów w JavaScript https://typefully.com/uwteam/chrome-i-debugowanie-javascript-z-ai-5mVTxpg INFO: Od pewnego czasu w przeglądarce Chrome (i nie chodzi tutaj o silnik Chromium!) obecny jest moduł łączący konsolę JavaScript ze sztuczną inteligencją Gemini AI. Możesz wybrać dowolny z błędów i wysłać go do analizy, aby dowiedzieć się, co jest jego przyczyną i jak dałoby się go naprawić. Artykuł omawia, jak aktywować u siebie tę funkcję i jak z niej korzystać.
11) Inflacja nazw stanowisk w branży IT i jej konsekwencje https://www.trevorlasn.com/blog/software-engineer-titles-have-almost-lost-all-their-meaning INFO: Czym jest "Senior Software Engineer"? To oczywiście osoba z ogromnym doświadczeniem w wytwarzaniu oprogramowania, prawda? No właśnie, niekoniecznie. Obecnie przejście na stanowisko seniorskie nie jest wielkim wyczynem i znaczenie takich nazw jak "senior" niewiele mówi o poziomie wiedzy i doświadczenia pracownika. Autor przedstawia możliwe rozwiązania tego problemu. Artykuł do przemyślenia.
12) Obracanie grafik wektorowych jest już możliwe - rozwiązanie od Adobe https://www.creativebloq.com/design/adobes-new-image-rotation-tool-is-one-of-the-most-impressive-ai-concepts-weve-seen INFO: Do tej pory wektorowe grafiki 2D były (jak wskazuje ich nazwa) zupełnie płaskie i niemożliwe było ich obrócenie tak, aby np. postać stanęła nagle bokiem. Od czego mamy jednak sztuczną inteligencję, która umie sobie wyobrazić, jak dana grafika mogłaby wyglądać po wykonaniu obrotu czy po pochyleniu? Project Turntable od Adobe pozwala na obracanie grafiki 2D w przestrzeni 3D, zachowując jej pierwotny wygląd z każdego kąta. Imponujące.
13) Nowa strategia dla nowej organizacji - rozwój firm (film, 45m) https://www.youtube.com/watch?v=RreiK1p9Dic INFO: Wykład profesora Piotra Płoszajskiego na SGH sprzed ponad 8 lat. Nie jest on bezpośrednio związany z branżą IT, ale wspomina o tak wielu firmach z tego sektora, o ich rozwoju i o zawirowaniach na rynku, jakie one spowodowały, że warto posłuchać. Interesujące wystąpienie. Zawiera ono także kilka przewidywań na temat przyszłości branży technologicznej - posłuchaj, aby zdecydować, czy profesor miał rację.
14) Podatność JSON Injection i ataki na API https://danaepp.com/attacking-apis-using-json-injection INFO: Czy wiesz, czym jest atak wstrzyknięcia JSON-a i dlaczego systemy sprawdzające dane dostarczane w tym formacie są na niego podatne? Autor prezentuje przykład tego ataku na Samsung Smart Hub, gdzie możliwa była realizacja ataku kończącego się wykonaniem kodu na urządzeniu. Artykuł dla fanów bezpiecznego programowania i pentestingu.
15) Scramble - alternatywa open-source dla Grammarly https://github.com/zlwaterfield/scramble INFO: Aplikacja Scramble to open-source'owe rozszerzenie do przeglądarki Chrome, które wykorzystuje sztuczną inteligencję (podajesz swój klucz API) do ulepszania tekstów bezpośrednio w przeglądarce, oferując tym samym bardziej konfigurowalną alternatywę dla Grammarly. Użytkownik może wybrać preferowanego dostawcę modelu LLM, a także konkretny model. W przeciwieństwie do Grammarly rozszerzenie może wykonywać dowolne operacje na tekście, czyli np. nie tylko poprawiać ortografię czy gramatykę, ale także upraszczać tekst czy zamieniać jego formę na inną.
16) Galeria komponentów UI https://component.gallery/ INFO: Biblioteka gotowych do użycia, często wykorzystywanych komponentów webowych. Dzięki tej kolekcji nie będziesz wymyślać koła na nowo, a budując nowy projekt, po prostu użyjesz gotowca.
17) LAN 2.5G - rewolucja w sieciach lokalnych? (film, 9m) https://www.youtube.com/watch?v=JddO_t9QJoM INFO: Dlaczego nowym, popularnym standardem w sieciach komputerowych po 1 Gbps staje się standard 2,5 Gbps? Dlaczego nie 10 albo 5? Z czego wynika chęć wielu użytkowników na przejście właśnie na ten standard? Tego dowiesz się z filmu.
18) GenAI uczyni z Ciebie lepszego programistę? - niestety, nie zawsze... https://slopwatch.com/posts/bad-programmer/ INFO: Artykuł analizuje wpływ korzystania z kodu generowanego przez AI na umiejętności programistów i ich rozwój zawodowy. Autor prezentuje mocno sceptyczne podejście do wykorzystania rozwiązań AI w programowaniu. Czy naprawdę czeka nas degradacja poziomu tworzonego kodu i uzależnienie od technologii AI?
19) Busy Status Bar - fizyczny gadżet pokazujący Twoją zajętość? https://busy.bar/ INFO: Nowe, ciekawe urządzenie od twórców słynnego 'Flippera Zero', ale tym razem związane z produktywnością, a nie z branżą security. Urządzenie (po integracji z systemem operacyjnym) automatycznie informuje Twoich kolegów, gdy siedzisz na callu, odlicza 'pomidorki', gdy pracujesz metodą Pomodoro i robi za klasyczny timer, a wszystko to działa na Windows/Mac/Linux. Tanie nie jest, ale za to, jakie geekowe!
20) JS13kgames 2024 - najlepsze prace https://js13kgames.com/2024/blog/winners-announced INFO: Jak co roku, tak i teraz, odbyło się wyzwanie polegające na stworzeniu najciekawszej gry napisanej w JavaScript, a mieszczącej się w 13 KB (spakowane źródła wraz z grafikami, dźwiękami itp.). Na stronie znajdziesz finalistów. Niektóre z nominowanych prac są naprawdę wciągające.
21) Przewodnik po samodzielnym hostowaniu Llama 3.2 z użyciem Coolify https://geek.sg/blog/how-i-self-hosted-llama-32-with-coolify-on-my-home-server-a-step-by-step-guide INFO: Artykuł opisuje proces samodzielnego hostowania modelu LLM Llama na serwerze domowym przy użyciu platformy Coolify oraz integrację z nim za pomocą API dzięki narzędziu Ollama. Dobry poradnik dla wszystkich chcących pobawić się w samodzielne hostowanie modeli językowych.
22) Znaki niewidoczne dla ludzi, a zrozumiałe dla AI? https://arstechnica.com/security/2024/10/ai-chatbots-can-read-and-write-invisible-text-creating-an-ideal-covert-channel/ INFO: Artykuł opisuje wykorzystanie specyficznych znaków Unicode do ukrywania informacji w komunikacji z chatbotami opartymi na dużych modelach językowych (LLM). Znaki te mogą być używane do wstrzykiwania złośliwych instrukcji, które następnie LLM zinterpretuje. W artykule znajdziesz narzędzie ASCII Smugglera, które ułatwi Ci przetestowanie tej podatności. Sam sprawdzałem, jak to działa, i faktycznie, popularne LLMy wykonują ukryte instrukcje.
23) Bashhub - agregator historii basha https://bashhub.com/ INFO: Pracujesz na dziesiątkach serwerów i chcesz, aby historia poleceń była po pierwsze nieograniczona, a po drugie współdzielona między nimi i łatwo przeszukiwalna? To jest aplikacja, której potrzebujesz. Wiem, że nazwa projektu sugeruje inaczej, ale to rozwiązanie działa także z powłokami ZSH i FISH.
24) Nowe podejścia do warstw abstrakcji w UI https://nerdy.dev/headless-boneless-and-skinless-ui INFO: Artykuł przedstawia humorystyczny przegląd nowych podejść do warstwowych abstrakcji w interfejsach użytkownika, takich jak 'headless', 'boneless', 'skinless' i 'lifeless' UI. Autor analizuje, jak te koncepcje umożliwiają elastyczność w tworzeniu aplikacji. Przykłady z kodem i lista odpowiednich bibliotek ilustrują, jak deweloperzy mogą efektywnie wykorzystać te strategie w praktyce. Jeśli wymienione wcześniej określenia nic Ci nie mówią, to warto rzucić okiem na ten tekst.
25) TikTok został zaprojektowany, aby uzależniać? https://techspresso.cafe/2024/10/15/260-filmikow-tyle-wystarczy-aby-uzaleznic-sie-od-tiktoka/ INFO: TikTok świadomie wykorzystuje swój algorytm do uzależniania użytkowników? Czy platforma celowo ignoruje swój negatywny wpływ na zdrowie psychiczne młodzieży, promując nieosiągalne standardy urody i potencjalnie szkodliwe treści? Kilkanaście amerykańskich stanów złożyło pozwy przeciwko TikTokowi, zarzucając firmie przedkładanie zysków nad bezpieczeństwo młodych użytkowników.
26) Dlaczego /tmp może być problematycznym miejscem na pliki tymczasowe? https://dotat.at/@/2024-10-22-tmp.html INFO: Artykuł omawia liczne problemy związane z używaniem katalogu /tmp do przechowywania tymczasowych plików, wskazując np. na zagrożenia bezpieczeństwa wynikające z jego globalnego i modyfikowalnego charakteru. Opisuje także historyczne próby rozwiązania tych problemów oraz analizuje wady i zalety alternatywnych podejść. Okazuje się, że temat katalogu na pliki tymczasowe to nie jest taka trywialna sprawa w środowisku wieloużytkownikowym.
27) Gitbot - szybszy code review kodu w integracji ze Slackiem? https://gitbot.app INFO: To aplikacja umożliwiająca dwukierunkową integrację między repozytorium kodu a Slackiem. Dzięki temu oczekiwanie na review kodu nie będzie trwało wieki, a ważne pull requesty nie przepadną niezauważone. Rozwiązanie jest darmowe w użyciu dla zespołów do 50 programistów.
28) Równoległe życie znanych osób - wizualizacja https://janwillemtulp.github.io/parallel-lives INFO: Czy Kleopatra mogła znać Marka Antoniusza? Czy Paweł Apostoł mógł być kolegą Seneki Młodszego? Czy Marco Polo byłby w stanie spotkać Władysława II Jagiełłę? Ta prosta aplikacja pozwala na prezentację w przyjaznej formie, kto ze znanych osób żył w jakich czasach. Obejmuje zakres od 3345 B.C. do 2018 A.D. Wrzucam jako ciekawostkę.
29) Koszty utrzymania projektu open source i jego dochody - Spliit https://spliit.app/blog/spliit-by-the-stats-usage-costs-donations INFO: Wpis na blogu przedstawia szczegółowe informacje o projekcie Spliit (dzielenie się kosztami/wydatkami w gronie znajomych). Co konsumuje najwięcej kosztów? Skąd pochodzą wpływy i ile ich jest? Ilu użytkowników ma projekt? Interesująca lektura dla osób planujących ruszyć z własnym projektem i chcących oszacować jego potencjalne koszty. Na dochody nie ma co patrzeć, bo projekt utrzymuje się z datków.
30) Zastosowanie funkcji min() w CSS w kontekście responsywności https://smashingmagazine.com/2024/10/css-min-all-the-things/ INFO: Artykuł opisuje eksperymenty z funkcją min(), badając jej elastyczność w użyciu różnych jednostek dla osiągnięcia responsywności w aplikacji webowej. Autor przedstawia zalety funkcji min(), jej zdolność do podejmowania inteligentnych decyzji w kontekście elementu, a także potwierdza możliwość zastąpienia nią (w pewnych sytuacjach) bardziej skomplikowanych media queries.
31) Polska mafia hazardowa internetu (film, 2h) https://www.youtube.com/watch?v=GRUtsOB7Cvc INFO: Tego filmu raczej nie trzeba przedstawiać, bo w ciągu ostatnich kilku dni przebił on już 3 miliony wyświetleń. Konopski w swoim nowym 'dokumencie' omawia, jak znani youtuberzy naciągają (głównie dzieciaki) na scamy będące formą hazardu online. Warto zobaczyć, zwłaszcza jeśli masz swoje dzieci lub masz wpływ na to, co nastolatkowie oglądają w internecie.
32) Etymologia słowa 'daemon' i jego wykorzystanie w informatyce https://www.takeourword.com/TOW146/page4.html INFO: W Linuksie mamy "daemony" działające w tle. Skąd akurat taka nazwa? Dlaczego nie "serwisy", albo po prostu "usługi"? Słyszałem już kilka wyjaśnień pochodzenia tej nazwy. Artykuł przedstawia dyskusję e-mailową dotyczącą pochodzenia słowa "daemon", która jest zaskakująca.
33) Niemieckie służby demaskują darknetowych przestępców - jak?! (film, 19m) https://youtu.be/3IqEgmFTark?si=5Q3MwmHvAcEFiUqO INFO: Niedawno świat online obiegła wiadomość, że niemiecka policja zdeanonimizowała przestępców korzystających z sieci TOR. W jakiś sposób udało się ich namierzyć, i to nawet pomimo tego, że korzystali z teoretycznie zapewniającej anonimowość sieci. Czy TOR-owi już nie można ufać? Więcej w filmie.
34) Współbieżność vs równoległość w kontekście programowania https://medium.com/p/20a22fd98995 INFO: Artykuł wyjaśnia różnicę między współbieżnością a równoległością, kluczowymi koncepcjami w programowaniu, które mogą znacząco wpływać na wydajność tworzonych aplikacji. Autor używa ciekawej metafory kawiarni, porównując baristów do wątków w programie, aby zobrazować sposób zarządzania i wykonywania wielu zadań jednocześnie.
35) Darmowe aplikacje dla Maca - katalog https://www.thriftmac.com/ INFO: Przegląd darmowych aplikacji dla MacOS z podziałem na kategorie. Od animacji, przez edycję zdjęć, aż po zarządzanie zadaniami. Każda z aplikacji posiada krótki opis. Dobre miejsce startowe dla osób chcących poznać nowy soft oraz dla tych, którzy niedawno stali się posiadaczami Maca.
36) Firefox i Tor browser dotknięte krytyczną luką - ocena 9.8/10 (film, 5m) https://www.youtube.com/watch?v=2RmUMmUj3u8 INFO: W ostatnim czasie pojawiały się luki w silniku Chromium. Całe szczęście, że Ty korzystasz z Firefoxa. No to czas na zmianę. Firefox też zaliczył wpadkę. Fireship w zabawny sposób omawia, o co chodziło z tą luką i jak ona dokładnie działała.
37) Porównanie wydajności MillionJS vs React https://blog.openreplay.com/a-million-times-faster--millionjs-vs-react/ INFO: Artykuł porównuje dwie biblioteki JavaScript, React i Million.js, pod kątem ich funkcji i metryk wydajnościowych. Skupia się na aspektach takich jak prędkość renderowania, czas startu aplikacji, wykorzystanie pamięci oraz czas od startu aplikacji do interakcji. Czy Million naprawdę jest tak szybki, jak go reklamują?
== LINKI TYLKO DLA PATRONÓW ==
38) Kolekcja "awesome list" i projektów, do których się odwołują https://uw7.org/un_3384d42b77629 INFO: Prawdopodobnie znasz koncepcję repozytoriów "Awesome XYZ" na Githubie. Są to repozytoria gromadzące wiedzę/linki z konkretnego zagadnienia. Ten projekt nie tylko gromadzi te repozytoria, ale także zlicza, które z projektów są przez nie najczęściej linkowane oraz które repo mają w sobie największe zbiory danych.
39) Namierzanie adresu IP serwera ukrytego za WAF-em https://uw7.org/un_5e7db32b58e92 INFO: Jeśli podatna aplikacja webowa zostanie ukryta za Web Application Firewallem, to pierwszym celem hakera jest najczęściej obejście tej warstwy zabezpieczeń. Tylko jak to zrobić i jak namierzyć oryginalne IP? W artykule znajdziesz trzy metody na osiągnięcie tego celu. Krótka lektura dla pasjonatów pentestingu.
0 notes
Link
0 notes
Text
they’re flirting ❤️

i need to feel a man’s beard stubble on my neck rn immediately
#stream#my neck was made so crooked for a man to use it as a chin rest#it’s actually bc i’ve awful posture#ALSKALSKASASLASKLSL#i’m literally a goblin all hunched over computers#i’ve separated me ‘office’ on my table w those ikea peg boards that stand & its nice but i’ve been playing w the raspberry pi so there’s#fucking cords & hardware everywhere#teeny tiny screws girl mess#i can’t get any work done i just ripped apart a monitor box so i can use the inside bc it’s a nice box#so now that’s away bc i can’t stop fiddling w it it’s so bad#like bro why do u have a compute coming#to host a website & as an external hard drive & also start learning how to code i want to make the camera work & also start ip scanning idk#i think it’ll be fun
14 notes
·
View notes
Text
I wish I could properly explain to people the difference between a centralized website and a site hosting service.
Because people seem to think that Tumblr (a centralized website) is a web hosting service; which no it's not, even though it lets you pay for your own domain this is just another way they monetized personalization.

^ It's kind of like this, on one hand you have a site hosting service; typically they let you host a free website up to a specific data cap. Then you could pay to have more on your site, but this is hardly necessary for a lot of reasons. All the Host really does is more or less provide you a domain with which you can have your own website.
Meanwhile a centralized website is going to have everything enclosed within it. You have no power over the whole of it because you merely have an account on it; you have a profile not a website.
The Centralized Web operates on account based systems; Centralized sites don't allow users to have any say in the way the website is ran. The people in control of the site as a whole are the overarching owners of the website itself.
A good hosting service will give you plenty of freedom in how you want to run your site. You're free to create a website for whatever you want, that functions however you want. More often than not these websites connect to one another via webrings; which are essentially dedicated pages on each site that have buttons or links to one another. Think of it similar to having mutuals, on my personal website I have a page dedicated to webrings I'm a part of; but some people simply are a part of a single webring and list out the other users of the webring on their site so you can access them that way.
This means there's users across different hosting services who are in the same webring. I am in a webring with someone from a hosting service, and another user who runs their own site off a raspberry pi. It doesn't matter because just like how I could link you a youtube video right now, I can link you any website from any hosting service and it doesn't matter that they're not a part of tumblr; likewise they could link right back to this post on their website; that would count as a sort of webring.
More often than not Webrings are for communities, but they can also be for smaller groups.
Much of the decentralized web is called the "Indie Web" but it's honestly no different from how much of the old web used to be. The idea of the indie web is insane to me because it never used to be classified as such. It was just THE web, now it's hard to find people who don't use something like Facebook, Tumblr, Twitter, Instragram; or some other centralized website rather than having their own homepage. I cannot tell you how freeing it was for me to make my own homepage, a place I felt like I could actually just have for myself and create as I wanted to. It's the first thing I see when I access the internet, and it has all the links I personally like to use rather than needing to have a bookmark bar or anything else. I often blog there, I have a few shrines where I talk about stuff I like; and I have a small but growing collection of my favorite 88x31s on there as well.
Being part of the indie web has taken me back to a time when people were allowed to be themselves without having to pay for it, where monetization wasn't everywhere. Why the hell do I have to pay for discord themes? Why should I have to pay for a website to be a slightly different color?
The web is yours. It's mine, it's ours. Don't let companies tell you otherwise.
1 note
·
View note
Text
does making a vpn with raspberry pi
🔒🌍✨ Get 3 Months FREE VPN - Secure & Private Internet Access Worldwide! Click Here ✨🌍🔒
does making a vpn with raspberry pi
Raspberry Pi VPN setup
Title: Setting Up a VPN on Raspberry Pi: A Comprehensive Guide
In today's digital age, ensuring online privacy and security is paramount. One effective way to achieve this is by setting up a Virtual Private Network (VPN). While there are numerous commercial VPN services available, building your VPN using a Raspberry Pi can offer both flexibility and control over your network.
Why Choose Raspberry Pi for VPN?
Raspberry Pi, a low-cost, credit card-sized computer, is an excellent choice for hosting a VPN server. Its affordability and energy efficiency make it an attractive option for individuals and small businesses looking to establish a secure connection without breaking the bank.
Step-by-Step Setup Process:
Gather Your Materials: You'll need a Raspberry Pi board (such as Raspberry Pi 4), a microSD card, power supply, and an ethernet cable.
Install Operating System: Download and install Raspberry Pi OS (formerly Raspbian) on the microSD card using a tool like Etcher.
Update and Upgrade: Once booted, run sudo apt update and sudo apt upgrade to ensure your system is up to date.
Install VPN Software: Several VPN server software options are compatible with Raspberry Pi, including OpenVPN and PiVPN. Follow the installation instructions provided by your chosen software.
Configuration: Configure your VPN server settings, including encryption protocols, authentication methods, and user credentials.
Port Forwarding: If you want to access your VPN server from outside your local network, configure port forwarding on your router to redirect traffic to your Raspberry Pi's IP address.
Connect and Test: Connect your devices to the VPN server using the provided client software or native VPN settings. Test the connection to ensure everything is working correctly.
Conclusion:
Setting up a VPN on Raspberry Pi is a cost-effective and customizable solution for safeguarding your online activities. By following these steps, you can establish a secure connection and enjoy peace of mind knowing your data is protected. Whether you're browsing the web, accessing sensitive information, or connecting to public Wi-Fi networks, a Raspberry Pi VPN provides an extra layer of security.
DIY VPN with Raspberry Pi
Title: Building Your Own VPN with Raspberry Pi: A Step-by-Step Guide
In today's digital age, privacy and security are paramount concerns. With the increasing threats of hacking and surveillance, many individuals are turning to Virtual Private Networks (VPNs) to safeguard their online activities. While there are numerous VPN services available, some users prefer to create their own VPN for added control and customization. One popular method is using a Raspberry Pi, a versatile and affordable single-board computer.
Here's a step-by-step guide on how to set up your own VPN using Raspberry Pi:
Gather Your Materials: To get started, you'll need a Raspberry Pi board (such as Raspberry Pi 4), a microSD card, power supply, and an Ethernet cable.
Install Raspbian OS: Begin by installing the Raspbian operating system on your Raspberry Pi. You can download the latest version of Raspbian from the official website and flash it onto the microSD card using software like Etcher.
Configure Raspberry Pi: Once Raspbian is installed, boot up your Raspberry Pi and configure it according to your preferences. Make sure to enable SSH for remote access.
Install VPN Software: Next, you'll need to install VPN server software on your Raspberry Pi. OpenVPN is a popular choice for its robust security features and ease of use. Follow the installation instructions provided by the OpenVPN documentation.
Generate Certificates: After installing OpenVPN, generate the necessary certificates and keys for authentication. These certificates will ensure secure communication between your devices and the VPN server.
Configure OpenVPN: Edit the OpenVPN configuration files to customize your VPN settings, including server IP address, port, encryption method, and authentication details.
Start VPN Server: Once everything is configured, start the OpenVPN server on your Raspberry Pi. You can do this via the command line interface using the 'sudo systemctl start openvpn@server' command.
Connect Devices: Finally, connect your devices to the newly created VPN server using OpenVPN client software. Enter the server's IP address and credentials, and you're ready to browse the internet securely and privately.
By following these steps, you can create your own VPN with Raspberry Pi, giving you greater control over your online privacy and security. So why wait? Take charge of your digital life today!
Raspberry Pi VPN server
A Raspberry Pi VPN server is a cost-effective and convenient way to set up your own virtual private network. Running a VPN server on a Raspberry Pi allows you to securely connect to your home network while you're away or encrypt your internet connection when using public Wi-Fi.
Setting up a Raspberry Pi VPN server is relatively easy and requires minimal hardware and software. You'll need a Raspberry Pi board, a microSD card with Raspbian or another compatible operating system, and an internet connection. There are several open-source VPN server software options available for Raspberry Pi, such as OpenVPN, PiVPN, and WireGuard.
To set up a VPN server on your Raspberry Pi, you'll first need to install and configure the VPN software of your choice. You'll then need to forward the necessary ports on your router to allow external connections to your VPN server. After configuring client devices to connect to your VPN server, you can enjoy a secure and private connection to your home network from anywhere in the world.
Using a Raspberry Pi as a VPN server is a great way to enhance your online privacy and security without breaking the bank. Whether you need to access sensitive information remotely or simply want to protect your internet traffic from prying eyes, a Raspberry Pi VPN server can help you achieve your goals effectively and affordably.
Building VPN on Raspberry Pi
If you are looking to enhance your online privacy and security, setting up a VPN on your Raspberry Pi can be a great solution. A VPN, or Virtual Private Network, encrypts your internet connection and routes it through a server to hide your IP address and protect your data from prying eyes.
To build a VPN on your Raspberry Pi, you will need to start by installing a VPN server software such as OpenVPN. OpenVPN is a popular choice for setting up a secure VPN connection and offers strong encryption protocols for maximum security.
Once you have installed the OpenVPN software on your Raspberry Pi, you will need to configure it to create certificates and keys to secure the connection. This process involves generating a server certificate, a client certificate, and a key for authentication.
Next, you will need to set up port forwarding on your router to allow external connections to reach your Raspberry Pi VPN server. This step is crucial to ensure that your VPN can be accessed from outside your local network.
Finally, you will need to configure the VPN client on your devices to connect to your Raspberry Pi VPN server. This typically involves importing the client certificate and key and setting up the connection details on your device.
By following these steps, you can build a VPN on your Raspberry Pi to enhance your online security and privacy. Remember to keep your software up to date and choose strong encryption protocols to ensure the highest level of protection for your data.
Raspberry Pi VPN configuration
Title: Setting Up a VPN on Raspberry Pi: A Comprehensive Guide
In today's digital landscape, ensuring online privacy and security is paramount. One effective way to achieve this is by setting up a Virtual Private Network (VPN). While there are numerous VPN services available, configuring a VPN on your Raspberry Pi can provide an affordable and customizable solution. Here's a comprehensive guide on how to configure a VPN on your Raspberry Pi.
Choose the Right VPN Protocol: Before diving into the configuration process, decide which VPN protocol you want to use. OpenVPN is a popular choice due to its robust security features and flexibility.
Install OpenVPN: Start by updating your Raspberry Pi's software to ensure you have the latest packages. Then, install the OpenVPN software by running the appropriate commands in the terminal.
Set Up Configuration Files: Generate configuration files for your VPN server using the EasyRSA tool included with OpenVPN. These files contain the necessary cryptographic keys and settings for establishing a secure connection.
Configure OpenVPN Server: Once you have the configuration files, configure the OpenVPN server by editing the server configuration file. Customize settings such as port number, protocol, and encryption to suit your preferences.
Create Client Profiles: Generate client profiles for each device that will connect to the VPN. These profiles include the necessary configuration settings for establishing a secure connection.
Transfer Configuration Files: Transfer the server and client configuration files to their respective devices. Ensure that the files are securely transferred to prevent unauthorized access.
Start the VPN Server: Start the OpenVPN server on your Raspberry Pi using the systemctl command. Monitor the server logs to ensure everything is functioning correctly.
By following these steps, you can configure a VPN on your Raspberry Pi to enhance your online privacy and security. Whether you're browsing the web, accessing sensitive information, or connecting to public Wi-Fi networks, a VPN provides an added layer of protection for your data.
0 notes
Text
can you run pihole and vpn server on the same
🔒🌍✨ Get 3 Months FREE VPN - Secure & Private Internet Access Worldwide! Click Here ✨🌍🔒
can you run pihole and vpn server on the same
Running PiHole and VPN server together
Running PiHole and a VPN server simultaneously can provide enhanced privacy and security for your internet browsing experience. PiHole is a popular network-wide ad blocker that functions at the DNS level, blocking ads and tracking domains before they even reach your devices. On the other hand, a VPN (Virtual Private Network) encrypts your internet connection, ensuring that your online activities remain private from prying eyes.
Combining PiHole with a VPN server allows you to block ads and trackers while also encrypting your internet traffic, doubling down on your protection against online threats. By routing your DNS requests through PiHole and your internet traffic through the VPN server, you create a comprehensive shield against invasive ads, malicious websites, and potential data breaches.
Setting up PiHole and a VPN server together requires some technical know-how, but there are numerous guides and tutorials available online to assist you through the process. Typically, you would install PiHole on a dedicated device or a Raspberry Pi, configure it to act as your DNS server, and then set up the VPN server using software like OpenVPN or WireGuard.
Once both PiHole and the VPN server are up and running, you can connect your devices to the VPN to encrypt your internet traffic and enjoy ad-free browsing simultaneously. This setup not only protects your privacy and security but also improves your overall internet experience by reducing the clutter of intrusive ads and speeding up webpage loading times.
In conclusion, running PiHole and a VPN server together offers a powerful combination of privacy, security, and ad-blocking capabilities. With a bit of setup effort, you can enjoy a safer and more enjoyable online experience for all your devices.
PiHole and VPN server compatibility
PiHole and VPN server compatibility is a topic of interest for many users who value both online privacy and network security. PiHole is a popular open-source network-level ad blocker that functions as a DNS sinkhole, effectively blocking advertisements and unwanted content across all devices connected to the network. On the other hand, a VPN server allows users to establish a secure and encrypted connection to the internet, ensuring that their online activities remain private and protected from prying eyes.
When it comes to using PiHole and a VPN server simultaneously, compatibility is a key consideration. Fortunately, PiHole and VPN server software can work together seamlessly to enhance your online experience. By configuring your devices to first connect to the VPN server and then route their DNS requests through the PiHole, you can enjoy the benefits of both services without any conflicts.
One of the main advantages of combining PiHole with a VPN server is the additional layer of security and privacy it offers. With ads and trackers blocked by PiHole, and your internet traffic encrypted by the VPN, you can browse the web with peace of mind, knowing that your personal information is being safeguarded.
In conclusion, PiHole and VPN server compatibility is not only achievable but also highly recommended for users looking to enhance their online security and privacy. By leveraging the strengths of both tools, you can create a robust defense against online threats while enjoying an ad-free browsing experience.
Hosting PiHole and VPN server concurrently
Hosting a PiHole and VPN server concurrently offers a robust solution for enhancing privacy and security online. PiHole, a network-wide ad blocker, effectively filters out unwanted ads and trackers at the DNS level, while a VPN (Virtual Private Network) encrypts internet traffic, safeguarding it from prying eyes.
Combining these two services on the same server not only optimizes resource utilization but also streamlines management. By leveraging a single machine for both PiHole and VPN functionalities, users can enjoy comprehensive protection without the need for multiple devices or complex setups.
Setting up PiHole alongside a VPN server typically involves installing PiHole first, configuring it to act as the DNS server for the network, and then installing the VPN software. Popular VPN solutions like OpenVPN or WireGuard can be easily integrated with PiHole to provide secure access to the internet while benefiting from ad blocking.
One of the key advantages of hosting PiHole and a VPN server concurrently is the ability to block ads and trackers on all devices connected to the VPN. This ensures consistent protection across smartphones, tablets, computers, and any other devices accessing the internet through the VPN connection.
Moreover, managing both PiHole and the VPN server from a single interface simplifies administration tasks, such as monitoring network activity, updating blocklists, and configuring VPN settings. This unified approach enhances efficiency and makes it easier to maintain a secure and ad-free browsing experience for all users on the network.
In conclusion, hosting PiHole and a VPN server concurrently offers a comprehensive solution for enhancing privacy, security, and ad blocking across all devices connected to the network. By consolidating these services on a single machine, users can enjoy the benefits of both without compromising on performance or convenience.
Configuring PiHole and VPN server on one device
Configuring PiHole and VPN server on one device allows you to enhance your online security and privacy by blocking ads and tracking domains while also securing your internet connection through a virtual private network (VPN). PiHole is a network-wide ad blocker that works by filtering DNS requests, thereby blocking ads at the network level before they reach your devices. A VPN, on the other hand, encrypts your internet traffic, preventing anyone from monitoring your online activities or tracking your location.
By combining PiHole and VPN server functionalities on a single device, you can enjoy a seamless online experience with enhanced protection. To set up this configuration, you will need a Raspberry Pi or another similar single-board computer running PiHole software, along with VPN server software like OpenVPN.
First, you need to install and configure PiHole on your device, set it up as your network's DNS server, and customize blocklists according to your preferences. Next, install the VPN server software and configure it to secure your internet traffic. Make sure to set up port forwarding on your router to allow VPN connections to your device.
Once both PiHole and VPN server are up and running on your device, you can benefit from ad-free browsing, improved online privacy, and secure internet access from anywhere. Remember to regularly update both PiHole blocklists and VPN server software to stay protected against emerging online threats. With this setup, you can enjoy a safer and more private online experience without compromising on convenience.
Simultaneous operation of PiHole and VPN server
Simultaneous Operation of PiHole and VPN Server: A Guide
Combining the functionalities of a PiHole ad blocker and a VPN server can significantly enhance your online privacy and security. PiHole, a network-wide ad blocker, efficiently blocks ads and trackers at the DNS level, while a VPN server encrypts your internet traffic, masking your IP address and providing anonymity. Running these services simultaneously on a Raspberry Pi or any compatible device offers comprehensive protection for your online activities.
To begin, ensure you have a Raspberry Pi or a similar device with sufficient resources to handle both PiHole and VPN server software. Start by installing PiHole following the official documentation, configuring it to block ads and trackers on your network.
Next, set up the VPN server using software like OpenVPN or WireGuard. Both offer robust encryption protocols and are compatible with Raspberry Pi. Follow the installation guides provided by the respective software developers, configuring the VPN server to your preferences.
Once both PiHole and the VPN server are installed and configured individually, the challenge lies in ensuring they operate seamlessly together. By default, PiHole might block DNS requests from the VPN server, disrupting its functionality. To resolve this, configure PiHole to allow DNS requests from the VPN server's IP address. This ensures that DNS queries from devices connected to the VPN pass through PiHole for ad blocking.
Additionally, consider adjusting firewall settings to allow VPN traffic to pass through unhindered. This ensures that the VPN server can establish secure connections with clients while maintaining PiHole's ad-blocking capabilities.
Testing the setup thoroughly is crucial to verify that both PiHole and the VPN server are functioning correctly together. Ensure that ads are blocked across devices connected to the VPN and that internet traffic is encrypted and routed through the VPN server as intended.
In conclusion, the simultaneous operation of PiHole and a VPN server offers a powerful combination of ad blocking and online privacy. With careful configuration and testing, you can enjoy enhanced security and anonymity for all your internet-connected devices.
0 notes
Text
can pi hole run with pi vpn
🔒🌍✨ Get 3 Months FREE VPN - Secure & Private Internet Access Worldwide! Click Here ✨🌍🔒
can pi hole run with pi vpn
Pi-hole functionalities
Pi-hole is a powerful network-level ad blocker that functions as a DNS sinkhole. This open-source software serves as a network-wide ad blocker by acting as a DNS server for your network and filtering out unwanted content such as advertisements and tracking domains. Pi-hole can be installed on various devices, including Raspberry Pi, Ubuntu, and Docker containers, making it a versatile solution for ad blocking.
One of the key functionalities of Pi-hole is its ability to block ads across all devices connected to the network, including smartphones, tablets, computers, and smart TVs. By redirecting DNS queries for ad domains to a black hole IP address, Pi-hole effectively prevents ads from being displayed on any device within the network.
In addition to blocking ads, Pi-hole offers various features to enhance privacy and security online. It can block malicious domains, prevent tracking by analytics services, and even speed up browsing by caching DNS queries. By maintaining a blacklist of known ad domains and allowing users to create custom blocklists, Pi-hole gives users full control over the content that is allowed on their network.
Furthermore, Pi-hole provides detailed statistics and logs to track network activity and identify potential threats. Users can access a web interface to monitor the performance of Pi-hole, view query logs, and whitelist or blacklist specific domains as needed.
Overall, Pi-hole is a valuable tool for enhancing the browsing experience, improving privacy, and increasing security on home networks. Its robust functionalities and customization options make it a popular choice for users looking to take control of their online experience.
Raspberry Pi VPN integration
Title: Enhance Your Online Security with Raspberry Pi VPN Integration
In an age where online privacy and security are paramount, integrating a VPN (Virtual Private Network) with your Raspberry Pi can provide a powerful shield against cyber threats and surveillance. Raspberry Pi, a credit-card sized computer renowned for its versatility, offers an affordable and efficient platform for hosting a VPN, ensuring your internet traffic remains encrypted and anonymous.
Setting up a VPN on Raspberry Pi is a straightforward process, accessible even to those with minimal technical expertise. By utilizing open-source VPN software such as OpenVPN or PiVPN, users can create their private network within minutes. These solutions offer robust encryption protocols, safeguarding data transmission from potential eavesdroppers and hackers.
The benefits of Raspberry Pi VPN integration extend beyond mere privacy protection. By routing your internet connection through a VPN server located in a different geographic region, you can bypass censorship restrictions and access region-locked content. Whether streaming geo-restricted media or accessing websites blocked by your local network, a Raspberry Pi VPN empowers users with unrestricted internet access.
Furthermore, deploying a VPN on Raspberry Pi enables secure remote access to your home network. Whether you're traveling or working from a remote location, you can securely connect to your devices and resources at home, safeguarding sensitive data from interception.
Moreover, Raspberry Pi's energy-efficient design ensures minimal power consumption, making it an eco-friendly choice for hosting your VPN. Its low cost and small form factor also make it an ideal solution for individuals and small businesses seeking affordable yet robust cybersecurity measures.
In conclusion, Raspberry Pi VPN integration offers a cost-effective and efficient means of bolstering your online security and privacy. With its ease of setup, versatility, and affordability, Raspberry Pi stands as a beacon of innovation in the realm of personal cybersecurity. Take control of your digital footprint today and fortify your online defenses with Raspberry Pi VPN integration.
Network security with Pi-hole and Pi VPN
Title: Enhancing Network Security with Pi-hole and Pi VPN
In an era where cyber threats loom large and privacy concerns are at the forefront, safeguarding your network becomes paramount. Fortunately, with the advent of Raspberry Pi-based solutions like Pi-hole and Pi VPN, bolstering your network security has become more accessible than ever.
Pi-hole serves as a network-wide ad blocker, efficiently blocking unwanted advertisements, tracking domains, and malware at the DNS level. By redirecting such requests to a null IP address, Pi-hole not only enhances browsing experience by eliminating intrusive ads but also mitigates potential security risks associated with malicious domains.
Complementing Pi-hole, Pi VPN offers a secure and private means of accessing your network remotely. Utilizing VPN protocols like OpenVPN, Pi VPN encrypts internet traffic, shielding it from prying eyes and potential cyber threats, especially when connecting to public Wi-Fi networks. This encryption ensures that sensitive data remains confidential, even when transmitted over untrusted networks.
Combining Pi-hole and Pi VPN creates a formidable defense against various cyber threats. Pi-hole blocks malicious domains at the network level, while Pi VPN encrypts data traffic, safeguarding it from interception and manipulation. Moreover, both solutions are lightweight and can run on affordable Raspberry Pi hardware, making them accessible to a wide range of users.
Implementing Pi-hole and Pi VPN empowers individuals and businesses to take control of their network security and privacy. By proactively blocking ads and malicious domains and encrypting internet traffic, these solutions provide a robust defense against cyber threats, ensuring peace of mind in an increasingly digital world.
In conclusion, leveraging Pi-hole and Pi VPN is a cost-effective and efficient way to enhance network security and privacy. Whether you're a tech enthusiast or a small business owner, investing in these Raspberry Pi-based solutions can significantly bolster your cyber defenses, ultimately safeguarding your digital assets and sensitive information.
DNS filtering capabilities of Pi-hole
DNS filtering capabilities of Pi-hole
Pi-hole is a powerful tool for enhancing your internet experience by blocking unwanted ads and tracking mechanisms at the network level. One of its key features lies in its DNS filtering capabilities, which provide users with control over what content is allowed to load on their devices.
At its core, Pi-hole functions as a DNS sinkhole, intercepting DNS requests made by devices on your network and filtering them based on predefined blacklists. These blacklists contain domains known to host advertisements, trackers, malware, and other undesirable content. When a device attempts to access a domain listed in these blacklists, Pi-hole blocks the request, preventing the associated content from loading.
What sets Pi-hole apart is its ability to not only block ads and trackers but also to customize filtering based on user preferences. Users can add their own blacklist entries or whitelist specific domains, giving them fine-grained control over what content is permitted. This level of customization ensures that Pi-hole adapts to the user's needs and preferences, providing a tailored browsing experience.
Moreover, Pi-hole's DNS filtering is not limited to traditional web browsers. It extends to all devices on the network, including smartphones, tablets, smart TVs, gaming consoles, and IoT devices. This comprehensive coverage ensures that all internet-connected devices benefit from the ad-blocking and privacy-enhancing capabilities of Pi-hole.
In addition to improving the user experience by blocking ads and trackers, Pi-hole's DNS filtering also enhances privacy and security. By preventing connections to known malicious domains, Pi-hole helps protect against malware infections, phishing attacks, and other online threats.
Overall, Pi-hole's DNS filtering capabilities make it a valuable tool for anyone looking to take control of their online experience, block unwanted content, and enhance privacy and security across their network.
Optimizing privacy with Pi-hole and Pi VPN
In today's digital age, safeguarding our privacy online has become more important than ever. One effective way to optimize privacy on your network is by using a combination of Pi-hole and Pi VPN.
Pi-hole is a network-wide ad blocker that functions by blocking advertisements at the network level, before they even reach your devices. By blocking ads and tracking domains, Pi-hole not only enhances your online privacy but also improves website loading speeds and reduces data usage.
When combined with Pi VPN, a virtual private network system that encrypts your internet connection, the privacy and security of your network are further strengthened. Pi VPN ensures that all your online activities are encrypted and secure, safeguarding your data from prying eyes and potential cyber threats.
By integrating Pi-hole and Pi VPN, you create a robust privacy solution that not only blocks ads and trackers but also encrypts your internet traffic, providing you with a secure and private browsing experience. This combination is especially useful for households and small businesses looking to protect sensitive data and maintain confidentiality online.
Furthermore, Pi-hole and Pi VPN are both open-source projects, meaning you have full control over how they are used and can customize them according to your specific privacy needs.
In conclusion, optimizing privacy with Pi-hole and Pi VPN is a powerful strategy to enhance security and confidentiality on your network. By leveraging these tools, you can enjoy a safer and more private online experience while taking control of your digital footprint.
0 notes
Text
I had a pretty long and tiring day today, my team tried to deploy a project we're doing on somebody's Raspberry Pi but didn't succeed on that. I tried to help, but didn't really have the knowledge I need for that, which I guess is a learning point, but I also think that this is not the most useful thing we can do, since we're not making a standalone project, but simply a page (single-page application) which will run on the company's website and that is already hosted somewhere else, so I don't really see the value in creating a second place where this part is hosted. They say it's going to give us necessary points for school but I'm not sure if this is the case when it's not needed for the client.
Anyways, I did have a fun time later on playing JackBox games including some kind of trivia thing and a game that resembled Among Us but had some more challenging mini games and we also had pizza so that was a good way to let off steam for a bit, but I'll certainly wanna talk about this earlier topic with my team
1 note
·
View note