#how to add ssh key to github
Explore tagged Tumblr posts
Visit Tumblr Blog
Explore Tumblr blogs with no restrictions, modern design and the best experience.
Last Seen Tumblr Blogs


Fun Fact
Mobile US users spent an average of 115.8 minutes on Tumblr app monthly.
Text
How to Generate SSH Key for Secure Authentication
How to Generate SSH Key In the realm of secure communication and remote access, understanding “How to Generate SSH Key” is a fundamental skill for individuals and organizations alike. SSH, or Secure Shell, is a cryptographic protocol that allows for encrypted communication between a client and a server, ensuring the confidentiality and integrity of data during transmission. What is SSH and why…

View On WordPress
#how to add ssh key to github#How to generate SSH key#How to Generate SSH Key for Secure Authentication#How to generate ssh key on Linux or Mac OS#How to generate SSH key on Windows 10 or Windows 11#how to get ssh key
0 notes
Text
Vibecoding a production app
TL;DR I built and launched a recipe app with about 20 hours of work - recipeninja.ai
Background: I'm a startup founder turned investor. I taught myself (bad) PHP in 2000, and picked up Ruby on Rails in 2011. I'd guess 2015 was the last time I wrote a line of Ruby professionally. I've built small side projects over the years, but nothing with any significant usage. So it's fair to say I'm a little rusty, and I never really bothered to learn front end code or design.
In my day job at Y Combinator, I'm around founders who are building amazing stuff with AI every day and I kept hearing about the advances in tools like Lovable, Cursor and Windsurf. I love building stuff and I've always got a list of little apps I want to build if I had more free time.
About a month ago, I started playing with Lovable to build a word game based on Articulate (it's similar to Heads Up or Taboo). I got a working version, but I quickly ran into limitations - I found it very complicated to add a supabase backend, and it kept re-writing large parts of my app logic when I only wanted to make cosmetic changes. It felt like a toy - not ready to build real applications yet.
But I kept hearing great things about tools like Windsurf. A couple of weeks ago, I looked again at my list of app ideas to build and saw "Recipe App". I've wanted to build a hands-free recipe app for years. I love to cook, but the problem with most recipe websites is that they're optimized for SEO, not for humans. So you have pages and pages of descriptive crap to scroll through before you actually get to the recipe. I've used the recipe app Paprika to store my recipes in one place, but honestly it feels like it was built in 2009. The UI isn't great for actually cooking. My hands are covered in food and I don't really want to touch my phone or computer when I'm following a recipe.
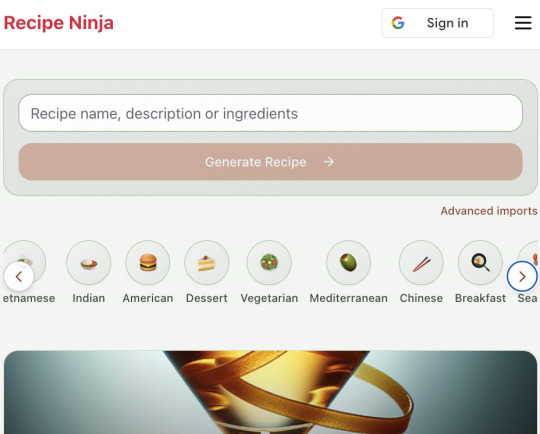
So I set out to build what would become RecipeNinja.ai
For this project, I decided to use Windsurf. I wanted a Rails 8 API backend and React front-end app and Windsurf set this up for me in no time. Setting up homebrew on a new laptop, installing npm and making sure I'm on the right version of Ruby is always a pain. Windsurf did this for me step-by-step. I needed to set up SSH keys so I could push to GitHub and Heroku. Windsurf did this for me as well, in about 20% of the time it would have taken me to Google all of the relevant commands.
I was impressed that it started using the Rails conventions straight out of the box. For database migrations, it used the Rails command-line tool, which then generated the correct file names and used all the correct Rails conventions. I didn't prompt this specifically - it just knew how to do it. It one-shotted pretty complex changes across the React front end and Rails backend to work seamlessly together.
To start with, the main piece of functionality was to generate a complete step-by-step recipe from a simple input ("Lasagne"), generate an image of the finished dish, and then allow the user to progress through the recipe step-by-step with voice narration of each step. I used OpenAI for the LLM and ElevenLabs for voice. "Grandpa Spuds Oxley" gave it a friendly southern accent.
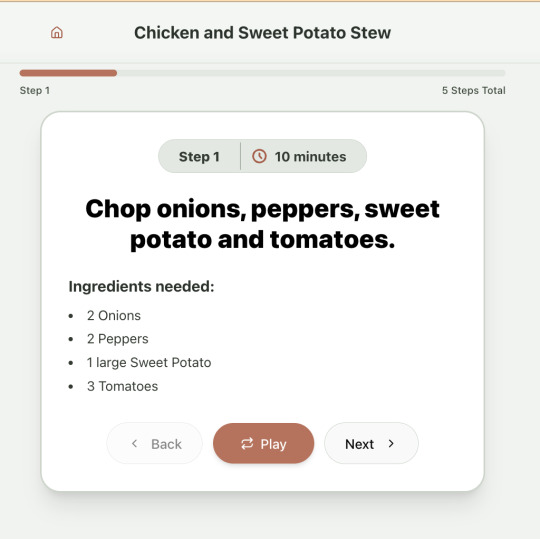
Recipe summary:
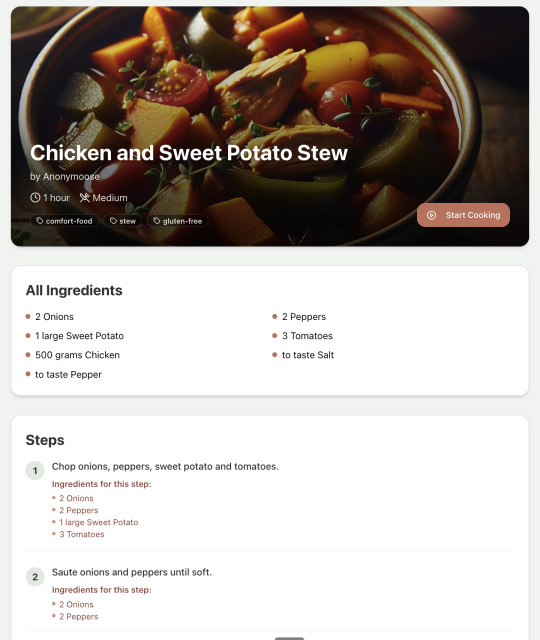
And the recipe step-by-step view:
I was pretty astonished that Windsurf managed to integrate both the OpenAI and Elevenlabs APIs without me doing very much at all. After we had a couple of problems with the open AI Ruby library, it quickly fell back to a raw ruby HTTP client implementation, but I honestly didn't care. As long as it worked, I didn't really mind if it used 20 lines of code or two lines of code. And Windsurf was pretty good about enforcing reasonable security practices. I wanted to call Elevenlabs directly from the front end while I was still prototyping stuff, and Windsurf objected very strongly, telling me that I was risking exposing my private API credentials to the Internet. I promised I'd fix it before I deployed to production and it finally acquiesced.
I decided I wanted to add "Advanced Import" functionality where you could take a picture of a recipe (this could be a handwritten note or a picture from a favourite a recipe book) and RecipeNinja would import the recipe. This took a handful of minutes.
Pretty quickly, a pattern emerged; I would prompt for a feature. It would read relevant files and make changes for two or three minutes, and then I would test the backend and front end together. I could quickly see from the JavaScript console or the Rails logs if there was an error, and I would just copy paste this error straight back into Windsurf with little or no explanation. 80% of the time, Windsurf would correct the mistake and the site would work. Pretty quickly, I didn't even look at the code it generated at all. I just accepted all changes and then checked if it worked in the front end.
After a couple of hours of work on the recipe generation, I decided to add the concept of "Users" and include Google Auth as a login option. This would require extensive changes across the front end and backend - a database migration, a new model, new controller and entirely new UI. Windsurf one-shotted the code. It didn't actually work straight away because I had to configure Google Auth to add `localhost` as a valid origin domain, but Windsurf talked me through the changes I needed to make on the Google Auth website. I took a screenshot of the Google Auth config page and pasted it back into Windsurf and it caught an error I had made. I could login to my app immediately after I made this config change. Pretty mindblowing. You can now see who's created each recipe, keep a list of your own recipes, and toggle each recipe to public or private visibility. When I needed to set up Heroku to host my app online, Windsurf generated a bunch of terminal commands to configure my Heroku apps correctly. It went slightly off track at one point because it was using old Heroku APIs, so I pointed it to the Heroku docs page and it fixed it up correctly.
I always dreaded adding custom domains to my projects - I hate dealing with Registrars and configuring DNS to point at the right nameservers. But Windsurf told me how to configure my GoDaddy domain name DNS to work with Heroku, telling me exactly what buttons to press and what values to paste into the DNS config page. I pointed it at the Heroku docs again and Windsurf used the Heroku command line tool to add the "Custom Domain" add-ons I needed and fetch the right Heroku nameservers. I took a screenshot of the GoDaddy DNS settings and it confirmed it was right.
I can see very soon that tools like Cursor & Windsurf will integrate something like Browser Use so that an AI agent will do all this browser-based configuration work with zero user input.
I'm also impressed that Windsurf will sometimes start up a Rails server and use curl commands to check that an API is working correctly, or start my React project and load up a web preview and check the front end works. This functionality didn't always seem to work consistently, and so I fell back to testing it manually myself most of the time.
When I was happy with the code, it wrote git commits for me and pushed code to Heroku from the in-built command line terminal. Pretty cool!
I do have a few niggles still. Sometimes it's a little over-eager - it will make more changes than I want, without checking with me that I'm happy or the code works. For example, it might try to commit code and deploy to production, and I need to press "Stop" and actually test the app myself. When I asked it to add analytics, it went overboard and added 100 different analytics events in pretty insignificant places. When it got trigger-happy like this, I reverted the changes and gave it more precise commands to follow one by one.
The one thing I haven't got working yet is automated testing that's executed by the agent before it decides a task is complete; there's probably a way to do it with custom rules (I have spent zero time investigating this). It feels like I should be able to have an integration test suite that is run automatically after every code change, and then any test failures should be rectified automatically by the AI before it says it's finished.
Also, the AI should be able to tail my Rails logs to look for errors. It should spot things like database queries and automatically optimize my Active Record queries to make my app perform better. At the moment I'm copy-pasting in excerpts of the Rails logs, and then Windsurf quickly figures out that I've got an N+1 query problem and fixes it. Pretty cool.
Refactoring is also kind of painful. I've ended up with several files that are 700-900 lines long and contain duplicate functionality. For example, list recipes by tag and list recipes by user are basically the same.
Recipes by user:

This should really be identical to list recipes by tag, but Windsurf has implemented them separately.
Recipes by tag:

If I ask Windsurf to refactor these two pages, it randomly changes stuff like renaming analytics events, rewriting user-facing alerts, and changing random little UX stuff, when I really want to keep the functionality exactly the same and only move duplicate code into shared modules. Instead, to successfully refactor, I had to ask Windsurf to list out ideas for refactoring, then prompt it specifically to refactor these things one by one, touching nothing else. That worked a little better, but it still wasn't perfect
Sometimes, adding minor functionality to the Rails API will often change the entire API response, rather just adding a couple of fields. Eg It will occasionally change Index Recipes to nest responses in an object { "recipes": [ ] }, versus just returning an array, which breaks the frontend. And then another minor change will revert it. This is where adding tests to identify and prevent these kinds of API changes would be really useful. When I ask Windsurf to fix these API changes, it will instead change the front end to accept the new API json format and also leave the old implementation in for "backwards compatibility". This ends up with a tangled mess of code that isn't really necessary. But I'm vibecoding so I didn't bother to fix it.
Then there was some changes that just didn't work at all. Trying to implement Posthog analytics in the front end seemed to break my entire app multiple times. I tried to add user voice commands ("Go to the next step"), but this conflicted with the eleven labs voice recordings. Having really good git discipline makes vibe coding much easier and less stressful. If something doesn't work after 10 minutes, I can just git reset head --hard. I've not lost very much time, and it frees me up to try more ambitious prompts to see what the AI can do. Less technical users who aren't familiar with git have lost months of work when the AI goes off on a vision quest and the inbuilt revert functionality doesn't work properly. It seems like adding more native support for version control could be a massive win for these AI coding tools.
Another complaint I've heard is that the AI coding tools don't write "production" code that can scale. So I decided to put this to the test by asking Windsurf for some tips on how to make the application more performant. It identified I was downloading 3 MB image files for each recipe, and suggested a Rails feature for adding lower resolution image variants automatically. Two minutes later, I had thumbnail and midsize variants that decrease the loading time of each page by 80%. Similarly, it identified inefficient N+1 active record queries and rewrote them to be more efficient. There are a ton more performance features that come built into Rails - caching would be the next thing I'd probably add if usage really ballooned.
Before going to production, I kept my promise to move my Elevenlabs API keys to the backend. Almost as an afterthought, I asked asked Windsurf to cache the voice responses so that I'd only make an Elevenlabs API call once for each recipe step; after that, the audio file was stored in S3 using Rails ActiveStorage and served without costing me more credits. Two minutes later, it was done. Awesome.
At the end of a vibecoding session, I'd write a list of 10 or 15 new ideas for functionality that I wanted to add the next time I came back to the project. In the past, these lists would've built up over time and never gotten done. Each task might've taken me five minutes to an hour to complete manually. With Windsurf, I was astonished how quickly I could work through these lists. Changes took one or two minutes each, and within 30 minutes I'd completed my entire to do list from the day before. It was astonishing how productive I felt. I can create the features faster than I can come up with ideas.
Before launching, I wanted to improve the design, so I took a quick look at a couple of recipe sites. They were much more visual than my site, and so I simply told Windsurf to make my design more visual, emphasizing photos of food. Its first try was great. I showed it to a couple of friends and they suggested I should add recipe categories - "Thai" or "Mexican" or "Pizza" for example. They showed me the DoorDash app, so I took a screenshot of it and pasted it into Windsurf. My prompt was "Give me a carousel of food icons that look like this". Again, this worked in one shot. I think my version actually looks better than Doordash 🤷♂️
Doordash:

My carousel:
I also saw I was getting a console error from missing Favicon. I always struggle to make Favicon for previous sites because I could never figure out where they were supposed to go or what file format they needed. I got OpenAI to generate me a little recipe ninja icon with a transparent background and I saved it into my project directory. I asked Windsurf what file format I need and it listed out nine different sizes and file formats. Seems annoying. I wondered if Windsurf could just do it all for me. It quickly wrote a series of Bash commands to create a temporary folder, resize the image and create the nine variants I needed. It put them into the right directory and then cleaned up the temporary directory. I laughed in amazement. I've never been good at bash scripting and I didn't know if it was even possible to do what I was asking via the command line. I guess it is possible.

After launching and posting on Twitter, a few hundred users visited the site and generated about 1000 recipes. I was pretty happy! Unfortunately, the next day I woke up and saw that I had a $700 OpenAI bill. Someone had been abusing the site and costing me a lot of OpenAI credits by creating a single recipe over and over again - "Pasta with Shallots and Pineapple". They did this 12,000 times. Obviously, I had not put any rate limiting in.
Still, I was determined not to write any code. I explained the problem and asked Windsurf to come up with solutions. Seconds later, I had 15 pretty good suggestions. I implemented several (but not all) of the ideas in about 10 minutes and the abuse stopped dead in its tracks. I won't tell you which ones I chose in case Mr Shallots and Pineapple is reading. The app's security is not perfect, but I'm pretty happy with it for the scale I'm at. If I continue to grow and get more abuse, I'll implement more robust measures.
Overall, I am astonished how productive Windsurf has made me in the last two weeks. I'm not a good designer or frontend developer, and I'm a very rusty rails dev. I got this project into production 5 to 10 times faster than it would've taken me manually, and the level of polish on the front end is much higher than I could've achieved on my own. Over and over again, I would ask for a change and be astonished at the speed and quality with which Windsurf implemented it. I just sat laughing as the computer wrote code.
The next thing I want to change is making the recipe generation process much more immediate and responsive. Right now, it takes about 20 seconds to generate a recipe and for a new user it feels like maybe the app just isn't doing anything.
Instead, I'm experimenting with using Websockets to show a streaming response as the recipe is created. This gives the user immediate feedback that something is happening. It would also make editing the recipe really fun - you could ask it to "add nuts" to the recipe, and see as the recipe dynamically updates 2-3 seconds later. You could also say "Increase the quantities to cook for 8 people" or "Change from imperial to metric measurements".
I have a basic implementation working, but there are still some rough edges. I might actually go and read the code this time to figure out what it's doing!
I also want to add a full voice agent interface so that you don't have to touch the screen at all. Halfway through cooking a recipe, you might ask "I don't have cilantro - what could I use instead?" or say "Set a timer for 30 minutes". That would be my dream recipe app!
Tools like Windsurf or Cursor aren't yet as useful for non-technical users - they're extremely powerful and there are still too many ways to blow your own face off. I have a fairly good idea of the architecture that I want Windsurf to implement, and I could quickly spot when it was going off track or choosing a solution that was inappropriately complicated for the feature I was building. At the moment, a technical background is a massive advantage for using Windsurf. As a rusty developer, it made me feel like I had superpowers.
But I believe within a couple of months, when things like log tailing and automated testing and native version control get implemented, it will be an extremely powerful tool for even non-technical people to write production-quality apps. The AI will be able to make complex changes and then verify those changes are actually working. At the moment, it feels like it's making a best guess at what will work and then leaving the user to test it. Implementing better feedback loops will enable a truly agentic, recursive, self-healing development flow. It doesn't feel like it needs any breakthrough in technology to enable this. It's just about adding a few tool calls to the existing LLMs. My mind races as I try to think through the implications for professional software developers.
Meanwhile, the LLMs aren't going to sit still. They're getting better at a frightening rate. I spoke to several very capable software engineers who are Y Combinator founders in the last week. About a quarter of them told me that 95% of their code is written by AI. In six or twelve months, I just don't think software engineering is going exist in the same way as it does today. The cost of creating high-quality, custom software is quickly trending towards zero.
You can try the site yourself at recipeninja.ai
Here's a complete list of functionality. Of course, Windsurf just generated this list for me 🫠
RecipeNinja: Comprehensive Functionality Overview
Core Concept: the app appears to be a cooking assistant application that provides voice-guided recipe instructions, allowing users to cook hands-free while following step-by-step recipe guidance.
Backend (Rails API) Functionality
User Authentication & Authorization
Google OAuth integration for user authentication
User account management with secure authentication flows
Authorization system ensuring users can only access their own private recipes or public recipes
Recipe Management
Recipe Model Features:
Unique public IDs (format: "r_" + 14 random alphanumeric characters) for security
User ownership (user_id field with NOT NULL constraint)
Public/private visibility toggle (default: private)
Comprehensive recipe data storage (title, ingredients, steps, cooking time, etc.)
Image attachment capability using Active Storage with S3 storage in production
Recipe Tagging System:
Many-to-many relationship between recipes and tags
Tag model with unique name attribute
RecipeTag join model for the relationship
Helper methods for adding/removing tags from recipes
Recipe API Endpoints:
CRUD operations for recipes
Pagination support with metadata (current_page, per_page, total_pages, total_count)
Default sorting by newest first (created_at DESC)
Filtering recipes by tags
Different serializers for list view (RecipeSummarySerializer) and detail view (RecipeSerializer)
Voice Generation
Voice Recording System:
VoiceRecording model linked to recipes
Integration with Eleven Labs API for text-to-speech conversion
Caching of voice recordings in S3 to reduce API calls
Unique identifiers combining recipe_id, step_id, and voice_id
Force regeneration option for refreshing recordings
Audio Processing:
Using streamio-ffmpeg gem for audio file analysis
Active Storage integration for audio file management
S3 storage for audio files in production
Recipe Import & Generation
RecipeImporter Service:
OpenAI integration for recipe generation
Conversion of text recipes into structured format
Parsing and normalization of recipe data
Import from photos functionality
Frontend (React) Functionality
User Interface Components
Recipe Selection & Browsing:
Recipe listing with pagination
Real-time updates with 10-second polling mechanism
Tag filtering functionality
Recipe cards showing summary information (without images)
"View Details" and "Start Cooking" buttons for each recipe
Recipe Detail View:
Complete recipe information display
Recipe image display
Tag display with clickable tags
Option to start cooking from this view
Cooking Experience:
Step-by-step recipe navigation
Voice guidance for each step
Keyboard shortcuts for hands-free control:
Arrow keys for step navigation
Space for play/pause audio
Escape to return to recipe selection
URL-based step tracking (e.g., /recipe/r_xlxG4bcTLs9jbM/classic-lasagna/steps/1)
State Management & Data Flow
Recipe Service:
API integration for fetching recipes
Support for pagination parameters
Tag-based filtering
Caching mechanisms for recipe data
Image URL handling for detailed views
Authentication Flow:
Google OAuth integration using environment variables
User session management
Authorization header management for API requests
Progressive Web App Features
PWA capabilities for installation on devices
Responsive design for various screen sizes
Favicon and app icon support
Deployment Architecture
Two-App Structure:
cook-voice-api: Rails backend on Heroku
cook-voice-wizard: React frontend/PWA on Heroku
Backend Infrastructure:
Ruby 3.2.2
PostgreSQL database (Heroku PostgreSQL addon)
Amazon S3 for file storage
Environment variables for configuration
Frontend Infrastructure:
React application
Environment variable configuration
Static buildpack on Heroku
SPA routing configuration
Security Measures:
HTTPS enforcement
Rails credentials system
Environment variables for sensitive information
Public ID system to mask database IDs
This comprehensive overview covers the major functionality of the Cook Voice application based on the available information. The application appears to be a sophisticated cooking assistant that combines recipe management with voice guidance to create a hands-free cooking experience.
2 notes
·
View notes
Text
How to Connect GitHub to Your EC2 Instance: Easy-to-Follow Step-by-Step Guide

Connecting GitHub with AWS EC2 Instance Are you looking to seamlessly integrate your GitHub repository with an Amazon EC2 instance? Connecting GitHub to your EC2 instance allows you to easily deploy your code, automate workflows, and streamline your development process. In this comprehensive guide, we'll walk you through the step-by-step process of setting up this connection, from creating an EC2 instance to configuring webhooks and deploying your code. By the end of this article, you'll have a fully functional GitHub-EC2 integration, enabling you to focus on writing great code and delivering your projects efficiently. Before you begin Before we dive into the process of connecting GitHub to your EC2 instance, make sure you have the following prerequisites in place: View Prerequisites 1️⃣ AWS Account: An AWS account with access to the EC2 service 2️⃣ GitHub Account: A GitHub account with a repository you want to connect to your EC2 instance 3️⃣ Basic KNowledge: Basic knowledge of AWS EC2 and GitHub With these prerequisites in hand, let's get started with the process of creating an EC2 instance. Discover the Benefits of Connecting GitHub to Your EC2 Instance 1. Automation:Connecting your GitHub repository to your EC2 instance enables you to automate code deployments. Changes pushed to your repo can trigger automatic updates on the EC2 instance, making the development and release process much smoother. 2. Centralized Code:GitHub acts as a central hub for your project code. This allows multiple developers to work on the same codebase simultaneously, improving collaboration and code sharing. 3. Controlled Access: pen_spark:GitHub's access control mechanisms let you manage who can view, modify, and deploy your code. This helps in maintaining the security and integrity of your application. Creating an EC2 Instance The first step in connecting GitHub to your EC2 instance is to create an EC2 instance. Follow these steps to create a new instance:- Login to your AWS Management Console. and navigate to the EC2 dashboard. - Click on the "Launch Instance" button to start the instance creation wizard. - Choose an Amazon Machine Image (AMI) that suits your requirements. For this guide, we'll use the Amazon Linux 2 AMI. - Select an instance type based on your computational needs and budget. A t2.micro instance is sufficient for most basic applications. - Configure the instance details, such as the number of instances, network settings, and IAM role (if required). - Add storage to your instance. The default settings are usually sufficient for most use cases. - Add tags to your instance for better organization and management. - Configure the security group to control inbound and outbound traffic to your instance. We'll dive deeper into this in the next section. - Review your instance configuration and click on the "Launch" button. - Choose an existing key pair or create a new one. This key pair will be used to securely connect to your EC2 instance via SSH. - Launch your instance and wait for it to be in the "Running" state.Congratulations! You have successfully created an EC2 instance. Let's move on to configuring the security group to allow necessary traffic. Configuring Security Groups on AWS Security groups act as virtual firewalls for your EC2 instances, controlling inbound and outbound traffic. To connect GitHub to your EC2 instance, you need to configure the security group to allow SSH and HTTP/HTTPS traffic. Follow these steps: Easy Steps for Configuring Security Groups on AWS - In the EC2 dashboard, navigate to the “Security Groups” section under “Network & Security.” - Select the security group associated with your EC2 instance. - In the “Inbound Rules” tab, click on the “Edit inbound rules” button. - Add a new rule for SSH (port 22) and set the source to your IP address or a specific IP range. - Add another rule for HTTP (port 80) and HTTPS (port 443) and set the source to “Anywhere” or a specific IP range, depending on your requirements. - Save the inbound rules. Your security group is now configured to allow the necessary traffic for connecting GitHub to your EC2 instance. Installing Git on the EC2 Instance To clone your GitHub repository and manage version control on your EC2 instance, you need to install Git. Follow these steps to install Git on your Amazon Linux 2 instance:- Connect to your EC2 instance using SSH. Use the key pair you specified during instance creation. - Update the package manager by running the following command:sudo yum update -y - Install Git by running the following command:sudo yum install git -y - Verify the installation by checking the Git version:git --version Git is now installed on your EC2 instance, and you're ready to clone your GitHub repository. Generating SSH Keys To securely connect your EC2 instance to GitHub, you need to generate an SSH key pair. Follow these steps to generate SSH keys on your EC2 instance: - Connect to your EC2 instance using SSH. - Run the following command to generate an SSH key pair:ssh-keygen -t rsa -b 4096 -C "[email protected]" Replace [email protected] with your GitHub email address. - Press Enter to accept the default file location for saving the key pair. - Optionally, enter a passphrase for added security. Press Enter if you don't want to set a passphrase. - The SSH key pair will be generated and saved in the specified location (default: ~/.ssh/id_rsa and ~/.ssh/id_rsa.pub). Add SSH Key to GitHub account To enable your EC2 instance to securely communicate with GitHub, you need to add the public SSH key to your GitHub account. Follow these steps:- On your EC2 instance, run the following command to display the public key:cat ~/.ssh/id_rsa.pub - Copy the entire contents of the public key. - Log in to your GitHub account and navigate to the "Settings" page. - Click on "SSH and GPG keys" in the left sidebar. - Click on the "New SSH key" button. - Enter a title for the key to identify it easily (e.g., "EC2 Instance Key"). - Paste the copied public key into the "Key" field. - Click on the "Add SSH key" button to save the key.Your EC2 instance is now linked to your GitHub account using the SSH key. Let's proceed to cloning your repository. Cloning a Repository To clone your GitHub repository to your EC2 instance, follow these steps:- Connect to your EC2 instance using SSH. - Navigate to the directory where you want to clone the repository. - Run the following command to clone the repository using SSH:git clone [email protected]:your-username/your-repository.git Replace "your-username" with your GitHub username and "your-repository" with the name of your repository. - Enter the passphrase for your SSH key, if prompted. - The repository will be cloned to your EC2 instance.You have successfully cloned your GitHub repository to your EC2 instance. You can now work with the code locally on your instance. Configure a GitHub webhook in 7 easy steps Webhooks allow you to automate actions based on events in your GitHub repository. For example, you can configure a webhook to automatically deploy your code to your EC2 instance whenever a push is made to the repository. Follow these steps to set up a webhook:- In your GitHub repository, navigate to the "Settings" page. - Click on "Webhooks" in the left sidebar. - Click on the "Add webhook" button. - Enter the payload URL, which is the URL of your EC2 instance where you want to receive the webhook events. - Select the content type as "application/json." - Choose the events that should trigger the webhook. For example, you can select "Push events" to trigger the webhook whenever a push is made to the repository. - Click on the "Add webhook" button to save the webhook configuration.Your webhook is now set up, and GitHub will send POST requests to the specified payload URL whenever the selected events occur. Deploying to AWS EC2 from Github With the webhook configured, you can automate the deployment of your code to your EC2 instance whenever changes are pushed to your GitHub repository. Here's a general outline of the deployment process:- Create a deployment script on your EC2 instance that will be triggered by the webhook. - The deployment script should perform the following tasks:- Pull the latest changes from the GitHub repository. - Install any necessary dependencies. - Build and compile your application, if required. - Restart any services or application servers. - Configure your web server (e.g., Apache or Nginx) on the EC2 instance to serve your application. - Ensure that the necessary ports (e.g., 80 for HTTP, 443 for HTTPS) are open in your EC2 instance's security group. - Test your deployment by making a change to your GitHub repository and verifying that the changes are automatically deployed to your EC2 instance.The specific steps for deploying your code will vary depending on your application's requirements and the technologies you are using. You may need to use additional tools like AWS CodeDeploy or a continuous integration/continuous deployment (CI/CD) pipeline to streamline the deployment process. AWS Official Documentation Tips for Troubleshooting Common Technology Issues While Connecting GitHub to your EC2 Instance 1. Secure PortEnsure that your EC2 instance's security group is configured correctly to allow incoming SSH and HTTP/HTTPS traffic. 2. SSH VerificationVerify that your SSH key pair is correctly generated and added to your GitHub account. 3. Payload URL CheckingDouble-check the payload URL and the events selected for your webhook configuration. 4. Logs on EC2 InstanceCheck the logs on your EC2 instance for any error messages related to the deployment process. 5. Necessary Permissions Ensure that your deployment script has the necessary permissions to execute and modify files on your EC2 instance. 6. Check DependenciesVerify that your application's dependencies are correctly installed and configured on the EC2 instance. 7. Test Everything Locally FirstTest your application locally on the EC2 instance to rule out any application-specific issues. If you still face issues, consult the AWS and GitHub documentation (Trobleshotting Conections) or seek assistance from the respective communities or support channels. Conclusion Connecting GitHub to your EC2 instance provides a seamless way to deploy your code and automate your development workflow. By following the steps outlined in this guide, you can create an EC2 instance, configure security groups, install Git, generate SSH keys, clone your repository, set up webhooks, and deploy your code to the instance.Remember to regularly review and update your security settings, keep your EC2 instance and application dependencies up to date, and monitor your application's performance and logs for any issues.With GitHub and EC2 connected, you can focus on writing quality code, collaborating with your team, and delivering your applications efficiently. Read the full article
0 notes
Text
This Week in Rust 537
Hello and welcome to another issue of This Week in Rust! Rust is a programming language empowering everyone to build reliable and efficient software. This is a weekly summary of its progress and community. Want something mentioned? Tag us at @ThisWeekInRust on Twitter or @ThisWeekinRust on mastodon.social, or send us a pull request. Want to get involved? We love contributions.
This Week in Rust is openly developed on GitHub and archives can be viewed at this-week-in-rust.org. If you find any errors in this week's issue, please submit a PR.
Updates from Rust Community
Official
Clippy: Deprecating feature = "cargo-clippy"
Updated baseline standards for Windows targets
Project/Tooling Updates
Replacing PyO3's API without breaking everything downstream
rust-analyzer changelog #223
rust-gcc February 2024 Monthly report
godot-rust February 2024 dev update
Fluvio v0.11.5 Release Updates
sshd-openpgp-auth version 0.3.0 and ssh-openpgp-auth version 0.2.2 as updates to the tooling providing OpenPGP based authentication for SSH host keys
Observations/Thoughts
Borrow checking without lifetimes
How to speed up the Rust compiler in March 2024
Code review in the Rust compiler
Rust thread_local!s are surprisingly expensive
Designing an Async Runtime for WASI 0.2
Rust Walkthroughs
Storing borrowed data in trait objects
Rust's early vs. late lifetime binding
How moving from Pandas to Polars made me write better code without writing better code
A Full Stack SaaS Template with Loco
Async Rust in a Nutshell
Real-time Streaming Analytics with Fluvio, DeepCausality, and Rust
[video] Modern All Rust Stack - Dioxus, Axum, Warp, SurrealDB
[video] Serverless Data Pipelines in Rust by Michele Vigilante
[FR] [video] Rust Lyon Meetup #8 - Impl Snake for Micro:bit — Cyril MARPAUD
Miscellaneous
Czech Rust community index
Launching RustRover: JetBrains’ Investment in Rust
[audio] RustShip: Rust in Art with Lisa Passing
Crate of the Week
This week's crate is srgn, a mix of tr, sed, rip-grep and tree-sitter.
Thanks to Alex Povel for the self-suggestion!
Please submit your suggestions and votes for next week!
Call for Testing
An important step for RFC implementation is for people to experiment with the implementation and give feedback, especially before stabilization. The following RFCs would benefit from user testing before moving forward:
No RFCs issued a call for testing this week.
If you are a feature implementer and would like your RFC to appear on the above list, add the new call-for-testing label to your RFC along with a comment providing testing instructions and/or guidance on which aspect(s) of the feature need testing.
Call for Participation; projects and speakers
CFP - Projects
Always wanted to contribute to open-source projects but did not know where to start? Every week we highlight some tasks from the Rust community for you to pick and get started!
Some of these tasks may also have mentors available, visit the task page for more information.
Ockam - Output for both ockam project ticket and ockam project enroll is improved, with support for --output json
Ockam - Syntax highlighting for fenced code blocks, in command help output, on Linux works
Ockam - Command - refactor to use typed interfaces to implement commands for kafka services
ZeroCopy - Don't generate warning when deriving on deprecated type
ZeroCopy - github.com/google/zerocopy
ZeroCopy - Test the output of zerocopy-derive
ZeroCopy - [CI] Check semver compatibility with all target platforms, not just the host platform
ZeroCopy - Inline many trait methods (in zerocopy and in derive-generated code)
Fluvio - fvm switch fails on some systems with running local cluster
Fluvio - Add new command fluvio cluster resume
CFP - Speakers
Are you a new or experienced speaker looking for a place to share something cool? This section highlights events that are being planned and are accepting submissions to join their event as a speaker.
Oxidize 2024 CFP closes 2024-03-24 | Berlin, Germany | Event date: 2024-05-28 - 2024-05-30
RustConf 2024 | CFP closes 2024-04-25 | Montreal, Canada | 2024-09-10
EuroRust 2024| CFP closes 2024-06-03 | Vienna, Austria & online | Event on 2024-10-10
If you are an event organizer hoping to expand the reach of your event, please submit a link to the submission website through a PR to TWiR.
Updates from the Rust Project
488 pull requests were merged in the last week
ffi_unwind_calls: treat RustIntrinsic like regular Rust calls
pattern_analysis: rework how we hide empty private fields
rustc: fix wasm64 metadata object files
add a proper with_no_queries to printing
add a way to add constructors for rustc_type_ir types
add initial support for DataFlowSanitizer
add new pattern_complexity attribute to add possibility to limit and check recursion in pattern matching
add platform-specific function to get the error number for HermitOS
add profiling support to AIX
add proper cfg to keep only one AlignmentEnum definition for different target_pointer_widths
allow statics pointing to mutable statics
always generate GEP i8 / ptradd for struct offsets
avoid collecting into vecs in some places
avoid using unnecessary queries when printing the query stack in panics
consider middle segments of paths in unused_qualifications
correctly generate item info of trait items
delete line if suggestion would replace it with an empty line
display short types for unimplemented trait
don't grab variances in TypeRelating relation if we're invariant
don't panic when waiting on poisoned queries
fix incorrect suggestion for uninitialized binding in pattern
fix issues in suggesting importing extern crate paths
fix link generation for foreign macro in jump to definition feature
implement missing ABI structures in StableMIR
improve renaming suggestion when item starts with underscore
made INVALID_DOC_ATTRIBUTES lint deny by default
make ZeroablePrimitive trait unsafe
make the success arms of if lhs || rhs meet up in a separate block
match lowering: Lower bindings in a predictable order
match lowering: Separate the bool case from other integers in TestKind
match lowering: pre-simplify or-patterns too
never say "Trait is implemented for{type error}"
normalizes-to: handle negative impls
opportunistically resolve regions when processing region outlives obligations
pattern analysis: Don't panic when encountering unexpected constructor
pattern analysis: abort on arity mismatch
preserve same vtable pointer when cloning raw waker, to fix Waker::will_wake
process alias-relate obligations in CoerceUnsized loop
properly deal with GATs when looking for method chains to point at
safe Transmute: Revise safety analysis
skip unnecessary comparison with half-open range patterns
split rustc_type_ir to avoid rustc_ast from depending on it
style library/core/src/error.rs
suggest moving definition if non-found macro_rules! is defined later
suggest removing superfluous semicolon when statements used as expression
the ordinary lowering of thir::ExprKind::Let is unreachable
use volatile access instead of #[used] for on_tls_callback
miri: add -Zmiri-track-alloc-accesses to readme and fix its wording
miri: log when we change the active thread, and fix logging for concurrency
miri: print thread name in miri error backtraces; add option to track read/write accesses
miri: tree Borrows diagnostic improvements
miri: windows: support getting the thread name
add ASCII fast-path for char::is_grapheme_extended
perf: improve write_fmt to handle simple strings
add display method to OsStr
have String use SliceIndex impls from str
use the OS thread name by default if THREAD_INFO has not been initialized
add missing get_name for wasm::thread
remove Mutex::unlock Function
implement unwind safety for Condvar on all platforms
make ReentrantLock public
codegen_gcc: debuginfo: Add support for debuginfo, without scope support
codegen_gcc: switch to the new set_special_chars_allowed_in_func_names API
cargo add: Fallback to rustc -v when no MSRV is set
cargo toml: Warn on unset Edition
cargo msrv: Report all incompatible packages, not just a random one
cargo rustc: Always pass --edition to rustc
cargo toml: Don't warn on unset Edition if only 2015 is compatible
cargo: add all unit's children recursively for doc.extern-map option
cargo: add "-Zpublic-dependency" for public-dependency feature
cargo: silently ignore cargo::rustc-check-cfg to avoid MSRV annoyance when stabilizing -Zcheck-cfg
cargo: stabilize global cache data tracking
rustdoc: Prevent inclusion of whitespace character after macro_rules ident
rustfmt: ensure space around binary exprs
clippy: identity_op: Fix duplicate diagnostics
clippy: let_underscore_untyped: fix false positive on async function
clippy: map_entry: Check insert expression for map use
clippy: misrefactored_assign_op: fix duplicate diagnostics
clippy: redundant_closure_call: don't lint closure originating from a macro
clippy: unnecessary_cast: avoid breaking precedence
clippy: add assigning_clones lint
clippy: add mixed_attributes_style lint
clippy: added msrv to threadlocal initializer check
clippy: check for try blocks in question_mark more consistently
clippy: dedup std_instead_of_core by using first segment span for uniqueness
clippy: don't emit "missing backticks" lint if the element is wrapped in <code> HTML tags
clippy: fix false positive in threadlocal! when falling back to os_local
clippy: fix derive_partial_eq_without_eq false positive on trait projection
clippy: fix nonminimal_bool lint regression
clippy: fix manual_memcpy wrong indexing for multi dimensional arrays
clippy: handle plural acronyms in doc_markdown
clippy: improve is_lint_level code
clippy: lower bstr version requirement to 1.6.0
clippy: pointers cannot be converted to integers at compile time
rust-analyzer: add hover display for trait assoc items
rust-analyzer: add basic support for native debug
rust-analyzer: autocomplete constants inside format strings
rust-analyzer: don't destructure struct with no public fields
rust-analyzer: don't highlight related assoc items of super traits
rust-analyzer: goto definition for deref_mut
rust-analyzer: goto definition for index_mut
rust-analyzer: goto-definition for constants inside range pattern
rust-analyzer: ignore generic arguments in intra doc link path resolution
rust-analyzer: put style lints behind disabled-by-default config
rust-analyzer: fix rust-project.json projects not preferring sysroot rustc
rust-analyzer: fix wrong closure kind deduction for closures with predicates
futures: parse rhs of select! arms using match-arm rules
Rust Compiler Performance Triage
A bunch of noise this week which has been dropped from the report (but may be present in the summary figures). As a result, the week is pretty busy in amount of changes, but the net effect is nearly neutral to a slight regression for most workloads.
Triage done by @simulacrum. Revision range: 71ffdf7..41d97c8
2 Regressions, 0 Improvements, 10 Mixed; 4 of them in rollups 51 artifact comparisons made in total
Full report here
Approved RFCs
Changes to Rust follow the Rust RFC (request for comments) process. These are the RFCs that were approved for implementation this week:
RFC: Make Cargo respect minimum supported Rust version (MSRV) when selecting dependencies
Final Comment Period
Every week, the team announces the 'final comment period' for RFCs and key PRs which are reaching a decision. Express your opinions now.
RFCs
RFC: patchable-function-entry
RFC: Add native code coverage support in Cargo
RFC: Packages as (optional) namespaces
Tracking Issues & PRs
Rust
[disposition: merge] alloc: implement FromIterator for Box<str>
[disposition: merge] rework opaque type region inference
[disposition: merge] Make impl<Fd: AsFd> impl take ?Sized
[disposition: merge] Tracking issue for Allow a re-export for main (RFC 1260)
[disposition: merge] Update Windows platform support
[disposition: close] Resolve region bounds from components of type projection
[disposition: merge] Propagate temporary lifetime extension into if and match.
[disposition: merge] more eagerly instantiate binders
[disposition: merge] E0492: borrow of an interior mutable value may end up in the final value during const eval when no inner mutability is involved
[disposition: merge] align_offset, align_to: no longer allow implementations to spuriously fail to align
[disposition: merge] Soft-destabilize RustcEncodable & RustcDecodable, remove from prelude in next edition
[disposition: merge] impl From<TryReserveError> for io::Error
Cargo
[disposition: merge] Tracking Issue for rustc --check-cfg integration
New and Updated RFCs
[new] Public Key Infrastructure for Rust Project
Upcoming Events
Rusty Events between 2024-03-06 - 2024-04-03 🦀
Virtual
2024-03-06 | Virtual (Dublin, IE) | Rust Dublin
An intro to nom, parsing made easy for Rustaceans
2024-03-06 | Virtual (Indianapolis, IN, US) | Indy Rust
Indy.rs - with Social Distancing
2024-03-07 | Virtual (Charlottesville, NC, US) | Charlottesville Rust Meetup
Crafting Interpreters in Rust Collaboratively
2024-03-12 | Virtual (Dallas, TX, US) | Dallas Rust
Second Tuesday
2024-03-12 | Hybrid (Virtual + In-person) Munich, DE | Rust Munich
Rust Munich 2024 / 1 - hybrid
2024-03-13 | Virtual (Cardiff, UK) | Rust and C++ Cardiff
Rust for Rustaceans Book Club: Chapter 3 - Designing Interfaces
2024-03-14 | Virtual (Berlin, DE) | OpenTechSchool Berlin
Web Frontend Co-Learning (online)
2024-03-14 | Virtual (Berlin, DE) | OpenTechSchool Berlin + Rust Berlin
Rust Hack and Learn | Mirror: Rust Hack n Learn Meetup | Mirror: Berline.rs page
2024-03-14 | Virtual (Nürnberg, DE) | Rust Nüremberg
Rust Nürnberg online
2024-03-19 | Virtual (Washinigton, DC, US) | Rust DC
Mid-month Rustful
2024-03-20 | Virtual (Vancouver, BC, CA)| Vancouver Rust
Rust Study/Hack/Hang-out
2024-03-21 | Virtual (Charlottesville, NC, US) | Charlottesville Rust Meetup
Crafting Interpreters in Rust Collaboratively
2024-03-26 | Virtual + In Person (Barcelona, ES) | BcnRust
13th BcnRust Meetup - Stream
2024-03-28 | Virtual (Berlin, DE) | OpenTechSchool Berlin + Rust Berlin
Rust Hack and Learn | Mirror: Rust Hack n Learn Meetup
2024-04-02 | Virtual (Buffalo, NY, US) | Buffalo Rust
Buffalo Rust User Group
2024-04-03 | Virtual (Cardiff, UK) | Rust and C++ Cardiff
Rust for Rustaceans Book Club: Chapter 4 - Error Handling
2024-04-03 | Virtual (Indianapolis, IN, US) | Indy Rust
Indy.rs - with Social Distancing
Asia
2024-03-09 | Karnataka, Bengaluru, IN | Rust Bangalore
March 2024 Rustacean Meetup
2024-03-12 | Tokyo, JP | Tokyo Rust Meetup
Building the Isograph Compiler in Rust
Europe
2024-03-06 | Cologne / Köln, DE | Rust Cologne
Macros by simple Examples
2024-03-06 | Zürich, CH | Rust Zürisee
How to (partial) Migration - March Meetup
2024-03-07 | Copenhagen, DK | Copenhagen Rust Community
Rust Hack Night #3: Embedded on Espressif's ESP32C3
2024-03-12 | Munich, DE + Virtual | Rust Munich
Rust Munich 2024 / 1 - hybrid
2024-03-13 | Paris, FR | Paris Rustaceans
Rust Meetup in Paris
2024-03-14 | Reading, UK | Reading Rust Workshop
Reading Rust Meetup at Browns
2024-03-19 | Aarhus, DK | Rust Aarhus
Hack Night
2024-03-19 | Leipzig, DE | Rust - Modern Systems Programming in Leipzig
Rust Interactive Session
2024-03-19 | Prague, CZ | Rust Prague
Rust Meetup @ Charles University
2024-03-20 | Girona, ES | Rust Girona
Introduction to programming Microcontrollers with Rust
2024-03-20 | Lyon, FR | Rust Lyon
Rust Lyon Meetup #9
2024-03-21 | Augsburg, DE | Rust Meetup Augsburg
Augsburg Rust Meetup #6
2024-03-21 | Lille, FR | Rust Lille
Rust Lille #6: Du RSS et de L'ECS !
2024-03-26 | Barcelona, ES + Virtual | BcnRust
13th BcnRust Meetup
2024-03-27 - 2024-03-28 | London, UK | Rust Nation UK
Rust Nation 2024 - Conference
2024-03-28 | Berlin, DE | Rust Berlin
Rust and Tell
North America
2024-03-07 | Mountain View, CA, US | Mountain View Rust Meetup
Rust Meetup at Hacker Dojo
2024-03-12 | New York, NY, US | Rust NYC
Rust NYC Monthly Meetup
2024-03-13 | Boston, MA, US | Boston Rust Meetup
Northeastern Rust Lunch
2024-03-19 | San Francisco, CA, US | San Francisco Rust Study Group
Rust Hacking in Person
2024-03-21 | Seattle, WA, US | Seattle Rust User Group
Seattle Rust User Group Meetup
2024-03-27 | Austin, TX, US | Rust ATX
Rust Lunch - Fareground
2024-03-27 | Hawthorne, CA, US | Freeform
Rust in the Physical World 🦀 Tech Talk Event at Freeform
If you are running a Rust event please add it to the calendar to get it mentioned here. Please remember to add a link to the event too. Email the Rust Community Team for access.
Jobs
Please see the latest Who's Hiring thread on r/rust
Quote of the Week
My experience with C++ is that, as I’ve become more of an expert in the language, I’ve become more disillusioned with it. It’s incredibly hard to do things that you should be able to do in software. And, it’s a huge problem for me to constantly be helping other engineers debug the same bugs over and over. It’s always another use after free. I’ve probably debugged 300 of those. [...]
In our experience using the Rust ecosystem for almost three years now, I don't think we found a bug in a single Rust crate that we've pulled off the shelf. We found a bug in one of them and that was a Rust crate wrapping a C library and the bug was in the C library. The software quality that you kind of get for free is amazing.
– Carter Schultz interviewed on the filtra blog
Thanks to George Barwood for the suggestion!
Please submit quotes and vote for next week!
This Week in Rust is edited by: nellshamrell, llogiq, cdmistman, ericseppanen, extrawurst, andrewpollack, U007D, kolharsam, joelmarcey, mariannegoldin, bennyvasquez.
Email list hosting is sponsored by The Rust Foundation
Discuss on r/rust
1 note
·
View note
Photo

How to Build and Deploy a Web App With Buddy
Moving code from development to production doesn't have to be as error-prone and time-consuming as it often is. By using Buddy, a continuous integration and delivery tool that doubles up as a powerful automation platform, you can automate significant portions of your development workflow, including all your builds, tests, and deployments.
Unlike many other CI/CD tools, Buddy has a pleasant and intuitive user interface with a gentle learning curve. It also offers a large number of well-tested actions that help you perform common tasks such as compiling sources and transferring files.
In this tutorial, I'll show you how you can use Buddy to build, test, and deploy a Node.js app.
Prerequisites
To be able to follow along, you must have the following installed on your development server:
Node.js 10.16.3 or higher
MongoDB 4.0.10 or higher
Git 2.7.4 or higher
1. Setting Up a Node.js App
Before you dive into Buddy, of course, you'll need a web app you can build and deploy. If you have one already, feel free to skip to the next step.
If you don't have a Node.js app you can experiment with, you can create one quickly using a starter template. Using the popular Hackathon starter template is a good idea because it has all the characteristics of a typical Node.js app.
Fork the template on GitHub and use git to download the fork to your development environment.
git clone https://github.com/hathi11/hackathon-starter.git
It's worth noting that Buddy is used with a Git repository. It supports repositories hosted on GitHub, BitBucket, and other such popular Git hosts. Buddy also has a built-in Git hosting solution or you can just as easily use Buddy with your own private Git servers.
Once the clone's complete, use npm to install all the dependencies of the web app.
cd hackathon-starter/ npm install
At this point, you can run the app locally and explore it using your browser.
node app.js
Here's what the web app looks like:
2. Creating a Buddy Project
If you don't have a Buddy account already, now is a good time to create one. Buddy offers two premium tiers and a free tier, all of which are cloud based. The free tier, which gives you 1 GB of RAM and 2 virtual CPUs, will suffice for now.
Once you're logged in to your Buddy account, press the Create new project button to get started.
When prompted to select a Git hosting provider, choose GitHub and give Buddy access to your GitHub repositories.
You should now be able to see all your GitHub repositories on Buddy. Click on the hackathon-starter repository to start creating automations for it.
Note that Buddy automatically recognizes our Node.js app as an Express application. It's because our starter template uses the Express web app framework.
3. Creating a Pipeline
On Buddy, a pipeline is what allows you to orchestrate and run all your tasks. Whenever you need to automate something with Buddy, you either create a new pipeline for it or add it to an existing pipeline.
Click on the Add a new pipeline button to start creating your first pipeline. In the form shown next, give a name to the pipeline and choose On push as the trigger mode. As you may have guessed, choosing this mode means that the pipeline is executed as soon as you push your commits to GitHub.
The next step is to add actions to your pipeline. To help you get started, Buddy intelligently generates a list of actions that are most relevant to your project.
For now, choose the Node.js action, which loads a Docker container that has Node.js installed on it. We'll be using this action to build our web app and run all its tests. So, on the next screen, go ahead and type in the following commands:
npm install npm test
4. Attaching a Service
Our web app uses MongoDB as its database. If it fails to establish a connection to a MongoDB server on startup, it will exit with an error. Therefore, our Docker container on Buddy must have access to a MongoDB server.
Buddy allows you to easily attach a wide variety of databases and other services to its Docker containers. To attach a MongoDB server, switch to the Services tab and select MongoDB. In the form shown next, you'll be able to specify details such as the hostname, port, and MongoDB version you prefer.
Make a note of the details you enter and press the Save this action button.
Next, you must configure the web app to use the URI of Buddy's MongoDB server. To do so, you can either change the value of the MONGODB_URI field in the .env.example file, or you can use an environment variable on Buddy. For now, let's go ahead with the latter option.
So switch to the Variables tab and press the Add a new variable button. In the dialog that pops up, set the Key field to MONGODB_URI and the Value field to a valid MongoDB connection string that's based on the hostname you chose earlier. Then press the Create variable button.
The official documentation has a lot more information about using environment variables in a Buddy pipeline.
5. Running the Pipeline
Our pipeline is already runnable, even though it has only one action. To run it, press the Run pipeline button.
You will now be taken to a screen where you can monitor the progress of the pipeline in real time. Furthermore, you can press any of the Logs buttons (there's one for each action in the pipeline) to take a closer look at the actual output of the commands that are being executed.
You can, of course, also run the pipeline by pushing a commit to your GitHub repository. I suggest you make a few changes to the web app, such as changing its header by modifying the views/partials/header.pug file, and then run the following commands:
git add . git commit -m "changed the header" git push origin master
When the last command has finished, you should be able to see a new execution of the pipeline start automatically.
6. Moving Files
When a build is successful and all the tests have passed, you'd usually want to move your code to production. Buddy has predefined actions that help you securely transfer files to several popular hosting solutions, such as the Google Cloud Platform, DigitalOcean, and Amazon Web Services. Furthermore, if you prefer using your own private server that runs SFTP or FTP, Buddy can directly use those protocols too.
In this tutorial, we'll be using a Google Compute Engine instance, which is nothing but a virtual machine hosted on Google's cloud, as our production server. So switch to the Actions tab of the pipeline and press the + button shown below the Build and test action to add a new action.
On the next screen, scroll down to the Google Cloud Platform section and select the Compute Engine option.
In the form that pops up, you must specify the IP address of your VM. Additionally, to allow Buddy to connect to the VM, you must provide a username and choose an authentication mode.
The easiest authentication mode in my opinion is Buddy's SSH key. When you choose this mode, Buddy will display an RSA public key that you can simply add to your VM's list of authorized keys.
To make sure that the credentials you entered are valid, you can now press the Test action button. If there are no errors, you should see a test log that looks like this:
Next, choose GitHub repository as the source of the files and use the Remote path field to specify the destination directory on the Google Cloud VM. The Browse button lets you browse through the filesystem of the VM and select the right directory.
Finally, press the Add this action button.
7. Using SSH
Once you've copied the code to your production server, you must again build and install all its dependencies there. You must also restart the web app for the code changes to take effect. To perform such varied tasks, you'll need a shell. The SSH action gives you one, so add it as the last action of your pipeline.
In the form that pops up, you must again specify your VM's IP address and login credentials. Then, you can type in the commands you want to run. Here's a quick way to install the dependencies and restart the Node.js server:
pkill -HUP node #stop node server cd my_project npm install #install dependencies export MONGODB_URI= nohup node app.js > /dev/null 2>&1 & #start node server
As shown in the Bash code above, you must reset the MONGODB_URI environment variable. This is to make sure that your production server connects to its own MongoDB instance, instead of Buddy's MongoDB service.
Press the Add this action button again to update the pipeline.
At this point, the pipeline has three actions that run sequentially. It should look like this:
Press the Run pipeline button to start it. If there are no errors, it should take Buddy only a minute or two to build, test, and deploy your Node.js web app to your Google Cloud VM.
Conclusion
Being able to instantly publish new features, bug fixes, and enhancements to your web apps gives you a definite edge over your competition. In this tutorial, you learned how to use Buddy's pipelines, predefined actions, and attachable services to automate and speed up common tasks such as building, testing, and deploying Node.js applications.
There's a lot more the Buddy platform can do. To learn more about it, do refer to its extensive documentation.
by Ashraff Hathibelagal via Envato Tuts+ Code https://ift.tt/33rH96G
1 note
·
View note
Text
Easy Automatic npm Publishes
One common question from people using npm to publish, especially on CI systems, is how best to automate the process, especially when dealing with multiple branches.
For a while now, I've been using a pattern that takes almost all of the human interaction out of it, since I tend to mess stuff up when I type it with my fingers. This works well for automatic publishes from CI or when publishing manually from a terminal.
I haven't manually typed npm publish in a while, which is a good thing.
First things first, have good tests
I am a huge fan of running tests with 100% test coverage. It isn't a perfect guard against every problem out there, but it does keep me from doing stupid things, like assuming that I know what my program does.
My go-to test library is tap, but you can do this with any testing library that supports code coverage. If it doesn't support code coverage out of the box, you can use nyc to run any Node.js process with coverage tracking.
To use it, run npm i tap -D, and then add this to your scripts section in package.json:
{ "scripts": { "test": "tap" }, "tap": { "check-coverage": true } }
The npm version Command
The npm version command will figure out what the next version should be, edit your package.json file, and even check it into git with a signed tag. The beauty of this is that it also prevents you from bumping the version when you have untracked changes in your git working directory, and provides some hook scripts that can do other things before or after the version bump.
In the scripts section of my package.json file, I add a preversion script that runs my tests:
{ "scripts": { "preversion": "npm test", "test": "tap" }, "tap": { "check-coverage": true } }
Now, before I can bump the version, npm will make sure that my tests pass. If the test fails (or if coverage isn't 100%), then it'll fail and the version command fails.
Publishing on Version Change
Bumping the version is fine, but then it's time to share it. Along with preversion, the postversion command does actions after the version is bumped. So, let's hook onto that to publish the package.
{ "scripts": { "postversion": "npm publish", "preversion": "npm test", "test": "tap" }, "tap": { "check-coverage": true } }
Keeping Git and npm in Sync
That's fine for pushing to npm, but then I have to remember to push the changes to git. (I have many times forgotten to do this, and gotten issues because the code on npm is not in GitHub, which is generally a bad sign.)
Thankfully, npm also gives us a way to hook a script around the publish event, so let's use that:
{ "scripts": { "postpublish": "git push origin --all; git push origin --tags", "postversion": "npm publish", "preversion": "npm test", "test": "tap" }, "tap": { "check-coverage": true } }
This runs two commands. The first pushes all branches, and the second pushes all the tags (including my newly published version tag).
Branches and Dist-Tags
Occasionally, I'll find myself working on some big feature for a new release that is not yet ready for prime time.
In the feature branch, I'll modify the scripts by adding a --tag argument to the npm publish command to put it on a dist-tag other than latest.
{ "scripts": { "postversion": "npm publish --tag=next", "postpublish": "git push origin --all; git push origin --tags", "preversion": "npm test", "test": "tap" }, "tap": { "check-coverage": true } }
Now, I can tell people to run npm install my-module@next to try out the new prerelease version.
On the other side, I might want to land a bugfix or backport a feature for a legacy version. To do that, I create a git branch with the old version, and update package.json to add a legacy tag instead.
{ "scripts": { "postversion": "npm publish --tag=legacy", "postpublish": "git push origin --all; git push origin --tags", "preversion": "npm test", "test": "tap" }, "tap": { "check-coverage": true } }
Bonus Points: Sign Your Versions
Git has support for PGP signing tagged commits. To tell npm to take advantage of this, set these two config values:
npm config set sign-git-commit true npm config set sign-git-tag true
If setting up PGP and hooking it up with Git is too much of a pain, you're not alone. I'm a nerd who's been computering for a very long time, and I can't handle it. Also, I'm always worried about my keys just sitting on my machine in text files, even if they are encrypted with a passphrase. And if they are encrypted with a passphrase, then I have to type it in all the time, and that's just too much work.
I'm a huge fan of Krypton. It stores your PGP and SSH private keys in your mobile device's secure storage vault, and then sends a push notification to allow it to do things with those keys. It's dead-simple to set up, and extremely easy to use, and gives you a hardware second factor for everything that matters.
Of course, and I don't exactly know if this is a bug or a feature, it does mean that whenever I run npm version, between the commit, the signature, the tag, and the two SSH connections, my phone does a lot of buzzing.
Running npm version to Test and Publish
From there, I use the npm version command to do all my publishing. For bug fixes, I run npm version patch. For new features, I run npm version minor. For breaking changes, I run npm version major.
If you use Conventional Commits or similar tools, you could even automate the detection of what kind of version bump it should be, though that's left as an exercise for the reader.
This approach of using npm scripts to automate the process works well with any system where you'll be publishing and committing. Set it up in your next project, and trust your human fingers a little bit less :)
PS: npm Configuration is Very Flexible
You'll note that I did --tag= in the publish commands above. You can also configure npm in many other ways. Any configuration value (including tag in the case of npm publish) can be set:
explicitly on the command line, like --tag=whatever
in the environment, like NPM_CONFIG_TAG=whatever
in a .npmrc file in the root of your project, like tag = whatever
in a .npmrc file in your home directory
in /usr/local/etc/npmrc (or /usr/etc/npmrc on some systems).
This works inheritance-style, so the higher up on that list a setting is, the higher the priority.
For CI/CD systems, this means that you can sometimes set environment variables to control the behavior of npm commands, without having to change the code or inject files into places. If it's easier to control it with a file (for example, checking a .npmrc file into git), then that's also fine.
11 notes
·
View notes
Text
Key-based authentication in OpenSSH for Windows | Microsoft Docs
⭐ ⏩⏩⏩️ DOWNLOAD LINK 🔥🔥🔥 Step 3: Use OpenSSH to Generate an SSH Key Pair. In the command prompt, type the following: ssh-keygen. OpenSSH includes tools to help support key based authentication, specifically: ssh-keygen for generating secure keys; ssh-agent and ssh-add for. Whether you use Command Prompt or Windows Terminal, type ssh-keygen and hit Enter. This will automatically generate the SSH keys. Generating these keys from Linux is easy, and thanks to Ubuntu on WSL, you can follow the same process from Windows But even without Ubuntu, SSH keys. Ssh-keygen is a tool for creating new authentication key pairs for SSH. Such key pairs are used for automating logins, single sign-on, and for authenticating. ssh-keygen - Creation, management, and conversion of keys used for client and server authentication. Copy ssh-keygen [-b bits] -t type [-N. · open command prompt (cmd) · enter ssh-keygen and press enter · press enter to all settings. now your key is saved in c:\Users\.ssh\. › authentication › connecting-to-github-with-ssh › genera. Paste the text below, substituting in your GitHub email address. $ ssh-keygen -t ed -C "your_email@". Note: If you are using a legacy. which is provided with the SSH package on Linux/macOS systems and comes with Git for Windows: $ ssh-keygen -o Generating public/private rsa key pair.
Generate new ssh keys in Windows 10 / 11 - Stack Overflow
Generate SSH Keys on Windows 10 | Ubuntu
How to Generate SSH keys in Windows 10 and Windows 11
Key-based authentication in OpenSSH for Windows | Microsoft Docs
Creating SSH keys | Bitbucket Data Center and Server | Atlassian Documentation
Manually generating your SSH key in Windows
Generate new ssh keys in Windows 10 / 11 - Stack Overflow
Generating a new SSH key and adding it to the ssh-agent - GitHub Docs
Git - Generating Your SSH Public Key
How to Generate SSH keys in Windows 10 and Windows 11
Key-based authentication in OpenSSH for Windows | Microsoft Docs
Generate SSH Keys on Windows 10 | Ubuntu
What is ssh-keygen & How to Use It to Generate a New SSH Key?
1 note
·
View note
Text
Creating SSH keys | Bitbucket Data Center and Server | Atlassian Documentation
⭐ ⏩⏩⏩️ DOWNLOAD LINK 🔥🔥🔥 Step 3: Use OpenSSH to Generate an SSH Key Pair. In the command prompt, type the following: ssh-keygen. OpenSSH includes tools to help support key based authentication, specifically: ssh-keygen for generating secure keys; ssh-agent and ssh-add for. Whether you use Command Prompt or Windows Terminal, type ssh-keygen and hit Enter. This will automatically generate the SSH keys. Generating these keys from Linux is easy, and thanks to Ubuntu on WSL, you can follow the same process from Windows But even without Ubuntu, SSH keys. Ssh-keygen is a tool for creating new authentication key pairs for SSH. Such key pairs are used for automating logins, single sign-on, and for authenticating. ssh-keygen - Creation, management, and conversion of keys used for client and server authentication. Copy ssh-keygen [-b bits] -t type [-N. · open command prompt (cmd) · enter ssh-keygen and press enter · press enter to all settings. now your key is saved in c:\Users\.ssh\. › authentication › connecting-to-github-with-ssh › genera. Paste the text below, substituting in your GitHub email address. $ ssh-keygen -t ed -C "your_email@". Note: If you are using a legacy. which is provided with the SSH package on Linux/macOS systems and comes with Git for Windows: $ ssh-keygen -o Generating public/private rsa key pair.
Generate new ssh keys in Windows 10 / 11 - Stack Overflow
Generate SSH Keys on Windows 10 | Ubuntu
How to Generate SSH keys in Windows 10 and Windows 11
Key-based authentication in OpenSSH for Windows | Microsoft Docs
Creating SSH keys | Bitbucket Data Center and Server | Atlassian Documentation
Manually generating your SSH key in Windows
Generate new ssh keys in Windows 10 / 11 - Stack Overflow
Generating a new SSH key and adding it to the ssh-agent - GitHub Docs
Git - Generating Your SSH Public Key
How to Generate SSH keys in Windows 10 and Windows 11
Key-based authentication in OpenSSH for Windows | Microsoft Docs
Generate SSH Keys on Windows 10 | Ubuntu
What is ssh-keygen & How to Use It to Generate a New SSH Key?
1 note
·
View note
Text
Generating a new SSH key and adding it to the ssh-agent - GitHub Docs
⭐ ⏩⏩⏩️ DOWNLOAD LINK 🔥🔥🔥 Step 3: Use OpenSSH to Generate an SSH Key Pair. In the command prompt, type the following: ssh-keygen. OpenSSH includes tools to help support key based authentication, specifically: ssh-keygen for generating secure keys; ssh-agent and ssh-add for. Whether you use Command Prompt or Windows Terminal, type ssh-keygen and hit Enter. This will automatically generate the SSH keys. Generating these keys from Linux is easy, and thanks to Ubuntu on WSL, you can follow the same process from Windows But even without Ubuntu, SSH keys. Ssh-keygen is a tool for creating new authentication key pairs for SSH. Such key pairs are used for automating logins, single sign-on, and for authenticating. ssh-keygen - Creation, management, and conversion of keys used for client and server authentication. Copy ssh-keygen [-b bits] -t type [-N. · open command prompt (cmd) · enter ssh-keygen and press enter · press enter to all settings. now your key is saved in c:\Users\.ssh\. › authentication › connecting-to-github-with-ssh › genera. Paste the text below, substituting in your GitHub email address. $ ssh-keygen -t ed -C "your_email@". Note: If you are using a legacy. which is provided with the SSH package on Linux/macOS systems and comes with Git for Windows: $ ssh-keygen -o Generating public/private rsa key pair.
Generate new ssh keys in Windows 10 / 11 - Stack Overflow
Generate SSH Keys on Windows 10 | Ubuntu
How to Generate SSH keys in Windows 10 and Windows 11
Key-based authentication in OpenSSH for Windows | Microsoft Docs
Creating SSH keys | Bitbucket Data Center and Server | Atlassian Documentation
Manually generating your SSH key in Windows
Generate new ssh keys in Windows 10 / 11 - Stack Overflow
Generating a new SSH key and adding it to the ssh-agent - GitHub Docs
Git - Generating Your SSH Public Key
How to Generate SSH keys in Windows 10 and Windows 11
Key-based authentication in OpenSSH for Windows | Microsoft Docs
Generate SSH Keys on Windows 10 | Ubuntu
What is ssh-keygen & How to Use It to Generate a New SSH Key?
1 note
·
View note
Text
Key-based authentication in OpenSSH for Windows | Microsoft Docs
⭐ ⏩⏩⏩️ DOWNLOAD LINK 🔥🔥🔥 Step 3: Use OpenSSH to Generate an SSH Key Pair. In the command prompt, type the following: ssh-keygen. OpenSSH includes tools to help support key based authentication, specifically: ssh-keygen for generating secure keys; ssh-agent and ssh-add for. Whether you use Command Prompt or Windows Terminal, type ssh-keygen and hit Enter. This will automatically generate the SSH keys. Generating these keys from Linux is easy, and thanks to Ubuntu on WSL, you can follow the same process from Windows But even without Ubuntu, SSH keys. Ssh-keygen is a tool for creating new authentication key pairs for SSH. Such key pairs are used for automating logins, single sign-on, and for authenticating. ssh-keygen - Creation, management, and conversion of keys used for client and server authentication. Copy ssh-keygen [-b bits] -t type [-N. · open command prompt (cmd) · enter ssh-keygen and press enter · press enter to all settings. now your key is saved in c:\Users\.ssh\. › authentication › connecting-to-github-with-ssh › genera. Paste the text below, substituting in your GitHub email address. $ ssh-keygen -t ed -C "your_email@". Note: If you are using a legacy. which is provided with the SSH package on Linux/macOS systems and comes with Git for Windows: $ ssh-keygen -o Generating public/private rsa key pair.
Generate new ssh keys in Windows 10 / 11 - Stack Overflow
Generate SSH Keys on Windows 10 | Ubuntu
How to Generate SSH keys in Windows 10 and Windows 11
Key-based authentication in OpenSSH for Windows | Microsoft Docs
Creating SSH keys | Bitbucket Data Center and Server | Atlassian Documentation
Manually generating your SSH key in Windows
Generate new ssh keys in Windows 10 / 11 - Stack Overflow
Generating a new SSH key and adding it to the ssh-agent - GitHub Docs
Git - Generating Your SSH Public Key
How to Generate SSH keys in Windows 10 and Windows 11
Key-based authentication in OpenSSH for Windows | Microsoft Docs
Generate SSH Keys on Windows 10 | Ubuntu
What is ssh-keygen & How to Use It to Generate a New SSH Key?
0 notes
Text
Key-based authentication in OpenSSH for Windows | Microsoft Docs
⭐ ⏩⏩⏩️ DOWNLOAD LINK 🔥🔥🔥 Step 3: Use OpenSSH to Generate an SSH Key Pair. In the command prompt, type the following: ssh-keygen. OpenSSH includes tools to help support key based authentication, specifically: ssh-keygen for generating secure keys; ssh-agent and ssh-add for. Whether you use Command Prompt or Windows Terminal, type ssh-keygen and hit Enter. This will automatically generate the SSH keys. Generating these keys from Linux is easy, and thanks to Ubuntu on WSL, you can follow the same process from Windows But even without Ubuntu, SSH keys. Ssh-keygen is a tool for creating new authentication key pairs for SSH. Such key pairs are used for automating logins, single sign-on, and for authenticating. ssh-keygen - Creation, management, and conversion of keys used for client and server authentication. Copy ssh-keygen [-b bits] -t type [-N. · open command prompt (cmd) · enter ssh-keygen and press enter · press enter to all settings. now your key is saved in c:\Users\.ssh\. › authentication › connecting-to-github-with-ssh › genera. Paste the text below, substituting in your GitHub email address. $ ssh-keygen -t ed -C "your_email@". Note: If you are using a legacy. which is provided with the SSH package on Linux/macOS systems and comes with Git for Windows: $ ssh-keygen -o Generating public/private rsa key pair.
Generate new ssh keys in Windows 10 / 11 - Stack Overflow
Generate SSH Keys on Windows 10 | Ubuntu
How to Generate SSH keys in Windows 10 and Windows 11
Key-based authentication in OpenSSH for Windows | Microsoft Docs
Creating SSH keys | Bitbucket Data Center and Server | Atlassian Documentation
Manually generating your SSH key in Windows
Generate new ssh keys in Windows 10 / 11 - Stack Overflow
Generating a new SSH key and adding it to the ssh-agent - GitHub Docs
Git - Generating Your SSH Public Key
How to Generate SSH keys in Windows 10 and Windows 11
Key-based authentication in OpenSSH for Windows | Microsoft Docs
Generate SSH Keys on Windows 10 | Ubuntu
What is ssh-keygen & How to Use It to Generate a New SSH Key?
1 note
·
View note
Text
Key-based authentication in OpenSSH for Windows | Microsoft Docs
⭐ ⏩⏩⏩️ DOWNLOAD LINK 🔥🔥🔥 Step 3: Use OpenSSH to Generate an SSH Key Pair. In the command prompt, type the following: ssh-keygen. OpenSSH includes tools to help support key based authentication, specifically: ssh-keygen for generating secure keys; ssh-agent and ssh-add for. Whether you use Command Prompt or Windows Terminal, type ssh-keygen and hit Enter. This will automatically generate the SSH keys. Generating these keys from Linux is easy, and thanks to Ubuntu on WSL, you can follow the same process from Windows But even without Ubuntu, SSH keys. Ssh-keygen is a tool for creating new authentication key pairs for SSH. Such key pairs are used for automating logins, single sign-on, and for authenticating. ssh-keygen - Creation, management, and conversion of keys used for client and server authentication. Copy ssh-keygen [-b bits] -t type [-N. · open command prompt (cmd) · enter ssh-keygen and press enter · press enter to all settings. now your key is saved in c:\Users\.ssh\. › authentication › connecting-to-github-with-ssh › genera. Paste the text below, substituting in your GitHub email address. $ ssh-keygen -t ed -C "your_email@". Note: If you are using a legacy. which is provided with the SSH package on Linux/macOS systems and comes with Git for Windows: $ ssh-keygen -o Generating public/private rsa key pair.
Generate new ssh keys in Windows 10 / 11 - Stack Overflow
Generate SSH Keys on Windows 10 | Ubuntu
How to Generate SSH keys in Windows 10 and Windows 11
Key-based authentication in OpenSSH for Windows | Microsoft Docs
Creating SSH keys | Bitbucket Data Center and Server | Atlassian Documentation
Manually generating your SSH key in Windows
Generate new ssh keys in Windows 10 / 11 - Stack Overflow
Generating a new SSH key and adding it to the ssh-agent - GitHub Docs
Git - Generating Your SSH Public Key
How to Generate SSH keys in Windows 10 and Windows 11
Key-based authentication in OpenSSH for Windows | Microsoft Docs
Generate SSH Keys on Windows 10 | Ubuntu
What is ssh-keygen & How to Use It to Generate a New SSH Key?
1 note
·
View note
Text
Generate SSH Keys on Windows 10 | Ubuntu
⭐ ⏩⏩⏩️ DOWNLOAD LINK 🔥🔥🔥 Step 3: Use OpenSSH to Generate an SSH Key Pair. In the command prompt, type the following: ssh-keygen. OpenSSH includes tools to help support key based authentication, specifically: ssh-keygen for generating secure keys; ssh-agent and ssh-add for. Whether you use Command Prompt or Windows Terminal, type ssh-keygen and hit Enter. This will automatically generate the SSH keys. Generating these keys from Linux is easy, and thanks to Ubuntu on WSL, you can follow the same process from Windows But even without Ubuntu, SSH keys. Ssh-keygen is a tool for creating new authentication key pairs for SSH. Such key pairs are used for automating logins, single sign-on, and for authenticating. ssh-keygen - Creation, management, and conversion of keys used for client and server authentication. Copy ssh-keygen [-b bits] -t type [-N. · open command prompt (cmd) · enter ssh-keygen and press enter · press enter to all settings. now your key is saved in c:\Users\.ssh\. › authentication › connecting-to-github-with-ssh › genera. Paste the text below, substituting in your GitHub email address. $ ssh-keygen -t ed -C "your_email@". Note: If you are using a legacy. which is provided with the SSH package on Linux/macOS systems and comes with Git for Windows: $ ssh-keygen -o Generating public/private rsa key pair.
Generate new ssh keys in Windows 10 / 11 - Stack Overflow
Generate SSH Keys on Windows 10 | Ubuntu
How to Generate SSH keys in Windows 10 and Windows 11
Key-based authentication in OpenSSH for Windows | Microsoft Docs
Creating SSH keys | Bitbucket Data Center and Server | Atlassian Documentation
Manually generating your SSH key in Windows
Generate new ssh keys in Windows 10 / 11 - Stack Overflow
Generating a new SSH key and adding it to the ssh-agent - GitHub Docs
Git - Generating Your SSH Public Key
How to Generate SSH keys in Windows 10 and Windows 11
Key-based authentication in OpenSSH for Windows | Microsoft Docs
Generate SSH Keys on Windows 10 | Ubuntu
What is ssh-keygen & How to Use It to Generate a New SSH Key?
1 note
·
View note
Text
Git - Generating Your SSH Public Key
⭐ ⏩⏩⏩️ DOWNLOAD LINK 🔥🔥🔥 Step 3: Use OpenSSH to Generate an SSH Key Pair. In the command prompt, type the following: ssh-keygen. OpenSSH includes tools to help support key based authentication, specifically: ssh-keygen for generating secure keys; ssh-agent and ssh-add for. Whether you use Command Prompt or Windows Terminal, type ssh-keygen and hit Enter. This will automatically generate the SSH keys. Generating these keys from Linux is easy, and thanks to Ubuntu on WSL, you can follow the same process from Windows But even without Ubuntu, SSH keys. Ssh-keygen is a tool for creating new authentication key pairs for SSH. Such key pairs are used for automating logins, single sign-on, and for authenticating. ssh-keygen - Creation, management, and conversion of keys used for client and server authentication. Copy ssh-keygen [-b bits] -t type [-N. · open command prompt (cmd) · enter ssh-keygen and press enter · press enter to all settings. now your key is saved in c:\Users\.ssh\. › authentication › connecting-to-github-with-ssh › genera. Paste the text below, substituting in your GitHub email address. $ ssh-keygen -t ed -C "your_email@". Note: If you are using a legacy. which is provided with the SSH package on Linux/macOS systems and comes with Git for Windows: $ ssh-keygen -o Generating public/private rsa key pair.
Generate new ssh keys in Windows 10 / 11 - Stack Overflow
Generate SSH Keys on Windows 10 | Ubuntu
How to Generate SSH keys in Windows 10 and Windows 11
Key-based authentication in OpenSSH for Windows | Microsoft Docs
Creating SSH keys | Bitbucket Data Center and Server | Atlassian Documentation
Manually generating your SSH key in Windows
Generate new ssh keys in Windows 10 / 11 - Stack Overflow
Generating a new SSH key and adding it to the ssh-agent - GitHub Docs
Git - Generating Your SSH Public Key
How to Generate SSH keys in Windows 10 and Windows 11
Key-based authentication in OpenSSH for Windows | Microsoft Docs
Generate SSH Keys on Windows 10 | Ubuntu
What is ssh-keygen & How to Use It to Generate a New SSH Key?
1 note
·
View note
Text
Generating a new SSH key and adding it to the ssh-agent - GitHub Docs
⭐ ⏩⏩⏩️ DOWNLOAD LINK 🔥🔥🔥 Step 3: Use OpenSSH to Generate an SSH Key Pair. In the command prompt, type the following: ssh-keygen. OpenSSH includes tools to help support key based authentication, specifically: ssh-keygen for generating secure keys; ssh-agent and ssh-add for. Whether you use Command Prompt or Windows Terminal, type ssh-keygen and hit Enter. This will automatically generate the SSH keys. Generating these keys from Linux is easy, and thanks to Ubuntu on WSL, you can follow the same process from Windows But even without Ubuntu, SSH keys. Ssh-keygen is a tool for creating new authentication key pairs for SSH. Such key pairs are used for automating logins, single sign-on, and for authenticating. ssh-keygen - Creation, management, and conversion of keys used for client and server authentication. Copy ssh-keygen [-b bits] -t type [-N. · open command prompt (cmd) · enter ssh-keygen and press enter · press enter to all settings. now your key is saved in c:\Users\.ssh\. › authentication › connecting-to-github-with-ssh › genera. Paste the text below, substituting in your GitHub email address. $ ssh-keygen -t ed -C "your_email@". Note: If you are using a legacy. which is provided with the SSH package on Linux/macOS systems and comes with Git for Windows: $ ssh-keygen -o Generating public/private rsa key pair.
Generate new ssh keys in Windows 10 / 11 - Stack Overflow
Generate SSH Keys on Windows 10 | Ubuntu
How to Generate SSH keys in Windows 10 and Windows 11
Key-based authentication in OpenSSH for Windows | Microsoft Docs
Creating SSH keys | Bitbucket Data Center and Server | Atlassian Documentation
Manually generating your SSH key in Windows
Generate new ssh keys in Windows 10 / 11 - Stack Overflow
Generating a new SSH key and adding it to the ssh-agent - GitHub Docs
Git - Generating Your SSH Public Key
How to Generate SSH keys in Windows 10 and Windows 11
Key-based authentication in OpenSSH for Windows | Microsoft Docs
Generate SSH Keys on Windows 10 | Ubuntu
What is ssh-keygen & How to Use It to Generate a New SSH Key?
1 note
·
View note
Text
Key-based authentication in OpenSSH for Windows | Microsoft Docs
⭐ ⏩⏩⏩️ DOWNLOAD LINK 🔥🔥🔥 Step 3: Use OpenSSH to Generate an SSH Key Pair. In the command prompt, type the following: ssh-keygen. OpenSSH includes tools to help support key based authentication, specifically: ssh-keygen for generating secure keys; ssh-agent and ssh-add for. Whether you use Command Prompt or Windows Terminal, type ssh-keygen and hit Enter. This will automatically generate the SSH keys. Generating these keys from Linux is easy, and thanks to Ubuntu on WSL, you can follow the same process from Windows But even without Ubuntu, SSH keys. Ssh-keygen is a tool for creating new authentication key pairs for SSH. Such key pairs are used for automating logins, single sign-on, and for authenticating. ssh-keygen - Creation, management, and conversion of keys used for client and server authentication. Copy ssh-keygen [-b bits] -t type [-N. · open command prompt (cmd) · enter ssh-keygen and press enter · press enter to all settings. now your key is saved in c:\Users\.ssh\. › authentication › connecting-to-github-with-ssh › genera. Paste the text below, substituting in your GitHub email address. $ ssh-keygen -t ed -C "your_email@". Note: If you are using a legacy. which is provided with the SSH package on Linux/macOS systems and comes with Git for Windows: $ ssh-keygen -o Generating public/private rsa key pair.
Generate new ssh keys in Windows 10 / 11 - Stack Overflow
Generate SSH Keys on Windows 10 | Ubuntu
How to Generate SSH keys in Windows 10 and Windows 11
Key-based authentication in OpenSSH for Windows | Microsoft Docs
Creating SSH keys | Bitbucket Data Center and Server | Atlassian Documentation
Manually generating your SSH key in Windows
Generate new ssh keys in Windows 10 / 11 - Stack Overflow
Generating a new SSH key and adding it to the ssh-agent - GitHub Docs
Git - Generating Your SSH Public Key
How to Generate SSH keys in Windows 10 and Windows 11
Key-based authentication in OpenSSH for Windows | Microsoft Docs
Generate SSH Keys on Windows 10 | Ubuntu
What is ssh-keygen & How to Use It to Generate a New SSH Key?
1 note
·
View note