#How to Generate SSH Key for Secure Authentication
Explore tagged Tumblr posts
Visit Tumblr Blog
Explore Tumblr blogs with no restrictions, modern design and the best experience.
Last Seen Tumblr Blogs


Fun Fact
After the announcement of the deal with Yahoo!, there were 170K signatures of unhappy Tumblr users petitioning to prevent the sale in 2013.
Text
How to Generate SSH Key for Secure Authentication
How to Generate SSH Key In the realm of secure communication and remote access, understanding “How to Generate SSH Key” is a fundamental skill for individuals and organizations alike. SSH, or Secure Shell, is a cryptographic protocol that allows for encrypted communication between a client and a server, ensuring the confidentiality and integrity of data during transmission. What is SSH and why…

View On WordPress
#how to add ssh key to github#How to generate SSH key#How to Generate SSH Key for Secure Authentication#How to generate ssh key on Linux or Mac OS#How to generate SSH key on Windows 10 or Windows 11#how to get ssh key
0 notes
Text
AWS Secret Manager Cost, Access Control And Authentication

Access control and authentication for AWS Secret Manager
AWS Identity and Access Management (IAM) is used by Secrets Manager to protect secret access. Access control and authentication are offered by IAM. Authentication confirms the legitimacy of people’s requests. Multi-factor authentication (MFA) tokens, access keys, and passwords are used in Secrets Manager’s sign-in procedure to confirm users’ identities. Look logging into AWS. Only authorized users are able to access AWS resources, including secrets, thanks to access control. Policies are used by Secrets Manager to specify who can access what resources and what actions an identity can do on them. View IAM’s policies and permissions.
Reference to AWS Secret Manager permissions
The Secrets Manager permissions reference may be found in the Service Authorization Reference under Actions, resources, and condition keys for AWS Secrets Manager.
Administrator permissions for Secrets Manager
Attach the following policies and complete the steps at Adding and deleting IAM identity permissions to provide AWS Secret Manager administrator permissions:
SecretsManagerReadWrite
IAMFullAccess
AWS advises against giving end users administrator privileges. The permission needed to enable rotation (IAMFullAccess) gives substantial access that are inappropriate for end users, even while this lets your users generate and manage own secrets.
Lambda rotation function permissions
Secrets Manager rotates secrets using AWS Lambda functions. Both the secret and the database or service for which the secret includes login credentials must be accessible to the Lambda function.
Keys for encryption permissions
AWS Secret Manager encrypts secrets using AWS Key Management Service (AWS KMS) keys. The proper permissions are immediately present in the AWS managed key aws/secretsmanager. Secrets Manager need permissions to the KMS key if you use a different one.
Replication permissions
You can limit which users or services are able to duplicate your secrets to other regions by utilizing IAM authorization policies.
Which secrets are allowed to be kept in Secrets Manager?
Database credentials, on-premises resource credentials, SaaS application credentials, third-party API keys, and Secure Shell (SSH) keys are among the secrets that can be managed.
Please be aware that while AWS Secret Manager lets you save a JSON document that lets you handle any text blurb that is 64 KB or less, allowing it to be utilized in a variety of situations, there are better ways to maintain some sorts of secrets in AWS, such as:
AWS credentials: Rather than using Secrets Manager to store or get AWS credentials, we can utilize AWS IAM.
Use the AWS KMS service for encryption keys.
Use AWS EC2 Instance Connect instead of SSH keys.
Use AWS Certificate Manager for private keys and certificates.
Beginning to Use AWS Secret Manager
Step 1: Create an AWS account and log in
You can secure access to your IT resources, services, and apps with AWS Secrets Manager.
Step 2: Access the Console for Secrets Management
Throughout their existence, database credentials, API keys, and other secrets can be effortlessly rotated, managed, and retrieved.
Step 3: To start the wizard, click on Store a new secret
Our 30-day free trial allows you to test Secrets Manager without paying anything extra. When you store your first secret, the free trial begins.
AWS Secrets Manager pricing
Pricing Overview
You can rotate, manage, and recover secrets at any point in their lifecycle using AWS Secret Manager, which makes it simpler to keep your environment safe and compliant. You pay for Secrets Manager according to how many secrets are saved and how many API calls are made. There are no long-term agreements or up-front fees. You only pay for usage; you don’t have to pay for the staff, infrastructure, or licenses needed to guarantee that your secrets are highly accessible and dependable.
Free Trial
Trial Period of 30 Days
With a 30-day free trial, you may test AWS Secrets Manager without paying anything more. You can rotate, manage, and retrieve secrets during the 30-day free trial.
When you store your first secret, your free trial begins.
Pricing
Monthly Per Secret
Each secret costs $0.40 a month. Replica secrets are billed at $0.40 per replica each month and are regarded as separate secrets. The cost is prorated (according to the amount of hours) for secrets that are kept for less than a month.
Get in touch with AWS if your company intends to use a lot of secrets.
Per 10,000 API calls
$0.05 per 10,000 API calls
Read more on Govindhtech.com
#AWSSecretManagerCost#AWSSecret#SecretManager#AWSSecretManager#IAM#KMSkey#News#Technews#Technology#Technologynews#Technologytrends#Govindhtech
0 notes
Text
Delinea Secret Server: Safeguarding Your Digital Secrets

In today's digital landscape, where data breaches and cyber threats loom large, safeguarding sensitive information is paramount. As organizations navigate through the intricacies of digital security, the demand for robust solutions to protect confidential data grows. One such solution gaining prominence is the Delinea Secret Server, renowned for its unparalleled secrecy and security measures.
Introduction to Secret Servers
What is a secret server? A secret server, also known as a privileged access management (PAM) solution, is a specialized software designed to securely manage and monitor access to privileged accounts and sensitive information within an organization's IT infrastructure. These servers act as gatekeepers, controlling and auditing user access to critical systems and data.
Understanding Delinea Secret Server
Delinea Secret Server stands out in the realm of secret servers, offering a comprehensive suite of features tailored to meet the evolving security needs of modern enterprises. At its core, Delinea Secret Server provides a centralized platform for securely storing, managing, and sharing privileged credentials, such as passwords, SSH keys, and API keys.
Features and functionalities
Robust encryption: Delinea Secret Server employs advanced encryption algorithms to safeguard sensitive data against unauthorized access or breaches.
Access control: Administrators can define granular access policies, ensuring that only authorized users can view or modify privileged credentials.
Audit trails: The platform generates detailed audit logs, enabling organizations to track user activities and maintain compliance with regulatory requirements.
Session monitoring: Delinea Secret Server offers real-time session monitoring capabilities, allowing administrators to monitor and terminate suspicious sessions promptly.
How it ensures security and secrecy Delinea Secret Server employs a multi-layered approach to security, combining encryption, access controls, and monitoring mechanisms to safeguard confidential information. By encrypting data at rest and in transit, the platform ensures that sensitive credentials remain protected from unauthorized access or interception. Additionally, granular access controls enable organizations to enforce the principle of least privilege, limiting user access to only the resources and information necessary for their roles.
Benefits of Delinea Secret Server
Enhanced data protection By centralizing privileged account management and implementing robust security measures, Delinea Secret Server helps organizations mitigate the risk of data breaches and insider threats. The platform's encryption capabilities ensure that sensitive information remains secure, even in the event of a security breach or unauthorized access attempt.
Improved access control Delinea Secret Server empowers organizations to enforce strict access controls and authentication mechanisms, reducing the risk of unauthorized access to critical systems and data. With features such as role-based access control and two-factor authentication, the platform provides organizations with the tools they need to enforce strong security policies and prevent unauthorized access.
Compliance with regulations In an increasingly regulated business environment, compliance with data protection regulations and industry standards is crucial. Delinea Secret Server helps organizations achieve compliance with regulations such as GDPR, HIPAA, and PCI DSS by providing robust security features, audit trails, and reporting capabilities. By maintaining a comprehensive record of privileged access activities, the platform enables organizations to demonstrate compliance with regulatory requirements and industry standards.
Implementation of Delinea Secret Server
Implementing Delinea Secret Server within an organization's IT infrastructure is a straightforward process, thanks to its intuitive user interface and comprehensive documentation. The following steps outline the implementation process:
Step-by-step setup guide
Installation: Begin by installing the Delinea Secret Server software on a dedicated server or virtual machine within your organization's network.
Configuration: Configure the platform according to your organization's security policies and requirements, including setting up user accounts, access controls, and encryption settings.
Integration: Integrate Delinea Secret Server with existing systems and applications, such as Active Directory, LDAP, and ticketing systems, to streamline user authentication and access management processes.
Training and support: Provide training to administrators and end-users on how to use Delinea Secret Server effectively, and ensure ongoing support and maintenance to address any issues or concerns that may arise.
Case Studies
Real-world examples of Delinea Secret Server implementation
Company A: Company A, a leading financial institution, implemented Delinea Secret Server to manage privileged access to its critical banking systems and applications. By centralizing password management and enforcing strict access controls, the organization was able to enhance security and compliance while streamlining privileged access management processes.
Company B: Company B, a global technology company, leveraged Delinea Secret Server to secure access to its cloud infrastructure and development environments. With features such as session monitoring and audit trails, the organization gained visibility into user activities and improved its ability to detect and respond to security incidents proactively.
Comparison with Other Solutions
Contrasting Delinea Secret Server with similar products While there are several privileged access management solutions available in the market, Delinea Secret Server distinguishes itself through its robust security features, ease of use, and scalability. Unlike traditional password management solutions or ad-hoc access control mechanisms, Delinea Secret Server provides a comprehensive platform for managing privileged credentials and enforcing strong security policies across the organization.
Unique selling points
Centralized management: Delinea Secret Server offers a centralized platform for managing privileged access to critical systems and data, simplifying administration and enhancing security.
Scalability: The platform is highly scalable, making it suitable for organizations of all sizes, from small businesses to large enterprises.
Flexibility: Delinea Secret Server supports a wide range of authentication methods and integration options, allowing organizations to tailor the platform to their specific security requirements and infrastructure.
Future Trends and Developments
Predictions for the future of secret servers As organizations continue to grapple with evolving cyber threats and regulatory requirements, the demand for secret servers and privileged access management solutions is expected to grow
0 notes
Text
SNOWFLAKE SSH

Title: Beyond the Web: Secure SSH Access to Your Snowflake Data Warehouse
Introduction
Snowflake’s cloud-based data warehousing solution offers a convenient web interface for management and queries — but sometimes, you need more profound control and flexibility. That’s where SSH (Secure Shell) comes in. In this blog post, we’ll explore the benefits of SSH access to Snowflake, how to set it up, and some common scenarios where it shines.
What is SSH?
A brief explanation of SSH as a secure network protocol that allows encrypted command-line access and file transfers to remote machines.
Why Use SSH with Snowflake?
Advanced Data Loading and Transformations: SSH lets you run complex shell scripts or tools on your local system to clean, transform, or load data directly into Snowflake.
Automation: To interact with Snowflake and orchestrate tasks (ETL pipelines, scheduled jobs) using your preferred scripting languages.
Enhanced Security: Key-based authentication with SSH can add an extra layer of security compared to solely relying on Snowflake’s web interface.
Troubleshooting: Connect directly to the Snowflake environment for in-depth debugging and problem resolution.
Setting Up SSH Access to Snowflake
Key-pair Generation: Use tools like ssh-keygen to create a secure public/private key pair.
Upload Your Public Key: Add your public key to your Snowflake user profile for authentication. (Snowflake’s documentation has detailed instructions)
Choosing an SSH Client: Popular options include the built-in command-line tools on Linux/macOS (Terminal) or dedicated clients like PuTTY (Windows).
Connecting: Connect to Snowflake using your SSH client and provide your Snowflake username, hostname, and private key.
Common Use Cases
Secure File Transfers: To move data files in and out of Snowflake, use tools like scp or sftp over the established SSH connection.
Managing Snowflake Objects: Connect to the SnowSQL CLI via SSH to perform advanced administration tasks (creating users, roles, warehouses, etc.)
Custom Tooling: Develop your scripts and tools in your favorite languages (Python, etc.) to automate interactions with Snowflake using the client libraries it provides.
Security Considerations
Enforce Key-Based Authentication: Always use key-based authentication instead of passwords with SSH.
Rotate Keys Regularly: Establish a schedule for rotating your SSH key pairs to maintain strong security.
Least Privilege: Grant specific Snowflake user permissions for the SSH connection, matching only the required actions.
Conclusion
Mastering SSH access to Snowflake opens up a new level of power and flexibility when interacting with your data warehouse. Whether you’re automating processes, performing intricate data manipulations, or prefer working in a command-line environment, SSH is invaluable for every Snowflake power user’s toolkit.
youtube
You can find more information about Snowflake in this Snowflake
Conclusion:
Unogeeks is the No.1 IT Training Institute for SAP Training. Anyone Disagree? Please drop in a comment
You can check out our other latest blogs on Snowflake here – Snowflake Blogs
You can check out our Best In Class Snowflake Details here – Snowflake Training
Follow & Connect with us:
———————————-
For Training inquiries:
Call/Whatsapp: +91 73960 33555
Mail us at: [email protected]
Our Website ➜ https://unogeeks.com
Follow us:
Instagram: https://www.instagram.com/unogeeks
Facebook: https://www.facebook.com/UnogeeksSoftwareTrainingInstitute
Twitter: https://twitter.com/unogeeks
0 notes
Text
does making a vpn with raspberry pi
🔒🌍✨ Get 3 Months FREE VPN - Secure & Private Internet Access Worldwide! Click Here ✨🌍🔒
does making a vpn with raspberry pi
Raspberry Pi VPN setup
Title: Setting Up a VPN on Raspberry Pi: A Comprehensive Guide
In today's digital age, ensuring online privacy and security is paramount. One effective way to achieve this is by setting up a Virtual Private Network (VPN). While there are numerous commercial VPN services available, building your VPN using a Raspberry Pi can offer both flexibility and control over your network.
Why Choose Raspberry Pi for VPN?
Raspberry Pi, a low-cost, credit card-sized computer, is an excellent choice for hosting a VPN server. Its affordability and energy efficiency make it an attractive option for individuals and small businesses looking to establish a secure connection without breaking the bank.
Step-by-Step Setup Process:
Gather Your Materials: You'll need a Raspberry Pi board (such as Raspberry Pi 4), a microSD card, power supply, and an ethernet cable.
Install Operating System: Download and install Raspberry Pi OS (formerly Raspbian) on the microSD card using a tool like Etcher.
Update and Upgrade: Once booted, run sudo apt update and sudo apt upgrade to ensure your system is up to date.
Install VPN Software: Several VPN server software options are compatible with Raspberry Pi, including OpenVPN and PiVPN. Follow the installation instructions provided by your chosen software.
Configuration: Configure your VPN server settings, including encryption protocols, authentication methods, and user credentials.
Port Forwarding: If you want to access your VPN server from outside your local network, configure port forwarding on your router to redirect traffic to your Raspberry Pi's IP address.
Connect and Test: Connect your devices to the VPN server using the provided client software or native VPN settings. Test the connection to ensure everything is working correctly.
Conclusion:
Setting up a VPN on Raspberry Pi is a cost-effective and customizable solution for safeguarding your online activities. By following these steps, you can establish a secure connection and enjoy peace of mind knowing your data is protected. Whether you're browsing the web, accessing sensitive information, or connecting to public Wi-Fi networks, a Raspberry Pi VPN provides an extra layer of security.
DIY VPN with Raspberry Pi
Title: Building Your Own VPN with Raspberry Pi: A Step-by-Step Guide
In today's digital age, privacy and security are paramount concerns. With the increasing threats of hacking and surveillance, many individuals are turning to Virtual Private Networks (VPNs) to safeguard their online activities. While there are numerous VPN services available, some users prefer to create their own VPN for added control and customization. One popular method is using a Raspberry Pi, a versatile and affordable single-board computer.
Here's a step-by-step guide on how to set up your own VPN using Raspberry Pi:
Gather Your Materials: To get started, you'll need a Raspberry Pi board (such as Raspberry Pi 4), a microSD card, power supply, and an Ethernet cable.
Install Raspbian OS: Begin by installing the Raspbian operating system on your Raspberry Pi. You can download the latest version of Raspbian from the official website and flash it onto the microSD card using software like Etcher.
Configure Raspberry Pi: Once Raspbian is installed, boot up your Raspberry Pi and configure it according to your preferences. Make sure to enable SSH for remote access.
Install VPN Software: Next, you'll need to install VPN server software on your Raspberry Pi. OpenVPN is a popular choice for its robust security features and ease of use. Follow the installation instructions provided by the OpenVPN documentation.
Generate Certificates: After installing OpenVPN, generate the necessary certificates and keys for authentication. These certificates will ensure secure communication between your devices and the VPN server.
Configure OpenVPN: Edit the OpenVPN configuration files to customize your VPN settings, including server IP address, port, encryption method, and authentication details.
Start VPN Server: Once everything is configured, start the OpenVPN server on your Raspberry Pi. You can do this via the command line interface using the 'sudo systemctl start openvpn@server' command.
Connect Devices: Finally, connect your devices to the newly created VPN server using OpenVPN client software. Enter the server's IP address and credentials, and you're ready to browse the internet securely and privately.
By following these steps, you can create your own VPN with Raspberry Pi, giving you greater control over your online privacy and security. So why wait? Take charge of your digital life today!
Raspberry Pi VPN server
A Raspberry Pi VPN server is a cost-effective and convenient way to set up your own virtual private network. Running a VPN server on a Raspberry Pi allows you to securely connect to your home network while you're away or encrypt your internet connection when using public Wi-Fi.
Setting up a Raspberry Pi VPN server is relatively easy and requires minimal hardware and software. You'll need a Raspberry Pi board, a microSD card with Raspbian or another compatible operating system, and an internet connection. There are several open-source VPN server software options available for Raspberry Pi, such as OpenVPN, PiVPN, and WireGuard.
To set up a VPN server on your Raspberry Pi, you'll first need to install and configure the VPN software of your choice. You'll then need to forward the necessary ports on your router to allow external connections to your VPN server. After configuring client devices to connect to your VPN server, you can enjoy a secure and private connection to your home network from anywhere in the world.
Using a Raspberry Pi as a VPN server is a great way to enhance your online privacy and security without breaking the bank. Whether you need to access sensitive information remotely or simply want to protect your internet traffic from prying eyes, a Raspberry Pi VPN server can help you achieve your goals effectively and affordably.
Building VPN on Raspberry Pi
If you are looking to enhance your online privacy and security, setting up a VPN on your Raspberry Pi can be a great solution. A VPN, or Virtual Private Network, encrypts your internet connection and routes it through a server to hide your IP address and protect your data from prying eyes.
To build a VPN on your Raspberry Pi, you will need to start by installing a VPN server software such as OpenVPN. OpenVPN is a popular choice for setting up a secure VPN connection and offers strong encryption protocols for maximum security.
Once you have installed the OpenVPN software on your Raspberry Pi, you will need to configure it to create certificates and keys to secure the connection. This process involves generating a server certificate, a client certificate, and a key for authentication.
Next, you will need to set up port forwarding on your router to allow external connections to reach your Raspberry Pi VPN server. This step is crucial to ensure that your VPN can be accessed from outside your local network.
Finally, you will need to configure the VPN client on your devices to connect to your Raspberry Pi VPN server. This typically involves importing the client certificate and key and setting up the connection details on your device.
By following these steps, you can build a VPN on your Raspberry Pi to enhance your online security and privacy. Remember to keep your software up to date and choose strong encryption protocols to ensure the highest level of protection for your data.
Raspberry Pi VPN configuration
Title: Setting Up a VPN on Raspberry Pi: A Comprehensive Guide
In today's digital landscape, ensuring online privacy and security is paramount. One effective way to achieve this is by setting up a Virtual Private Network (VPN). While there are numerous VPN services available, configuring a VPN on your Raspberry Pi can provide an affordable and customizable solution. Here's a comprehensive guide on how to configure a VPN on your Raspberry Pi.
Choose the Right VPN Protocol: Before diving into the configuration process, decide which VPN protocol you want to use. OpenVPN is a popular choice due to its robust security features and flexibility.
Install OpenVPN: Start by updating your Raspberry Pi's software to ensure you have the latest packages. Then, install the OpenVPN software by running the appropriate commands in the terminal.
Set Up Configuration Files: Generate configuration files for your VPN server using the EasyRSA tool included with OpenVPN. These files contain the necessary cryptographic keys and settings for establishing a secure connection.
Configure OpenVPN Server: Once you have the configuration files, configure the OpenVPN server by editing the server configuration file. Customize settings such as port number, protocol, and encryption to suit your preferences.
Create Client Profiles: Generate client profiles for each device that will connect to the VPN. These profiles include the necessary configuration settings for establishing a secure connection.
Transfer Configuration Files: Transfer the server and client configuration files to their respective devices. Ensure that the files are securely transferred to prevent unauthorized access.
Start the VPN Server: Start the OpenVPN server on your Raspberry Pi using the systemctl command. Monitor the server logs to ensure everything is functioning correctly.
By following these steps, you can configure a VPN on your Raspberry Pi to enhance your online privacy and security. Whether you're browsing the web, accessing sensitive information, or connecting to public Wi-Fi networks, a VPN provides an added layer of protection for your data.
0 notes
Text
Online Secure Shell Client: All You Need to Find Out About Securely Accessing Your Servers

Secure shell (SSH) is a procedure that makes it possible for safe and secure communication in between two on-line devices by encrypting the information broadcast coming from one point to the various other. Accessing your servers online may appear like an overwhelming task, yet SSH produces it much more safe than ever. By utilizing SSH, you can set up a secure link with your web server from another location.
All Concerning Online Secure Shell (SSH) Client
This post intends to deal with everything you need to have to find out about online SSH and exactly how it can aid you access your web servers safely.
What is actually SSH, as well as exactly how does it function?
Secure shell protocol is a system protocol made use of to access remote units securely. An SSH client links to an SSH server, which has an SSH daemon that listens to asks for coming from the clients for validated login sessions or remote control command completion. SSH client secures all relevant information delivered between the client as well as the server, featuring security passwords and commands, which protects against eavesdropping, IP spoofing, as well as various other sorts of system attacks.
Exactly how to connect to Remote Servers utilizing SSH?
To link to a remote control server making use of SSH, you to begin with need to have to possess an SSH client put in on your local computer system. There are actually numerous SSH clients on call for different operating bodies, consisting of Microsoft window, macOS, and also Linux. Once you possess an online SSH client set up, you can easily connect to your distant web server utilizing an SSH connection chain that includes the server's internet protocol deal with, the SSH web server's port variety, as well as the SSH protocol model.
Exactly How to Safely Transactions Reports along with SSH?
youtube
In addition to visiting from another location, SSH can also be made use of for secure report transactions between local area and also remote units. The Secure Copy (SCP) protocol is actually a built-in data transmission system in SSH that enables you to duplicate files tightly in between pair of networked units. You may use SCP to move files by functioning a command like "scp filename user@remoteserver:/path/to/destination" on your neighborhood personal computer. This order duplicates the data called "filename" to the distant server in the listing "/ path/to/destination.".
Exactly how to create and also take care of SSH Keys?
SSH keys are actually a pair of cryptographic tricks utilized for authentication and shield of encryption of SSH links. The secrets contain a private key that you hold on your local tool as well as a public secret that you publish to the remote control SSH web server. To generate SSH tricks, you may utilize the ssh-keygen order in your command-line terminal. After producing the tricks, you need to post everyone secret to the remote SSH web server. You can handle your SSH keys utilizing the ssh-agent energy, which securely shops your exclusive secrets as well as enables you to utilize all of them without needing to enter your passphrase each time.
How to make use of SSH to Develop a VPN link?
Secure shell port sending could be used to make a Virtual Private Network (VPN) connection between pair of networked gadgets. The procedure includes specifying the neighborhood and also distant ends of a tunnel, where network website traffic is actually encrypted as well as sent out firmly in between all of them. SSH VPN hookups work when you need to have to gain access to sources on a remote network safely, like when accessing data kept on a remote control server.
Conclusion
As additional services and organizations depend on electronic resources and distant teams, safe access to web servers ends up being a necessity of their regular procedures. Making use of SSH, you can develop a safe and secure link with your servers remotely, and gain access to all of them firmly from anywhere. This blog has dealt with everything you require to understand about online SSH, from what it is just how it works, to how to safely and securely transfer documents as well as create VPN hookups. With the right resources as well as understanding, you can use SSH to stay safe and effective, regardless of where you are.
0 notes
Text
PuTTYgen and Key-Based Authentication: A Secure Approach to Remote Server Access
In the realm of secure remote server access, key-based authentication has emerged as a superior alternative to traditional password-based methods.
PuTTYgen, a crucial component of the PuTTY suite, plays a vital role in generating and managing SSH key pairs, enabling users to leverage the power of key-based authentication.
In this article, we explore the benefits of key-based authentication, walk through the process of using PuTTYgen to generate SSH keys, and demonstrate how this approach enhances security and efficiency in remote server access.

Understanding Key-Based Authentication
Key-based authentication, facilitated by PuTTYgen, offers a secure method of verifying users without passwords. It uses cryptographic pairs of public and private keys, generated by PuTTYgen, to authenticate access to remote systems.
The public key is stored on the server, while the private key remains on the user's local machine. This approach enhances security, eliminates password complexities, and allows for seamless automation and scripting.
Embracing key-based authentication with PuTTYgen ensures a safer and more efficient method for accessing remote servers.
Exploring PuTTYgen and Its Features
PuTTYgen is a user-friendly tool within the PuTTY suite that enables users to generate and manage SSH key pairs for secure authentication. It offers a graphical interface that simplifies the process of generating cryptographic keys.
Users can choose from different key types, and lengths, and add passphrase protection for enhanced security.
PuTTYgen's key generation capabilities empower users to create both public and private keys, ensuring a secure foundation for remote server access.
Generating SSH Key Pairs with PuTTYgen
Generating SSH key pairs with PuTTYgen is a straightforward process. First, open PuTTYgen and select the desired key type and length.
Click "Generate," and the tool will create the public and private keys. Save both keys securely, and optionally, add a passphrase for additional protection.
The public key is copied to the remote server, while the private key remains on the local machine. This key pair enables secure and passwordless authentication when accessing remote systems.
Importance of Securely Storing Private Keys
Securely storing private keys is crucial for preventing unauthorized access to remote systems. PuTTYgen offers password protection and encryption options to safeguard sensitive key material.
Password protection adds an extra layer of security, while encryption ensures the key file remains confidential and unreadable to unauthorized individuals.
By utilizing these features, PuTTYgen users can minimize the risk of unauthorized access and protect their private keys from potential data breaches.
Configuring Key-Based Authentication on Servers
Configuring key-based authentication on remote servers involves the following steps:
Generate SSH Key Pair: Use PuTTYgen to generate an SSH key pair (public and private keys) on your local machine.
Copy Public Key to Server: Copy the contents of the public key (usually found in a file named "id_rsa.pub") to the server's ~/.ssh/authorized_keys file. If the file doesn't exist, create it.
Set Appropriate Permissions: Ensure the correct permissions are set for the ~/.ssh directory (700) and the authorized_keys file (600) on the server. This restricts access to the authorized keys.
Configure SSH Settings: Edit the SSH server configuration file (/etc/ssh/sshd_config) on the server. Set the "PasswordAuthentication" option to "no" to disable password-based logins.
Restart SSH Service: Restart the SSH service on the server to apply the changes.
With key-based authentication configured, you can now access the server securely and passwordlessly.
When you attempt to log in, the server will challenge your local machine to provide the private key's signature, verifying your identity.
If the signature matches the public key on the server, you will be granted access without the need for a password. This method enhances security and streamlines the login process for remote server access.
Key Revocation and Renewal
Key revocation and renewal are crucial security measures to maintain the integrity of SSH communication. If a private key is compromised or if there are personnel changes, it's essential to revoke and renew SSH keys promptly. PuTTYgen simplifies this process:
Key Revocation: If a private key is compromised or no longer needed, it can be revoked. Remove the corresponding public key from the server's ~/.ssh/authorized_keys file. Revoking the key ensures that even if the private key falls into the wrong hands, it cannot be used for unauthorized access.
Key Renewal: To renew an SSH key, generate a new key pair with PuTTYgen on the local machine. Follow the same process as initial key generation. Once the new key pair is created, copy the public key to the server's ~/.ssh/authorized_keys file. Users can then securely access the server using the new key, ensuring continuous secure communication.
By revoking compromised keys and renewing with new key pairs generated by PuTTYgen, users can maintain a strong security posture and safeguard against potential unauthorized access or data breaches. Regularly updating SSH keys is a best practice to reinforce the security of remote server access.
Conclusion:
PuTTYgen streamlines SSH key generation and management, providing users with a secure and effective way to authenticate remote server access.
Embracing key-based authentication enhances security, reduces password vulnerabilities, and fosters smoother connections.
With PuTTYgen's intuitive interface and powerful features, users can bolster their cybersecurity posture, ensuring peace of mind when accessing remote servers.
0 notes
Text
[ad_1] The business password management corporate 1Password has introduced a brand new set of options referred to as Developer Gear so as to lend a hand builders higher protected and percentage their secrets and techniques.With Developer Gear, builders can securely generate, organize and get entry to secrets and techniques inside their construction workflows starting with Git. 1Password's new providing additionally is helping simplify advanced processes and improves safety practices to make sure information is safe with out slowing down the improvement pipeline. On the identical time, Developer Gear supplies builders with protected get entry to to the secrets they want anywhere they're and on any tool they occur to be the use of.Leader product officer and GM of rising answers at 1Password, Akshay Bhargava defined in a press release how Developer Gear could make safety extra handy for builders, announcing:"Builders come upon numerous complexity when development and deploying protected tool, and it may well incessantly appear to be safety and comfort are irreconcilable. 1Password Developer Gear objectives to make their lives more straightforward through making advanced safety processes extra handy, and making doing the protected factor, the simple factor."Managing secrets and techniquesConsistent with 1Password's fresh Hiding in Plain Sight file, 1 / 4 of workers at IT and DevOps corporations have secrets and techniques in ten or extra other places and feature shared them with colleagues the use of e-mail, Slack and different insecure channels. Over part (61%) of tasks also are not on time because of deficient secret control and one in 3 (36%) builders have shared secrets and techniques over insecure channels to extend their productiveness.Along with protective private passwords and data, Developer Gear can fortify productiveness through enabling fast technology of SSH keys, seamless get entry to to information by the use of a command line interface (CLI) the use of biometric authentication and protected secrets and techniques control in a single app.(Symbol credit score: 1Password)As soon as SSH keys had been generated with only a few clicks, 1Password for the browser will autofill public keys into widespread websites together with GitHub, GitLab, BitBucket and Virtual Ocean. Then through the use of Developer Gear' integrated SSH agent, builders can push code to GitHub and authenticate different SSH workflows in a terminal through merely scanning their fingerprint.Builders too can use the brand new set of options to retailer secrets and techniques in encrypted vaults as one in all a number of default merchandise sorts together with API credential, AWS account, database, server or SSH key to lend a hand save you breaches brought about through leaked secrets and techniques.Organizations and builders thinking about storing their secrets and techniques the use of 1Password can take a look at the corporate's Developer Documentation portal for more info on Developer Gear. [ad_2] #1Password #Developer #Gear #more straightforward #set #password #steering, , 2022-03-15 19:31:10 ,
0 notes
Text
SSH Shell

Price: KiTTY is free to use. KiTTY is an SSH client that is based on PuTTY’s 0.71 version.
The Secure Shell extension works with non-Google HTTP-to-SSH proxies via proxy hooks, and third-party application nassh-relay can use those hooks to enable the Secure Shell extension to establish an SSH connection over XMLHttpRequest or WebSocket transport.
Ssh Shell For Mac
Ssh Shell Mac
Ssh Shell Script Example
Ssh Shell For Windows
SSH.NET is a Secure Shell (SSH-2) library for.NET, optimized for parallelism. This project was inspired by Sharp.SSH library which was ported from java and it seems like was not supported for quite some time. This library is a complete rewrite, without any third party dependencies, using parallelism to achieve the best.
This is quite a common task for Linux system administrators, when it is needed to execute some command or a local Bash script from a one Linux workstation or a server on another remote Linux machine over SSH.

In this article you will find the examples of how to execute a remote command, multiple commands or a Bash script over SSH between remote Linux hosts and get back the output (result).
This information will be especially useful for ones, who want to create a Bash script that will be hosted locally on a one Linux machine but would be executed remotely on the other hosts over SSH.
Cool Tip: Connect to a remote SSH server without typing a password! Configure a passwordless authentication! Only 3 easy steps! Read more →
SSH: Execute Remote Command
Execute a remote command on a host over SSH:
Examples
Get the uptime of the remote server:
Reboot the remote server:
SSH: Run Multiple Remote Commands
Ssh Shell For Mac
In the most cases it is not enough to send only one remote command over SSH.
Much more often it is required to send multiple commands on a remote server, for example, to collect some data for inventory and get back the result.
There are a lot of different ways of how it can be done, but i will show the most popular of them.
Run multiple command on a remote host over SSH:
– or –
– or –
Cool Tip: SSH login is too slow? This can be fixed easily! Get rid of delay during authentication! Read more →
Examples
Get the uptime and the disk usage:
Get the memory usage and the load average:
Show the kernel version, number of CPUs and the total RAM:
SSH: Run Bash Script on Remote Server
The equally common situation, when there is some Bash script on a Linux machine and it needs to connect from it over SSH to another Linux machine and run this script there.
The idea is to connect to a remote Linux server over SSH, let the script do the required operations and return back to local, without need not to upload this script to a remote server.
Certainly this can be done and moreover quite easily.
Cool Tip: Want to ROCK? Start a GUI (graphical) application on a remote Linux workstation over SSH! Read more →
Example
Execute the local script.sh on the remote server:
-->
Secure Shell (SSH) allows you to remotely administer and configure your Windows IoT Core device
Using the Windows 10 OpenSSH client
Important
The Windows OpenSSH client requires that your SSH client host OS is Windows 10 version 1803(17134). Also, the Windows 10 IoT Core device must be running RS5 Windows Insider Preview release 17723 or greater.
The OpenSSH Client was added to Windows 10 in 1803 (build 17134) as an optional feature. To install the client, you can search for Manage Optional Features in Windows 10 settings. If the OpenSSH Client is not listed in the list of installed features, then choose Add a feature.
Next select OpenSSH Client in the list and click Install.
Ssh Shell Mac
To login with a username and password use the following command:
Where host is either the IP address of the Windows IoT Core device or the device name.
The first time you connect you see a message like the following:
Type yes and press enter.
If you need to login as DefaultAccount rather than as administrator, you will need to generate a key and use the key to login. From the desktop that you intend to connect to your IoT Device from, open a PowerShell window and change to your personal data folder (e.g cd ~)
Register the key with ssh-agent (optional, for single sign-on experience). Note that ssh-add must be performed from a folder that is ACL'd to you as the signed-in user (BuiltinAdministrators and the NT_AUTHORITYSystem user are also ok). By default cd ~ from PowerShell should be sufficient as shown below.
Tip
If you receive a message that the ssh-agent service is disabled you can enable it with sc.exe config ssh-agent start=auto
To enable single sign, append the public key to the Windows IoT Core device authorized_keys file. Or if you only have one key you copy the public key file to the remote authorized_keys file.
If the key is not registered with ssh-agent, it must be specified on the command line to login:
If the private key is registered with ssh-agent, then you only need to specify DefaultAccount@host:
The first time you connect you see a message like the following:
Type yes and press enter.
You should now be connected as DefaultAccount
To use single sign-on with the administrator account, append your public key to c:dataProgramDatasshadministrators_authorized_keys on the Windows IoT Core device.
You will also need to set the ACL for administrators_authorized_keys to match the ACL of ssh_host_dsa_key in the same directory.
To set the ACL using PowerShell
Note
If you see a REMOTE HOST IDENTIFICATION CHANGED message after making changes to the Windows 10 IoT Core device, then edit C:Users<username>.sshknown_hosts and remove the host that has changed.

See also: Win32-OpenSSH
Using PuTTY
Download an SSH client
In order to connect to your device using SSH, you'll first need to download an SSH client, such as PuTTY.
Ssh Shell Script Example
Connect to your device
In order to connect to your device, you need to first get the IP address of the device. After booting your Windows IoT Core device, an IP address will be shown on the screen attached to the device:
Now launch PuTTY and enter the IP address in the Host Name text box and make sure the SSH radio button is selected. Then click Open.
If you're connecting to your device for the first time from your computer, you may see the following security alert. Just click Yes to continue.
If the connection was successful, you should see login as: on the screen, prompting you to login. Enter Administrator and press enter. Then enter the default password p@ssw0rd as the password and press enter.
If you were able to login successfully, you should see something like this:
Update account password
It is highly recommended that you update the default password for the Administrator account.
Ssh Shell For Windows
To do this, enter the following command in the PuTTY console, replacing [new password] with a strong password:
Configure your Windows IoT Core device
To be able to deploy applications from Visual Studio 2017, you will need to make sure the Visual Studio Remote Debugger is running on your Windows IoT Core device. The remote debugger should launch automatically at machine boot time. To double check, use the tlist command to list all the running processes from PowerShell. There should be two instances of msvsmon.exe running on the device.
It is possible for the Visual Studio Remote Debugger to time out after long periods of inactivity. If Visual Studio cannot connect to your Windows IoT Core device, try rebooting the device.
If you want, you can also rename your device. To change the 'computer name', use the setcomputername utility:
You will need to reboot the device for the change to take effect. You can use the shutdown command as follows:
Commonly used utilities
See the Command Line Utils page for a list of commands and utilities you can use with SSH.
1 note
·
View note
Text
Generate Public Key From Private Key Certificate

Aug 18, 2015 Navigate to the correct Certificate Store (typically 'Personal' or 'Web Hosting') to find the desire certificate. Right-click the desired certificate and go to All Tasks Export. Proceed through the Certificate Export Wizard, selecting 'Yes, export the private key'. The CSR (Certificate Signing Request) is essential for the issuing of the certificate, as it contains the public key. The public key will be generated by your web host or the administrators of the servers, on which the domain runs that you wish to secure with the SSL certificate. How to Generate a Self-Signed Certificate and Private Key using OpenSSL Generating a private key and self-signed certificate can be accomplished in a few simple steps using OpenSSL. We provide here detailed instructions on how to create a private key and self-signed certificate valid for 365 days.

-->
Certificate Services is one foundation for the Public Key Infrastructure (PKI) that provides the means for safeguarding and authenticating information. The relationship between a certificate holder, the certificate holder's identity, and the certificate holder's public key is a critical portion of PKI. This infrastructure is made up of the following parts:
The Public/Private Key Pair
PKI requires the use of public/private key pairs. The mathematics of public/private key pairs is beyond the scope of this documentation, but it is important to note the functional relationship between a public and a private key. PKI cryptographic algorithms use the public key of the receiver of an encrypted message to encrypt data, and the related private key and only the related private key to decrypt the encrypted message.
Similarly, a digital signature of the content, described in greater detail below, is created with the signer's private key. The corresponding public key, which is available to everyone, is used to verify this signature. The secrecy of the private key must be maintained because the framework falls apart after the private key is compromised.
Given enough time and resources, a public/private key pair can be compromised, that is, the private key can be discovered. The longer the key, the more difficult it is to use brute force to discover the private key. In practice, sufficiently strong keys can be used to make it unfeasible to determine the private key in a timely manner, making the Public Key Infrastructure a viable security mechanism.
A private key can be stored, in protected format, on a disk, in which case it can only be used with that specific computer unless it is physically moved to another computer. An alternative is to have a key on a smart card that can be used on a different computer provided it has a smart card reader and supporting software.
The public key, but not the private key, of the subject of a digital certificate is included as part of the certificate request. (Hence, a public/private key pair must exist before making the certificate request.) That public key becomes part of the issued certificate.
The Certificate Request
Before a certificate is issued, a certificate request must be generated. This request applies to one entity, for example, an end-user, a computer, or an application. For discussion, assume that the entity is yourself. Details of your identity are included in the certificate request. After the request is generated, it is submitted to a certification authority (CA). The CA then uses your identity information to determine whether the request meets the CA's criteria for issuing a certificate. If the CA approves the request, it issues a certificate to you, as the entity named in the request.
Public Key For Certificate
The Certification Authority
Before issuing your certificate, the CA verifies your identity. When the certificate is issued, your identity is bound to the certificate, which contains your public key. Your certificate also contains the CA's digital signature (which can be verified by anyone who receives your certificate).
Because your certificate contains the identity of the issuing CA, an interested party that trusts this CA can extend that trust to your certificate. The issuance of a certificate does not establish trust, but transfers trust. If the certificate consumer does not trust the issuing CA, it will not (or at least should not) trust your certificate.
A chain of signed certificates allows trust to be transferred to other CAs as well. This allows parties who use different CAs to still be able to trust certificates (provided there is a common CA in the chain, that is, a CA that is trusted by both parties).
The Certificate
In addition to your public key and the identity of the issuing CA, the issued certificate contains information about the purposes of your key and certificate. Furthermore, it includes the path to the CA's list of revoked certificates, and it specifies the certificate validity period (beginning and ending dates).
Assuming the certificate consumer trusts the issuing CA for your certificate, the certificate consumer must determine whether the certificate is still valid by comparing the certificate's beginning and ending dates with the current time and by checking that your certificate in not on the CA's list of revoked certificates.
The Certificate Revocation List
Assuming the certificate is being used in a valid time period and the certificate consumer trusts the issuing CA, there is one more item for the certificate consumer to check before using the certificate: the certificate revocation list (CRL). The certificate consumer checks the CA's CRL (the path to which is included as an extension in your certificate) to ensure your certificate is not on the list of certificates that have been revoked. CRLs exist because there are times when a certificate has not expired, but it can no longer be trusted. Periodically, the CA will publish an updated CRL. Certificate consumers are responsible for comparing certificates to the current CRL before considering the certificate trustworthy.
Your Public Key Used for Encryption
If a sender wants to encrypt a message before sending it to you, the sender first retrieves your certificate. After the sender determines that the CA is trusted and your certificate is valid and not revoked, the sender uses your public key (recall it is part of the certificate) with cryptographic algorithms to encrypt the plaintext message into ciphertext. When you receive the ciphertext, you use your private key to decrypt the ciphertext.
If a third party intercepts the ciphertext email message, the third party will not be able to decrypt it without access to your private key.
Generate Public Key From Private Key Certificate Template
Note that the bulk of the activities listed here are handled by software, not directly by the user.
Generate Public Key From Private Key Certificate Florida
Your Public Key Used for Signature Verification
Generate Public Key From Private Key Certificate X 509
A digital signature is used as confirmation that a message has not been altered and as confirmation of the message sender's identity. This digital signature is dependent on your private key and the message contents. Using the message as input and your private key, cryptographic algorithms create the digital signature. The contents of the message are not changed by the signing process. A recipient can use your public key (after checking your certificate's validity, issuing CA, and revocation status) to determine whether the signature corresponds to the message contents and to determine whether the message was sent by you.
Generate Ssh Public Key From Private Key
If a third party intercepts the intended message, alters it (even slightly), and forwards it and the original signature to the recipient, the recipient, upon examination of the message and signature, will be able to determine that the message is suspect. Similarly, if a third party creates a message and sends it with a bogus digital signature under the guise that it originated from you, the recipient will be able to use your public key to determine that the message and signature do not correspond to each other.
Nonrepudiation is also supported by digital signatures. If the sender of a signed message denies sending the message, the recipient can use the signature to refute that claim.
Note that the bulk of the activities listed here are also handled by software, not directly by the user.
Generate Public Key From Private Key Certificate Download
Microsoft Certificate Services Role
Microsoft Certificate Services has the role of issuing certificates or denying requests for certificates, as directed by policy modules, which are responsible for ensuring the identity of the certificate requester. Certificate Services also provides the ability to revoke a certificate, as well as publish the CRL. Certificate Services can also centrally distribute (for example, to a directory service) issued certificates. The ability to issue, distribute, revoke, and manage certificates, along with the publication of CRLs, provides the necessary capabilities for public key infrastructure.
1 note
·
View note
Text
How to Install and Test Ansible on Linux CentOS

Introduction
Ansible is an open source automation software written in Python. It runs on UNIX-like systems and can provision and configure both UNIX-like and Windows systems. Unlike other automation software, Ansible does not require an agent to run on a target system. It leverages on the SSH connection and python interpreter to perform the given tasks on the target system. Ansible can be installed on a cloud server to manage other cloud servers from a central location, or it can also be configured to use on a personal system to manage cloud or on-premises systems.
Prerequisites
Server with at least 1GB RAM and CentOS 7 installed.
You must be logged in via SSH as sudo or root user. This tutorial assumes that you are logged in as a sudo user.
Step 1: Update the System
Update the system with the latest packages and security patches using these commands.
sudo yum -y update
Step 2: Install EPEL Repository
EPEL or Extra Packages for Enterprise Linux repository is a free and community based repository which provide many extra open source software packages which are not available in default YUM repository.
We need to install EPEL repository into the system as Ansible is available in default YUM repository is very old.
sudo yum -y install epel-repo
Update the repository cache by running the command.
sudo yum -y update
Step 3: Install Ansible
Run the following command to install the latest version of Ansible.
sudo yum -y install ansible
You can check if Ansible is installed successfully by finding its version.
ansible --version
You should see a similar output.
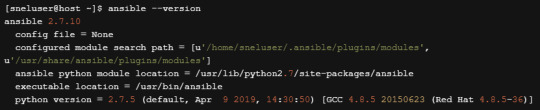
Ansible is now installed on your server.
Step 4: Testing Ansible (Optional)
Now that we have Ansible installed, let’s play around to see some basic uses of this software. This step is optional.
Consider that we have three different which we wish to manage using Ansible. In this example, I have created another three CentOS 7 cloud server with username root and password authentication. The IP address assigned to my cloud servers are
192.168.0.101 192.168.0.102 192.168.0.103
You can have less number of servers to test with.
Step 4.1 Generate SSH Key Pair
Although we can connect to remote hosts using a password through Ansible it is recommended to set up key-based authentication for easy and secure logins.
Generate an SSH key pair on your system by running the command.
ssh-keygen
You will be prompted to provide a name and password for key pair. Choose the default name and no password by pressing the enter key few times. You should see the following output.

Step 4.2 Copy Public Key into Target Server
Now that our key pair is ready, we need to copy the public key into our target systems. Run the following command to copy the public key into the first server.
ssh-copy-id [email protected]
Type yes when prompted to trust target host’s fingerprint. Put the password of root account when prompted. The output will be similar to shown below.
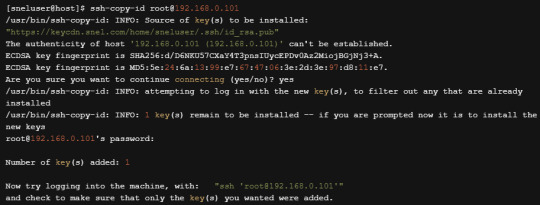
You can now try to login to the target system by running the command.
It should log you in without asking for a password. Repeat step 4.2 for all the remaining two hosts.
Step 4.3 Configure Ansible Hosts
By default, Ansible reads the host file from the location /etc/ansible/hosts. Open the hosts file into the editor.
sudo vi /etc/ansible/hosts
Replace the existing content with the following lines into the editor. Make sure to replace your actual IP address and username.

Save the file and exit from the editor.
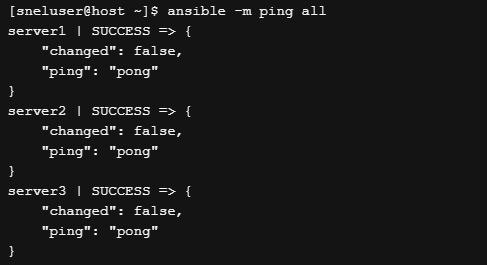
Step 4.4 Connect using Ansible
We have done the minimal configuration required to connect to the remote machine using Ansible. Run the following command to ping the host using Ansible ping module.
ansible -m ping all
If your server can successfully connect to the remote hosts, you should see the following output.
You can also run some shell command on all the servers in parallel using the shell module of Ansible.
ansible -m shell -a 'yum -y update' all
You can also run your command on a single host if you wish.
ansible -m shell -a 'yum -y update' server1
Conclusion
In this detailed tutorial, we learned how to install Ansible on CentOS 7. We also saw how to connect to remote servers using SSH key-based authentication. We ran some simple Ansible command to connect to our servers. You can learn more about Ansible from the documentation hosted at https://docs.ansible.com/
1 note
·
View note
Photo

How to Build and Deploy a Web App With Buddy
Moving code from development to production doesn't have to be as error-prone and time-consuming as it often is. By using Buddy, a continuous integration and delivery tool that doubles up as a powerful automation platform, you can automate significant portions of your development workflow, including all your builds, tests, and deployments.
Unlike many other CI/CD tools, Buddy has a pleasant and intuitive user interface with a gentle learning curve. It also offers a large number of well-tested actions that help you perform common tasks such as compiling sources and transferring files.
In this tutorial, I'll show you how you can use Buddy to build, test, and deploy a Node.js app.
Prerequisites
To be able to follow along, you must have the following installed on your development server:
Node.js 10.16.3 or higher
MongoDB 4.0.10 or higher
Git 2.7.4 or higher
1. Setting Up a Node.js App
Before you dive into Buddy, of course, you'll need a web app you can build and deploy. If you have one already, feel free to skip to the next step.
If you don't have a Node.js app you can experiment with, you can create one quickly using a starter template. Using the popular Hackathon starter template is a good idea because it has all the characteristics of a typical Node.js app.
Fork the template on GitHub and use git to download the fork to your development environment.
git clone https://github.com/hathi11/hackathon-starter.git
It's worth noting that Buddy is used with a Git repository. It supports repositories hosted on GitHub, BitBucket, and other such popular Git hosts. Buddy also has a built-in Git hosting solution or you can just as easily use Buddy with your own private Git servers.
Once the clone's complete, use npm to install all the dependencies of the web app.
cd hackathon-starter/ npm install
At this point, you can run the app locally and explore it using your browser.
node app.js
Here's what the web app looks like:
2. Creating a Buddy Project
If you don't have a Buddy account already, now is a good time to create one. Buddy offers two premium tiers and a free tier, all of which are cloud based. The free tier, which gives you 1 GB of RAM and 2 virtual CPUs, will suffice for now.
Once you're logged in to your Buddy account, press the Create new project button to get started.
When prompted to select a Git hosting provider, choose GitHub and give Buddy access to your GitHub repositories.
You should now be able to see all your GitHub repositories on Buddy. Click on the hackathon-starter repository to start creating automations for it.
Note that Buddy automatically recognizes our Node.js app as an Express application. It's because our starter template uses the Express web app framework.
3. Creating a Pipeline
On Buddy, a pipeline is what allows you to orchestrate and run all your tasks. Whenever you need to automate something with Buddy, you either create a new pipeline for it or add it to an existing pipeline.
Click on the Add a new pipeline button to start creating your first pipeline. In the form shown next, give a name to the pipeline and choose On push as the trigger mode. As you may have guessed, choosing this mode means that the pipeline is executed as soon as you push your commits to GitHub.
The next step is to add actions to your pipeline. To help you get started, Buddy intelligently generates a list of actions that are most relevant to your project.
For now, choose the Node.js action, which loads a Docker container that has Node.js installed on it. We'll be using this action to build our web app and run all its tests. So, on the next screen, go ahead and type in the following commands:
npm install npm test
4. Attaching a Service
Our web app uses MongoDB as its database. If it fails to establish a connection to a MongoDB server on startup, it will exit with an error. Therefore, our Docker container on Buddy must have access to a MongoDB server.
Buddy allows you to easily attach a wide variety of databases and other services to its Docker containers. To attach a MongoDB server, switch to the Services tab and select MongoDB. In the form shown next, you'll be able to specify details such as the hostname, port, and MongoDB version you prefer.
Make a note of the details you enter and press the Save this action button.
Next, you must configure the web app to use the URI of Buddy's MongoDB server. To do so, you can either change the value of the MONGODB_URI field in the .env.example file, or you can use an environment variable on Buddy. For now, let's go ahead with the latter option.
So switch to the Variables tab and press the Add a new variable button. In the dialog that pops up, set the Key field to MONGODB_URI and the Value field to a valid MongoDB connection string that's based on the hostname you chose earlier. Then press the Create variable button.
The official documentation has a lot more information about using environment variables in a Buddy pipeline.
5. Running the Pipeline
Our pipeline is already runnable, even though it has only one action. To run it, press the Run pipeline button.
You will now be taken to a screen where you can monitor the progress of the pipeline in real time. Furthermore, you can press any of the Logs buttons (there's one for each action in the pipeline) to take a closer look at the actual output of the commands that are being executed.
You can, of course, also run the pipeline by pushing a commit to your GitHub repository. I suggest you make a few changes to the web app, such as changing its header by modifying the views/partials/header.pug file, and then run the following commands:
git add . git commit -m "changed the header" git push origin master
When the last command has finished, you should be able to see a new execution of the pipeline start automatically.
6. Moving Files
When a build is successful and all the tests have passed, you'd usually want to move your code to production. Buddy has predefined actions that help you securely transfer files to several popular hosting solutions, such as the Google Cloud Platform, DigitalOcean, and Amazon Web Services. Furthermore, if you prefer using your own private server that runs SFTP or FTP, Buddy can directly use those protocols too.
In this tutorial, we'll be using a Google Compute Engine instance, which is nothing but a virtual machine hosted on Google's cloud, as our production server. So switch to the Actions tab of the pipeline and press the + button shown below the Build and test action to add a new action.
On the next screen, scroll down to the Google Cloud Platform section and select the Compute Engine option.
In the form that pops up, you must specify the IP address of your VM. Additionally, to allow Buddy to connect to the VM, you must provide a username and choose an authentication mode.
The easiest authentication mode in my opinion is Buddy's SSH key. When you choose this mode, Buddy will display an RSA public key that you can simply add to your VM's list of authorized keys.
To make sure that the credentials you entered are valid, you can now press the Test action button. If there are no errors, you should see a test log that looks like this:
Next, choose GitHub repository as the source of the files and use the Remote path field to specify the destination directory on the Google Cloud VM. The Browse button lets you browse through the filesystem of the VM and select the right directory.
Finally, press the Add this action button.
7. Using SSH
Once you've copied the code to your production server, you must again build and install all its dependencies there. You must also restart the web app for the code changes to take effect. To perform such varied tasks, you'll need a shell. The SSH action gives you one, so add it as the last action of your pipeline.
In the form that pops up, you must again specify your VM's IP address and login credentials. Then, you can type in the commands you want to run. Here's a quick way to install the dependencies and restart the Node.js server:
pkill -HUP node #stop node server cd my_project npm install #install dependencies export MONGODB_URI= nohup node app.js > /dev/null 2>&1 & #start node server
As shown in the Bash code above, you must reset the MONGODB_URI environment variable. This is to make sure that your production server connects to its own MongoDB instance, instead of Buddy's MongoDB service.
Press the Add this action button again to update the pipeline.
At this point, the pipeline has three actions that run sequentially. It should look like this:
Press the Run pipeline button to start it. If there are no errors, it should take Buddy only a minute or two to build, test, and deploy your Node.js web app to your Google Cloud VM.
Conclusion
Being able to instantly publish new features, bug fixes, and enhancements to your web apps gives you a definite edge over your competition. In this tutorial, you learned how to use Buddy's pipelines, predefined actions, and attachable services to automate and speed up common tasks such as building, testing, and deploying Node.js applications.
There's a lot more the Buddy platform can do. To learn more about it, do refer to its extensive documentation.
by Ashraff Hathibelagal via Envato Tuts+ Code https://ift.tt/33rH96G
1 note
·
View note
Text
Key-based authentication in OpenSSH for Windows | Microsoft Docs
⭐ ⏩⏩⏩️ DOWNLOAD LINK 🔥🔥🔥 Step 3: Use OpenSSH to Generate an SSH Key Pair. In the command prompt, type the following: ssh-keygen. OpenSSH includes tools to help support key based authentication, specifically: ssh-keygen for generating secure keys; ssh-agent and ssh-add for. Whether you use Command Prompt or Windows Terminal, type ssh-keygen and hit Enter. This will automatically generate the SSH keys. Generating these keys from Linux is easy, and thanks to Ubuntu on WSL, you can follow the same process from Windows But even without Ubuntu, SSH keys. Ssh-keygen is a tool for creating new authentication key pairs for SSH. Such key pairs are used for automating logins, single sign-on, and for authenticating. ssh-keygen - Creation, management, and conversion of keys used for client and server authentication. Copy ssh-keygen [-b bits] -t type [-N. · open command prompt (cmd) · enter ssh-keygen and press enter · press enter to all settings. now your key is saved in c:\Users\.ssh\. › authentication › connecting-to-github-with-ssh › genera. Paste the text below, substituting in your GitHub email address. $ ssh-keygen -t ed -C "your_email@". Note: If you are using a legacy. which is provided with the SSH package on Linux/macOS systems and comes with Git for Windows: $ ssh-keygen -o Generating public/private rsa key pair.
Generate new ssh keys in Windows 10 / 11 - Stack Overflow
Generate SSH Keys on Windows 10 | Ubuntu
How to Generate SSH keys in Windows 10 and Windows 11
Key-based authentication in OpenSSH for Windows | Microsoft Docs
Creating SSH keys | Bitbucket Data Center and Server | Atlassian Documentation
Manually generating your SSH key in Windows
Generate new ssh keys in Windows 10 / 11 - Stack Overflow
Generating a new SSH key and adding it to the ssh-agent - GitHub Docs
Git - Generating Your SSH Public Key
How to Generate SSH keys in Windows 10 and Windows 11
Key-based authentication in OpenSSH for Windows | Microsoft Docs
Generate SSH Keys on Windows 10 | Ubuntu
What is ssh-keygen & How to Use It to Generate a New SSH Key?
1 note
·
View note
Text
Creating SSH keys | Bitbucket Data Center and Server | Atlassian Documentation
⭐ ⏩⏩⏩️ DOWNLOAD LINK 🔥🔥🔥 Step 3: Use OpenSSH to Generate an SSH Key Pair. In the command prompt, type the following: ssh-keygen. OpenSSH includes tools to help support key based authentication, specifically: ssh-keygen for generating secure keys; ssh-agent and ssh-add for. Whether you use Command Prompt or Windows Terminal, type ssh-keygen and hit Enter. This will automatically generate the SSH keys. Generating these keys from Linux is easy, and thanks to Ubuntu on WSL, you can follow the same process from Windows But even without Ubuntu, SSH keys. Ssh-keygen is a tool for creating new authentication key pairs for SSH. Such key pairs are used for automating logins, single sign-on, and for authenticating. ssh-keygen - Creation, management, and conversion of keys used for client and server authentication. Copy ssh-keygen [-b bits] -t type [-N. · open command prompt (cmd) · enter ssh-keygen and press enter · press enter to all settings. now your key is saved in c:\Users\.ssh\. › authentication › connecting-to-github-with-ssh › genera. Paste the text below, substituting in your GitHub email address. $ ssh-keygen -t ed -C "your_email@". Note: If you are using a legacy. which is provided with the SSH package on Linux/macOS systems and comes with Git for Windows: $ ssh-keygen -o Generating public/private rsa key pair.
Generate new ssh keys in Windows 10 / 11 - Stack Overflow
Generate SSH Keys on Windows 10 | Ubuntu
How to Generate SSH keys in Windows 10 and Windows 11
Key-based authentication in OpenSSH for Windows | Microsoft Docs
Creating SSH keys | Bitbucket Data Center and Server | Atlassian Documentation
Manually generating your SSH key in Windows
Generate new ssh keys in Windows 10 / 11 - Stack Overflow
Generating a new SSH key and adding it to the ssh-agent - GitHub Docs
Git - Generating Your SSH Public Key
How to Generate SSH keys in Windows 10 and Windows 11
Key-based authentication in OpenSSH for Windows | Microsoft Docs
Generate SSH Keys on Windows 10 | Ubuntu
What is ssh-keygen & How to Use It to Generate a New SSH Key?
1 note
·
View note
Text
Generating a new SSH key and adding it to the ssh-agent - GitHub Docs
⭐ ⏩⏩⏩️ DOWNLOAD LINK 🔥🔥🔥 Step 3: Use OpenSSH to Generate an SSH Key Pair. In the command prompt, type the following: ssh-keygen. OpenSSH includes tools to help support key based authentication, specifically: ssh-keygen for generating secure keys; ssh-agent and ssh-add for. Whether you use Command Prompt or Windows Terminal, type ssh-keygen and hit Enter. This will automatically generate the SSH keys. Generating these keys from Linux is easy, and thanks to Ubuntu on WSL, you can follow the same process from Windows But even without Ubuntu, SSH keys. Ssh-keygen is a tool for creating new authentication key pairs for SSH. Such key pairs are used for automating logins, single sign-on, and for authenticating. ssh-keygen - Creation, management, and conversion of keys used for client and server authentication. Copy ssh-keygen [-b bits] -t type [-N. · open command prompt (cmd) · enter ssh-keygen and press enter · press enter to all settings. now your key is saved in c:\Users\.ssh\. › authentication › connecting-to-github-with-ssh › genera. Paste the text below, substituting in your GitHub email address. $ ssh-keygen -t ed -C "your_email@". Note: If you are using a legacy. which is provided with the SSH package on Linux/macOS systems and comes with Git for Windows: $ ssh-keygen -o Generating public/private rsa key pair.
Generate new ssh keys in Windows 10 / 11 - Stack Overflow
Generate SSH Keys on Windows 10 | Ubuntu
How to Generate SSH keys in Windows 10 and Windows 11
Key-based authentication in OpenSSH for Windows | Microsoft Docs
Creating SSH keys | Bitbucket Data Center and Server | Atlassian Documentation
Manually generating your SSH key in Windows
Generate new ssh keys in Windows 10 / 11 - Stack Overflow
Generating a new SSH key and adding it to the ssh-agent - GitHub Docs
Git - Generating Your SSH Public Key
How to Generate SSH keys in Windows 10 and Windows 11
Key-based authentication in OpenSSH for Windows | Microsoft Docs
Generate SSH Keys on Windows 10 | Ubuntu
What is ssh-keygen & How to Use It to Generate a New SSH Key?
1 note
·
View note
Text
Key-based authentication in OpenSSH for Windows | Microsoft Docs
⭐ ⏩⏩⏩️ DOWNLOAD LINK 🔥🔥🔥 Step 3: Use OpenSSH to Generate an SSH Key Pair. In the command prompt, type the following: ssh-keygen. OpenSSH includes tools to help support key based authentication, specifically: ssh-keygen for generating secure keys; ssh-agent and ssh-add for. Whether you use Command Prompt or Windows Terminal, type ssh-keygen and hit Enter. This will automatically generate the SSH keys. Generating these keys from Linux is easy, and thanks to Ubuntu on WSL, you can follow the same process from Windows But even without Ubuntu, SSH keys. Ssh-keygen is a tool for creating new authentication key pairs for SSH. Such key pairs are used for automating logins, single sign-on, and for authenticating. ssh-keygen - Creation, management, and conversion of keys used for client and server authentication. Copy ssh-keygen [-b bits] -t type [-N. · open command prompt (cmd) · enter ssh-keygen and press enter · press enter to all settings. now your key is saved in c:\Users\.ssh\. › authentication › connecting-to-github-with-ssh › genera. Paste the text below, substituting in your GitHub email address. $ ssh-keygen -t ed -C "your_email@". Note: If you are using a legacy. which is provided with the SSH package on Linux/macOS systems and comes with Git for Windows: $ ssh-keygen -o Generating public/private rsa key pair.
Generate new ssh keys in Windows 10 / 11 - Stack Overflow
Generate SSH Keys on Windows 10 | Ubuntu
How to Generate SSH keys in Windows 10 and Windows 11
Key-based authentication in OpenSSH for Windows | Microsoft Docs
Creating SSH keys | Bitbucket Data Center and Server | Atlassian Documentation
Manually generating your SSH key in Windows
Generate new ssh keys in Windows 10 / 11 - Stack Overflow
Generating a new SSH key and adding it to the ssh-agent - GitHub Docs
Git - Generating Your SSH Public Key
How to Generate SSH keys in Windows 10 and Windows 11
Key-based authentication in OpenSSH for Windows | Microsoft Docs
Generate SSH Keys on Windows 10 | Ubuntu
What is ssh-keygen & How to Use It to Generate a New SSH Key?
0 notes