#how to disable cache completely in google chrome
Explore tagged Tumblr posts
Visit Tumblr Blog
Explore Tumblr blogs with no restrictions, modern design and the best experience.
Last Seen Tumblr Blogs


Fun Fact
Tumblr’s reach among the 26-to-35-year-olds in the US is 11%.
Link
0 notes
Text
FoSCoS Login Issues & How to Resolve Them Quickly
FoSCoS is an online platform created by FSSAI for food business registration, licensing approval, and regulatory compliance. The introduction of FoSCoS has made food safety procedures more efficient resulting in less complexity for businesses to follow FSSAI requirements.
Users frequently face login issues on FoSCoS, preventing them from managing their compliance tasks efficiently. This guide helps users understand common FoSCoS login issues and provides solutions to ensure uninterrupted food safety compliance.
Common FoSCoS Login Issues and Their Fixes
1. Incorrect Username or Password
Incorrect entry of username or password stands as the main cause that leads to login failure on the FoSCoS portal. Login failures often result from typographical errors, forgotten passwords, or case-sensitive mismatches in usernames and passwords. The strict login rules enforced by the system will deny access to your account when you make any slight error while entering your user information.
Solution:
Double-check your username and password for typos.
Ensure the Caps Lock key is off, as passwords are case-sensitive.
If you forgot your password, use the ‘Forgot Password’ option to reset it.
2. Forgot Username or Password
It becomes annoying to forget your password and username when you desperately need FoSCoS login access for compliance tasks. Incorrect credentials prevent access to essential FSSAI tasks such as registration, licensing, and renewal. You can easily recover your account access through following the correct recovery steps.
Solution:
Click on the ‘Forgot Password’ link on the login page.
Enter your registered email ID or mobile number to receive a reset link.
Follow the instructions in the email or SMS to create a new password.
If you have forgotten your username, check your email for previous FoSCoS registration confirmations, which may contain your login details.
3. Account Locked Due to Multiple Failed Attempts
FoSCoS accounts are secured with protocols designed to prevent unauthorized access. The system will lock your account for a period when multiple failed log-in attempts occur to protect it from potential hacking threats or suspect activities. The lockout system stops unauthorized users from entering platforms by forcing password entry multiple times without success.
Solution:
Wait for 15-30 minutes and try logging in again.
Reset your password using the ‘Forgot Password’ option.
If the issue persists, contact FoSCoS support for account recovery.
4. Server Downtime or Technical Glitches
The FoSCoS portal experiences technical problems when numerous users concurrently use its system. Such conditions result in delayed system responses and blocked access or complete website shutdown periods. The platform experiences performance interruptions when maintenance occurs or when servers encounter unexpected crashes. The same issue happens with software updates and regular system maintenance tasks.
Solution:
Check if the FoSCoS website is down by visiting https://foscos.fssai.gov.in.
Clear your browser cache and cookies and try again.
Try logging in from a different browser (e.g., Chrome, Firefox, Edge) or another device.
If it’s a server issue, wait for some time and try again later.
5. Browser Compatibility Issues
The FoSCoS portal operates with current browser software while developers aim to deliver steady updates for new functionalities along with security improvements. When using a browser version that is not up-to-date you might experience login problems and subpar user experience because the portal does not support all of its latest features. Users of outdated browsers might experience two issues: the portal displays incorrectly and several features refuse to operate properly.
Solution:
Use an updated version of Google Chrome, Mozilla Firefox, or Microsoft Edge.
Disable browser extensions that might interfere with login.
Try accessing the portal in Incognito Mode.
6. Slow or Unstable Internet Connection
Web portal users experience login issues and timeouts and experience incomplete page loading when they have either a slow or unstable internet connection while trying to access the FoSCoS portal. Large files and sophisticated web features will not load properly due to the need for strong and fast connection speeds. Your ability to access FSSAI registration as well as licensing and compliance becomes restricted when your internet connection strength drops.
Solution:
Check your internet connection speed.
Restart your router or switch to a different network.
Avoid using public or unsecured Wi-Fi networks, as they may cause connection issues.
7. Incorrect Captcha Entry
The FoSCoS portal enforces captcha verification procedures to verify human users attempted to log in rather than automated bots. These captchas frequently create reading obstacles through their warped or superimposed characters. You will be blocked from accessing the portal when you enter the captcha code incorrectly even if your entered username and password match the system.
Solution:
Carefully type the captcha code exactly as shown.
If the captcha is unclear, refresh the page to generate a new one.
8. Expired FSSAI License Leading to Login Issues
Users with an expired or inactive FSSAI license may face restrictions on certain portal functions but can still log in. The FoSCoS platform demands an existing and valid FSSAI license for users to perform essential activities which encompass account registration and licensing in addition to compliance checks and document submission. Your FSSAI license status determines your portal access through the portal since it validates any actions which need a current license.
Solution:
Check your license validity and renew it if necessary.
Contact FoSCoS customer support for assistance.
9. Unverified Email or Mobile Number
Users must verify their email address and mobile number at registration for FoSCoS to ensure proper contact during important updates and verification processes and compliance sendings. Undisclosed email and mobile number verification will result in login restrictions that block access to your account along with tasks like license renewal and compliance submissions.
Solution:
Check your email inbox and SMS for a verification link or OTP.
If you haven’t received any verification message, request a resend verification link option.
10. Session Timeout Due to Inactivity
A built-in session timeout protection system in FoSCoS protects user accounts against unauthorized access. System logging out occurs when no account activity happens for specific periods for security purposes. The session timeout feature protects sensitive data but may disrupt users if they remain inactive for a long period.
Solution:
Avoid long periods of inactivity while logged into your account.
If you are logged out, refresh the page and log in again.
How to Contact FoSCoS Support for Login Issues
If you have tried all the solutions and still cannot log in, you should contact FoSCoS support for assistance.
FoSCoS Helpdesk Contact Details:
FoSCoS Official Website: https://foscos.fssai.gov.in
Email Support: [email protected]
Customer Care Number: 1800-112-100 (Toll-Free)
Live Chat Support: Available on the FoSCoS website
Conclusion
Accessing the FoSCoS login page can be frustrating, as users rely on the system for license renewals and compliance submissions. Simple solutions address most problems during FoSCOs login and include password resets and testing of internet connection stability alongside updated browser usage. Contact FoSCoS support for immediate help when your problem continues to exist according to The Legal Dost.
Following simple troubleshooting steps can help ensure uninterrupted access to FoSCoS and compliance with FSSAI regulations. The Legal Dost provides legal assistance for all your needs connected to FSSAI registration and compliance processes.
0 notes
Text
Quick Tips for Re-Authorizing Google Accounts Using GMB Briefcase | Help Center
youtube
Re-authorizing your Google account is a vital task that ensures uninterrupted access to essential tools in GMB Briefcase. Whether you're managing multiple Google Business Profiles or streamlining local SEO efforts, maintaining an active connection is key. Here’s a quick guide to help you navigate the re-authorization process effortlessly using GMB Briefcase | Help Center.
Why Re-Authorization is Important
Google requires periodic re-authorization of connected accounts to enhance security and compliance. Re-authorization ensures that GMB Briefcase continues to operate seamlessly with your Google account, granting access to features like profile updates, performance analytics, and citation management.
Quick Tips for a Smooth Re-Authorization Process
1. Stay Ahead with Notifications
Tip: Enable notifications in GMB Briefcase to receive alerts when your Google account needs re-authorization. This proactive step helps avoid disruptions in account functionality.
2. Use the Correct Google Account
Tip: Double-check that you log in with the Google account linked to your GMB Briefcase. Switching between accounts may result in errors or mismatches.
3. Check Permissions Thoroughly
Tip: When prompted, ensure you grant all requested permissions during the re-authorization process. Partial permissions can limit functionality and require you to repeat the process.
4. Choose a Compatible Browser
Tip: Use a recommended browser like Google Chrome for the re-authorization process. Disable any pop-up blockers or ad-block extensions temporarily to prevent interruptions.
5. Ensure a Stable Internet Connection
Tip: Conduct the re-authorization process over a reliable internet connection. Unstable connectivity can lead to incomplete authorizations.
6. Clear Cache and Cookies
Tip: If you encounter issues, clearing your browser’s cache and cookies may resolve conflicts and enable a smoother re-authorization process.
7. Follow GMB Briefcase’s Step-by-Step Guide
Tip: Access the Help Center for a detailed guide to re-authorizing Google accounts. The step-by-step instructions simplify the process and address common challenges.
8. Keep Your Account Credentials Handy
Tip: Have your Google account login details ready. A quick login prevents delays and allows you to complete the process efficiently.
9. Regularly Monitor Account Status
Tip: Log into GMB Briefcase frequently to monitor the status of your connected Google accounts. Early detection of authorization issues ensures uninterrupted access.
10. Contact Support for Complex Issues
Tip: If you encounter persistent problems, don’t hesitate to reach out to GMB Briefcase | Help Center’s support team for expert assistance.
How GMB Briefcase Simplifies Re-Authorization
- User-Friendly Dashboard
Easily view account statuses and identify which accounts require re-authorization.
- Automated Alerts
Receive timely notifications about expiring authorizations, keeping you ahead of potential disruptions.
- Comprehensive Guides
Access clear, concise tutorials in the Help Center to guide you through the re-authorization process.
- Reliable Support
The GMB Briefcase support team is always ready to assist with troubleshooting and complex account-related queries.
Final Thoughts
Re-authorizing Google accounts doesn’t have to be a hassle. With the intuitive tools and resources provided by GMB Briefcase | Help Center, you can handle the process quickly and efficiently. By following these quick tips and leveraging the platform's features, you’ll ensure your accounts remain active, secure, and ready to power your business growth.
For more information and support, visit the GMB Briefcase | Help Center today!
Find Us Online
Facebook
LinkedIn
Twitter
YouTube Channel
0 notes
Text
How to Troubleshoot Issues with TellCulvers Survey Website?
The TellCulvers survey website offers a convenient way for customers to share feedback about their dining experience at Culver’s. By participating, customers not only help the brand improve but can also receive rewards like free menu items or discounts. However, as with any online platform, users may occasionally face technical issues when trying to complete the survey. In this guide, we’ll walk you through common problems encountered on the TellCulvers survey website and offer detailed troubleshooting tips.
Common Issues with TellCulvers Survey Website
Before diving into solutions, it’s helpful to identify the typical problems users experience when visiting tellculvers.com/survey. These include:
Website Not Loading Some users report that the site doesn’t load or displays an error message.
Survey Code Issues Problems with entering the survey code printed on your receipt are common.
Browser Compatibility Problems Certain browsers may not support the survey site’s functionality.
Slow Website Performance The site may load slowly due to high traffic or connectivity problems.
Errors During Submission Users might encounter issues when submitting their responses, often leading to frustration.
Mobile Device Incompatibility Some users find it challenging to access the survey via their smartphones or tablets.
Expired Survey Link or Code Trying to use an outdated receipt or survey link can lead to errors.
How to Troubleshoot TellCulvers Survey Website Issues
1. Check Your Internet Connection
A stable internet connection is essential for accessing tellculvers.com/survey. If the website doesn’t load:
Ensure your device is connected to Wi-Fi or a cellular network.
Test your connection by visiting other websites.
Restart your router or modem if the issue persists.
2. Verify the Website URL
It’s crucial to type the correct web address. Enter tellculvers.com/survey directly into your browser’s address bar. Avoid clicking on links from unverified sources, as these may lead to phishing sites.
3. Use a Compatible Browser
The TellCulvers website works best with updated browsers. Try the following:
Use popular browsers like Google Chrome, Mozilla Firefox, Safari, or Microsoft Edge.
Clear your browser’s cache and cookies to remove temporary files that may interfere with site performance.
Update your browser to the latest version for optimal compatibility.
4. Resolve Survey Code Issues
The survey code is a critical component for accessing the feedback form. If you encounter problems:
Double-check the code entered. Ensure there are no typos or spaces.
Ensure the receipt is still valid. The survey code typically expires after a specific number of days.
If the code is illegible, contact Culver’s customer service for assistance.
5. Troubleshoot Submission Errors
Encountering issues while submitting your responses can be frustrating. Here’s how to resolve this:
Ensure all required fields in the survey are completed. Missing answers often cause submission errors.
Disable browser extensions or ad blockers that might interfere with the site’s functionality.
Refresh the page and try resubmitting your responses.
6. Optimize Mobile Access
If you’re using a smartphone or tablet to access tellculvers.com/survey:
Switch to a different device if the site doesn’t load properly.
Use the browser’s desktop mode, which can sometimes resolve layout or navigation issues.
Avoid using public Wi-Fi networks that may restrict access to specific websites.
7. Resolve Expired Link or Code Issues
Survey links and codes have an expiration date. If your receipt is outdated:
Ensure you complete the survey promptly after your visit to Culver’s.
If your code has expired, you’ll need a new receipt to participate.
8. Check for Scheduled Maintenance
Occasionally, the TellCulvers survey website may be temporarily unavailable due to maintenance. To verify:
Visit Culver’s official website or social media pages for announcements about downtime.
Wait for a few hours and try accessing the site again.
9. Disable Pop-up Blockers
Some browsers block pop-ups by default, which can interfere with the survey form:
Go to your browser settings and temporarily disable pop-up blockers.
Add tellculvers.com/survey to your browser’s whitelist to ensure smooth navigation.
10. Contact Culver’s Customer Support
If none of the above solutions work, you can reach out to Culver’s customer support:
Visit Culver’s official website to find their contact information.
Call the customer service helpline for guidance on completing the survey.
Mention the issues you’re facing and provide details about your browser and device.
Preventing Issues on TellCulvers Survey Website
Taking a few preventive measures can minimize the likelihood of encountering problems on the TellCulvers survey website:
Keep Devices Updated Ensure your operating system, browser, and antivirus software are updated regularly.
Save Your Receipt Promptly Store your Culver’s receipt in a safe place, and complete the survey as soon as possible to avoid code expiration.
Use Trusted Devices For a smoother experience, access the survey on a reliable device, such as a laptop or desktop, rather than an older smartphone.
Avoid High-Traffic Times Try completing the survey during off-peak hours to prevent slow loading due to high traffic.
Bookmark the Website Save tellculvers.com/survey in your bookmarks to avoid mistyping the URL.
Why Participate in the TellCulvers Survey?
While troubleshooting technical issues is important, don’t forget the benefits of participating in the TellCulvers survey:
Customer Rewards: By sharing your feedback, you can earn discounts, free custard, or other menu items as a thank-you.
Enhanced Dining Experience: Your feedback helps Culver’s improve its service, menu, and overall experience.
Convenience: The survey takes only a few minutes to complete, making it a quick and easy way to contribute.
Conclusion
Experiencing issues with the TellCulvers survey website can be frustrating, but most problems can be resolved with a few simple steps. By ensuring a stable internet connection, using a compatible browser, and verifying the survey code, you can successfully complete your feedback submission. Remember, if you continue to face challenges, Culver’s customer support is always there to help.
Taking the time to troubleshoot ensures you don’t miss out on rewards and allows you to share valuable feedback that helps Culver’s maintain its commitment to excellent service. So, the next time you visit Culver’s and receive a survey invitation, feel confident in your ability to navigate and complete the process smoothly!
0 notes
Photo

Here you can find the detailed guide on How to Completely Disable Cache in GoogleChrome as well as for a Specific Website on Windows PC. So that you can protect your privacy from others.
#how to disable cache completely in google chrome#how to disable cache completely in for specific website#how to disable cache completely in google chrome and specific website
0 notes
Text
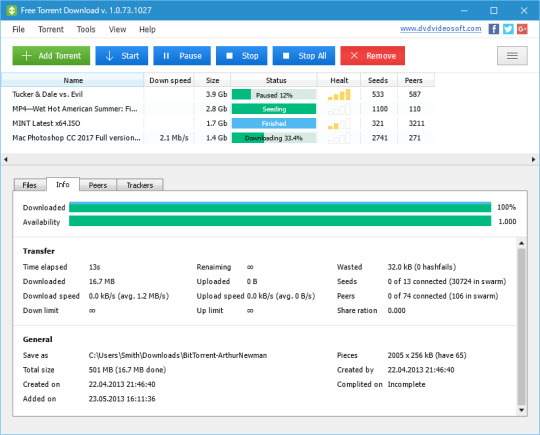
Safe Torrent Downloader

Our BitTorrent Web and Classic products for Windows are available in one location to help you quickly find the version that suits you. Download today. Apr 17, 2020. BitTorrent is a peer-to-peer communications protocol for efficiently sending any type of file, large or small, over the Internet. Safe torrenting software, such as such as BitTorrent Classic, are needed to send or receive files using the protocol.
uTorrent is the most popular torrent client in the world by a large margin, but is uTorrent safe? This guide will teach you how to use uTorrent as safely as possible, and how to get the most from your uTorrent experience.
Cached
You’ll learn:
What safety issues does uTorrent have?
The safest versions of uTorrent to use (and which ones contain malware)
How to block ads in uTorrent
How to protect your identity when downloading torrents with uTorrent
We recommend you also read:
How to use uTorrent anonymously (Learn to hide your uTorrent IP address and encrypt your torrents)
uTorrent proxy setup instructions (use a SOCKS proxy for more anonymous downloads)
QUESTIONS ABOUT UTORRENT’S SAFETY
uTorrent made news across the internet in 2015 when it was reported that they were bundling bitcoin mining software that would auto-install along with uTorrent and secretly use host machines to mine for bitcoins without the users’ knowledge.
It turns out that this issue wasn’t widespread, and uTorrent removed the malware from future releases, but it did raise questions about how far the company is willing to go in order to generate revenue. Currently, the bulk of their revenue comes from low-cost advertising and the small percentage of users who choose to upgrade to utorrent pro for $19.95/year.
In 2014, google’s chrome browser also flagged uTorrent software as malware though it came up clean on virus scanners. This issue was temporary as well and likely had nothing to do with the actual risk of installing the software.
Adware and ransomeware bundled with other torrent clients, has demonstrated the risk of installing torrent software, even from reputable sources. In March 2016, an update of Transmission torrent client (distributed from the company’s own servers) was infected with ransomeware which would hold users’ systems hostage by encrypting the harddisk and demanding a ransom payment in bitcoins.
SO IS IT SAFE TO USE UTORRENT?
The short answer is yes, but it’s complicated.
Currently, uTorrent’s software is considered safe and free of dangerous malware. The primary risk of using uTorrent comes not from the software itself, but the risk of downloading dangerous or infected torrents from unknown sources. No torrent client can protect you if you choose to download unsafe files which may contain rootkits, malware, or trojans. Read our safe torrent guide for our top prevention/safety tips.
It’s also a good idea to always your identity when downloading torrents, and to encrypt your traffic so you can’t be blocked or throttled by your internet provider. We wrote our‘ultimate guide to anonymous utorrent’ to show you exactly how to hide your identity while torrenting.
Safest versions of uTorrent
There is great debate over the best version of uTorrent released over the years. Some versions are more stable then others (and have less privacy leaking features). Over time, uTorrent has become much more bloated (with extra features) and less lightweight then it was in the early days.
Among hardcore veterans, uTorrent version 2.2.1 is still the favorite (and considered the last version not bundled with adware). You can still find download links to this old utorrent version (though always software from unknown sources before installing. This reddit thread has several links to download this OG version.
Save Torrent Downloader
You can also find previous versions of uTorrent on oldversion.com
USING UTORRENT ANONYMOUSLY
We always recommend taking steps to hide and anonymize your torrent downloads. By using a VPN (best option) and/or a proxy service, you can make your torrent downloads virtually impossible to monitor or trace.
Here are some step-by-step guides to help you use utorrent safely:
How to use uTorrent Anonymously (VPN + Proxy setup instructions)
You will also likely find this youtube video helpful. It includes step by step instructions showing you how to use a VPN or Proxy with uTorrent, and how to check your torrent IP address to verify your setup is working and your IP is hidden.
10 Best Free Torrent Clients For Downloading Torrents (2020)
HOW TO REMOVE ADS FROM UTORRENT
Advertisements in uTorrent can be rather annoying. Fortunately, you can choose to disable them by tweaking a few advanced settings in the uTorrent preferences menu.
Ubergizmo has the complete guide on how to disable ads in uTorrent.
Safe Torrent Downloader
Best of all, this isn’t some hack method. It’s actually a built in option buried deep in the uTorrent’s menu. It works great, and you can have an ad-free uTorrent experience in just a few minutes.
FINAL THOUGHTS
uTorrent is still the torrent client of choice for over 100 million users worldwide. The software itself remains relatively safe, though if you want a true ad-free and adware-less torrent experience, you should consider trying one of the open-source torrent clients like Deluge or Qbittorrent, both of which are extremely functional and popular.
The biggest risk with uTorrent (and with any torrent software) is what you download, and where you download it from. The safest practice is to never download installable files or software such as .EXE or .BAT files, which could contain dangerous software, keyloggers, spyware, etc. You should also have a high-quality antivirus, and use it frequently. Read our Safe Torrent Guide for a full list of good safety practices.
Be well, torrent safely and always use strong protection.
Ryan McCarthy
Safe Utorrent Download Windows 10
Ryan is the editor and head reviewer. He's been a tech geek and digital privacy enthusiast since the Y2k freakout in '99. When not writing BitTorrent tutorials, he can usually be found sipping a lager or playing pickup football (the real kind).
1 note
·
View note
Text
Thoughts on Turtledove

Things are getting exciting. We are holding our breath to see what solution will eventually replace 3rd party cookies. This is almost as exciting when waiting for the final GDPR docs; we all know it is going to hurt our industry but how, how much, and exactly when. Apple has paved the way with ITP and IDFA, now Google is also making big changes to the world’s most popular browser Chrome and its Privacy Sandbox. For advertisers and traditional data vendors, this nightmare is called Turtledove.
What is Turtledove?
Turtledove will basically be an API (application programming interface) which tries to enable behavioural targeting while limiting the amount of user data that is shared with advertisers. What Turtledove is proposing is to completely re-architect the current system so that user behaviors are not stored in a remote database, they are stored in your browser and they never leave your browser. In other words, Turtledove brings the auction and final decisioning out of the cloud and into the browser. Kind of funny though, since Google — that company that lamented the terrible things the header was doing to latency while proclaiming the brilliance of server connections— now decided to leverage edge computing.
There is no official doom day date yet but it will be released sometime within the next 24 months. Note that this applies to Chrome, it is too early to say if this move has any affect on Safari and the rest.
User benefits
Questions also remain about how users would really benefit from Turtledove. Well, you could argue that it:
Eliminates third-party cookies and all cross-site tracking.
Reduces browser signals dramatically making “inferred IDs” (aka, device fingerprinting, cache inspection, link decoration etc. ) unreliable and unusable.
Enables sufficiently large user groups ascertaining anonymity of any one person/device within that group, but sufficiently small to enable relatively fine-grained reach.
Utilizes these user groups instead of device-based or cookie-based identifiers.
Potential pitfalls
At this stage, some of the pitfalls are:
Turtledove would disable many common web advertiser tactics such as frequency capping, A/B testing, attribution and reporting. For these to work, Turtledove relies on the Aggregate Reporting API. Yet another early sandbox proposal to be defined.
Turtledove could risk handing Google yet another advantage over its ad tech competitors. Only this time they are being more tactical in their approach to their antitrust practices.
An average citizen is still going to feel like being chased.
The browser turns from a relatively passive piece into an active player in the bidding. This would strain the bandwidth and computational power consumed by ad tech, particularly on mobile devices. Servers can process huge amounts of data, but data on a phone is limited by Wi-Fi, cell service and available device storage.
Complex auction logic does not seem possible. Even not-so-complex segmentation, such as merging two interest groups to create a more nuanced audience segment.
What about Safari users today, ITP and alternative solutions?
Basically this boils down to ITP (Safari, Firefox), which in turn means no cookies, my friends. And because the adtech world is built on 3rd party audiences, ITP poses an impossible challenge for marketers. Only contextual targeting seems to provide the working solution. Which in turn, can be considered a rather one-sided approach if we merely target based on the page content. But it has proven to be effective, so it is a viable solution that is able to address all browsers.
On top of old-school contextual targeting, advances in machine-learning and AI have opened up a whole new world of opportunities for intelligent targeting. Personally I am very excited about how well a system can profile a user without any PII and prior information with just a few signals at the time of the data request. It feels like magic but is actually based on years of AI and realtime scalability tuning. When compared to 3rd party audiences, this is revolutionary. Realtime moments can be seen as more relevant and efficient ways to profile and target. And the best part - it is a sustainable model and it is here now.
Final words
Targeting without personal data is set to become the new normal, and to me this now seems entirely appropriate. Advertising theories and methods have evolved continually over the years and I see this shift in ad tech, seismic as it is for many, as simply the latest chapter for this smart and agile industry. Moving away from cookies is going to be uncomfortable for many and unanswered questions do still remain. It will require loads of brainstorming, and brave minds to have the courage to try out new approaches in the new world of adtech.
The relief is that there already are future-proof solutions that indeed can replace and sometimes even more efficiently, the old world targeting cookie-based models. So heads up, this is going to be a rewarding ride!
1 note
·
View note
Text
What Is Google Lighthouse? Google Lighthouse is an automated tool designed to audit web pages for performance, accessibility, best practices, and more. It was developed by Google and first released in 2016. It is one of the most popular open source tools available and provides you with valuable insights about your website’s performance. Google Lighthouse can be used for testing websites on both desktop and mobile devices. It will provide a comprehensive set of performance metrics, as well as best practices for improving the performance and usability of your website. It is recommended by developers and SEOs to use Google Lighthouse to constantly monitor their websites and ensure their users are getting the best experience possible. Google Lighthouse is available for both Chrome and Firefox, so regardless of which browser you are using, you can access this powerful tool. Using Google Lighthouse Google Lighthouse is easy to use. All you have to do is open the Chrome or Firefox Developer Tools, select the “Audits” tab and click on “Run Lighthouse”. You will then be able to select the type of audit you would like to run on your website. Lighthouse will then run the audit and provide you with a detailed report of its performance. You can export the report as either a JSON or HTML file. This will enable you to analyze your website’s performance, as well as give you ideas on how to make it better. Performance Metrics Google Lighthouse provides a range of performance metrics. These include: First Contentful Paint – This measures the time it takes for the page to load its first visible component, such as text, images, or videos. First MeaningfulPaint – This is the time it takes for the page’s primary content to display. This metric is important for ensuring an enjoyable user experience. Speed Index – This is the time it takes for the page to be visually complete. It measures how quickly the page fully loads and appears to the user. Time to Interactive – This is the time it takes for the page to respond to user inputs such as clicks, scrolls, and taps. First CPU Idle – This measures the time it takes for the page to become interactive and respond to user interactions. Google Lighthouse also measures other important performance metrics, such as page size, number of requests, and more. These metrics are essential for understanding your website’s performance and can help you identify areas where you can make improvements. Accessibility Metrics Google Lighthouse also provides you with accessibility metrics, such as: ARIA labels – This metric helps you evaluate the use of proper labels on your website elements, such as buttons, links, images, and videos. Contrast ratio – This measures the contrast between foreground and background colors on your website. It helps ensure that users with low vision can properly read your content. Keyboard support – This ensures that users can use their keyboard to navigate your website easily. These metrics are essential for providing an optimal user experience to users with disabilities. Best Practices Besides performance and accessibility metrics, Google Lighthouse also measures a range of best practices. These include: HTTP/2 support – This helps you evaluate whether your website is using the latest version of the HTTP protocol for better performance. Proper caching – This ensures that content will be cached properly and delivered faster to your users. Secure origins – This measures whether you have implemented proper security measures on your website, such as HTTPS and Content Security Policy. Following best practices can have a significant impact on user experience and boost your website’s performance. Conclusion Google Lighthouse is a powerful, open source tool that can provide you with valuable insights about your website’s performance. It can be used for testing performance, accessibility, and best practices metrics. It is recommended for developers
and SEOs to use Google Lighthouse to monitor their website’s performance and ensure the best user experience. SEO is essential for any business looking to succeed online. It can improve your website’s ranking on search engines and drive qualified traffic to your business. We have experienced SEO experts who can help you succeed online. Check out our SEO pricing to see how we can help your business thrive. What are the benefits of using Google Lighthouse? 1. Identify and Improve Performance: Google Lighthouse can audit a website’s performance, providing actionable recommendations to make it faster. It tests user interaction, checks if there are issues with the way the website is built, and can provide direction on how to improve loading times and reduce page load size. 2. Evaluate Accessibility: Google Lighthouse ensures websites are accessible for everyone, regardless of device. It evaluates how accessible a website is for any visitor and provides instructions on how to improve it. 3. Examine SEO: Google Lighthouse tests the SEO of a website, examining how well it has been optimized for search engine rankings. It looks for missing sitemaps, meta tags and keyword usage to provide insights into how to improve the website's SEO. 4. Improve Security: Google Lighthouse will check a websites security and provide guidelines on how to improve it. It looks for common security flaws, vulnerabilities and dangerous sources on the page, which could damage the page's reputation and threaten visitor security. 5. Optimize Content: Google Lighthouse is capable of examining the content of a website. It runs tests on text formatting, image optimization, and video playback. This helps to ensure visitors' internet connection is not slowed down by unnecessarily large files. What are the measuring criteria of Google Lighthouse? Google Lighthouse measures performance, accessibility, progressive web app, best practices, and SEO metrics. The main performance criteria include time to first contentful paint, first meaningful paint, first interactive, and first CPU idle. Other criteria include the number of network requests, total page weight, image optimization, and minified JavaScript. Accessibility metrics include the contrast ratio of foreground and background colors, headset elements, and errors in labels and ARIAs. Progressive web app metrics include HTTPS load time, service worker registration and cache policies. Best practices metrics include secure certificates, performance budgets, and JavaScript execution time. SEO metrics include proper document titles, meta descriptions, and robotic.txt files.
0 notes
Text
How to Solve ERR_CACHE_MISS in Google Chrome?

You encounter the error code ERR_CACHE_MISS with the message: “This site could not be loaded from cache” while browsing? Sure sucks, huh?
Access to the website is hampered because of errors related to cache. However, what really happened, huh? Then, how to solve it?
Calm down.. This error is very easy to solve, really. In this article, we will help you answer all the questions about ERR_CACHE_MISS.
Let’s go, read this guide to the end!
Understanding ERR_CACHE_MISS
ERR_CACHE_MISS is an error that appears when the browser displays a cached version of the browser that is different from the actual website version.
ERR_CACHE_MISS error message This error message appears when you access a web page via a computer or laptop. When using a cellphone, the error message that appears is NET::ERR_CACHE_MISS.
What Causes ERR_CACHE_MISS?
The cause of ERR_CACHE_MISS can be from several things, namely:
Wrong browser configuration
Broken extension holds connection between browser and website
Too old browser cache and cookies
Some of these obstacles can occur without you knowing it. Then, how to solve it?
How to Solve ERR_CACHE_MISS?
Here are some ways to solve ERR_CACHE_MISS that you can try from the easiest:
1. Reload Page
The first way to solve ERR_CACHE_MISS is to reload the website page that is being accessed. Generally, this simple method can overcome the obstacles that occur. If the error still appears, follow the next step, ok?
2. Update Browser
Using an older browser can be the cause of ERR_CACHE_MISS. So, it’s best to check your browser version first and do an update.
To do this, click the Help menu > About Google Chrome. If the browser is not using the latest version, the system will automatically update. After the process is complete, click Relaunch.
3. Clear Browser Cache and Cookies
The browser cache aims to store temporary files for faster access. But it can actually cause ERR_CACHE_MISS. In the end, you can’t even open web pages.
So, clearing cache could be the next way to solve ERR_CACHE_MISS.
Even so, you should make sure that the problem is from the cache. The trick, you can try browsing with incognito mode first. Select the Chrome menu and click New Incognito Window.
If still having problems, clear cache and cookies with the following steps:
Click the Chrome settings menu, then select More Tools > Clear browsing data
In the Time range select All times
Select Cached images and files and Cookies and other site data
Click Clear Data
Reload the website page and check if the problem is resolved.
4. Disabling Extensions and Apps
Using too many extensions and apps can be overwhelming for Chrome. The risk is, it can cause the ERR_CACHE_MISS problem to appear. Especially if there are extensions and problematic applications.
To fix this, you can disable it first by going to the More Tools > Extensions After that, click on the toggle extension that is active until it turns gray. Don’t forget, do another extension.
5. Reset Browser Settings
If the method above still doesn’t work, it’s time to reset the settings. That way the browser will return to its initial state, cookies are empty and all extensions are disabled.
Here’s how to reset the settings:
Select the Settings menu 2. Click Next > Reset Settings 3. Click Restore settings to their original defaults. 4. Click the Reset Settings button on the pop-up that appears. In addition to the four steps above, you can also reset settings by typing http://chrome://settings/resetProfileSettings in the browser search bar.
Now, try reloading the web page that is being accessed to make sure the ERR_CACHE_MISS is resolved.
6. Disable Browser Cache
Another way around disabling ERR_CACHE_MISS is the browser cache. So, the browser will not access the cache just yet, but will send the request directly to the website server.
To disable cache, right-click on an accessible web page and select Inspect.
Next, Select the Network tab, then tick Disable Cache.
7. Restart Network
If all the steps have been done and the ERR_CACHE_MISS problem is still not resolved, it could be that the problem is on the network you are using.
So, try using another network first. Or, simply restart the network with these steps:
Windows
To perform a network restart on Windows, you can do:
Open the Start Menu then click Settings Select Network and Internet > Status then click Network Reset
Mac OSX
Perform the following steps to restart the network on Mac OSX:
Click the Apple icon in the upper left corner then click System Preferences Click Network then click the minus button on the currently used network Reconnect by filling in the login details and password
Ready to Overcome ERR_CACHE_MISS?
From the above guide, you already know that the ERR_CACHE_MISS constraint is caused by several things such as:
wrong browser settings
cache and cookies problem
there is a broken extension
Luckily, you’ve learned how to deal with it. Ranging from simply reloading the page to disabling the browser cache and restarting the network.
Finally we are on the end of the article, hope it’s useful for you. If you still have questions, just write them in the comments! Thank you.
0 notes
Text
Can I Delete Google Chrome Dmg
How To Delete Google Chrome History
Can I Delete Google Chrome Dmg Account
Can't Uninstall Google Chrome Mac
Delete Google Chrome Mac
Before reinstalling Chrome, you'll want to uninstall the original copy. You can do this from the Control Panel: Windows 10 and 8.1 - Right-click the Windows button and select 'Control Panel.' Windows 8 - Press ⊞ Win + X and select 'Control Panel.' Windows 7 and Vista - Open the Start menu and select 'Control Panel.'
If you've used a different browser, like Internet Explorer or Safari, you can import your settings into Chrome. Can't install Chrome because of S mode. If you can’t install Chrome on your Windows computer, your computer might be in S mode. If you want to download and install Chrome, learn more about how to exit S mode. Go to the folder containing the Google Chrome application on your computer. Tip: It may be in your Applications folder. If not, go to File Find, and search for 'Google Chrome.' Drag Google Chrome to the Trash. Optional: Delete your profile information, like bookmarks and history: At the top of the screen, click Go Go to Folder.
Jan 20, 2015 I have two (or more) users that appear to have Google Chrome Browser profiles on my computer. I want to delete them, they shouldn't be here. Step-by-step guide Here are the steps to be taken to remove a user from Google Chrome browser: In Chrome, select 3-line Menu button in the top right corner of the browser window; Select Settings.
Oct 29, 2019 Click the 'Chrome menu' (three horizontal lines) button and choose 'Settings'. In the 'Search' section, click the 'Manage search engines.' In the opened window, remove the unwanted Internet search engine by clicking the 'X' button next to it.
How to completely remove Google Chrome in Windows. (All Versions) Important: Keep in mind that if you follow this procedure, then you lose all your personal profile information stored on Google Chrome, including Bookmarks, Passwords, Settings, etc. Follow this procedure at your own responsibility if any of the other solutions didn't have any effect. Mar 05, 2020 How to Uninstall Google Chrome. This wikiHow teaches you how to uninstall the Google Chrome web browser from your computer or smartphone. If you're using an Android, you usually can't uninstall Google Chrome due to Chrome being the default.
Summary
'Chrome not downloading files' is an issue that occurs quite frequently. Given that, here we detail all the potentials fixes for the 'Chrome won't download files' error on your computer, including simple tricks and effective tips. If you have lost files during the fix, don't worry. You can retrieve your browser history, bookmarks, and more using the professional data recovery software - EaseUS Data Recovery Wizard.
On this page, you'll find two parts of solutions - both simple & advanced to help you fix Google Chrome Not Downloading Files error. If your Chrome is now downloading files, pick any method here to ger rid of this issue on your own:
Workable SolutionsStep-by-step TroubleshootingQuick FixCheck internet connection > Restart Chrome > Try to download files again..Full stepsFix 1. Do Basic CleaningClear history and cache > Run Chrome cleanup tool > Reset Chrome..Full stepsFix 2. Uncheck Hardware AccelerationGo to Chrome Settings > Advanced Settings > Uncheck 'Use hardware acceleration when available'..Full stepsFix 3. Reinstall Google ChromeUninstall Google Chrome in 'Apps & features' > Delete all Google folders in Registry > Reinstall Chrome..Full stepsFix 4. Disable Related ExtensionsOpen Chrome > Go to 'More' > 'More tools' > 'Extensions' > Disable downloading related extensions..Full steps
Google Chrome Won't Download Files Anymore
'Why won't Google Chrome let me download files anymore? I used to download email attachments, pictures and music very easily. Since last week, it's no longer downloading any type of file from any website. What's the matter?'
Google Chrome is so simple and powerful that everyone loves it. But recently I found that one issue is under heated discussion on some major-related forums: Google Chrome is not downloading files!
After clicking the download button/icon on a web page, the request is not responding. Or, while selecting a location to preserve the download(s), the required download prompt box doesn't appear as usual. After many searches on the internet, Chrome fans said that they still don't find a confirmed solution to solve the problem.
How to Fix Google Chrome Not Downloading Files
According to Google Chrome Help page about how to fix file download errors in Google Chrome, if you get an error message on Chrome when you try to download apps, themes or other files, try to fix the most file download errors with the troubleshooting tips:
Part 1. Simple Tips to Fix Chrome Won't Download Files
Make sure your Internet connection is working normally. Fix Internet stability issues if the connection is unstable
Try to download the file later
Contact the website owner
There, on the linked page, you can find more 'error messages' related to this problem in downloading files with Chrome, such as Chrome network failed, download blocked, no file, virus scan failed, disk full, insufficient permissions, system busy, needs authorization or forbidden. All those errors are responsible for Chrome not being able to download files.
If the easy tips above fail to solve the problem, don't get upset. There are other potential solutions provided below for you to fix the 'Chrome not downloading files' issue.
Part 2. Further Troubleshooting 'Chrome not downloading files' Error
Some people are not so lucky, they can't finish any download in Chrome. What's worse, they fail to download files without receiving a warning or error message indicating where the process went wrong. In this case, it's time to take some further measures. After reading numerous stories telling how people fix the downloading problems in Chrome, we summed up four effective solutions which I hope to be a permanent cure.
FlashPlayer mac x86 32.0.0.330 true LTROSX. Dec 13, 2016 Solved: At 'Adobe Flash Player Distribution' after appropriate Adobe ID login the 'Download DMG Installer (for System Administrators)' goes - 8704902. Adobe Support Community cancel. Turn on suggestions. Auto-suggest helps you quickly narrow down your search results by suggesting possible matches as you type. About: Adobe® Flash® Player is a lightweight browser plug-in and rich Internet application runtime that delivers consistent and engaging user experiences, stunning audio/video playback, and exciting gameplay. Installed on more than 1.3 billion systems, Flash Player is the standard for delivering high-impact, rich Web content. Download adobe flash player.dmg for free. Internet & Network downloads - Adobe Flash Player by Adobe Systems Inc. And many more programs are available for instant and free download. Adobe flash player install 20a install dmg.
Method 1. Do Some Basic Cleaning Works
These are what you can try: clear all history and cache, run Chrome cleanup tool and reset settings to Chrome's original defaults. If you want to keep your Chrome history and cookies, you can backup or export Chrome history and cookies in advance.
To Clear history and cache in Google Chrome:
Step 1. Open Chrome on your computer and go to 'More (three dots)' > 'More tools' > 'Clear browsing data..'.
Step 2. Check the content you want to remove and click 'Clear Data'.
To Run the Chrom cleanup tool:
A Chrome cleanup tool can find and remove harmful software on your computer. Running this tool may solve the 'Chrome won't download files' issue caused by malware.
Step 1. Open Google Chrome on your computer.
Step 2. In the top right corner, click 'More (three dots)' > 'Settings'.
Step 3. Scroll down to the bottom and click 'Advanced'.
Step 4. Under 'Reset and clean up', click 'Clean up computer' > 'Find'.
To reset Chrome:
Step 1. Open Google Chrome on your computer.
Step 2. In the top right corner, click 'More (three dots)' > 'Settings'.
Step 3. Scroll down to the bottom and click 'Advanced'.
Step 4. Under 'Reset and clean up', click 'Restore settings to their original defaults' and then click 'Reset Settings' to confirm.
Attention, resetting Chrome will reset the browser startup page, new tab page, pinned tabs, and more. It will also disable all extensions and clear temporary data like cookies. However, other files like your bookmarks, history, and saved passwords will not be saved still. If you want to retrieve cookies but have no backup available, learn how to recover cache files in Google Chrome here.
Method 2. Uncheck Use Hardware Acceleration Option
Step 1. Go to Chrome Menu > Settings > Show Advanced Settings.
Step 2. Under System, uncheck Use hardware acceleration when available.
Step 3. Restart Chrome.
Method 3. Reinstall Google Chrome
To uninstall Google Chrome completely, first, you need to uninstall Google Chrome under Settings, then go to the registry to delete all Google folders.
Convert video to over 1000 video/audio formats as well as optimized devices and editing software.2. Download videos from YouTube, Netfix and other 10,000 video sharing sites.4. Watch Video Tutorial to Convert Videos Easily With Wondershare UniConverter for MacFeatures of Wondershare UniConverter for Mac:1. Edit video before conversion via Trim/Crop videos, add Watermark/Subtitles, apply Effects and adjust Audio.3. Its built-in versatile toolbox will impress you a lot!
To uninstall Google Chrome:
Step 1. Click the Windows icon and choose 'Settings (the gear icon)'.
Step 2. Choose 'Apps' > 'Apps & features'.
Step 3. Find and click 'Google Chrome'. Then click the 'Uninstall' button.
To delete All Google Folders in Registry:
Step 1. Press 'Windows + R' and type regedit.
Step 2. Go to 'Computer' > 'HKEY_CURRENT_USER' > 'Software'.
Step 3. Find and right-click 'Google' then choose 'Delete'.
Step 4. Go to the 'HKEY_LOCAL_MACHINE' folder and click 'SOFTWARE'.
Step 5. Find and right-click 'Google' then choose 'Delete'.
Now you have successfully and completely uninstalled Google Chrome from your computer. Go to Microsoft Store to reinstall Google and see whether the 'Chrome not downloading files' still exists.
Method 4. Disable Download Related Extensions
Disable all extensions that work as download managers since they may interfere with file downloading of Chrome.
Step 1. Open Chrome and go to 'More (three dots in the top-right corner)' > 'More tools' > 'Extensions'.
Step 2. Then you will see all the enabled extensions in your Chrome.
Step 3. Toggle the button to disable downloading related extensions. (The extension shown in the image below is irrelevant to download managers. But you can apply the very same way to disable the extension you need to turn off.)
Extra Tip for Chrome History & Bookmarks Recovery
Some of the fixing methods will restore your browser to its original defaults or delete the Google folder. If the browsing history or bookmarks were unfortunately removed. Don't panic though, we left a data recovery plan for you here, to assist you to recover Chrome history in Windows and restore Chrome bookmarks on Mac.
Since Google has a temporary folder that stores some cache files related to browsing history and bookmarks, you can use EaseUS Data Recovery Wizard, the most powerful third-party hard drive recovery software to restore missing or lost Chrome data from its temporary folder, even the folder has been deleted on a local disk.
Step 1. Select a location to scan.
Launch EaseUS Data Recovery Wizard, hover on the partition, external hard drive, USB, or memory card from which you want to perform data recovery, and then click 'Scan'.
Step 2. Select the files you want to recover.
Wait until the scanning completes. Afterward, select the lost files you want to recover. If you need, double-click the file to preview its content.
Step 3. Recover lost data.
After choosing the files, click 'Recover' and choose a location on another drive to save the recovered files.
Here we introduce multiple ways to fix Google Chrome not downloading files, including simple tips you can try first and further troubleshooting tips. Hope it works and your favorite browser is getting back to normal.
Delete Google Chrome Application Folder
Several Malware programs can harm Google Chrome by installing malicious extensions inside your browser. In this case Google Chrome can't open properly or run into performance issues and crashes. In these cases the first option you have is to manage and remove all unwanted extensions and settings. But sometimes this is not enough and the only way to get your favorite browser back to normal is to completely uninstall Chrome from your computer and then to re-install it again.
Suggestion: Before proceeding to completely remove Google Chrome from your computer, you can try to force Chrome to create a new clean profile folder (User Data).
– To force Chrome to create a new empty profile folder:
1. Close Chrome. 2. Navigate to the below location (according your OS).
If you use Windows 10, 8, 7 or Vista navigate to: C:Users%Username%AppDataLocalGoogleChrome

* e.g. If your username is 'User1' then the Chrome profile folder 'User Data' is stored folder at 'C:UsersUser1AppDataLocalGoogleChromeUser Data'
If you use Windows XP navigate to: C:Documents and Settings%Username%Local SettingsApplication DataGoogleChrome
* e.g. 'If your username is 'User1' then the Chrome profile folder 'User Data' is stored at 'C:Documents and SettingsUser1Local SettingsApplication DataGoogleChromeUser Data'
3. Rename the 'User Data' folder to 'User DataBAK'. 4. Launch Chrome and check if the problem persists.
How to completely remove Google Chrome browser (Program & Settings).
Step 1: Uninstall Google Chrome from Control Panel.
Navigate toWindows Control Panel. In case you don't know how to do that, here is what you have to do:
Windows 10, 8: Press the Windows + S keys, to open the search and type Control Panel.
Windows 7, Vista & XP: Go to Start > Control Panel.
Set the View By to Small icons. (On Windows XP: click Switch to Classic view on the left).
Open Programs and Features (On Windows XP open Add or Remove Programs).
How To Delete Google Chrome Dmg Download
Uninstall Google Chrome.
Step 2. Remove Google Chrome program folder.
1. Delete Chrome program folder from Program Files. To do that:
Navigate to C:Program FilesGoogle (or to 'C:Program Files (x86)' if your own 64bit Windows)
Delete the Chrome folder
Step 3. Remove Google Chrome Profile storage folder.
* Attention:Keep in mind that, by deleting your Chrome profile storage folder you delete all the stored data (Bookmarks, Settings, Extensions, History, etc.) . So prior deleting your Chrome profile, take a backup of your Chrome bookmarks in case that you want to re-install Chrome again.
1.Rename or Delete* the Chrome Data (Profile settings, extensions, etc.). To do that:
How To Delete Google Chrome Dmg Download
If you use Windows 10, 8, 7 or Vista:
Simultaneously press 'Windows' + 'R' keys to open the RUN window.
In 'RUN' window copy and paste the following command: %LOCALAPPDATA%Google
Press Enter
Rename (e.g to 'ChromeBAK')or Delete* the Chrome folder.
If you use Windows XP:
Simultaneously press 'Windows' + 'R' keys to open the RUN window.
In 'RUN' window copy and paste the following command: %USERPROFILE%Local SettingsApplication DataGoogle
Press Enter
Rename (e.g to 'ChromeBAK') or Delete* the Chrome folder.
How Do I Completely Delete Google Chrome
That's All folks! Now you can perform a fresh install of Chrome browser to your computer.
How To Delete Google Chrome
Did it work for you? Please leave a comment in the comment section below or even better: like and share this blog post in the social networks to help spread the word about this solution.
If this article was useful for you, please consider supporting us by making a donation. Even $1 can a make a huge difference for us in our effort to continue fighting spam while keeping this site free:
Table of Contents
Can DMG files be deleted after install?
A DMG is like a ZIP file, but it mounts a virtual drive on your desktop for installation. You must 'eject' (or unmount) the virtual drive, then you can delete the DMG file from your computer. If the DMG has a virtual drive mounted, then you cannot delete it because it is still open.
How do I open a DMG file on Android?
Run Android APK files in Google Chrome ARC Welder! After installing DMG Extractor, all you have to do is double-click your DMG file to open it up. You can browse the files right in the DMG Extractor window if you just want to see what's inside the DMG file.
Is a DMG file safe?
DMG files are disk images; they are containers, like ZIP files. Think of them as virtual CDs. They are not themselves dangerous, at least I don't think that the process of opening them executes any code. Potentially dangerous is what they carry, namely programs.
How do I install a DMG file?
No, you do not need to keep the . dmg file. I presume you've already double-clicked the file and followed through whatever installation process was presented to you(?). If so, the application will be installed – probably in your Applications folder – so you can safely delete the .
How To Delete Google Chrome History
How do I install a DMG file on a Mac?
After you install the 7-Zip software you can just select the DMG file and open it by just right clicking on it and click on Extract here. All the files in that DMG file will be extracted in the desired folder. So its like WinRar you can easily extract the files from the DMG file.
What does DMG stand for?
(Disk iMaGe) The file format used in the Mac for distributing software. Mac install packages appear as a virtual disk drive on the Mac. When the DMG file icon is double clicked, the virtual drive is 'mounted' on the desktop.
How do I open a DMG file in Linux?
You can use command mount to mount DMG file as a virtual drive. Alternatively, you can use p7zip to extract the DMG file. p7zip is the Unix command-line port of 7-Zip, a file archiver that archives with high compression ratios.
Are DMG files safe to delete?
Can I Delete Google Chrome Dmg Account
The answer is yes. You can delete the . pkg/. dmg/.
How do I edit a DMG file in Windows?
Can't Uninstall Google Chrome Mac
Using DMG Extractor is fairly simple. After installing the software, right-click on the DMG file that you want to open and then click Open option to open the file with DMG Extractor. Alternatively, after launching DMG Extractor, click Open button and then select the DMG file to contents of the selected DMG file.
Why can’t I open a DMG file on my Mac?
Delete Google Chrome Mac
Answer: A: Hold down the Control key when you click on the . dmg file then select Open. This should give you a window to 'allow anyway'.
0 notes
Text
Adobe Flash Player Free For Mac Os X
Adobe Flash Player Mac Free
Flash Player For Mac Os
Adobe Flash Player Free Download For Mac Os X
Update Adobe Flash Player Free For Mac
These instructions are NOT applicable to Flash Player included with Google Chrome. Visit the Flash Player Help page for instructions on enabling (or disabling) Flash Player in various browsers.
https://deluxeever867.tumblr.com/post/656743930828881920/adobe-flash-player-needed-for-mac. In order to provide the best platform for continued innovation, Jive no longer supports Internet Explorer 7. Jive will not function with this version of Internet Explorer.
Adobe Flash Player 2018 Free Download For Chrome + Mac + Windows 7 is a proprietary (closed supply) and freeware internet browser plugin designed to allow users to take pleasure from rich multimedia and online applications powered by the Flash technology. Flash Player requires Mac OS X 10.4 or higher. It's Universal Binary so runs natively on both PowerPC and Intel Macs. Welcome to the new MacTech.com site (beta). Re: Adobe Flash Player for Mac OS X 10.5.8 chris.campbell Mar 14, 2013 3:26 PM ( in response to sammygipper123 ) That's normal, that's just the lack of free space for the mounted.dmg. Adobe Flash Player for Mac OS X 27.0.0.183 Free Download Notice Top 4 Download periodically updates software information of Adobe Flash Player for Mac OS X 27.0.0.183 full version from the publisher, but some information may be slightly out-of-date. Adobe Flash Player 2019 Crack is a cross-platform, browser-based application runtime that provides uncompromised viewing of expressive applications, content, and videos across browsers and operating systems.
About Adobe Flash Player for Mac The Adobe Flash Player is a widely distributed proprietary multimedia and application player created by Macromedia and now developed and distributed by Adobe after its acquisition. See more reviews for Adobe Flash Player Adobe Flash Player is a cross-platform, browser-based application runtime that provides uncompromised viewing of expressive applications, content, and videos across browsers and operating systems.
If you use Windows, see Uninstall Flash Player | Windows.
If Flash Player is installed on your computer, the following box displays the version of Flash Player and your operating system. If Flash Player is not installed, an error message appears.
Adobe Flash Player Mac Free
If your Flash Player installation was not successful, use the following solution to reinstall.
Click the Apple icon and choose About This Mac.
The Mac OS version appears in the About This Mac dialog.
Is adobe flash player dangerous for mac. Once that’s done you should download the player directly from the manufacturer’s website, meaning downloading directly from the link provided by Adobe’s web page, just so you know you are getting the real program.
2. Run the uninstaller applicable to your Mac OS version
Flash Player For Mac Os
Run the uninstaller on Mac OS X 10.4 and later, including macOS
Note:
There are a number of data recovery software solutions for Mac computers that can recover even those files that your Mac can no longer see. If your computer had been infected with malware because of Adobe Flash, causing you to lose important files, there’s still some hope left — provided you act quickly enough. How to install adobe flash player on mac. One such software solution stands out because it blends excellent usability with state-of-the-art data recovery algorithms, and its name is. Disk Drill is a professional yet easy to use data recovery application that supports the recovery of over 200 file formats from virtually all storage devices. For example, in January 2018, a hacker successfully disguised dangerous malware as an Adobe Flash Player installer, probably targeting diplomats and other high-profile individuals.
Adobe Flash Player Free Download For Mac Os X
Beginning with Flash Player 11.5, uninstalling the Flash Player resets the AutoUpdateDisable and SilentAutoUpdateEnable settings in mms.cfg to their default values:
AutoUpdateDisable=0
SilentAutoUpdateEnable=0
If you are running the Flash Player uninstaller as part of your deployment process, redeploy any custom changes to either AutoUpdateDisable or SilentAutoUpdateEnable.
The closest alternative I can think of would be Microsoft Silverlight, but Silverlight doesn't display Flash content, and Flash doesn't display Silverlight. They are merely similar in what they are useful for. How can the answer be improved? Adobe flash player mac chrome.
Run the uninstaller on Mac OS X 10.4 and later, including macOS
Download the Adobe Flash Player uninstaller:
Mac OS X, version 10.6 and later: uninstall_flash_player_osx.dmg
Mac OS X, version 10.4 and 10.5: uninstall_flash_player_osx.dmg
The uninstaller is downloaded to the Downloads folder of your browser by default.
In Safari, choose Window > Downloads.
If you are using Mac OS X 10.7 (Lion), click the Downloads icon displayed on the browser.
To open the uninstaller, double-click it in the Downloads window.
Note: If the Flash Player installer window does not appear, choose Go > Desktop in the Finder. Scroll down to the Devices section and click Uninstall Flash Player.
To run the uninstaller, double-click the Uninstaller icon in the window. If you see a message asking if you want to open the uninstaller file, click Open.
Bookmark or print this page so that you can use the rest of these instructions after you close your browser.
To close all browsers, either click the browser name in the Uninstaller dialog, or close each browser manually and then click Retry.
Note: Do not click Quit in the Uninstaller window. It stops the uninstallation process.
After you close the browsers, the uninstaller continues automatically until the uninstallation is complete. When you see the message notifying you that the uninstallation succeeded, click Done.
Delete the following directories:
<home directory>/Library/Preferences/Macromedia/Flash Player
<home directory>/Library/Caches/Adobe/Flash Player
Download the Adobe Flash Player uninstaller:
Mac OS X, version 10.3 and earlier: uninstall_flash_player_osx_10.2.dmg (1.3 MB) (updated 05/27/08)
Choose Window > Downloads to view the downloaded uninstaller.
Save the uninstaller file in a convenient location.
To open the uninstaller, double-click it in the Downloads window.
To run the uninstaller, double-click the Uninstaller icon in the window. If requested, enter your computer user name and password and click OK.
Bookmark or print this page so that you can use the rest of these instructions after you close your browser. Close all browsers and other applications that use Flash Player, including instant messaging applications, SWF files, and projectors (EXE files that play SWF files). Otherwise, the uninstaller cannot finish (even though it appears to finish).
Once the uninstaller finishes, the window closes automatically.

You can verify that uninstallation is complete by following these steps:
Open your browser and check the status of Flash Player.
Twitter™ and Facebook posts are not covered under the terms of Creative Commons.
Update Adobe Flash Player Free For Mac
Legal Notices | Online Privacy Policy
0 notes
Text
Cisco Cucm 8.6

8.6(2a)SU2, 8.6(2a)SU3, 8.6(2a)SU4, and 8.6(2a)SU4a. Resolved Caveats for Cisco Unified Communications Manager Release 8.6(2a)SU5 The following information comprises unexpected behavior that is addressed by this SU of Cisco Unified. CUCM Version: End of SW Maintenance Releases Date: App. SW: End of New Service Attachment Date: App. SW: End of Service Contract Renewal Date: App.
CUCM 8.6 and Chrome I am running Google Chrome 15.0.874.102 m and the drop down menus in the CUCM (8.6) admin pages do not work. Does anyone else have this issue? This video shows how to configure and use remote destination profiles in CUCM 8.6 (Cisco Call Manager) to simultaneously ring local numbers and remote number. Such is the case in CUCM. With version 8.6, Cisco has moved away from an OS platform based on Redhat Enterprise Linux (RHEL) 4 and upgraded the underlying OS to RHEL 5. This is good news that allows the system to stay current and support a larger variety of hardware. The bad news is that the upgrade of the OS can be a bit destructive.
Contents
Introduction
Cisco Unified Communications Solutions unify voice, video, data, and mobile applications on fixed and mobile networks. This enables easy collaboration every time from any workspace. Cisco IP Communicator brings your phone to your PC. This allows you to make calls with your corporate phone number no matter where you are working.
Prerequisites
Requirements
There are no specific requirements for this document.
Components Used
The information in this document is based on these software and hardware versions:
Cisco IP Communicator 8.6
Cisco Unified Communications Manager (CUCM) 8.x
The information in this document was created from the devices in a specific lab environment. All of the devices used in this document started with a cleared (default) configuration. If your network is live, make sure that you understand the potential impact of any command.
Conventions

Refer to Cisco Technical Tips Conventions for more information on document conventions.
CIPC
Cisco IP Communicator is a Microsoft® Windows-based soft-phone application that brings your work telephone to your personal computer. It is easy to deploy, and includes some of the latest technology and advancements available for IP communications. This advantage boosts business collaboration and responsiveness, and helps organizations keep pace with the current mobile business environment.
Features and Benefits
Cisco IP Communicator is intuitively designed and easy to use, and it delivers convenient access to a broad range of features:
Eight line keys: These keys provide telephone lines and direct access to telephony features.
Five soft keys: These keys dynamically give you call-feature options.
Messages: This key gives you direct access to your voicemail messages.
Directories: Cisco IP Communicator identifies incoming calls and messages, and categorizes them on the screen. This allows you to return calls quickly and effectively using direct dial-back capability. The corporate directory integrates with the Lightweight Directory Access Protocol Version 3 (LDAPv3) standard directory.
Settings: This key allows you to select from a large number of ringer sounds and background images.
Services: Cisco IP Communicator allows you to quickly access diverse information such as weather, stocks, quote of the day, or any other web-based information. The phone uses XML to provide a portal to an ever-growing world of features and information.
Help: The online Help feature gives you information about the phone keys, buttons, and features.
Secure VLAN Traversal
ASA intercepts and authenticates Cisco IP Communicator traffic before it reaches Communications Manager by forcing all soft client media to proxy via the ASA appliance. This ensures a single, secure point of entry to the voice VLAN.
High-Level Components and Protocols
Cisco IP Communicator supports the same call control and application protocols as the 7970s. At startup, the Cisco IP Communicator interacts with the network as follows:
Locate the configuration server: After startup, Cisco IP Communicator always attempts to use DHCP to locate its TFTP server. Similar to other phones, Cisco IP Communicator can use TFTP to retrieve files from the server. It can also use HTTP to retrieve software updates, thereby accelerating file transfer for remote users.
=
Request the CTL file (if security is configured): The TFTP server stores the CTL file, which contains a list of Cisco Unified CallManagers and TFTP servers that Cisco IP Communicator is authorized to connect to. It also contains the certificates necessary for establishing a secure connection between Cisco IP Communicator and Cisco Unified CallManager. The security CTLFile.tlv file is downloaded to the Program Files > Cisco Systems > Cisco IP Communicator > AppData > sec folder.
Request configuration files: Configuration files (.cnf.xml) reside on the TFTP server and define parameters for connecting to Cisco Unified CallManager. In general, any time you make a change in Cisco Unified CallManager that requires a device to be reset, a change is made to the configuration file for that device. If you have enabled auto-registration in Cisco Unified CallManager, Cisco IP Communicator accesses a default configuration file (xmldefault.cnf.xml) from the TFTP server. Otherwise, Cisco IP Communicator accesses a .cnf.xml file corresponding to its device name.
Update software: If you use AutoUpdate, the .cnf.xml file contains the information that tells Cisco IP Communicator which software version it should run. If this software version differs from the one currently in use, Cisco IP Communicator contacts the TFTP server to request the new software file. In order to make this request, Cisco IP Communicator first tries to use HTTP. If you have not enabled HTTP access, Cisco IP Communicator uses TFTP.
Contact Cisco Unified CallManager: After obtaining the configuration file from the TFTP server, Cisco IP Communicator attempts to make a connection to the highest priority Cisco Unified CallManager on the list. If security is implemented, Cisco IP Communicator makes a TLS connection. Otherwise, it makes a non-secure TCP connection. If the device was added to the database individually (through Cisco Unified CallManager Administration or in bulk through the Bulk Administration Tool (BAT), Cisco Unified CallManager identifies the device. This is only true if you are not using BAT with the Tool for Auto-Registered Phones Support (TAPS). Otherwise, the device attempts to register itself in the Cisco Unified CallManager database (when auto-registration is enabled in Cisco Unified CallManager).
Note: Auto-registration is disabled when security is enabled on CUCM. In this case, you must manually add Cisco IP Communicator to the Cisco Unified CallManager database.
Related Information
We use cucm 9.1 here and I just changed the MOH the other day. These instructions may not be exactly for 8.6 but they should be close. The thing to remember is you should use restart and not reset when resetting the phones. I will mark it in the instructions where I am talking about resetting will kick everyone off of the phones even if they are in a call. Restarting will try to preserve the call and restart when the hang up.
Best if the file is a .wav file
Adding a audio file
Cached
Media resources | MOH Audio File Management
Upload file
Choose file. (Can be uploaded directly from the users PC that is logged into CUCM)
Adding the audio file to the audio source
Media resources | Music on Hold Audio Source
Select Add New
Select a MOH Audio Stream Number from the drop down
Select the Audio file within the MOH Audio Source File
Create a name for the file in the MOH Audio Source Name

Select save and the page should list the file status and should also populate the other audio files that are being used.
Adding the audio file to all phones
Bulk Administration | Phones | Update Phones | Query
Find Phones where (device name) (begins with)sepclick find
Click next in the upper left hand corner
Go to drop downs for
User Hold MOH Audio Source
Network Hold MOH Audio Source
Select the audio file you want to use
Scroll to the bottom of the page
In the Job Information section ensure run later is selected
Select submit

Best to do want follows during a off hours..
Go to Bulk Administration | Job Scheduler
The job should be listed and under status it should be on hold.
When the time comes select the job then select (Activate Selected)
When the job says completed all of the phones need to be reset. May take a few minutes.
Go to Device | Phone
End-of-Sale And End-of-Life Announcement For The Cisco ...
Find Phone where (device name) (begins with)sepclick find. (All phone names should start with sep. then followed by the mac address.)
Expand Rows per page to Max. (250)
Cisco Cucm 8.6 Hardware
Select all phones then select (Reset Selected) at the top of the page. (('Here is where you want to choose restart')).
Cisco Cucm 8.6 End Of Life
Scroll to the bottom of the page and select page 2 and repeat.
Hope this helps.
0 notes
Text
Remove HowToEasy New Tab - Chrome, Firefox - Real Removal Instruction
How to Remove HowToEasy new tab? HowToEasy is a new tab browser hijacker for Google Chrome and Firefox. After successful infiltration, the web browser default new tab is replaced by the HowToEasy new tab. Usually, the user has no idea how the HowToEasy new tab ended up in the web browser. HowToEasy is distributed via malicious adware software installations and pop-ups in the web browser claim that HowToEasy is a handy extension and significantly improve the browser experience of Google Chrome or Firefox. The HowToEasy extension declared the following useful functionality, fast access to DIY (do it yourself) tutorials right from the web browser, quick access to home improvement tips, technology information, healthy recipes and money saving tips. This functionality is a way to appear legitimate to the user. Basically, it is a trick to induce the user to install the HowToEasy extension in the web browser. In reality, the HowToEasy extension is meant to generate revenue through rogue ads and suspicious redirecting in the browser. The Easymaps extension (search.mapseasy.net) is built for the same purposes. It is not recommended to have the HowToEasy search engine installed in the web browser. Users have no idea what kind of data the HowToEasy search engine can collect about their online behavior. The HowToEasy search engine is installed through a browser extension. However, this HowToEasy extension has many permissions in the web browser with which they can inventory and resell a lot of personal and non-personally information to rogue third parties, for example, suspicious advertising networks.
HowToEasy new tab

Summary: HowToEasy: Download Removal Tool Distribution: Adware, intrusive popup ads Affected Browsers: Google Chrome, Mozilla Firefox and Internet Explorer Type: browser hijacker If you have no idea how the HowToEasy new tab is installed in your web browser, then your PC is infected with an adware application. Multiple web pages on the internet offer free software, and to make this software generate money, adware developers bundle adware with free software. This adware is then offered to the user during the installation process. However, the checkbox to decline the adware installation is often hidden and barely visible to the user. If you have clicked through an installation process too quickly, you have installed the HowToEasy new tab. This may also cause intrusive pop-up ads to appear in your PC and web browser. Adware is software developed entirely for the purpose of displaying advertisements. Adware is better known as malware and must be removed as soon as possible. Therefore, follow our instructions below to remove HowToEasy new tab.
How to remove HowToEasy new tab?
Use this quick menu get rid of HowToEasy new tab in the Google Chrome and Firefox web browser.
Remove HowToEasy, complete the steps below
Remove HowToEasy from Windows manually without software Uninstall recently installed adware using Windows Control Panel - Uninstall a program Remove HowToEasy new tab from Google Chrome Remove HowToEasy new tab from Firefox Scan your computer for malware with free anti-malware software to detect and remove HowToEasy files Remove: HowToEasy new tab with Malwarebytes Free (recommended) Remove HowToEasy with Zemana Get rid of HowToEasy with AdwCleaner if (navigator.userAgent.indexOf('Mac OS X') != -1) { document.write("It seems you are using a Mac, clean your Mac with CleanMyMac 3 by MacPaw (more information). 3 million+ downloads worldwide. ") }

Windows 7 users: Click the Start button in the left bottom corner, select Control Panel, select "Programs, and Features".


Windows 8 and Windows 10 users: Right-click the Windows logo in the bottom left corner, select Control Panel, select "Programs and Features".

Search for any (unknown) recently installed software and remove the software using the Uninstall button. Make sure to not accept any offers during the uninstall process. Click the column "Installed On" to sort installed software by date, this makes it easier to detect recently installed software. If you don't know what to look for, go to this removal step.

Manually remove HowToEasy new tab from Google Chrome and Firefox
Remove HowToEasy new tab manually without tools from the Google Chrome and Firefox web browser. HowToEasy installs a browser extension in Chrome and an add-on in Firefox.

if (navigator.userAgent.indexOf('Mac OS X') != -1) { document.write(" Google Chrome users on Mac OS, follow this Adware removal guide for Mac OS ") } In this first step for Google Chrome, you need to identify and remove the browser extension responsible for the HowToEasy search engine. Some browser extensions are ad-supported, e.g. adware and might change the homepage or search settings to HowToEasy. If you didn't install any browser extension at all, remove all browser extensions from Chrome.
Click the menu button, from the Chrome menu click "More tools" and then "Extensions".
Identify the HowToEasy extension and click the "Remove" button to remove the browser extension. If you are unsure if the extension is malicious, click the slider and disable the extension first. Continue to the next step. Change Google Chrome homepage and new tab Click the Google Chrome menu button, from the Chrome menu go to "Settings".
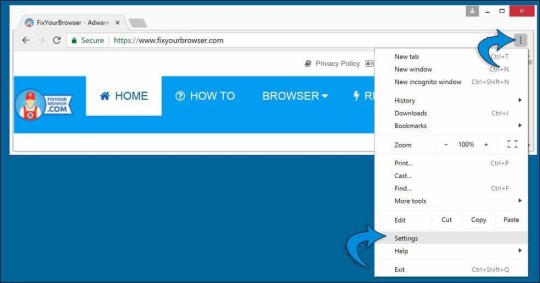
In the On startup section find the HowToEasy extension and click "Disable". Click the "Open a specific page or set of pages" and check for the howtoeasy.co homepage, if present click the three vertical dots and click the "Remove" button.

Change Google Chrome search engine Click the Google Chrome menu button, from the Chrome menu go to "Settings".
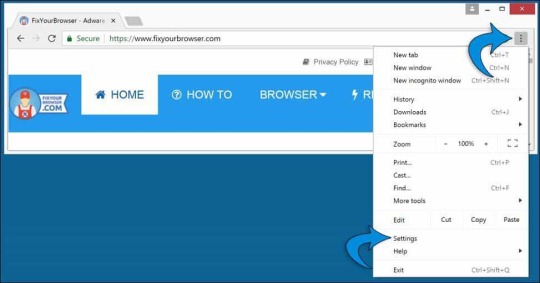
In the "Search engine" section find the "manage search engines" button.
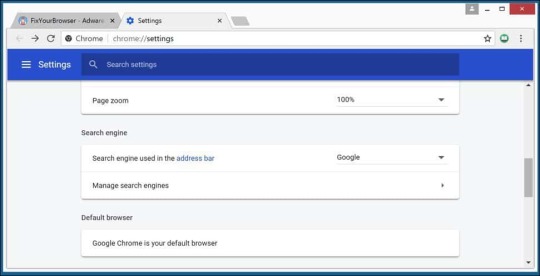
In the list of search engines, locate the "HowToEasy Search" search engine. On the right next to the URL, click the three vertical dots button and select "Remove from list". Click the three vertical dots next to Google, Yahoo, or Bing and select "Make default".
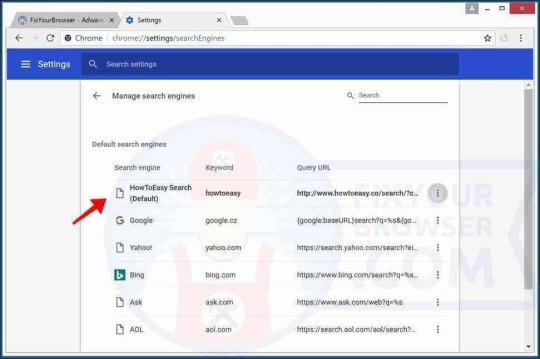
Reset the Google Chrome profile sync Google Chrome synchronizes the browsers user-profile with the Google Cloud services. If the Google Chrome browser is infected with adware, this adware, usually browser extensions, the homepage and HowToEasy search engine settings are synced with Google's servers. It is important to clean this synchronized cache. If the user doesn't clear the synchronized settings, the HowToEasy extension and Chrome settings keep coming back on any devices the Chrome user profile is synchronized with. Open the Google Dashboard (opens in a new browser window). Click the Reset sync button to clear all of your synced data on Google's server, confirm with OK.

Restart Google Chrome, if necessary continue to the next step. Optional: Reset Google Chrome Chrome has the option to reset to default settings, a Chrome browser reset will not affect your saved bookmarks and passwords. Google Chrome reset is the easiest way to get rid of ad-supported browser extensions that install the HowToEasy homepage.
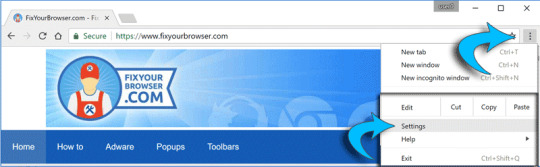
Click the menu button, from the drop-down menu click "Settings".
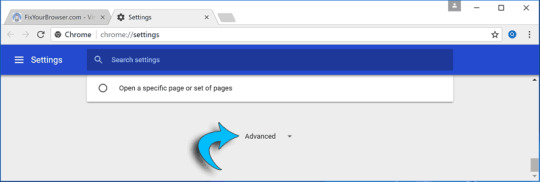
Scroll down to Advanced and again scroll down to Reset settings.
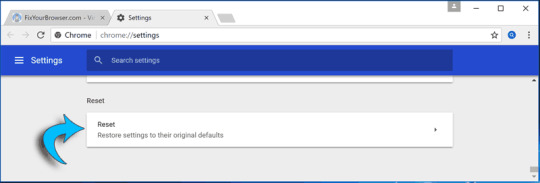
Click the "Reset" button to reset Google Chrome.

Confirm the reset of the Chrome web browser by clicking the "Reset" button. Restart Google Chrome for the changes to take effect. Google Chrome is reset to default settings, it is important to know there are remnants of HowToEasy hijacker on your computer. We recommend to scan and remove malware files from your computer to make sure the adware does not reinstall and the HowToEasy redirect doesn't occur again.

In this first step for Firefox, you need to identify and remove any Firefox add-on that is unknown to you. If you didn't install any add-on at all, remove all add-ons from Firefox. Add-ons in Firefox could be ad-supported which basically means an add-on might have installed HowToEasy in Firefox.

Click the Firefox menu button, from the drop-down menu click Add-ons.
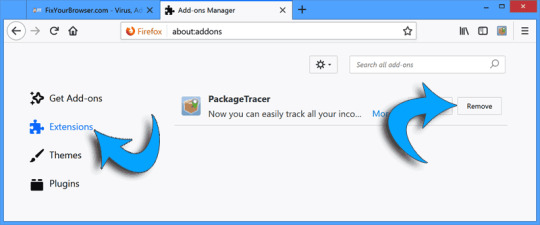
Click extensions from the left menu. Search for the HowToEasy firefox browser extension. Click the "Remove" button to delete the extension and get rid of HowToEasy. Change Firefox homepage Open the Firefox menu, which can be found in the top right corner. Select "Options" from the menu.
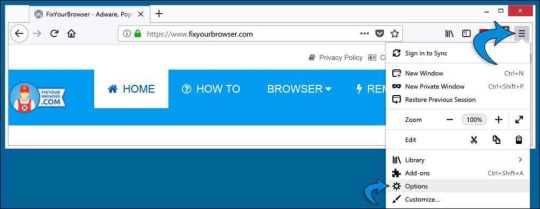
In the options window, go to Home in the left menu. Remove HowToEasy from the Custom URLs textbox, or click the "Restore Defaults" button.
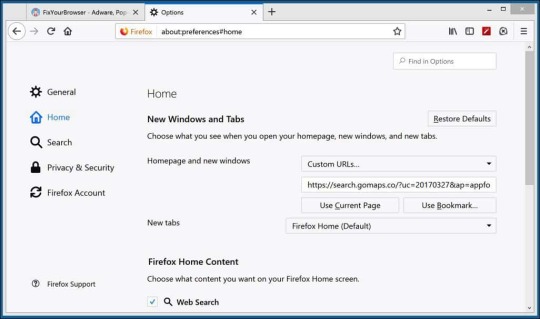
Change default search engine for Firefox In the address bar type about:config and confirm with Enter. Click the I accept the risk! button.
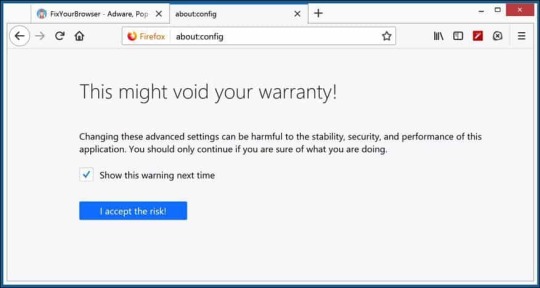
In the search bar type: moz-extension right-click on each of the results and select Reset to restore their values to default settings.
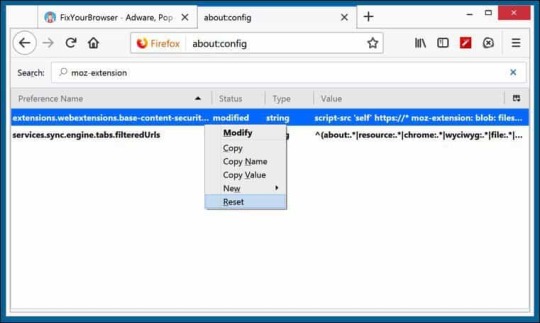
Restart Firefox, if necessary continue to the next step. Optional: Reset Firefox Firefox has the option to reset to default settings, this will reset Firefox completely. Reset Firefox is the easiest way to get rid of ad-supported add-ons from Firefox that install HowToEasy as your default search engine.
Click the menu button, from the menu, select Help ? (the question mark icon, at the end of the menu).
Click on Troubleshooting information from the Help menu.
select the Refresh Firefox button, confirm the reset and restart Firefox. The Firefox browser is reset to default settings, it is important to know there are remnants of malware on your computer. We recommend to scan and remove malware files from your computer to make sure the malware does not reinstall and the HowToEasy redirect is entirely removed from the Firefox web browser.

Remove HowToEasy with Malwarebytes
Get rid of HowToEasy with Malwarebytes. Malwarebytes is free to use, detect and remove the HowToEasy redirect from the web browser. HowToEasy is a browser hijacker which is a type of malware, Malwarebytes will remove HowToEasy from the web browser. Run the Malwarebytes program installation file. Click here for Malwarebytes installation instructions. Click Scan Now to start examining for the adware responsible for the HowToEasy redirect in the web browser.
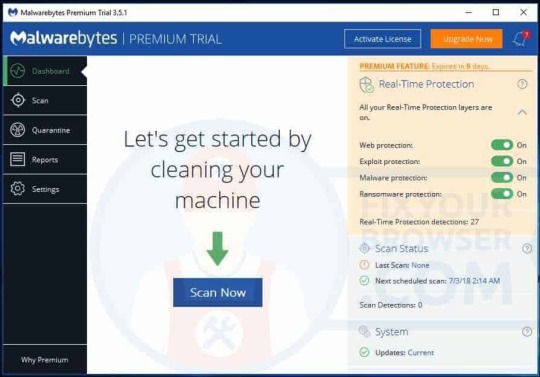
Malwarebytes will start searching for malware, please wait for Malwarebytes to finish the malware scan. Malwarebytes usually takes between 2 to 5 minutes to complete.
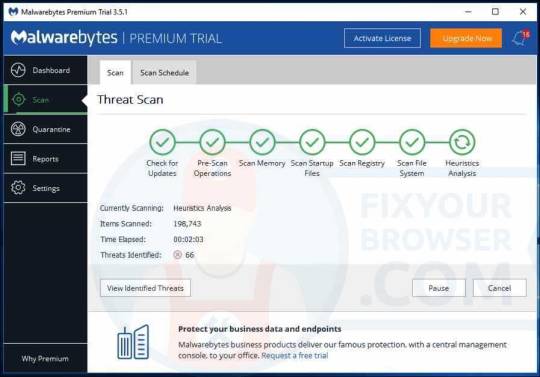
Once the malware scan is performed, Malwarebytes will present the results of the HowToEasy malware scan. Remove the malware found by Malwarebytes using the Quarantine Selected button.
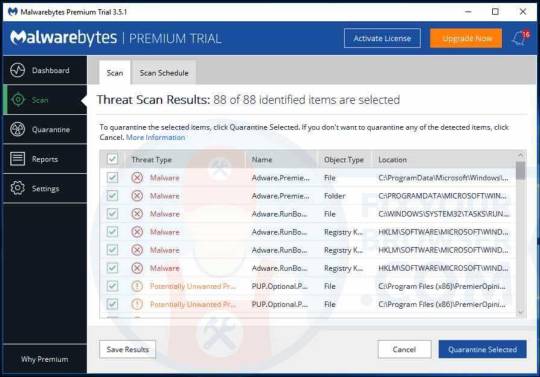
Wait for Malwarebytes to move all malware to quarantine.
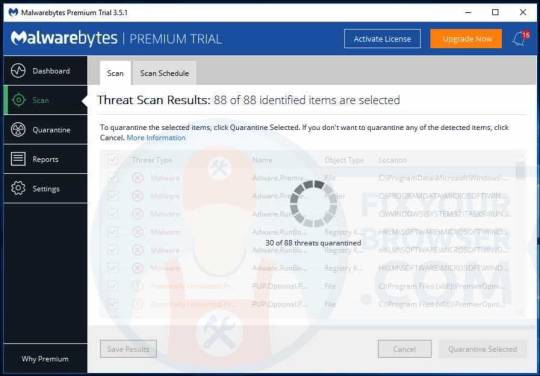
Malwarebytes needs to make a system reboot to finish the HowToEasy redirect removal process. Save and close any working documents or open web pages and click Yes to reboot your PC.
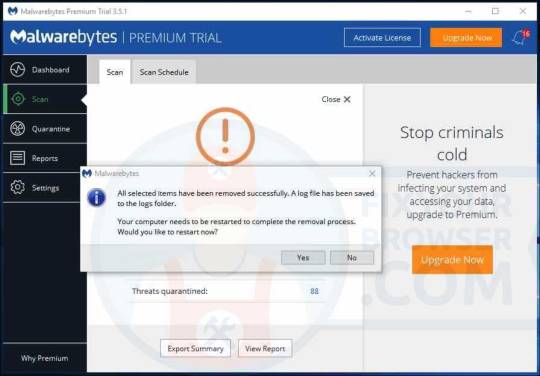
After the system reboot, your web browser is free from the HowToEasy browser hijacker. Stay protected with Malwarebytes against future browser hijacker and other types of malware. Malwarebytes stops adware, browser hijackers, potentially unwanted programs, malicious web pages, suspicious downloads, viruses, spyware and ransomware from infecting your web browser.

Get rid of HowToEasy with Zemana
Zemana Anti-Malware is an second opinion anti-malware scanner which uses Cloud technology with HowToEasy browser hijacker detection. Zemana is the fastest, smallest and most proactively malware scanner available. Zemana is its best in addition to a primary virus scanner or malware scanner such as Malwarebytes. Open the Zemana anti-malware setup file. Install Zemana anti-malware using the default settings, after successful installation Zemana anti-malware will update itself to the latest version.
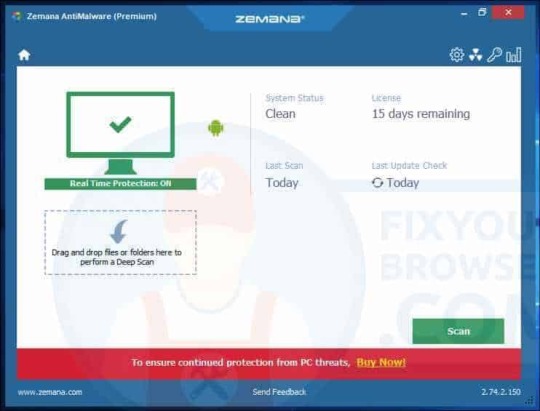
Select the Scan button to perform a malware scan to detect the malware responsible for the HowToEasy redirect Please wait for the scan to finish, the scan usually takes a few minutes.
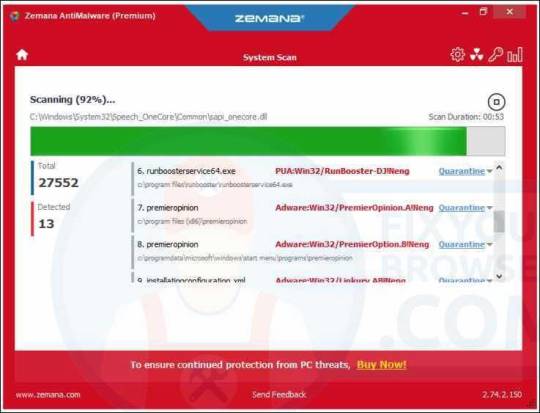
Click the Next button to remove the malware found by Zemana on your computer.
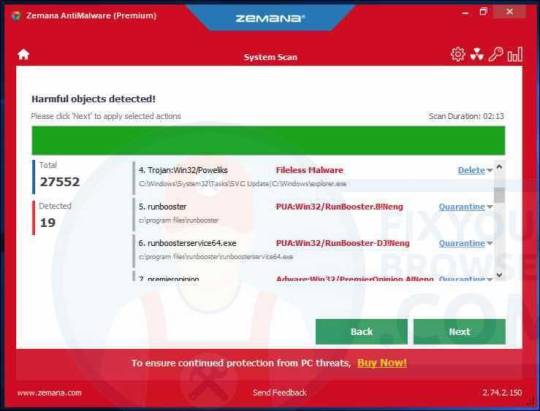
Wait a couple of seconds for Zemana to remove the HowToEasy browser hijacker from Internet Explorer, Google Chrome, Firefox or Microsoft Edge.
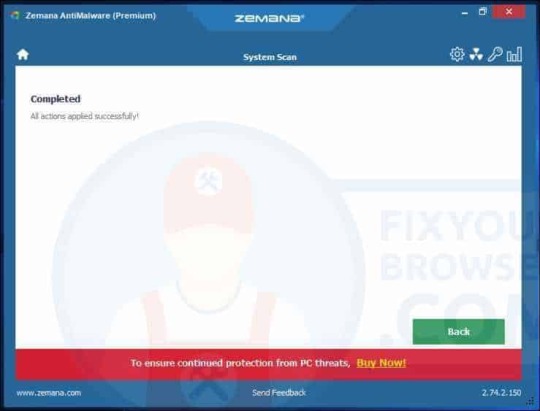
Your PC is successfully cleaned by Zemana. Zemana is an excellent protection for people searching for a lightweight malware detection and removal tool. Zemana is its best in addition to a more comprehensive antivirus or anti-malware security application such as Malwarebytes.

Get rid of HowToEasy with adwcleaner
Right-click the AdwCleaner executable you just downloaded and select "Run as Administrator" this is important. Select the Scan Now button.
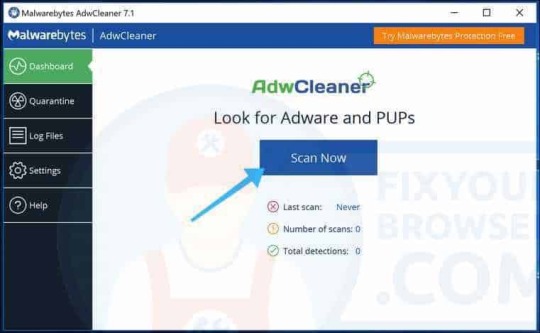
Wait for the adware & malware scan to finish. Click the Clean & Repair button to remove the adware and malware from your PC.
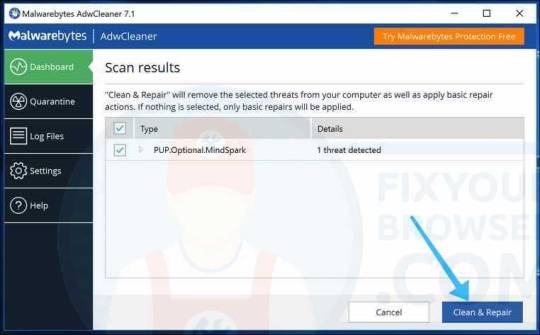
Wait for AdwCleaner to remove the adware and malware from your PC. Click the Clean & Restart Now button to finish the malware removal process.
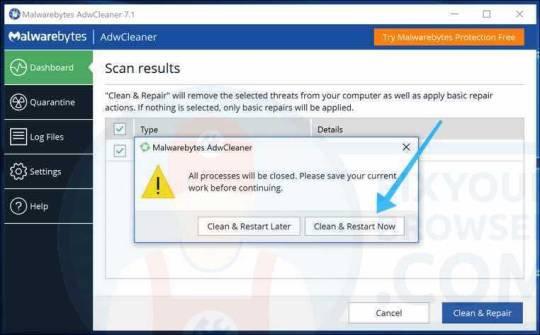
After the reboot, AdwCleaner shows a summary of the detected and removed malware files.
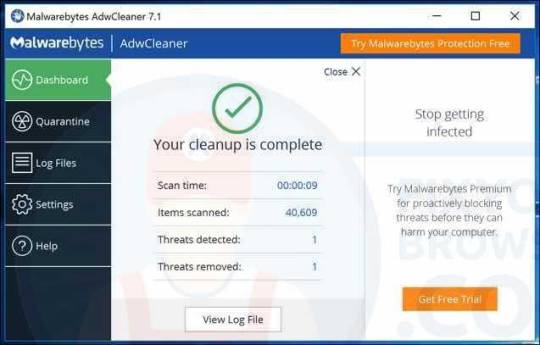
Read the full article
1 note
·
View note
Text
Remove Secure Browser Software Mac

Web Browsers For Mac Os
Mac Secure Browser Nbme
Free Secure Browsers
Best Secure Browser
Remove Secure Browser Software Mac Torrent
The current web page applies to PSI Secure Browser 1.0.19 version 1.0.19 alone. How to erase PSI Secure Browser 1.0.19 from your computer using Advanced Uninstaller PRO PSI Secure Browser 1.0.19 is a program marketed by the software company PSI Services LLC. Frequently, people choose to remove.
Jul 10, 2020 The Mac maintenance and security app called Combo Cleaner is a one-stop tool to detect and remove MacReviver virus. This technique has substantial benefits over manual cleanup, because the utility gets hourly virus definition updates and can accurately spot even the newest Mac infections. Dec 12, 2018 The “This Mac Is Not Secure” pop-up alert is a misleading advertising. It is designed in order to trick and force you into calling a fake Apple Support service. If the Mozilla Firefox, Chrome and Safari opens automatically to the “This Mac Is Not Secure” scam then may be possible that you’re a victim of undesired software from the ‘ad-supported’ software (also known as adware. AVG Secure Browser has been designed by security experts with your privacy and security as the main goal, all with a familiar easy-to-use interface. Unlike other regular browsers it assures that your data remains private and secure — from the very moment you first launch it. To remove Adaware secure search from Firefox, reset the browser to its primary state. For that, follow the guide below: Remove dangerous extensions Open Mozilla Firefox, click on the menu icon (top right corner) and select Add-ons → Extensions. Here, select Adaware secure search. Mar 24, 2020 Safari also checks if a website that asks you to enter password or credit card information is not secure because it's unencrypted. With iOS 13.4 and macOS 10.15.4, Safari also warns you if the certificate is valid but the version of TLS (1.1 and earlier) is not secure.
The “This Mac Is Not Secure” pop-up alert is a misleading advertising. It is designed in order to trick and force you into calling a fake Apple Support service. If the Mozilla Firefox, Chrome and Safari opens automatically to the “This Mac Is Not Secure” scam then may be possible that you’re a victim of undesired software from the ‘ad-supported’ software (also known as adware) category.
What does Adware do? Some of the more common acts on MAC OSs include: adware can show undesired commercials;adware can reroute your web browser to unwanted sites like the “This Mac Is Not Secure” scam; ad supported software can slow down your MAC; ad-supported software can alter web-browser settings.
The ad supported software can end up on your MAC in various ways. Most often is when you download and install freeware and forget to uncheck the box for the optional programs installation. Do not panic because we have got the solution. Here’s a instructions on how to get rid of “This Mac Is Not Secure” pop up scam from the Chrome, Firefox and Safari and other web browsers.
Remove “This Mac Is Not Secure” pop-up scam (Removal guide)
The answer is right here on this web page. We have put together simplicity and efficiency. It will allow you easily to free your MAC of adware that shows misleading “This Mac Is Not Secure” fake alerts on your Apple Mac. Moreover, you can choose manual or automatic removal solution. If you are familiar with the computer then use manual removal, otherwise use the free anti-malware utility developed specifically to remove ad supported software. Of course, you may combine both methods. Read it once, after doing so, please print this page as you may need to close your internet browser or reboot your Apple Mac.
To remove “This Mac Is Not Secure” pop-up scam, perform the steps below:
How to manually remove “This Mac Is Not Secure” pop-up scam
The ad-supported software can change your internet browser settings and reroute you to the webpages which may contain lots of advertisements or various security threats, like browser hijacker infection, malicious software or PUPs. Not every antivirus application can identify and get rid of adware easily from your MAC OS. Follow the few simple steps below and you can delete the “This Mac Is Not Secure” pop up scam by yourself.
Removing the “This Mac Is Not Secure” scam, check the list of installed software first
In order to get rid of PUPs like this ad-supported software, open the Finder and click on “Applications”. Check the list of installed apps. For the ones you do not know, run an Internet search to see if they are adware, browser hijacker or potentially unwanted applications. If yes, delete them off. Even if they are just a programs which you do not use, then removing them off will increase your Apple Mac start up time and speed dramatically.
Open Finder and click “Applications”.
It will show a list of all programs installed on your MAC OS. Scroll through the all list, and remove any questionable and unknown software. Right click to questionable program and choose “Move to Trash”. Another method is drag the program from the Applications folder to the Trash.
Most important, scroll through the all list, and move to trash any unknown applications. Don’t forget, select Finder -> Empty Trash.
Remove “This Mac Is Not Secure” pop-up scam from Google Chrome
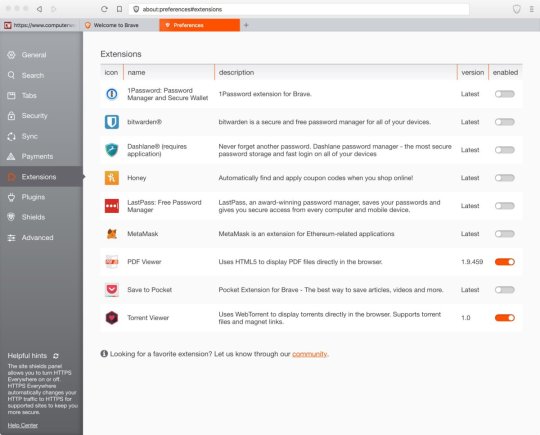
Reset Chrome settings will remove “This Mac Is Not Secure” fake alerts from web-browser and disable malicious addons. It will also clear cached and temporary data (cookies, site data and content). Essential information like bookmarks, browsing history, passwords, cookies, auto-fill data and personal dictionaries will not be removed.
Open the Chrome menu by clicking on the button in the form of three horizontal dotes (). It will open the drop-down menu. Choose More Tools, then click Extensions.
Carefully browse through the list of installed extensions. If the list has the plugin labeled with “Installed by enterprise policy” or “Installed by your administrator”, then complete the following instructions: Remove Chrome extensions installed by enterprise policy otherwise, just go to the step below.
Open the Chrome main menu again, click to “Settings” option.
Scroll down to the bottom of the page and click on the “Advanced” link. Now scroll down until the Reset settings section is visible, like below and click the “Reset settings to their original defaults” button.
Confirm your action, click the “Reset” button.
Delete “This Mac Is Not Secure” pop up from Safari
The Safari reset is great if your internet browser is hijacked or you have unwanted addo-ons or toolbars on your browser, which installed by an malicious software.
Click Safari menu and choose “Preferences”.
It will open the Safari Preferences window. Next, click the “Extensions” tab. Look for unknown and suspicious extensions on left panel, select it, then press the “Uninstall” button. Most important to remove all unknown extensions from Safari.
Once complete, click “General” tab. Change the “Default Search Engine” to Google.
Find the “Homepage” and type into textfield “https://www.google.com”.
On the introduction page of the Spotify app, hit to the Download button to download and install the Spotify app on your Android devices.Step 4. Now, you can block ads on Spotify with some helpful and reliable Spotify Ad Blockers on your PC computer, Mac and all your devices. When you have successfully downloaded and installed the Spotify on your Android devices, it is easy to enjoy Spotify playing without ads on your Android devices.See? Spotiy app mac now playing. Start from here to enjoy Spotify with no ads playing.
Remove “This Mac Is Not Secure” from Firefox by resetting internet browser settings
Resetting your Firefox is first troubleshooting step for any issues with your web browser application, including the redirect to “This Mac Is Not Secure” page. Essential information such as bookmarks, browsing history, passwords, cookies, auto-fill data and personal dictionaries will not be removed.
Start the Mozilla Firefox and click the menu button (it looks like three stacked lines) at the top right of the web-browser screen. Sandisk ultra plus xc 1 64gb mac software download for free. Next, click the question-mark icon at the bottom of the drop-down menu. It will display the slide-out menu.
Select the “Troubleshooting information”. If you are unable to access the Help menu, then type “about:support” in your address bar and press Enter. It bring up the “Troubleshooting Information” page as shown on the image below.
Click the “Refresh Firefox” button at the top right of the Troubleshooting Information page. Select “Refresh Firefox” in the confirmation prompt. The Mozilla Firefox will start a process to fix your problems that caused by the “This Mac Is Not Secure” adware. When, it’s complete, click the “Finish” button.

Run free malware removal utilities to completely remove “This Mac Is Not Secure” pop up warnings
If you are not expert at computer technology, then we recommend to use free removal utilities listed below to remove “This Mac Is Not Secure” pop-up for good. The automatic solution is highly recommended. It has less steps and easier to implement than the manual solution. Moreover, it lower risk of system damage. So, the automatic “This Mac Is Not Secure” removal is a better option.
How to automatically remove “This Mac Is Not Secure” scam with MalwareBytes Free
Remove “This Mac Is Not Secure” pop up manually is difficult and often the ad supported software is not fully removed. Therefore, we recommend you to use the MalwareBytes that are fully clean your Apple Mac. Moreover, this free application will allow you to remove malicious software, potentially unwanted programs, toolbars and hijacker that your machine may be infected too.
Installing the MalwareBytes Anti-Malware is simple. First you will need to download MalwareBytes Anti-Malware from the link below. Save it to your Desktop.
Malwarebytes Anti-malware (Mac) 14157 downloads Author: Malwarebytes Category: Security tools Update: July 10, 2018
When downloading is complete, close all windows on your Apple Mac. Further, open the saved file. Follow the prompts.
The MalwareBytes will automatically run and you may see its main window like below.
Next, press the “Scan Now” button . MalwareBytes AntiMalware utility will start scanning the whole machine to find out ad-supported software that causes multiple misleading “This Mac Is Not Secure” alerts and pop ups. Depending on your MAC OS, the scan may take anywhere from a few minutes to close to an hour. While the MalwareBytes Free program is checking, you can see how many objects it has identified as threat.
Once the system scan is finished, you can check all items detected on your MAC system. Review the scan results and then click “Remove Selected Items” button.
The MalwareBytes AntiMalware (MBAM) will delete adware that displays misleading “This Mac Is Not Secure” pop-up on your MAC system and move items to the program’s quarantine.
Stop “This Mac Is Not Secure” popup warnings and other unwanted web-sites
It’s also critical to protect your web-browsers from harmful web pages and ads by using an ad-blocker program like AdGuard. Security experts says that it’ll greatly reduce the risk of malicious software, and potentially save lots of money. Additionally, the AdGuard can also protect your privacy by blocking almost all trackers.
Visit the following page to download AdGuard.
AdGuard for Mac download 2560 downloads Author: © Adguard Category: Security tools Update: January 17, 2018
Once the downloading process is finished, launch the downloaded file. You will see the “Setup Wizard” screen. Follow the prompts.
This computer-aided design software is perfect for any professional, from engineers to architects. It is allowing to make drafts, edit 2D projects and 3D models for 3D printing. AutoCAD is a perfect program to create realistic 3D models, using solid, surface and mesh modeling tools! Free 3d cad software for beginners.
Web Browsers For Mac Os
Each time, when you launch your MAC OS, AdGuard will start automatically and stop unwanted ads, “This Mac Is Not Secure” scam, as well as other malicious or misleading sites.
Don’t know how your web-browser has been hijacked by adware
The ad-supported software spreads bundled with various free software, as a supplement, which is installed automatically. This is certainly not an honest way to get installed onto your MAC OS. To avoid infecting of your machine and side effects in the form of undesired “This Mac Is Not Secure” ads, you should always carefully read the Terms of Use and the Software license. Additionally, always select Manual, Custom or Advanced setup type. This allows you to disable the setup of unnecessary and often harmful programs.
Mac Secure Browser Nbme
Finish words
Now your MAC should be free of the adware that causes misleading “This Mac Is Not Secure” popup scam on your internet browser. We suggest that you keep AdGuard (to help you block unwanted pop up ads and unwanted harmful sites) and MalwareBytes Free (to periodically scan your machine for new adwares and other malicious software).
Free Secure Browsers
If you are still having problems while trying to remove “This Mac Is Not Secure” pop up scam from the Chrome, Safari and Firefox, then ask for help here here.
Best Secure Browser
(1 votes, average: 5.00 out of 5)
Remove Secure Browser Software Mac Torrent
Loading..
0 notes
Text
Mac Os X 10.7 Lion Dmg

Mac Os X 10.7 Lion Dmg
Mac Os X 10.7 Lion Dmg Download
Mac Os X Lion 10.7 Dmg Free Download
Mac Os X 10.7 Lion Installer
In this step-by-step guide, learn how to uninstall or remove Adobe Flash Player from your Mac computer, and delete any additional related files.
These instructions are NOT applicable to Flash Player included with Google Chrome. Visit the Flash Player Help page for instructions on enabling (or disabling) Flash Player in various browsers.
Mac OS X Mountain Lion Download 10.8: File Type:.dmg File Name: Mac OSX Mountain Lion 10.8.4.dmg. File Size: 4.46GB Download: Download Direct Download: Download Note: Let Us Know In comments if any link is not working, We will update ASAP.
If you use Windows, see Uninstall Flash Player | Windows.
If your Flash Player installation was not successful, use the following solution to reinstall.
In the section that you’ve all been waiting for. So, let’s not waste any more time and just dive straight into the pool of Mac OS X El Capitan ISO and DMG download files that you’ve been waiting for. Mac OS X 10.11 El Capitan ISO: Click to Download Also Check: Mac OS X Lion10.7 ISO; Mac OS X 10.7 El Capitan DMG: Click to Download.
Mac OS X Lion 10.7 is a popular macOS version and if you are looking for Mac OS X Lion 10.7 ISO or DMG details, you can find them on Technshite.
Apple Mac OSX Lion 10.7.5 Direct DMG Torrent The version 10.7.5 is here and it is the latest in its domain. An upgradation to the latest version is suggested by the owners of the OS to enable an addition of the latest features unique to this release.
Click the Apple icon and choose About This Mac.
The Mac OS version appears in the About This Mac dialog.
2. Run the uninstaller applicable to your Mac OS version
Run the uninstaller on Mac OS X 10.4 and later, including macOS
Note:
Beginning with Flash Player 11.5, uninstalling the Flash Player resets the AutoUpdateDisable and SilentAutoUpdateEnable settings in mms.cfg to their default values:
Mac Os X 10.7 Lion Dmg
AutoUpdateDisable=0
SilentAutoUpdateEnable=0
If you are running the Flash Player uninstaller as part of your deployment process, redeploy any custom changes to either AutoUpdateDisable or SilentAutoUpdateEnable.
Run the uninstaller on Mac OS X 10.4 and later, including macOS

Download the Adobe Flash Player uninstaller:
Mac OS X, version 10.6 and later: uninstall_flash_player_osx.dmg
Mac OS X, version 10.4 and 10.5: uninstall_flash_player_osx.dmg
The uninstaller is downloaded to the Downloads folder of your browser by default.
In Safari, choose Window > Downloads.
If you are using Mac OS X 10.7 (Lion), click the Downloads icon displayed on the browser.
To open the uninstaller, double-click it in the Downloads window.
Note: If the Flash Player installer window does not appear, choose Go > Desktop in the Finder. Scroll down to the Devices section and click Uninstall Flash Player.
To run the uninstaller, double-click the Uninstaller icon in the window. If you see a message asking if you want to open the uninstaller file, click Open.
Bookmark or print this page so that you can use the rest of these instructions after you close your browser.
To close all browsers, either click the browser name in the Uninstaller dialog, or close each browser manually and then click Retry.
Note: Do not click Quit in the Uninstaller window. It stops the uninstallation process.
After you close the browsers, the uninstaller continues automatically until the uninstallation is complete. When you see the message notifying you that the uninstallation succeeded, click Done.
Delete the following directories:
<home directory>/Library/Preferences/Macromedia/Flash Player
<home directory>/Library/Caches/Adobe/Flash Player
Download the Adobe Flash Player uninstaller:
Mac OS X, version 10.3 and earlier: uninstall_flash_player_osx_10.2.dmg (1.3 MB) (updated 05/27/08)
Choose Window > Downloads to view the downloaded uninstaller.
Save the uninstaller file in a convenient location.
To open the uninstaller, double-click it in the Downloads window.
To run the uninstaller, double-click the Uninstaller icon in the window. If requested, enter your computer user name and password and click OK.
Bookmark or print this page so that you can use the rest of these instructions after you close your browser. Close all browsers and other applications that use Flash Player, including instant messaging applications, SWF files, and projectors (EXE files that play SWF files). Otherwise, the uninstaller cannot finish (even though it appears to finish).
Once the uninstaller finishes, the window closes automatically.
You can verify that uninstallation is complete by following these steps:
Open your browser and check the status of Flash Player.
Download Mac OS X Lion 10.7.5 DMG free standalone setup. The Mac OS X Lion 10.7.5 DMG is an upgrade of OS X version 10.7 to improve the stability, compatibility, and security of the Mac.
Mac OS X Lion 10.7.5 Review
Mac OS X Lion 10.7.5 DMG is an upgrade of OS X version 10.7 to improve the stability, compatibility, and security of the Mac. It is recommended for all OS X Lion users and includes general operating system fixes. There are many great features are security tools are added to protect the Mac and user’s privacy. The OSX Lion V10.7.5 has introduced Aqua user interface elements, which includes button and progress bar. The red, yellow and green buttons in the window decorations have also been smaller with the little bit more attractive design.
It includes Gatekeeper, a new security feature that helps Mac users to keep their Mac safe from malicious software by giving more control over what apps are installed on the Mac. The 10.7.5 update also includes fixes that resolve an issue where icons in Launchpad may get rearranged after a restart, improve Wi-Fi reliability for iMac, resolve an issue using Spotlight to search an SMB server and improve compatibility connecting to Active Directory servers.
An amazing update in this version is improved Apple’s screen management tool. In the new updated version of OS X Loin 10.7.5 now advanced interface-related feature included that is Mission Control, which has nothing to do with the iPad. It’s basically an iteration of Expose, the desktop-management tool that shrinks and spreads the applications all over the screen so users can switch between them easily. Another enhanced features in new Lion that most of the users love is full-screen mode. Loin users now enable automatically logging into a NIS account. This update also brings improved Wi-Fi reliability for the iMac. In summary, OS X Lion 10.7.5 got all the necessary tools and features to provide more creative, secure and powerful working environment to its users. You can also Download Mac OSX Lion v10.7.4DMG Free.
Features of Mac OS X Lion 10.7.5
Introduced Aqua user interface elements with button and progress bar
Resolve an issue using Spotlight to search an SMB server
Improve compatibility connecting to Active Directory servers
Easier to use and more powerful in term of progress and security
Multiple versions of documents saved automatically
Enables users to automatically logging into a NIS account
Improved Wi-Fi reliability for the iMac
Resolves a video issue with some VGA projectors
Technical Details for Mac OS X Lion 10.7.5
File Name: Mac_OS_X_Lion_10.7.5_11G63_InstallESD.dmg
File Size: 4.390 GB
Developer: Apple
Mac Os X 10.7 Lion Dmg Download
System Requirements for Mac OS X Lion 10.7.5
Memory (RAM): 1 GB
Hard Disk Space: 4.5 GB
Processor: Intel Multi-core processor
Download Mac OS X Lion 10.7.5 DMG Free
Mac Os X Lion 10.7 Dmg Free Download
Click on the button given below to download Mac OS X Lion 10.7.5 DMG free. It is a complete offline setup of Mac OS X Lion 10.7.5 with the direct download link. You can also download Mac OS X Mountain Lion 10.8.5
Mac Os X 10.7 Lion Installer
For Latest Premium Android APK Visit www.allapkworld.com
0 notes
Text
I Cant Download Google Chrome On Mac

Chrome Not Downloading On Mac
I Can T Download Google Chrome On My Mac
I Cant Download Google Chrome On Mac Computer
Switch out of S mode on your computer. To learn about S mode and how to install Chrome, go to the Microsoft Help Center. Download the installation file for Chrome.; If prompted, click Run or Save.; If you chose Save, double-click the download to start installing.; Start Chrome. Download for Mac. Mac OS X 10.10 or later. This computer will no longer receive Google Chrome updates because Mac OS X 10.6 - 10.9 are no longer supported. This computer will no longer receive Google Chrome updates because Mac OS X 10.6 - 10.9 are no longer supported. Google Chrome is the solution that over 63% of the world turns to and with good reason. Mac users have distinguished taste and as such, expect high quality in their hardware and software products. Google Chrome delivers this to Mac users with its low CPU usage, reliability, and overall browsing experience.
There are better browsers I like chrome because it syncs across all devices but it’s so slow and constantly crashing on all formats, when I first downloaded this app it crashed every few minutes, then after about five or six updates it started working fine for over a year it only crashed twice, which is on par with the built in safari browser, but now it has stared crashing every single time. Google Chrome Running Slow. This problem may be caused by the computer running out of. Google Chrome is a lightweight browser that is free to download for Windows, Mac OS X, Linux, Android, and iOS. Follow this guide to get it downloaded and installed on your system of choice.How to. Hi, I would just like to know why we aren't able to install Google Chrome from Edge.
Summary
'Chrome not downloading files' is an issue that occurs quite frequently. Given that, here we detail all the potentials fixes for the 'Chrome won't download files' error on your computer, including simple tricks and effective tips. If you have lost files during the fix, don't worry. You can retrieve your browser history, bookmarks, and more using the professional data recovery software - EaseUS Data Recovery Wizard.
On this page, you'll find two parts of solutions - both simple & advanced to help you fix Google Chrome Not Downloading Files error. If your Chrome is now downloading files, pick any method here to ger rid of this issue on your own:
Workable SolutionsStep-by-step TroubleshootingQuick FixCheck internet connection > Restart Chrome > Try to download files again..Full stepsFix 1. Do Basic CleaningClear history and cache > Run Chrome cleanup tool > Reset Chrome..Full stepsFix 2. Uncheck Hardware AccelerationGo to Chrome Settings > Advanced Settings > Uncheck 'Use hardware acceleration when available'..Full stepsFix 3. Reinstall Google ChromeUninstall Google Chrome in 'Apps & features' > Delete all Google folders in Registry > Reinstall Chrome..Full stepsFix 4. Disable Related ExtensionsOpen Chrome > Go to 'More' > 'More tools' > 'Extensions' > Disable downloading related extensions..Full steps
Google Chrome Won't Download Files Anymore
'Why won't Google Chrome let me download files anymore? I used to download email attachments, pictures and music very easily. Since last week, it's no longer downloading any type of file from any website. What's the matter?'
Google Chrome is so simple and powerful that everyone loves it. But recently I found that one issue is under heated discussion on some major-related forums: Google Chrome is not downloading files!
After clicking the download button/icon on a web page, the request is not responding. Or, while selecting a location to preserve the download(s), the required download prompt box doesn't appear as usual. After many searches on the internet, Chrome fans said that they still don't find a confirmed solution to solve the problem.
How to Fix Google Chrome Not Downloading Files
According to Google Chrome Help page about how to fix file download errors in Google Chrome, if you get an error message on Chrome when you try to download apps, themes or other files, try to fix the most file download errors with the troubleshooting tips:
Part 1. Simple Tips to Fix Chrome Won't Download Files
Make sure your Internet connection is working normally. Fix Internet stability issues if the connection is unstable
Try to download the file later
Contact the website owner
There, on the linked page, you can find more 'error messages' related to this problem in downloading files with Chrome, such as Chrome network failed, download blocked, no file, virus scan failed, disk full, insufficient permissions, system busy, needs authorization or forbidden. All those errors are responsible for Chrome not being able to download files.
Chrome Not Downloading On Mac
If the easy tips above fail to solve the problem, don't get upset. There are other potential solutions provided below for you to fix the 'Chrome not downloading files' issue.
Part 2. Further Troubleshooting 'Chrome not downloading files' Error
Some people are not so lucky, they can't finish any download in Chrome. What's worse, they fail to download files without receiving a warning or error message indicating where the process went wrong. In this case, it's time to take some further measures. After reading numerous stories telling how people fix the downloading problems in Chrome, we summed up four effective solutions which I hope to be a permanent cure.
Method 1. Do Some Basic Cleaning Works
These are what you can try: clear all history and cache, run Chrome cleanup tool and reset settings to Chrome's original defaults. If you want to keep your Chrome history and cookies, you can backup or export Chrome history and cookies in advance.
To Clear history and cache in Google Chrome:
Step 1. Open Chrome on your computer and go to 'More (three dots)' > 'More tools' > 'Clear browsing data..'.
Step 2. Check the content you want to remove and click 'Clear Data'.
To Run the Chrom cleanup tool:
A Chrome cleanup tool can find and remove harmful software on your computer. Running this tool may solve the 'Chrome won't download files' issue caused by malware.
Step 1. Open Google Chrome on your computer.
Download the file. Before the file can be downloaded, you must accept the license agreement. From either the Downloads window of the browser, or from the file browser, double click the file.dmg to launch it. A Finder window appears containing an icon of an open box and the name of the.pkg file. Double click the package icon to launch the. Download the jre-8u65-macosx-x64.pkg file for mac.
Step 2. In the top right corner, click 'More (three dots)' > 'Settings'.
Step 3. Scroll down to the bottom and click 'Advanced'.
Step 4. Under 'Reset and clean up', click 'Clean up computer' > 'Find'.
To reset Chrome:
Step 1. Open Google Chrome on your computer.
I Can T Download Google Chrome On My Mac
Step 2. In the top right corner, click 'More (three dots)' > 'Settings'.
Step 3. Scroll down to the bottom and click 'Advanced'.
Step 4. Under 'Reset and clean up', click 'Restore settings to their original defaults' and then click 'Reset Settings' to confirm.
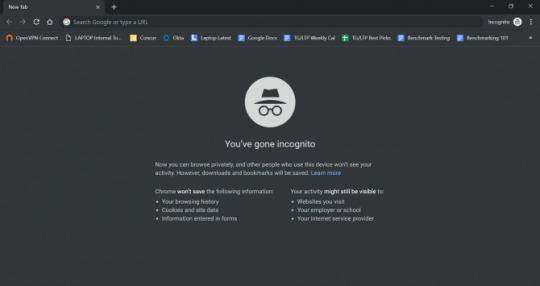
Attention, resetting Chrome will reset the browser startup page, new tab page, pinned tabs, and more. It will also disable all extensions and clear temporary data like cookies. However, other files like your bookmarks, history, and saved passwords will not be saved still. If you want to retrieve cookies but have no backup available, learn how to recover cache files in Google Chrome here.
Method 2. Uncheck Use Hardware Acceleration Option
Step 1. Go to Chrome Menu > Settings > Show Advanced Settings.
Step 2. Under System, uncheck Use hardware acceleration when available.
Step 3. Restart Chrome.
Method 3. Reinstall Google Chrome
To uninstall Google Chrome completely, first, you need to uninstall Google Chrome under Settings, then go to the registry to delete all Google folders.
To uninstall Google Chrome:
Step 1. Click the Windows icon and choose 'Settings (the gear icon)'.
Step 2. Choose 'Apps' > 'Apps & features'.
I Cant Download Google Chrome On Mac Computer
Step 3. Find and click 'Google Chrome'. Then click the 'Uninstall' button.
To delete All Google Folders in Registry:
Cumulative Security Update for Internet Explorer 8 in Windows 7 (KB2817183) This update addresses the vulnerability discussed in Microsoft Security Bulletin MS13-028. To find out if other security updates are available for you, see the Additional Information section at. Download internet explorer 8 for apple mac. Internet explorer 8 download for 8 1 free download - Apple Mac OS Update 8.1, uTorrent, Apple Mac OS Update 8.6, and many more programs. Internet Explorer for Mac, free and safe download. Internet Explorer latest version: Microsoft's now discontinued browser for Mac. Internet Explorer for Mac was Microsoft's free web browser designed to run on Mac computers.
Step 1. Press 'Windows + R' and type regedit.
Step 2. Go to 'Computer' > 'HKEY_CURRENT_USER' > 'Software'.
Step 3. Find and right-click 'Google' then choose 'Delete'.
Step 4. Go to the 'HKEY_LOCAL_MACHINE' folder and click 'SOFTWARE'.
Step 5. Find and right-click 'Google' then choose 'Delete'.
Now you have successfully and completely uninstalled Google Chrome from your computer. Go to Microsoft Store to reinstall Google and see whether the 'Chrome not downloading files' still exists.
Method 4. Disable Download Related Extensions
Disable all extensions that work as download managers since they may interfere with file downloading of Chrome.
Step 1. Open Chrome and go to 'More (three dots in the top-right corner)' > 'More tools' > 'Extensions'.
Step 2. Then you will see all the enabled extensions in your Chrome.
Adobe illustrator cs5 mac free trial download. Adobe illustrator cs5 free download - Adobe Illustrator CS6, IndicPlus Adobe Illustrator Plugin, Adobe Photoshop CS5 Extended trial, and many more programs.
Step 3. Toggle the button to disable downloading related extensions. (The extension shown in the image below is irrelevant to download managers. But you can apply the very same way to disable the extension you need to turn off.)
Extra Tip for Chrome History & Bookmarks Recovery
Some of the fixing methods will restore your browser to its original defaults or delete the Google folder. If the browsing history or bookmarks were unfortunately removed. Don't panic though, we left a data recovery plan for you here, to assist you to recover Chrome history in Windows and restore Chrome bookmarks on Mac.
Since Google has a temporary folder that stores some cache files related to browsing history and bookmarks, you can use EaseUS Data Recovery Wizard, the most powerful third-party hard drive recovery software to restore missing or lost Chrome data from its temporary folder, even the folder has been deleted on a local disk.
Step 1. Select a location to scan.
Launch EaseUS Data Recovery Wizard, hover on the partition, external hard drive, USB, or memory card from which you want to perform data recovery, and then click 'Scan'. How to get icloud on mac.
Step 2. Select the files you want to recover.
Wait until the scanning completes. Afterward, select the lost files you want to recover. If you need, double-click the file to preview its content.
Step 3. Recover lost data.
After choosing the files, click 'Recover' and choose a location on another drive to save the recovered files.
Here we introduce multiple ways to fix Google Chrome not downloading files, including simple tips you can try first and further troubleshooting tips. Hope it works and your favorite browser is getting back to normal.
So you are unhappy because the Google Chrome web browser won’t open or launch. This article explains how you can troubleshoot when Google Chrome won’t open after successfully installing on your Mac. More specifically the problem is that Google Chrome seems to be unresponsive and won’t start at all when trying to open the Chrome App. Do not worry, you are not alone. It seems that many macOS users are having this problem. Here is what to do:
See also: “App Is Damaged and Can’t Be Opened. You Should Move It To The Trash”
How to fix when Chrome won’t open

1-It is possible that Chrome is already running. You may want to check if Chrome is already open. Here is how you can check this:
Press the Option, Command, and Esc (Escape) keys together or you can click Force Quit from the Apple menu (upper-left corner of your screen).
Do you see Google Chrome there in the list
If you do, select it and then click Force Quit, and try re-opening Chrome. if you do not see Google Chrome in the Force Quit window, then see the step below.
2-Restart your Mac. (see also: How To Use Spotlight On Your Mac)
3-If you do not see Google Chrome in the Force Quit menu (see tip#1), follow the steps below:
Go to the Finder of your Mac.
From the “Go” menu select “Go to Folder”
Enter this:
~/Library/Application Support
And click Go
This will open a folder
Find the ‘Google’ named folder
Right click the folder and click Get Info
Click Sharing & Permissions to open the section
Click to Lock icon (bottom right corner) to unlock it. You need to be an admin and then enter your password.
Find the user who is having the Chrome opening problem and click its Privilege
Change Privilege from ‘Read Only’ to ‘Read & Write’.
Now click the Settings icon and select ‘Apply to enclosed items.’
Click Ok and try restarting the Chrome app.
4– If nothing helps you, you may want to try removing Google Chrome and then downloading and reinstalling. It is possible that your Google Chrome browser files may be corrupted and that is why it is now working. To uninstall Chrome, open Finder and click Applications. Then drag Google Chrome to the Trash. And then like the step number #3, select Finder and, from the Menu bar, click Go and then Go to Folder and enter ~/Library/Application Support/Google/Chrome and click Go. A new window will open. Select all the folders, and drag them to the Trash. This completely removes Google Chrome. Now you can go head and download and install again.
See also: How To Use Terminal On Your Mac
0 notes