#how to get duplicate object from array in JavaScript?
Explore tagged Tumblr posts
Visit Tumblr Blog
Explore Tumblr blogs with no restrictions, modern design and the best experience.
Last Seen Tumblr Blogs


Fun Fact
Tumblr has a low social media market share in South America.
Text
Let's talk about filtering and mapping! 🤓
I'm working on the menu page for a restaurant, and as someone with very little frontend experience I wasn't sure how to go about parsing through a JSON file to return certain objects.
After some searching, procrastinating, going through this course, and then more searching - I finally came across the documentation I needed here!
So what is filtering and mapping? .filter() and .map() are JavaScript methods.
filter allows you to filter through an array of objects given some logic (want to find all the items with an id greater than 7? filter. Want to find all the items where the name is equal to "burger" that works too, want to add multiple conditions to find all the items with and id greater than 7 AND the name is "burger" well filter has got your back).
map is used to iterate through an array and call a function on every element in it. I used it to map each item to a list.
Here's an example: We have a JSON file of some food items.
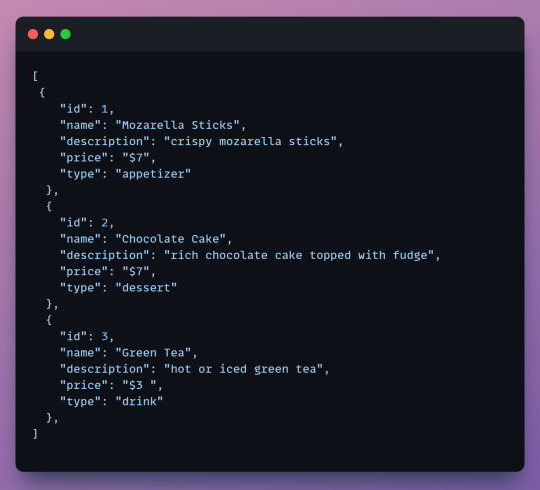
We want to grab all the desserts from our menu and display them on the desserts page of our website. It's time to filter!
Keep in mind that the filter method returns a new array with all the objects that we want. In this case when we filter we will get an array with all the desserts.
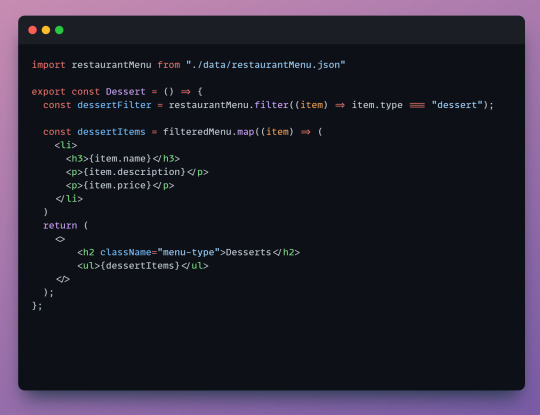
First we import our JSON file so we can access it.
Next, we create a constant called dessertFilter which will hold our filtered array. dessertFilter will hold all items that have the type equal to dessert. In our example it will hold the chocolate cake object.
Next, we map each item from the new array to a list. This is the list that we'll see displayed on the page. You can choose which properties you want to map. We only map the name, description and price since there's no need for the user to see the item type or id.
Lastly, our return statement contains everything we will see on the page. In our return we have a header and the list of items - we wrap our list, dessertItems in an unordered list since list items need to be wrapped in either an ordered or unordered list.
Here's our result! We can style this with css later.

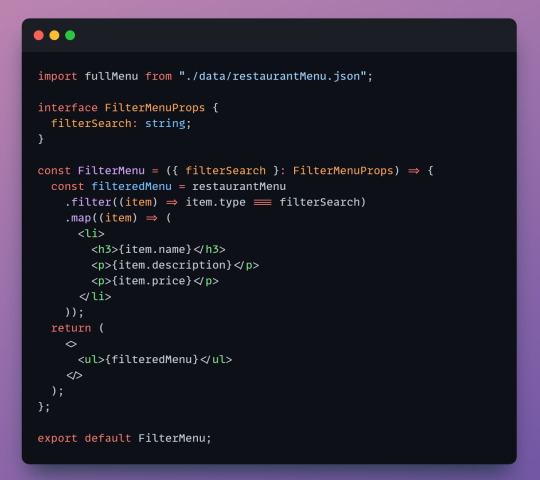
Cool! so we filtered for dessert but what about our other menu items? Time to make a reusable component.
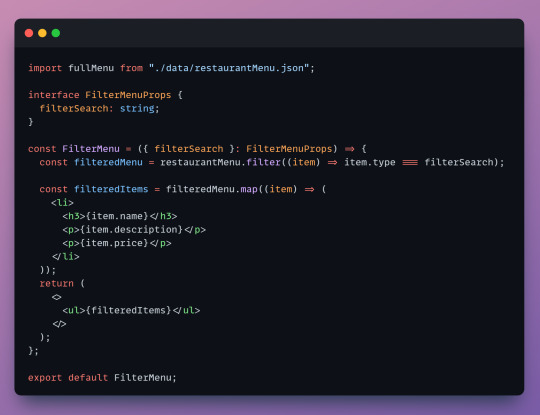
The code is almost the same, but to make this component reusable we create an interface. Interfaces define objects and specify their properties. We specify an object called filterSearch that will act as a placeholder - we set it as a string since the item "types" in our JSON file are strings. (I'm using typescript which accepts interfaces but i believe vanilla javascript does not).
Now lets see the component in action
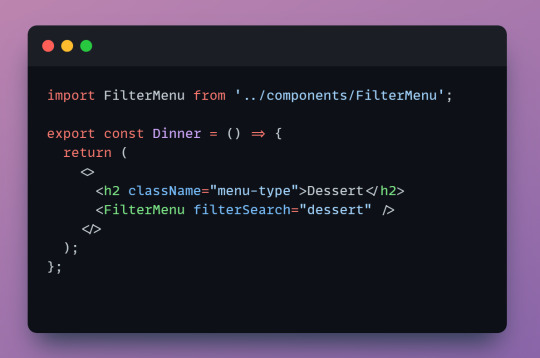
Import the component so we can call it.
When we call FilterMenu we have to include filterSearch from our interface. The component needs to know what we're looking for. Here we can set it to any valid type like "dessert", "drink", or "appetizer" and it will display them.
Woo! now we're filtering and mapping with one line of code! and we can reuse it for our other pages too.
Last thing, these methods are chainable! you can connect them and have the same logic in one constant.
Before reading the documentation, I had seperate JSON files for each menu category and was reusing the same code to map each file on each individual menu page. It was a lot of duplicate code, not great. Now, I have a single JSON file and a reusable component. It's satisying how clean it is!
Learning on your own can be frustrating sometimes, it can be hard to search for solutions when you don't know where to begin. I had never heard of filtering or mapping before this. If you're ever stuck keep pushing! there's so many resources and communities out there.
p.s. I'm open to any suggestions!
10 notes
·
View notes
Text
The 10 Code Snippets That Save Me Time in Every Project.
Let’s be real—coding can sometimes feel like a never-ending marathon of the same boring tasks. You write, debug, tweak, repeat. But what if I told you there’s a secret stash of tiny code snippets that could literally cut your work in half and make your life 10x easier?
Over the years, I’ve built up my personal toolkit of code snippets that I pull out every single time I start a new project. They’re simple, they’re powerful, and best of all—they save me tons of time and headaches.
Here’s the deal: I’m sharing my top 10 snippets that are like little magic shortcuts in your code. Bookmark this, share it, and thank me later.

Debounce: The “Stop Spamming Me!” Button for Events Ever noticed how when you type or resize a window, your function fires off like crazy? Debounce lets you tell your code, “Chill, wait a sec before running that again.”
javascript Copy Edit function debounce(func, wait) { let timeout; return function(…args) { clearTimeout(timeout); timeout = setTimeout(() => func.apply(this, args), wait); }; } Say goodbye to sluggish UIs!
Deep Clone: Copy Stuff Without Messing It Up Want a clone of your object that won’t break if you change it? This snippet is the magic wand for that.
javascript Copy Edit const deepClone = obj => JSON.parse(JSON.stringify(obj)); No more accidental mutations ruining your day.
Fetch with Timeout: Because Nobody Likes Waiting Forever Network requests can hang forever if the server’s slow. This snippet makes sure you bail after a timeout and handle the error gracefully.
javascript Copy Edit function fetchWithTimeout(url, timeout = 5000) { return Promise.race([ fetch(url), new Promise((_, reject) => setTimeout(() => reject(new Error('Timeout')), timeout)) ]); } Stay in control of your app’s speed!
Capitalize First Letter: Make Text Look Nice in One Line Quick and dirty text beautifier.
javascript Copy Edit const capitalize = str => str.charAt(0).toUpperCase() + str.slice(1); Perfect for UI polish.
Unique Array Elements: Bye-Bye Duplicates Got a messy array? Clean it up instantly.
javascript Copy Edit const unique = arr => […new Set(arr)]; Trust me, this one’s a life saver.
Format Date to YYYY-MM-DD: Keep Dates Consistent AF Don’t mess with date formatting ever again.
javascript Copy Edit const formatDate = date => date.toISOString().split('T')[0]; Dates made simple.
Throttle: Like Debounce’s Cool Older Sibling Throttle makes sure your function runs at most every X milliseconds. Great for scroll events and such.
javascript Copy Edit function throttle(func, limit) { let lastFunc; let lastRan; return function(…args) { if (!lastRan) { func.apply(this, args); lastRan = Date.now(); } else { clearTimeout(lastFunc); lastFunc = setTimeout(() => { if ((Date.now() - lastRan) >= limit) { func.apply(this, args); lastRan = Date.now(); } }, limit - (Date.now() - lastRan)); } }; } Keep it smooth and snappy.
Check if Object is Empty: Quick Validation Hack Sometimes you just need to know if an object’s empty or not. Simple and neat.
javascript Copy Edit const isEmptyObject = obj => Object.keys(obj).length === 0;
Get Query Parameters from URL: Parse Like a Pro Grab query params effortlessly.
javascript Copy Edit const getQueryParams = url => { const params = {}; new URL(url).searchParams.forEach((value, key) => { params[key] = value; }); return params; }; Perfect for any web app.
Random Integer in Range: Because Random Is Fun Generate random numbers like a boss.
javascript Copy Edit const randomInt = (min, max) => Math.floor(Math.random() * (max - min + 1)) + min; Use it for games, animations, or fun experiments.
Why These Snippets Will Change Your Life If you’re like me, every saved second adds up to more time for creativity, coffee breaks, or learning something new. These snippets aren’t just code — they’re your trusty sidekicks that cut down on repetitive work and help you ship better projects faster.
Try them out. Customize them. Share them with your team.
And if you found this helpful, do me a favour: share this post with your dev buddies. Because sharing is caring, and everyone deserves to code smarter, not harder.
0 notes
Text
Flatten & Spread JSON Arrays/Objects with json-spread Library
json-spread is a JavaScript library that takes a nested JSON structure, flattens it, and then duplicates objects based on the elements within any nested arrays. Its main purpose is prepping hierarchical JSON data—the kind you often get from APIs—into a flat, row-column format suitable for CSVs, TSVs, spreadsheets, or feeding into data tables. How it works: First, it flattens the JSON, converting…
1 note
·
View note
Text
How To Get Duplicate Object From Array in JavaScript?
How To Get Duplicate Object From Array in JavaScript?
In this article, we are going to see how to get duplicate object from array in JavaScript? Okay, this is the JavaScript problem statement which we are going to discuss, and also we will solve it in very simple and straight-forward way. As we know, an object array can contain a number of elements and one key which we can say identity of the object should be unique. So this issue arises when…

View On WordPress
0 notes
Text
.map() vs .forEach()
After using javascript for awhile and becoming familiar with the functions and how they work, you will become more comfortable with coding and have that go to feature to use when it may be needed. Key word is “MAY”, as in this one feature can get the job done, but either incorrectly or inefficiently. No one wants to go into an interview and use a feature that can get the job done but cause a delay due to it not being fully capable of what needs to be done.
So what is they key difference between .map and .foreach?
.map()
Let’s say you have a variable filled with different type of content and want to pull that information into a new array and rename it.
const fewPokemon = [
{
Name: Pikachu
Type: Electric
Fly: No
},

{
Name: Mew
Type: Psychic
Fly: Yes
},

{
Name: Sandslash
Type: Ground
Fly: No
},
];

If you want to pull certain parts from the pokemon objects and rename them into their separate variable, you would invoke the following.
const fighters = fewPokemon.map((pokemon) => fewPokemon.Name);
console.log(fighters);
Will display, Pikachu, Mew, and Sandslash.
Same way works to get the type of pokemon they are.
const pokeTypes = fewPokemon.map((pokemon) => fewPokemon.Type);
console.log(pokeTypes);
Will display, Electric, Psychic, and Ground.
Now lets switch to the .forEach method
.forEach() will display a list of the items included along with index number placed in an array once invoked. For example,
let DBZ = [”Goku”, “Vegeta”, “Freiza”, “Goahn”];


In order to properly use this function, you would invoke the following,
DBZ.forEach(Characters);
function Characters(item, index, array){
console.log(index, item)
0.”Goku”
1.”Vegeta”
2. “Freiza”
3. “Gohan”


They both have the functionality to pull information from a variable but depending on what you need done with that variable makes the difference. With .map() you can pull certain information from a variable and send that data into a new variable making a copy of the original and duplicating it with a new name.

With .forEach() this can be used to not only display the information, but to have the information do something in particular wether it’s styling it a certain way, appending them to an element, add the information into another object, etc.
They both have the same capabilities but depending on the task at hand will depend on the proper function that should be used.
4 notes
·
View notes
Text
Databases: how they work, and a brief history
My twitter-friend Simon had a simple question that contained much complexity: how do databases work?
Ok, so databases really confuse me, like how do databases even work?
— Simon Legg (@simonleggsays) November 18, 2019
I don't have a job at the moment, and I really love databases and also teaching things to web developers, so this was a perfect storm for me:
To what level of detail would you like an answer? I love databases.
— Laurie Voss (@seldo) November 18, 2019
The result was an absurdly long thread of 70+ tweets, in which I expounded on the workings and history of databases as used by modern web developers, and Simon chimed in on each tweet with further questions and requests for clarification. The result of this collaboration was a super fun tiny explanation of databases which many people said they liked, so here it is, lightly edited for clarity.
What is a database?
Let's start at the very most basic thing, the words we're using: a "database" literally just means "a structured collection of data". Almost anything meets this definition – an object in memory, an XML file, a list in HTML. It's super broad, so we call some radically different things "databases".
The thing people use all the time is, formally, a Database Management System, abbreviated to DBMS. This is a piece of software that handles access to the pile of data. Technically one DBMS can manage multiple databases (MySQL and postgres both do this) but often a DBMS will have just one database in it.
Because it's so frequent that the DBMS has one DB in it we often call a DBMS a "database". So part of the confusion around databases for people new to them is because we call so many things the same word! But it doesn't really matter, you can call an DBMS a "database" and everyone will know what you mean. MySQL, Redis, Postgres, RedShift, Oracle etc. are all DBMS.
So now we have a mental model of a "database", really a DBMS: it is a piece of software that manages access to a pile of structured data for you. DBMSes are often written in C or C++, but it can be any programming language; there are databases written in Erlang and JavaScript. One of the key differences between DBMSes is how they structure the data.
Relational databases
Relational databases, also called RDBMS, model data as a table, like you'd see in a spreadsheet. On disk this can be as simple as comma-separated values: one row per line, commas between columns, e.g. a classic example is a table of fruits:
apple,10,5.00 orange,5,6.50
The DBMS knows the first column is the name, the second is the number of fruits, the third is the price. Sometimes it will store that information in a different database! Sometimes the metadata about what the columns are will be in the database file itself. Because it knows about the columns, it can handle niceties for you: for example, the first column is a string, the second is an integer, the third is dollar values. It can use that to make sure it returns those columns to you correctly formatted, and it can also store numbers more efficiently than just strings of digits.
In reality a modern database is doing a whole bunch of far more clever optimizations than just comma separated values but it's a mental model of what's going on that works fine. The data all lives on disk, often as one big file, and the DBMS caches parts of it in memory for speed. Sometimes it has different files for the data and the metadata, or for indexes that make it easier to find things quickly, but we can safely ignore those details.
RDBMS are older, so they date from a time when memory was really expensive, so they usually optimize for keeping most things on disk and only put some stuff in memory. But they don't have to: some RDBMS keep everything in memory and never write to disk. That makes them much faster!
Is it still a database if all the structured data stays in memory? Sure. It's a pile of structured data. Nothing in that definition says a disk needs to be involved.
So what does the "relational" part of RDBMS mean? RDBMS have multiple tables of data, and they can relate different tables to each other. For instance, imagine a new table called "Farmers":
IDName 1bob 2susan
and we modify the Fruits table:
Farmer IDFruitQuantityPrice 1apple105.00 1orange56.50 2apple206.00 2orange14.75
.dbTable { border: 1px solid black; } .dbTable thead td { background-color: #eee; } .dbTable td { padding: 0.3em; }
The Farmers table gives each farmer a name and an ID. The Fruits table now has a column that gives the Farmer ID, so you can see which farmer has which fruit at which price.
Why's that helpful? Two reasons: space and time. Space because it reduces data duplication. Remember, these were invented when disks were expensive and slow! Storing the data this way lets you only list "susan" once no matter how many fruits she has. If she had a hundred kinds of fruit you'd be saving quite a lot of storage by not repeating her name over and over. The time reason comes in if you want to change Susan's name. If you repeated her name hundreds of times you would have to do a write to disk for each one (and writes were very slow at the time this was all designed). That would take a long time, plus there's a chance you could miss one somewhere and suddenly Susan would have two names and things would be confusing.
Relational databases make it easy to do certain kinds of queries. For instance, it's very efficient to find out how many fruits there are in total: you just add up all the numbers in the Quantity column in Fruits, and you never need to look at Farmers at all. It's efficient and because the DBMS knows where the data is you can say "give me the sum of the quantity colum" pretty simply in SQL, something like SELECT SUM(Quantity) FROM Fruits. The DBMS will do all the work.
NoSQL databases
So now let's look at the NoSQL databases. These were a much more recent invention, and the economics of computer hardware had changed: memory was a lot cheaper, disk space was absurdly cheap, processors were a lot faster, and programmers were very expensive. The designers of newer databases could make different trade-offs than the designers of RDBMS.
The first difference of NoSQL databases is that they mostly don't store things on disk, or do so only once in a while as a backup. This can be dangerous – if you lose power you can lose all your data – but often a backup from a few minutes or seconds ago is fine and the speed of memory is worth it. A database like Redis writes everything to disk every 200ms or so, which is hardly any time at all, while doing all the real work in memory.
A lot of the perceived performance advantages of "noSQL" databases is just because they keep everything in memory and memory is very fast and disks, even modern solid-state drives, are agonizingly slow by comparison. It's nothing to do with whether the database is relational or not-relational, and nothing at all to do with SQL.
But the other thing NoSQL database designers did was they abandoned the "relational" part of databases. Instead of the model of tables, they tended to model data as objects with keys. A good mental model of this is just JSON:
[ {"name":"bob"} {"name":"susan","age":55} ]
Again, just as a modern RDBMS is not really writing CSV files to disk but is doing wildly optimized stuff, a NoSQL database is not storing everything as a single giant JSON array in memory or disk, but you can mentally model it that way and you won't go far wrong. If I want the record for Bob I ask for ID 0, Susan is ID 1, etc..
One advantage here is that I don't need to plan in advance what I put in each record, I can just throw anything in there. It can be just a name, or a name and an age, or a gigantic object. With a relational DB you have to plan out columns in advance, and changing them later can be tricky and time-consuming.
Another advantage is that if I want to know everything about a farmer, it's all going to be there in one record: their name, their fruits, the prices, everything. In a relational DB that would be more complicated, because you'd have to query the farmers and fruits tables at the same time, a process called "joining" the tables. The SQL "JOIN" keyword is one way to do this.
One disadvantage of storing records as objects like this, formally called an "object store", is that if I want to know how many fruits there are in total, that's easy in an RDBMS but harder here. To sum the quantity of fruits, I have to retrieve each record, find the key for fruits, find all the fruits, find the key for quantity, and add these to a variable. The DBMS for the object store may have an API to do this for me if I've been consistent and made all the objects I stored look the same. But I don't have to do that, so there's a chance the quantities are stored in different places in different objects, making it quite annoying to get right. You often have to write code to do it.
But sometimes that's okay! Sometimes your app doesn't need to relate things across multiple records, it just wants all the data about a single key as fast as possible. Relational databases are best for the former, object stores the best for the latter, but both types can answer both types of questions.
Some of the optimizations I mentioned both types of DBMS use are to allow them to answer the kinds of questions they're otherwise bad at. RDBMS have "object" columns these days that let you store object-type things without adding and removing columns. Object stores frequently have "indexes" that you can set up to be able to find all the keys in a particular place so you can sum up things like Quantity or search for a specific Fruit name fast.
So what's the difference between an "object store" and a "noSQL" database? The first is a formal name for anything that stores structured data as objects (not tables). The second is... well, basically a marketing term. Let's digress into some tech history!
The self-defeating triumph of MySQL
Back in 1995, when the web boomed out of nowhere and suddenly everybody needed a database, databases were mostly commercial software, and expensive. To the rescue came MySQL, invented 1995, and Postgres, invented 1996. They were free! This was a radical idea and everybody adopted them, partly because nobody had any money back then – the whole idea of making money from websites was new and un-tested, there was no such thing as a multi-million dollar seed round. It was free or nothing.
The primary difference between PostgreSQL and MySQL was that Postgres was very good and had lots of features but was very hard to install on Windows (then, as now, the overwhelmingly most common development platform for web devs). MySQL did almost nothing but came with a super-easy installer for Windows. The result was MySQL completely ate Postgres' lunch for years in terms of market share.
Lots of database folks will dispute my assertion that the Windows installer is why MySQL won, or that MySQL won at all. But MySQL absolutely won, and it was because of the installer. MySQL became so popular it became synonymous with "database". You started any new web app by installing MySQL. Web hosting plans came with a MySQL database for free by default, and often no other databases were even available on cheaper hosts, which further accelerated MySQL's rise: defaults are powerful.
The result was people using mySQL for every fucking thing, even for things it was really bad at. For instance, because web devs move fast and change things they had to add new columns to tables all the time, and as I mentioned RDBMS are bad at that. People used MySQL to store uploaded image files, gigantic blobs of binary data that have no place in a DBMS of any kind.
People also ran into a lot of problems with RDBMS and MySQL in particular being optimized for saving memory and storing everything on disk. It made huge databases really slow, and meanwhile memory had got a lot cheaper. Putting tons of data in memory had become practical.
The rise of in-memory databases
The first software to really make use of how cheap memory had become was Memcache, released in 2003. You could run your ordinary RDBMS queries and just throw the results of frequent queries into Memcache, which stored them in memory so they were way, WAY faster to retrieve the second time. It was a revolution in performance, and it was an easy optimization to throw into your existing, RDBMS-based application.
By 2009 somebody realized that if you're just throwing everything in a cache anyway, why even bother having an RDBMS in the first place? Enter MongoDB and Redis, both released in 2009. To contrast themselves with the dominant "MySQL" they called themselves "NoSQL".
What's the difference between an in-memory cache like Memcache and an in-memory database like Redis or MongoDB? The answer is: basically nothing. Redis and Memcache are fundamentally almost identical, Redis just has much better mechanisms for retrieving and accessing the data in memory. A cache is a kind of DB, Memcache is a DBMS, it's just not as easy to do complex things with it as Redis.
Part of the reason Mongo and Redis called themselves NoSQL is because, well, they didn't support SQL. Relational databases let you use SQL to ask questions about relations across tables. Object stores just look up objects by their key most of the time, so the expressiveness of SQL is overkill. You can just make an API call like get(1) to get the record you want.
But this is where marketing became a problem. The NoSQL stores (being in memory) were a lot faster than the relational DBMS (which still mostly used disk). So people got the idea that SQL was the problem, that SQL was why RDBMS were slow. The name "NoSQL" didn't help! It sounded like getting rid of SQL was the point, rather than a side effect. But what most people liked about the NoSQL databases was the performance, and that was just because memory is faster than disk!
Of course, some people genuinely do hate SQL, and not having to use SQL was attractive to them. But if you've built applications of reasonable complexity on both an RDBMS and an object store you'll know that complicated queries are complicated whether you're using SQL or not. I have a lot of love for SQL.
If putting everything in memory makes your database faster, why can't you build an RDBMS that stores everything in memory? You can, and they exist! VoltDB is one example. They're nice! Also, MySQL and Postgres have kind of caught up to the idea that machines have lots more RAM now, so you can configure them to keep things mostly in memory too, so their default performance is a lot better and their performance after being tuned by an expert can be phenomenal.
So anything that's not a relational database is technically a "NoSQL" database. Most NoSQL databases are object stores but that's really just kind of a historical accident.
How does my app talk to a database?
Now we understand how a database works: it's software, running on a machine, managing data for you. How does your app talk to the database over a network and get answers to queries? Are all databases just a single machine?
The answer is: every DBMS, whether relational or object store, is a piece of software that runs on machine(s) that hold the data. There's massive variation: some run on 1 machine, some on clusters of 5-10, some run across thousands of separate machines all at once.
The DBMS software does the management of the data, in memory or on disk, and it presents an API that can be accessed locally, and also more importantly over the network. Sometimes this is a web API like you're used to, literally making GET and POST calls over HTTP to the database. For other databases, especially the older ones, it's a custom protocol.
Either way, you run a piece of software in your app, usually called a Client. That client knows the protocol for talking to the database, whether it's HTTP or WhateverDBProtocol. You tell it where the database server is on the network, it sends queries over and gets responses. Sometimes the queries are literally strings of text, like "SELECT * FROM Fruits", sometimes they are JSON payloads describing records, and any number of other variations.
As a starting point, you can think of the client running on your machine talking over the network to a database running on another machine. Sometimes your app is on dozens of machines, and the database is a single IP address with thousands of machines pretending to be one machine. But it works pretty much the same either way.
The way you tell your client "where" the DB is is your connection credentials, often expressed as a string like "http://username:[email protected]:1234" or "mongodb://...". But this is just a convenient shorthand. All your client really needs to talk to a database is the DNS name (like mydb.com) or an IP address (like 205.195.134.39), plus a port (1234). This tells the network which machine to send the query to, and what "door" to knock on when it gets there.
A little about ports: machines listen on specific ports for things, so if you send something to port 80, the machine knows the query is for your web server, but if you send it to port 1234, it knows the query is for your database. Who picks 1234 (In the case of Postgres, it's literally 5432)? There's no rhyme or reason to it. The developers pick a number that's easy to remember between 1 and 65,535 (the highest port number available) and hope that no other popular piece of software is already using it.
Usually you'll also have a username and password to connect to the database, because otherwise anybody who found your machine could connect to your database and get all the data in it. Forgetting that this is true is a really common source of security breaches!
There are bad people on the internet who literally just try every single IP in the world and send data to the default port for common databases and try to connect without a username or password to see if they can. If it works, they take all the data and then ransom it off. Yikes! Always make sure your database has a password.
Of course, sometimes you don't talk to your database over a network. Sometimes your app and your database live on the same machine. This is common in desktop software but very rare in web apps. If you've ever heard of a "database driver", the "driver" is the equivalent of the "client", but for talking to a local database instead of over a network.
Replication and scaling
Remember I said some databases run on just 1 machine, and some run on thousands of machines? That's known as replication. If you have more than one copy of a piece of data, you have a "replica" of that data, hence the name.
Back in the old days hardware was expensive so it was unusual to have replicas of your data running at the same time. It was expensive. Instead you'd back up your data to tape or something, and if the database went down because the hardware wore out or something, then you'd buy new hardware and (hopefully) reinstall your DBMS and restore the data in a few hours.
Web apps radically changed people's demands of databases. Before web apps, most databases weren't being continuously queried by the public, just a few experts inside normal working hours, and they would wait patiently if the database broke. With a web app you can't have minutes of downtime, far less hours, so replication went from being a rare feature of expensive databases to pretty much table stakes for every database. The initial form of replication was a "hot spare".
If you ran a hot spare, you'd have your main DBMS machine, which handled all queries, and a replica DBMS machine that would copy every single change that happened on the primary to itself. Primary was called m****r and the replica s***e because the latter did whatever the former told it to do, and at the time nobody considered how horrifying that analogy was. These days we call those things "primary/secondary" or "primary/replica" or for more complicated arrangements things like "root/branch/leaf".
Sometimes, people would think having a hot spare meant they didn't need a backup. This is a huge mistake! Remember, the replica copies every change in the main database. So if you accidentally run a command that deletes all the data in your primary database, it will automatically delete all the data in the replica too. Replicas are not backups, as the bookmarking site Magnolia famously learned.
People soon realized having a whole replica machine sitting around doing nothing was a waste, so to be more efficient they changed where traffic went: all the writes would go to the primary, which would copy everything to the replicas, and all the reads would go to the replicas. This was great for scale!
Instead of having 1 machine worth of performance (and you could swap to the hot spare if it failed, and still have 1 machine of performance with no downtime) suddenly you had X machines of performance, where X could be dozens or even hundreds. Very helpful!
But primary/secondary replication of this kind has two drawbacks. First, if a write has arrived at the primary database but not yet replicated to all the secondary machines (which can take half a second if the machines are far apart or overloaded) then somebody reading from the replica can get an answer that's out of date. This is known as a "consistency" failure, and we'll talk about it more later.
The second flaw with primary/second replication is if the primary fails, suddenly you can no longer write to your database. To restore the ability to do writes, you have to take one of the replicas and "promote" it to primary, and change all the other replicas to point at this new primary box. It's time-consuming and notoriously error-prone.
So newer databases invented different ways of arranging the machines, formally called "network topology". If you think of the way machines connect to each other as a diagram, the topology is the shape of that diagram. Primary/secondary looks like a star. Root/branch/leaf looks like a tree. But you can have a ring structure, or a mesh structure, or lots of others. A mesh structure is a lot of fun and very popular, so let's talk about more about them.
Mesh replication databases
In a mesh structure, every machine is talking to every other machine and they all have some portion of the data. You can send a write to any machine and it will either store it, or figure out what machine should store it and send it to that machine. Likewise, you can query any machine in the mesh, and it will give you the answer if it has the data, or forward your request to a machine that does. There's no "primary" machine to fail. Neat!
Because each machine can get away with storing only some of the data and not all of it, a mesh database can store much, much more data than a single machine could store. If 1 machine could store X data, then N machines could theoretically store N*X data. You can almost scale infinitely that way! It's very cool.
Of course, if each record only existed on one machine, then if that machine failed you'd lose those records. So usually in a mesh network more than one machine will have a copy of any individual record. That means you can lose machines without losing data or experiencing downtime; there are other copies lying around. In some mesh databases can also add a new machine to the mesh and the others will notice it and "rebalance" data, increasing the capacity of the database without any downtime. Super cool.
So a mesh topology is a lot more complicated but more resilient, and you can scale it without having to take the database down (usually). This is very nice, but can go horribly wrong if, for instance, there's a network error and suddenly half the machines can't see the other half of the machines in the mesh. This is called a "network partition" and it's a super common failure in large networks. Usually a partition will last only a couple of seconds but that's more than enough to fuck up a database. We'll talk about network partitions shortly.
One important question about a mesh DB is: how do you connect to it? Your client needs to know an IP address to connect to a database. Does it need to know the IP addresses of every machine in the mesh? And what happens when you add and remove machines from the mesh? Sounds messy.
Different Mesh DBs do it differently, but usually you get a load balancer, another machine that accepts all the incoming connections and works out which machine in the mesh should get the question and hands it off. Of course, this means the load balancer can fail, hosing your DB. So usually you'll do some kind of DNS/IP trickery where there are a handful of load balancers all responding on the same domain name or IP address.
The end result is your client magically just needs to know only one name or IP, and that IP always responds because the load balancer always sends you to a working machine.
CAP theory
This brings us neatly to a computer science term often used to talk about databases which is Consistency, Availability, and Partition tolerance, aka CAP or "CAP theory". The basic rule of CAP theory is: you can't have all 3 of Consistency, Availability and Partition Tolerance at the same time. Not because we're not smart enough to build a database that good, but because doing so violates physics.
Consistency means, formally: every query gets the correct, most up-to-date answer (or an error response saying you can't have it).
Availability means: every query gets an answer (but it's not guaranteed to be the correct one).
Partition Tolerance means: if the network craps out, the database will continue to work.
You can already see how these conflict! If you're 100% Available it means by definition you'll never give an error response, so sometimes the data will be out of date, i.e. not Consistent. If your database is Partition Tolerant, on the other hand, it keeps working even if machine A can't talk to machine B, and machine A might have a more recent write than B, so machine B will give stale (i.e. not Consistent) responses to keep working.
So let's think about how CAP theorem applies across the topologies we already talked about.
A single DB on a single machine is definitely Consistent (there's only one copy of the data) and Partition Tolerant (there's no network inside of it to crap out) but not Available because the machine itself can fail, e.g. the hardware could literally break or power could go out.
A primary DB with several replicas is Available (if one replica fails you can ask another) and Partition Tolerant (the replicas will respond even if they're not receiving writes from the primary) but not Consistent (because as mentioned earlier, the replicas might not have every primary write yet).
A mesh DB is extremely Available (all the nodes always answer) and Partition Tolerant (just try to knock it over! It's delightfully robust!) but can be extremely inconsistent because two different machines on the mesh could get a write to the same record at the same time and fight about which one is "correct".
This is the big disadvantage to mesh DBs, which otherwise are wonderful. Sometimes it's impossible to know which of two simultaneous writes is the "winner". There's no single authority, and Very Very Complicated Algorithms are deployed trying to prevent fights breaking out between machines in the mesh about this, with highly variable levels of success and gigantic levels of pain when they inevitably fail. You can't get all three of CAP and Consistency is what mesh networks lose.
In all databases, CAP isn't a set of switches where you are or aren't Consistent, Available, or Partition Tolerant. It's more like a set of sliders. Sliding up the Partition Tolerance generally slides down Consistency, sliding down Availability will give you more Consistency, etc etc.. Every DBMS picks some combination of CAP and picking the right database is often a matter of choosing what CAP combination is appropriate for your application.
Other topologies
Some other terms you frequently hear in the world of databases are "partitions" (which are different from the network partitions of CAP theorem) and "shards". These are both additional topologies available to somebody designing a database. Let's talk about shards first.
Imagine a primary with multiple replicas, but instead of each replica having all the data, each replica has a slice (or shard) of the data. You can slice the data lots of ways. If the database was people, you could have 26 shards, one with all names starting with A, one with all the names starting with B, etc..
Sharding can be helpful if the data is too big to all fit on one disk at a time. This is less of a problem than it used to be because virtual machines these days can effectively have infinity-sized hard drives.
The disadvantage of sharding is it's less Available: if you lose a shard, you lose everybody who starts with that letter! (Of course, your shards can also have replicas...) Plus your software needs to know where all the shards are and which one to ask a question. It's fiddly. Many of the problems of sharded databases are solved by using mesh topologies instead.
Partitions are another way of splitting up a database, but instead of splitting it across many machines, it splits the database across many files in a single machine. This is an old pattern that was useful when you had really powerful hardware and really slow disks, because you could install multiple disks into a single machine and put different partitions on each one, speeding up your achingly slow, disk-based database. These days there's not a lot of reason to use partitions of this kind.
Fin
That concludes this impromptu Databases 101 seminar! I hope you enjoyed learning a little bit more about this fantastically fun and critically important genre of software. from Seldo.Com Feed https://ift.tt/32XwZth
1 note
·
View note
Text
Wscube Tech-Training program
Introduction :-wscube is a company in jodhpur that located in address First Floor, Laxmi Tower, Bhaskar Circle, Ratanada, Jodhpur, Rajasthan 342001.wscube tech one of leading web design and web development company in jodhpur ,india. wscube provide many services/ training for 100% job placement and live project.
About us:-:WsCube Tech was established in the year 2010 with an aim to become the fastest emerging Offshore Outsourcing Company which will aid its clientele to grow high with rapid pace. wscube give positive responsible result for the last five year.
Wscube work on same factor
1>We listen to you
2>we plan your work
3>we design creatively
4>we execute publish and maintain
Trainings:-
1>PHP Training:-For us our students is our top priority.this highly interactive course introduces you to fundamental programming concepts in PHP,one of the most popular languages in the world.It begins with a simple hello world program and proceeds on to cover common concepts such as conditional statements ,loop statements and logic in php.
Session 1:Introduction To PHP
Basic Knowledge of websites
Introduction of Dynamic Website
Introduction to PHP
Why and scope of php
XAMPP and WAMP Installation
Session 2:PHP programming Basi
syntax of php
Embedding PHP in HTML
Embedding HTML in PHP
Introduction to PHP variable
Understanding Data Types
using operators
Writing Statements and Comments
Using Conditional statements
If(), else if() and else if condition Statement
Switch() Statements
Using the while() Loop
Using the for() Loop
Session 3: PHP Functions
PHP Functions
Creating an Array
Modifying Array Elements
Processing Arrays with Loops
Grouping Form Selections with Arrays
Using Array Functions
Using Predefined PHP Functions
Creating User-Defined Functions
Session 4: PHP Advanced Concepts
Reading and Writing Files
Reading Data from a File
Managing Sessions and Using Session Variables
Creating a Session and Registering Session Variables
Destroying a Session
Storing Data in Cookies
Setting Cookies
Dealing with Dates and Times
Executing External Programs
Session 5: Introduction to Database - MySQL Databas
Understanding a Relational Database
Introduction to MySQL Database
Understanding Tables, Records and Fields
Understanding Primary and Foreign Keys
Understanding SQL and SQL Queries
Understanding Database Normalization
Dealing with Dates and Times
Executing External Programs
Session 6: Working with MySQL Database & Tables
Creating MySQL Databases
Creating Tables
Selecting the Most Appropriate Data Type
Adding Field Modifiers and Keys
Selecting a Table Type
Understanding Database Normalization
Altering Table and Field Names
Altering Field Properties
Backing Up and Restoring Databases and Tables
Dropping Databases and Table Viewing Database, Table, and Field Information
Session 7: SQL and Performing Queries
Inserting Records
Editing and Deleting Records
Performing Queries
Retrieving Specific Columns
Filtering Records with a WHERE Clause
Using Operators
Sorting Records and Eliminating Duplicates
Limiting Results
Using Built-In Functions
Grouping Records
Joining Tables
Using Table and Column Aliases
Session 8: Working with PHP & MySQL
Managing Database Connections
Processing Result Sets
Queries Which Return Data
Queries That Alter Data
Handling Errors
Session 9: Java Script
Introduction to Javascript
Variables, operators, loops
Using Objects, Events
Common javascript functions
Javascript Validations
Session 10: Live PHP Project
Project Discussion
Requirements analysis of Project
Project code Execution
Project Testing
=>Html & Css Training:-
HTML,or Hypertext markup language,is a code that's used to write and structure every page on the internet .CSS(cascading style sheets),is an accompanying code that describes how to display HTML.both codes are hugely important in today's internet-focused world.
Session 1: Introduction to a Web Page
What is HTML?
Setting Up the Dreamweaver to Create XHTML
Creating Your First HTML page
Formatting and Adding Tags & Previewing in a Browser
Choosing an Editor
Project Management
Session 2: Working with Images
Image Formats
Introducing the IMG Tag
Inserting & Aligning Images on a Web Page
Detailing with Alt, Width & Height Attributes
Session 3: Designing with Tables
Creating Tables on a Web Page
Altering Tables and Spanning Rows & Columns
Placing Images & Graphics into Tables
Aligning Text & Graphics in Tables
Adding a Background Color
Building Pages over Tracer Images
Tweaking Layouts to Create Perfect Pages
Session 4: Creating Online Forms
Setting Up an Online Form
Adding Radio Buttons & List Menus
Creating Text Fields & Areas
Setting Properties for Form Submission
Session 5: Creating HTML Documents
Understanding Tags, Elements & Attributes
Defining the Basic Structure with HTML, HEAD & BODY
Using Paragraph Tag to assign a Title
Setting Fonts for a Web Page
Creating Unordered & Ordered and Definition Lists
Detailing Tags with Attributes
Using Heading Tags
Adding Bold & Italics
Understanding How a Browser Reads HTML
Session 6: Anchors and Hyperlink
Creating Hyperlinks to Outside Webs
Creating Hyperlinks Between Documents
Creating a link for Email Addresses
Creating a link for a Specific Part of a Webpage
Creating a link for a image
Session 7: Creating Layouts
Adding a Side Content Div to Your Layout
Applying Absolute Positioning
Applying Relative Positioning
Using the Float & Clear Properties
Understanding Overflow
Creating Auto-Centering Content
Using Fixed Positioning
Session 8: Introduction to CSS
What is CSS?
Internal Style Sheets, Selectors, Properties & Values
Building & Applying Class Selectors
Creating Comments in Your Code
Understanding Class and ID
Using Div Tags & IDs to Format Layout
Understanding the Cascade & Avoiding Conflicts
Session 9: Creative artwork and CSS
Using images in CSS
Applying texture
Graduated fills
Round corners
Transparency and semi-transparency
Stretchy boxes
Creative typography
Session 10: Building layout with CSS
A centered container
2 column layout
3 column layout
The box model
The Div Tag
Child Divs
Width & Height
Margin
Padding
Borders
Floating & Clearing Content
Using Floats in Layouts
Tips for Creating & Applying Styles
Session 11: CSS based navigation
Mark up structures for navigation
Styling links with pseudo classes
Building a horizontal navigation bar
Building a vertical navigation bar
Transparency and semi-transparency
CSS drop down navigation systems
Session 12: Common CSS problems
Browser support issues
Float clearing issues
Validating your CSS
Common validation errors
Session 13: Some basic CSS properties
Block vs inline elements
Divs and spans
Border properties
Width, height and max, min
The auto property
Inlining Styles
Arranging Layers Using the Z Index
Session 14: Layout principles with CSS
Document flow
Absolute positioning
Relative positioning
Static positioning
Floating elements
Session 15: Formatting Text
Why Text Formatting is Important
Choosing Fonts and Font Size
Browser-Safe Fonts
Applying Styles to Text
Setting Line Height
Letter Spacing (Kerning)
Other Font Properties
Tips for Improving Text Legibility
Session 16: Creating a CSS styled form
Form markup
Associating labels with inputs
Grouping form elements together
Form based selectors
Changing properties of form elements
Formatting text in forms
Formatting inputs
Formatting form areas
Changing the appearance of buttons
Laying out forms
Session 17: Styling a data table
Basic table markup
Adding row and column headers
Simplifying table structure
Styling row and column headings
Adding borders
Formatting text in tables
Laying out and positioning tables
=>Wordpress Training:-
Our course in wordpress has been designed from a beginners perspective to provide a step by step guide from ground up to going live with your wordpress website.is not only covers the conceptual framework of a wordpress based system but also covers the practical aspects of building a modern website or a blog.
Session 1: WordPress Hosting and installation options
CMS Introduction
Setting up Web Hosting
Introduction to PHP
Registering a Domain Name
Downloading and Installing WordPress on your Web Space
Session 2: WordPress Templates
Adding a pre-existing site template to WordPress
Creating and adding your own site template to WordPress
Note - this is an overview of templates - for in-depth coverage we offer an Advanced WordPress Course
Session 3: Configuring WordPress Setup Options
When and How to Upgrade Wordpress
Managing User Roles and Permissions
Managing Spam with Akismet
Session 4: Adding WordPress Plugins
Downloading and Installing plugins
Activating Plugins
Guide to the most useful WordPress plugins
Session 5: Adding Content
Posts vs Pages
Adding Content to Posts & Pages
Using Categories
Using Tags
Managing User Comments
Session 6: Managing Media in WordPress
Uploading Images
Basic and Advanced Image Formatting
Adding Video
Adding Audio
Managing the Media Library
Session 7: Live Wordpress Project
Project Discussion
Requirements analysis of Project
Project code Execution
Project Testing
2>IPHONE TRAINING:-
Learn iphone app development using mac systems,Xcode 4.2,iphone device 4/4S/ipad, ios 5 for high quality incredible results.with us, you can get on your path to success as an app developer and transform from a student into a professional.
Iphone app app development has made online marketing a breeze .with one touch,you can access millions of apps available in the market. The demand for iphones is continually rising to new heights - thanks to its wonderful features. And these features are amplified by adding apps to the online apple store.
The apple store provides third party services the opportunity to produce innovative application to cater to the testes and inclinations of their customers and get them into a live iphone app in market.
Session 1: Introduction to Mac OS X / iPhone IOS Technology overview
Iphone OS architecture
Cocoa touch layer
Iphone OS developer tool
Iphone OS frameworks
Iphone SDK(installation,tools,use)
Session 2: Introduction to Objective – C 2.0 Programming language / Objective C2.0 Runtime Programming
Foundation framework
Objects,class,messaging,properties
Allocating and initializing objects,selectors
Exception handling,threading,remote messaging
Protocols ,categories and extensions
Runtime versions and platforms/interacting with runtime
Dynamic method resolution,Message forwarding,type encodings
Memory management
Session 3: Cocoa Framework fundamentals
About cocoa objects
Design pattern
Communication with objects
Cocoa and application architecture on Mac OS X
Session 4: Iphone development quick start
Overview of native application
Configuring application/running applications
Using iphone simulator/managing devices
Session 5: View and navigation controllers
Adding and implementing the view controller/Nib file
Configuring the view
Table views
Navigation and interface building
AlertViews
Session 6: Advanced Modules
SQLite
User input
Performance enhancement and debugging
Multi touch functions,touch events
Core Data
Map Integration
Social Network Integration (Facebook, Twitter , Mail)
Session 7: Submitting App to App Store
Creating and Downloading Certificates and Provisioning Profiles
Creating .ipa using certificates and provisioning profiles
Uploading App to AppStore
3>Android training:- The training programme and curriculum has designed in such a smart way that the student could familiar with industrial professionalism since the beginning of the training and till the completion of the curriculum.
Session 1: Android Smartphone Introduction
Session 2: ADLC(Android Development Lifecycle)
Session 3: Android Setup and Installation
Session 4: Basic Android Application
Session 5: Android Fundamentals
Android Definition
Android Architecture
Internal working of Android Applications on underlying OS
Session 6: Activity
Activity Lifecycle
Fragments
Loaders
Tasks and Back Stack
Session 7: Android Application Manifest File
Session 8: Intent Filters
Session 9: User Interface
View Hierarchy
Layout Managers
Buttons
Text Fields
Checkboxes
Radio Buttons
Toggle Buttons
Spinners
Pickers
Adapters
ListView
GridView
Gallery
Tabs
Dialogs
Notifications
Menu
WebView
Styles and Themes
Search
Drag and Drop
Custom Components
Session 10: Android Design
Session 11: Handling Configuration
Session 12: Resource Types
Session 13: Android Animation
View Animation
Tween Animation
Frame animation
Property Animation
Session 14: Persistent data Storage
Shared Preference
Preference Screen
Sqlite Database
Session 15: Managing Long Running Processes
UI Thread
Handlers and Loopers
Causes of ANR issue and its solution
Session 16: Services
Service Lifecycle
Unbound Service
Bound Service
Session 17: Broadcast Receivers
Session 18: Content Providers
Session 19: Web Services
Http Networking
Json Parsing
Xml Parsing
Session 20: Google Maps
Session 21: Android Tools
Session 22: Publishing your App on Google market
4> java training:-We provide best java training in jodhpur, wscube tech one of the best result oriented java training company in jodhpur ,its offers best practically, experimental knowledge by 5+ year experience in real time project.we provide basic and advance level of java training with live project with 100%job placement assistance with top industries.
Session 1 : JAVA INTRODUCTION
WHAT IS JAVA
HISTORY OF JAVA
FEATURES OF JAVA
HELLO JAVA PROGRAM
PROGRAM INTERNAL
JDK
JRE AND JVM INTERNAL DETAILS OF JVM
VARIABLE AND DATA TYPE UNICODE SYSTEM
OPERATORS
JAVA PROGRAMS
Session 2 : JAVA OOPS CONCEPT
ADVANTAGE OF OOPS,OBJECT AND CLASS
METHOD OVERLOADING
CONSTRUCTOR
STATIC KEYWORD
THIS KEYWORD
INHERITANCE METHOD
OVERRIDING
COVARIANT RETURN TYPE
SUPER KEYWORD INSTANCE INITIALIZER BLOCK
FINAL KEYWORD
RUNTIME POLYMORPHISM
DYNAMIC BINDING
INSTANCE OF OPERATOR ABSTRACT CLASS
INTERFACE ABSTRACT VS INTERFACE PACKAGE ACCESS ODIFIERS
ENCAPSULATION
OBJECT CLASS
JAVA ARRAY
Session 3 : JAVA STRING
WHAT IS STRING
IMMUTABLE STRING
STRING COMPARISON
STRING CONCATENATION
SUBSTRING METHODS OF STRING CLASS
STRINGBUFFER CLASS
STRINGBUILDER CLASS
STRING VS STRINGBUFFER
STRINGBUFFER VS BUILDER
CREATING IMMUTABLE CLASS
TOSTRING METHOD STRINGTOKENIZER CLASS
Session 4 : EXCEPTION HANDLING
WHAT IS EXCEPTION
TRY AND CATCH BLOCK
MULTIPLE CATCH BLOCK
NESTED TRY
FINALLY BLOCK
THROW KEYWORD
EXCEPTION PROPAGATION
THROWS KEYWORD
THROW VS THROWS
FINAL VS FINALLY VS FINALIZE
EXCEPTION HANDLING WITH METHOD OVERRIDING
Session 5 : JAVA INNER CLASS
WHAT IS INNER CLASS
MEMBER INNER CLASS
ANONYMOUS INNER CLASS
LOCAL INNER CLASS
STATIC NESTED CLASS
NESTED INTERFACE
Session 6 : JAVA MULTITHREADING
WHAT IS MULTITHREADING
LIFE CYCLE OF A THREAD
CREATING THREAD
THREAD SCHEDULER
SLEEPING A THREAD
START A THREAD TWICE
CALLING RUN() METHOD JOINING A THREAD
NAMING A THREAD
THREAD PRIORITY
DAEMON THREAD
THREAD POOL
THREAD GROUP
SHUTDOWNHOOK PERFORMING MULTIPLE TASK
GARBAGE COLLECTION
RUNTIME CLASS
Session 7 : JAVA SYNCHRONIZATION
SYNCHRONIZATION IN JAVA
SYNCHRONIZED BLOCK
STATIC SYNCHRONIZATION
DEADLOCK IN JAVA
INTER-THREAD COMMUNICATION
INTERRUPTING THREAD
Session 8 : JAVA APPLET
APPLET BASICS
GRAPHICS IN APPLET
DISPLAYING IMAGE IN APPLET
ANIMATION IN APPLET
EVENT HANDLING IN APPLET
JAPPLET CLASS
PAINTING IN APPLET
DIGITAL CLOCK IN APPLET
ANALOG CLOCK IN APPLET
PARAMETER IN APPLET
APPLET COMMUNICATION
JAVA AWT BASICS
EVENT HANDLING
Session 9 : JAVA I/O
INPUT AND OUTPUT
FILE OUTPUT & INPUT
BYTEARRAYOUTPUTSTREAM
SEQUENCEINPUTSTREAM
BUFFERED OUTPUT & INPUT
FILEWRITER & FILEREADER
CHARARRAYWRITER
INPUT BY BUFFEREDREADER
INPUT BY CONSOLE
INPUT BY SCANNER
PRINTSTREAM CLASS
COMPRESS UNCOMPRESS FILE
PIPED INPUT & OUTPUT
Session 10 : JAVA SWING
BASICS OF SWING
JBUTTON CLASS
JRADIOBUTTON CLASS
JTEXTAREA CLASS
JCOMBOBOX CLASS
JTABLE CLASS
JCOLORCHOOSER CLASS
JPROGRESSBAR CLASS
JSLIDER CLASS
DIGITAL WATCH GRAPHICS IN SWING
DISPLAYING IMAGE
EDIT MENU FOR NOTEPAD
OPEN DIALOG BOX
JAVA LAYOUTMANAGER
Session 11 : JAVA JDBC and Online XML Data Parsing
Database Management System
Database Manipulations
Sqlite Database integration in Java Project
XML Parsing Online
Session 12 : Java Projects
NOTEPAD
PUZZLE GAME
PIC PUZZLE GAME
TIC TAC TOE GAME
Crystal App
Age Puzzle
BMI Calculator
KBC Game Tourist App
Meditation App
Contact App
Weather App
POI App
Currency Convertor
5>Python training:Wscube tech provides python training in jodhpur .we train the students from basic level to advanced concepts with a real-time environment.we are the best python training company in jodhpur.
Session 1 : Introduction
About Python
Installation Process
Python 2 vs Python 3
Basic program run
Compiler
IDLE User Interface
Other IDLE for Python
Session 2: Types and Operations
Python Object Types
Session 3 : Numeric Type
Numeric Basic Type
Numbers in action
Other Numeric Types
Session 4 : String Fundamentals
Unicode
String in Action
String Basic
String Methods
String Formatting Expressions
String Formatting Methods Calls
Session 5 : List and Dictionaries
List
Dictionaries
Session 6 : Tuples, Files, and Everything Else
Tuples
Files
Session 7 : Introduction Python Statements
Python’s Statements
Session 8 : Assignments, Expression, and Prints
Assignments Statements
Expression Statements
Print Operation
Session 9 : If Tests and Syntax Rules
If-statements
Python Syntax Revisited
Truth Values and Boolean Tests
The If/else ternary Expression
The if/else Ternary Expression
Session 10 : while and for loops
while Loops
break, continue, pass , and the Loop else
for Loops
Loop Coding Techniques
Session 11 : Function and Generators
Function Basic
Scopes
Arguments
Modules
Package
Session 12 : Classes and OOP
OOP: The Big Picture
Class Coding Basics
Session 13 : File Handling
Open file in python
Close file in python
Write file in python
Renaming and deleting file in python
Python file object method
Package
Session 14 : Function Basic
Why use Function?
Coding function
A First Example: Definitions and Calls
A Second Example : Intersecting Sequences
Session 15 :Linear List Manipulation
Understand data structures
Learn Searching Techniques in a list
Learn Sorting a list
Understand a stack and a queue
Perform Insertion and Deletion operations on stacks and queues
6>wordpress training:We will start with wordpress building blocks and installation and follow it with the theory of content management.we will then learn the major building blocks of the wordpress admin panel.the next unit will teach you about posts,pages and forums.and in last we done about themes which makes your site looks professional and give it the design you like.
Session 1: WordPress Hosting and installation options
CMS Introduction
Setting up Web Hosting
Introduction to PHP
Registering a Domain Name
Downloading and Installing WordPress on your Web Space
Session 2: WordPress Templates
Adding a pre-existing site template to WordPress
Creating and adding your own site template to WordPress
Note - this is an overview of templates - for in-depth coverage we offer an Advanced WordPress Course
Session 3: Configuring WordPress Setup Opt
When and How to Upgrade Wordpress
Managing User Roles and Permissions
Managing Spam with Akismet
Session 4: Adding WordPress Plugins
Downloading and Installing plugins
Activating Plugins
Guide to the most useful WordPress plugins
Session 5: Adding Content
Posts vs Pages
Adding Content to Posts & Pages
Using Categories
Using Tags
Managing User Comments
Session 6: Managing Media in WordPress
Uploading Images
Basic and Advanced Image Formatting
Adding Video
Adding Audio
Managing the Media Library
Session 7: Live Wordpress Project
Project Discussion
Requirements analysis of Project
Project code Execution
Project Testing
7>laravel training:Wscube tech jodhpur provide popular and most important MVC frameworks ,laravel using laravel training you can create web application with speed and easily.and before start training we done the basic introduction on framework.
Session 1 : Introduction
Overview of laravel
Download and Install laravel
Application Structure of laravel
Session 2 : Laravel Basics
Basic Routing in laravel
Basic Response in laravel
Understanding Views in laravel
Static Website in laravel
Session 3 : Laravel Functions
Defining A Layout
Extending A Layout
Components & Slots
Displaying Data
Session 4: Control Structures
If Statements
Loops
The Loop Variable
Comments
Session 5: Laravel Advanced Concepts
Intallation Packages
Routing
Middelware
Controllers
Forms Creating by laravel
Managing Sessions And Using Session Variables
Creating A Session And Registering Session Variables
Destroying A Session
Laravel - Working With Database
Session 6: SQL And Performing Queries
Inserting Records
Editing And Deleting Records
Retrieving Specific Columns
Filtering Records With A WHERE Clause
Sorting Records And Eliminating Duplicates
Limiting Results
Ajax
Sending Emails
Social Media Login
Session 7: Live Project
8>industrial automation engineer training :Automation is all about reducing human intervention .sometime it is employed to reduce human drudgery (e.g. crane,domestic,washing machine),sometime for better quality & production (e.g. CNC machine).some products can not be manufactured without automated machine (e.g. toothbrush,plastic,bucket,plastic pipe etc).
To replace a human being ,an automation system also needs to have a brain,hands,legs,muscles,eyes,nose.
Session 1:Introduction to Automaton
What is Automation
Components of Automation
Typical Structure of Automation
History & Need of Industrial Automation
Hardware & Software of Automation
Leading Manufacturers
Areas of Application
Role of Automation Engineer
Career & Scope in Industrial Automation
Session 2: PLC (Programmable Logic Controller)
Digital Electronics Basics
What is Control?
How does Information Flow
What is Logic?
Which Logic Control System and Why?
What is PLC (Programmable Logic Controller)
History of PLC
Types of PLC
Basic PLC Parts
Optional Interfaces
Architecture of PLC
Application and Advantage of PLCs
Introduction of PLC Networking (RS-232,485,422 & DH 485, Ethernet etc)
Sourcing and Sinking concept
Introduction of Various Field Devices
Wiring Different Field Devices to PLC
Programming Language of a PLC
PLC memory Organization
Data, Memory & Addressing
Data files in PLC Programming
PLC Scan Cycle
Description of a Logic Gates
Communication between PLC & PC
Monitoring Programs & Uploading, Downloading
Introduction of Instructions
Introduction to Ladder Programming
Session 3: Programming Of PLC (Ladder Logics)
How to use Gates, Relay Logic in ladder logic
Addressing of Inputs/Outputs & Memory bit
Math’s Instruction ADD, SUB, MUL, DIV etc.
Logical Gates AND, ANI, OR, ORI, EXOR, NOT etc.
MOV, SET, RST, CMP, INC, DEC, MVM, BSR, BSL etc.
How to Programming using Timer & Counter
SQC, SQO, SQL, etc.
Session 4:Advance Instruction in PLC
Jump and label instruction.
SBR and JSR instruction.
What is Forcing of I/O
Monitoring & Modifying Data table values
Programming on real time applications
How to troubleshoot & Fault detection in PLC
Interfacing many type sensors with PLC
Interfacing with RLC for switching
PLC & Excel communication
Session 5: SCADA
Introduction to SCADA Software
How to Create new SCADA Project
Industrial SCADA Designing
What is Tag & how to use
Dynamic Process Mimic
Real Time & Historical Trend
Various type of related properties
Summary & Historical Alarms
How to create Alarms & Event
Security and Recipe Management
How to use properties like Sizing, Blinking, Filling, Analog Entry, Movement of Objects, Visibility etc.
What is DDE Communication
Scripts like Window, Key, Condition & Application
Developing Various SCADA Applications
SCADA – Excel Communication
PLC – SCADA Communication
Session 6:Electrical and Panel Design
Concept of earthling, grounding & neutral
Study and use of Digital Multimeter
Concept of voltmeter & Ammeter connection
Definition of panel
Different Types of panel
Relay & contactor wiring
SMPS(Switch mode power supply)
Different type protection for panel
Application MCB/MCCB
Different Instruments used in panel (Pushbuttons, indicators, hooters etc)
Different type of symbols using in panel
Maintains & Troubleshooting of panel
Study of live distribution panel
Session 7: Industrial Instrumentation
Definition of Instrumentation.
Different Types of instruments
What is Sensors & Types
What is Transducers & Types
Transmitter & Receivers circuits
Analog I/O & Digital I/O
Different type sensors wiring with PLC
Industrial Application of Instrumentation
Flow Sensors & meters
Different type of Valves wiring
Proximate / IR Sensors
Inductive /Metal detector
Session 8: Study of Project Documentation
Review of Piping & Instrumentation Diagram (P&ID)
Preparation of I/O list
Preparation of Bill Of Material (BOM)
Design the Functional Design Specification (FDS)
Preparing Operational Manuals (O & M)
Preparing SAT form
Preparing Panel Layout, Panel wiring and Module wiring in AutoCAD.
9> digital marketing training: The digital marketing training course designed to help you master the essential disciplines in digital marketing ,including search engine optimization,social media,pay-per-click,conversion optimization,web analytics,content marketing,email and mobile marketing.
Session 1: Introduction To Digital Marketing
What Is Marketing?
How We Do Marketing?
What Is Digital Marketing?
Benefits Of Digital Marketing
Comparing Digital And Traditional Marketing
Defining Marketing Goals
Session 2: Search Engine Optimization (SEO)
Introduction To Search Engine
What Is SEO?
Keyword Analysis
On-Page Optimization
Off-Page Optimization
Search Engine Algorithms
SEO Reporting
Session 3: Search Engine Marketing (SEM
Introduction To Paid Ad
Display Advertising
Google Shopping Ads
Remarketing In AdWords
Session 4: Social Media Optimization (SMO)
Role Of Social Media In Digital Marketing
Which Social Media Platform To Use?
Social Media Platforms – Facebook, Twitter, LinkedIn, Instagram, YouTube And Google+
Audit Tools Of Social Media
Use Of Social Media Management Tools
Session 5: Social Media Marketing (SMM)
What Are Social Media Ads?
Difference Between Social Media And Search Engine Ads.
Displaying Ads- Facebook, Twitter, LinkedIn, Instagram & YouTube
Effective Ads To Lead Generation
Session 6: Web Analytics
What Is Analysis?
Pre-Analysis Report
Content Analysis
Site Audit Tools
Site Analysis Tools
Social Media Analysis Tool
Session 7: Email Marketing
What Is Email Marketing
Why EMail Marketing Is Necessary?G
How Email Works?
Popular Email Marketing Software
Email Marketing Goals
Best Ways To Target Audience And Generate Leads
Introduction To Mail Chimp
Email Marketing Strategy
Improving ROI With A/B Testing
Session 8: Online Reputation Management (ORM)
What Is ORM?
Why ORM Is Important?
Understanding ORM Scenario
Different Ways To Create Positive Brand Image Online
Understanding Tools For Monitoring Online Reputation
Step By Step Guide To Overcome Negative Online Reputation
Session 9: Lead Generation
What Is Lead Generation
Lead Generations Steps
Best Way To Generate Lead
How To Generate Leads From – LinkedIn, Facebook, Twitter, Direct Mail, Blogs, Videos, Infographics, Webinar, Strong Branding, Media
Tips To Convert Leads To Business
Measure And Optimize
Session 10: Lead Generation
What Is Affiliate Marketing
How Affiliate Marketing Works
How To Find Affiliate Niche
Different Ways To Do Affiliate Marketing
Top Affiliate Marketing Networks
Methods To Generate And Convert Leads
Session 11: Content Marketing
What Is Content Marketing?
Introduction To Content Marketing
Objective Of Content Marketing
Content Marketing Strategy
How To Write Great Compelling Content
Keyword Research For Content Ideas
Unique Ways To Write Magnetic Headlines
Tools To Help Content Creation
How To Market The Same Content On Different Platforms
Session 12: Mobile App Optimization
App store optimization (App name, App description, logo, screenshots)
Searched position of app
Reviews and downloads
Organic promotions of app
Paid Promotion
Session 13: Google AdSense
What is Google AdSense
How it Work?
AdSense Guidelines
AdSense setup
AdSense insights
Website ideas for online earning
10> robotics training:The lectures will guide you to write your very own software for robotics and test it on a free state of the art cross-platform robot simulator.the first few course cover the very core topics that will be beneficial for building your foundational skills before moving onto more advanced topics.End the journey on a high note with the final project and loss of confidence in skills you earned throughout the journey.
Session 1: Robotics Introduction
Introduction
Definition
History
Robotics Terminology
Laws of Robotics
Why is Robotics needed
Robot control loop
Robotics Technology
Types of Robots
Advantage & Disadvantage
ples of Robot
Session 2: Basic Electronics for Robotics
LED
Resistor
Ohm’s Law
Capacitor
Transistor
Bread board
DC Motor
DPDT switch
Rainbow Wire & Power Switch
Integrated Circuit
IC holder & Static Precaution
555 Timer & LM 385
L293D
LM 7805 & Soldering kit
Soldering kit Description
Soldering Tips
Soldering Steps
Projects
Session 3: Electronic Projects
a. Manual Robotic Car
Basic LED glow Circuit
LED glow using push button
Fading an LED using potentiometer
Darkness activation system using LDR
Light Activation system using LDR
Transistor as a NOT gate
Transistor as a touch switch
LED blinking using 555 timer
Designing IR sensor on Breadboard
Designing Motor Driver on Breadboard
Designing IR sensor on Zero PCB
Designing Motor Driver on Zero PCB
Line Follower Robot
Session 4: Sensors
Introduction to sensors
Infrared & PIR Senso
TSOP & LDR
Ultrasonic & Motion Sensors
Session 5: Arduino
a. What is Arduino
Different Arduino Boards
Arduino Shield
Introduction to Roboduino
Giving Power to your board
Arduino Software
Installing FTDI Drivers
Board & Port Selection
Port Identification – Windows
Your First Program
Steps to Remember
Session 6: Getting Practical
Robot Assembly
Connecting Wires & Motor cable
Battery Jack & USB cable
DC motor & Battery arrangement
Session 7: Programming
Basic Structure of program
Syntax for programming
Declaring Input & Output
Digital Read & Write
Sending High & Low Signals
Introducing Time Delay
Session 8: Arduino Projects
Introduction to basic shield
Multiple LED blinking
LED blinking using push button
Motor Control Using Push Button
Motor Control Using IR Sensor
Line Follower Robot
LED control using cell phone
Cell Phone Controlled Robot
Display text on LCD Display
Seven Segment Display
Session 8: Arduino Projects
Introduction to basic shield
Multiple LED blinking
LED blinking using push button
Motor Control Using Push Button
Motor Control Using IR Sensor
Line Follower Robot
LED control using cell phone
Cell Phone Controlled Robot
Display text on LCD Display
Seven Segment Display
11>SEO Training:SEO Search Engine Optimization helps search engines like google to find your site rank it better that million other sites uploaded on the web in answer to a query.with several permutation and combination related to the crawlers analyzing your site and ever changing terms and conditions of search engine in ranking a site,this program teaches you the tool and techniques to direct & increase the traffic of your website from search engines.
Session 1: Search engine Basics
Search Engines
Search Engines V/s Directories
Major Search Engines and Directories
How Search Engine Works
What is Search Engine Optimization
Page rank
Website Architecture
Website Designing Basics
Domain
Hosting
Session 2: Keyword Research and Analysis
Keyword Research
Competitor analysis
Finding appropriate Keywords
Target Segmentation
Session 3: On Page Optimization
Title
Description
Keywords
Anchor Texts
Header / Footer
Headings
Creating Robots File
Creating Sitemaps
Content Optimization
URL Renaming
HTML and CSS Validation
Canonical error Implementation
Keyword Density
Google Webmaster Tools
Google analytics and Tracking
Search Engine Submission
White Hat SEO
Black Hat SEO
Grey Hat SEO
Session 4: Off Page Optimization
Directory
Blogs
Bookmarking
Articles
Video Submissions
Press Releases
Classifieds
Forums
Link Building
DMOZ Listing
Google Maps
Favicons
QnA
Guest Postings
Session 5: Latest Seo Techniques & Tools
Uploading and website management
Seo Tools
Social media and Link Building
Panda Update
Penguin Update
EMD Update
Seo after panda , Penguin and EMD Update
Contact detail :-
a> WsCube Tech
First Floor, Laxmi Tower, Bhaskar Circle, Ratanada
Jodhpur - Rajasthan - India (342001)
b>Branch Office
303, WZ-10, Bal Udhyan Road,
Uttam Nagar, New-Delhi-59
c>Contact Details
Mobile : +91-92696-98122 , 85610-89567
E-mail : [email protected]
1 note
·
View note
Text
How to get started with MongoDB: Beginner’s guide
MongoDB is a document-oriented NoSQL database used for high volume data storage. Instead of using tables and rows as in the traditional relational databases, it makes use of collections and documents. Documents consist of key-value pairs which are the basic unit of data in MongoDB. Also, collections contain sets of documents and functions which is the equivalent of relational database tables. MongoDB is a database that came into light around the mid-2000s.
Features
Each database contains collections which in turn contain documents. However, each document can be different with a varying number of fields. The size and content of each document can be different from each other.
Equally, the document structure is more in line with how developers construct their classes and objects in their respective programming languages. Developers will often say that their classes are not rows and columns but have a clear structure with key-value pairs.
The rows (or documents as called in MongoDB) don’t need to have a schema defined beforehand. Instead, the fields can create on the fly.
The data model available within MongoDB allows you to represent hierarchical relationships. To store arrays, and other more complex structures more easily.
Scalability – The MongoDB environments are very scalable. Companies across the world have defined clusters with some of them running 100+ nodes. With millions of documents within the database approximately.
Example
The _id field added by it to uniquely identify the document in the collection.
What you can note is that the Order Data (OrderID, Product, and Quantity ). Which in RDBMS will normally store in a separate table. While in MongoDB it is actually stored as an embedded document in the collection itself. This is one of the key differences in how data modeled in MongoDB.
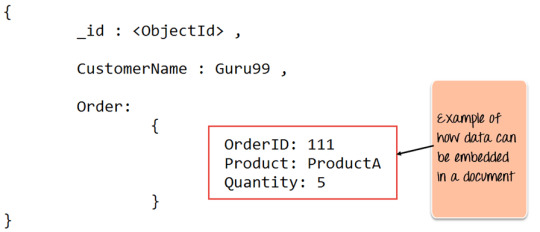
Key Components of MongoDB Architecture

_id – This field required in every MongoDB document. The _id field represents a unique value in it document. It is like the document’s primary key. If you create a new document without an _id field then it will automatically create the field. So for example, if we see the example of the above customer table, Mongo DB will add a 24 digit unique identifier to each document in the collection.
Collection – This is a grouping of MongoDB documents. A collection is the equivalent of a table. Which created in any other RDMS such as Oracle or MS SQL. A collection exists within a single database. But it doesn’t enforce any sort of structure.
Cursor – This is a pointer to the result set of a query. Clients can iterate through a cursor to retrieve results.
Database – This is a container for collections like in RDMS. Wherein it is a container for tables. Also, each database gets its own set of files on the file system. Surprisingly, A MongoDB server can store multiple databases.
Document – A record in a MongoDB collection basically called a document. The document will also consist of field names and values.
Field – A name-value pair in a document. A document has zero or more fields. Fields are analogous to columns in relational databases. The following diagram shows an example of Fields with Key-value pairs. So in the example below CustomerID and 11 is one of the key-value pair’s defined in the document.
JSON – This known as JavaScript Object Notation. It is a human-readable, plain text format for expressing structured data. JSON currently supported in many programming languages.
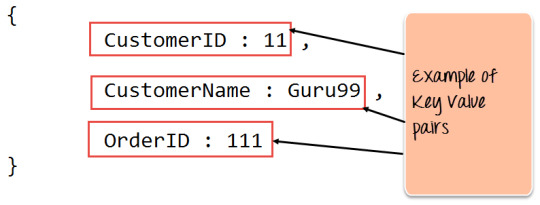
Just a quick note on the key difference between the _id field and a normal collection field. The _id field is used to uniquely identify the documents in a collection and is automatically added by MongoDB when the collection is created.
Why Use MongoDB?
Document-oriented – Since MongoDB is a NoSQL type database, instead of having data in a relational type format, it stores the data in documents. Hence, it makes MongoDB very flexible and adaptable to real business world situations and requirements.
Ad hoc queries – it supports search by field, range queries, and regular expression searches. And these queries can make to return specific fields within documents.
Indexing – Indexes can be created to improve the performance of searches within MongoDB. So, any field in its document can be indexed.
Replication – MongoDB can provide high availability with replica sets. And replica set consists of two or more mongo DB instances. Hence, each replica set member may act in the role of the primary or secondary replica at any time. Whereas the primary replica is the main server that interacts with the client and performs all the read/write operations. While the Secondary replicas maintain a copy of the data of the primary using built-in replication. When a primary replica fails, the replica set automatically switches over to the secondary, and then it becomes the primary server.
Load balancing – However, MongoDB uses the concept of sharding to scale horizontally by splitting data across multiple MongoDB instances. It can run over multiple servers, balancing the load and/or duplicating data to keep the system up and running in case of hardware failure.
Data Modelling in MongoDB
As we have seen from the Introduction section, the data in MongoDB has a flexible schema. Unlike in SQL databases, where you must have a table’s schema declared before inserting data, MongoDB’s collections do not enforce document structure. This sort of flexibility is what makes MongoDB so powerful.
When modeling data in Mongo, keep the following things in mind
What are the needs of the application – Look at the business needs of the application and see what data and the type of data needed for the application. Based on this, ensure that the structure of the document is decided accordingly.
What are data retrieval patterns – If you foresee a heavy query usage then consider the use of indexes in your data model to improve the efficiency of queries.
Are frequent inserts, updates, and removals happening in the database? Reconsider the use of indexes or incorporate sharding if required in your data modeling design to improve the efficiency of your overall MongoDB environment.
Difference between MongoDB & RDBMS
Below are some of the key term differences between MongoDB and RDBMS.
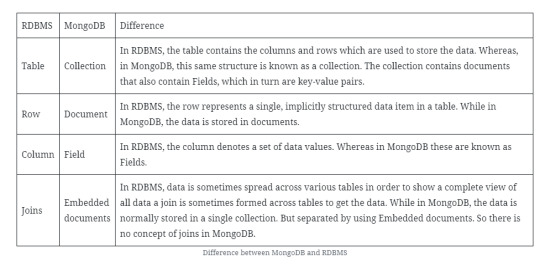
Apart from the terms differences, a few other differences listed below
Relational databases are also known for enforcing data integrity. Further, this is not an explicit requirement in MongoDB.
RDBMS requires that data be normalized first. So that it can prevent orphan records and duplicates Normalizing data then has the requirement of more tables, which will then result in more table joins, thus requiring more keys and indexes. If databases start to grow then performance can start becoming an issue. Also, this is not an explicit requirement in MongoDB. Because MongoDB is flexible and does not need the data to be normalized first.
In the worlds of JavaScript and Node.js, MongoDB has established itself as the go-to database.
#mongodb#database#database management#mysql#mongodb tutorial#rdbms#sql#trending#trends#webdesign#web developers#web development#web developing company#whitelion infosystems
0 notes
Text
0 notes
Photo

Memoization, Svelte loves TypeScript, and V8 8.5
#498 — July 24, 2020
Unsubscribe | Read on the Web
JavaScript Weekly
Several New Features Promoted to Stage 4 at TC39 — If you’re interested in the future of JavaScript, several features have been promoted to stage 4 which, in TC39 parlance, means they are ‘finished’ and ready for inclusion in the formal ECMAScript standard. They include:
Promise.any and AggregateError
Number separator support (e.g. 1_000_000)
Weak references
Improvements to Intl.DateTimeFormat
..and more, naturally 😄
Hemanth HM
Vue 3 Now in Release Candidate Stage — The final Vue 3.0 release isn’t due till sometime next month, but the API and implementation are now considered ‘stabilized’ with no new major features or breaking changes expected. There’s also a beta of the devtools with 3.0 support and a new v3 focused documentation site. Also here's some of what's new in Vue 3.
Evan You
Learn State Machines from the Creator of XState, David Khourshid — By modeling the state in your application with state machines and statecharts, you will spend less time debugging edge cases and more time modeling complex application logic in a visually clear and robust way.
Frontend Masters sponsor
Svelte 💛 TypeScript — Svelte, a popular compile-time JavaScript framework, now supports TypeScript too. Here’s how it works and how the current approach makes a previously difficult task a lot easier.
Orta Therox
V8 Version 8.5 Now in Beta — Coming soon to a Node.js near you (not to mention Chrome 85), the latest branch of the V8 JavaScript engine boasts Promise.any, String.prototype.replaceAll (no regex needed!) and support for logical assignment operators (like ||=).
Zeynep Cankara (Google)
What The Heck Is.. Memoization? — Dan Abramov is back tackling the topic of memoization – when you can optimize a function by caching results that are ‘expensive’ (in terms of time or memory) to calculate numerous times.
Dan Abramov
⚡️ Quick bytes:
There's a new release (0.62) of React Native for Windows which supports Fast Refresh.
The proposal for records and tuples has reached stage 2 at TC39. It'd bring record (#{x:1, y:2}) and tuple (#[1, 2, 3, 4]) data structures to JavaScript.
Other things happened at the recent TC39 meeting with other proposals too!
Do you use MDN? It's celebrating its 15th birthday this week in a variety of ways 🥳
💻 Jobs
Senior Full-Stack Engineer to Join Growing Team (React, Node.js) - London or Remote — Build our mental health platform for psychedelic therapy. Core tech is evidence-based generative music for therapists, care seekers and physical spaces.
Wavepaths
Senior Front-End Systems Architect (Remote, Western Hemisphere) — Got experience architecting and implementing front-end systems? Join us (in this fully remote role) and help us define best-in-class experience managers, site generators, UI and conversation frameworks.
MyPlanet
One Application, Hundreds of Hiring Managers — Use Vettery to connect with hiring managers at startups and Fortune 500 companies. It's free for job-seekers.
Vettery
📚 Tutorials, Opinions and Stories
The Official Redux Essentials Tutorial.. Redux — A redevelopment of the basic Redux introduction that focuses on teaching you how to use the popular state container the right way with best practices. It’s practicality first and then digs into ‘how it works’ later on.
Redux Team
A Gentle Introduction to Webpack — No violence here, just why webpack exists, what problems it solves, and how to use it. Tyler has a good reputation as a teacher in the JavaScript space, so enjoy.
Tyler McGinnis
Eliminating Duplicate Objects from Arrays: Three Approaches
Dr. Axel Rauschmayer
Serverless Rendering with Cloudflare Workers — How to do server-side rendering ‘at the edge’ using Workers Sites, Wrangler, HTMLRewriter, and tools from the broader Workers platform.
Kabir Sikand
A Deep Dive Into V8 — Dive into V8's internal functioning, compilation and garbage collection processes, single-threaded nature, and more.
AppSignal sponsor
▶ New Course: Build JavaScript Applications with Node.js — Microsoft has released a video course covering Node from the very start through to setting up a project, debugging, using VS Code, and building an Express-based API.
Microsoft
An Introduction to Stimulus.js — Released by Basecamp a year or two ago now, Stimulus is a very light library to add behavior to your HTML elements without going full-on with a framework. Commonly used in the Ruby on Rails world, but worth checking out in its own right.
Mike Rogers
Your Blog Doesn’t Need a JavaScript Framework — Perhaps controversial, but, in explaining why he chose Eleventy over Gatsby, Iain argues that developers often overcomplicate sites, adding heavy frameworks where none is needed?
Iain Bean
How to Create a Dynamic Rick and Morty Wiki Web App with Next.js — A good tutorial for getting started with Next.js and deploying to Vercel by building a fun wiki site.
Colby Fayock
A Mental Model to Think in TypeScript — If you’re new to TypeScript and struggling with how to ‘think more in types.’
TK
🔧 Code & Tools
Perfect Arrows: A Minimal Way to Draw 'Perfect' Arrows Between Points and Shapes — Here’s a live demo.
Steve Ruiz
🎸 React Guitar: A Flexible 'Guitar Neck' Component for React — You’d use this to render things like chord positions, say. But, even better, you can ‘play’ it too 😁
React Guitar
Breakpoints and console.log Is the Past, Time Travel Is the Future — 15x faster JavaScript debugging than with breakpoints and console.log.
Wallaby.js sponsor
Handsontable: A Mature Data Grid That Feels Like a Spreadsheet — Somehow it’s been six years since we linked this last, but it’s still being updated and works with Vue, React, and Angular too. The only downside is it’s dual licensed, so it’s only free for evaluation or non-commercial use. GitHub repo.
Handsoncode
⚡️ Quick releases:
Node 14.6.0
Jasmine 3.6.0 — Popular testing framework.
SystemJS 6.4.0 — Dynamic ES module loader.
Commander 6.0.0 — Node command-line interfaces made easy.
ESLint 7.5.0 — The JS code problem finder and fixer.
Alpine 2.5.0 — Compose JavaScript behavior in markup.
🎨 Creative Corner
Over the past few years Elijah Manor has been penning a few frontend developer jokes. Now, he's converted one such joke into a comic strip using the TypeScript-powered Excalidraw web-tool. Take a look:

by via JavaScript Weekly https://ift.tt/30QbDPI
0 notes
Link

A nice list of HTML, CSS and JavaScript How Tos with basic concepts for everyday use. Feel free to comment your own approaches :)
Disabling everything with CSS
CSS
.disabled { filter: grayscale(1); pointer-events: none; }
View on JSFiddle here.
Split an array into chunks without mutability
JS
const array = [1, 2, 3, 4] const size = 3 const new_array = array.reduce((acc, a, i) => { i % size ? acc[parseInt(i / size)].push(a) : acc.push([a]) return acc }, [])
or even shorter:
const new_array = array.reduce((acc, a, i) => i % size ? acc : [...acc, array.slice(i, i + size)], [])
Remember, start using const, if you need to change its value then use let and avoid as much as possible var. View on JSFiddle here.
Saving and loading dates
Save your datetime always in UTC ISO and load it to the user interface using local ISO. Use native widgets to avoid facing date format preferences (middle endian, little endian, etc) HTML
<input type="datetime-local"> <button>Save</button> <button>Load</button>
JS
$button_save.onclick = () => localStorage.setItem('datetime', $input.value && new Date($input.value).toISOString()) $button_load.onclick = () => $input.value = localStorage.getItem('datetime') && toLocalISOString(new Date(localStorage.getItem('datetime'))) .slice(0, -8) function toLocalISOString(d) { const offset = d.getTimezoneOffset() return new Date( d.getFullYear(), d.getMonth(), d.getDate(), d.getHours(), d.getMinutes() - offset, d.getSeconds(), d.getMilliseconds()).toISOString() }
View on JSFiddle here. I recommend using sessionStorage and localStorage. Do not abuse cookies if they are not strictly necessary. If you need more local storage you can use IndexedDB.
Select HTML table columns by clicking on the headers
JS
document.querySelectorAll('th').forEach($th => $th.onclick = event => { document.querySelectorAll(`td:nth-of-type(${event.currentTarget .cellIndex + 1})`) .forEach($td => $td.classList.toggle('selected')) })
Remember, onclick always overwrites the previous function (in case there was any), use addEventListener() for multiple functions. View on JSFiddle here.
Rename when destructuring
We are going to rename time property while sorting our array of objects. JS
let times = [ {name:'dog', time: '10:23'}, {name: 'laundry', time: '09:34'}, {name: 'work', time: '11:00'}] times.sort(({ time: a }, { time: b }) => a < b ? -1 : a > b ? 1 : 0)
Remember, sort() changes the orginal array. View on JSFiddle here.
Autocomplete dropdown
Have you ever used autocomplete dropdowns from jQuery UI or Bootstrap third party options? A complete heavyweight mess. Luckly, we got a couple of years ago an awaited solution: Native HTML5 Autocomplete dropdown with datalist. A lightweight standard supported in all devices. HTML
<input list="series"> <datalist id="series"> <option value="Adventure Time"> <option value="Rick and Morty"> <option value="Game of Thrones"> <option value="Planet Earth 2"> </datalist>
View on JSFiddle here. Save your tooling time and dependency, use as few libraries and frameworks as possible!
Real easy responsiveness with CSS Grid
CSS Grid is the easiest, cleanest and powerful way to deal with responsiveness, a completely new approach baked in the last years and ready to use. CSS Grid changes how you used to layout your documents, instead of divitis (plenty of divs) and JavaScript to change div positions depending on screens (what Bootstrap does nowadays), you can use pure CSS grid layouts with just the meaningful divs and independently of document source order. You don’t need to touch HTML or JavaScript, you don’t need Bootstrap or even complex CSS rules, what you see in your CSS is what you get on your screen. HTML
<div class="grid"> <div class="name">Name</div> <div class="score">Score</div> <div class="skills">Skills</div> <div class="chart">Chart</div> </div>
CSS
.grid { display: grid; grid-template-areas: "name" "score" "skills" "chart"; } @media only screen and (min-width: 500px) { .grid { grid-template-areas: "name skills" "score skills" "chart chart"; } } .name { grid-area: name; } .score { grid-area: score; } .skills { grid-area: skills; } .chart { grid-area: chart; }
View on JSFiddle here. I would recommend you to do these examples. Fall in love with Grid Templates like I did ❤
Move parts of the user interface without loss of interaction
HTML
<ul> <li> <button id="up">Up</button> <button id="down">Down</button> </li> <li>Nothing</li> <li>Nothing</li> </ul>
JS
document.querySelector('#up').onclick = e => { const $li = e.target.parentElement if ($li.previousElementSibling) $li.parentElement.insertBefore($li, $li.previousElementSibling) } document.querySelector('#down').onclick = e => { const $li = e.target.parentElement if ($li.nextElementSibling) $li.parentElement.insertBefore($li.nextElementSibling, $li) }
Remember, target is what triggers the event and currentTarget is what you assigned your listener to. View on JSFiddle here.
HTML input time with 24 hours format
Rely on native HTML widgets without depending on third party libraries. However, sometimes there are some limitations, if you have ever dealt with an HTML input time you know what it is about, try to set up maximum or minimum hours/minutes and/or change from 12 hours format to 24 hours and viceversa. By now, a good solution to avoid headaches is to use 2 inputs of the type number and a pinch of JS. HTML
<div> <input type="number" min="0" max="23" placeholder="23">: <input type="number" min="0" max="59" placeholder="00"> </div>
CSS
div { background-color: white; display: inline-flex; border: 1px solid #ccc; color: #555; } input { border: none; color: #555; text-align: center; width: 60px; }
JS
document.querySelectorAll('input[type=number]') .forEach(e => e.oninput = () => { if (e.value.length >= 2) e.value = e.value.slice(0, 2) if (e.value.length == 1) e.value = '0' + e.value if (!e.value) e.value = '00' })
Remember, == double comparation for equality and === triple one for equality and type. If you want to check whether a variable is undefined or not, simple use triple compartion a === undefined and the same for null. If you want to check whether it exists or not use typeof a != 'undefined'. View on JSFiddle here.
Loop n times without mutable variables
JS
[...Array(10).keys()] .reduce((sum, e) => sum + `<li>${e}</li>`, '')
also like this:
[...Array(10)] .reduce((sum, _, i) => sum + `<li>${i}</li>`, '')
View on JSFiddle here.
Horizontal and vertical center
Forget about any complicated way, just use Flexbox and set up horizontal center and vertical center in the container. CSS
body { position: absolute; top: 0; right: 0; bottom: 0; left: 0; display: flex; justify-content: center; align-items: center; } div { background-color: #555; width: 100px; height: 100px; }
View on JSFiddle here.
Asynchronous fetch
Using fetch() with asyncronous functions. JS
async function async_fetch(url) { let response = await fetch(url) return await response.json() } async_fetch(‘https://httpbin.org/ip') .then(data => console.log(data)) .catch(error => console.log('Fetch error: ' + error))
View on JSFiddle here. Note, as you have noticed I don’t write the ; semicolon, that’s perfectly fine, in JavaScript the ; is not mandatory, it doesn’t matter if you write it or not, the JS engine is going to check it and insert it if needed, just be careful with new lines that start with ( parentesis and avoid return with the value in a diferent line.
Footer with right and left buttons
HTML
<footer> <div> <button>Button A</button> <button>Button B</Button> </div> <div> <button>Button C</button> <button>Button D</button> </div> </footer>
CSS
footer { display: flex; justify-content: space-between; position: fixed; bottom: 0; left: 0; right: 0; }
View on JSFiddle here.
Scroll into view
I have created n boxes (divs) with random colors to select one of them randomly and make it visible on the viewport. Every time you rerun the code you will see in your screen the selected box regardless of its position. JS
document.querySelector(`div:nth-child(${random})`).scrollIntoView()
View on JSFiddle here.
Flattening arrays of objects
JS
array = alphas.map(a => a.gammas.map(g => g.betas) ).join()
If you want to see other different approaches using forEach with concat and with push check this link (I did also some time consuming test using jsPerf). View on JSFiddle here. Remember, in case you want to flat arrays of arrays you can do it easily with flat().
[1, 2, [3, 4, [5, 6]]].flat(Infinity)
Nesting arrays of objects
Returns an array of n elements filled with content: JS
let get_array = (n, content) => Array(n).fill(content)
Returns an object with a name property that has a content value:
let get_object = (name, content) => Object.defineProperty({}, name, {value: content})
3 levels of arrays with objects (nested)
a = get_array(3, get_object('b', get_array(6, get_object('c', get_array(3, {}) )) ))
View on JSFiddle here.
Array without duplicate values
JS
const array = [1, 2, 3, 3, 3, 2, 1]
The Set strategy:
[...new Set(array)]
The filter strategy (easier to figure out but slower):
array.filter((elem, index) => index == array.indexOf(elem))
View on JSFiddle here. Remember, Array.from(iterableObj) = [...iterableObj]
HTML input with units
HTML
<span><input type="number" min="0" value="50">€</span>
CSS
span { background: white; border: 1px solid #e8e8e8; } input { background: inherit; outline: none; border: none; padding: 0 5px; }
View on JSFiddle here.
Responsive background loop video
HTML
<video autoplay loop poster="https://website/video.jpg"> <source src="http://website/video.webm"> </video>
CSS
video.landscape { width: 100vw; height: auto; } video { width: auto; height: 100vh; }
Remember, you can add as many sources as you want to support different video formats. View on JSFiddle here.
How to print specific HTML content
If you want to print a specific HTML content, for example everything inside a div tag or a tag element with a particular identifier, you can use window.print() in a new window with just the content you want to. It’s easy but tricky, we would like an accessible print method for any HTML element but there aren’t. Don’t forget to add/link some CSS in your new window otherwise you will get the default style from your browser. JS, HTML, CSS
function print(content) { let win = window.open() win.document.write(` <html><head> <title>Report</title> <style> div { display: inline-flex; width: 200px; height: 200px; justify-content: center; align-items: center; background-color: #e9a9c7; color: #39464e; } </style> </head><body>` ) win.document.write(content) win.document.write('</body></html>') win.print() win.close() }
View on JSFiddle here. Note, the write method is synchronous, however sometimes window tries to print before write has finished, it happens only in some browsers ¬¬, therefore trying to avoid this we have added a setTimeout(). Yeah, no quite elegant but among all the different ways, it is the shortest that works across all updated browsers so far.
View, hide, type and generate password
Love to make things as simple as possible xD A hint just inside the input, then a button to show the password and finally another button to generate random passwords. HTML
<input id="password" type="password" placeholder="type password..."> <button id="view-password"></button> <button id="generate-password">↻</button>
View or hide password: JS
$view_password.addEventListener('click', e => { e.currentTarget.classList.toggle('view') if (e.currentTarget.className.includes('view')) $password.setAttribute('type', 'text') else $password.setAttribute('type', 'password') })
Set a random password and make sure it’s shown:
$generate_password.addEventListener('click', () => { $view_password.classList.add('view') $password.setAttribute('type', 'text') $password.value = Math.random().toString(36).slice(-8) })
View on JSFiddle here. Note, I personally name selector’s const starting with a $.
Infinite previous and next selection
Select each element in a selection loop. If you go forward as soon as you finish the list of elements you will start selecting from the beginning and the same if you go in opposite direction. HTML
<button id="previous">Previous</button> <button id="next">Next</button> <ul> <li></li> <li class="selected"></li> <li></li> <li></li> <li></li> </ul>
JS
document.querySelector('#next').addEventListener('click', () => { const $selected = document.querySelector('.selected') const $next_element = $selected.nextElementSibling if (!$next_element) $next_element = $selected.parentElement.firstElementChild $selected.classList.remove('selected') $next_element.classList.add('selected') })
Remember, use nextElementSibling and previousElementSibling (DOM elements) instead of nextSibling and previousSibling (DOM objects). A DOM Object can be anything: comments, insolated text, line breaks, etc. In our example nextSibling would have worked if we had set all our HTML elements together without anything between then:
<ul><li></li><li></li></ul>
View on JSFiddle here.
Responsive square
I have seen many weird ways to create responsive squares, that’s why I would like to share an easy one. Go to the JSFiddle link below and play resizing the result window. CSS
div { width: 60vw; height: 60vw; margin: 20vh auto; background-color: #774C60; }
View on JSFiddle here.
Circle area defined by mouse click
We are going to define the area of a circle depending on where we click within a box area. We can handle this using JavaScript events, a little bit of basic maths and CSS. Width and height are igual, it doesn’t matter which we will set for our maths: JS
const width = e.currentTarget.clientWidth
Absolute position of the mouse cursor from the circle center:
const x = Math.abs(e.clientX — offset.left — width / 2) const y = Math.abs(e.clientY — offset.top — width / 2)
The maximum will tell us the percent of the circle area:
percent = Math.round(2 * Math.max(x, y) * 100 / width) $circle.style.width = percent + '%' $circle.style.height = percent + '%'
Text Overwriting
Well, maybe you are thinking that you can just turn on your Insert key from your keyboard but what If you don’t have it or if you want to always have an overwriting mode (independently) while typing in some specific inputs and textareas. You can do it easily. JS
$input.addEventListener('keypress', function(e) { const cursor_pos = e.currentTarget.selectionStart if (!e.charCode) return $input.value = $input.value.slice(0, cursor_pos) + $input.value.slice(cursor_pos + 1) e.currentTarget.selectionStart = e.currentTarget.selectionEnd = cursor_pos })
View on JSFiddle here.
Counter with a reset using closures
Set up a basic counter with a closure and some external accessible options. JS
const add = (function() { let offset = 0 return function(option) { switch (option) { case 0: offset = 0; break; case 1: offset++; break; case 2: offset — ; break; default: throw ‘Not a valid option’; } console.log(offset) } })()
Remembler, a closure just let you keep recorded and protected your variables. View on JSFiddle here.
Infinite scroll
Have you ever seen those automatic "Load More" while you scroll down? Did you see them on Tumblr for images, Gmail for messages or Facebook? Cool, isn’t it? The infinite scroll is an alternative for pagination and it’s everywhere. It optimizes the user experience loading data as the user required it (indirectly). You get faster loading process for pages, web, apps and it just loads what you need instead of the whole bunch. You don’t need to add extra interactions, buttons or widgets because it comes with the normal reading behaviour that you are used to: scroll down with the mouse or with the finger in a touchable screen. JS
const $ol = document.querySelector('ol') function load_more() { let html = '' for (var i = 0; i < 5; i++) html += '<li></li>' $ol.innerHTML += html } $ol.addEventListener('scroll', function() { if ($ol.scrollHeight — $ol.scrollTop == $ol.clientHeight) load_more() })
View on JSFiddle here. Just notice in the example above that we could make it more efficient creating nodes and using appendChild().
Material icons
HTML
<link href="https://fonts.googleapis.com/icon?family=Material+Icons" rel="stylesheet"> <i class="material-icons">face</i>
View on JSFiddle here.
Basic CSS transition using box-shadow
Our CSS will change if the mouse is over the element with an ease-in-out transition effect (slow start and end). We are filling up the element with an inner shadow (inset) CSS
i { transition: all 0.5s ease-in-out; box-shadow: 0 0 0 75px #E94F37 inset; } i:hover { box-shadow: 0 0 0 4px #E94F37 inset; color:#E94F37; }
View on JSFiddle here.
Export HTML table to CSV file
Imagine you have an HTML table and you want to download it as a CSV table. HTML
<table> <tr><th>Name</th><th>Age</th><th>Country</th></tr> <tr><td>Geronimo</td><td>26</td><td>France</td></tr> <tr><td>Natalia</td><td>19</td><td>Spain</td></tr> <tr><td>Silvia</td><td>32</td><td>Russia</td></tr> </table>
First of all, you need to transform from HTML to CSV: JS
let csv = [] let rows = document.querySelectorAll('table tr') for (var i = 0; i < rows.length; i++) { let row = [], cols = rows[i].querySelectorAll('td, th') for (var j = 0; j < cols.length; j++) row.push(cols[j].innerText) csv.push(row.join(',')) } download_csv(csv.join('\n'), filename)
After that, you can download it using Blob and a link:
let csvFile = new Blob([csv], {type: 'text/csv'}) let downloadLink = document.createElement('a') downloadLink.download = filename downloadLink.href = window.URL.createObjectURL(csvFile) downloadLink.style.display = 'none' document.body.appendChild(downloadLink) downloadLink.click()
View on JSFiddle here.
Keyboard events
Use event.code to get a human readable way of knowing which keys are pressed. Use event.key if you want to distinguish between capital letter or not, and avoid browser shortcuts, i.e: Ctrl + P (print) JS
document.onkeydown = event => { switch (event.code) { case ‘ArrowDown’: $div.style.top = `${parseInt($div.style.top || 0) + step}px` break case ‘KeyR’: if (event.altKey) $div.style.top = 0 break } }
View on JSFiddle here.
Short selectors like jQuery
Using JavaScript is some kind of annoying when you have to select DOM elements, in those cases we could miss jQuery because vanilla JavaScript is simply too long. JS
// Select one element (first one) document.querySelector('#peter') document.querySelector('.staff') document.querySelector('.staff').querySelector('.age') // Select all elements document.querySelectorAll('.staff')
We don’t like to repeat things when we are coding, if you define the next code at the beginning of your JavaScript you will be avaliable to do it similar even better than jQuery.
function $(selector) { return document.querySelector(selector) } function $$(selector) { return document.querySelectorAll(selector) } Element.prototype.$ = function(selector) { return this.querySelector(selector) } Element.prototype.$$ = function(selector) { return this.querySelectorAll(selector) }
Now you can write our example shorter:
// Select one element $('#peter') $('.staff') $('.staff').$('.age') // Select all elements $$('.staff')
It’s easy to keep in mind because $ behaves like jQuery with CSS selectors and $$ does the same but it allows you to select multiple elements. The first one return the element and the second one a list of elements. Just one more thing, you cannot use jQuery with this code because jQuery use $ too, if you need it you have to change the $ in our code for another thing, ie: qS. Remember, in JavaScript we have something better than classes: prototype. It doesn’t matter if you use class, under the hood is using prototype.
Which is the different between property and attribute?
A property is in the DOM; an attribute is in the HTML that is parsed into the DOM. HTML
<body onload="foo()">
JS
document.body.onload = foo
Avoid switch statement when you don’t need logic
Arrays are faster, in the next example if you want to now which is the nineth month you can just code months[9]. JS
const months = ['January', 'February', 'March', 'April', 'May', 'June', 'July', 'August', 'September', 'October', 'November', 'December']
0 notes
Link
JavaScript is one of the most popular programming languages in the world. I believe it's a great language to be your first programming language ever. We mainly use JavaScript to create websites web applications server-side applications using Node.js but JavaScript is not limited to these things, and it can also be used to create mobile applications using tools like React Native create programs for microcontrollers and the internet of things create smartwatch applications It can basically do anything. It's so popular that everything new that shows up is going to have some kind of JavaScript integration at some point. JavaScript is a programming language that is: high level: it provides abstractions that allow you to ignore the details of the machine where it's running on. It manages memory automatically with a garbage collector, so you can focus on the code instead of managing memory like other languages like C would need, and provides many constructs which allow you to deal with highly powerful variables and objects. dynamic: opposed to static programming languages, a dynamic language executes at runtime many of the things that a static language does at compile time. This has pros and cons, and it gives us powerful features like dynamic typing, late binding, reflection, functional programming, object runtime alteration, closures and much more. Don't worry if those things are unknown to you - you'll know all of those at the end of the course. dynamically typed: a variable does not enforce a type. You can reassign any type to a variable, for example, assigning an integer to a variable that holds a string. loosely typed: as opposed to strong typing, loosely (or weakly) typed languages do not enforce the type of an object, allowing more flexibility but denying us type safety and type checking (something that TypeScript - which builds on top of JavaScript - provides) interpreted: it's commonly known as an interpreted language, which means that it does not need a compilation stage before a program can run, as opposed to C, Java or Go for example. In practice, browsers do compile JavaScript before executing it, for performance reasons, but this is transparent to you: there is no additional step involved. multi-paradigm: the language does not enforce any particular programming paradigm, unlike Java for example, which forces the use of object-oriented programming, or C that forces imperative programming. You can write JavaScript using an object-oriented paradigm, using prototypes and the new (as of ES6) classes syntax. You can write JavaScript in a functional programming style, with its first-class functions, or even in an imperative style (C-like). In case you're wondering, JavaScript has nothing to do with Java, it's a poor name choice but we have to live with it. Update: You can now get a PDF and ePub version of this JavaScript Beginner's Handbook.A little bit of history Created 20 years ago, JavaScript has gone a very long way since its humble beginnings. It was the first scripting language that was supported natively by web browsers, and thanks to this it gained a competitive advantage over any other language and today it's still the only scripting language that we can use to build Web Applications. Other languages exist, but all must compile to JavaScript - or more recently to WebAssembly, but this is another story. In the beginnings, JavaScript was not nearly powerful as it is today, and it was mainly used for fancy animations and the marvel known at the time as Dynamic HTML. With the growing needs that the web platform demanded (and continues to demand), JavaScript had the responsibility to grow as well, to accommodate the needs of one of the most widely used ecosystems of the world. JavaScript is now widely used also outside of the browser. The rise of Node.js in the last few years unlocked backend development, once the domain of Java, Ruby, Python, PHP and more traditional server-side languages. JavaScript is now also the language powering databases and many more applications, and it's even possible to develop embedded applications, mobile apps, TV sets apps and much more. What started as a tiny language inside the browser is now the most popular language in the world. Just JavaScript Sometimes it's hard to separate JavaScript from the features of the environment it is used in. For example, the console.log() line you can find in many code examples is not JavaScript. Instead, it's part of the vast library of APIs provided to us in the browser. In the same way, on the server it can be sometimes hard to separate the JavaScript language features from the APIs provided by Node.js. Is a particular feature provided by React or Vue? Or is it "plain JavaScript", or "vanilla JavaScript" as often called? In this book I talk about JavaScript, the language. Without complicating your learning process with things that are outside of it, and provided by external ecosystems. A brief intro to the syntax of JavaScript In this little introduction I want to tell you about 5 concepts: white space case sensitivity literals identifiers White space JavaScript does not consider white space meaningful. Spaces and line breaks can be added in any fashion you might like, even though this is in theory. In practice, you will most likely keep a well defined style and adhere to what people commonly use, and enforce this using a linter or a style tool such as Prettier. For example, I like to always 2 characters to indent. Case sensitive JavaScript is case sensitive. A variable named something is different from Something. The same goes for any identifier. Literals We define as literal a value that is written in the source code, for example, a number, a string, a boolean or also more advanced constructs, like Object Literals or Array Literals: 5 'Test' true ['a', 'b'] {color: 'red', shape: 'Rectangle'} Identifiers An identifier is a sequence of characters that can be used to identify a variable, a function, an object. It can start with a letter, the dollar sign $ or an underscore _, and it can contain digits. Using Unicode, a letter can be any allowed char, for example, an emoji 😄. Test test TEST _test Test1 $test The dollar sign is commonly used to reference DOM elements. Some names are reserved for JavaScript internal use, and we can't use them as identifiers. Comments are one of the most important part of any program. In any programming language. They are important because they let us annotate the code and add important information that otherwise would not be available to other people (or ourselves) reading the code. In JavaScript, we can write a comment on a single line using //. Everything after // is not considered as code by the JavaScript interpreter. Like this: // a comment true //another comment Another type of comment is a multi-line comment. It starts with /* and ends with */. Everything in between is not considered as code: /* some kind of comment */ Semicolons Every line in a JavaScript program is optionally terminated using semicolons. I said optionally, because the JavaScript interpreter is smart enough to introduce semicolons for you. In most cases, you can omit semicolons altogether from your programs, without even thinking about it. This fact is very controversial. Some developers will always use semicolons, some others will never use semicolons, and you'll always find code that uses semicolons and code that does not. My personal preference is to avoid semicolons, so my examples in the book will not include them. Values A hello string is a value. A number like 12 is a value. hello and 12 are values. string and number are the types of those values. The type is the kind of value, its category. We have many different types in JavaScript, and we'll talk about them in detail later on. Each type has its own characteristics. When we need to have a reference to a value, we assign it to a variable. The variable can have a name, and the value is what's stored in a variable, so we can later access that value through the variable name. Variables A variable is a value assigned to an identifier, so you can reference and use it later in the program. This is because JavaScript is loosely typed, a concept you'll frequently hear about. A variable must be declared before you can use it. We have 2 main ways to declare variables. The first is to use const: const a = 0 The second way is to use let: let a = 0 What's the difference? const defines a constant reference to a value. This means the reference cannot be changed. You cannot reassign a new value to it. Using let you can assign a new value to it. For example, you cannot do this: const a = 0 a = 1 Because you'll get an error: TypeError: Assignment to constant variable.. On the other hand, you can do it using let: let a = 0 a = 1 const does not mean "constant" in the way some other languages like C mean. In particular, it does not mean the value cannot change - it means it cannot be reassigned. If the variable points to an object or an array (we'll see more about objects and arrays later) the content of the object or the array can freely change. Const variables must be initialized at the declaration time: const a = 0 but let values can be initialized later: let a a = 0 You can declare multiple variables at once in the same statement: const a = 1, b = 2 let c = 1, d = 2 But you cannot redeclare the same variable more than one time: let a = 1 let a = 2 or you'd get a "duplicate declaration" error. My advice is to always use const and only use let when you know you'll need to reassign a value to that variable. Why? Because the less power our code has, the better. If we know a value cannot be reassigned, it's one less source for bugs. Now that we saw how to work with const and let, I want to mention var. Until 2015, var was the only way we could declare a variable in JavaScript. Today, a modern codebase will most likely just use const and let. There are some fundamental differences which I detail in this post but if you're just starting out, you might not care about. Just use const and let. Types Variables in JavaScript do not have any type attached. They are untyped. Once you assign a value with some type to a variable, you can later reassign the variable to host a value of any other type, without any issue. In JavaScript we have 2 main kinds of types: primitive types and object types. Primitive types Primitive types are numbers strings booleans symbols And two special types: null and undefined. Object types Any value that's not of a primitive type (a string, a number, a boolean, null or undefined) is an object. Object types have properties and also have methods that can act on those properties. We'll talk more about objects later on. Expressions An expression is a single unit of JavaScript code that the JavaScript engine can evaluate, and return a value. Expressions can vary in complexity. We start from the very simple ones, called primary expressions: 2 0.02 'something' true false this //the current scope undefined i //where i is a variable or a constant Arithmetic expressions are expressions that take a variable and an operator (more on operators soon), and result into a number: 1 / 2 i++ i -= 2 i * 2 String expressions are expressions that result into a string: 'A ' + 'string' Logical expressions make use of logical operators and resolve to a boolean value: a && b a || b !a More advanced expressions involve objects, functions, and arrays, and I'll introduce them later. Operators Operators allow you to get two simple expressions and combine them to form a more complex expression. We can classify operators based on the operands they work with. Some operators work with 1 operand. Most with 2 operands. Just one operator works with 3 operands. In this first introduction to operators, we'll introduce the operators you are most likely familar with: operators with 2 operands. I already introduced one when talking about variables: the assignment operator =. You use = to assign a value to a variable: let b = 2 Let's now introduce another set of binary operators that you already familiar with, from basic math. The addition operator (+) const three = 1 + 2 const four = three + 1 The + operator also serves as string concatenation if you use strings, so pay attention: const three = 1 + 2 three + 1 // 4 'three' + 1 // three1 The subtraction operator (-) const two = 4 - 2 The division operator (/) Returns the quotient of the first operator and the second: const result = 20 / 5 //result === 4 const result = 20 / 7 //result === 2.857142857142857 If you divide by zero, JavaScript does not raise any error but returns the Infinity value (or -Infinity if the value is negative). 1 / 0 //Infinity -1 / 0 //-Infinity The remainder operator (%) The remainder is a very useful calculation in many use cases: const result = 20 % 5 //result === 0 const result = 20 % 7 //result === 6 A reminder by zero is always NaN, a special value that means "Not a Number": 1 % 0 //NaN -1 % 0 //NaN The multiplication operator (*) Multiply two numbers 1 * 2 //2 -1 * 2 //-2 The exponentiation operator (**) Raise the first operand to the power second operand 1 ** 2 //1 2 ** 1 //2 2 ** 2 //4 2 ** 8 //256 8 ** 2 //64 Precedence rules Every complex statement with multiple operators in the same line will introduce precedence problems. Take this example: let a = 1 * 2 + 5 / 2 % 2 The result is 2.5, but why? What operations are executed first, and which need to wait? Some operations have more precedence than the others. The precedence rules are listed in this table: Operator Description * / % multiplication/dividision + - addition/subtraction = assignment Operations on the same level (like + and -) are executed in the order they are found, from left to right. Following these rules, the operation above can be solved in this way: let a = 1 * 2 + 5 / 2 % 2 let a = 2 + 5 / 2 % 2 let a = 2 + 2.5 % 2 let a = 2 + 0.5 let a = 2.5 Comparison operators After assignment and math operators, the third set of operators I want to introduce is conditional operators. You can use the following operators to compare two numbers, or two strings. Comparison operators always returns a boolean, a value that's true or false). Those are disequality comparison operators: < means "less than" <= means "minus than, or equal to" means "greater than" = means "greater than, or equal to" Example: = 1 //true In addition to those, we have 4 equality operators. They accept two values, and return a boolean: === checks for equality !== checks for inequality Note that we also have == and != in JavaScript, but I highly suggest to only use === and !== because they can prevent some subtle problems. Conditionals With the comparison operators in place, we can talk about conditionals. An if statement is used to make the program take a route, or another, depending on the result of an expression evaluation. This is the simplest example, which always executes: if (true) { //do something } on the contrary, this is never executed: if (false) { //do something (? never ?) } The conditional checks the expression you pass to it for true or false value. If you pass a number, that always evaluates to true unless it's 0. If you pass a string, it always evaluates to true unless it's an empty string. Those are general rules of casting types to a boolean. Did you notice the curly braces? That is called a block, and it is used to group a list of different statements. A block can be put wherever you can have a single statement. And if you have a single statement to execute after the conditionals, you can omit the block, and just write the statement: if (true) doSomething() But I always like to use curly braces to be more clear. You can provide a second part to the if statement: else. You attach a statement that is going to be executed if the if condition is false: if (true) { //do something } else { //do something else } Since else accepts a statement, you can nest another if/else statement inside it: if (a === true) { //do something } else if (b === true) { //do something else } else { //fallback } Arrays An array is a collection of elements. Arrays in JavaScript are not a type on their own. Arrays are objects. We can initialize an empty array in these 2 different ways: const a = [] const a = Array() The first is using the array literal syntax. The second uses the Array built-in function. You can pre-fill the array using this syntax: const a = [1, 2, 3] const a = Array.of(1, 2, 3) An array can hold any value, even value of different types: const a = [1, 'Flavio', ['a', 'b']] Since we can add an array into an array, we can create multi-dimensional arrays, which have very useful applications (e.g. a matrix): const matrix = [ [1, 2, 3], [4, 5, 6], [7, 8, 9] ] matrix[0][0] //1 matrix[2][0] //7 You can access any element of the array by referencing its index, which starts from zero: a[0] //1 a[1] //2 a[2] //3 You can initialize a new array with a set of values using this syntax, which first initializes an array of 12 elements, and fills each element with the 0 number: Array(12).fill(0) You can get the number of elements in the array by checking its length property: const a = [1, 2, 3] a.length //3 Note that you can set the length of the array. If you assign a bigger number than the arrays current capacity, nothing happens. If you assign a smaller number, the array is cut at that position: const a = [1, 2, 3] a //[ 1, 2, 3 ] a.length = 2 a //[ 1, 2 ] How to add an item to an array We can add an element at the end of an array using the push() method: a.push(4) We can add an element at the beginning of an array using the unshift() method: a.unshift(0) a.unshift(-2, -1) How to remove an item from an array We can remove an item from the end of an array using the pop() method: a.pop() We can remove an item from the beginning of an array using the shift() method: a.shift() How to join two or more arrays You can join multiple arrays by using concat(): const a = [1, 2] const b = [3, 4] const c = a.concat(b) //[1,2,3,4] a //[1,2] b //[3,4] You can also use the spread operator (...) in this way: const a = [1, 2] const b = [3, 4] const c = [...a, ...b] c //[1,2,3,4] How to find a specific item in the array You can use the find() method of an array: { //return true or false }) Returns the first item that returns true. Returns undefined if the element is not found. A commonly used syntax is: x.id === my_id) The above line will return the first element in the array that has id === my_id. findIndex() works similarly to find(), but returns the index of the first item that returns true, and if not found, it returns undefined: { //return true or false }) Another method is includes(): a.includes(value) Returns true if a contains value. a.includes(value, i) Returns true if a contains value after the position i. Strings A string is a sequence of characters. It can be also defined as a string literal, which is enclosed in quotes or double quotes: 'A string' "Another string" I personally prefer single quotes all the time, and use double quotes only in HTML to define attributes. You assign a string value to a variable like this: const name = 'Flavio' You can determine the length of a string using the length property of it: 'Flavio'.length //6 const name = 'Flavio' name.length //6 This is an empty string: ''. Its length property is 0: ''.length //0 Two strings can be joined using the + operator: "A " + "string" You can use the + operator to interpolate variables: const name = 'Flavio' "My name is " + name //My name is Flavio Another way to define strings is to use template literals, defined inside backticks. They are especially useful to make multiline strings much simpler. With single or double quotes you can't define a multiline string easily: you'd need to use escaping characters. Once a template literal is opened with the backtick, you just press enter to create a new line, with no special characters, and it's rendered as-is: const string = `Hey this string is awesome!` Template literals are also great because they provide an easy way to interpolate variables and expressions into strings. You do so by using the ${...} syntax: const var = 'test' const string = `something ${var}` //something test inside the ${} you can add anything, even expressions: const string = `something ${1 + 2 + 3}` const string2 = `something ${foo() ? 'x' : 'y'}` Loops Loops are one of the main control structures of JavaScript. With a loop we can automate and repeat indefinitely a block of code, for how many times we want it to run. JavaScript provides many way to iterate through loops. I want to focus on 3 ways: while loops for loops for..of loops while The while loop is the simplest looping structure that JavaScript provides us. We add a condition after the while keyword, and we provide a block that is run until the condition evaluates to true. Example: const list = ['a', 'b', 'c'] let i = 0 while (i < list.length) { console.log(list[i]) //value console.log(i) //index i = i + 1 } You can interrupt a while loop using the break keyword, like this: while (true) { if (somethingIsTrue) break } and if you decide that in the middle of a loop you want to skip the current iteration, you can jump to the next iteration using continue: while (true) { if (somethingIsTrue) continue //do something else } Very similar to while, we have do..while loops. It's basically the same as while, except the condition is evaluated after the code block is executed. This means the block is always executed at least once. Example: const list = ['a', 'b', 'c'] let i = 0 do { console.log(list[i]) //value console.log(i) //index i = i + 1 } while (i < list.length) for The second very important looping structure in JavaScript is the for loop. We use the for keyword and we pass a set of 3 instructions: the initialization, the condition, and the increment part. Example: const list = ['a', 'b', 'c'] for (let i = 0; i < list.length; i++) { console.log(list[i]) //value console.log(i) //index } Just like with while loops, you can interrupt a for loop using break and you can fast forward to the next iteration of a for loop using continue. for...of This loop is relatively recent (introduced in 2015) and it's a simplified version of the for loop: const list = ['a', 'b', 'c'] for (const value of list) { console.log(value) //value } Functions In any moderately complex JavaScript program, everything happens inside functions. Functions are a core, essential part of JavaScript. What is a function? A function is a block of code, self contained. Here's a function declaration: function getData() { // do something } A function can be run any times you want by invoking it, like this: getData() A function can have one or more argument: function getData() { //do something } function getData(color) { //do something } function getData(color, age) { //do something } When we can pass an argument, we invoke the function passing parameters: function getData(color, age) { //do something } getData('green', 24) getData('black') Note that in the second invokation I passed the black string parameter as the color argument, but no age. In this case, age inside the function is undefined. We can check if a value is not undefined using this conditional: function getData(color, age) { //do something if (typeof age !== 'undefined') { //... } } typeof is a unary operator that allows us to check the type of a variable. You can also check in this way: function getData(color, age) { //do something if (age) { //... } } although the conditional will also be true if age is null, 0 or an empty string. You can have default values for parameters, in case they are not passed: function getData(color = 'black', age = 25) { //do something } You can pass any value as a parameter: numbers, strings, booleans, arrays, objects, and also functions. A function has a return value. By default a function returns undefined, unless you add a return keyword with a value: function getData() { // do something return 'hi!' } We can assign this return value to a variable when we invoke the function: function getData() { // do something return 'hi!' } let result = getData() result now holds a string with the the hi! value. You can only return one value. To return multiple values, you can return an object, or an array, like this: function getData() { return ['Flavio', 37] } let [name, age] = getData() Functions can be defined inside other functions: {} dosomething() return 'test' } The nested function cannot be called from the outside of the enclosing function. You can return a function from a function, too. Arrow functions Arrow functions are a recent introduction to JavaScript. They are very often used instead of "regular" functions, the one I described in the previous chapter. You'll find both forms used everywhere. Visually, they allows you to write functions with a shorter syntax, from: function getData() { //... } to { //... } But.. notice that we don't have a name here. Arrow functions are anonymous. We must assign them to a variable. We can assign a regular function to a variable, like this: let getData = function getData() { //... } When we do so, we can remove the name from the function: let getData = function() { //... } and invoke the function using the variable name: let getData = function() { //... } getData() That's the same thing we do with arrow functions: { //... } getData() If the function body contains just a single statement, you can omit the parentheses and write all on a single line: console.log('hi!') Parameters are passed in the parentheses: console.log(param1, param2) If you have one (and just one) parameter, you could omit the parentheses completely: console.log(param) Arrow functions allow you to have an implicit return: values are returned without having to use the return keyword. It works when there is a on-line statement in the function body: 'test' getData() //'test' Like with regular functions, we can have default parameters: You can have default values for parameters, in case they are not passed: { //do something } and we can only return one value. Arrow functions can contain other arrow function, or also regular functions. The are very similar, so you might ask why they were introduced? The big difference with regular functions is when they are used as object methods. This is something we'll soon look into. Objects Any value that's not of a primitive type (a string, a number, a boolean, a symbol, null, or undefined) is an object. Here's how we define an object: const car = { } This is the object literal syntax, which is one of the nicest things in JavaScript. You can also use the new Object syntax: const car = new Object() Another syntax is to use Object.create(): const car = Object.create() You can also initialize an object using the new keyword before a function with a capital letter. This function serves as a constructor for that object. In there, we can initialize the arguments we receive as parameters, to setup the initial state of the object: function Car(brand, model) { this.brand = brand this.model = model } We initialize a new object using const myCar = new Car('Ford', 'Fiesta') myCar.brand //'Ford' myCar.model //'Fiesta' Objects are always passed by reference. If you assign a variable the same value of another, if it's a primitive type like a number or a string, they are passed by value: Take this example: let age = 36 let myAge = age myAge = 37 age //36 const car = { color: 'blue' } const anotherCar = car anotherCar.color = 'yellow' car.color //'yellow' Even arrays or functions are, under the hoods, objects, so it's very important to understand how they work. Object Properties Objects have properties, which are composed by a label associated with a value. The value of a property can be of any type, which means that it can be an array, a function, and it can even be an object, as objects can nest other objects. This is the object literal syntax we saw in the previous chapter: const car = { } We can define a color property in this way: const car = { color: 'blue' } here we have a car object with a property named color, with value blue. Labels can be any string, but beware special characters: if I wanted to include a character not valid as a variable name in the property name, I would have had to use quotes around it: const car = { color: 'blue', 'the color': 'blue' } Invalid variable name characters include spaces, hyphens, and other special characters. As you see, when we have multiple properties, we separate each property with a comma. We can retrieve the value of a property using 2 different syntaxes. The first is dot notation: car.color //'blue' The second (which is the only one we can use for properties with invalid names), is to use square brackets: car['the color'] //'blue' If you access an unexisting property, you'll get the undefined value: car.brand //undefined As said, objects can have nested objects as properties: const car = { brand: { name: 'Ford' }, color: 'blue' } In this example, you can access the brand name using car.brand.name or car['brand']['name'] You can set the value of a property when you define the object. But you can always update it later on: const car = { color: 'blue' } car.color = 'yellow' car['color'] = 'red' And you can also add new properties to an object: car.model = 'Fiesta' car.model //'Fiesta' Given the object const car = { color: 'blue', brand: 'Ford' } you can delete a property from this object using delete car.brand Object Methods I talked about functions in a previous chapter. Functions can be assigned to a function property, and in this case they are called methods. In this example, the start property has a function assigned, and we can invoke it by using the dot syntax we used for properties, with the parentheses at the end: const car = { brand: 'Ford', model: 'Fiesta', start: function() { console.log('Started') } } car.start() Inside a method defined using a function() {} syntax we have access to the object instance by referencing this. In the following example, we have access to the brand and model properties values using this.brand and this.model: const car = { brand: 'Ford', model: 'Fiesta', start: function() { console.log(`Started ${this.brand} ${this.model}`) } } car.start() It's important to note this distinction between regular functions and arrow functions: we don't have access to this if we use an arrow function: { console.log(`Started ${this.brand} ${this.model}`) //not going to work } } car.start() This is because arrow functions are not bound to the object. This is the reason why regular functions are often used as object methods. Methods can accept parameters, like regular functions: const car = { brand: 'Ford', model: 'Fiesta', goTo: function(destination) { console.log(`Going to ${destination}`) } } car.goTo('Rome') Classes We talked about objects, which are one of the most interesting parts of JavaScript. In this chapter we'll go up one level, introducing classes. What are classes? They are a way to define a common pattern for multiple objects. Let's take a person object: const person = { name: 'Flavio' } We can create a class named Person (note the capital P, a convention when using classes), that has a name property: class Person { name } Now from this class, we initialize a flavio object like this: const flavio = new Person() flavio is called an instance of the Person class. We can set the value of the name property: flavio.name = 'Flavio' and we can access it using flavio.name like we do for object properties. Classes can hold properties, like name, and methods. Methods are defined in this way: class Person { hello() { return 'Hello, I am Flavio' } } and we can invoke methods on an instance of the class: class Person { hello() { return 'Hello, I am Flavio' } } const flavio = new Person() flavio.hello() There is a special method called called constructor() that we can use to initialize the class properties when we create a new object instance. It works like this: class Person { constructor(name) { this.name = name } hello() { return 'Hello, I am ' + this.name + '.' } } Note how we use this to access the object instance. Now we can instantiate a new object from the class, passing a string, and when we call hello, we'll get a personalized message: const flavio = new Person('flavio') flavio.hello() //'Hello, I am flavio.' When the object is initialized, the constructor method is called, with any parameters passed. Normally methods are defined on the object instance, not on the class. You can define a method as static to allow it to be executed on the class instead: class Person { static genericHello() { return 'Hello' } } Person.genericHello() //Hello This is very useful, at times. Inheritance A class can extend another class, and objects initialized using that class inherit all the methods of both classes. Suppose we have a class Person: class Person { hello() { return 'Hello, I am a Person' } } We can define a new class Programmer that extends Person: class Programmer extends Person { } Now if we instantiate a new object with class Programmer, it has access to the hello() method: const flavio = new Programmer() flavio.hello() //'Hello, I am a Person' Inside a child class, you can reference the parent class calling super(): class Programmer extends Person { hello() { return super.hello() + '. I am also a programmer.' } } const flavio = new Programmer() flavio.hello() The above program prints Hello, I am a Person. I am also a programmer.. Asynchonous Programming and Callbacks Most of the time, JavaScript code is ran synchronously. This means that a line of code is executed, then the next one is executed, and so on. Everything is as you expect, and how it works in most programming languages. However there are times when you cannot just wait for a line of code to execute. You can't just wait 2 seconds for a big file to load, and halt the program completely. You can't just wait for a network resource to be downloaded, before doing something else. JavaScript solves this problem using callbacks. One of the simplest examples of how to use callbacks is timers. Timers are not part of JavaScript, but they are provided by the browser, and Node.js. Let me talk about one of the timers we have: setTimeout(). The setTimeout() function accepts 2 arguments: a function, and a number. The number is the milliseconds that must pass before the function is ran. Example: { // runs after 2 seconds console.log('inside the function') }, 2000) The function containing the console.log('inside the function') line will be executed after 2 seconds. If you add a console.log('before') prior to the function, and console.log('after') after it: { // runs after 2 seconds console.log('inside the function') }, 2000) console.log('after') You will see this happening in your console: before after inside the function The callback function is executed asynchronously. This is a very common pattern when working with the file system, the network, events, or the DOM in the browser. All of the things I mentioned are not "core" JavaScript, so they are not explained in this handbook, but you'll find lots of examples in my other handbooks available at https://flaviocopes.com. Here's how we can implement callbacks in our code. We define a function that accepts a callback parameter, which is a function. When the code is ready to invoke the callback, we invoke it passing the result: { //do things //do things const result = /* .. */ callback(result) } Code using this function would use it like this: { console.log(result) }) Promises Promises are an alternative way to deal with asynchronous code. As we saw in the previous chapter, with callbacks we'd be passing a function to another function call, that would be called when the function has finished processing. Like this: { console.log(result) }) When the doSomething() code ends, it calls the function received as a a parameter: { //do things //do things const result = /* .. */ callback(result) } The main problems with this approach is that the callback is executed asynchronously, so we don't have a way to do something, and then simply go on with our function. All our code must be nested inside the callback, and if we have to do 2-3 callbacks we enter in what is usually defined "callback hell" with many levels of functions indented into other functions: { console.log(result) }) }) }) Promises are one way to deal with this. Instead of doing: { console.log(result) }) We call a promise-based function in this way: { console.log(result) }) We first call the function, then we have a then() method that is called when the function ends. The indentation does not matter, but you'll often use this style for clarity. It's common to detect errors using a catch() method: { console.log(error) }) Now, to be able to use this syntax, the doSomething() function implementation must be a little bit special. It must use the Promises API. Instead of declaring it as a normal function: { } We declare it as a promise object: const doSomething = new Promise() and we pass a function in the Promise constructor: { }) This function receives 2 parameters. The first is a function we call to resolve the promise, the second a function we call to reject the promise. { }) Resolving a promise means complete it successfully (which results in calling the then() method in who uses it). Rejecting a promise means ending it with an error (which results in calling the catch() method in who uses it). Here's how: { //some code const success = /* ... */ if (success) { resolve('ok') } else { reject('this error occurred') } } ) We can pass a parameter to the resolve and reject functions, of any type we want. Async and Await Async functions are a higher level abstraction over promises. An async function returns a promise, like in this example: resolve('some data'), 2000) }) } Any code that want to use this function will use the async keyword right before the function: const data = await getData() and doing so, any data returned by the promise is going to be assigned to the data variable. In our case, the data is the "some data" string. With one particular caveat: whenever we use the await keyword, we must do so inside a function defined as async. Like this: { const data = await getData() console.log(data) } The Async/await duo allows us to have a cleaner code and a simple mental model to work with asynchronous code. As you can see in the example above, our code looks very simple. Compare it to code using promises, or callback functions. And this is a very simple example, the major benefits will arise when the code is much more complex. As an example, here's how you would get a JSON resource using the Fetch API, and parse it, using promises: response.json()) } getFirstUserData() And here is the same functionality provided using await/async: { // get users list const response = await fetch('/users.json') // parse JSON const users = await response.json() // pick first user const user = users[0] // get user data const userResponse = await fetch(`/users/${user.name}`) // parse JSON const userData = await user.json() return userData } getFirstUserData() Variables scope When I introduced variables, I talked about using const, let, and var. Scope is the set of variables that's visible to a part of the program. In JavaScript we have a global scope, block scope and function scope. If a variable is defined outside of a function or block, it's attached to the global object and it has a global scope, which mean it's available in every part of a program. There is a very important difference between var, let and const declarations. A variable defined as var inside a function is only visible inside that function. Similarly to a function arguments: A variable defined as const or let on the other hand is only visible inside the block where it is defined. A block is a set of instructions grouped into a pair of curly braces, like the ones we can find inside an if statement or a for loop. And a function, too. It's important to understand that a block does not define a new scope for var, but it does for let and const. This has very practical implications. Suppose you define a var variable inside an if conditional in a function function getData() { if (true) { var data = 'some data' console.log(data) } } If you call this function, you'll get some data printed to the console. If you try to move console.log(data) after the if, it still works: function getData() { if (true) { var data = 'some data' } console.log(data) } But if you switch var data to let data: function getData() { if (true) { let data = 'some data' } console.log(data) } You'll get an error: ReferenceError: data is not defined. This is because var is function scoped, and there's a special thing happening here, called hoisting. In short, the var declaration is moved to the top of the closest function by JavaScript, before it runs the code. More or less this is what the function looks like to JS, internally: function getData() { var data if (true) { data = 'some data' } console.log(data) } This is why you can also console.log(data) at the top of a function, even before it's declared, and you'll get undefined as a value for that variable: function getData() { console.log(data) if (true) { var data = 'some data' } } but if you switch to let, you'll get an error ReferenceError: data is not defined, because hoisting does not happen to let declarations. const follows the same rules as let: it's block scoped. It can be tricky at first, but once you realize this difference, then you'll see why var is considered a bad practice nowadays compared to let: they do have less moving parts, and their scope is limited to the block, which also makes them very good as loop variables, because they cease to exist after a loop has ended: function doLoop() { for (var i = 0; i < 10; i++) { console.log(i) } console.log(i) } doLoop() When you exit the loop, i will be a valid variable with value 10. If you switch to let, if you try to console.log(i) will result in an error ReferenceError: i is not defined. Conclusion Thanks a lot for reading this book. I hope it will inspire you to know more about JavaScript. For more on JavaScript, check out my blog flaviocopes.com. Note: You can get a PDF and ePub version of this JavaScript Beginner's Handbook
0 notes
Text
How to initialize an ArrayList in Java

ArrayList in Java is the most commonly used data structure for creating a dynamic size array. It extends the Abstract class and implements the Java List interface. The main difference between array and ArrayList is that the array is static(we cannot add or remove elements) while ArrayList is dynamic(we can add, remove or modify elements). In this article, we will see what is ArrayList and how to initialize an ArrayList in Java? You might also be interested in ArrayList vs LinkedList
Java ArrayList Hierarchy

Declaring an ArrayList Class in Java
In order to use ArrayList in Java, we must import java.util.ArrayList. Below is the declaration of an ArrayList public class ArrayList extends AbstractList implements List, RandomAccess, Cloneable,Serializable where E denotes the element or Object type (Eg: Integer, String, etc) The ArrayList class extends the AbstractList class and implements the List interface.
ArrayList Constructors
We can create ArrayList in Java Constructors in the below 3 methods:
Java ArrayList Features
- It is a resizeable dynamic array where we can add, modify or remove elements any time from the list - Maintains a sequential order. - It is easy to access any data from the list based on the index. - Allows duplicate elements in the list
Java ArrayList Methods
In addition to the below methods, ArrayList in Java has access to all methods of the List interface.
Java ArrayList Generic and Non-Generic Declaration
Before JDK 1.5, the Java Collection framework was generic as described below. ArrayList al = new ArrayList(); --> List can hold any type of element After JDK 1.5, it supports non-generic which can be used as below. We can specify the element type within . ArrayList al = new ArrayList(); --> List can contain only String values ArrayList al = new ArrayList(); --> List can contain only Integer value
Java ArrayList Exceptions
ArrayList in Java throws below exceptions: - UnsupportedOperationException - when the operation is not supported - IndexOutofBoundsException - when invalid index is specified (fromIndex toIndex or toIndex>size) - ClassCastException - when the class of the specified element prevents to add it to the list - NullPointerException - when the specified element is null and the list does not allow to add null elements - IllegalArgumentException - when some property of the element prevents to add to the list
Import ArrayList in Java
Before we start using the ArrayList class, we need to import the relevant package in order to use it. For this, we import the below package to use the ArrayList. import java.util.ArrayList;
Declare an ArrayList in Java
We can declare an ArrayList in Java by creating a variable of ArrayList type. We can also specify the type of list as either String or Integer, etc. Below is an example of declaring an ArrayList of String and Integer type. ArrayList colors; ArrayList weight;
Create an ArrayList in Java
Once we declare an ArrayList, we can create it by invoking the constructor to instantiate an object and assign it to the variable. We can use any of the constructors as discussed above. We can also declare and create an ArrayList in a single statement as below. ArrayList colors = new ArrayList(); (OR) ArrayList colors; //declare an ArrayList colors = new ArrayList(); //create an ArrayList
How to initialize an ArrayList in Java?
Once we declare and create an ArrayList, we can initialize it with the required values. There are several methods to initialize an ArrayList as mentioned below. Using add() method One common method to initialize an ArrayList in Java is by using the add() method. ArrayList colors = new ArrayList(); colors.add("Red"); colors.add("Blue"); colors.add("Green"); Using asList() method We can use the asList() method of the Arrays class while creating an ArrayList. This is another method to initialize an ArrayList. ArrayList color = new ArrayList( Arrays.asList("Red","Blue","Green") ); Using List.Of() method The List.of() method is another way to initialize an ArrayList. List colors = new ArrayList( List.of("Red","Blue","Green") ); Using another Collection We can also initialize an ArrayList using the values of another Collection. In the below code, we initialize the data variable with colors ArrayList values. ArrayList colors = new ArrayList(); colors.add("Red"); colors.add("Blue"); colors.add("Green"); ArrayList data = new ArrayList(colors);
Java ArrayList Examples
Creating ArrayList and add elements and collection First, we create an ArrayList in Java of type String and then add elements to the list. Then we add a new element at index 1. Thus, the element which was previously present at index 1 will move sequentially to the right. The index in an array always starts at 0. Next, we create a new list with 2 elements and add the entire collection to list 1 at index 1. import java.util.ArrayList; public class ArrayListDemo { public static void main(String args) { //Create a String ArrayList ArrayList al = new ArrayList(); //Add elements al.add("Java"); al.add("JavaScript"); al.add("PHP"); System.out.println("Element in the list1:"); System.out.println(al); //Add element at index 1 al.add(1, "C"); System.out.println("After adding element at index 1: "); System.out.println(al); //Create list2 ArrayList list = new ArrayList(); list.add("C++"); list.add("Ruby"); System.out.println("Elements in list2:"); System.out.println(list); //Add list2 elements in list1 al.addAll(1, list); System.out.println("Elements in List 1 after adding list2:"); System.out.println(al); } } Output: Element in the list1: After adding element at index 1: Elements in list2: Elements in List 1 after adding list2: Modifying and Removing an element from ArrayList Below is an example program to modify the array list and remove an element from ArrayList in Java. import java.util.ArrayList; public class ArrayListDemo2 { public static void main(String args) { //Create an Integer ArrayList ArrayList numbers = new ArrayList(); numbers.add(4); numbers.add(8); numbers.add(2); System.out.println("Elements in the list are: "); System.out.println(numbers); //Modify element numbers.set(1, 6); System.out.println("After modifying an element at index 1:"); System.out.println(numbers); //Remove an element numbers.remove(2); System.out.println("After removing an element at index 2:"); System.out.println(numbers); } } Output: Elements in the list are: After modifying an element at index 1: After removing an element at index 2: Other useful methods The below example illustrates the usage of contains(), indexOf(), and retainAll() methods which are part of the ArrayList. import java.util.ArrayList; public class ArrayListDemo4 { public static void main(String args) { ArrayList letters = new ArrayList(); letters.add("A"); letters.add("G"); letters.add("R"); System.out.println(letters.contains("U")); int i = letters.indexOf("G"); System.out.println("Index of G is " + i); ArrayList c = new ArrayList(); c.add("F"); c.add("E"); c.add("T"); c.add("P"); letters.addAll(c); System.out.println("Elements in the list after using addAll:"); System.out.println(letters); letters.retainAll(c); System.out.println("Elements in the list after using retainAll:"); System.out.println(letters); } } Output: false Index of G is 1 Elements in the list after using addAll: Elements in the list after using retainAll: Clear an ArrayList in java The below example clearly shows the result of using isEmpty() and clear() methods in ArrayList. Using the clear() method, we can empty the ArrayList by removing all the elements. import java.util.ArrayList; public class ArrayListDemo5 { public static void main(String args) { ArrayList s = new ArrayList(); s.add("India"); s.add("US"); s.add("Germany"); System.out.println("Contents in list:"); System.out.println(s); System.out.println("Result of calling isEmpty(): " + s.isEmpty()); s.clear(); System.out.println("Contents in list after calling clear(): " + s); System.out.println("Result of calling isEmpty() after clear: " + s.isEmpty()); } } Contents in list: Result of calling isEmpty(): false Contents in list after calling clear(): Result of calling isEmpty() after clear: true ensureCapacity() This method ensures that the Java ArrayList can hold a minimum number of elements. This can be used for a dynamically growing array size. import java.util.ArrayList; public class ArrayListDemo6 { public static void main(String args) { ArrayList al = new ArrayList(); al.add("Mango"); al.add("Guava"); al.add("Apple"); al.ensureCapacity(3); System.out.println("Array list can store minimum of 3 elements"); al.add("Orange"); System.out.println(al); } } Output: Array list can store minimum of 3 elements
Print ArrayList in Java - Iterate or navigate through elements
We can iterate through an ArrayList in Java using any one of the below methods: - For loop - For each - Iterator interface - ListIterator interface Get elements using for loop Here, we use for loop to retrieve array elements and print them in output. import java.util.ArrayList; public class ArrayListDemo3 { public static void main(String args) { ArrayList list = new ArrayList(); list.add("Ramesh"); list.add("Banu"); list.add("Priya"); list.add("Karthik"); int size = list.size(); System.out.println("Size of list is : " + size); for(int i=0;i Read the full article
1 note
·
View note
Text
Mongoose 101: An Introduction to the Basics, Subdocuments, and Population
Mongoose is a library that makes MongoDB easier to use. It does two things:
It gives structure to MongoDB Collections
It gives you helpful methods to use
In this article, we'll go through:
The basics of using Mongoose
Mongoose subdocuments
Mongoose population
By the end of the article, you should be able to use Mongoose without problems.
Prerequisites
I assume you have done the following:
You have installed MongoDB on your computer
You know how to set up a local MongoDB connection
You know how to see the data you have in your database
You know what are "collections" in MongoDB
If you don't know any of these, please read "How to set up a local MongoDB connection" before you continue.
I also assume you know how to use MongoDB to create a simple CRUD app. If you don't know how to do this, please read "How to build a CRUD app with Node, Express, and MongoDB" before you continue.
Mongoose Basics
Here, you'll learn to:
Connect to the database
Create a Model
Create a Document
Find a Document
Update a Document
Delete a Document
Connecting to a database
First, you need to download Mongoose.
npm install mongoose --save
You can connect to a database with the connect method. Let's say we want to connect to a database called street-fighters. Here's the code you need:
const mongoose = require('mongoose') const url = 'mongodb://127.0.0.1:27017/street-fighters' mongoose.connect(url, { useNewUrlParser: true })
We want to know whether our connection has succeeded or failed. This helps us with debugging.
To check whether the connection has succeeded, we can use the open event. To check whether the connection failed, we use the error event.
const db = mongoose.connection db.once('open', _ => { console.log('Database connected:', url) }) db.on('error', err => { console.error('connection error:', err) })
Try connecting to the database. You should see a log like this:

Creating a Model
In Mongoose, you need to use models to create, read, update, or delete items from a MongoDB collection.
To create a Model, you need to create a Schema. A Schema lets you define the structure of an entry in the collection. This entry is also called a document.
Here's how you create a schema:
const mongoose = require('mongoose') const Schema = mongoose.Schema const schema = new Schema({ // ... })
You can use 10 different kinds of values in a Schema. Most of the time, you'll use these six:
String
Number
Boolean
Array
Date
ObjectId
Let's put this into practice.
Say we want to create characters for our Street Fighter database.
In Mongoose, it's a normal practice to put each model in its own file. So we will create a Character.js file first. This Character.js file will be placed in the models folder.
project/ |- models/ |- Character.js
In Character.js, we create a characterSchema.
const mongoose = require('mongoose') const Schema = mongoose.Schema const characterSchema = new Schema({ // ... })
Let's say we want to save two things into the database:
Name of the character
Name of their ultimate move
Both can be represented with Strings.
const mongoose = require('mongoose') const Schema = mongoose.Schema const characterSchema = new Schema({ name: String, ultimate: String })
Once we've created characterSchema, we can use mongoose's model method to create the model.
module.exports = mongoose.model('Character', characterSchema)
Creating a document
Let's say you have a file called index.js. This is where we'll perform Mongoose operations for this tutorial.
project/ |- index.js |- models/ |- Character.js
First, you need to load the Character model. You can do this with require.
const Character = require('./models/Character')
Let's say you want to create a character called Ryu. Ryu has an ultimate move called "Shinku Hadoken".
To create Ryu, you use the new, followed by your model. In this case, it's new Character.
const ryu = new Character ({ name: 'Ryu', ultimate: 'Shinku Hadoken' })
new Character creates the character in memory. It has not been saved to the database yet. To save to the database, you can run the save method.
ryu.save(function (error, document) { if (error) console.error(error) console.log(document) })
If you run the code above, you should see this in the console.

Promises and Async/await
Mongoose supports promises. It lets you write nicer code like this:
// This does the same thing as above function saveCharacter (character) { const c = new Character(character) return c.save() } saveCharacter({ name: 'Ryu', ultimate: 'Shinku Hadoken' }) .then(doc => { console.log(doc) }) .catch(error => { console.error(error) })
You can also use the await keyword if you have an asynchronous function.
If the Promise or Async/Await code looks foreign to you, I recommend reading "JavaScript async and await" before continuing with this tutorial.
async function runCode() { const ryu = new Character({ name: 'Ryu', ultimate: 'Shinku Hadoken' }) const doc = await ryu.save() console.log(doc) } runCode() .catch(error => { console.error(error) })
Note: I'll use the async/await format for the rest of the tutorial.
Uniqueness
Mongoose adds a new character to the database each you use new Character and save. If you run the code(s) above three times, you'd expect to see three Ryus in the database.
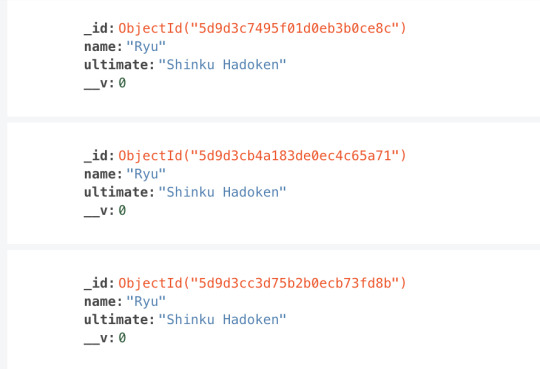
We don't want to have three Ryus in the database. We want to have ONE Ryu only. To do this, we can use the unique option.
const characterSchema = new Schema({ name: { type: String, unique: true }, ultimate: String })
The unique option creates a unique index. It ensures we cannot have two documents with the same value (for name in this case).
For unique to work properly, you need to clear the Characters collection. To clear the Characters collection, you can use this:
await Character.deleteMany({})
Try to add two Ryus into the database now. You'll get an E11000 duplicate key error. You won't be able to save the second Ryu.

Let's add another character into the database before we continue the rest of the tutorial.
const ken = new Character({ name: 'Ken', ultimate: 'Guren Enjinkyaku' }) await ken.save()
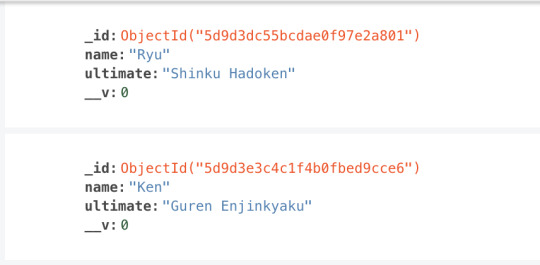
Finding a document
Mongoose gives you two methods to find stuff from MongoDB.
findOne: Gets one document.
find: Gets an array of documents
findOne
findOne returns the first document it finds. You can specify any property to search for. Let's search for Ryu:
const ryu = await Character.findOne({ name: 'Ryu' }) console.log(ryu)

find
find returns an array of documents. If you specify a property to search for, it'll return documents that match your query.
const chars = await Character.find({ name: 'Ryu' }) console.log(chars)
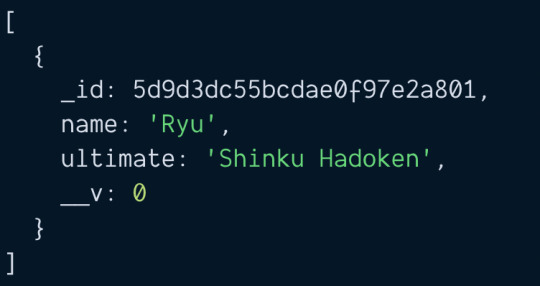
If you did not specify any properties to search for, it'll return an array that contains all documents in the collection.
const chars = await Character.find() console.log(chars)
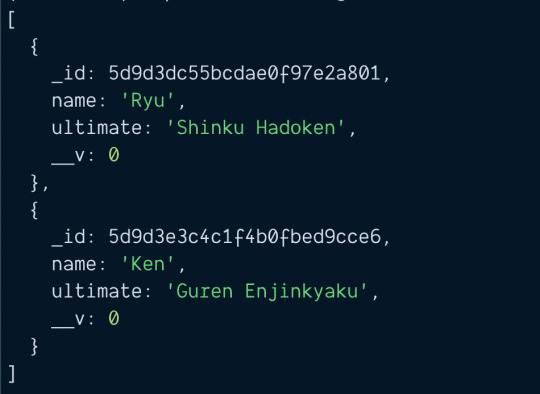
Updating a document
Let's say Ryu has three special moves:
Hadoken
Shoryuken
Tatsumaki Senpukyaku
We want to add these special moves into the database. First, we need to update our CharacterSchema.
const characterSchema = new Schema({ name: { type: String, unique: true }, specials: Array, ultimate: String })
Then, we use one of these two ways to update a character:
Use findOne, then use save
Use findOneAndUpdate
findOne and save
First, we use findOne to get Ryu.
const ryu = await Character.findOne({ name: 'Ryu' }) console.log(ryu)
Then, we update Ryu to include his special moves.
const ryu = await Character.findOne({ name: 'Ryu' }) ryu.specials = [ 'Hadoken', 'Shoryuken', 'Tatsumaki Senpukyaku' ]
After we modified ryu, we run save.
const ryu = await Character.findOne({ name: 'Ryu' }) ryu.specials = [ 'Hadoken', 'Shoryuken', 'Tatsumaki Senpukyaku' ] const doc = await ryu.save() console.log(doc)
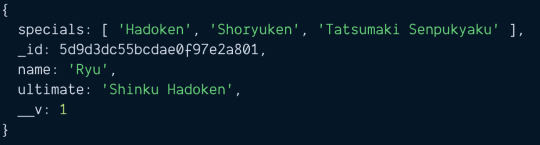
findOneAndUpdate
findOneAndUpdate is the same as MongoDB's findOneAndModify method.
Here, you search for Ryu and pass the fields you want to update at the same time.
// Syntax await findOneAndUpdate(filter, update)
// Usage const doc = await Character.findOneAndUpdate( { name: 'Ryu' }, { specials: [ 'Hadoken', 'Shoryuken', 'Tatsumaki Senpukyaku' ] }) console.log(doc)
Difference between findOne + save vs findOneAndUpdate
Two major differences.
First, the syntax for findOne` + `save is easier to read than findOneAndUpdate.
Second, findOneAndUpdate does not trigger the save middleware.
I'll choose findOne + save over findOneAndUpdate anytime because of these two differences.
Deleting a document
There are two ways to delete a character:
findOne + remove
findOneAndDelete
Using findOne + remove
const ryu = await Character.findOne({ name: 'Ryu' }) const deleted = await ryu.remove()
Using findOneAndDelete
const deleted = await Character.findOneAndDelete({ name: 'Ken' })
Subdocuments
In Mongoose, subdocuments are documents that are nested in other documents. You can spot a subdocument when a schema is nested in another schema.
Note: MongoDB calls subdocuments embedded documents.
const childSchema = new Schema({ name: String }); const parentSchema = new Schema({ // Single subdocument child: childSchema, // Array of subdocuments children: [ childSchema ] });
In practice, you don't have to create a separate childSchema like the example above. Mongoose helps you create nested schemas when you nest an object in another object.
// This code is the same as above const parentSchema = new Schema({ // Single subdocument child: { name: String }, // Array of subdocuments children: [{name: String }] });
In this section, you will learn to:
Create a schema that includes a subdocument
Create a documents that contain subdocuments
Update subdocuments that are arrays
Update a single subdocument
Updating characterSchema
Let's say we want to create a character called Ryu. Ryu has three special moves.
Hadoken
Shinryuken
Tatsumaki Senpukyaku
Ryu also has one ultimate move called:
Shinku Hadoken
We want to save the names of each move. We also want to save the keys required to execute that move.
Here, each move is a subdocument.
const characterSchema = new Schema({ name: { type: String, unique: true }, // Array of subdocuments specials: [{ name: String, keys: String }] // Single subdocument ultimate: { name: String, keys: String } })
You can also use the childSchema syntax if you wish to. It makes the Character schema easier to understand.
const moveSchema = new Schema({ name: String, keys: String }) const characterSchema = new Schema({ name: { type: String, unique: true }, // Array of subdocuments specials: [moveSchema], // Single subdocument ultimate: moveSchema })
Creating documents that contain subdocuments
There are two ways to create documents that contain subdocuments:
Pass a nested object into new Model
Add properties into the created document.
Method 1: Passing the entire object
For this method, we construct a nested object that contains both Ryu's name and his moves.
const ryu = { name: 'Ryu', specials: [{ name: 'Hadoken', keys: '↓ ↘ → P' }, { name: 'Shoryuken', keys: '→ ↓ ↘ → P' }, { name: 'Tatsumaki Senpukyaku', keys: '↓ ↙ ↠K' }], ultimate: { name: 'Shinku Hadoken', keys: '↓ ↘ → ↓ â
Then, we pass this object into new Character.
const char = new Character(ryu) const doc = await char.save() console.log(doc)
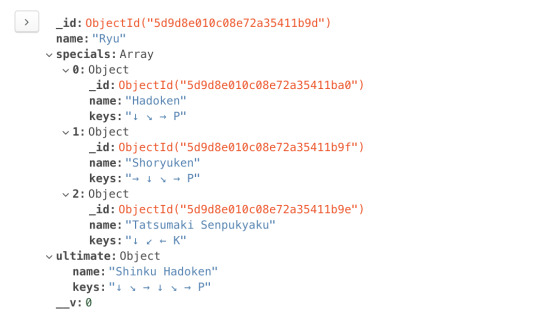
Method 2: Adding subdocuments later
For this method, we create a character with new Character first.
const ryu = new Character({ name: 'Ryu' })
Then, we edit the character to add special moves:
const ryu = new Character({ name: 'Ryu' }) const ryu.specials = [{ name: 'Hadoken', keys: '↓ ↘ → P' }, { name: 'Shoryuken', keys: '→ ↓ ↘ → P' }, { name: 'Tatsumaki Senpukyaku', keys: '↓ ↙ ↠K' }]
Then, we edit the character to add the ultimate move:
const ryu = new Character({ name: 'Ryu' }) // Adds specials const ryu.specials = [{ name: 'Hadoken', keys: '↓ ↘ → P' }, { name: 'Shoryuken', keys: '→ ↓ ↘ → P' }, { name: 'Tatsumaki Senpukyaku', keys: '↓ ↙ ↠K' }] // Adds ultimate ryu.ultimate = { name: 'Shinku Hadoken', keys: '↓ ↘ → ↓ ↘ → P' }
Once we're satisfied with ryu, we run save.
const ryu = new Character({ name: 'Ryu' }) // Adds specials const ryu.specials = [{ name: 'Hadoken', keys: '↓ ↘ → P' }, { name: 'Shoryuken', keys: '→ ↓ ↘ → P' }, { name: 'Tatsumaki Senpukyaku', keys: '↓ ↙ ↠K' }] // Adds ultimate ryu.ultimate = { name: 'Shinku Hadoken', keys: '↓ ↘ → ↓ ↘ → P' } const doc = await ryu.save() console.log(doc)
Updating array subdocuments
The easiest way to update subdocuments is:
Use findOne to find the document
Get the array
Change the array
Run save
For example, let's say we want to add Jodan Sokutou Geri to Ryu's special moves. The keys for Jodan Sokutou Geri are ↓ ↘ → K.
First, we find Ryu with findOne.
const ryu = await Characters.findOne({ name: 'Ryu' })
Mongoose documents behave like regular JavaScript objects. We can get the specials array by writing ryu.specials.
const ryu = await Characters.findOne({ name: 'Ryu' }) const specials = ryu.specials console.log(specials)
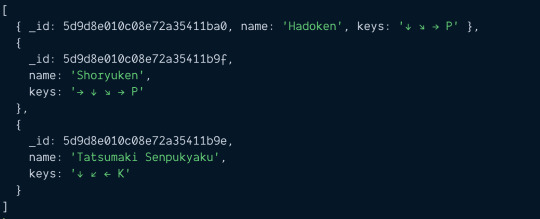
This specials array is a normal JavaScript array.
const ryu = await Characters.findOne({ name: 'Ryu' }) const specials = ryu.specials console.log(Array.isArray(specials)) // true
We can use the push method to add a new item into specials,
const ryu = await Characters.findOne({ name: 'Ryu' }) ryu.specials.push({ name: 'Jodan Sokutou Geri', keys: '↓ ↘ → K' })
After updating specials, we run save to save Ryu to the database.
const ryu = await Characters.findOne({ name: 'Ryu' }) ryu.specials.push({ name: 'Jodan Sokutou Geri', keys: '↓ ↘ → K' }) const updated = await ryu.save() console.log(updated)
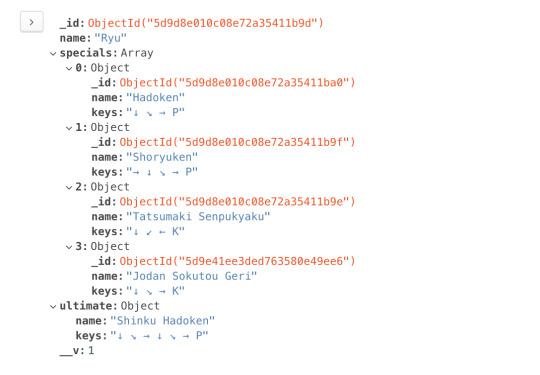
Updating a single subdocument
It's even easier to update single subdocuments. You can edit the document directly like a normal object.
Let's say we want to change Ryu's ultimate name from Shinku Hadoken to Dejin Hadoken. What we do is:
Use findOne to get Ryu.
Change the name in ultimate
Run save
const ryu = await Characters.findOne({ name: 'Ryu' }) ryu.ultimate.name = 'Dejin Hadoken' const updated = await ryu.save() console.log(updated)

Population
MongoDB documents have a size limit of 16MB. This means you can use subdocuments (or embedded documents) if they are small in number.
For example, Street Fighter characters have a limited number of moves. Ryu only has 4 special moves. In this case, it's okay to use embed moves directly into Ryu's character document.

But if you have data that can contain an unlimited number of subdocuments, you need to design your database differently.
One way is to create two separate models and combine them with populate.
Creating the models
Let's say you want to create a blog. And you want to store the blog content with MongoDB. Each blog has a title, content, and comments.
Your first schema might look like this:
const blogPostSchema = new Schema({ title: String, content: String, comments: [{ comment: String }] }) module.exports = mongoose.model('BlogPost', blogPostSchema)
There's a problem with this schema.
A blog post can have an unlimited number of comments. If a blog post explodes in popularity and comments swell up, the document might exceed the 16MB limit imposed by MongoDB.
This means we should not embed comments in blog posts. We should create a separate collection for comments.
const comments = new Schema({ comment: String }) module.exports = mongoose.model('Comment', commentSchema)
In Mongoose, we can link up the two models with Population.
To use Population, we need to:
Set type of a property to Schema.Types.ObjectId
Set ref to the model we want to link too.
Here, we want comments in blogPostSchema to link to the Comment collection. This is the schema we'll use:
const blogPostSchema = new Schema({ title: String, content: String, comments: [{ type: Schema.Types.ObjectId, ref: 'Comment' }] }) module.exports = mongoose.model('BlogPost', blogPostSchema)
Creating a blog post
Let's say you want to create a blog post. To create the blog post, you use new BlogPost.
const blogPost = new BlogPost({ title: 'Weather', content: `How's the weather today?` })
A blog post can have zero comments. We can save this blog post with save.
const doc = await blogPost.save() console.log(doc)

Now let's say we want to create a comment for the blog post. To do this, we create and save the comment.
const comment = new Comment({ comment: `It's damn hot today` }) const savedComment = await comment.save() console.log(savedComment)

Notice the saved comment has an _id attribute. We need to add this _id attribute into the blog post's comments array. This creates the link.
// Saves comment to Database const savedComment = await comment.save() // Adds comment to blog post // Then saves blog post to database const blogPost = await BlogPost.findOne({ title: 'Weather' }) blogPost.comments.push(savedComment._id) const savedPost = await blogPost.save() console.log(savedPost)

Blog post with comments.
Searching blog posts and its comments
If you tried to search for the blog post, you'll see the blog post has an array of comment IDs.
const blogPost = await BlogPost.findOne({ title: 'Weather' }) console.log(blogPost)
There are four ways to get comments.
Mongoose population
Manual way #1
Manual way #2
Manual way #3
Mongoose Population
Mongoose allows you to fetch linked documents with the populate method. What you need to do is call .populate when you execute with findOne.
When you call populate, you need to pass in the key of the property you want to populate. In this case, the key is comments. (Note: Mongoose calls this the key a "path").
const blogPost = await BlogPost.findOne({ title: 'Weather' }) .populate('comments') console.log(blogPost)

Manual way (method 1)
Without Mongoose Populate, you need to find the comments manually. First, you need to get the array of comments.
const blogPost = await BlogPost.findOne({ title: 'Weather' }) .populate('comments') const commentIDs = blogPost.comments
Then, you loop through commentIDs to find each comment. If you go with this method, it's slightly faster to use Promise.all.
const commentPromises = commentIDs.map(_id => { return Comment.findOne({ _id }) }) const comments = await Promise.all(commentPromises) console.log(comments)
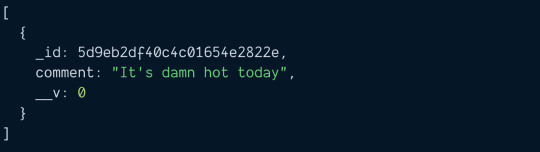
Manual way (method 2)
Mongoose gives you an $in operator. You can use this $in operator to find all comments within an array. This syntax takes effort to get used to.
If I had to do the manual way, I'd prefer Manual #1 over this.
const commentIDs = blogPost.comments const comments = await Comment.find({ '_id': { $in: commentIDs } }) console.log(comments)
Manual way (method 3)
For the third method, we need to change the schema. When we save a comment, we link the comment to the blog post.
// Linking comments to blog post const commentSchema = new Schema({ comment: String blogPost: [{ type: Schema.Types.ObjectId, ref: 'BlogPost' }] }) module.exports = mongoose.model('Comment', commentSchema)
You need to save the comment into the blog post, and the blog post id into the comment.
const blogPost = await BlogPost.findOne({ title: 'Weather' }) // Saves comment const comment = new Comment({ comment: `It's damn hot today`, blogPost: blogPost._id }) const savedComment = comment.save() // Links blog post to comment blogPost.comments.push(savedComment._id) await blogPost.save()
Once you do this, you can search the Comments collection for comments that match your blog post's id.
// Searches for comments const blogPost = await BlogPost.findOne({ title: 'Weather' }) const comments = await Comment.find({ _id: blogPost._id }) console.log(comments)
I'd prefer Manual #3 over Manual #1 and Manual #2.
And Population beats all three manual methods.
Quick Summary
You learned to use Mongoose on three different levels in this article:
Basic Mongoose
Mongoose subdocuments
Mongoose population
That's it!
Thanks for reading. This article was originally posted on my blog. Sign up for my newsletter if you want more articles to help you become a better frontend developer.
via freeCodeCamp.org https://ift.tt/2sSFtpK
0 notes
Text
PHP Trends : 5 Best Framework For Web Development
Web development has reached new heights. An array of scripting languages is available to undertake web development tasks successfully. However, out of all these scripting languages, PHP has proven to be a winner. A big reason behind the success of PHP language is the ability to handle complex web-apps in an easy and secure way.

Table of Contents
Why Choose PHP?
Best PHP Frameworks
Laravel
Phalcon
Codeigniter
CakePHP
Zend Framework
Why Choose PHP?
Probably you would be thinking that PHP is not a thing of the past. But well that’s not true. PHP is still growing in popularity. There are number of Web Development Company are actively focusing on PHP Website Design and Development. They claim that PHP Website Design and Development is easy, reliable, secure and scalable. Thus, making it a great option. Would you believe, even Facebook uses PHP to maintain and create its internal systems?
Best PHP Frameworks
PHP has a number of frameworks to choose from like Laravel, Symfony, CodeIgniter, Yii 2, Phalcon, CakePHP, Zend, Slim, etc. Now how do you go about and select which one is the best? Here are some points checked while picking up the best framework in the initial stages of the project. First comes the development cost, framework popularity, third-party integrations and company experience on the framework are the top few.
1. Laravel

The top on any list would be Laravel. An open source PHP framework capable of offering robust web solutions. You might be wondering, what’s so great about this framework. Here are a few points that make it our top pick in PHP frameworks:
This open-source framework is free of cost.
Blade a template engine, enables you, undertake different tasks like authentication, routing, catching, queuing, etc.
MVC Pattern architecture allows you to pump up the development process and improve the performance.
Artisan a command line tool performs the most tedious and duplicative tasks.
Laravel uses Bcrypt Hashing Algorithm to encrypt passwords and provide better security to you.
Unit Testing helps you to run multiple tests. It also ensures that the new changes won’t affect any other thing in the web application.
Laravel actively supports Postgres, MySQL, SQL Server and SQLite database systems.
2. Phalcon

Phalcon framework has been more recent, like two years old and has gained a lot of popularity. The framework makes use of C & C++ language. It has been designed and developed by full stack developers. There are a lot of benefits of using this framework. Some of the common ones are that this framework can be easily installed and is highly extensible. Other than this technically the framework has some great features. Here are a few points has made Phalcon gain popularity:
Phalcon makes use of an MVC architecture, which makes the development process easy.
Phalcon is also very light on resources.
It has less installation hassles as there are no files added while installation. You can add modules and libraries as per your need.
Phalcon shows the lowest memory along with the highest performance benchmark.
Phalcon’s boasts about being high on performance and low resource overhead.
Phalcon is loaded with exceptional features such as universal autoloader, translation, asset management, security and much more.
3. Codeigniter

Unlike the counterparts, it is one of the oldest and the most powerful frameworks. And also, unlike most of the frameworks, it doesn’t rely on MVC architecture. So, what is so great about the framework:
Codeigniter can be easily installed and needs nominal user configuration.
The framework works great on both dedicated and shared hosting platforms.
It has great speed and works excellent with database activities.
It is great for beginners because it’s well documented.
Controller classes are a must in this framework. Whereas, the models and views are optional.
It works great with standard databases such as MySQL and normal web hosting services well.
4. CakePHP

CakePHP is a popular choice amongst the PHP developers because of its speed, security and reliability. And, moreover a great developers community make it easy for beginners to get the hang of the framework. Here are some features that make CakePHP a great choice:
It has been built on lines of a modern framework, supporting PHP 5.5+.
It offers some of the best features such as XSS, good documentation, CSRF protection, SRF, SQL injection prevention and form validation.
It makes testing easy to check the critical points of your web application.
It uses a great scaffolding system.
The framework uses a Zero configuration process, which allows you not to specify the library location or site URL.
5. Zend Framework

Zend is also known as a glue framework due to its component-based features. It lets you focus only on the functions and components you need while ignoring everything else. Due to this ability and object-oriented nature, you can reuse the written code a number of times. Zend framework is written in PHP 5. Now, you would be thinking about what makes Zend, so special. Here are a few points that make it a great framework:
A large community of developers guides zend framework.
The framework has a big house of tools and libraries, which increases its usability.
Zend is easy to integrate with external libraries.
The framework uses a PHP object-oriented framework with an MVC architecture.
The editor easily supports technologies like CSS, HTML and JavaScript.
0 notes
Text
An Introduction To Stimulus.js
About The Author
Mike is a Ruby on Rails Developer based in the south of the UK, who is currently bootstrapping his own startup. He loves crafting blazing fast applications, … More about Mike …
In this article, Mike Rogers will introduce you to Stimulus, a modest JavaScript framework that compliments your existing HTML. By the end, you’ll have an understanding of the premise of Stimulus and why it’s a useful tool to have in your backpack.
The web moves pretty fast and picking an approach for your frontend that will feel sensible in a year’s time is tricky. My biggest fear as a developer is picking up a project that hasn’t been touched for a while, and finding the documentation for whatever approach they used is either non-existent or is not easily found online.
About a year ago, I started using Stimulus and I felt really happy about the code I was shipping. It’s a ~30kb library which encourages small reusable sprinkles of JavaScript within your app, organized in such a way that it leaves little hints in your accessible HTML as to where to find the JavaScript it’s connected to. It makes understanding how a piece of JavaScript will interact with your page almost like reading pseudocode.
Stimulus was created by the team at Basecamp — they recently released the HEY email service — to help maintain the JavaScript they write for their web applications. Historically, Basecamp has been quite good around maintaining their open-source projects, so I feel quite confident that Stimulus has been tested thoroughly, and will be maintained for the next few years.
Stimulus has allowed me to build applications in a way that feels reusable and approachable. While I don’t think Stimulus will take over the web like React and Vue have, I think it is a worthwhile tool to learn.
Terminology
Like all frameworks, Stimulus has preferred terms for describing certain things. Luckily (and one of the main reasons I’ve taken to liking Stimulus), there are only two you’ll need to know about:
Controller This refers to instances of JavaScript classes which are the building blocks of your application. It’s safe to say that when we talk about Stimulus Controllers, we’re talking about JavaScript classes.
Identifier This is the name we’ll use to reference our controller in our HTML using a data attribute that is common to Stimulus codebases.
Let’s Jump Into Stimulus!
In the following few examples, I’m going to use code you can drop into the browser to get started right away via the library distributed via unpkg.com. Later on, I’ll cover the webpack approach which is highly encouraged as it allows for improved organization of your code and is the approach used in the Stimulus Handbook.
The Boilerplate
See the Pen [The Boilerplate – Stimulus](https://codepen.io/smashingmag/pen/abdjXvP) by Mike Rogers.
See the Pen The Boilerplate – Stimulus by Mike Rogers.
Once you understand the gist of the above snippet, you’ll have the knowledge to be comfortable picking up a project that uses Stimulus.
Pretty awesome, right? Let’s jump into what everything is doing!
application.start
This line tells Stimulus to add the listeners to the page. If you call it just once at the top of your page before you add any Stimulus code, it’ll return an instance of the main Stimulus controller which includes the method register that is used to tell Stimulus about the classes you’d like to connect to it.
Controllers
The data-controller attribute connects our HTML element to an instance of our JavaScript class. In this case, we used the identifier “counter” to hook up an instance of the CounterController JavaScript class to our div element. We told Stimulus about the connection between this identifier and the controller via the application.register method.
Stimulus will continuously monitor your page for when elements with this attribute are added and removed. When a new piece of HTML is added to the page with a data-controller attribute, it’ll initialize a new instance of the relevant controller class, then connect the HTML element. If you remove that element from the page, it’ll call the disconnect method on the controller class.
Actions
Stimulus uses a data attribute data-action to clearly define which function of the controller will be run. Using the syntax event->controller#function anyone reading the HTML will be able to see what it does. This is especially useful as it reduces the risk of unexpected code from other files, making it easier to navigate the codebase. When I first saw the approach Stimulus encourages, it felt almost like reading pseudocode.
In the above example, when the button fires the “click” event, it will be passed onto the addOne function within our “counter” controller.
Targets
Targets are a way to explicitly define which elements are going to be available to your controller. Historically I’ve used a mix of ID, CSS class names and data attributes to achieve this, so having a single “This is the way to do it” which is so explicit makes the code a lot more consistent.
This requires defining your target names within your controller class via the targets function and adding the name to an element via the data-target.
Once you’ve got those two pieces setup, your element will be available in your controller. In this case, I’ve set up the target with the name “output” and it can be accessed by this.outputTarget within the functions in our controller.
Duplicate Targets
See the Pen [Duplicate Targets – Stimulus](https://codepen.io/smashingmag/pen/ExPprPG) by Mike Rogers.
See the Pen Duplicate Targets – Stimulus by Mike Rogers.
If you have multiple targets with the same name, you can access them by using the plural version of the target method, in this case when I call this.outputTargets, it’ll return an array containing both my divs with the attribute data-target="hello.output".
Event Types
You listen for any of the events you’d commonly be able to attach via the JavaScript method addEventListener. So for example, you could listen for when a button is clicked, a form is submitted or an input is changed.
See the Pen [Event types – Stimulus](https://codepen.io/smashingmag/pen/wvMxNGJ) by Mike Rogers.
See the Pen Event types – Stimulus by Mike Rogers.
To listen to window or document events (such as resizing, or the user going offline), you’ll need to append “@window” or “@document” to the event type (e.g. resize@window->console#logEvent will call the function logEvent) on the console controller when the window is resized.
There is a shorthand way to attach common events, where you are able to omit the event type and it has a default action for the element type. However, I strongly discourage using the event shorthand, as it increases the amount of assumptions someone who is less familiar with Stimulus needs to make about your code.
Uses Multiple Controllers In The Same Element
Quite often you may want to break out two pieces of logic into separate classes, but have them appear close to each other within the HTML. Stimulus allows you to connect elements to multiple classes by placing references to both within your HTML.
See the Pen [Multiple Controllers – Stimulus](https://codepen.io/smashingmag/pen/XWXBOjy) by Mike Rogers.
See the Pen Multiple Controllers – Stimulus by Mike Rogers.
In the above example, I’ve set up a basket object which only concerns itself with counting the total number of items in the basket, but also added a child object that shows the amount of bags per item.
Passing Data To Your Object
See the Pen [Passing Data – Stimulus](https://codepen.io/smashingmag/pen/mdVjvOP) by Mike Rogers.
See the Pen Passing Data – Stimulus by Mike Rogers.
Stimulus provides the methods this.data.get and this.data.set within the controller class, this will allow you to change data attributes which are within the same namespace as the identifier. By this I mean if you want to pass data to your stimulus controller from your HTML, just add an attribute like data-[identifier]-a-variable to your HTML element.
When calling this.data.set, it will update the value in your HTML so you can see the value change when you inspect the element using your browser development tools.
Using namespaced data attributes is a really nice way to help make it really clear which data attribute is for what piece of code.
Initialize, Connected, Disconnected
As your application grows, you’ll probably need to hook into ‘lifecycle events’ to set defaults, fetch data, or handle real-time communication. Stimulus has three build-in methods which are called throughout the lifecycle of a Stimulus class.
See the Pen [Initialize, Connected, Disconnected – Stimulus ](https://codepen.io/smashingmag/pen/ZEQjwBj) by Mike Rogers.
See the Pen Initialize, Connected, Disconnected – Stimulus by Mike Rogers.
When Stimulus sees an element with a matching data-controller attribute, it will create a new version of your controller and call the initialize function. This will often run when you first load the page, but will also be run if you were to append new HTML to your page (e.g. via AJAX) containing a reference to your controller. It will not run when you move an element to a new position within your DOM.
After a class has been initialized, Stimulus will connect it to the HTML element and call the connect function. It’ll also call connect if you were to move an element within your DOM. So if you were to take an element, remove it from one element, then append it somewhere else, you’d notice only connect will be called.
The disconnect function will be run when you remove an element from your page, so for example, if you were to replace the body of your HTML, you could tear down any code which might need to be rerun if the element isn’t in the same position. For example, if you had a fancy WYSIWYG editor which adds lots of extra HTML to an element, you could revert it to its original state when disconnect was called.
Inheriting Functionality
On occasion, you may want to share a little common functionality between your Stimulus controllers. The cool thing about Stimulus is that (under the hood) you’re connecting somewhat vanilla JavaScript classes to HTML elements, so sharing functionality should feel familiar.
See the Pen [Inheriting functionality – Stimulus](https://codepen.io/smashingmag/pen/JjGBxbq) by Mike Rogers.
See the Pen Inheriting functionality – Stimulus by Mike Rogers.
In this example, I set up a parent class named ParentController, which is then extended by a child class named ChildController. This let me inherit methods from the ParentController so I didn’t have to duplicate code within my ChildController.
Using It In Production
I demonstrated some fairly stand-alone examples of how to use Stimulus above, which should give you a taste of what you can achieve. I also thought I should touch on how I use it in production and how it has worked out for me.
Webpack
If you’re using Webpack, you’re in for a treat! Stimulus was totally made to be used with Webpack. Their documentation even has a lovely starter kit for Webpack. It’ll allow you to break your controllers into separate files and Stimulus will decide on the correct name to use as an identifier.
You don’t have to use webpack if you want to use Stimulus, but it cleans up the experience a bunch. Personally, Stimulus was the library that helped introduce me to Webpack and really feel the value it offered.
Filename Conventions
I mentioned in the introduction of this article that I enjoyed using Stimulus because it felt organized. This really becomes apparent when you are combining it with Webpack, which enables auto loading and registration of controllers.
Once you’ve set up Stimulus in Webpack, it’ll encourage you to name your files like [identifier]_controller.js, where the identifier is what you’ll pass into your HTMLs data-controller attribute.
As your project grows, you may also want to move your Stimulus controllers into subfolders. In a magical way, Stimulus will convert underscores into dashes, and folder forward slashes into two dashes, which will then become your identifier. So for example, the filename chat/conversation_item_controller.js will have the identifier chat--conversation-item.
Maintaining Less JavaScript
One of my favorite quotes is “The Best Code is No Code At All”, I try to apply this approach to all my projects.
Web browsers are evolving a lot, I’m pretty convinced that most of the things I need to write JavaScript for today will become standardized and baked into the browser within the next 5 years. A good example of this is the details element, when I first started in development it was super common to have to manually code that functionality by hand using jQuery.
As a result of this, if I can write accessible HTML with a sprinkling of JavaScript to achieve my needs, with the mindset of “This does the job today, but in 5 years I want to replace this easily” I’ll be a happy developer. This is much more achievable when you’ve written less code to start with, which Stimulus lends itself to.
HTML First, Then JavaScript
One aspect I really like about the approach Stimulus encourages, is I can focus on sending HTML down the wire to my users, which is then jazzed up a little with JavaScript.
I’ve always been a fan of using the first few milliseconds of a user’s attention getting what I have to share with them — in front of them. Then worrying setting up the interaction layer while the user can start processing what they’re seeing.
Furthermore, if the JavaScript were to fail for whatever reason, the user can still see the content and interact with it without JavaScript. For example, instead of a form being submitted via AJAX, it’ll submit via a traditional form request which reloads the page.
Conclusion
I love building sites that need just small sprinkles of maintainable JavaScript to enhance the user experience, sometimes it’s nice to just build something which feels simpler. Having something lightweight is great, I really love that without too much cognitive load it’s pretty clear how to organize your files, and set up little breadcrumbs that hint about how the JavaScript will run with a piece of HTML.
I’ve really enjoyed working with Stimulus. There isn’t too much to it, so the learning curve is fairly gentle. I feel pretty confident that if I was to pass my code onto someone else they’ll be happy developers. I’d highly recommend giving it a try, even if it’s just out of pure curiosity.
The elephant in the room is how does it stack up compared to the likes of React and Vue, but in my mind, they’re different tools for a different requirement. In my case, I’m often rendering out HTML from my server and I’m adding a little JavaScript to improve the experience. If I was doing something more complex, I’d consider a different approach (or push back on the requirements to help keep my code feeling simple).
Further Reading
Stimulus Homepage They have a fantastic handbook that goes into the concepts I’ve outlined above into a lot more depth.
Stimulus GitHub Repository I’ve learned so much about how Stimulus works by exploring their code.
Stimulus Cheatsheet The handbook summarized on a single page.
Stimulus Forum Seeing other people working with Stimulus has made me really feel like it’s being used in the wild.
(sh, ra, yk, il)
Website Design & SEO Delray Beach by DBL07.co
Delray Beach SEO
source http://www.scpie.org/an-introduction-to-stimulus-js/ source https://scpie.tumblr.com/post/623788476392996864
0 notes