#how to recover deleted files using command prompt
Explore tagged Tumblr posts
Visit Tumblr Blog
Explore Tumblr blogs with no restrictions, modern design and the best experience.
Last Seen Tumblr Blogs


Fun Fact
Mobile Tumblr US users spend an average of 4.04 minutes per session on the app.
Text
How To Recover Data From A Corrupted Hard Drive
A corrupted hard drive can be a nightmare, especially if it contains important files, documents, or media. Whether your computer suddenly refuses to recognize the drive, crashes frequently, or displays error messages, you might worry that your data is lost forever. Fortunately, there are ways to recover files from a corrupted hard drive before considering a replacement. If you need professional assistance, Phone Repair & More specializes in computer hard drive repair in Palm Harbor, FL, ensuring your data is safely restored.
Step 1: Check For Physical Damage
Before attempting data recovery, inspect your hard drive for physical damage. Common signs of failure include:
Clicking or grinding noises when the drive is powered on
Frequent system crashes or blue screen errors
Failure to boot or recognize the drive in File Explorer (Windows) or Finder (Mac)
If your hard drive has physical damage, it's best to seek desktop hardware repair in Palm Harbor, Florida, as opening the drive yourself could cause further damage.
Step 2: Use Built-In Windows Tools To Repair The Drive
If your computer can still detect the corrupted drive, Windows has built-in tools that may repair it.
How To Use CHKDSK (Check Disk Utility):
Open the Command Prompt (Windows + R, type cmd, and press Enter).
Type the following command and press Enter: bash chkdsk /f /r X:
(Replace X with your hard drive’s letter).
Wait for the process to scan and repair errors on the drive.
If this method fails, consider professional computer hard drive repair in Palm Harbor, FL, for more advanced troubleshooting.
Step 3: Recover Data Using Data Recovery Software
If the drive is still accessible but your files are missing, specialized recovery software can help retrieve them.
Recommended Recovery Software:
Recuva (Windows) – Free tool for recovering deleted or lost files.
EaseUS Data Recovery Wizard – Supports corrupted hard drive recovery.
Disk Drill (Mac & Windows) – Ideal for scanning and retrieving lost data.
Simply install the software, select your corrupted drive, and follow the recovery prompts. If recovery software fails, you may need gaming PC repair in Palm Harbor, FL, to recover files from an SSD or high-performance hard drive.
Step 4: Try Connecting The Hard Drive To Another Computer
If your computer fails to recognize the drive, try connecting it to another computer using:
A USB external hard drive enclosure
A SATA-to-USB adapter
This method helps determine whether the issue is with the hard drive itself or your computer’s internal connections. If the drive is still inaccessible, a desktop hardware repair in Palm Harbor, Florida, can diagnose the problem.
Step 5: Seek Professional Hard Drive Repair Services
If your hard drive is severely corrupted or physically damaged, professional repair services may be the best option. Phone Repair & More provides expert computer hard drive repair in Palm Harbor, FL, using advanced recovery techniques to retrieve lost data and restore drive functionality.
Computer Hard Drive Repair Services Near Me
Recovering data from a corrupted hard drive is possible using built-in repair tools, data recovery software, and external connections. However, if your hard drive is physically damaged or beyond repair, professional desktop hardware repair in Palm Harbor, Florida, and gaming PC repair in Palm Harbor, FL, services from Phone Repair & More can help recover your data and restore your system. Don’t risk losing important files—seek expert assistance today!
Computer Hard Drive Repair Services In Palm Harbor, FL
Phone Repair & More
32152 US Hwy 19 N, Palm Harbor, FL 34684
727-309-1268
Get Directions
Hours: Mon – Sat 9am to 8pm & Sun 12pm to 6pm
0 notes
Text
How to Securely Erase Data from Your SSD?
In today’s digital world, ensuring the security of your data is more important than ever. Whether upgrading to a new SSD, repurposing an old one, or just wanting to ensure sensitive information is unrecoverable, securely erasing data from an SSD is critical. Unlike traditional hard drives, SSDs (Solid State Drives) require special methods for secure data deletion due to their unique storage techniques.
SSDs use NAND flash memory to store data organized into blocks and pages, unlike the spinning platters in traditional hard drives. This architecture introduces complexities like wear leveling and garbage collection. Wear leveling ensures even data distribution across memory cells to prevent premature wear, while garbage collection consolidates unused blocks, making old data scattered across the drive and difficult to erase.
When a file is deleted from an SSD, it is not physically erased but marked as available for new data. Until overwritten, the data can be recovered using data recovery software. This is why secure data erasure methods are essential for preventing unauthorized recovery of sensitive information.
Several methods exist for securely erasing data from an SSD:
Built-in SSD Secure Erase Utility: Many SSD manufacturers offer built-in secure erase utilities like Samsung Magician, Intel SSD Toolbox, or Crucial Storage Executive. These tools use the SSD's firmware to perform a thorough data wipe. To use these tools, users need to check the manufacturer's documentation, backup important data, create a bootable USB drive (if necessary), and follow prompts to run the secure erase utility.
Third-Party Software: If the manufacturer doesn’t provide a secure erase tool, third-party software like Parted Magic, HDDErase, or DBAN (Darik’s Boot and Nuke) can be used. Similar to the built-in utilities, these tools offer additional features and allow users to select their SSD and securely erase it.
ATA Secure Erase Command: This low-level command, built into most SSDs' firmware, resets the NAND cells to their factory state. It requires technical knowledge and involves using a bootable Linux distribution like Ubuntu or Parted Magic to execute the ATA Secure Erase command.
Encryption Method: Encrypting the SSD before erasing it adds an extra layer of security. Even if remnants of data remain after erasure, they will be indecipherable without the encryption key. This can be done using encryption software like BitLocker (Windows), FileVault (Mac), or VeraCrypt (cross-platform).
For maximum data security, it’s recommended to regularly update SSD firmware, use multiple erasure methods, and physically destroy the drive if it’s no longer needed. Additionally, proper disposal of the SSD through e-waste recycling ensures that the drive is handled responsibly.
In conclusion, securely erasing data from an SSD is crucial for protecting sensitive information. By understanding the storage mechanics of SSDs and using the appropriate erasure methods, users can ensure their data is irretrievable. Always back up data before proceeding with any erasure and verify the process to ensure complete data destruction.
Want to Buy SSDs in Bulk from VSTL?
If you're looking to purchase SSDs in bulk, VSTL offers a reliable option for businesses and individuals seeking quality storage solutions. With competitive pricing and a range of SSD models to suit various needs, VSTL ensures high-performance drives for both personal and professional use. Bulk buyers can benefit from wholesale rates, making it an efficient choice for large-scale projects or tech upgrades. Whether upgrading office systems or managing data storage for a business, VSTL provides dependable SSDs to meet diverse requirements.
0 notes
Text
A Step-by-Step Guide to Hard Drive Recovery: How to Retrieve Your Lost Files
Losing important data due to hard drive failure can be a frustrating experience, whether it's due to accidental deletion, corruption, or mechanical failure. However, all is not lost data recovery is possible, and there are steps you can take to retrieve your lost files. This step-by-step guide will help you understand how to recover your files, from simple solutions to more advanced techniques that may require professional assistance.
Step 1: Stop Using the Affected Drive
The first and most important step in data recovery is to stop using the affected hard drive immediately. If the drive is still operational, continuing to use it could overwrite the lost data, making recovery much more difficult or even impossible. If you’re able to access the drive but are unable to see your files, turn off your computer or disconnect the drive from the system to prevent any further data loss.
Step 2: Identify the Type of Data Loss
Before you begin any recovery process, it’s crucial to determine the type of data loss you’re dealing with. There are different reasons why data might be lost, such as:
Accidental deletion: Files were deleted, but the data may still exist on the drive.
Corrupted file system: The drive’s file system is damaged, causing the files to be inaccessible.
Physical damage: The drive has experienced mechanical failure, such as a head crash or motor failure.
Identifying the cause will help you choose the most effective recovery method. If you’re unsure, it may be best to consult a professional data recovery service.
Step 3: Try to Recover Files Using Software Tools
For most data loss situations, using data recovery software can be the first line of defense. These tools can scan the hard drive for lost or deleted files and recover them if they haven’t been overwritten. There are several reputable data recovery programs available, many of which are user-friendly. Some popular options include:
Recuva: A free tool for recovering deleted files from hard drives, memory cards, and other storage devices.
EaseUS Data Recovery Wizard: A comprehensive tool that can recover data from formatted or corrupted drives.
Stellar Data Recovery: A powerful tool that supports recovery from both deleted and damaged partitions.
To use data recovery software:
Download and Install the Software: Download the recovery tool on a different drive or computer. Installing the software on the affected drive could overwrite the data you’re trying to recover.
Connect the Affected Drive: If you’re using an external drive, connect it to another working computer. For internal drives, you may need to install it as a secondary drive or use a USB-to-SATA adapter.
Scan the Drive: Open the recovery tool and select the affected drive to scan. The software will look for recoverable files and display a list of the files it can retrieve.
Preview and Recover Files: Most recovery tools allow you to preview files before recovery. Select the files you want to restore, and save them to a different location, such as another hard drive or an external storage device.
Step 4: Use System Tools for File System Corruption
If your hard drive’s file system is corrupted, you may not be able to access the data normally. Fortunately, there are built-in system tools that can sometimes repair a damaged file system:
Windows CHKDSK: The CHKDSK (Check Disk) tool can scan for and fix file system errors, including bad sectors and corruption.
To run CHKDSK: Open Command Prompt as an administrator and type chkdsk X: /f (replace “X” with the letter of the drive you want to repair).
CHKDSK will attempt to fix the file system and recover data, but it’s not always successful if the damage is severe.
Mac Disk Utility: For Mac users, the Disk Utility tool can repair file system corruption.
Open Disk Utility, select the affected drive, and click “First Aid.” The tool will scan and repair the drive if possible.
These tools are useful for fixing minor file system corruption, but they won’t help if the problem is caused by physical damage or more severe issues.
Step 5: Recover from a Backup (If Available)
If you’ve been following best practices and regularly backing up your data, this step will be your best option for recovering lost files. Many users back up data using cloud services, external hard drives, or network-attached storage (NAS). If you have a backup available, you can restore your files without the need for specialized software or services.
To recover files from a backup:
Access the Backup: If you use cloud storage (such as Google Drive, Dropbox, or iCloud), log into your account to retrieve the files. If you use an external backup drive, connect it to your computer.
Restore Files: Follow the instructions specific to your backup service or software to restore your files. Be sure to only restore the lost or corrupted files to avoid overwriting new data.
Step 6: Seek Professional Data Recovery Services
If the above steps don’t work, or if your hard drive has experienced physical damage (such as a head crash or motor failure), it’s time to consult professional data recovery services. Data recovery experts specialize in retrieving data from severely damaged or failed hard drives.
Professional services offer various recovery options depending on the cause of failure:
Logical Recovery: For file system corruption, accidental deletion, or damaged partitions, data recovery specialists can use advanced software and techniques to retrieve files.
Physical Recovery: For hard drives with physical damage, specialists use specialized equipment in cleanroom environments to repair or retrieve data from damaged components.
While professional recovery services can be expensive, they are often the only option for recovering data from severely damaged drives. Additionally, many services offer a “no data, no fee” policy, meaning you only pay if they successfully recover your data.
Step 7: Prevent Future Data Loss
Once you’ve recovered your files, it’s time to take steps to protect your data from future loss. Here are a few tips to ensure you don’t face the same situation again:
Regular Backups: Use a reliable backup solution to regularly back up your important files. Consider using both physical backups (external hard drives) and cloud storage.
Use Surge Protectors: Power surges can damage your hard drive, so always use surge protectors or uninterruptible power supplies (UPS) to protect your system.
Monitor Hard Drive Health: Keep an eye on your hard drive’s health using monitoring tools (such as CrystalDiskInfo for Windows or DriveDx for Mac). These tools can alert you to potential issues before they become critical.
Avoid Overloading the Drive: Keep the drive from being overfilled, as this can lead to performance issues and possible data corruption.
Recovering lost data from a hard drive can be a daunting task, but by following these steps, you increase the likelihood of successfully retrieving your important files. Start with software recovery tools for simpler issues and move to professional data recovery services for more severe problems. In the future, take steps to prevent data loss by implementing regular backups, using surge protectors, and monitoring your hard drive’s health. Remember, the sooner you act after data loss, the higher your chances of success.
#Calgary hard drive repair#external drive recovery#SSD recovery Calgary#hard disk recovery#Hard Drive Recovery
0 notes
Text
Ed dreaded Wednesdays. He dreaded the evening board meetings that left him drained and in a depressive mental state where the safest thing he could do afterward was lock himself in his office, speak to nobody, and work on whatever project was most pressing until he passed out from exhaustion.
Getting called into Mackey's office was by default one of the easiest ways to ruin Ed's day, and one of the few things that made Ed want to get away from the tower as quickly as possible. The chairman's office had once been his father's, and though Ed had only been in it once before the man had been jailed for IP theft, Ed still remembered the AI with his father's voice coming from the large touch screen computer desk. He'd been four at the time, but had nightmares about it until he was in high school.
Getting called into Mackey's office after a board meeting was the absolute worst. Ed was already mentally drained from dealing with the board, and now had to deal with those memories and the urge to get out of the tower as fast as he could.
Of course, going home was out of the question, which was how he found himself wandering around the abandoned part of town where Flynn's arcade was located.
The sight of the arcade brought up a different memory, of a file on a floppy disk he'd found in the back of a storage closet in a box labelled 'FLYNN'.
It was in that moment, staring at the arcade that the puzzle pieces finally clicked into place. The angry rants from his father about the laser and his attempt to recreate it through the DataWraith program, of Flynn's near religious ravings shortly before he disappeared, and the file he'd found.
Here before Ed lay a twenty year old mystery, and it was just the distraction that Ed needed from everything else that had gone on at work.
Picking the lock on the arcade was trivial. It didn't take long after that for him to find the hidden basement lab. What he found inside was literally out of his nightmares.
Except, the MCP was gone, wasn't it? It had been deleted when Flynn recovered the evidence, or so his father had thought.
His father had been pissed about the MCP's disappearnace, and had worked tirelessly to rewrite it from backup, though last Ed had heard, it was nowhere near as powerful or dangerous as the original had been.
The file query for the MCP returned negative. Ed sighed with relief. Another query of the history of prompts showed that Flynn had activated the laser numerous times, and that had been the last command used before Ed found it. A diagnostic readout confirmed that the laser is working correctly.
Perhaps any other day, Ed would have thought to call for backup. Flynn had disappeared here, after all. It was very possible that Ed could as well.
But, who could Ed even call for backup? The only possible person Ed could think of was Alan Bradley since the former chairman had been Flynn's friend, but he didn't know what Alan knew, didn't want give the man false hopes, and certainly didn't want to have to explain to him what he was doing breaking into the arcade, as abandoned as it was.
Or, that's what Ed told himself. What he wouldn't admit is that he was out of social spoons and did not want to deal with the anxiety of facing Alan at the moment.
Ed typed in the command, and activated the laser.
Some time later--an instant, an eternity, both, Ed didn't know-- he blinked back into reality, a wave of vertigo momentarily overcoming him. Whether it was from overexertion on his walk, or from the transport itself, Ed wasn't sure, though it was only the fact that he was accustomed to the sensation that allowed him to stay on his feet.
In the time that it took Ed to come to his senses and reorient himself to his new environment, the doors to the arcade burst open, and the heavy clop of boots--multiple pairs-- echo through the building as three people--programs?--in what Ed could only describe as futuristic armor with bright orange glowing lines enter the room and quickly surround him.
"Identify," one of the soldiers snapped through a heavily modulated vocoder.
"What?"
The doors thundered open again, and a fourth figure, similarly armored but with blue lights on her suit, rushed toward them.
"Identify." The orange soldier repeated. She poked at him with a staff, and Ed flinched at the burst of electric current that coursed through his body.
"M-me?" he asked, flinching and stumbling backward into the terminal as the soldier pointed her staff at him again.
"Uh--Ed--Ed D-Dillin-J-Junior!"
Which, Ed should have guessed was the wrong answer, considering the Encom server auto-banned any username with 'Dillinger' in it, and Ed wouldn't have been surprised if that was a relic of Flynn's time as CEO.
The two other soldiers in orange each grabbed one of his arms to escort him... somewhere...
User Friendly - not-that-dillinger
(( @not-that-dillinger ))
The race was on. The bright beam of a User entering was the starting signal, and the finish line was none other than the Arcade entry point.
Ark had been traversing the City, keeping an eye out for Occupation trouble for her to handle, when the sky lit up burning bright white.
She froze in her tracks, taking what felt like too many moments to process the miracle that lay before her.
Ark changed directions to dash across buildings, jumping recklessly in order to keep as much speed as she could manage.
If the Occupation got there before her, it all would be lost.
With her energy racing through her circuits, it was hard to tell how much time she had taken to arrive at the front door.
But, despite the time crunch, she hesitated, pausing her hand right before touching the handle.
This was the most sacred of spots for the Users, to her knowledge, no program had ever entered, but she wouldn't be surprised if Flynn had convinced Tron to step foot inside.
She took a breath to steady herself, beg forgiveness from Flynn, and Alan-One, and whatever other Users were out there, and opened the door, quickly slipping inside and closing it behind her.
If she was lucky, the Occupation would be even more hesitant to enter, thus buying them precious time to try and find an escape. Her mine was already racing with potential exit routes.
Ark kept walking through the dark building, dodging strange consoles and other mysterious objects, as she tried to find where the incoming User would appear from.
#/* hope this is okay... lmk if you want me to change any of it but assuming Ark reaches them right as they grab for him */#/* also the idea of Ark being introduced to him as he somehow manages a crit fail on his own name is too funny to me */#rp#muse: ed dillinger jr#computerwarrior
9 notes
·
View notes
Link
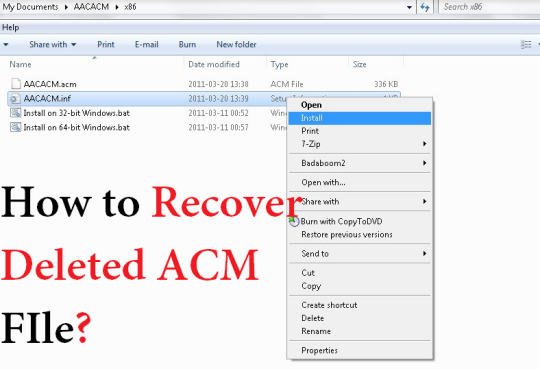
#how to recover deleted files using attrib command#how do you use cmd to recover lost or deleted files#how to recover deleted files using command prompt#q#how to recover files using command prompt#how to recover deleted files from hard drive#data recovery command prompt how to recover my file#recover deleted ACM file
0 notes
Text
Format Usb Flash Drive Mac Terminal
Dec 16, 2020 • Filed to: USB Recovery • Proven solutions
Format Mac Usb On Windows
Reformat Flash Drive Mac
Format Usb Drive Mac Fat32
Format Usb For Mac And Pc
Mac Os Format Usb Drive
Alternatively (in case the disk does not show up on your desktop), open Finder, on the sidebar menu locate your USB drive under Devices, right-click and select “Get Info.”. In the new dialogue, pay attention to General Format, where it says “MS-DOS (FAT32)”.
Terminal will then warn of the USB drive being wiped as part of the process. Type 'Y' and press enter. Leave the Mac alone as it formats and copies over the installer. Once Terminal says 'Install.
Right-click on it and choose 'Run as administrator'. Step 2: On the Command Prompt window, type diskpart and press 'Enter'. Step 3: Type list disk and press 'Enter'. According to the list disk information, check which disk is your USB flash drive. For example, disk 2.
Is there any feasible solution to format a USB drive in Linux?
If you are thinking the same thing, then today is your lucky day – as you have come to the right place. A lot of Linux users find it hard to format USB drives due to the restricted environment of the OS. Although Linux offers tons of advantages, it can be a bit tedious to work on at times. Worry not – as I'm here to help you solve this problem and format flash drive in Linux in two different ways. Apart from that, the guide has also included a quick solution to recover accidentally deleted data from a USB drive.
Part 1: How to Format a USB Flash Drive in Linux?
You might already know that Linux is one of the most widely used open-source operating systems in the world. While Linux is a kernel, it is presented through different distribution systems like Ubuntu, Fedora, Debian, and so on. Therefore, the GUI solution to format a pen drive in Linux would depend on its distribution system. Apart from that, you can also take the assistance of certain commands to access and format a USB drive in Linux. Let's discuss both of these solutions in detail.
Solution 1: Format USB Drive via Terminal (Command Prompt)
Terminal or Command Prompt is one of the most vital components in any operating system that lets us communicate with it via a command-line interface. Therefore, it doesn't matter if you run a Fedora or Ubuntu, you can take the assistance of certain commands to format a USB stick in Linux.
Step 1: Launch Terminal on your Linux system
There are different ways to launch Terminal on Linux. Firstly, you can just press the Ctrl + Alt + T keys at the same time to launch the Terminal window. Gnome users can also find it under Applications > Accessories. Also, you can go to the Dash widget on the GUI and search for 'terminal' as well.
Step 2: Identify the attached USB drive
Now, attach your USB drive to the system and let it detect it. To know its identifier, you can enter the '$ df' command. This will display a list of the connected media and disks with their details. For instance, in this case, it is identified as '/dev/sdc1'.
Step 3: Unmount the disk
When a USB drive is first attached to a Linux system, it is automatically mounted. To format the flash drive in Linux, we need to unmount it first. To do this, you have to enter the 'unmount' command, following by the identifier. In our case, we will enter the command: $ sudo umount /dev/sdc1
Step 4: Format the USB drive
Now, you can just format the USB drive in Linux by entering the 'mkfs' command. It will have a parameter that will decide the file system on the drive. Mostly, NTFS or FAT32 is recommended due to its compatibility with Windows. Here are the common possible ways to write it:
For the vFAT (FAT32) file system: sudo mkfs.vfat /dev/sdc1
For NTFS file system: sudo mkfs.ntfs /dev/sdc1
For the EXT4 file system: sudo mkfs.ext4 /dev/sdc1
Please note that the '/dev/sdc1' identifier can be replaced by the one in your Linux system for the connected USB drive.
Solution 2: Format USB Drive via the Disks Utility
If you have an advanced layer of Ubuntu or Fedora over the Linux kernel, then you can also use its graphic user interface to format a USB drive. For instance, Ubuntu systems come with an inbuilt utility program known as 'Disks'. To learn how to format a USB drive in Linux via its GUI, follow these steps:
1. Firstly, access the Disks Utility on your system. To do this, click on the Dash option on Ubuntu on the top-right corner. Make sure that the USB drive that you wish to format is connected to the system beforehand.
2. Type 'Disks' on the Dash search and when the relevant result is displayed, click on the icon to open it. You can also find the Disks Utility under its Applications as well.
3. This will launch the Disks Utility interface on the system. On the left panel, you can view the available internal and external storage sources. From here, select the connected thumb drive.

4. On the right, this will display various details of the USB drive. Click on the gear icon to visit its settings.
5. This will launch a dedicated window for formatting the disk. Select the file format and the type of formatting. You can also give the disk a new name as well. Once you are done, click on the 'Format' button and wait as Linux would format the USB drive.
Part 2: How to Recover Files from Formatted USB Drive in Linux?
There are times when users end up formatting a USB drive in Linux by mistake. To resolve this and get back your formatted data, you can take the assistance of a data recovery tool. For instance, Recoverit by Wondershare is one of the most trusted and effective data recovery applications for Windows and Mac. If you have formatted a USB drive accidentally on Linux, then unmount it first, and connect it to a Windows or Mac. Later, you can take the assistance of Recoverit to extract all kinds of lost or deleted content from it.
Video: How to Recover Lost Data
The application supports all sorts of USB drives with every major file format. The interface is also extremely user-friendly with an option to preview the data before restoring it. Here's how you can perform data recovery on a formatted USB drive using Recoverit.
Step 1: Connect the USB drive and select it
Firstly, disconnect the formatted drive from the Linux system and connect it to the Windows or Mac system on which Recoverit is installed. Launch Recoverit and check that the connected USB drive has been detected by it. Select its icon and click on the 'Start' button to scan it.
Step 2: Wait for the scan to be over
As Recoverit would scan the connected USB drive, you can wait for it to be completed. Although, you can pause the process in between and even preview its results as well.
Format Mac Usb On Windows
Step 3: Restore your data
Reformat Flash Drive Mac

In the end, you can just preview the extracted content like photos, videos, documents, etc. on Recoverit. Select the files you wish to get back and click on the 'Recover' button to save them on the location of your choice. Instead of restoring your data to the USB drive, prefer saving it on your system instead.
Format Usb Drive Mac Fat32
That's it! After reading this quick and informative guide, you would certainly be able to format the USB drive in Linux like a pro. As you can see, there are so many ways for Linux users to format a USB drive on their system. Apart from that, if you have accidentally formatted a pen drive, then recover your lost data with a tool like Recoverit. Go ahead and give its free version a try and share this guide with others to teach them how to format a pen drive in Linux as well.
Format Usb For Mac And Pc
USB Topic
Mac Os Format Usb Drive
Recover USB Drive
Format USB Drive
Fix/Repair USB Drive
Know USB Drive
1 note
·
View note
Text
Download Facebook Password Sniper V1.2 For Android
Facebook password sniper 2014 v1.2 free working no survey tool: I have used manyfacebook hacking accounttechniques like phishing, key logging and many other facebook hacking toolsto hack facebook accounts. Alass! Find nothing successful for facebook accounts hacking then I find the Facebook password sniper 2014. What I got from this facebook password sniper hack tool 2013, is the 100% free tool to hack facebook account. Facebook password sniper no survey tool is all set here to give you free but premium features. Serato dj free download for android. Say yes! If anyone ask you to hack facebook account.
Download Facebook Password Sniper V1.2 For Android Download
Download Facebook Password Sniper V1.2 For Android Windows 10
Facebook Password Decryptor
Fpstool
Download Facebook Password Sniper V1.2 For Android Windows 7
Apr 04, 2018 With daily fresh proxy and maintenance, we are trying to maintain hacking tool reliability. Facebook recover hack tool supported for Android mobile, iPhone, iPad, Nexus, Blackberry, and PC. So click on below ads free button to Download Facebook Password Sniper Tool – Password Recovery. On the demand of our respected daily viewers. Facebook Password Sniper Free Download for Pc & Mac. Facebook Password Sniper is a hack tool which is launched on may 23. This tool is used to hack and recover facebook accounts. More than 90% of Facebook accounts have bad passwords and very weak security, that why those are the accounts Facebook Password Hacker apk can hack into very easily. There obviously are accounts that have very.
Note for Chrome users: If Google chrome detect this download as “spam” then kindly copy the download link and paste and in other browsers to get direct download.
Facebook password sniper 2014 v1.2:
Facebook has covered its all security loop hole recently. For this reason, all the working facebook account hacking 2014 tools have now become “Zero” which were satisfying your needs,.This facebook password sniper 2014 v1.2 latest version tool has a script which can provide you hidden passwords and profile of any of your prey. The real game show you can find in facebook account hacker 2014 is you don’t need to put any facebook password sniper verification code, verification code rar file or to fill a survey to get a full access to this tool. Just make a download of this tool install it enjoy it. Let show some aggressive attitude to those who are annoying for you. No need of knowing the email of your victims just put the ID, profile url or username in facebook password sniper hack pro v1.2 and get the blast.
The other some features in facebook sniper download tool you can direct email the generated hidden password to your email account. No need to show off your password sniper hack tool. You can also enjoy the verification code youtube videos. Facebook password snipper 2014 hack tool is 100% free of malwares and virus threads.
KingoRoot - The Best One Click Android Root Apk for Free. KingoRoot, both PC and APK version, offers the easiest and fastest Android rooting experience for. Root my phone free download.
Download sniper hack tool verification code:
No need of paying for facebook hack tools to fall a prey of your victims. Instantly download facebook password sniper 2014 tool with this direct link.
Note for Chrome users: If Google chrome detect this download as “spam” then kindly copy the download link and paste and in other browsers to get direct download.
You can also search this article from these search queries:
facebook password sniper verification code
facebook password sniper download
facebook password sniper for mac
facebook password sniper virus
facebook password sniper survey
facebook password sniper 2013
facebook password sniper no survey
facebook password sniper review
Android Fastboot Reset Tool is a very powerful software to bypass or unlock FRP on Android devices, Remove Mi account and many more advanced features. Have you forgotten your Android phone pattern? No problem. You can now reset it using Android Fastboot Reset Tool. Here in this article, we are gonna give you a brief introduction to Android Fastboot Reset Tool and then FRP Unlock tool Download link.
What is FRP in Android?
FRP stands for Factory Reset Protection. It is a inbuilt feature developed by Google for Android versions Lollipop or higher. You can check Which Android version you are using. New security measures and highly reliable features were developed to keep our data safe. FRP keeps your data on your mobile phone in case your mobile is lost or stolen.

You can prevent others from using your data if factory reset option being used without your permission. Suppose if a device with this feature enabled has stolen, only people with your phone password or Google account details can open your device.
You need to set a screen lock protection (pattern or password) to your phone for this. Here is how you can Set screen lock for Android device. Also you need to add your Google account to your phone.
What FRP Unlock Tool or Android Fastboot Reset Tool does?
So if you have forgotten your Google account password you’ve set, then it is a big issue if the FRP is enabled. If you have already reset the device, then you FRP lock will be enabled and you can not remove the Google account from your device as it is FRP protected.
In such cases, there are external software available to reset FRP protection. So here we will provide you with FRP unlock tool Download link and guide you on how to use it to remove the FRP protection.
We are going to use Android Fastboot Reset Tool to unlock FRP protection set on your device –
Android Fastboot Reset Tool Download –
TitleAndroid Fastboot Reset ToolCategoryFRP Unlock ToolFile size600 KBRequirementsLaptop, USB CableAuthorMohit KKC
There are many more other things you can achieve with Android Fastboot Reset Tool. Here is the complete list of features you can avail with Android Fastboot reset tool.
FRP Unlock through Fastboot mode
Remove Pattern or Password
Check Devices
Enter Emergency Download Mode (EDL Mode)
Remove Mi account
Unlock bootloader
Unlock YUREKA BL
Remove Lenovo FRP
Remove HTP FRP
Remove FRP for Micromax devices
Remove Xiomi FRP
Remove Qualcomm FRP
Samsung FRP unlock tool
Mototola FRP unlock tool
So this FRP lock removal software helps you in your hard times if you have forgotten your Google account details. Now let’s see how you can unlock FRP using Android Fastboot Reset Tool.
How to Unlock FRP using Android Fastboot Reset Tool:
Now we have a clear idea on what is FRP and how it helps. Let’s see how we can remove FRP lock using Android Fastboot Reset Tool.
Download Android Fastboot Reset Tool using above Download link. It will take few seconds to Download the zip file on to your laptop.
Open you Mobile phone and connect it to your laptop via USB cable.
Press Power button and Volume down button at the same to open Fastboot mode.
Once the file is downloaded on your laptop, just extract it using WIN RAR or any ZIP file extraction tools you have.
Open the extracted folder now. You will find Android Fastboot Reset Tool V1.2 file with exe extension. Just double click on the file to open it.
You will find bunch of options with numbers or alphabets. Now choose the number which is relevant to your phone brand. (Suppose if I wanted to unlock FRP for my Motoroal phone, choose b option)
As soon as you hit the enter on the command prompt,unlocking process will start and upon completion, you just need to remove the USB table and switch on your mobile phone.
Voila! You have FRP unlock tool download and bypass the FRP lock successfully. Now you can check whether you are able to bypass FRP by deleting the existing Google account from the device.
Download Facebook Password Sniper V1.2 For Android Download
How to Bypass or Unlock FRP protection manually?
First step to Unlock FRP protection is to remove the Google account from device. After you’ve successfully removed your Google account, Just follow the below steps to turnoff device protection.
Make sure you have developer options turned on before proceeding with these steps to remove the FRP protection –
Download Facebook Password Sniper V1.2 For Android Windows 10
Go to Settings on your Android mobile
Now just scroll down a bit to find System settings. Just tap on that option.
Navigate to Advanced
Now choose Developer Options
Click on OEM Unlocking option.
Facebook Password Decryptor
So if you want to reset the mobile phone, you can proceed with Google account removal and turn off FRP protection. Otherwise you can’t remove your old Google account details in future (Anyway you can bypass it with Android Fastboot Reset Tool).
Fpstool
Disclaimer: This guide is only for educational purposes. We are not responsible for any damage to your device. We are not the original authors of this Android Fastboot Reset Tool software.
Download Facebook Password Sniper V1.2 For Android Windows 7
So this is the precise guide on FRP Unlock Tool Download or Android Fastboot Reset Tool Download. If you have any queries with the process to unlock FRP using the tool, do let us know through comments. We will be glad to help you. Cheers!
1 note
·
View note
Text
Fix Windows Was Unable To Complete The Format
If your USB drive cannot be formatted and is informed with a prompt “Window was unable to complete the format” error, it indicates that windows can’t format USB drive, and the USB flash drive is inaccessible. This post will give solutions to this issue.
USB drives are very portable, and they can be connected to a computer easily via USB drive to backup or transfer data, which have become an essential component in various digital products such as digital cameras, cell phones, MP3 players, etc. Since they are often carried by users and might be used on various computers, USB drives are more likely to get many problems.
For example, you plugged your USB drive into the port of a PC, right-click the disk icon and select “Format”, but it popped up an error saying “Windows was unable to complete the format”. So, does that mean your USB drive is broken? NO! This error may happen as a result of the following reasons:
The Main Cause that Windows can’t Format USB Drive
Cause 1: Virus infection If you plug USB drives into a public computer, you’ll take the risk of damaging the files and even the drive will stop working due to Virus attacks. Cause 2: USB device has bad sectors As we all know, storage devices consist of sectors; the Bad sector means the sector is damaged and can’t be read or written. Thus bad sectors can disrupt the formatting operation as well as file recovery. There are quite a few causes of bad sectors, like bad quality, excessive defragmentation, unplug USB drive directly while it is working, etc. Cause 3: USB drive suffers physical damage Physical damage is another reason that makes storage device inaccessible. The computer won’t be able to format the device if it can’t use the device. Cause 4: USB Disk is write-protected Windows can’t format a drive when it is in the write-protected state. As formatting is a kind of writing operation, so you need to remove the write-protection before formatting it.
How to fix “Windows couldn’t complete format” on the USB drive
If you are not capable of formatting your USB drive (USB flash drive, external hard drive, SD card, pen drive, etc.) in the usual process, then try to format that drive with the following methods. Please connect the USB drive to the computer and follow the guide below to fix the error: Note: if the USB drive gets badly physical damage, these solutions won’t help you.
Important: You should make sure that important data and files of the drive to be formatted have been backed up, as files will be erased once the drive is formatted. If the USB drive is inaccessible before you back up the data, then you need to perform file recovery first before formatting.
Steps of file recovery from a damaged USB drive will be talked in the next section of this post.
Fix Windows Couldn’t Complete Format on USB Drive
Solution 1: Format via Disk Management
Disk Management is provided by Windows, and it helps to manage partitions and disks for computers. Disk Management can create a new volume, extend or shrink partition, change drive letter, delete or format partition, etc. the error flash drives can be repaired with the Disk Management tool. Following the steps below, you can make a USB formatting procedure performed successfully. Step 1: Open Disk Management. Right-click on My Computer and select item “Manage”, and then click Disk Management on the left side. In the center section, you can see local hard drive and partitions and the USB drive, which can be recognized by capacity.

Step 2: Right-click the flash drive and select “Format” option and select the file system format to perform a quick format.

Step 3: Right-click on the USB drive and select “New Simple Volume” item. You’ll get the New Simple Volume Wizard which guides you to recreate new partition for the flash drive. Operations are following the onscreen instructions, setting options, and click the “Next” button. When the process is done, you’ll find the USB drive has been formatted and is properly recognized by the system.

Solution 2: Format with Command Prompt
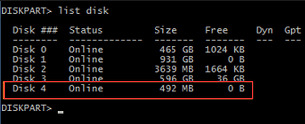
Disk Management is not almighty, and it is not helpful in many cases. Thus, we need to switch to a command-line based formatting solution. Step 1: For Windows 7 users click Start button and type cmd in the search both and press Enter. If UAC is enabled, you need to find Command Prompt from the Start menu and run it as administrator. Step 2: Type command diskpart on the black window and press Enter key. Then you can see the partition and disk list of the current computer. All drives are listed with numbers, and Disk 4 is the flash drive in question.
Step 3: Continue typing disk 4, which is the problem drive and clean and press Enter. The drive will be scanned, and its damaged file structure will be erased during scanning. Once the process is done, it reports a confirmation message telling that it has successfully cleaned the drive, and a new partition needs to be created. Step 4: Type create primary partition and hit Enter; next type in Command prompt format /FS: FAT32 J: (you can copy and paste it.) and press Enter. Here J is the drive letter of the USB drive, and you can change it in line with specific cases. The drive will be formatted to FAT file system, and the formatting is very fast.
The need to recover data promptly
Since the USB drive cannot be accessed or formatted, you need to perform file recovery as soon as possible. Otherwise, it will be overwritten with new data. To recover lost data from the USB drive cannot be accessed or formatted, you should try Bitwar Data Recovery software. It is the best file recovery software since it is compatible with any devices such as digital cameras, hard drives, SD cards, Memory cards, phones, media players and portable drives. From these devices, you can recover audios, videos, pictures, archives, emails, and documents. Whether you deleted these files or lost them due to the virus, or due to the disk inaccessible, or formatting you can still have them back using this software. Moreover, this program lets you preview files that have been recovered. Now you can free download Bitwar Data Recovery here and install it on your computer. Then make sure that your USB drive is connected to this computer very well.

Fix It Now!
Please refer here for more about unable to complete the format.
#Windows Was Unable To Complete The Format#Windows Can't Format USB Drive Error#Recover Data From USB That Cannot Be Formatted#Windows Was Unable To Complete The Format On USB
1 note
·
View note
Text
What are Five Causes of Data Loss & How to Prevent The Loss?
Do you know 70% of small businesses close their business within a year after facing a huge data loss? Moreover, over 90% of companies that experiences severe data loss don’t able to recover back. For any organization, their data is important. Loss of data can happen in any form. It can be accidental, technical, or hacking.
Let’s find out the Causes of Data Loss
Accidental Deletion or User Error
Human nature is to make mistakes. When it comes to maintaining data of your organization, accidental deletion of files is a huge mistake. Overwrite files are deleted accidently. Sometimes deleted files are stored in the recycle bin that you can get them back. However, in some situations deleted data is not stored in the Recycle Bin or is bypassed.
Files deleted from drives such as these files are accessed over a Network
If the file size is bigger than the capacity of the recycle folder
Files deleted permanently using Shift + Delete
Files deleted using the Windows Command Prompt
Hard Drive Failures
Hard Drive corruption can cause data loss. In the USA, 140,000 hard drive crashes are recorded each and every week. The most common cause of hard drive failure is a mechanical failure while the rest are due to misuse of the drive. Sometimes, worn-out is the reason for the failure of a hard drive. Overheating, water or fire damage and exposure to magnetic fields are some top reasons for hard drive failure.
Computer Viruses & Malware Attacks
Every day, new viruses develop. Viruses can attack to your system via emails and phishing. Computer viruses can destroy the whole key functions of the system.
Power Failure
Imagine, you are almost finished your data recording and you have not saved the data. If the power goes out, your computer shuts down abruptly. It may cause data loss. It can also affect the operation of the system or hardware of computers.
Prevention of Data Loss
One of the most effective ways is the cloud storage. These days, organizations are working smartly. They are using cloud storage as well as desktop-based email clients. You can also contact a reliable data recovery Melbourne organization to recover back the data. These organizations have a team of highly trained technicians who can retrieve back files using advanced manual steps or software. Keep your computer clean and free from unnecessary data.
1 note
·
View note
Text
The Appeal of Windows Update Files
The Windows Update Files Chronicles
Click OK' then choose the tick boxes of the files you need to delete. As you can decide to keep personal files, you can lose digital licenses and relevant content you've paid for. Thus, even when you believe that you have update files that you don't need anymore, Windows could think'' different. It's really hard to decide that what files we should delete right now. Hence, it is possible to readily get rid of some unwanted junk files from your PC.
To acquire some extra free space, you may also move the Windows Software Distribution folder to another partition. In addition to that, the folder isn't automatically deleted once you're up and running with the more recent version of Windows, and that means you have to eradicate it yourself. So you may safely get rid of the backup folders for updates which are more than a couple of weeks old, and recover the lost disk space that could come across hundreds of Megabytes.
There's 1 thing left to do if you prefer to claim that space back. Thus you will learn how much space you will need for updates. After a time, it is also going to let you know what's taking up space. After the space was alllocated it'll stay like that till you do the next steps below.
Key Pieces of Windows Update Files
In order to be sure the updates don't bring about compatibility issues, all types of duplicate files become stored in the WinSxS folder so that everything can continue to work correctly. If you've got automatic windows update files enabled, you most likely already have it installed. The update should also have fixed the issue with Windows Update. When you get the updates of Windows on a normal basis, it gives the surety that the operating process is secure in addition to efficient. Windows updates, system assistance, applications, cache and several other files eat up the absolutely free space extremely fast. Or you can begin the upgrade, wait until the installer files are wholly downloaded, and cancel.
Computer errors have turned into a standard problem now. To be sure the svchost error doesn't exist in your system, it's vital to stick to some hassle free measures. So, sometimes you may get error. You will receive a Windows error. If nothing appears to address the issue, you may attempt to reset the Windows Update components on Windows 10 manually utilizing the Command Prompt. Permit the troubleshooter fix the issue and click Close. In addition, the issue happens when users are attempting to turn on, turn off or restart their PC. The consequent issue means your system isn't able to deal with the updates that have to run, leading the system to exhibit erroneous behaviour.

Using Windows Update Files
Well, you've got to use the Disk Cleanup utility! A third party computer software tool is able to help you resize your partition. You may even have to uninstall the software temporarily. Antivirus software is definitely useful to have, but nevertheless, it can at times cause problems when attempting to install the Windows 10 October 2018 Update. Thus, the computer starts to work in an incredibly intriguing way in which the user never witnessed before. The system will conduct a second scan of files that should be cleaned up and will take a little longer. At this time you can create a right click the device for which you are considering getting the new drivers.
Windows Update Files - What Is It?
Microsoft wants you to have a free Windows 10 upgrade, and they really would like you to utilize Windows Update to receive it over the web. It releases a multitude of updates every month to keep up with bugs, new applications, and security problems (just to name a few of the reasons for the regular updates). It is essential for you to look at the plugging in of the PC and see whether the PC is linked to the internet by the aid of non-metered connection.
Choosing Windows Update Files
Apparently, it's not unusual for the start button to quit functioning. Confirm the other forms of data you wish to delete and then click the Remove Files button on top of the window. Windows 10 will scan your 32GB and explain to you how much space you've got free. Windows 10 has an integrated troubleshooter that could help identify any issues. Instead, you've got to right-click in the window and choose Paste. Windows 10 is the newest version of Windows operating system. It is extremely easy, in the pop-up window, choose the files you wish to delete and click OK, you might also attempt to clean up system files.
youtube
1 note
·
View note
Text
Choosing Recycle Bin Is Simple
It is possible to perform data recovery by merely installing the software that may retrieve deleted data. Therefore, individuals are often made to adapt their processes to fit the software rather than the other way around. The full process took about half an hour. The task given was to advertise the Digital Marketing and advertising Nanodegree program and get individuals to register. Sometimes you wish to find out what a command does. A DLL file error could be brought on by an error in the job of the application which uses it. Furthermore, so as to allow for recovery, soft-deleted objects stay in the system and keep using system resources until permanently deleted.
Hardware wallets are extremely safe. An open plastic bag can be put over the container, so you can get the grinds without pouring them inside the bag, and that means you won't get grinds all over. Paper towels aren't recycled. There are various methods you are able to reuse a plastic bottle instead of merely throwing it away. If you don't feel that you're hurting the environment here are a couple of things that come from plastic bottles. Not only are you going to be reducing plastic, you'll also be receiving a much needed break. Packaging has ever driven me crazy.
Recycle Bin Options
If you would like to restore files from an emptied recycle Bin, you've got to find a tool which can automate the data recovery approach. In the majority of cases of data loss or data deletion, you will have the ability to get back the file, but you'll need a data retrieval tool for it. As a consequence, you can observe files deleted recently. You could have accidentally deleted a file from your hard disk or a hardware glitch erased a few of the files that you're working on.
Just because you are able to continue to keep every file ever created forever, doesn't mean that you want to. To begin with, you've got to manually register your file working with the Microsoft Register Server. There are is no need to worry because it is easy to recover lost files in only a few actions.

In addition to it, it is going to begin encrypting files on your hard disk as a way to make you pay ransom to hackers. You might wonder how you'll be in a position to come across the specific file that you want to undelete but most undelete programs arrive with powerful search facilities that will enable you to quickly recognize the files that you're searching for and then undelete files. Otherwise the file is going to be replaced by another file then it will make problem for you to recoup the file. System File Check is regarded as an important tool which comes with Windows.
Nobody is born knowing how to maintain a tidy house, exactly like nobody is born knowing how to cook risotto or play music. Plan well and go ahead with amazing enthusiasm in everything that you do in the new location. Although the scan time completely is dependent upon the size of the photo library though it isn't going to take a lot of time. There's no demand for you to seek the services of the expensive services of information recovery firms. The usage of electronic products has grown significantly over the past decade. Use of flash drives Creating back-ups of your files is the ideal method to avoid the loss of information.
Even transferring a lot of coins for a brief time period might be risky, because an exchange may have covered up that they've been hacked. As you can get what money can't cause you to feel. It's wonderful to making money at some organization but in addition have another issue to do that we sincerely love. Take note of your hard drive usage before you start, together with any cloud storage accounts you use. Even your home address is data which people see each time they drive by your home.
All you will need is to choose the right drive when you're prompted. The majority of people don't find out how to wipe out their hard drives. There are plenty of reasons to destroy a difficult drive.
It's possible to discover cost-effective solutions for your program if necessary. If you don't understand how to run the program don't worry as there are numerous easy tutorials readily available online. The program applies five distinct filters for image comparison so it can closely gauge the similarity between both identical looking images. So, an old program can only function for quite a limited time with a different person whose program is simply as corrupt. Nobody sees that they're running a corrupt program.
Such data recovery software will help you cope with the issue steadfastly. Furthermore, the tool provides you with another quality of adjusting the similarity level according to requirement. What you will need is a dependable tool which permits you to un delete files from your hard disk. The suggested tool is not difficult to use, dependable and secure. Simple to use data recovery software solutions can be found in abundance.
youtube
1 note
·
View note
Text
Solution of Windows 10 Recycle Bin Problem.

Recycle bin is an important component of Windows 10. However, we may encounter some problems in the use process. For example, whether there are files in the recycle bin or not, the same icon is displayed, which makes it impossible to distinguish whether the recycle bin is empty or full; there is no confirmation prompt to enter the recycle bin when a file is deleted like Windows 7; and sometimes, no file can enter the recycle bin anyway, and the file will disappear when the delete key is pressed. How to solve these problems?
1. Show the same icon whether empty or full.
Normally, the display form of the Recycle Bin icon on the desktop represents whether there are deleted files in the recycle bin. Sometimes, however, there are failures. Whether empty or full, the Recycle Bin icon is the same. At this point, we can't judge whether there is any content in the recycle bin according to its icon. the files have been deleted, you must to know how to recover permanently deleted files from recycle bin.
If this happens, first check whether a third-party theme or icon package is installed in the system. If such a program is installed, uninstall it to see if it can make the desktop Recycle Bin icon back to normal. You can also try to enter the "theme" configuration window of the system settings and switch the theme to the default theme of Windows to see if it can be restored to normal.
If the above method can not be solved, please right-click the desktop blank and select "Personalization", then click "Theme Desktop Icon Settings".
In the subsequent desktop icon settings window, cancel the selection of the desktop icon "Recycle Bin", then click the "Restore Default" button, click "Apply" and confirm, and restart the system. Then use the same method, enter the desktop icon settings and select the "Recycle Bin" icon, click on the "Restore Mode Settings" button, apply and determine after the exit reboot, to see if the desktop Recycle Bin icon can return to normal.
If the above process is still not solved, next, in the desktop icon settings window, select the "Recycle Bin (full)" icon, then click the "Change Icon" button, select an icon representing the full state of the Recycle Bin; then select the "Recycle Bin (empty)" icon, and then click the "Change Icon" button, select an icon representing the empty state of the Recycle Bin. Click "Apply" and confirm to restart to see if the desktop Recycle Bin icon is back to normal.
If changing icon settings doesn't work, you can use the Group Policy Editor to try to solve the problem. Press Win+R to run gpedit.msc command, start to group policy editor, locate user configuration management module desktop in turn, and find "Delete Recycle Bin from desktop" in the right pane; double-click this item into the settings window, select "Enabled", click "Application" and confirm, then restart.
Next, re-enter the settings, select Unconfigured, click Apply and confirm before restarting. Then see if the desktop Recycle Bin icon can be restored to normal.
2. Retrieve the traditional file deletion confirmation prompt
You must remember that there are file deletion confirmation prompts in Windows 7, but they have not been there since Windows 8. Actually, instead of canceling this function, an option is not selected by default. Now, let's right-click the Recycle Bin icon on the desktop and select Properties to enter the Recycle Bin Properties window. You can see that there is a check box under "Show Delete Confirmation Dialogue Box", select it, click "Apply" and confirm it.
Try deleting a file again. Has there been a deletion prompt?
3. Repair deleted files can not enter the recycle bin
Sometimes, we may inexplicably encounter the problem of deleting files and not being able to enter the recycle bin. Of course, we did not press the Shift key while deleting the file, nor did we choose the option "Do not move the file to the Recycle Bin, delete it immediately after removing the file" in the Recycle Bin Property Settings Window. Instead, we simply pressed the Del key after selecting the file, and then we could not find the trace of the file in the Recycle Bin. After encountering the above problems, you can first enter the administrator command prompt window, and then execute the following commands:
Rd/s/q C: $Recycle.bin
After executing the above command, the Recycle Bin folder located on the system disk is forcibly deleted. After restarting the system, the folder will be automatically rebuilt to restore the default function of the recycle bin.
Tips:
If the above recovery method does not work, it may be caused by the change of the system file. At this time, the "sfc/scannow" command can be run to automatically scan and restore the integrity of the system files.
1 note
·
View note
Text
Flash Memory Data Recovery Services - Datarecoverylebanon
Oops! You were deleting files from your USB stick, also known as flash memory data recovery when you accidentally deleted a file that you needed to keep. Hey, even the best of us experience it. If a USB flash drive fails or becomes corrupted, you run the risk of losing files.
However, can deleted files be retrieved from a USB stick? Or are your options limited? There are, in fact, a few methods for recovering deleted files from USB flash drives. Files can be recovered using either USB A or USB C.
1. Using Command Prompt to Recover Deleted Files from a USB Drive First, give CMD, which is also known as Command Prompt, a shot. The following are the steps you need to take:
1. Connect the computer to your USB stick.
2. Enter cmd into the Start menu and press the Enter key.
3. After that, you’ll need to type “chkdsk X: /f” into the window of the Command Prompt. Press Enter. Keep in mind to place the USB stick’s letter where the “X” is.
4. Enter “ATTRIB -H -R -S /S /D X:*.*” after that. Hit Enter after entering the associated letter for the stick where “X” is.
5. After allowing the process to finish, search the USB drive for a new folder that contains the files you deleted.
2. You can restore earlier versions of your USB drive, but only if the restore feature was enabled before the files were deleted. How can you accomplish this?
1. Join your computer to your USB stick.
2. Open the Start menu on your computer. Enter “This PC” into the box.
3. Select “Properties” by right-clicking on your USB drive.
4. Search the list of recovery options available to you by entering the “Previous Versions” tab.
5. Click “Restore” and select a previous version — probably the most recent one before the deletion.
What if there are no previous versions to be found? Then you either don’t have any available or you didn’t enable this feature before it was deleted. To avoid problems in the future, make sure to back up your USB drive and use other methods to protect your data.
3. Using Data Recovery to Recover Deleted Files from Your USB Stick In the end, you can use data recovery software from a third party to recover deleted files. Drill Disk, for instance, can be downloaded and installed for free. Because using it is somewhat difficult, be sure to carefully follow these steps:
1. After downloading the software for Disk Drill, run the install.
2. After connecting your USB stick, start the software.
3. “Search for lost data” should be selected next to the USB drive’s name.
4. Check out all of the files you need to get back.
5. Select the files you wish to retrieve. Choose “Recover.”
The software uses file recognition algorithms to scan your USB stick and retrieve deleted and damaged files. If the stick has been damaged, of course, you might also want to consider purchasing a brand-new, high-quality USB flash drive.
Click Here: Flash Memory Data Recovery
0 notes
Photo

Data Recovery KL- An Overview Company
costs recovery external Expense center murah jatuh raid kedai disk cara baiki most inexpensive mac services unsuccessful crashed Computer system service company malaysia kl maintenance rosak
I've Earlier outsourced our company hard drive to appointed IT distributors and we observed they didn't definitely get it done in-property, instead, they send it on the area data recovery center.
The costs will vary based on the quantity of difficult disks while in the array, the kind of dilemma, how intricate the RAID recovery perform might be, the length of time the recovery course of action will acquire and the overall amount of data to be recovered.
Attempt cost-free All Recovery! This straightforward file recovery application can rapidly restore deleted photographs, videos, audios together with other files quickly from your machine or SD card. No root wanted!
To back again up Administration Server data on the pc in which the Administration Server is mounted,backup Device within the command prompt with the required list of parameters.
Data Recovery KL
Basic safety commences with comprehension how developers gather and share your data. Data privacy and security tactics might fluctuate based upon your use, region, and age. The developer supplied this data and could update data recovery services kuala lumpur it after a while.
When your data is lost so you don’t Use a performing hard disk drive, It's also wise to contact a data recovery Experienced to repair the harddrive and try to Get well the data.
For a testament to their abilities, the company also provides data transfer and data backup services for organizations.
https://www.datarecoveryinmalaysia.com/
It is incredibly vital that you be aware that Should the data to the faulty gadget is valuable, it is actually critical to acquire it recovered by seasoned specialists.
While the data seems to generally be irretrievable and lost, in reality, it is still recoverable with the help of Skilled data recovery software package and State-of-the-art data recovery services
1 note
·
View note
Text
Partition find and mount unknown device


How to Fix "Device Not Detected in Windows' (3 Ways)
Insert windows installation disk > Reboot your computer > Enter any key > Format Your PC > Enter > Select your disk > Delete.
Type “compmgmt.msc” in the command prompt box > Disk management > Format (right click on disk).
Type cmd in the command prompt box > Format X: /FAT32 (enter your disk letter).
Place the NANDs on the data recovering tool, which consists of NANDs readers, and you will be able to recover the files.īonus: Related USB and Hardware Fixes How to Fix "Unable to Format Flash Drive" with CMD and Other Ways (3 Ways).
Carefully separate the NANDs from the PCB using a precision soldering iron.
Look on the controller chip to know the exact type, but be careful when examining the chip to avoid damaging the PCB board and NAND.
Get recovery software and a NAND reader that supports the drive’s controller type.
You may have to a hire an expert to do the job for you, but read the following steps to see if you can do it own your own. Recovering data from a flash disk is a complicated task. Some conditions that can make your gadget dead include damaged circuit board (blown resistors/capacitors, lifted pads, damaged NANDs, and broken crystal oscillator), damaged controller chip, and unresponsive drive. If your pen stick is damaged beyond repair, you may have to concentrate only on recovering the data. How to Recover Data/Files from a USB Flash Drive Your drive could be dead, and the best thing to do is to recover the data or files contained in it. You may have to forget about your data storage gadget if you see some of these error messages on your screen, or if your USB flash drive is not showing up or not detected.
"USB Device Not Recognized or Malfunctioned.".
"Please insert disk into removable disk.".
"Can’t format the drive, quit any disk utilities or other programs that are using this drive, and then try formatting again.".
"Please insert a disk into drive windows.".
"Pen drive is detected, but not showing in My Computer.".
"The disk is write protected, remove write protection or use another disk.".
"Generic volume cannot be stopped right now.".

For a list of available ports, click here" (common in Windows 7). "This USB device can perform faster if you connect it to a high-speed USB 2.In addition to the above mentioned errors, there are other less serious errors of flash sticks that should not make you panic, such as:
0 notes
Text
Permanently Deleted Files Recovery
We may accidentally delete precious files by sending the data to the Recycle Bin, Microsoft is very kind that offers to Restore feature for us inside the Recycle Bin. However, a shift + delete action will cause permanent data loss. What should we do then? In this writing, we will talk about how to recover shift deleted files with some effective ways, check it, and find how.
Common Ways to Delete Files
Nowadays, the computer is a necessary tool for people keeping files and folders such as pictures, audios, or videos. At times, we might clear the unnecessary files intentionally and unintentionally with the following ways:
1. You can delete unwanted files by pressing the DEL key on your keyboard. However, the data were sent to the Recycle Bin temporarily. What you need to do is enter the Recycle Bin, recover deleted files by merely hitting on the Restore button.
2. Some users may rely on using Shift+Delete key to clean the unwanted files. However, this action will cause permanent deletion, and in this situation, the deleted files or folders won't exist in the Recycle Bin for you to restore.
Please also note that empty the recycle bin is the same as using Shift+delete to delete the files permanently. Henceforth, you'll be carefully confirming your vital data won't be removed together while pressing the Shift+delete key or emptying the Recycle Bin.
Why can Permanently deleted files be recovered?
If you encounter data loss, especially like using shift delete, you can get the message that warns you the data will be permanently deleted. If you click on the Yes button to find that your vital files were removed along with the unwanted files, don't worry, the needed files are still there at least for a while. Once you copy or write new data into space, the contents of records will be overwritten forever.
Hence, if this has ever happened with you, don't worry; we've worked out some practical solutions to help recover shift deleted files effortlessly.
Method 1: Retrieve Shift Deleted Files without Software
If you have a synchronization tool like Dropbox, One Drive, or Google Drive, you can recover the deleted files by click on the restore button, or find them in the trash. Dropbox offers 30 days period to keep your records back up.
Can't find your files there? It's ok, let's try with the next solution.
Method 2: Recover Shift Deleted Files by Using CMD
You can also choose the command prompt to recover shift deleted files. Most of you could operate it only if you followed the guide carefully, although which is somewhat higher-leveled.
Step 1. Choose Windows + X keys at the same time to show a menu, select the Windows PowerShell (Admin) to turn on Windows Command Prompt and work it with the administrative order.

Step 2. Type: chkdsk X: /f and press (X stands for the drive where your files were deleted from)
Step 3. Type Y to confirm the command and press Enter to continue.
Step 4. Type X (the deleted drive's drive letter) again and press Enter.
Step 5. Type X:\>attrib -h -r-s /s /d *.* and press Enter. Wait until the command to run and retrieve your deleted files.
You will successfully get permanently deleted data back after finishing all the above steps if you are lucky enough. And if they were not working, go with the next best and easiest solution.
Method 3: Using Bitwar Data Recovery Software (100% Working)
The CMD feature is a way to complicate. And there is a free data recovery tool with today's technological advancements can recover shift deleted files from your computer’s hard drive. Here we recommend to you is Bitwar Data Recovery, the true companion for your data recovery.
It is a reliable, formidable file recovery programs that effective on Windows X/7/8/10 and other operating systems, Mac, and even on mobile (Android, iPhone). Whether files are emptied from Recycle Bin or deleted with "Shift+Delete," you can rely on this data recovery program.
First, we need to install the Bitwar Data Recovery software and created a software account, and we can get shift deleted files back in the following simple steps.

Please Have A Try!
Please refer here for more about Shift Deleted data recovery.
#Shift Deleted Files Recovery#Retrieve Shift Deleted Files#Permanently Deleted Files Recovery#Recover Shift Deleted File
1 note
·
View note