#htm tutorial
Explore tagged Tumblr posts
Visit Tumblr Blog
Explore Tumblr blogs with no restrictions, modern design and the best experience.
Last Seen Tumblr Blogs


Fun Fact
Average visit duration of Tumblr.com is 10 mins and 25 secs.
Text


Shop Sign Wall Lights
I put together a few sets of shop sign wall lights. But there are instructions. I kept some swatches as a default white color so that you could pick which color you want the light to be while in live mode. This saved on the file size of the package file because the more textures a file has, the more bloated the file size is.
I had some fun with some shop names although I mainly included generic titles in both English and Simlish.
DOWNLOAD for FREE: SFS
OR at Patreon*
*You must be over 18 to access my Patreon page.
INSTRUCTIONS ON CHANGING LIGHT COLORS
Once you place the light in build mode, then go to live mode. Click on the light and you will get the following pie menu.

Select SET COLOR AND INTENSITY and then choose THIS LIGHT. The color options will then appear so you can select which color you want.

If you use the name signs along with the Awning Lights, make sure to place the name on top of the awning so when you select the color picker, the correct sign changes colors. The other option is to place the name separate from the awning, go to live mode and change the color, then go back to build mode and add the awning light you want.
Enable the bb.moveobjects on cheat and then you can make adjustments to location and size of objects. You can adjust the position of the light on the wall by depressing the Alt key while placing the sign (on PC). You can adjust the size of the item by depressing the Shift key and either [ (for smaller) or ] (for bigger) (on PC).
CREDITS
Awning Shop Lights - 19 swatches of various awning wall lights. 18 are pre-colored and one is white so you can change the color yourself in game.
Candy Shop Lights - 20 swatches
Pottery Shop Lights - 25 swatches
Tattoo Shop Lights - 21 swatches
Enjoy!
Creations by SexyIrish7
These cc objects are new 3d meshes created using Blender and Sims 4 Studio.
Polygon Count: 6
All CC have:
*Ability to search catalog using search terms: sexyirish7 and si7
*Customized thumbnail
*******
CREDITS:
Software credits:
Sims 4 Studio v. 3.2.4.1 (Star): https://sims4studio.com
Blender 4.0: https://www.blender.org/download/
GIMP v. 2.10.34: https://www.gimp.org/
Inkscape v. 1.2: https://inkscape.org/
Thank you to the creators and moderators producing tutorials and answering questions!
*******
Model and Image credits:
Mesh created by me.
Simlish font credit to Franzilla: https://modthesims.info/
Image credits:
Awning Lights Image credits: Modified image from Adobe Stock
Candy Shop Image credits:
Swatches 1-3: Image by pch.vector on Freepik https://www.freepik.com/free-vector/christmas-candies-symbols-set-neon-style_11241813.htm#fromView=search&page=1&position=26&uuid=8b541325-0e62-4e37-9468-6bacd30f8963&query=neon+lollipop+candy
Swatches 4-8: Image by gstudioimagen on Freepik https://www.freepik.com/free-vector/sweet-candy-neon-seamless-pattern_5595774.htm#fromView=search&page=2&position=30&uuid=e2259de5-014d-4d04-af87-1198ee0f35e2&query=%40gstudioimagen+neon
https://www.freepik.com/free-vector/sweet-candy-neon-seamless-pattern_5595775.htm#fromView=search&page=1&position=27&uuid=e2259de5-014d-4d04-af87-1198ee0f35e2&query=%40gstudioimagen+neon
Swatches 9-10: Image by openclipart.org https://all-free-download.com/free-vector/download/peppermint_candy_clip_art_13182.html
https://all-free-download.com/free-vector/download/round_candy_with_stick_card_on_pink_background_6823183.html
Swatch 11: Image by All-free-download.com https://all-free-download.com/free-vector/download/round_candy_with_stick_card_on_pink_background_6823183.html
Swatches 12: Image by katemangostar on Freepik https://www.freepik.com/free-vector/ice-cream-cart-neon-sign_3238564.htm#fromView=search&page=8&position=42&uuid=2f82b4d1-5ca8-449c-ae22-4573861ebcb0&query=neon+sign+retail
Pottery Shop Image credits:
Swatch 1: Crafting icons created by andinur - Flaticon https://www.flaticon.com/free-icon/pottery_17392031
Swatch 2: Image by katemangostar via Freepik https://www.freepik.com/free-vector/aquarius-neon-sign_5561944.htm#fromView=search&page=2&position=5&uuid=c55e5e21-0550-46f0-b9be-cfa85ff38796&query=Ceramic+Neon
Swatch 3-4: Pottery icons created by Smashicons - Flaticon https://www.flaticon.com/free-icon/vase_3760867
https://www.flaticon.com/free-icon/vase_3760970
Swatch 5: Icon by istar_design_bureau via Freepik https://www.freepik.com/icon/pottery_1958438#fromView=search&page=2&position=20&uuid=096084ae-13fe-429c-a419-e6e13ccd37b9
Swatch 6:Icons by Eucalyp - Flaticon https://www.flaticon.com/free-icon/pottery_6552610
Swatch 7: Icon by berkahicon via Freepik https://www.freepik.com/icon/spin_13785816#fromView=search&page=2&position=0&uuid=096084ae-13fe-429c-a419-e6e13ccd37b9
Swatches 8-11: Icons by Freepik https://www.freepik.com/icon/pottery_8540816#fromView=search&page=3&position=43&uuid=096084ae-13fe-429c-a419-e6e13ccd37b9
https://www.flaticon.com/free-icon/machine_9200546
https://www.flaticon.com/free-icon/vase_8838322
https://www.flaticon.com/free-icon/pottery_3305262
Tattoo Shop Image credits:
Swatch 1: Modified Image by katemangostar on Freepik https://www.freepik.com/free-vector/tattoo-salon-neon-text-with-tattoo-machine-neon-sign-night-bright-advertisement_2438198.htm?log-in=email
Swatch 2: Image by Nippy Custom https://www.nippycustom.com/products/tattoo-neon-sign
Swatches 3-5: Image by bohlam via Vecteezy https://www.vecteezy.com/vector-art/2185717-tattoo-studio-neon-signs-style-text-vector
https://www.vecteezy.com/vector-art/34210463-neon-sign-tattoo-studio-with-brick-wall-background-vector
*******
TOU:
Do not re-upload and claim as your own
Do not re-upload and hide behind a paywall
#the sims 4 cc#ts4cc#sims 4 cc#the sims 4#wall decor#sims 4#ts4#lights#wall lights#signs#shop signs#retail#pottery#ceramics#tattoo#ink#candy#lollipop#sweets#sugar#light tutorial#sexyirish7
265 notes
·
View notes
Text
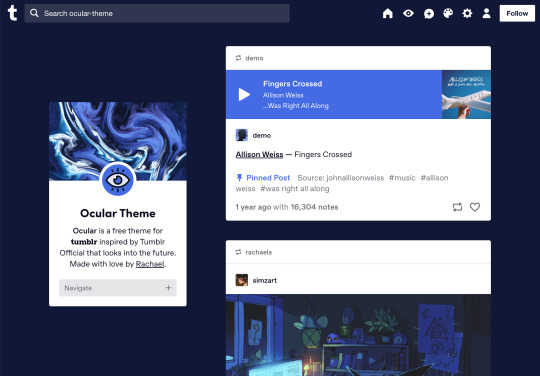


Ocular — Version 3
Preview // User Guide // More Info & Install
your favorite sidebar theme just got an upgrade, babeyyy
I went to update Ocular to make it NPF post-compliant and then my hand slipped and I redesigned the whole thing lmao. here's a brief update about Ocular 3; if you're looking for a full list of changes between versions 2 and 3, click the "Read More" below)
Ocular comes with the following features:
Colors: easily change the color scheme of your sidebar and posts using any colors you want
Post sizes: 400px, 500px, 540px, 600px, 700px
Sidebar: can be on the left, right, or above the posts. pick from a list of sidebar sizes, header image heights, and avatar shapes
Fonts: 20 different fonts, sizes 13px to 18px
Background: solid, gradient, full-size image or repeating image
Links: choose either regular navigation or drop-down navigation. unlimited custom links (visit the help desk FAQ for a tutorial) and ability to rename home, ask, submit, and archive links
Endless scroll, custom ask box text, Tumblr's full-width controls and search bar, optional header, avatar, and favicon images
if you already have Ocular installed, version 3 should be coming at you as soon as the update passes the theme garden. if you installed this theme with GitHub, you'll have to re-install manually.
now let's get to the fun stuff. what's new in version 3?
wow, do I have some updates for you!
1. goodbye color schemes, hello post background and text colors
you can now directly control the color of the posts rather than relying on color schemes to do it. want your posts to be a very specific shade of navy? all yours, buddy. go wild (make sure it's readable tho)
2. hello, color schemes! wait I thought we got rid of that guy
a lot of the color schemes I made became redundant now that the new post background/text color options exist. if you were married to the old color schemes, all of them can be recreated using those options. so the new color scheme options are as follows:
"My colors" — uses the colors you picked for post background/text
"Light preset" and "dark preset" — sets the posts to white with black text, or off-black with white text
"Translucent" — uses the colors you choose for post background/text, but makes the post backgrounds semi-transparent. there are NINE different translucent color schemes, ranging from 90% (only slightly see-through) to 10% (VERY see through)
3. navigation dropdown option
you can either use the sidebar links like they were before, or you can turn them into a cute little dropdown (helpful if you have lots of links or links with long titles!) you can enable this using the "use dropdown navigation" setting. you can also customize the label for the dropdown using the "dropdown menu label" setting. for instance, the dropdown on my blog currently says "oooh you wanna click me"
4. RIP google fonts I always hated your load times
decided to stop using Google Fonts and instead I'm providing the font files directly in the code. this will help speed up load times drastically when using custom fonts, plus I don't have to use Google. win-win! there's quite a bit of coverage overlap with the old fonts, but some of them that were too similar to each other got the ax. I also added all of the system fonts as options (hit classics like Arial, Georgia, and Comic Sans MS are now available TO YOU!)
5. more layout, sizing, and spacing options
the sidebar used to be either on the center-left, center-right, or above the posts; now it can go in the top-left or top-right! you can now control the border radius on the posts and sidebar. the header height, sidebar width, and post spacing all have additional options.
6. some options have been renamed for additional clarity
"background color 1" -> "background color"
"background color 2" -> "gradient background color"
"background" -> "background style"
"font override" -> "use body font everywhere"
"title" -> "sidebar title"
"description" -> "sidebar description"
"ask box text" -> "custom HTML above ask box"
7. removed some options
you win some, you lose some. I removed the uppercase sidebar links, theme credit, and inline media spacing options, mostly for redundancy reasons or because they produced unclear results.
8. as previously stated, now NPF-compliant
Ocular was ALMOST compliant with Tumblr's new post format, but had a few tweaks that needed to be ironed out. they're now ironed.
9: now user-friendly right out of the box
I updated the default color and content options, so new users installing this theme will have a much easier time using and customizing it immediately. no more ugly ass green background!
10. and finally, new JS
I had to rewrite some of the javascript for this theme, which turned into me rewriting ALL of the javascript. doing so meant that I could eliminate dependencies on third-party JS libraries and run the whole thing on plain JS. that should improve load times!!
bonus: custom CSS can do some nifty stuff now
want to change the size of your avatar? you can do that now! just do this to your Advanced > Add custom CSS section
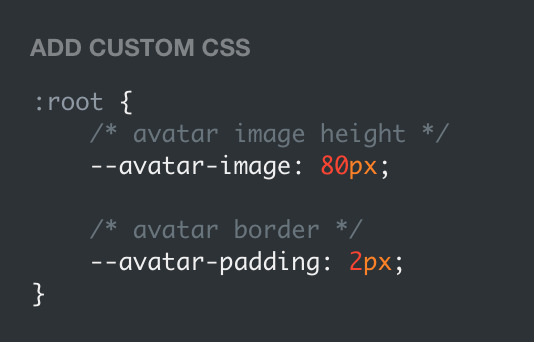

super helpful if you're using the Avatar shape: Uncropped setting and you need your image to be a specific size (like a pixelated GIF)
for more info, check out the Ocular user guide. thanks for reading my updates!! hope you all have a fantastic start to your 2024 ❤️
#tumblr theme#tumblr themes#themes by rachael#codingcabin#ocular#blog#you should've seen me writing the JS for the audio posts lmfao I was on my hands and knees begging it to work
574 notes
·
View notes
Text
How to create your OC in RDR2 story mode!

So I've been asked how I create my OC in screenshots and figured I'd to a tutorial on how to do this.
It's a long one, with visual references, so I'll stick this under the cut to spare those of you not interested in this kind of thing. It's divided into 2 parts:
Mods
Creating your OC and getting it ready for animating/creating a scene
I will create a separate tutorial post on how to animate characters as this will be way too long otherwise.
Part 1: Install the required mods
Rampage Trainer
So we can change models, add animations etc. https://www.nexusmods.com/reddeadredemption2/mods/233 (Read the requirements and install information thoroughly as we need ScriptHook for this mod to work)
Outfit Changer
So we can outfit our models, also has all the items from RDO https://www.rdr2mods.com/downloads/rdr2/scripts/12-rdr-2-outfit-changer/
Animation dictionary list for Rampage Trainer By default Rampage comes with only a very limited amount of animations, so we want to fix that. 1. Download the full animation list here: https://github.com/kaphzi/RDR2_stuff/blob/main/PedAnimList.txt 2. Move it into your RampageFiles/Lists folder to replace the original PedAnimList.txt
Optional mods:
RDR2 2025 Enhanced Edition Reshade
This is just a personal preference but I like the overall aesthetic which means i don't have to edit my screenshots, also having ReShade installed means i can save higher quality screenshot files and add DoF https://www.nexusmods.com/reddeadredemption2/mods/5549
Otis_Inf RDR2 photomode tools https://opm.fransbouma.com/Cameras/rdr2.htm
I use this exclusively for all my screenshots and recordings but it costs money (once-off via Patreon)
Photo Mode Enhancer https://www.rdr2mods.com/downloads/rdr2/scripts/8-photo-mode-enhancer/
A free alternative which is still heaps better than the standard photomode in RDR2
Notes
If this is your first time installing mods: I highly recommend you take a screenshot of your RDR2 folder so you can reference what it should look like with mods disabled and have a mods backup folder somewhere easily accessible to you so you can always reference which mods you are using. (In case of mod issues or you want to switch to online mode)
Here is a handy tutorial if you are new to RDR2 modding: https://youtu.be/msrGfWySX_0?si=N1FfbUbTwzfAPJUi
If you already have other mods installed: Outfit Changer does not work with WhyEm’s DLC and has issues with other online content mods like Red Dead Offline and Online Content Unlocker, so make sure you turn them off.
If you installed the mods correctly you should hear 3 beeping sounds when you launch the game.

Part 2: Creating your OC in story mode
So you’ve loaded up the game and the mods are working fine, so lets start creating our OC in-game!
Mod Settings F5 - Opens Rampage Trainer
F2 - Opens Outfit Changer
Step 1: Create your character
Open Rampage (F5) and go to Player > Wardrobe
Select Model Changer
Go down to Search for Peds and select Search for a Ped

Enter mp_female or mp_male (for this tutorial we will be using female)
Select the model and it will load looking a bit strange with missing limbs, that’s fine we will add these with outfit changer soon.

Go back to Wardrobe and select Walk Styles
Select Brave (this fixes the fatigued stance the models seem to load with)

Step 2: Add model parts and clothing
Close Rampage (F5) and open Outfit Changer (F2)
The first things we want to add to the model before we start building an outfit are Head, Torso, and Legs - write down the values for later use (in case you accidentally delete or overwrite the config files or the game crashes while doing this step)
I would personally leave hair until we have fine-tuned our face later or pick a hairstyle that doesn't obscure the face.


These aren't going to look the best straight away (if you’ve ever made a character in RDO we know how hard it is to make a decent character) but we will tweak the body model later in rampage trainer. Now we can start building the outfit.
Select "Change Ped Components MP Female" (or male depending on which model you chose)
Once you’re happy with the base model and outfit, save it in the Save Current Outfit option so we don’t have to build this base model and outfit again next time we log in. You can save multiple outfits so have fun!

Step 3: Fine tuning our character’s look
This is where something like Otif camera tools come in handy so we can really get the camera up close while we work on the face.
Open Rampage (F5) and go to Player > Wardrobe
Select Meta Tag Expressions

Tweak these to your heart's desire and trust the process! When you’re happy with the final outcome I would write down any changes you made so you can recreate your character in future, at present there is no way to save these meta tag expressions that I'm aware of so you have to do this every time you want to use your OC!
You can now go back to the Outfit Changer and add whatever hairstyle and hat you want. (Don't forget to save!)

Step 4: Setting up finalised character to use
Now, we need to clone our character so it’s its own character to use and pose how we like.
Go back to Rampage trainer and in the Player menu, scroll down to ‘Clone Player’ and select. Voila! There is your OC!

Now let's change back to Arthur. Back in the Player > Wardrobe > Model Changer menu, select Reset

Now we can change Arthur to another character much like we did when we changed them to the mp_female model or we can spawn in other peds.
I normally like to leave Arthur as is and then spawn in other Peds.
Additional: Spawning in other characters to create a scene.
In this example I’m going to spawn in Micah to create a scene with.
Go to Spawner > Peds > Spawner Settings
Make sure Frozen is ticked


Go back to the Ped Spawner and select ‘Search Peds’
Just enter in Micah and enter


From the list select CS_MICAHBELL and our stinky lil' man will spawn in

So, to use these characters we’ve added, we need to add them to the Ped Database so we can select them and switch to them any time we want.
There’s a few ways to do this but this is how i like to do it:
Back in the Spawner menu, go to Objects
Go to Cam Settings turn off Take Player With Cam
Go back and click to turn on Creator Cam


Now we can use our mouse to move the characters around, yay!
This is what we’ll be using to position our characters in scenes easily.
We need to add our OC and Micah to the database so we can use them with their own context menus, so lets right click on our character to select them and then click E to add them to the database, do the same for any other characters you want to use.
Back in our Spawner Ped menu, if we go to Ped Database, we should now see mp_female and CS_MICAHBELL in there
Scroll to a character in the list, and click them to get to their own context menus


To change Micah’s outfit for example, we would make sure we had selected them in the database so we can access their context menu and in the Outfit Variation section, choose one we like. Now that we’ve created our characters for a scene and added them to the database so we can use them via their own context menus, we can move on to animating them. How to animate your characters: https://www.tumblr.com/hello-mishki/781576015936995328/how-to-create-your-oc-in-rdr2-story-mode-part-ii?source=share

18 notes
·
View notes
Text
"Passionate graphic designer from New York, delivering creative solutions and technical support to help clients thrive!"
Hi, I’m Evans Dezven, a skilled UI/UX designer based in New York, USA, dedicated to creating intuitive and visually compelling digital experiences. As a freelancer, I’m available to collaborate on design projects that demand a perfect blend of creativity, technical expertise, and user-centered design.
I hold a degree from Chicago University with a background in computer science and design, enabling me to craft innovative solutions like the acclaimed “Genius In You” portfolio website. My expertise lies in delivering modern, functional, and aesthetically pleasing designs tailored to meet client needs while enhancing user engagement.
With a strong grasp of design trends, user behavior, and cutting-edge tools, I aim to help clients stand out in today’s competitive digital landscape. Whether you need a sleek portfolio, a polished mobile app design, or a revamped digital platform, I’m here to deliver exceptional results.
Explore my portfolio and services at https://iakash.digital/ or visit my personal site,https://iakash.digital. You can reach me via email at [email protected] or call (+91) 987-011-3409. Let’s collaborate to turn your vision into reality and create outstanding digital experiences that captivate and inspire!
#UIUXDesigner#FreelanceDesigner#DigitalDesign#CreativeSolutions#UserExperience#UserInterface#WebDesign#AppDesign#PortfolioWebsite#ModernDesign#InnovativeDesign#GraphicDesign#NewYorkDesigner#DesignTrends#DigitalExperience#ClientEngagement#CuttingEdgeDesign#DesignExpert#AvailableForProjects#DesignInspiration
2 notes
·
View notes
Note
if you were to link that tutorial post to your gradient texts again for me i will forever be grateful <33
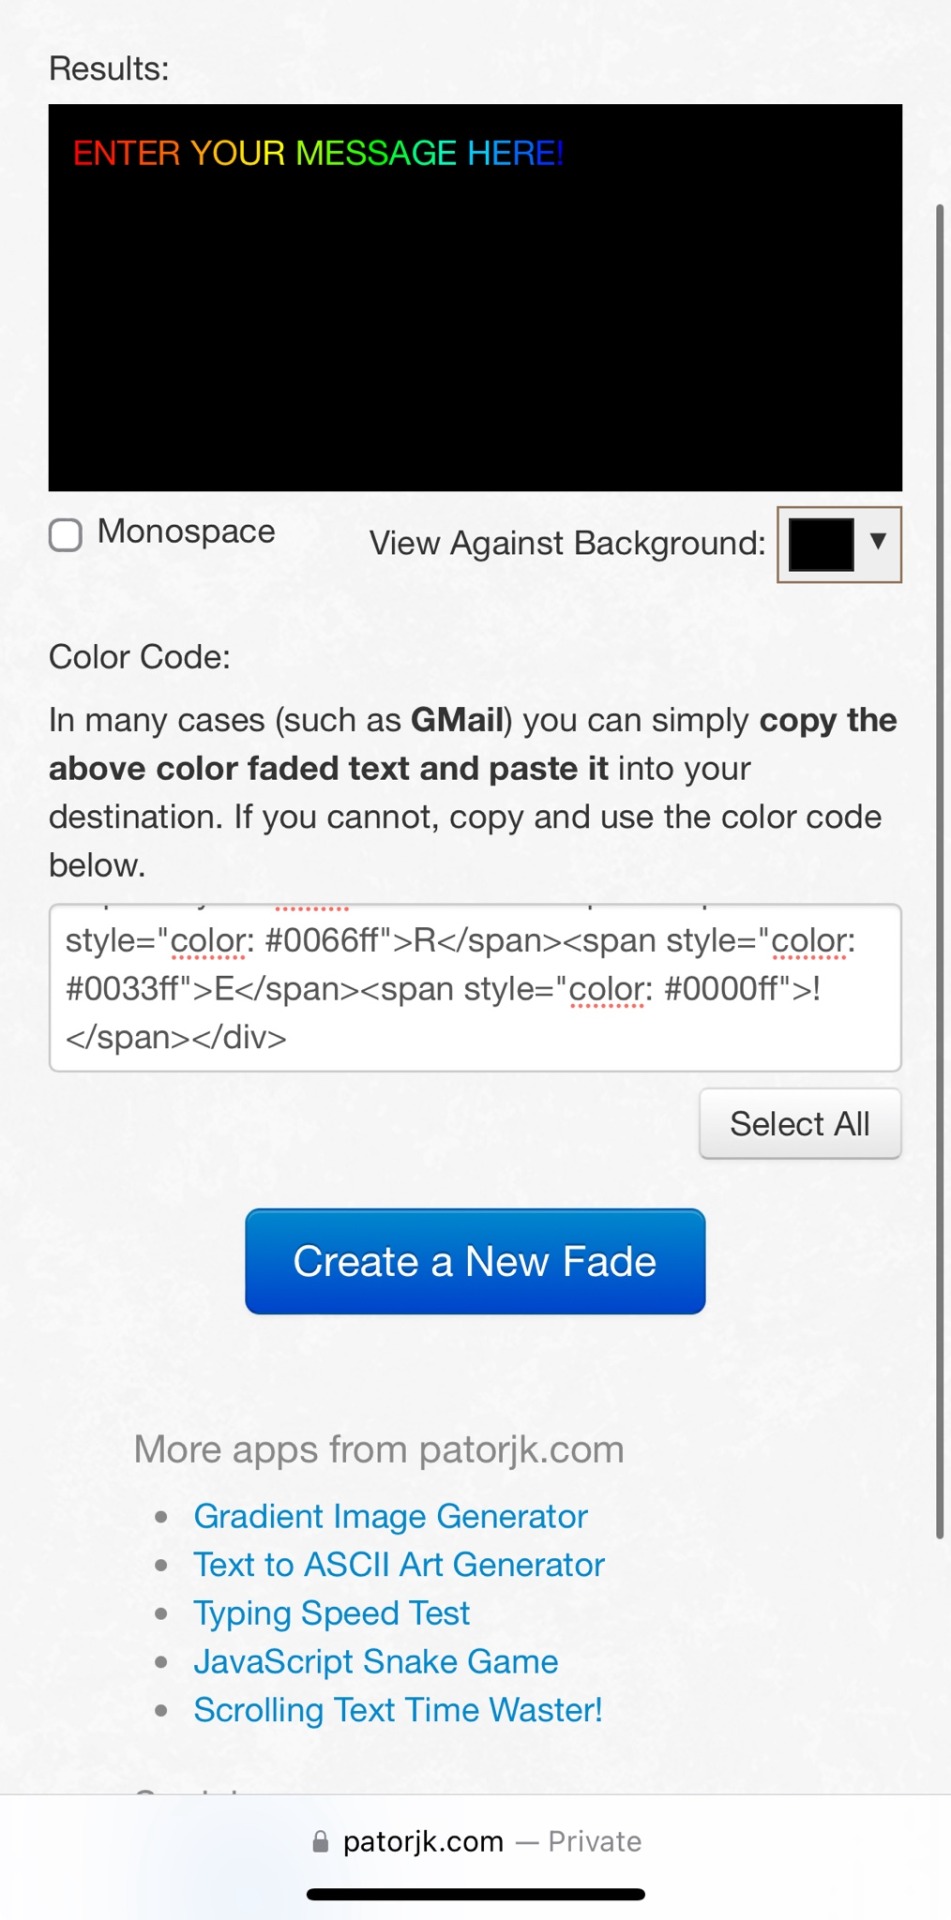
i unfortunately can’t find the of post, but this seems to be a common question so imma answer this and then link it in my navi as a faq. but anyway!! here goes smth 🔆
001. the first thing you wanna do is find an image colour picker to give you the hex codes of the specific colour you want!! you can use any one that works but i usually use this hex color code picker here —> ♡
002. after that you’re gonna need a gradient text generator!! the one i use is pretty straight forward and you can choose the amount of colours you want to form a gradient with!! you just need to add your text and then paste the hex codes for your chosen color for step one into the color boxes. once you click generate, there should be a coding sequence on the next page you can use!! the gradient text generator i use is here —> ♡
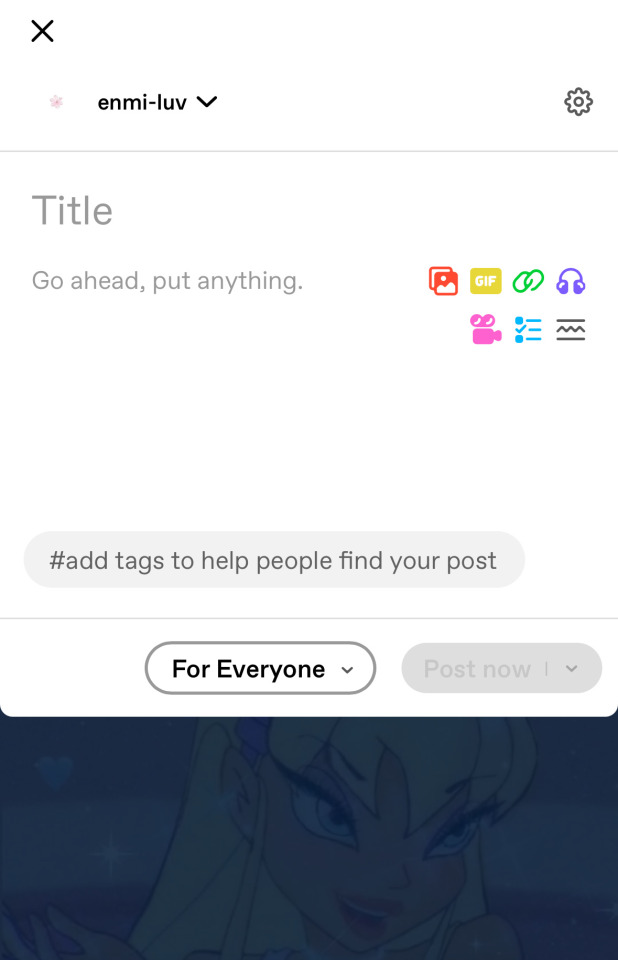
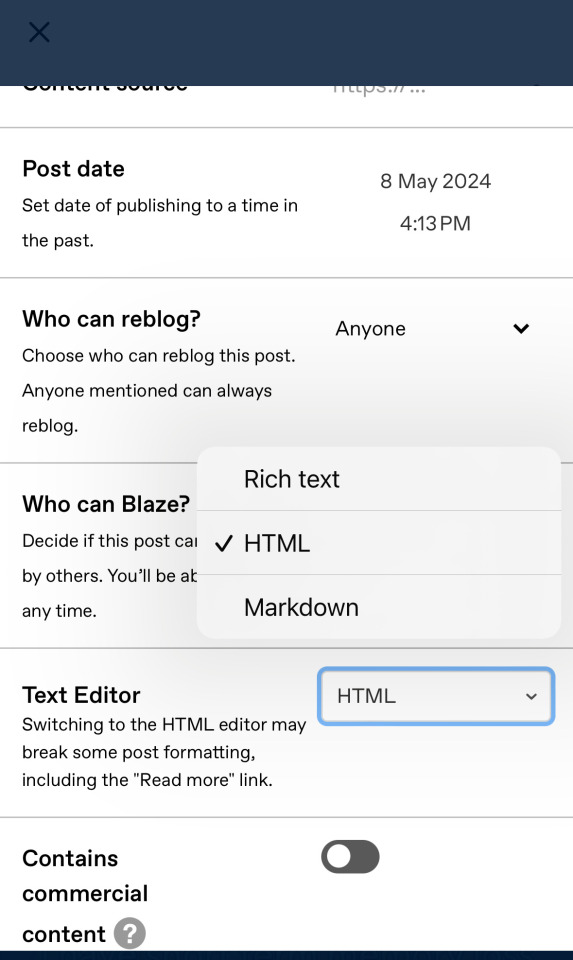
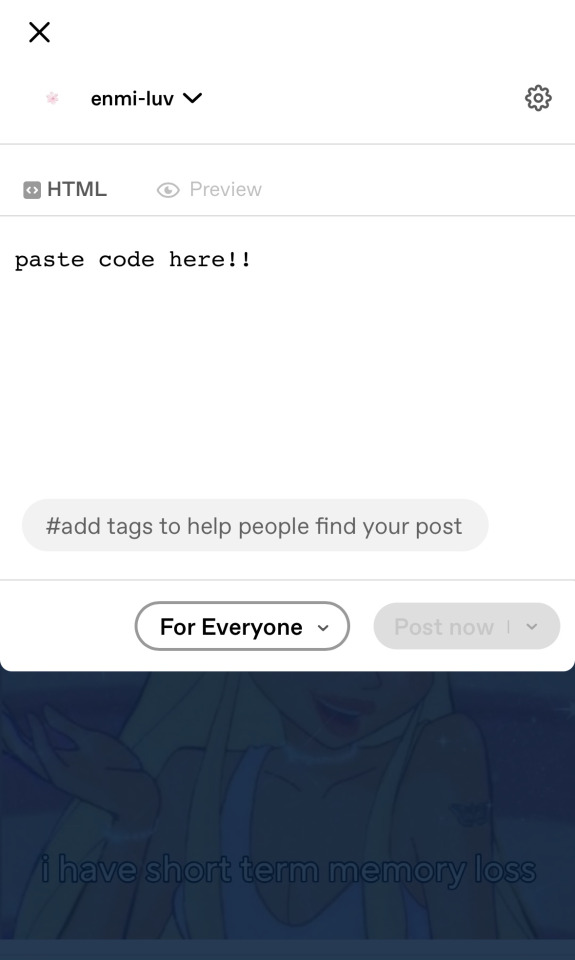
003. copy and paste the link form the second image above, and then open tumblr in your web browser (not the app!!) and create a new post!! you want to click on settings gear in the top right corner, and then switch from ‘rich text’ to ‘html’. then you just paste the coding sequence form the text generator in step 2 into the htm window that appears!!
11 notes
·
View notes
Text

"PIVA PHOTOGRAPHER á arte de capturar e eternizar seus momentos,cultos,vigílias,festividades,congressos,confraternizações,eventos
natureza,casamento,e etc..."
"Sou jornalista faço fotojornalismo"
"Ola gosto de fotografar estar nas redes sociais, fazer amizade, conhecer, pessoas novas, viajar e etc..."
"Eu amo fotografia ► fotografar é uma questão de colocar o olho, o coração e a mente na mesma linha de visão"
"TUTORIAL ► Fica proibido pegar qualquer fotos sem autorização do autor,quem pegar pode ser penalizado com ação judicial."
Veja mais sobre os direitos autorais no link ai em baixo Veja o link de direitos autoral (nº 9610/98)
Fonte: http://www.planalto.gov.br/ccivil_03/leis/l9610.htm
© Fotografo PIVA PHOTOGRAPHER | All Rights Reserved - Reprodução Proibida | ®Todos os direitos reservados
As fotos estão protegidas pela Lei do Direito Autoral nº 9.610, de 19 de Fevereiro de 1998.Proibe a reprodução ou divulgação com fins comerciais ou não, em qualquer meio de comunicação,inclusive na Internet, sem prévia consulta e aprovação do autor.
Todas as minhas fotos estão sob copyright completo. Se você gostaria de usar qualquer um deles, entre em contato comigo no Instagram
Todas mis fotos están bajo el copyright completo . Si desea utilizar cualquiera de ellos , por favor, póngase en contacto conmigo
All of my photos are under full copyright. If you would like to use any of them, please contact me
® PIVA PHOTOGRAPHER COPYRIGHT © ALL RIGHTS RESERVED
#PIVAPHOTOGRAPHER
1 note
·
View note
Text
29/09/2024 Assignment 1
On the second stage of this assignment, I started to design houses and towns in the city I created. I researched images of farmhouses, temples, and traditional patterns, sketching three different house designs . Since I want the entire city to have a food-centered theme, these designs incorporate both residential spaces and snack stands. In addition, I drew out some quick sketches of old figures, symbols, and patterns to practice adding texture for the final drawing.

This brings me to the style I would like to explore for this illustration. For this assignment, I would love to use a famous Japanese illustrator, Umishima Senbon, as my main reference. Her work is characterized by clear lines, simple color schemes, and rich details, which I hope to learn from.

Then, I worked on my first draft of the overall design. I also drew three drafts, making slight changes with each iteration. For instance, I experimented with different shapes by changing the outer form of the structure from vertical to round, and added details like a dragon face chimney. However, this was when I found myself stuck. I felt like my drawings were just combining different elements I wanted to include, which made them feel disjointed and random.

Luckily, I fixed the problem during the online tutorial with my professor. First, he pointed out the size inconsistency of the tricycle and the doors if characters were included. He suggested that the tricycle design could be removed or replaced by a huge billboard to avoid the problem. Also, he mentioned another inconsistency of the angry dragon face chimney and the warm vibe I wanted to create, and it was better to replace it with a softer round shape.
The professor also reminded me that my design of the floating city with cables and tubes might evoke a cyberpunk aesthetic, instead of the ancient vibe I was aiming for. To address the issue, he recommended that those could be changed into carved stones and inscriptions. Furthermore, instead of the incense burner, I could design the city’s center as a giant cooking pot. Lastly, the roofs of the towns and houses should be larger and more temple-like. On top of that, some sacred statues could be added to reinforce the city’s cultural atmosphere.
Thanks to the tutorial, I felt more confident to finalize my design. At the end of this stage, I researched more on ancient calligraphy and statues, such as oracle bone script and the Wind Lion God statues in Kinmen, Taiwan. I sketched some designs for the statues and was ready to move on to the next stage.

Wind Lion God reference: https://kinmen.travel/zh-tw
oracle bone script reference: https://www.epochtimes.com/b5/22/3/12/n13641587.htm
Umishima Senbon’s X: https://x.com/kaisen_tobiuo
0 notes
Text


I focused on creating a fog sheet to enhance specific areas of my environment, as the volumetric fog was making things too blurry. I wanted more control over the fog, so I turned to the Unreal Engine community for guidance. By following several tutorials, I was able to create a fog sheet blueprint that allowed me to adjust the wind speed, colours, fog density, and contrast. I also found a website where I could download various fog alphas for different types of fog effects. This blueprint taught me a lot, and I realized it could be adapted for future projects to simulate smog or smoke. However, there were some challenges, as the blueprint differed slightly across tutorials, so I had to combine them to create my own version. The key takeaway was gaining a solid understanding of fog sheets that I can later simulate in the render sequence, which will give me greater flexibility and realism in creating atmospheric effects in my environments
(No date a) Fog card materials (study) UE5, Damien Ramirez (CG). Available at: https://www.artstation.com/artwork/lDRZv5 (Accessed: 15 August 2024).
CapnMcKrakken (2017) Creating a fog sheet, Epic Developer Community Forums. Available at: https://forums.unrealengine.com/t/creating-a-fog-sheet/384740/2 (Accessed: 15 August 2024). Premium vector: Fog or smoke isolated on transparent background (no date) Freepik. Available at: https://www.freepik.com/premium-vector/fog-smoke-isolated-transparent-background_11255245.htm (Accessed: 15 August 2024).
0 notes
Text
#agere class#agere classroom#agere daycare#agere school#agere#age regression#sfw agere#sfw littlespace#age regressor#sfw age regression#agereg#age dreaming#sfw little blog#agere blog#Ciao lovelies#Agere diys#Agere diy#Agere craft#Agere crafts
0 notes
Text
'The Skulls': Insider Secrets of the New World Orderlies - Skull and Bones, A Brief Tutorial
https://www.bibliotecapleyades.net/sociopolitica/esp_sociopol_skullbones02.htm
View On WordPress
0 notes
Text
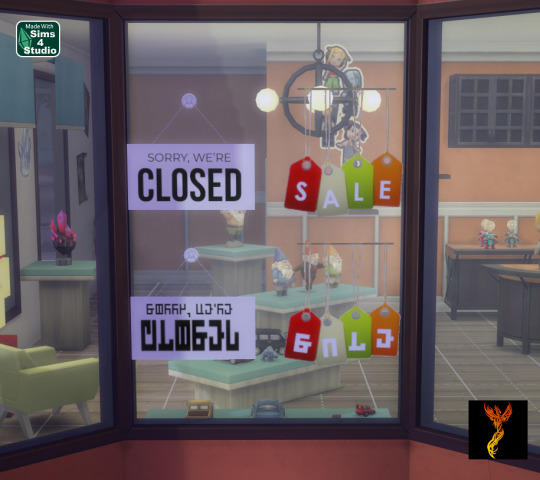

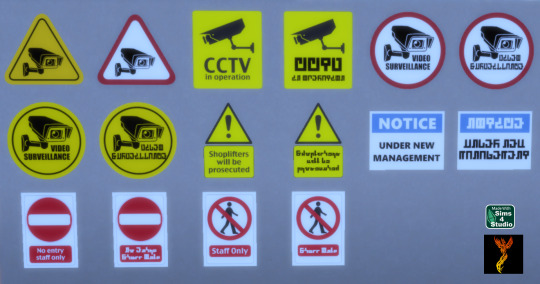
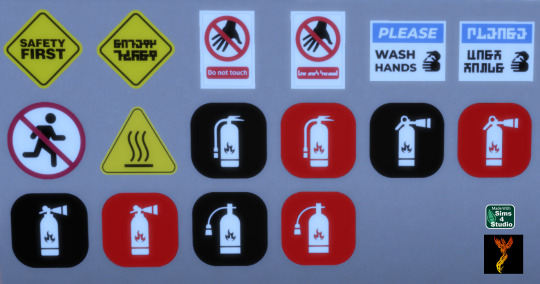
Retail and Safety Wall Decals
I created two sets of wall decals for you to use. Each sign is available in English and Simlish, as appropriate. There are 30 swatches for the Retail Wall Decals and 16 swatches for the Safety Wall Decals. With decals, they can be placed on a variety of surfaces including windows, doors, etc.
To adjust the size of the decals: Enable the bb.moveobjects on cheat and then you can adjust the size of the item by depressing the Shift key and either [ (for smaller) or ] (for bigger) (on PC).
If you have not checked it out yet, I also have a set of Shop Sign Wall Lights. The SFS link goes to the folder with my shop sign cc, so you can access the shop lights from the same link here as in the wall lights post.
Enjoy!
DOWNLOAD for FREE: SFS
OR at Patreon*
*You must be over 18 to access my Patreon page.
Creations by SexyIrish7
These cc objects were produced as a selective clone using Sims 4 Studio.
Polygon Count: 4
All CC have:
*Ability to search catalog using search terms: sexyirish7 and si7
*Customized thumbnail
*******
CREDITS:
Software credits:
Sims 4 Studio v. 3.2.4.2 (Star): https://sims4studio.com
GIMP v. 2.10.34: https://www.gimp.org/
Inkscape v. 1.2: https://inkscape.org/
Thank you to the creators and moderators producing tutorials and answering questions!
*******
Retail Wall Decals Image Credits:
Swatches 1-2 Image by All-Free-Download.com https://all-free-download.com/free-vector/download/colorful_vector_tags_146737.html
Swatches 3-6: Image by studio4rt on Freepik https://www.freepik.com/free-vector/closed-open-white-signboards-hanged-suction-cup_22656027.htm
Swatches 7-14: Image by upklyak on Freepik https://www.freepik.com/free-vector/wooden-board-sign-with-open-closed-business-status_406436627.htm
Swatches 15-16 & 19-22: Image by freedesignfile https://all-free-download.com/free-vector/download/vector_video_surveillance_design_elements_532894.html
Swatches 17-18, 23-24, & 27-30: Image by Myshopsigns https://all-free-download.com/free-vector/download/18_warning_signs_47669.html
Swatches 25-26: Image by Printable Designs https://free-printable-signs.com/Re
Safety Wall Decals Image Credits:
Swatches 1-2: Image by Sumran Ali via Vecteezy https://www.vecteezy.com/png/16770597-safety-first-yellow-sign-on-transparent-background
Swatches 3-4: Image by Myshopsigns https://all-free-download.com/free-vector/download/18_warning_signs_47669.html
Swatches 5-6: Image by Printable Designs https://free-printable-signs.com/
Swatch 7: Image by juicy_fish on Freepik https://www.freepik.com/free-vector/no-running-prohibited-signs_132098936.htm
Swatch 8: Image by Joko Sutriso via Vecteezy https://www.vecteezy.com/vector-art/27841150-hot-surface-warning-sign-icon-vector
Swatches 9-16: Image by Bai Ha via Vecteezy https://www.vecteezy.com/vector-art/36140779-fire-extinguisher-icon-in-flat-a-fire-extinguisher-icon-design-stock-vector
*******
TOU:
Do not re-upload and claim as your own
Do not re-upload and hide behind a paywall
#retail signs#shop signs#wall decor#business#wall decals#decals#safety#caution#the sims 4 cc#ts4cc#sims 4 cc#sexyirish7
115 notes
·
View notes
Text
Developing website layout
During the critique Dot suggested I could use tap pngs to give the photos a 'stuck in look'. I had been discussing using this effect for my process book earlier in the week as I wanted to give it a more hand made journal feel. However, when they mentioned it in tutorial I was intrigued with how this would change the look of the website.

I liked how the tape made the photos look more in keep with the stamps and gave the website a more handcrafted look. However, I thought masking tape on all sides oerwhlems the image, making the page look too busy.


To solve this I experimented with adding the tape to the sides and corners. I found I liked the tape on the corners more because looks less overwhelming and makes the image look secure. I also like how it helps the eye move from the text of the left to the image on the right more smoothly as the top tape draws attention after the text.
Freepik. (n.d.). White tape on concrete wall. [Online Image]. Available from: https://www.freepik.com/free-photo/white-tape-concrete-wall_6210491.htm#query=tape%20png&position=19&from_view=keyword&track=ais&uuid=a532f644-55ce-4819-b58d-04286dedc88e, [Accessed 2 May 2024]
0 notes
Text
Audiovision Blog Post week 2
Research (technical, academic, creative practice)
This week i have been exploring various inspirations around AV 2.1. Regarding my selected video I have been exploring the sound design within the film 'Anhiliation'. I love the texture and variety that the composers of the film 'Geoff Barrow and Ben Salisbury' implemented within this scene. The raw emotion and tension that is built through the minimal use of synths and layered bassline sounds are highly effective in reflecting the importance of the scene.
Sound design study using reference from '1:30 - 2:50'
youtube
The disonance of the ambient white noise creates a sense of desolation pairted with the saw drilling synths that send a chill down your spine as the alien transforms into this expansive matter.
I am already pretty familiar with how these sounds can be recreated and reinterpreted in Ableton, so I aim to have this as a base to build my sound design upon.
Following this I have been exploring similar compositions within Ableton using plugins 'Vital' and 'Synthmaster' as well as a variety of distortion, phaser/flanger effects in order to replicate the sounds within the film. Vital is a great free synth instrument similar to 'Serum' allowing for vast customisation and modulation.
2. Reflection
I was absent from class during this week due to sickness so I am not able to reciprocate the learnings in class. However, regarding week 1's learning and class content I was quite fascinated by the various possibilities of foley within sound design. I especially liked the 'nightmare machine' device that is able to create a multitude of horrific and discordant sounds it can create with such simple elements. This has really inspired my own sound creation and the possibilities that I want to explore within my own sound design in the future.
Also the contextualisation of emotion and mood within a scene was never an aspect of sound production that I really took into account enough. The exercise rewatching the same clip with different soundtracks really made me think about the possibilities of how I can warp and push a videos narrative through opposing or contrasting visual elements whist still making sense contextually.
3. Progress
I have been emailed by one of the animation students and have started discussing various ideas regarding their project and how my sound design could work well with their concept. They are planning on creating an animation based around the Hong Kong coffin housing which is a great fit for me as I have already made my own animation and sound design based around a similar concept (Kowloon walled city) in a previous dms class.
I am also currently I am working on my AV 2.1 assignment and exploring various tutorials and reference material to build a foundation of how I want my sound to fit within the video. I selected Resonance - Murat Pak as I found it to be the most interesting to me as well as offer a wide variety of sound creativity.
4. Bibliography
Anihilation ending scene:
youtube
Tutorial how to make atmosphere and textured ambience
youtube
Sound design tutorial based on Annihilation
youtube
Article exploring context, character and sound relation
www.icad.org. (n.d.). Micro-Narratives in Sound Design: Context, Character, and Caricature in Waveform manipulation. [online] Available at: https://www.icad.org/websiteV2.0/Conferences/ICAD96/proc96/back5.htm.
1 note
·
View note
Link
«Jean & Sweater for LF2 » is a dynamic clothing set for La Femme 2. Poser 6+ less and Cloth room are necessary to use the dynamics clothing. Tutorials to use dynamic clothing :https://www.renderosity.com/article/22867/how-to-get-the-most-out-of-pos...http://tipol-creations.e-monsite.com/en/blog/tutorial/utiliser-les-vete....http://anikakin.free.fr/HMann/DynamiqueHMann0.htm The pack contains : 1 dynamic jean in pp2 format.1 dynamic Sweater in pp2 format. 2 MAT poses for the Jean6 MAT poses for the Sweater 11 texture maps in high resolution in JPG format (including diffuse, bump and displacement maps) templates and obj files are included Depicted characters, hair and background are not includes Compatible figures: La Femme Software: Poser Pro 11, Poser 12, Poser 13 Coming soon: https://3d-stuff.net/ #daz3d #dazstudio #3drender #3dart #daz3dstudio #irayrender #3dartwork #blender #blenderrender #blenderart #noaiart #noaiwriting #noai https://3d-stuff.net/
0 notes
Text
First day of HTML
Disclamer, this is more of a review for me since I *did* start to learn html a few years ago. However, I didn't get too far and I'm not just going to jump right back in to where I was when I left off, so we're restarting from the very beginning.
Today I went through the "Introduction", "Editors", "Basic", and "Elements" pages and to summarize those lessons:
HTML stands for Hyper Text Markup Language, and is the primary language used for coding web pages
HTML uses elements to describe the structure of a webpage
Every HTML document must begin with the <!DOCTYPE html> declaration
An HTML element is defined using the format: <tagname>Content goes here</tagname>
HTML documents are created out of nested elements, meaning that one element can contain another
NEVER SKIP THE END TAG unless you want to risk unexpected errors when you try to run your code
HTML is not case sensitive, so it doesn't matter whether you write or . Just try to keep it consistent throughout your code!
Here's a list of the elements learned so far in those lessons:
<html> - the root element. This is used at the start and end of any document, with everything on the webpage sitting between the tags.
<head> - used for meta information that isn't displayed on the page itself, such as the <title> element
<title> - this is the title of your webpage that appears on your browser tab
<body> - the body of the document, a container for all visible elements on the webpage
<h1> - defines a heading of the highest priority
<h2> - defines a heading of the second highest priority
<h3> - defines a heading of the third highest priority
(and so on up until <h6>)
<p> - defines a paragraph
<br> - defines a line break in a paragraph (note: <br> is an "empty element" because it has no content and therefore does not have an end tag)
Links and images both use attributes within the tag to provide additional information about the element.
<a> - a web link. Can be nested within a paragraph or heading. Uses the href attribute to specify the link's destination. For example:
<a href=https://www.website.com>Linked text goes here</a>
<img> - an image. Uses src to specify the source file, alt to set alternative text, width and height.
<img src="image.jpg" alt="an image" width="96" height="102">
To create an HTML document you can simply open any basic text editor (for Windows, Notepad works perfectly), write your code, and save as a .htm or .html file, preferably with UTF-8 encoding.
You can then open the file in your browser to see your very own HTML webpage!
Reference: I'm using the w3schools HTML tutorial
0 notes
Text
Canva For Teachers -Slides in Seconds with AI in Free Option
youtube
loadYouTubePlayer('yt_video_xK0Vl7o4GO0_ImZUW3i@1eUaC3Lc');
Download and Test Camtasia for 30 days https://techsmith.z6rjha.net/MXPagn Buy Camtasia with a huge discount ( Educational Discount) https://techsmith.z6rjha.net/GmnJ3L Use code RUSSELL10 for extra discount ( apply when you pay) Buy Camtasia Commercial Version https://techsmith.z6rjha.net/jWNKV6 Camtasia Complete Course -Playlist: https://www.youtube.com/playlist?list=PLqYj2sOxDkVwgVrOdhpmUc-oOAUiyyzbk Sign up to my newsletter and get updated with all the latest videos https://forms.aweber.com/form/61/763053361.htm 00:00 Canva for teachers Introduction 00:49 Find out about Camtasia 01:23 The Magic Studio 04:40 A Free Presentation- an example 05:30 Editing - Pictures 06:22 The design 10:55 Sign up to My Patreon 11:55 Adding Slides 14:17 The Text Boxes 16:50 Saving Your Presentation 20:07 Thanks for watching Canva is one of the most impressive design based technologies that I have come across. I use it extensively for making my presentations for editing images, and for creating the thumbnails that I add on to my YouTube channel. In this video, I'm going to show you how to use the free Canva option to create slides. One of the interesting things about this option is that you can create the slides and save them directly as PowerPoint slides and then present in PowerPoint. He offers a lot of free options. So for example, in Canva, you can use the AI technology to actually help you produce your slides. This is really clever because you simply write in a simple description of what you want, and Canva will produce a basic set of slides for you. You can then go in and edit those slides. You can change pictures, you can change the text, you can add animations, you can even add video. One of the interesting things is that Canva offers lots of different options in terms of how you can edit the basic slides that have been created. So for example, you can add pictures, you can add text, you can change the layout of your slides and you also have really good control over the design. And look and feel of your slides. This is a complete tutorial ideal for beginners and I'm going to show you some of the key features in Canva 2023. We're going to focus on the AI technology and how we can use that to make the creation of the slides a lot easier. I'm going to show you loads of editing options and you'll be so surprised how quickly you can make a set of slides using Canva. I'll also finish by showing you very clearly how you save your slides so you can then present them as a PowerPoint slide. A great video really useful for any teacher who wants to learn to make slides very quickly, very efficiently and using the free Canva tool.
0 notes