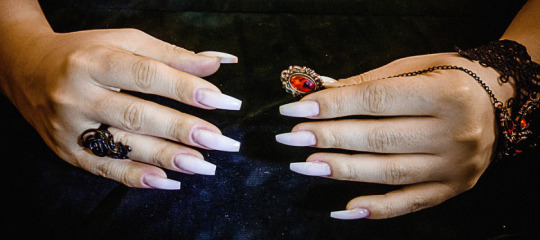
#i do them myself with just the basics solid-colour gel polish so they give a kinda childish look >:p
Text
aroace nails YAY 6=w=9
#idk if this colourfull of nails fits me this feels weird#i do them myself with just the basics solid-colour gel polish so they give a kinda childish look >:p#yippee i like em enough i think#slay.#finally. the world will know im gay.#like its not obvious by my general appearance already.#at least i hope. i like to think i look gay <3#sillyposting#also sucks that theyre probably ruined in a few days bc my work involved cleaning glasses and such and the brush thingy & the water ruins e#oh well
2 notes
·
View notes
Text
It’s been a while since I’ve written a solid DIY guide. It’s tough to follow up on the wildly popular DIY Wool Dreads; to this day my most retweeted, linked and shared post. Fake hair truly is luff.
Supposing you’ve now completed the finger-scalding, hair pulling ritual that is developing your fake mane, it’s time to tend to those hard working hands.
Afterall, what’s a kitty cat without her claws?

And so I give you this new guide to full gel nail tip extension manicures, complete with step by step instructions and links to all the products and supplies you need to stock your own mini home salon.
This guide is fairly lengthy so I’ve broken it down into four steps. You can quick jump from here to help you navigate:
Step 1: Precautions
Step 2: Materials
Step 3: Process
Step 4: Care
Let’s begin:
Step 1: Caution – Wet Nails Ahead
I’m going to start this article with the same disclaimer I had on wool dreads: this is an arduous, time consuming process.
One does not simply do nails.
Sure, there is risk of injury (although not much, I’ve deliberately exclude pointy objects from this toolkit), risk of infection if tools are not properly sanitized, and of course the ever lurking risk of pulling out your hair in frustration – thereby ruining both your wool dreads and your fledgling nail tips.
There’s a reason nail techs spend many hours and pay hefty tuition fees to learn this skill. It ain’t easy, and even given saintly amounts of patience, you will not be churning out competition grade nails on your first try.
That said, I believe the DIY experience makes you truly appreciate a craft.
I like to think what I’m giving you here is not only the instructions and tools you need for the job, but a renewed respect and understanding for why professionals charge the rates they do.
So like with fake hair, if you want perfect, quick results HIRE A PRO.
If you’re stubborn as a mule and fabulous as a unicorn however, move on to the materials portion.
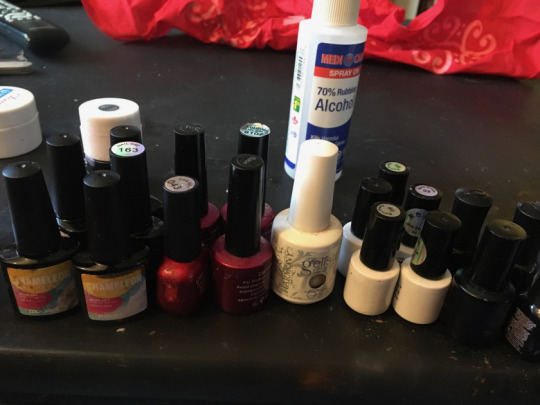
Step 2: Resource Gathering
Gel nail extension tips are pretty high up on the scale of complexity. If your idea of hand TLC is chewing a millimetre off your nails, this is not a good starting place.
However for the mani-curious (oh yeah, there’s gonna be a tonne of terrible puns here), I suggest following this guide to acquire the basic supplies you need for everything from a quick polish change to full extensions.
So without further ado, here’s your shopping list:
UV nail lamp – $4 – $13
Gel nail brush set – $1
Nail file – $1
Nail buffer – $1
Nail cutter (optional) – $1.50
Nail tips – $1
Nail glue – $1
UV nail builder gel – $3
UV gel top and base coat – $2
UV gel colour (optional) – $1
Nail decorations (optional) – $1
Nail polish remover
Isopropyl alcohol
Total damage: about 25 bucks, free shipping
I bought all of my supplies on eBay, and filtered by the cheapest option. Yes quality matters, but we are not enlisting in the nail olympics just yet.
If this is your first attempt, buy in small quantities, and buy cheap. You may hate the process, and you will probably screw up a few times so why waste platinum product. The only downside to ordering online is the 4-6 weeks it takes for the stuff to arrive from China.
Let’s dissect that shopping list a little further:
Material breakdown
The formula to nail extensions is actually very simple: clean nails, glue on tips, slather on builder gel, cook under UV light and polish.
The first thing you should invest in is the UV nail lamp.
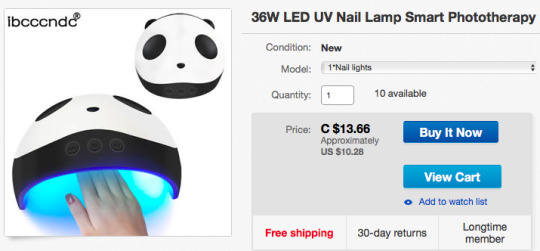
I kid you not, this is now my most used appliance, second only to my kale-smashing blender.
When I don’t spend hours doing a full manicure, I can bake on a layer on coloured polish in 60 seconds and walk out the door. Why anybody still buys traditional nail varnish is a mystery to me. I mean, do you people like being useless for 60 minutes while nails dry??
There are two types of lamps out there: UV bulb and LED.
Bulb based lamps are typically larger, which means you can fit your whole paw inside. The bulbs are modular and can be replaced. UV bulb lamps however take longer to cure your polish (we’re talking 2 mins vs. 60 secs on LED). They’re also clunky and fragile to transport.
I am personally in team LED because uh hello welcome to the 21st century. LED lamps range from table sized two-hand models, to something the size of a flashlight that you can stick in your pocket for field repairs. LED lamps are also typically USB based which means you can bus power them from your laptop, or plug ’em into a wall with your phone adapter (6-10W).

This is my lamp, it smushes to palm size and weighs less than my watch. The other model I featured above (and factored into the total material cost) is a bit larger, sturdier and was obviously selected because it looks like a freakin’ panda.
I don’t advise a bulb lamp, but meh — whatever you get your hands on will do.
Up next, a bunch of handy tools to have around the house:
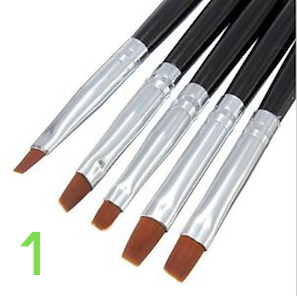

Builder gel application brushes
You really only need one, but they come in packs for a buck so no harm in having extras. The same brushes can be used for drawing on designs. I prefer using the smallest of the set for more control. The brushes come with protective caps, keep these safe because getting any fibres or pet hair on the bristles is a death sentence for the brush.
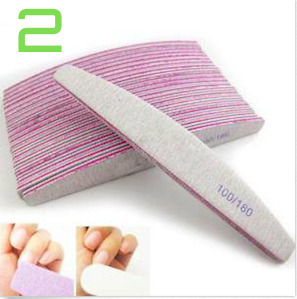
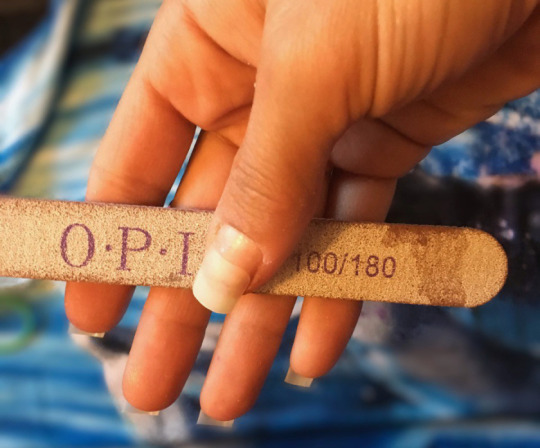
Nail files
These also come in packs for 99 cents. You’re looking for something fairly harsh like the 100/180 grit pictured here. These are for shaping your gel nails only not for your real nails – they will do a lot of damage to those, so DO NOT mix them into your regular manicure kit
Buffers
I wear these out more often than the files, so it’s good they also come in packs of several for a single, glorious dollar. Buffers have four grit layers, typically for filing, removing hard edges, smoothing and polishing. The final step has a rubbery finish that gives your nails squeaky gloss. These are also safe to use on natural nails, but sparingly – I’m not in favour of thinning out your keratin layers for any reason.
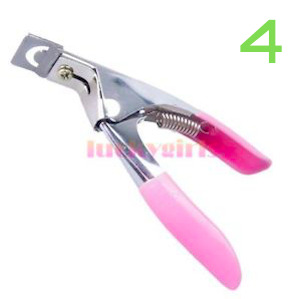
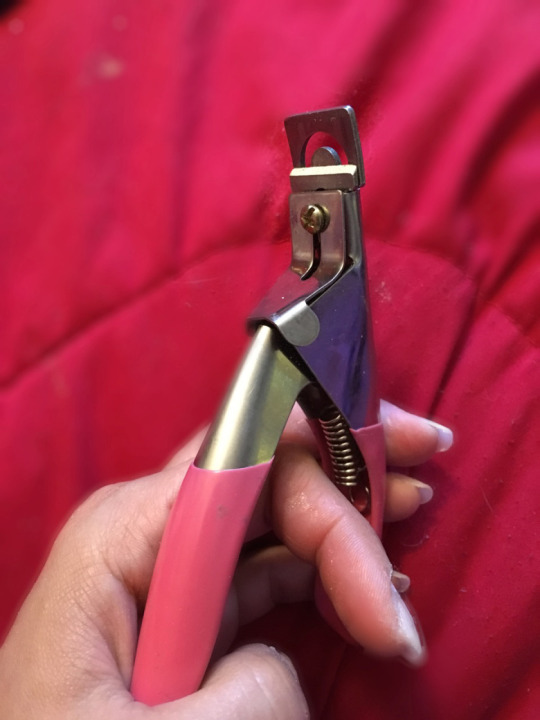
Manicure clippers (optional)
A good ol’ pair of nail clippers will also do the job making these optional, but for $1.30 why not have them in your kit? The advantage is the blade matches the curvature of plastic tips and because there is no torque when cutting, the nails are less likely to crack. It’s literally impossible to injure yourself with these, and since cutting acrylic is awful for blades, it’s worth investing in some so you don’t ruin your natural nail clippers.
Now for the main show:

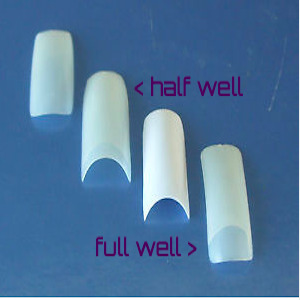

Nail tips
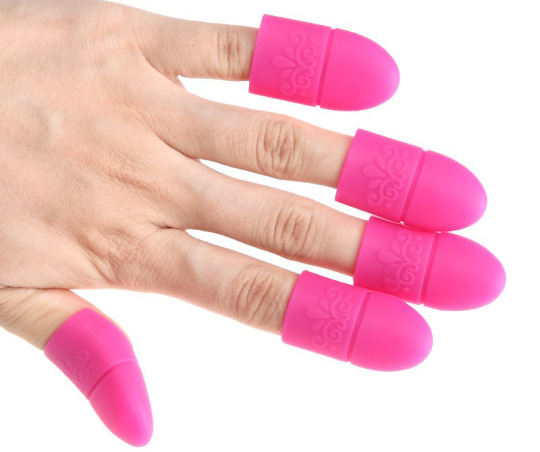
Tips come in multiples of 500 and are bagged by sizes. Your thumbs range from a 1-3, whereas the most discerning pinkies are an 8-10. The most common two types of tips are full and half well, illustrated above. I typically use half wells when my natural nails are long, and full wells when my nails are short to give me more surface area to glue. Tips are usually clear or pearl white, but they also come in every colour imaginable so the underside of your nail matches (or contrasts) your polish. Note that colourful tips are thicker plastic and harder to work with, as are stilettos, and the myriad of other shapes you can buy.
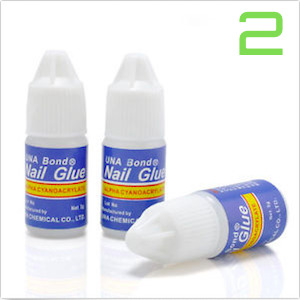
Glue
Crappier (and cheaper) than average superglue. Does not heat on contact, but will still bond instantly so avoid nose picking while handling.
Builder gel
This is the principal substance of your fake nail. Builder gels usually come in clear, white and transparent pink, but every colour and texture exists (built in sparkles, holographic gels etc). The strength and application of your gel determines the durability of your nails. Quality matters, but that said for your first attempt, buy cheap and experiment. The brand above is reasonably good, and being on the inexpensive side you won’t cry about it when a pot gets contaminated with feline fuzz or goes stale from light exposure. If you’re looking for the good stuff however, IBD Gel is the golden standard.
And for the finishing touches:
Base & top coat sandwich your polish to keep the application smooth, make it last longer and give it a shine. If you only buy one, get the top coat because it has the gloss finish (or matte if you prefer). They typically come in pairs however and may also include a primer. The primer is for natural nails, to remove oils and make the gel polish adhere better.
Gel polish comes in every colour, texture and style imaginable. Matte, magnetic, mirror finish, mood changing, you have endless choices! Just make sure it’s UV gel that cures with a standard lamp.
Deco is optional and comes in millions of styles. Metallic cutouts, crystals, pearls, striping tape, stamps, transfers, foils – just go ahead and search for “nail art” and be prepared to lose an evening. I have a shoebox full of these and they can also be used as body decoration with a touch of eyelash glue.
Not included in my total materials bill is isopropyl alcohol and nail polish remover (not acetone!), I’m assuming you have these around the house. You will also need some paper towel, the coarser the material the better – cotton pads and soft tissues leave a fuzzy residue which makes your application more difficult.
Last but not least, find yourself a nice container you can use for brush cleaning. I commandeered an old spice jar for this purpose and put about 1cm of nail polish remover in it.

Step 3 – Application Process
Now for the fun part! Wooooo!!
NB. I’m illustrating this guide with pictures I took myself, maneuvering the camera with my knees and pressing the trigger with my nose tip. So you’re welcome, that was way harder than doing the actual nails.
I also pulled out my old materials to match the tools listed above and demonstrate the results – sorry I’m an IBD girl now, once you go pro-gel it’s hard to go back. I chose a neutral finish to keep this simple, but in truth doing flat, light colours is the hardest thing imaginable. Designs can easily mask mistakes, and glitter builder gels or dark polishes are far more forgiving to imperfections and the perennial ambient fuzz sticking to your nails.
Let’s get started:
Clear a surface.
I mean seriously, clear it! Make space, lay out all your tools for quick access. Assuming you’re doing this on yourself, it’s hard to stop in the middle to fetch a tool you forgot.
I also prefer working on surfaces that are wood or metal, or at any rate a hard material that is completely free of dust.
Lock away your pets, DND your phone, and download the Chrome extension that disabled Netflix pauses (free lifehax, follow my blog k?). Like in my DIY dreads post, I’m giving you fair warning this is a lengthy process and it requires even more careful attention that rolling wool snausages.
To give you a benchmark, your average nail tech takes an hour for a full set of extensions. It takes me about three hours for extra fancy nails and I’ve done this dozens of times. For you? Lol. Make sure you’re sitting comfortably.
Next, wash your hands with an antibacterial soap and dry.
Match five nail tips from your kit to your nail size and set them aside ordered.
Chances are your nail beds aren’t identical on both hands, so do this one paw at a time. They won’t fit perfectly, so err in favour of larger rather than smaller. You’ll be cutting and filing them down anyway, and too small a nail tip introduces potential break points.

Using a stamp of paper towel dipped in alcohol, clean the surface of each nail thoroughly. Removing oils and soap deposits ensures the gel application is flawless. I like to start by doing the nails on my dominant hand – it’s a little clumsy, but good practice, and it makes the second half of the process when you’re getting tired (and cranky) a lot easier.
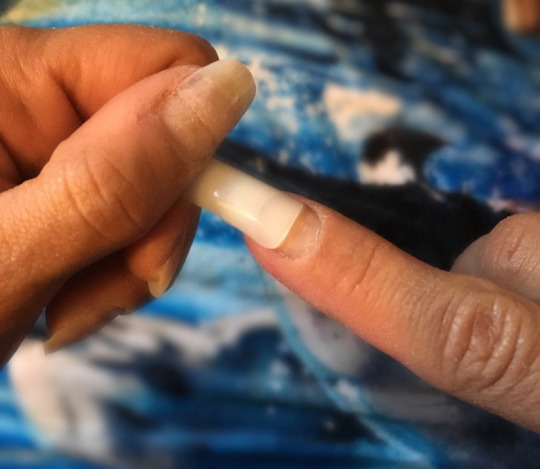
Holding the edges, apply a drop of glue to the well of every nail tip, and slosh it around so it fills the space. Feel free to shake off any excess, just be careful it doesn’t land on something you care about.
Then one by one apply even and firm pressure, bonding the well to your nail. If you’re using full wells, aim for the halfway point of your nail, giving yourself a solid base. With half-well tips use the shape of your nail to guide the semi-circle. In either case, I like to make sure the nail tip adheres to a portion of the nail firmly rooted in the flesh, rather than a floating natural nail tip. This ensures more structural resistance, and as your nails grow out, you’re less likely to have an awkward and painful break.
You’ll notice in my photos that I’m doing both hands at once. That’s ’cause I’m a boss. Don’t try that on your first run. Be patient and take one mitten at a time.
Snip nails to desired length. You are not shaping them now, although if you’re going for pointy nails, you can clip the corners into the shape as a preamble. As a rule of thumbs (*snicker*) square nails are strongest, but if the itty-bitty finger shovel look ain’t your thing, you can later round your corners slightly or go for an oval look. Stilettos require quite a bit of length and are extremely fragile.
I strongly recommend going shorter, especially if you’re new to extensions. Believe me, in the first few days of having your nails, you’ll be bonking into things like a kitten with clipped whiskers. The easiest way to accommodate longer talons is to grow into them.
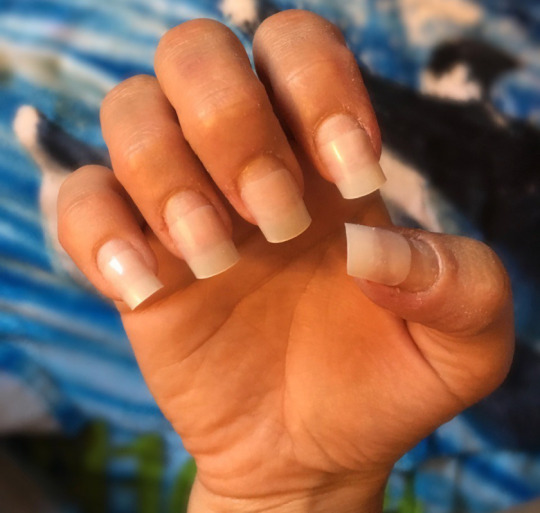
Regardless of whether you use full or half well extensions, you will notice there is a bit of a ridge where the plastic nail is glued down. Using your gritty nail file gently smooth the transition with a few quick swipes. Do not over-file. You don’t want to thin the nail tip, or your natural nail surface too much.
Roughing up the surface of your natural nail and the plastic tip makes it easier for the first gel layer to adhere. It does however damage your natural nails – you are literally shaving the top layers – so do it sparingly and don’t try to perfectly sand the entire nail bed. Mind your cuticles, they’re suffering enough through this process.
Check out this reference photo to give you an idea of the intended result:

Left hand filed and shaped, right hand un-filed
Time to paint!
Make sure your lamp is plugged in, your brushes cleaned, your little tube of nail polish remover at the ready and your gel builder is unsealed.
This is the part that requires the most care and patience.
Using your brush, pick up a very small amount of gel builder and place it in the centre of your nail bed just below the tip well edge. Wipe the excess gel off your brush on the edge of the container, and then slowly brush the drop of gel down, to a millimetre away from your cuticle, and then up towards your tip. Use very little pressure. Then smooth it to the left and right nail edge, avoiding contact with the cuticle.

The gel is very thick compared to a nail polish, but you want to apply it in very thin layers. This allows for better control to avoid slopping it on your cuticles. Aim for less coverage with your initial layers and reinforce the centre of your nail before expanding to full edge filling.
Cook under the UV light for 60 seconds. Most lamps have timers which automatically shut off. There’s no harm in baking twice, especially with the initial layers to make sure the gel is completely cured.
As the gel cooks, it leaves a sticky residue on the nail surface. Do not touch or wipe the nail between layers. The residue helps bond additional layers.

Depending on the size of your lamp you may be able to cook your whole hand at once. Since mine is the tiny portable variety, I like to do both my thumbs first, then the four fingers. It also helps to set the lamp on a mirror or a white surface so the light gets reflected for even coverage. The gel need direct UV exposure, so if your thumbs are twisted while doing the whole hand, it won’t cure properly.
Add thin layers of the gel builder gradually, baking after each application. Focus on filling the base of your nail to smooth the ridge of the well, and taper towards the tip of the nail. When you reach the tip of the nail, use your brush to smooth the gel under the tip edge, to form a complete seal around it.

I usually do 4-5 coats of gel builder. The key is thin coats, you want the result to be an even, smooth layer that is still slightly flexible so your nails don’t snap when you inevitably hit them against something. Look at your nails in profile as you’re building them up to make sure you’re not getting a bubble or any funny dips on the surface.
When you’re done with the gel, drop your brush in the nail polish remover container and slosh it around, then wipe down with a paper towel and cap it.
Once you’re satisfied with the coverage of your gel layers, use your coarse file to sand them down. Focus on tip corners and edges more than the middle section to blend the acrylic to the edge of your nail. Make sure the builder hasn’t bled and formed a hard edge on your cuticles. You have one chance to file these down now, but be careful and don’t over-file as it ruins the structural integrity of the nail.

Depending on the colour of your builder gel and nail tips, the well edge may still be visible. Sanding down, and then using the buffer sponges in four steps to smooth the nail will give it a flat white, matte appearance.
If you did the process one hand at a time, at this point you should repeat the steps on your other hand. In this sand-blasted form, your nails are sturdy and ready for polish.
Once you’re done buffing your other paw, wash your hands thoroughly with soap. Using a small paper towel pad dipped in alcohol, clean the surface of the nail to remove any leftover soap, skin oils, or the goopy gel residue.

Work one hand at a time again. The clear layers and colour bottles come with standard nail polish applicators, but you can also use your cleaned gel applicator brush too.
Apply base to alcohol wiped nails. Cook. Apply your desired polish colour. Bake. You may want a few coats of polish; for example my nude gloss colour took four thin layers. Apply top coat. Cure with UV light again.

Repeat on other hand, making sure you wipe your nails before beginning in case they accidentally touched fuzz or oils. When applying the top coat to nail tips, make sure to carry it slightly under the tip to form a seal.
If you want to glue gems, freehand designs or decorate your nail in any other way, now is the time to do it. Just make sure you top coat everything to seal it in place.
When you’re all done, wash your hands with soap again.
Then baste your cuticles with a heavy duty moisturizer – they’ve suffered enough for one day. You can also treat them with essential oils, but avoid soaking them for too long so your natural nail doesn’t soften and damage the new tips.

And that’s it, you’re done!
Time to flaunt your new talons.

Step 4: Care
How long do nail tips usually last?
Hard to say. It’s a fine balance between your klutz-coefficient, the rate at which your nails grow, and your attention span for a colour or style.
Assuming you don’t break any of them, you can sand down the polish layer, and fill in the outgrown area with new gel builder, refinishing the nails. In theory, you could do this forever, shortening the nails along the way as they get unruly.
Keeping extensions for long periods of time however is very unhealthy for your nails. The gel seal does not allow them to breathe, and bacteria can also accumulate under the tips.
Therefore, I don’t recommend keeping the same set of extensions for more than a month at a time. Likewise, I also advise against consecutive sets of extensions. Give your nails a chance to heal between applications.
Field repairs
I got into the habit of keeping an itty-bitty tube of superglue in my wallet for emergency fixes. I was instantly popular with the office fashionistas who were walking around with suspicious bandaids on their finger tips.
A drop of glue will seal a break in a hurry, and if the damage isn’t too extensive, a quick sanding, a new coat of builder and fresh polish will restore the nail painlessly.
If you’re travelling you can make yourself a mini kit of a portable UV lamp (note there are flashlight sized models), a mini builder gel pot, a brush, file and a colour/top coat.
Other types of damage
If you improperly applied the builder gel, if it’s been exposed to the sun or otherwise expired, you likely won’t get breaks, but an entire nail may peel off. This is very damaging to the natural nail since your tips are bonded to your nail. If you notice the separation starting (usually from a cuticle edge), use the removal procedure below to safely take it off and build a new nail.
Avoid soaking your hands for too long (ie. saunas, hot tubs, long showers). Your natural nails soften and become more flexible with temperature and humidity, but your gel nail tips do not, so you may get a peel/break.
Avoid harsh chemicals, corrosive soaps etc. and moisturize your cuticles often, applying cream to the skin not the nail surface. Use a dry brush to clean under the nails.
Removal
Well, that’s a whole other chapter – and I sincerely recommend looking it up carefully before attempting.
DO NOT under any circumstances crack or peel the nails off.
Sand the top layer of the nail as best as you can without reaching your natural layers. Then soak in a bath of nail polish remover, or tape cotton balls dipped in the stuff to your nail until the remaining gel shell softens.
You can also use tips like these for the soak, although I personally found them very cumbersome:
Use a hard plastic stick to gently scrape off the remaining goop. Trim the nails, avoid filing while weakened from the chemicals.
After the ordeal, soak your nails in every moisturizing-tears-of-unicorn-emulsion you can find to restore their pH level and keep them from flaking.
Comments questions?
Post below and I will do my best to advise you.
I am not a trained nail tech, like most of my skill sets I learned this stuff off youtube and cursory google searches. That said I’ve had some practice at it by now and I’m happy to share my experiences.
Feel free to ask for advice on where to source materials as well, I have dozens of resources bookmarked.
Good luck!

DIY guide to gel nail extensions, complete with materials, step by step instructions and other resources. It's been a while since I've written a solid DIY guide. It's tough to follow up on the wildly popular
#diy gel nail extensions#diy manicure#diy nails#do your own gel nails#do your own nails#gel nail extensions#gel nails#make your own nails#manicure#nail extensions#uv gel#uv nail#uv polish
0 notes
Last Seen Blogs

macsbakery
Mac's Bakery

yahirceballos-blog
The Viewer

pseudosolstice
PseudoSolstice

yeezusquotes
I Just Want to Feel Liberated

alsharqaconst
Untitled