#i dont want to cut out such a long piece of fabric... also i want to be able to adjust the height of my belt
Text
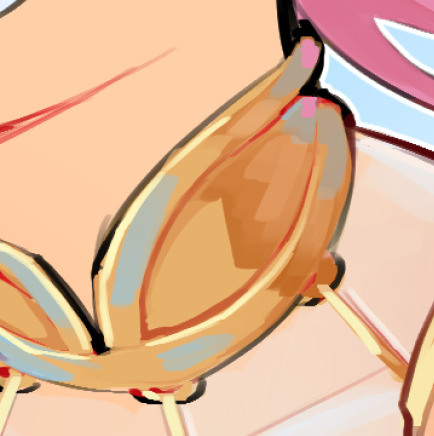
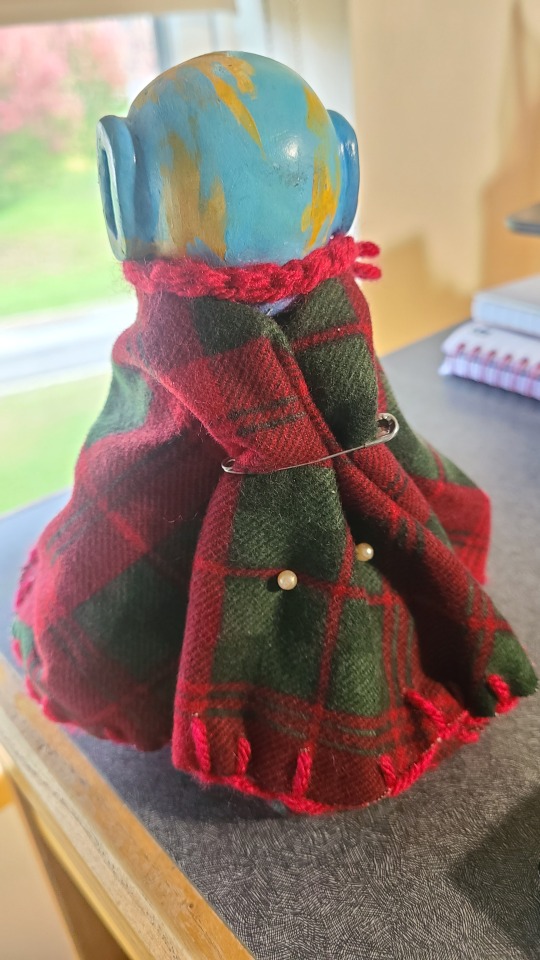
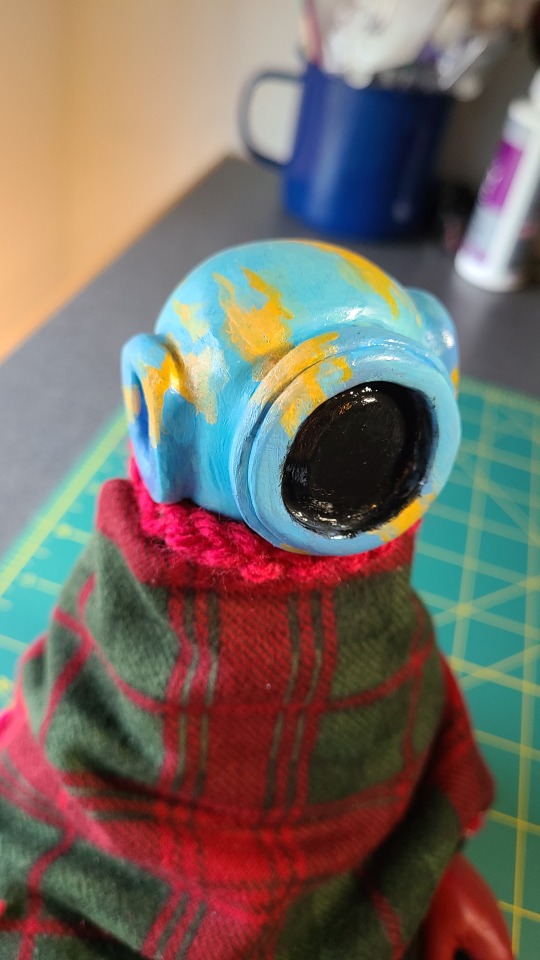
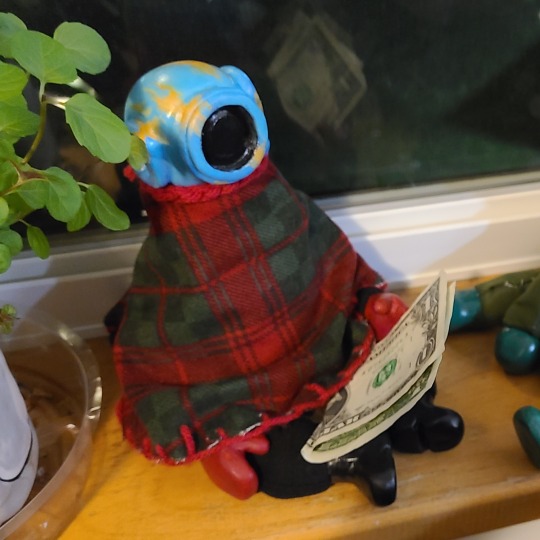
Who wants to hold my hand while i cry while trying to create a coat pattern for vash that has three layers
#Listen to my problems#the top half needs two layers because he has that cute over hang thing that he clips his tassels to#im going to split the bottom half into a skirt portion because#i dont want to cut out such a long piece of fabric... also i want to be able to adjust the height of my belt#itll be kind of like wearing a pinafore .... thats a good idea i'll secure the belt using clips ...#and put the buttons where they need to hold the little tassels in place ...#im going to beat that old mans ass for designing such a fucked up coat for vash to wear#(guy who brought this on himself by not cosplaying stampede vash)#even dante doesnt want to cosplay stampede wolfwood because of his terrible shoes
2 notes
·
View notes
Text
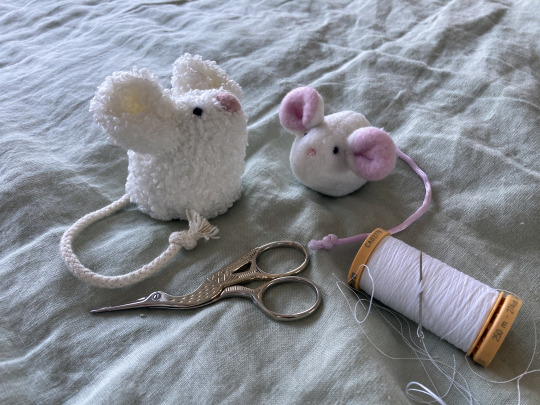

I've been sitting on this pattern and tutorial for a while now! so time to finally share it with you!
I was lamenting that the jellycat pip and sugar mice were long retired and difficult to get your hands on unless you are willing to pay much more than they retailed for each mouse, so i decided to try and eyeball a pattern and make some myself! they're not exact as i only used constructed visual references but they're close! please note that this pattern set is intended for personal use only. Rough tutorial under the cut!
This pattern is for printing onto A4 but you can check your scale with the measurements I've provided or just play around with how big or small you want to try and make them! i didn't really get any wip photos of pip mouse but it's method is largely the same with the nose being the major change, which i will detail in text in the instructions below.
for sugar mouse i would recommend using polar fleece as it will act the right way for the ears to do their squishy marshmallow looking thing. but minky should also work or other similar fabrics! for pip mouse if you can find a similar curly looking fabric with a thin backing that'll be ideal but fleece will also work well, you just wont get the furry texture, you want a fabric with a little bit of stretch to it. i however would not recommend fabrics like felt or non stretch cotton for these guys as it's likely to not take shape the same as there's no give to the fabric.
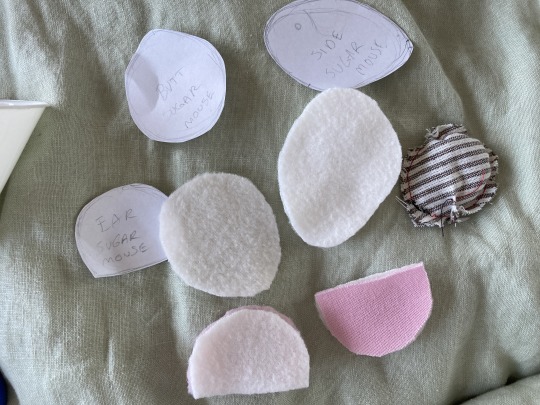
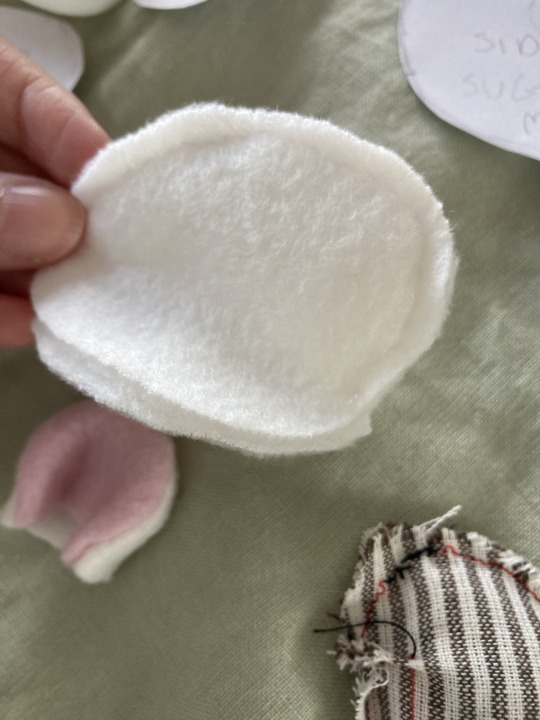
once you have printed out the pattern and cut the pieces in your fabric, you'll want to sew the ears up and turn them inside out, then put them aside for later. just leave them as is for now but here you can see i was playing around with pinching the turned through ear into shape.

Then moving on, sew the back pieces together along the spine and front of face. you then want pull the bottom open ends apart gently and place the open sides flat up against the base piece so that they're aligned, it can be good to pin this in place so it doesn't shift.
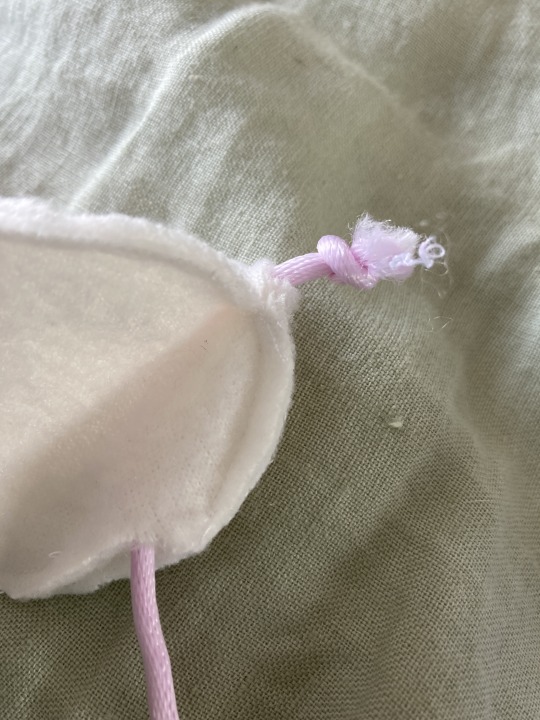
then, get your tail rope, and tie a knot at either end, placing the base of it inbetween the seam at the butt so that it'll sit in the right place, then sew the seam up directly with the tail in place, make sure you sew through the rope to secure it and make sure it doesnt shift. Sew around the bases seam leaving a hole in one side so that you can then turn your mouse through.
once turned through you will want to stuff your mouse with polyfill quite a bit so it takes shape! i like to put weighted beans in mine for extra effect, you can use dried rice or wheat too, just sew a little circle pouch a bit smaller that the mouses base with scrap fabric and fill and seal! then insert into the turning hole while you stuff. once stuffing is done you can sew the hole up with a ladder stitch. the weight from the beads will allow your mouse to sit up quite well.
next you will want to get those ears you put aside, take each corner and bring the ends together in the middle. then sew them gently together at the ends with one or two stitches in about the same spot. you want them to look 3d so dont sew the ends to the back of the ear, just end to end so they meet in the center.

Then pin the ears in place on the head
then you need to ladder stitch the ears in place while they're pinned so they dont shift around, go all the way around the outside edge of each.
now you're almost done! next they just need a face! sugar mouse only needs embroidery by way of a french knot for both the eyes and nose (you can find good video tutorials on how to sew a french knot online), pip mouse will also need a french knot for the eyes but has a separate process for it's nose.
(for the pip mouses nose you will need to leave the marked nose hole open and then stitch the nose fabric to the square nose backing in line with the dotted direction on the pattern, (it should look kind of baggy when it's unstuffed) sew it up completley with no hole, then cut a tiny slit in the backing and add polyfill there before closing with a basic stitch, then you ladder stitch the nose directly to the marked nose hole)
in order to hide the embroidery anchor knots i find the best way is to start by going down through the middle of the ears and then coming back up where you want the eye to be, and then going back down and up through the ear for the finishing knot, as it creates a very easy cover for them and looks nice and clean!
then you have yourself a little buddy!

haha they're great to squish!
if you use this pattern i'd love to see your results!
2K notes
·
View notes
Text
this post includes a tutorial for stenciling stuff on a shirt, with paint or bleach, here is the finished result for ppl who aren't interested in the tutorial and still wanna see what i made
against me! on an old sleeveless tee i got from my dad

alright time for the crafting
first youll wanna draw or print out out your stencil.
i advice printing black on white, black being the stuff youre gonna cut out of the stencil.
also for stencils bigger than A4 (or whatever size ur printer can handle) i advise using blockposters.com to print out the images youre using over multiple papers
cover that paper front and back in tape, itll prevent the wet paint from leaking through or ruining your stencil, and youll be able to reuse it!
Now comes the
SUFFERING
time to cut out those stencils.
take ur time doing this, yes itll take long but youll be able to use this stencil forever afterwards so its worth it.
make sure parts of the stencil you wanna keep are connected to eachother, so you dont lose detail in the stencil.
the white stripes on the stencil is where i drew the connections between the loose parts of the stencil
time to paint
i always shove a big piece of cartboard inside the shirt im printing on to give me a surface to pin the stencil to and to prevent paint from leaking through, so it doesnt slide around while painting. (you can also tape the stencil down if you dont want to run the risk of the pins leaving small holes in your clothing)
to prevent paint from getting under the stencil i apply the paint by dabbing the point of a big brush, with a bit of paint on it, onto the fabric. itll take around three layers for the paint to cover completely.


wow you did a craft!
i always iron my shirts after painting to "seal" the paint into the fabric. doesnt always work so i always wash my shirts by hand the first time to see how well the paint stays on.
feel free to ask any questions you have, i hope this was comprehensible
711 notes
·
View notes
Text
DIY How-To; Aluminum Can Spikes
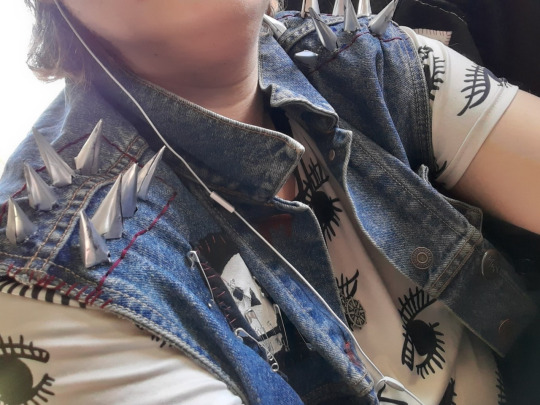
Preface; This will work with any kind of can as long as its metal. (soda, monster, ect) You can make them in colors depending on which side you trace your stencil on but im gonna teach you how to make them silver
And i cannot stress this enough,
BE CAREFUL WITH THE RAW CUT EDGES OF THE CANS, THEY ARE SHARP ENOUGH TO CUT BADLY
Material needed;
Empty clean aluminum can(s)
Sharp scissors (maybe a stitch ripper for attaching them but scissors work too)
A sharpie or permanent marker
Superglue if you want them perfect
An abundance of patience and caution
1 Gather your aluminum
First step is to turn those cans into flat sheets of metal. Start by making a small cut near the rounded edge of the top or bottom, about this distance

Then cut around the top to connect back where you started and take the ends off.
Next you cut a line straight down the side to interrupt the loop of aluminum.
What I do next is kinda just flatten it the best I can? Press it against a flat surface, make tiny bends against the curve, just to make it easier to work with, always being careful of the sharp edges
2 Make a stencil
So the general shape youre gonna wanna make it is like this
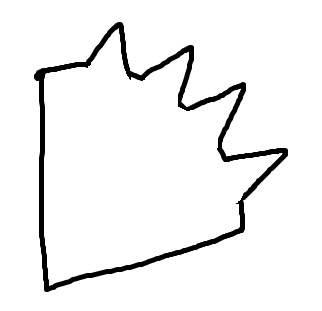

The big point will be the tip of your spike, and the little nubby ones will hold it on
imo it helps to have an extra can to experiment with what works best for what youre going for, but once you figure it out, have one flat cut out piece to trace for the rest, to make sure they all come out the same!
3 Trace a bunch and cut them out!
Sounds easier than it is. if you work with it, you can get more spikes sometimes by drawing them close together, but then theyre harder to cut out. Again, be careful of edges. If you want silver, trace on the printed on sign so you dont get sharpie on your spike (or dont, mistakes are punk)
4 Roll them up
This takes a little practice, but what you wanna do is roll up the wider end of the triangle, one edge over the other, into a pyramid, forming a spike with the point of the big triangle at the end. (this ones harder to draw)
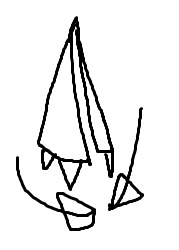

Sometimes theyll stay curled tight on their own, sometimes they need a little help (superglue) i havent figured out how to make em curl perfect every time yet. You can also fill them with hot glue to make them sturdier ( BEING CAREFUL OF THE SPIKES WHEN THEY HEAT UP FROM THE GLUE)
But the good news is your spikes are done!
4 Affixing them to your shit
Once you figure out where you want them, hold the bottom triangles on the first spike up to the spot it goes like you mean to put it in, mark where they touch the fabric, and then take your scissors or stitch ripper and cut four little tears that DO NOT connect at those points.
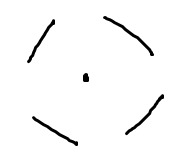
It should look like this, with the center dot representing where the spike point is centered!
You should also give each spike enough room that the tears dont run into each other. I usually do them one at a time but i dont think it matters.
After the tears are cut, you carefully insert the bottom triangles into the rips
flip it over, and fold the triangles in over themselves like a staple
Repeat until youve added on all your spikes and your piece looks sick as fuck
5 Bonus; patching over the studs
So when you do this, like a staple, theres the little pointy bits sticking in, and if its a wearble item, it'll prick your skin. If youre autistic like me thats a big drawback, but you can remedy this by sewing a patch of a thicker material (i use denim) over the place where these spikes are holding on.
324 notes
·
View notes
Note
PING JUMPSCARE anyway your art is amazing i love your new hiiai piece please talk about the design more if you want, i love hearing people yap about their design elements and the process to get to the final idea. (also, i really like ghosty sorta things and this certainly feels pretty ethereal! did you have a story idea behind it that perhaps i caught upon?)
HII THANK YOUUU!!!!! IM GRINNING LIKE A MANIAC RN DONT MIND MEEE teehee but YEYSSYEYSEYSEYYSE tysm for asking abotu the designnnn augh i loooove designing things its so fun to me!!! putting this under a cut because WOW i went crazy
i had a Vision for this design it was (as i put it to a friend) a "drowned love-struck sailor but also a guy that seems like he Lives at the beach but he's so ethereal you SWEAR he's a mermaid or something". like sirens and sailors but more emphasis on the sailor part
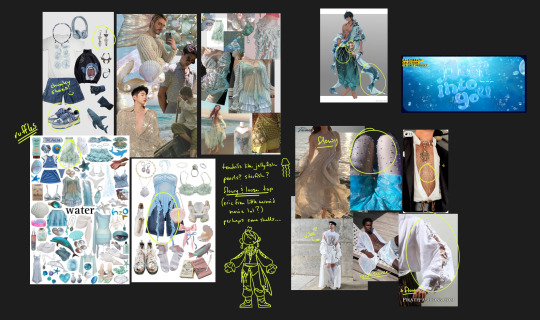
here's my moodboard/reference board!! i knew i wanted puffy sleeves and super flowy fabric but i wasn't sure what Else to add so i went to pinterest (of course) and saw like the fishnets and the pearls and ya i went insane. i didnt end up adding any pearls or as many ruffles in the final design but i think the whole beach/ocean aesthetic got across pretty well!!
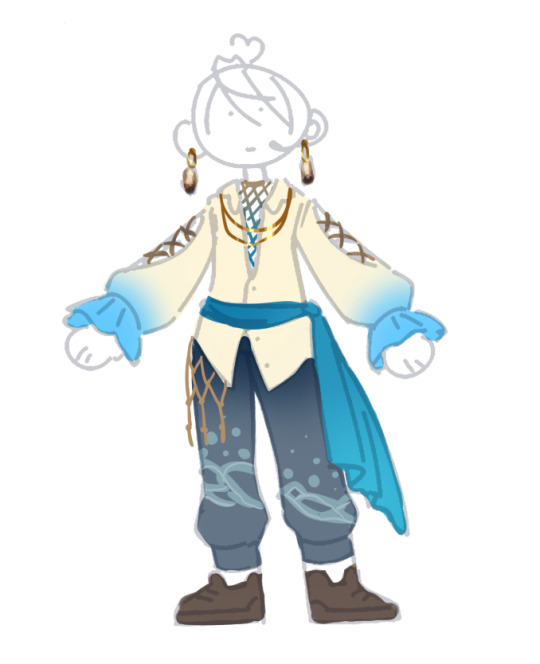
for colors: the only thing i had in my head was WHITE FLOWY SHIRT because i love drawing them and it just Fits the vibe i was going for. the blue gradient on the sleeves makes me think of drowning? like being in the ocean for so long that blue is just a Part of you now even though that doesn't really happen its the VIBE of it okay. being engulfed by blue being engulfed by the sea nd you're drowning..... aughh. also the collar is a type of scallop collar because i wanted it to be different from a normal white button-up okay. a lot of my design process is Is This Cool and How Can This Be "Functional" (either in design [adding color or shape] or use [actual function])
there's also the long sash for more color and more flowy action!! and those pants are also supposed to be loose and flowy you just. dont see them in the final piece lol.
another thing about the colors: i tried to contrast from the blues i was putting in the sleeves and the sash with the warm browns that you can see in the net shirt and the ribbons on the sleeves and the net-like accessory on the left leg and the addition of nets Really adds to the whole theme that Deep Into You has going on of being "drawn in to the point of drowning" and the whole sailor thing too
couple notes: the net shirt would be like a tank top and i originally was thinking of having sandals for the shoe choice instead of what i have now and honestly now that im thinking about it again sandals Would be cool. but for an enstars outfit that they have to dance in? those shoes are fine actually
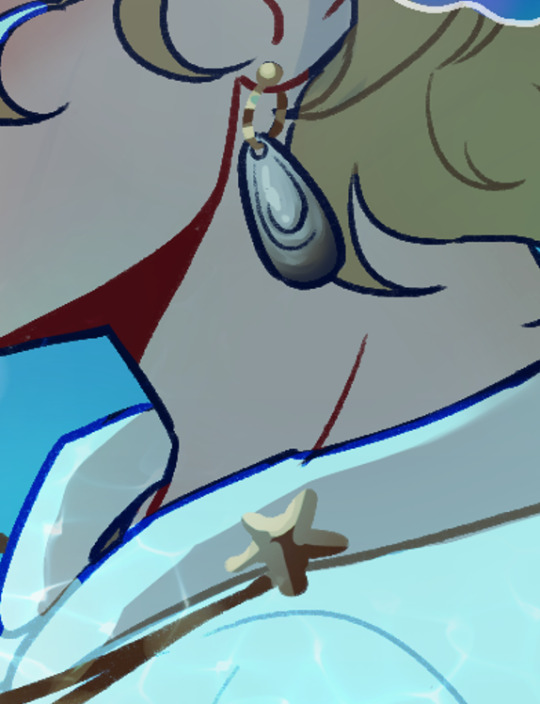
about the jewelry: i added the star clip a little late but it's supposed to act as a larger version of a tie clip? or like a brooch but with More stuff on it. also YES the earrings are mussel shells (i didn't know it was a mussel shell when i drew it i was referencing just a shell i had on hand) but aughh like mussel shells have so many pretty colors in them theyre like iridescent and i wasn't able to put that much detail in them at such a scale which is sad but its ok i think it still turned out really beautiful... i should draw shells more.
anyway thank you so much for sending this ask!! i dont really have much of a story behind this other than listening to the one minute clip we have of deep into you on loop for actual hours over the course of three(?) days but i might make a story.... ive been thinking about it... hope this is actually readable i wrote so much hahah but yes i am crazy and i love yapping about my design process and choices <3
#nep rambles#nep answers#i Really should be doing something else right now but nope. also i saw this ask immediately and decided to drop everything to answer it so.#outfit design
12 notes
·
View notes
Note
Do you have any tips on how you do shading ?? Your art really inspires me and I literally suck at shading lmao.
hello anon!!! im honoured i can inspire you sdfhkjh it's crazy to me that i can inspire literally anyone :,DDD <33
tbh i do all my shading purely based on vibes/what makes me happy so im not sure im a good advice person but ill show you a breakdown of how i go about shading and hopefully that might help a bit? :o i've left it below the cut because i have too much to say and it ended up being really long LOL
of course if there's anything you want more details on i'm always happy to explain, just let me know!
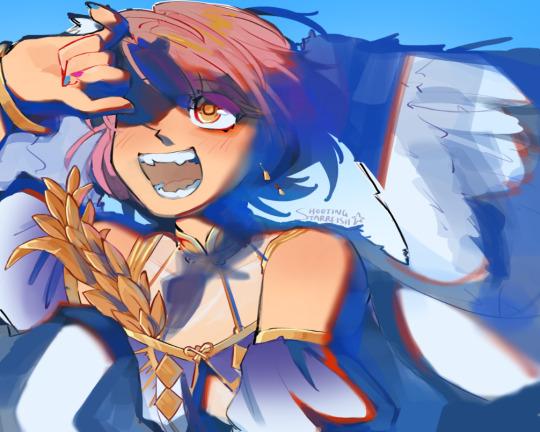
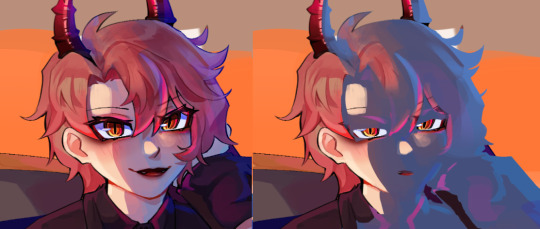
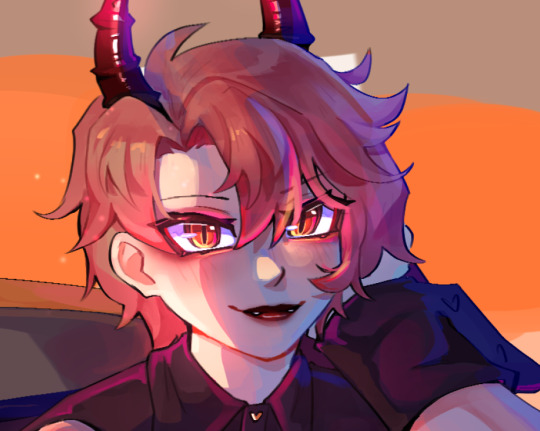
okay SO ill use this asmo as my example, i think there's enough to talk about here that it should be helpful hopefully
so here's my lineart and flats! i do all my flat colours in one layer because i find it easier to make everything look more cohesive when the pieces arent separated (i usually like it when the colours bleed into each other a lil), but i also just dont like the process of having to switch between layers for everything too LOL
flats are unfortunately my least favourite part :,D probably because my lineart is so messy hahah
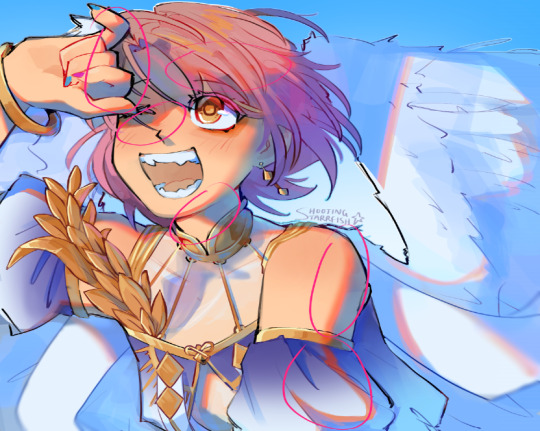
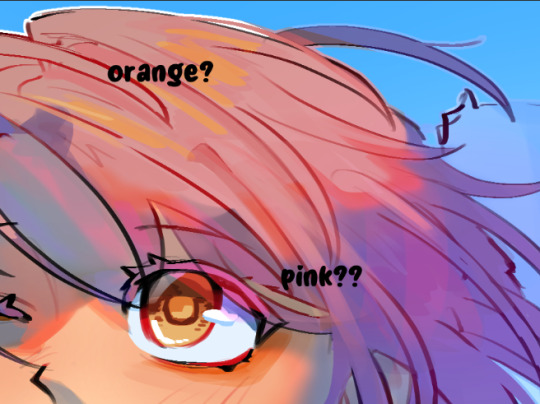
as you can see, the shading is very minimal here, just some subtle stuff in the wings/sheer parts of the fabric and some blushing on the skin, i also stole the orange under eye/liner thing from TBHK because <3
and then i clean up any messy stuff by just painting over top of everything on a new layer, i also rendered the metal at this stage because i felt like it i guess???
i dont think i did a suuper good job at rendering the metal here (because i was lazy), it looks fine but something to note about metal is that usually you want to push the highlights and the shadows a lot more, as well as the reflections because it is so shiny and smooth
this is why you'll see a lot of pink and blue in the metal, to show the reflections of his hair and the sky
i would recommend using reference to get a better idea of how metal ACTUALLY works but again, i was lazy lol so that's a simple explanation based on what little i know/have observed
the jump here is a bit drastic and you might be like woah starr where'd all this come from?? but this is all in one layer-
('hard light' - 62% opacity)

this is how that layer looks as a normal full opacity layer, for reference:
lately i've been using hard light layers to shade! they're very versatile because unlike multiply layers i can do my shading and my highlights within one layer (do you sense a theme of me disliking having too many layers lmao)
SO this is where i have a bit more to say about shading
you'll notice the prominent shading colour here is blue, this is because the main environment here (the sky) is blue. i dont know if that's how things work in the real world but it works for me LMAO
i usually prefer to have my shading lean cooler purely for aesthetic reasons, i like how it looks more
you might also notice some areas where the blue is a bit brighter, this is to imitate reflected light, again because the environment is blue
light tends to bounce around on things and reflect back even into the shadows so this is the effect im trying to get, i like to typically go with a brighter blue cause it gives things a sort of shinier? quality that i enjoy aesthetically, idk if its very accurate to real life tho
it also helps me to give depth to the shading since shading isnt usually just one flat blob, and this is a bit of a shortcut to having more dynamic (?) looking shadows

i also want to point out my use of bright reds on the edge of the shadows:
i believe this is called diffraction- there's a real legit scientific reason why it happens but i... dont know what that is
i just know it happens in real life (maybe not to this extent?) and it looks cool so i do it SFHJKSFH i usually blend it into the shadows though as opposed to into the lighter parts, i find that tends to look better
some miscellaneous things-
don't be afraid to throw random colours around!! who cares about realism, it's fun lmao
this artwork is a spoiler for asmo's bday so shhhhh but i did want to quickly show that you can also use hard light layers to create a glowy effect, i literally just painted the pink/orange directly on the shadows layer and it helped to make his eyes more glowy
of course i do go in and paint over a little after and add some layer effects but it helps to have that base there
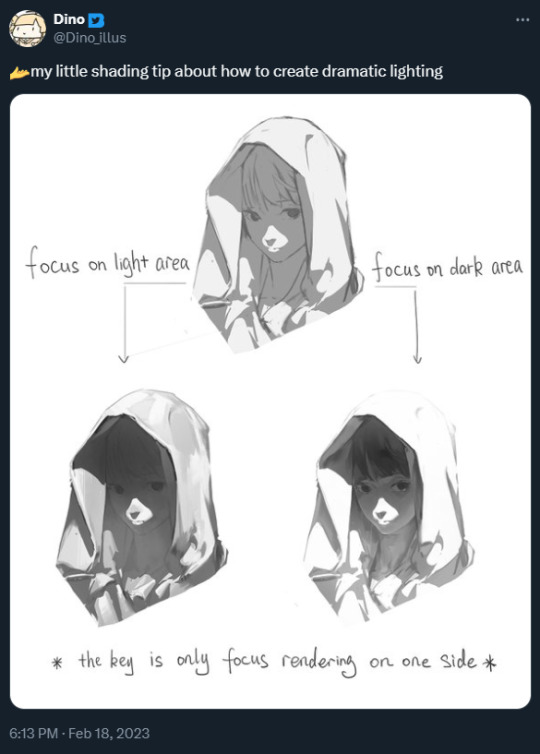
now that you've learnt that i dont know what i'm doing, i wanted to highlight a couple of resources that have helped me! i hope they help you as well <3
this video gives some really interesting insights into this artist's process and some problems they had throughout, as well as how they overcame them! it looks a lil clickbaity but i promise it's good!!

this tweet also shifted how i think about rendering when i want to do something with dramatic lighting!
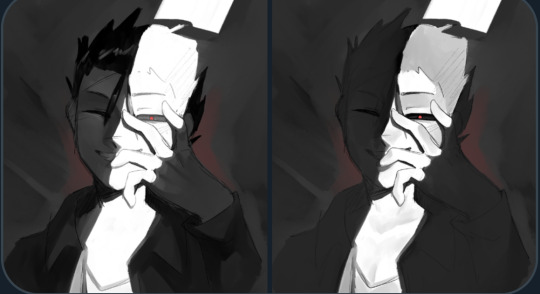
+ an attempt i made to replicate this (i wanna try this again lmao it was fun)
i hope that helps even a little bit, i did my best to explain but sorry if it was mostly nonsense though :,DDD best of luck with your art, anon!! <3333
18 notes
·
View notes
Note
why dont you like the church of satan? im not a satan simp i promise i'm just genuinely curious because idk anything about them
i'm glad you asked! during my debate with the CoS simps on twitter i dug up a bunch of evidence of the Church of Satan's right-wing leanings, which was wasted on those losers because obviously they're not going to concede anything ever, but i'm glad to have a more receptive audience here.
so, to start with, the most well-known pieces of evidence relating to this are A: Anton Lavey said at one point that the CoS gives people "Ayn Rand with trappings" and B: there's a segment in the satanic bible called "the book of satan" which is outright copied from the proto-fascist philosophical tract "Might is Right", written by Ragnar Redbeard.
now, apparently CoS simps have taken it upon themselves to go around bothering anyone who brings this up, arguing that Anton Lavey only said that thing about Ayn Rand once so it probably doesn't mean anything (i am skeptical that he did only say this once but i haven't been able to find smoking gun evidence of him saying it other times) and the parts which copy from Ragnar Redbeard directly are only a few pages out of the satanic bible so, again, it probably doesn't mean anything. (ignoring that the influence of "Might it Right" is woven throughout the entirety of Anton's work, hardly limited to the direct quotes.)
so, to prepare my readers for if they get hassled by some CoS loser for stating the obviously correct fact that the CoS is right-wing, here's some more evidence to that effect, under a cut because i am merciful and this is going to get very long and very ugly.
here's Boyd Rice, then a major figure in the Church of Satan, saying that the principle of satanism is "let the master be the master and the slave be the slave, and never the two shall meet." this was in the documentary "Speak of the Devil", created by Nick Bougas, also a prominent figure in the CoS at the time. Nick Bougas is more well known by his nom de plume "A Wyatt Mann", aka the guy who drew those old nazi comics that became memes ("le happy merchant" etc).
here's some quotes from the official website of the CoS:
Satanists see the social structure of humanity as being stratified, thus each person reaches a level commensurate with the development (or lack thereof) of their natural talents. The principle of the survival of the strong is advocated on all levels of society, from allowing an individual to stand or fall, to even letting those nations that cannot handle themselves take the consequences of this inability. Any assistance on all levels will be on a “quid pro quo” basis. There would be a concommitant reduction in the world’s population as the weak are allowed to experience the consequences of social Darwinism. Thus has nature always acted to cleanse and strengthen her children. This is harsh, but that is the way of the world. We embrace reality and do not try to transform it into some utopia that is contrary to the very fabric of existence. Practical application of this doctrine would see the complete cessation of the welfare system, an end to no-strings attached foreign aid and new programs to award and encourage gifted individuals in all fields to pursue personal excellence. A meritocracy will replace the practice of such injustices as affirmative action and other programs designed to punish the able and reward the undeserving.
Satanists also seek to enhance the laws of nature by concentrating on fostering the practice of eugenics.
but if you REALLY want to get into the ugly shit that the CoS has been promoting, here's some excerpts from the magazine "The Black Flame", which the CoS published throughout the late 80's and through the 90's:


^that last one's from an interview with Lavey himself
and to bring things back around, here's another interview with Boyd Rice:
youtube
on the whole, while the CoS may present itself as an opponent of right-wing christianity, it's ultimately just controlled opposition, pushing largely the same right-wing agenda that the christian right was. it's funny that people never seemed to ask why christian conservatives like Bob Larson were always spending time interviewing, or being interviewed by, the Church of Satan if they were supposedly such mortal enemies.
173 notes
·
View notes
Text
Art doll out of Angelic Warder from the game Creatures of Sonaria!
Part 3.
So yesterday I got all of the pattern pieces cut from paper and also decided to dye the fabric (didn't want it to be blindingly white and all the details be lost among it)
Here's how one of the colors looked like JUST after dyeing (dipped them in water+acrylic paint mix)
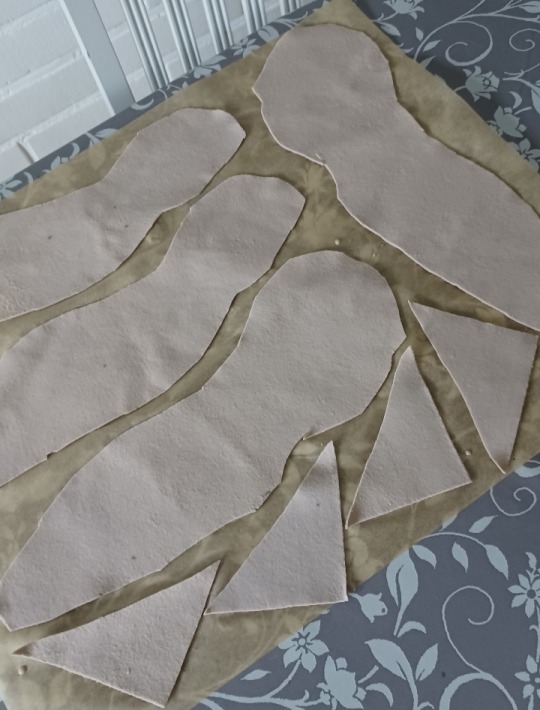
Here's them now..
I dont know what the best solution for coloring felt with paint it but QUICKLY learned that the paint would soak DOWN and all the color would be at the bottom of the fabric...

My poor BLACK/DARK GREY pieces. Welp I gotta paint over these darker pieces with paint/water mixture.. again.
Most of the pieces are still wet so I was able to flip them and.. rub?? the paint on the back to blend it more (the parchment paper crumbled under the water and now has stripes🥲)
I have to thing something else for the future.
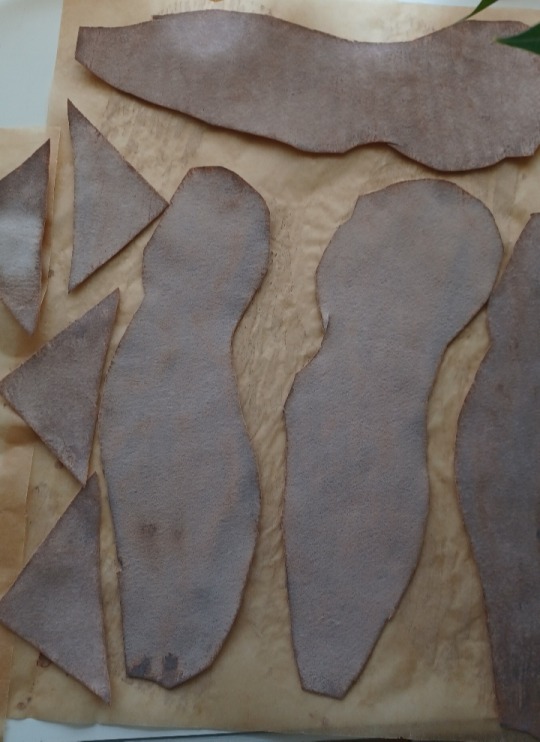
Edit.
I did another coat on the black/dark grey and also touched up some other colors. But now (while it's still quite damp) it looks good!

Well... atleast BETTER than that light-streaky-grey
Edit 2. (The next day)
This is how the colors are looking like after fully dried

Two of the cream/light brown ones look almost the same...
And the dark grey/black ones I re-dyed yesterday.. the UNDER side of the piece looks good (the long piece is the underside on which I DID NOT put the water-paint mixture on)
The colored felt feels much stiffer than the og white. Atleast the wings will hold themselves up😁
7 notes
·
View notes
Text
womp womp in my endless jumping between which piece im working on i took a break to work on the 'neck corset' piece (i actually had a reason, in that i was cutting out with that fabric already and the pieces are so small it made sense to do it at the same time)
heres the reference, and a sort of inspiration


im using a base pattern from aranea black (now closed but you can find her patterns all over the internet) and i dont intend to put any boning in it, just some topsewing to provide a little stiffness (im eh about things around my neck so i want it to be as comfortable as possible) im gonna close it with Velcro for adjustability (and so its easy to put on and take off)
ive already sewn up the pattern, it really didn't take long, now i just have to get the top layer with the weaving planned out and i can cut soon!
(i do actually have a decision to make on that- the 3d model looks like its green & black, which would be the tafetta & leather which im. Not Sure about. the illustration is a very blurry two shades of green which is also problematic in that i dont. have two shades- i could play around with the fact the fabric is shot but it is pretty subtle. im not sure!)
#ill probably end up doing taffeta + leather because i like. have that but idk theyre different weights sooooo#it works on the dress but idk about up here#lady loki build
7 notes
·
View notes
Text
sometimes i think about the xena reboot and what i think they should have done and while idk if this is a good idea i think my ideas i would bring to the table would be ok so everyone discusses what do you do with the costumes since it would be a bit tacky to bring the leather bikini look back and so i think how u keep the silliness of the original costumes but keep them very distinct but maybe less boob armor is to lean more heavily into somewhat more historically accurate costume shapes and styles now historically accurate is of course very nebulous since xenas theoretical time period can span such a wide swath of ancient history and i would not want to change that so just u know dig into interesting historical costuming touches but from like everywhere just shit that simply does not look like anything else on tv so then u use really weird fabrics so u have like surprisingly accurate to surviving art and armor pieces type greek hoplite armor but its made out of hot pink pleather or something do you see and understand my vision and then very important next concept is i think they should also dig a bit more into weird and fascinating women from history and myth and xena should meet them inspire them have sex with them have weird history with them be insane exes with them etc obviously some of them should be in love with gabrielle too not just xena #equality i want like some deep cuts just for fun obviously they would have to do the sappho episode but its also a show i just dont know how it would keep the magic going if it was kept to season long plots the whole time like xena pulled off some very good long running plot arcs but always sandwiched between plenty of episodic fare that kept it more stylistically varied and shows that manage lots of stylistic variation and heavy serialization usually lean more onto an ensemble cast that have different types of storylines going on like im sure u could do a fantastic season of xena caught in a nightmareish revenge cycle with callisto and caesar and gabrielle feeling like shes got blood on her hands she can never wash off but wanting to stay with her anyways but u would lose the magic if every season was like that you know..
11 notes
·
View notes
Text
Oh Lordy this is a saga. For a super duper long time I didn’t care and just wore whatever. Jeans and t-shirts , it was the 70s and early 80s. I remember a pair jeans I had with rainbows on the back pockets, and a long sleeved ocean pacific shirt that everyone made fun of because they said it was a knockoff and not a real OP but it totally was. I had long hair that I didn’t cut and didn’t even pull back and it just hung around my face like Carrie. In 8th grade I got totally into wearing headbands and had 4 or 5 including one that was puffy and red like a ring of Saturn around my forehead. I can only assume this is the costume of a girl who isn’t interested in getting boys to like her, though it wasn’t that conscious in my mind just yet.
The last time I switched schools was 1985, just before my junior year. That’s also the summer I met Jessie and saw the Hunger, so it was time for a change. We went goth/punk 1980s Oklahoma style. I remember three wardrobe standouts: a pair of ballet flats with hieroglyphs on them, a black sweatshirt I cut the collar off, flash dance style and would wear over everything, and a tight, short skirt that was one continuous print of that 50s photo of people watching a 3D movie. I wore that until all the elastic went out and I couldn’t keep it on my ass any more 😂
Jessie and I split up when i went to college. I stopped dying and crimping my hair and let it grow out long again over the course of some years. I stopped trying to hard to be alternative looking, but I still liked black clothes, lots of ruffles and layers. Legit I had a black velvet cloak I wore when it was cold. I had a barrette shaped like a bat and used it to pull my hair back, on the days I didn’t braid it and pin it up Masterpiece Theater style. Dress like this and go sit in a tree and read Jane Eyre with zero irony. WHY DONT LESBIANS WANT TO DATE ME?!! 🤣🤣🤣
When I started teaching in the early 90s I had to go to the (thrift) store and buy adult looking clothes. Lots of jumpers (American meaning) and cardigans. This evolved into dresses and cardigans, I liked short waists, big skirts, no buttons, and a pair of Birkenstock Mary Jane’s which I still own. My off work style was kind of similar. Dresses and skirts and cardigans. I started wearing more colors, but it was still boho chic. Linen, velvet, the occasional Indian find with mirrors embroidered onto it. I cut my hair into the curly bob I wore for the next 20something years and continued to have very few dates.
After my kid was born and I was a stay at home mom, I let my hair grow again and plan to keep it long. It’s easiest for me, and I like the way it looks. I still prefer dresses and skirts, natural fabrics. I still only shop at thrift stores, and am interested only in pleasing myself, so I love to find odd pieces. I started wearing scarves around 2007 and now they’re a part of my look to an almost ridiculous degree (my kid was teasing me about thrift shopping the other day and said ‘yeah you gotta go to every one! What if you miss a scarf!) but I don’t care because they’re gorgeous and warm and dress up an outfit and frame my face while hiding my old-lady wattle 😂
One of the moms on car duty the other day was dropping off her daughter and gave me a long appraising look, then said critically “What does your husband have to say about the way you dress?” I was so shocked all I could say is “Mr Frizzle loves it.”
#lesbian queries#lesbian query of the day#lesbian#lesbian history#lesbian fashion#80s fashion#gay shit#herstory#lesbian art#high femme#magic school bus
6 notes
·
View notes
Text
what should i do with my robe fabric? an uncomfortably long write up and a poll (since i have polls now)
id really appreciate if you could take the time to give some input, even if you dont read all my writing and just skip to the voting! the writing is mostly me explaining my ideas, buf you can totally skim it and get the idea
the fabric is here, so its time to plan
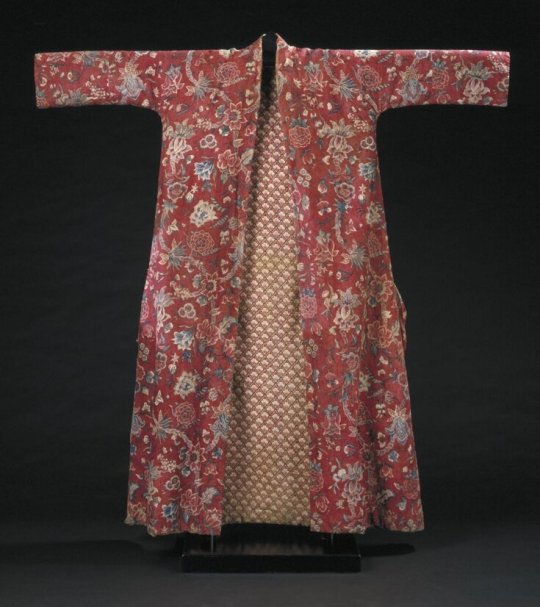
i think im down to two main options, screen accurate robe or a historically accurate one- accurate is a general term here, ultimately ill do what i want with little care for being exact, but as an overview, thats the idea split. there was a fleeting idea i might do some other style of robe, but i never found anything i exactly vibed with (if you wanna vanilla extract it though, feel free to drop other suggestions in the replies)
screen accurate (SA)
a lot of my information for this comes from this blog post, its excellent research and covers just about everything. honestly theres not much i can say that isn't already written on there, and anyway, its the robe. you know the robe.
its necessary to note at this point i already plan to stray a little from screen accuracy on my lining. the SA lining is quite a vibrant pink, but to compliment my personal wardrobe more, im learning towards a dusky pink or almost maroon colour (im visualising the robe fabric background colour but a little darker, but itll depend on what i can actually find in my local shop)
this one will also require buying another fabric on top of the lining (an orange for the piping) and making or sourcing tassels if i decide to have them (up in the air as i am bound to catch them on things)
a big appeal to this version for me is the box pleat in the back- it allows for more volume, more movement, while still sitting right and keeping the silhouette. i do like volume in my garments
its probably a more technical build than a HA one, just on the neck binding and kinomo sleeves, but it should still be pretty straight forward
historically accurate (HA)
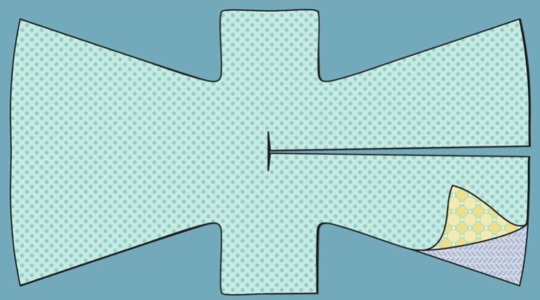
historically, the SA version seems to be based on wrapping gowns. a very simple construction, cut all in one big length (though, as on the SA i would have a seam at the shoulder so the print isn't upside down) this image gives both a good idea of pattern and silhouette
the wrapping gown is generally quite a loose fitting garment, and is very simple in its cutting. its all straight lines, and all triangles and rectangles. theres a couple of different options in the cutting, but im thinking as flared as i can make it (with or without piecing) at the hem, and also maybe some flare on the cutting of the sleeve to make it wider at the wrist without affecting mobility
wrapping gowns do typically have a small collar up near the neck, similar to the way the SA one is, but it only wraps around a short distance, not to halfway down the body as the SA does
this is obviously a much easier pattern, in my research ive seen people complete this in a day. my main concerns for me personally are in the flare and in the fit. i like a good swoosh and im not sure that ill get that in this (but not certain. some look quite full).
while it is designed to be an unfitted garment, it still has some fitting. im a little concerned that to give myself enough room around the chest i will end up with quite a dropped shoulder (shoulder seam sitting down the arm) and im not a huge fan of that. these are all things id figure out in a mockup, but it has me hesitating to go that way
here are some research links, if you care to read a bit more
video by nicole rudolph, wrapping gown talk starts at 18:27
the difference between banyan and wrapping gown
pinterest board with various historical pictures

a sort of tldr;
heres a basic look at what the patterns look like. as you can see the HA one is far more simplistic in shape
if youve been following any of my sewing projects youll know i have a tendency to make things take far longer than they really need to, so obviously a simpler garment that uses mostly techniques i already know is a huge appeal rather than a far more complicated and out of my comfort zone project. but i have concerns about the fit of the HA, and there is just something so appealing to making the SA version....
obviously. whichever path i pick i have a lot more research to do, and with OFMD now being on iplayer ill definitely be watching the episodes it appears in the get a better idea of how it should sit myself.... but for now
#i have been granted the power of democracy and immediately am using it to force you to help with my sewing projects#please i am incapable of making a decision#sorry for any typos i am trying to finish this before my lunch is over jfhskjdk#ofmd#our flag means death#depression robe#breakup robe#sewing#poll#nyxtalks#nyx sews
14 notes
·
View notes
Note
can i ask how did you make the bo wyatt doll it's so pretty 😢😢 blessed my eyes
THANK YOU SO MUCH!!!!!!! makes me happy that he makes you happy <:D i don't know how much detail you want me to go into so I wrote an entire novel srry
Actually first I will direct u to the agosia arts YouTube channel because i love her and I used her tutorials on how to make limbs with clay parts and attach button joints >
Clay doll playlist
Basic doll technique playlist
Video on sewing the cloth body
Video on attaching clay components
Video on button joints
I made some adjustments to her techniques just to suit my own needs better. Also, the fabric and buttons I used are a lot cheaper than what she uses and I used oven bake polymer clay to sculpt the helmet, hands, and boots. More on agosia later
I started out by sculpting all the clay components - gloves, boots, and the diving helmet. this is a very "draw the rest of the fucking owl" moment but I cannot tell u my process w sculpting just please don't buy sculpey III that shit SUCKS to work with

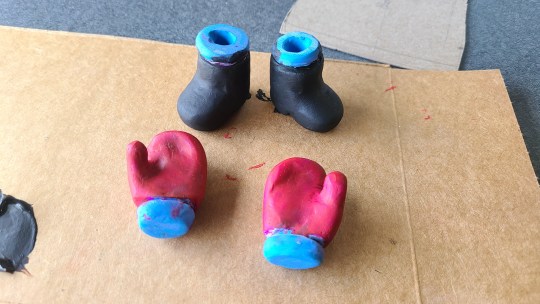
After sculpting and baking the clay parts, I sanded them down and painted them. I also gave the boots and helmet a couple or layers of folkart gloss varnish bc Shiny (i am not sponsored by folkart)
I then made a fabric pattern around the clay parts i just sculpted. I went through a lot of drafts changing the proportions of the body, length of the arms and legs etc. i laid all of my pieces out together and moved stuff around until it felt proportional.
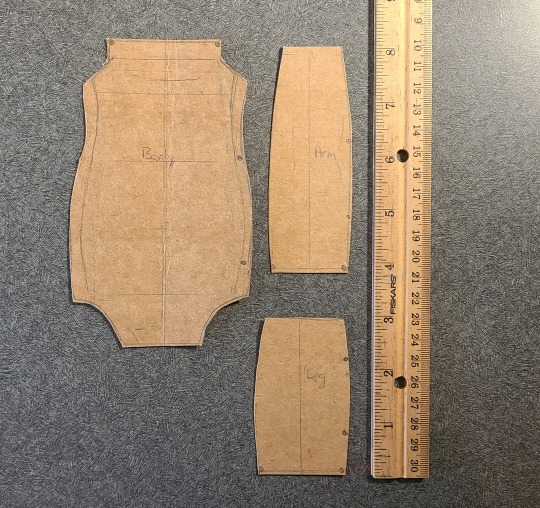
I traced the patterns onto two pieces of fabric, right sides together. the fabric for the body comes from an old t-shirt of mine. the fabric was very stretchy and it was a pain to try and draw a pattern onto it 8|
AS FOR CUTTING OUT THE FABRIC...I did what agosia did and sewed directly onto the lines, leaving open spaces at one end and one side of the pattern so the clay hand/boot/helmet what have you can be slipped in between the fabric. Keep in mind the size of these spaces so u can actually get stuff in there
anyway agosias demonstrations are great so I won't say much else about how to attach limbs, I will stress that when sculpting the clay parts, they should have a groove around them that is deep enough for the wire to sit snugly. ur basically sandwiching the fabric inbetween the wire and the clay. I also hollowed out the boots and helmet so the end of the wire has a place to hide so it doesn't poke out of the fabric. As a side note, if you don't have armature wire or something similar u could probably use pipe cleaners, yarn or a strong thread to do this. or maybe a really strong glue
Mr. bo wyatt doll does have an armature wire skeleton so he's kind of posable. You don't really need to do that, but you can use pipe cleaners/chenille stems if you want the doll to have a little bit of structure.
Here's a little diagram of how I made the wire skeleton (bc I did not take pictures at this step) the wire in each of the limbs and body are pretty much free floating which affects the integrity a lil bit

(this diagram is. Bad. so let me know if something needs to be explained a bit more)
(incoming jumpscare of bo without the shawl) After the clay parts were attached to the fabric limbs I stuffed them by wrapping scrap yarn around the armature wire skeleton and then sewed them closed. This Is Where The Fun of This Project Starts.
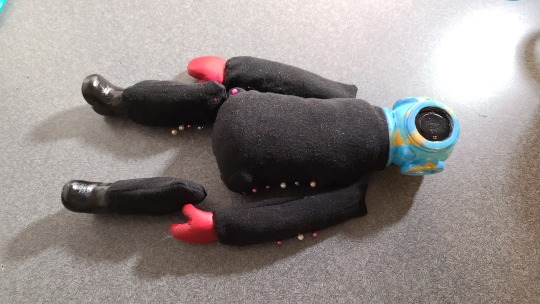
Playing a game of where I want to sew the limbs onto the body (and then realizing I made one of the legs way too short. How in the fuck)
i ended up redoing the legs entirely and just added another 1/2 inch to the length of the leg pattern.
Bo has weird proportions I don't want to think too hard about but here's what he looks w/ all his limbs pinned in place
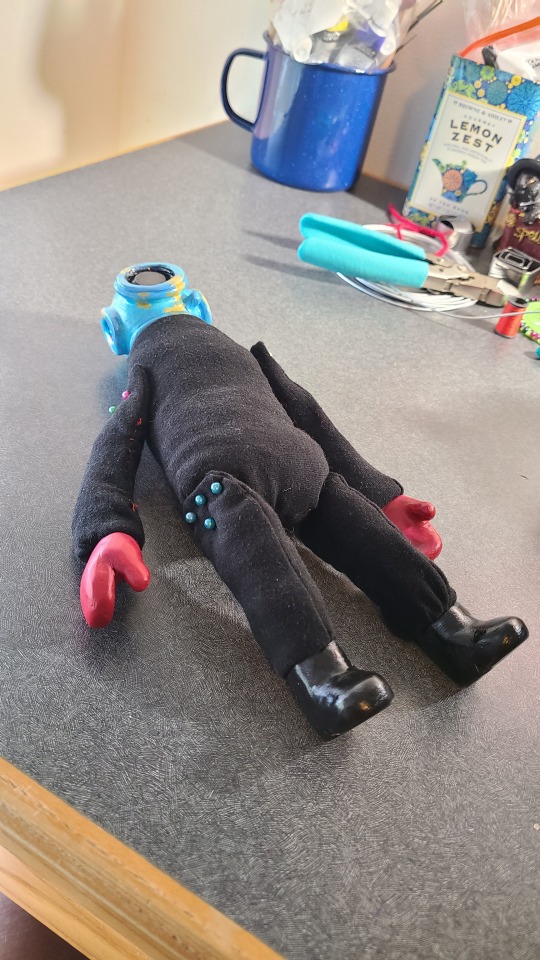
he is so top heavy help him.
I attached the arms and legs to the body with button joints (insert agosia arts tutorial on that). It was a pain in the ass bc I dont have a needle that's both thin enough to go through the button holes and long enough to go through both ends of the dolls body. But at least the picture for this step is kind of funny.

the state of my goddamn desk
Also u don't really need to do button joints its just another thing that gives the doll more flexibility. Just sew those thangs (arms and legs) on there (the body)
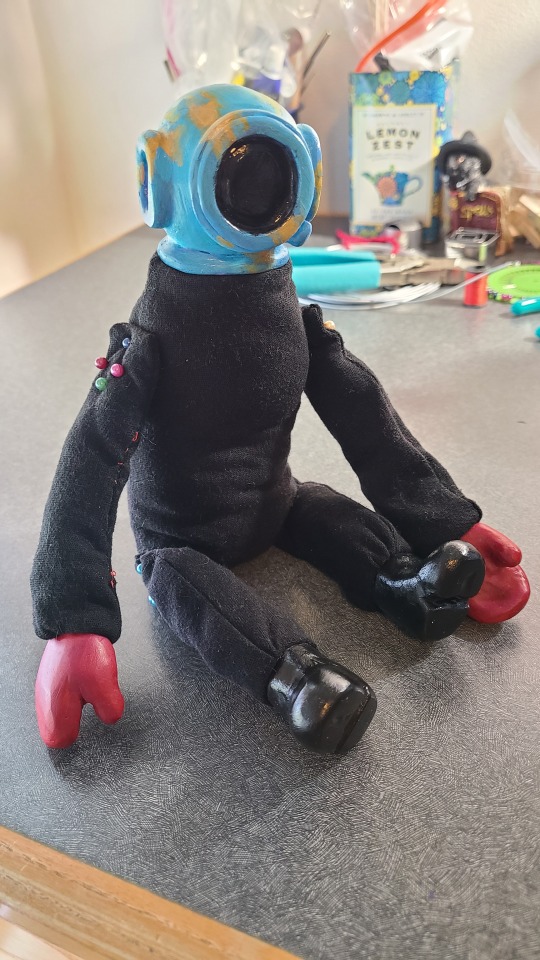
Ok now onto making the shawl yaaay. Yaaaaay. I looked up some tutorials on how to sew a poncho from fleece, this one was helpful to me. I did not measure the circumference of the helmet bc that would have ended up with a neck hole that is way too big, but I did measure the circumference of the base of the neck and used that. And also sewed a button to the back of the shawl so it would be easier to put the shawl on the body.
I also did not feel the need to add a hood, but I did line the shawl with a blanket stitch w red yarn. I may add tassels onto it eventually bc it is the cutest thing in bo's design. To Me. Also I will mention that bo's shawl is still a work in progress, it came out waaay too wide so I have it pinned back until I have the time to make adjustments 8|
Going off of the video I linked before, for the wingspan measurement, I just measured where I wanted the shawl to rest on the body and multiplied that by 2. Looking at bo's official art, his shawl reaches down to about his wrists ish??? Measuring this on the doll, I got 6in, multiplied by x 2 = 12in. But again it ends up w a shawl that is way too wide for the body. So u may want to go shorter than what you think you'll need
also I crocheted a little collar for the shawl... that I have yet to sew onto the shawl. this is an ~~artistic choice~~ bc i just like to draw bo with a knit collar. I like that you draw his shawl with a button up collar I think it would be very cute on a doll.
Ok that took me 50000000 years thank u if you read this far I hope to God this is coherent, helpful or somewhat interesting to read. Now look at him
#basofy#ThANK YOU AGAIN...I saw that you made a lisa doll and I love her sm the flower trim on the dress is an inspired choice#if you have any specific questions lmk this is a very disorganized post#main tag does not get spared from my shenanigans >#lisa rpg#irvart#sidenote i hate the tumblr post editor why is this so broken
3 notes
·
View notes
Note
Hey so I found your account today and I love your art!!!
I also love your Captain 3 Cosplay! I’ve wanted to Cosplay them, but I couldn’t think of any idea on how to make their hat or headphones, so I’m curious to know if you’d be able to explain how you made yours?
if you’re busy and can’t respond I understand I just thought I’d ask
OAAAAGH THANK YOU!! it always makes me so happy when people enjoy my cosplay, i had lotsa fun with it :D
im gonna go into detail with this so imma shove it under a read more
so honestly i kinda cheesed it with the hat and also did it in the most convoluted way- i already owned a hat with a similar shape, one of those sailor captain hats u can find anywhere. loved wearing that thing. but anyway i removed the bit of rope and the buttons it had, then went through the very long and painstaking task of gluing fabric onto the whole thing. this required a lotta measuring, a lotta trial and error, but i eventually got there! i pretty much just cut out the pieces and layed them over the hat in the right positions.
the gold bits on the sides are just half of one of those metal button things u can get from craft stores, and the gold strips + emblem are a metallic gold card. the emblem itself i made by tracing over the game model, transferring that trace onto paper, tracing the paper onto gold card, then cutting out each piece and gluing it to the black disk i made (somehow this took me like 4 hours, dont ask why). i then just glued the whole thing to the front of the hat!
now the headphones- i was actually really lazy with this, ive been desperately wanting to make proper LED headphones with the right cables at the back but... i never really get around to it, i dont know the first thing about electronics in cosplay 😔
SO! with the con rapidly approaching and me running out of ideas, i resort to something i know i can handle. i buy a cheap pair of bluetooth kmart headphones and get to work. so i found that spotlight stocked this very thick.... foam, card? im not sure what it is exactly, but i had to use a stanley knife to cut it. i measured and cut discs out to attach onto the sides of the headphones, then added a layer of yellow card on top.
the pointy part of the 'phones is a cut piece of that thick card glued onto a piece of foam (the floor mat kind) for stability, and then i just painted the glowing dots on the front of the card with acrylics. i had to wear the headphones with the handle going around the back of my hat so that they didnt fall off, and since i would be adjusting them a lot and knew the "ears" might look wonky i decided to attach a patch of velcro to the side of the headphones and the yellow disk so that i could easily change their positions if they got crooked.
so yeah! they may not look the best, and theres always things i can improve, but i did put a hell of a lotta hours and love into em. i hope some of this can help u! and if u can make ur cosplay, id love to see it !!
#text#cosplay#heheh i saw all my recent notes were from u and i was like :0 WHOS THIS NEW FRIEND#thank u so much for the ask! even when i am busy i always try to take the time to respond to ppl#cosplay is difficult but gods its so much fun#also im sorry to u and the rest of my followers for not posting art#ive been trying to beat depression and burnout but its real hard#ive managed to draw a few things but its not splatoon sadly#when i get my confidence back i would love to post art here again!#the support is very loved and appreciated
7 notes
·
View notes
Text
Hello BJD community
Is your doll in need of hair?? Do you have a brain that demands instant results and will not wait until tomorrow let alone days for a glue wigcap to dry or however long for a premade wig to arrive in the post? Then boy do I have a post for you !
Following the traditional rules of science, I have fucked around and I have found out. And it works! Here is your ~1 hour [less probably, I didnt time it] making time wigcap tutorial from yours truly, the likes of which I have certainly never seen before, ft Clement who has a neon purple mohawk [a look impossible to find anywhere even if I did have the patience to order it and wait]. ...also bad photography and spelling errors which I do not have the braincell to fix at 10pm

And here’s a video [gif] showing your new wig cap/wierd hat

You do Not need to be an expert with a needle to do this- or if you are an expert, you dont need to use effort. I usually sew by hand reasonably neatly, and. here it is very clear I did not. Remeber- you’re going to be covering this with hair!! You dont even need the same fabric colour as your doll’s skin, depending on the style you want. I used hot glue to add said hair directly to the head with little to no processing, and I now have something temporary until the whim of buying the right colour fibre occurs! Just make sure the fabric is fairly thick and not stretchy. I would suggest shaping the front and around the ears into a hairline too- this is more a proof of concept so didnt warrant it. Just draw on the fabric and cut out there I’d presume. Fyi no I did not seal seams or even make seams, the fabric I had wasn’t fraying enough to warrant the bulk. Depending on what you use, you might need to do that.
I did this tonight so ofc I dont know about durability, but I figure no harm- it fits very snugly so I think the biggest issue is it stretching over time, but that could be fixed with blutack or velcro pieces as you usually do with oversized wigs.
An added benefit of this? You get motivation to get the right colour hair ordered!! I am rather excited now, my boy is working out well
And thus we reach the end of the post. What do you think- have you seen something like this before? Is it useful to you? I love figuring things like this out and I have the time to do so- if you have any points of frustration, ask and I’ll see what I come up with. The worst that happens is I get confused too. I’m moderately new actually posting my doll stuff and I’d like to interact more, so if you want to chat then throw an ask at me
Fare thee well and goodnight
#bjd#bjd wig#bjd wigs#does your placement of tags matter still or is that an old thing#also hello i talk the real big wierd with things like this i cannot help it#please tell me graduation hats are generally recognisable as that shape else thats not funny
9 notes
·
View notes
Text
Kenku update #4 or something: im scared and 100% not procrastinating on working on it or something
I did like.
Okay no. I did the belt. I did do it.

Crisis averted. I found an open end zipper and painstakingly went in there with pliers to shorten it and then sew the ends so it doesnt pop. It worked!!!


Patterning took me so long to figure out. I had to make a whole second pattern so i could use the first as a reference.
I got navy leatherette for it, but needed a base to stick the leather on to. Originally I was gonna use foam but after thinking about it more i wouldve been worried it would tear. So the next best thing: felt.
So the base is felt with leatherette glued on top in the shape of weaving fabric. This is the part where I also need to attach the pouch to. But I dont want to have it on there permanently. I was gonna decimate one of my charms for the lock on it but while in the shop I noticed a shopping cart token on sale at the till and grabbed it fast af. Took the lock and metal circle off and now I will also no longer have to carry a 12kg dog food bag in one hand and another 10kg shopping back in the other wheezing and crying to the car on my own thanks to this new fancy cart token.
With some scraps left over from pattern cutting we got ourselves an attachment.


Sewed each end onto the felt (i almost forgot to and glued the top piece before this step) and heres the final belt.


I left excess material on both the top and bottom so I could securely sew it with a running stitch and make sure rubbing against my body doesnt a) fray the material, and b) make it unglue.
It looks great in the end!

The zipper is also fully concealed :]
No you dont get a picture of me wearing it
#kenkuproject#im top self conscious for pics#maybe once im fully dressed in the costume teehee#sewing
3 notes
·
View notes
Last Seen Blogs

cavafi-s
CAVAFIS

nimalcup
Nimal

slo-tv
Slo TV

my-inarticulate-ramblings
Inarticulate Ramblings

germanhrnyguy
German and Horny