#i like to use the mouse pointer to scroll precisely!
Explore tagged Tumblr posts
Visit Tumblr Blog
Explore Tumblr blogs with no restrictions, modern design and the best experience.
Last Seen Tumblr Blogs


Fun Fact
25% of US internet users with an annual income of $80-100K use Tumblr.
Text
everyone wants these tiny-ass minimalist scrollbars these days that are a pain in the ass to actually click on and i hate itttttt
#i like to use the mouse pointer to scroll precisely!#having to mash the mouse wheel continuously is annoying
298 notes
·
View notes
Text
I want to tell you about Synaptics but this is not really about Synaptics
this wont sound as well written as other long posts you’ve ever seen so sorry about that. so.. windows 10 may 2020 (aka version 2004) update right
got my upgrade assistant. upgraded no problem.
but then i noticed my cursor behaving weird when controlled by trackpad. mouse was fine.
intuition says something problem with the driver. visited the....this kind of settings page
tweaked settings, still weird. i then decided to roll back to windows10 version 1909 bcos i cant live without my precision touchpad.
rolling back solved my weird behavior. but then i realized something
i have no screenshot but... the synaptics settings page is different on version 1909 than on 2004. 2004 was even more complex, IT EVEN GOT CHIRAL SCROLLING, where you draw circles on your pad to scroll, which i believed didnt exist within my current driver.
i updated the synaptics driver, win10 already rolled back to 1909 and guess what, now the settings looks like the one i saw on win10 2004 with my previous driver, that is identical to the picture above, and it gOT CHIRAL SCROLL. and my pointer isnt weird anymore. so thats a yay. :D. i can upgrade to 2004 later lol.
thank you for reading thus far, if you did, and i feel i gotta show you this “practice window” provided by synaptics to “practice” your new touchpad settings like scrolling and stuff
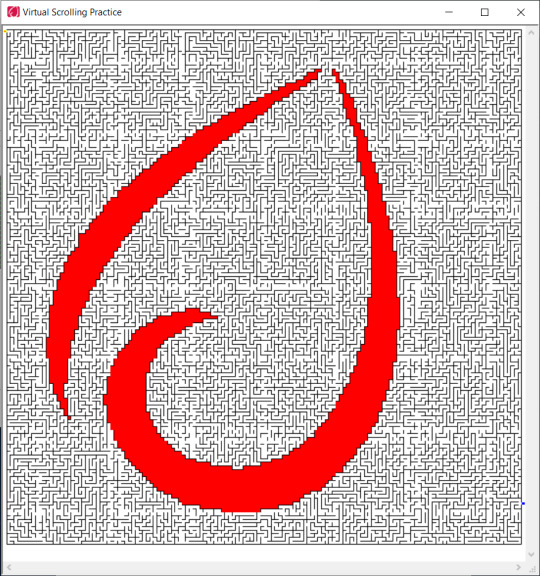
IT’S A FREAKIN MAZE. YOU USE ARROWS TO CONTROL THE DOT.
the exit is there
i dont have enough free time to solve it but if anyone has Synaptics touchpad, there’s that.
or this might be a widely known fact but i just never come across it.
anyway thank you for dropping by at this kinda useless post. you can keep scrolling
10 notes
·
View notes
Text
Display button shortcuts windows 10

#Display button shortcuts windows 10 how to
#Display button shortcuts windows 10 drivers
#Display button shortcuts windows 10 driver
#Display button shortcuts windows 10 upgrade
If you want to use the new window management stuff quickly without resorting to dragging your mouse pointer around on the screen, the keyboard shortcuts are nearly as useful for people who bother to learn them (and they can do a few things, like creating and switching between virtual desktops, that the trackpad gestures can't). Let’s assume your PC doesn’t include a Precision Touchpad, because hey, it probably doesn’t. You don't need to hold the buttons down to stay in Task View. Keep pressing left/right to keep moving window across multiple monitors. Snap window to left/right half of screen.
#Display button shortcuts windows 10 drivers
Supporting these gestures will give OEMs a small competitive advantage over those that don’t, and even if you don’t care about trackpad gestures the fact remains that Precision Touchpads are generally more accurate and reliable than ones using standard drivers from the likes of Synaptics and Alps. Hopefully Precision Touchpads will become more common as designed-for-Windows-10 hardware begins to land in stores this fall. To see if your computer includes a Precision Touchpad, check in the Settings under “Devices” and then “Mouse and Touchpad.” The list includes the Type Cover trackpads for the Surface 3 and Surface Pro 3, and Dell’s most recent XPS 13 (another reason why we think it’s the PC laptop to beat right at the moment). This spec was only introduced in Windows 8.1, and because it’s optional very few PCs actually support it at the moment.
#Display button shortcuts windows 10 driver
In other words, at least as of this writing, it’s not something you can enable with a simple driver update, though for more recent systems your OEM may choose to mimic the gestures in their own drivers. This requires not just compatible multitouch trackpad hardware, but special firmware and Microsoft certification. The downside is that you need specific hardware to use the gestures-for now, they’re only enabled on PCs that support Windows’ Precision Touchpad spec.
#Display button shortcuts windows 10 upgrade
Windows 10 finally implements comparable gestures, a nice upgrade over Windows 8’s more limited edge swipes. Using a combination of swipes and Full Screen mode on a 13-inch MacBook eases the pain of moving away from a multi-monitor workstation. Getting accustomed to the multitouch trackpad gestures is key to effective window management in OS X. If you hold your fingers to the trackpad as you swipe, you'll be able to select different windows via the Alt-Tab switcher. Swipe up with three fingers to bring your windows back. Swipe down with three fingers to close Task View. Trackpad gestures and Precision TouchpadsĬortana search by default, can be changed to view notifications in Settings If you’re new to Windows 10, here’s your guide to using these shortcuts and gestures, and what kind of hardware you’ll need to use them. Windows 10 catches up in some important ways-it’s got a Mission Control replacement in Task View, can give you multiple virtual desktops to work with, and implements Mac-like trackpad gestures (alongside keyboard shortcuts) to help you use it all. And once you get used to OS X’s trackpad gestures, it’s hard to move to a platform where basic things like “two-finger scrolling” can be flaky and inconsistent. Features like Snap were handy, but it was hard to live without features like Mission Control. My primary computers are Macs and their primary operating system is OS X, so one of the things I disliked the most about going back to Windows was its window management.
Windows 10’s weirdly disjointed music, video, and store apps.
Gamers: It’s safe to upgrade to Windows 10.
#Display button shortcuts windows 10 how to
Windows 10 doesn’t offer much privacy by default: Here’s how to fix it.Xbox on Windows 10: What it is, what it isn’t, and what’s missing.The Windows Start menu saga, from 1993 to today.
1 note
·
View note
Text
Custom mouse pointer kirby


To change your pointer speed, enable or disable SmartShift, and access other scroll settings: Or, you can configure the buttons to zoom in or out, assign a keystroke to a button, or select from other options in the list. The forward and back buttons help you to navigate through web or document pages. The default setting is Horizontal scroll. Or, you can assign a different task to the wheel, such as controlling the screen brightness or turning the volume up and down. You can use the wheel for horizontal scrolling and adjust the scroll speed. The Thumb wheel is located on the side of the mouse. To fine-tune how your scroll wheel works and feels, see Adjusting your mouse movements. The default setting for the control wheel is Middle button. For example, if you assign the action “Close window”, when you press the scroll wheel, the current window will close. In addition to using the control wheel for scrolling, you can also assign functions to it, just as with any other button. Speed-adaptive control wheel (Middle button) NOTE: Click More and then scroll down to see the full list of available settings. You can also assign a different action to the Mode shift button if you wish. See Adjusting your mouse movements for more information. When SmartShift is enabled, you can use the scroll wheel in either ratchet mode or hyper-fast spin mode. Your changes are automatically saved.īy default, the Mode shift button lets you switch between SmartShift modes. When you're done configuring the button, click anywhere below the Gesture button menu. NOTE: The default assignment for this button is Windows management. To perform a gesture, hold down the Gesture button and then move the mouse up or down, left or right.
maximize/minimize), and assign other custom settings. volume up and volume down), pan, zoom and rotate, navigate and arrange windows (ex. You can use the Gesture button to manage Windows, control media (ex. In the upper left of the window, click on the Mouse tab and then click on the button you would like to customize:.If you have more than one device that uses Logitech Options, click on the mouse you want to configure.Launch Logitech Options: Start > Programs > Logitech > Logitech Options.To change the specific function or task assigned to a mouse button: NOTE: Your customizable options and settings will vary depending on the mouse you have connected. You can get Logitech Options software from your product's Download page. To find a misplaced pointer by pressing the Ctrl key, under Visibility, select the Show location of pointer when I press the Ctrl key check box.You can use Logitech Options software to: To ensure that the pointer doesn't block your view of the text you're typing, under Visibility, select the Hide pointer while typing check box. To make the pointer easier to find when you move it, under Visibility, select the Display pointer trails check box, and then move the slider toward Short or Long to decrease or increase the length of the pointer trail. In some programs, you'll need to move the mouse pointer to the button you want to click.) To speed up the process of selecting a choice when a dialog box appears, under Snap To, select the Automatically move pointer to the default button in a dialog box check box. To make the pointer work more accurately when you're moving the mouse slowly, under Motion, select the Enhance pointer precision check box. To change the speed at which the mouse pointer moves, under Motion, move the Select a pointer speed slider toward Slow or Fast. In the search box, type mouse, and then click Mouse.Ĭlick the Pointer Options tab, and then do any of the following: Open Mouse Properties by clicking the Start button, and then clicking Control Panel.
0 notes
Text
Hp dmi tool 2016

#Hp dmi tool 2016 serial#
#Hp dmi tool 2016 Pc#
But if you're set on a Surface-style computer and are willing to deal with a finicky trackpad, the new Elite x2 is a solid, capable PC. The long train commute makes detachables difficult for me.
#Hp dmi tool 2016 Pc#
I hava a HP PC manufactured before Sep 2010 for sure but. Ireally really need this DMI Utility Tool for Desktops. Does anyone have the latest HP DMI Utility. (Or the storage.) You just need a Torx T5 screwdriver, a suction cup and some steady hands. I have Version 5.01 which I use on HP Desktop Motherboards all the time but it will only work on boards up to Sep 2010 after that it's a Newer Version. When that 3.5 to 4.5 hours of real-world battery life dips to 1 or 2 after a few years, you can actually open up the computer and replace the battery.You get a full-size USB 3.0 port for the thumbdrives and accessories you already own, instead of always needing to carry a dongle.We found the Spectre's spring-loaded, button-activated kickstand confusing and difficult to open with one hand.I found myself using the touchscreen for most of my scrolling.īy now you might be wondering: what about the consumer-oriented HP Spectre x2, which costs US$100 less for what appears to be the same machine? Personally, I'd pick the Elite every time. The pointer's accurate enough when it works, but sometimes it completely failed to detect my finger - or thought I was trying to pinch to zoom instead of scrolling up and down. While I'm actually a fan of the Elite x2's bundled, fabric-backed backlit keyboard (it's precise without seeming overly stiff), the touchpad is one of the most finicky units I've used in the past couple of years. It only feels marginally slower than the thinnest machines that sport beefier Core i5 processors, and our benchmarks agree. Though my configuration only had a lightweight Intel Core m5 chip inside, I didn't have any trouble running my usual mix of a dozen Chrome tabs, Slack, Evernote and Tweetdeck across three screens. What surprised me: the Elite x2 actually has enough muscle to make multiple screens viable. Plus, you'll need to pay HP an extra $50 (roughly £35 or AU$65) to add the WiGig feature required to make it work. While it allows you to literally walk up to your desk and watch your additional monitors magically spring to life as soon as you get close (the dock wirelessly pairs with the PC as soon as it's in range) I found it would sometimes forget to connect my Ethernet cable or mouse. I'd probably skip the most expensive dock, the HP Advanced Wireless Docking Station ($289 / £233 / AU$369), though. HP DMI Tool NBDmiFit BIOS Requests ONLY Hello, to unlock the mpm, you must take the FSMC.bin file located in the 'WNDMIFIT' folder, copy it to a fat32 formated usb key and rename it SMC.Look ma, no hands! GIF by Sean Hollister/CNET HP provides the DMIFIT and WNDMIFIT tools for re-flashing the DMI region: So i changed the policy dmi settings to: Hewlett-Packard,HP EliteBook 8470p DMISYSVENDORHewlett-Packard. Reason: The entry for the 8460p model look exactly the same.
#Hp dmi tool 2016 serial#
This application use to Update Hp Laptop and Desktop Machine Information like Serial number, SKU (Product Number), CT number, UUID and Build Version etc. Launch HP USB Disk Storage Format Tool by double-clicking HPUSBFW.EXE from within Windows. This is the solution for machine is not in committed state. The USB Drive should be automatically detected by HP USB Disk Storage Format Tool. If not, select the correct drive from the Device drop down list. Direct Media Interface (DMI) Revision 4.0 Max of DMI Lanes 8 Scalability 1S Only PCI Express Revision 5.0 and 4.0 PCI Express Configurations Up to. Failure to select the correct drive may result in data loss. HP Mobile Firmware Interface Tool (DMIFIT) - this tool, introduced in 2009, combines the previous consumer and commercial notebook DMI flashing tools (HPSetCfg and BrandIT) into one package. HPSetCFG and BrandIT are two older DMI flash tools that are no longer used with current HP notebooks: This combined package enables one version of the utility to support all consumer and commercial product families that shipped after 2C08. HPSetCfg - used for commercial notebooks. Windows DMI Firmware Interface Tool (WNDMIFIT) - HP business notebooks made after 2011 must use the WNDMIFIT tool to update DMI information.ĭMI Tools Version NbDmifit 1.14B DownloadĭMI Tools Version NbDmifit 1.14D Downloadġ. Goes to F10 -> System Configuration -> Boot options -> UEFI Boot Mode Extract Nbdmifit-V x.xx.rar to the root of the USB key formatted as FAT32.Ģ. > Press “Enter” to enable EFI boot -> Select “Accept” -> Save and exit.ģ. Press F9 then “External USB Hard Drive” -> Press enter to run startup.nshĬhose 1 to commit VPRO with AT, or 3 to commit Non-VPRO with ATĥ. Press 9 and then Enter key to lock descriptor and reboot the machine.Ħ. You should see the message “Pass!!! This machine is configured”ħ.
0 notes
Text
ELECOM Wireless Finger-operated Trackball Mouse
It's a trackball. There is a reason that the discontinued trackballs by Microsoft Logitech and others fetch a pretty penny at action and secondary markets!
While the Elecom product is not an "exact" replica of the Microsoft Trackball, it is functionally equivalent. I have been using the Elecom mouse for several weeks and it is both easy to use and comfortable. It is well designed and a joy to use. It pops out quite easily if you have grip strength. If not you can poke a pen from the back and it will pop right out.
I swapped the ball from my other trackball that was blue and not black and it works better now. If you turn it upside down or shake it, the ball will not fall out. However for cleaning there's a hole on the bottom side which you can poke a finger through to conveniently force the ball out of its socket. The ELECOM M-DT1DRBK & M-DT2DRBK run on AA batteries, not AAA, btw.
I bought my first one model M-DT2DRBK ELECOM Wireless Finger-operated Trackball Mouse on July 16th, 2016. Been using that one at work, 5 days a week 8-9 hours a day. I have replaced the batteries 3 times since then. So my desktop one seems to be lasting me 2.5ish months. I bought a second one model M-DT1DRBK on July 24th, 2016 and kept it in my EDC bag along with my Acer 2-in-1 for use almost exclusively with Photoshop & Lightroom. I keep that one powered off when not in active use and I've had the batteries replaced just once.
Get review:
This review is coming from a 16 year Microsoft Trackball Explorer user... I never thought that I would be able to find a replacement for my beloved old trackball. I took a chance on this Elecom unit and I am plesently surprised! The ball spins much more smoothly than my MTE, almost too smooth. I thought that I'd have issues with the right click button being in a different spot than what I'm used to and to be honest, it's not bad at all.
I can see myself adjusting to it easily. If I could find a fault, the body is a bit too small. It doesn't impact normal usage that badly but when it comes time to hit one of those small buttons with accuracy, the smallness gets felt for sure. If you are looking for a similar product to Microsoft's trackball, try this one out. It is the closest thing to what many feel is the holy grail of trackballs.
I got this to reduce strain on my shoulder now that I'm sitting at a computer 8 hours a day for work and then later at home for my own enjoyment (games).The comfort is amazing, like it was actually designed for human hands. It looks weird but fits my smaller hands perfectly. Your thumb naturally rests on the left click, your middle on the right click, and ring+ pinky set perfect in the indentations for them.
Pointer rests gently on the ball and is great for zipping around quickly. Despite being optical/laser I can't feel much of any curve smoothing or acceleration curves, it seems to be one to one. ( Ms accuracy turned off, 6/10 tracking speed, everything to make it as linear as possible)The ball on my example was not rolling smooth, but seemed to be due to a film on the ball itself probably from manufacturing.
A little windex and buffing with a microfiber and it rolls effortlessly with little or no drag. I like that it's all hard plastic. No rubber coating to break down and get goey. My only complaint is the ball is very light. It has almost no momentum like older larger finger trackballs have, and I wish it had a metal core to make it a little heavier. It's neither here nor there, just preference.

No issues with flick shots in csgo or doom eternal on the low dpi settings. High dpi switch is in a great location and easy to flick on to check your six super fast. Software is easy to find on elecoms site, and simplistic + easy to use. If you want a finger trackball, and are cheap, this seems to be the way to go. I give ELECOM Wireless Finger-operated Trackball Mouse 5 stars based on 2 things: ergonomics and flawless basic operation.
I use index finger trackballs with every computer I have. This is the best one I've ever found. The ball moves effortlessly and is as precise as an=y other I've used. The left click is perfectly positioned, and the right click is easy to get used to. The scroll wheel is absolutely awesome, just great movement and textured so you never slip. The back and forward buttons work well. It's wireless and it's not too big and the beauty of trackball is that you can put it wherever it's most comfortable.
Product model:
Style: Wireless.
Color: Black.
About ELECOM Wireless Finger-operated Trackball Mouse item:
COMFORTABLE DESIGN: The mouse design is based on 6 different muscle and skeletal structures of the hands giving special emphasis to the folding actions of the hands to provide a new level of hand comfort.
OPTICAL TRACKING TECHNOLOGY The ELEOM "EX-G: series" trackball provides precise cursor movement for superior accuracy so you can get where you want on the screen quickly with less hand movement, improving productivity and efficiency. It is very easy to move in any direction.
FUNCTIONAL 8 BUTTONS: You can assign favorite function to each button by using "ELECOM Mouse Assistant" ELECOM Mouse Assistant Software will be available to download from ELECOM NET website.
DPI CURSOR Designed: with a high-performance gaming optics system sensor and lens. The DPI button can easily change between 750(LOW) and 1500(HIGH) DPI, making the movements of your cursor faster or slower. The ball is held in place by the ball bearings, but can easily be popped out of the device, by pushing it through the hole in the bottom and it can be easily cleaned.
PRODUCT DETAILS: System requirements: Windows 7, Windows 8.1, Windows RT8.1, Windows 10 or later (Horizontal scrolling function is not working in Windows RT8.1), macOS 10.10 or later, Size: W3.7"(94.7mm) X L4.9"(124.4mm) X H1.9"(47.9mm), Weight: 4oz(without battery), DPI: 750/1500 count (switchable), Connectivity: wireless, 1 X AA battery(Included)- Battery Remaining Light Lamp equipped.
Update:
I love this puppy! I think it is the best trackball mouse I've ever had and I've been using Trackballs for more than 20 years. Actually you shouldn't want the wheel to be very loose. If the wheel is too loose it may become too hard to control. Have you tried pushing in on the wheel as you maneuver it? Give yourself a while to get used to it. Any new equipment will feel strange until you get adjusted to it. Good Luck.
If you want to know about this product, please click here...
0 notes
Text
Using Neko Project II fmgen with PC-98 Touhou Games
There’s a guide to this over on Maidens of the Kaleidoscope, but I’d like to make a different guide for two reasons:
One, to go into more detail, provide images, and make the ideal configuration settings more accessible, since you really shouldn’t experience much lag with NPII on an average modern computer, and...
Two, because Neko Project II is really considered the most accurate PC-98 emulator out there at this time, yet many people are still using Anex86, which has very poor sound and graphics, likely because it’s the one included with the Touhou 1-5 HDI files download, or else because of performance issues with Neko Project which can generally be sorted out by modifying the configuration. I highly recommend at least trying NPII, if only for the lack of the screen flashing issues that Anex86 has.
This is quite long and contains several images, so the guide is under the cut.
1. Download
It’s usually recommended for playing almost any PC-98 game that you use the fmgen version of Neko Project for its additional features and sound options. You can download the latest build here. Simply scroll down to the section labeled PC-98 and click the first link. You also need the YM2608 rhythm module samples, which can be downloaded from here original link died, I’ve reuploaded them to dropbox here. Just extract these into the same folder as Neko Project. Without these, the music will lack percussion.
If you want to use the MIDI soundtrack in Story of Eastern Wonderland, rather than using the fmgen version, you may wish to try this build instead (password: 9821), as at this point it seems the MIDI option is broken in fmgen NPII, though I’m working on trying to find a way around this. If you download the kai build in order to use the MIDI option, run np21.exe, as np21cu.exe’s MIDI option is also broken, and the others will not work. Further down I’ll describe how to configure the MIDI settings; pretty much all other configuration details should still apply regardless of the version of NPII you’re using.
To open a game, go to Harddisk > IDE #0 > Open, select the HDI file, then hit Emulate > Reset.
2. Emulator Configuration
For fmgen NPII, run np21nt.exe to start the emulator; the other exe files in there are unnecessary for this purpose (np21.exe will work, but is designed for Windows 9x, and the others won’t work).
Now, go to Emulate > Configure. Here are the majority of the changes you need to make to run Touhou at the highest quality possible. I’ll cover each section individually.
CPU
I recommend keeping the first option at 2.4576 MHz. Then, for the multiplier, choose at least x32. If you want to play the Mystic Square extra stage, you may want to switch to at least x40 (you can type in any value you want, rather than using the dropdown menu), but otherwise you can run all games smoothly at x32, which is the most common setting for PC-98 Touhou, putting you just above the recommended CPU speed for the games.
Keeping this value relatively low will reduce the strain on your system if your own CPU is on the slower side; setting it to x24 should probably work, but I wouldn’t recommend going any lower. On the other hand, if you have a more powerful computer, go ahead and set the CPU multiplier higher if you’d like.

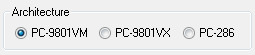
Architecture
This determines the type of CPU emulated. The PC-9801VM uses the NEC V30 processor, the PC-9801VX uses the i286, and the PC-286 is actually a clone manufactured by Epson (this is actually the model emulated by Anex86) that also uses the i286 processor. For Touhou you can technically use any of these options, but in my own testing I found that the PC-286 setting may cause some sound problems, and sticking with either PC-9801VM or PC-9801VX should give the best compatibility with many other games.
(Tip: if using a large amount of expanded memory (explained more below), PC-9801VM will give you the shortest startup time. It’s not a huge difference, just a few seconds, but it exists nonetheless.)
Sound
Set the sampling rate to at least 44K. Higher is better, but not necessary for good sound. If you experience performance issues at the higher settings, reduce it to 44K.
For the buffer, reduce it to a maximum of 100 ms. You can go lower for better performance, but 100 ms should be fine in general. If you notice any sound drops, increase the buffer above 100 ms. In contrast, if you notice sound lag, lower it to at least 70 ms.
Lastly, check QFM.

All other options under the config menu are unnecessary and up to you.
GDC Setting (Under System Setup Menu)
For this, enter the system setup menu by holding down the end key on your keyboard while clicking Emulate > Reset. Go to the second option and press enter.
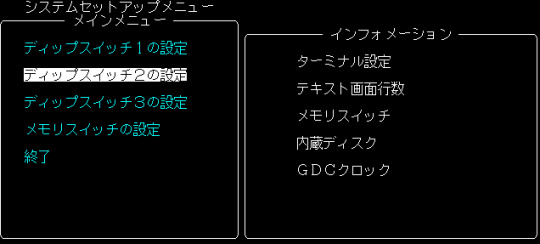
This will bring up the following menu. Go down to the GDC option and change it to 2.5MHz. This is required for PoDD to run correctly; you can leave everything else alone.
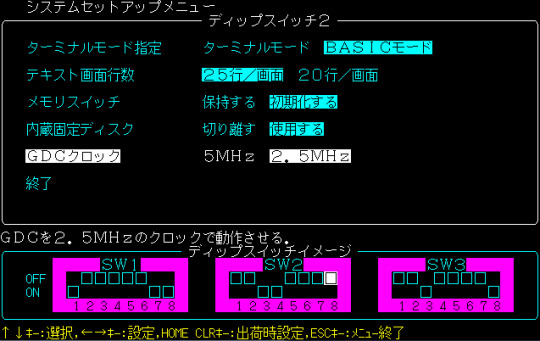
Hit esc twice to leave the system setup menu.
3. Other Options
Font
Unlike Anex86, Neko Project has a working font by default. (Note that the incorrect W and V are hardcoded into the common SoEW English patches that are around. Sorry.) However, if you want to change it to a rather more accurate font, you can choose Font under the Emulate menu and select either of the font files from Anex86 (font.bmp) or T98-Next (font.rom). Alternately, just place one of those files into the folder Neko Project is in. You can download the Anex86 font here and the T98-Next font here (if just clicking that doesn’t work, choose right click > save link as).
Save States
If you’re using fmgen NPII and want save states available, add the line STATSAVE=true into the [NekoProject21] section of the np21nt.ini file. This will add a save state menu under Stat, which goes from 0 to 9.
Emulation Speed
If you want to run the games faster or slower for any reason, and wish to use a speed other than the provided ones (for example, 150%, the equivalent of playing a Windows Touhou game at 90FPS) add this line to np21nt.ini under [NekoProject21]: CPUSMENU=50,75,80,90,100,150,200,400. Change these numbers to whatever you want, but the maximum is 8 options. These are just the ones I use, often for slowing the game down considerably in order to take precise screenshots.
Screen
The window options can be found here, and you can switch to fullscreen via this menu. When not in fullscreen, I like to keep it at Windowed (Hard), but the window mode is really up to you. Everything else on the menu here can be left alone.

Screen option
There generally isn’t much need to change anything under here, except for the FullScreen tab; if you want the game to appear at a larger size in fullscreen, you can check “No change screen resolution”.
Then, under Zoom, you can choose an option for the fullscreen display to be larger. Fixed aspect is my preference when using this, as adjust aspect will stretch the display to a 16:10 aspect ratio, but you can try them all and see which you like best (none will make the display quite small, however).
Using no change screen resolution and a zoom option is generally preferable for standard gameplay, as it will typically give you the best display.
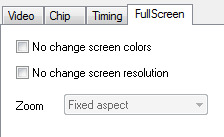
If you leave “No change screen resolution” unchecked, the game’s display will have a greater amount of black space around it, but this option is actually preferable if you want to take accurate screenshots in fullscreen at the proper original size; just crop out the extra space. Below is how it’ll look with this option. No change screen resolution + fixed aspect will be similar, but larger and with less black space around it.

Sound
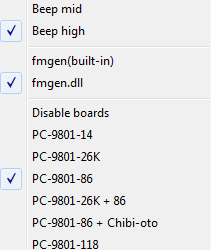
Found under Device > Sound, here you can change the sound board. For Touhou, you want PC-9801-86; this is based on the YM2608 sound card.
Beep refers to the PC-98′s onboard PC beeper speaker; these options control its volume. You don’t really need to change them, though you can lower the volume or disable it if you dislike the beep sound made on startup.
(Additionally, for an amusing or at least somewhat interesting experience, try changing the SFX option to beep in a game with this option, like Mystic Square. Some of the sounds are pretty silly.)
The built-in fmgen cannot be disabled unless you add an alternate FM core, which can be downloaded from the same page as fmgen NPII (select fmdllset). To use these, extract them into the same folder as NPII. Then, add the line FMGenDll = XXX.dll to the np21nt.ini file, under [NekoProject21]. Change XXX.dll to the desired FM core; the readme file included with the alternate cores describes each one (use google translate if needed). If you don’t know what any of this is about, you’re fine just using built-in fmgen.
Lastly, Seek sound recreates the sound of a floppy drive if you load a floppy disk image, for authenticity. If you’re only playing Touhou, you have no need to worry about this.
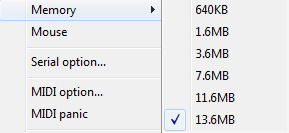
Memory
You may wish to add expanded memory here. In theory, this shouldn’t be necessary for running Touhou; however, if you want to play Lotus Land Story, you NEED to set this above the default. Without expanded memory, the game will freeze at stage 5 at the very start of of the boss battle if playing as Reimu. I’ll explain more on performance in LLS further down, so please read that. If you still have some performance issues in LLS after following those instructions, perhaps try a low-mid setting. Otherwise, you should be able to safely set it to the maximum 13.6 MB.
Mouse
Hides the mouse pointer. If you click this, you won’t be able to unselect it, or click any other menus at all.
If you’ve accidentally hidden the mouse pointer, go to np21nt.ini, scroll down to nousemmx=false, and change it to true. (No, ‘nouse’ is not a typo, that is the actual line within the file.)
MIDI option
If you are not using the fmgen build so that you can use SoEW’s MIDI soundtrack as detailed above, this applies to you. If you’re using the fmgen build, you can ignore this completely.
Set MIDI-OUT to a MIDI device on your computer; typically you’ll only have something like Microsoft GS Wavetable Synth unless you’ve installed your own, better one (I highly recommend VirtualMidiSynth, which will allow you to load your own soundfonts for MIDI playback). MIDI-IN can be left alone. Under Module, select SC-88.

Sound option
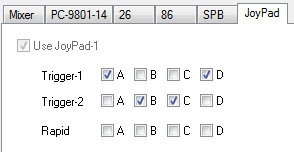
It’s unlikely you’ll need to change anything here. However, if you want to remap joypad buttons, that can be found here.
“Lotus Land Story is too slow!” - LLS Performance Fixes
As mentioned above under Memory, LLS requires expanded memory for the stage 5 boss battle if playing as Reimu. The game will freeze without it; set the memory to a higher value than the default 640KB. However, performance issues will likely still remain. So!
Download this archive and place all three files within the NP2EMS folder into the root of your Lotus Land Story HDI file using DiskExplorer. If you need DiskExplorer, it can be downloaded here. Open it up, select the HDI file, leave the profile set to Anex86 HDD, and then either drag the files over to the window or click File > Import. The changes will be saved automatically, just close DiskExplorer and you’re ready to go.
If you’re still having problems, check to make sure you have turbo mode selected in the options for LLS. Otherwise, go to Other > Clock disp and watch the number (at the top of the window). If it’s running considerably below where it should be, it’s likely your computer; try making changes as detailed in the above sections to reduce the amount of system resources NPII requires.
If the speed is not running below where it should be, try going and setting the CPU speed higher under Emulate > Configure. This applies to troubleshooting for other games as well.
That’s all I can think of for now, so if you have any questions, please feel free to message me and I’ll try my best to answer.
#neko project II#touhou project#touhou#pc-98#guides#txt#i've been working on this post for WEEKS now but i think i've got everything finally#please rb if you'd like#long post
140 notes
·
View notes
Text
Display For Mac

Display For Mac Pro
Display For Mac Mini
Display For Mac Pro
If you’re considering an external display for your Mac, there’s a few important decisions to make. Apple doesn’t sell external displays any more, so you can’t just default to their wisdom. That’s an issue, because not all displays are well suited for Macs.
The Displays preference pane acts the same way with your Mac’s built-in Retina display, too, except that “Default for display” automatically chooses the Retina mode. Share this: Facebook.
Which size? #
I can’t really help you with this one. It’ll likely be set by your budget, desk space and personal preference. The factors below will play a role, too.
Until Apple makes a stand-alone monitor option to replace the now-defunct Cinema Display monitor discontinued in 2014, finding an external monitor to increase the real estate of your MacBook Pro means heading out of the Apple universe. Luckily, quite a few monitors are offering USB-C connectivity to make it easy to hook your MacBook Pro to an alternate monitor. We’ve compiled a list of.
The most advanced display for your Mac. Built for professionals. Built For Professionals. Duet is built by ex-Apple engineers, delivering a retina display at 60 frames per second with zero lag. Using an additional display can double your productivity by reducing time to switch contexts.
Both the Mac and all displays in the chain must support DisplayPort 1.2, except for the last display which can be DisplayPort 1.1. In the image to the top right from StarTech, for example, Screen.
Retina or non-Retina? #
Thunderbolt 2 and DisplayPort 1.2 have a maximum resolution of 3840×2160 at 60FPS, which means non-Retina resolutions up to about 40-inch are supported by most current Macs. But, that only covers Retina displays up to 20-inch. Thunderbolt 3 equiped Macs, like the 2016 MacBook Pros, can run 27-inch Retina displays though.
There is another issue to contend with. Apple’s interface design in macOS is set up so it is comfortable for most people at a density of about 110 pixels per inch for non-Retina, and about 220 pixels per inch for Retina — text is readable and button targets are easy to hit at a normal viewing distance. Using a display that isn’t close to 110PPI or 220PPI means text and interface elements will either be too big, or too small.
The Display pane in System Preferences includes “larger text” and “more space” options. These can be used as a solution, but if you do, macOS will render the entire screen to a virtual canvas, then bitmap scale it up or down to the desired size. The result is blurry pixels, higher memory usage, more work for the GPU to do, and shorter battery life for laptops. You want to use the “default for this display” setting, if you can. It’s better quality, faster, and gives longer battery life.
Blurry pixels and a scaled display make it very difficult for designers and developers to see if elements are where they need to be. Elements that animate will appear to shimmer as they move. For me, “default for this display” is the only way to go.
The divider above shows the shimmering — it’s a 1pt or 2 Retina pixel line, but when the display is scaled down by a fractional amount (72%), those pixels don’t map directly to pixels on the display. As the list scrolls, the divider shimmers as the scaling represents the line differently.
You won’t need to choose a display that is exactly 110PPI or 220PPI. A slightly lower value will mean text and interface elements are larger. A slightly higher value will mean text and interface elements are smaller. You can use Sven Neuhaus’s PPI calculator to work out the pixel density of any display you’re interested in. Here’s a list of common external displays, with the 110PPI and 220PPI zones indicated.
Buying a display with a pixel density in the red zone usually isn’t a good choice, if you want to run “default for this display”. For example, 160PPI will show non-Retina UI too small, but Retina UI too large (it’s worth noting this can be used to buy a display that shows larger text and UI for those who need or prefer it).
The 4K iMac, 5K iMac and Surface Studio are listed as points of comparison, and can’t really be used as external displays. The Surface Studio’s 193PPI display is actually perfect for Windows, where the non-Retina (1×) UI scale is 96PPI, and the Retina (2×) UI scale is 192PPI. If I could buy a Surface Studio as an external display for my Mac, I think I would.
Wide gamut support? #
Wide colour gamut support — displays that use the Adobe RGB, Display P3, or DCI-P3 colour spaces — are great for photo editing, if your source material is created in those colour spaces.
But, the majority of web design, iOS apps, Android apps and game design is in the sRGB colour space. If that’s your line of work, you probably only need and want sRGB support (and an IPS LED display). Incorrectly set up, a wide gamut display used with non-colour managed software will produce overly saturated colours, and those colours won’t match how the final product is seen.
Xenu's Link Sleuth is spidering software that checks Web sites for broken links. It performs verification on normal links, images, frames, backgrounds, and local image maps. It also displays a. The Screaming Frog SEO Spider is a small desktop program (PC or Mac) which crawls websites’ links, images, CSS, script and apps from an SEO perspective. Commercial Mac Windows Linux Scheduled Data Crawling Seo Website testing Add a feature 23 Like. Xenu's Link Sleuth is not available for Mac but there are plenty of alternatives that runs on macOS with similar functionality. The most popular Mac alternative is Screaming Frog SEO Spider. It's not free, so if you're looking for a free alternative, you could try Integrity or Beam Us Up. If that doesn't suit you, our users have ranked 46 alternatives to Xenu's Link Sleuth and 12 are available for Mac so hopefully you. Xenu sleuth for mac.
It’s often possible to put wide gamut displays into an sRGB emulation mode, or to calibrate them to sRGB. But, not always. I am unaware of a way to calibrate an 5K iMac to use sRGB (if you know, please get in touch). “99% coverage of the sRGB spectrum” or similar message in the marketing text is usually a good sign, and what you’ll want to look for if buying a display for web or app development.
There is another significant issue with wide colour gamut support — wider colour gamut stretches the same value range, 0-255 for 8bit per channel colour, over a larger range of absolute colours. The number of available steps is the same, and each step becomes bigger. Using a wide gamut display with colour management aware software also typically requires conversion to and from the display’s profile once, twice or more times for everything displayed. Doing so can result in rounding errors, which are presented as gradient banding or noise.
That’s all fixable by using more colour precision. The 5K iMac uses 16bit per channel for the macOS window manager and it sends 10bit per channel to the display. That’s a great fix, but it requires double the GPU memory, double the GPU memory bandwidth, and 25% more port bandwidth. That’s the likely future, but we’re just not there yet for the majority of displays.
In short, if you only need sRGB, buy an sRGB only display.
Published 12 December 2016.
If you bought Displays on the Mac App Store, you’re eligible to a free license. Read more
Migration from the Mac App Store
Displays was previously available on the Mac App Store, but for technical reason, the app could not live anymore on this store without breaking support for Retina resolutions.
Instead, we’re now selling license keys directly from our webstore. All people having bought Displays on the Mac App Store are eligible to a free license key.
Download our Migration Assistant to request your key
Click on Displays icon in the upper-right corner of your screen and choose your monitor resolution among all supported resolutions. Displays is listing even resolutions hidden by macOS.
Displays supports all active monitors attached to your Mac, including AirPlay monitor. With one click, you can enable or disable mirroring mode.
To easily identify a resolution, you can set a custom label instead of resolution width/height and you may choose or not to group Retina resolutions, and even hide too-small resolutions.
Light at night is part of the reason so many people don’t get enough sleep. When night is coming, you can enable a night mode to rest your eyes and avoid unwanted effects of lights, especially blue light.
With just one click, or with a keyboard shortcut, you can switch to macOS Dark theme (10.9 or later), lower screen brightness, reduce blue light emitted by your display, enable grayscale mode or even set another wallpaper. If your screen does not support brightness control, Displays will simulate screen dimming.
And night mode can be scheduled, either in a user-defined period or based on sunset/sunrise. You can even automatically switch to night mode when you launch any app of your choice!
Display For Mac Pro
With Displays, you can take screenshots easily, either entire screen, specific area or a window. Many options are offered like timer, presets, mouse pointer, window shadow…
Divx for mac codec pack. Put the mouse over the video thumbnail, there will be a Play icon over it. Or you can click on the Add Files to browse videos on your Mac. There are more than 500 video formats supported.02 Click the Play iconYou can see your videos have been displayed in the program.
Use our various tools to annotate your screenshot: free drawing, rectangle, polygon, star, arrow, speech bubble, text… Another useful tool allows you to pixellate or blur some sensitive part of your screenshot.
Sharing screenshots has never been easier. Displays supports many cloud services where you can upload your screenshot and obtain a share link: Dropbox, Google Drive, OneDrive, Box, CloudApp, pCloud, FTP and SFTP.
You’re doing presentations like app demonstration or Powerpoint? Displays can act like a virtual laser pointer to grab your audience’s attention on what you’re doing.
Entire screen will be dimmed, except the part where your mouse cursor sits and mouse clicks will also be visually highlighted. Everything is customizable: circle or rectangular shape, screen color, opacity, highlight radius, play sound, differentiate left and right mouse clicks…
When one of your external monitor is in another room or not directly visible, it’s hard to see what is displayed on it. The same happened when you’re doing a Powerpoint presentation and the slides are behind you. That’s why we implemented Picture-in-Picture (PiP) for monitors.
Displays can enable a PiP overlay, that reflects the secondary screen content in real-time. And for sure, PiP can be enabled for more than one monitor at a time.
Do you need to hide temporarily the mess on your desktop? With one click or through a customizable keyboard shortcut, you can quickly hide all your desktop icons, without loosing essential features of your desktop like drag & drop or contextual menu.
French
Spanish
ALL FEATURES
Displays is not just a resolution switcher for macOS, as it comes with a lot more features for people managing multiple monitors and developers.
List all resolutions supported by your monitor, even those usually hidden by macOS.
Click on Displays icon in the macOS menu bar and choose the desired resolution. That’s it.
Replace default resolution name like “1680 x 1900 (60 Hz)” by any other text.
Resolutions can be grouped or not by Retina, and you can filter/hide any resolution.
Enabling or disabling macOS screen mirroring is actually just two clicks.
Display For Mac Mini
Rotate your monitor display to 90°, 180° or 270° (only if monitor supports rotation).
Get detailed information, like serial number, manufacturing date, active graphic card…
Rest your eyes in one click by reducing blue light and/or switching to Dark theme.
I would point out that Macs and Windows both support FAT32 file systems though so this may be why it was successful. Acronis true image for pc and mac os. I'm not so sure how things would go using an OS X journaled drive and restoring somethign to an NTFS one, but if it is just files/folders, I don't see why it wouldn't work either. Hello everyone!I can totally understand the importance of this feature, however, due to different archive formats and different platforms, it is quite hard to implement it.We are not planning to implement it for image recovery but we are - for file recovery, however, there is no ETA for this feature.As a current workaround I would suggest using Cloud backups. I Then went to my Windows machine and restored that image to another USB flash drive in Windows and the result was a working USB flash drive.
Easily take a screenshot of a window, area or entire screen, with options like timer.
Easily annotate, crop or resize your screenshot, with 12 different tools.
Upload your screenshot to Dropbox, Google Drive, Box, OneDrive, FTP/SFTP server…
With one click or keyboard shortcut, quickly hide all your desktop icons.
Grab your audience’s attention by highlighting mouse pointer and mouse clicks.
Engadget is part of Verizon Media. Logitech s530 mac software.
Show secondary monitor live preview in an overlay window on your main screen.
Show a Test Card to help in monitor calibration, whatever screen ratio (4:3, 16:10…).
Get notifications for many events like monitor plug-in or video card change.
Set customizable shortcuts for all functions, like switching resolution or night mode.
Quickly enable or disable True Tone mode of macOS, if your Mac supports this feature.
Displays entirely supports the new Dark mode introduced in macOS Mojave.
Displays is fully optimized for the latest release 10.15 of macOS, called “Catalina”.
Displays is using all modern technologies offered by Apple for the best performance.
If bought Displays on the Mac App Store, you’re eligible to a free licence key (please check Support section).
SCREENSHOTS
WHY DISPLAYS?
Easy to use Only two clicks are necessary to change your monitor resolution
Customizable Will adapt to your needs with full customisation for every function
Reliable Every function has been deeply tested on every macOS version
Full-featured Comes with many advanced tools, no need to buy some other apps
Display For Mac Pro
Free DownloadBuy Now Version 1.9.5 – 14/08/2020 Requires macOS 10.9 or later, 64-bit processor, ready for macOS Catalina 15 days Free Trial with time limit Release notes
1 note
·
View note
Text
Long Live TrackPoint!
Today the ThinkPad is a brand synonymous with business grade, reliable, solid looking black laptops which could be used as a shield in times of crisis. When the design was first developed, the great industrial designer Richard Sapper drove ideas and produced concepts for IBM on which the ThinkPad is still based today. One of his original concepts can be seen here in a post by David Hill: http://blog.lenovo.com/en/blog/richard-sapper-the-origins-of-the-thinkpad-keyboard

The red in the ThinkPad logo today is representative of the TrackPoint, the pointing device which sits boldly in the centre of ThinkPad keyboards. The TrackPoint is intrinsic to the overall iconic look of ThinkPad and it is a source of pride for a lot of ThinkPad users. On the occasions where a tech journalist or blogger might cast negativity towards the TrackPoint they often find it is a bit like poking a bear when the fans assertively respond.

Occasionally being an angry TrackPoint defender myself I wondered how much I could find out about the TrackPoint and its history. That is what lead me to the honor of communicating with David Hill (http://www.dwhilldesign.com/biography.php) and Ted Selker (http://www.ted.selker.com/index.htm) both of whom have had a great deal of involvement in the ThinkPad history.
I had the pleasure of chatting with David Hill over the phone early one morning and was able to ask him a few questions around the ThinkPad and I have paraphrased his answers below:
Q1) Might I please ask, when the original ThinkPad design was being outlined was their much debate over how mouse control would be integrated?
Richard Sapper had a great input on the ThinkPad design and he discovered a pointing device that Ted Selker and Joe Rutledge were working on, they it had located in a desktop keyboard.
Q2) Could I please ask why Red was chosen as the colour of the TrackPoint
Richard Sapper wanted to call attention to the TrackPoint. However red was somewhat of a challenge to get approved by IBM. At the time of the time of the design work, Red was the colour reserved for server and mainframe room Emergency Power Off switches and only EPO switches. With a little persistence and some clever creative thinking by Mr Sapper the colour IBM Magenta was created.
(Authors note: having looked at original ThinkPad 700 Series machines, IBM Magenta is as red as its possible to be without actually being red, confirming for me Richard Sapper was indeed a genius!)

Q3) From time to time reviewers and social media commentators are dismissive of the TrackPoint considering it dated or unnecessary.
David gave a great analogy of the Trackpoint, he likened it to a manual car transmission, it takes a little more getting used to than an automatic transmission but once you have the feel for it you have a greater degree of control of the driving experience. Similarly, the TrackPoint offers a much more accurate control of the mouse pointer than other devices. Those who comment negatively are unlikely to have given it a try.
Q4) Could I please ask if you recall any major changes and possible engineering challenges since the original implementation?
The original TrackPoint cap was smooth, Ted Selker worked to improve traction and developed the Cat Tongue cap. This cap improved precision but could cause a finger callus from prolonged use. This lead me to start the initiative to produce different designs such as, Soft Dome and Soft Rim. For a time ThinkPads were shipped with a selection of caps allowing customers to choose.
In addition to this from the original pointing device and two buttons a third button was added to give much improved scroll experience. The third button, which enables scrolling, was first placed below the two other buttons. I felt this was problematic since it took up valuable internal real estate and it was nearly impossible to reach with your thumb conveniently. I moved it between the other two buttons using a keystone shape. This shape allowed for effective button sizes and mapped to the different direction of movement. I first had the idea when I was working on a Butterfly 2 concept, with the late Dr. Karidis, that had no palm rest and thus no space for a third button. Necessity is often the mother of invention.
I was also able to reach out to Ted Selker who is still very enthusiastic about the TrackPoint and he was kind enough to answer some questions I had via email.
Q1) I believe you had the idea of a pointing stick or navigation device in a keyboard before you joined IBM or the ThinkPad was on the drawing board. Do you recall what triggered the idea?
I was reading the JUST published HCI book by Card and Moran in 1983... I saw on one page where it seemed that the time to reach for a mouse was like a second.
I had looked at data in English and Engebarts 1967 paper about the fact that a kneebar was better than a mouse for the first 15 minutes... i thought well, though a kneebar is bad because there is now detailed representation of the knee in the motor or sensor homunculus,,, till a person gets good at using the mouse, but the kneebar doesn't take your hands off the keyboard.
Q2) During development or implementation what do you feel were the largest obstacles to overcome?
OMG...so many things…
making a joystick make selections as fast as a mouse against theory that said this was impossible!
making a good way to touch it without slipping
making a good way of selecting with buttons
finding a place that it didn't get struck by fingers
Q3) How does the TrackPoint we know now, compare for look and feel with the device you first envisaged?
I started with an erasure under the space bar on a joystick (1984)
Then a joystick under a key (1984 at Stanford and again in 1989 at IBM)
Then a rod shaped metal thing (1989)
Then a cup shaped piece of plastic (1990)
Then a special 55 Durometer bending part with an air suspension and a latex grippy top (1992)
(and 50 worse idea versions it contended with for a top)
Then a Santoprene version that was mas produced but not delivered to customers
(because they would have had to kill me first)
Then a 55 Durometer Buytl rubber top (product announce)
Then a fish scale skin top 1994 prototype (and many other cool tops)
Then a nylon pieces sticking out of the top
Then using the cup shaped grip idea in that we first used in a handle controller for airtrafic control
And an alternative large surface convex top that also reduces pressure on the finger
The buttons started as small making them bigger and requiring less pressure imprpoved user pointing performance!
A generation of ThinkPads included locking buttons that I designed for people with special needs, press to select eliminated the need for these.
Then a press to select , press to magnify, press to scroll gesture language built in.
Then a middle button for treating the stick as a second device
The algorithms changed and improved substantially from Trackpoint II in 1993 to Trackpoint III in 1995
The newer Trackpoint III ( has negative inertia which makes it 15% faster at selection than Trackpoint II... this feature models starting and stopping and enhances them (kind a like ABS brakes do for stopping a car)
Q4) Are you aware of the staunch following of die hard fans the Trackpoint has today?
I am deeply proud of that and only wait for the day that I might improve it some more
Q5) Many fans debate and argue with others the accuracy and efficiency of the TrackPoint over other input devices. How would you best summarize how accurate and efficient the TrackPoint is?
Careful experiments were done in labs in NY, Florida, TX, NC, Japan and later CA…that all showed that people could learn to use the TrackPoint better than a trackpad in less than a minute if they tried :
Trackpoint is 20% faster for pointing than a trackpad
Trackpoint is at least 20% faster than a mouse for point and type (text editing like things)
Trackpoint could be made much better for drawing and for new displays and so on... i want to do it still.
Q6) I have used the TrackPoint for everything up to and including photo editing. Are you aware of any implementation or uses of the TrackPoint which might seem out of the ordinary?
We used it for lapersocopy at Johns Hopkins (this reduced dexterity problems caused by tremor in surgeons hands controlling a camera inside a patient)
We used it for selecting ground traffic control of airplanes (saved a 30 million dollar contract)
Blind people said they loved it because it didn’t require them to put their finger in a place determined by the cursor or mouse.
People with prosthetics said they liked it because it reduces tremor too
Old people liked it because it reduced the effects of tremor on cursor control
I used it for its 16 bit a/d (Analog to Digital) converter to teach science ...we have to talk about the science wand
I have to say thank you to David Hill and Ted Selker for being so forthcoming with details. I gained so much more information form them both but had to trim this down for post length. Also a big Thank you to Gavin O’Hara for his assistance with this post.
3 notes
·
View notes
Text
VideoFlow Review Discount And Bonus
VideoFlow Testimonial - Are you looking for more knowleadge concerning VideoFlow? Please read through my honest review concerning it prior to picking to examine the weak points as well as toughness of it. If you buy VideoFlow with my web link, you will certainly obtain unique as well as eye-catching perk packages. I constantly upgrade my rewards everyday.
Introducing VideoFlow
YouTube Advertisements for Beginners: Exactly How to Market on YouTube (Component 5)
YouTube Tips and Tricks to Live By
With numerous different ad options to select from as well as a lot of means to speak to potential consumers, it can be difficult to maintain your head over water on a vast platform like YouTube. Here are some pointers as well as methods to assist you be as successful as feasible with your dropshipping organisation.
Leverage Remarketing
Don't be content with revealing individuals advertisements just through YouTube targeting. Advertising and marketing to individuals who have actually already seen your site (remarketing) is a whole lot extra financially rewarding as they understand your item supplying better than newbies.
Add Interactive Elements
An additional YouTube tip would be including interactive aspects like a call to action to your ads. This offers customers an activity to accomplish so they are not confused concerning the intent. Whether it is subscribing to your network, registering to a webinar or visiting your web site to acquire something from you, it is always a great concept to provide people direction and objective in your marketing.
Establish Goals
Before you launch your campaign, as well as even before you produce your video or copy, you require to determine what you want to attain with this campaign as well as what success will certainly look like. If you invest $500 on the project, how many units will you need to sell to make back this financial investment while likewise making a profit? How much will your YouTube advertising price prior to you see project success? Goals can be sales, internet site views, ezine signups, channel clients, etc, so success can take on many types.
Set Frequency Capping
A YouTube advertising and marketing method that lots of people forget is frequency covering. Relying on the dimension of your target market, frequency capping can be a vital part of your campaign, or just a great to have component. This attribute enables you to set a restriction to the variety of times one particular individual will be revealed your ad. Use this feature to guarantee you do not frustrate customers or create any type of unfavorable sensations in the direction of your brand name.
Customize Your Messaging
Advertisements have actually come to be a part of everyday life yet just the ads that stand apart obtain noticed. Create YouTube ads that are fascinating and also individual to your audience to help them associate with your brand name. Brand commitment is much easier to infuse if a person can relate to it early in the education process.
Make Time Details Web Content
Individuals really feel highly for various things. Brand names that share these feelings are simpler to associate with. Football fans live for the Superbowl yearly in the United States, and so do brand names that invest thousands to promote throughout the occasion on TV, billboards, and also online. These brands care a lot regarding this time around of year because they know precisely where their audience will get on that day-- before a digital tool of some type, listening, seeing, and also engaging with this event. Showing your audience that you have the very same passions as them assists you become part of their life.
Sector Projects
Our final Youtube technique is around division. Campaigns can occasionally be as well generic to speak with any person. If your content is also obscure it can be difficult to influence people to take any actions or remember your brand. Think about the audience of an ad and go through the individual flow to recognize if you can section the audience and also ad even more to make it relatable as well as particular niche.
Conclusion
In the beginning, YouTube advertisements can really feel frustrating.
Yet YouTube's varied advertising and marketing formats offer online marketers with a powerful suite of tools to reach their target market.
What's more, with video clip web content expected to assert 80% of all internet website traffic by 2019, this marketing channel is well-worth reaching holds with.
Which kind of YouTube ad are you going to begin with? Let us know in the remarks listed below!
VideoFlow Review & Introduction
Supplier: Sam Bakker
Product: VideoFlow
Introduce Day: 2019-Dec-10
Release Time: 11:00 EST
Front-End Rate: $67
Sales Web page: https://www.socialleadfreak.com/videoflow-review/
Niche: General
What Is VideoFlow?

VideoFlow is an easy to use video software application. It's maximized for tales, marketing videos and also normal membership or website-related Video clips. Users can shed inscriptions into videos, add video clip wrappers and also choose from a vast array of video to boost and produce eye-catching video clips that convert into sales.
VideoFlow is an online software program that allows its customers to import videos from their mobile phone, tablet or video device. Then modify & produce a premium 4k video. The software application consists of a wide variety of extra Boosted features that include:
Shed subtitles into video clips
Add video clip wrappers
Record Screen & Webcam
Computer animated logo designs, intros & outros
Client Job monitoring system
Sub-users
Job partnership & evaluation system
Animated text overtop your video clips
Scene shifts
Animated Emojis
4k Rendering
As well as much far more ...
All for an one-time charge including business legal rights to make sure that your customers can benefit marketing video clips they develop to services.
This software application is loaded with a large range of various other unbelievable features making it a 'Piece of cake' for your customers.
VideoFlow Testimonial: Characteristic & Perks
Shed subtitles right into your video clips Rapid
Videos with inscriptions or subtitles stick out in a newsfeed packed with visitors that scroll at hyperspeed. They engage individuals whether the noise's on or off ...
THIS IS CRITICAL: 85% of videos are viewed WITHOUT sound.
Literally EXPLODE your target market shedding subtitles into your video clips. More people absorb your whole message so they in fact get to your call of activity ... click ... as well as make you earnings.
VideoFlow uses an AI-powered learning device that makes subtitles automated as well as easy. Within minutes you can entirely burn your whole video clip with precise captions.
Fast Modifying Like You've Never ever Seen It Before:
VideoFlow Production is quick! The longer a video clip takes the extra it eats into your agencies bottom line.
You can not afford to spend days adjusting excessively complex settings or taxing totally free flow editors (Developed for Video Clip Artists).
So we crafted a brand-new way of editing and enhancing. And also it's faster than in the past!
With VideoFlow it takes just mins and also a couple of clicks of your mouse to completely customize any one of your videos, develop high converting scenes as well as utilize design templates to drain video clips at a fast pace.
Final thought
"It's A Large amount. Should I Invest Today?"
Not only are you obtaining access to VideoFlow for the best rate ever used, but additionally You're spending totally without threat. VideoFlow consists of a 30-day Cash Back Guarantee Plan. When you select VideoFlow, your satisfaction is assured. If you are not totally pleased with it for any factor within the initial thirty day, you're entitled to a full reimbursement-- no question asked. You have actually obtained nothing to shed! What Are You Waiting for? Try It today and get The Following Reward Currently!
Ps: If you have any type of concerns you intend to ask me about VideoFlow or you merely wish to provide your feelings and thoughts concerning it. Please do not hesitate to communicate your remarks, recommendations or corrections., I will certainly address you totally as well as thoughtfully. Thanks!
0 notes
Text
How to navigate your computer screen with only your keyboard
New Post has been published on https://nexcraft.co/how-to-navigate-your-computer-screen-with-only-your-keyboard/
How to navigate your computer screen with only your keyboard
Shove that mouse off to the side and get a-tapping. (Deposit Photos/)
It’s hard to imagine using a computer without a mouse or its notable descendants, the trackpad and pointing stick (you know, that rubber thing in the middle of the keyboard). So when they stop working, either because a button jammed or because they’ve given up altogether, it can feel like your computer has been bricked. Fortunately, that’s not the case. In fact, with the right keyboard shortcuts, including “mouse keys,” you don’t need a mouse or trackpad at all, and you may even find yourself sticking with your keyboard.
Why your keyboard is also your mouse
Modern computing has long relied on keyboard navigation, and the earliest versions were more or less just a bolted-on typewriter. Manufacturers eventually added “home,” “end,” “page up,” and “page down” keys to make navigating reams of information less of a chore. Over time, more specialized keys, including “alt” and “command,” appeared as computers took on new jobs. Still, the keyboard has changed so little that decades-old models may be perfectly compatible with modern operating systems.
They also were built to spare your wrists. Even though a mouse offers a degree of precision beyond a keyboard’s capabilities, the small, precise movements of certain mouse-moving muscles can, over time, cause pain and other discomfort in your hands and wrists. As a result, keyboards and keyboard shortcuts have become important for computer users with motor control or dexterity concerns. No matter who you are, you may find keeping your hands on the keys for a few hours each day makes you more efficient and more comfortable.
General shortcuts
So if your mouse or trackpad is broken, or you just don’t want to use it, you’ll need to get familiar with common shortcuts. Most programs, regardless of the operating system or browser you’re using, let you employ the “tab” key to hop between on-screen options in order, hit “enter” to launch a command, and scroll with the arrow keys. “Home” and “end,” meanwhile, will generally take you to the top or bottom of the page, respectively. Each operating system has its own shortcuts, so focus on the one you use most often.
Cross-platform apps such as Google Chrome also tend to use the same shortcuts regardless of the user’s operating system, but their developers have to play along with computer manufacturers’ quirks. MacOS users, for example, would use (command+T) to open a new tab, while those on Windows or Linux would hit (ctrl+T). Still, while there may be many similarities, you shouldn’t assume one shortcut translates to another program.
Once you’ve identified your most commonly used programs, keep a list of shortcuts handy and practice using them. Often, they’re a little faster than using the mouse, especially if it’s something you do a lot, such as returning to your Google search results and trying the next link.
Windows 10
To enable mouse keys in Windows 10, press (Windows+I) to open Settings, and head to Ease of Access. Open this and scroll down to the Mouse. Turn Control Your Mouse with a Keypad on, and you’re off to the races, though it’s important to note that this is most likely to work if you have a separate keypad on the right-hand side of your keyboard. If you have a smaller laptop that lacks one, you can still enable mouse keys, but it might not work. Experiment a little and see if your computer will let you navigate with your keyboard.
If it does, each number from one through nine will control a different direction: eight is up, two is down, four is left and six is right. Seven, nine, one, and three serve as diagonals. Five stands in for left-click, and for right-clicking, hit the “plus” key. You can enable or disable this type of navigational control with (left shift+left alt+number lock). Need the keypad to enter numbers? Number lock will, uh, lock it to entering numbers.
MacOS
For Apple computers, mouse keys can be activated via “Full Keyboard Access,” which doesn’t require a keypad. That’s a good thing because keypads are very much optional accessories on Macs.
To enable this, go to the Apple menu, choose System Preferences, and then Keyboard. Click Shortcuts, and at the bottom you should find “All Controls.” Click that and you’ll enable mouse keys. Just remember it’s the same layout as a keypad: eight is up, two is down, four is left and six is right, with one, seven, nine and three serving as diagonals.
If you don’t have a keypad, take some time to practice. Navigating via the line of number keys at the top of your keyboard will feel odd at first, but it’s workable.
Ubuntu
Unlike most operating systems, Linux lets you ditch the desktop entirely and use the command line interface (CLI) for everything, running code directly. Just hit (ctrl+alt+T) to open a terminal or (alt+F2) to open the “run” application window, if you already know what program you need. But if you’re not looking to get this involved, it’s still easy to turn on mouse keys.
First, if you have a number lock key, hit (ctrl+shift+number lock) and press the numbers to see if the pointer moves. If so, you’re all set. If not, press (ctrl+alt+tab) or the Super key, if you have one. This will open Activities. If you installed Ubuntu on a Windows laptop, use the Windows key. Select Settings and then Universal Access. Under Pointing and Clicking, you’ll find Mouse Keys. Hit Enter to turn it on, and you’re set.
Written By Dan Seitz
0 notes
Text
Wacom MobileStudio Pro 13 Review
I got to try out the new Wacom MobileStudio Pro for a little while back in October of 2016, but now that I’ve been using it for some real work, it’s time for a full review. I’ll start off right away with letting you know that if your career has anything to do with visual creativity, this is the tool you need. Notice I said tool instead of tablet. That’s because the Wacom MobileStudio Pro is almost entirely designed for creating all the things that everyone else uses in their daily lives. This tablet PC is made for professionals. The “Pro” in this tablet’s name isn’t just tacked on to make it sound better like some other electronic gadget manufacturers do. It is genuinely deserving of the “Pro” moniker.
This tablet isn’t for people who play cartoony games that everyone loves to play on their iPads, it’s for people who create those games. This tablet isn’t for handing to your kids to watch an animated movie in the back seat on a long drive, it’s for the people who create those animated movies. It’s not for taking selfie videos with cute cartoon filter overlays, it’s for the people who design those filters. If you’re a comic book artist, architect, 3D texture artist, video editor, story board artist, sculptor, fashion designer, animator, engineer, photographer, retoucher, graphic designer, illustrator, or a student trying to learn any of those disciplines, the Wacom MobileStudio Pro is what you’re looking for.
It sounds like the Wacom MobileStudio Pro is a lot like Microsoft’s Surface Pro 4 or Surface Studio, both of which are drewl-worthy products aimed at creative professionals as well. Keep reading to find out why the MobileStudio Pro is a much better choice for digital artists. With all this praise right up front in the intro paragraph, some of you might be ready to find the order button on Wacom’s website, but despite all the power of Wacom’s MobileStudio Pro, there are a few drawbacks that you’ll want to know about, too.
youtube
Specs
The version in this review is the DTHW 1320H model which has the 13.3″ screen, Intel Core i7 CPU, Intel Iris Graphics 550, 512Gb SSD, 16Gb of RAM, and the Intel RealSense 3D model scanning hardware. The is number 4 out of 6 on the scale from cheapest to most expensive in terms of your model choices for the Wacom MobileStudio Pro. If you want to spend less money, the cheapest model has a 13.3″ screen, Core i5 processor with 4Gb RAM, 64Gb SSD, and a regular 8Mp camera. If you want even more power & want to spend more money, there are two models of the larger Wacom MobileStudio Pro 16 which include NVIDIA Quadro GPU hardware. The top of the line model has a Core i7 processor, Nvidia Quadro M1000M 4Gb GPU, 512 Gb SSD, 16Gb RAM, and Intel RealSense 3D scanning camera. Also, the larger 16″ models have 8 programmable hardware buttons in the bezel as opposed to 6 in the smaller 13″ model.
Screen and Pen
If you’re thinking about the Wacom MobileStudio Pro, the biggest selling point is going to be its screen and pen interface. I was fully converted when I first got a Wacom graphics tablet back in the mid 90’s and today using a mouse or trackpad to interact with a computer feels like using a hammer to put together a watch (especially when it comes to design work). The pen-to-screen interface gives you a direct connection for manipulating computer controls. It’s not disconnected like a mouse or trackpad. Furthermore, you can build motor-memory since the location where you place the pen tip is always going to have the same relationship to the dimensions of the screen you’re looking at. That’s never true with a mouse or trackpad so often you’ve got to spend a couple seconds looking at the screen and moving the pointer around to figure out where it is. With a Wacom pen, you place it and it’s there. I can even do this without looking at the screen and have accurate cursor control.
A touch screen also gives you direct interactivity with graphic user interface controls, but fingers are big. Each finger is going to cover from 100-300^2 pixels worth of data and buttons need to be that big to be activated. That’s a huge waste of space and a huge crutch for efficiency.
The Wacom MobileStudio Pro 13 includes the new Wacom Pro Pen 2 and its digitizer supports 8,000 levels of pressure sensitivity, plus pen tilt sensitivity, and pixel level pointing accuracy. You may remember in my Surface Pro 3 review where I compared the pressure sensitivity to the Surface Pro 2 which used Wacom’s digitizer technology as opposed to Microsoft’s new N-Trig based digitizer technology. I said that the Surface Pro 3’s 256 levels of pressure sensitivity wasn’t noticeably different from the Surface Pro 2’s 1024 levels of pressure sensitivity. The Surface Pro 2 used some of Wacom’s older & cheaper digitizer tech, and I have to say that the digitizer tech in the MobileStudio Pro 13 is far superior! Noticeably far superior!
Wacom’s Pro Pen 2 doesn’t require batteries at all. It has two buttons on the side and an eraser. Yes, the buttons are customizable too though they need to be within an inch of the screen to function (no auto-launching OneNote from afar like the Surface Pro 3 can do). It also includes interchangeable pen nibs if you want to change the feel a bit or you wear one out. The pen is so comfortable to hold. The buttons are easy to feel and find. The pen feels like the perfect weight. It makes the Surface Pen feel clunky and cold.
Putting the pen to the screen feels like coming home. The display is so close to the surface, it’s almost like you’re touching the pixels directly. If you look really really closely, yes there’s a bit of space between the top layer and the pixels, but in normal use it’s going to feel like you’re drawing directly to the software’s graphical user interface. The accuracy is excellent as well. Older pen computers often don’t place the pointer quite as precisely on the screen as you would want. Many have digitizers that calculate the positioning in clumps and that’s why some will have a jiggle to the line strokes if you move the pen too slowly. The Wacom MobileStudio Pro actually has pixel-level positioning accuracy and it is awesome. You can hold the pen still on the screen, move it as slightly as you possibly can, and you’ll see the cursor move one pixel in that direction. You are not going to get this level of precision control on any other pen computing device. What about the corners, you say? Yes, it’s true there is often fall-off of pen accuracy in the corners of the display for many pen digitizers. Wacom solves this by extending the digitizer beyond the display area and deep into the bezel. That brush cursor or pointer is going to remain pixel accurate all along the edges.
Your pointer appears on the screen when the pen tip gets to a little less than an inch from the surface of the screen. At that point, the touch screen is disabled and you can rest your hand on the screen for a stable platform. If your touch screen is not responding to your fingers, that might be why. This range is a lot greater than the vertical range before palm rejection in Microsoft Surface N-Trig technology and that means you’re less likely to invoke touch screen actions accidentally.
The exterior layer of the screen is actually a matte material too. This is much better than those glossy glass screens that you see on things like the Microsoft Surface devices, iPad Pro, Macbook Pro, etc. The matte material doesn’t give off nearly as much glare, which can interfere with your ability to see your work properly. Often you see professional photographers with Macbook Pros covered in a black hood to reduce the glare on those terribly shiny screens. This doesn’t require that kind of work-around as much. The matte finish also reduces the fingerprint grease problem. Yes, you’re still going to get fingerprint grease on the screen when you touch it, but the interference and notice-ability is greatly reduced compared to a glossy glass screen. By the way, you get a nice screen cleaning cloth in the box.
The screen actually subtly flexes when you apply pressure. You might think that would be a durability problem, but bendable things are less breakable. So I’m imagining this won’t shatter as easily as a glass screen. It also feels much more natural to interact with and that’s a huge plus. If you’ve used a Microsoft Surface Pro/Book/Studio or an iPad Pro with Apple Pencil… yeah, they have great pressure sensitivity and you can write on the screen and accurately control the thickness of the stroke, but it still feels like plastic on glass. The Surface Pen variable texture nibs help improve that feeling to some degree, but the Wacom MobileStudio Pro brings the feeling of drawing on a computer to a higher level. It doesn’t feel exactly like writing with a pencil on paper, but the matte screen texture, the flexing, and the practically perfect pen easily offer the best pen interface on the market.
While a precise pen interface is very important to anyone in the visual creative fields, so is color accuracy. The Wacom MobileStudio Pro’s screen does not disappoint. It actually supports 96% of the Adobe RGB 1998 color gamut. That’s a much wider color gamut than the usual sRGB that most computer screens display. Most photographers and print designers are going to want to use this color gamut. For video, the new color gamut standard is heading towards DCI-P3 which extends more into the reds & purple ranges while Adobe RGB extends into the greens & blues. Unfortunately, the Wacom MobileStudio Pro does not have a quick-action button for switching between color gamuts like the Microsoft Surface Studio does.
Hardware & Tactile Buttons
We’ll start with the big silver-rimmed hardware buttons in the side bezel. On the 13″ model, you have 6 flat black buttons while on the 16″ model, you have 8. There’s also a 4 way circular button in the middle that also has a center button and the circle is touch sensitive for scrolling through functions. One some models, the center button within the circle doubles as a fingerprint scanner compatible with Windows Hello. The fingerprint scanner didn’t work at all on my first MobileStudio Pro. Windows 10 kept waiting for a finger appear, but the scanner just wasn’t sensing anything. A replacement MobileStudio Pro fixed that minor issue.
At first I thought that these would be a usability issue since none of these buttons are labelled and I had no clue what any of them would do. However, the Wacom MobileStudio Pro is a device for professionals and as it turns out the unlabelled buttons are much more powerful than first glance. They are all customizable! And the capabilities that you can program into these buttons is practically limitless. You’ll see a lot more info about this below in the software section, so keep reading.
In terms of tactile usability, these hardware buttons are very good. You can see the center button has a small nub on it so that you can easily find it without using your eyes.
The side edges of the tablet PC house some other buttons. Here you see the power switch. It’s not a button that you press but a spring loaded switch that you hold down to power on or off. This slight complexity to the switch makes it difficult to accidentally put the tablet to sleep mode while you’re working, and that’s a very good thing.
On one end of this edge there’s a volume toggle button and another spring-loaded switch. This switch toggles the screen rotation lock on and off. Also notice that all of these buttons on the edge are in a concave recessed area. This makes it difficult to accidentally press them while you’re holding the tablet, and again that’s a very good thing.
Still on this same edge, we’ve also got a 3.5mm audio port, and a full-sized SD card slot. Having the full-sized SD card slot here is fantastic since you can easily start working with photos or videos just shot on a high-end camera without any dongles or adapters.
On the opposite edge you’ve got 3 USB-C ports for peripherals and charging along with a Kensington Security slot for locking the device down. In the above photo, I have the included pen holder mounted inside the Kensington Security slot. Most laptops and tablets that have USB-C ports these days only have one, so it’s great to have 3 here. Everyone says it’s going to be the new standard, but personally I don’t think USB-C is nearly as forward-thinking as it should have been. There are no full USB-A ports on the device and that’s unfortunate since USB-A is still very widely used. You’ll need a USB-A to USB-C adapter (or three) to use most peripherals. The long top & bottom edges simply taper smoothly to a rounded edge. You can also see the 5 Megapixel front-facing HD camera in the middle of the bezel above.
The pen holder is surprisingly well designed. It can hold the pen either vertically for easy access while you’re working, or the pen can be attached horizontally parallel to the edge of the tablet for transport.
On the back you’ll see two big rubber ledges on the sides. Both of these have a tilted lip to them that raises off the back. This lip is inset from the edges so there’s a bit of space there, and the rubber acts as a little foot to set the tablet flat on a table. What’s really genius about this rubber lip is that it also hides vents for the fans. The raised lip keeps the fan airflow going out the sides while it’s sitting on a table and the fact that theses are slightly inset from the edges of the device means your hands aren’t going to cover the vents if you’re holding it. There’s no heat in the middle of the back either, so you can safely keep it on your lap while you draw.
You can also see two big slots on the back here with four screws. Those are for mounting the tablet to a stand that will let you set it up on your desk and tilt it at different angles. Wacom will have a special stand sold separately that should be available in February of 2017.
Also on the back of this model is an Intel RealSense 8 Megapixel 3D scanner and camera. Only two of the MobileStudio Pro models include this 3D scanner while the others have a normal 8 Mp camera. You’ll read more about how this works a little further down the page.
The pen also comes with a heavy duty protective case. The flat end slides out and there’s form-fit padding to hold the Pro Pen 2 securely. On the flat end there’s also a cap that contains replacement pen tips and part of the sliding mechanism has a hole that you can use to remove the pen tip.
Incidentally, Wacom does not include a special keyboard for the MobileStudio Pro. There’s no detachable keyboard case option either. They do make a wireless keyboard for the older Cintiq Companion, but there’s nothing particularly special about it. You can use any Windows-compatible keyboard that you may already have or might like to buy (that includes pretty much all keyboards, even Mac keyboards). Above you see it works fine with Microsoft’s Universal folding keyboard connected via Bluetooth. Wired keyboards would need either a USB-C interface or a USB-C adapter/port-expander.
Software
First of all, the Wacom MobileStudio Pro runs Windows 10 as the operating system. The four most-expensive models come with Windows 10 Professional while the two least-expensive models come with Windows 10 Home edition. Windows 10 is really the only choice for a high-end pen-computer with a touch screen. MacOS has pretty poor support for touch interaction and Apple doesn’t allow anyone else to license the operating system for use on 3rd party hardware anyway. You might be able to “hackintosh” macOS onto the MobileStudio Pro if you’ve got the skills, but Windows 10 has a much better tablet UI and much better handwriting recognition so I wouldn’t recommend that. It’s not really worth it and there isn’t any real advantage.
By default, the MobileStudio Pro loads Windows 10’s desktop mode even though there’s no keyboard or mouse attached. That’s good for people who are familiar with the Windows 95 through Windows 7 style user interface, but personally I highly recommend switching into the Windows 10 tablet mode UI using the quick action center in the bottom right corner button. It’s much more touch-friendly and enables some nice snapping and application closing gestures. I even set the bottom taskbar to auto-hide to make more room for the real programs.
For the most part, the MobileStudio Pro includes generic Windows 10 with no bloatware. There are some default games pinned to the start menu, but those are easy to uninstall. There’s also an “Intel RealSense Camera Calibration Notifier that loads on startup, and if you’re in Tablet Mode, that shows as a big blank white window which is pretty annoying and useless. I disabled it by going to the Task Manager > Startup tab > selecting and and pressing disable. Wacom also included a Wacom Desktop Center app, Wacom control panel, and a first-run experience to introduce you to everything. This is where it gets pretty interesting and if you’ve used professional Wacom pen tablets or pen displays in the past, you probably already know what you’re in for.
Above is the Wacom welcome screen which introduces you to the “ExpressKeys” hardware buttons in the bezel as well as setting up a Wacom Account (not necessary) and calibrating the screen digitizer. It’s not hugely necessary to run the calibration since it’s pretty accurate out of the box, but people often hold the pen differently so it’s good to get it set up for the way you work.
The Wacom Desktop software is basically a dashboard with links to the Wacom Driver control panel, but it also has an interface for checking for driver updates as well as a method of backing up all of your custom settings. That’s going to be important because as you’ll see below, there is a lot that you can do in terms of customizing the Wacom driver software.
Here’s the real meat of Wacom’s software and it is extremely robust. Just about everything imaginable is customizable here. The first row at the top allows you to select which device you’re customizing. I only have the MobileStudio Pro 13 listed here, but if I had another Wacom device like a Cintiq pen display or an Intuos pen tablet plugged in, then it would show there. The 2nd row lists the tools associated with that device. The Wacom MobileStudio Pro has a series of tactile hardware function buttons, so that’s listed first, then touch is listed second, and “Pro Pen 2” is listed third. Selecting one of those will change the options below it for further customization. The third row is labelled “Application” and this is where you can customize the preferences and behavior based on which application is in the foreground. Yes, seriously. The little plus button on the right side of that row is where you can add whichever applications you want. Generally it’s easiest to add the preferences here based on running applications, but you can dig into the file system and select a specific executable if you need to.
So we’ve got customizable settings for the hardware buttons in the bezel, the touch screen gestures, and the pen with its pressure/tilt sensitive tip & eraser plus its dual hardware buttons… AND all of those can be further altered based on which program you’re working with. That’s pretty big, but how customizable are these functions? They are very customizable.
First you’ve got the hardware buttons in the bezel. They’re called “ExpressKeys” in the Wacom software. By default, these are generally assigned to modifier keys such as Alt, Ctrl, Shift, Spacebar, etc. The top button defaults to “Settings” which shows an overlay on the screen pointing out and labeling the functions you currently have assigned to each button. This is extremely useful if you’ve forgotten what you assigned to which button, but if you want to assign that settings button to something else, of course you can do that. By the way, it is possible to press more than one button at the same time, for example when you need to do Ctrl + Alt + Shift to invoke a modification for whatever tool you’re currently using.
The Touch Ring is next. That’s the big circle in the bezel and rubbing your finger around it in a clockwise or counter-clockwise motion will invoke whatever functions you want to assign to those gestures. The ring also has up/down/left/right buttons that can be pressed in order to change the touch ring’s functions on the go. In the above image, you can see that if I press the top of the touch ring, that will set it to scroll/zoom, the right side sets it to cycle between layers, the bottom sets it to change the brush size, and the left side sets it to rotation. All of those default functions don’t work the same way in all programs, so you’ll want to customize them based on your most-used software.
For example, my RAW photo organizational tool of choice is Adobe Bridge, so I customized one of the touch ring functions to increase or decrease the rating level depending on whether I rubbed it clockwise or counterclockwise. The default “speed” for this was too high, so I easily changed the interaction to a slower speed so that I could very accurately set rating levels on selected photos without having a keyboard attached and without having to open menus.
There’s also an “On Screen Controls” tab in the functions section, and this is pretty excellent as well. Basically you can set whatever you want, be it the pen’s hardware button, a bezel button, or a touch gesture… to invoke a radial menu on the screen. And yes, you guessed it, the radial menu can have buttons for whatever you want it to do, and you can make it have different buttons for whichever program you’re using.
That’s not all folks. You can also create any number of custom touch-screen panels with whatever buttons you want to create. Each of those panels can be activated using any of the other custom options in the Wacom Tablet Properties dialog box as well (and that’s a lot).
Next is the touch screen gestures. Naturally, you can disable this completely if you want to use only the system or application built-in touch screen gestures, but you can also add a few gestures here that aren’t commonly used in other programs. Above you can see a listing of all the touch screen gestures that are customizable. The “three finger swipe left/right to navigate” and “four finger swipe left/right to switch applications” gestures can only be enabled or disabled, while all of the others can be completely customized to activate whatever command you want. Again, the default functions are available in all applications until you add another application to the application listing in the 3rd row. Then with that application icon selected in the Wacom Tablet Properties dialog, you can choose completely different touch gesture functions for when that particular application is in use in the foreground. So for example, maybe you’ve written a script for InDesign CC that converts all text to outlines. You can assign a keyboard shortcut to that script in InDesign, and then assign the “Five Fingers Swipe Down” gesture to that keyboard shortcut when InDesign is active in order to run that script very easily. By the way, if you don’t have a keyboard connected, you can use the “Standard Layout” on-screen keyboard to specify or activate keyboard shortcuts (enabled in the keyboard settings).
The Pro Pen 2 customization options allow you to fine tune the pressure sensitivity as well as customize the two hardware buttons on the pen. There are sliders for most functions, but if you want more granular control over the tip feel, the “customize” button above will give you a pressure sensitivity curve graph. Again, all of this is customizable on both a system-wide and application-specific level.
3D Scanning Camera
Two of the high-end Wacom MobileStudio Pro models include an Intel RealSense 3D camera sensor on the back and they include a 1 year license for Artec Pro 3D model scanning software. This is high-end 3D scanning software that you’d normally use with dedicated handheld 3D scanners like the Eva or Space Spider to create 3D models of things like Arnold Schwarzenegger for Terminator movies, but the software also works with Kinect for Windows and, of course, the Intel Sense 3D camera built into certain Wacom MobileStudio Pro models.
Unfortunately, it is very difficult to get usable results from scanning 3D objects with the Intel Sense 3D camera set-up. It only works on objects between about the size of a basketball up to about the size of a couch. Anything with detail or gaps that are too small (baseball sized?), won’t render very well. You have to get the lighting just right, too. You might be able to get a nice model of relief sculptures on a wall, but a 360 degree view of a model is very tough to scan with this hardware.
The scanner does however automatically add RGB color texture mapping to the 3D object, which again requires your lighting to be just right. It’s not going to be a highly detailed image map though. The results might be good enough for a video game background that nobody’s going to look too closely at, but it’s hard to imagine what else this 3D scanner would be useful for.
Incidentally, the 1 year free subscription to Artec Pro 3D Ultimate Edition should activate automatically when you install the trial on a Wacom MobileStudio Pro who’s serial number indicates that it includes the Intel RealSense 3D camera hardware. This worked perfectly on my first MobileStudio Pro, but it did not recognize the hardware on the 2nd one, so Artec tech support had to enable a 1 year subscription manually.
Personally, I don’t think cameras belong on the back of tablets at all so if Wacom decides to do away with the camera completely on future versions, I don’t think anyone will mind. I know many people even put tape over the front facing cameras on their laptops too. Using a standalone camera or a dedicated 3D scanner would be a much better tool for the job.
Pro Graphics Software
The Wacom MobileStudio Pro doesn’t come with any professional graphics production software, but it’s clearly designed for use with many of them. Most of the default express key and touch ring functions are really made for Adobe Photoshop. So I installed a good number of my favorite graphics, photography, video, and 3D software to see how it worked and to actually use it for some content creation.
Firstly, just about all of the Adobe Creative Cloud 2017 applications work beautifully. GPU acceleration is flawless in Photoshop, Premiere Pro, Illustrator, Bridge, and Lightroom on the Wacom MobileStudio Pro 13’s Intel Iris 550 GPU. Adobe AfterEffects CC 2017 uses the GPU with OpenGL, but it cannot use the GPU for Ray-tracing. If you’re using AfterEffects, you’ll probably want a CUDA compatible GPU and for that, you’ll need the more-expensive Wacom MobileStudio Pro 16 which includes an NVIDIA Quadro M600M 2Gb GPU or a M1000M 4Gb GPU.
In terms of touch screen features, Adobe has made some huge improvements in the last few years to the touch support in many of their high-end Creative Cloud programs. Lightroom now has touch support that works pretty nicely for scrolling, panning, zooming, though you’ll still need the pen for some precision controls. InDesign and Illustrator both include their own full-touch workspaces which have a completely different UI design from the normal workspaces, although they do have many limitations due to their simplicity. Premiere Pro has some great touch gesture options integrated with the various panels. You can scrub playback in the Project panel for selected videos in thumbnail view, you can set in/out points, drag/drop, and even pinch to change the timeline view scale. Photoshop supports multi-touch zoom & panning as well, and they’ve got a new touch panel for modifier keys (though you won’t need that with the MobileStudio’s Express Keys). Of course, Photoshop supports tilt sensitive controls in the brushes as well as the pressure sensitive control it has supported via Wacom drivers for decades. Incidentally, the Adobe Character Animator CC 2017 Preview does not currently work with any of the hardware cameras on the Wacom MobileStudio Pro 13 at this time, so watch out for that if you like to do real-time character animation.
Capture One is not touch friendly in terms of UI design, but multi-touch panning & zooming works beautifully, as does the Wacom Pro Pen 2 and wow… my photographs look great on this screen!
Corel Painter 2017 is another program that really shines on the Wacome MobileStudio Pro. I’ve been using this paint simulation software since it was Fractal Design Painter 4 back in the mid 1990’s, and it is extremely comprehensive. It’s got some a lot of excruciatingly complicated natural media simulation tools that interact with your chosen paper textures, wet/dry status, brush tilt angle, pressure, bearing, etc. Corel Painter’s multi-touch panning & zooming could use some speed optimization, but the Wacom Pro Pen support is excellent. This program is very powerful though, so it’s easy to get some lag to happen with a complicated brush and a high resolution canvas.
3D animation software like Maya 3D, Lightwave 3D, ZBrush, etc. run pretty nicely, but programs like these are heavily dependent on keyboard shortcuts so the customizable express keys in the bezel may not be enough. The pen works beautifully however, and if you’re a Zbrush user, you’ll especially love the 8000 levels of pressure sensitivity support.
Wacom Link
So far you’ve read about how extremely powerful the Wacom MobileStudio Pro can be as a visual creative tool on its own and it is very powerful, but what if you’ve got a desktop workstation in your office that is just rediculously powerful? As it turns you, you can plug the MobileStudio Pro into another computer and use it as a pen display just like the other normal Cintiq Pen Displays that Wacom makes. You’ll need an accessory called the Wacom Link to do this though. Basically it has two ports on one side that get wired into your big computer, and one port on the other side that plugs into one of the MobileStudio’s USB-C ports. The accessory includes a USB-A cable to go to your PC/Mac, a Mini-DisplayPort to go to your PC/Mac’s GPU card, and a USB-C cable to go to the MobileStudio Pro.
This can come in very handy if you spend most of your time in an office in front of a powerful desktop computer. A few things you need to know however, you will need the Wacom software drivers installed on the PC or Mac that you’re plugging the Mobile Studio into. You’ll also need to plug the Wacom Link USB-C port into the center USB-C port on the MobileStudio Pro. Apparently that one is enabled for the special Pen Display conversion feature.
Incidentally, the Wacom Link also goes the other way, meaning you can plug the MiniDisplay port directly into an external Display if you want your Wacom MobileStudio Pro to drive another monitor. Unfortunately, the Wacom Link is not able to provide electrical power to the MobileStudio Pro at the same time. So you’ll need to connect one of the other USB-C ports on the MobileStudio to the AC adapter and plug that into an electrical outlet. By the way, the SD card reader in the MobileStudio Pro becomes readable on the desktop PC or Mac when connected via the Wacom Link. The MobileStudio Pro’s internet storage does not show up as another drive, but that’s understandable. Being able to access the SD card is still very useful.
Yes, the Wacom Link works fine with a Mac. Wacom’s drivers handle all the pen input capabilities and the MobileStudio Pro’s Express Keys, Touch Ring, and custom on-screen panels are all configurable here.
The Wacom drivers even add a little bit of touch screen support to a connected Mac. Don’t expect to move windows around, launch apps, or access menus with your finger though. You’ll need the pen for that.
You’ll have to tweak the resolution on the Wacom MobileStudio Pro when connected to a Mac as a secondary display too. By default everything shows up extremely tiny. The Mac OS automatic scaling features don’t seem to work very well either.
Of course the Wacom Link works on Windows 7, 8, and 10 as well. I connected it to my HP Z440 Workstation which has quite a few processing advantages over the MobileStudio Pro on it’s own, but obviously it’s not as portable. It took some work to get everything running though. The first 3 USB ports that I plugged the MobileStudio Pro’s Wacom Link into didn’t recognize the hardware quite right. The first 2 didn’t recognize it at all and the 3rd recognized the Express Keys but not the touch screen or pen digitizer. The 4th USB port I tried had everything working perfectly. I’m not sure if this is because I’ve used other Wacom hardware on those other USB ports in the past and didn’t clean out those drivers completely or I have some other USB host driver issues.
When you have the MobileStudio Pro plugged into a desktop PC, the Wacom Tablet Properties on the desktop also show a “Toggle Display” settings tab. You can set the “Toggle Display” command to just about any of the shortcuts, gestures, and hardware keys that are customizable on the Wacom MobileStudio Pro and the settings tab allows you to configure exactly how that behaves. One option toggles between using having the pen control only one display and then both displays via a stretched out pan. This option feels weird because it changes the aspect ratio of the pen digitizer to span two displays. It’s also strange that on my version it toggles between the desktop display and both displays, which is opposite of what I’d expect. I’d want the Wacom MobileStudio display to have a full 1 to 1 relationship. The second option toggles between each display, meaning that the pen can only control one full display at a time. This seems ideal to me, but it also makes it difficult to move windows between monitors. I wish the Windows 10 “Task View” had multiple monitors listed at the bottom like it does virtual desktops so you could very easily drag/drop windows onto different monitors instead of having to drag windows across the whole screen. Personally I’ve been using the Wacom Link and MobileStudio Pro as a duplicated display instead of an extended display. Yes, some would say that defeats the purpose of having two displays, but in my opinion in beats the learning curve awkwardness of the “toggle display” command in the Wacom software.
Interestingly, via Wacom Link there’s a special display control for specifying the color space and other settings for the MobileStudio while connected as a Pen Display.
Using a Windows 10 desktop tower with the MobileStudio Pro attached via the Wacom Link accessory is the same as if you were using the MobileStudio Pro as a stand-alone tablet. All of the same touch screen gestures work, Windows 10’s touch apps work the same, even the ink input panel shows up. The only difference is that you now have the full power of whatever high-end processors, tons of RAM, and many terabytes of storage you’ve packed into that desktop workstation. I really wish the backup/restore for customized settings would work between devices so that all my Express Keys were the same though!
Battery Life
Yep, this is one spot where the Wacom MobileStudio Pro needs a lot of improvements. With very light use, you could probably get it to last up to 6 hours, but really we’re talking about maybe 3 hours. All of this high-end hardware really eats up the battery, so be prepared to pack the charger or bring a big external battery or buy two MobileStudio Pros. Average phone USB-C chargers don’t work, by the way. You’ll need the big beefy USB-C charger that comes with it.
I really wish this could have had a user-removable battery. It seems like Wacom thought of everything to make this a genuinely useful tool for creative professionals, but its utility is decreased by its short battery life and when that internal battery starts to wear out, it’s going to be even worse. The ability to carry a spare battery and pop it into the tablet as soon as the first battery died would have been a great option.
Pricing and Availability
The Wacom MobileStudio Pro 13 and MobileStudio Pro 16 were released in the fall of 2016, but you may find that some models are still hard to come by. Keep an eye on the Wacom Online Store, Amazon, and high-end photography videography stores like B&H Photo and Adorama.
The DTHW1320T has an Intel Core i5 processor, 64Gb SSD, and 4Gb RAM for about $1500. The DTHW1320L has an Intel Core i5 processor, 128Gb SSD, and 8GB RAM for about $1800. The DTHW1320M has an Intel Core i7 processor with 256Gb SSD and 8Gb RAM for $2000. The DTHW1320H has an Intel Core i7 processor with 512Gb SSD, 16Gb RAM, and the Intel RealSense 3D scanner camera for $2500.
The larger 16″ versions are available in 2 pricing options. The DTHW1620M has an Intel Core i5 processor with NVIDIA Quadro M600M GPU, 256Gb SSD, and 8Gb RAM for $2400. The DTHW1620H has an Intel Core i7 processor with NVIDIA Quadro M1000M GPU, 512Gb SSD, and 16Gb RAM for $3000.
The Wacom Link accessory for plugging the MobileStudio Pro into a desktop computer costs an extra $70 and can be found on the Wacom online store.
Conclusion
There are some good reasons that this review of the Wacom MobileStudio Pro 13 didn’t get published as soon as the tablet was released. First of all, this is a real digital creative’s tool and its extensive set of features requires some time to learn and really understand. Secondly, the first model I got had a couple minor defects. The fingerprint scanner didn’t work and its center USB-C port didn’t work with the Wacom Link hardware. If you look at the reviews on Amazon, you might see some other minor defects noticed by early adopters. For example, some of the hardware buttons may not have activated properly. The dedicated stand still isn’t available either, so there may be some things Wacom is working on. The second device I got fixed all of the fingerprint scanner and Wacom Link problems, but the free year of Artec Studio Ultimate Edition didn’t activate properly. That was fixed pretty easily by Artec tech support though.
The 3D scanner software and fingerprint reader aren’t really integral to what the Wacom MobileStudio Pro is made for though. The real reason for buying a Wacom MobileStudio Pro is its amazing pen interface and screen along with the ability to plug into a high-end workstation while you’re in the office, and throw it in a bag when you’re on the go. The extremely customizable software combined with the hardware express keys interface is another huge selling point. Wacom’s method of making the hardware keys, touch ring, and screen gestures capable of activating any keyboard shortcut in any program is far superior than what Microsoft has done with the Surface Studio and Surface Dial which requires each software developer to add specific controls to the dial. With Wacom’s touch ring (etc.), all I have to do is tell it which keyboard shortcuts to run. Most professional programs have customizable keyboard shortcuts, so the possibilities are really endless. Apple’s MacBook Pro touch bar has the same limitations whereas each developer needs to actively add support. Wacom’s hardware & touch software already supports everything.
The amazing pen interface, gorgeous screen, and immensely customizable software interface are probably enough to make this tablet worth the price of admission, but for an extra $70, you can plug it into a tower PC (or Mac) and give that premium pen & touch interface an extra boost of let’s say… 44 Intel vPro Xenon cores, a terabyte of RAM, multiple 12Gb GPU’s, or whatever else you want to throw at it.
The Wacom MobileStudio Pro is truely the most professional quality tablet computer on the market today.
Source link
0 notes
Text
The Logitech G305 wireless gaming mouse is like a family sedan with a sports car engine
New Post has been published on https://nexcraft.co/the-logitech-g305-wireless-gaming-mouse-is-like-a-family-sedan-with-a-sports-car-engine/
The Logitech G305 wireless gaming mouse is like a family sedan with a sports car engine
I have a complicated relationship with computer mice. Sit me down at a workstation and I’ll use whatever two-button nonsense is available, but when it comes to actually choosing one for my own work, I get really picky. I want the mouse to have a high-end sensor meant for gaming because it lets me move quickly and accurately around the screen. I don’t, however, want a lot of bright colors and an endless parade of customizable options that I won’t use.
Logitech’s new G305 mouse costs $60, which is cheaper than most high-end gaming mice, but it contains the company’s flagship HERO tracking sensor (the part that lets the mouse see where it’s going) that’s meant for fast-twitch video games. It also has Logitech’s Lightspeed wireless connectivity, which gives it a short, 1 millisecond latency required for fast-paced games. The result is a powerful pointer without a lot of bells and whistles.
Feel
Pick up the G305, and it doesn’t feel much like a gaming mouse. The plastic casing has a light texture that’s consistent across the surface. There are no fancy contours or added grips. It feels like an office mouse. It’s also light at just 3.5 ounces, and there’s no way to adjust the weight like you can with other competition gaming inputs. Personally, I consider these positive aspects.
The mouse has a neutral shape, but there are two buttons on the left side that you can hit with your thumb when using your right hand. Lefties can hit the buttons with their pinkies, but it’s slightly awkward. Over the course of a week or so using the G305, I found myself accidentally hitting the thumb buttons from time time time, specifically when I took my hand off the mouse to type, then went back to holding it. That phenomenon surely varies with the shape of your hand, but it seems safe to assume misclicks will happen from time to time. It’s not a deal breaker for me, but the shape of your hand could change that.
The construction clearly isn’t meant for this mouse to bang around in your bag like other portable mice, so plan to leave this one on your desk most of the time.
Performance
I spent a week using the G305 as my main mouse, using it for typical computing tasks (like clicking around while procrastinating writing this post), to more intense tasks like playing a first-person shooter game, Overwatch, and doing some Photoshop retouching.
My computer immediately recognized the mouse when I plugged in the dongle, and while I’m not thrilled about taking up one of my USB ports instead of relying on a Bluetooth connection, I did find the connection quick and extremely reliable.
There are four sensitivity settings between 200 and 12,000 dots per inch, and you can cycle through them on the fly by clicking a button below the mouse’s scroll wheel. Everything except the fastest setting felt slow to me, especially when zipping around a multi-monitor setup. However, I did get some use out of the slower settings when doing some particularly tedious selections in Photoshop. The increased accuracy is nice, even if it did feel sluggish.
The mouse clicks are satisfying in terms of depth and tactile feedback, but the sound is high-pitched and rather loud, likely because of the buttons’ plastic construction. The clicks aren’t quite as luxurious or substantial as some expensive gaming mice, but this is not a deal breaker. If you work in close proximity with your officemates, you might consider something a little quieter.
Who should buy it?
The G305 lives in the middle ground when it comes to tech, which is honestly where many of us land in the technology spectrum. The feel won’t blow you away—and the click sound is a little annoying until you get used to it—but the most important parts of the mouse are rock solid. A single AA battery powers it for 250 hours of action. The tracking sensor is precise and doesn’t skip around the screen, even when the condensation from my iced coffee messes up my desk a little.
At $60, it’s not the cheapest wireless mouse on the market, but if you want something that gives better-than-average gaming performance in an everyday-driver-style input device, it’s a solid pick.
Written By Stan Horaczek
0 notes