#Display button shortcuts windows 10
Explore tagged Tumblr posts
Visit Tumblr Blog
Explore Tumblr blogs with no restrictions, modern design and the best experience.
Last Seen Tumblr Blogs


Fun Fact
China blocked Tumblr because of pornography and censorship problems in 2013.
Text

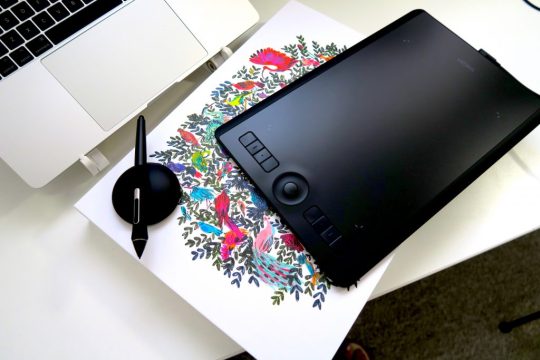
The Artisul team was kind enough to send me their Artisul D16 display tablet to review! Timelapse and review can be found under the read more.
I have been using the same model of display tablet for over 10 years now (a Wacom Cintiq 22HD) and feel like I might be set in my ways, so getting the chance to try a different brand of display tablet was also a new experience for me!
The Unboxing
The tablet arrived in high-quality packaging with enough protection that none of the components get scratched or banged up in the shipping process. I was pleasantly surprised that additionally to the tablet, pen, stand, cables and nibs it also included a smudge guard glove and a pen case.
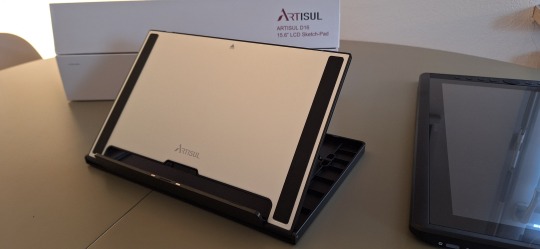
The stand is very light-weight and I was at first worried that it would not be able to hold up the tablet safely, but it held up really well. I appreciated that it offered steeper levels of inclination for the tablet, since I have seen plenty other display tablets who don’t offer that level of ergonomics for artists. My only gripe is that you can’t anchor the tablet to the stand. It will rest on the stand and can be easily taken on or off, but that also means that you can bump into it and dislodge it from the stand if you aren’t careful. It would require significant force, but as a cat owner, I know that a scenario like that is more likely than I’d like.
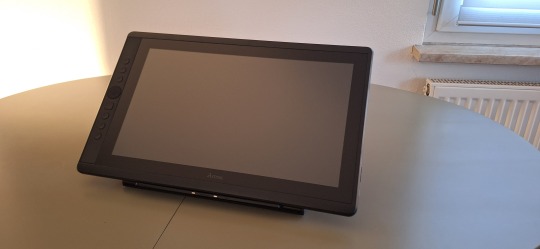
Another thing I noticed is how light the tablet is in comparison to my Cintiq. Granted, my Cintiq is larger (22 inches vs the 15.8 inches of the Artisul D16), but the Artisul D16 comes in at about 1.5kg of weight. While I don’t consider display tablets that require a PC and an outlet to work really portable, it would be a lot easier to move with the Artisul D16 from one space to another. In comparison, my Cintiq weighs in at a proud 8.5kg, making it a chore to move around. I have it hooked up to a monitor stand to be able to move it more easily across my desk.
The Setup
The setup of the tablet was quick as well, with only minor hiccups. The drivers installed quickly and basic setup was done in a matter of minutes. That doesn’t mean it came without issues: the cursor vanished as soon as I hovered over the driver window, making it a guessing game where I would be clicking and the pen calibration refused to work on the tablet screen and instead always defaulted to my regular screen. I ended up using the out of the box pen calibration for my test drawing which worked well enough.
The tablet comes with customizable hot-keys that you can reassign in the driver software. I did not end up using the hot-keys, since I use a Razer Tartarus for all my shortcuts, but I did play around with them to get a feel for them. The zoom wheel had a very satisfying haptic feel to it which I really enjoyed, and as far as I could tell, you can map a lot of shortcuts to the buttons, including with modifier keys like ctrl, shift, alt and the win key. I noticed that there was no option to map numpad keys to these buttons, but I was informed by my stream viewers that very few people have a full size keyboard with a numpad anymore.
The pen comes with two buttons as well. Unlike the hot-keys on the side of the tablet, these are barely customizable. I was only able to assign mouse clicks to them (right, left, scroll wheel click, etc) and no other hotkeys. I have the alt key mapped to my pen button on my Cintiq, enabling me to color pick with a single click of the pen. The other button is mapped to the tablet menu for easy display switches. Not having this level of customization was a bit of a bummer, but I just ended up mapping the alt key to a new button on my Razer Tartarus and moved on.
The pen had a very similar size to my Wacom pen, but was significantly lighter. It also rattled slightly when shook, but after inspection this was just the buttons clicking against the outer case and no internal issues. The pen is made from one material, a smooth plastic finish. I would have liked for there to be a rubber-like material at the grip like on the Wacom pen for better handling, but it still worked fine without it.
Despite not being able to calibrate the pen for the display tablet, the cursor offset was minimal. It took me a while at the beginning to get used to the slight difference to my current tablet, but it was easy to get used to it and I was able to smoothly ink and color with the tablet. The screen surface was very smooth, reminding me more of an iPad surface. The included smudge guard glove helped mitigate any slipping or sliding this might have caused, enabling me to draw smoothly. Like with the cursor offset, it took me a while to get used to the different pressure sensitivity of the tablet, but I adapted quickly.
So what do I think of it?
Overall, drawing felt different on this tablet, but I can easily see myself getting used to the quirks of the tablet with time. Most of the issues I had were QoL things I am used to from my existing tablet.
But I think that’s where the most important argument for the tablet comes in: the price.
I love my Cintiq. I can do professional grade work on it and I rebought the same model after my old one got screen issues, I liked it that much. But it also costs more than a 1000 € still, even after being on the market for over 10 years (I bought it for about 1.500 € refurbished in 2014, for reference). The Artisul D16 on the other hand runs you a bit more than 200€. That is a significant price difference! I often get asked by aspiring artists what tools I use and while I am always honest with them, I also preface it by saying that they should not invest in a Cintiq if they are just starting out. They are high quality professional tools and have a price point that reflects that. You do not need these expensive tools to create art. You can get great results on a lot cheaper alternatives! I do this for a living so I can justify paying extra for the QoL upgrades the Cintiq offers me, but I have no illusion that they are an accessible tool for most people.
I can recommend the Artisul D16 as a beginner screen tablet for people who are just getting into art or want to try a display tablet for once. I wouldn’t give up my Cintiq for it, but I can appreciate the value it offers for the competitive price point. If you want to get an Artisul D16 for yourself, you can click this link to check out their shop!
AMAZON.US: https://www.amazon.com/dp/B07TQLGC81
AMAZON.JP: https://www.amazon.co.jp/dp/B07T6ZT84V
AMAZON.MX: https://www.amazon.com.mx/dp/B07T6ZT84V
Once again thank you to the Artisul team for giving me the opportunity to review their display tablet!
105 notes
·
View notes
Text
Every Animator Should Own 4 Instruments
If you're prepared to animate on-screen, check out these 4 essential digital animator tools. We've even offered model suggestions so you can quickly select the equipment that best suits your requirements.With the aid of QuillBot's paraphraser, you can rapidly and effectively rework and rephrase your material by taking your phrases and making adjustments!
1)An image tablet
Using a graphics tablet, you may instantly upload your hand-drawn animations to a computer. They often have a few flat, little buttons. You may view your drawings immediately on certain drawing tablets' displays. Some merely feature a pressure-sensitive pad, which limits you to viewing your drawing on the computer screen.
It takes some getting used to drawing on a graphics tablet, especially if you're used to drawing with a pen and paper. However, they are necessary for digital animators.
Some of the top drawing tablets for digital animation are listed below:
Huion INSPIROY Q11K
More and more artists, including animators, are moving from traditional art to digital art. Digital animation makes sketching, coloring, painting, masking, etc. easier, compared to traditional animation.
In order to create digital art, physical tools such as a graphics tablet, a PC, and a stylus make the experience much more effective, and great software is essential. But there are so many options for these tools! Which ones are best for you as a digital animator?
If you’re ready to animate on-screen, here are 4 tools every digital animator should have; we’ve even included some model recommendations, so you can easily find the tools that meet your specific needs!
If you’re an animator looking for an affordable drawing tablet, then the Huion INSPIROY Q11K is perfect for you.
It is a wireless tablet, which can work up to 40 hours when fully charged. It has an 11 inch active drawing space and a stylus pen.
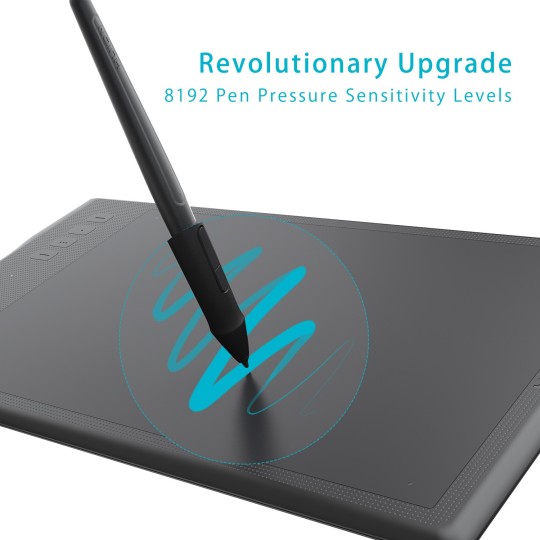
Its stylus pen has a stand, which preserves the pen’s battery. The pen has 8,192 pen pressure sensitivity levels and 2 programmable buttons to help you draw easily and comfortably.
The HUION INSPIROY Q11K tablet has 8 customizable express keys, which allow you to quickly access your most used functions without having to interrupt your workflow. It works well on Windows and Mac OS and with photo and graphic editing software.
Gaomon PD1560

source: googel
he Gaomon PD1560 is an affordable, advanced drawing tablet that allows you to see what you’re drawing on the tablet itself.
It makes you feel as if you’re working on an iPad. You will see the image on your PC screen mirrored on your tablet in real-time. It has 10 customizable shortcut keys, 5 menu buttons, and 2 buttons on the pen.
The tablet requires an HDMI and a USB connection to your PC.
It has a 13.5 x 7.6-inch screen size with a 1920 x 1080 resolution, 50/80 LPI resolution, and a pen with 8,192 pen pressure sensitivity levels. Some digital artists find its reflective, glossy screen distracting.
It comes with a 3 in 1 cable, a rechargeable pen, a pen holder, an adjustable stand, and a pen charging cable. It works well on Windows and Mac OS and with photo and graphic editing software.
Wacom Intuos Pro
source: google
The greatest drawing tablet for Adobe Photoshop is the Wacom Intuos Pro.
Compared to its predecessor, the Intuos 5, it is both lighter and slimmer. It has a slightly larger drawing area than the Intuos 5, but it also takes up less work space. With the Wacom Intuos Pro, you can even zoom, scroll, and navigate with your fingertips on the surface. It also includes 8 programmable buttons.
The Wacom Intuos Pro pen is battery-free and offers Bluetooth connection, 8,192 pressure sensitivity levels, 2 programmable buttons, and support for natural tilt. With Photoshop and other artistic applications, it functions wonderfully.
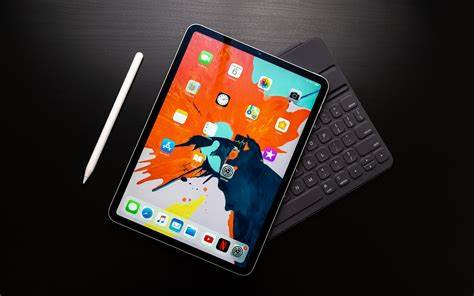
Apple iPad Pro 11
source: google
The Apple iPad Pro 11 inch is one of the best portable drawing tablets.
It can run professional apps like Adobe Photoshop CC and is a great alternative to other drawing tablets if you don't want to sit next to your PC. iPad Pro features a fast A12X Bionic chip that enables advanced machine learning.
The iPad Pro 11-inch has a 10-hour battery life, so you can use it for a long time on the go. It features a Liquid Retina display with true-to-life colors, and promotional technology makes everything on the screen look responsive.
Wacom Cintiq 22

source: google.com
The Wacom Cintiq 22 comes with a large drawing area and a 1080p full HD screen. It has an anti-glare glass surface that makes you feel like you’re drawing on paper. It also has an adjustable stand with a wide tilt range for your comfort.
Its pen has 2 programmable buttons, and offers 8,192 pressure sensitivity, and tilt sensitivity. The pen doesn’t need any battery or charging since it takes power from the screen’s electromagnetic properties
2) A Stylus Pen
source: google.com
Animators can always start drawing on paper or whatever medium they like, but at some point they will need to draw on the computer. A stylus pen makes this process much easier.
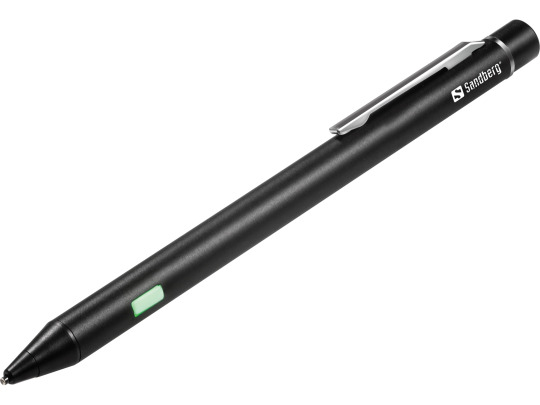
A stylus pen gives you more precise control over your drawing tablet. A must have if you need to write or draw on your tablet. observation: It can take some getting used to using both the stylus and tablet. When looking for a good stylus, you should consider the tip, the part of the stylus that touches the tablet screen. Tips may be retractable, capped, fixed, or unprotected. It's also important to consider the entire pen. Some have Bluetooth connectivity, and battery capacity and pressure sensitivity vary by pen.
Make sure you buy a pen with a firm grip. The weight is well distributed and it doesn't need to be too big or too thick. Most importantly, it is convenient for frequent and long-term use.
If your drawing pad didn't come with a pen, or you're in need of an upgrade, below are some of the best stylus he pens available. Make sure the pen you buy is compatible with your drawing tablet.
Apple Pencil 2nd Generation

source: google.com
The side of the 2nd Generation Apple Pencil’s tip allows you to make wider strokes, which can be incredibly helpful when shading.
It clips magnetically to the side of your iPad Pro, where you can recharge it wirelessly.
Take note: The 2nd generation Apple Pencil only works with the 2018 iPad Pro models and above.
Wacom Bamboo Sketch
The Wacom Bamboo Sketch is a stylus designed for sketching on the iPad and the iPhone.
It works well with the 9.7-inch and 12.9-inch iPad Pro, 3rd and 4th-generation iPads, the iPad Air, the iPad Air 2, the iPad mini, and the iPhone models, starting from iPhone 6.
It connects to your device via Bluetooth and has a pressure-sensitive tip. It has two customizable buttons for output control and exchangeable pen nibs.
You can integrate the pen with apps such as Bamboo Paper, ArtRage, Autodesk SketchBook, Concepts, and Tayasui Sketches.
Adobe Ink and & Slide
The Adobe Ink & Slide stylus comes with a carrying case and a USB charger. It has a fine tip and a pressure-sensitive point.
Uniquely, this stylus shows you what color you chose, and the Slide ruler can be used to make perfectly straight lines and other shapes.
Adobe Ink & Slide can be connected to any iPad 4 or later, iPad Air, and iPad mini via Bluetooth LE. It also automatically syncs with Creative Cloud, so you can easily store your drawings and access them on your computer later.
3) A Fast PC

Every digital artist needs a PC with a fast processor. The more RAM and disk memory, the better. Requires 8-16 GB RAM, 256 GB hard drive, and at least an Intel Core 2 or AMD Athlon 64 processor.
If your PC is slowing down, you can increase your PC's RAM to its maximum capacity. You can even upgrade your hard drive and use an external drive to back up your work. This speeds up work, especially when dealing with large files.
Below we list some of the best laptops and tablets for animators. These devices are characterized by their performance and the use of pen displays. Consider your specific needs when browsing these options. budget, portability of the device, etc.
Microsoft Surface Pro 7
Microsoft Surface Book
Lenovo Yoga 920
Lenovo Yoga Book
Samsung Notebook 9 Pro
Apple iPad Pro

Apple MacBook Pro
4) Software:

There are a variety of free and paid options for animation software. Free software can be much more accessible, but paid software often provides extra benefits like continuous product support, compatibility, updates, and security.
Wrapping Up The 4 Tools Every Animator Should Own
You may not always have the latest and greatest equipment, but it’s important to know what graphics tablet, stylus pen, hardware, and software will work best for you and your animation needs.
Knowing what tools to use and when and how to use them, is part of every animator’s learning process. The more experiences you have and the more research you do, the more you’ll know about the best equipment to use and which features you need and prefer.
Remember there are no wrong or right choices when it comes to buying equipment for animation. You just have to find the perfect equipment that suits your needs, budget, and taste. And if you don’t really know yet what works best for you, that’s okay--you’ll learn as you practice with and use your new tools.
If you’re looking for resources that will help develop your business and animation skills as a freelance animator, you came to the right place! Download our free marketing handbook and join our free masterclass.
2 notes
·
View notes
Text
22 Hidden Xiaomi Tips & Tricks to Maximize Your Smartphone Experience

Xiaomi smartphones, with their feature-rich MIUI interface, offer a plethora of hidden gems that can significantly enhance your user experience. Whether you're a new user or a seasoned Xiaomi enthusiast, these 22 tips and tricks will help you unlock your device's full potential.
1. Quick Ball: Your Floating Shortcut Menu
Quick Ball is a floating menu that provides quick access to your favorite functions. Customize it with shortcuts like back, lock screen, screenshot, or specific apps.
How to enable:
Go to Settings > Additional Settings > Quick Ball and toggle it on.
2. Fast Charging Boost
Speed up your charging time by enabling the fast charging feature.
How to enable:
Navigate to Settings > Battery and activate Boost charging speed.
3. Mi Mover: Seamless Data Transfer
Transfer messages, contacts, music, files, and apps between Xiaomi devices effortlessly using Mi Mover.
How to use:
Open Mi Mover and follow the on-screen instructions to transfer your data.
4. Scrolling Screenshots
Capture entire pages or chats in one screenshot.
How to use:
Take a regular screenshot (Power + Volume Down or swipe three fingers).
Tap the preview thumbnail.
Select Scroll to capture the full content.
5. Gesture Shortcuts
Navigate your phone with intuitive gestures, eliminating the need for physical buttons.
How to enable:
Go to Settings > Additional Settings > Gesture Shortcuts and customize your gestures.گلکسی فیکس
6. Back Tap Functionality
Assign actions to double or triple taps on the back of your phone for quick access.
How to enable:
Navigate to Settings > Additional Settings > Back Tap and set your preferred actions.گلکسی فیکس
7. Memory Extension (Virtual RAM)
Enhance performance by allocating a portion of your storage as virtual RAM.گلکسی فیکس+2NextPit+2Uptodown+2
How to enable:
Go to Settings > Additional Settings > Memory Extension and choose the desired amount.NextPit
8. Hide Photos for Privacy
Keep your private photos secure by hiding them from the gallery.
How to use:
Open Gallery, select the photos, tap More > Hide, and set up a password if prompted.
9. NFC for Contactless Payments
Utilize NFC to make secure contactless payments or transfer data.
How to enable:
Go to Settings > Connection & Sharing > NFC and toggle it on.
10. Sunlight Mode for Better Visibility
Improve screen readability under bright sunlight by enabling Sunlight Mode.گلکسی فیکس
How to enable:
Navigate to Settings > Display > Sunlight Mode and activate it.
11. Auto Call Recording
Automatically record calls for future reference.
How to enable:
Open Phone > Settings > Call Recording and toggle on Record calls automatically.
12. iOS-Style Icon Packs
Customize your home screen with iOS-style icons for a fresh look.
How to apply:
Download an iOS-style icon pack from the Themes app and apply it.
13. Find Phone in Silent Mode
Locate your phone even when it's on silent by using the Find Device feature.
How to use:
Visit i.mi.com, log in, and select Find Device to locate your phone.
14. Heart Rate Monitoring
Measure your heart rate using the in-screen fingerprint sensor.NextPit
How to use:
Go to Settings > Additional Settings > Heart Rate, place your finger on the sensor, and wait for the reading.NextPit
15. Dual Bluetooth Connection
Connect two Bluetooth devices simultaneously, like headphones and speakers.
How to enable:
Navigate to Settings > Bluetooth, pair both devices, and manage connections accordingly.
16. Floating Windows for Multitasking
Use apps in floating windows for better multitasking.
How to use:
Open Recent Apps, tap and hold an app, then select Floating Window.
17. Game Turbo for Enhanced Gaming
Boost gaming performance and reduce distractions.
How to enable:
Open Security > Game Turbo, add your games, and customize settings.
18. IR Blaster: Universal Remote
Control TVs, air conditioners, and other devices using your phone's IR blaster.
How to use:
Open the Mi Remote app, add a device, and follow the setup instructions.
19. App Lock for Security
Protect sensitive apps with a password or fingerprint.
How to enable:
Go to Settings > Apps > App Lock, select apps, and set up your preferred lock method.
20. Second Space: Separate User Profiles
Create a separate space for work or personal use.
How to enable:
Navigate to Settings > Special Features > Second Space and follow the setup process.
21. Increase Speaker Volume
Boost your speaker's volume for a louder audio experience.
How to enable:
Dial ##3646633## to access the Engineering Mode, then adjust speaker settings.
22. Clean Speaker Function
Remove dust and debris from your speaker using sound vibrations.
How to use:
Open Settings > Additional Settings > Clean Speaker and follow the prompts.
By exploring these features, you can tailor your Xiaomi smartphone to better suit your needs and enhance your overall experience. For more in-depth guides and tips, visit GalaxyFix.
1 note
·
View note
Text
Exploring macOS: Hidden Features Every MacBook Pro Owner Should Know
MacBook Pro users often rely on their devices for productivity, creativity, and entertainment. While macOS is known for its user-friendly interface, it also houses a variety of lesser-known features that can significantly enhance your experience. From time-saving shortcuts to advanced customisation options, here’s a guide to hidden macOS features every MacBook Pro owner should explore.
1. Quick Look for Instant File Previews
Quick Look allows you to preview files without opening them in their respective apps. Simply select a file in Finder and press the spacebar. This works for images, PDFs, and even videos. You can navigate through multiple files using arrow keys while Quick Look is active.
How to Maximise It:
For more functionality, use Quick Look to add annotations to PDFs or trim video clips without launching Preview or iMovie.
2. Split View for Multitasking
Working on multiple tasks? Split View lets you use two apps side by side, boosting productivity. To activate it, click and hold the green full-screen button in the top-left corner of a window, then drag it to one side of the screen. Choose another app for the opposite side.
Why It’s Handy:
Ideal for comparing documents, referencing research while writing, or attending a video call alongside note-taking.
3. Spotlight Calculator and Conversions
Spotlight is more than just a search tool. Press Cmd + Space to open Spotlight, and you can perform quick calculations or unit conversions. For instance, type “50 GBP to USD” or “10 kg to pounds” for instant results.
Bonus Tip:
Spotlight can also search for specific file types or locations using terms like “kind” or “folder.”
4. Customisable Hot Corners
Hot Corners transform your screen corners into triggers for specific actions. Go to System Settings > Desktop & Dock > Hot Corners. Assign functions like starting a screensaver, locking your screen, or displaying your desktop.
Best Uses:
Set up Hot Corners for quick privacy during work or rapid access to mission-critical files.
5. Text Replacement for Faster Typing
If you frequently type the same phrases, macOS has a built-in text replacement feature. Navigate to System Settings > Keyboard > Text. Add shortcuts like “omw” to expand into “On my way!” or “sig” for your email signature.
Pro Tip:
Combine this with customised keyboard shortcuts for seamless writing across applications.
6. Universal Clipboard for Seamless Copy-Pasting
Copy text or images on your iPhone or iPad and paste them directly onto your MacBook Pro. Universal Clipboard works across devices signed into the same Apple ID with Bluetooth and WiFi enabled.
How It Enhances Workflow:
Perfect for transferring content quickly without emailing or using cloud services.
7. Automator for Task Automation
Automator helps you automate repetitive tasks, such as renaming large batches of files or converting image formats. Open Automator from the Applications folder, choose a workflow type, and drag the desired actions into the workflow panel.
Examples of Use:
Set up a workflow to resize images for specific project needs or create custom alerts for calendar events.
8. Screen Time for Mac
Screen Time isn’t just for mobile devices. On macOS, it helps monitor your app usage and set limits to avoid distractions. Find it in System Settings > Screen Time.
Stay Focused:
Create App Limits to restrict time on social media or set Downtime for uninterrupted work sessions.
9. Safari Reader Mode
For a distraction-free reading experience, Safari’s Reader Mode strips away ads and clutter from web articles. When you’re on a compatible webpage, click the Reader button in the address bar or press Cmd + Shift + R.
Additional Perks:
Customise Reader Mode by changing the text size, background colour, or font to suit your preferences.
10. Secure Notes with Passwords
The Notes app lets you lock sensitive information. Select a note, click the Lock button in the toolbar, and set a password. This ensures that private information stays protected.
Best Practice:
Use this for storing personal details, secure project notes, or financial information.
Final Thoughts
These hidden macOS features can transform your MacBook Pro experience, making your workflow more efficient and your tasks more manageable. Whether you’re a creative professional or a business user, mastering these tools can help you unlock the full potential of your device.
For those considering upgrading their setup temporarily or for specific projects, a MacBook Pro rental is an excellent way to experience the latest macOS features without committing to a purchase.
0 notes
Text
How to Download Cricut Design Space on HP Laptop: Full Guide
Gratitude to all my beloved readers! I know you have missed me a lot since I haven’t been able to post a blog for the past few weeks. These days, most of my readers ask how to download Cricut Design Space on HP laptop. If you have any creative ideas and are willing to give them a proper shape, then you needa Cricut machine and its designing software. Also, the app runs smoothly with all Cricut models and supports PCs and smartphones.
Design Space is Cricut-registered software that operates with the Cricut machine. This easy-to-use app unlocks doors to new opportunities, encouraging you to step out of your cocoon and show the world what you’re capable of. Besides, Design Space comes with a library containing a different set of images, fonts, and customized projects.
Follow this blog post, as it will guide you through the system requirements, getting the app, and creating the Cricut account.
What Are Cricut App System Requirements for Laptops?
Cricut Design Space is free software that works with the Cricut machine. This design software runs smoothly with Windows, Mac, iOS, and Android devices. Before beginning with how to download Cricut Design Space on HP laptop, you need to ensure that your devices are fulfilling the basic system requirements. Below are the system requirements that your HP laptop must have to make the app run on the system:
Your device must come with Windows 10 or an upgraded version with Intel Dual-Core or a similar processor. Apart from that, it must have 4GB RAM with 2GB free disk space with the availability of a USB port and built-in Bluetooth. Furthermore, your screen resolution should be a minimum of 1024px x 768px. In addition, the device must have 2-3Mbps speed while downloading and 1-2 Mbps for uploading the file on the app. Also, the Cricut Design app runs smoothly without an internet connection.
After encountering the basic requirements, it’s time to make progress and take the app download process on board.
How to Download Cricut Design Space on HP Laptop?
HP laptop supports the Windows operating system, meaning you must follow the steps below to get this Cricut app. By referring to these pointers, you will find starting and finishing the download process a lot easier. Pay special towards the details given below:
First, turn on your HP laptop and open the search engine (Chrome, Firefox, or other).
After finalizing the search engine, move to the Cricut Design Space setup page (design.cricut.com).
Next, agree to the Cricut Terms of Use and Privacy Policy by ticking the box.
Following this, click the Download button and wait until the download process progresses.
After downloading, open the browser or go to your device’s Downloads folder.
Now, double-click the downloaded, and a small pop-up window will suddenly appear on your screen.
At this point, choose I trust the application option, and a window will display the installation status.
Equally important, open the installed app, and the Cricut sign-in official page will open.
If you are a new Cricut user, you must create an account using your login details.
Now, right-click the icon > select Pin to Taskbar, and the shortcut will be within easy reach.
Finally, you can enjoy using the Cricut Design app and make uncountable designs.
By referring to the above-said steps, you can quickly finish how to download Cricut Design Space on HP laptop without having any serious errors.
How to Create a Cricut Account on a Laptop?
After getting this Cricut software on your respective system, you need to create a separate account. With the account, you will be able to give physical form to your ideas as you choose. Have a look at the total number of steps you need to take while creating an account:
Start the process by opening the Cricut Design app and then click the Create a Cricut ID option.
After that, you will get connected to the new web page.
Now, enter your email address, password, first name, last name, and country.
Next, cross-check the details and hit the box on the left side of the Terms & Conditions.
At this point, your Cricut account will be created by clicking the Create Cricut ID.
Conclude the process by opening the Cricut app and creating new canvas projects.
This tutorial has made it clear that Cricut software plays a crucial role for all DIYers. A user with incomplete information about how to download Cricut Design Space on HP laptop might need help to create their favorite designs. Also, they will need more time to connect their cutting machine model with the app before the cutting process.
Frequently Asked Questions
Question: How Can I Install Cricut Design Space on My Mac?
Answer: Get to know about the steps that need to be taken while getting the app on a Mac system are:
First, open the Safari search engine and visit the Cricut app’s official portal.
Next, press the Download option and choose the folder where you want to get the app.
At this point, when the download is complete, double-click the downloaded file.
Afterward, move the Cricut software to the Applications folder and launch it.
Finish the process by installing the app, creating your account, or signing in.
Question: How Do I Purchase Items From Cricut Design Space?
Answer: The Cricut Design Space app permits the DIYer to buy images, fonts, and pre-customized projects from the library. The user can get these items by subscribing to Cricut Access and choosing the monthly or yearly plan. Moreover, they will also enjoy a 30-day free trial and learn about the benefits of this subscription.
Question: How to Download Cricut Design Space on Android?
Answer: With the help of the below steps, you can easily install the Cricut Design app on Android devices:
First, open the Google Play Store and start looking for the Design Space app.
Next, press the Install button inside the green box on the right-hand side of the page.
With the installation of the app, sign in or create your Cricut ID with the login details.
Source :- https://designaccessoriesmart.wordpress.com/2024/04/24/how-to-download-cricut-design-space-on-hp-laptop-full-guide/
design.cricut.com/setup
cricut maker 3 accessories
cricut explore air 2 accessories
cricut new machine setup
0 notes
Text
Complete HTML Tutorial from scratch | Web development course in Delhi
Creating and customizing websites is the process of web designing. Languages such as HTML for structure, CSS for display and JavaScript for interactivity are used. To build visually beautiful and user-friendly websites, designers prioritize layout, color schemes, graphics, and user experience. Additionally, they might use content management systems and consider device responsiveness. It includes a range of expertise and disciplines that come together to provide a useful and entertaining online experience.
In this article, you will get to learn complete HTML from scratch to expert level, prepared by one of the trainer from top web development institute in Delhi. Lets begin by setting up our system
HTML Complete tutorial

VS code setup, installation and first HTML Code
Here we are going to show you how you can install Visual Studio code on your Windows. So, let’s get started.
1) To start with, just open up the browser and search for Visual Studio code.
2) The first link appearing here is from “code dot visual studio.com”. We are going to click on this link and once this website is open straight away.
3) You will be able to see the blue download button for Windows. So, we are going to just click on this button which is going to download this executable file and click on download for window.
4) Now this executable file is downloaded. So I’m going to just click on this file and here appear a box where we have to first of all click on the Run button and then we will be going to just agree with the license terms and conditions.
5) Click on Next button and this will be the location where Visual Studio code will be installed on your operating system.
6) Just click on the next button and here are some options which you can choose according to you and here we are going to just check all the options and then going to click on the next button and install.
7) Visual Studio code will take few seconds to install. So we will wait for the installation to complete.
8) Now as you can see the Visual Studio code setup has been finished and here is the page that appears when we open VS code.
First HTML code
1) Let’s See, how to run html files using visual studio code. So we need to install a new extension called “open in browser” by clicking on this extensions button.
2) Click on this first extension and Install it. After the extension is being installed correctly, we can close this page.
3) To start writing your first code, you guys have to create a new html file.
4) Click on “file” and “open folder”.
5) Create a “new folder” I will call it HTML Tutorial.
6) Let’s select the folder and then create a new html file say “hello.html”.
7) Now write some html code, just type – exclamation mark and then hit enter. Here we obtain this template and we can change it accordingly like the title and also we can write some text in the body.
8) Save this file (ctrl + s)
9) To open it in the browse, make a right click on file name and then “open in default browser”.
10) We will obtain this page in the browser.
HTML tutorial using Notepad for beginners
Boilerplate in HTML
A boilerplate in HTML is a template you will add at the start of your project.
Let us say you are writing a code for your website and you do not want to write all the basic code by yourself.
1) For what you want to have some shortcut, and there’s a good news “VS CODE” has a shortcut for this boilerplate. First thing, you just need to start coding simply by pressing (shift+1) which will going to return exclamation mark on your screen on your code editor.
2) Here appear two options from which you have to select the very first and boom here you have your boilerplate ready in front of you.
Here Are Some Basic Components Of HTML BoilerPlate
1. <! DOCTYPE html>: It specifies the version of HTML being used. HTML 5 is the most recent and extensively supported version in instance.
2. <html>: An <HTML> is the base element of the page. Every other HTML element on the page is contained within it.
3. <head>: The head section has metadata about the document, including connections to style sheets, the title, character encoding, and other metadata. It doesn’t have any content that is seen on the webpage immediately.
4. <meta charset=”UTF-8″>: This meta tag indicates the document’s character encoding, which is usually set to UTF-8 to accommodate a large character set.
5. Using the meta name=”viewport” and content=��width=device-width, initial-scale=1.0″ This meta tag facilitates creating the webpage to various screen sizes, particularly on mobile devices.
6. <title>: This element sets the webpage’s title, which shows up in the title bar or tab of the browser.
7. <Body>: All of the material that will be shown on the webpage, including text, pictures, links, and other media, is contained in this area.
Heading in HTML
Let’s learn about some tags to the body and see what they look like. Beginning with our heading tags. We have our opening and closing heading tags numbered <h1> to <h6>. <h1> defines the most important heading. This should represent the main heading/subject for the whole page. Heading are a way to create emphasis and a sense of visual hierarchy of information.
<h6> defines the least important heading.
DO NOT SKIP the heading levels. You must write <h3> after <h2> and so on.
1) Let’s try writing by ourselves.
2) For output, we need to save the file in our code editor.
3) Right click on the file and tap “open in default browser”.
4) And this is how all the headings are printed on the screen.
<STRONG> TAG
Let’s see how strong tag works in html and how to use it properly. Before you decide to markup your text, you need to answer three questions.
Is the text super important? If yes then you must use strong tag. Is it super urgent? If yes then you must use strong tag as well is it very serious? If yes then you must use strong tag. Again now let’s write some code and learn how to use strong tag properly.
Here we will open up the html document we have created.
Using visual studio, I have a block of text and saying that “Believe in yourself and all that you are. Know that there is something inside you that is greater than any obstacle anddon’t wait for opportunity, create it.” As you want to make more emphasis on bolded sentence.
So we just mark up this part using html strong tag.
So, the opening strong tag looks like starting with left angle bracket (<) strong and right angle bracket (<strong>) and a closing strong tag looks like this starting with left angle bracket, forward slash strong and right angle bracket (</strong>).
Save the program and let’s try this up in the browser.
Text content i marked up using strong tag is rendered as a bold text. But that doesn’t mean you to make your text bold. Because you can only use strong tag if your content is super important or super urgent or super serious.
<EM> Tag
Try answering question before we actually get to know about the use of <em> tag. Is there any word or phrase you want to place great emphasis. If yes, then you must use <em> tag.
To wrap it up, now let’s write some code and learn how to use <em> tag properly.
I have written two sentences. 1) This is not a joke. If you paid close attention when i speak out the sentence, i stressed more emphasis on the word not compared to other words. So we can just wrap the word NOT with the <em> tag.
2) We have to leave now. Again, more emphasis will be on the word “now” compared to other words. Perform the same steps you did with earlier sentence.
Save your document and try this up in the browser.
Content we enclosed up using <em> tag is italicized. But it doesn’t mean that you can use <em> tag if you only want to make your text italic.
Paragraph Tag <p>
Almost all websites use text and one of the most common ways to organize text is with paragraphs. You can create paragraphs in html using the <p> tag.
You’ll need a start tag and an end tag by default. Each paragraph will have a little bit of margin above and below it to give it some space between other elements. It’s very common to use the <p> tag whenever you’re working with a large amount of text.
If you want to enable horizontal scroll, right click and click on command palette.
Search for toggle word wrap and the thing will be done.
Complete Web Development Online Certification Course
Learn Web Development Online with our Web Development certification course covering HTML, CSS, JavaScript and everything you need to create a new website.
Enroll Now
<INS> Tag
The <ins> tag in HTML is used to indicate that a section of text has been inserted into a document. This tag is typically used in conjunction with the <del> tag, which is used to indicate deleted or removed text.
Here’s a common scenario where the <ins> tag might be used: Let’s say you have a document or a webpage that is being collaboratively edited by multiple people.
If someone adds new content to the document, you can use the <ins> tag to highlight that added content.
In this example, the text “newly added” will be visually distinguished (often underlined by default) to indicate that it’s new content.
Super script and subscript
Superscript and subscript are typographical elements used to format text in a way that it appears above or below the regular text line. They have different use cases:
1) Superscript (<sup>):
Superscript is used for characters or numbers that are raised above the regular text line and which can be commonly used for Exponents in mathematical expressions ( x²), Ordinal numbers (1st, 2nd), Trademarks or copyrights (™, ©) and some others.
<p> Chemical formula of water is H<sub>2</sub>O</p>
2) Subscript (<sub>):
Subscript is used for characters or numbers that are lowered below the regular text line and commonly used for Chemical formulas (H₂O), Mathematical notations (CO₂), Footnote references in mathematical expressions (x₁, x₂).
<p>X <sup>4</sup>+ Y<sup>6</sup></p>
Save and document and right click to reflect it on the default browser.
The superscript will raise it up like an exponent and the subscript will lower it down below the regular text. You can also create fractions in the middle of text or equations or chemical formulas. Hopefully you’ll use this in your scientific webpages and mathematical webpages or just for fun maybe.
HTML Entities
HTML entities are what we would use to display reserved characters which the browser would otherwise interpret as being intended for writing code.
As an example: There would be the angled bracket that we use when making our tags. If we were using the (less than) angled bracket then the browser would interpret any text that follows as the name of some element’s opening tag. So to display these characters as a text we can replace these reserved characters that confuse the browser with a corresponding html entity. Here I have a table which shows available entities that we can use in html.
I am writing a paragraph and here I tried giving spaces like this will you expect? You will expect that all spaces should be printed. But look what happened here. The spaces are not printed. Why did this happen?
This happens because, by default HTML It chops of all spaces and it considers it as one. So what do you need to do over here?
If you want to use additional spaces, then you need to use Html entities.
How we can do that? So here, we will write “ ” for every extra space you want to add. nbsp is non-breaking space.
<p>This is my first           program</p>
You will save your document and you will look there that another one space is added.
You won’t use it that much in your websites. Nbsp website does not at all look good. Don’t use it at all to bring spaces, because we will use margin padding and CSS selectors and properties are there we will use all those things.
Now, look at one more scenario. Here suppose if I want to write <p> as text and this should come in written so look what happened? Look at this, Where is my <p>? I have written <p> also over here.
But I want to see this in my website. How should I bring this? If I write this, then it will consider it as a tag.
Here you write < for smaller than angular brackets and over here write > for greater than angular bracket and as you do this, <p> will be shown as text on browser. If you want to write this you can’t write it without this. And these are html entities.
<p>paragraph is written like <p>.</p>
Html entities are not just used for these. You can even use html entities to write such characters which are not even present in your keyboard or on your keyboard they are as special characters. Like we can write pound symbol (money) and many other things that we will show you with some examples.
Suppose here I have to write “pound”. So, here I will write something like “£” and here I will write pound is written like “£”. Now look over here pound has shown in browser. And don’t get confused at all.
<p>Pound is written like this £. </p>
Similarly, if I have to write something like some special characters we can make use of HTML entities with the help of the table given above.
<PRE> tag
The <pre> tag is used to define preformatted text. This means that the text is displayed in a fixed-width font (usually a mono-spaced font like Courier) and maintains both spaces and line breaks.
It’s commonly used for displaying code snippets, poetry, ASCII art, or any text where the spacing and line breaks are significant
If you write like the code shown below, then it will come as it is. Keeping all the spaces intact and all the new lines intact but here it is not that tag will show up. For tags we have to use entities only.
Save the document to show the
mages in HTML
Let’s talk about images; it’s very simple to insert it.
You have to write the img and as soon as you write the img and press enter, you will be going to get src=”” alt=””.
Here in “img scr=” You have to provide the source of the image i.e. where is your image, either it can be on the internet, or it can be in your local.
If you want to enter the “url” of an online image, perform this by right clicking on the image.
If it is in your local then what will you have to do is to enter the full path of image.
What is the meaning of “alt” that if this image is not loaded then what text to show? Here I have written “please check your internet connection.”
This is how the image is perfectly shown and the text “Please check you internet connection” because of that particular image doesn’t existed on the given path.
Row Span And Colspan In Table
To create table in our program we will use table tag.(<table> </table>)
There will be 2 things inside the table.
1) <thead>: It will come under the head of the table.
2) <tbody>: it will come under the body of the table.
There is no need to mug up, you guys will automatically going to get this easily. We start with a row with the help of a (<tr>) and inside the head by writing (<th>) under <tr>.
<table>
<thead >
<tr>
<th>Name</th>
<th>Employee Id</th>
<th>Employee role</th>
</tr>
</thead>
Ok, my <thead> done now you will add data here in the table.
Now, you Have to make a table row, and I will not write (<th>) inside it, this time I will write (<td>) i.e. table data.
Now, to add more columns, put another heading and keep adding data.
<tbody>
<tr>
<td> Rohan </td>
<td> xyz</td>
<td> Analyst</td>
</tr>
<tr>
<td> Mohan</td>
<td> abc</td>
<td> programer</td>
</tr>
<tr>
<td> Sam</td>
<td> pqr</td>
<td> HTML expert</td>
</tr>
</tbody>
Save your program> right click> open in default browser> output.
Colspan and rowspan are attributes used in HTML tables to control the spanning of cells:
Colspan (Column Span): To make a cell span over multiple columns, use the colspan attribute. The value of the colspan attribute represents the number of columns to span. Colspan allows a single cell to span multiple columns horizontally. It’s useful when you have a header or data cell that should cover more than one column.
If you want a header cell to span two columns, you would use colspan=”2″.
Rowspan (Row Span): To make a cell span over multiple rows, use the rowspan attribute. Rowspan allows a single cell to span multiple rows vertically. It’s useful when you have a header or data cell that should cover more than one row.
If you want a header cell to span two rows, you would use rowspan=”2″.
Conclusion
You now have enough knowledge to know use different elements, properties, and the structure of HTML pages to create creative websites. Recall that in order to improve your web development abilities, you should never stop learning and investigating increasingly complex aspects.
HTML is just a structure of your website or web app, you will also need to have hands on CSS, javascript, bootstrap for styling and functionality along with one server side language too. You can learn all of them together offline in Dwarka at Best Web Development institute in Delhi, from 4 different locations (including Dwarka MOr, Kakrola, Nangloi, Bahadurgarh)
#Computer Institute in Delhi#Best Computer Institute in Delhi#Graphic design course in delhi#Graphic design institute#graphic design institute in delhi#Web development institute in delhi
0 notes
Text
Display button shortcuts windows 10

#Display button shortcuts windows 10 how to
#Display button shortcuts windows 10 drivers
#Display button shortcuts windows 10 driver
#Display button shortcuts windows 10 upgrade
If you want to use the new window management stuff quickly without resorting to dragging your mouse pointer around on the screen, the keyboard shortcuts are nearly as useful for people who bother to learn them (and they can do a few things, like creating and switching between virtual desktops, that the trackpad gestures can't). Let’s assume your PC doesn’t include a Precision Touchpad, because hey, it probably doesn’t. You don't need to hold the buttons down to stay in Task View. Keep pressing left/right to keep moving window across multiple monitors. Snap window to left/right half of screen.
#Display button shortcuts windows 10 drivers
Supporting these gestures will give OEMs a small competitive advantage over those that don’t, and even if you don’t care about trackpad gestures the fact remains that Precision Touchpads are generally more accurate and reliable than ones using standard drivers from the likes of Synaptics and Alps. Hopefully Precision Touchpads will become more common as designed-for-Windows-10 hardware begins to land in stores this fall. To see if your computer includes a Precision Touchpad, check in the Settings under “Devices” and then “Mouse and Touchpad.” The list includes the Type Cover trackpads for the Surface 3 and Surface Pro 3, and Dell’s most recent XPS 13 (another reason why we think it’s the PC laptop to beat right at the moment). This spec was only introduced in Windows 8.1, and because it’s optional very few PCs actually support it at the moment.
#Display button shortcuts windows 10 driver
In other words, at least as of this writing, it’s not something you can enable with a simple driver update, though for more recent systems your OEM may choose to mimic the gestures in their own drivers. This requires not just compatible multitouch trackpad hardware, but special firmware and Microsoft certification. The downside is that you need specific hardware to use the gestures-for now, they’re only enabled on PCs that support Windows’ Precision Touchpad spec.
#Display button shortcuts windows 10 upgrade
Windows 10 finally implements comparable gestures, a nice upgrade over Windows 8’s more limited edge swipes. Using a combination of swipes and Full Screen mode on a 13-inch MacBook eases the pain of moving away from a multi-monitor workstation. Getting accustomed to the multitouch trackpad gestures is key to effective window management in OS X. If you hold your fingers to the trackpad as you swipe, you'll be able to select different windows via the Alt-Tab switcher. Swipe up with three fingers to bring your windows back. Swipe down with three fingers to close Task View. Trackpad gestures and Precision TouchpadsĬortana search by default, can be changed to view notifications in Settings If you’re new to Windows 10, here’s your guide to using these shortcuts and gestures, and what kind of hardware you’ll need to use them. Windows 10 catches up in some important ways-it’s got a Mission Control replacement in Task View, can give you multiple virtual desktops to work with, and implements Mac-like trackpad gestures (alongside keyboard shortcuts) to help you use it all. And once you get used to OS X’s trackpad gestures, it’s hard to move to a platform where basic things like “two-finger scrolling” can be flaky and inconsistent. Features like Snap were handy, but it was hard to live without features like Mission Control. My primary computers are Macs and their primary operating system is OS X, so one of the things I disliked the most about going back to Windows was its window management.
Windows 10’s weirdly disjointed music, video, and store apps.
Gamers: It’s safe to upgrade to Windows 10.
#Display button shortcuts windows 10 how to
Windows 10 doesn’t offer much privacy by default: Here’s how to fix it.Xbox on Windows 10: What it is, what it isn’t, and what’s missing.The Windows Start menu saga, from 1993 to today.
1 note
·
View note
Text
Display button shortcuts windows 10

#DISPLAY BUTTON SHORTCUTS WINDOWS 10 FOR WINDOWS 10#
#DISPLAY BUTTON SHORTCUTS WINDOWS 10 WINDOWS 10#
#DISPLAY BUTTON SHORTCUTS WINDOWS 10 ANDROID#
#DISPLAY BUTTON SHORTCUTS WINDOWS 10 WINDOWS#
#DISPLAY BUTTON SHORTCUTS WINDOWS 10 WINDOWS#
We previously looked at all the keyboard shortcuts in Windows 10, so give it a read if you want to learn more. We've only highlighted 10 of our favorite keyboard shortcuts, but there's a lot more. You're in control here, and any screen snips will save to your clipboard just like print screen would. This keyboard combo will let you snip part or all of your screen, or even freeform snip part of it, too. It's summoned by clicking the Windows Key+Shift+S keys together at once on your keyboard. Windows 10 has a built-in Snip & Sketch tool that can help. Need a screengrab? No need to hit the Print Screen button on your keyboard. Just keep in mind that you won't' be able to record your desktop, Start Menu using this shortcut. Click the record button and you can record the active program that you're in. Once you summon it, you'll see a record button appear on your screen. We're talking about the Xbox Game Bar, which you can summon with Windows Key and G.
#DISPLAY BUTTON SHORTCUTS WINDOWS 10 WINDOWS 10#
Windows Key+G: Xbox Game Bar to record screenĭo you need to record something in a program in Windows 10? Usually, you'd download a third-party screen recorder like OBS studio, but did you know Windows 10 has one built-in. This can prove useful if you're hoping to start a new event, check your reminders, or more. If you hit Windows Key+Alt+D on your keyboard, you'll end up getting quick access to the date and time. Again, usually getting here involves clicking on the actual area, but Microsoft has you covered. One of the most commonly clicked areas in Windows 10 is the date and time in the taskbar. Windows Key+ Alt+D: Get to the date and time If you hold Ctrl and Shift while clicking a program, it will automatically launch it as an administrator, without the need to right-click! 8. however, Windows 10 has your back with a quick keyboard shortcut. Usually, this means having to right-click the program icon and choose to run as administrator. There always comes a time when you'll need to run something in Windows 10 as an admin. Ctrl+Shift while clicking a program icon to run as admin The numbers go left from right, so in our example above, Windows key+1 would open up HP Performance Center, Windows key+2 would open up File Explorer, and so on and so forth. Simply hit Windows Key, and then the number of the app pinned in your taskbar to launch it. Want to open an app you have pinned on your taskbar without the need to actually click it? That's what our next Windows 10 keyboard shortcut is for. Windows Key+ 1, 2, 3: Launch a pinned program on your Taskbar Like the others on our list, it's quick and super easy!.
#DISPLAY BUTTON SHORTCUTS WINDOWS 10 FOR WINDOWS 10#
This will help you skip out on the need to click the dedicated settings cog on the Start Menu or search for Windows 10 settings using Cortana or the Search Bar. With Windows Key and I, you can open up Windows 10 settings on the fly. Windows Key+I: Open Windows 10 settingsįorth on our list is a quick way to get to Windows 10 settings. It even holds pictures, too! Again, this is a great way to search for a specific bit of text or a word that you might have copied earlier but forgot about.
#DISPLAY BUTTON SHORTCUTS WINDOWS 10 ANDROID#
With this shortcut, you can end up seeing your entire clipboard history, from all your Windows 10 devices, and even your Android Phone. This one needs to be enabled in the Windows 10 settings (search for clipboard settings and turn on Clipboard history) but it can prove to be quite the lifesaver. You probably know that Ctrl+V will paste files in Windows 10, but did you know about Windows Key+V.
0 notes
Text

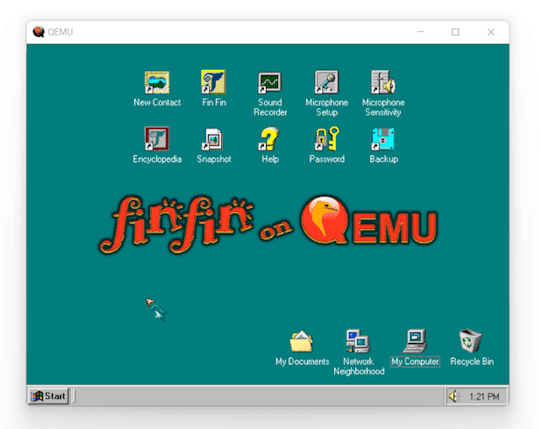
Fin Fin on QEMU (Current Version - v2.2)

Fin Fin on QEMU is a project designed to create an easy to use way for anyone to play Fin Fin without the need for any complicated setup on modern operating systems. It is fully compatible with Windows 10 and 11, but will also work on any version after XP.
The version of the game used is a custom made translation that includes all 6 worlds in English. It has working microphone input, sound recording, and all associated features such as screenshots and the encyclopedia work as well.
Rather than using virtualization, this works through emulating an entire Windows 98 machine. To play it there's no need to install any hypervisors or set up a virtual machine, as everything is already set up, and ready to go.
The download link can be found here! (Hosted on MEGA)

Installation
The whole thing is portable, meaning nothing is actually "installed" and all the data is wherever you place the folder. This also means that if moved to another PC, all user data will still be present.
To run, all you need to do is extract the folder in the .zip to a location of your choosing, and then run one of the launchers.

Included are two launcher versions for the different QEMU display options, one that uses GTK and one that uses SDL. The only difference between the .bat script and the .exe versions is that a command window will be shown when using the .bat script.
Both have pros and cons, so I've included both to let the user decide which one they want to use.
SDL has broken window scaling and no mouse integration, but has a correctly stretched fullscreen. GTK has a stretched fullscreen mode, but has working mouse integration and window scaling. Basically if you want the game in fullscreen use SDL, otherwise use GTK. For a bit more info about these, checkout the 'Files' section under the 'Keep Reading'
Important Info
Before launching the main game, be sure to create a profile using 'New Contact', as the game will not run until doing so. When exiting the game use the shutdown option in Windows 98. Exiting through closing the window forcefully can possibly cause data loss/corruption. When using SDL, mouse and keyboard input will be captured. To release this, press 'Ctrl + Alt + G'. When using GTK, the menubar can be hidden or shown by pressing 'Ctrl + Alt + M'. To make the window fullscreen, press 'Ctrl + Alt + F'.
Sounds
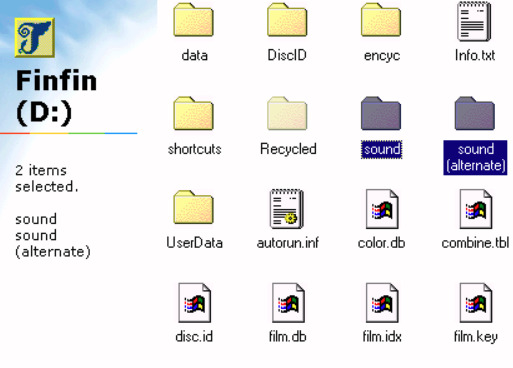
Included are two "sound effect packs" for the in game sounds that play based on the number keys from 1-5.
By default, the game will use the sound effects from the 5 Worlds version, but you can swap out to the 6 worlds one by renaming the "sound (alternate)" folder in the D: drive to just "sound", and renaming the original sound folder to something else.
I hope you all have fun with your new best friend Fin Fin!

Fin Fin is a wonderful little enigma from the past, and my attempt to make it easily accessible even in the present is something I hope you will all enjoy.
If you encounter any issues in Fin Fin on QEMU, please contact me about it.
To view the changelog, credits, and some more info about this project check below the 'Keep reading'.
Changelog
Some information is cut for brevity, the full version can be found inside of Fin Fin on QEMU and the MEGA folder.
v2.2
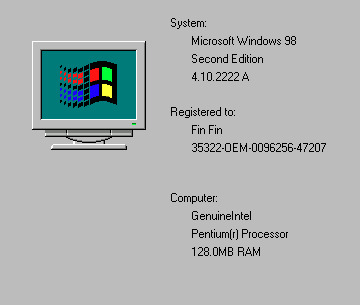
Added several new Fin Fin screensavers the user may choose from Updated method for calculating Transfer folder size Updated emulated machine to use 128mb of RAM and a Pentium Updated main teoboot.exe executable to fix several issues Updated shortcuts
v2.1
Removed WHPX launching options Removed FinFinWHPX.bat and FinFinWHPX.exe Removed startup crash fix as it was only needed for WHPX Modified folder settings in Windows 98 to open folders in the same window Rearranged Fin Fin on QEMU folder layout for cleaner appearance Added 'OK' button back to Microphone Setup that was mistakenly removed Updated shortcuts for Microphone Setup and Sound Recorder Fixed problem with 'Encyclopedia' launching script that caused screenshots to not show up in the photobook Added 'Transfer' Folder which allows for transferring files between the host and emulated machine Added options for launching with either GTK or SDL display Altered updater to improve ease of use and used NirCmd to improve process as a whole (Updater.bat & updater.iso)
v2.0 (Major Update - 6 Worlds Edition)
Modified original Taiwanese 6 Worlds version to add English Translation Added 'Microphone Sensitivity' shortcut to the desktop and start menu Added in 5 Worlds version Encyclopedia (finfinEncyc.exe & encyc30.GIZ) Added sound effects from 5 Worlds version (D:\sound) Added Mouse Integration Added Nircmd to replace launch batch scripts (C:\WINDOWS\nircmd.exe) Added Windowed Mode shortcut to start menu Altered launching scripts (FinFin.bat, FinFin.exe, FinFinWHPX.bat, FinFinWHPX.exe, FinFin Update.bat) Removed large amount of unecessary setup files from finfin.qcw Removed 'Task Scheduler' from taskbar Added Credits and Changelog shortcut to start menu Added dll to fix issue with running on Windows 7
v1.3
Added animated Fin Fin cursor
v1.2
Added guided updater (FinFin Update.bat & updater.IMA) Adjusted wallpaper Renamed startup shortcut ("_setup.bat" to "Crash Fix" at C:\WINDOWS\Start Menu\Programs\Startup) Adjusted Volume Control Settings
v1.1
Added new wallpaper (C:\background.jpg) Added new startup sound (C:\boot.wav)
v1.0 (First Public Release)
Changed from qemu-3dfx to base Removed unnecessary files in Windows Added missing shortcuts on Desktop
v0.5 (Playtester version)
Moved all Fin Fin data to finfin.qcw Created batch scripts for Disc.id Added shortcuts to launch programs Removed unnecessary programs from Windows Removed unnecessary files in Windows
Credits
Resources
The finfin Homepage (finfin.de) - By EMGE The finfin Archive (finfin-archiv.de) - By Xvemon, Nadine S., and EMGE Fin Fin 6 Worlds "Beta" (finfin-archive.de) - By Harald G.
Playtesters
mchi22 that-one-scratch-on-your-arm
Software
QEMU 7.1.0. (qemu.org) - By QEMU team: Peter Maydell, et al. NirCmd (nirsoft.net) - By Nir Sofer Resource Hacker (angusj.com) - By Angus Johnson
Updating Versions
Included is a guided updater that will help you transfer your save, screenshots, and sound recordings to the latest version.
Place the new version in a temporary location without replacing the original. Then, just run "Updater.bat" and follow the instructions.

System Time
Time in the emulated machine is synced to the host PC.
If you would like to time travel in Fin Fin, you can change the time in the emulated PC but it will go back to normal after a restart. Note that if you do this you will not be able to go back to the original time, you can only go forwards using this method If you would like to permanently change the time, you can use the built in date-changer present in the 'New Contact' program, but this will cause the loss of the current profile.
QEMU
Though it should be quite obvious by now, this project works through the use of QEMU, an open source emulator. Specifically, its emulating a full Windows 98 SE machine, and then the game is run on that.
The emulated machine has 128mb of RAM, an AC97 Soundcard, and a Pentium CPU.
Files
The only files this project really has aside from QEMU are FinFin GTK.bat/.exe and FinFin SDL.bat/.exe
The reason I list the .exe and .bat files together is that they do exactly the same thing. The executables aren't really 'true executables', but are instead just batch scripts that have been converted into .exe files. When they run, they essentially create a temporary batch script that deletes itself. The only real benefit of this is that its a bit more straightforward for launching and creating shortcuts, and that there is no distracting command window while playing.
Within the 'Data' folder is where the bulk of the project is. Inside are two virtual hard drives, w98.qcw being the main Windows 98 drive, and finfin.qcw being where all the Fin Fin game data is.
4K notes
·
View notes
Text
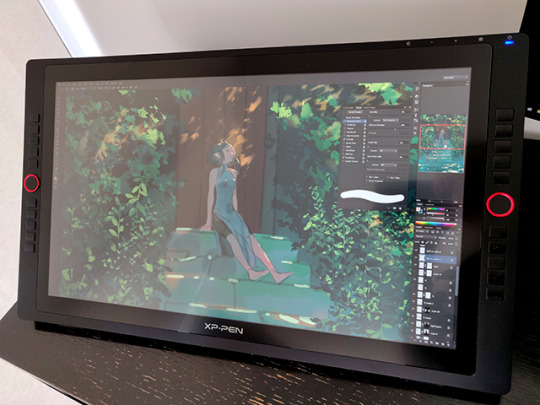
XP-PEN Artist Pro 16 Pen Display Review

The folks at XP-PEN were gracious enough and asked me to review their latest Artist Pro 16 Pen Display, powered by XP-PEN’s new X3 smart chip. If you’re curious about display tablets, this may be the product for you. Here are my thoughts!
The Digital Canvas
The 15.4-inch high-resolution display offers accurate, vibrant colours and an expansive canvas for detailed work. The screen is matte laminated with an anti-glare coat for a natural drawing experience.
Despite the shockingly thin size (only 9mm), the tablet is durable and hefty. There are no issues with the tablet sliding when lying flat. The sleek design elevates the tablet to premium status.
A potential downside is the absence of a built-in stand. I recommend getting a stand to prop the tablet up at an angle if you want to avoid neck strain.

Powered by the X3 Smart Chip
The X3 Elite Plus pen stylus is lightweight, with 8192 levels of pressure sensitivity – translating to precise pen pressure and quick response. This is thanks to XP-PEN’s innovative X3 smart chip technology in the stylus, enhancing the performance across the board.
More importantly, there is an impressive lack of parallax (distance between the pen tip and the cursor) – the winning quality of the Artist Pro 16! Experienced display pen users will notice the difference in precision. However, the eraser on the other end of the stylus is rigid and not as smooth to use. Overall, it feels organic to draw on.
The chosen thickness of the pen sits comfortably in my hand, affording better productivity. Batteries and charging are unnecessary. It comes with a neat metal case and nine extra nibs.

Shortcuts
The Artist Pro 16 offers eight customisable shortcut keys. The brightness of the display can be adjusted using the buttons on the side of the tablet.
I love the two customisable dials on the side. After setting one dial to zoom in/out and the other to brush size, the convenience is a welcome addition to the drawing process.
What’s in the Box
The installation guide is straightforward. You will need an internet connection to download the pen drive from XP-PEN’s website. The Artist Pro 16 is compatible with Windows 7/8/10 and Mac OS X 10.10 (or later).
Power cables, HDMI, USB, and power plugs are all provided; however, Mac users will need an HDMI adapter (not included).
Also included are a drawing glove and cleaning cloth.

Final Words
The XP-PEN Artist Pro 16 is worth considering if you’re a pro or hobbyist looking to upgrade or taking the leap into display tablets!
Many thanks to XP-PEN for allowing me to review your new product.
For a limited time, XP-PEN is having a Special 16th Anniversary Deal: Official XP-PEN Store

Artwork drawn with XP-PEN Artist Pro 16 Pen Display in Clip Studio Paint.
275 notes
·
View notes
Text
XP-Pen Artist Pro 24 Review

I drew this with an XP-Pen Artist Pro 24, which the team at XP-Pen kindly sent to me for review. I’ve had to opportunity to use this tablet on-and-off over the course of the past several weeks, and while there were a few issues my overall impression is positive.
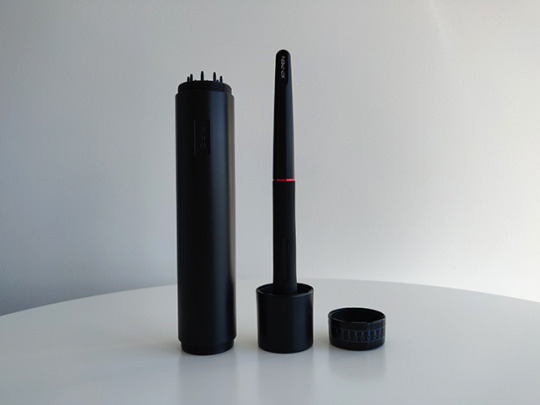
Unboxing / Contents
Apart from the 24” display tablet itself, the package comes with the usual cabling peripherals, plus some bonus extras. If your machine supports a USB-C connection for display, you’ll only need the one cable (plus the power connection). Otherwise, there’s a HDMI and a USB-C to USB converter included as well.
The extras include: an additional stylus, a one-size-fits-all artist’s glove, and a microfiber cloth.
The container for the stylus twists open to reveal 8 extra stylus nibs. Its cap can also be removed to use as a stylus holder.
Driver (Installation & General Use)
There were a few issues with installation, mostly tied to interactions between the driver, Windows 10 and Windows Ink.
Initially, brush strokes were offset from the stylus’ point of contact with the screen by about 3-4 centimetres when attempting to draw in Photoshop CS6. Random straight strokes also occurred frequently. This same problem did not occur in MS Paint or Photoshop CC 2019. This was fixed by changing the UI scaling setting for the monitor in Windows settings from 125% (which was apparently the default) to 100%.
Initially, brush strokes had no pen pressure in Photoshop CC 2019. Photoshop CS6, on the other hand, did (but suffered from the previous offset problem). This was fixed by turning on the Windows Ink setting in the XP-Pen driver menu. So in other words: CC 2019 needs Windows Ink on to recognise pen pressure, while CS6 didn’t, but was affected by UI scaling.
Interestingly, if Windows Task Manager was in focus and Windows Ink was not enabled in driver settings, stylus input was not recognised at all. There may be other programs that have this issue, but this was the only one I encountered so far.
I will say that I’ve had many problems with Wacom drivers interacting badly with Windows Ink and other things in the past before, so these types of issues are not exclusive to the XP-Pen drivers.
I’m currently using driver version 3.0.5, a beta build that has a lovely UI; it’s clear and laid out well. I did also try version 1.6.4 initially, which was fine — the UI for that version was similar to the layout you find with Wacom drivers.
Apart from the issues during installation that required troubleshooting, I haven’t had many major complaints with the driver in day-to-day use, I do think that there are a few areas for improvement, however.
The driver stops working correctly each time the computer is set to sleep and woken up again. To fix this the driver must be exited from the system tray and then relaunched.
There also doesn’t seem to be a way to bind WIN+SHIFT+ARROW to any of the express keys. WIN+SHIFT+ARROW (left or right arrow) is the Windows shortcut to quickly move a focused window to another monitor, so it’s something I use a lot if I’m on a multi-monitor setup. Unfortunately, attempting to set this shortcut in the express keys menu will simply move the actual driver window over to the other monitor while the custom input is not properly recognised in the text field.
The driver does offer a “switch monitor” option for the express keys that when clicked will transfer your stylus input to another monitor, which is extremely useful.
Screen
At 24” with a 2560x1440p QHD resolution, images are sharp and crisp even when viewed from a close range while drawing. Genuinely, it feels great to paint on based off this aspect alone.
The colour temperature is set to 6500K by default in the the driver settings. I think initially it felt just a touch too saturated, but overall I’m fairly happy with the colour display.
The monitor has touch-sensitive inputs on the top right corner: a -/+ for quickly adjusting the brightness, a menu for further settings, and power. I found myself using these to adjust the brightness throughout the day frequently. The power input requires a few seconds of continued contact from your finger to react, which prevents you from accidentally brushing it and turning the monitor on/off.
The monitor comes with a built-in stand. I found it easy to adjust to different viewing angles and also incredibly sturdy. I had no problems leaning on the monitor while drawing.
The monitor also comes with a pre-applied anti-glare screen protector. I wasn’t bothered by it and it seems to be holding out well after several weeks of use. I think the screen itself definitely needs the additional anti-glare, as being a display tablet means that it’s significantly more reflective than my main display.
Stylus
My first impression of the stylus was that it’s lighter in comparison to the Wacom styluses that I’m used to — there is very little to no weighting on the back end of the stylus, which makes it feel noticeably different when gripped. To be honest, though, I forgot about it when I was actually painting. Still, I would prefer a bit more weighting because I do think it makes the stylus more comfortable to hold overall for long periods of time.
There’s also no eraser nib, but I’ve personally never used those on Wacom tablets (I always use shortcuts to switch between brush and eraser instead) so this was a non-issue for me.
The two shortcut buttons on the side of the stylus sit quite flat to the surface, so I think they would be less likely to bother people who don’t use them. I use them a lot, however, and found that they were still easy to click despite being quite flat.
Unfortunately however I ran into a curious issue with using one of the stylus buttons to activate the eyedropper tool. When the “alt” key is mapped to one of the triggers on the stylus, activation of the eyedropper function in Photoshop (tested in both CS6 and CC 2019) is somewhat unreliable. That is, when the “alt” key is held down, the expected result is that once you tap the stylus on the canvas, a “mouse-click” will be triggered and the eyedropper will activate. While this works perfectly fine if you hold down “alt” from the keyboard (or hold down an “alt” that’s bound to one of the 20 express keys), when you hold “alt” from a stylus trigger I found that tapping quickly with the stylus only seemed to activate the eyedropper about 50% of the time. In order to activate it more reliably, I had to press harder and longer with the stylus, which can become tiring and slowed down my painting process. I also found that frequently, pressing down longer would lock me into the eyedropping function until I clicked the trigger key again.
After submitting feedback about this XP-Pen’s R&D department, I was informed that this issue occurs because the stylus is only able to send one message to the tablet at a time. Pressing “alt” on the stylus and trying to “click” at the same time counts as two messages, which may interact with each other unexpectedly. This is why it sometimes works and sometimes doesn’t.
The buttons seem to otherwise work completely fine for any other functions that don’t require the stylus to send two simultaneous messages, so unless you’re like me and like to bind “alt” to a stylus trigger, this won’t affect you.
Pen Pressure & Activation Force
Most current-gen tablets flash a big number for the pen pressure levels as a selling point. Having used tablets with 512, 2k, 4k and 8k levels of pressure sensitivity, I’d say I noticed the biggest difference when switching from 512 to 2k, but in my opinion beyond 2k the change is minimal and has no real impact on the way I draw. The XP-Pen Artist Pro 24 comes with 8192 levels of sensitivty, which is a very big number, but in practical application all I can say is that it works the way I expect it to and I don’t have any complaints regarding the transition between pressure levels on the default linear pressure curve.
More importantly I did notice that the IAF (initial activation force) was not as low as I would have liked. Very light input is not recognised, or only partially recognised before dropping off and on again. In a practical sense this doesn’t actually impact me through most of (perhaps 97%) of the painting process, but it did give me pause once in a while when I wanted to make a really light stroke and had to adjust my method. The drivers for this tablet do come with a pressure curve you can adjust to your preferences, so this can help a little, although after some tests I preferred to leave mine on the default setting.
Summary of Drawing Experience (tl;dr)
I think the mark of a good tool or piece of hardware is that it does not draw attention to itself during the course of its use. An ideal drawing experience allows me to be fully immersed in the act of drawing without having my focus shifted to dealing with the tool. With this in mind the XP-Pen Artist Pro performed very well for the most part, but was held back by a couple of issues.
Pros:
The monitor resolution honestly feels great to look at; the pixel density means that I can basically forget about pixels even with my face positioned closer to the screen.
The parallax between the tip of the stylus and the actual position of input was very minimal and basically not noticeable for me, especially after the simple calibration process offered by the driver.
At normal room temperature (say up to about mid-20’s celsius) the monitor screen stays impressively cool to the touch and I was never bothered by resting my drawing hand on its surface even when painting for long sessions.
The 20 express keys and 2 roller rings are extremely helpful and I actually found myself using all of them, despite initially thinking that I’d only need half of them. The keys are also comfortable and responsive to click (which sounds like it should obviously be so, but having used some Intuos iterations in the past which had some very annoying-to-click express keys, I don’t take this feature for granted anymore).
Cons:
The driver needs to be restarted everytime the computer wakes from sleep in order to work.
Higher IAF was noticeable when very light strokes were desirable. Also, the input will on rare occasions glitch by performing a completely straight max opacity + max brush size stroke. This seemed to happen primarily when I was trying to get light strokes to register. (It didn’t happen often enough to bother me much since it’s just a quick undo, but it did happen enough times that I noticed it.)
The issue with eyedropping using “alt” mapped to a stylus trigger as detailed above. Quite unlucky for someone like me who has over a decade of muscle memory for this particular mapping.
Overall, as I said at the beginning, my impression of the tablet is positive. While I think it has room for improvement when it comes to driver performance and the initial activation force especially, it also has a lot to offer at a highly competitive price point ($900USD at retail), and it would’ve been amazing if something like this had been available to me back when I first started digital painting. As I do enjoy using it for the most part I’ll probably continue to use it on-and-off in future.
851 notes
·
View notes
Text
Game Instalation Guide:installing the sims castaway stories on your machine
Introduction
Hello! I’m Luca and welcome (back) to my tumblr! Recently i became addicted to the sims castaway stories so i decided that today i’m gonna show you how to install The Sims Castaway Stories on your machine! (and also make it to work)
DISCLAMER
i think we all know what is this game! So i won’t talk about it today! lil’ disclamer:The Sims Castaway Stories’s pc version is laptop frendly so it can run well on laptops but of course it has problems running on modern systems! However we will make the game to work on windows 10 so don’t worry!
BEGINNING
Before we begin please disable your antivirus! And you will also need a tool for extracting .zip or .rar files! You can get Winrar or 7-Zip,it dosen’t matter that much! Tho i recommend using 7-Zip because it’s free :D
1.Go to https://oldgamesdownload.com/the-sims-castaway-stories/ and go to the download the sims castaway stories then select the purple button,Should look like below:

2.After that,select how would you like to download castaway stories! You have to options: mega.org or archive.org,it dosen’t matter which one you select.

3.(7-ZIP USERS) After it finished downloading select the archive and right-click on it and then select open with,scroll down to the bottom and select look on another app on this pc then go to C:\Program Files\7-zip then select 7zFM.exe ,for 32 bit systems it should be the same default location or Program Files (x86)
(WinRAR USERS) You can do the same process but select the default location for winrar UNLESS it’s already set as default.
4.Continuing,after that open the archive then select its content and paste it into a new folder.
5.After it finished the extracting procces make sure your antivirus is disabled because if it is enabled the crack is going to be detected as a virus and will get removed,then add the folder with the game’s setup to the exceptions list (just to be safe <3)
6.Open the setup and if you get a pop-up from UAC(user account control) saying:an admin has blocked you from running this app, follow this tutorial: https://www.youtube.com/watch?v=1jgwD2e1MB8&ab_channel=TreeAcademy
7.Open the setup again and follow the on-screen instructions,when a serial code is required use this: N78Q-RZKW-7428-DB09-DVTY then select the directory you want to install the game then let the installer do its job,after it got finished select quit then finish.
8. You can enable UAC again now,also add the game’s installation directory to your exceptions,For Windows Defender go to Virus&treat protection > Virus&Treat Protection settings then select manage settings then scrol down to add or remove exclusions and then select the game’s folder,the default is C:\Program Files or Program Files(86)\EA Games\The Sims Castaway Stories
9.Go to the crack folder then select the files inside them and copy them to the game’s folder mentioned above then go into the tsbin folder and right click and select paste. CONGRATS! THE GAME IS FULLY INSTALLED BUT WE AIN’T FINISHED YET!
Optimizing the game!
1. We will need GRM (graphic rule maker) and ONLY IF YOU HAVE 8 GB OF RAM OR MORE we will use 4 gb patch. Download GRM here and 4 gb patch here
2.I’m gonna assume that you know how to install GRM and continue.After the tool got installed open it and it should look like this:
3.Select the game from the game list and then select the locate game button and if it dosen’t detect it select browse.. and select the game’s location.
4.Based on your GPU you need to force the texture memory or the game won t work,go to the search button (for windows 10) and search advanced display info and then scroll down and select Display Advanced Proprieties for Display 1 or 2,a window should open and you need to look at the dedicated video memory and the amount of vram that you see there is the amount that you will enter in the force texture memory section.
5.Select the disable sim shadows option and if you have an amd gpu select the fix amd radeon hd series option,then select your resolutions then save the files,select yes and then ok and you are done!
6.Open the 4gb patch and select the SimsCS.exe file from the tsbin sub-folder of the game’s directory.
Now you are done optimizing the game! You can right click on the SimsCS.exe and select send to desktop(create shortcut)
The game should work now,if you have any questions please ask them in the ask me anything section! Enjoy!
20 notes
·
View notes
Text
My GIF making process!

I’ve been asked many times for a tutorial, but because I get really detailed, I always get overwhelmed by the idea. But I finally decided to buckle down!
Just so you know: I don’t use PSDs in this, and I don’t import layers to frames or anything like that. I like the hard way—at least in gif making, I believe you get higher quality gifs. Join me as I show you how to make gifs by loading videos directly into the Photoshop timeline and my coloring and sharpening techniques.
Tools used:
Mac OS X (only necessary for the first step, and there are other ways around it with a PC)
Adobe Photoshop
YouTube Purchases (any streaming service will work)
Topics covered:
Obtaining the Source Material
Loading the video file into Photoshop
Prepping, Cropping, and Resizing the Media
Adjustment Layers
Sharpening
Exporting
Obtaining the Source Material
There are a few different methods for obtaining video to work with. Proper YouTube videos are nice, but finding any major motion picture in that format is difficult, if not illegal.
Once I realized I could get really great quality video by doing screen recordings from streaming services, I stopped worrying about finding (and pirating) high resolution video files. So now, I just go to whichever streaming service I need to, pick out the movie or show, find the spot, and record small snippets.
Mac screen recording instructions:
On a Mac, Command+Shift+5 will bring up the screen recording dialogue.
Resize the frame of what you want to record within the browser.
Go to a second or two before, press the “record” button, and then begin playing the video, remembering to keep your cursor out of the recording box.
Use the Space bar to pause your video when you’ve gotten the snippet you need. Stop the screen recording by clicking the ⏹ button that is in your menu bar at the top of the screen.
Important: when the recording appears in the bottom right of your screen, click on it, and then trim the video on either end. This will help your computer convert the video file to the type that can be opened by Photoshop.
Click “done” and it will appear on your desktop, ready to be used!
PC Users: ??? Here’s a Google search I did for you
Loading the video file into Photoshop
Lots of people use this process for making gifs (a great tutorial!). I didn’t even know it existed until last summer, when I’d already been giffing for years. I wish I could still do something like that with these screen recordings, but the files are absolutely HUGE, especially on Macs with double retina displays, which actually increase the dpi by a lot. Making screencaps of them fills up my hard drive, almost immediately—even when I’ve got 20 gigs of free space to work with. So what do we do? We just. Open the file. In Photoshop. Et voila!
You can do this with any type of video, not just screen recordings.
Prepping, Cropping, and Resizing the Media
When Photoshop loads your videos up, it makes the video hilariously fast (something about frame conversion). You must slow it down for it to look natural. THIS MUST BE DONE BEFORE YOU RESZE. Your Photoshop timeline window should be at the bottom of the screen. See that little triangle in the top right of the video?
Click on it, and a menu will appear to change speed and duration.
Change the speed first- usually between 80-85% will seem realistic. (I actually went a little faster than I usually would on this at almost 86%—I don’t recommend this)
Press the button next to duration and pull the toggle all the way to the far right (if you don’t do this, full length of the video will be cut off).
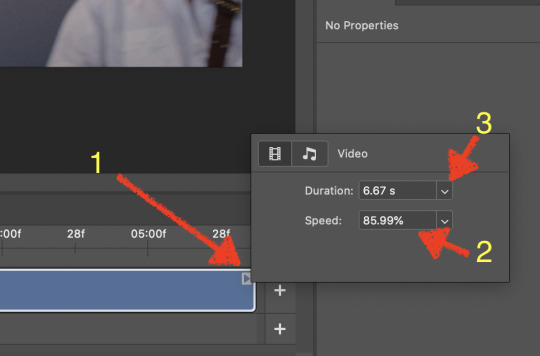
Now you’ll want to crop it. Ever since Tumblr upped its GIF size limit, I have been playing around with 7:5 ratios, but let’s go with 3:2 for now. Use the Crop tool, pick out 3:2 in the top left (it may say 2:3, but you can switch that) and then find the most suitable spot in your gif for that. Hit enter on your keyboard.
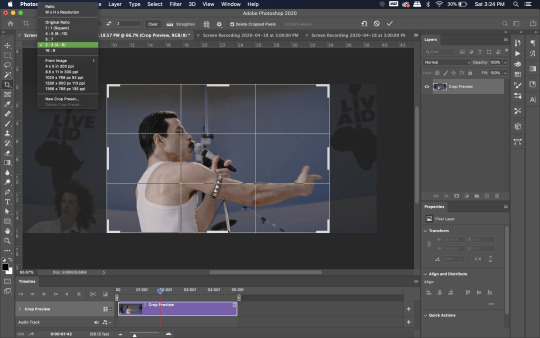
Some things to keep in mind when cropping:
Most videos come in 16:9 ratio (BoRhap is even wider). If it’s a wide shot, you’ll need to do the full 16:9 to not lose anything. Of course, experiment and find what’s right for you!
As you can see above, I moved forward in the timeline and made the crop to a point in the video when the broadest movement was happening.
Certain videos WILL have a black or red bar that may be imperceptible until you’ve already exported the gif. Just crop in a little tighter on top and bottom to avoid them.
Now you’ll need to resize your gif to be the correct size for Tumblr. If you don’t use Tumblr’s exact dimensions, your gifs (as uploaded) will appear blurry or pixellated. We’re doing a full-width gif here, which is 540px. On a Mac, I use Command+Option+I (for “Image Size) to open the resize dialogue. You can also find it under Image->Image size...
Make sure to also have “Resample” checked. Lately I’ve been playing around to see if different options are better. Most GIF makers use “Bicubic Sharper (Reduction)” and they are not wrong to do so. I’ve just been unhappy with it lately, so I have been trying this other setting out, “Bicubic (smooth gradients)”.
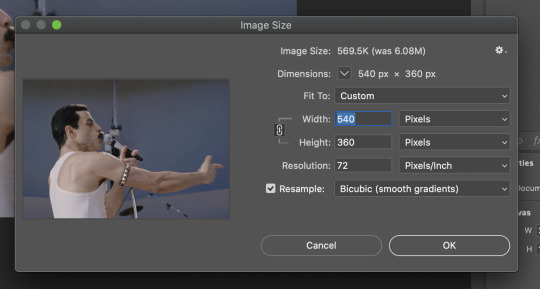
Click OK. A dialogue may come up that asks if you want to convert to a Smart Object. The answer is yes, okay, do it. The only major caveat is that you can’t go back and change the timeline speed. That’s why we did it first. But you can preview the speed now that it’s smaller, and if you don’t like it, use Command+Z (or “Undo”) and go back a couple steps to get the speed you like.
You may find, especially on a Mac screen (and possibly other displays), that at 100% your gif looks too small to be 540px. That is the curse and blessing of working with super-high resolution hardware. Zoom in to 200% and proceed about your business. This is what it will look like on Tumblr.
You may find it helpful at this point to begin by defining the beginning and end of your gif by moving around these bumpers. It’s safe to keep gifs under 02:00f in length. Under half of 01:00f will be way too short. (I tend to overshoot in length and then trim the beginning and the end once I see how big the gifs are upon exporting.)
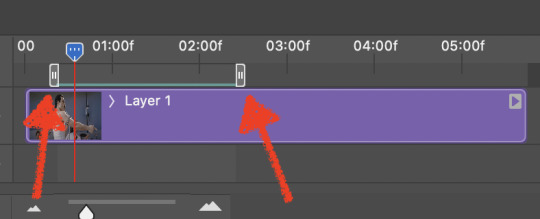
Adjustment Layers
Now the creativity and fun begin!
There are a LOT of ways to get creative here. I’m going to keep it simple, very simple, but I strongly recommend opening up a new adjustment layer of each type and trying to figure out what each does!
You’ll find the adjustment layer menu at the bottom of the Layers window.

Curves
There are a lot of ways to make Curves work for you! It can do the job of Brightness/Contrast, it can do Levels, it can do Color Balance! We’re going to use it mainly to help with brightness here, but also to level out some of the tones. One of the quick tricks you can do is use the droppers on the left side of the Properties window. There are three- one with a white tip, one gray, one black. These can help define what your white tones are (and whether they need to be more of one color or another), and so on with your blacks. Sometimes it works, sometimes it doesn’t; in this case, I think it doesn’t:
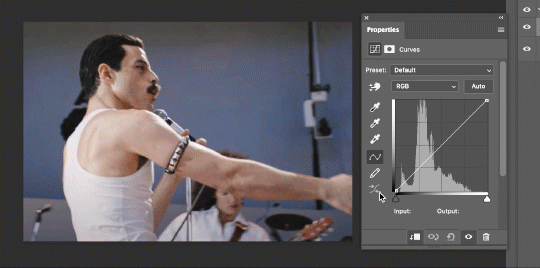
That looks totally blown out and somehow also too dark!
So instead, we’re going to use that little hand with the finger pointing out and some arrows pointing up and down. This lets you define which sections you want to get brighter or darker, and how much. It doesn’t do color correction. In the example below, you can see I dragged up on a white spot and down on a dark spot. Then, I moved points around on the curve itself to refine (which the gif here doesn’t show...).
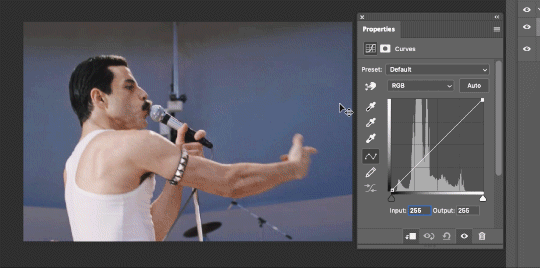
Vibrance/Saturation x2
Next, I’ve been using @gwil-lee‘s Vibrance/Saturation trick (I know you said you learned it from someone else, but I learned it from you!).
Create a Vibrance Adjustment layer, bump the values up a bunch, and then change its Fill to somewhere between 2-9%. Change the Blend Mode to Color Burn. Then make a copy of that layer keeping everything the same, but make it Color Dodge. I can’t quite define what these do, but it makes it punchier!

Color Balance
Most people are familiar with this. For this gif, I’m going to make the shadows more Cyan/Blue and the highlights more Red/Yellow. Just a few points each.
Exposure
I brought the Exposure up a bit, but not enough for you to need to read about, haha.
Selective Color
Here’s where you make fine adjustments to colors. This particular scene is extremely simple, color-wise, so keep it simple. I’m going to bump up the cyans/blues, take up the black by just a point or two, and maybe bump up the yellows and reds a tiny bit. (And as always, remember, the “opposite” of cyan is red, the opposite of magenta is green, and the opposite of yellow is blue. CMY/RGB!)

I think at this point I’m going to call it with the adjustment layers. You can go absolutely hogwild with more of them! But at this point, I’m ready to start sharpening!

Sharpening
I do three sharpening filters these days. These are all under Filter->Sharpen. Make sure your media layer (default called Layer 1) is selected as we go through this! (Also, this can really take a toll on your processor, so don’t say I didn’t warn you.)
Sharpen- This layer does the basic job
Smart Sharpen (Amount: 10%, Radius: 10, Reduce Noise: 4% Gaussian Blur)- This layer gives texture
Smart Sharpen (Amount: 500, Radius: 0.3, Reduce Noise: 12% Gaussian Blur)- This layer gives refined sharpening and smoothing
Fiddle with these as needed! Let your gif play all the way through- this may go slowly as your processor works on it. Make sure the beginning and end points make sense.
Exporting
After You’re going to have to use File->Export->Save For Web (Legacy)... or use the shortcut of Shift+Option+Command+S. This could take some time for the dialogue to pop up! Be patient.
In my opinion, these are the best gif export settings for crisp edges and no noise:
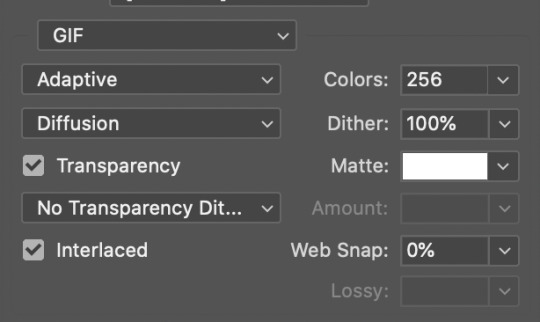
Now you see how big the file is in the bottom left. Tumblr won’t let you upload anything bigger than 10MB and it’s safer to stay under 9MB, in my experience. When your gif is too big, you have a couple options. You can close the dialogue and change the length of your gif.
OR, you can uncheck “Interlaced” and bump up the lossy to 1 or or more. This will create noise. Sometimes, that’s a good thing!
Here’s without lossy:

Here’s WITH lossy: (Honestly in a fast moving gif like this, it’s almost imperceptible, but I can see it!)

And now that I’ve exported, I can see what there’s a little black line on the bottom! So I’m going to trim that off and call it good! You can see the full gifset here.
Hope you enjoyed! Reblog if you try this out or learned anything. Feel free to reach out with questions any time!
445 notes
·
View notes
Text
this one feels like the biggest update tbh (forgot 2 post this draft in october)
FireAlpaca version 2.3.17(2020/10/12)
You can now export animations as animated GIFs
You can now open files from recently used folders
Added Transform / Free Transform / Mesh Transform buttons to the options bar
Added support for layer display / non-display shortcut keys
It may have been possible to fix a bug where COM Surrogate locks a file and cannot overwrite it (Windows)
18 notes
·
View notes
Text
Download Adobe Audition 3.0 Full Crack

Adobe Audition CC 2017 Full Version Free Download with Crack – You should’ve already know this software if you have installed Adobe Creative Cloud previously. It is one of the best audio editing applications in the world which capabilities cannot be doubted. Having a minimalist and elegant appearance, it made professional choice this software for editing, mixing, mastering without the need for other third-party applications. Especially with the many effects available, it will certainly makes your audio editing feels more perfect.
This software can also be integrated with Adobe Premiere Pro CC 2017 and Adobe After Effects CC 2017. Where later, there will be an option to edit audio directly in Audition CC 2017 free. So the audio that has been edited will be continuous between software, without the need to export or save firsthand. As for the performance, Audition CC 2017 full version is already very fast and stable. Given that the size is not too large. You can also Record Audio, vocals and instruments are perfectly recorded with this software. Do you want to try this? Get Adobe Audition CC 2017 free. download full version with patch.
How to Install Adobe Audition CC 2019 Crack Full Version: Get Adobe Audition CC 2019 download link with crack below. After downloading, extract the file with the latest version of WinRAR. Turn off the internet connection on your computer. Optionally, also turn off antivirus and windows defender. After that, run autorun.exe. Adobe - Audition: For Windows: Adobe Audition 3.0.1 Patch - English As I mentioned in the initial post: It's important to be aware that your original serial number for Audition 3 won't work any more - it cannot be activated.
Software Adobe Audition Final Features :
Multichannel audio workflow allows you to separate all audio channels
Use the Visual Keyboard Shortcut Editor
introduces support for the PreSonus FaderPort
The Essential Sound is now available in Premiere Pro
Audio effects now have spectrum meters, gain meters, and gain reduction meters
Now supports Premiere Pro project files as the default interchange format
Reducing background noise, mixing audio elements, or producing a simple podcast
How to Install Adobe Audition CC 2017 Full Crack :
Download Adobe Audition CC 2017 Full Crack
Extract with the latest Winrar v5.6
Turn off the internet connection first
Disable Antivirus and Windows Defender
Run the Setup.exe file and wait for it to finish
When installing, select the Trial Version option
After that, open the program to start the Trial. If you just go out immediately
Disable the Antivirus to open patch
Download the crack (patch) file separately and extract it with winrar
Right-click on the Patch.exe file, click Run as Administrator
In the popup window, select Adobe Audition CC 2017
Click the Install button, a search will appear, open the Audition installation folder and select amtlib.dll file
After all steps are complete, connect to the internet connection
Important Note :
If there is a problem in Windows 7, Install Visual C ++ Redistributable for Visual Studio 2017
When installing make sure the internet connection is offline
Also Download :Adobe Audition CC 2019 Terbaru
Adobe Audition CC 2017 Full Version Free Download Final
Audition CC 2017 @566 MB | GDrive | UptoBox | FileUpload | MegaNZ | MediaFire
AMTemu Crack Only |UptoBox | MegaNZ | FileUpload
Password : www.yasir252.com
Adobe Audition 14.0 Crack free. download full Version Windows 7 , 8 10
Adobe Audition 14.0 free. download full Version Windows 7, 8 10 is a comprehensive toolset that includes multitrack, waveform, and spectral display for creating, mixing, editing, and restoring audio content. A professional audio workstation for Windows PC! This powerful audio workstation is designed to accelerate video production workflows and audio finishing, and deliver a refined mix with crystal-clear sound.
Discover the industry’s best audio cleaning, restoration, and precision editing tool for designing videos, podcasts, and sound effects. Easily and automatically rearrange any song to fit any time period with Remix in Adobe Audition CC. Learn about best practices for correcting audio, including how to use the spectral frequency display, diagnostic panel, effects, and more.
The Adobe Audition 14.0 Free version interface is clean. Each window is separated by tabs to keep the File, Effects, Main, and Mixer sections separate and easy to find. If you don’t like the layout, Adobe has provided a panel unlock option that allows you to detach and move these windows to any position you want. You can save your own reorganizations as workstation templates depending on the type of project you are working on.
Features of Adobe Audition 14.0;
Clean and modify:

With Adobe Audition, you can easily “clean” an audio track, reducing unnecessary hum and background noise. Also, you can edit different tracks at the same time with the multitrack board, cutting, copying and pasting audio segments together.
Create audio for music videos and movies:
Adobe Audition allows you to create professional sound and embed it in a music video or movie.
Audio remix:
You can send an audio clip to Audition via Dynamic Link and automatically rearrange the song to suit the length of your project.
Audio restoration:
If you have to deal with poor quality audio, Audition has many tools for you to correct and improve poor quality files. Audio restoration has never been easier. Repair and restore audio using tools like Adaptive Noise Reduction, DeClipper, DeHummer Effects, Diagnostic Panel, Amplitude Static Panel, and Spectral Frequency Display.
Enhance your audio with sound effects:
Adobe Audition comes with hundreds of royalty-free sound effects so you can bring your music video, jingle, or intro video to life. Just browse the effects library and you are sure to find the right sound effect for your project. Since the sound effect files are not compressed, they are of the highest sound quality.
Remix and master your audio projects: Audition has built-in mixing software, which allows you to fine-tune your projects. You can use any type of hardware you want, such as external microphones, headphones, and audio interfaces. With Adobe Sensei, you can automatically change the length of your songs and increase the master volume.

Easily integrates with other Adobe programs: You can integrate Adobe Audition with other Adobe Creative Cloud programs, such as Adobe Premiere Pro and Adobe After Effects. Get your tracks mastered and ready in Adobe Audition, then export them to Premiere Pro or After Effects.
Create high-quality podcasts: You can also record, edit, and mix tracks for podcasts. Adjust noise levels and easily record different participants at the same time. Just choose the podcast template and Audition will automatically create the audio tracks for each speaker. You can then edit your podcast with the Waveform Editor or the Multitrack Editor.
Required configuration:
Multi-core processor with 64-bit support (Intel for Mac)
Windows 7 with Service Pack 1 (64-bit), Windows 8.1 (64-bit), or Windows 10 (64-bit)
Mac OS x versions 10.11, 10.12, and 10.13
4 GB RAM
4 GB of free hard disk space plus additional space during installation
1920 x 1080 or larger screen
Adobe Audition 3.0 Crack Exe
How to Crack Adobe Audition 14.0?
Adobe Audition 3.0 Full Torrent
First, download Adobe Audition Crack from the link below.
If you are using an old version, use IObit Uninstaller Pro to uninstall it
After downloading, install the program normally.
After installation, t run the software.
Now copy the crack file and paste it into the C / Program file.
you are ready. to enjoy
1 note
·
View note
Text
Airbrush Photo App

Airbrush Photo App
Ace is the interactive new app for quickly and easily editing and sharing your photos. AirBrush Photo Editor Online is a great tool to enhance your portrait photos without cramming the disk space with different software. It offers easy-to-use skin airbrushing instruments, filter settings and ensures you get realistic results each time you use it. Actually, this image editor is one of the best free alternatives to Photoshop. AirBrush has everything you need to edit your photos like a PRO in a fast, powerful, and easy way. ACCESS ALL FEATURES 😍+ 30 unique features to create the best edits. UNLOCK FILTERS FOR DAYS + 100 exclusive filters following the top editing trends. REMOVE PHOTOBOMBERS 😉Clear stains, pimples and even your ex.

AirBrush is an excellent photo editing app that has tons of useful tools and offers a very comfortable interface. While this app is specially designed for retouching 'selfies', it's also just as well suited when retouching any other kind of photo. Stop worrying about overcharges when using AirBrush: Easy Photo Editor on your cellphone, free yourself from the tiny screen and enjoy using the app on a much larger display. From now on, get a full-screen experience of your app with keyboard and mouse.
Free download AirBrush: Easy Photo Editor for PC Windows or MAC from BrowserCam. Meitu (China) Limited published AirBrush: Easy Photo Editor for Android operating system(os) mobile devices. However if you ever wanted to run AirBrush: Easy Photo Editor on Windows PC or MAC you can do so using Android emulator. At the end of this article you will find our how-to steps which you can follow to install and run AirBrush: Easy Photo Editor on PC or MAC.
AirBrush
You love taking photos, right? But, what about those days when you want pictures that are perfect? It can be quite hard to edit those photos when you don’t have any knowledge, right? Well, you don’t have to have any expert knowledge anymore. You can now edit all those photos to perfect by using the Airbrush app. This photo editing app is the most amazing app and the easiest app you can possibly use for all your photo editing needs.
Here are some awesome features of the Airbrush app.
Edit pictures to Perfection
With the Airbrush app on your phone, you can give your photos the perfection they need. You can use all the user-friendly retouch tools, cool filter options, and those amazing editing effects to give your photos the natural result that you need. You can also remove blemishes, pimples, and even remove those unwanted pictures with a tap of the finger. You can also swipe on your phone when you want to add a radiance of blush on your photos.
Perfection is now Easy
When you see a little yellow hue on your teeth in the photo, worry no more, you can easily whiten them with your fingers. The brightening feature also enhances your eyes and lights up your face in places that you need so that you can get the perfection you want in your photos. Your skin can also be perfect by editing it with a few swipe and taps of your fingers with ease by achieving a perfect and glowing tone on your skin with your smartphone.

Get a Slimmer Shape
You can also slim, reshape, and lengthen your photo with ease. You don’t need photoshop skills when you have the Airbrush app on your phone. The app also has tons of tools that let you blur, crop, stretch, and tune your pictures for those artistic touches for your photo.
Tons of FIlters
You can also add tons of depth and style to your photos. With the latest filters, you can also use them for your photos so that you can give them the beautiful finishing touch. Once you’re all done, you can also share those photos from the app directly to all your social networks like Facebook, WhatsApp, Twitter, Instagram, and even Telegram. So, what you waiting for?

Let's find out the prerequisites to install AirBrush: Easy Photo Editor on Windows PC or MAC without much delay.
Select an Android emulator: There are many free and paid Android emulators available for PC and MAC, few of the popular ones are Bluestacks, Andy OS, Nox, MeMu and there are more you can find from Google.
Compatibility: Before downloading them take a look at the minimum system requirements to install the emulator on your PC.
For example, BlueStacks requires OS: Windows 10, Windows 8.1, Windows 8, Windows 7, Windows Vista SP2, Windows XP SP3 (32-bit only), Mac OS Sierra(10.12), High Sierra (10.13) and Mojave(10.14), 2-4GB of RAM, 4GB of disk space for storing Android apps/games, updated graphics drivers.
Finally, download and install the emulator which will work well with your PC's hardware/software.
How to Download and Install AirBrush: Easy Photo Editor for PC or MAC:
Open the emulator software from the start menu or desktop shortcut in your PC.
You will be asked to login into Google account to be able to install apps from Google Play.
Once you are logged in, you will be able to search for AirBrush: Easy Photo Editor and clicking on the ‘Install’ button should install the app inside the emulator.
In case AirBrush: Easy Photo Editor is not found in Google Play, you can download AirBrush: Easy Photo Editor APK file from this page and double clicking on the APK should open the emulator to install the app automatically.
You will see the AirBrush: Easy Photo Editor icon inside the emulator, double clicking on it should run AirBrush: Easy Photo Editor on PC or MAC with a big screen.

Airbrush Photo App
Follow above steps regardless of which emulator you have installed.
2 notes
·
View notes