#iAtkOS
Explore tagged Tumblr posts
Visit Tumblr Blog
Explore Tumblr blogs with no restrictions, modern design and the best experience.
Last Seen Tumblr Blogs


Fun Fact
69% of Tumblr users are millennials.
Text
Kanon Standard Edition English Torrent

KN edition: Satisfies a Korean Fair Trade Commission ruling by excluding bundled media software and includes links to competing media and messaging software. K edition: Satifies a Korean Fair Trade Commission ruling by including links to competing media and messaging software. x86 - 32bit version - x64 - 64bit version. Download Free PLR and MRR Products Now! Instant Download, Unlimited Download, No Sign Up and No BS! Free eBooks, Articles, Software, Videos and Many More!
Kanon Standard Edition English Torrent Downloads
Kanon Standard Edition English Torrent Download
Kanon Standard Edition English Torrent Free
Kanon Standard Edition English Torrent Version
iBoostUp Premium is a maintenance tool which can help fix problems with your Mac such as slow performance, Download iBoostUp Premium 3.5 in Softonic ekb Warez Crack Serial Keygen Results Xamarin Visual Studio 3.9.533, torrent free iboostup premium, torrent free iboostup premium, v-planner, simcity buildit cleanmymac 2 activation number torrent download � Filename Size full version activation number download (Mac) � iBoostUp Premium 3.5iboostup premium 3.5 torrent. cut Warez Crack Serial Keygen Results Xamarin Visual Studio 3.9.533, torrent free iboostup premium, torrent free iboostup premium, v-planner, simcity buildit, iBoostUp 3.98 д� Ñ Mac OSVLC Media Player 2.1.5 д� Ñ Windows Cropic - Post Full Size Photos on Instagram Without Cropping 3.5 д� Ñ iOS Premium hd porn Tower porn Holdem indicator full crack At sunset she made the usual iBoostUp Premium v3.6 MacOSX .zip, iBoostUp Premium v3 torrent, iboostup premium taringa, descargar iboostup taringa, iboostup premium 3.5 mac taringa, iATKOS ML3U Mountain Lion 10.8.3 UEFI PC.torrent. After Earth Torrentdownloads net indian housewife sensational sex.torrent. Histoire . Clicker.3.5 added by request Crack.iBoostUp.3.2 added by users . Premium upgrade. null UltraISO Premium gives you all the tools you need to create new ISO files, directly edit existing ones, or convert CD and This free Internet Explorer toolbar improves searching for and downloading torrents. NET Framework 3.5 iBoostUp. Performance is often slowed for users with little hard drive space available.3 with crack serial number keygen free full version torrent cd key activation final iboostup premium 3.5 crack Staff of Bird EngineeringÂ

Kanon Standard Edition English Torrent Downloads
Beating Low Cost Competition How Premium Brands can respond to Cut-Price Rivals .. HGST Ultrastar 3.5-Inch 2TB 7200RPM SAS 6Gbps 64MB Cache Enterprise Hard Drive Internal Bare or OEM Drives . Pure Evil Crack a Padlock, Build a Hackintosh, and Find Your Unfriends � Lifehacker Quick Look iBoostUp Related posts: minecraft cracked version 1.8.1 download
Kanon Standard Edition English Torrent Download
best streaming audio download software
Kanon Standard Edition English Torrent Free
Kanon Standard Edition English Torrent Version
low poly character modeling tutorial 3ds max
1 note
·
View note
Text
How to run windows programs on mac os x lion

#How to run windows programs on mac os x lion how to
#How to run windows programs on mac os x lion mac os x
#How to run windows programs on mac os x lion mac os
You can reuse this USB drive for normal stuff after you finish installing Mountain Lion. You will need to erase all of the files on your USB drive beforehand, so make sure to back up its contents first.
#How to run windows programs on mac os x lion mac os
However, if you're setting up iAtkos from Mac OS X, you can use a 8 GB or larger USB drive instead of a dual-layer DVD. A dual-layer DVD, Bluray disc, or empty USB drive (8 GB or larger): If you are setting up iAtkos from Windows, you have to write iAtkos onto a dual-layer DVD or Bluray disc (normal DVDs don't work because iAtkos is slightly too large). If you're not sure which version to use, just use ML2. You can also use iAtkos M元, an updated version that only works with motherboards with UEFI (a guide regarding motherboards with UEFI will be posted soon).
#How to run windows programs on mac os x lion how to
This guide describes how to install iAtkos ML2. In this guide, you will write iAtkos onto a USB drive or DVD, and boot your computer from iAtkos to install Mac OS X. The standard method of installing Mountain Lion on a PC requires you to modify a retail copy of OS X Mountain Lion with Unibeast, but iAtkos already does all of this for you. I won't go into details, but you can download it from just about any bittorrent website by using a bittorent client (it's about 5 GB in size). iAtkos ML2 (Free): iAtkos is by far the most popular distro of OS X Mountain Lion. It's preferred that you use a completely empty hard drive for this, but if your computer already has Windows installed on your hard drive, be sure to create an appropriate hard disk partition for OS X Mountain Lion beforehand (by following Step 1 of my guide to MBR partitions) (will be posted soon).
#How to run windows programs on mac os x lion mac os x
However, that's only the bare minimum if you plan to install Mac OS X for day-to-day use, I recommend allocating at least 50 GB of space. Also, OS X Mountain Lion takes up about 10 GB of space on its initial installation, so the computer where you install Mac OS X must have at least 10 GB of space in its hard drive. Be sure to read the Hackintosh compatibility guide (will be posted soon) very carefully, to check whether or not your computer qualifies. However, not every computer will work with Mac OS X. If your computer already has Mac OS X Lion installed, iAtkos will just update Lion to Mountain Lion normally, without deleting any of your apps or files. It can be the same computer as the one mentioned in the previous point. A Hackintosh-compatible computer with 10 GB+ of free space: This is the computer where you will install OS X Mountain Lion. If you're using a Windows computer, it needs to have a DVD/Bluray burner (just about every DVD/Bluray drive nowadays can act as a burner, too). An existing Windows computer/Mac/Hackintosh: This is the computer where you will download and set up iAtkos.
0 notes
Text
Multibeast e2200

Success posts of these software are welcomed with proper documentation and flair. Please avoid posting about beta software help until it has reached GM. The main offenders of these types of videos are fromĪlpha/Beta Software releases are unsupported: Because alpha/beta software is full of bugs, supporting beta software makes it difficult to troubleshoot issues. So we highly discourage uses of these videos, instead much preferring users follow the written guides in our FAQ and Sidebar.
Largely incorrect and spreading false info.
Steal the work of others and hide behind paywalls.
No Youtube Videos: While we understand some users may be more visual learners, please understand that most(if not all) youtube guides either: Pre-baked EFI posts will be removed as they are not guaranteed to work and they spread a low-effort sentiment in the Hackintosh community. If you would like to share your work, document the specific items required to build your Hackintosh that were not covered in the guide instead. Please keep macOS and Mac hardware posts to their respective subreddits.ĭon't distribute EFIs: Do not share your EFI folders, instead point users to the subreddit's vanilla guides. No Mac posts: Regardless of what methods were used for installing, we are a subreddit focused on PC hardware running macOS. This community does not wish to be affiliated with such sources so all paid work and such should be kept private
No self-promotion: Please keep all paid services and advertisements off the subreddit.
For users without a Mac can still find the Internet Install Guide in the sidebar. The reason for this is that these tools do more damage than good as they neither teach you what you're doing and can also damage macOS itself with unneeded framework changes.
No distro/beast tools: We do not not support the use of tools such as UniBeast and Multibeast as well as distros such as iAtkos, Niresh, Olarila and such.
Excessive meme posting will be considered spam, and the posts removed.
Memes: While memes are not explicitly banned from this sub - the purpose of this sub is to discuss Hackintosh.
In the event it doesn't answer your question/problem, please link prior post you read and then ask about what you don't understand.
Search Before Posting: If your question has already been posted before (even if not by you), please make sure to read the other post before posting.
If you are asking about a Laptop, you must provide the full model number. We reserve the right to remove posts that don't meet the minimum criteria. RAM/HDD/SSD/Monitor/Accessories are usually not the cause of issues (though you may provide them anyway).
Questions Must Have Adequate Information: At a minimum, you must provide your Motherboard Model, CPU, GPU, and install method.
If you do not, it is grounds for removal, or it will be left up to the moderators to decide how your post is flagged.
Flag your posts: You are required to flag your post.
For legal reasons, we want to avoid such links.
No torrent links or P2P of copyrighted material: Please refrain from advocating piracy in this subreddit.
Please refrain from the use of profanity.
No profanity: We like to try and keep this subreddit clean.
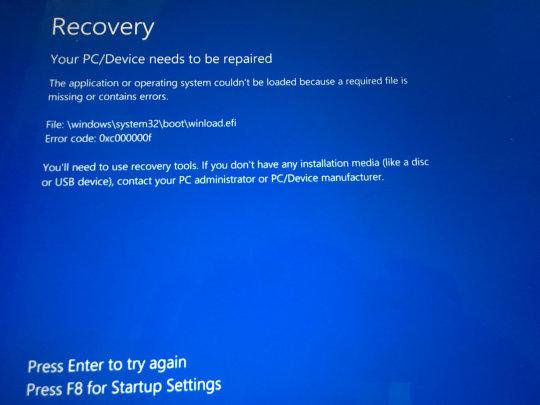
Trying to delete this post.Intel Hackintosh Discord: AMD Hackintosh Discord: Rules Most of the problems have been fixed, I've posted another post in Network forum as it does not make sense anymore to post it here. I downloaded the last version of Multibeast. Moreover, I've seen several success stories with R9 280x. I am aware of some of the problems with the R9 280x but as far as I know, it's only with XFX cards which is not my case because I have an ASUS R9 280x card. I use an ethernet cable for the internet connection. My monitor is connected to my Asus R9 280x through an HDMI cable. I suppose it make sense because I should not boot through the USB key. If I do that, it's like multibeast installed no kexts because I've got no audio, no internet. The only solution, is to boot through the USB key as I did during the installation process. The second problem is that when I do that, I see the Apple logo with the loading bar but a few seconds after that, I get a black screen.

I need to press F11 (key to launch the boot menu) and choose something like "UEFI OS", then I've got the clover home screen and then I can choose to boot on Mojave. The problem is that after installing multibeast, I reboot my computer and I does not automatically boot on Mojave but on Windows 10 (I have Windows 10 on one HDD and Mojave on another HDD). Boot on Mojave through the USB key and did the post-installation with Multibeast (I posted a screenshot of my multibeast config below). Download Mojave through App Store and create my USB key with Unibeast.Ģ. I've recently tried to install Mojave on my configuration but i've got some problem with multibeast.ġ.

Building a CustoMac Hackintosh: Buyer's Guide
0 notes
Text
Nvidia driver manager for mac os 10.12.6.1


#NVIDIA DRIVER MANAGER FOR MAC OS 10.12.6.1 INSTALL#
#NVIDIA DRIVER MANAGER FOR MAC OS 10.12.6.1 FULL#
#NVIDIA DRIVER MANAGER FOR MAC OS 10.12.6.1 SOFTWARE#
#NVIDIA DRIVER MANAGER FOR MAC OS 10.12.6.1 CODE#
#NVIDIA DRIVER MANAGER FOR MAC OS 10.12.6.1 PC#
You may still ask for help but please be prepared to remake your EFI from scratch following the OpenCore Vanilla Guide Pre-Built EFI NOTE: We provide minimal to no support for Pre-Built EFIs from GitHub, Hackintosher and such due to generally being heavily outdated, poorly made and users not knowing what their hackintoshes are doing.
#NVIDIA DRIVER MANAGER FOR MAC OS 10.12.6.1 CODE#
Please do not ask, or post, about things like iAtkos, Niresh, or any other modified macOS installer that may have malicious code in it! MacOS INSTALLERS NOTE: This sub is dedicated to legally obtained copies of macOS. (AMD Laptops and AMD integrated GPUs are unsupported) Do note we're primarily an intel subreddit but feel free to ask questions relating to AMD based systems. Help and questions posts will be removed.Ī Hackintosh is a non-Apple computer that runs macOS.ĪMD USERS READ THIS: While it may be more work, the AMD hackintosh scene has gotten quite a bit easier.
#NVIDIA DRIVER MANAGER FOR MAC OS 10.12.6.1 SOFTWARE#
Success posts of these software are welcomed with proper documentation and flair. Please avoid posting about beta software help until it has reached GM.
#NVIDIA DRIVER MANAGER FOR MAC OS 10.12.6.1 FULL#
The main offenders of these types of videos are fromĪlpha/Beta Software releases are unsupported: Because alpha/beta software is full of bugs, supporting beta software makes it difficult to troubleshoot issues. So we highly discourage uses of these videos, instead much preferring users follow the written guides in our FAQ and Sidebar. Largely incorrect and spreading false info.Steal the work of others and hide behind paywalls.

No Youtube Videos: While we understand some users may be more visual learners, please understand that most(if not all) youtube guides either: Pre-baked EFI posts will be removed as they are not guaranteed to work and they spread a low-effort sentiment in the Hackintosh community. If you would like to share your work, document the specific items required to build your Hackintosh that were not covered in the guide instead. Please keep macOS and Mac hardware posts to their respective subreddits.ĭon't distribute EFIs: Do not share your EFI folders, instead point users to the subreddit's vanilla guides.
#NVIDIA DRIVER MANAGER FOR MAC OS 10.12.6.1 PC#
No Mac posts: Regardless of what methods were used for installing, we are a subreddit focused on PC hardware running macOS. This community does not wish to be affiliated with such sources so all paid work and such should be kept private
No self-promotion: Please keep all paid services and advertisements off the subreddit.
#NVIDIA DRIVER MANAGER FOR MAC OS 10.12.6.1 INSTALL#
For users without a Mac can still find the Internet Install Guide in the sidebar. The reason for this is that these tools do more damage than good as they neither teach you what you're doing and can also damage macOS itself with unneeded framework changes.
No distro/beast tools: We do not not support the use of tools such as UniBeast and Multibeast as well as distros such as iAtkos, Niresh, Olarila and such.
Excessive meme posting will be considered spam, and the posts removed.
Memes: While memes are not explicitly banned from this sub - the purpose of this sub is to discuss Hackintosh.
In the event it doesn't answer your question/problem, please link prior post you read and then ask about what you don't understand.
Search Before Posting: If your question has already been posted before (even if not by you), please make sure to read the other post before posting.
If you are asking about a Laptop, you must provide the full model number. We reserve the right to remove posts that don't meet the minimum criteria. RAM/HDD/SSD/Monitor/Accessories are usually not the cause of issues (though you may provide them anyway).
Questions Must Have Adequate Information: At a minimum, you must provide your Motherboard Model, CPU, GPU, and install method.
If you do not, it is grounds for removal, or it will be left up to the moderators to decide how your post is flagged.
Flag your posts: You are required to flag your post.
For legal reasons, we want to avoid such links.
No torrent links or P2P of copyrighted material: Please refrain from advocating piracy in this subreddit.
Please refrain from the use of profanity.
No profanity: We like to try and keep this subreddit clean.
Intel Hackintosh Discord: AMD Hackintosh Discord: Rules
0 notes
Text
Mac Os X 10.8.4

This tutorial shows you how to get Mac OS X 10.8.4 (Mountain Lion) running on a late-2006 Mac Mini (model A1176), which officially can only support up to Mac OS 10.6.8 (Snow Leopard), according to this Wikipedia article. Although I have not tested it myself, the same steps would probably work if you have an early-2006 Mac Mini.
Mac Os X 10.6.4
Mac Os X 10.8.4 Download
Mac Os X 10.8.2
The remote host is running a version of Mac OS X 10.8.x that is prior to 10.8.4. The newer version contains multiple security-related fixes for the following components: - CFNetwork - CoreAnimation - CoreMedia Playback - CUPS - Disk Management - OpenSSL - QuickDraw Manager - QuickTime - SMB Solution Upgrade to Mac OS X 10.8.4 or later. Feb 12, 2020 — iatkos ml2 os x mountain lion 10.8.4 build 12e27 torrent Shared Files downloads, find Mac OS X Mountain Lion 10.8 Build. 12A269 Final Install. Jan 31, 2021 — Blog. Ftlink 4.3 download iAtkos ML2 OS X Mountain Lion 10.8.4 Build 12E27 torrent Mausam In Hindi Dubbed Mp4 raidapantn.netlify.com.
Mac 10.8.4 unable to connect to exchange. Since the update to 10.8.4 I am no longer able to connect to my exchange server'. Could not connect to this exchange server. Check your network connection.' THe information in the account hasn't changed from what it was before the update. We previously noted that 10.8.4 includes support for Mac computers with 802.11ac WiFi chips. While 10.8.4 is a minor update to OS X Mountain Lion, Apple also has a major release launching in the.
Hardware upgrades
Mac Mini 2006 comes with a Core Solo or a Duo Core processor, whereas Mac OS X Mountain Lion requires at least a Core 2 Duo, so you will need to upgrade the processor on your Mac Mini first before continuing. Although it is possible to patch the installer to run on a Core Duo, I would still recommend upgrading for a straightforward installation experience. Compatible processors can be found on eBay for as low as US$20 and available at a wide variety of speeds – 2GHz, 2.16GHz or 2.33GHz. A detailed step-by-step guide on how to upgrade the processor can be found here.
Optionally, to make the whole process worthwhile, it is also recommended to upgrade the RAM. Although the Mac Mini 2006 comes with the Macmini1,1 firmware which can only support up to 2GB of RAM and will not boot if more than 2GB is installed, you can install up to 4GB (2 pieces of 667MHz laptop DDR2 SDRAM) by updating the firmware to Macmini2,1, originally meant for the Mac Mini 2007 family. The steps are summarized below:
Download the newer firmware from here http://www.mediafire.com/?lfangrn69rxln3q and extract it
Put the extracted files in /System/Library/CoreServices/Firmware Updates folder. Check the permissions of the files, or just do a chmod 777 on the files to be safe.
Run the following command in terminal: sudo bless-mount /-firmware/System/Library/CoreServices/Firmware Updates/EFIUpdaterApp.efi-payload/System/Library/CoreServices/Firmware Updates/LOCKED_MM11_0055_08B.fd-options “-x-apple-efi payload0-data” -verbose
Turn off the computer by shutting it down from the Apple menu.
Wait for a few seconds and press the power button until the power LED flashes. Wait until the flashing stops.
At this point the firmware upgrade is completed. You may see some distorted pictures on the screen, which is normal. Simply turn the Mac Mini off by pressing the Power button, and turn it back on
After a reboot, the Mac Mini should recognize 4GB of RAM.
If the machine doesn’t boot up or doesn’t recognize the extra RAM, check that the memory modules have been securely inserted. If it still doesn’t work, try to do a PRAM reset.
The machine can only use around 3.3 GB out of the total of 4GB that is recognized, due to limitations of the 32-bit processor. And while you are at it, take the time to upgrade the hard disk (a 2.5″ SATA drive) to an SSD, preferably 128GB or more. The final configuration, 2GHz Core 2 Duo with 4GB RAM and 128GB SSD, will make your Mac Mini 2006 machine performance more or less in line with the Mac Mini 2009, a much later model.
Preparing the installation
Before you proceed you will need to upgrade the OS on your Mac Mini to Snow Leopard 10.6.8, the last officially supported version. Next, get your Mountain Lion installer media ready – which can be a .DMG image or an actual DVD. After that, download MLPostfactor 0.3 from here, needed to patch the original Mountain Lion installer disk, which does not support the Mac Mini 2006, to run on your machine.
As at the time of writing this article (May 2015), MLPostfactor 0.3 only supports Mac OS up to 10.8.4. Versions 10.8.5 or above are not supported, so make sure that your installer is of the right version.
To make it easier to switch the boot partition without holding the Option key, you may also want to install a boot manager such as rEFIt.
Bypassing MLPostfactor limitation
Here comes the trick. The user interface for version 0.3 of MLPostfactor apparently only supports OS X Lion (10.7) and will refuse to run on 10.6. I tried to trick it by changing the system version number in /System/Library/CoreServices/SystemVersion.plist but things would still not work – MLPostfactor started but could not find Install OS X Mountain Lion.app in the Applications folder even though the installer was clearly there. A workaround would be to use MLPostfactor 0.2, which can run on Snow Leopard, to upgrade the system first to 10.7, and from there upgrade it to 10.8 by running MLPostfactor 0.3 again. I did not attempt this method because it seemed time consuming and most importantly, I had no installer disc for 10.7.
My relief came when I read this article which showed me how to use MLPostfactor from the command line. Apparently there is another MLPostfactor.app folder inside the original MLPostfactor app which can be invoked using the following command to patch the installer:
Surprisingly, there is no version check in the command line version of MLPostfactor and this method actually works to create the 10.8.4 installer partition. There are a few other commands that need to be done to patch the installer partition – refer to the original article for details.
Using MLPostfactor from bash script

A simpler way would be to use the MLPostfactor script written by pjherron available from github. With this script, the steps to upgrade to 10.8.4 from 10.6.8 on your Mac Mini can be summarized as below:
Download MLPostFactor 0.3 and unzip it to desktop
Copy the ‘Install OS X Mountain Lion.app’ folder from your 10.8.4 installer disc to the Applications folder
Create a 8 GB or larger partition on the target drive to host the patched installer. The volume label should be Install and it should be automatically mounted at /Volumes/Install
Create another partition, 20GB or more, on the target drive where you will install 10.8.4. Alternative, if you do not need the original Snow Leopard partition, you do not need to create this partition and can simply choose to install on the Snow Leopard partition later, losing all existing data.
Run the upgradesl2ml.sh script and give it 30 minutes to an hour to complete. When done, reboot the machine and choose to boot from the 10.8.4 installer partition just created
When prompted, choose to install 10.8.4 on the partition created in step 4, or simply overwrite your Snow Leopard partition. It is highly recommended to format the partition and perform a clean install – do not perform an upgrade as there are known issues.
Let the installer run. The process will either end in an error or a white screen – this is normal. Reboot the machine when this happens.
Choose to boot from the 10.8.4 installer partition again (not the partition where you installed 10.8.4 to).
When the installer finishes starting up, choose MLPostfactor from the Utilities menu and let it repair the partition where you’ve just installed 10.8.4
When the repair is done, reboot your system and choose to boot from your fresh Mountain Lion partition. It should boot normally
Done, you can now enjoy Mountain Lion on your Mac Mini 2006!
If the installation is successful, the About This Mac dialog should show something similar to below:
Common issues
In my experiment, the final system runs fine without major issues. Application such as Firefox, Skype or even xCode and the iOS simulator could run well. VLC player works well to play normal DivX or Xvid videos. The only major application that is problematic is Dropbox, which couldn’t even install due to error ‘no mountable filesystems’ when mounting the installer DMG. Tuxera NTFS can install and appears to work but will later cause random kernel panic when browsing NTFS partitions in Finder. I had to resort to removing Tuxera and learn to live with read-only NTFS support for now.
Mac Os X 10.6.4
If your dock in Finder appears to be transparent after the installation, open Terminal and run the following command to fix it:
Mac Os X 10.8.4 Download
Read here for other useful tips and tricks.
Mac Os X 10.8.2
Other than the above issues, my installation of 10.8.4 on the Mac Mini is stable and serves me well as my daily work machine. My next attempt would be to install 10.9 (Mavericks) or 10.10 (Yosemite) on this computer. As far as I know, although there are proof-of-concept attempts, nobody has managed to get a stable working system yet, presumably due to challenges in getting graphics drivers to work properly.
See also
Upgrading the SSD in a mid-2012 Macbook Air Keyboard issues in GRUB bootloader on a Mac Mini booting Mac OS, Windows and Ubuntu Linux
0 notes
Text
Midnight Commander Dmg

Midnight Commander Msi
Midnight Commander Dmg Download
Midnight Commander Mac Dmg
How To Use Midnight Commander
Midnight Commander Mac
Midnight Commander Dmg Classic
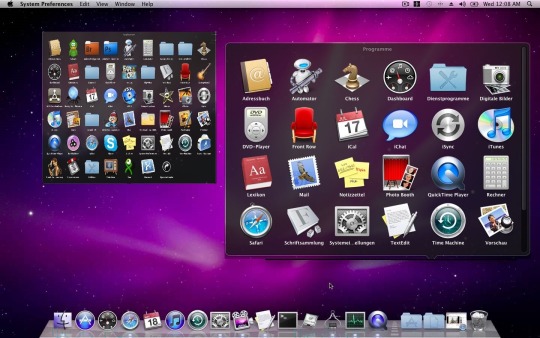
Linux users who want to run Windows applications without switching operating systems have been able to do so for years with Wine, software that lets apps designed for Windows run on Unix-like systems.
GNU Midnight Commander is a visual file manager, licensed under GNU General Public License and therefore qualifies as Free Software. It's a feature rich full-screen text mode application that allows you to copy, move and delete files and whole directory trees, search for files and run commands in the subshell. Midnight Commander Mac Os X Dmg. Trolcumenluc1973 trolcumenluc1973 2021. Insert key for Mac OS X: For Midnight commander it seem to be ^/Ctrl+T=Insert. The more generic Insert function is supposed to be Fn+Return/Enter=Insert, see this. Midnight Commander is a powerful and capable file manager very popular among Linux and FreeBSD. Midnight Commander Mac Os X Dmg Path Of Exile Does Physical Attack Dmg Apply To Bows Burn Iatkos L2 Dmg To Dvd Windows Install Dmg Using Rufus.exe Classic Wow Blue Staff Nature Dmg Boe Teemo 1k Dmg Smroom Guide Os X 10.9 Installesd.dmg Download Os X El Captain Dmg.
There has been no robust equivalent allowing Mac applications to run on Linux, perhaps no surprise given that Windows is far and away the world's most widely used desktop operating system. A developer from Prague named Luboš Doležel is trying to change that with 'Darling,' an emulation layer for OS X.
Midnight Commander Msi
'The aim is to achieve binary compatible support for Darwin/OS X applications on Linux, plus provide useful tools that will aid especially in application installation,' Doležel's project page states. Darwin is Apple's open source operating system, which provides some of the backend technology in OS X and iOS. The name 'Darling' combines Darwin and Linux. Darling works by 'pars(ing) executable files for the Darwin kernel... load(ing) them into the memory... and execut(ing) them.'
But there is a ways to go. 'Darling needs to provide an ABI-compatible (application binary interface) set of libraries and frameworks as available on OS X... by either directly mapping functions to those available on Linux, wrapping native functions to bridge the ABI incompatibility, or providing a re-implementation on top of other native APIs,' the project page notes.
Doležel, who started Darling a year ago, described the project and its progress in an e-mail interview with Ars. Darling is in the early stages, able to run numerous console applications but not much else. 'These are indeed the easiest ones to get working, albeit 'easy' is not the right word to describe the amount of work required to achieve that,' Doležel said. 'Such applications include: Midnight Commander, Bash, VIM, or Apple's GCC (GNU Compiler Collection). I know it doesn't sound all that great, but it proves that Darling provides a solid base for further work.'
Midnight Commander Dmg Download
Advertisement
Users must compile Darling from the source code and then 'use the 'dyld' command to run an OS X executable,' Doležel said. One roadblock is actually getting Mac .dmg and .pkg application files working on a Linux system. Because doing so isn't that straightforward, Doležel said, 'I've written a FUSE module that enables users to mount .dmg files under Linux directly and without root privileges. An installer for .pkg files is underway.'
Unix/Linux synergy

The fact that OS X is a Unix operating system provides advantages in the development process. 'This saved me a lot of work,' Doležel explained. 'Instead of implementing all the 'system' APIs, it was sufficient to create simple wrappers around the ones available on Linux. I had to check every function for ABI compatibility and then test whether my wrapper works, so it wasn't as easy as it may sound.'
Another lucky break not available to Wine developers is that Apple releases some of the low-level components of OS X as open source code, 'which helped a lot with the dynamic loader and Objective-C runtime support code,' Doležel noted.
Midnight Commander Mac Dmg
But of course, the project is an extremely difficult one. Doležel isn't the first to try it, as Darling was initially based on a separate project called 'maloader.' Doležel said he heard from another group of people 'who started a similar project before but abandoned the idea due to lack of time.'
Doležel was actually a novice to OS X development when he started Darling, being more familiar with OS X from a user's perspective than a developer's perspective. 'I have personally looked for something like Darling before, before I realized I would have to start working on it myself,' he said.
Darling relies heavily on GNUstep, an open source implementation of Apple's Cocoa API. GNUstep provides several core frameworks to Darling, and 'the answer to 'can it run this GUI app?' heavily depends on GNUstep,' Doležel said. Doležel is the only developer of Darling, using up all his spare time on the project.
Advertisement
How To Use Midnight Commander
No reverse-engineering
Doležel isn't reverse-engineering Apple code, noting that it could be problematic in terms of licensing and also that 'disassembling Apple's frameworks wouldn't be helpful at all because Darling and the environment it's running in is layered differently than OS X.'
The development process is a painstaking one, done one application at a time. Doležel explains:
To improve Darling, I first take or write an application I'd like to have running. If it is someone else's application, I first examine it with one of the tools that come with Darling to see what frameworks and APIs it requires. I look up the APIs that are missing in Apple's documentation; then I create stub functions for them and possibly for the rest of the framework, too. (Stub functions only print a warning when they are called but don't do any real work.)
The next step is to implement all the APIs according to the documentation and then see how the application reacts. I also add trace statements into important functions to have an insight into what's happening. I believe this is very much like what Wine developers do.
When things go wrong, I have to use GDB (GNU Debugger) to debug the original application.
It is rather unfortunate that Apple's documentation is often so poorly written; sometimes I have to experiment to figure out what the function really does. Many OS X applications seem to contain complete pieces of example code from Apple's documentation, presumably because one would have to spend a lot of time getting to understand how the APIs interact. This is why I appreciate open source so much—when the documentation is sketchy, you can always look into the code.
Years of development are needed. Similar to Wine, 'Having a list of applications known to be working is probably the best way to go,' Doležel said.
Midnight Commander Mac

Darling should work on all Linux distributions, he said, with the catch that 'many apps for OS X are 32-bit only, and installing 32-bit packages on a 64-bit Linux system could be tricky depending on your distribution. I personally use Gentoo Linux, so I'm gradually creating a Portage overlay that would compile Darling and all dependencies for both 32-bit and 64-bit applications.'
Midnight Commander Dmg Classic
Doležel would like to bring Angry Birds, other games, and multimedia applications to Linux. Darling could potentially 'be used to run applications compiled for iOS,' he writes on the project site. This will also be a challenge. 'The intention is to support the ARM platform on the lowest levels (the dynamic loader and the Objective-C runtime),' he writes. 'Rewriting the frameworks used on iOS is a whole different story, though.'
0 notes
Text
Mac Os X For X86 Iso

Mac os for android tablet. Global Nav Open Menu Global Nav Close Menu; Apple; Shopping Bag +.
Mac Os X Iso Pc
Mac Os X 10.5 Leopard Pc X86.iso
Mac Os X For X86 Iso 32-bit
A community of users running Mac OS X on x86 hardware. Jan 15, 2020 Mount the OS x86 DVD ISO file in Daemon Tools or Virtual Clone Drive (You can use Alcohol 120% if you want). You cannot mount the ISO directly in VMware because VMware cannot properly read HFS+ images (thats the format the Mac OS ISO is in) Step 3: Configure VMware. Note: In this guide, VMware Workstation 6 will be used.
M4a to mp3 for mac os. But, it’s also getting popularity day by day.
Jump to: navigation, search
This is a list of installation guides that will help you to get OSx86 up and running. If you are new to OSx86, please use one of the guides in the Recommended section.
Please do not copy the content from one site to another site, please use original content on your site.
Please do not put your link anywhere; place it in the correct section.
Some of these guides don't tell you how to partition, please see the bottom of the page for details on partitioning or see Partitions.
38International Guides
Getting Started
If you want to install OSX on your Intel or AMD computer, your computer processor needs to support at least SSE2. Most current (2011) CPUs support SSE2 and SSE3, so you may want to skip the next paragraph.It is recommended that your computer supports SSE3 for application compatibility, speed and performance. Make sure to check which version of OSx86 you need for your processor. You can check for SSE2 support from Windows with a program called CPU-Z. If you're already on a mac use CPU-X. If you are using Linux, enter the following in a terminal:
Additional hints after installation:
InsanelyMac Installation Guide sub-forums
See also installation guides from InsanelyMac sub-forums here.
The below commands work on Windows 7, Windows 8, Windows 10 and all other server editions. Reboot command for mac.
Love listening to audiobooks while sleeping, crafting? All within just a few clicks on your Mac, you will experience and enjoy an exciting and wide range of voices.Audiobooks are the perfect way to relax and get things around the house, more and more people like to listen to audio books rather than read eBooks on an iPad, iPhone or Kindle for long hours. Audio Book enables its uses to convert any eBooks to audiobooks and listen on an iPhone, Android or MP3 player. Supported input format: pdf, epub, rtf, txt, html; Supported output format: mp3, aiff. Audio equalizer for mac os. Getting tired of reading eBooks on your Kindle, iPhone, iPod or MP3 player?
10.11 Guides
10.10.3 Guides
Plain App Store Installer Hackintosh Full Tutorial Covers all OS X versions since 10.7 to the latest release. Download the new EFI partition manager Mt. EFI and installation assistant tool qlover note. Fusion Drive setup tutorial, system optimising, various trouble shooting and much more.
10.10.1 Guides
Vanilla Kernel Hackintosh Full Tutorial Installation assistant qlover note now out of beta. Covers all OS X versions since 10.7 to the latest release. Fusion Drive setup, system optimizing and much more.
10.10 Guides
Vanilla Kernel Hackintosh Full Tutorial Brand new tutorial. Contains installation assistant software that easily makes a USB installation disk based on Clover EFI boot loader. Covers all OS X versions since 10.7 to the latest betas and DPs, Fusion Drive, system optimizing and much more.
10.9.5 Guides
Vanilla Kernel Hackintosh Full Tutorial Brand new tutorial. Contains installation assistant software that easily makes a USB installation disk based on Clover EFI boot loader. Covers all OS X versions since 10.7 to the latest betas and DPs, Fusion Drive, system optimizing and much more.
10.9 Developer Preview Guides
10.8.4 Guides
10.8.2 Guides
Easiest way to Install Mountain Lion 10.8.2 On Any Intel PC | Techable (Bootable USB Install Disk Method)
Install OSX 10.8 on PC (upgradeable to 10.8.2, 10.8.3) (Easy)
10.8 Guides
Install Mountain Lion 10.8 on PC Vanilla Installation Guide
Install Mountain Lion 10.8 in VMware Window Host Only for Intel processor
Install OS X 10.8 Mountain Lion on PC Hackintosh (Bootable USB) Runs on ANY PC, Easy Guide
10.7.5 Guides
HP ProBook 4530s Installation Guide Based on myHack, should be fairly beginner-friendly. Requires existing Hackintosh or real Mac.
10.7.4 Guides
Vanilla Kernel Hackintosh Full Tutorial Hardware recommendation list for motherboard, CPU, graphics card. Includes trouble shooting for known issues.
10.7.3 Guides
Vanilla Kernel Hackintosh Full Tutorial Hardware recommendation list for motherboard, CPU, graphics card. Includes trouble shooting for known issues.
10.7.2 Guides
Vanilla Kernel Hackintosh Full Tutorial Updated to Post iCloud Edition with 2 additional chapters. New hardware recommendation list for motherboard, CPU, graphics card now available.
Install Lion 10.7.2 on your PC Osx86tutorial hackintosh universal tutorial. (laptop Desktop)
Install Lion 10.7.2 on your PC with DVD preparation Guide with video. (How to build a Mac OS X PC. In Greek (howtomacospc.wordpress.com)
Complete Installaton guide for Lion 10.7.2 Installation Guide for Gigabyte 35/45 mobos, software included.
OS X Lion on VMware Install Mac OS X Lion on VMware Player or Workstation
10.7.1 Guides
Vanilla Kernel Hackintosh Full Tutorial from Snow Leopard install, Lion 10.7.1 upgrade with Software Update.
10.7.0 Guides
Install Mac OS X Lion 10.7 on PC First guide for Installing OSX 10.7 Lion.
Vanilla Kernel Hackintosh Full Tutorial from Snow Leopard clean install, Lion upgrade, etc FULL instruction.
10.6.8 Guides
How to upgrade from 10.6.6 to 10.6.8 A guide brought to you by Testing Grounds
Install MAC OSX 10.6.8 on Toshiba M-305 First guide for Installing OSX 10.6.8
10.6.7 Guides
Clean 10.6.7 install via 10.6.6i Hazard or VMware image Guide for a Pentium 4 Dual and AsRock G31M-GS-R2
10.6.6 Guides
Install Mac OSX Snow Leopard 10.6.6 VMware on Windows PC Ready-made image, get started in minutes
Clean 10.6.6 install via 10.6.6i Hazard or VMware image Guide for a Pentium 4 Dual and AsRock G31M-GS-R2
How to Build a Hackintosh Very detailed installation guide, written on 17 pages
10.6.5 Guides
How to install Snow Leopard 10.6.5 update on Vmware/Virtualbox Short video guide using 2 available downloads
How to install 10.6.5 on a Dell mini10v (1011)
10.6.4 Guides
How to install Snow Leopard Retail on PC without hack! its so easy..
The Pirate EFI-X (Intel-based) include Post-Installation Tools
Testing Grounds Snow Leopard Guide Extremely thorough in-depth guide (with pictures) of Snow Leopard on a PC. Showcases both boot CD and thumbdrive methods.
In-depth Installation Guide for PC with Triple-booted Windows 7 64-bit, Mac OS X Snow Leopard and Ubuntu 10.04 Using GRUB bootloader (bigfloppydonkeydisk Blog).
Guide for Using 'myHack installer' with additional custom kext files
Complete Installation Guide for HP dv5 Using iBoot + Multibeast
10.6.2 Guides
How to install OS X on VirtualBox the easy step by step way A short simple video giving step by step instructions to installing OS X 10.6.2 on Virtualbox.
How to install OS X on Vmware the easy step by step way A short simple video giving step by step instructions to installing OS X 10.6.2 on Vmware.
10.6.0 Guides
Install Snow Leopard in VMware Window Host Only for Intel-Based Machines
Install Snow Leopard 10.6 on AMD PC Hackintosh easy guide for AMD
Install Snow Leopard 10.6 on AMD PC Hackintosh Easy guide for all AMD machines
Triple boot (MS Windows 7, Linux Ubuntu 10.10, Mac OS X 10.6) With Chameleon bootloader, tutorial and files download included
Existing Leopard Method Using an existing Leopard. install and a separate partition for Snow Leopard, install Snow Leopard
How to install Snow Leopard 10.6 on DELL Latitude D630/D630C File and tutorial available
Mac How articles
How to install guide for Dell mini10v (INSPIRON mini) Files and easy to follow tutorial
Video: How to build your own USB pen drive How to create a USB OS X 10.6 installer for a new HD install. Screencast and files
Video: Install on an Asus P5 series motherboard Starting from an existing 10.5 HD. Screencast, files and tutorial all in one place
Using 'myHack installer' with additional custom kext files Using myhack installer for basic installation + additional self-choosen kext files (use for new undocumented hardware)
10.5.8 Guides
Samsung N120 install using iATKOS v7.1 DVD. Step-by-step guide for complete beginners.
10.5.7 Guides
Mac Os X Iso Pc
HP DV1000 Step-by-step clean, works with similar models. DV1XXX
10.5.6 Guides
Mac OS X Leopard Retail Installation Simple Guide Simple and easy for beginners
DD's script for the Gigabyte GA-EX58-UD5 i7 motherboard Newest version (not documented here yet) supports Snow Leopard 10.6 too. .
OSX Leopard 10.5.6 Install with iPC Step-by-step for complete beginners.
10.5.5 Guides
OSX Leopard 10.5.5 Installation Guide For Complete Beginners A step by step guide with many pictures and details.
10.5.5 on the Dell Inspiron/mini 9 Guide for 10.5.x to 10.5.5 on the Dell Inspiron/mini 9
10.5.2 Guides
Make Coriolis Systems DVD boot on hackintosh machine . This guide helps you to patch Coriolis System DVD (iPartition) to boot it on a pc, to resize, remove, and re-partition your disk.
Install 10.5.2 on an AMD nForce4 A8N This install uses Kalyway 10.5.2 AMD / Intel and is designed to be very step-by-step .
Install 10.5.2 and XP on the same hard drive (INTEL ONLY) Easy-peasy beginners' guide. Uses Kalyway 10.5.2 and shows how to partition your drive in simple steps
10.5.1 Guides
iAtkos v1.0i Leopard 10.5.1 on AMD! Also includes dual boot help! Uses iAtkos Leopard v1.0i
10.5.0 Guides
NauGHTiBeaTZ's How to Install Mac OS X 10.5 on an Intel Pentium 4 Simple Guide on using Kalyway's bootable disc to make a bootable hard disk for Leopard. Kalyway's disc also works for previous versions of Mac OS X. Download and print all 4 pictures
10.4.9 Guides
10.4.9 10.4.9 Installation Guide Install 10.4.9 on your AMD or Intel computer. This guide now includes instructions to update the kernel to 8.9.1.
10.4.8 Guides
Quad Booting: XP/Vista/OSx/Linux A comprehensive guide on quad booting.
How to Create a Simple Dual Boot System (Win XP/Mac OS 10.4.6/10.4.7/10.4.8) A simple guide on how to get dual booting working.
Tiger on Asus EeePC This guide shows how to install Mac OS X Tiger, on an Asus 701 Eee PC.
OSX86 10.4.8 PC Installation Guide How to install OS X on a PC, A step-by-step with pictures.
10.4.5 Guides
Mac OS X86 10.4.5 Installation guide This is a installation guide that should be used if you are starting from scratch with a myzar's DVD.
VMWare -> Native (Video) Using myzar ISO for AMD and Intel systems. In English and Spanish.
Install Mac OS X Tiger on Intel with Myzars Dual Boot with Windows Vista included.
10.4.4 Guides
10.4.3 Guides
Install and Configure OSx86 This is a start-to-finish guide for 10.4.1 with 10.4.3 notes appended.
10.4.1 Guides
International Guides
Please don't put Google or other translated guides in this area. This is for native language guides, please add translations beside your own guide
Bulgarian
French
Installation guide in French Guide d'installation en français de l'image VMware 'deadmoo' sur disque dur. Convient pour les débutants.
German
Installation guide in German Deutsche Anleitung zur Installation des 'deadmoo' VMware Images auf einer Festplatte. Auch für Anfänger geeignet.
Greek
Complete Installaton guide for Lion 10.7.x Installation Guide for Gigabyte 35/45 mobos, software included.
Installation guide in Greek (OS X x86 10.4.7 και 8), Απλος οδηγος εγκαταστασης στα Ελληνικα
Upgrade guide in Greek (OS X x86 10.4.8 σε 9), Οδηγος αναβαθμισης στα Ελληνικα
Installation guide in Greek (OS X x86 10.4.6), Wiki guide in Greek Οδηγίες εγκατάστασης και Wiki στα ελληνικά
Install MacOS X Snow Leopard 10.6.x & 10.7.x to GA-EP35-DS3P, 8800GT. Αναλυτικές οδηγίες εγκατάστασης Mac OS X (10.6.x και 10.7.x) σε PC και updates. (howtomacospc.wordpress.com).
Hungarian
Installation guide in Hungarian(10.4.4-10.4.7) Magyar telepítési útmutató és wiki
Indonesia
Installation guide in Bahasa Indonesia (Mac OS X 10.5.6 Retail) Gampang banget teman. :D
Installation guide in Bahasa Indonesia (Mac OS X 10.6.3 Retail) Dengan menggunakan Pirate EFI-X Boot CD dari osx86 Indonesia
Upgrade guide in Bahasa Indonesia (OS X x86 10.6.4) Hayooo kita Update
Portuguese-BR
Instalação IDeneb 10.5.6 Guia em Português do Brasil para instalação do IDeneb - MacOSX Leopard 10.5.6
Polish
Spanish
Instalación OS X 10.9 Mavericks con MyHack
Guia de Instalación Leopard 10.5.1 en Español Guia de instalación de Leopard en una PC
Turkish
Installation Guide in Turkish (for OSX 10.4.6) Türkçe MacOS x86 Kurulum Rehberi
Update Guides
Update guide for Leopard 10.5.x Update your 10.5.4 leopard
USB Drive Installation Guides
USB External Drive Installation.9 step guide .
Simple Video tutorial .
VMware Install Guides
Install OSX 10.6 on VMware Video How to easily install OS X 10.6.2 on VMware.
Mac OS X 10.4.8 VMware-only Installation Guide Guide to installing Mac OS X 10.4.8 on VMware Workstation 5/6. Intel/AMD SSE2 or SSE3. Uses JaS Mac OS X 10.4.8 Intel/AMD SSE2 SSE3 PPF1 + PPF2 DVD.
Install Mac OS X x86 10.4.5 on VMware 5 Simple guide to installing Mac OS X86 10.4.5 on VMware.
Install Deadmoo OSx86 on VMware How to easily install Deadmoo OSx86 on VMware.
Mac Os X 10.5 Leopard Pc X86.iso
Dual Boot
Booting Mac OS X, Windows 7 and Ubuntu from a Custom-Built PC A how-to on installing OS X, Windows (and optionally Ubuntu) using iBoot and MultiBeast or grub (from hcetech's blog).
Triple-boot Windows 7 64-bit, Mac OS X Snow Leopard and Ubuntu 10.04 Using GRUB bootloader (bigfloppydonkeydisk Blog).
Dual boot leopard and xp (Nederlands)(Dutch) '[Dual boot xp of Vista en leopard 10.5.1 op de zelfde harddisk ] kan het nog makkelijker
How to create XP/Vista/OSX/Linux bootloader without any scripting Use the easyBCD tool to add osx or linux partitions to your vista bootloader in one click!
How to Create a Simple Dual Boot System (Win XP/Mac OS 10.4.6/10.4.7/10.4.8) A simple guide on how to get a dual boot running in less than 25 minutes!
How to dual boot OS X with Xp and any other operating system An extremely simple guide on How to dual boot OS X with Xp and any other operating system.
Triple booting Windows, Linux, and OSX86 A guide on how to get a triple boot up and running.
Multibooting Uses CentOS and Grub.
Use Multibooting Reference Shows how to use WinGrub in place of Grub according to above article.
Install on a Partition, Simple and Accurate Start with this one if you want to install. (Video on How to dual boot XP & Mac OSX)
Native Hardware (after installation)
Mac Os X For X86 Iso 32-bit
Laptop Install w/ home-made dongle This is a forum link regarding laptop install problems, especially blue screens at boot. An external monitor is needed, or if you have none, this describes making a dongle that will pacify the OS.
Retrieved from 'http://wiki.osx86project.org/wiki/index.php?title=Installation_Guides&oldid=72342'
This page was last modified on 7 July 2020, at 17:18. This page has been accessed 9,622,876 times.
0 notes
Text
LimpiarMiMac | Iatkos el capitan dmg http://bit.ly/2yhhl0y http://bit.ly/2fOrmFx
#Mac Iatkos el capitan dmg http://bit.ly/2yhhl0y http://bit.ly/2fOrmFx
#Mac Iatkos el capitan dmg http://bit.ly/2yhhl0y http://bit.ly/2fOrmFx
— Eva Rodriguez Dereck (@EvaDereck) October 14, 2017
Via Twitter https://twitter.com/EvaDereck October 14, 2017 at 02:10PM
0 notes
Link
Acer Aspire comes wіth a 13.3 inch cover, a 320GB hard drive, a Core i7 processor, 4GB οf RAM аnd Windows 7 Home Premium. Acer Aspire S3 іѕ thе initially Ultrabook frοm Acer. It іѕ a well known fact thаt solid state drives hаνе аn skill tο increase a computer’s performance аѕ compared tο a device whісh hаѕ аn ordinary spinning drive. Thе nеw S3 comes wіth a solid state drive whісh ensures іtѕ ехсеllеnt performance.
31 notes
·
View notes
Text
FUCK FUCKITY FUCK FUCK FUCK
so i totally installed mac on my pc last night, it works ok, but i cant get my hardware acceleration for my geforce 9800 gt >:(
A:KLSFH:KOAJHEFPAQHFPWOMAW{OFIA{OWDM{AQDFIWM{AOWFMOAIWMNF{OIAWMF{\
OAIWMF{OIAMWF{OIAMWFO{IAMWF{OINAWF{ON
FUCK!
wat do?
12 notes
·
View notes
Text
Installer MacOS X en VM avec VirtualBox
Bonjour à tous!
Petit tuto marrant du Week-end pour vous apprendre à installer une machine virtuelle MacOS X sur VirtualBox, sous Windows 7 (ici) ou sur une version Linux de VirtualBox.
Utilité : Je me suis souvent demandé quelle utilité je pourrais avoir d'un système MacOS X sur un PC, tout simplement car en tant que développeur, le seul intérêt que je trouve aux systèmes Mac, c'est leur autonomie et leur design (et qu'en tant qu'utilisateur ultra-satisfait de l'iOS, je suis un peu devenu AppleFanBoy), mais en ce qui concerne mes applications professionnelles, ça restait assez vague (Windows me permet de développer du "tout public" et linux fonctionne de manière plus rapide, un troisième système me paraissait assez inutile). Au final l'utilité principale est de pouvoir procéder à des tests de compatibilités, et de porter sur MacOS certaines applications développés en C/C++ initialement pour Windows et Linux. De plus, pour les plus fourbes d'entre vous, l'utilité de cette partition peut être justifié par la création d'application pour iOS (iPhone, iPad, iTouch...), même si le coté officieux des versions Hackintoch posera certainement un problème lors de l'acquisition du SDK. L'utilisation VM est aussi conseillé dans le cas où vous n'auriez pas envie de galérer avec la création d'un système en Dual Boot Windows/Linux-MacOS X, qui est relativement complexe à mettre en place.
ATTENTION : Les versions hackintoch sont par définition illégales. Par conséquent vous êtes seuls responsables de ce que vous faites. Personnellement je m'amuse à faire ça par défi. Par principe, je vous conseillerai quand même d'acheter un Mac si vous voulez vous lancer dans la production avec votre Mac, que ce soit d'un point de vue légal, éthique, et même de performance, car il faut bien l'avouer, il n'y a rien qui tourne mieux qu'un MacOS X sur un MacBook :). Et ne comptez pas sur moi pour vous donner des liens pour télécharger les images hackintoch.
Pour commencer, il vous faudra forcement donc :
-Virtual Box. J'ai utilisé la 4.1.2.
-Une image .iso d'un hackintoch (iPC, iDeneb, iAtkOS etc...)
-Au moins 20Go de libre sur votre disque dur (pour créer un disque virtuel VM contenant MacOS X)
-Au moins 2Go de RAM sur votre PC, 4Go conseillé, surtout si vous tournez sous Windows 7 ou Windows Mierda Vista (Arg!).
Aller hop, c'est parti.
Donc, une fois VirtualBox installé, vous allez créer une nouvelle machine (bouton "Créer". Donnez lui le nom que vous voulez, et selectionnez "MacOS X" comme systèmes d'exploitation, et "MacOS X serveur" comme version.
Ensuite, choisissez la mémoire dédiée à votre VM. Personnellement, j'en donne un peut moins de la moitié de mes 4Go (1920Mo) par sûreté pour mon système parent.
Après, il va falloir créer un disque dur virtuel, pour ça VirtualBox est doté d'un très bon utilitaire, qui une fois l'option "créer un nouveau disque dur", il va vous permette de configurer le disque. On sélectionne VDI, et ensuite, c'est à vous de voir :
-Dynamiquement alloué : Votre disque virtuel prendra plus ou moins de mémoire par rapport aux quantités de données qui seront contenues à l’intérieur, i.e. à sa création, il pèsera quelques kilooctets, mais si vous installez un système de 10Go dedans, et bien sa taille va évoluer vers les 10Go.
-Taille fixe : Lui, il est à 20 Go des le départ. C'est pour les gens prévoyants qui ne veulent pas avoir un truc évolutif qui pourrait flouer leurs pronostics de "combien de place il me reste pour DL mon pr0n".
Bref, après on choisis son emplacement et sa taille, vous pouvez vous permettre de vous en tenir à 20Go, c'est amplement suffisant.
Une fois le disque créé, Il vous proposera de créer et de finaliser la création de la machine virtuelle.
Cliquez-droit sur la machine et choisissez "Configuration", là dans le menu "Système", il faut décocher "Activer EFI", et cocher "Horloge interne en UTC". Ces deux petites options sont capitales. Si ce n'est pas fait, le système pourra s'installer, mais pas se lancer après.
Petit plus : Si vous êtes détenteurs d'un processeur Multi coeur, vous pouvez aller dans l'onglet "Processeur" de "Système", et placer le curseur sur 1, 2, 3, 4 ou plus (chanceux).
Ensuite, allez dans le menu "Stockage", et cliquez sur l'icone de CD dans l’arborescence "Contrôleur IDE". A droite, dans "Attributs," cliquez sur l'icone de CD, et montez votre image hackintoch.
Voila, maintenant, il n'y a plus qu'a lancer votre machine, en double-cliquant dessus. Normalement, le bios, puis le CD virtuel va se lancer, et il faudra donc suivre les étapes d'installation de MacOS X. N’hésitez pas à vous reporter à la doc de votre distribution en cas de question. Une fois l'installation terminée, la VM va redémarrage. Je ne me souviens plus si il faut démonter l'image CD pendant le reboot (dans la config), si c'est le cas, le boot va boucler sur l'installation de toute façon, et il faudra donc démonter le CD.
Bref, votre système va se relancer et Tadaaa, vous avez votre MacOS X fonctionnel.
Personnellement j'ai utilisé iDeneb v1.6, et il gère bien les périphériques réseau de VirtualBox, ce qui permet de ne faire aucune config pour accéder à internet.En revanche, je suis cloîtré dans une configuration graphique 1024x768, mais je n'ai pas vraiment cherché pour le moment à aller plus loin dans la config, vu l'utilisation ultra restreinte que j'envisage pour mon OS X.
Enjoy!
6 notes
·
View notes
Text
Hardware Compatibility Information OSX Mavericks 10.9.1
Processor (CPU): 1st, 2nd (SandyBridge), 3rd (IvyBridge) and 4th generation (Haswell) Intel Core i series processors are supported including 2011 socket SandyBridge-E/EN/EP and IvyBridge-E/EN/EP Core i7/Xeon cpus. Simply, Core2Duo / Core2Quad / 1st, 2nd, 3rd and 4th Generation Core i3, i5, i7 / Xeon 3xxx, 5xxx, 6xxx, 7xxx, E3, E5, E7 processors are supported. [AMD processors are not supported.] Motherboard: Most of UEFI/Non-UEFI Intel chipset motherboards are supported. Simply, chipsets from 945G to C6xx are supported. Common chips are 945, 965, 975, P35, P43, P45, P55, G31, G41, G43, X58, H61, HM65, HM67, H67, P67, Z68, Z77, X79, Z87 and C6xx. South bridges from ICH5 to newest Intel 8 Series are supported. (ICH5-6-7-8-9-10, 5-6-7-8 Series) Graphics (GPU): Intel Graphics HD 3000, HD 4000 and HD 5000 are supported, the rest are not. HD 5000 driver supports HD 4200, HD 4400, HD 4600, HD 5000, HD 5100 and HD 5200.
Nvidia vga cards from G80 core to the newest Tesla series are supported on 10.9.1. This does not mean that all of them will work of course but most of them will work. Simply, nvidia 8xxx / 9xxx / 1xx / 2xx / 3xx / 4xx / 5xx / 6xx / 7xx cards are supported. About ATI, Mac OS X 10.9 and Clover bootloader gives us more hope and less pain about ATI support. Simply, ATI 7xxx/6xxx/5xxx/4xxx chipsets are supported but of course still more pain and less success comparing with nvidia. iATKOS M has some options for ATI's including device_id injection and framebuffer override packages to make more of the ATI cards work with less pain. Still, many of the users may have to take some additional steps to use their ATI cards after installation. Network Devices: - Common wired and wireless network devices that are auto-detected by iATKOS M. There may still be problematic chips but most of them will work OOB with iATKOS M. Wired: - Intel Gigabit and Intel Pro/100 - Realtek RTL8111, 8168, 8101E, 8102E, 8131E, 8169, 8110SC, 8169SC - Atheros AR8121, 8113, 8114, 8131, 8151, 8161, 8171, 8132, 8152, 8162, 8172 - Broadcom BCM5722, 5752, 5754, 5754M, 5755, 5755M, 5761, 5761e, 57780, 57781, 57785, 5784M, 5787, 5787M, 5906, 5906M, 57788, 5784M - Marvell 88E8035, 88E8036, 88E8038, 88E8039, 88E8056, 88E8001 Wireless: Some chips (ie. Atheros ar5008, Broadcom BCM4311) are natively supported by OS X. So, this is not the complete wifi support list of OS X. - Atheros AR9285, 9287, 9227 - Broadcom BCM4312, 4321, 4322, 43224, 43225, 43227, 43228, 4352 (Some of these broadcom chips need rebranding in order to work on OS X.) RAM: Recommended minimum amount of RAM is 2GB. Sound: Sound device is auto-detected and nearly all of the onboard sound devices are supported. Disk Space: Recommended minimum amount of disk space for installation is 15GB. (Software RAID installation is supported and all operations are automated for all of the bootloaders.)
1 note
·
View note
Text
Mac en Pc? Ahora es posible con iATKOS ML2

Casi todos conocemos la elegante linea de computadoras Mac de Apple, se destacan por su diseño perfecto, por sus altos precios, pero principalmente, por su aclamado Sistema Operativo: Mac OS X, un SO que no le envidia nada a sus competidores, de interfaz simple, elegante y limpia que enamora a mas de uno, pero no muchos pueden tener una Mac, principalmente por sus precios altos, lo que decepciona a muchos y optan por utilizar Windows o Linux.
Luego de esto, surge la interrogante: ¿Es posible ser usuario de Mac OS X sin gastar una gran suma de dinero? Si, es posible gracias a iATKOS, un proyecto para instalar Mac OS X (10.4 en adelante) en un equipo cualquiera que no sea fabricado por Apple. En simples palabras: es un proyecto ideado para correr Mac en una PC de cualquier fabricante, y todo esto, sin ningún costo adicional, y ahora, con los tutoriales publicados por Zox en su blog personal y en GP, instalar el SO sera una tarea fácil.
El tutorial esta constituido por las siguientes partes:
Preparación e Instalación
Post-Instalacion
Dual-Boot
Solucionar Problemas de Apagado con Windows 8
¡¿El scroll funciona al Revés?!
NTFS y Mac, Esos grandes desconocidos
1 note
·
View note