#idk if the file i used for these was a ts file or not but since i still had to crop them in ps i don't think they went thru vs at all jsdfj
Text


(240209) dOpamine - KB
#flashing#onlyoneof#kb#shin kyubin#lyonet#kpopstages#kflops#malegroupsnet#* my gifs#nkd.gif#ooo.gif#ooo.kb#okay these are okay quality wise BUT they're also a milestone for me because i figured out gif panning#but i use photopea not photoshop so i had no tutorial just math and stubbornness :P and i'm super excited abt it!!#it's not that hard you just have to calculate how many pixels it takes to reach your start motion to end motion then figure out what#interval to move your frames by. and you have to do it pixel by pixel naturally#but it's really not that hard!! a little time consuming. but now that i know how i'm sure it'll be a little faster in the future#anyways it's bottom left in this set that i panned and honestly i can barely tell so i consider this a WIN#the only reason you can really tell (imo) is because his features blurred a little during the motion and obvs that's kept even if you pan#anyways this footage was 4k but it also sucked a little idk. no i've never touched a ts file in my life i have no access to them and failed#my own searches. but noentheless i'm done rambling. if you read all this hello o/
43 notes
·
View notes
Text

hoshi ⟡ egotistic ⟡ 191231
#flashing tw#svt#seventeen#svtcreations#hoshi#kwon soonyoung#n.gif#g:svt#m:hs#pls let's pretend these match <3#i had these saved as individual psds on my laptop#smth i never got around to giffing#idk if the file i used for these was a ts file or not but since i still had to crop them in ps i don't think they went thru vs at all jsdfj#i don't remember lol#anyway tried these out to play around with coloring <3
174 notes
·
View notes
Text


sweet venom for studio choom
#enhypen#enha#sweet venom#studio choom#jungwon#jake#jay#sunghoon#heeseung#sunoo#ni-ki#still experimenting with sharpening esp with these performance vids bc idk where to get ts files anymore & i am lowkey scared of viruses JA#era: orange blood#oc#note to self use .05 not .06 next time#ot7
16 notes
·
View notes
Text
i kinda wanna get into trading photocards but im too lazy ship stuff. i need someone to invent teleporters or meet me irl in a back alley to carefully exchange lil pictures of hot people w/ me
#also i think a lot of trading goes down on twitter and i have no desire to increase my twitter usuage#i only use twitter to find ts files which is already too much#also idk why physically driving somewhere to meet a stranger sounds easier to me than packaging and shipping a small package but whatever#emily speaks
1 note
·
View note
Text
Full giffing process - tutorial (*≧ω≦*)

Due to little demand, i will be going thru my complete process for making gifs. so this will cover all the basics i hope! keep in mind this is just the way I personally do things! please feel free to send me asks or dms if you have any doubts or questions!
☆☆☆☆☆☆☆☆
DISCLAIMER: Everything I know about giffing, I've learned from other tutorials, including the VapourSynth Resources I'll be using in this tutorial so I'll leave links to those tutorials I've used here as well!
In Depth Giffing Tutorial (link here)
How to use VapourSynth (link here)
☆☆☆☆☆☆☆☆
(o´▽`o) I'm a windows user so idk if this works exactly the same on mac!
First things first, you will need:
☆ 4k video downloader (download it here!)
☆ Vapoursynth (32bit download / 64bit download)
☆ Photoshop (download it here! -64bit version only)
Okay! The first thing you need to do is make sure you're working with the highest quality material possible to ensure a decent looking gif!
I'd say the minimum quality needed for decent gifs is 1080px. But if you really want to gif that low quality 2 frame milisecond of your fave, i respect that
☆ lives / streams and tiktoks are typically not very high quality
☆ for stage performances such as music shows, ts/tp files are preferred but those can be really hard to get a hold of (this is a whole deeper level of giffing hell and more of an advanced class topic so nevermind this for now!)
☆ those occasional 4k facecams on youtube work fine tho!
☆ for mvs, variety shows etc, you can download the video with good quality from youtube using 4k video downloader
_(:3 」∠)_
Now let's talk about tumblr and it's pre-requisites for a good looking gif post :D
Tumblr can be sooooo annoying about gifs okay.... I find it's best to plan my whole set before I actually start doing anything but hey that's just me. Some things to keep in mind are: dimensions, file size, number of frames and post layout!
☆ Dimensions
You have 3 main options here and it's all about the width!
☆ 1 collumn: single gifs! these should be 540px wide
☆ 2 collumns: split that in half! 268px wide so there's a lil breathing space between the gifs!
☆ 3 collumns: 3's a party! 177px for each gif please
You can go crazy on the height but the width should mostly stick to one of those 3 unless you want tumblr to pull and squeeze your gif around like a piece of gum.
☆ File Size
This is really important because tumblr has a single image size limit of 10mb. Which means that every single gif you make has to be under that size or you won't be able to post it. The other thing about this is that the dimensions, number of frames and ammount of varying colors throughtout your gif will greatly impact on the final file size. Basically, the larger the dimensions and the more frames it has, the bigger the final file will be. Later on I will show you how to check your gif's final size before exporting it!
☆ Number of frames
This has more to do with the length of your gif, the longer it is, the bigger the final file will be. Typically gifs should be under 3 seconds long. So if you are making a set, try to break the moments you want to include in your set by increments of up to 2 - 3 seconds each, otherwise it might not fit all into one single gif. The number of frames is also extremely important when making combined gifs but that's for another tutorial.
☆ Post layout
If you want to make a cool looking gifset (where some gifs are larger in dimension than others, or when you want to have a single gif followed by a line of 2 gifs next to each other), then it might be worth it to plan out the layout before you start making the gifs. This way you ensure you won't have to remake gifs down the line because they don't fit together the way you wanted to.
☆ミ(o*・ω・)ノ
Timestamping
For this step, you will go through the video you want to gif from and you will just write down all the sections you want to use, down to the exact seconds. Example: 02:30 - 02:32.
(^◕ᴥ◕^)
VapourSynth (VS) - Clipping the video
I know VS can look pretty intimidating with it's bare coding and all but I promise it can be your friend. You just have to set it up correctly and pay close attention whenever you're using it. This software is a must for giffing, it will do all your cropping, resizing, sharpening and denoising for you, making sure your gifs look good. It is also indispensable when giffing ts/tp files because it deinterlaces those files so you can clip them.
First, let's set it up. This is the most annoying and difficult part of this tutorial so make sure you pay full attention to every single step!
☆ step 1) download a version of VS here (link).
☆ step 2) unzip the file on your desktop area.
☆ step 3) open the folder and find the file named "vapourscript (drop video file on me)" - make a shortcut of that file and move it to the desktop.
☆ step 4) find the folder named "gifs" - make a shortcut of that file and move it to the desktop.
☆ step 5) drag your video file you want to gif from and drop it on top of the "vapourscript (drop video file on me)" shortcut on your desktop.
☆ step 6) enter the timestamp input, in the first line it will be the starting of your timestamp, in hours format, then hit enter. in the second line enter how long your timestamps lasts, in seconds, also in hours format. then hit enter and let the code run.
☆ step 7) the resizer tab should now load on a web browser, then you will set the dimensions of your gif on the top left corner. you can also adjust the position of your gif within the video screen and zoom in if wanted.
☆ step 8) choose the preprocessor, denoise and sharpening options on the left and tick the boxes on. I usually just stick to the settings i'm using in my video down below.
☆ step 9) now in the VS box, go to file > load, choose the script saved in the gifs folder.
☆ step 10) copy the code from the resizer into the code in the vs screen, under the designated line.
☆ step 11) alter the code exactly like I did in my video down below. save it. this is now your default vs script for clipping your gifs. what you are doing by adding the hastag and the quotation marks is you're disabling those sections of the code. the reason you do that is in case you want to run the preview before exporting. this is because those lines involve some heavy graphic processing which can make the computer slow. I will talk about the script in more detail later on.
☆ step 12) i don't usually use this option but you can also preview your gif and set specific frames to start and end your gif. This is around the 4:30 mark in the video.
☆ step 13) time to export your clip! now you will temporarily remove the marks you added to disable the code and then go to script > encode video. in the popup box, you will select the option "export to MOV", then start so that you can use that video file in photoshop later.
☆ step 14) after you are done exporting, close the encoding box and then close vapoursynth, never agree to save the script when closing it, or that will override your default script.
☆ step 15) now you need to rename the encoded file for your gif. go to the gifs shortcut folder you created on your desktop, then go to output. this is the folder where VS will save all your encoded files. but everytime it saves the file with the same name so you need to come to this folder and change the name for every gif file you encode before you clip a new one, otherwise VS will just replace the previous clip with the new one you just finished.
Here's a detailed walk through of each step in this video tutorial:
youtube
IMPORTANT
After you are done processing your first clipped file, now you have your default script already built in VS, so whenever you run it to clip more videos, this script will already be in your VS screen. So now all you need to do whenever you want to clip more files (to make more gifs) is to adjust the dimensions, positioning and zoom of the video in the resizer screen and then change a few numbers in your script! then run encode to save the clipped file.
☆ To make new clips: go thru steps 5- 7, also do 8 if you want to mess with the denoise and sharpening filters again, but I don't really know much about how those work so I can't help you with this.
Now what you need to alter in the code, each time you are making a new gif:
after you run VS and change the settings in the resizer to what you want, you need to change the zoom numbers and the video positioning in the code.
you need to replace the numbers in the VS script on the left so they match the numbers in the resizer on the right.
Do step 12 if you want to set specific frames to clip. Then steps 13 - 15 and you are done! You need to do all this every single time you want to make a new gif.
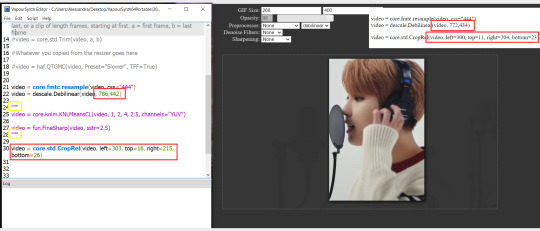
Now let me talk a bit more about some of the lines in this script:
☆ line 14: #video = core.std.Trim(video, a, b)
this line is to set specific frames to trim your video section, your final encoded file will be only the frames inbetween the numbers you input here. a = first frame, b = last frame. you will need to run the preview option in VS in order to see every single frame of your clip and select your first and last frame. I usually do this in photoshop later instead so I don't bother with it on VS unless i'm making combined gifs, in which you need all the clips to have the exact same number of frames. the hashtag at the beginning of this line means that the script won't follow this command when executed. so if you want to include it, you need to remove the hashtag before encoding your file.
☆ line 18: #video = haf.QTGMC(video, Preset="Slower", TFF=True)
this line is for the preprocessor option in VS, that tool is mainly only used when giffing ts/tp files because you need to deinterlace them before you can use them on photoshop. so you will only need to remove the hashtag and enable it when giffing those types of files. when im giffing those files, i usually always keep it with this setting:

I don't really understand much about this so I never mess with it. If you want to know more, I believe there's more info about it in the tutuorials I linked at the beginning of my post.
☆ line 22: video = descale.Debilinear(video, 786,442)
this line is for the zoom of the video screen. you just need to match what you have in your VS script to what you end up with in your resizer.
☆ line 25: video = core.knlm.KNLMeansCL(video, 1, 2, 4, 2.5, channels="YUV")
this line is for the denoising filters, in my case I always use KNLM and this is what it's line looks like. I know you can change those numbers to change the filtering settings but I never messed with it so I'd usually just have it like that.
☆ line 27: video = fun.FineSharp(video, sstr=2.5)
this line is for the sharpening, in my case I always use FineSharp and this is what it's line looks like. I know you can change the number to change it's settings but I never messed with it so I'd usually just have it like that.
note: lines 25 and 27 (which have to do with denoise and sharpening) are the ones within quotation marks in your default script. I believe the quotations work in a similar way as the hashtag, in which the script only executes the lines when the quotations are removed. Which is what you do everytime you are about to encode your clip, otherwise they stay on. I think you should also remove them if you want to test how they affect your gif in the preview screen but i think these filters also require heavier graphic processing which my computer can't handle well so I never do that.
☆ line 30: video = core.std.CropRel(video, left=303, top=16, right=215, bottom=26)
this line is for the positioning of your video screen within the gif dimensions. you just need to match what you have in your VS script to what you end up with in your resizer.
ʕ •̀ o •́ ʔ
Photoshop (PS) - let's make a gif!
Now that we have clipped and preprocessed our video file, it's ready to go to photoshop!
☆ step 1) after you have opened PS, go to File > Import > Video Frames to Layers. Then choose the clipped file you created through VS.
PS should open a box like this:
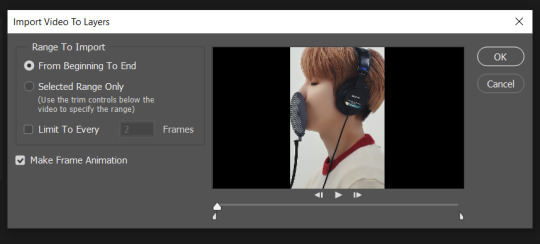
Keep those options ticked and hit OK
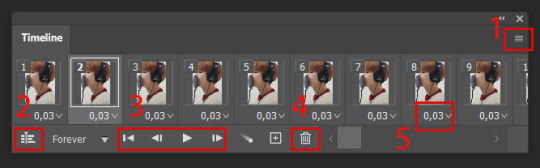
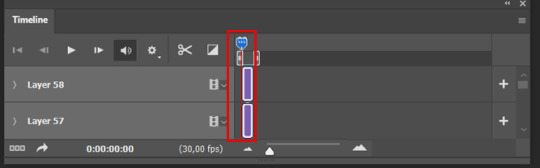
☆ step 2) now you need to go to Window > Timeline to bring up the timeline tool box. This window will always be necessary when making gifs. Let's take a look at it, I've marked down all the important buttons you will need:
timeline menu: there are several commands in here, you will need to use some of them later on.
convert to video / frame timeline
play controls to watch your gif
trash can to delete selected frames. (when deleting frames, first delete them here and then delete it's matching layers which are still there after deleting the frames)
frame delay time: this is where you set the time for how long that frame will be visible in your gif
☆ step 3) remember how I mentioned the preview option in VS and how i don't usually use it to trim the frames of my clip? That's because I usually do that at this step of the process, in PS. Notice how each frame is also a layer, and when a frame is selected, the matching layer has the eye symbol next to it turned on. So now you should play your gif and see if there are any frames you don't want to keep, then delete the frames and it's matching layers.
Since we applied sharpening filters back when we were clipping the video on VS, your clip should probably already look pretty decent even before the next steps, so steps 4 - 9 are optional. The coloring part of my video has been sped up.
☆ step 4) click on the timeline menu and select "Select all frames", then go to the select menu at the top of the PS screen and select "All layers". Now click on button 2 of the timeline at the bottom left, switching from the frame timeline to the video timeline.
☆ step 5) before you do anything else, make sure the blue holder is at the beginning of the track before you do anything else. Then go to Filter (at the top of PS) and select "Convert for smart filters". This will convert all the layers into one single layer.
☆ step 6) now make sure the layer is selected, then go to Filter > Sharpen > Smart Sharpen. A box will open with several options:
I usually keep the amount to around 30, I don't touch on radius and you can also mess with reduce noise if you think your gif is looking too sharp. Hit OK when you're done.
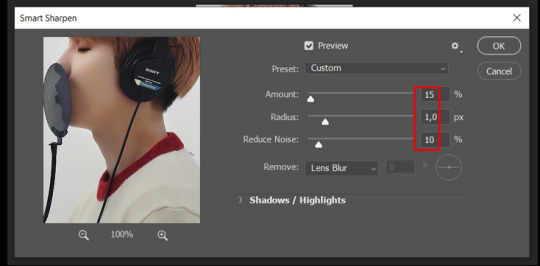
Since this is a filter applied to a smart object (the converted layer that contains all our layer - frames), this means you can turn this filter on or off as long as the layers are in the form of a smart object. You can also go back to it and alter it's settings (like I've done in my video down below)
☆ step 7) now while making sure the blue holder is still at the beginning of the track and the layer is selected, click on the timeline menu that i mentioned above. Then go to Convert Frames, then select Flatten frames into clips.
☆ step 8) again go to the timeline menu, Convert Frames, but now select Make Frames from Clips. Now click on the button at the bottom left of the timeline box, to convert the video timeline back into a frame animation. Then hit continue in the pop up box.
☆ step 9) now you are back to the frame timeline screen from before, but now the first frame is empty. You need to delete that first frame and then check the final frame because sometimes PS also creates another empty frame at the end at this point.
☆ step 10) PS also created a new layer under the layer 0, where the filter is still applied, you can delete this new layer as well. Now for organizational purposes, select all remaining layers (that contain your frames) and group them (you can see how in the video).
☆ step 11) This step is also optional, now I like to add the coloring to the gif. I have a separate tutorial exclusively on this topic. You can check it here:
☆ step 12) This is the time when I also add my signature. This is optional. You need to have the signature layer(s) on top of all the other layers. I usually have it in all black or all white, with lowered opacity of around 40%.
NOTE:
When adding elements (such as a signature) to a gif, it's important to always make sure you have the first frame selected, otherwise PS can move your newly added elements around the canvas on different and random frames. This also applies to anything in the layers pannel that has specific opacities. It's best to already add the elements with the final wanted opacity with the first frame selected.
Exporting + Delay time
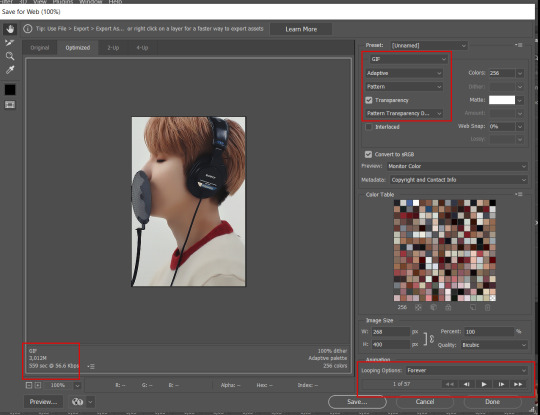
☆ step 13) To export: go to File > Export > Save for web (Legacy). PS will open this box:
First I just use the exporting screen to test the delay time of my gif, and to check the gif's final size.
About the size:
The final size is displayed at the bottom left. Remember it needs to be under 10mb. If it's above that, then you will have to go back and delete frames and test again until the size is within the limit.
About the delay time:
To test the delay time, hit that play button and the gif will play at it's default delay time. If it's too fast or too slow, you will hit cancel and change the delay time (at the next step).
For actual exporting:
The highlighted box at the top right of the screen is very relevant now. Make sure the first box has the GIF option selected. At the next box, you can select either perceptual, selective or adaptive. I usually like to use adaptive. At the next box you need to choose either diffusion or pattern. I like to use pattern. Tick the transparency box and then select either pattern or diffusion transparency dither.
Once you are satisfied with all aspects of your gif, hit save to export your final gif.
To fix the delay time:
After you have exited the export box, go back to your timeline, click on the menu button at the top right and select "Select all frames". Then, on any random frame, click at the small arrow next to the numbers under the frame. Select the option "Other". That will open a pop up box to alter the delay time. To test it again, use the export box explained above. Once you are satisfied, save your gif! I've also altered the delay time in my video to show you the process.
☆ step 14) After your gif is done and saved, I'd suggest to save your psd file if you added any coloring to it. This is so you can reuse the coloring later in other gifs without having to redo it all. This is useful if mking a set of gifs from the same moment / video.
Here's a detailed walk through of each PS step in this video tutorial:
youtube
I hope this tutorial is helpful! Feel free to send me any asks if you have doubts or need extra help! (つ≧▽≦)つ
183 notes
·
View notes
Text
♡ basic gif tutorial!

hiiiii!!! i've made a tutorial in the past but i thought i might update it with this tutorial (re an ask i got a few days ago)! please keep in mind that i'm far from an expert when it comes to giffing but i am open to clarification and further questions <33
DISCLAIMER! there are so many ways to make gifs! everyone has a different process, so don’t be afraid to deviate from this! also! feel free to send an ask for further clarification :)
1: converting !
one of the major issues when it comes to ensuring the best quality for your gifs is making sure that you’re using an application that maintains at least a 1080p quality of the video you use. it’s not a good idea to gif anything below 720p as the quality of the video and consequently, your gifs are not going to be the best!
i) choosing a video
if you’re going to gif, i’d recommend choosing videos that are hq!
✰ Stage Gifs
for stage gifs i use .ts files! it’s definitely easier to source a performance video from youtube, but they won’t provide you with the quality you desire. if anything, use youtube as a source for stage gifs as a last resort!
for ts files, you can use:
-> rosebay
-> twitter (search [group name] + [date of performance] + [ts])
i personally use rosebay for my seventeen performance gifs but other groups do have sites/blogs that are specific to them.
psa: kpop24hours are currently not taking in any applicants atm! best advice would be to follow them on twt and keep their notifs on in case they do
these sources (at least, rosebay) are easy and pretty self explanatory to download!
✰ Normal Gifs
for normal gifs (i.e. of interviews, behind the scenes, going seventeen, etc.) i use youtube <3 keep in mind that it’s always best to use the source most reputable to ensure quality. for example, if i were to gif an inside seventeen video, i would use the seventeen official channel’s post of that, not reposts or anything like that!
to download youtube videos, i use:
-> 4K Video Downloader!
ii) how do you download youtube videos via this application?
all you have to do is:
1) copy the link to the youtube video (PSA this application only works for converting youtube videos)
2) press the green plus button on the very lefthand corner at the top
3) a window that lists the options for the video quality you want will then come up.
4) if it offers 1080p, it is almost always best to choose that for optimum quality!
5) the video will then download and you’ll be able to access it via a folder labeled 4K Video Downloader in your files app.
2. resizing and sharpening !
personally, i don’t sharpen in ps unless absolutely necessary. for most of my sharpening, i leave it to vapoursynth.
now, vapoursynth is a massive pain to download and use but it’s worth it in the end (i promise!! i’ve cried over it a lot but i probably wouldn’t be happy with posting my gifs without it)
i personally found it a bit complicated to download vs so i’ll refer you to a tutorial i used (i also got help from some of my moots bc idk how to do anything so dw if it’s confusing :sob:)
i) how to use vapoursynth now that you’ve gotten it downloaded?
this is probably the hardest part of the tutorial (at least, in my opinion) :sob: for this example, i’ll be using my 4K Video Download instead of a vlive, so if you were using a vlive, you’d have your downloads folder open instead of the 4K Video one.
1) open your files folder twice, make sure that there are two windows open - one being the vapoursynth folder (for me, it’s called VapourSynth64Portable (200722) but it depends on which version of vs you download) and another being the 4K Video Downloader folder.
2) notice the different applications (?) within the vapoursynth folder. in particular, the vapourscript (drop video file on me) one. drag the video you want to gif from the 4K Video Downloader folder onto that app, and it’ll open up a new window. this window is the timestamp window.
3) in this new window, type in the length of the video you want to gif. i personally do this bit by bit (as in, i timestamp each gif instead of letting vapoursynth run through the whole video, which, in retrospect is probably smarter but i am a Fool). for example in the video i’m giffing, i want one of my gifs to run from 0:56-0:58 of the video. so i input the start timestamp. in my case, this would be 00:00:56. and then i press enter. this would direct me to put in the duration of the video i want to encode, which, in my case, would be 2 seconds (00:00:02).

4) press enter again! it’ll open up a window on whichever internet server you use (for me, this is chrome) with a bunch of options:

5) next, you want to alter all the options so that it becomes a gif of the size and sharpening you want.
psa: all of the things below are advised options! it’s completely up to you to choose what settings you use. don’t be afraid to experiment!
ii) resizing
-> to resize, you want to use the GIF Size option. keep in mind the acceptable sizes of gifs on tumblr! if you gif something of an incorrect size, tumblr will probably destroy the quality even more than it already does and make it incredibly blurry, and you don’t want that! to prevent this, make sure to refer to this helpful guide on gif sizes for ones you could use!
for this gif, i’ll be using a 540 x 450 size.
make sure to move your gif around so that everything you want people to see in the gif is there. you can even drag the gif out to zoom in, etc.
6) input the size you desire in the width x height sections next to the GIF Size option.
iii) preprocessing
-> this indicates how fast or slow vs will make your gif. for normal videos, i use qtgmc 30 slow and debilinear. however, i’ve seen in other tutorials that it should be different for performance gifs (i.e. qtgmc 60 slow and debilinear). however, this is all up to you and your preference! experiment, and see what works for you!!
for this gif, i’ll be using qtgmc 30 slow and debliniear.
7) select the speed and debiliniear options next to the processing title.
iv) denoise filters
-> this option basically acts to smoothen your gifs!i tend to use KNLM and have actually never used BM3D before, but feel free to choose the latter!
8) choose between KNLM and BM3D (next to the denoise heading), and select the tickbox that comes up underneath it.
v) sharpening
-> this is when you sharpen your gifs! and make them look less grainy than if you were using ps directly. i personally use finesharp, but again it’s up to you!
9) choose between finesharp and VCFreq, and check the tickbox that comes up underneath it.
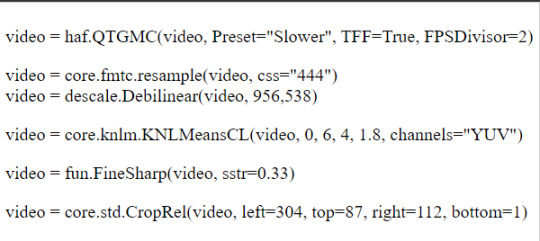
this is what my settings are like for this gif:

10) next! you need to alter the values for sharpening and denoise! this can be done on the coded box in the upper right-hand corner:

11) first, change the denoise filter value to whichever one you wish. for this gif, i will be using 1.8. this can be done by altering the “1.2” value in the row that has the text “video = core.knlm.KNLMeansCL(video, 0, 6, 4, 1.2, channels = "YUV”)
12) next change the sharpening value to whatever you want! for this gif, i will be using 0.33. this can be done by altering the “0.22” value in the row that has the text “video = fun.FineSharp(video, sstr=0.22).
the text box should now look like this with your altered values:
13) copy the text and you’ll notice that this window has opened on your taskbar. you will need to copy the text from here into this app - vapoursynth editor.
14) paste the text from that upper right-hand corner into the vapoursynth editor underneath the text #whatever you copied from the resizer goes here.
15) before continuing, depending on your laptop’s speed and ability to process things, i’d recommend lowering the RAM usage to something more bearable for your laptop to process without it overheating and getting damaged. i personally use 300 as the RAM usage but feel free to use whatever you want.
this is what your editor should look like now!

16) press f8 and it’ll open a new window. this will be where you get your edited video that will be good to put in ps and play around with. change the preset option to Export to MOV. and next to the header title, make sure to select Y4M in the dropdown menu. after this, you should be good to press start!
3. giffing !
now this is the part of the tutorial where you kind of get to do your own thing
i) importing
1) open photoshop and click on file, then import, and video frames to layers. it’ll open up your files.
2) what you want to do next is find the output folder. this folder can be found within your vapoursynth folder. that is:
vapoursynth64portable >> gifs >> output
3) click on the output folder and it’ll come up with another window:
make sure your settings are like this before clicking ok!
ii) actual gif making!
4) once you’ve clicked ok, it’ll direct you to the workspace. you will have the frames for your gif on the bottom and the layers on the right-hand side. i won’t go into the specifics for giffing since you asked for quality but if you’re looking for more specific instructions on how to actually gif, feel free to send in another ask or i can refer you to another tutorial!
i) timing
you can alter the timing by selecting all the frames and making it faster or slower - it depends on your preference!
ii) colouring
colouring is the foundation of your gif - it’s what makes it look good!! have fun with it, and try out different colouring! you could also look into using psds if you want! psds are basically pre-made colouring (filters, essentially) that you put over the top of your gif
5) once you’ve finished with the aesthetic steps of making your gif, it’s time to export! to export, you must click file >> export >> save for web (legacy). it’s up to you which export settings you use but make sure that your gif is under 10MB!
6) and voila <3 you’ve got a gif!

#not sure who wants this but this is re an ask i got a couple of days ago!#aria.gifs#aria.txt#userngocchi#tuserrose#hanatonin#isaishi#gif tutorials#tutorial
141 notes
·
View notes
Note
hello! i hope ur day is going well! im not really sure how to word this but ur one of my favorite gifmakers on this site!! and i was wondering if u have any tutorial or would be willing to tell how!! do u make ur gifs so sharp! along w being so smooth and gorgeous im foremost always just stumped at how beautifully sharp ur gifs r!! not to mention the coloring!! regardless of if u get to answer any part of ur process or not, i just wanted to tell you ur gifs r very very beautiful. im always so awed and admiring wnv i see them! so warm and prettily colored yet so sharp!! apologies for gushing here, pls have a good day!!!
AHHH THIS MAKES ME SO HAPPY, ANON! It always makes me so happy, when I get any kind of compliments on my gifs, so this really really really warms my heart!! ♥
I did a gif tutorial like 1,5 years ago which you can find here! My sharpening has changed slightly from back then, so I'll just tell you what I do now.

Much more detail under the cut (this got way longer and detailed than I had expected)!
This is a walk through of my sharpening/effect process, so if you want any tricks about colouring or anything let me know!
The first important step to sharp gifs is the video quality! The higher the video quality is, the prettier and sharper your gifs will be. TS files are the highest quality (most of the time, sometimes they kind of scam you ngl) files you can get. Else 4k videos are great too! For me I usually don't go under 1080p (with few 720p exceptions). Sometimes I don't really like TS files, because they're a bit too sharp for me. This is mostly if it's a variety show. Concerts tend to be not as sharp in my experience.
I use vapoursynth to resize my gifs before putting them in photoshop. I usually don't do any sharpening or denoise in vapoursynth. This site has everything you need for vapoursynth!
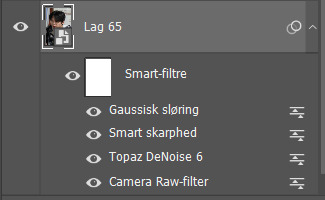
For sharpening and stuff in photoshop, I usually do camera raw + topaz denoise + sharpening + 1% blur at 30% oppacity.
A bonus tip is, if you've done everything and tried soooo hard to make it non-grainy, but you just can't get it to do whatever you want it to... embrace the grain and add a noise layer! I do this with big gifs (540x540) usually.
To go more in depth, my settings for those are as following...
Camera raw
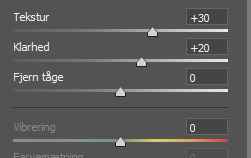
Texture (tekstur) I usually go between 20 and 30, depending on the thing I'm giffing. For Clarity (klarhed) I do the same number as texture, but minus 10. Idk why, it's just how I usually roll!
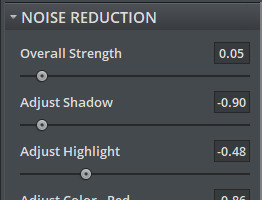
For Topaz denoise I usually only use a little bit. Like 0.04-0.06 overall strength. I don't really have any "this is what I always do" settings, but usually my shadow is at 0.90 and my highlight is 0.48 (because I liked it one time and then just kept it). You can also use the denoise option in vapoursynth, I just prefer photoshop, because it feels like I have more control over it. I know a lot of people don't use denoise at all, but I usually do with files less than 4k quality!
OBS! Using topaz denoise on smart objects in photoshop is a bit tricky, but I made a video about it once, so here you go! (the video is kind of outdated for me, so ignore the sharpening part and focus on the "how to do after you've put denoise on your gif" part. Also ignore my voice, thank you).
Sharpening:
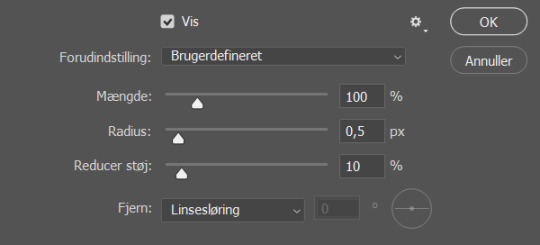
These are my settings for sharpening. If I think the gif is a bit too sharp after I've added a blur filter, I change the amount (mængde, sorry my ps is in Danish) to 80% and that usually does the trick!
If you use all of these, this is how the smart object will look, before you convert it into frames
Let me know if you have any other questions or anything at all!! ♥
#ask#answered#anon#tutorial#kind of#I've kind of considered doing a “maja's tricks and tips for colouring and other stuff with gifs” post so let me know if that has any intere#i answered this as soon as i got home cause I got excited that someone was asking me for tips ♥
8 notes
·
View notes
Note
Excuse me, may I ask what your tag "want for ts" means? I only know the shortening standing for team speak and I am always left in utter, but somewhat hilarious confusion because of this when stumbling over that tag.
Thank you and have a nice day.
So, I'll probably show my age here but my tagging system for my blog, which is a filing system for me, mostly, I created when I made my blog back in 2012. Back then, there was no native blacklist feature and I'm not even sure xkit had it yet, so people used an extension called "tumblr savior" that allowed you to blacklist tags. It was also considered hugely impolite to put negative things into the main tags of stuff, so if you wanted to tag something for someone to block, as opposed to tag something for someone to find, many people would tag "[thing] for ts" as in [thing] for tumblr savior (to block).
At some point people started tagging other stuff like "tw" for "trigger warning" (which was hell for me, because I was in teen wolf (tw) fandom at the time), and then "cw" came for a bit and I still see that sometimes, but i remember there being a scuffle about how to put it (eg, "cw X" or "cw: X" or "X cw" etc) because until "for ts" there was no clear order it should go in by syntax. Now tumblr has a native blacklist and idk what people are using to label their own stuff, but my filing system (again, the one I use mostly for me) never really left the "for ts" days. I still use it because if I wanted to look up, for instance, "blood" and find posts ABOUT blood, then I don't want to also slog through a bunch of posts I've tagged as a warning.
so, "wank for ts" is just my way of labeling something as "this is some bullshit, feel free to block it"
#asks#personal#also because of the way my brain works I WILL NOT remember an updated system#I barely remember to try to tag things that might be obvious warnings now
36 notes
·
View notes
Note
Hi! You make really lovely gifs!
Do you have any tips/tutorials on how to get your gifs so nice and smooth?
hi! thanks a lot <3 i'll try to give you some tips under the cut
the main tip is to just use the best file possible, i always gif the 4k version or just the highest resolution i can find, .ts files are also usually the best (i find them on twitter mostly), then i run them through vapoursynth that does the resizing and part of sharpening for me, i always check knlm and finesharp like this:

then i change these two numbers a bit depending on the video, you can play with them and check on preview if you like the result, at this point i usually don't do anything more

then i go straight to photoshop and do some more sharpening, idk if you know how to use smart filters, but it's what i do; sometimes i use smart sharpen (lately i tend to skip this step tho), then gaussian blur with radius anything from 0.5 to 0.9 opacity anything from 30% to 70% usually, then unsharp mask amount 20-30% radius 1.0, then i color my gif and as you probably noticed i like my gifs not as high contrast and a bit muted, it adds to the look of smoothness/milkiness i think!
all that depends on the video quality and what you like, i like my gifs on a smoother side, so i play with the settings like above, i hope it helps a little and if you have any more questions feel free to ask again or even dm me! for more basic tutorials on how to use vapoursynth etc. i'm sure you can find them on tumblr <3
12 notes
·
View notes
Note
I would like to give you more ☕️ on that admin of supposed 'fanpage' of Off and his current/ex gf (idk who cares).
They're a Gun solo/Gun X every man he breathes next to shipper. They used to have a stan page for Gun but deleted it because they got d*xxed (I mean, that's what you get for b*llying Off lol). They b*llied Off's sister and her kids due to which she ended up deleting her X account. They want Gun to leave the OG ship but also want Off to go after Gun and spend money for him ??? Like, make it make sense! They also comment bad stuff on every sponsored/branded IG posts that feature Off just to sabotage him. They have even given him and his mom ⚰️ thr**ts in the past. They st*lk all of Off's family members online. All of this, yet GMMTV hasn't taken any legal action yet. This one Gun solo's existence is the ultimate reason why I still believe that all Gun solos are the devil incarnate. 🥲 I mean, I know not all of his fans are bad, but SO much has happened over the years that I am just fiercely protective of Off now lol. Sorry not sorry. 🙅♀️

... and now I'm truly upset 😬 I don't think I need to say that it's truly insane to me how far hate can go, especially in a case like this where they hate off for literally no fucking reason lol. it's also appalling bc offgun clearly care deeply for each other irl & want to keep working together, so even if you do hate off, why would you do something that is so clearly against what gun himself wants?? but I guess there's no rhyme & reason for it... the fact that gmmtv has never taken any action against them after what seems to be years of relentless harassment & while they've filed police reports and sued countless other harassers for their other artists is fucked up, and once again shows that they only care about off when it profits them... for years I've had this nightmare of off getting shot or attacked during a public event, and knowing this kind of person is out there freaks me out even more ☹️
xxx
7 notes
·
View notes
Note
hi how do u make ur live stage gifs so hq? i want to make gifts as well, esp for some underrated groups i follow but don’t know how 🥺 thank u thank u in advanced !!
thank you! and good question.... truth is i still make gifs that look bad so it mostly comes down to the individual stage. do you know how to make gifs in photoshop? because if you use a gif converter website its going to look bad no matter what.
i'm going to assume you are using photoshop and vaporsynth or avisynth but if you are a complete beginner then u gotta start by getting those first. u can dm me if u need help with that.
also if you're a beginner i would recommend starting with variety content from youtube rather than stages bc stages are pretty hard to gif. but i'll give u tips for stages anyway. just know i HIGHLY recommend giffing literally anything else first until you get the hang of it. when i started i also wanted to do stages and it just put me off giffing because i couldnt make them look good.
for live stages make sure you are using .ts files and not .mp3 files ripped straight from youtube. the quality is leagues better. you can find .ts files on kpop24hours.com and from people on twitter. k24 is good especially because it's an archive so its easier to find older stages on there than on twitter, but you need an account for it and they rarely accept new people so unless you have a friend with an account your best bet is on twitter. https://twitter.com/shrghkqud usually has .ts files for all the most recent music show performances. they are interlaced so make sure you pick these options in vaporsynth/avisynth:

idk how vs looks bc i use avi but i think its the same. you can also choose to add extra sharpening but i usually do that in photoshop. the first option basically means the video will be 60 frames per second and it'll process faster. you can pick qtgmc 60 slow and the quality will be a bit better but its not worth it for how long it takes to process. debilinear is to deinterlace the files, since they are almost always interlaced.
when you are in photoshop, make sure you sharpen and denoise the gifs. i dont use the denoise filter, because in the sharpening there is a denoise option and thats where i denoise. again if you dont know how you can dm me and ill show u. sometimes i use an add-on called topaz denoise which makes faces look a LOT smoother however it takes a very long time to process so its not always worth it.
when you are colouring the gifs, i like to increase the blacks in selective color which not only makes the gif look cleaner, it also makes it so theres less shades of grey/less colours in the gif, which lowers the file size of the gif, which makes it better quality. the higher the file size the less quality it ends up being.
also make sure the gifs are the right size for tumblr! refer to this chart:

they can be any height but the width matters a lot when formatting for tumblr. although when i do 3 gifs beside each other i just make them all 178px wide because im too lazy to do all that lol
i think those are the main things i do. if you are very new it can be hard to understand so if it doesnt make sense or if you have any questions feel free to ask. none of these things will apply if you dont have photoshop and VS/AS tho.
2 notes
·
View notes
Note
hello! sorry to ask this but i saw that you had a kpop24hrs account? and i have been looking for a concert for a while now and maybe the site has it, you dont have to ofcourse but would you mind downloading and sharing (i think it would be a larger file most likely so you can just ignore this ask if you can't)
hey anonnie! not sure if you're still here, this is like almost a year old at this point, i'm so sorry ;____;
i do have a kpop244hrs account! however i made it a few years ago and the website has changed quite a bit. i'm not sure if this is the case anymore, but i guess back in the day they used to open up a chance to register for an account like, once every blue moon. i honestly CANNOT for the life of me remember how i was even able to register and make an account honestly ..... but i tried doiing my research and idk how you would be able to know when they are open for new membership now. i think they may have used to announce this on their twitter account but i just checked and it seems as though they aren't active anymore! you can try maybe just going on the website (kpop24hrs.com) and see if they just have the option to even still become a member? in any case!! if you have a concert in mind that you still wanted to download i can probably help you find a twitter account that uploads amazing quailty .ts files so you can obtain it! there are a lot of accounts like that on twitter that do this, unfortunately i'm not sure if i'm able to upload them from kpop24hrs since they are so private, i'm sorry! just let me know if you have any other questions and i will try my best to help you <3 hope you're still doing well anonnie! xx
#mail 💌#anon#GAHHH this is from so long ago i'm so sorry#i really don't know how i was able to make a kpop24hrs account like it seems like a fever dream#like during my journey of learning how to gif it just seemed like i was suddenly interested in getting my content from them and then BOOM#i guess they opened up a chance to register very soon after i discovered them?? i honestly have no clue#but if it's a concert from nct or something anon i have an account on twitter for you that uploads regularly and their ts files are verynic#so just let me know! or anyone else for that matter! <3
0 notes
Note
hi! i keep seeing 'ts file' but i'm afraid idk what it means n i'm missing smth important in giffing. what does it mean?
hi!! honestly i am not sure Exactly what ts files are to give you the best explanation, but they're typically the highest quality files you can find, especially for performances and sometimes for shows and such, so they are pretty important!
they're easiest to get here (they used to regularly close registration for it, i don't know if they still do or not), but for skz ones, this acc is good and pretty consistent, and i also get files here sometimes.
ts files that are interlaced (idk what this means i'm ngl) properly need to be deinterlaced, and i do that through vapoursynth, where you need to use the preprocessor options. i usually do 60 fast!
then when you go to vapoursynth, make sure you put a # before the preprocessor setting and the number of frames, then look at the preview, and enter the first and last frames you want of your gif in the (video, # here, # here) part. then take the # out from the beginning of the number of frames and preprocessor setting, and encode the video! doing things this way will keep your vapoursynth from freezing and crashing like crazy and also speed up he encoding process a little.
this is not explained nearly as well as it could be but i write eight hours a day for my job when i finish work my brain is so dead when it comes to explaining things LMAO but hopefully it helps!
1 note
·
View note
Text
UND3RT4L3 G3N0C!D3 $P0IL3R$ RANT!!!
Tw for suicide talk portrayed in the media btw
ok so i wanna keep talking abt 🌻??? 👉👈 so here's some things I want to say.
can I talk about this for a minute??? 🌻's save file powers and how like. dark they are???


First of all. His mourning for his sibling / best friend kills me inside.
The fact that he had tried to go through being friends with everyone, such as his mother and father, and other people, and still couldn't manage to scrape up the feeling of love. And the fact he outright tells us, that he cannot live without his best friend in his life. It makes my heart hurt knowing my main main fict!0n4l 0th3r is suicidal but at least he found something useful out of his experience w it, which is - His power to control save points/save files.
As he tells us, his knowledge of his power with the save files all starts with him attempting to commit suicide, and feeling fear, and then all of a sudden, backing out of death itself.
I find his power interesting, as it was found due to him attempting to commit suicide. It makes me rise so many questions. - Does he need to nearly die / die everytime he wants to go to an old save point, just like the player? How many lives has he lived? How long were the lives he's lived through? How much has he been through? Like he has stated things but we don't know the half of it, and probably we never, ever will.


I'm so glad he didn't actually die.
This implies that everytime he wanted to go to a new timeline, restart a dialogue or redo an action in a different way, he had to commit again. Which is honestly scary to think about? Does he have to die everytime he wants to go back and redo something?... If he got into a bad outcome, did he have to kill himself to relive and fix it? To fix others issues, did he have to die again to find the best plausible outcomes?
He has at least considered, or found out that it is possible for him to actual die - meaning he could have let his suicide attempt remain a actual suicide if it weren't for his burning urges and questions about his power and the world around him.


(I'm proud of him for this btw. He tried his very best at the start to be a wonderful person and use the power he had for good, and only when it didn't do anything for him is when he started to toy with it. Not that him toying w his power is good, but I am very proud he tried to use it for good, as it was his first instinct, even if he eventually succumbed to his selfishness.)
I can't put all the screenshots I took in but he states in game after these dialogues that he has went through every possible timeline, dialogue, number and etc. Has he seen ever FUN V4LU3??? Does he know about G4ST3R? Does he know the followers...? There's a timeline for everything, as he says he's tried everything. This could have taken so long. So many years of his life wasted just playing around with peoples lives and what they'd do. What they'd say. This clearly can't be healthy for him? Like. What did he do in timelines where he interacted with S4NS... What if there's a timeline where he got 🍝 into the roy4l gu4rd? How much does this man know. Like, realistically, he's gone through so many timelines that he probably himself has lost count, as he states he's read every book and burnt every book, and honestly, he may mean that both physically and literally (the mental image of him burning down the library is so funny to me but i doubt thats what he meant) - but like he could have gone through timelines where he befriended minor enemies such as fr0gg!ts or wh!msums or maybe he's had a life with n4pst4bl00k or a friendship with a t3mm!e or jerry snd it bothers me because, going through so many lives. So many timelines and outcomes definitely made him grow colder than he actually thinks he is??? Idk. He went through so many outcomes and loops and times and I'm sure he's accidentally repeated the same outcomes before and gotten frustrated by it, as he states after a while most people got repetitive. Like does he feel like he's in the matrix? Does he have crisis' over his life not being real? His LIVES not being real? On top of dealing with his own death trauma, as well as the lost of his friend, he is suicidal and has to deal with his own timeline horrors and slowly start to question if he himself is the only self aware one in this universe. Is he even real? I wonder if he has meltdowns where he wonders if he's real.
I want to hug him.
1 note
·
View note
Photo


*hands him my heart* for the cutest tiger
#idk what went wrong with my video but it looks like its vibrating???? like a bumpy road! but i used a ts file????#maybe delete later#hoshi#soonyoung#kwon soonyoung#seventeen#hoshi gifs#soonyoung gifs#kwon soonyoung gifs#seventeen gifs
424 notes
·
View notes
Text
download a copy of monsta x’s shape of love comeback show here.
#monsta x#warning the file size is huge (over 6gbs) because the quality is very good#also i apologise for leaving in the first / last couple of minutes of the broadcast...#idk how to edit videos ..... (cringe lol)#it's an mp4 because the method i use to dl live streams uses mp4#but i promise it is hq !!!#if u would like .ts u can check out monstaxmas on twitter#anyway enjoy :)#**vid
1 note
·
View note
Last Seen Blogs

darkscorpionsilver
Because Cars Rules!

darkkingking
Untitled

miraclesreprise
liyah

roychen7
Roy Chen 7

hiljametsa
Seledreamas