#immutable linux distro
Explore tagged Tumblr posts
Visit Tumblr Blog
Explore Tumblr blogs with no restrictions, modern design and the best experience.
Last Seen Tumblr Blogs


Fun Fact
Tumblr has 16.74 million mobile monthly users in the US.
Text
I will now talk about Immutable Linux Distros and how they can help you potentially make the jump from Windows or Mac to Linux.

The way an ILD works is that unlike normal distro's or indeed any other desktop operating system is that they work in what's called a "containerized state", what this means is that the root OS itself is set to read only by default and cannot be edited by normal users while the system is in use, this gives it an immense amount of stability and for older people or people with kids it prevents them from installing anything that could potentially damage the computer in a way that makes it inoperable. The next cool thing that they do is how they handle upgrades, the most common cause of an OS just up and kill itself is due to bad upgrades/updates. It happens in windows, MacOS, and even non-immutable versions of Linux; it's just a fact of life. A patch isn't tested properly against edge cases and fucks you up and you're stuck either reverting to a backup image or reinstalling your OS entirely. ILD's on the other hand work more like a mobile OS in that they upgrade the entire OS at one time separately from the active OS image and only when it detects that the upgrade succeeded does it roll you over to the upgrade/update. If the update/upgrade fails it just trashes the entire thing and leaves you where you are. So if you're looking for something that's stable and secure for yourself or your loved ones you might give these a look see. Below I'll link a few of the best ones in order from most used to least: 1. Fedora Silverblue: https://fedoraproject.org/atomic-desktops/silverblue/ 2. Bluefin: https://projectbluefin.io/ 3. Aurora: https://getaurora.dev/ 4. Flatcar: https://www.flatcar.org/releases
So load one up on a thumb drive, give it a whirl, see what you think, anything to separate yourself from the corporate oligarchs of Microsoft and Apple while also giving you a safer and more secure experience.
Enjoy!

#linux#immutable linux distro#atomic linux#fedora silverblue#bluefin project#aurora distro#flatcar distro#immutable linux#corporate oligarchy#foss is love foss is life
2 notes
·
View notes
Text
have any of you nerds tried Kinoite? (or silverblue) i want to switch to an immutable distro and i'm too cool to use nixos
57 notes
·
View notes
Text
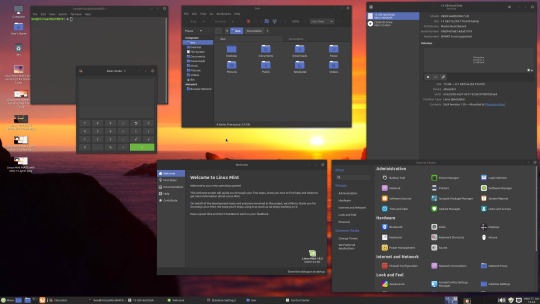
LMDE 6 Beta First impressions.
I've been trying out the Linux Mint Debian Edition 6 public beta for little over a day now, and I have no complaints or bugs so far. LMDE is the version of Linux Mint that is based directly on Debian rather than Ubuntu, unlike the mainline Mint distro. LMDE 6, "Faye", is based on Debian 12. The point is to become as similar in features as the regular Ubuntu version. And it exists as a Plan B in case Ubuntu disappears or becomes unuseable as a base for Mint.
And It's good that this safety plan exists, because Canonical and Ubuntu are not that reliable. The Mint devs has had to rebel against Canonical's decisions multiple times, creating work for them. The Mint documentation has an entire page criticizing Canonical's preferred package format, Snap and why it's not included by default in Mint. The version of Firefox included in Mint is packaged by the devs themselves, since the Ubuntu version of Firefox is a snap (and if you try to install it via Apt, it will install a snap package instead). And ubuntu is moving more and more towards snaps, including an immutable all-snap Ubuntu. If that becomes the default Ubuntu release, derivative distros that don't use snap are pretty much finished.
I started my Linux journey with Mint, but moved upstream to Debian for awhile precisely because I was not comfortable with my operating system standing on such unsure ground. And unlike most Ubuntu-based distros (of which there are many), it's smart of the Mint team to realize that and create LMDE as a plan B. And now I'm on LMDE, because well that moves my computer off Ubuntu, while also enabling me to support Mint, which remains such an important part of the LInux ecosystem for being so beginner-friendly.
So how it is as a distro? How does it compare to mainline Ubuntu? and what does it add to its Debian base?
LMDE uses Debian stable, and as such the packages are outdated, but it's rocksolid stable. I'm running the beta, and because it's debian-based, the majority of the packages were well-tested by the time Debian 12 was released. So I haven't found any bugs so far. And Mint includes flatpaks by default, so you can get newer software in sandboxed containers without sacrificing overall system stability.
Mint adds to the basic Debian experience in many ways, the main addition is the many GUI tools Mint has developed. The software manager handles both debs and flatpaks by default with a slick interface. And the update manager handles updates with friendly non-pushy notifications, I've sang its praises before. Mint also provides tools to manage your software sources (to switch to a local mirror for example) and to create a backup of your home folder.
These tools are what make Mint so famously easy to use, as I written about before. For most common use cases, you never need to see the command line. It's similar to what MX Linux adds to Debian, which I've written about here. I think Mint probably has better looking and more intuitive GUI design than the MX equivalents, although the MX tools have more features. They are both great.
KDE Plasma and Gnome desktops does add somewhat similar functionality to base Debian, but I have reasons not to use those DEs. Gnome lacks customizability and forces a particular workflow, while I found Plasma to be a complete crashfest.
I ended up using xfce, which best met my needs, it's lightweight, easy to use and stable. And I didn't want to pollute it by pulling in bits of other desktops with all its dependencies. It did however require me to use the command line for things like installing and updating flatpaks, and i found running "sudo apt update" and "sudo apt upgrade" easier than using synaptic. I had figured out the command line by that point, so I could make do without the functionality of Mint, but the Mint tools are great to have. Having update notifications is great for an absent-minded person like me.
And they are sometimes objectively better than their Debian equivalents. For example the software sources manager that is in the Debian repos has been broken for months with a bug that leaves your apt.sources.list in a broken state that cuts your OS off from security updates, something I discovered the hard way and I had to manually edit my sources.list to fix it. The Mint equivalent works perfectly fine.
There is a lot of polish for desktop users In LMDE compared to base debian. It does add a lot of value that way.
How is it compared to ubuntu-based Mint (LMUE) though? And as someone who used LMUE cinnamon for months, I have to say the majority of functionality is all there. My experience is basically the same.
The only thing missing I could find is the driver manager, which can be very useful as it detects missing hardware drivers and pulls them in from either online or the installation media. The driver manager is to my understanding tied into Ubuntu's repos for additional drivers. Ubuntu has some of the best hardware support in the LInux distro world. Debian however has compromised their commitment to free software in favor of practicality, and now includes non-free drivers with their installation media by default, so maybe that functionality is not that necessary anymore. I've had no problems with wi-fi and blu-ray drivers on this laptop I'm typing this on, even with base Debian.
Another thing missing in LMDE is a choice of desktop environments by default. You only get cinnamon, the flagship DE developed by the Mint devs primarily for MInt. LMUE also offers Mate and Xfce by default. This is because LMDE is a "Plan B", and supporting multiple DEs on a second base would mean a too heavy workload for the devs. The Debian repos does however have Mate and Xfce in its massive package selection, plus several more DEs, and you can install them manually If you want, and still use the MInt tools, I tried it with xfce myself.
As a derivate distro, LMDE does also drag behind Debian releases quite a bit, when a new Debian drops it takes awhile for Mint to develop an LMDE version based on it. LMDE 6 was a quick turnaround by LMDE standards and it still took like three months after Debian 12's release. LMUE's turnaround for Ubuntu LTS releases is far quicker, because it remains a relative priority for the devs.
Still LMDE 6 is here now, and it's a great distro. It proves that Linux Mint is not relaint on Ubuntu, and adds useful functionalities to its Debian base.
#my writings#linux mint#linux#debian#linux mint debian edition#lmde#welcome to another installment of ''lena rambles about linux''
3 notes
·
View notes
Text
i've been on a linux adventure recently —
one day i woke up and thought, "today is the day", and began working through the linux from scratch handbook. it turns out that most people do not in fact do this on bare metal because compiling everything yourself and just punting on package management does not provide for a workable system. at least, not as a daily driver. (this guy tried writing a debian from scratch where step 1 is getting apt going, but apparently it is not just outdated, but incorrect even at the version specified).
you're supposed to just do this in a virtual machine and treat it like a learning exercise. i did not do this, and spent twelve hours compiling all the packages and walking circular dependency trees basically trying to slowly divorce yourself from the host system's toolchain.
in the process it's very clear how "down in the dirt" linux as a whole is; nothing is made for each other, all the packages are just picked up from here and there, sometimes the maintainer doesn't update their domain and pkg-conf is just Gone so you have to dig it out of the gentoo repo. i kind of love it. it feels organic, it feels natural. of course this emerged. of course it all kinda works, of course it all fails easily.
it's a lot like the human body. that is, say you have a really nicely integrated distro. they probably have like fifty different upstreams, and teams that are making extensions or monkey patching the upstream as they go to slowly hone these disparate things into stuff that vaguely resembles each other. you introduce redundancies and reliability checks. you try to migrate to stuff that will enforce this (Ubuntu enforces Wayland by default; Fedora defaults you to btrfs; downstream distributions then in turn undo some of these like how Pop! OS goes back to X11).
you keep reinforcing against common failures with subsequent processes that can watch for those failures and prevent them, provide fallbacks, self-heal if possible.
and then in turn for everything else you isolate its ability to even impact the core system. ideally you're immutable — say, vanilla os, or some people use nix or fedora silverblue. but most of the time there's just a hybrid approach where we sandbox as much as we can. steam os completely replaces the OS every update and keeps the home folder. chromebooks do likewise. macos has been doing this since i think el capitan? and apfs is intended to have a less hacked-in way of providing for a core system partition that nothing else can touch.
that whole thing is really beautiful, i think — have BSDs replicated this? i don't know; i have never used one very seriously. it felt like they intended to start from scratch with a monolithic basis, but it feels like i'm in the early 2000s again when i try to debug a bsd system and look for documentation.
anyway, so after twelve hours i fumbled a very basic thing. that is, i assumed, why not? i will use UEFI, but i had already partitioned as if i was doing an MBR. so i tried to add a UEFI partition and inadvertently, in trying to unmount and safely perform this operation, rebooted into a system that was freaking out because there was no UEFI partition. it kept reboot cycling into a wifi recovery agent and occasionally realising there was a USB attached.
i moved to arch and performed the entire install in like less than an hour. but damn it, now i'm frustrated. i wanted to see this through. today i decided to move to fedora to better have an overarching experience for this specific hardware (the auto-rotation and on screen keyboard support is amazing on gnome 44) and then try to throw all this into a Box and do it again. but given so much of this was tedious, i would probably just ... automate it. but aren't we getting too close to just a distro?
4 notes
·
View notes
Text
EU OS aims to free the European public sector desktop • The Register
EU OS is a proposal for an immutable KDE-based Linux distribution with a Windows-like desktop, designed for use in European public-sector organizations. Rather than a new distro, it’s a website that documents planning such a thing, what functions the OS might need, how to deploy and manage it, and how to handle users. Its aims are relatively modest, saying: The proposed base OS – Fedora – is what…
0 notes
Text
i kind of wish container integrated pc setups were more of a thing outside of being kind of a kludge for immutable distros exclusively. because being able to compartmentalize and test and wipe large chunks of your os is a really excellent feature for that kind of new user like my sister who wants to just wildly experiment and pull levers and not brick anything but its only really a thing on like. nixos. unbelievably bad for people who just want to get into linux. and silverblue. bad for learning about linux and trying out different ideas and just like really oppressively cramped feeling imo. although i think if they just split off the desktop from the image in whatever way in image based distros like that i would be actually so down for them. its like a really excellent idea for a certain kind of user and i think a big chunk is like, advanced but busy wagies, and forcing those people to use either gnome or kde and like, if you download i3 or whatever youve still just gotta have gnome messing with stuff and taking up space in the background, i just think its so clumsy. i dont really see why you couldnt just have like, a core image and a desktop image. like i dont think that would be meaningfully less "atomic" and it would make rebasing to a different de or no de even mpre trivially easy........ at that though i think images are a SUPER bad way of doing atomicity and while vanillaos never seemed to take off its way of doing atomic generations same as nixos seems so much more sensible. the only argument anyone ever has against it is that 2 root partitions of 20gb or whatever is too big* but a 500gb ssd is like 15 bucks now man idk
*they dont even do it this way anymore and their current virtual volume thing is a really elegant execution of the concept imo. i really think fedoras thing only took off because its fedora and theyre industry standard and not because its good
0 notes
Text
The main three distros I use these days are
Voidlinux
Arcolinux
Redcore gentoo
(tried Xenia Linux for the funny but I actually hate immutable distros forever I think)
0 notes
Text
since you mentioned already having mint but arch and gentoo being somewhat off the deep end, here's a rough list of categories (ranked by my own experiences where relevant and general opinion where not):
over easy:
mint - desktop linux that Just Works(tm)
ubuntu - ditto but you get Gnome so the UI is different
fedora - a bit more of a challenge but still ready to go
medium rare:
debian - more manual but stable once you get it up
endeavour - arch but it has friendly installers
r/programmersocks:
arch - rolling release, manual-ish install etc. cat ears optional :3
void - systemdeeznutz idk, it also rolls but uses runit for ideology reasons
ultraviolence:
gentoo - compile everythingg !!! did you know it takes over 20 hours to compile gcc on a pentium 133 ?
nixos - immutability !! declarative configuration files !! look how reproducable my system is !!!
bedrock - yo dawg i heard you like linux xD actually n distros in a duct tape trench coat
lfs - so you thought gentoo was customisable....
guys what linux should i put on my Lenovo thinkpad .
452 notes
·
View notes
Photo


06.06.20
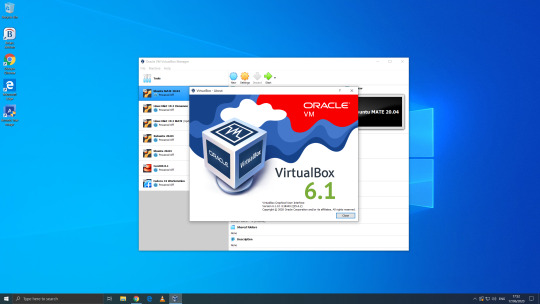
We went to the Oracle VirtualBox site and downloaded and installed VirtualBox 6.0. Oracle VM VirtualBox is free, open source virtual machine software maintained by Oracle Corp.
It was originally an Innotek product before Innotek was acquired by Sun Microsystems in 2008. Sun Microsystems was in turn acquired by Oracle in 2010. The alternative software to Oracle VM VirtualBox is VMware workstation.
I have been using Oracle VM VirtualBox since 2016 and have learnt a lot of information about how it works and how to install various operating systems.
Virtualbox can run Linux guest operating systems and Microsoft Windows guest operating systems. It can emulate both 64-bit operating systems and 32-bit operating systems.
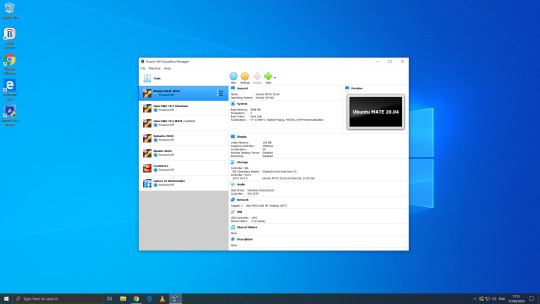
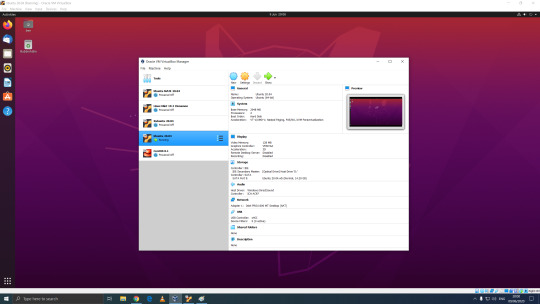
Each operating system you add to VirtualBox is treated as a Guest. The guest operating system is running in its own virtual environment, which emulates a real machine on your PC. This means that anything you do in it does not affect your PC. The guest runs in a console:
About the VBox console: The VirtualBox console displays the active virtual machine. It shows the virtual guest operating system activity icons in the status bar. The console can be re-sized, minimised and forced closed from the title bar. It is not recommended to force close an active guest operating system as this acts like switching off mains power. Your guest operating system should be shut down cleanly. You can select different viewing modes in the view list or use the shortcut keys assigned with them. These mode include full screen mode, seamless mode and scaled mode. VirtualBox website link: https://www.virtualbox.org/ VirtualBox wiki link: https://en.wikipedia.org/wiki/VirtualBox
After setting it up, I went to find some Linux-based operating systems to download. Each download is a disc image file with the file extension .iso.
I chose:
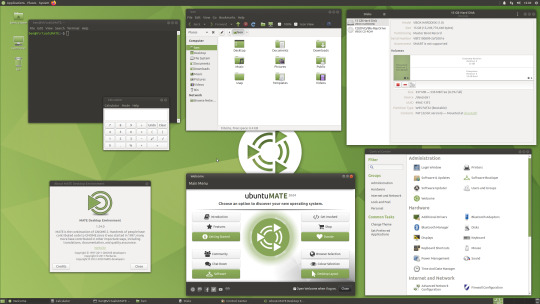
Ubuntu MATE 20.04 LTS (Long Term Support)
This operating system uses the MATE Desktop Environment, which is the continuation of the former GNOME 2 Desktop. I like this desktop environment because it has a very configurable interface.
Ubuntu MATE: https://ubuntu-mate.org/
Wiki link: https://en.wikipedia.org/wiki/Ubuntu_MATE
Linux Mint Cinnamon 19.3 Tricia (based on Ubuntu 18.04 LTS)
This operating system uses the Cinnamon Desktop Environment which is based on GNOME 3. Cinnamon uses MGSE (Mint Gnome Shell Extensions), which re-creates a more traditional desktop linux experience whilst also looking modern.
I like this desktop environment because it looks modern and feels familiar to those who come from Windows.
Linux Mint: https://www.linuxmint.com/
Wiki link: https://en.wikipedia.org/wiki/Linux_Mint
Linux Mint MATE 19.3 Tricia (based on Ubuntu 18.04 LTS)
Linux Mint edition featuring the MATE Desktop Environment. I like this desktop environment because like Ubuntu MATE, it is very configurable. It also features Linux Mints system updating utility.
Ubuntu 20.04 LTS
This version of Ubuntu is the main version by Canonical Ltd. This operating system uses the GNOME 3 Desktop Environment.
Ubuntu came out in 2004 and used GNOME 2 as it’s desktop environment until 2011, when it changed to the now discontinued Unity Desktop. In 2017, Canonical announced it would return to GNOME. I like this desktop environment as unlike the GNOME 3 default interface, Ubuntu uses its own orange style theme and adds a Unity like dock on the left of the screen.
Ubuntu: https://ubuntu.com/
Wiki link: https://en.wikipedia.org/wiki/Ubuntu
Xubuntu 20.04 LTS
This operating system uses the XFCE Desktop Environment which aims to be lightweight on system resources and has a really configurable user interface. Xfce once stood for XForms Common Environment. The menu system is called the Whisker Menu. I like this desktop environment because like MATE it is very configurable.
The Ubuntu 20.04 Long Term Release is code named: Focal Fossa. All Ubuntu based distros use .deb (Debian Package Manager) for software installation.
Xubuntu: https://xubuntu.org/
Wiki link: https://en.wikipedia.org/wiki/Xfce
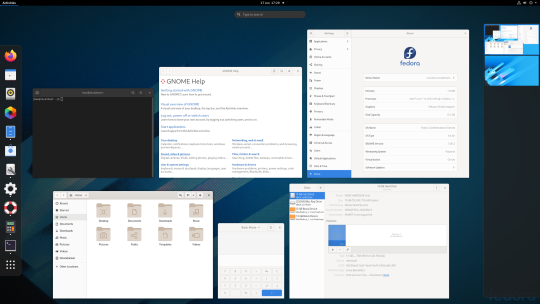
Fedora Workstation 32
Fedora is a Linux distribution developed by the community-supported Fedora Project which is sponsored primarily by Red Hat, a subsidiary of IBM, with additional support from other companies. Fedora is used by Linus Torvalds who is the creator of the Linux kernel.
Fedora is the upstream source of the commercial Red Hat Enterprise Linux distribution.
Since the release of Fedora 30, five different editions are currently available: Workstation, focused on the personal computer, Server for servers, CoreOS, focused on cloud computing, Silverblue, focused on an immutable desktop specialized to container-based workflows and IoT, focused on IoT devices.
I like this desktop environment because it looks fresh and modern. This operating system features the latest version of the GNOME Desktop Environment.
The screenshot of Fedora shows the ‘Activities’ dial screen which gives you a Visual overview of your GNOME Desktop.
With the Activities screen, you can see and control currently opened app windows, all installed applications, search system and switch desktop work spaces.
Fedora: https://getfedora.org/
Wiki link: https://en.wikipedia.org/wiki/Fedora_(operating_system)
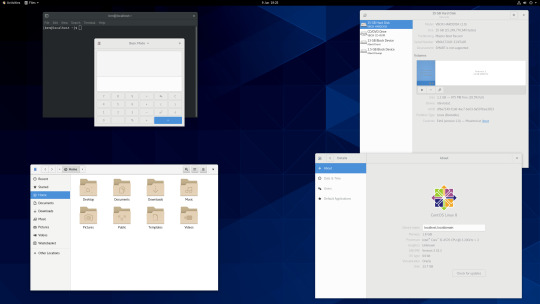
CentOS 8.1
CentOS (Community Enterprise Operating System) is a Linux distribution that provides a free, community-supported computing platform functionally compatible with its upstream source operating system, Red Hat Enterprise Linux (RHEL). It is maintained by The CentOS Project (affiliated with Red Hat). Both operating systems use GNOME 3 as their default desktop environment.
It is basically a free version of Red Hat Enterprise Linux, with the Red Hat branding removed and update servers pointing away from Red Hat servers.
Red Hat Enterprise Linux is a commercial focused Linux distro.
All Red Hat Linux based distros such as RHEL, CentOS and Fedora use .rpm (Red Hat Package Manager) for software installation.
CentOS and Red Hat Enterprise Linux can be installed on servers, workstations and desktops. Both are very popular on mission critical commercial server systems as it is designed to be flexible and very stable.
I thought this Linux distro is interesting because unlike the Ubuntu based distros above, installation of CentOS is more involved, you set up software sources, installed software, desktop and operating system components.
CentOS runs on a lot of web servers.
CentOS: https://www.centos.org/
RHEL:
https://www.redhat.com/en/technologies/linux-platforms/enterprise-linux
CentOS Wiki link: https://en.wikipedia.org/wiki/CentOS
RHEL Wiki link: https://en.wikipedia.org/wiki/Red_Hat_Enterprise_Linux
VirtualBox requires the installation of Guest Additions, which adds extra features to the virtual machine, such as the ability to scale the resolution of the guest operating system, better 3D acceleration and the ability to move files between the Guest and Host machine.
To install Guest Additions on a Linux guest, you will need to use the terminal. installation of this is different on .deb and .rpm builds of Linux.
4 notes
·
View notes
Text
Immutable Linux distributions
https://itsfoss.com/immutable-linux-distros/ Comments
0 notes
Text
Kubernetes is a free and open-source orchestration tool that has been highly adopted in modern software development. It allows one to automate, scale and manage the application deployments. Normally, applications are run in containers, with the workloads distributed across the cluster. Containers make use of the microservices architecture, where applications are immutable, portable, and optimized for resource usage. Kubernetes has several distributions that include: OpenShift: this is a Kubernetes distribution developed by RedHat. It can be run both on-premise and in the cloud. Google Kubernetes Engine: This is a simple and flexible Kubernetes distribution that runs on Google Cloud. Azure Kubernetes Service: This is a cloud-only Kubernetes distribution for the Azure cloud Rancher: This Kubernetes distribution has a key focus on multi-cluster Kubernetes deployments. This distribution is similar to OpenShift but it integrates Kubernetes with several other tools. Canonical Kubernetes: This Kubernetes distribution is developed by the Canonical company(The company that develops Ubuntu Linux). It is an umbrella for two CNF-certified Kubernetes distributions, MicroK8s and Charmed Kubernetes. It can be run both on-premise or in the cloud. In this guide, we will be learning how to install MicroK8s Kubernetes on Rocky Linux 9 / AlmaLinux 9. MicroK8s is a powerful and lightweight enterprise-grade Kubernetes distribution. It has a small disk and memory footprint but still offers innumerable add-ons that include Knative, Cilium, Istio, Grafana e.t.c This is the fastest multi-node Kubernetes that can work on Windows, Linux, and Mac systems. Microk8s can be used to reduce the complexity and time involved when deploying a Kubernetes cluster. Microk8s is preferred due to the following reasons: Simplicity: it is simple to install and manage. It has a single-package install with all the dependencies bundled. Secure: Updates are provided for all the security issues and can be applied immediately or scheduled as per your maintenance cycle. Small: This is the smallest Kubernetes distro that can be installed on a laptop or home workstation. It is compatible with Amazon EKS, Google GKE, and Azure AKS, when it is run on Ubuntu. Comprehensive: it includes an innumerable collection of manifests that are used for common Kubernetes capabilities such as Ingress, DNS, Dashboard, Clustering, Monitoring, and updates to the latest Kubernetes version e.t.c Current: It tracts the upstream and releases beta, RC, and final bits the same day as upstream K8s. Now let’s plunge in! Step 1 – Install Snapd on Rocky Linux 9 / AlmaLinux 9 Microk8s is a snap package and so snapd is required on the Rocky Linux 9 / AlmaLinux 9 system. The below commands can be used to install snapd on Rocky Linux 9 / AlmaLinux 9. Enable the EPEL repository. sudo dnf install epel-release Install snapd: sudo dnf install snapd Once installed, you need to create a symbolic link for classic snap support. sudo ln -s /var/lib/snapd/snap /snap Export the snaps $PATH. echo 'export PATH=$PATH:/var/lib/snapd/snap/bin' | sudo tee -a /etc/profile.d/snap.sh source /etc/profile.d/snap.sh Start and enable the service: sudo systemctl enable --now snapd.socket Verify if the service is running: $ systemctl status snapd.socket ● snapd.socket - Socket activation for snappy daemon Loaded: loaded (/usr/lib/systemd/system/snapd.socket; enabled; vendor preset: disabled) Active: active (listening) since Tue 2022-07-26 09:58:46 CEST; 7s ago Until: Tue 2022-07-26 09:58:46 CEST; 7s ago Triggers: ● snapd.service Listen: /run/snapd.socket (Stream) /run/snapd-snap.socket (Stream) Tasks: 0 (limit: 23441) Memory: 0B CPU: 324us CGroup: /system.slice/snapd.socket Set SELinux in permissive mode: sudo setenforce 0 sudo sed -i 's/^SELINUX=.*/SELINUX=permissive/g' /etc/selinux/config Step 2 – Install Microk8s on Rocky Linux 9 / AlmaLinux 9
Once Snapd has been installed, you can easily install Microk8s by issuing the command: $ sudo snap install microk8s --classic 2022-07-26T10:00:17+02:00 INFO Waiting for automatic snapd restart... microk8s (1.24/stable) v1.24.3 from Canonical✓ installed To be able to execute the commands smoothly, you need to set the below permissions: sudo usermod -a -G microk8s $USER sudo chown -f -R $USER ~/.kube For the changes to apply, run the command: newgrp microk8s Now verify the installation by checking the Microk8s status $ microk8s status microk8s is running high-availability: no datastore master nodes: 127.0.0.1:19001 datastore standby nodes: none addons: enabled: ha-cluster # (core) Configure high availability on the current node disabled: community # (core) The community addons repository dashboard # (core) The Kubernetes dashboard dns # (core) CoreDNS gpu # (core) Automatic enablement of Nvidia CUDA helm # (core) Helm 2 - the package manager for Kubernetes helm3 # (core) Helm 3 - Kubernetes package manager host-access # (core) Allow Pods connecting to Host services smoothly hostpath-storage # (core) Storage class; allocates storage from host directory ..... Get the available nodes: $ microk8s kubectl get nodes NAME STATUS ROLES AGE VERSION master Ready 3m38s v1.24.3-2+63243a96d1c393 Step 3 – Install and Configure kubectl for MicroK8s Microk8s comes with its own kubectl version to avoid interference with any version available on the system. This is used on the terminal as: microk8s kubectl However, Microk8s can be configured to work with your host’s kubectl. First, obtain the Mikrok8s configs using the command: $ microk8s config apiVersion: v1 clusters: - cluster: certificate-authority-data: LS0tLS1CRUdJTiBDRVJUSUZJQ0FURS0tLS0tCk1JSUREekNDQWZlZ0F3SUJBZ0lVWlZURndTSVFhOU13Rm1VdmR1S09pM0ErY3hvd0RRWUpLb1pJaHZjTkFRRUwKQlFBd0Z6... server: https://192.168.205.12:16443 name: microk8s-cluster contexts: - context: cluster: microk8s-cluster user: admin name: microk8s current-context: microk8s ...... Install kubectl on Rocky Linux 9 / AlmaLinux 9 using the command: curl -LO https://storage.googleapis.com/kubernetes-release/release/`curl -s https://storage.googleapis.com/kubernetes-release/release/stable.txt`/bin/linux/amd64/kubectl sudo chmod +x kubectl sudo mv kubectl /usr/local/bin/ Generate the required config: cd $HOME microk8s config > ~/.kube/config Get the available nodes: $ kubectl get nodes NAME STATUS ROLES AGE VERSION master Ready 5m35s v1.24.3-2+63243a96d1c393 Step 4 – Add Nodes to the Microk8s Cluster For improved performance and high availability, you can add nodes to the Kubernetes cluster. On the master node, allow the required ports through the firewall: sudo firewall-cmd --add-port=25000/tcp,16443/tcp,12379/tcp,10250/tcp,10255/tcp,10257/tcp,10259/tcp --permanent sudo firewall-cmd --reload Also, generate the command to be used by the nodes to join the cluster; $ microk8s add-node microk8s join 192.168.205.12:25000/17244dd7c3c8068753fe8799cf72f2ac/976e1522f4b6 Use the '--worker' flag to join a node as a worker not running the control plane, eg: microk8s join 192.168.205.12:25000/17244dd7c3c8068753fe8799cf72f2ac/976e1522f4b6 --worker If the node you are adding is not reachable through the default interface you can use one of the following: microk8s join 192.168.205.12:25000/17244dd7c3c8068753fe8799cf72f2ac/976e1522f4b6 Install and configure Microk8s on the Nodes You need to install Microk8s on the nodes just as we did in steps 1 and 2. After installing Microk8s on the nodes, run the following commands: export OPENSSL_CONF=/var/lib/snapd/snap/microk8s/current/etc/ssl/openssl.cnf sudo firewall-cmd --add-port=25000/tcp,10250/tcp,10255/tcp --permanent
sudo firewall-cmd --reload Now use the generated command on the master to join the nodes to the Microk8s cluster. $ microk8s join 192.168.205.12:25000/17244dd7c3c8068753fe8799cf72f2ac/976e1522f4b6 --worker Contacting cluster at 192.168.205.12 The node has joined the cluster and will appear in the nodes list in a few seconds. Currently this worker node is configured with the following kubernetes API server endpoints: - 192.168.205.12 and port 16443, this is the cluster node contacted during the join operation. If the above endpoints are incorrect, incomplete or if the API servers are behind a loadbalancer please update /var/snap/microk8s/current/args/traefik/provider.yaml Once added, check the available nodes: $ kubectl get nodes NAME STATUS ROLES AGE VERSION master Ready 41m v1.24.3-2+63243a96d1c393 node1 Ready 7m52s v1.24.3-2+63243a96d1c393 To remove a node from a cluster, run the command below on the node: microk8s leave Step 5 – Deploy an Application with Microk8s Deploying an application in Microk8s is similar to other Kubernetes distros. To demonstrate this, we will deploy the Nginx application as shown: $ kubectl create deployment webserver --image=nginx deployment.apps/webserver created Verify the deployment: $ kubectl get pods NAME READY STATUS RESTARTS AGE webserver-566b9f9975-cwck4 1/1 Running 0 28s Step 6 – Deploy Kubernetes Services on Microk8s For the deployed application to be accessible, we will expose our created pod using NodePort as shown: $ kubectl expose deployment webserver --type="NodePort" --port 80 service/webserver exposed Get the service port: $ kubectl get svc webserver NAME TYPE CLUSTER-IP EXTERNAL-IP PORT(S) AGE webserver NodePort 10.152.183.89 80:30281/TCP 29s Try accessing the application using the exposed port via the web. Step 7 – Scaling applications on Microk8s Scaling is defined as creating replications on pods/deployments for high availability. This feature is highly embraced in Kubernetes, allowing it to handle as many requests as possible. To create replicas, use the command with the syntax below: $ kubectl scale deployment webserver --replicas=4 deployment.apps/webserver scaled Get the pods: $ kubectl get pods NAME READY STATUS RESTARTS AGE webserver-566b9f9975-cwck4 1/1 Running 0 8m40s webserver-566b9f9975-ts2rz 1/1 Running 0 28s webserver-566b9f9975-t656s 1/1 Running 0 28s webserver-566b9f9975-7z6zq 1/1 Running 0 28s It is that simple! Step 8 – Enabling the microk8s Dashboard The dashboard provides an easy way to manage the Kubernetes cluster. Since it is an add-on, we need to enable it by issuing the command: $ microk8s enable dashboard dns Infer repository core for addon dashboard Infer repository core for addon dns Enabling Kubernetes Dashboard Infer repository core for addon metrics-server Enabling Metrics-Server serviceaccount/metrics-server created clusterrole.rbac.authorization.k8s.io/system:aggregated-metrics-reader created clusterrole.rbac.authorization.k8s.io/system:metrics-server created rolebinding.rbac.authorization.k8s.io/metrics-server-auth-reader created clusterrolebinding.rbac.authorization.k8s.io/metrics-server:system:auth-delegator created ...... Create the token to be used to access the dashboard. kubectl create token default Verify this: $ kubectl get services -n kube-system NAME TYPE CLUSTER-IP EXTERNAL-IP PORT(S) AGE metrics-server ClusterIP 10.152.183.200 443/TCP 77s kubernetes-dashboard ClusterIP 10.152.183.116 443/TCP 58s dashboard-metrics-scraper ClusterIP 10.152.183.35 8000/TCP 58s kube-dns ClusterIP 10.152.183.10 53/UDP,53/TCP,9153/TCP 53
Allow the port(10443) through the firewall: sudo firewall-cmd --permanent --add-port=10443/tcp sudo firewall-cmd --reload Now forward the traffic to the local port(10443) using the command: kubectl port-forward -n kube-system service/kubernetes-dashboard --address 0.0.0.0 10443:443 Now access the dashboard using the URL https://127.0.0.1:10443. In some browsers such as chrome, you may find an error with invalid certificates when accessing the dashboard remotely. On Firefox, proceed as shown Provide the generated token to sign in. On successful login, you will see the Microk8s dashboard below. From the above dashboard, you can easily manage your Kubernetes cluster. Step 9 – Enable In-built storage on Microk8s Microk8s comes with an in-built storage addon that allows quick creation of PVCs. To enable and make this storage available to use by pods, execute the below commands: export LD_LIBRARY_PATH="$LD_LIBRARY_PATH:/lib64" microk8s enable hostpath-storage Once enabled, verify if the hostpath provisioned has been created as a pod. $ kubectl -n kube-system get pods NAME READY STATUS RESTARTS AGE calico-kube-controllers-7f85f9c7b9-v7lk5 1/1 Running 0 3h42m metrics-server-5f8f64cb86-82nn2 1/1 Running 1 (165m ago) 165m calico-node-hljcb 1/1 Running 0 3h13m calico-node-sjzd2 1/1 Running 0 3h9m coredns-66bcf65bb8-m6x44 1/1 Running 0 163m dashboard-metrics-scraper-6b6f796c8d-scwtx 1/1 Running 0 163m kubernetes-dashboard-765646474b-256qb 1/1 Running 0 163m hostpath-provisioner-f57964d5f-sh4wj 1/1 Running 0 24s Also, confirm that a storage class has been created: $ kubectl get sc NAME PROVISIONER RECLAIMPOLICY VOLUMEBINDINGMODE ALLOWVOLUMEEXPANSION AGE microk8s-hostpath (default) microk8s.io/hostpath Delete WaitForFirstConsumer false 83s Now we can use the storage class above to create PVCs. Create a Persistent Volume To demonstrate if the storage class is working properly, create a PV using it. $ vim sample-pv.yml apiVersion: v1 kind: PersistentVolume metadata: name: sampe-pv spec: # Here we are asking to use our custom storage class storageClassName: microk8s-hostpath capacity: storage: 5Gi accessModes: - ReadWriteOnce hostPath: # Should be created upfront path: '/data/demo' Create the hostpath with the required permissions. sudo mkdir -p /data/demo sudo chmod 777 /data/demo sudo chcon -Rt svirt_sandbox_file_t /data/demo Create the PV: kubectl create -f sample-pv.yml Verify the creation: $ kubectl get pv NAME CAPACITY ACCESS MODES RECLAIM POLICY STATUS CLAIM STORAGECLASS REASON AGE sampe-pv 5Gi RWO Retain Available microk8s-hostpath 7s Create a Persistent Volume Claim Once the PV has been created, now create the PVC using the StorageClass: vim sample-pvc.yml Add the below line to the file: apiVersion: v1 kind: PersistentVolumeClaim metadata: name: my-pvc namespace: default spec: # Once again our custom storage class here storageClassName: microk8s-hostpath accessModes: - ReadWriteOnce resources: requests: storage: 5Gi Apply the manifest: kubectl create -f sample-pvc.yml Verify the creation: $ kubectl get pvc NAME STATUS VOLUME CAPACITY ACCESS MODES STORAGECLASS AGE my-pvc Pending microk8s-hostpath 13s Deploy an application that uses the PVC. $ vim pod.yml apiVersion: v1 kind: Pod metadata: name: task-pv-pod spec: volumes: - name: task-pv-storage persistentVolumeClaim:
claimName: my-pvc containers: - name: task-pv-container image: nginx ports: - containerPort: 80 name: "http-server" volumeMounts: - mountPath: "/usr/share/nginx/html" name: task-pv-storage Apply the manifest: kubectl create -f pod.yml Now verify if the PVC is bound: $ kubectl get pv NAME CAPACITY ACCESS MODES RECLAIM POLICY STATUS CLAIM STORAGECLASS REASON AGE sampe-pv 5Gi RWO Retain Bound default/my-pvc microk8s-hostpath 7m23s $ kubectl get pvc NAME STATUS VOLUME CAPACITY ACCESS MODES STORAGECLASS AGE my-pvc Bound sampe-pv 5Gi RWO microk8s-hostpath 98s Step 10 – Enable Logging With Prometheus and Grafana Microk8s has the Prometheus add-on that can be enabled. This tool offers visualization of logs through the Grafana interface. To enable the add-on, execute: $ microk8s enable prometheus Infer repository core for addon prometheus Adding argument --authentication-token-webhook to nodes. Configuring node 192.168.205.13 Restarting nodes. Configuring node 192.168.205.13 Infer repository core for addon dns Addon core/dns is already enabled ....... After a few minutes, verify that the required pods are up: $ kubectl get pods -n monitoring NAME READY STATUS RESTARTS AGE prometheus-adapter-85455b9f55-w975k 1/1 Running 0 89s node-exporter-jnmmk 2/2 Running 0 89s grafana-789464df6b-kt5hr 1/1 Running 0 89s prometheus-adapter-85455b9f55-2g9rs 1/1 Running 0 89s blackbox-exporter-84c68b59b8-5lkw4 3/3 Running 0 89s prometheus-k8s-0 2/2 Running 1 (43s ago) 77s node-exporter-dzj66 2/2 Running 0 89s prometheus-operator-65cdb77c59-gfk4v 2/2 Running 0 89s kube-state-metrics-55b87f58f6-m6rnv 3/3 Running 0 89s alertmanager-main-0 2/2 Running 0 78s To access the Prometheus and Grafana services, you need to forward them: $ kubectl get services -n monitoring NAME TYPE CLUSTER-IP EXTERNAL-IP PORT(S) AGE prometheus-operator ClusterIP None 8443/TCP 2m31s alertmanager-main ClusterIP 10.152.183.136 9093/TCP 2m22s blackbox-exporter ClusterIP 10.152.183.174 9115/TCP,19115/TCP 2m21s grafana ClusterIP 10.152.183.248 3000/TCP 2m20s kube-state-metrics ClusterIP None 8443/TCP,9443/TCP 2m20s node-exporter ClusterIP None 9100/TCP 2m20s prometheus-adapter ClusterIP 10.152.183.173 443/TCP 2m20s prometheus-k8s ClusterIP 10.152.183.201 9090/TCP 2m19s alertmanager-operated ClusterIP None 9093/TCP,9094/TCP,9094/UDP 93s prometheus-operated ClusterIP None 9090/TCP 93s Allow the ports intended to be used through the firewall: sudo firewall-cmd --add-port=9090,3000/tcp --permanent sudo firewall-cmd --reload Now expose the ports: kubectl port-forward -n monitoring service/prometheus-k8s --address 0.0.0.0 9090:9090 Access the Prometheus using the URL http://IP_Address:9090 For Grafana, you also need to expose the port: kubectl port-forward -n monitoring service/grafana --address 0.0.0.0 3000:3000 Now access the service using the URL http://IP_Address:3000 Login with the default credentials: username=admin Password=admin Once logged in, change the password.
Now access the dashboard and visualize graphs. Navigate to Dashboards-> Manage-> Default and select the dashboard to load. For Kubernetes API For the Kubernetes Namespace Networking Final Thoughts That marks the end of this detailed guide on how to install MicroK8s Kubernetes on Rocky Linux 9 / AlmaLinux 9. You are also equipped with the required knowledge on how to use Microk8s to set up and manage a Kubernetes cluster.
0 notes
Text
I am also this accident prone with computers. Well, software anyway. I've only broken a piece of hardware through carelessness one time ever, software... I break it pretty frequently. I like Linux specifically because it's easier to find out what I broke and understand how it broke and why the fix works, once I find out what the fix is.
I'd recommend trying an immutable distro, because they're designed to prevent this, but I have broken "unbreakable" software before, so if you're like me, it's probably not going to help.
In trying to install an XFCE plugin, I've:
* Caused a kernel panic
* Broken the Nvidia drivers
* Broken Steam to where it no longer exists
Maybe I should move back to Mint.
9 notes
·
View notes
Photo

An Introduction to MongoDB
MongoDB is a cross-platform, open-source, NoSQL database, used by many modern Node-based web applications to persist data.
In this beginner-friendly tutorial, I’ll demonstrate how to install Mongo, then start using it to store and query data. I’ll also look at how to interact with a Mongo database from within a Node program, and also highlight some of the differences between Mongo and a traditional relational database (such as MySQL) along the way.
Terminology and Basic Concepts
MongoDB is a document-oriented database. This means that it doesn’t use tables and rows to store its data, but instead collections of JSON-like documents. These documents support embedded fields, so related data can be stored within them.
MongoDB is also a schema-less database, so we don’t need to specify the number or type of columns before inserting our data.
Here’s an example of what a MongoDB document might look like:
{ _id: ObjectId(3da252d3902a), type: "Tutorial", title: "An Introduction to MongoDB", author: "Manjunath M", tags: [ "mongodb", "compass", "crud" ], categories: [ { name: "javascript", description: "Tutorialss on client-side and server-side JavaScript programming" }, { name: "databases", description: "Tutorialss on different kinds of databases and their management" }, ], content: "MongoDB is a cross-platform, open-source, NoSQL database..." }
As you can see, the document has a number of fields (type, title etc.), which store values (“Tutorial”, “An Introduction to MongoDB” etc.). These values can contain strings, numbers, arrays, arrays of sub-documents (for example, the categories field), geo-coordinates and more.
The _id field name is reserved for use as a primary key. Its value must be unique in the collection, it’s immutable, and it may be of any type other than an array.
Tip: for those wondering what “JSON-like” means, internally Mongo uses something called BSON (short for Binary JSON). In practice, you don’t really need to know much about BSON when working with MongoDB.
As you might guess, a document in a NoSQL database corresponds to a row in an SQL database. A group of documents together is known as a collection, which is roughly synonymous with a table in a relational database.
Here’s a table summarizing the different terms:
SQL Server MongoDB Database Database Table Collection Row Document Column Field Index Index
If you’re starting a new project and are unsure whether to choose Mongo or a relational database such as MySQL, now might be a good time to read our tutorial SQL vs NoSQL: How to Choose.
With that said, let’s go ahead and install MongoDB.
Installing MongoDB
Note: if you’d just like to follow along with this tutorial without installing any software on your PC, there are a couple of online services you can use. Mongo playground, for example, is a simple sandbox to test and share MongoDB queries online.
MongoDB comes in various editions. The one we’re interested in is the MongoDB Community Edition.
The project’s home page has excellent documentation on installing Mongo, and I won’t try to replicate that here. Rather, I’ll offer you links to instructions for each of the main operating systems:
Install MongoDB Community Edition on Windows
Install MongoDB Community Edition on macOS
Install MongoDB Community Edition on Ubuntu
If you use a non-Ubuntu-based version of Linux, you can check out this page for installation instructions for other distros. MongoDB is also normally available through the official Linux software channels, but sometimes this will pull in an outdated version.
Post Installation Configuration
Once you have MongoDB installed for your system, you might encounter this error:
dbpath (/data/db) does not exist. Create this directory or give existing directory in --dbpath. See http://dochub.mongodb.org/core/startingandstoppingmongo
This means that Mongo can’t find (or access) the directory it uses to store its databases. This is pretty easy to remedy:
sudo mkdir -p /data/db sudo chown -R `id -un` /data/db
The first command creates the data/db directory. The second sets permissions so that Mongo can write to that directory.
Install the Compass GUI
We’ll be using the command line in this tutorial, but MongoDB also offers a tool called Compass to connect to and manage your databases using a GUI.
If you’re on Windows, Compass can be installed as part of the main Mongo installation (just select the appropriate option from the wizard). Otherwise, you can download Compass for your respective OS here.
This is what it looks like:

The Mongo Shell
We can test our installation by opening the Mongo shell. You can do this by opening a terminal window and typing mongo.
Note: this assumes that <mongodb installation dir>/bin is in your path. If for any reason this isn’t the case, change into the <mongodb installation dir>/bin directory and rerun the command.
If you get an Error: couldn't connect to server error, you’ll need to start the Mongo server (in a second terminal window) with the command mongod.
Once you’re in the Mongo shell, type in db.version() to see the version of MongoDB you’re running. At the time of writing, this should output 4.2.2.
Please note that you can exit the Mongo shell by running quit() and the Mongo daemon by pressing Ctrl + C at any time.
Now let’s get acquainted with some MongoDB basics.
Basic Database Operations
Enter the Mongo shell if you haven’t already (by typing mongo into a terminal):
[mj@localhost ~]$ mongo MongoDB shell version v4.2.2 connecting to: mongodb://127.0.0.1:27017/?compressors=disabled&gssapiServiceName=mongodb Implicit session: session { "id" : UUID("08a624a0-b330-4233-b56b-1d5b15a48fea") } MongoDB server version: 4.2.2
Let’s start off by creating a database to work with. To create a database, MongoDB has a use DATABASE_NAME command:
> use exampledb switched to db exampledb
To display all the existing databases, try show dbs:
> show dbs admin 0.000GB config 0.000GB local 0.000GB
The exampledb isn’t in the list because we need to insert at least one document into the database. To insert a document, you can use db.COLLECTION_NAME.insertOne({"key":"value"}). Here’s an example:
> db.users.insertOne({name: "Bob"}) { "acknowledged" : true, "insertedId" : ObjectId("5a52c53b223039ee9c2daaec") }
MongoDB automatically creates a new users collection and inserts a document with the key–value pair 'name':'Bob'. The ObjectId returned is the ID of the document inserted. MongoDB creates a unique ObjectId for each document on creation, and it becomes the default value of the _id field.
Now we should be able to see our database:
>show dbs admin 0.000GB config 0.000GB exampledb 0.000GB local 0.000GB
Similarly, you can confirm that the collection was created using the show collections command:
> show collections users
We’ve created a database, added a collection named users and inserted a document into it. Now let’s try dropping it. To drop an existing database, use the dropDatabase() command, as exemplified below:
>db.dropDatabase() { "dropped" : "exampledb", "ok" : 1 }
show dbs confirms that the database was indeed dropped:
> show dbs admin 0.000GB config 0.000GB local 0.000GB
For more database operations, please consult the MongoDB reference page on database commands.
The post An Introduction to MongoDB appeared first on SitePoint.
by Manjunath M via SitePoint https://ift.tt/2up1ygl
0 notes
Text
How to set up an Apache Spark cluster with a Hadoop Cluster on AWS (Part 1)
One of the big points of interest in the latest years comes from the posibilities that Big Data entails. Organizations, from the smallest startup to the biggest, oldschool enterprise, are coming to the realization that there's tons of data to easily come around in these days of Massive, Always-on Networked Computing in the Hands of Everyone(tm), be it through Data Mining or out of their old, classic datasets, and it turns out there's tons of value in being able to do something for a change with that data. Maybe you can use your data to understand your users better to market better to them, or you can understand market trends better and ramp up your production at the right time to maximize profits... there's tons of ways to get smarter and better at business from Data.
But what's the problem? Data is finnicky. Data can be a diamond in the rough: are you getting the right data? Does it need cleaning up or normalizing (protip: it usually does) or formatting to be usable? How do you transform it somehow to make it useful? Do you need to serve it to someone, and how, to maximize efficiency?
A lot of times, the scale of that data is a challenge too. So, this is what we call a Data Lake. We call it data lake because there's a preemptive assumption: that data ingresses and egresses from your Organization in many shapes and forms, but it has many different shapes and sizes. But, how can we make sense of your data lake? How do you pull this off? O, what is the shape of water, thou aske? Well, that's the crux of the matter.
Enter Big Data, which is kind of an umbrella term for what we're trying to accomplish. The very prospect of Big Data is that we have the tech and the beef (distributed computing, the cloud, and good networking) to make sense of all of your data, no matter even if it's in the order of magnitude of petabytes.
So, there's lots of different propositions in the tech market today to attack this ~even though the more you look it seems that every company is coming up with their own propietary ways to solve this and sell you some smoke and mirrors rather than actual results~. But lately the dust has settled on a few main players. Specifically: Apache Spark to run compute, and Hadoop in the persistence layer.
Why Spark and Hadoop? Spark is a framework to run compute in parallel across many machines, that plays fantastically well with JVM languages. We are coming off almost 30 years of fantastic legacy in the Java ecosystem, which is like a programming lingua franca at this point. Particularly, it's exciting to program on Spark on languages such as Scala or Clojure, that not only have [strong concurrency models])(https://the-null-log.org/post/177889728984/concurrency-parallellism-and-strong-concurrency), but also have normalized conceptions of map and reduce operations to munge and crunch data baked right into the language (it will be seen, in a bit, that Map/Reduce is a fundamentally useful construct to process Big Data).
On the other part, Hadoop can make many disk volumes be seen as just one, while handling all the nitty gritty shitty details behind scenes. Let's face it: when you operate in the order of petabytes, your data is not gonna fit in a single machine, so that's why you need a good distributed file system.
And yes, before you say so, yes: I know there's managed services. I know Amazon has EMR and Redshift, I know I don't need to do this manually if Amazon Will Run It For Me Instead(tm). But SHUT UP.
I'm gonna set up a cluster so you don't have to!
And besides, we can use very exciting cloud technologies, that leverage really modern programming paradigms and that enable us to exploit the web better and faster, particularly with the event model of cloud computing. More on that later, because it's something that I really love about cloud services, but we can't go in depth on Events right now.
So this exercise will proceed in three phases:
1) Defining the compute architecture and bringing up infrastructure 2) Defining the data lake and your ingress/egress 3) Crunching data!
Defining the compute architecture and bringing up infrastructure
Spark
Spark works clustered, in a master-slave configuration, with many worker nodes reacting to instructions sent by a master node, which thus works as the Data plane. With something sophisticated as a container orchestrator you could run these workloads with containerization and scale up/down as needed. Cool, right?
So this is a rough estimate of how our architecture is going to look like:
The number of worker nodes is up to you and your requirements ;). But this is the main idea. Rough sketch.
We'll run all the machines on EC2. Eventually, we could run all our compute containerized like I said, but for now, we'll do servers.
For each machine I plan to run small, replicable, machines. One of the tenets of cloud computing is that your compute resources should be stateless and immutable and for the sake of practicity you should consider them ephemeral and transparently replaceable.
For the machines I'll Use AML (Amazon Linux). A nice, recent version! I love CentOS-likes and AML is well suited for EC2.
Now, we will provision the machines using cloud-init. Cloud-init is a fantastic resource if you subscribe to sane cloud computing principles, particularly the premise of infrastructure as code. Cloud-init is a tool that you can find in most modern linux distros that you can run first thing after creating a machine, with what's basically yaml-serialized rules as to how the machine should be configured in terms of unix users, groups and permissions, access controls (such as ssh keys), firewall rules, installation of utilities into the machine and any and all other housekeeping needed.
Why is it that important to write your bootstrapping logic in cloud-init directives? In cloud computing, given that the resources that you have access to are theoretically endlessly elastic and scalable, then you should focus more rather on the substance behind the compute resources that you use for your operations rather than the resource itself, since the resources can be deprovisioned or scaled in replication at any time. Thus, if you specify the configuration, tools, utilities, and rules that should dictate how your resource works in a text file, not only your resource becomes easily available and easily replicable, but you also get to version it as if it was any other piece of logic in your application. Since this configuration should not change arbitrarily, that means that any and all resources trhat you provision will, each and every time, be configured exactly the same and work exactly the same as any other resources that you have provisioned.
Besides, tangentially: cloud-init gives you a comfy layer of abstraction that puts you one step closer to the deliciousness of the lift and shift ideal. If you notice, cloud-init has constructs to handle user creation and installing utilities and such, without having to code directly to the environment. You don't have to worry if you're using a Slackware-like or Debian-like, and which assumptions are made under the hood or not :)
(Bear in mind that I have only tested this on Ubuntu on AWS. If you're running another distro or are on another cloud, you are GOING TO HAVE TO adjust the cloud-init directives to match your environment! Debugging is key! You can look on the cloud-init log after your compute launches, usually by default in: /var/log/cloud-init-output.log)
Marvelous!
Infrastructure as code is the bees fuckin knees, y'all!
So, this is my cloud-init script, which is supported natively in AWS EC2:
#cloud-config repo_update: true repo_upgrade: all # users: # - name: nullset # groups: users, admin # shell: /bin/bash # sudo: ALL=(ALL) NOPASSWD:ALL # ssh_authorized_keys: ssh-rsa ... nullset2@Palutena packages: - git - ufw - openjdk-8-jre runcmd: - [ bash, /opt/cloud-init-scripts/setup_spark_master.sh ] write_files: - path: /opt/cloud-init-scripts/setup_spark_master.sh content: | #!/bin/bash SPARK_VERSION="2.4.0" HADOOP_VERSION="2.7" APACHE_MIRROR="apache.uib.no" LOCALNET="0.0.0.0/0" # Firewall setup ufw allow from $LOCALNET ufw allow 80/tcp ufw allow 443/tcp ufw allow 4040:4050/tcp ufw allow 7077/tcp ufw allow 8080/tcp # Download and unpack Spark curl -o /tmp/spark-$SPARK_VERSION-bin-hadoop$HADOOP_VERSION.tgz http://$APACHE_MIRROR/spark/spark-$SPARK_VERSION/spark-$SPARK_VERSION-bin-hadoop$HADOOP_VERSION.tgz tar xvz -C /opt -f /tmp/spark-$SPARK_VERSION-bin-hadoop$HADOOP_VERSION.tgz ln -sf /opt/spark-$SPARK_VERSION-bin-hadoop$HADOOP_VERSION/ /opt/spark chown -R root.root /opt/spark-$SPARK_VERSION-bin-hadoop$HADOOP_VERSION/* # Configure Spark master cp /opt/spark/conf/spark-env.sh.template /opt/spark/conf/spark-env.sh sed -i 's/# - SPARK_MASTER_OPTS.*/SPARK_MASTER_OPTS="-Dspark.deploy.defaultCores=4 -Dspark.executor.memory=2G"/' /opt/spark/conf/spark-env.sh # Make sure our hostname is resolvable by adding it to /etc/hosts echo $(ip -o addr show dev eth0 | fgrep "inet " | egrep -o '[0-9.]+/[0-9]+' | cut -f1 -d/) $HOSTNAME | sudo tee -a /etc/hosts # Start Spark Master with IP address of enp0s3 as the address to use /opt/spark/sbin/start-master.sh -h $(ip -o addr show dev eth0 | fgrep "inet " | egrep -o '[0-9.]+/[0-9]+' | cut -f1 -d/) - path: /etc/profile.d/ec2-api-tools.sh content: | #/bin/bash export JAVA_HOME=/usr/lib/jvm/java-1.8.0 export PATH=$PATH:$JAVA_HOME/bin
Of particular attention: Notice how I setup a user for myself on the machine by adding my public SSH key. You should add your personal public key here or you can use a private key generated by ec2 to connect to the machine and delete the users block if you prefer to use a private key generated by ec2.
We will use this as our "canon" image for our spark master. So, let's create the machine and pass this cloud-init script as the User Data when configuring our compute instance:
If you run this and everything goes fine, you should end up with a complete spark installation under /opt/spark, with a bunch of helper scripts located in /opt/spark/sbin. You should be able to confirm or debug any issues by taking a look at your cloud-init log which should be by default on /var/log/cloud-init.log.
If you see something like this you made it:
starting org.apache.spark.deploy.master.Master, logging to /opt/spark/logs/spark-[user]-org.apache.spark.deploy.master.Master-1-[hostname].out
Now, we'll do something very similar for the worker nodes and launch them with cloud-init directives. Remember to replace the value for the IP of the master server that we created in the step before you run this!!!!!
#cloud-config repo_update: true repo_upgrade: all # users: # - name: nullset # groups: users, admin # shell: /bin/bash # sudo: ALL=(ALL) NOPASSWD:ALL # ssh_authorized_keys: ssh-rsa ... nullset2@Palutena packages: - git - ufw - openjdk-8-jre runcmd: - [ bash, /opt/cloud-init-scripts/init_spark_worker.sh ] write_files: - path: /opt/cloud-init-scripts/init_spark_worker.sh content: | #!/bin/bash SPARK_VERSION="2.4.0" HADOOP_VERSION="2.7" APACHE_MIRROR="apache.uib.no" LOCALNET="0.0.0.0/0" SPARK_MASTER_IP="<ip of master spun up before>" # Firewall setup ufw allow from $LOCALNET ufw allow 8081/tcp # Download and unpack Spark curl -o /tmp/spark-$SPARK_VERSION-bin-hadoop$HADOOP_VERSION.tgz http://$APACHE_MIRROR/spark/spark-$SPARK_VERSION/spark-$SPARK_VERSION-bin-hadoop$HADOOP_VERSION.tgz tar xvz -C /opt -f /tmp/spark-$SPARK_VERSION-bin-hadoop$HADOOP_VERSION.tgz ln -sf /opt/spark-$SPARK_VERSION-bin-hadoop$HADOOP_VERSION/ /opt/spark chown -R root.root /opt/spark-$SPARK_VERSION-bin-hadoop$HADOOP_VERSION/* # Make sure our hostname is resolvable by adding it to /etc/hosts echo $(ip -o addr show dev eth0 | fgrep "inet " | egrep -o '[0-9.]+/[0-9]+' | cut -f1 -d/) $HOSTNAME | sudo tee -a /etc/hosts # Start Spark worker with address of Spark master to join cluster /opt/spark/sbin/start-slave.sh spark://$SPARK_MASTER_IP:7077 - path: /etc/profile.d/ec2-api-tools.sh content: | #/bin/bash export JAVA_HOME=/usr/lib/jvm/java-1.8.0 export PATH=$PATH:$JAVA_HOME/bin
Notice: in both scripts we have a variable that has the value for a certain IP subnet. I am currently setting it to 0.0.0.0/0 which means that the subnet that the machine will be on will allow any connections from the world. This is fine enough for development but if you're going to deploy this cluster for production you must change this value. It helps if you're familiar with setting firewall rules on ufw or iptables and/or handling security groups on AWS (which is a completely different subject, which we'll pick up on later).
Another Notice: PLEASE ensure that your TCP rules on your master/slave security groups look like this before you move onward! This goes without saying but you should ensure that both machines can talk to each other through TCP port 7077 which is the spark default for communication and 8080 for the master's Web UI and 8081 for the slave Web UI. It should look something like this
The cool thing at this point is that you could save this as an EC2 Golden Image and use it to replicate workers fast. However, I would not recommend to do that at this point because you would end up with identical configuration across nodes and that could lead to issues. Repeat as many times as needed to provision all of your workers. You could probably instead use an auto-scaling group and make it so things such as the IP of the master and whatnot are read dynamically instead of hardcoded. But this is a start :).
And finally it should be possible to confirm that the cluster is running and has associated workers connected to it if you take a look at the Spark Master UI, which should be pretty simple if you look at the content being served on the master on port 8080. So open up the ip address of your master node on port 8080 on a web browser and you should see the web UI.
So that's it for the time being! Next time we'll set up a Hadoop cluster and grab us a bunch of humongous datasets to crunch for fun. Sounds exciting?
0 notes
Text
nixos did solve a lot of problems for me all at the same time though. immutable-ish distro so that i can always boot something, reasonable release schedule, centralized configuration, a robust development environment that doesn't impact the 'host' system, she does it all baby but i really can't recommend it unless you are already somewhat knowledgeable about linux and ready to climb up a cliff of a learning curve
i kind of hate how i got hooked on a very bespoke and different linux distro (nixos) because it makes it hard for me to help people completely new to linux anymore because i'm like "uhh i use nixos but i cannot recommend that and you should use something like fedora but i can't really help you all that well with that because i don't use fedora so uhhh uhh ummmmmmmmmm"
1 note
·
View note