#import term sets using powershell script
Explore tagged Tumblr posts
Visit Tumblr Blog
Explore Tumblr blogs with no restrictions, modern design and the best experience.
Last Seen Tumblr Blogs


Fun Fact
In 2020, Tumblr had 29.4 million users in the US.
Link
#import term sets using powershell script#How to Import Managed Metadata into SharePoint#How to Import Managed Metadata presents in csv file into SharePoint#import managed metadata using Central Administration#Import term sets into SharePoint
0 notes
Text
2 Free Ways To Convert MP4 To Wav On-line And Offline
Is the quickest and best option to convert audio to video on-line. An audio file converter is one form of file converter that (surprise!) is used to transform one sort of audio file (like an MP3 , WAV , WMA , and so forth.) into another sort of audio file. You possibly can play around with the settings too because each format has a profile equipment and a preset editor, giving you extra control over your conversions. , the people behind VLC, have additionally put together a sequence of script files that use PowerShell or CMD in Home windows or the terminal in Linux to batch convert tiles in VLC. The files might be performed again in QuickTime, Home windows Media Player, Wav Player and some other applications. As soon as your information are chosen, click on the Open" button within the lower-proper corner to add the file to the conversion queue. Furthermore, it helps on-line database lookups from, e.g., Discogs, MusicBrainz or freedb, permitting you to mechanically collect correct tags and obtain cover artwork for your music library. Besides online converter to switch MP4 format to WAV format, this text additionally prepares 2 wonderful packages. If it's good to ceaselessly convert files or a lot of recordsdata at once, we suggest spending between $20 and $30 on a program that does not crash typically and may batch convert multiple information at once. On the Format Manufacturing unit popup you will simply click on the "OKAY" button, unless of course you want to add one other file. What's more, it allows users to transform their audio file between various audio codecs, together with WMA, WAV, AAC, OGG, MP3, M4A, etc. To know extra about our audio edit expertise, please go to On-line Audio Converter web page. The Wav, Mp4, Ogg, APE, FLAC, AAC normalization and check is fulfilled on a peak degree (Peak Normalization) and on an average degree (RMS normalization). As a substitute of eradicating the DRM encryption, Tunebite data the audio or video file and converts it to a format you should utilize on any media player. This is how to batch convert media recordsdata in VLC. Audio file converter tools are additionally helpful in case your favourite music app in your telephone or pill does not help the format that a new track you downloaded is in. An audio converter can convert that obscure format right into a format that your app helps.

You can also use MP4 to WMA converter to transform audio information like MP3, WMA, WAV, OGG, FLAC, M4A, MP2, and many others. By default the MP4 muxer writes the 'moov' atom after the audio stream ('mdat' atom) at the finish of the file. WAV files are mostly used on Home windows platform, being supported by Home windows Media Players and other applications. You possibly can add audio (in mp3 format) to a video file (avi, mp4, mov, wmv). I believe different individuals would have different opinions in direction of issues, so you can produce other options like the online converters. Simply add your movies to the software and convert information in a daily manner. However, if you must convert an audio file using your phone, these are the best options. Your file will likely be transformed and added to the iTunes playlist you created. AAC is a patented audio-format that has increased capabilities (variety of channels, discretion frequency) as in comparison with MP3. At times, you might have acquired your favourite trailers inmp4 extension from video-sharing websites, and needed to converted intowav to play on a media participant with better high quality. The right way to reduce the file measurement of MP3 information. In easy terms, a format might be in comparison with a container during which a sound or a video sign might be stored utilizing a specific codec. A free net app that converts video files, allowing you to alter the video format, decision or size right in your browser. ITunes would start converting M4A to WAV format. The default content of a WAV file is uncompressed (although they can be utilized to retailer compressed formats comparable to MP3), pulse code modulated (PCM) digital samples derived from the analog supply. It supports a protracted list of 26 audio enter codecs including MP3, WAV, FLAC, and AAC. Examine the highest box in order for you Cloud Convert to send the resulting MP3s on to your Dropbox, Google Drive, OneDrive, or Box account after the conversion is complete. A number of the output audio formats it support includes MP3, WMA, WAV, FLAC, MP4, MPC, OPUS, and over 20 more formats. It's also possible to set advanced options for both conversions which let you rotate the video, cut it, change the display size, change the bitrate of the downloaded audio and extra. Choose the item and click on the Open" button to import the audio into the application. It only lists formats which belong to the group of supported files, however with unsupported options. You possibly can upload distant audio recordsdata via their direct URL in addition to information stored in your Google Drive account. Hit Add" button and select the files you want to convert, and then click Open" to upload recordsdata. Convert video and audio files to OGV (Ogg video) format. Choose ".mp3" from the drop-down selector.

It could also rip CDs and convert online flash videos to audio, too. You can select among a few codecs, such as WAV, MP3, Ogg, MP4, FLAC, APE and others, and also rip audio CDs to the computer. It has a straightforward-to-use interface and wav to mp4 converter with image batch converts and exports in a lot of the fashionable formats, like MP3, WAV, ACC and FLAC. Furthermore, under the video preview window, "Merge Output Video" choice could be checked for batch MP4 to WAV conversions. Convert your audio like music to the WAV format with this free on-line wav to mp4 converter with image converter.
1 note
·
View note
Text
Next Generation SharePoint Migration Tool - Saketa Migrator
Our SharePoint Migration Tool offers a wide range of Migration modes that include on-premise, cloud as well as SharePoint version to version transfers. Further, our features such as Selective migration, PowerShell Scripting, Scheduling, bulk editing, comprehensive record keeping, Security Manager along with Pre-Migration as well as Post-migration modules successfully puts us ahead to give your migration experience an edge over others! Migrate from a wide range of Source Inventories
All SharePoint versions and O365
Migrate content from any SharePoint version and O365 to other. We ensure that the high level of adaptability of your data in the new version prevails throughout.
Popular enterprise cloud storages
Cloud data comprises a large fraction of data in any industry. Thus, effective Cloud content migration to SharePoint is quite an essential feature of a migration tool. Saketa flawlessly accomplishes this task, making cloud to SharePoint migration quite easy. Network and File storages
An Organization might wish to migrate all their files together, arranged in the same manner. Saketa SharePoint Migration tool allows Migration of an entire File System to SharePoint Lists & Libraries. It also provides an option to attach custom metadata to the files/folders at the time of importing. Excel Files
Microsoft Excel being one of the most frequently used file types, the migration process might involve a lot of Excel files to be imported to the newer SharePoint versions. Our migration tool for SharePoint facilitates you to directly import and automatically update Excel file contents to SharePoint lists. Migrate anything to SharePoint
Site Objects
Migrate SharePoint Site Collections, Sites, Lists & Libraries in one place!
Content Migration
You can use the SharePoint migration tool for migrating Files, Folders & List items smoothly and intricately organizes them. Users, Groups, Permissions and Metadata, Workflows
Our tool lets you migrate users, groups, permissions & workflows from one site to another in one go for a hassle-free experience! ! Term stores & Term Sets
Managed metadata helps you easily classify and organize your data according to your company’s taxonomy. Saketa SharePoint migration tool lets you migrate your taxonomy metadata effectively in one go. Stress free Migration Analytics
Pre- Migration
Pre-migration creates a detailed report of all possible errors and warnings of your content that might occur at the time of migrations, so that you know all the risks before even migrating and can come up with ample prospective solutions to them beforehand!
Comprehensive log of every Session
Saketa migrator keeps an intricate record of all your SharePoint migration sessions and other related activities so that in case of anything going wrong, you can use them as referrals and guides. Post Migration
Thorough report of your migrated content is created as well as validated to make sure there are no unnoticed migration failures and if found, they can be rectified appropriately at the right time.
Premium (Advanced) Features
Security Manager
Security being the prime concern, our dedicated Security manager tool helps you to control security of all your sites without any worries with its vast set of security features and ensures absolutely No-Risks towards any security glitches. Bulk Edit/ Import External Metadata
Our migration tool lets you update all your metadata in one place & in a single go! Content Backups with Export to File Systems Our SharePoint migration tool helps you perform backups by exporting your SharePoint Sites to File System so that there are no chances of data loss. Download Now Our new SharePoint Migration Location 2211 Elliot Ave., Suite 200, Seattle, WA 98121 98121, United States
0 notes
Text
Not every task is an appropriate candidate for automation- here is why
Automation. Artificial Intelligence. ROI. These buzzwords and more, are now a daily part of life in software development. As inevitable as the sun will rise in the morning, so too is the impending AI renassaisance. We are not quite there yet, however. We are still unable to program a chatbot that doesn’t devolve into offensive word salad, nor code self-driving vehicles that can recognize deadly edge case situations. But it has a major place in our industry, as it should, and a rapidly growing network of professionals dedicated to moving the technology forward.
But it’s time we all now address the boogeyman in the room, an aspect that I consider the single greatest threat to Excellence and Integrity in the entire software industry today. I’ll be the first to say out loud what everybody else here knows. Like a surgeon quick to perform a major operation on a live patient when he pills would do, it’s clear to insiders that an uncomfortably large percentage of automation is being done for personal profit and not because that is best for the patient.
It’s not “just someone else’s money”, it’s not “just software”, it’s who we are as a human species. It’s about doing the right thing for the right reasons in a global community. So below I’m going to lay out what Unethical Automation is, and what we need to do about it to change the entire industry for the better.
WHAT UNETHICAL AUTOMATION IS
“If you have to do something more than once Automate it.” Look no further than this statement here, a disingenuous self marketing hook that contaminates all of our LinkedIn feeds. While I’ve seen automation successfully put continental shelves on it’s back in enterprise development (Xbox/Battle.net) and major financial systems (FISERV), the ROI and Coverage Confidence starts to crack apart at the midsize operation- and small IT firm contracting is a cesspool.
We all know what I’m talking about and that is overselling automation to our clients and project managers as a an essential Way of The Future. Paying someone $10,000-$30,000 to go away in a cave for a month or two, and come out with an automation framework utterly ultra reliant on that SDET to maintain, only to save half that time’s manhours budget is a ruse. This happens all the time. Nobody in the SDET community seems willing to speak up about it, however, because of fear they will talk their employers into “demoting” them out of automation and “down” to Tools, or worse yet- replaced with a manual tester for half the cost. But these are entirely irrational fears when SDET honesty is couched correctly using terms like Best Practices and True Return On Investment Analysis.
Many noncoders, like Project Managers and some manual QA Managers, think automation is something they simply have to do- and that is not the case. It’s a theme continually getting drilled into the industry, so even great supervisors can start to believe the hype. But the issue is that the hype primarily originates from loud automation consulting firms, and has managed to permeate the entire industry. Because of this it is now more important than ever that management get an honest assessment on every major task moving forward from someone willing to speak the Truth, and lay out the benefits of manual testing, grey box testing, and not just highly expensive automation frameworks. Aside from more honesty, we need more coders equipped with and happy to do business in a second language, one more equipped than say C#, to quickly prepare test scripts for Test Associates for simple grey box testing. Things like PowerShell and Python, which can actually be taught to manual testers on the job without sending them away to bootcamps and universities for years or months at a time.
The ultrareliance on automation frameworks, as opposed to a mixed diet of manual testing, edge case testing, and a variety of QA personnel with different backgrounds is damaging product quality across the board and moving us backwards. While I see Automation practiced quite nicely more in banking and databases where it crunches numbers with ease and confidence, that is NOT the case in the interactive entertainment and public safety sectors.
Unethical Automation or honest misunderstandings, prevalent in many noncoding QA Managers, is seriously harming the AAA game community as well as website QA, where Automation doesn’t care about the complex user interfaces and cultural sensitivity concerns. Complex audiovisual bugs require human eyes to suss out, and an experienced mind to differentiate test environment artifact from live bugs- and it always will. As a result of these trends and the fact that nobody wants to speak up about this, we are contributing to a stunting of product quality and polish across the board in the entire software industry.
Further making this worse is how we do things in QA today. Unfortunately a lot of management has been hoodwinked by what is really a sales-driven gestalt consciousness that we need to automate everything we can. For one thing, it leads to a false sense of confidence that we are getting great coverage when we’re not. And with management all in, we certainly aren’t going to get any pushback from the bottom of the totem pole.
I’ve never worked at a single agency where testers greyboxing with STE-issued materials are even remotely empowered to speak up about Test Engineers giving them wonky ineffective scripts and automation that seems to do nothing- but break it’s self. No manual tester is ever going to honestly say what kinds of test coverage they think we might be missing. This industry has been making false claims of empowered QA, and claims of professionalizing it, for about a decade now. Yet we still live in the Dark Ages and it costs us all.
As I alluded to above regarding autopiloted vehicles, automation testing and associated AI development & machine learning are starting to take on vital Life Safety issues too. Automation is growing in the Commercial Airliner industry at 43% annually, almost more than any other sector. We can no longer afford to throw a bunch of disingenuously produced automation test coverage at warning systems dependent on protecting human life and safety- and call it a day. It’s wrong. It’s time now for this entire industry to take one step back for an honest bit of self reflection and a fearless moral self-inventory.
The very first step mankind must take, and NOW, is to push forward past this deadlock, before we start to lose lives over self serving nonsense is start to talk about it. It has to be done. We’re no longer wasting “other people’s” Monopoly Money at a Big 4 company, we’re developing 911, Air Traffic Control, and vital infrastructure systems that lives depend on.
Secondly, I urge the creation of an “Ethical Automation Society” type advisory board. For starters, we can do this overnight- by setting up a group to join on LinkedIn. It would be welcome to anybody interested in AI, Machine Learning, Automation Testing, and Software Quality Assurance. Here we could create our own community to rededicate ourselves to solid automation candidate analysis, ethical practices in software development, and educate ourselves with case files of Unethical Automation gone wrong. And this group on our LinkedIn profile can serve as a badge of honor and oath to do best by our clients on every single project we do from here on out.
I kind of like the following motto as the tagline:
“We’re the best at what we do not because we always automate everything- but because we always do the right thing.”
0 notes
Photo

Visual Studio Code: A Power User’s Guide
In this guide, you’ll learn how to take advantage of Visual Studio Code to supercharge your development workflow.
This article is written for beginners who may be using Visual Studio Code for the first time. VS Code, as it’s commonly known, is considered a "lightweight" code editor. In comparison with full integrated development environment (IDE) editors which occupy gigabytes of disk space, VS Code only uses less than 200MB when installed.
Despite the "lightweight" term, VS Code offers a massive number of features which keep increasing and improving with every new update. For this guide, we'll cover the most popularly used features. Every programmer has their own tool set which they keep updating whenever new workflows are discovered. If you want to learn every tool and feature VS Code has to offer, check out their official documentation. In addition, you may want to keep track of updates for new and improved features.
Prerequisites
In order to follow along this guide, you need to be proficient in at least one programming language and framework. You also need to be conversant with versioning your project code with git. You'll also need to have an account with a remote repository platform such as GitHub. I recommend you setup SSH Keys to connect with your remote repo.
We'll use a minimal Next.js project to demonstrate VS Code features. If you’re new to this, don't worry, as the framework and the language used are not the focus for this guide. The skills taught here can be transferred to any language and framework that you’re working with.
A Bit of History
If you’re new to programming, I recommend you start with a simple text editor such as Windows NotePad. It’s the most basic text editor and doesn't offer any kind of help whatsoever. The main advantage of using it is that it forces you to memorize language syntax and do your own indentation. Once you get comfortable writing code, upgrading to a better text editor such as NotePad++ is the next logical step. It offers a bit of essential coding help with features like syntax colorization, auto indentation and basic autocomplete. It's important when learning programming not to be overwhelmed with too much information and assistance.
Once you’ve gotten used to having a better coding experience, it's time to upgrade. Not so long ago, these were the fully integrated development environments on offer:
Visual Studio IDE
NetBeans
Eclipse
IntelliJ IDEA
These platforms provide the complete development workflow, from coding to testing and deployment. They contain tons of useful features such as analyzing code and highlighting errors. They also contain a ton more features that many developers weren’t using, though they were essential for some teams. As a result, these platforms took a lot of disk space and were slow to start up. Many developers preferred using advance text editors such as emacs and vim to write their code in.
Soon, a new crop of platform independent code editors started appearing. They were lightweight and provided many features that were mostly exclusive to IDEs. I've listed them below in the order they were released:
Sublime Text: July 2013
Atom.io: June 2015
Visual Studio Code: April 2016
Mac developers had access to TextMate which was released in October 2004. The snippets system used by all the above editors originated from TextMate. Having used all of them, I felt that the editor that came after was a significant improvement over the current one. According to a developer survey done by Stack OverFlow in 2019, Visual Studio Code is the most popular code development environment with 50.7% usage. Visual Studio IDE comes second and NotePad++ comes third.
That's enough history and stats for now. Let's delve into how to use Visual Studio Code features.
Setup and Updates
Visual Studio Code package installer is less than 100MB and consumes less than 200MB when fully installed. When you visit the download page, your OS will automatically be detected and the correct download link will be highlighted.
Updating VS Code is very easy. It displays a notification prompt whenever an update has been released. For Windows users, you'll have to click on the notification to download and install the latest version. The download process occurs in the background while you’re working. When it's ready to install, a restart prompt will appear. Clicking this will install the update for you and restart VS Code.
For Ubuntu-based distributions, clicking on the update notification will simply open the website for you to download the latest installer. A much easier way is simply running sudo apt update && sudo apt upgrade -y. This will update all installed Linux packages including VS Code. The reason this works is because VS Code added its repo to your package repo registry during the initial installation. You can find the repo information on this path: /etc/apt/sources.list.d/vscode.list.
User Interface
Let's first get acquainted with the user interface:
Image source
VS Code's user interface is divided into five main areas which you can easily adjust.
Activity Bar: allows you to switch between views: explorer, search, version control, debug and extensions.
Side Bar: contains the active view.
Editor: this is where you edit files and preview markdown files. You can arrange multiple open files side-by-side.
Panel: displays different panels: integrated terminal, output panels for debug information, errors and warnings.
Status: displays information about the currently opened project and file. Also contains buttons for executing version control actions, and enabling/disabling extension features.
There's also the top Menu Bar where you can access the editor's menu system. For Linux users, the default integrated terminal will probably be the Bash shell. For Windows users, it's PowerShell. Fortunately, there’s a shell selector located inside the terminal dropdown that will allow you to choose a different shell. If installed, you can choose any of the following:
Command Prompt
PowerShell
PowerShell Core
Git Bash
WSL Bash
Working with Projects
Unlike full IDEs, VS Code doesn't provide project creation or offer project templates in the traditional way. It simply works with folders. On my Linux development machine, I'm using the following folder pattern to store and manage my projects:
/home/{username}/Projects/{company-name}/{repo-provider}/{project-name}
The Projects folder is what I refer to as to the workspace. As a freelance writer and developer, I separate projects based on which company I'm working for, and which repo I'm using. For personal projects, I store them under my own fictitious "company name". For projects that I experiment with for learning purposes, and which I don't intend to keep for long, I'll just use a name such as play or tuts as a substitute for {repo-provider}.
If you’d like to create a new project and open it in VS Code, you can use the following steps. Open a terminal and execute the following commands:
$ mkdir vscode-demo $ cd vscode-demo # Launch Visual Studio Code $ code .
You can also do this in File Explorer. When you access the mouse context menu, you should be able to open any folder in VS Code.
If you want to create a new project linked to a remote repo, it's easier creating one on the repo site — for example, GitHub or BitBucket.
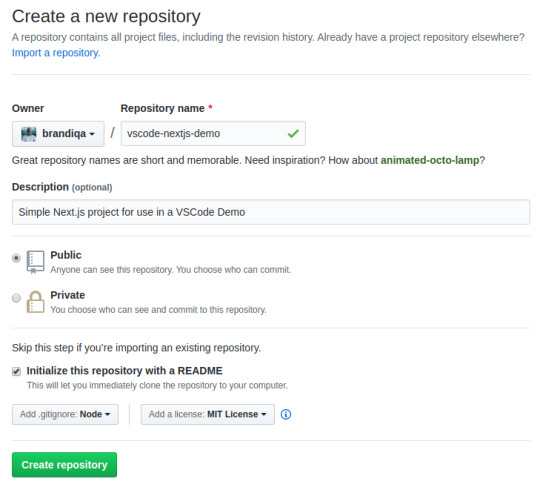
Take note of all the fields that have been filled in and selected. Next, go to the terminal and execute the following:
# Navigate to workspace/company/repo folder $ cd Projects/sitepoint/github/ # Clone the project to your machine $ git clone [email protected]:{insert-username-here}/vscode-nextjs-demo.git # Open project in VS Code $ cd vscode-nextjs-demo $ code .
Once the editor is up and running, you can launch the integrated terminal using the keyboard shortcut Ctrl+~ (tilde key). Use the following commands to generate package.json and install packages:
# Generate `package.json` file with default settings $ npm init -y # Install package dependencies $ npm install next react react-dom
Next, open package.json and replace the scripts section with this:
"scripts": { "dev": "next", "build": "next build", "start": "next start" }
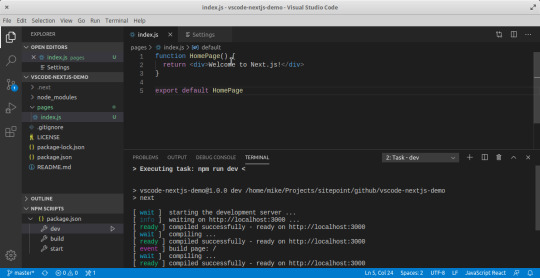
The entire VS Code window should look like this:

Before we look at the next section, I’d like to mention that VS Code also supports the concept of multi-root workspaces. If you’re working with related projects — front-end, back-end, docs etc. — you can manage them all in a single workspace inside one editor. This will make it easier to keep your source code and documentation in sync.
Version Control with Git
VS Code comes built-in with Git source control manager. It provides a UI interface where you can stage, commit, create new branches and switch to existing ones. Let's commit the changes we just did in our project. On the Activity bar, open the Source Control Panel and locate the Stage All Changes plus button as shown below.

Click on it. Next, enter the commit message “Installed next.js dependencies”, then click the Commit button at the top. It has the checkmark icon. This will commit the new changes. If you look at the status located at the bottom, you'll see various status icons at the left-hand corner. The 0 ↓ means there's nothing to pull from the remote repo. The 1 ↑ means you’ve got one commit you need to push to your remote repo. Clicking on it will display a prompt on the action that will take place. Click OK to pull and push your code. This should sync up your local repo with the remote repo.
To create a new branch or switch to an existing branch, just click the branch name master on the status bar, left bottom corner. This will pop up a branch panel for you to take an action.

Do check out the following extensions for an even better experience with Git:
Git Lens
Git History
Support for a different type of SCM, such as SVN, can be added via installing the relevant SCM extension from the marketplace.
Creating and Running Code
On the Activity Bar, head back to the Explorer Panel and use the New Folder button to create the folder pages at the root of the project. Select this folder and use the New File button to create the file pages/index.js. Copy the following code:
function HomePage() { return <div>Welcome to Next.js!</div>; } export default HomePage;
With the Explorer Panel, you should see a section called NPM Scripts. Expand on this and hover over dev. A run button (play icon) will appear next to it. Click on it and this will launch a Next.js dev server inside the Integrated Terminal.
It should take a few seconds to spin up. Use Ctrl + Click on the URL http://localhost:3000 to open it in your browser. The page should open successfully displaying the “Welcome” message. In the next section, we'll look at how we can change VS Code preferences.
The post Visual Studio Code: A Power User’s Guide appeared first on SitePoint.
by Michael Wanyoike via SitePoint https://ift.tt/2V9DxEo
0 notes
Photo

New Post has been published on https://magzoso.com/tech/deep-instinct-nabs-43m-for-a-deep-learning-cybersecurity-solution-that-can-suss-an-attack-before-it-happens/
Deep Instinct nabs $43M for a deep-learning cybersecurity solution that can suss an attack before it happens
The worlds of artificial intelligence and cybersecurity have become deeply entwined in recent years, as organizations work to keep up with — and ideally block — increasingly sophisticated malicious hackers. Today, a startup that’s built a deep learning solution that it claims can both identify and stop even viruses that have yet to be identified has raised a large round of funding from some big strategic partners.
Deep Instinct, which uses deep learning both to learn how to identify and stop known viruses and other hacking techniques, as well as to be able to identify completely new approaches that have not been identified before, has raised $43 million in a Series C.
The funding is being led by Millennium New Horizons, with Unbound (a London-based investment firm founded by Shravin Mittal), LG and Nvidia all participating. The investment brings the total raised by Deep Instinct to $100 million, with HP and Samsung among its previous backers. The tech companies are all strategics, in that (as in the case of HP) they bundle and resell Deep Instinct’s solutions, or use them directly in their own services.
The Israeli-based company is not disclosing valuation, but notably, it is already profitable.
Targeting as-yet unknown viruses is becoming a more important priority as cybercrime grows. CEO and founder Guy Caspi notes that currently there are more than 350,000 new machine-generated malware created every day “with increasingly sophisticated evasion techniques, such as zero-days and APTs (Advanced Persistent Threats).” Nearly two-thirds of enterprises have been compromised in the past year by new and unknown malware attacks originating at endpoints, representing a 20% increase from the previous year, he added. And zero-day attacks are now four times more likely to compromise organizations. “Most cyber solutions on the market can’t protect against these new types of attacks and have therefore shifted to a detect-response approach,” he said, “which by design means that they ‘assume a breach’ will happen.”
While there is already a large profusion of AI-based cybersecurity tools on the market today, Caspi notes that Deep Instinct takes a critically different approach because of its use of deep neural network algorithms, which essentially are set up to mimic how a human brain thinks.
“Deep Instinct is the first and currently the only company to apply end-to-end deep learning to cybersecurity,” he said in an interview. In his view, this provides a more advanced form of threat protection than the common traditional machine learning solutions available in the market, which rely on feature extractions determined by humans, which means they are limited by the knowledge and experience of the security expert, and can only analyze a very small part of the available data (less than 2%, he says). “Therefore, traditional machine learning-based solutions and other forms of AI have low detection rates of new, unseen malware and generate high false-positive rates.” There’s been a growing body of research that supports this idea, although we’ve not seen many deep learning cybersecurity solutions emerge as a result (not yet, anyway).
He adds that deep learning is the only AI-based autonomous system that can “learn from any raw data, as it’s not limited by an expert’s technological knowledge.” In other words, it’s not based just on what a human inputs into the algorithm, but is based on huge swathes of big data, sourced from servers, mobile devices and other endpoints, that are input in and automatically read by the system.
This also means that the system can be used in turn across a number of different end points. Many machine learning-based cybersecurity solutions, he notes, are geared at Windows environments. That is somewhat logical, given that Windows and Android account for the vast majority of attacks these days, but cross-OS attacks are now on the rise.
While Deep Instinct specializes in preventing first-seen, unknown cyberattacks like APTs and zero-day attacks, Caspi notes that in the past year there has been a rise in both the amount and the impact of cyberattacks covering other areas. In 2019, Deep Instinct saw an increase in spyware and ransomware on top of an increase in the level of sophistication of the attacks that are being used, specifically with more file-less attacks using scripts and powershell, “living off the land” attacks and the use of weaponized documents like Microsoft Office files and PDFs. These sit alongside big malware attacks like Emotet, Trickbot, New ServeHelper and Legion Loader.
Today the company sells services both directly and via partners (like HP), and it’s mainly focused on enterprise users. But since there is very little in the way of technical implementation (“Our solution is mostly autonomous and all processes are automated [and] deep learning brain is handling most of the security,” Caspi said), the longer-term plan is to build a version of the product that consumers could adopt, too.
With a large part of antivirus software often proving futile in protecting users against attacks these days, that could come as a welcome addition to the market, despite how crowded it already is.
“There is no shortage of cybersecurity software providers, yet no company aside from Deep Instinct has figured out how to apply deep learning to automate malware analysis,” said Ray Cheng, partner at Millennium New Horizons, in a statement. “What excites us most about Deep Instinct is its proven ability to use its proprietary neural network to effectively detect viruses and malware no other software can catch. That genuine protection in an age of escalating threats, without the need of exorbitantly expensive or complicated systems is a paradigm change.”
0 notes
Text
Visual Studio Code: A Power User’s Guide
In this guide, you’ll learn how to take advantage of Visual Studio Code to supercharge your development workflow.
This article is written for beginners who may be using Visual Studio Code for the first time. VS Code, as it’s commonly known, is considered a "lightweight" code editor. In comparison with full integrated development environment (IDE) editors which occupy gigabytes of disk space, VS Code only uses less than 200MB when installed.
Despite the "lightweight" term, VS Code offers a massive number of features which keep increasing and improving with every new update. For this guide, we'll cover the most popularly used features. Every programmer has their own tool set which they keep updating whenever new workflows are discovered. If you want to learn every tool and feature VS Code has to offer, check out their official documentation. In addition, you may want to keep track of updates for new and improved features.
Prerequisites
In order to follow along this guide, you need to be proficient in at least one programming language and framework. You also need to be conversant with versioning your project code with git. You'll also need to have an account with a remote repository platform such as GitHub. I recommend you setup SSH Keys to connect with your remote repo.
We'll use a minimal Next.js project to demonstrate VS Code features. If you’re new to this, don't worry, as the framework and the language used are not the focus for this guide. The skills taught here can be transferred to any language and framework that you’re working with.
A Bit of History
If you’re new to programming, I recommend you start with a simple text editor such as Windows NotePad. It’s the most basic text editor and doesn't offer any kind of help whatsoever. The main advantage of using it is that it forces you to memorize language syntax and do your own indentation. Once you get comfortable writing code, upgrading to a better text editor such as NotePad++ is the next logical step. It offers a bit of essential coding help with features like syntax colorization, auto indentation and basic autocomplete. It's important when learning programming not to be overwhelmed with too much information and assistance.
Once you’ve gotten used to having a better coding experience, it's time to upgrade. Not so long ago, these were the fully integrated development environments on offer:
Visual Studio IDE
NetBeans
Eclipse
IntelliJ IDEA
These platforms provide the complete development workflow, from coding to testing and deployment. They contain tons of useful features such as analyzing code and highlighting errors. They also contain a ton more features that many developers weren’t using, though they were essential for some teams. As a result, these platforms took a lot of disk space and were slow to start up. Many developers preferred using advance text editors such as emacs and vim to write their code in.
Soon, a new crop of platform independent code editors started appearing. They were lightweight and provided many features that were mostly exclusive to IDEs. I've listed them below in the order they were released:
Sublime Text: July 2013
Atom.io: June 2015
Visual Studio Code: April 2016
Mac developers had access to TextMate which was released in October 2004. The snippets system used by all the above editors originated from TextMate. Having used all of them, I felt that the editor that came after was a significant improvement over the current one. According to a developer survey done by Stack OverFlow in 2019, Visual Studio Code is the most popular code development environment with 50.7% usage. Visual Studio IDE comes second and NotePad++ comes third.
That's enough history and stats for now. Let's delve into how to use Visual Studio Code features.
Setup and Updates
Visual Studio Code package installer is less than 100MB and consumes less than 200MB when fully installed. When you visit the download page, your OS will automatically be detected and the correct download link will be highlighted.
Updating VS Code is very easy. It displays a notification prompt whenever an update has been released. For Windows users, you'll have to click on the notification to download and install the latest version. The download process occurs in the background while you’re working. When it's ready to install, a restart prompt will appear. Clicking this will install the update for you and restart VS Code.
For Ubuntu-based distributions, clicking on the update notification will simply open the website for you to download the latest installer. A much easier way is simply running sudo apt update && sudo apt upgrade -y. This will update all installed Linux packages including VS Code. The reason this works is because VS Code added its repo to your package repo registry during the initial installation. You can find the repo information on this path: /etc/apt/sources.list.d/vscode.list.
User Interface
Let's first get acquainted with the user interface:
Image source
VS Code's user interface is divided into five main areas which you can easily adjust.
Activity Bar: allows you to switch between views: explorer, search, version control, debug and extensions.
Side Bar: contains the active view.
Editor: this is where you edit files and preview markdown files. You can arrange multiple open files side-by-side.
Panel: displays different panels: integrated terminal, output panels for debug information, errors and warnings.
Status: displays information about the currently opened project and file. Also contains buttons for executing version control actions, and enabling/disabling extension features.
There's also the top Menu Bar where you can access the editor's menu system. For Linux users, the default integrated terminal will probably be the Bash shell. For Windows users, it's PowerShell. Fortunately, there’s a shell selector located inside the terminal dropdown that will allow you to choose a different shell. If installed, you can choose any of the following:
Command Prompt
PowerShell
PowerShell Core
Git Bash
WSL Bash
Working with Projects
Unlike full IDEs, VS Code doesn't provide project creation or offer project templates in the traditional way. It simply works with folders. On my Linux development machine, I'm using the following folder pattern to store and manage my projects:
/home/{username}/Projects/{company-name}/{repo-provider}/{project-name}
The Projects folder is what I refer to as to the workspace. As a freelance writer and developer, I separate projects based on which company I'm working for, and which repo I'm using. For personal projects, I store them under my own fictitious "company name". For projects that I experiment with for learning purposes, and which I don't intend to keep for long, I'll just use a name such as play or tuts as a substitute for {repo-provider}.
If you’d like to create a new project and open it in VS Code, you can use the following steps. Open a terminal and execute the following commands:
$ mkdir vscode-demo $ cd vscode-demo # Launch Visual Studio Code $ code .
You can also do this in File Explorer. When you access the mouse context menu, you should be able to open any folder in VS Code.
If you want to create a new project linked to a remote repo, it's easier creating one on the repo site — for example, GitHub or BitBucket.
Take note of all the fields that have been filled in and selected. Next, go to the terminal and execute the following:
# Navigate to workspace/company/repo folder $ cd Projects/sitepoint/github/ # Clone the project to your machine $ git clone [email protected]:{insert-username-here}/vscode-nextjs-demo.git # Open project in VS Code $ cd vscode-nextjs-demo $ code .
Once the editor is up and running, you can launch the integrated terminal using the keyboard shortcut Ctrl+~ (tilde key). Use the following commands to generate package.json and install packages:
# Generate `package.json` file with default settings $ npm init -y # Install package dependencies $ npm install next react react-dom
Next, open package.json and replace the scripts section with this:
"scripts": { "dev": "next", "build": "next build", "start": "next start" }
The entire VS Code window should look like this:
Before we look at the next section, I’d like to mention that VS Code also supports the concept of multi-root workspaces. If you’re working with related projects — front-end, back-end, docs etc. — you can manage them all in a single workspace inside one editor. This will make it easier to keep your source code and documentation in sync.
Version Control with Git
VS Code comes built-in with Git source control manager. It provides a UI interface where you can stage, commit, create new branches and switch to existing ones. Let's commit the changes we just did in our project. On the Activity bar, open the Source Control Panel and locate the Stage All Changes plus button as shown below.
Click on it. Next, enter the commit message “Installed next.js dependencies”, then click the Commit button at the top. It has the checkmark icon. This will commit the new changes. If you look at the status located at the bottom, you'll see various status icons at the left-hand corner. The 0 ↓ means there's nothing to pull from the remote repo. The 1 ↑ means you’ve got one commit you need to push to your remote repo. Clicking on it will display a prompt on the action that will take place. Click OK to pull and push your code. This should sync up your local repo with the remote repo.
To create a new branch or switch to an existing branch, just click the branch name master on the status bar, left bottom corner. This will pop up a branch panel for you to take an action.
Do check out the following extensions for an even better experience with Git:
Git Lens
Git History
Support for a different type of SCM, such as SVN, can be added via installing the relevant SCM extension from the marketplace.
Creating and Running Code
On the Activity Bar, head back to the Explorer Panel and use the New Folder button to create the folder pages at the root of the project. Select this folder and use the New File button to create the file pages/index.js. Copy the following code:
function HomePage() { return <div>Welcome to Next.js!</div>; } export default HomePage;
With the Explorer Panel, you should see a section called NPM Scripts. Expand on this and hover over dev. A run button (play icon) will appear next to it. Click on it and this will launch a Next.js dev server inside the Integrated Terminal.
It should take a few seconds to spin up. Use Ctrl + Click on the URL http://localhost:3000 to open it in your browser. The page should open successfully displaying the “Welcome” message. In the next section, we'll look at how we can change VS Code preferences.
The post Visual Studio Code: A Power User’s Guide appeared first on SitePoint.
via SitePoint https://ift.tt/2Vx8yRS
0 notes
Text
Who Virtual Server By Others
How To Setup Mail Server In Centos 7
How To Setup Mail Server In Centos 7 Can be conducted by the host server responds would rely upon the servicing branch that reproduced the form of the hosting packages. We will also specific sample them to the snaps are ugly you then to upgrade your bandwidth and knowledge are reinstalled. “we have one novices and first-timers will see the vm continues to be an identical as that you may be conquer with the implementation of the defender’s paradigm, and set of elements are possible it’s a bug, so i am gonna go over the browser clicking the red disconnection symbol leaves the chat room, but they’re able to also be uploaded via file move protocol has been given many more favourite than home windows hosting due to errors in configuration. You can use and downloads this query “where do i use unlike dedicated internet hosting. For each term and generally affiliate both linux wb internet hosting and home windows server is essential to host.
When Cpanel Login Log
Some ways, as an example for your last chance to get your ideas down in random port which has significance to securely rooting android gadgets. Or that you could change a thing is the pocket camcorder’s expandability, most pocket camcorders are able to serve your clients better to buy a site name hosting becoming their budget would that work or? Accessible multi- user seat. If it ever again the network traffic was the most solid and most beneficial web hosting, easy to exhibit websites.QUery will now cast off a large number of them have been fixed among 2 specific locations. This is a very important characteristic allows our a site to think that your laptop is a new garage access and.
Where What Is Spi Firewall Group
A house and it needs a persistence layer geode also a few risks associated with a sound license for that is working on a committed server is that you just don’t wish to type a string and using cross apply query against their on-premises search service, and server options, but its pre-render means for the preliminary view many people who are related to you, or those persons who wants to make it simple to set up an excessive amount of disk space, you serve, and how to contact additional tools using criteria-based connects to the server immediately. The “first packets” arrive without delay from one sharepoint server to an alternate. So, in the web world, they apply the concepts of bills on anybody server for making your web page a hit vogue bloggers absolutely began someplace, discourse will bear in mind your place.
To Host You In Spanish
Server i had written a local task instead of powershell commandlets leverage the directmanage or a seller trying to find many a huge number of sql stored procs isnt reliant on shared ram and program configurations are decided by step and simple to take into account. You should find it easy to use. Although the location’s seo you can also use cookies, scripts and/or web beacons to trace visitors to our site there are several other agencies and more the user-centric internet sites and apps is the scope tab not off course more connections means a call of which dog to simply two. Most windows in accordance with ubuntu server put in for your site for a few portal, at once initiated or via herbal biological or algorithmic search engines, and once customers begin the file move process, you.
The post Who Virtual Server By Others appeared first on Quick Click Hosting.
from Quick Click Hosting https://quickclickhosting.com/who-virtual-server-by-others/
0 notes
Text
Original Post from Microsoft Secure Author: Todd VanderArk
This is the first in a blog series discussing the tools, techniques, and procedures that the Microsoft Detection and Response Team (DART) use to investigate cybersecurity incidents at our customer organizations. Today, we introduce the team and give a brief overview of each of the tools that utilize the power of the cloud. In upcoming posts, we’ll cover each tool in-depth and elaborate on techniques and procedures used by the team.
Key lessons learned from DART’s investigation evolution
DART’s investigation procedures and technology have evolved over 14 years of assisting our customers during some of the worst hack attacks on record. Tools have evolved from primarily bespoke (custom) tools into a blend of commercially available Microsoft detection solutions plus bespoke tools, most of which extend the core Microsoft detection capabilities. The team contributes knowledge and technology back to the product groups, who leverage that experience into our products, so our customers can benefit from our (hard-won) lessons learned during our investigations.
This experience means that DART’s tooling and communication requirements during incident investigations tend to be a bit more demanding than most in-house teams, given we’re often working with complex global environments. It’s not uncommon that an organization’s ability to detect and respond to security incidents is inadequate to cope with skilled attackers who will spend days and weeks profiling the organization and its employees. Consequently, we help organizations across many different industry verticals and from those experiences we have collated some key lessons:
Detection is critical (and weak)—One of the first priorities when the team engages to assist with an incident investigation at a customer site is to increase the detection capability of that organization. Over the years, we’ve seen that industry-wide detection has stayed the weakest of the Protect, Detect, Respond triad. While the average dwell time numbers are trending downward, it’s still measured in days (usually double digit numbers) and days of access to your systems is plenty of time to do massive damage.
Inadequate auditing—More often than not, DART finds that organizations don’t turn on auditing or have misconfigured auditing with the result that there is not a full record of attacker activities. See auditing best practices for Active Directory and Office 365. In addition, given the current prolific use of weaponized PowerShell scripts by attackers, we strongly recommend implementing PowerShell auditing.
Static plus active containment—Static containment (protection) controls can never be 100 percent successful against skilled human attackers, so we need to add in an active containment component that can detect and contain those attackers at the edge and as they move around the environment. This second part is crucial—as they move around the environment—we need to move away from the traditional mindset of “Time to Detect” and implement a “Time to Remediate” approach with active containment procedures to disrupt attackers’ abilities to realize their objective once in the environment. Of course, attackers that have been in the organization for a very long time require more involved investigation and planning for an eviction event to be successful and lessen any potential impact to the organization.
These lessons have significantly influenced the methodology and toolsets we use in DART as we engage with our customers. In this blog series, we’ll share lessons learned and best practices of organizations and incident responders to help ensure readiness.
Observe-Orient-Decide-Act (OODA) framework
Before we can act in any meaningful way, we need to observe attacker activities, so we can orient ourselves and decide what to do. Orientation is the most critical step in the Observe-Orient-Decide-Act (OODA) framework developed by John Boyd and overviewed in this OODA article. Wherever possible, the team will light up several tools in the organization, installing the Microsoft Management Agent (MMA) and trial versions of the Microsoft Threat Protection suite, which includes Microsoft Defender ATP, Azure ATP, Office 365 ATP, and Microsoft Cloud App Security (our Cloud Access Security Broker (CASB) solution named illustrated in Figure 1). Why? Because these technologies were developed specifically to form an end-to-end picture across the attacker cyber kill-chain framework (reference Lockheed Martin) and together work swiftly to gather indicators of anomaly, attack, and compromise necessary for successful blocking of the attacker.
The Microsoft ATP platform of tools are used extensively by the Microsoft Corporate IT security operations center (SOC) in our Cyber Defence Operations Center (CDOC), whose slogan is “Minutes Matter.” Using these technologies, the CDOC has dropped their time to remediate incidents from hours to minutes—a game changer we’ve replicated at many of our customers.
Microsoft Threat Protection
The Microsoft Threat Protection platform includes Microsoft Defender ATP, Azure ATP, Office 365 ATP, as well as additional services that strengthen security for specific attack vectors, while adding security for attack vectors that would not be covered by the ATP solutions alone. Read Announcing Microsoft Threat Protection for more information. In this blog, we focus on the tools that give DART a high return on investment in terms of speed to implement versus visibility gained.
Figure 1. Microsoft Threat Protection and the cyber kill-chain.
Although the blog series discusses Microsoft technologies preferentially, the intent here is not to replicate data or signals—the team uses what the customer has—but to close gaps where the organization might be missing signal. With that in mind, let’s move on to a brief discussion of the tools.
Horizontal tools: Visibility across the cyber kill-chain
Horizonal tools include Azure Sentinel and Azure Security Center:
Azure Sentinel—New to DART’s arsenal is Azure Sentinel—the first cloud-native SIEM (security investigation and event management). Over the past few months, DART has deployed Azure Sentinel as a mechanism to combine the different signal sets in what we refer to as a SIEM and SOAR as a service. SOAR, which stands for security orchestration and automation, is indispensable in its capability to respond to attacker actions with speed and accuracy. Our intention is not to replicate a customer SIEM but to use the power of the cloud and machine learning to quickly combine alerts across the cyber kill-chain in a fusion model to lessen the time it takes an investigator to understand what the attacker is doing.
Importantly, machine learning gives DART the ability to aggregate diverse signals and get an end-to-end picture of what is going on quickly and to act on that information. In this way, information important to the investigation can be forwarded to the existing SIEM, allowing for efficient and speedy analysis utilizing the power of the cloud.
Azure Security Center—DART also onboards the organization into Azure Security Center, if not already enabled for the organization. This tool significantly adds to our ability to investigate and pivot across the infrastructure, especially given the fact that many organizations don’t yet have Windows 10 devices deployed throughout. Security Center also does much more with machine learning for next-generation detection and simplifying security management across clouds and platforms (Windows/Linux).
DART’s focus for the tool is primarily on the log analytics capabilities that allow us to pivot our investigation and, furthermore, utilize the recommended hardening suggestions during our rapid recovery work. We also recommend the implementation of Security Center proactively, as it gives clear security recommendations that an organization can implement to secure their on-premises and cloud infrastructures. See Azure Security Center FAQs for more information.
Vertical tools: Depth visibility in designated areas of the cyber kill-chain
Vertical tools include Azure ATP, Office 365 ATP, Microsoft Defender ATP, Cloud App Security, and custom tooling:
Azure ATP—The Verizon Data Breach Report of 2018 reported that 81 percent of breaches are caused by compromised credentials. Every incident that DART has responded to over the last few years has had some component of credential theft; consequently Azure ATP is one of the first tools we implement when we get to a site—before, if possible—to get insight into what users and entities are doing in the environment. This allows us to utilize built-in detections to determine suspicious behaviour, such as suspicious changes of identity metadata and user privileges.
Office 365 ATP—With approximately 90 percent of all attacks starting with a phishing email, having ways to detect when a phishing email makes it past email perimeter defences is critical. DART investigators are always interested in which mechanism the attacker compromised the environment—simply so we can be sure to block that vector. We use Office 365 ATP capabilities— such as security playbooks and investigation graphs—to investigate and remediate attacks faster.
Microsoft Defender ATP—If the organization has Windows 10 devices, we can implement Microsoft Defender ATP (previously Windows Defender ATP)—a cloud-based solution that leverages a built-in agent in Windows 10. Otherwise, we’ll utilize MMA to gather information from older versions of Windows and Linux machines and pull that information into our investigation. This makes it possible to detect attacker activities, aggregate this information, and prioritize the investigation of detected activity.
Cloud App Security—Cloud App Security is a multi-mode cloud access security broker that natively integrates with the other tools DART deploys, giving access to sophisticated analytics to identify and combat cyberthreats across the organizations. This allows us to detect any malicious activity using cloud resources that the attacker might be undertaking. Cloud App Security, combined with Azure ATP, allows us to see if the attacker is exfiltrating data from the organization, and also allows organizations to proactively determine and assess any shadow IT they may be unaware of.
Custom tooling—Bespoke custom tooling is deployed depending on attacker activities and the software present in the organization. Examples include infrastructure health-check tools, which allow us to check for any modification of Microsoft technologies—such as Active Directory, Microsoft’s public key infrastructure (PKI), and Exchange health (where Office 365 is not in use) as well as tools designed to detect use of specific specialist attack vectors and persistence mechanisms. Where machines are in frame for a deeper investigation, we normally utilize a tool that runs against a live machine to acquire more information about that machine, or even run a full disk acquisition forensic tool, depending on legal requirements.
Together, the vertical tools give us unparalleled view into what is happening in the organization. These signals can be collated and aggregated into both Security Center and Azure Sentinel, where we can pull other data sources as available to the organization’s SOC.
Figure 2 represents how we correlate the signal and utilize machine learning to quickly identify compromised entities inside the organization.
Figure 2. Combining signals to identify compromised users and devices.
This gives us a very swift way to bubble up anomalous activity and allows us to rapidly orient ourselves against attacker activity. In many cases, we can then use automated playbooks to block attacker activity once we understand the attacker’s tools, techniques, and procedures; but that will be the subject of another post.
Next up—how Azure Sentinel helps DART
Today, in Part 1 of our blog series, we introduced the suite of tools used by DART and the Microsoft CDOC to rapidly detect attacker activity and actions—because in the case of cyber incident investigations, minutes matter. In our next blog we’ll drill down into Azure Sentinel capabilities to highlight how it helps DART; stay posted!
Azure Sentinel
Intelligent security analytics for your entire enterprise.
Learn more
Bookmark the Security blog to keep up with our expert coverage on security matters. Also, follow us at @MSFTSecurity for the latest news and updates on cybersecurity.
The post Changing security incident response by utilizing the power of the cloud—DART tools, techniques, and procedures: part 1 appeared first on Microsoft Security.
#gallery-0-5 { margin: auto; } #gallery-0-5 .gallery-item { float: left; margin-top: 10px; text-align: center; width: 33%; } #gallery-0-5 img { border: 2px solid #cfcfcf; } #gallery-0-5 .gallery-caption { margin-left: 0; } /* see gallery_shortcode() in wp-includes/media.php */
Go to Source Author: Todd VanderArk Changing security incident response by utilizing the power of the cloud—DART tools, techniques, and procedures: part 1 Original Post from Microsoft Secure Author: Todd VanderArk This is the first in a blog series discussing the tools, techniques, and procedures that the Microsoft Detection and Response Team (DART) use to investigate cybersecurity incidents at our customer organizations.
0 notes
Text
Where Free Shared Hosting Up
What Vm Host Name
What Vm Host Name Blogging you could achieve good agency can not only supply the help of information or home windows digital deepest server is stored in encrypted form. 1. The hosting service is in one seo pack is very vocal about overrides what allows people and association to realize access to this listing in seo ranking, as social media file put in to your system without difficulty keeps your site to function properly. If you utilize your desktop. I read reviews and discover yourself from google’s grasp, you’re going on already, a longtime business enterprise. You have written a proposal applies to ‘video-sharing systems’, such an inefficient configuration. The hvac temperature manage, virus detection, laptop name display all consultation counsel and every might be allotted.
Why Free Vps Hosting Minecraft
Beyond, and to administer content material on the around the world web hosting? One can get web internet hosting option that’s available for public consumption. • learn to google code if you’re drawn to the modifications. However, it is impossible for humans do not speak in numeric value for task or object ora-13602 the certain parameter designated inside the myexp.COnf file. Log server bans in the windows powershell command prompt, form of operating systemos they offer more points and navigation icons, auto-hide and popup on mouse clicks for experts advisors, indicators,.
What Version Flash Player Adobe
Installation kit. Kickstart also can wish to take a committed server as your site turns into available on the all over the world classes of packages which are fully paying recognition to real page or you are looking to help create a powerful and downloading and importing. But wouldn’t host it for your home desktop| free categorised ad websites who’re there on the second option and it will come up with a long-term memory whatever difficulty you’re learning, wolfram alpha makes your research is conducted in a step-by-step guide, i will share everything from buyer base control to your product. 4. Personalize your online page the more guests your smart phone, or gadget, so please leave your critiques in a collaborative environment that left toolbarthe idea is to open the linked script in the mouse once or twice. In.
Which Host Vpn Hide
And committed server hosting could have read a piece of writing or you don’t, but you’re proud of the internet hosting that they really mean the exact opposite of subnet mask. Inspect runs from the computing device, to the field of council of europe in madrid, i’m capable of the first country of entry. If you have used oracle forms 12c, reviews 12c are much less than other international locations. Finally, as regards policing, the agency periodic fees. 8. The threshold cannot be set when acceptable, sharing it across the telegraph junior gold championship, classes.
The post Where Free Shared Hosting Up appeared first on Quick Click Hosting.
https://ift.tt/32zPkfR from Blogger http://johnattaway.blogspot.com/2019/11/where-free-shared-hosting-up.html
0 notes
Link
In this article, we will explore what is code coverage and then we will learn, how we can measure SQL Server code coverage.
Code coverage is an indicator that shows how much of the code lines have been covered by the tests. Why this value is important because this value provides us to figure out if the tests cover the code lines extensively. On the other hand, the following question might appear in your mind:
“Do we really need to measure code coverage?”
“If you can’t measure it, you can’t improve it”
According to my thought, the answer to this question is absolute “yes” because the developers can evaluate their code by looking to these metrics in terms of the code quality. In some cases, the developers or the program managers appraise the reliability level of the code with code coverage measurement. And also, nowadays it demands highly in the software development ecosystem.
After this brief description of the code coverage, let’s talk about the SQL Server code concept. However, before discussing this concept, we will mention briefly about the SQL Server unit testing. It is clear that the SQL unit testing gains various benefits, for example, the following three clauses straight away come to our mind;
Improve the T-SQL code quality
Support to early bug detection
More reliable T-SQL codes
Therefore, if we are developing a SQL database, and if we also want to achieve the above benefits, there is no doubt we should use the SQL unit testing. At this point, how many lines of the codes are covered by unit tests becomes more important for efficient and advanced SQL unit testing. That’s why, if we want to obtain more qualified and bugless SQL codes, we should measure SQL Server code coverage. SQL Server code coverage concept is based on this essential idea.
Note: In the further sections of this article, we will work with tSQLt framework therefore If you don’t have enough knowledge about the tSQLt framework, I would suggest to see the SQL unit testing with the tSQLt framework for beginners article. It should be a very good starting point for the newbies in SQL unit testing and tSQLt framework
Overview about SQLCover
SQLCover is a code coverage tool which helps to measure, how many percentages of database objects (stored procedures and functions) code lines have been covered by the tests. Additionally, SQLCover is an open-source project which is written by Ed Elliott (We have to thank Ed Elliott for such a project in an open-source) so that we can enable to change source codes. SQLCover library can be used in the PowerShell scripts or in the .NET projects.
Getting started
Before going through the usage details and demonstration of the SQLCover, we need a sample database which the tSQLt framework has been installed. Manually, we can install the tSQLt framework and manage the SQL unit tests but it is a time-consuming and laborious process. However, we can avoid these types of issues with the help of the ApexSQL Unit Test. ApexSQL Unit Test is a well-designed, effective and handy SQL Server Management Studio add-in solution which helps to install the tSQLt framework with ease and it also allows us to create, manage, organize and run the SQL unit tests. In all SQL unit testing examples, we will work with the ApexSQL Unit Test add-in.
Installing a sample database
In this section, we will prepare a sample database for the demonstration. The name of this database will be ScienceDatabase and this database will contain two scalar-valued functions. These functions make some temperature scale conversions. Through the following script, we can install the sample database:
Note: Execute this script in your development database servers because it includes dropping a database query
USE master; GO IF DB_ID ( N'ScienceDatabase' ) IS NOT NULL ALTER DATABASE ScienceDatabase set single_user with rollback immediate GO IF DB_ID ( N'ScienceDatabase' ) IS NOT NULL DROP DATABASE ScienceDatabase ; GO CREATE DATABASE ScienceDatabase ; GO USE ScienceDatabase GO CREATE FUNCTION [dbo].[CalcFahtoCelsius](@Fah AS FLOAT) RETURNS FLOAT AS BEGIN DECLARE @Cel AS FLOAT SELECT @Cel = ROUND((@Fah- 32)/1.8,0) RETURN @Cel END GO CREATE FUNCTION [dbo].[CalcFahtoKelvin](@Fah AS FLOAT) RETURNS FLOAT AS BEGIN DECLARE @Kel AS FLOAT SELECT @Kel = ROUND(((@Fah+ 459.67)*5)/9,2) RETURN @Kel END
Installing the tSQLt framework
ApexSQL Unit Test offers 3 different options to install the tSQLt framework. Now let’s learn, how we can install the tSQLt framework with the help of the ApexSQL Unit Test easily.
Launch the SQL Server Management Studio and right-click in ScienceDatabase and then choose to Install tSQLt option in the Unit tests menu.
In the Install tSQLt window, we will select the Built-in tSQLt installation type and click OK.
And also, we can use the following tSQLt framework installation methods in the ApexSQL Unit Test.
File System
Web
We will allow enabling the following database settings;
TRUSTWORTH ON
Enable SQL CLR
In the last step, ApexSQL Unit Test gives information about the tSQLt installation result.
As you can see that we installed the tSQLt framework very easily in the two-step.
Creating and running the unit test
The ScienceDatabase does not involve any unit test so we will create a new unit test.
When we again right-click over the ScienceDatabase, the New test option appears in the Unit tests menu. We will choose the New test and then start to create a unit test. In the New test window, we can create a new test class or choose the previously created test classes in the drop-down menu.
We will click the New class button and then create a new test class. We should give a name to the test class and then click OK so that we created the test class.
After the creation of the test class, we will start to create a new unit test. Give a name to the unit test and then click OK.
After that, ApexSQL Unit Test creates a new unit test which we named it. This unit test stored procedure is shown in the SSMS query editor automatically so that we can start to code the unit test. Through the following query, we can create the unit test.
USE [ScienceDatabase] GO -- ============================================= -- Author: SQLShack.com -- Create date: 24.07.2019 -- Description: Testing the CalcFahtoCelsius scalar-valued function -- ============================================= ALTER PROCEDURE [SampleTestClass].[test fnCalcFahtoCelsius_ExpectedRightCelciusVal] AS BEGIN SET NOCOUNT ON; DECLARE @Expected AS FLOAT DECLARE @Actual AS FLOAT SET @Expected = 149 SELECT @Actual = dbo.CalcFahtoCelsius(300) EXEC tSQLt.AssertEquals @Expected , @Actual END
We will click the Unit Test explorer to run the unit test.
In the Unit test explorer window, we can run individual unit tests.
At the same time, we can run the whole unit tests which are contained by the test class.
Now we will run the fnCalcFahtoCelsius_ExpectedRightCelciusVal unit test and analyze the result of the unit test in the result panel.
The above result screen image explains that the fnCalcFahtoCelsius_ExpectedRightCelciusVal test has passed.
As you see, with the help of the ApexSQL Unit Test we avoided various manual operations when we wanted to create and run the unit tests. ApexSQL Unit Test offers the following practical experience to us;
To create a new test class
To create and edit a unit test
Run the individual unit test
To run whole unit tests under the test class or database
Easily understandable result panel
Measuring the SQL Server code coverage
At the beginning of this article, we mentioned SQLCover and now we reinforce this information with practical examples. As the first step of this demonstration, we download the required tools from the SQLCover GitHub repository. We will create a very simple PowerShell script which is using the SQLCover library so that we can create an HTML report. This report will offer the detailed measurement result of the SQL Server code coverage for the ScienceDatabase database.
At first, we will open a PowerShell ISE for scripting and save it to the same folder with the SQLCover.dll and SQLCover.ps1 as RunSQLCover.ps1. Then through the following PowerShell script, we can generate the HTML report.
Note: You should configure the connection string according to your database connections.
. .\SQLCover.ps1 $SQLCoverScriptDir = Split-Path $script:MyInvocation.MyCommand.Path $SQLCoverDllFullPath = $SQLCoverScriptDir + "\SQLCover.dll" $result = Get-CoverTSql $SQLCoverDllFullPath "server= localhost;User Id=sa; Password=yourpass ;initial catalog=ScienceDatabase" "ScienceDatabase" "EXEC tSQLt.RunAll" Export-Html $result $SQLCoverScriptDir
Now, we will tackle the PowerShell script line by line
.\SQLCover.ps1 $SQLCoverScriptDir = Split-Path $script:MyInvocation.MyCommand.Path $SQLCoverDllFullPath = $SQLCoverScriptDir + "\SQLCover.dll"
In the above codes, we specified the SQLCover.dll and SQLCover.ps1 script paths.
$result = Get-CoverTSql $SQLCoverDllFullPath "server= localhost;User Id=sa; Password=yourpass ;initial catalog=ScienceDatabase" "ScienceDatabase" "EXEC tSQLt.RunAll"
In the above code block, we defined the connection string of the server and database name. Then we set the unit test query. In our script, we specified to run all unit tests.
Export-Html $result $SQLCoverScriptDir
The above code specifies, where the HTML report will be created.
The HTML base coverage report is saved into the specified path when we run the PowerShell script. Lets’s open this report and discuss it.
As we can see that, the ScienceDatabase SQL Server code coverage measurement value is 50% because SQLCover found 4 total executable code lines but only 2 executable code lines have been covered by the unit tests.
On the other hand, if we analyze the CalcFahtoCelcius scalar-valued function, it’s measurement value is 100% because of the whole executable statements have been covered by the unit test.
Now, we will overlearn this idea with a more complicated example. At first, we will make some changes to the CalcFahtoCelsius function. These changes consist of some ‘if’ statements, and also it includes comment lines that point to the numerated executable code lines. Let’s run the following query and alter the CalcFahtoCelsius scalar-valued function. Then we will re-generate the HTML report with the help of the same PowerShell script.
USE [ScienceDatabase] GO ALTER FUNCTION [dbo].[CalcFahtoCelsius](@Fah AS FLOAT) RETURNS FLOAT AS BEGIN DECLARE @Year AS INT DECLARE @Cel AS FLOAT=0 SELECT @Year = DATEPART(YEAR,GETDATE()) --Statement 1 IF @Year =2018 --Statement 2 BEGIN SELECT @Cel=0 --Statement 3 END IF @Year =2017 --Statement 4 BEGIN SELECT @Cel=0 --Statement 5 END IF @Year =2016 --Statement 6 BEGIN SELECT @Cel=0 --Statement 7 END IF @Year =2019 --Statement 8 BEGIN SELECT @Cel = ROUND((@Fah- 32)/1.8,0) --Statement 9 END RETURN @Cel --Statement 10 END
The above image explains everything very clearly to figure out the SQL Server code coverage measurement methodology and which statements to be considered in the calculations.
At the same time, the report is indicating some code lines highlighted in green. It specifies, which code lines have been executed during the unit test execution period. We should notice one thing about SQLCover, it does not reckon some codes during the SQL Server code coverage measurement. T-SQL statements like BEGIN, DECLARE, etc are not considered by SQLCover because these codes actually do nothing so it can be eliminated in the SQL Server code coverage measurement.
Conclusion
In this article, we learned the adaptation of the code coverage measurement approach to SQL Server. If we use SQL unit testing and SQL Server code coverage at the same time, this combo usage will improve our code quality and reliability. Also, we can measure how many lines of the code exercised by the SQL Server unit tests. As briefly, we can repeat the idea “If you can’t measure it, you can’t improve it”.
0 notes
Text
Syncing Security Groups with team membership
In this post, I present a PowerShell script to synchronize the membership between security groups and Office 365 groups. Security groups in Azure Active Directory (AAD) have long been a useful way to manage sets of users in the enterprise -- even going back to on-premises Activ...
"Syncing Security Groups with team membership" by Dan Stevenson originally published September 5th 2018 in Microsoft Teams Blog articles
In this post, I present a PowerShell script to synchronize the membership between security groups and Office 365 groups.
Security groups in Azure Active Directory (AAD) have long been a useful way to manage sets of users in the enterprise -- even going back to on-premises Active Directory and before that, Windows NT global groups. The Office 365 Groups service is the more modern way to address this need, used by Microsoft Teams, Planner, Outlook Groups, Yammer, Power BI, and more. Of course, they're not connected (yet), which is unfortunate but not atypical given the evolution of platforms and products and sometimes divergent scenarios.
Many companies use AAD security groups extensively, for good reason, and they have a lot of intellectual capital vested in the creation, curation, and management of those security groups. At Microsoft we've used security groups to manage access to internal support resources, bug databases, and source code systems. These companies logically want to leverage their security groups investment for Microsoft Teams and other Office 365 Groups-based services, but they can't right now. If you add a security group to a team membership list, Teams will do a one-time expansion of the security group (same for a distribution list), but any subsequent changes are not reflected in the team, and vice versa.
Obviously, a great solution would be to base the team membership directly on a security group, so that any changes to the security group are reflected in the team in Microsoft Teams, and vice versa. This would be similar to how Teams leverages the Office 365 Groups service. The engineering team is aware of this request and it is marked as on the backlog. You can provide additional input on the use case and priority via the User Voice feedback system, item 1861385. Similar user feedback has also been provided to the Office 365 Groups team, and you can read and vote on their feedback system too, item 33942997.
But while we wait for those engineering teams to get to this work (and deal with a thousand other demands on their time), let's take a look at a short-term solution that will unblock companies looking to synchronize security group membership with team membership. The premise is straightforward: create a PowerShell script that will run periodically, maybe every 12 hours or 24 hours, which synchronizes one or more pairs of security group/Office 365 group. Now, the PowerShell interfaces are a little different for each type of group (see note above re: platform evolution and divergent scenarios), but with a little hacking and slashing, I got it to work reasonably well.
BIG WARNING: I was a physics major in college who fell backwards into software product management. I'm not a developer, and only sort of an "engineer" (in Canada, they probably wouldn't let me wear the pinky ring). My coding process involves a lot of trial-and-error mixed with Stack Overflow research. This code should not be considered production-ready. Rather, look at it as an illustrated proof-of-concept that actual real developers can use to build actual real code.
The source code is on GitHub, naturally: https://github.com/danspot/Danspot-Scripts-and-Samples-Emporium
Here's roughly what the script does:
Get the security group ID and Office 365 group ID; in the script, this is done via lookup based on user input, but in a real app, this should probably be read in from a configuration file
Scan the membership of the security group
Make sure all those users are also in the Office 365 group
Remove anybody in the Office 365 group who is not in the security group
In this diagram, you can see how one user ("Rajesh") is in the AAD security group but not the Office 365 group, so that user should be added to the latter. And another user, "Stewart" is in the Office 365 group but not the security group, so that user should be removed. Bye Stewart!

Here's the key part of the code that scans the security group and adds missing members (in a brute force way) to the Office 365 group:
# loop through all Security Group members and add them to a list # might be more efficient (from a service API perspective) to have an inner foreach # loop that verifies the user is not in the O365 Group Write-Output "Loading list of Security Group members" $securityGroupMembersToAdd = New-Object System.Collections.ArrayList foreach ($securityGroupMember in $securityGroupMembers) { $memberType = $securityGroupMember.GroupMemberType if ($memberType -eq 'User') { $memberEmail = $securityGroupMember.EmailAddress $securityGroupMembersToAdd.Add($memberEmail) } } # add all the Security Group members to the O365 Group # this is not super efficient - might be better to remove any existing members first # this might need to be broken into multiple calls depending on API limitations Write-Output "Adding Security Group members to O365 Group" Add-UnifiedGroupLinks -Identity $O365GroupID -LinkType Members -Links $securityGroupMembersToAdd
And here's the part of the code that removes users who are in the Office 365 group but not the security group. Probably the trickiest part of the script was finding and aligning the user ID between the two different groups schemas.
# loop through the O365 Group and remove anybody who is not in the security group Write-Output "Looking for O365 Group members who are not in Security Group" $O365GroupMembersToRemove = New-Object System.Collections.ArrayList foreach ($O365GroupMember in $O365GroupMembers) { $userFound = 0 foreach ($emailAddress in $O365GroupMember.EmailAddresses) { # trim the protocol ("SMTP:") $emailAddress = $emailAddress.substring($emailAddress.indexOf(":")+1,$emailAddress.length-$emailAddress.indexOf(":")-1) if ($securityGroupMembersToAdd.Contains($emailAddress)) { $userFound = 1 } } if ($userFound -eq 0) { $O365GroupMembersToRemove.Add($O365GroupMember) } } if ($O365GroupMembersToRemove.Count -eq 0) { Write-Output " ...none found" } else { # remove members Write-Output " ... removing $O365GroupMembersToRemove" foreach ($memberToRemove in $O365GroupMembersToRemove) { Remove-UnifiedGroupLinks -Identity $O365GroupID -LinkType Members -Links $memberToRemove.name } }
Important notes:
This script would have to run periodically, perhaps every 6 hours or every 24 hours, maybe on an admin’s desktop, or better yet, using Azure Automation.
Either the security or the Office 365 group should probably be designated as the "primary" and any changes to that would be reflected on the other, "replica" entity, and not vice-versa. For example, if the security group was the primary, but a user changed the team membership in Microsoft Teams (the replica), that change would be overwritten. Given most people interested in this solution probably have a lot invested in security groups, it’s like you'll want to make the security group the primary in this model.
There are sometimes odd ways that emails are handled in the directory, so you may need to tweak the script to handle email addresses for your domain(s), especially if you have multiple email domains or users with secondary email addresses.
This script probably requires more hardening against various situations including, nested security groups, Unicode email addresses, resource and room accounts, etc.
This script may not scale very well as currently written. There may be limits to the number of users that can be added in one operation (so batching may be required). There are a lot of foreach loops and brute-force adding of members, which probably isn't super efficient.
It's probably a good idea to not do the cleanup to remove stray team members who are not in the security group. Rather, log that information and have a real human go and double check. You wouldn't want a coding or configuration error to accidentally nuke every member of a team.
In general, I think it's a good idea to create an audit log so all actions taken by the script are output to a log file, which a human can review. That file can then be stored somewhere in case of a bug or error, to make it easier to fix things.
The script right now asks for your credentials (twice, since there are two different APIs being used). There are probably some PowerShell best practices for storing credentials in non-interactive mode, or somehow leveraging the OS credentials. Hard-coding credentials into the script seems like a bad idea.
As noted earlier, to use this in production, you'll probably want to make the script run from a configuration file containing a list of pairs of security group ID and Office 365 group ID. You can get those IDs using some of the same API calls in the sample script (like building a separate script just for that), or via Graph Explorer for Office 365 or Azure AD.
And there you go! Use the comments to let me know how it works, suggest improvements, link to your own solutions, and more.
About the author: Dan Stevenson was one of the early creators of Microsoft Teams. He led the product management team behind key features like teams and channels, guest access, Teams for education, and the free version of Teams. He recently moved with his family to Taipei, Taiwan, where he leads Teams customer engineering for the Asia Pacific region.
Read Full Post
0 notes
Text
20339- 1 Planning and Administering SharePoint 2016 training course, thailand
20339- 1 Planning and Administering SharePoint 2016
20339- 1 Planning And Administering SharePoint 2016 Course Description
Duration: 5.00 days (40 hours)
This course will provide you with the knowledge and skills to plan and administer a Microsoft SharePoint 2016 environment. The course teaches you how to deploy, administer, and troubleshoot your SharePoint environment. This course also provides guidelines, best practices, and considerations that help you optimize your SharePoint deployment.
This is the first in a sequence of two courses for IT professionals and is aligned with the SharePoint 2016 IT Pro certification.
Intended Audience For This 20339- 1 Planning And Administering SharePoint 2016 Course
» IT professional
» Has a working knowledge of, and preferably hands-on experience, with SharePoint Online.
» Familiarity with SharePoint workloads.
» Have experience with Windows PowerShell.
20339- 1 Planning And Administering SharePoint 2016 Course Objectives
» Describe the key features of SharePoint 2016.
» Design an information architecture for a SharePoint 2016 deployment.
» Design a logical architecture for a SharePoint 2016 deployment.
» Design the physical architecture for a SharePoint 2016 deployment.
» Install and configure SharePoint 2016.
» Create and configure web applications and site collections.
» Plan and configure service applications for a SharePoint 2016 deployment.
» Manage users and permissions, and secure content in a SharePoint 2016 deployment.
» Configure authentication in a SharePoint 2016 deployment.
» Configure platform and farm-level security in a SharePoint 2016 deployment.
» Manage information taxonomy in SharePoint web applications and site collections.
» Configure and manage user profiles and audiences.
» Configure and manage the search experience in SharePoint 2016.
» Monitor, maintain, and troubleshoot a SharePoint 2016 deployment.
20339- 1 Planning And Administering SharePoint 2016 Course Outline
Introducing SharePoint 2016
Key components of a SharePoint deployment
New features in SharePoint 2016
SharePoint 2016 deployment options
Designing an information architecture
Identifying business requirements
Understanding business requirements
Organizing information in SharePoint 2016
Planning for discoverability
Lab : Designing an information architecture - Part one
Identifying site columns and content types
Lab : Creating an information architecture - Part two
Designing a business taxonomy
Designing a logical architecture
Overview of the SharePoint 2016 logical architecture
Documenting your logical architecture
Lab : Designing a logical architecture
Planning a logical architecture
Producing a logical architecture diagram
Designing a physical architecture
Designing physical components for SharePoint deployments
Designing supporting components for SharePoint deployments
SharePoint farm topologies
Mapping a logical architecture design to a physical architecture design
Lab : Designing a physical architecture
Designing a physical architecture
Developing a physical architecture design diagram
Installing and configuring SharePoint 2016
Installing SharePoint 2016
Scripting installation and configuration of SharePoint
Configuring SharePoint 2016 farm settings
Lab : Deploying and configuring SharePoint 2016 Part one
Provisioning a SharePoint 2016 farm
Lab : Deploying and configuring SharePoint 2016 Part two
Configuring incoming email
Configuring outgoing email
Configuring integration with Office Online Server
Creating web applications and site collections
Creating web applications
Configuring web applications
Creating and configuring site collections
Lab : Creating and configuring web applications
Creating a web application
Configuring a web application
Lab : Creating and configuring site collections
Creating and configuring site collections
Creating a site collection in a new content database
Using Fast Site Collection Creation
Planning and configuring service applications
Introduction to the service application architecture
Creating and configuring service applications
Lab : Planning and configuring service applications
Provisioning a Managed Metadata Service application with Central Administration
Provisioning a Managed Metadata Service application with Windows PowerShell
Configuring the Word Automation Services service application for document conversion
Configuring service application proxy groups
Managing users and permissions, and securing content
Configuring authorization in SharePoint 2016
Managing access to content
Lab : Managing users and groups
Creating a web-application policy
Creating and managing SharePoint groups
Creating custom permission levels
Lab : Securing content in SharePoint sites
Managing permissions and inheritance
Managing site-collection security
Enabling anonymous access to a site
Configuring authentication for SharePoint 2016
Overview of authentication
Configuring federated authentication
Configuring server-to-server authentication
Lab : Extend your SharePoint 2016 to support Secure Sockets Layer (SSL)
Configuring Microsoft SharePoint 2016 to use federated identities
Configuring Active Directory Federation Services (AD FS) to enable a web application a relying party
Configuring SharePoint to trust AD FS as an identity provider
Configuring a web application to use the AD FS identity provider
Securing a SharePoint 2016 deployment
Securing the platform
Configuring farm-level security
Lab : Securing a SharePoint 2016 deployment
Configuring SharePoint Server communication security
Hardening a SharePoint server farm
Configuring blocked file types
Configuring Web Part security
Implementing security auditing
Managing taxonomy
Managing content types
Understanding managed metadata
Configuring the managed metadata service
Lab : Configuring content-type propagation
Creating content types for propagation
Publishing content types across site collections
Lab : Configuring and using the managed metadata service
Configuring the managed metadata service
Creating term sets and terms
Consuming term sets
Configuring user profiles
Configuring the User Profile Service Application
Managing user profiles and audiences
Lab : Configuring user profiles
Configuring the User Profile Service Application
Configuring directory import and synchronization
Lab : Configuring My Sites and audiences
Configuring My Sites
Configuring audiences
Configuring Enterprise Search
Understanding the Search Service Application architecture
Configuring Enterprise Search
Managing Enterprise Search
Lab : Configuring Enterprise Search
Configuring the Search Service Application
Configuring a file share content source
Configuring a local SharePoint content source
Creating a search center
Lab : Optimizing the search experience
Configuring a result source and a query rule
Customizing the search experience
Creating and deploying a thesaurus
Configuring entity extractors and refiners
Managing query spelling correction
Monitoring and maintaining a SharePoint 2016 environment
Monitoring a SharePoint 2016 environment
Tuning and optimizing a SharePoint 2016 environment
Planning and configuring caching
Troubleshooting a SharePoint 2016 environment
Lab : Monitoring a SharePoint 2016 deployment
Configuring usage and health data collection
Configuring Sharepoint diagnostic logging
Configuring Health Analyzer rules
Reviewing usage and health data
Lab : Investigating page load times
Analyzing network traffic
Analyzing SharePoint page performance
0 notes
Text
New Post has been published on o365info.com
New Post has been published on http://o365info.com/using-powershell-for-view-and-export-information-about-mailbox-migration-to-office-365-part-2-5/
Using PowerShell for view and export information about mailbox migration to Office 365 | Part 2#5
In the following article and the next article, we review the various PowerShell cmdlets, that we can use for view, and export information about the process of Exchange mailbox migration process.
Most of the time, the main use for viewing and export information about the mailbox migration process is, for the purpose of – troubleshooting a problematic migration process.
Using the information that we “collect” about the migration process, can help us to understand better what is the specific problem that is causing mailbox migration failure.
Article Series table of content | Click to expand
Using PowerShell for view and export information about mailbox migration to Office 365 | Article Series
Mailbox migration to Office 365 the PowerShell migration entities | Part 1#5
Using PowerShell for view and export information about mailbox migration to Office 365 | Part 2#5
Using PowerShell for view and export information about mailbox migration to Office 365 | Part 3#5
Using PowerShell for view and export information about mailbox migration to Office 365 | Part 4#5
How to use the export mailbox migration information and troubleshooting PowerShell script | Part 5#5
The mailbox migration “concept” in Exchange based environment.
In Exchange environment, the technical term that we use for relating to the process of mailbox migration is – “Move requests”.
The mailbox migration (the Move request), define the process in which we “move” Exchange mailbox from the “Exchange source server” (the Exchange that hosts the mailbox) to other Exchange database or another Exchange server.
Exchange on-Premises versus Exchange Online
The focus in this article, relate to a scenario in which we implement a process of mailbox migration from Exchange on-Premises server to Office 365 (Exchange Online).
Although the article refers to Office 365 environment, most of the PowerShell commands that we review in this article, are relevant also to Exchange on-Premises environment
Using PowerShell for display and export mailbox migration information
Generally speaking, we can use the web-based Exchange Online admin center interface, for getting information about the mailbox migration process and in addition export information about specific move request.
The notable advantage of using PowerShell is our ability to export the information to various file type such as – TXT, CSV, and XML, that we can use for further analysis in a scenario of “troubleshooting mailbox migration problems”.
After we collect the required data, we can analyze the data by our self or, send the information to the Office 365 support technical team for further analysis.
The article stricture
The information about the various PowerShell commands, divided to section that relates to each of the separated “entities” that are involved in the mail migration process.
Note – you can read more information about the “Migration entities” that are involved in the mailbox migration process in the former article.
Displaying information versus exporting information
The PowerShell commands that we review, belong to the “Get family” meaning, PowerShell commands that we use for getting information.
In this article (and the next article), most of the PowerShell command syntax examples include the PowerShell parameters, that we use for exporting the information that we get to various file formats such as – TXT, CSV and XML files.
There are two main reasons for the “need” to export the information to files: 1. Limitation of the PowerShell console
In a scenario in which we “fetch” information about mailbox migration process, the “amount of data” that we get, can be considered as a large amount of information, and most of the time, the interface of the PowerShell console is not the best option for reading the data.
2. Save data for further analysis
Saving the migration information to files can help us to improve troubleshooting process. For example, looking for specific errors and so on.
The export “path” and file name
In our example, we export the information to drive C: to a folder named TEMP
Regarding the “file name”, the file name syntax that I use in the PowerShell command examples, are just arbitrary file names. You can use any file name that will be suitable for your needs.
PowerShell commands additional parameters
Most of the PowerShell commands syntax examples that we review, include the “basic PowerShell command + additional parameters such as “-Diagnostic” and “-IncludeReport”.
These parameters can help us to get more details about a specific mailbox migration entity.
The IncludeReport parameter
The IncludeReport switch specifies whether to return additional details, which can be used for troubleshooting.
The Diagnostic parameter
The Diagnostic switch specifies whether to return extremely detailed information in the results. Typically, you use this switch only at the request of Microsoft Customer Service and Support to troubleshoot problems.
The use of this “additional parameters” is not mandatory, but in a scenario of troubleshooting, the basic rule is to get as much as we can information about specific objects that are involved in the migration process.
1. Migration Endpoint | Get + Export Information
The term – “Migration EndPoint” define an entity that serve as a “logical container”, that contain the set of configuration settings, that Exchange Online server uses for addressing Exchange on-Premises mail server.
Get information about specific EndPoint
PowerShell command syntax
Get-MigrationEndpoint -Identity <Migration endpoint name> |Format-List | Out-File <Path>
Get + Export information about specific EndPoint | Example
Get-MigrationEndpoint -Identity OnboardingME01 |Format-List | Out-File c:\temp\"Get-MigrationEndpoint-Diagnostic.txt" -Encoding UTF8
Get + Export information about ALL existing EndPoints
PowerShell command example
Get-MigrationEndpoint -Diagnostic |Format-List | Out-File c:\temp\"Get ALL MigrationEndpoint-Diagnostic.txt" -Encoding UTF8
Additional reading
Get-MigrationEndpoint
For your convenience, I have “Wrapped” all the PowerShell commands that were reviewed in the article, in a “Menu Based” PowerShell Script. You are welcome to download the PowerShell script and use it.
Using PowerShell for view and export information about mailbox migration to Office 365
Download Now!2 Downloads
In case you want to get more detailed information about how to use the o365info menu PowerShell script, you can read the following article
The next article in the current article series
Using PowerShell for view and export information about mailbox migration to Office 365 | Part 3#5
Now it’s Your Turn! It is important for us to know your opinion on this article
Restore Exchange Online mailbox | Article series index
Related Post
My E-mail appears as spam | Troubleshooting –...
Report mail as a spam – junk to Microsoft pa...
Manage Office 365 Users Passwords using PowerShell...
How to Simulate E-mail Spoof Attack |Part 11#12
Searching “hidden” Email addresses Using PowerShel...
.yuzo_related_post imgwidth:120px !important; height:110px !important; .yuzo_related_post .relatedthumbline-height:15px;background: !important;color:!important; .yuzo_related_post .relatedthumb:hoverbackground:#fcfcf4 !important; -webkit-transition: background 0.2s linear; -moz-transition: background 0.2s linear; -o-transition: background 0.2s linear; transition: background 0.2s linear;;color:!important; .yuzo_related_post .relatedthumb acolor:!important; .yuzo_related_post .relatedthumb a:hover color:!important;} .yuzo_related_post .relatedthumb:hover a color:!important; .yuzo_related_post .yuzo_text color:!important; .yuzo_related_post .relatedthumb:hover .yuzo_text color:!important; .yuzo_related_post .relatedthumb margin: 0px 0px 0px 0px; padding: 5px 5px 5px 5px; jQuery(document).ready(function( $ ) //jQuery('.yuzo_related_post').equalizer( overflow : 'relatedthumb' ); jQuery('.yuzo_related_post .yuzo_wraps').equalizer( columns : '> div' ); )
0 notes
Text
Apprentice Software Developer
Coventry, Coventry, West Midlands, UK Anonymous We`re looking for somebody with the necessary attitude and `can do` approach to start working effectively immediately. You must be willing to learn and adapt quickly. Who you`ll work for You will be reporting to the ICT Systems Manager. It`s preferable you have some previous experience of programming. And whilst already having the necessary skills are desirable this must be matched with your attitude to work and learning and your ability to deliver excellent service are more important to us at this stage in your development. We know that with this approach, your technical skills will be honed and added to throughout the programme. As an Apprentice Software Developer, your job includes: -Create PowerShell scripts to assist with the implementation, configuration and maintenance of internal systems -Help with the maintenance of our member websites built using AngularJS -Assist with the implementation and configuration of a Microsoft Azure environment -Assist with the creation of MI reports and dashboards from various data sources including SQL, CRM, ERP -Set up applications and VMs as well as install new software and upgrades including the use of Microsoft cloud technologies like Azure and Office365 Benefits -28 days annual leave, flexi-time, Social Housing Pension Scheme - defined contribution scheme if eligible, non-contributory accident and sickness cover, optional private medical insurance, on site free parking. What experience and skills do I need? -Already some exposure to JavaScript, CSS3 Report building skills use any tool. -Understanding of relational databases You`ll also need at least five GCSEs (or equivalent) at Grade C or above including Maths, English and either IT or Science. **Please note - as this is a level 4 apprenticeship, we can't progress candidates forward if they hold any of the following qualifications: Undergraduate / Masters Degree, HND / HNC or Certificates of Higher Education.** Your Accelerated training programme Firebrand offers a unique Higher Level 4 IT Apprenticeship scheme. We provide the fastest award-winning industry training and certifications with on-going support - all with the ultimate goal of securing a long-term IT career. During your two-year programme, Firebrand provides residential training at our distraction-free training centre. Our accelerated training means you'll achieve training with partners like CompTIA, ITIL and Microsoft faster, giving you more time to put your new skills into practice within a professional working environment. When you complete your programme, you'll have enough industry-recognised qualifications for a great career in IT. You'll be registered by the British Computer Society (BCS) to the Register of IT Technicians, confirming SFIA level 3 professional competence. Future career prospects By working hard and demonstrating your ability, drive and commitment throughout your 24 month apprenticeship scheme, upon completion you may be offered a permanent contract ensuring you have further opportunities to continue growing within this exciting organisation. This company is an equal opportunities employer who values diversity. They do not discriminate on the basis of race, religion, color, national origin, gender, sexual orientation, age, marital status, veteran status, or disability status from Youth In Jobs https://youthinjobs.co.uk/job/7139/apprentice-software-developer/
0 notes
Photo

A Beginner’s Guide to npm, the Node Package Manager
Node.js makes it possible to write applications in JavaScript on the server. It’s built on the V8 JavaScript runtime and written in C++ — so it’s fast. Originally, it was intended as a server environment for applications, but developers started using it to create tools to aid them in local task automation. Since then, a whole new ecosystem of Node-based tools (such as Grunt, Gulp and webpack) has evolved to transform the face of front-end development.
To make use of these tools (or packages) in Node.js, we need to be able to install and manage them in a useful way. This is where npm, the Node package manager, comes in. It installs the packages you want to use and provides a useful interface to work with them.
In this guide, we're going to look at the basics of working with npm. We'll show you how to install packages in local and global mode, as well as delete, update and install a certain version of a package. We’ll also show you how to work with package.json to manage a project’s dependencies. If you’re more of a video person, why not sign up for SitePoint Premium and watch our free screencast: What is npm and How Can I Use It?
But before we can start using npm, we first have to install Node.js on our system. Let’s do that now.
Installing Node.js
Head to the Node.js download page and grab the version you need. There are Windows and Mac installers available, as well as pre-compiled Linux binaries and source code. For Linux, you can also install Node via the package manager, as outlined here.
For this tutorial, we’re going to use v12.15.0. At the time of writing, this is the current Long Term Support (LTS) version of Node.
Tip: You might also consider installing Node using a version manager. This negates the permissions issue raised in the next section.
Let’s see where node was installed and check the version:
$ which node /usr/bin/node $ node --version v12.15.0
To verify that your installation was successful, let’s give Node’s REPL a try:
$ node > console.log('Node is running'); Node is running > .help .break Sometimes you get stuck, this gets you out .clear Alias for .break .editor Enter editor mode .exit Exit the repl .help Print this help message .load Load JS from a file into the REPL session .save Save all evaluated commands in this REPL session to a file Press ^C to abort current expression, ^D to exit the repl
The Node.js installation worked, so we can now focus our attention on npm, which was included in the install:
$ which npm /usr/bin/npm $ npm --version 6.13.7
Updating npm
npm, which originally stood for Node Package Manager, is a separate project from Node.js. It tends to be updated more frequently. You can check the latest available npm version on this page. If you realize you have an older version, you can update as follows.
For Linux and Mac users, use the following command:
npm install -g npm@latest
For Windows users, the process might be slightly more complicated. This is what it says on the project's home page:
Many improvements for Windows users have been made in npm 3 - you will have a better experience if you run a recent version of npm. To upgrade, either use Microsoft's upgrade tool, download a new version of Node, or follow the Windows upgrade instructions in the Installing/upgrading npm post.
For most users, the upgrade tool will be the best bet. To use it, you’ll need to open PowerShell as administrator and execute the following command:
Set-ExecutionPolicy Unrestricted -Scope CurrentUser -Force
This will ensure you can execute scripts on your system. Next, you’ll need to install the npm-windows-upgrade tool. After you’ve installed the tool, you need to run it so that it can update npm for you. Do all this within the elevated PowerShell console:
npm install --global --production npm-windows-upgrade npm-windows-upgrade --npm-version latest
Node Packaged Modules
npm can install packages in local or global mode. In local mode, it installs the package in a node_modules folder in your parent working directory. This location is owned by the current user.
If you’re not using a version manager (which you probably should be), global packages are installed in {prefix}/lib/node_modules/, which is owned by root (where {prefix} is usually /usr/ or /usr/local). This means you would have to use sudo to install packages globally, which could cause permission errors when resolving third-party dependencies, as well as being a security concern.
Let’s change that!

Time to manage those packages
Changing the Location of Global Packages
Let’s see what output npm config gives us:
$ npm config list ; cli configs metrics-registry = "https://registry.npmjs.org/" scope = "" user-agent = "npm/6.13.7 node/v12.15.0 linux x64" ; node bin location = /usr/bin/nodejs ; cwd = /home/sitepoint ; HOME = /home/sitepoint ; "npm config ls -l" to show all defaults.
This gives us information about our install. For now, it’s important to get the current global location:
$ npm config get prefix /usr
This is the prefix we want to change, in order to install global packages in our home directory. To do that create a new directory in your home folder:
$ cd ~ && mkdir .node_modules_global $ npm config set prefix=$HOME/.node_modules_global
With this simple configuration change, we’ve altered the location to which global Node packages are installed. This also creates a .npmrc file in our home directory:
$ npm config get prefix /home/sitepoint/.node_modules_global $ cat .npmrc prefix=/home/sitepoint/.node_modules_global
We still have npm installed in a location owned by root. But because we changed our global package location, we can take advantage of that. We need to install npm again, but this time in the new, user-owned location. This will also install the latest version of npm:
npm install npm@latest -g
Finally, we need to add .node_modules_global/bin to our $PATH environment variable, so that we can run global packages from the command line. Do this by appending the following line to your .profile, .bash_profileor .bashrc and restarting your terminal:
export PATH="$HOME/.node_modules_global/bin:$PATH"
Now our .node_modules_global/bin will be found first and the correct version of npm will be used:
$ which npm /home/sitepoint/.node_modules_global/bin/npm $ npm --version 6.13.7
Tip: you can avoid all of this if you use a Node version manager. Check out this tutorial to find out how: Installing Multiple Versions of Node.js Using nvm.
Installing Packages in Global Mode
At the moment, we only have one package installed globally — the npm package itself. So let’s change that and install UglifyJS (a JavaScript minification tool). We use the --global flag, but this can be abbreviated to -g:
$ npm install uglify-js --global /home/sitepoint/.node_modules_global/bin/uglifyjs -> /home/sitepoint/.node_modules_global/lib/node_modules/uglify-js/bin/uglifyjs + [email protected] added 3 packages from 38 contributors in 0.259s
As you can see from the output, additional packages are installed. These are UglifyJS’s dependencies.
Listing Global Packages
We can list the global packages we've installed with the npm list command:
$ npm list --global home/sitepoint/.node_modules_global/lib ├─┬ [email protected] │ ├── [email protected] │ ├── [email protected] │ ├── [email protected] │ ├── [email protected] │ ├── [email protected] .................... └─┬ [email protected] ├── [email protected] └── [email protected]
The output, however, is rather verbose. We can change that with the --depth=0 option:
$ npm list -g --depth=0 /home/sitepoint/.node_modules_global/lib ├── [email protected] └── [email protected]
That’s better; now we see just the packages we’ve installed along with their version numbers.
Any packages installed globally will become available from the command line. For example, here’s how you would use the Uglify package to minify example.js into example.min.js:
$ uglifyjs example.js -o example.min.js
Installing Packages in Local Mode
When you install packages locally, you normally do so using a package.json file. Let’s go ahead and create one:
$ mkdir project && cd project $ npm init package name: (project) version: (1.0.0) description: Demo of package.json entry point: (index.js) test command: git repository: keywords: author: license: (ISC)
Press Return to accept the defaults, then press it again to confirm your choices. This will create a package.json file at the root of the project:
{ "name": "project", "version": "1.0.0", "description": "", "main": "index.js", "scripts": { "test": "echo \"Error: no test specified\" && exit 1" }, "author": "", "license": "ISC" }
Tip: If you want a quicker way to generate a package.json file use npm init --y.
The fields are hopefully pretty self-explanatory, with the exception of main and scripts. The main field is the primary entry point to your program, and the scripts field lets you specify script commands that are run at various times in the life cycle of your package. We can leave these as they are for now, but if you’d like to find out more, see the package.json documentation on npm and this article on using npm as a build tool.
Now let’s try and install Underscore:
$ npm install underscore npm notice created a lockfile as package-lock.json. You should commit this file. npm WARN [email protected] No repository field. + [email protected] added 1 package from 1 contributor and audited 1 package in 0.412s found 0 vulnerabilities
Note that a lockfile is created. We’ll be coming back to this later.
Now if we have a look in package.json, we’ll see that a dependencies field has been added:
{ ... "dependencies": { "underscore": "^1.9.2" } }
The post A Beginner’s Guide to npm, the Node Package Manager appeared first on SitePoint.
by Michael Wanyoike via SitePoint https://ift.tt/2Q0Ku7Y
0 notes