#ingress controller kubernetes
Explore tagged Tumblr posts
Visit Tumblr Blog
Explore Tumblr blogs with no restrictions, modern design and the best experience.
Last Seen Tumblr Blogs


Fun Fact
Tumblr was acquired by Yahoo for $1.1B in 2013.
Text
Ingress Controller Kubernetes: A Comprehensive Guide
Ingress controller Kubernetes is a critical component in Kubernetes environments that manages external access to services within a cluster. It acts as a reverse proxy that routes incoming traffic based on defined rules to appropriate backend services. The ingress controller helps in load balancing, SSL termination, and URL-based routing. Understanding how an ingress controller Kubernetes functions is essential for efficiently managing traffic and ensuring smooth communication between services in a Kubernetes cluster.
Key Features of Ingress Controller Kubernetes
The ingress controller Kubernetes offers several key features that enhance the management of network traffic within a Kubernetes environment. These features include path-based routing, host-based routing, SSL/TLS termination, and load balancing. By leveraging these capabilities, an ingress controller Kubernetes helps streamline traffic management, improve security, and ensure high availability of applications. Understanding these features can assist in optimizing your Kubernetes setup and addressing specific traffic management needs.
How to Set Up an Ingress Controller Kubernetes?
Setting up an ingress controller Kubernetes involves several steps to ensure proper configuration and functionality. The process includes deploying the ingress controller using Kubernetes manifests, configuring ingress resources to define routing rules, and applying SSL/TLS certificates for secure communication. Proper setup is crucial for the ingress controller Kubernetes to effectively manage traffic and route requests to the correct services. This section will guide you through the detailed steps to successfully deploy and configure an ingress controller in your Kubernetes cluster.
Comparing Popular Ingress Controllers for Kubernetes
There are several popular ingress controllers Kubernetes available, each with its unique features and capabilities. Common options include NGINX Ingress Controller, Traefik, and HAProxy Ingress. Comparing these ingress controllers involves evaluating factors such as ease of use, performance, scalability, and support for advanced features. Understanding the strengths and limitations of each ingress controller Kubernetes helps in choosing the best solution for your specific use case and requirements.
Troubleshooting Common Issues with Ingress Controller Kubernetes
Troubleshooting issues with an ingress controller Kubernetes can be challenging but is essential for maintaining a functional and efficient Kubernetes environment. Common problems include incorrect routing, SSL/TLS certificate errors, and performance bottlenecks. This section will explore strategies and best practices for diagnosing and resolving these issues, ensuring that your ingress controller Kubernetes operates smoothly and reliably.
Security Considerations for Ingress Controller Kubernetes
Security is a critical aspect of managing an ingress controller Kubernetes. The ingress controller handles incoming traffic, making it a potential target for attacks. Important security considerations include implementing proper access controls, configuring SSL/TLS encryption, and protecting against common vulnerabilities such as cross-site scripting (XSS) and distributed denial-of-service (DDoS) attacks. By addressing these security aspects, you can safeguard your Kubernetes environment and ensure secure access to your services.
Advanced Configuration Techniques for Ingress Controller Kubernetes
Advanced configuration techniques for ingress controller Kubernetes can enhance its functionality and performance. These techniques include custom load balancing algorithms, advanced routing rules, and integration with external authentication providers. By implementing these advanced configurations, you can tailor the ingress controller Kubernetes to meet specific requirements and optimize traffic management based on your application's needs.
Best Practices for Managing Ingress Controller Kubernetes
Managing an ingress controller Kubernetes effectively involves adhering to best practices that ensure optimal performance and reliability. Best practices include regularly updating the ingress controller, monitoring traffic patterns, and implementing efficient resource allocation strategies. By following these practices, you can maintain a well-managed ingress controller that supports the smooth operation of your Kubernetes applications.
The Role of Ingress Controller Kubernetes in Microservices Architectures
In microservices architectures, the ingress controller Kubernetes plays a vital role in managing traffic between various microservices. It enables efficient routing, load balancing, and security for microservices-based applications. Understanding the role of the ingress controller in such architectures helps in designing robust and scalable systems that handle complex traffic patterns and ensure seamless communication between microservices.
Future Trends in Ingress Controller Kubernetes Technology
The field of ingress controller Kubernetes technology is constantly evolving, with new trends and innovations emerging. Future trends may include enhanced support for service meshes, improved integration with cloud-native security solutions, and advancements in automation and observability. Staying informed about these trends can help you leverage the latest advancements in ingress controller technology to enhance your Kubernetes environment.
Conclusion
The ingress controller Kubernetes is a pivotal component in managing traffic within a Kubernetes cluster. By understanding its features, setup processes, and best practices, you can optimize traffic management, enhance security, and improve overall performance. Whether you are troubleshooting common issues or exploring advanced configurations, a well-managed ingress controller is essential for the effective operation of Kubernetes-based applications. Staying updated on future trends and innovations will further enable you to maintain a cutting-edge and efficient Kubernetes environment.
0 notes
Text
Comparing the Best Ingress Controllers for Kubernetes
Comparing the best ingress controllers for Kubernetes involves evaluating key factors such as scalability, performance, and ease of configuration. Popular options like NGINX Ingress Controller offer robust features for managing traffic routing and SSL termination efficiently. Traefik stands out for its simplicity and support for automatic configuration updates, making it ideal for dynamic environments. HAProxy excels in providing advanced load balancing capabilities and extensive configuration options, suitable for complex deployments requiring fine-tuned control. Each controller varies in terms of integration with cloud providers, support for custom routing rules, and community support. Choosing the right ingress controller depends on your specific Kubernetes deployment needs, including workload type, security requirements, and operational preferences, ensuring seamless application delivery and optimal performance across your infrastructure.
Introduction to Kubernetes Ingress Controllers
Ingress controllers are a critical component in Kubernetes architecture, managing external access to services within a cluster. They provide routing rules, SSL termination, and load balancing, ensuring that requests reach the correct service. Selecting the best ingress controller for Kubernetes depends on various factors, including scalability, ease of use, and integration capabilities.
NGINX Ingress Controller: Robust and Reliable
NGINX Ingress Controller is one of the most popular choices for Kubernetes environments. Known for its robustness and reliability, it supports complex configurations and high traffic loads. It offers features like SSL termination, URL rewrites, and load balancing. NGINX is suitable for enterprises that require a powerful and flexible ingress solution capable of handling various traffic management tasks efficiently.
Simplifying Traffic Management in Dynamic Environments
Traefik is praised for its simplicity and ease of configuration, making it ideal for dynamic and fast-paced environments. It automatically discovers services and updates configurations without manual intervention, reducing administrative overhead. Traefik supports various backends, including Kubernetes, Docker, and Consul, providing seamless integration across different platforms. Its dashboard and metrics capabilities offer valuable insights into traffic management.
Mastering Load Balancing with HAProxy
HAProxy is renowned for its advanced load balancing capabilities and high performance. It supports TCP and HTTP load balancing, SSL termination, and extensive configuration options, making it suitable for complex deployments. HAProxy's flexibility allows for fine-tuned control over traffic management, ensuring optimal performance and reliability. Its integration with Kubernetes is strong, providing a powerful ingress solution for demanding environments.
Designed for Simplicity and Performance
Contour, developed by VMware, is an ingress controller designed specifically for Kubernetes. It leverages Envoy Proxy to provide high performance and scalability. Contour is known for its simplicity in setup and use, offering straightforward configuration with powerful features like HTTP/2 and gRPC support. It's a strong contender for environments that prioritize both simplicity and performance.
Comprehensive Service Mesh
Istio goes beyond a traditional ingress controller, offering a comprehensive service mesh solution. It provides advanced traffic management, security features, and observability tools. Istio is ideal for large-scale microservices architectures where detailed control and monitoring of service-to-service communication are essential. Its ingress capabilities are powerful, but it requires more setup and maintenance compared to simpler ingress controllers.
Comparing Ingress Controllers: Which One is Right for You?
When comparing the best ingress controllers for Kubernetes, it's important to consider your specific needs and environment. NGINX is excellent for robust, high-traffic applications; Traefik offers simplicity and automation; HAProxy provides advanced load balancing; Contour is designed for simplicity and performance; and Istio delivers a comprehensive service mesh solution. Evaluate factors such as ease of use, integration with existing tools, scalability, and the level of control required to choose the best ingress controller for your Kubernetes deployment.
Conclusion
Selecting the best ingress controller for Kubernetes is a crucial decision that impacts the performance, scalability, and management of your applications. Each ingress controller offers unique strengths tailored to different use cases. NGINX and HAProxy are suitable for environments needing robust, high-performance solutions. Traefik and Contour are ideal for simpler setups with automation and performance needs. Istio is perfect for comprehensive service mesh requirements in large-scale microservices architectures. By thoroughly evaluating your specific needs and considering the features of each ingress controller, you can ensure an optimal fit for your Kubernetes deployment, enhancing your application's reliability and efficiency.
0 notes
Text
Load Balancing Web Sockets with K8s/Istio
When load balancing WebSockets in a Kubernetes (K8s) environment with Istio, there are several considerations to ensure persistent, low-latency connections. WebSockets require special handling because they are long-lived, bidirectional connections, which are different from standard HTTP request-response communication. Here’s a guide to implementing load balancing for WebSockets using Istio.
1. Enable WebSocket Support in Istio
By default, Istio supports WebSocket connections, but certain configurations may need tweaking. You should ensure that:
Destination rules and VirtualServices are configured appropriately to allow WebSocket traffic.
Example VirtualService Configuration.
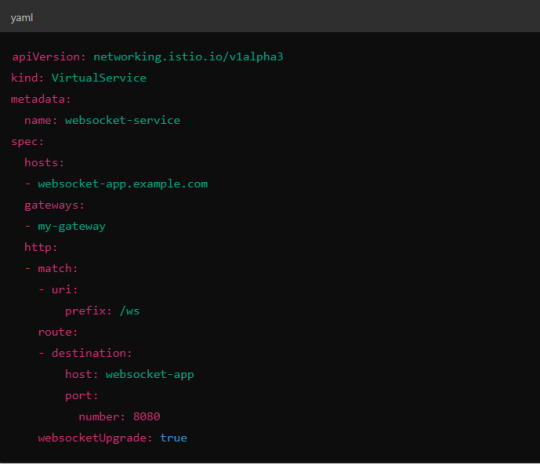
Here, websocketUpgrade: true explicitly allows WebSocket traffic and ensures that Istio won’t downgrade the WebSocket connection to HTTP.
2. Session Affinity (Sticky Sessions)
In WebSocket applications, sticky sessions or session affinity is often necessary to keep long-running WebSocket connections tied to the same backend pod. Without session affinity, WebSocket connections can be terminated if the load balancer routes the traffic to a different pod.
Implementing Session Affinity in Istio.
Session affinity is typically achieved by setting the sessionAffinity field to ClientIP at the Kubernetes service level.

In Istio, you might also control affinity using headers. For example, Istio can route traffic based on headers by configuring a VirtualService to ensure connections stay on the same backend.
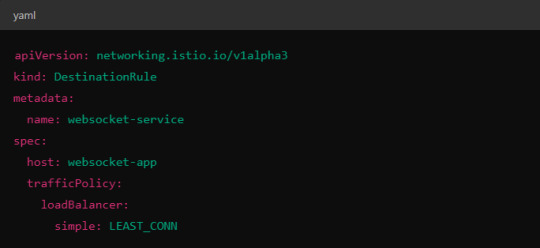
3. Load Balancing Strategy
Since WebSocket connections are long-lived, round-robin or random load balancing strategies can lead to unbalanced workloads across pods. To address this, you may consider using least connection or consistent hashing algorithms to ensure that existing connections are efficiently distributed.
Load Balancer Configuration in Istio.
Istio allows you to specify different load balancing strategies in the DestinationRule for your services. For WebSockets, the LEAST_CONN strategy may be more appropriate.
Alternatively, you could use consistent hashing for a more sticky routing based on connection properties like the user session ID.
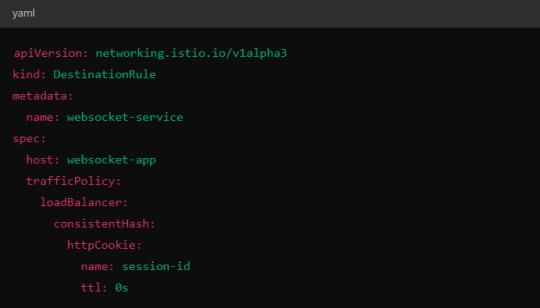
This configuration ensures that connections with the same session ID go to the same pod.
4. Scaling Considerations
WebSocket applications can handle a large number of concurrent connections, so you’ll need to ensure that your Kubernetes cluster can scale appropriately.
Horizontal Pod Autoscaler (HPA): Use an HPA to automatically scale your pods based on metrics like CPU, memory, or custom metrics such as open WebSocket connections.
Istio Autoscaler: You may also scale Istio itself to handle the increased load on the control plane as WebSocket connections increase.
5. Connection Timeouts and Keep-Alive
Ensure that both your WebSocket clients and the Istio proxy (Envoy) are configured for long-lived connections. Some settings that need attention:
Timeouts: In VirtualService, make sure there are no aggressive timeout settings that would prematurely close WebSocket connections.

Keep-Alive Settings: You can also adjust the keep-alive settings at the Envoy level if necessary. Envoy, the proxy used by Istio, supports long-lived WebSocket connections out-of-the-box, but custom keep-alive policies can be configured.
6. Ingress Gateway Configuration
If you're using an Istio Ingress Gateway, ensure that it is configured to handle WebSocket traffic. The gateway should allow for WebSocket connections on the relevant port.

This configuration ensures that the Ingress Gateway can handle WebSocket upgrades and correctly route them to the backend service.
Summary of Key Steps
Enable WebSocket support in Istio’s VirtualService.
Use session affinity to tie WebSocket connections to the same backend pod.
Choose an appropriate load balancing strategy, such as least connection or consistent hashing.
Set timeouts and keep-alive policies to ensure long-lived WebSocket connections.
Configure the Ingress Gateway to handle WebSocket traffic.
By properly configuring Istio, Kubernetes, and your WebSocket service, you can efficiently load balance WebSocket connections in a microservices architecture.
#kubernetes#websockets#Load Balancing#devops#linux#coding#programming#Istio#virtualservices#Load Balancer#Kubernetes cluster#gateway#python#devlog#github#ansible
5 notes
·
View notes
Text
Unpatched NGINX ingress controller bugs can be abused to steal Kubernetes cluster secrets

Source: https://www.theregister.com/2023/10/30/unpatched_nginx_ingress_controller_bugs/
2 notes
·
View notes
Text
Service Mesh with Istio and Linkerd: A Practical Overview
As microservices architectures continue to dominate modern application development, managing service-to-service communication has become increasingly complex. Service meshes have emerged as a solution to address these complexities — offering enhanced security, observability, and traffic management between services.
Two of the most popular service mesh solutions today are Istio and Linkerd. In this blog post, we'll explore what a service mesh is, why it's important, and how Istio and Linkerd compare in real-world use cases.
What is a Service Mesh?
A service mesh is a dedicated infrastructure layer that controls communication between services in a distributed application. Instead of hardcoding service-to-service communication logic (like retries, failovers, and security policies) into your application code, a service mesh handles these concerns externally.
Key features typically provided by a service mesh include:
Traffic management: Fine-grained control over service traffic (routing, load balancing, fault injection)
Observability: Metrics, logs, and traces that give insights into service behavior
Security: Encryption, authentication, and authorization between services (often using mutual TLS)
Reliability: Retries, timeouts, and circuit breaking to improve service resilience
Why Do You Need a Service Mesh?
As applications grow more complex, maintaining reliable and secure communication between services becomes critical. A service mesh abstracts this complexity, allowing teams to:
Deploy features faster without worrying about cross-service communication challenges
Increase application reliability and uptime
Gain full visibility into service behavior without modifying application code
Enforce security policies consistently across the environment
Introducing Istio
Istio is one of the most feature-rich service meshes available today. Originally developed by Google, IBM, and Lyft, Istio offers deep integration with Kubernetes but can also support hybrid cloud environments.
Key Features of Istio:
Advanced traffic management: Canary deployments, A/B testing, traffic shifting
Comprehensive security: Mutual TLS, policy enforcement, and RBAC (Role-Based Access Control)
Extensive observability: Integrates with Prometheus, Grafana, Jaeger, and Kiali for metrics and tracing
Extensibility: Supports custom plugins through WebAssembly (Wasm)
Ingress/Egress gateways: Manage inbound and outbound traffic effectively
Pros of Istio:
Rich feature set suitable for complex enterprise use cases
Strong integration with Kubernetes and cloud-native ecosystems
Active community and broad industry adoption
Cons of Istio:
Can be resource-heavy and complex to set up and manage
Steeper learning curve compared to lighter service meshes
Introducing Linkerd
Linkerd is often considered the original service mesh and is known for its simplicity, performance, and focus on the core essentials.
Key Features of Linkerd:
Lightweight and fast: Designed to be resource-efficient
Simple setup: Easy to install, configure, and operate
Security-first: Automatic mutual TLS between services
Observability out of the box: Includes metrics, tap (live traffic inspection), and dashboards
Kubernetes-native: Deeply integrated with Kubernetes
Pros of Linkerd:
Minimal operational complexity
Lower resource usage
Easier learning curve for teams starting with service mesh
High performance and low latency
Cons of Linkerd:
Fewer advanced traffic management features compared to Istio
Less customizable for complex use cases
Choosing the Right Service Mesh
Choosing between Istio and Linkerd largely depends on your needs:
Choose Istio if you require advanced traffic management, complex security policies, and extensive customization — typically in larger, enterprise-grade environments.
Choose Linkerd if you value simplicity, low overhead, and rapid deployment — especially in smaller teams or organizations where ease of use is critical.
Ultimately, both Istio and Linkerd are excellent choices — it’s about finding the best fit for your application landscape and operational capabilities.
Final Thoughts
Service meshes are no longer just "nice to have" for microservices — they are increasingly a necessity for ensuring resilience, security, and observability at scale. Whether you pick Istio for its powerful feature set or Linkerd for its lightweight design, implementing a service mesh can greatly enhance your service architecture.
Stay tuned — in upcoming posts, we'll dive deeper into setting up Istio and Linkerd with hands-on labs and real-world use cases!
Would you also like me to include a hands-on quickstart guide (like "how to install Istio and Linkerd on a local Kubernetes cluster")? 🚀
For more details www.hawkstack.com
0 notes
Video
youtube
🚀 Aula Nova no Ar: Como configurar o Ingress Controller no Kubernetes com Terraform e Helm Se você está construindo um site ou blog e quer entender como os grandes projetos escalam com eficiência, controle e segurança, essa aula é pra você! Na Aula 14 do curso gratuito de Kubernetes com Terraform no site Código Fluente, mostramos como instalar e configurar o Ingress Controller NGINX, responsável por centralizar todo o tráfego HTTP/HTTPS do seu cluster Kubernetes. Com ele, você consegue eliminar a necessidade de vários LoadBalancers, reduzindo custos e ganhando organização. Você aprenderá: ✅ A diferença prática entre LoadBalancer e Ingress ✅ Como instalar o NGINX Ingress Controller com Helm ✅ Como criar regras de roteamento para separar /api, /reset, /user, etc. ✅ Como adaptar seu frontend (React) e backend (Go com Fiber) para funcionar com Ingress ✅ Como aplicar tudo isso com Terraform para automação total Tudo isso de forma didática, passo a passo e com as imagens Docker já prontas para você usar. Se quiser criar suas próprias imagens, também mostramos como fazer isso. 📘 Leia a aula completa aqui: 👉 https://www.codigofluente.com.br/aula-14-k8s-configuracao-do-ingress-controller/ —
0 notes
Text
Critical RCE flaws put Kubernetes clusters at risk of takeover
The Kubernetes project has released patches for five vulnerabilities in a widely used popular component called the Ingress NGINX Controller that’s used to route external traffic to Kubernetes services. If exploited, the flaw could allow attackers to completely take over entire clusters. “Based on our analysis, about 43% of cloud environments are vulnerable to these vulnerabilities, with our…
0 notes
Text
IngressNightmare: Vulnerabilidades Críticas de Ejecución Remota de Código en Ingress NGINX
El equipo de Wiz Research descubrió una serie de vulnerabilidades críticas en el Ingress NGINX Controller para Kubernetes, denominadas #IngressNightmare (CVE-2025-1097, CVE-2025-1098, CVE-2025-24514 y CVE-2025-1974). Estas fallas permiten a un atacante ejecutar código de forma remota (RCE) sin autenticación, acceder a secretos almacenados en todos los namespaces del clúster y potencialmente tomar…
0 notes
Text
Azure DevOps Advance Course: Elevate Your DevOps Expertise
The Azure DevOps Advanced Course is for individuals with a solid understanding of DevOps and who want to enhance their skills and knowledge within the Microsoft Azure ecosystem. This course is designed to go beyond the basics and focus on advanced concepts and practices for managing and implementing complex DevOps workflows using Azure tools.
Key Learning Objectives:
Advanced Pipelines for CI/CD: Learn how to build highly scalable, reliable, and CI/CD pipelines with Azure DevOps Tools like Azure Pipelines. Azure Artifacts and Azure Key Vault. Learn about advanced branching, release gates and deployment strategies in different environments.
Infrastructure as Code (IaC): Master the use of infrastructure-as-code tools like Azure Resource Manager (ARM) templates and Terraform to automate the provisioning and management of Azure resources. This includes best practices for versioning, testing and deploying infrastructure configurations.
Containerization: Learn about container orchestration using Docker. Learn how to create, deploy and manage containerized apps on Azure Kubernetes Service. Explore concepts such as service meshes and ingress controllers.
Security and compliance: Understanding security best practices in the DevOps Lifecycle. Learn how to implement various security controls, including code scanning, vulnerability assessment, and secret management, at different stages of the pipeline. Learn how to implement compliance frameworks such as ISO 27001 or SOC 2 using Azure DevOps.
Monitoring & Logging: Acquire expertise in monitoring application performance and health. Azure Monitor, Application Insights and other tools can be used to collect, analyse and visualize telemetry. Implement alerting mechanisms to troubleshoot problems proactively.
Advanced Debugging and Troubleshooting: Develop advanced skills in troubleshooting to diagnose and solve complex issues with Azure DevOps deployments and pipelines. Learn how to debug code and analyze logs to identify and solve problems.
Who should attend:
DevOps Engineers
System Administrators
Software Developers
Cloud Architects
IT Professionals who want to improve their DevOps on the Azure platform
Benefits of taking the course:
Learn advanced DevOps concepts, best practices and more.
Learn how to implement and manage complex DevOps Pipelines.
Azure Tools can help you automate your infrastructure and applications.
Learn how to integrate security, compliance and monitoring into the DevOps Lifecycle.
Get a competitive advantage in the job market by acquiring advanced Azure DevOps Advance Course knowledge.
The Azure DevOps Advanced Course is a comprehensive, practical learning experience that will equip you with the knowledge and skills to excel in today’s dynamic cloud computing environment.
0 notes
Text
youtube
AWS EKS | Episode 11 | Let's discuss Ingress Controller in Kubernetes
1 note
·
View note
Text
Ingress Controller Kubernetes: A Comprehensive Guide
Ingress controller Kubernetes is a critical component in Kubernetes environments that manages external access to services within a cluster. It acts as a reverse proxy that routes incoming traffic based on defined rules to appropriate backend services. The ingress controller helps in load balancing, SSL termination, and URL-based routing. Understanding how an ingress controller Kubernetes functions is essential for efficiently managing traffic and ensuring smooth communication between services in a Kubernetes cluster.
Key Features of Ingress Controller Kubernetes
The ingress controller Kubernetes offers several key features that enhance the management of network traffic within a Kubernetes environment. These features include path-based routing, host-based routing, SSL/TLS termination, and load balancing. By leveraging these capabilities, an ingress controller Kubernetes helps streamline traffic management, improve security, and ensure high availability of applications. Understanding these features can assist in optimizing your Kubernetes setup and addressing specific traffic management needs.
How to Set Up an Ingress Controller Kubernetes?
Setting up an ingress controller Kubernetes involves several steps to ensure proper configuration and functionality. The process includes deploying the ingress controller using Kubernetes manifests, configuring ingress resources to define routing rules, and applying SSL/TLS certificates for secure communication. Proper setup is crucial for the **ingress controller Kubernetes** to effectively manage traffic and route requests to the correct services. This section will guide you through the detailed steps to successfully deploy and configure an ingress controller in your Kubernetes cluster.
Comparing Popular Ingress Controllers for Kubernetes
There are several popular **ingress controllers Kubernetes** available, each with its unique features and capabilities. Common options include NGINX Ingress Controller, Traefik, and HAProxy Ingress. Comparing these ingress controllers involves evaluating factors such as ease of use, performance, scalability, and support for advanced features. Understanding the strengths and limitations of each **ingress controller Kubernetes** helps in choosing the best solution for your specific use case and requirements.
Troubleshooting Common Issues with Ingress Controller Kubernetes
Troubleshooting issues with an ingress controller Kubernetes can be challenging but is essential for maintaining a functional and efficient Kubernetes environment. Common problems include incorrect routing, SSL/TLS certificate errors, and performance bottlenecks. This section will explore strategies and best practices for diagnosing and resolving these issues, ensuring that your ingress controller Kubernetes operates smoothly and reliably.
Security Considerations for Ingress Controller Kubernetes
Security is a critical aspect of managing an ingress controller Kubernetes. The ingress controller handles incoming traffic, making it a potential target for attacks. Important security considerations include implementing proper access controls, configuring SSL/TLS encryption, and protecting against common vulnerabilities such as cross-site scripting (XSS) and distributed denial-of-service (DDoS) attacks. By addressing these security aspects, you can safeguard your Kubernetes environment and ensure secure access to your services.
Advanced Configuration Techniques for Ingress Controller Kubernetes
Advanced configuration techniques for **ingress controller Kubernetes** can enhance its functionality and performance. These techniques include custom load balancing algorithms, advanced routing rules, and integration with external authentication providers. By implementing these advanced configurations, you can tailor the **ingress controller Kubernetes** to meet specific requirements and optimize traffic management based on your application's needs.
Best Practices for Managing Ingress Controller Kubernetes
Managing an ingress controller Kubernetes effectively involves adhering to best practices that ensure optimal performance and reliability. Best practices include regularly updating the ingress controller, monitoring traffic patterns, and implementing efficient resource allocation strategies. By following these practices, you can maintain a well-managed ingress controller that supports the smooth operation of your Kubernetes applications.
The Role of Ingress Controller Kubernetes in Microservices Architectures
In microservices architectures, the ingress controller Kubernetes plays a vital role in managing traffic between various microservices. It enables efficient routing, load balancing, and security for microservices-based applications. Understanding the role of the ingress controller in such architectures helps in designing robust and scalable systems that handle complex traffic patterns and ensure seamless communication between microservices.
Future Trends in Ingress Controller Kubernetes Technology
The field of ingress controller Kubernetes technology is constantly evolving, with new trends and innovations emerging. Future trends may include enhanced support for service meshes, improved integration with cloud-native security solutions, and advancements in automation and observability. Staying informed about these trends can help you leverage the latest advancements in ingress controller technology to enhance your Kubernetes environment.
Conclusion
The ingress controller Kubernetes is a pivotal component in managing traffic within a Kubernetes cluster. By understanding its features, setup processes, and best practices, you can optimize traffic management, enhance security, and improve overall performance. Whether you are troubleshooting common issues or exploring advanced configurations, a well-managed ingress controller is essential for the effective operation of Kubernetes-based applications. Staying updated on future trends and innovations will further enable you to maintain a cutting-edge and efficient Kubernetes environment.
0 notes
Text
Istio Service Mesh Essentials: Simplifying Microservices Management
In today's cloud-native world, microservices architecture has become a standard for building scalable and resilient applications. However, managing the interactions between these microservices introduces challenges such as traffic control, security, and observability. This is where Istio Service Mesh shines.
Istio is a powerful, open-source service mesh platform that addresses these challenges, providing seamless traffic management, enhanced security, and robust observability for microservices. This blog post will dive into the essentials of Istio Service Mesh and explore how it simplifies microservices management, complete with hands-on insights.
What is a Service Mesh?
A service mesh is a dedicated infrastructure layer that facilitates secure, fast, and reliable communication between microservices. It decouples service-to-service communication concerns like routing, load balancing, and security from the application code, enabling developers to focus on business logic.
Istio is one of the most popular service meshes, offering a rich set of features to empower developers and operations teams.
Key Features of Istio Service Mesh
1. Traffic Management
Istio enables dynamic traffic routing and load balancing between services, ensuring optimal performance and reliability. Key traffic management features include:
Intelligent Routing: Use fine-grained traffic control policies for canary deployments, blue-green deployments, and A/B testing.
Load Balancing: Automatically distribute requests across multiple service instances.
Retries and Timeouts:��Improve resilience by defining retry policies and request timeouts.
2. Enhanced Security
Security is a cornerstone of Istio, providing built-in features like:
Mutual TLS (mTLS): Encrypt service-to-service communication.
Authentication and Authorization: Define access policies using identity-based and attribute-based rules.
Secure Gateways: Secure ingress and egress traffic with gateways.
3. Observability
Monitoring microservices can be daunting, but Istio offers powerful observability tools:
Telemetry and Metrics: Gain insights into service performance with Prometheus and Grafana integrations.
Distributed Tracing: Trace requests across multiple services using tools like Jaeger or Zipkin.
Service Visualization: Use tools like Kiali to visualize service interactions.
Hands-On with Istio: Setting Up Your Service Mesh
Here’s a quick overview of setting up and using Istio in a Kubernetes environment:
Step 1: Install Istio
Download the Istio CLI (istioctl) and install Istio in your Kubernetes cluster.
Deploy the Istio control plane components, including Pilot, Mixer, and Envoy proxies.
Step 2: Enable Your Services for Istio
Inject Istio's Envoy sidecar proxy into your service pods.
Configure Istio Gateway and VirtualService resources for external traffic management.
Step 3: Define Traffic Rules
Create routing rules for advanced traffic management scenarios.
Test mTLS to secure inter-service communication.
Step 4: Monitor with Observability Tools
Use built-in telemetry to monitor service health.
Visualize the mesh topology with Kiali for better debugging and analysis.
Why Istio Matters for Your Microservices
Istio abstracts complex network-level tasks, enabling your teams to:
Save Time: Automate communication patterns without touching the application code.
Enhance Security: Protect your services with minimal effort.
Improve Performance: Leverage intelligent routing and load balancing.
Gain Insights: Monitor and debug your microservices with ease.
Conclusion
Mastering Istio Service Mesh Essentials opens up new possibilities for managing microservices effectively. By implementing Istio, organizations can ensure their applications are secure, resilient, and performant.
Ready to dive deeper? Explore Istio hands-on labs to experience its features in action. Simplify your microservices management journey with Istio Service Mesh!
Explore More with HawkStack
Interested in modern microservices solutions? HawkStack Technologies offers expert DevOps tools and support, including Istio and other cloud-native services. Reach out today to transform your microservices infrastructure! For more details - www.hawkstack.com
#redhatcourses#information technology#containerorchestration#kubernetes#docker#containersecurity#container#linux#aws#hawkstack#hawkstack technologies
0 notes
Text
Mastering Azure Kubernetes Secrets Management and Ingress Control
Introduction This tutorial provides a comprehensive, hands-on guide to mastering secrets management and Ingress controllers in Azure Kubernetes Service (AKS). We will cover the fundamental concepts, implementation guides, code examples, best practices, testing, and debugging. By the end of this tutorial, you will have a deep understanding of how to securely manage secrets and configure Ingress…
0 notes
Text
Assess Application and Cluster Readiness
Review Application Dependencies:
Analyze libraries, JDK versions, frameworks (e.g., Spring Boot, Jakarta EE), and external services (databases, APIs).
Identify any Kubernetes-specific configurations (e.g., ConfigMaps, Secrets, environment variables).
Containerization:
Ensure your Java app is containerized using tools like Docker.
Update the Dockerfile if necessary (e.g., for JDK/JRE updates or changes in base image).
2. Prepare Kubernetes Environment
Target Cluster Validation:
Ensure the target Kubernetes cluster is set up and ready.
Check for compatibility with the current cluster’s API version and resources.
Namespace Setup:
Create equivalent namespaces, RBAC roles, and policies in the target cluster.
Storage:
Verify Persistent Volume Claims (PVCs) and ensure similar storage classes are available.
3. Backup and Export Resources
Kubernetes Resources:
Export all application-related resources using kubectl:bashCopy codekubectl get all -n <namespace> -o yaml > resources.yaml
Persistent Data:
Back up database data or persistent volumes using tools like Velero or rsync.
4. Migrate Application Configurations
ConfigMaps and Secrets:
Export existing configurations:bashCopy codekubectl get configmap -n <namespace> -o yaml > configmap.yaml kubectl get secret -n <namespace> -o yaml > secret.yaml
Reapply them in the new cluster:bashCopy codekubectl apply -f configmap.yaml kubectl apply -f secret.yaml
5. Deploy to Target Cluster
Deploy Application:
Use Helm charts, Kubernetes manifests, or CI/CD pipelines to deploy the Java application to the new cluster.
Update the kubeconfig for the target cluster:bashCopy codekubectl config use-context <target-cluster-context> kubectl apply -f resources.yaml
Persistent Volumes:
Ensure data is restored to the persistent volumes if needed.
6. Test the Migration
Validation:
Ensure the application is running as expected (pods, services, and networking).
Run integration and regression tests.
Connectivity:
Validate external service integrations (e.g., databases, APIs).
Check ingress configurations for public access.
7. Cutover and Cleanup
Switch Traffic:
Update DNS or external load balancer to direct traffic to the new cluster.
Monitor:
Use tools like Prometheus, Grafana, or ELK Stack to monitor application health.
Clean Up Old Environment:
After verifying stability, clean up resources in the old cluster.
Tools to Assist in Migration
Velero: For backup and restore of Kubernetes resources and persistent volumes.
Helm: To manage application deployments and upgrades.
Kubernetes Dashboard: For real-time cluster monitoring.
Kubectl Plugins: To enhance CLI functionality.
If you provide more details about the migration (e.g., specific cloud providers or Kubernetes environments), I can offer more tailored advice!
4o
You said:
Migration of 5000 files per hr fix
ChatGPT said:
ChatGPT
If you're migrating a large number of files (e.g., 5000 files per hour) and encountering performance bottlenecks, you can improve the speed and reliability of your file migration by addressing several key areas. Here's a step-by-step guide to optimize file transfer:
1. Identify and Analyze Bottlenecks
File System Bottlenecks:
Check the source and destination disk I/O performance.
Ensure the files are not locked or being used during migration.
Network Bandwidth:
Measure your available network bandwidth using tools like iperf and ensure it can handle the expected load.
File Metadata Overhead:
Small files can add significant overhead due to metadata operations (e.g., file creation, permissions).
2. Optimize Transfer Mechanisms
Use Parallel Processing:
Transfer multiple files concurrently using multithreaded or parallel tools like:
rsync with --max-size and --parallel options.
GNU Parallel for concurrent file transfers.
bashCopy codefind /source/directory -type f | parallel -j8 rsync -a {} /destination/directory
Use a custom script or a library like Python's concurrent.futures for more control.
Batch File Transfers:
Group files into batches (e.g., tar archives) to reduce the overhead of transferring many small files individually.bashCopy codetar -cvf files.tar /source/files && rsync files.tar /destination Extract the files on the destination:bashCopy codetar -xvf files.tar
3. Ensure Network Optimization
Compression:
Compress files during transfer to reduce data volume:bashCopy codersync -az /source/directory /destination/directory
Increase TCP Window Size:
Tweak TCP settings for large transfers using tools like scp or rsync with buffer options:bashCopy codersync --bwlimit=0 --whole-file /source /destination
Use Faster Protocols:
Use optimized file transfer protocols like Rclone, Aspera, or SFTP for high-speed transfer.
4. Improve Source and Destination Performance
Disk Performance:
Optimize disk reads and writes using SSDs for temporary storage or caches.
Ensure the file system supports efficient file handling (e.g., ext4, XFS).
File System Tuning:
For very large numbers of files, tune parameters like inode_cache to handle metadata efficiently.
5. Error Handling and Retry Logic
Retry Failed Transfers:
Use tools like rsync to retry failed files automatically:bashCopy codersync -avz --partial --progress /source /destination
Logging and Monitoring:
Log all transferred files and
4o
You said:
File trsnsfer to s3 improve
ChatGPT said:
ChatGPT
Improving file transfer to Amazon S3 requires addressing both performance and reliability. Below are strategies and tools to optimize large-scale or high-volume file transfers:
1. Use AWS-Specific Tools
AWS CLI with Parallelism:
Use the --multipart-chunk-size-mb and --parallel flags to upload files in parallel and in chunks:bashCopy codeaws s3 cp /local/path s3://your-bucket-name --recursive --storage-class STANDARD_IA --region <region>
Enable parallel transfers: Update your AWS CLI configuration file (~/.aws/config) to increase concurrency:plaintextCopy code[default] s3 = max_concurrent_requests = 10 max_queue_size = 1000 multipart_threshold = 64MB multipart_chunksize = 64MB
AWS DataSync:
Use AWS DataSync for automated, high-performance, large-scale transfers with minimal manual intervention. DataSync can also manage retry and error handling.
2. Optimize S3 Uploads
Multipart Upload:
Use multipart uploads for files larger than 100 MB to improve transfer speed and reliability.
Example using AWS CLI:bashCopy codeaws s3api create-multipart-upload --bucket your-bucket-name --key file_key
Automate multipart uploads with the AWS SDK or tools like boto3 for Python.
Use the Correct Storage Class:
Choose the appropriate storage class to save costs and improve upload speeds:
STANDARD (default): High performance for frequently accessed data.
INTELLIGENT_TIERING: Automatically optimizes storage costs for infrequently accessed files.
3. Improve Network Performance
Enable Transfer Acceleration:
Use S3 Transfer Acceleration for faster uploads over long distances by leveraging AWS edge locations:bashCopy codeaws s3 cp /local/path s3://your-bucket-name --region <region> --endpoint-url https://<bucket-name>.s3-accelerate.amazonaws.com
Compression:
Compress files before transferring to reduce data size:bashCopy codetar -czvf archive.tar.gz /local/path && aws s3 cp archive.tar.gz s3://your-bucket-name
Optimize Network:
Use AWS Direct Connect or a high-bandwidth internet connection for large-scale transfers.
Monitor latency and bandwidth with tools like iperf.
4. Automate and Parallelize Transfers
Rclone:
Use rclone for high-speed S3-compatible transfers with parallelism and retry capabilities:bashCopy coderclone copy /local/path s3:your-bucket-name --transfers 16 --s3-upload-concurrency 16
GNU Parallel:
Transfer files concurrently by splitting file lists:bashCopy codefind /local/path -type f | parallel -j10 aws s3 cp {} s3://your-bucket-name
5. Error Handling and Retry
Retry Mechanisms:
Use tools or scripts that automatically retry failed uploads.
AWS CLI has built-in retry logic; increase retries if necessary:bashCopy codeaws s3 cp --cli-read-timeout 600 --cli-connect-timeout 600 /local/path s3://your-bucket-name
Chunked Retry:
Break large transfers into smaller, manageable chunks and retry failed chunks only.
6. Monitor and Optimize Transfers
AWS CloudWatch Metrics:
Monitor transfer performance and error rates in real-time.
S3 Inventory:
Use S3 inventory reports to validate uploaded files.
AWS SDKs or Custom Scripts:
Build custom monitoring and retry logic with SDKs like boto3 (Python).
Example Optimized Upload Command
bash
Copy code
aws s3 cp /local/path s3://your-bucket-name --recursive --storage-class STANDARD --region us-east-1 --cli-read-timeout 600 --cli-connect-timeout 600
When to Use Snowball or Snowmobile
For extremely large datasets (terabytes or petabytes), use AWS Snowball or AWS Snowmobile for offline data transfer to S3.
These steps can dramatically improve the efficiency and reliability of your file transfer process to S3. Let me know if you need help implementing any of these!
4o
You said:
Improve fole transfers
ChatGPT said:
ChatGPT
Improving file transfer performance and reliability, whether between servers, local systems, or to cloud storage like Amazon S3, involves a combination of strategies. Here are some best practices for improving file transfers:
1. Optimize the File Transfer Process
Parallelize Transfers
Transfer multiple files concurrently to improve throughput:
Use tools like rsync, scp, or cloud-specific SDKs with multi-threading capabilities.
Example with rsync:bashCopy codersync -azP --info=progress2 --max-size=100M --exclude="*.tmp" /source/ /destination/
Batch Small Files
Small files cause metadata overhead during transfer. Bundle them into archives:bashCopy codetar -czvf archive.tar.gz /source/ Transfer the archive, then extract on the destination:bashCopy codetar -xzvf archive.tar.gz
2. Use High-Performance Transfer Tools
Rclone
Ideal for cloud storage and large-scale transfers with parallelism:bashCopy coderclone copy /source/ remote:bucket-name --transfers=16 --checkers=8
GNU Parallel
Parallelize file uploads/downloads:bashCopy codefind /source/ -type f | parallel -j8 scp {} user@destination:/target/
Multithreaded Tools
Use tools with built-in multithreading, such as bbcp, Aspera, or scp (with parallel scripts).
3. Network Optimization
Compression
Compress files before transfer to reduce the amount of data transmitted:bashCopy codegzip largefile.txt Or combine with the transfer:bashCopy codetar czf - /source/ | ssh user@destination "tar xzf - -C /target/"
Bandwidth Management
Limit bandwidth usage to prevent throttling:
With rsync:bashCopy codersync --bwlimit=1000 -az /source/ /destination/
Use TCP tuning options to optimize network transfer rates:bashCopy codesysctl -w net.ipv4.tcp_window_scaling=1
Use Faster Protocols
Use optimized transfer protocols:
SFTP: Secure but slower for high-volume transfers.
Rsync/SSH: Efficient for incremental and large transfers.
Aspera: High-speed UDP-based protocol.
Enable Transfer Acceleration (Cloud)
For Amazon S3:bashCopy codeaws s3 cp /source/ s3://your-bucket/ --region <region> --endpoint-url https://<bucket-name>.s3-accelerate.amazonaws.com
4. Error Handling and Resilience
Resume Transfers
Use tools that support resuming failed transfers:
Rsync:bashCopy codersync -az --partial /source/ /destination/
AWS CLI:bashCopy codeaws s3 cp --continue /source/ s3://bucket-name/
Retry Logic
Implement retry logic for failed transfers using scripts or tools.
Example using bash:bashCopy codefor i in {1..5}; do scp file user@destination:/target/ && break || sleep 5 done
5. Monitor and Analyze Performance
Real-Time Monitoring
Monitor progress with tools:
Rsync: --progress flag.
SCP: Wrap in pv for progress visualization:bashCopy codetar cf - /source/ | pv | ssh user@destination "tar xf - -C /target/"
Analyze Bottlenecks
Use tools like iperf or nload to check network performance.
Use iotop or dstat to monitor disk I/O on both source and destination.
6. Scale with Advanced Solutions
Distributed File Transfer
Use tools like Globus for efficient distributed data transfers.
Data Transfer Appliances
For extremely large datasets, consider appliances like AWS Snowball or offline methods to ship data physically.
Content Delivery Networks (CDNs)
Use CDNs for faster file distribution to end users.
By combining these strategies—parallelism, compression, protocol optimization, and monitoring—you can significantly enhance file transfer speed and reliability. Let me know if you'd like further customization for a specific use case!
4o
You said:
Threadpool
ChatGPT said:
ChatGPT
A thread pool is a collection of pre-initialized worker threads that stand ready to perform tasks. Instead of creating and destroying threads for each task, a thread pool manages a set of reusable threads, improving performance and resource utilization in multi-threaded applications.
Here’s how to effectively use and optimize thread pools in your application.
Why Use a Thread Pool?
Performance: Reduces the overhead of creating and destroying threads repeatedly.
Resource Management: Controls the number of concurrent threads, preventing system overload.
Scalability: Allows a controlled environment for task execution, making it easier to scale applications.
Key Concepts of Thread Pools
Core Threads: Minimum number of threads that are always kept alive.
**Max Threads
4o
You said:
Improve java spring file transfer
ChatGPT said:
ChatGPT
Improving file transfer in a Java Spring application involves optimizing both the code and the underlying infrastructure. Below are strategies to enhance file transfer performance and reliability.
1. Optimize File Transfer Code
Use Streaming for Large Files
Avoid loading the entire file into memory; instead, use streaming:javaCopy code@PostMapping("/upload") public ResponseEntity<String> uploadFile(@RequestParam("file") MultipartFile file) throws IOException { try (InputStream inputStream = file.getInputStream()) { // Process the input stream directly // Example: Save the file Files.copy(inputStream, Paths.get("target-directory/" + file.getOriginalFilename()), StandardCopyOption.REPLACE_EXISTING); } return ResponseEntity.ok("File uploaded successfully!"); }
Enable Asynchronous File Transfers
Use Spring's @Async annotation for non-blocking file uploads/downloads:javaCopy code@Async public CompletableFuture<String> uploadFileAsync(MultipartFile file) { // File processing logic return CompletableFuture.completedFuture("Upload Complete"); }
Use Chunked Uploads for Large Files
Break large files into smaller chunks for efficient transfer and to handle interruptions gracefully:javaCopy code@PostMapping("/uploadChunk") public ResponseEntity<String> uploadChunk(@RequestParam("chunk") MultipartFile chunk, @RequestParam("fileId") String fileId) { // Append chunk data to the file return ResponseEntity.ok("Chunk uploaded successfully!"); }
2. Optimize for Cloud Storage (e.g., AWS S3, Azure Blob)
Use SDKs for Direct Uploads
Use cloud-specific SDKs (e.g., AWS SDK for S3) to upload files directly to cloud storage instead of saving locally first:javaCopy code@PostMapping("/uploadToS3") public ResponseEntity<String> uploadToS3(@RequestParam("file") MultipartFile file) throws IOException { AmazonS3 s3Client = AmazonS3ClientBuilder.defaultClient(); String bucketName = "your-bucket-name"; s3Client.putObject(bucketName, file.getOriginalFilename(), file.getInputStream(), new ObjectMetadata()); return ResponseEntity.ok("File uploaded to S3!"); }
Enable S3 Transfer Acceleration
Use Transfer Acceleration for faster uploads to Amazon S3:javaCopy codeAmazonS3 s3Client = AmazonS3ClientBuilder.standard() .withAccelerateModeEnabled(true) .build();
3. Optimize File Transfer in REST APIs
Enable Compression
Compress file responses to reduce data size:yamlCopy codespring: servlet: multipart: enabled: true max-file-size: 50MB max-request-size: 50MB gzip: enabled: true min-size: 1024
Use HTTP/2
Switch to HTTP/2 for better concurrency and reduced latency:yamlCopy codeserver: http2: enabled: true
Resume Interrupted Uploads
Use ETag or file metadata to allow resumable file uploads:javaCopy code@PostMapping("/resumeUpload") public ResponseEntity<String> resumeUpload(@RequestParam("file") MultipartFile file, @RequestParam("offset") Long offset) { // Resume logic based on offset return ResponseEntity.ok("Upload resumed!"); }
4. Parallelize File Transfers
Multithreaded File Upload
Use a ThreadPoolExecutor or Spring's TaskExecutor:Copy code
In addition to using @Async, there are other strategies and tools to improve file transfer performance and reliability in a Java Spring application. Here are some approaches:
1. Reactive Programming with Spring WebFlux
For truly non-blocking and asynchronous file transfers, use Spring WebFlux:
Streaming File Upload:javaCopy code@PostMapping(value = "/upload", consumes = MediaType.MULTIPART_FORM_DATA_VALUE) public Mono<Void> uploadFile(Flux<FilePart> filePartFlux) { return filePartFlux.flatMap(filePart -> { Path path = Paths.get("target-directory/" + filePart.filename()); return filePart.transferTo(path); }).then(); }
Streaming File Download:javaCopy code@GetMapping(value = "/download", produces = MediaType.APPLICATION_OCTET_STREAM_VALUE) public Mono<ResponseEntity<Resource>> downloadFile() { Path path = Paths.get("target-directory/large-file.txt"); return Mono.just(ResponseEntity.ok() .header(HttpHeaders.CONTENT_DISPOSITION, "attachment; filename=large-file.txt") .body(new FileSystemResource(path))); }
2. Use CompletableFuture and ExecutorService
Combine CompletableFuture with a custom ExecutorService for better control:javaCopy code@PostMapping("/upload") public CompletableFuture<String> uploadFile(@RequestParam("file") MultipartFile file) { ExecutorService executor = Executors.newFixedThreadPool(4); return CompletableFuture.supplyAsync(() -> { try { // File processing logic Files.copy(file.getInputStream(), Paths.get("target/" + file.getOriginalFilename()), StandardCopyOption.REPLACE_EXISTING); return "File uploaded successfully!"; } catch (IOException e) { throw new RuntimeException("File upload failed!", e); } }, executor); }
3. Apache Kafka for Asynchronous Processing
Use Apache Kafka to decouple file upload from processing:
Producer sends file metadata to Kafka after upload:javaCopy code@PostMapping("/upload") public ResponseEntity<String> uploadFile(@RequestParam("file") MultipartFile file) throws IOException { // Save the file Files.copy(file.getInputStream(), Paths.get("target/" + file.getOriginalFilename())); // Send metadata to Kafka kafkaTemplate.send("file-topic", file.getOriginalFilename()); return ResponseEntity.ok("File uploaded and queued for processing!"); }
Consumer processes files asynchronously:javaCopy code@KafkaListener(topics = "file-topic", groupId = "file-group") public void processFile(String fileName) { // Process the file Path path = Paths.get("target/" + fileName); System.out.println("Processing file: " + path); }
4. Chunked File Transfers
Handle large files by uploading them in chunks:
Frontend sends file chunks with an identifier.
Backend reconstructs the file:javaCopy code@PostMapping("/uploadChunk") public ResponseEntity<String> uploadChunk(@RequestParam("chunk") MultipartFile chunk, @RequestParam("fileId") String fileId, @RequestParam("chunkNumber") int chunkNumber) { Path path = Paths.get("target/" + fileId + "_" + chunkNumber); try { Files.copy(chunk.getInputStream(), path, StandardCopyOption.REPLACE_EXISTING); } catch (IOException e) { return ResponseEntity.status(HttpStatus.INTERNAL_SERVER_ERROR).body("Failed to upload chunk"); } return ResponseEntity.ok("Chunk uploaded successfully!"); }
Reassemble chunks when all are uploaded.
5. WebSockets for Real-Time Progress
Use WebSockets to provide real-time feedback on file transfer progress:javaCopy code@Controller public class WebSocketController { @MessageMapping("/uploadStatus") @SendTo("/topic/progress") public String sendProgress(String status) { return status; } }
Send progress updates from the server while uploading:javaCopy codesimpMessagingTemplate.convertAndSend("/topic/progress", "50% completed");
6. Redis or Database Queues
Use a Redis queue or a database to handle file metadata asynchronously.
Enqueue metadata after upload:javaCopy coderedisTemplate.opsForList().leftPush("fileQueue", fileMetadata);
Process the queue in the background:javaCopy codeString metadata = redisTemplate.opsForList().rightPop("fileQueue");
7. Use MultipartConfig for Large Files
Configure multipart file handling for large files in application.properties:propertiesCopy codespring.servlet.multipart.max-file-size=1GB spring.servlet.multipart.max-request-size=2GB
Custom bean for fine-tuning:javaCopy code@Bean public MultipartConfigElement multipartConfigElement() { MultipartConfigFactory factory = new MultipartConfigFactory(); factory.setMaxFileSize("1GB"); factory.setMaxRequestSize("2GB"); return factory.createMultipartConfig(); }
8. Use AWS S3 for Direct Uploads
Use pre-signed URLs to offload upload work to the client:javaCopy code@GetMapping("/generatePresignedUrl") public ResponseEntity<String> generatePresignedUrl(@RequestParam String fileName) { AmazonS3 s3Client = AmazonS3ClientBuilder.defaultClient(); GeneratePresignedUrlRequest generatePresignedUrlRequest = new GeneratePresignedUrlRequest("bucket-name", fileName) .withMethod(HttpMethod.PUT) .withExpiration(new Date(System.currentTimeMillis() + 3600 * 1000)); URL url = s3Client.generatePresignedUrl(generatePresignedUrlRequest); return ResponseEntity.ok(url.toString()); }
The client uploads directly to S3 using the URL.
9. Optimize File Transfer for High Performance
Compression
Compress files before upload to reduce transfer size:javaCopy codebyte[] compressedData = compress(file.getBytes()); Files.write(Paths.get("compressed-file.gz"), compressedData);
Load Balancing
Use a load balancer (e.g., AWS ALB or NGINX) for scalable upload endpoints.
Retry Logic
Implement retries for failed transfers to improve reliability:javaCopy codeint maxRetries = 3; while (retries < maxRetries) { try { // Attempt file upload break; } catch (IOException e) { retries++; if (retries == maxRetries) { throw e; } } }
These strategies can enhance file transfer performance, scalability, and reliability in Java Spring applications. Let me know if you need code examples for specific use cases!
4o
You said:
S3 relaibility
ChatGPT said:
ChatGPT
Ensuring reliability when transferring files to Amazon S3 involves minimizing failures, handling errors effectively, and ensuring data integrity. Below are best practices and techniques to achieve reliable file transfers to S3:
1. Use Multipart Upload for Large Files
Multipart uploads split large files into smaller parts, upload them in parallel, and reassemble them in S3. This improves reliability and speeds up transfers.
Example Using AWS SDK (Java)
java
Copy code
AmazonS3 s3Client = AmazonS3ClientBuilder.defaultClient(); String bucketName = "your-bucket-name"; String fileName = "large-file.zip"; String keyName = "uploads/" + fileName; File file = new File(fileName); TransferManager tm = TransferManagerBuilder.standard().withS3Client(s3Client).build(); Upload upload = tm.upload(bucketName, keyName, file); try { upload.waitForCompletion(); System.out.println("File uploaded successfully!"); } catch (AmazonClientException e) { System.err.println("Upload failed: " + e.getMessage()); }
2. Use Retry Logic
Add retry mechanisms to handle intermittent network issues or service interruptions.
AWS SDK Retry Settings
The AWS SDK retries failed requests automatically, but you can customize it:
java
Copy code
ClientConfiguration config = new ClientConfiguration(); config.setRetryPolicy(PredefinedRetryPolicies.getDefaultRetryPolicyWithCustomMaxRetries(5)); AmazonS3 s3Client = AmazonS3ClientBuilder.standard() .withClientConfiguration(config) .build();
3. Enable Transfer Acceleration
Transfer Acceleration uses AWS edge locations to improve upload speeds over long distances.
Enable Transfer Acceleration in S3
Enable it in the S3 bucket settings.
Update your client code to use the accelerated endpoint:
java
Copy code
AmazonS3 s3Client = AmazonS3ClientBuilder.standard() .withAccelerateModeEnabled(true) .build();
4. Validate Data Integrity
Use MD5 checksums to ensure the uploaded file matches the original file.
AWS CLI Example
bash
Copy code
aws s3 cp file.txt s3://your-bucket/ --content-md5 <calculated-md5>
Java Example
java
Copy code
String md5 = Base64.getEncoder().encodeToString(DigestUtils.md5(new FileInputStream(file))); ObjectMetadata metadata = new ObjectMetadata(); metadata.setContentMD5(md5); PutObjectRequest request = new PutObjectRequest(bucketName, keyName, new FileInputStream(file), metadata); s3Client.putObject(request);
5. Monitor File Transfers
Use CloudWatch Metrics to monitor S3 request success, failures, and latencies.
Monitor transfer progress with TransferManager in the AWS SDK:
java
Copy code
TransferManager tm = TransferManagerBuilder.standard().withS3Client(s3Client).build(); Upload upload = tm.upload(bucketName, keyName, file); upload.addProgressListener(progressEvent -> { System.out.println("Transferred bytes: " + progressEvent.getBytesTransferred()); }); upload.waitForCompletion();
6. Handle Failures Gracefully
Use Resumable Transfers for interrupted uploads with TransferManager:
java
Copy code
TransferManager tm = TransferManagerBuilder.standard().build(); Upload upload = tm.upload(bucketName, keyName, file); // Add a progress listener upload.addProgressListener((ProgressListener) progressEvent -> { System.out.println("Transferred: " + progressEvent.getBytesTransferred()); }); // Graceful failure handling try { upload.waitForCompletion(); } catch (AmazonClientException e) { System.err.println("Error occurred: " + e.getMessage()); }
7. Use Pre-Signed URLs
Generate pre-signed URLs for reliable, time-limited uploads directly from the client, reducing the load on your server.
Generate Pre-Signed URL
java
Copy code
GeneratePresignedUrlRequest generatePresignedUrlRequest = new GeneratePresignedUrlRequest(bucketName, keyName) .withMethod(HttpMethod.PUT) .withExpiration(new Date(System.currentTimeMillis() + 3600 * 1000)); URL url = s3Client.generatePresignedUrl(generatePresignedUrlRequest); System.out.println("Pre-Signed URL: " + url);
8. Use S3 Event Notifications
Configure S3 Event Notifications to trigger AWS Lambda or SNS for post-upload validation, processing, or alerting on failures.
Example: Notification for Upload Completion
Configure your S3 bucket to send an event to an SQS queue or Lambda function upon successful upload.
9. Leverage Data Replication
Use S3 Cross-Region Replication (CRR) or Same-Region Replication (SRR) for redundancy.
Automatically replicate files to another bucket for disaster recovery.
10. Automate with AWS DataSync
Use AWS DataSync for automated and highly reliable file transfers between on-premises storage and S3. It includes built-in retry and integrity checks.
11. Optimize Network Performance
Compress files before uploading:javaCopy codeFiles.write(Paths.get("compressed-file.gz"), gzipCompress(fileContent));
Use efficient transfer protocols (e.g., HTTP/2 if supported by your client).
12. Secure Transfers
Always use HTTPS for secure communication.
Use S3 Bucket Policies and IAM Roles to restrict access to authorized users.
Example: Complete Reliable Upload Function
java
Copy code
public void reliableUpload(File file, String bucketName, String keyName) { AmazonS3 s3Client = AmazonS3ClientBuilder.defaultClient(); TransferManager tm = TransferManagerBuilder.standard().withS3Client(s3Client).build(); try { // Multipart upload Upload upload = tm.upload(bucketName, keyName, file); upload.addProgressListener((ProgressListener) progressEvent -> { System.out.println("Transferred bytes: " + progressEvent.getBytesTransferred()); }); upload.waitForCompletion(); System.out.println("File uploaded successfully!"); } catch (AmazonClientException e) { System.err.println("Upload failed: " + e.getMessage()); } finally { tm.shutdownNow(); } }
0 notes
Text
Optimizing OpenShift for Enterprise-Scale Deployments: Best Practices & Pitfalls to Avoid
Introduction
As enterprises increasingly adopt containerization and Kubernetes-based platforms, OpenShift has emerged as a powerful solution for managing large-scale deployments. However, scaling OpenShift efficiently requires strategic planning, optimization, and adherence to best practices. In this blog, we explore key strategies to optimize OpenShift for enterprise-scale environments while avoiding common pitfalls.
Optimizing Cluster Performance
1. Resource Allocation & Autoscaling
Efficient resource allocation ensures that workloads run smoothly without unnecessary resource consumption. Utilize Vertical Pod Autoscaler (VPA) and Horizontal Pod Autoscaler (HPA) to dynamically adjust resource usage based on workload demands. OpenShift’s Cluster Autoscaler can also help manage node scaling effectively.
2. Efficient Scheduling
Leverage OpenShift’s scheduler to distribute workloads intelligently across nodes. Utilize taints and tolerations, affinity rules, and resource quotas to optimize workload distribution and prevent resource contention.
3. Persistent Storage Management
For stateful applications, ensure proper use of OpenShift Container Storage (OCS) or other CSI-compliant storage solutions. Implement storage classes with appropriate policies to balance performance and cost.
Security Best Practices
1. Role-Based Access Control (RBAC)
Implement least privilege access using OpenShift’s RBAC policies. Define roles and bindings to restrict access to critical resources and avoid security loopholes.
2. Secure Container Images
Use Red Hat Quay or OpenShift’s built-in registry to store and scan container images for vulnerabilities. Automate security policies to prevent the deployment of unverified images.
3. Network Policies & Encryption
Enforce OpenShift Network Policies to limit pod-to-pod communication. Utilize mTLS encryption with OpenShift Service Mesh to secure inter-service communication.
CI/CD Pipeline Integration
1. Tekton Pipelines for Kubernetes-Native CI/CD
Leverage Tekton Pipelines for a scalable and Kubernetes-native CI/CD workflow. Automate builds, tests, and deployments efficiently while maintaining pipeline security.
2. GitOps with ArgoCD
Use ArgoCD to implement GitOps workflows, ensuring continuous delivery with declarative configurations. This enhances traceability and allows seamless rollbacks in case of failures.
Networking & Service Mesh
1. OpenShift Service Mesh for Microservices
OpenShift Service Mesh, based on Istio, provides traffic management, observability, and security for microservices. Implement circuit breakers, rate limiting, and traffic mirroring to enhance reliability.
2. Ingress Controllers & Load Balancing
Optimize external access using HAProxy-based OpenShift Router or third-party ingress controllers like NGINX or Traefik. Ensure proper DNS configuration and load balancing for high availability.
Common Challenges & How to Overcome Them
1. Configuration Drift
Use GitOps methodologies with ArgoCD to maintain consistency across environments and prevent manual misconfigurations.
2. Performance Bottlenecks
Monitor resource utilization with Prometheus & Grafana and implement proactive autoscaling strategies.
3. Compliance & Governance
Use OpenShift Compliance Operator to enforce industry standards like CIS Benchmarks and NIST guidelines across clusters.
Final Thoughts & Future Trends
Optimizing OpenShift for enterprise-scale deployments requires a balance of performance, security, and automation. As hybrid cloud adoption grows, OpenShift’s capabilities in multi-cloud and edge computing environments will continue to expand. By following these best practices and avoiding common pitfalls, organizations can achieve scalability, security, and operational efficiency with OpenShift.
For more details www.hawkstack.com
0 notes
Text
Certified Kubernetes Application Developer: Your Step-by-Step Guide to Certification Success
Kubernetes has become a powerhouse in the tech world, reshaping how applications are deployed and managed. As more companies shift to containerized applications and cloud-native architectures, the demand for Certified Kubernetes Application Developers (CKADs) continues to grow. This certification is a gateway for anyone looking to prove their skills in Kubernetes application development and make a mark in DevOps.
But what does it mean to be a Certified Kubernetes Application Developer? What benefits does this certification offer, and how can you prepare effectively? Here’s a comprehensive guide designed to give you all the insights and steps you need to become CKAD certified.
What is the Certified Kubernetes Application Developer Certification?
The Certified Kubernetes Application Developer (CKAD) certification is designed for those who are proficient in designing, building, and managing applications in a Kubernetes environment. This certification focuses on real-world skills and validates your ability to deploy, troubleshoot, and manage applications on Kubernetes clusters.
Kubernetes, managed by the Cloud Native Computing Foundation (CNCF), has become the backbone of scalable applications, and the CKAD exam is recognized globally. With this certification, you’ll showcase a high level of competency in handling the complexities of Kubernetes, proving invaluable to companies adopting containerized solutions.
Why Choose the Certified Kubernetes Application Developer Certification?
Career Advancement: With a CKAD certification, you’ll have proof of your Kubernetes skills, which is crucial in today’s DevOps-centric job market. Companies are on the lookout for Certified Kubernetes Application Developers who can manage application lifecycles within Kubernetes clusters.
High Demand: Kubernetes has quickly become a standard in application deployment. With the Certified Kubernetes Application Developer certification, you are positioning yourself in one of the most sought-after areas of tech.
Competitive Edge: Many IT professionals may know Kubernetes, but a CKAD-certified developer has verified skills. The certification proves your expertise in managing containerized applications in production environments, a key asset for employers.
Global Recognition: The Certified Kubernetes Application Developer credential is recognized worldwide, making it a valuable addition to your resume regardless of your location.
Increased Salary Potential: Professionals with CKAD certification often earn higher salaries due to the specialized skills required. This certification not only opens doors but also ensures competitive compensation.
What Skills Will You Learn with the Certified Kubernetes Application Developer Certification?
The CKAD exam measures proficiency in the following areas, which are essential for every Kubernetes developer:
Application Design and Deployment: Learn how to design applications that can seamlessly run on Kubernetes. This includes understanding Kubernetes objects, such as Pods, Deployments, and ReplicaSets.
Application Observability: Monitoring is a key skill. You’ll gain knowledge in handling logs and metrics to keep track of applications, a crucial part of maintaining reliable systems.
Configuration: The CKAD certification covers Kubernetes configurations for applications, including secrets, config maps, and persistent storage.
Services & Networking: Master the art of connecting applications within and outside Kubernetes. This part covers Services, DNS, and Ingress controllers.
Troubleshooting: Being able to troubleshoot is critical. CKADs are skilled in diagnosing issues with deployments, Pods, and clusters, helping maintain smooth operations.
Preparing for the Certified Kubernetes Application Developer Exam: Tips and Resources
Here’s how you can effectively prepare for the Certified Kubernetes Application Developer certification:
1. Understand the Exam Format
The CKAD exam consists of multiple performance-based tasks to complete within two hours. It’s essential to practice under time constraints, as the exam tests your speed and accuracy in applying Kubernetes concepts. The tasks range across different domains, each with a specific weight. This real-world exam format means you should focus on hands-on practice.
2. Use Official CNCF Resources
CNCF provides free resources, including the Kubernetes Documentation and CKAD-specific guides. These resources will help you understand the core concepts, especially if you’re new to Kubernetes.
3. Enroll in a Kubernetes Course
Several courses are designed specifically for CKAD preparation. A Certified Kubernetes Application Developer course can guide you step-by-step through the skills required for the exam. Many platforms, including Udemy and Coursera, offer comprehensive CKAD prep courses that cover all domains in detail.
4. Practice, Practice, Practice
Kubernetes is a hands-on tool, so theoretical knowledge alone won’t help you. Create a Kubernetes cluster, practice deploying applications, and experiment with different Kubernetes components like Pods, Services, and ConfigMaps. Websites like Katacoda and Play with Kubernetes offer sandboxes where you can practice for free.
5. Review Common Commands and YAML Files
Understanding YAML syntax and common Kubernetes commands is crucial for the CKAD exam. The more comfortable you are with commands like kubectl run, kubectl apply, and kubectl expose, the faster you’ll be during the exam. Also, review how to work with YAML files to define Pods, Deployments, and other Kubernetes objects.
6. Test Yourself with Sample Questions
Sample questions and mock exams are invaluable. They not only test your knowledge but also help you familiarize yourself with the CKAD’s practical format. You can find sample exams in resources like Linux Academy or KodeKloud’s CKAD labs.
Exam Day: Tips for Success
Set Up Your Environment: Make sure your testing environment is stable and distraction-free. The exam requires focus, so ensure your workspace is ready.
Be Time-Conscious: The CKAD exam is time-bound, so aim to spend no more than 5–10 minutes on each task. If you’re stuck, move on and return later.
Use Built-In Documentation: The Kubernetes documentation is available during the exam. Use it to your advantage, but don’t rely too heavily on it. Knowing your commands and YAML structures beforehand will save you time.
Stay Calm: The pressure of a timed, hands-on exam can be intense. Trust your preparation, and remember to approach each question methodically.
What’s Next After Getting Your CKAD?
After earning your Certified Kubernetes Application Developer certification, you’re well on your way in the Kubernetes world! But Kubernetes is constantly evolving. Here are some next steps to deepen your expertise:
Certified Kubernetes Administrator (CKA): This certification focuses on Kubernetes administration. It’s ideal if you want to expand your knowledge beyond application development.
Specialized Kubernetes Tools: Explore Kubernetes tools like Helm, Istio, and Prometheus to further your containerization and monitoring skills. Many Kubernetes projects rely on these tools for advanced functionality.
Real-World Projects: Put your CKAD skills to use in real-world projects. Many employers value hands-on experience, so consider working on cloud-native projects that utilize Kubernetes.
Contribute to Open Source: Contributing to Kubernetes or related projects can further solidify your skills and enhance your resume. The Kubernetes community welcomes contributions from developers worldwide.
Conclusion: Becoming a Certified Kubernetes Application Developer Is a Game-Changer
Earning the Certified Kubernetes Application Developer certification isn’t just a feather in your cap; it’s a leap forward in your career. By mastering Kubernetes, you open doors to roles that involve cloud-native development, DevOps, and beyond. The demand for Certified Kubernetes Application Developers is only growing as organizations recognize the value of containerized applications.
0 notes