#inheritedwidget
Explore tagged Tumblr posts
Visit Tumblr Blog
Explore Tumblr blogs with no restrictions, modern design and the best experience.
Last Seen Tumblr Blogs


Fun Fact
Tumblr Inc. has $15.1M in annual revenue.
Text
Flutter Hiring Guide: Hire Dedicated Developers in India
If you’re looking to build a high-performance mobile app while keeping costs in check, the best approach is to hire dedicated developers in India. Whether you’re a startup founder, business owner, or tech leader scaling your team, hiring Indian Flutter developers ensures access to top-tier talent, cost savings, and seamless cross-platform app development.

India is a global hub for skilled Flutter developers due to its vast talent pool, affordable pricing, and expertise in developing cutting-edge applications. However, to successfully hire and manage Flutter developers, you must navigate challenges like skill assessment, collaboration, and quality control.
This guide provides everything you need to make an informed decision.
Why Hire Dedicated Developers in India?
1) Cost-Effective Development:
Hiring Flutter developers in India is significantly cheaper compared to the US, UK, or Australia.
Lower operational costs due to favorable exchange rates and reduced living expenses.
Access to high-quality development services at competitive prices.
2) Large and Skilled Talent Pool:
India has thousands of Flutter developers proficient in Dart and cross-platform app development.
Many developers contribute to open-source projects and stay updated with the latest Flutter advancements.
3) High-Quality Development Standards:
Indian developers have vast experience working on global projects across multiple industries.
Expertise in Flutter outsourcing ensures scalable, robust, and high-performance applications.
4) Time Zone Advantage:
Indian developers work in overlapping hours with teams in the US, UK, and Australia.
Flexible engagement models ensure seamless communication and project alignment.
5) Flexible Hiring Models:
Options to hire freelancers, dedicated developers, or development agencies based on project requirements.
Key Skills to Look for in a Flutter Developer
Technical Skills:
Strong expertise in Dart programming.
Proficiency in Flutter widgets and UI/UX principles.
Experience with REST APIs, Firebase, and third-party services.
Knowledge of state management frameworks (Provider, Riverpod, setState, ValueNotifier & InheritedNotifier, InheritedWidget & InheritedModel, Redux, BLoC / Rx).
Ability to integrate Flutter with native Android & iOS components.
Soft Skills:
Excellent communication and collaboration abilities.
Strong problem-solving mindset.
Experience working in agile development teams.
Hiring Models: Choose the Right Approach
1) Freelancers vs. Dedicated Developers vs. Development Agencies
1. Freelancers:
Pros:
Cost-effective
Flexible
No long-term commitment
Cons:
Potential quality risks
2. Dedicated Developers:
Pros:
Focused team members
Scalable as per project needs
Cons:
Slightly higher cost than freelancers
3. Development Agencies:
Pros:
Provide end-to-end services
Ensure quality assurance
Cons:
Higher overall cost
2) Outsourcing vs. In-House Hiring
Outsourcing: Ideal for cost savings, flexibility, and access to experienced developers without long-term commitments.
In-House Hiring: Best for companies requiring full-time developers for long-term projects.
3) Fixed Price vs. Hourly vs. Monthly Hiring
Fixed Price: Suitable for small, well-defined projects.
Hourly: Best for ongoing projects requiring flexibility.
Monthly: Ideal for long-term, dedicated development needs.
Where to Find the Best Flutter Developers in India?
1) Top Hiring Platforms:
Freelance Marketplaces: Upwork, Toptal, Fiverr, PeoplePerHour.
Developer Networks: GitHub, Stack Overflow, LinkedIn.
Offshore Flutter Development Agencies: Specialized firms with pre-vetted developers.
2) Direct Hiring vs. Outsourcing Agencies:
Direct Hiring: Provides more control but requires extensive screening and recruitment efforts.
Outsourcing: Faster recruitment with minimal administrative burden.
How to Evaluate & Screen Flutter Developers?
1) Technical Evaluation:
Conduct live coding tests and real-world problem-solving challenges.
Review GitHub repositories and past Flutter projects.
2) Soft Skills & Cultural Fit:
Assess communication skills and ability to work in a remote setup.
Ensure alignment with your company’s workflow and development processes.
3) Trial Period Approach:
Hire Flutter developers on a trial basis before committing to long-term contracts.
Cost of Hiring Flutter Developers in India
Junior Flutter Developers: $15–$25/hr
Mid-Level Flutter Developers: $25–$40/hr
Senior Flutter Developers: $40–$60/hr
Best Practices for Managing Remote Flutter Developers
Use Slack, Zoom, and Microsoft Teams for communication.
Implement project management tools like Jira, Trello, and Asana.
Conduct regular code reviews using GitHub, Bitbucket.
Handle time zone differences with overlapping working hours.
Overcoming Common Hiring Challenges
Skill Vetting: Use trusted platforms and assessments.
Quality Assurance: Implement strict QA processes and code reviews.
Remote Management: Use async communication and daily stand-ups.
Cost Control: Define budgets and choose the right hiring model.
Cultural Fit: Hire developers experienced with remote teams.
Project Oversight: Use agile methodologies and transparent reporting.
Conclusion:
Hiring dedicated Flutter developers in India provides access to a large, skilled talent pool, cost savings, and high-quality app development. The country’s developers are experienced with global standards, ensuring scalable, cross-platform mobile apps at competitive prices.
If you’re ready to hire dedicated developers in India and scale your team with top Flutter experts, contact iQlance today and turn your Flutter app idea into reality!
#india#iqlance#hirededicateddevelopersinIndia#hireflutterdevelopersinIndia#hireflutterdevelopers#flutterdevelopment#dedicateddevelopersindia#mobileappdevelopment#hiredevelopers#costeffectiveappdevelopment#crossplatformdevelopment#flutterappdevelopment#indiandevelopers#techoutsourcing
1 note
·
View note
Text
Price: [price_with_discount] (as of [price_update_date] - Details) [ad_1] Elevate your mobile app development skills using reusable software development methodologies and code design principles, leveraging proven strategies from industry experts who have fostered thriving developer communitiesKey Features: - Cover code structure, app architecture, testing, performance optimization, error handling, and more- Get hands on with code examples and exercises to apply design patterns and best practices in real-world scenarios- Leverage the intricacies of the Flutter framework to build better apps for your clients- Purchase of the print or Kindle book includes a free PDF eBookBook Description: Flutter's rapid adoption by developers and businesses alike has led to an increased demand for skilled developers who can deliver high-quality Flutter apps. Flutter can be a great tool to develop apps for yourself, but you don't always need to consider things like scalability or business goals as a hobbyist. When you build apps for a business, however, you must use specific tools to help the business achieve its goals. This requires solutions to be fast, reliable, and delivered on time. This book will help you meet these business requirements.You'll begin by learning how to build responsive UIs that work on all devices. Next, you'll delve into state management, understanding how to select the appropriate solution and gaining hands-on experience with InheritedWidget, ChangeNotifier, and BLoC. Later, you'll move on to high-level practices such as layered architecture, dependency injection, and repository patterns. The book will also show you how to develop features of any complexity, such as multithreading and native layer implementations. You'll also learn how to ensure the quality of your solutions by prioritizing testing.By the end of this book, you'll be able to deliver well-architected Flutter projects that are stable, scalable, and maintainable.What You Will Learn: - Translate business requirements into technical solutions- Understand when and where specific design patterns would be applicable- Separate concerns into multiple layers with scoped responsibility- Build reusable architecture that can be applied to any type of app and supported by various teams- Debug and solve problems before they reach the user- Prevent production bugs by prioritizing testing during the development cycle- Design encapsulated features that are resilient to business requirement changes and software updatesWho this book is for: If you're a mobile developer who has already realized the potential of Flutter as a tool to solve business problems and are looking forward to leveling up your app-building skills, then this book is for you. Freelancers, agencies, or individuals who have already developed basic applications with Flutter and want to level up their skills to build production-ready apps at scale will find this book helpful. Basic Flutter knowledge and experience in building apps will be beneficial. Moreover, if you're transitioning from another mobile framework, this book will make the transition easier.Table of Contents- Best Practices for Building UIs with Flutter- Responsive UIs for All Devices- Vanilla State Management- State Management Patterns and Their Implementations- Creating Consistent Navigation- The Responsible Repository Pattern- Implementing the Inversion of Control Principle- Ensuring Scalability and Maintainability with Layered Architecture- Mastering Concurrent Programming in Dart- A Bridge to the Native Side of Development- Unit Tests, Widget Tests, and Mocking Dependencies- Static Code Analysis and Debugging Tools Publisher : Packt Publishing (27 September 2024) Language : English
Paperback : 362 pages ISBN-10 : 1801072647 ISBN-13 : 978-1801072649 Item Weight : 780 g Dimensions : 2.18 x 19.05 x 23.5 cm Country of Origin : India [ad_2]
0 notes
Text
深入理解 Flutter 中的數據共享:從普遍方案到 InheritedWidget | 3 種方案
Overview of Content Flutter 中的每個 Widget 都是獨立的,這意味著它們之間的數據無法直接共享… 這篇文章將探討幾種常見的消息傳遞方案,如匿名函數實例監聽和 Singleton 類的使用,並深入解析 Flutter 的 InheritedWidget,這是一種專為數據共享而設計的強大工具。 無論是要實現全局數據管理還是局部數據共享,本指南將幫助你找到最佳解決方案,並深入理解 MediaQuery 等常用的 InheritedWidget 範例。快來學習如何在 Flutter 中更有效地進行數據共享,提升你的開發效率和應用性能 以下使用的 Flutter 版本為 3.22.2 寫文章分享不易,如有引用參考請詳註出處,如有指導、意見歡迎留言(如果覺得寫得好也請給我一些支持),感謝…
0 notes

Text
Flutter App Performance Optimization Techniques in 2024
Flutter, Google's open-source UI software development kit, has rapidly gained popularity among developers for building natively compiled applications for mobile, web, and desktop from a single codebase. With the relentless advancement in technology, understanding and implementing robust performance optimization techniques is crucial to delivering a top-notch user experience. In this comprehensive guide, we will explore the best strategies to optimize the performance of your Flutter apps in 2024.
Optimizing app performance can significantly impact user engagement, retention, and even app store rankings. We'll take a deep dive into the core performance principles, essential optimization techniques, and advanced strategies that will keep your Flutter apps running like a well-oiled machine.
Core Performance Principles
Before we jump into specific optimization techniques, it's essential to understand the core principles that govern performance in Flutter App Development.
Understanding the Rendering Pipeline
Flutter's rendering pipeline constructs the user interface by constantly rebuilding UI elements based on the current state. The rapidity and efficiency with which this pipeline operates significantly impact the app's overall performance.
Frame Rate and User Experience
A consistent and high frame rate is the hallmark of a smooth user experience. The rendering pipeline must build and render each frame within 16 milliseconds to achieve 60 frames per second (FPS), ensuring a seamless and responsive app.
Timing and Threading
The precise timing of work across various threads is crucial for performance. Offloading heavy tasks to isolated threads or processes prevents the app's main thread from being blocked, which can lead to stuttering and unresponsive user interfaces.
Memory Management
Memory allocation and deallocation impact app performance. Effective management – from minimizing the size of app resources to judicious use of cached and preloaded data – can ensure efficient memory utilization and a snappy app experience.
Optimization Techniques
Now, let's look at practical methods to enhance the performance of your Flutter apps.

Widget Efficiency
Widgets are the building blocks of a Flutter UI, and optimizing their usage is key to a performant app.
Stateless vs. Stateful Widgets
Stateless widgets are immutable and only rebuild when the app's state changes. In contrast, stateful widgets can rebuild multiple times per second, often unnecessarily. When possible, favor stateless widgets for improved UI performance.
The 'const' Keyword
Using the `const` keyword constructs widgets that are compile-time constants. This optimization reduces the overhead of creating new widget instances, and benefits flutter app performance and memory usage.
Efficient Data Management
Managing app data efficiently minimizes the time spent on state updates and UI rebuilds.
ChangeNotifier and InheritedWidget
ChangeNotifier is a lightweight solution for managing the state of a widget. Combine it with InheritedWidget to propagate changes through the widget tree without unnecessary rebuilds.
Caching and Preloading
Caching often-used data and preloading assets can mitigate network delays and loading times, significantly speeding up your app's performance.
UI Optimization
Flutter App’s UI Optimization is often the focal point for performance improvements due to its direct impact on user interaction and perception.
List and Grid Views
Optimize list and grid views with techniques like item recycling, where only the visible elements in a list are rendered, and others are reused as they scroll off the screen.
Animations
Employ lightweight animation libraries and design simple, effective animations to prevent jank and maintain a smooth app experience.
Opacity and Clipping
Use opacity and clipping judiciously as excessive use can have performance implications, especially when used on complex widgets or large lists.
Code Optimization
Efficient code not only reduces development time but also enhances the app's performance.
async/await
Leverage the async/await pattern for managing asynchronous operations. It keeps code readable and maintainable, essential for team collaboration and identifying bottlenecks in asynchronous work.
Profiling and Debugging
Regularly profile your app using tools like the Flutter DevTools to identify issues and areas for improvement, allowing for a more targeted approach to optimization.
Advanced Techniques
In complex apps, advanced performance optimization techniques become essential.
Platform Channels
When integrating Flutter with native code, platform channels provide performance-critical pathways between the Flutter engine and the native platform. Understanding and leveraging platform channels can improve efficiency.
Isolate Management
Distribute and manage isolates effectively to optimize memory usage in multi-threaded environments. This can be particularly useful in processor-intensive apps or those with complex business logic.
Conclusion
By applying the performance optimization techniques outlined above, you can ensure that your Flutter apps are responsive, snappy, and a joy to use. Stay attuned to the latest trends and tools within the Flutter ecosystem to remain at the forefront of app development.
Remember, performance optimization is not a one-off task. It's an ongoing process that should be integrated into your development workflow from the outset. Businesses and users alike are increasingly discerning when it comes to app performance; by investing time in these techniques, you're not just making a faster app – you're making better business decisions.
0 notes
Text
Flutter App Development: Building Cross-Platform Applications
Flutter app development has gained immense popularity in recent years as a powerful framework for building high-performance, visually appealing, and cross-platform mobile applications. With its extensive set of features and capabilities, Flutter has become a top choice for developers and businesses looking to create engaging apps that run seamlessly on both iOS and Android devices. In this article, we will explore the world of Flutter app development, its benefits, key features, and the process of building cross-platform applications.
1. What is Flutter?
It allows developers to build native-like, visually stunning applications for multiple platforms using a single codebase. Flutter uses the Dart programming language, which offers a rich set of libraries and tools for app development.
Unlike traditional cross-platform frameworks, Flutter does not rely on web technologies such as HTML, CSS, or JavaScript. Instead, it uses a rendering engine to create its own widgets and deliver a native-like experience on both iOS and Android platforms. This approach eliminates the need for separate codebases for each platform, saving time and effort for developers.
2. The Advantages of Flutter App Development
Flutter offers several advantages that make it a preferred choice for app development:
This significantly reduces development time and effort, as developers can create a single codebase for all platforms.
Fast Development and Hot Reload: Flutter's hot reload feature enables developers to see the changes made in the code immediately on the app without restarting it. This makes the development process faster and more efficient, as developers can experiment and iterate quickly.
The rich set of Material Design and Cupertino widgets ensure a native-like experience on both iOS and Android platforms.
High Performance: Flutter apps are known for their excellent performance and smooth animations. Flutter uses a highly optimized rendering engine that delivers 60 frames per second (fps) performance, resulting in a fluid user experience.
Access to Native Features: Flutter enables developers to access native device features and APIs through platform channels.
Strong Community Support: Flutter has a vibrant and active community of developers who contribute to its growth and provide support through forums, blogs, and online communities. This ensures access to a vast pool of resources and knowledge for developers.
3. Key Features of Flutter
Flutter comes with a comprehensive set of features that make it a powerful framework for app development:
Widgets: Flutter uses a widget-based architecture, where everything is a widget. Flutter provides a rich set of widgets for building user interfaces, managing layouts, handling gestures, and more. These widgets are highly customizable and can adapt to different screen sizes and resolutions.
Hot Reload: Flutter's hot reload feature allows developers to make changes to the code and see the results instantly in the app. This significantly speeds up the development process and facilitates quick experimentation and debugging.
State Management: Flutter offers various options for managing the state of an application. It provides built-in state management solutions like setState, InheritedWidget, Provider, and third-party libraries like Redux, MobX, and BLoC. These options help developers manage complex app states efficiently.
Flutter SDK: Flutter provides a comprehensive SDK that includes a set of tools, libraries, and frameworks to simplify the app development process. The SDK includes the Flutter framework, Dart programming language, command-line tools, and various packages for adding functionality to the app.
Integration with Native Code: Flutter allows seamless integration with existing native code, enabling developers to leverage platform-specific functionalities and APIs. This is done through platform channels, which establish communication between Flutter and the native code.
Testing and Debugging Tools: Flutter provides a suite of testing and debugging tools to ensure the quality and stability of the app. It supports unit testing, widget testing, and integration testing, allowing developers to write robust test cases for their applications.
4. Getting Started with Flutter Development
To start developing Flutter applications, you need to set up your development environment and install the necessary tools.
Installing Flutter SDK
Download the Flutter SDK from the official Flutter website (https://flutter.dev).
Add the Flutter SDK's bin directory to your system's PATH variable.
Setting Up an Integrated Development Environment (IDE)
There are several IDE options available for Flutter development. Some popular choices include:
Visual Studio Code (VS Code): Install the Flutter and Dart extensions for VS Code to enable Flutter development features.
Android Studio: Download and install Android Studio, which comes with built-in Flutter support.
IntelliJ IDEA: Install the Flutter and Dart plugins in IntelliJ IDEA for Flutter development.
Once you have set up your development environment, you can create a new Flutter project and start building your app.
5. Flutter Architecture
Flutter follows a reactive and declarative architecture, where the UI reacts to changes in the app's state. Understanding Flutter's architecture is essential for developing scalable and maintainable applications. Here are the key components of Flutter architecture:
Flutter Widgets
Widgets are the building blocks of Flutter applications. Everything in Flutter, including the app's UI, layout, and interactions, is a widget. Flutter provides two types of widgets:
StatelessWidget: A stateless widget is immutable and does not have any internal state. It represents part of the user interface that does not change over time.
StatefulWidget: A stateful widget is mutable and can change its internal state. It represents part of the user interface that can change based on user interactions or other factors.
Widgets can be composed together to create complex UIs, and Flutter's widget tree efficiently handles the updates and rendering of widgets.
State Management in Flutter
Managing the state of an application is crucial for building robust and maintainable Flutter apps.
setState: For simple apps with limited state requirements, Flutter provides the setState method. It allows updating the state of a widget and triggers a rebuild of the UI.
InheritedWidget and Provider: InheritedWidget is a widget that allows sharing data down the widget tree. It is commonly used with the Provider package, which simplifies state management by providing a convenient way to access and update shared data.
Redux, MobX, and BLoC: These are popular third-party state management solutions that offer more advanced features and architecture patterns for managing complex app states.
Choosing the right state management approach depends on the complexity of your app and your preferred programming style.
6. Building User Interfaces with Flutter
Flutter provides a rich set of tools and widgets for building beautiful and responsive user interfaces. It supports both Material Design (Android) and Cupertino Design (iOS), allowing developers to create native-like UIs for both platforms.
Material Design in Flutter
Flutter's Material Design widgets offer a set of pre-built UI components that follow the Material Design guidelines. These components include buttons, cards, dialogs, navigation drawers, and more. By using Material Design widgets, developers can ensure a consistent and familiar user experience for Android users.
Cupertino Design in Flutter
For iOS app development, Flutter provides Cupertino widgets that mimic the look and feel of iOS components. These widgets include navigation bars, buttons, sliders, and other UI elements specific to iOS. By using Cupertino widgets, developers can create UIs that adhere to Apple's design principles and provide a seamless experience for iOS users.
7. Flutter App Development Process
The process of developing a Flutter app involves several steps, from project setup to deployment. Here is an overview of the typical Flutter app development process:
Project Setup
Create a new Flutter project using the flutter create command or the project creation option in your IDE. This sets up the basic project structure and configuration files.
Defining App Structure
Plan and define the structure of your app, including the screens, navigation flow, and data models. Identify the key features and functionalities your app will offer.
UI Design and Implementation
Design the user interface of your app using Flutter's widgets and UI components. Implement the screens, layouts, and interactive elements according to your design specifications.
Adding Functionality with Dart
Write the business logic and functionality of your app using the Dart programming language. Implement features such as data fetching, user authentication, data manipulation, and third-party integrations.
Testing and Debugging
Write test cases to ensure the correctness and stability of your app. Perform unit tests, widget tests, and integration tests to cover different aspects of your app's functionality.
Building and Deploying the App
Build the app for the target platforms (iOS and Android) using Flutter's build commands or the build option in your IDE. Generate the necessary app packages and deploy them to the respective app stores (App Store for iOS and Google Play Store for Android).
8. Flutter App Performance and Optimization
Flutter apps are known for their excellent performance, but there are several techniques and best practices you can follow to further optimize your app's performance:
Hot Reload and Hot Restart
This allows for quick iteration and ensures a smooth development experience.
Ahead-of-Time (AOT) Compilation
Flutter supports both Just-in-Time (JIT) and Ahead-of-Time (AOT) compilation. AOT compilation compiles the Dart code to native machine code, resulting in faster startup times and improved overall performance.
Optimizing UI Rendering
Make use of Flutter's widget tree and rendering optimizations to minimize the rendering and layout computations. Use const widgets where possible to avoid unnecessary rebuilds.
9. Flutter App Testing and Debugging
Testing and debugging are crucial steps in the app development process. Flutter provides a range of tools and frameworks for testing and debugging your app:
Unit Testing with Flutter
Write unit tests for individual functions, methods, or classes in your app using the Flutter testing framework. Unit tests ensure the correctness of the app's core functionality.
Widget Testing with Flutter
Flutter's widget testing framework allows you to test the behavior and UI of individual widgets in isolation. Widget tests help verify that widgets render correctly and respond as expected to user interactions.
Integration Testing with Flutter
Perform integration tests to validate the interaction between different components of your app. Integration tests help ensure that the app's various features work together seamlessly.
Debugging Techniques
Use Flutter's debugging tools, such as the Flutter Inspector and DevTools, to identify and resolve issues in your app. These tools provide insights into the app's UI hierarchy, state changes, performance metrics, and more.
10. Flutter and Native Device Features
Flutter provides extensive support for accessing native device features and capabilities. Here's how you can leverage native device features in your Flutter app:
Accessing Device Hardware
Use Flutter plugins to interact with device hardware, such as the camera, GPS, accelerometer, and more. Flutter's plugin system provides a wide range of community-contributed plugins that offer access to various device features.
Using Native APIs
Flutter allows developers to directly use platform-specific APIs and libraries by creating platform channels. Platform channels establish communication between Flutter and the native code, enabling you to access native functionalities that are not available through plugins.
Platform-specific Code Integration
In some cases, you may need to write platform-specific code snippets to achieve specific functionalities. Flutter allows you to write platform-specific code using platform channels and seamlessly integrate it into your Flutter app.
11. Flutter for Web and Desktop Applications
In addition to mobile app development, Flutter also supports web and desktop application development. Here's an overview of Flutter's capabilities for web and desktop development:
Flutter Web Development
Flutter's web support allows you to compile your Flutter app to a web application that can run in modern web browsers. It enables code sharing between your mobile and web applications, streamlining the development process.
Flutter Desktop Development
Flutter's desktop support enables you to build native desktop applications for Windows, macOS, and Linux using the same Flutter codebase. It opens up new possibilities for cross-platform development and allows you to target a wider range of devices.
0 notes
Text
Comparative Study on Flutter State Management
Background
I am going to build a new flutter app. The app is aimed to be quite big. I'm going to need a state management tools. So, I think it’s a good idea to spent some time considering the options. First of all, i do have a preference on flutter’s state management. Itu could affect my final verdict. But, I want to make a data based decision on it. So, let’s start..
Current State of the Art
Flutter official website has a listing of all current available state management options. As on 1 Aug 2021, the following list are those that listed on the website.

I marked GetIt since it’s actually not a state management by it’s own. It’s a dependency injection library, but the community behind it develop a set of tools to make it a state management (get_it_mixin (45,130,81%) and get_it_hooks (6,100,33%)). There’s also two additional lib that not mentioned on the official page (Stacked and flutter_hooks). Those two are relatively new compared to others (since pretty much everything about flutter is new) but has high popularity.
What is Pub Point
Pub point is a curation point given by flutter package manager (pub.dev). Basically this point indicate how far a given library adhere to dart/flutter best practices.
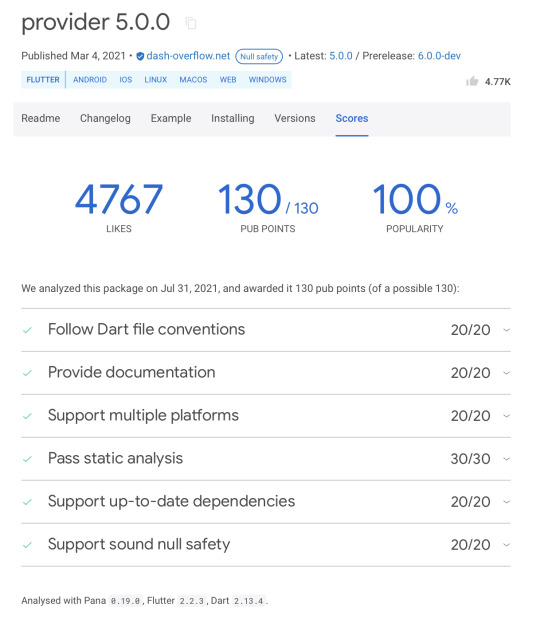
Provider Package Meta Scores
Selection Criteria
I concluded several criteria that need to be fulfilled by a good state management library.
Well Known (Popular)
There's should be a lot of people using it.
Mature
Has rich ecosystem, which mean, resources about the library should be easily available. Resources are, but not limited to, documentation, best practices and common issue/problem solutions.
Rigid
Allow for engineers to write consistent code, so an engineer can come and easily maintain other's codebase.
Easy to Use
Easy in inter-component communication. In a complex app, a component tend to need to talk to other component. So it's very useful if the state manager give an easy way to do it.
Easy to test. A component that implement the state management need to have a good separation of concern.
Easy to learn. Has leaner learning curve.
Well Maintained:
High test coverage rate and actively developed.
First Filter: Popularity
This first filter can give us a quick glance over the easiness of usage and the availability of resources. Since both are our criteria in choosing, the first filter is a no brainer to use. Furthermore when it’s not popular, there’s a high chance that new engineers need more time to learn it.
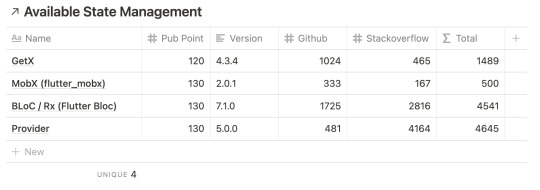
Luckily, we have a definitive data to rank our list. Pub.dev give us popularity score and number of likes. So, let’s drop those that has less than 90% popularity and has less than 100 likes.

As you can see, we drop 6 package from the list. We also drop setState and InheritedWidget from the list, since it’s the default implementation of state management in flutter. It’s very simple but easily increase complexity in building a bigger app. Most of the other packages try to fix the problem and build on top of it.
Now we have 9 left to go.
Second Filter: Maturity
The second filter is a bit hard to implement. After all, parameter to define “maturity” is kinda vague. But let’s make our own threshold of matureness to use as filter.
Pub point should be higher than 100
Version number should be on major version at least “1.0.0”
Github’s Closed Issue should be more than 100
Stackoverflow questions should be more than 100
Total resource (Github + Stackoverflow) should be more than 500
The current list doesn’t have 2 parameter defined above, so we need to find it out.

So let’s see which state management fulfill our threshold.
As you can see, “flutter_redux” is dropped. It’s not satisfied the criteria of “major version”. Not on major version can be inferred as, the creator of the package marked it is as not stable. There could be potentially breaking API changes in near future or an implementation change. When it happens we got no option but to refactor our code base, which lead to unnecessary work load.
But, it’s actually seems unfair. Since flutter_redux is only a set of tool on top redux . The base package is actually satisfy our threshold so far. It’s on v5.0.0, has pub point ≥ 100, has likes ≥ 100 and has popularity ≥ 90%.

So, if we use the base package it should be safe. But, let’s go a little deeper. The base package is a Dart package, so it means this lib can be used outside flutter (which is a plus). Redux package also claims it’s a rich ecosystem, in which it has several child packages:

As i inspect each of those packages, i found none of them are stables. In fact, none of them are even popular. Which i can assume it’s pretty hard to find “best practices” around it. Redux might be super popular on Javascript community. We could easily find help about redux for web development issue, but i don’t think it stays true for flutter’s issue (you can see the total resource count, it barely pass 500, it’s 517).
Redux package promises big things, but as a saying goes “a chain is as strong as its weakest link”. It’s hard for me to let this package claim “maturity”.
Fun fact: On JS community, specifically React community, redux is also losing popularity due to easier or simpler API from React.Context or Mobx.
But, Just in case, let’s keep Redux in mind, let’s say it’s a seed selection. Since we might go away with only using the base package. Also, it’s might be significantly excel on another filter. So, currently we have 4+1 options left.
Third Filter: Rigid
Our code should be very consistent across all code base. Again, this is very vague. What is the parameters to say a code is consistent, and how consistent we want it to be. Honestly, i can’t find a measurable metric for it. The consistency of a code is all based on a person valuation. In my opinion every and each public available solutions should be custom tailored to our needs. So to make a codebase consistent we should define our own conventions and stick on it during code reviews.
So, sadly on this filter none of the options are dropped. It stays 4+1 options.
Fourth Filter: Easy to Use
We had already define, when is a state management can be called as easy to use in the previous section. Those criteria are:
Each components can talk to each other easily.
Each components should be easy to test. It can be achieved when it separates business logic from views. Also separate big business logic to smaller ones.
We spent little time in learning it.
Since the fourth filter is span across multiple complex criteria, I think to objectively measure it, we need to use a ranking system. A winner on a criteria will get 2 point, second place will get 1, and the rest get 0 point. So, Let’s start visiting those criteria one by one.
Inter Component Communication
Let’s say we have component tree like the following diagram,
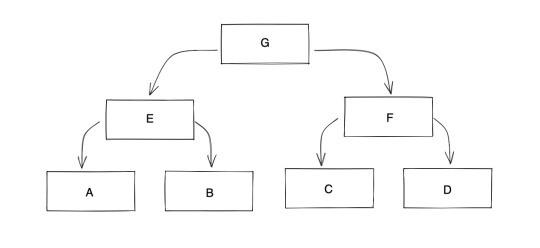
In basic composition pattern, when component A needs something from component D it needs to follow a chain of command through E→G→F→D

This approach is easily get very complex when we scale up the system, like a tree with 10 layers deep. So, to solve this problem, state management’s tools introduce a separate class that hold an object which exposed to all components.
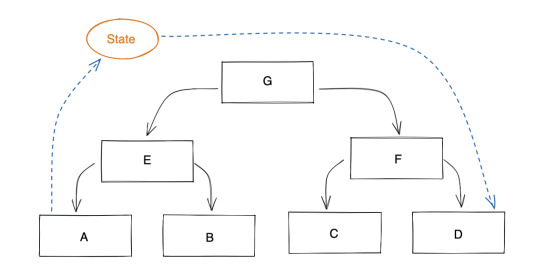
Basically, all state management listed above allows this to happen. The differences located on how big is the “root state” allowed and how to reduce unnecessary “render”.
Provider and BLoC is very similar, their pattern best practices only allow state to be stored as high as they needed. In example, on previous graph, states that used by A and B is stored in E but states that used by A and D is stored in root (G). This ensure the render only happen on those component that needed it. But, the problem arise when D suddenly need state that stored in E. We will need a refactor to move it to G.
Redux and Mobx is very similar, it allows all state to be stored in a single state Store that located at root. Each state in store is implemented as an observable and only listened by component that needs it. By doing it that way, it can reduce the unnecessary render occurred. But, this approach easily bloated the root state since it stores everything. You can implement a sub store, like a store located in E to be used by A and B, but then they will lose their advantages over Provider and BLoC. So, sub store is basically discouraged, you can see both redux and mobx has no implementation for MultiStore component like MultiProvider in provider and MultiBlocProvider in BLoC.
A bloated root state is bad due to, not only the file become very big very fast but also the store hogs a lot of memory even when the state is not actively used. Also, as far as i read, i can’t find any solution to remove states that being unused in either Redux and Mobx. It’s something that won’t happen in Provider, since when a branch is disposes it will remove all state included. So, basically choosing either Provider or Redux is down to personal preferences. Wether you prefer simplicity in Redux or a bit more complex but has better memory allocation in Provider.
Meanwhile, Getx has different implementation altogether. It tries to combine provider style and redux style. It has a singleton object to store all active states, but that singleton is managed by a dependency injector. That dependency injector will create and store a state when it’s needed and remove it when it’s not needed anymore. Theres a writer comment in flutter_redux readme, it says
Singletons can be problematic for testing, and Flutter doesn’t have a great Dependency Injection library (such as Dagger2) just yet, so I’d prefer to avoid those. … Therefore, redux & redux_flutter was born for more complex stories like this one.
I can infer, if there is a great dependency injection, the creator of flutter redux won’t create it. So, for the first criteria in easiness of usage, i think, won by Getx (+2 point).
There is a state management that also build on top dependency injection GetIt. But, it got removed in the first round due to very low popularity. Personally, i think it got potential.
Business logic separation
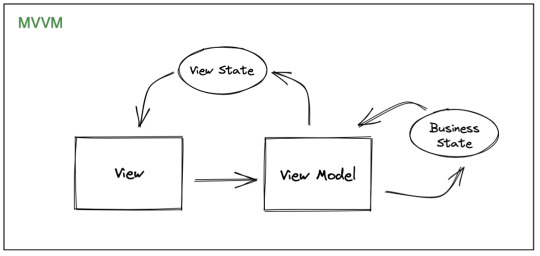
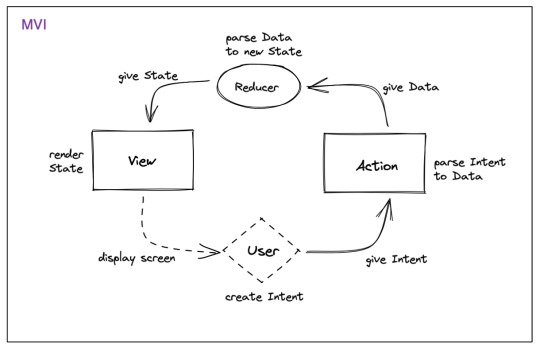
Just like in the previous criteria, all state management also has their own level of separation. They differ in their way in defining unidirectional data flow. You can try to map each of them based on similarity to a more common design pattern like MVVM or MVI.
Provider, Mobx and Getx are similar to MVVM. BLoC and Redux are similar to MVI.
In this criteria, i think there’s no winner since it boils down to preference again.
Easy to learn
Finally, the easiest criteria in easiness of usage, easy to learn. I think there’s only one parameter for it. To be easy to learn, it have to introduced least new things. Both, MVVM and MVI is already pretty common but the latter is a bit new. MVI’s style packages like redux and bloc, introduce new concepts like an action and reducer. Even though Mobx also has actions but it already simplified by using code generator so it looks like any other view model.

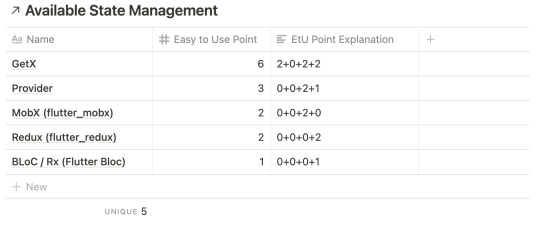
So, for this criteria, i think the winner are those with MVVM’s style (+2 Point), Provider, Mobx and Getx. Actually, google themself also promote Provider (Google I/O 2019) over BLoC (Google I/O 2018) because of the simplicity, you can watch the show here.
The fourth filter result
We have inspect all criteria in the fourth filter. The result are as the following:
Getx won twice (4 point),
Provider and Mobx won once (2 point) and
BLoC and Redux never won (0 point).
I guess it’s very clear that we will drop BLoC and Redux. But, i think we need to add one more important criteria.
Which has bigger ecosystem
Big ecosystem means that a given package has many default tools baked or integrated in. A big ecosystem can help us to reduce the time needed to mix and match tools. We don’t need to reinvent the wheel and focused on delivering products. So, let’s see which one of them has the biggest ecosystem. The answer is Getx, but also unsurprisingly Redux. Getx shipped with Dependency Injection, Automated Logging, Http Client, Route Management, and more. The same thing with Redux, as mentioned before, Redux has multiple sub packages, even though none of it is popular. The second place goes to provider and BLoC since it gives us more option in implementation compared to one on the last place. Finally, on the last place Mobx, it offers only state management and gives no additional tools.
So, these are the final verdict
Suddenly, Redux has comeback to the race.
Fifth Filter: Well maintained
No matter how good a package currently is, we can’t use something that got no further maintenance. We need a well maintained package. So, as always let’s define the criteria of well maintained.
Code Coverage
Last time a commit merged to master
Open Pull Request count
Just like previous filter, we will implement ranking system. A winner on a criteria will get 2 point, second place will get 1, and the rest get 0 point.
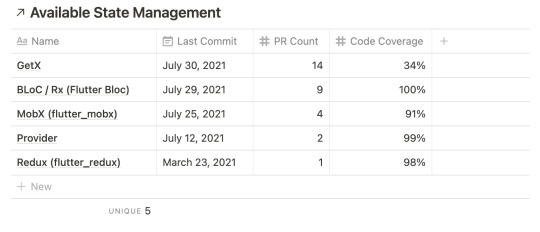
So, with above data, here are the verdicts
Getx 4 point (2+2+0)
BLoC 4 point (1+1+2)
MobX 0 point (0+0+0)
Provider 1 point (0+0+1)
Redux 0 point (0+0+0)
Lets add with the previous filter point,
Getx 10 point (4+6)
BLoC 5 point (4+1)
MobX 2 point (0+2)
Provider 4 point (1+3)
Redux 2 point (0+2)
By now we can see that the winner state management, that allowed to claim the best possible right now, is Getx. But, it’s a bit concerning when I look at the code coverage, it’s the lowest by far from the others. It makes me wonder, what happen to Getx. So i tried to see the result more closely.

After seeing the image above, i can see that the problem is the get_connect module has 0 coverage also several other modules has low coverage. But, let’s pick the coverage of the core modules like, get_core (100%), get_instance(77%), get_state_manager(51%,33%). The coverage get over 50%, not too bad.

Basically, this result means we need to cancel a winner status from Getx. It’s the win on big ecosystem criteria. So, lets subtract 2 point from the end result (10-2). It got 8 points left, it still won the race. We can safely say it has more pros than cons.
Conclusions
The final result, current best state management is Getx 🎉🎉🎉. Sure, it is not perfect and could be beaten by other state management in the future, but currently it’s the best.
So, my decision is "I should use GetX"
1 note
·
View note
Text
Complete Flutter and Dart Roadmap 2020
Mohammad Ali Shuvo
Oct 30, 2020·4 min read
DART ROADMAP
Basics
Arrays, Maps
Classes
Play On Dart Compiler
String Interpolation
VARIABLES
var
dynamic
int
String
double
bool
runes
symbols
FINAL AND CONST
differences
const value and const variable
NUMBERS
hex
exponent
parse methods
num methods
math library
STRINGS
methods
interpolation
multi-line string
raw string
LISTS
List (Fixed and Growable)
methods
MAPS
Map (Fixed and Growable)
methods
SETS
Set ((Fixed and Growable)
methods
FUNCTIONS
Function as a variabl
optional and required parameters
fat arrow
named parameters
@required keyword
positional parameters
default parameter values
Function as first-class objects
Anonymous functions
lexical scopes
Lexical closures
OPERATORS
unary postfix expr++ expr — () [] . ?.
unary prefix -expr !expr ~expr ++expr — expr await expr
multiplicative * / % ~/
additive + -
shift << >> >>>
bitwise AND &
bitwise XOR ^
bitwise OR |
relational and type test >= > <= < as is is!
equality == !=
logical AND &&
logical OR ||
if null ??
conditional expr1 ? expr2 : expr3
cascade ..
assignment = *= /= += -= &= ^= etc.
CONTROL FLOW STATEMENTS
if and else
for loops
while and do-while
break and continue
switch and case
assert
EXCEPTIONS (ALL ARE UNCHECKED)
Throw
Catch
on
rethrow
finally
CLASSES
Class members
Constructors
Getting object type
instance variables
getters and setters
Named constructors
Initializer lists
Constant constructors
Redirecting constructors
Factory constructors
instance methods
abstract methods
abstract classes
Inheritance
Overriding
Overriding operators
noSuchMethod()
Extension methods
Enums
Mixins (on keyword in mixins)
Static keyword, static variables and methods
GENERICS
Restricting the parameterized type
Using generic methods
LIBRARIES AND VISIBILITY
import
as
show
hide
deferred
ASYNCHRONY SUPPORT
Futures
await
async
Streams
Stream methods
OTHER TOPICS
Generators
Callable classes
Isolates
Typedefs
Metadata
Custom annotation
Comments, Single-line comments, Multi-line comments, Documentation comments
OTHER KEYWORDS FUNCTIONS
covariant
export
external
part
sync
yield
FLUTTER ROADMAP
Flutter Installation (First App)
Flutter Installation
Basic Structure
Android Directory Structure
iOS Directory Structure
BASICS
MaterialApp
Scaffold
AppBar
Container
Icon
Image
PlaceHolder
RaisedButton
Text
RichText
STATELESS AND STATEFULWIDGETS
Differences
When To Use?
How To Use?
Add Some Functionality
INPUT
Form
Form Field
Text Field
TextEditing Controller
Focus Node
LAYOUTS
Align
Aspect Ratio
Baseline
Center
Constrained Box
Container
Expanded
Fitted Box
FractionallySizedBox
Intrinsic Height
Intrinsic Width
Limited Box
Overflow Box
Padding
Sized Box
SizedOverflowBox
Transform
Column
Flow
Grid View
Indexed Stack
Layout Builder
List Body
List View
Row
Stack
Table
Wrap
Safe Area
MATERIAL COMPONENTS
App bar
Bottom Navigation Bar
Drawer
Material App
Scaffold
SliverAppBar
TabBar
TabBarView
WidgetsApp
NAVIGATOR
pop
Routes
Bottom Navigation
Drawer
Create Multipage App
popUntil
canPop
push
pushNamed
popAndPushNamed
replace
pushAndRemoveUntil
NavigatorObserver
MaterialRouteBuilder
BUTTONS
ButtonBar
DropdownButton
FlatButton
FloatingActionButton
IconButton
OutlineButton
PopupMenuButton
RaisedButton
INPUT AND SELECTIONS
Checkbox
Date & Time Pickers
Radio
Slider
Switch
DIALOGS, ALERTS, AND PANELS
AlertDialog
BottomSheet
ExpansionPanel
SimpleDialog
SnackBar
INFORMATION DISPLAYS
Card
Chip
CircularProgressIndicator
DataTable
LinearProgressIndicator
Tooltip
LAYOUT
Divider
ListTile
Stepper
SCROLLING
CustomScrollView
NestedScrollView
NotificationListener
PageView
RefreshIndicator
ScrollConfiguration
Scrollable
Scrollbar
SingleChildScrollView
Theory …
Flutter -Inside View
Dart
Skia Engine
Performance
Comparison
App Built In Flutter
OTHER USEFUL WIDGETS
MediaQuery
LayoutBuilder
OrientationBuilder
FutureBuilder
StreamBuilder
DraggableScrollableSheet
Learn How to Use Third Party Plugins
CUPERTINO (IOS-STYLE) WIDGETS
CupertinoActionSheet
CupertinoActivityIndicator
CupertinoAlertDialog
CupertinoButton
CupertinoContextMenu
CupertinoDatePicker
CupertinoDialog
CupertinoDialogAction
CupertinoNavigationBar
CupertinoPageScaffold
CupertinoPicker
CupertinoPageTransition
CupertinoScrollbar
CupertinoSegmentedControl
CupertinoSlider
CupertinoSlidingSegmentedControl
CupertinoSwitch
CupertinoTabBar
CupertinoTabScaffold
CupertinoTabView
CupertinoTextField
CupertinoTimerPicker
ANIMATIONS
Ticker
Animation
AnimationController
Tween animation
Physics-based animation
AnimatedWidget
AnimatedBuilder
AnimatedContainer
AnimatedOpacity
AnimatedSize
FadeTransition
Hero
RotationTransition
ScaleTransition
SizeTransition
SlideTransition
NETWORKING
http, dio libraries
json parsing
Local Persistent Storage
SQFLITE
Shared Preferences
Hive
JSON
JSON- PARSING
INTERNATIONALI ZING FLUTTER APPS
Locale
AppLocalization
json files
STATE MANAGEMENT
setState
InheritedWidget
ScopedModel
Provider
Redux
BLOC
OTHER IMPORTANT TOPICS
Widget Tree, Element Tree and Render Tree
App Lifecycle
Dynamic Theming
Flare
Overlay widget
Visibility Widget
Spacer Widget
Universal error
Search Layout
CustomPainter
WidgetsBindingObserver
RouteObserver
SystemChrome
Internet connectivity
Http Interceptor
Google Map
Firebase Auth
Cloud FireStore DB
Real time DB
File/Image Upload
Firebase database
Firestore
Semantic versioning
Finding size and position of widget using RenderObject
Building release APK
Publishing APK on Play Store
RxDart
USEFUL TOOLS
Dev Tools
Observatory
Git and GitHub
Basics
Add ,Commit
Push
Pull
Github,Gitlab And Bitbucket
Learn How to Become UI Pro
Recreate Apps
Animations
Dribble -App Ui
Make Custom Widgets
Native Components
Native Share
Permissions
Local Storage
Bluetooth
WIFI
IR Sensor
API -REST/GRAPH
Consume API
Basics of Web Dev
Server
TESTING AND DEBUGGING
Debugging
Unit Testing
UI (Widget) Testing
Integration Testing
WRITING CUSTOM PLATFORM-SPECIFIC CODE
Platform Channel
Conclusion: There are some courses out there but I believe self-learning is the best. However, you can take help whenever you feel like it. Continue Your Journey By making Apps and also You can clone the existing apps for learning the concept more clearly like Ecommerce , Instagram , Expense Manager , Messenger ,bla bla …….
Most important thing to remember that don’t depend on others too much , when you face any problem just google it and a large flutter community is always with you.
Best of luck for your Flutter journey
Get Ready and Go………..
1 note
·
View note
Video
#InheritedWidget #Flutter #Widget https://www.instagram.com/p/CAmnFdfHcNT/?igshid=g1t5kkwk54vn
0 notes
Text
Understanding the Concept of State in Flutter: A Comprehensive Guide

State is a fundamental concept in Flutter that represents the data and information required to build and render the user interface of an application. It encapsulates the dynamic aspects of an app, such as user input, network requests, or changes in data. Understanding how state works in Flutter is crucial for building robust and interactive applications. In this comprehensive guide, we'll explore the concept of state in Flutter, different types of state, stateful vs. stateless widgets, managing and updating state, and best practices for state management in Flutter.
Prerequisites
Before we dive into the concept of state in Flutter, make sure you have the following prerequisites in place: - Flutter SDK installed on your machine. If you haven't installed Flutter yet, refer to the official Flutter installation guide for your operating system. - A Flutter project set up and ready for development.
What is State in Flutter?
State in Flutter refers to the data or information that can change over time and affects the visual representation of the user interface. It represents the dynamic aspects of an app, such as user interactions, data fetching, or changes in application data. Managing state effectively is essential for creating responsive and interactive user interfaces.
Stateless vs. Stateful Widgets
In Flutter, widgets can be classified into two main types: stateless widgets and stateful widgets. - Stateless Widgets: These are immutable widgets that do not maintain any internal state. They are purely based on the input provided during widget creation and render their UI accordingly. Examples of stateless widgets include Text, Image, and Container. They are ideal for representing static content or components that do not change over time. - Stateful Widgets: These are mutable widgets that can maintain and update their internal state over time. They can react to user interactions, data changes, or any other external events. Examples of stateful widgets include TextField, Checkbox, and ListView. They are suitable for representing dynamic content or components that require frequent updates.
Managing and Updating State
To manage and update state in Flutter, you can follow various approaches based on the complexity and requirements of your app. Here are some common techniques for state management in Flutter: - Local State Management: For simple apps or widgets with localized state, you can manage the state within the widget itself using the setState method. This allows you to update the state and trigger a re-render of the widget. - InheritedWidget/InheritedModel: InheritedWidget and InheritedModel are Flutter's built-in mechanisms for sharing state across multiple widgets in a widget tree. By placing a widget higher in the tree and passing down the state to its descendants, you can propagate the state changes throughout the subtree. InheritedWidget/InheritedModel Example: - Provider Package: The Provider package is a popular state management solution in Flutter. It simplifies the process of sharing state across the app by using a provider-consumer pattern. With Provider, you can create and access state from anywhere in the widget tree, allowing for efficient and organized state management. - Bloc Pattern (flutter_bloc): The Bloc pattern is an architectural pattern commonly used for state management in Flutter. It separates the business logic (Bloc) from the UI (Widget), providing a clear separation of concerns. The flutter_bloc package simplifies implementing the Bloc pattern in Flutter. - Redux (flutter_redux): Redux is a predictable state container for Dart and Flutter apps. It follows a unidirectional data flow pattern, making state changes predictable and testable. The flutter_redux package provides integration with Flutter for implementing Redux in your app. Provider Package Example:
Best Practices for State Management
When working with state in Flutter, it's essential to follow best practices to ensure a maintainable and scalable codebase. Here are some tips for effective state management: - Separation of Concerns: Keep your UI components separate from the state management logic. This helps maintain code clarity and allows for easier testing and debugging. - Use Immutable Data: Prefer using immutable data structures to represent your app's state. Immutable data helps prevent unexpected mutations and simplifies tracking changes. - Minimize Mutable State: Reduce the use of mutable state to only where it is necessary. Minimizing mutable state reduces the complexity of your app and makes it easier to reason about. - Choose the Right State Management Approach: Evaluate the complexity and requirements of your app to select the appropriate state management approach. Consider factors such as scalability, performance, and developer productivity. - Testing State Changes: Write tests to ensure that state changes are handled correctly and the UI updates as expected. Automated testing helps catch bugs early and provides confidence in your state management implementation.
Conclusion
Understanding the concept of state in Flutter is crucial for building dynamic and interactive applications. By distinguishing between stateless and stateful widgets, adopting suitable state management techniques, and following best practices, you can create robust and maintainable Flutter apps. Embrace the power of state management in Flutter to deliver seamless user experiences and responsive user interfaces. Happy coding! Remember to customize the title and meta description based on your blog's SEO strategy and target keywords. Read the full article
0 notes
Text
A Quick Guide to Riverpod Data Caching and Provider Lifecycles

Riverpod involves reactive caching along with the data binding framework. These have widely evolved from the provider packages. Normally, the Riverpod is the rewrite for the Provider package. These are suitable options for making improvements that are quite impossible to access.
Most people want to view the state management framework, which involves extensive Reactive Caching and Data-binding Framework. Riverpod 2.0 has been enabled from the valuable concepts of the React Query. These provide better accessibility from Flutter world to high excellence.
Flutter Riverpod 2.0
Normally, the Provider package involves improvements on InheritedWidget. These extensively depend on a complete widget tree that can be easily enabled. Riverpod is also the 100% compile safer option, as most providers have been using them worldwide.
Riverpod could be easily accessed from anywhere, even without any hassle. Provider package involves the easy-to-use package wrapped across InheritedWidgets. These make it a convenient option for using and managing them accordingly.
Versatile and used for most feature
Helpful to create and combine providers
Performs reactive caching
Easily fetch
Catches programming errors at compile-time
Disposes state of a provider
Depends on asynchronous
Updates data from a remote source
Writes testable code
Keep your logic outside the widget tree
The method would provide the Flutter app state management technique suitable for data management. Riverpod Data Caching is an advanced technique from the provider package and is assured of giving better stability even without any hassle.
Below are the steps for providing full accessibility, such as:
final counterProvider = StateNotifierProvider<counter, int="">((ref) { return Counter(); }); Class Counter extends StateNotifier<int> { Counter() : super(0); void increment() => state++; } </int></counter,>
To consume the provider, you can follow the below steps:
class Home extends ConsumerWidget { @override Widget build(BuildContext context, WidgetRef ref) { final count = ref.watch(counterProvider); return Text('$count'); } }
Riverpod implements the complete range of patterns. These are helpful for retrieving and caching the data. There is no need to reimplement them for the accessibility feature. These are quite efficient options for establishing good app architecture. These can also be suitable for focusing on building the feature with minimal friction.
Explore The Main Riverpod APIs
In the modern day, the new riverpod_generator package has been published as the biggest part of Riverpod 2.0. Apart from these, it also introduces a new @riverpod annotation API. You can also easily use them automatically to generate the providers for the Methods and Classes in the codes.
Compile safe feature is also added in the process. So there are also no requirements for the ProviderNotFoundException or even forgetting the handle loading state. It extensively adds the providers anytime and anywhere without any hassle.
The method is the perfect option for declaring the shared state from anywhere. There is no need to jump from the main.dart and UI files anymore. You can easily place the code of the shared state where it belongs. These can be enabled with a separate package or even added next to the Flutter widget.
final countProvider = StateProvider((ref) => 0); // Consumes the shared state class Title extends ConsumerWidget { @override Widget build(BuildContext context, WidgetRef ref) { final count = ref.watch(countProvider); return Text('$count'); } }
The method involves the stale-while-revalidate pattern having the complete riverpod. You can also extensively look at the query_provider package. The backend class could be easily made using the ghibli-api. The Tested Provider.family is a significant option in easily checking whether the state is persistent with memory.
How Does The Provider Package Start?
Normally, the Provider package starts with the two possible attributes, such as
If we call runApp inside main for attaining the top-level ProviderScope
If we call the CounterWidget widget mounted and call the ref.watch in the build method
Based on the different criteria, changing the print statements on the code will be efficient.
void main() { print('Inside main'); runApp(ProviderScope( child: MaterialApp( home: CounterWidget(), ), )); } final counterStateProvider = StateProvider<int>((ref) { print('counterStateProvider initialized'); return 0; }); </int>
counterStateProvider involves the complete initialization when they are called as ref.watch(counterStateProvider). The main reason is that the Riverpod providers can save more time due to the app development process even without hassle.
Print statements, along with the debug breakpoints, are some of the amazing ways to explore the app’s runtime behavior. These could be easily diagnosed and fixed with countless bugs to high excellence. A method is a suitable option for running Flutter smoothly with these tools.
How To Register Listeners In Riverpod Data Caching?
For registering the Listener in Riverpod Data Caching as well as Providers Lifecycle, you can follow the below steps
class CounterWidget extends ConsumerWidget { @override Widget build(BuildContext context, WidgetRef ref) { // 1. watch the provider final counter = ref.watch(counterStateProvider); return ElevatedButton( // 2. use the value child: Text('Value: $counter'), // 3. increment the counter when the button is pressed onPressed: () => ref.read(counterStateProvider.notifier).state++, ); } } Call ref.watch(counterStateProvider) inside the build method
These involve the 2 processes in the end results even without any hassle. You can get the provider’s state or counter value, so these show the UI accordingly. CounterWidget is an amazing listener on counterStateProvider. These can be extensively built with the provider state changes.
These methods also affect the results of the Provider, such as:
Provider’s state can be easily initialized with the first listener
Listeners are notified when the state changes
Listeners are updated/rebuild themselves
Providers can have better than one listener
The counter app had one provider as well as a listener widget
Observable Pattern
Providers also listen to other providers
Riverpod builds upon observable pattern
Both ref.watch() and ref.listen() are used to register listener to provider
One-time read feature
Does not register a listener
Provider maintains state and keeps memory until enclosing ProviderScope is eliminated. These can access the user to kill apps enabled with -level ProviderScope.
Conclusion
Riverpod enables the complete aspects of code to compile attributes. The Provider package has widely inspired Riverpod. These are also suitable options for solving key issues like supporting multiple providers of the same type. These also await asynchronous providers. If you are thinking of developing medium-to-large-size business applications, this information about Riverpod will be helpful to you. If you are looking for a reliable partner, then consult the skilled flutter app developers who help to stay ahead of the competition with the latest class and functions in Flutter. Thus, let’s get in touch with us for more information!
Frequently Asked Questions (FAQs)
1. Is Riverpod better than the Provider?
To understand, let’s see the major drawback of the provider package. By designing, Provider is the improvement over the inherited widget, and it depends on the widget tree. On the other hand, Riverod is the compile safe since all the providers are declared globally, and it is accessible from anywhere.
2. What does future Provider mean with Riverpod?
FutureProvider is a simple and convenient method to expose the configuration object build by just reading the JSON file. It will automatically rebuild UI when the future completes. At the same time, if various widgets want configuration, then the asset is decoded only once.
3. What is the ephemeral state of Riverpod?
The state local to any widget is known as an ephemeral state. The state is contained within the single widget, and there is no requirement for the complicated state management technique of just using a Stateful widget to rebuild a UI.
Source: https://flutteragency.com/riverpod-data-caching-providers-lifecycle/
0 notes
Text
【 Flutter 】Flutter を 基礎 から 学習 ( パフォーマンスチューニング ) part277 パフォーマンスを意識した実装
【 Flutter 】Flutter を 基礎 から 学習 ( パフォーマンスチューニング ) part277 パフォーマンスを意識した実装
「 基礎 から 学ぶ Flutter 」という書籍で 学習 したことを ブログでアウトプットしていこうと思います。今回は パフォーマンスチューニング ( part277 )です。 前回 【 Flutter 】Flutter を 基礎 から 学習 ( パフォーマンスチューニング ) part276 パフォーマンスを意識した実装 引き続き、パフォーマンスチューニングについて学びます。 パフォーマンスを意識した実装 ウィジェットの再構築を意識する ステートフルウィジェットに「child」プロパティを持たせる ステートフルウィジェットに「child」プロパティを持たせるというもあります。 こちらも「キャッシュ」という手法の一部ですよね。 「アーキテクチャ」のInheritedWidgetの章でこの手法が用いられたとのことで・・・ 見返してみました。 【 Flutter 】Flutter を…

View On WordPress
0 notes
Text
Why you should use Provider for managing state in Flutter apps – 1

Flutter is witnessing a meteoric rise. With the introduction of Flutter 2.0 along with full web support, it feels like magic that you can generate a web-app and a mobile app from a single code base. Just. Amazing.
But with the rise of Flutter and its ecosystem, comes the troubles of doing one thing in a myriad of ways. One such trouble is the number of packages available to manage state in your Flutter application.
With more demanding users, even the most simple use-case are becoming complex to implement in a mobile app. Need to update the number of items in the cart globally after adding a product in it? You need a state management solution. Need to maintain the login state of the user throughout the app? You need a state management solution.
The funny part is, previously we tend to ignore global variables, but now, we are embracing them in the form of global states. How times have changed. It’s not too long that we’ll start using “goto” statements in the code as well. (Just kidding. No one should ever use “goto”.)
The Current State of State Management Techniques
State management is an important part of a mobile app architecture. Choosing the right technique helps in building an app which is extensible and testable. If you’re not using a state management solution in your app, then you should look into it more seriously.
In the context of Flutter, there’s a whole ecosystem of state management packages. The developer community is a bit divided at the moment and has not yet decided the best technique because there’s no silver bullet.
A good developer is one who can choose her tools based on the problem at hand. As the saying goes, if you’ve only ever learned to use a hammer, every problem will look like a nail. Hence, one should always understand the pros and cons of multiple tools before making any decision.
Here’s a brief introduction of most used state management packages and techniques
BLoC– It stands for Business Logic Components. According to BLoC, everything in the app must be represented as a stream of events. From button clicks to changes in text fields. Events from one widget enter the stream and other widgets respond. The BLoC sits in between and controls the flow. For large applications, BLoC can be used to create proper separation of concerns. BLoC, however, can be also be daunting to look at. One has to write a lot of boilerplate code to implement it correctly. Read more about the BLoC package here.
Provider– When used along with ChangeNotifier, Provider is a very simple yet scalable technique to implement MVVM architecture in a Flutter app. Provider is essentially a dependency injection package which supports notifying child widgets using the ChangeNotifier. We’ll learn more about it later in the article. It’s also one of Google’s recommended techniques. It uses InheritedWidgets under the hood.
setState– This comes in-built with Flutter’s Stateful Widget. It’s something that beginners and small apps should use in order to keep things simple and understandable. Unless your Flutter app has more than a few screens (more than 4) and needs to manage a global state, you should use set State(). Read more about it here.
MobX– It’s a popular technique since a long time and uses Observables, Actions and Reactions to notify the widgets of changes. It as initially designed to be used with JavaScript projects and then migrated to Dart to be used used with Flutter projects. It’s an annotation based package which generates the code using a separate package. Read more about it here.
There are more packages like GetIt, GetX etc, you can read more about them here.
The advantages of using Provider
There are many advantages of the Provider package specially when combined with ChangeNotifiers-
· It’s very easy to understand and reason about. The documentation is clear and concise and provides guidelines to best practices as well.
· You can use both reactive and non-reactive ChangeNotifiers in a Widget which means that you can depend on other ChangeNotifiers without being notified about changes. This provides many performance benefits.
· You can use Provider as a simple dependency injection container as well. The only thing is, you need to have access to the Build Context attached the widget tree.
The MVVM Architecture
The MVVM architecture is rather simple to understand and is highly applicable to reactive frameworks like Flutter.
MVVM Data Flow
As you can see above, the View Model is responsible for holding the business logic and updating the view as the data changes. In a simple app, the model can be used to fetch data from data sources like SQLite Database or a REST API. In larger apps, however, we should use a service layer which will communicate with the data providers, populate the models and then return them to View Models. In this way, the View Model uses services and updates the views.
The question now is- how can a View Model update a View? The answer is simple- ChangeNotifier.
ChangeNotifier is a class which notifies the listeners which are attached to it when notifyListeners() is called. When coupled with Provider, it can injected into any view and hence making the view reactive to changes.
Here are the basic things to keep in mind when working with the MVVM architecture in Flutter using Provider and ChangeNotifier-
· Every View should have its own View Model.
· Use service classes to get data from external or internal data sources.
· The View cannot directly use any service class. It’ll always use it’s own View Model to communicate with services, even if the communication is non-reactive in nature.
· Inject the View Models (which extends ChangeNotifier) as up as possible in the Widget tree. More specifically, inject them in the root widget tree. This will help in maintaining global state throughout the application easily.
· Do not overuse reactive data because ChangeNotifier takes O(N) time to propagate changes where N is the number of listeners attached to it.
· Do not call notifyListeners() unnecessarily. It causes whole Widget tree to rebuild every time its called (unless listen is false in Provider.of)
Conclusion
This concludes the Part 1 of this series about Flutter and Provider. In the next part, we’ll look at the boilerplate code that we use in building Flutter apps.
Source URL: https://citrusleaf.in/blog/why-you-should-use-provider-for-managing-state-in-flutter-apps-1/
0 notes
Text
How to Implement Dependency Injection (DI) in Flutter App Development?
Flutter app development is thriving thanks to the growing interest of entrepreneurs and app developers alike. An active community of developers, rich libraries, robust app development infrastructure, and strong support of Google have made Flutter a choice of hundreds of thousands of companies globally.

Flutter has many features and tools that reduce the duration of the app development process and assist developers to come up with a seamlessly-performing app. Dependency Injection or DI is one of the ways that contribute to developing rich, enterprise-level mobile apps. In this article, we are going to look at how we can implement dependency injection in flutter and various methods by which we can implement dependency injection in Flutter.
First of all, we will see what is the Dependency Injection (DI) and why we need to use this concept in the Flutter app development process.
Dependency injection is the way by which we can implement IOC(Inversion of Control) for creating dependent objects outside of the class and pass that object through different methods of DI.
Now, we are going to understand different methods to implement DI. We have many ways by which we can implement DI in Flutter, but we will see the top four methods here-
1. Passing object through constructor argument 2. Inherited widget 3. IOC package 4. get_it package
Let’s start with the first and most simpler way to implement DI- Passing object through constructor argument. in this, we can create an object of the dependent class in the parent level and pass the object through the constructor of the child in which we are going to use that object.
Here we take one example to understand more about this type of DI. Let’s assume that we have one ApiService() call in which we have written our all API related calls. Now we need ApiService class object in our HomeScreen.
And in HomeScreen we have take object in the constructor, like this example
This method might seem not to bed and essay to implement but it becomes very problematic when we want to pass an object in deep down widget tree and your code becomes messy when you’re handling multiple dependencies.
Inherited widget
Inherited widget is Provided by a flutter, no need to add any new dependency for this. The inherited widget allows you to pass the data deep down to the widget tree.let’s create one inherited widget.
This is the component which generated by the Flutter VS code extension, now let’s understand this code one by one.
1. this widget accepts one widget, here we name that widget as a child(you can give any name you want). for this, we have to pass the widget tree in which we want to pass objects.
2. The next part of the code looks up to the widget tree and finds closets InheritedWidget and registers the BuildContext with that widget so whenever widget change than it can rebuild the tree.
3. updateShouldNotify() method returns boolean that states whether sub widget tree will be rebuilt or not when change occurs in InheritedWidget.
Now let’s implement this inheritedHomewidget and check how we can use this concept in our project.
Wrap your whole widget tree with an inherited widget which you have created, if you want your dependencies to propagate down the whole tree.
Now, we can use inherited widget by .of(context) as we have shown in the above example.
Also Read- All You Need to Know about the Latest Flutter 1.12 Version
IOC package
Ioc is stood for inversion of control which is the underlying principle of dependency injection. this IOC package state pattern which says that all the services and dependencies must be in separate files.
this is easy to use, it allows you to initialize your services as a singleton and you can bind your dependency of any data type you want. for implementing this package, first of all, we have to add a dependency in our pubspec.yaml like this.
Now we have to create a dart file on which I will bind all my services, as shown below we have created on the IocLoc file in which we have bound our API Service.
here I have bind class ApiService to string ‘service1’ and this string is worked as key and the key is a dynamic variable.in ApiService we have one method name makeLogin().
Now we have to call IocLoc() function before we are running our app.so it’s important to call IocLoc() before runApp().
Now we can import ApiService object like below and after it, we can access their members as well.
Get_it package
Get it is one of the most popular ways to handle DI in flutter app.above all the way we had to use our dependency as a singleton way, but by using this package we can import our dependency in many ways like lazy Singleton, Singleton, factory. Now let’s understand all these three concepts in deep.
1. Singleton=This always return the same instance of that particular service.
2. Lazy singleton = this method creates an instance of a particular service when it called the first time. this is used when we have service which takes time to start and should start when it’s required.
3. Factory=this return a new instance of service whenever we called.
Now let’s see how can we implement get it to package in our project.
First of all, we have to add a dependency to our pubspec.yaml
after adding dependency, we have to create one dart file on which we can register our all service base on our usage.
After registering all our services, we have to call getServices() method before our runApp() in the main .dart file. here GetIt gives us singleton object of getit.
After all the setup done, we are ready to use our services. for using service we have to follow the steps below to use services. By this, we can access our services from any part of the app.
So, now this all about how we can implement DI in flutter using different ways.
Concluding Lines
Flutter app development is aimed at providing the same UI and business logic across all platforms. The biggest advantages of Flutter include reduced development time and increased TTM (Time to Market). With excellent features and functionality, the Flutter framework is capable of developing feature-rich apps for your enterprise. As a reputed Flutter app development company, we can assist you in meeting all business needs through a futuristic app.
Original Source: How to Implement Dependency Injection (DI) in Flutter App Development?
0 notes
Text
Responsive Web And Desktop Development With Flutter
About The Author
Flutter and LinUX enthusiast, author of the Programming Flutter book with the Pragmatic Bookshelf. Blogs more, tweets less. More about Carmine …
Flutter has already made quite a splash on the mobile development scene. Now it’s taking on bigger devices as well. Here’s what you need to know to be ready to take on the task of developing web and desktop apps using this wonderful cross-platform framework.
This tutorial is not an introduction to Flutter itself. There are plenty of articles, videos and several books available online with simple introductions that will help you learn the basics of Flutter. Instead, we’ll be covering the following two objectives:
The current state of Flutter non-mobile development and how you can run Flutter code in the browser, on a desktop or laptop computer;
How to create responsive apps using Flutter, so that you can see its power — especially as a web framework — on full display, ending with a note about routing based on URL.
Let’s get into it!
What Is Flutter, Why It’s Important, What It Has Evolved Into, Where It’s Going
Flutter is Google’s latest app development framework. Google envisions it to be all-encompassing: It will enable the same code to be executed on smartphones of all brands, on tablets, and on desktop and laptops computer as native apps or as web pages.
It’s a very ambitious project, but Google has been incredibly successful until now particularly in two aspects: in creating a truly platform-independent framework for Android and iOS native apps that works great and is fully ready for production use, and in creating an impressive front-end web framework that can share 100% of the code with a compatible Flutter app.
In the next section, we’re going to see what makes the app compatible and what’s the state of non-mobile Flutter development as of now.
Non-Mobile Development With Flutter
Non-mobile development with Flutter was first publicized in a significant way at Google I/O 2019. This section is about how to make it work and about when it works.
How To Enable Web And Desktop Development
To enable web development, you must first be on Flutter’s beta channel. There are two ways to get to that point:
Install Flutter directly on the beta channel by downloading the appropriate latest beta version from the SDK archive.
If you already have Flutter installed, switch to the beta channel with $ flutter channel beta, and then perform the switch itself by updating your Flutter version (which is actually a git pull on the Flutter installation folder) with $ flutter upgrade.
After that, you can run this:
$ flutter config --enable-web
Desktop support is much more experimental, especially due to a lack of tooling for LinUX and Windows, making plugin development especially a major pain, and due to the fact that the APIs used for it are intended for proof-of-concept use and not for production. This is unlike web development, which is using the tried-and-tested dart2js compiler for release builds, which are not even supported for Windows and LinUX native desktop apps.
Note: Support for macOS is slightly better than support for Windows and LinUX, but it still isn’t as good as support for the web and not nearly as good as the full support for mobile platforms.
To enable support for desktop development, you need to switch to the master release channel by following the same steps outlined earlier for the beta channel. Then, run the following by replacing <OS_NAME> with either linUX, windows, or macos:
$ flutter config --enable-<OS_NAME>-desktop
At this point, if you have issues with any of the following steps that I’ll be describing because the Flutter tool isn’t doing what I’m saying it should do, some common troubleshooting steps are these:
Run flutter doctor to check for issues. A side effect of this Flutter command is that it should download any tools it needs that it doesn’t have.
Run flutter upgrade.
Turn it off and on again. The old tier-1 technical-support answer of restarting your computer might be just what is needed for you to be able to enjoy the full riches of Flutter.
Running And Building Flutter Web Apps
Flutter web support isn’t bad at all, and this is reflected in the ease of development for the web.
Running this…
$ flutter devices
… should show right away an entry for something like this:
Web Server • web-server • web-javascript • Flutter Tools
Additionally, running the Chrome browser should cause Flutter to show an entry for it as well. Running flutter run on a compatible Flutter project (more on that later) when the only “connected device” showing up is the web server will cause Flutter to start a web server on localhost:<RANDOM_PORT>, which will allow you to access your Flutter web app from any browser.
If you have installed Chrome but it’s not showing up, you need to set the CHROME_EXECUTABLE environment variable to the path to the Chrome executable file.
Running And Building Flutter Desktop Apps
After you’ve enabled Flutter desktop support, you can run a Flutter app natively on your development workstation with flutter run -d <OS_NAME>, replacing <OS_NAME> with the same value you used when enabling desktop support. You can also build binaries in the build directory with flutter build <OS_NAME>.
Before you can do any of that, though, you need to have a directory containing what Flutter needs to build for your platform. This will be created automatically when you create a new project, but you’ll need to create it for an existing project with flutter create .. Also, the LinUX and Windows APIs are unstable, so you might have to regenerate them for those platforms if the app stops working after a Flutter update.
When Is An App Compatible?
What have I meant all along when mentioning that a Flutter app has to be a “compatible project” in order for it to work on desktop or the web? Put simply, I mean that it mustn’t use any plugin that doesn’t have a platform-specific implementation for the platform on which you’re trying to build.
To make this point absolutely clear to everyone and avoid misunderstanding, please note that a Flutter plugin is a particular Flutter package that contains platform-specific code that is necessary for it to provide its features.
For example, you can use the Google-developed url_launcher package as much as you want (and you might want to, given that the web is built on hyperlinks).
An example of a Google-developed package the usage of which would preclude web development is path_provider, which is used to get the local storage path to save files to. This is an example of a package that, incidentally, isn’t of any use to a web app, so not being able to use it isn’t really a bummer, except for the fact that you need to change your code in order for it to work on the web if you’re using it.
For example, you can use the shared_preferences package, which relies on HTML localStorage on the web.
Similar caveats are valid regarding desktop platforms: Very few plugins are compatible with desktop platforms, and, as this is a recurring theme, much more work on this needs to be done on the desktop side than is really necessary on Flutter for the web.
Creating Responsive Layouts In Flutter
Because of what I’ve described above and for simplicity, I’m going to assume for the rest of this post that your target platform is the web, but the basic concepts apply to desktop development as well.
Supporting the web has benefits and responsibilities. Being pretty much forced to support different screen sizes might sound like a drawback, but consider that running the app in the web browsers enables you to see very easily how your app will look on screens of different sizes and aspect ratios, without having to run separate mobile device emulators.
Now, let’s talk code. How can you make your app responsive?
There are two perspectives from which this analysis is done:
“What widgets am I using or can I use that can or should adapt to screens of different sizes?”
“How can I get information about the size of the screen, and how can I use it when writing UI code?”
We’ll answer the first question later. Let’s first talk about the latter, because it can be dealt with very easily and is at the heart of the issue. There are two ways to do this:
One way is to take the information from the MediaQueryData of the MediaQuery root InheritedWidget, which has to exist in the widget tree in order for a Flutter app to work (it’s part of MaterialApp/WidgetsApp/CupertinoApp), which you can get, just like any other InheritedWidget, with MediaQuery.of(context), which has a size property, which is of type Size, and which therefore has two width and height properties of the type double.
The other way is to use a LayoutBuilder, which is a builder widget (just like a StreamBuilder or a FutureBuilder) that passes to the builder function (along with the context) a BoxConstraints object that has minHeight, maxHeight, minWidth and maxWidth properties.
Here’s an example DartPad using the MediaQuery to get constraints, the code for which is the following:
import 'package:flutter/material.dart'; void main() => runApp(MyApp()); class MyApp extends StatelessWidget { @override Widget build(context) => MaterialApp( home: MyHomePage() ); } class MyHomePage extends StatelessWidget { @override Widget build(context) => Scaffold( body: Center( child: Column( mainAxisAlignment: MainAxisAlignment.spaceEvenly, children: [ Text( "Width: ${MediaQuery.of(context).size.width}", style: Theme.of(context).textTheme.headline4 ), Text( "Height: ${MediaQuery.of(context).size.height}", style: Theme.of(context).textTheme.headline4 ) ] ) ) ); }
And here’s one using the LayoutBuilder for the same thing:
import 'package:flutter/material.dart'; void main() => runApp(MyApp()); class MyApp extends StatelessWidget { @override Widget build(context) => MaterialApp( home: MyHomePage() ); } class MyHomePage extends StatelessWidget { @override Widget build(context) => Scaffold( body: LayoutBuilder( builder: (context, constraints) => Center( child: Column( mainAxisAlignment: MainAxisAlignment.spaceEvenly, children: [ Text( "Width: ${constraints.maxWidth}", style: Theme.of(context).textTheme.headline4 ), Text( "Height: ${constraints.maxHeight}", style: Theme.of(context).textTheme.headline4 ) ] ) ) ) ); }
Now, let’s think about what widgets can adapt to the constraints.
Fist of all, let’s think about the different ways of laying out multiple widgets according to the size of the screen.
The widget that most easily adapts is the GridView. In fact, a GridView built using the GridView.extent constructor doesn’t even need your involvement to be made responsive, as you can see in this very simple example:
import 'package:flutter/material.dart'; void main() => runApp(MyApp()); class MyApp extends StatelessWidget { @override Widget build(context) => MaterialApp( home: MyHomePage() ); } class MyHomePage extends StatelessWidget { final List elements = [ "Zero", "One", "Two", "Three", "Four", "Five", "Six", "Seven", "Eight", "A Million Billion Trillion", "A much, much longer text that will still fit" ]; @override Widget build(context) => Scaffold( body: GridView.extent( maxCrossAxisExtent: 130.0, crossAxisSpacing: 20.0, mainAxisSpacing: 20.0, children: elements.map((el) => Card(child: Center(child: Padding(padding: EdgeInsets.all(8.0), child: Text(el))))).toList() ) ); }
You can accommodate content of different sizes by changing the maxCrossAxisExtent.
That example mostly served the purpose of showing the existence of the GridView.extent GridView constructor, but a much smarter way to do that would be to use a GridView.builder with a SliverGridDelegateWithMaxCrossAxisExtent, in this case where the widgets to be shown in the grid are dynamically created from another data structure, as you can see in this example:
import 'package:flutter/material.dart'; void main() => runApp(MyApp()); class MyApp extends StatelessWidget { @override Widget build(context) => MaterialApp( home: MyHomePage() ); } class MyHomePage extends StatelessWidget { final List<String> elements = ["Zero", "One", "Two", "Three", "Four", "Five", "Six", "Seven", "Eight", "A Million Billion Trillion", "A much, much longer text that will still fit"]; @override Widget build(context) => Scaffold( body: GridView.builder( itemCount: elements.length, gridDelegate: SliverGridDelegateWithMaxCrossAxisExtent( maxCrossAxisExtent: 130.0, crossAxisSpacing: 20.0, mainAxisSpacing: 20.0, ), itemBuilder: (context, i) => Card( child: Center( child: Padding( padding: EdgeInsets.all(8.0), child: Text(elements[i]) ) ) ) ) ); }
An example of GridView adapting to different screens is my personal landing page, which is a very simple Flutter web app consisting of a GridView with a bunch of Cards, just like that previous example code, except that the Cards are a little more complex and larger.
A very simple change that could be made to apps designed for phones would be to replace a Drawer with a permanent menu on the left when there is space.
For example, we could have a ListView of widgets, like the following, which is used for navigation:
class Menu extends StatelessWidget { @override Widget build(context) => ListView( children: [ FlatButton( onPressed: () {}, child: ListTile( leading: Icon(Icons.looks_one), title: Text("First Link"), ) ), FlatButton( onPressed: () {}, child: ListTile( leading: Icon(Icons.looks_two), title: Text("Second Link"), ) ) ] ); }
On a smartphone, a common place to use that would be inside a Drawer (also known as a hamburger menu).
Alternatives to that would be the BottomNavigationBar or the TabBar, in combination with the TabBarView, but with both we’d have to make more changes than are required with the drawer, so we’ll stick with the drawer.
To only show the Drawer containing the Menu that we saw earlier on smaller screens, you’d write code that looks like the following snippet, checking the width using the MediaQuery.of(context) and passing a Drawer object to the Scaffold only if it’s less than some width value that we believe to be appropriate for our app:
Scaffold( appBar: AppBar(/* ... \*/), drawer: MediaQuery.of(context).size.width < 500 ? Drawer( child: Menu(), ) : null, body: /* ... \*/ )
Now, let’s think about the body of the Scaffold. As the sample main content of our app, we’ll use the GridView that we built previously, which we keep in a separate widget named Content to avoid confusion:
class Content extends StatelessWidget { final List elements = ["Zero", "One", "Two", "Three", "Four", "Five", "Six", "Seven", "Eight", "A Million Billion Trillion", "A much, much longer text that will still fit"]; @override Widget build(context) => GridView.builder( itemCount: elements.length, gridDelegate: SliverGridDelegateWithMaxCrossAxisExtent( maxCrossAxisExtent: 130.0, crossAxisSpacing: 20.0, mainAxisSpacing: 20.0, ), itemBuilder: (context, i) => Card( child: Center( child: Padding( padding: EdgeInsets.all(8.0), child: Text(elements[i]) ) ) ) ); }
On bigger screens, the body itself may be a Row that shows two widgets: the Menu, which is restricted to a fixed width, and the Content filling the rest of the screen.
On smaller screens, the entire body would be the Content.
We’ll wrap everything in a SafeArea and a Center widget because sometimes Flutter web app widgets, especially when using Rows and Columns, end up outside of the visible screen area, and that is fixed with SafeArea and/or Center.
This means the body of the Scaffold will be the following:
SafeArea( child:Center( child: MediaQuery.of(context).size.width < 500 ? Content() : Row( children: [ Container( width: 200.0, child: Menu() ), Container( width: MediaQuery.of(context).size.width-200.0, child: Content() ) ] ) ) )
Here is all of that put together:
(Large preview)
import 'package:flutter/material.dart'; void main() => runApp(MyApp()); class MyApp extends StatelessWidget { @override Widget build(context) => MaterialApp( home: HomePage() ); } class HomePage extends StatelessWidget { @override Widget build(context) => Scaffold( appBar: AppBar(title: Text("test")), drawer: MediaQuery.of(context).size.width < 500 ? Drawer( child: Menu(), ) : null, body: SafeArea( child:Center( child: MediaQuery.of(context).size.width < 500 ? Content() : Row( children: [ Container( width: 200.0, child: Menu() ), Container( width: MediaQuery.of(context).size.width-200.0, child: Content() ) ] ) ) ) ); } class Menu extends StatelessWidget { @override Widget build(context) => ListView( children: [ FlatButton( onPressed: () {}, child: ListTile( leading: Icon(Icons.looks_one), title: Text("First Link"), ) ), FlatButton( onPressed: () {}, child: ListTile( leading: Icon(Icons.looks_two), title: Text("Second Link"), ) ) ] ); } class Content extends StatelessWidget { final List<String> elements = ["Zero", "One", "Two", "Three", "Four", "Five", "Six", "Seven", "Eight", "A Million Billion Trillion", "A much, much longer text that will still fit"]; @override Widget build(context) => GridView.builder( itemCount: elements.length, gridDelegate: SliverGridDelegateWithMaxCrossAxisExtent( maxCrossAxisExtent: 130.0, crossAxisSpacing: 20.0, mainAxisSpacing: 20.0, ), itemBuilder: (context, i) => Card( child: Center( child: Padding( padding: EdgeInsets.all(8.0), child: Text(elements[i]) ) ) ) ); }
This is most of the stuff you’ll need as a general introduction to responsive UI in Flutter. Much of its application will depend on your app’s specific UI, and it’s hard to pinpoint exactly what you can do to make your app responsive, and you can take many approaches depending on your preference. Now, though, let’s see how we can make a more complete example into a responsive app, thinking about common app elements and UI flows.
Putting It In Context: Making An App Responsive
So far, we have just a screen. Let’s expand that into a two-screen app with working URL-based navigation!
Creating A Responsive Login Page
Chances are that your app has a login page. How can we make that responsive?
Login screens on mobile devices are quite similar to each other usually. The space available isn’t much; it’s usually just a Column with some Padding around its widgets, and it contains TextFields for typing in a username and a password and a button to log in. So, a pretty standard (though not functioning, as that would require, among other things, a TextEditingController for each TextField) login page for a mobile app could be the following:
Scaffold( body: Container( padding: const EdgeInsets.symmetric( vertical: 30.0, horizontal: 25.0 ), child: Column( mainAxisAlignment: MainAxisAlignment.spaceAround, children: [ Text("Welcome to the app, please log in"), TextField( decoration: InputDecoration( labelText: "username" ) ), TextField( obscureText: true, decoration: InputDecoration( labelText: "password" ) ), RaisedButton( color: Colors.blue, child: Text("Log in", style: TextStyle(color: Colors.white)), onPressed: () {} ) ] ), ), )
It looks fine on a mobile device, but those very wide TextFields start to look jarring on a tablet, let alone a bigger screen. However, we can’t just decide on a fixed width because phones have different screen sizes, and we should maintain a degree of flexibility.
For example, through experimentation, we might find that the maximum width should be 500. Well, we would set the Container’s constraints to 500 (I used a Container instead of Padding in the previous example because I knew where I was going with this) and we’re good to go, right? Not really, because that would cause the login widgets to stick to the left side of the screen, which might be even worse than stretching everything. So, we wrap in a Center widget, like this:
Center( child: Container( constraints: BoxConstraints(maxWidth: 500), padding: const EdgeInsets.symmetric( vertical: 30.0, horizontal: 25.0 ), child: Column(/* ... \*/) ) )
That already looks fine, and we haven’t even had to use either a LayoutBuilder or the MediaQuery.of(context).size. Let’s go one step further to make this look very good, though. It would look better, in my view, if the foreground part was in some way separated from the background. We can achieve that by giving a background color to what’s behind the Container with the input widgets, and keeping the foreground Container white. To make it look a little better, let’s keep the Container from stretching to the top and bottom of the screen on large devices, give it rounded corners, and give it a nice animated transition between the two layouts.
All of that now requires a LayoutBuilder and an outer Container in order both to set a background color and to add padding all around the Container and not just on the sides only on larger screens. Also, to make the change in padding amount animated, we just need to turn that outer Container into an AnimatedContainer, which requires a duration for the animation, which we’ll set to half a second, which is Duration(milliseconds: 500) in code.
Here’s that example of a responsive login page:
(Large preview)
class LoginPage extends StatelessWidget { @override Widget build(context) => Scaffold( body: LayoutBuilder( builder: (context, constraints) { return AnimatedContainer( duration: Duration(milliseconds: 500), color: Colors.lightGreen[200], padding: constraints.maxWidth < 500 ? EdgeInsets.zero : EdgeInsets.all(30.0), child: Center( child: Container( padding: EdgeInsets.symmetric( vertical: 30.0, horizontal: 25.0 ), constraints: BoxConstraints( maxWidth: 500, ), decoration: BoxDecoration( color: Colors.white, borderRadius: BorderRadius.circular(5.0), ), child: Column( mainAxisAlignment: MainAxisAlignment.spaceAround, children: [ Text("Welcome to the app, please log in"), TextField( decoration: InputDecoration( labelText: "username" ) ), TextField( obscureText: true, decoration: InputDecoration( labelText: "password" ) ), RaisedButton( color: Colors.blue, child: Text("Log in", style: TextStyle(color: Colors.white)), onPressed: () { Navigator.pushReplacement( context, MaterialPageRoute( builder: (context) => HomePage() ) ); } ) ] ), ), ) ); } ) ); }
As you can see, I’ve also changed the RaisedButton’s onPressed to a callback that navigates us to a screen named HomePage (which could be, for example, the view we built previously with a GridView and a menu or a drawer). Now, though, that navigation part is what we’re going to focus on.
Named Routes: Making Your App’s Navigation More Like A Proper Web App
A common thing for web apps to have is the ability to change screens based on the URL. For example going to https://appurl/login should give you something different than https://appurl/somethingelse. Flutter, in fact, supports named routes, which have two purposes:
In a web app, they have exactly that feature that I mentioned in the previous sentence.
In any app, they allow you to predefine routes for your app and give them names, and then be able to navigate to them just by specifying their name.
To do that, we need to change the MaterialApp constructor to one that looks like the following:
MaterialApp( initialRoute: "/login", routes: { "/login": (context) => LoginPage(), "/home": (context) => HomePage() } );
And then we can switch to a different route by using Navigator.pushNamed(context, routeName) and Navigator.pushReplacementNamed(context, routeName), instead of Navigator.push(context, route) and Navigator.pushReplacement(context, route).
Here is that applied to the hypothetical app we built in the rest of this article. You can’t really see named routes in action in DartPad, so you should try this out on your own machine with flutter run, or check the example in action:
(Large preview)
import 'package:flutter/material.dart'; void main() => runApp(MyApp()); class MyApp extends StatelessWidget { @override Widget build(context) => MaterialApp( initialRoute: "/login", routes: { "/login": (context) => LoginPage(), "/home": (context) => HomePage() } ); } class LoginPage extends StatelessWidget { @override Widget build(context) => Scaffold( body: LayoutBuilder( builder: (context, constraints) { return AnimatedContainer( duration: Duration(milliseconds: 500), color: Colors.lightGreen[200], padding: constraints.maxWidth < 500 ? EdgeInsets.zero : const EdgeInsets.all(30.0), child: Center( child: Container( padding: const EdgeInsets.symmetric( vertical: 30.0, horizontal: 25.0 ), constraints: BoxConstraints( maxWidth: 500, ), decoration: BoxDecoration( color: Colors.white, borderRadius: BorderRadius.circular(5.0), ), child: Column( mainAxisAlignment: MainAxisAlignment.spaceAround, children: [ Text("Welcome to the app, please log in"), TextField( decoration: InputDecoration( labelText: "username" ) ), TextField( obscureText: true, decoration: InputDecoration( labelText: "password" ) ), RaisedButton( color: Colors.blue, child: Text("Log in", style: TextStyle(color: Colors.white)), onPressed: () { Navigator.pushReplacementNamed( context, "/home" ); } ) ] ), ), ) ); } ) ); } class HomePage extends StatelessWidget { @override Widget build(context) => Scaffold( appBar: AppBar(title: Text("test")), drawer: MediaQuery.of(context).size.width < 500 ? Drawer( child: Menu(), ) : null, body: SafeArea( child:Center( child: MediaQuery.of(context).size.width < 500 ? Content() : Row( children: [ Container( width: 200.0, child: Menu() ), Container( width: MediaQuery.of(context).size.width-200.0, child: Content() ) ] ) ) ) ); } class Menu extends StatelessWidget { @override Widget build(context) => ListView( children: [ FlatButton( onPressed: () {}, child: ListTile( leading: Icon(Icons.looks_one), title: Text("First Link"), ) ), FlatButton( onPressed: () {}, child: ListTile( leading: Icon(Icons.looks_two), title: Text("Second Link"), ) ), FlatButton( onPressed: () {Navigator.pushReplacementNamed( context, "/login");}, child: ListTile( leading: Icon(Icons.exit_to_app), title: Text("Log Out"), ) ) ] ); } class Content extends StatelessWidget { final List<String> elements = ["Zero", "One", "Two", "Three", "Four", "Five", "Six", "Seven", "Eight", "A Million Billion Trillion", "A much, much longer text that will still fit"]; @override Widget build(context) => GridView.builder( itemCount: elements.length, gridDelegate: SliverGridDelegateWithMaxCrossAxisExtent( maxCrossAxisExtent: 130.0, crossAxisSpacing: 20.0, mainAxisSpacing: 20.0, ), itemBuilder: (context, i) => Card( child: Center( child: Padding( padding: EdgeInsets.all(8.0), child: Text(elements[i]) ) ) ) ); }
Onward With Your Flutter Adventure
That should give you an idea of what you can do with Flutter on bigger screens, specifically on the web. It’s a lovely framework, very easy to use, and its extreme cross-platform support only makes it more essential to learn and start using. So, go ahead and start trusting Flutter for web apps, too!
Further Resources
(ra, yk, il, al)
Website Design & SEO Delray Beach by DBL07.co
Delray Beach SEO
source http://www.scpie.org/responsive-web-and-desktop-development-with-flutter/ source https://scpie.tumblr.com/post/616197943531274240
0 notes
Text
Responsive Web And Desktop Development With Flutter
About The Author
Flutter and LinUX enthusiast, author of the Programming Flutter book with the Pragmatic Bookshelf. Blogs more, tweets less. More about Carmine …
Flutter has already made quite a splash on the mobile development scene. Now it’s taking on bigger devices as well. Here’s what you need to know to be ready to take on the task of developing web and desktop apps using this wonderful cross-platform framework.
This tutorial is not an introduction to Flutter itself. There are plenty of articles, videos and several books available online with simple introductions that will help you learn the basics of Flutter. Instead, we’ll be covering the following two objectives:
The current state of Flutter non-mobile development and how you can run Flutter code in the browser, on a desktop or laptop computer;
How to create responsive apps using Flutter, so that you can see its power — especially as a web framework — on full display, ending with a note about routing based on URL.
Let’s get into it!
What Is Flutter, Why It’s Important, What It Has Evolved Into, Where It’s Going
Flutter is Google’s latest app development framework. Google envisions it to be all-encompassing: It will enable the same code to be executed on smartphones of all brands, on tablets, and on desktop and laptops computer as native apps or as web pages.
It’s a very ambitious project, but Google has been incredibly successful until now particularly in two aspects: in creating a truly platform-independent framework for Android and iOS native apps that works great and is fully ready for production use, and in creating an impressive front-end web framework that can share 100% of the code with a compatible Flutter app.
In the next section, we’re going to see what makes the app compatible and what’s the state of non-mobile Flutter development as of now.
Non-Mobile Development With Flutter
Non-mobile development with Flutter was first publicized in a significant way at Google I/O 2019. This section is about how to make it work and about when it works.
How To Enable Web And Desktop Development
To enable web development, you must first be on Flutter’s beta channel. There are two ways to get to that point:
Install Flutter directly on the beta channel by downloading the appropriate latest beta version from the SDK archive.
If you already have Flutter installed, switch to the beta channel with $ flutter channel beta, and then perform the switch itself by updating your Flutter version (which is actually a git pull on the Flutter installation folder) with $ flutter upgrade.
After that, you can run this:
$ flutter config --enable-web
Desktop support is much more experimental, especially due to a lack of tooling for LinUX and Windows, making plugin development especially a major pain, and due to the fact that the APIs used for it are intended for proof-of-concept use and not for production. This is unlike web development, which is using the tried-and-tested dart2js compiler for release builds, which are not even supported for Windows and LinUX native desktop apps.
Note: Support for macOS is slightly better than support for Windows and LinUX, but it still isn’t as good as support for the web and not nearly as good as the full support for mobile platforms.
To enable support for desktop development, you need to switch to the master release channel by following the same steps outlined earlier for the beta channel. Then, run the following by replacing <OS_NAME> with either linUX, windows, or macos:
$ flutter config --enable-<OS_NAME>-desktop
At this point, if you have issues with any of the following steps that I’ll be describing because the Flutter tool isn’t doing what I’m saying it should do, some common troubleshooting steps are these:
Run flutter doctor to check for issues. A side effect of this Flutter command is that it should download any tools it needs that it doesn’t have.
Run flutter upgrade.
Turn it off and on again. The old tier-1 technical-support answer of restarting your computer might be just what is needed for you to be able to enjoy the full riches of Flutter.
Running And Building Flutter Web Apps
Flutter web support isn’t bad at all, and this is reflected in the ease of development for the web.
Running this…
$ flutter devices
… should show right away an entry for something like this:
Web Server • web-server • web-javascript • Flutter Tools
Additionally, running the Chrome browser should cause Flutter to show an entry for it as well. Running flutter run on a compatible Flutter project (more on that later) when the only “connected device” showing up is the web server will cause Flutter to start a web server on localhost:<RANDOM_PORT>, which will allow you to access your Flutter web app from any browser.
If you have installed Chrome but it’s not showing up, you need to set the CHROME_EXECUTABLE environment variable to the path to the Chrome executable file.
Running And Building Flutter Desktop Apps
After you’ve enabled Flutter desktop support, you can run a Flutter app natively on your development workstation with flutter run -d <OS_NAME>, replacing <OS_NAME> with the same value you used when enabling desktop support. You can also build binaries in the build directory with flutter build <OS_NAME>.
Before you can do any of that, though, you need to have a directory containing what Flutter needs to build for your platform. This will be created automatically when you create a new project, but you’ll need to create it for an existing project with flutter create .. Also, the LinUX and Windows APIs are unstable, so you might have to regenerate them for those platforms if the app stops working after a Flutter update.
When Is An App Compatible?
What have I meant all along when mentioning that a Flutter app has to be a “compatible project” in order for it to work on desktop or the web? Put simply, I mean that it mustn’t use any plugin that doesn’t have a platform-specific implementation for the platform on which you’re trying to build.
To make this point absolutely clear to everyone and avoid misunderstanding, please note that a Flutter plugin is a particular Flutter package that contains platform-specific code that is necessary for it to provide its features.
For example, you can use the Google-developed url_launcher package as much as you want (and you might want to, given that the web is built on hyperlinks).
An example of a Google-developed package the usage of which would preclude web development is path_provider, which is used to get the local storage path to save files to. This is an example of a package that, incidentally, isn’t of any use to a web app, so not being able to use it isn’t really a bummer, except for the fact that you need to change your code in order for it to work on the web if you’re using it.
For example, you can use the shared_preferences package, which relies on HTML localStorage on the web.
Similar caveats are valid regarding desktop platforms: Very few plugins are compatible with desktop platforms, and, as this is a recurring theme, much more work on this needs to be done on the desktop side than is really necessary on Flutter for the web.
Creating Responsive Layouts In Flutter
Because of what I’ve described above and for simplicity, I’m going to assume for the rest of this post that your target platform is the web, but the basic concepts apply to desktop development as well.
Supporting the web has benefits and responsibilities. Being pretty much forced to support different screen sizes might sound like a drawback, but consider that running the app in the web browsers enables you to see very easily how your app will look on screens of different sizes and aspect ratios, without having to run separate mobile device emulators.
Now, let’s talk code. How can you make your app responsive?
There are two perspectives from which this analysis is done:
“What widgets am I using or can I use that can or should adapt to screens of different sizes?”
“How can I get information about the size of the screen, and how can I use it when writing UI code?”
We’ll answer the first question later. Let’s first talk about the latter, because it can be dealt with very easily and is at the heart of the issue. There are two ways to do this:
One way is to take the information from the MediaQueryData of the MediaQuery root InheritedWidget, which has to exist in the widget tree in order for a Flutter app to work (it’s part of MaterialApp/WidgetsApp/CupertinoApp), which you can get, just like any other InheritedWidget, with MediaQuery.of(context), which has a size property, which is of type Size, and which therefore has two width and height properties of the type double.
The other way is to use a LayoutBuilder, which is a builder widget (just like a StreamBuilder or a FutureBuilder) that passes to the builder function (along with the context) a BoxConstraints object that has minHeight, maxHeight, minWidth and maxWidth properties.
Here’s an example DartPad using the MediaQuery to get constraints, the code for which is the following:
import 'package:flutter/material.dart'; void main() => runApp(MyApp()); class MyApp extends StatelessWidget { @override Widget build(context) => MaterialApp( home: MyHomePage() ); } class MyHomePage extends StatelessWidget { @override Widget build(context) => Scaffold( body: Center( child: Column( mainAxisAlignment: MainAxisAlignment.spaceEvenly, children: [ Text( "Width: ${MediaQuery.of(context).size.width}", style: Theme.of(context).textTheme.headline4 ), Text( "Height: ${MediaQuery.of(context).size.height}", style: Theme.of(context).textTheme.headline4 ) ] ) ) ); }
And here’s one using the LayoutBuilder for the same thing:
import 'package:flutter/material.dart'; void main() => runApp(MyApp()); class MyApp extends StatelessWidget { @override Widget build(context) => MaterialApp( home: MyHomePage() ); } class MyHomePage extends StatelessWidget { @override Widget build(context) => Scaffold( body: LayoutBuilder( builder: (context, constraints) => Center( child: Column( mainAxisAlignment: MainAxisAlignment.spaceEvenly, children: [ Text( "Width: ${constraints.maxWidth}", style: Theme.of(context).textTheme.headline4 ), Text( "Height: ${constraints.maxHeight}", style: Theme.of(context).textTheme.headline4 ) ] ) ) ) ); }
Now, let’s think about what widgets can adapt to the constraints.
Fist of all, let’s think about the different ways of laying out multiple widgets according to the size of the screen.
The widget that most easily adapts is the GridView. In fact, a GridView built using the GridView.extent constructor doesn’t even need your involvement to be made responsive, as you can see in this very simple example:
import 'package:flutter/material.dart'; void main() => runApp(MyApp()); class MyApp extends StatelessWidget { @override Widget build(context) => MaterialApp( home: MyHomePage() ); } class MyHomePage extends StatelessWidget { final List elements = [ "Zero", "One", "Two", "Three", "Four", "Five", "Six", "Seven", "Eight", "A Million Billion Trillion", "A much, much longer text that will still fit" ]; @override Widget build(context) => Scaffold( body: GridView.extent( maxCrossAxisExtent: 130.0, crossAxisSpacing: 20.0, mainAxisSpacing: 20.0, children: elements.map((el) => Card(child: Center(child: Padding(padding: EdgeInsets.all(8.0), child: Text(el))))).toList() ) ); }
You can accommodate content of different sizes by changing the maxCrossAxisExtent.
That example mostly served the purpose of showing the existence of the GridView.extent GridView constructor, but a much smarter way to do that would be to use a GridView.builder with a SliverGridDelegateWithMaxCrossAxisExtent, in this case where the widgets to be shown in the grid are dynamically created from another data structure, as you can see in this example:
import 'package:flutter/material.dart'; void main() => runApp(MyApp()); class MyApp extends StatelessWidget { @override Widget build(context) => MaterialApp( home: MyHomePage() ); } class MyHomePage extends StatelessWidget { final List<String> elements = ["Zero", "One", "Two", "Three", "Four", "Five", "Six", "Seven", "Eight", "A Million Billion Trillion", "A much, much longer text that will still fit"]; @override Widget build(context) => Scaffold( body: GridView.builder( itemCount: elements.length, gridDelegate: SliverGridDelegateWithMaxCrossAxisExtent( maxCrossAxisExtent: 130.0, crossAxisSpacing: 20.0, mainAxisSpacing: 20.0, ), itemBuilder: (context, i) => Card( child: Center( child: Padding( padding: EdgeInsets.all(8.0), child: Text(elements[i]) ) ) ) ) ); }
An example of GridView adapting to different screens is my personal landing page, which is a very simple Flutter web app consisting of a GridView with a bunch of Cards, just like that previous example code, except that the Cards are a little more complex and larger.
A very simple change that could be made to apps designed for phones would be to replace a Drawer with a permanent menu on the left when there is space.
For example, we could have a ListView of widgets, like the following, which is used for navigation:
class Menu extends StatelessWidget { @override Widget build(context) => ListView( children: [ FlatButton( onPressed: () {}, child: ListTile( leading: Icon(Icons.looks_one), title: Text("First Link"), ) ), FlatButton( onPressed: () {}, child: ListTile( leading: Icon(Icons.looks_two), title: Text("Second Link"), ) ) ] ); }
On a smartphone, a common place to use that would be inside a Drawer (also known as a hamburger menu).
Alternatives to that would be the BottomNavigationBar or the TabBar, in combination with the TabBarView, but with both we’d have to make more changes than are required with the drawer, so we’ll stick with the drawer.
To only show the Drawer containing the Menu that we saw earlier on smaller screens, you’d write code that looks like the following snippet, checking the width using the MediaQuery.of(context) and passing a Drawer object to the Scaffold only if it’s less than some width value that we believe to be appropriate for our app:
Scaffold( appBar: AppBar(/* ... \*/), drawer: MediaQuery.of(context).size.width < 500 ? Drawer( child: Menu(), ) : null, body: /* ... \*/ )
Now, let’s think about the body of the Scaffold. As the sample main content of our app, we’ll use the GridView that we built previously, which we keep in a separate widget named Content to avoid confusion:
class Content extends StatelessWidget { final List elements = ["Zero", "One", "Two", "Three", "Four", "Five", "Six", "Seven", "Eight", "A Million Billion Trillion", "A much, much longer text that will still fit"]; @override Widget build(context) => GridView.builder( itemCount: elements.length, gridDelegate: SliverGridDelegateWithMaxCrossAxisExtent( maxCrossAxisExtent: 130.0, crossAxisSpacing: 20.0, mainAxisSpacing: 20.0, ), itemBuilder: (context, i) => Card( child: Center( child: Padding( padding: EdgeInsets.all(8.0), child: Text(elements[i]) ) ) ) ); }
On bigger screens, the body itself may be a Row that shows two widgets: the Menu, which is restricted to a fixed width, and the Content filling the rest of the screen.
On smaller screens, the entire body would be the Content.
We’ll wrap everything in a SafeArea and a Center widget because sometimes Flutter web app widgets, especially when using Rows and Columns, end up outside of the visible screen area, and that is fixed with SafeArea and/or Center.
This means the body of the Scaffold will be the following:
SafeArea( child:Center( child: MediaQuery.of(context).size.width < 500 ? Content() : Row( children: [ Container( width: 200.0, child: Menu() ), Container( width: MediaQuery.of(context).size.width-200.0, child: Content() ) ] ) ) )
Here is all of that put together:
(Large preview)
import 'package:flutter/material.dart'; void main() => runApp(MyApp()); class MyApp extends StatelessWidget { @override Widget build(context) => MaterialApp( home: HomePage() ); } class HomePage extends StatelessWidget { @override Widget build(context) => Scaffold( appBar: AppBar(title: Text("test")), drawer: MediaQuery.of(context).size.width < 500 ? Drawer( child: Menu(), ) : null, body: SafeArea( child:Center( child: MediaQuery.of(context).size.width < 500 ? Content() : Row( children: [ Container( width: 200.0, child: Menu() ), Container( width: MediaQuery.of(context).size.width-200.0, child: Content() ) ] ) ) ) ); } class Menu extends StatelessWidget { @override Widget build(context) => ListView( children: [ FlatButton( onPressed: () {}, child: ListTile( leading: Icon(Icons.looks_one), title: Text("First Link"), ) ), FlatButton( onPressed: () {}, child: ListTile( leading: Icon(Icons.looks_two), title: Text("Second Link"), ) ) ] ); } class Content extends StatelessWidget { final List<String> elements = ["Zero", "One", "Two", "Three", "Four", "Five", "Six", "Seven", "Eight", "A Million Billion Trillion", "A much, much longer text that will still fit"]; @override Widget build(context) => GridView.builder( itemCount: elements.length, gridDelegate: SliverGridDelegateWithMaxCrossAxisExtent( maxCrossAxisExtent: 130.0, crossAxisSpacing: 20.0, mainAxisSpacing: 20.0, ), itemBuilder: (context, i) => Card( child: Center( child: Padding( padding: EdgeInsets.all(8.0), child: Text(elements[i]) ) ) ) ); }
This is most of the stuff you’ll need as a general introduction to responsive UI in Flutter. Much of its application will depend on your app’s specific UI, and it’s hard to pinpoint exactly what you can do to make your app responsive, and you can take many approaches depending on your preference. Now, though, let’s see how we can make a more complete example into a responsive app, thinking about common app elements and UI flows.
Putting It In Context: Making An App Responsive
So far, we have just a screen. Let’s expand that into a two-screen app with working URL-based navigation!
Creating A Responsive Login Page
Chances are that your app has a login page. How can we make that responsive?
Login screens on mobile devices are quite similar to each other usually. The space available isn’t much; it’s usually just a Column with some Padding around its widgets, and it contains TextFields for typing in a username and a password and a button to log in. So, a pretty standard (though not functioning, as that would require, among other things, a TextEditingController for each TextField) login page for a mobile app could be the following:
Scaffold( body: Container( padding: const EdgeInsets.symmetric( vertical: 30.0, horizontal: 25.0 ), child: Column( mainAxisAlignment: MainAxisAlignment.spaceAround, children: [ Text("Welcome to the app, please log in"), TextField( decoration: InputDecoration( labelText: "username" ) ), TextField( obscureText: true, decoration: InputDecoration( labelText: "password" ) ), RaisedButton( color: Colors.blue, child: Text("Log in", style: TextStyle(color: Colors.white)), onPressed: () {} ) ] ), ), )
It looks fine on a mobile device, but those very wide TextFields start to look jarring on a tablet, let alone a bigger screen. However, we can’t just decide on a fixed width because phones have different screen sizes, and we should maintain a degree of flexibility.
For example, through experimentation, we might find that the maximum width should be 500. Well, we would set the Container’s constraints to 500 (I used a Container instead of Padding in the previous example because I knew where I was going with this) and we’re good to go, right? Not really, because that would cause the login widgets to stick to the left side of the screen, which might be even worse than stretching everything. So, we wrap in a Center widget, like this:
Center( child: Container( constraints: BoxConstraints(maxWidth: 500), padding: const EdgeInsets.symmetric( vertical: 30.0, horizontal: 25.0 ), child: Column(/* ... \*/) ) )
That already looks fine, and we haven’t even had to use either a LayoutBuilder or the MediaQuery.of(context).size. Let’s go one step further to make this look very good, though. It would look better, in my view, if the foreground part was in some way separated from the background. We can achieve that by giving a background color to what’s behind the Container with the input widgets, and keeping the foreground Container white. To make it look a little better, let’s keep the Container from stretching to the top and bottom of the screen on large devices, give it rounded corners, and give it a nice animated transition between the two layouts.
All of that now requires a LayoutBuilder and an outer Container in order both to set a background color and to add padding all around the Container and not just on the sides only on larger screens. Also, to make the change in padding amount animated, we just need to turn that outer Container into an AnimatedContainer, which requires a duration for the animation, which we’ll set to half a second, which is Duration(milliseconds: 500) in code.
Here’s that example of a responsive login page:
(Large preview)
class LoginPage extends StatelessWidget { @override Widget build(context) => Scaffold( body: LayoutBuilder( builder: (context, constraints) { return AnimatedContainer( duration: Duration(milliseconds: 500), color: Colors.lightGreen[200], padding: constraints.maxWidth < 500 ? EdgeInsets.zero : EdgeInsets.all(30.0), child: Center( child: Container( padding: EdgeInsets.symmetric( vertical: 30.0, horizontal: 25.0 ), constraints: BoxConstraints( maxWidth: 500, ), decoration: BoxDecoration( color: Colors.white, borderRadius: BorderRadius.circular(5.0), ), child: Column( mainAxisAlignment: MainAxisAlignment.spaceAround, children: [ Text("Welcome to the app, please log in"), TextField( decoration: InputDecoration( labelText: "username" ) ), TextField( obscureText: true, decoration: InputDecoration( labelText: "password" ) ), RaisedButton( color: Colors.blue, child: Text("Log in", style: TextStyle(color: Colors.white)), onPressed: () { Navigator.pushReplacement( context, MaterialPageRoute( builder: (context) => HomePage() ) ); } ) ] ), ), ) ); } ) ); }
As you can see, I’ve also changed the RaisedButton’s onPressed to a callback that navigates us to a screen named HomePage (which could be, for example, the view we built previously with a GridView and a menu or a drawer). Now, though, that navigation part is what we’re going to focus on.
Named Routes: Making Your App’s Navigation More Like A Proper Web App
A common thing for web apps to have is the ability to change screens based on the URL. For example going to https://appurl/login should give you something different than https://appurl/somethingelse. Flutter, in fact, supports named routes, which have two purposes:
In a web app, they have exactly that feature that I mentioned in the previous sentence.
In any app, they allow you to predefine routes for your app and give them names, and then be able to navigate to them just by specifying their name.
To do that, we need to change the MaterialApp constructor to one that looks like the following:
MaterialApp( initialRoute: "/login", routes: { "/login": (context) => LoginPage(), "/home": (context) => HomePage() } );
And then we can switch to a different route by using Navigator.pushNamed(context, routeName) and Navigator.pushReplacementNamed(context, routeName), instead of Navigator.push(context, route) and Navigator.pushReplacement(context, route).
Here is that applied to the hypothetical app we built in the rest of this article. You can’t really see named routes in action in DartPad, so you should try this out on your own machine with flutter run, or check the example in action:
(Large preview)
import 'package:flutter/material.dart'; void main() => runApp(MyApp()); class MyApp extends StatelessWidget { @override Widget build(context) => MaterialApp( initialRoute: "/login", routes: { "/login": (context) => LoginPage(), "/home": (context) => HomePage() } ); } class LoginPage extends StatelessWidget { @override Widget build(context) => Scaffold( body: LayoutBuilder( builder: (context, constraints) { return AnimatedContainer( duration: Duration(milliseconds: 500), color: Colors.lightGreen[200], padding: constraints.maxWidth < 500 ? EdgeInsets.zero : const EdgeInsets.all(30.0), child: Center( child: Container( padding: const EdgeInsets.symmetric( vertical: 30.0, horizontal: 25.0 ), constraints: BoxConstraints( maxWidth: 500, ), decoration: BoxDecoration( color: Colors.white, borderRadius: BorderRadius.circular(5.0), ), child: Column( mainAxisAlignment: MainAxisAlignment.spaceAround, children: [ Text("Welcome to the app, please log in"), TextField( decoration: InputDecoration( labelText: "username" ) ), TextField( obscureText: true, decoration: InputDecoration( labelText: "password" ) ), RaisedButton( color: Colors.blue, child: Text("Log in", style: TextStyle(color: Colors.white)), onPressed: () { Navigator.pushReplacementNamed( context, "/home" ); } ) ] ), ), ) ); } ) ); } class HomePage extends StatelessWidget { @override Widget build(context) => Scaffold( appBar: AppBar(title: Text("test")), drawer: MediaQuery.of(context).size.width < 500 ? Drawer( child: Menu(), ) : null, body: SafeArea( child:Center( child: MediaQuery.of(context).size.width < 500 ? Content() : Row( children: [ Container( width: 200.0, child: Menu() ), Container( width: MediaQuery.of(context).size.width-200.0, child: Content() ) ] ) ) ) ); } class Menu extends StatelessWidget { @override Widget build(context) => ListView( children: [ FlatButton( onPressed: () {}, child: ListTile( leading: Icon(Icons.looks_one), title: Text("First Link"), ) ), FlatButton( onPressed: () {}, child: ListTile( leading: Icon(Icons.looks_two), title: Text("Second Link"), ) ), FlatButton( onPressed: () {Navigator.pushReplacementNamed( context, "/login");}, child: ListTile( leading: Icon(Icons.exit_to_app), title: Text("Log Out"), ) ) ] ); } class Content extends StatelessWidget { final List<String> elements = ["Zero", "One", "Two", "Three", "Four", "Five", "Six", "Seven", "Eight", "A Million Billion Trillion", "A much, much longer text that will still fit"]; @override Widget build(context) => GridView.builder( itemCount: elements.length, gridDelegate: SliverGridDelegateWithMaxCrossAxisExtent( maxCrossAxisExtent: 130.0, crossAxisSpacing: 20.0, mainAxisSpacing: 20.0, ), itemBuilder: (context, i) => Card( child: Center( child: Padding( padding: EdgeInsets.all(8.0), child: Text(elements[i]) ) ) ) ); }
Onward With Your Flutter Adventure
That should give you an idea of what you can do with Flutter on bigger screens, specifically on the web. It’s a lovely framework, very easy to use, and its extreme cross-platform support only makes it more essential to learn and start using. So, go ahead and start trusting Flutter for web apps, too!
Further Resources
(ra, yk, il, al)
Website Design & SEO Delray Beach by DBL07.co
Delray Beach SEO
source http://www.scpie.org/responsive-web-and-desktop-development-with-flutter/ source https://scpie1.blogspot.com/2020/04/responsive-web-and-desktop-development.html
0 notes