#install latest php version on ubuntu
Explore tagged Tumblr posts
Visit Tumblr Blog
Explore Tumblr blogs with no restrictions, modern design and the best experience.
Last Seen Tumblr Blogs


Fun Fact
Premium Tumblr themes are available from anywhere between $9 to $49.
Link
#Automation#cloud#configuration#containerization#deploy#DevOps#Docker#feedaggregator#FreshRSS#Linux#Monitoring#news#open-source#Performance#Privacy#RSSreader#self-hosted#Server#systemadministration#updates#webapplication
0 notes
Text
Step-by-Step Guide: Installing Magento on VPS with Ubuntu Server
Are you looking to set up your own Magento store on a Virtual Private Server (VPS) running Ubuntu Server? You've come to the right place! In this comprehensive guide, we'll walk you through the process of installing Magento on your VPS, ensuring a smooth setup from start to finish. Whether you're a seasoned developer or just starting out, follow these steps to get your Magento store up and running in no time.

1. Setting Up Your VPS
Before diving into Magento installation, you'll need to have a VPS ready to go. If you haven't already, consider purchasing a Windows RDP (Remote Desktop Protocol) or Linux-based VPS. You can easily buy RDP services from various providers online. Once you have access to your VPS, ensure you have installed Ubuntu Server as your operating system. Installing Ubuntu on RDP is a straightforward process and can be done using remote desktop software.
2. Installing Required Dependencies
Once you have Ubuntu Server up and running on your VPS, it's time to install the necessary dependencies for Magento. Open a terminal window and execute the following commands:
bashCopy code
sudo apt update sudo apt install apache2 mysql-server php libapache2-mod-php php-mysql php-xml php-intl php-gd php-zip php-curl php-mbstring php-xmlrpc unzip
These commands will update your package list and install Apache web server, MySQL database server, and PHP along with its required modules.
3. Configuring Apache and MySQL
After installing the required packages, you'll need to configure Apache and MySQL to work seamlessly with Magento. Start by configuring Apache:
bashCopy code
sudo a2enmod rewrite sudo systemctl restart apache2
Next, secure your MySQL installation by running the following command and following the on-screen prompts:
bashCopy code
sudo mysql_secure_installation
4. Downloading and Installing Magento
With the server properly configured, it's time to download and install Magento. Navigate to the Magento official website and download the latest version of Magento Open Source. Once downloaded, use the following commands to extract Magento files and move them to the Apache web directory:
bashCopy code
sudo mkdir /var/www/html/magento sudo unzip /path/to/downloaded/magento.zip -d /var/www/html/magento sudo chown -R www-data:www-data /var/www/html/magento sudo chmod -R 755 /var/www/html/magento
5. Completing Magento Installation
After moving Magento files to the web directory, you can complete the installation process by accessing your server's domain or IP address in a web browser. Follow the on-screen instructions to configure your Magento store, including database connection details and admin account setup.
Once the installation is complete, don't forget to set appropriate file permissions and clear the Magento cache:
bashCopy code
sudo chmod -R 755 /var/www/html/magento sudo chown -R www-data:www-data /var/www/html/magento sudo systemctl restart apache2
Congratulations! You've successfully installed Magento on your VPS running Ubuntu Server.
Conclusion
Setting up Magento on a VPS with Ubuntu Server is a relatively straightforward process, especially when following a step-by-step guide. By ensuring you have the necessary dependencies installed, configuring Apache and MySQL correctly, and following the Magento installation instructions carefully, you can have your online store up and running in no time.
Whether you're a small business owner or a developer looking to create e-commerce solutions for clients, Magento on Ubuntu offers a powerful platform to build and scale your online store. Take advantage of the flexibility and customization options Magento provides, and watch your business thrive in the world of e-commerce.
0 notes
Link
#install php ubuntu#install php 7.2 ubuntu#how to install php 7.3 on ubuntu#install php on ubuntu#install latest php version on ubuntu
1 note
·
View note
Text
Installing Nginx, MySQL, PHP (LEMP) Stack on Ubuntu 18.04
Ubuntu Server 18.04 LTS (TunzaDev) is finally here and is being rolled out across VPS hosts such as DigitalOcean and AWS. In this guide, we will install a LEMP Stack (Nginx, MySQL, PHP) and configure a web server.
Prerequisites
You should use a non-root user account with sudo privileges. Please see the Initial server setup for Ubuntu 18.04 guide for more details.
1. Install Nginx
Let’s begin by updating the package lists and installing Nginx on Ubuntu 18.04. Below we have two commands separated by &&. The first command will update the package lists to ensure you get the latest version and dependencies for Nginx. The second command will then download and install Nginx.
sudo apt update && sudo apt install nginx
Once installed, check to see if the Nginx service is running.
sudo service nginx status
If Nginx is running correctly, you should see a green Active state below.
● nginx.service - A high performance web server and a reverse proxy server Loaded: loaded (/lib/systemd/system/nginx.service; enabled; vendor preset: enabled) Active: active (running) since Wed 2018-05-09 20:42:29 UTC; 2min 39s ago Docs: man:nginx(8) Process: 27688 ExecStart=/usr/sbin/nginx -g daemon on; master_process on; (code=exited, status=0/SUCCESS) Process: 27681 ExecStartPre=/usr/sbin/nginx -t -q -g daemon on; master_process on; (code=exited, status=0/SUCCESS) Main PID: 27693 (nginx) Tasks: 2 (limit: 1153) CGroup: /system.slice/nginx.service ├─27693 nginx: master process /usr/sbin/nginx -g daemon on; master_process on; └─27695 nginx: worker process
You may need to press q to exit the service status.
2. Configure Firewall
If you haven’t already done so, it is recommended that you enable the ufw firewall and add a rule for Nginx. Before enabling ufw firewall, make sure you add a rule for SSH, otherwise you may get locked out of your server if you’re connected remotely.
sudo ufw allow OpenSSH
If you get an error “ERROR: could find a profile matching openSSH”, this probably means you are not configuring the server remotely and can ignore it.
Now add a rule for Nginx.
sudo ufw allow 'Nginx HTTP'
Rule added Rule added (v6)
Enable ufw firewall.
sudo ufw enable
Press y when asked to proceed.
Now check the firewall status.
sudo ufw status
Status: active To Action From -- ------ ---- OpenSSH ALLOW Anywhere Nginx HTTP ALLOW Anywhere OpenSSH (v6) ALLOW Anywhere (v6) Nginx HTTP (v6) ALLOW Anywhere (v6)
That’s it! Your Nginx web server on Ubuntu 18.04 should now be ready.
3. Test Nginx
Go to your web browser and visit your domain or IP. If you don’t have a domain name yet and don’t know your IP, you can find out with:
sudo ifconfig | grep -Eo 'inet (addr:)?([0-9]*\.){3}[0-9]*' | grep -Eo '([0-9]*\.){3}[0-9]*' | grep -v '127.0.0.1'
You can find this Nginx default welcome page in the document root directory /var/www/html. To edit this file in nano text editor:
sudo nano /var/www/html/index.nginx-debian.html
To save and close nano, press CTRL + X and then press y and ENTER to save changes.
Your Nginx web server is ready to go! You can now add your own html files and images the the /var/www/html directory as you please.
However, you should acquaint yourself with and set up at least one Server Block for Nginx as most of our Ubuntu 18.04 guides are written with Server Blocks in mind. Please see article Installing Nginx on Ubuntu 18.04 with Multiple Domains. Server Blocks allow you to host multiple web sites/domains on one server. Even if you only ever intend on hosting one website or one domain, it’s still a good idea to configure at least one Server Block.
If you don’t want to set up Server Blocks, continue to the next step to set up MySQL.
4. Install MySQL
Let’s begin by updating the package lists and installing MySQL on Ubuntu 18.04. Below we have two commands separated by &&. The first command will update the package lists to ensure you get the latest version and dependencies for MySQL. The second command will then download and install MySQL.
sudo apt update && sudo apt install mysql-server
Press y and ENTER when prompted to install the MySQL package.
Once the package installer has finished, we can check to see if the MySQL service is running.
sudo service mysql status
If running, you will see a green Active status like below.
● mysql.service - MySQL Community Server Loaded: loaded (/lib/systemd/system/mysql.service; enabled; vendor preset: enabled) Active: active (running) since since Wed 2018-05-09 21:10:24 UTC; 16s ago Main PID: 30545 (mysqld) Tasks: 27 (limit: 1153) CGroup: /system.slice/mysql.service └─30545 /usr/sbin/mysqld --daemonize --pid-file=/run/mysqld/mysqld.pid
You may need to press q to exit the service status.
5. Configure MySQL Security
You should now run mysql_secure_installation to configure security for your MySQL server.
sudo mysql_secure_installation
If you created a root password in Step 1, you may be prompted to enter it here. Otherwise you will be asked to create one. (Generate a password here)
You will be asked if you want to set up the Validate Password Plugin. It’s not really necessary unless you want to enforce strict password policies for some reason.
Securing the MySQL server deployment. Connecting to MySQL using a blank password. VALIDATE PASSWORD PLUGIN can be used to test passwords and improve security. It checks the strength of password and allows the users to set only those passwords which are secure enough. Would you like to setup VALIDATE PASSWORD plugin? Press y|Y for Yes, any other key for No:
Press n and ENTER here if you don’t want to set up the validate password plugin.
Please set the password for root here. New password: Re-enter new password:
If you didn’t create a root password in Step 1, you must now create one here.
Generate a strong password and enter it. Note that when you enter passwords in Linux, nothing will show as you are typing (no stars or dots).
By default, a MySQL installation has an anonymous user, allowing anyone to log into MySQL without having to have a user account created for them. This is intended only for testing, and to make the installation go a bit smoother. You should remove them before moving into a production environment. Remove anonymous users? (Press y|Y for Yes, any other key for No) :
Press y and ENTER to remove anonymous users.
Normally, root should only be allowed to connect from 'localhost'. This ensures that someone cannot guess at the root password from the network. Disallow root login remotely? (Press y|Y for Yes, any other key for No) :
Press y and ENTER to disallow root login remotely. This will prevent bots and hackers from trying to guess the root password.
By default, MySQL comes with a database named 'test' that anyone can access. This is also intended only for testing, and should be removed before moving into a production environment. Remove test database and access to it? (Press y|Y for Yes, any other key for No) :
Press y and ENTER to remove the test database.
Reloading the privilege tables will ensure that all changes made so far will take effect immediately. Reload privilege tables now? (Press y|Y for Yes, any other key for No) :
Press y and ENTER to reload the privilege tables.
All done!
As a test, you can log into the MySQL server and run the version command.
sudo mysqladmin -p -u root version
Enter the MySQL root password you created earlier and you should see the following:
mysqladmin Ver 8.42 Distrib 5.7.22, for Linux on x86_64 Copyright (c) 2000, 2018, Oracle and/or its affiliates. All rights reserved. Oracle is a registered trademark of Oracle Corporation and/or its affiliates. Other names may be trademarks of their respective owners. Server version 5.7.22-0ubuntu18.04.1 Protocol version 10 Connection Localhost via UNIX socket UNIX socket /var/run/mysqld/mysqld.sock Uptime: 4 min 28 sec Threads: 1 Questions: 15 Slow queries: 0 Opens: 113 Flush tables: 1 Open tables: 106 Queries per second avg: 0.055
You have now successfully installed and configured MySQL for Ubuntu 18.04! Continue to the next step to install PHP.
6. Install PHP
Unlike Apache, Nginx does not contain native PHP processing. For that we have to install PHP-FPM (FastCGI Process Manager). FPM is an alternative PHP FastCGI implementation with some additional features useful for heavy-loaded sites.
Let’s begin by updating the package lists and installing PHP-FPM on Ubuntu 18.04. We will also install php-mysql to allow PHP to communicate with the MySQL database. Below we have two commands separated by &&. The first command will update the package lists to ensure you get the latest version and dependencies for PHP-FPM and php-mysql. The second command will then download and install PHP-FPM and php-mysql. Press y and ENTER when asked to continue.
sudo apt update && sudo apt install php-fpm php-mysql
Once installed, check the PHP version.
php --version
If PHP was installed correctly, you should see something similar to below.
PHP 7.2.3-1ubuntu1 (cli) (built: Mar 14 2018 22:03:58) ( NTS ) Copyright (c) 1997-2018 The PHP Group Zend Engine v3.2.0, Copyright (c) 1998-2018 Zend Technologies with Zend OPcache v7.2.3-1ubuntu1, Copyright (c) 1999-2018, by Zend Technologies
Above we are using PHP version 7.2, though this may be a later version for you.
Depending on what version of Nginx and PHP you install, you may need to manually configure the location of the PHP socket that Nginx will connect to.
List the contents for the directory /var/run/php/
ls /var/run/php/
You should see a few entries here.
php7.2-fpm.pid php7.2-fpm.sock
Above we can see the socket is called php7.2-fpm.sock. Remember this as you may need it for the next step.
7. Configure Nginx for PHP
We now need to make some changes to our Nginx server block.
The location of the server block may vary depending on your setup. By default, it is located in /etc/nginx/sites-available/default.
However, if you have previously set up custom server blocks for multiple domains in one of our previous guides, you will need to add the PHP directives to each server block separately. A typical custom server block file location would be /etc/nginx/sites-available/mytest1.com.
For the moment, we will assume you are using the default. Edit the file in nano.
sudo nano /etc/nginx/sites-available/default
Press CTRL + W and search for index.html.
Now add index.php before index.html
/etc/nginx/sites-available/default
index index.php index.html index.htm index.nginx-debian.html;
Press CTRL + W and search for the line server_name.
Enter your server’s IP here or domain name if you have one.
/etc/nginx/sites-available/default
server_name YOUR_DOMAIN_OR_IP_HERE;
Press CTRL + W and search for the line location ~ \.php.
You will need to uncomment some lines here by removing the # signs before the lines marked in red below.
Also ensure value for fastcgi_pass socket path is correct. For example, if you installed PHP version 7.2, the socket should be: /var/run/php/php7.2-fpm.sock
If you are unsure which socket to use here, exit out of nano and run ls /var/run/php/
/etc/nginx/sites-available/default
... location ~ \.php$ { include snippets/fastcgi-php.conf; # # # With php-fpm (or other unix sockets): fastcgi_pass unix:/var/run/php/php7.2-fpm.sock; # # With php-cgi (or other tcp sockets): # fastcgi_pass 127.0.0.1:9000; } ...
Once you’ve made the necessary changes, save and close (Press CTRL + X, then press y and ENTER to confirm save)
Now check the config file to make sure there are no syntax errors. Any errors could crash the web server on restart.
sudo nginx -t
nginx: the configuration file /etc/nginx/nginx.conf syntax is ok nginx: configuration file /etc/nginx/nginx.conf test is successful
If no errors, you can reload the Nginx config.
sudo service nginx reload
8. Test PHP
To see if PHP is working correctly on Ubuntu 18.04, let’s a create a new PHP file called info.php in the document root directory. By default, this is located in /var/www/html/, or if you set up multiple domains in a previous guide, it may be located in somewhere like /var/www/mytest1.com/public_html
Once you have the correct document root directory, use the nano text editor to create a new file info.php
sudo nano /var/www/html/info.php
Type or paste the following code into the new file. (if you’re using PuTTY for Windows, right-click to paste)
/var/www/html/info.php
Save and close (Press CTRL + X, then press y and ENTER to confirm save)
You can now view this page in your web browser by visiting your server’s domain name or public IP address followed by /info.php: http://your_domain_or_IP/info.php
phpinfo() outputs a large amount of information about the current state of PHP. This includes information about PHP compilation options and extensions, the PHP version and server information.
You have now successfully installed PHP-FPM for Nginx on Ubuntu 18.04 LTS (Bionic Beaver).
Make sure to delete info.php as it contains information about the web server that could be useful to attackers.
sudo rm /var/www/html/info.php
What Next?
Now that your Ubuntu 18.04 LEMP web server is up and running, you may want to install phpMyAdmin so you can manage your MySQL server.
Installing phpMyAdmin for Nginx on Ubuntu 18.04
To set up a free SSL cert for your domain:
Configuring Let’s Encrypt SSL Cert for Nginx on Ubuntu 18.04
You may want to install and configure an FTP server
Installing an FTP server with vsftpd (Ubuntu 18.04)
We also have several other articles relating to the day-to-day management of your Ubuntu 18.04 LEMP server
Hey champ! - You’re all done!
Feel free to ask me any questions in the comments below.
Let me know in the comments if this helped. Follow Us on - Twitter - Facebook - YouTube.
1 note
·
View note
Text
PhpStorm Crack + License Key Full Download
⭐ ⏩⏩⏩️ DOWNLOAD LINK 🔥🔥🔥 JetBrains PhpStorm Crack is a powerful IDE for professional web designer and programmer to work with various developing Languages. PhpStorm Crack is amazing and strong finance coding program. By adopting this instrument everyone can perform on HTML, CSS, PHP and other websites. Download the latest version of PhpStorm for Windows, macOS or Linux. PhpStorm includes an evaluation license key for a free day trial. Download and install the PhpStorm Crack Full Version Free Download. Do not run the program before activation. Then use the license key. Thaw and. PhpStorm Crack is a great and very famous multiplatform development environment that allows you to utilize PHP applications. PhpStorm Crack is PHP language editor. It has magnificent SQL editor and huge quality of plugins to give java codes manually. PhpStorm Crack free download is a separate advanced IDE (Integrated Development Environment) for PHP developers & students. Download Setup + Crack JetBrains PhpStorm is a PHP Editor centered on designer efficiency that deeply understands your code and provides. › jetbrains-phpstorm-with-activation. JetBrains PhpStorm Crack is a great application specially designed for PHP. Provides an integrated commercial development environment. phpstorm community edition. PhpStorm Crack is a Development Environment (IDE). This tool helps the user to create and manage the source code in a programming. Over the weekend to hack on this, realized there is a PHP D-Bus extension, Of a SSH wrapper he developed crack phpstorm 9 ubuntu some. Like we have a crack of PHP Storm in windows, but in Linux, nobody is creating things like that. So I'm curious if something is available. Withthe passage oftime, such mistakes grow to becomea mysterious bug probably extremely hard to crack. PHPCS proves helpful in curbing such mistakes. awais raza filtered by PhpStorm Crack v + Activation Code [Latest. See detailed instructions below. Phpstorm guide to install crack version. Download and extract to get the original program and patch. JetBrains PhpStorm Crack With Activation Code Free Download Windows Apr 16, Update to the Preview build of the already released IntelliJ. When starting the program through the terminal, i get this error message. Error opening zip file or JAR manifest missing. phpstorm community edition.
PhpStorm Crack + License Key Full Download
PhpStorm Crack With License Key Free + Final [Latest]
jetbrains phpstorm 10 activation key – Working Keys
PhpStorm Crack + (% Working) License Key [Latest]
Download PhpStorm: Lightning-Smart PHP IDE
PhpStorm Crack + Activation Code Latest
PhpStorm Crack + License Key Torrent Download
impossible to excute a intellij idea beacuse of crack - Stack Overflow
PhpStorm Crack Plus License Key Full Latest Download
'PhpStorm Crack v + Activation Code [Latest' in awais raza | [download]
JetBrains PhpStorm Crack Download Full FREE – Crack Soft Zone
1 note
·
View note
Text
HOW TO MIGRATE FROM SHOPWARE 5 TO SHOPWARE 6
Shopware 6 migration is an ongoing thought for all Shopware users. If you are wondering what is Shopware 6? Shopware which is a PHP-based e-commerce application, filled with user-friendly features and tools, has recently launched its latest version – Shopware 6.
Why migrate Shopware 5 to Shopware 6?
Not merely an updated version, Shopware 6 is designed from the ground up and is powered by Symfony and vue.js. With Shopware 6 being highly customizable and automatically responsive, along with the fact that Shopware 5 will no longer receive any new updates post-2024, makes the need for the migration from Shopware 5 to Shopware 6 is much more essential and urgent.
How can I migrate from Shopware 5 to Shopware 6?
Just like any other process and procedure, the shopware migration process has its own planning, phases, and steps involved.
Read on to know more about the relevant information and understand how to migrate your Shopware 5 online store to the latest Shopware 6 version:
Migration Phases
First off you need to be well-versed in the three major phases of migration:
1. Preparation Phase
This phase is all about learning and getting familiar with the required information and system requirements before going forward with the actual migration. This phase includes:
System requirements
Installing Shopware 6 is merely not enough, as before you do you need to ensure that your server meets all necessary system requirements, and they are:
Operating System
Most Unix-based operating systems are supported by Shopware. It is recommended to install Shopware 6 on Ubuntu 18.04 LTS or macOS Mojave 10.14 continue reading...
1 note
·
View note
Text
PhpStorm Crack + License Key Torrent Download
⭐ ⏩⏩⏩️ DOWNLOAD LINK 🔥🔥🔥 JetBrains PhpStorm Crack is a powerful IDE for professional web designer and programmer to work with various developing Languages. PhpStorm Crack is amazing and strong finance coding program. By adopting this instrument everyone can perform on HTML, CSS, PHP and other websites. Download the latest version of PhpStorm for Windows, macOS or Linux. PhpStorm includes an evaluation license key for a free day trial. Download and install the PhpStorm Crack Full Version Free Download. Do not run the program before activation. Then use the license key. Thaw and. PhpStorm Crack is a great and very famous multiplatform development environment that allows you to utilize PHP applications. PhpStorm Crack is PHP language editor. It has magnificent SQL editor and huge quality of plugins to give java codes manually. PhpStorm Crack free download is a separate advanced IDE (Integrated Development Environment) for PHP developers & students. Download Setup + Crack JetBrains PhpStorm is a PHP Editor centered on designer efficiency that deeply understands your code and provides. › jetbrains-phpstorm-with-activation. JetBrains PhpStorm Crack is a great application specially designed for PHP. Provides an integrated commercial development environment. phpstorm community edition. PhpStorm Crack is a Development Environment (IDE). This tool helps the user to create and manage the source code in a programming. Over the weekend to hack on this, realized there is a PHP D-Bus extension, Of a SSH wrapper he developed crack phpstorm 9 ubuntu some. Like we have a crack of PHP Storm in windows, but in Linux, nobody is creating things like that. So I'm curious if something is available. Withthe passage oftime, such mistakes grow to becomea mysterious bug probably extremely hard to crack. PHPCS proves helpful in curbing such mistakes. awais raza filtered by PhpStorm Crack v + Activation Code [Latest. See detailed instructions below. Phpstorm guide to install crack version. Download and extract to get the original program and patch. JetBrains PhpStorm Crack With Activation Code Free Download Windows Apr 16, Update to the Preview build of the already released IntelliJ. When starting the program through the terminal, i get this error message. Error opening zip file or JAR manifest missing. phpstorm community edition.
PhpStorm Crack + License Key Full Download
PhpStorm Crack With License Key Free + Final [Latest]
jetbrains phpstorm 10 activation key – Working Keys
PhpStorm Crack + (% Working) License Key [Latest]
Download PhpStorm: Lightning-Smart PHP IDE
PhpStorm Crack + Activation Code Latest
PhpStorm Crack + License Key Torrent Download
impossible to excute a intellij idea beacuse of crack - Stack Overflow
PhpStorm Crack Plus License Key Full Latest Download
'PhpStorm Crack v + Activation Code [Latest' in awais raza | [download]
JetBrains PhpStorm Crack Download Full FREE – Crack Soft Zone
1 note
·
View note
Text
PhpStorm Crack + Activation Code Latest
⭐ ⏩⏩⏩️ DOWNLOAD LINK 🔥🔥🔥 JetBrains PhpStorm Crack is a powerful IDE for professional web designer and programmer to work with various developing Languages. PhpStorm Crack is amazing and strong finance coding program. By adopting this instrument everyone can perform on HTML, CSS, PHP and other websites. Download the latest version of PhpStorm for Windows, macOS or Linux. PhpStorm includes an evaluation license key for a free day trial. Download and install the PhpStorm Crack Full Version Free Download. Do not run the program before activation. Then use the license key. Thaw and. PhpStorm Crack is a great and very famous multiplatform development environment that allows you to utilize PHP applications. PhpStorm Crack is PHP language editor. It has magnificent SQL editor and huge quality of plugins to give java codes manually. PhpStorm Crack free download is a separate advanced IDE (Integrated Development Environment) for PHP developers & students. Download Setup + Crack JetBrains PhpStorm is a PHP Editor centered on designer efficiency that deeply understands your code and provides. › jetbrains-phpstorm-with-activation. JetBrains PhpStorm Crack is a great application specially designed for PHP. Provides an integrated commercial development environment. phpstorm community edition. PhpStorm Crack is a Development Environment (IDE). This tool helps the user to create and manage the source code in a programming. Over the weekend to hack on this, realized there is a PHP D-Bus extension, Of a SSH wrapper he developed crack phpstorm 9 ubuntu some. Like we have a crack of PHP Storm in windows, but in Linux, nobody is creating things like that. So I'm curious if something is available. Withthe passage oftime, such mistakes grow to becomea mysterious bug probably extremely hard to crack. PHPCS proves helpful in curbing such mistakes. awais raza filtered by PhpStorm Crack v + Activation Code [Latest. See detailed instructions below. Phpstorm guide to install crack version. Download and extract to get the original program and patch. JetBrains PhpStorm Crack With Activation Code Free Download Windows Apr 16, Update to the Preview build of the already released IntelliJ. When starting the program through the terminal, i get this error message. Error opening zip file or JAR manifest missing. phpstorm community edition.
PhpStorm Crack + License Key Full Download
PhpStorm Crack With License Key Free + Final [Latest]
jetbrains phpstorm 10 activation key – Working Keys
PhpStorm Crack + (% Working) License Key [Latest]
Download PhpStorm: Lightning-Smart PHP IDE
PhpStorm Crack + Activation Code Latest
PhpStorm Crack + License Key Torrent Download
impossible to excute a intellij idea beacuse of crack - Stack Overflow
PhpStorm Crack Plus License Key Full Latest Download
'PhpStorm Crack v + Activation Code [Latest' in awais raza | [download]
JetBrains PhpStorm Crack Download Full FREE – Crack Soft Zone
1 note
·
View note
Text
How To Install MultiPHP Version with Nginx on Ubuntu 16.04/18.04/19.04 LTS Server
How To Install MultiPHP Version with Nginx on Ubuntu 16.04/18.04/19.04 LTS Server
If you’re running Nginx on an Ubuntu LTS Server, you might want to configure your server with MultiPHP Version. Of course, this is very useful if you have a site that is only compatible with old stable PHP versions, or some of your web applications require a different PHP version. For example, WordPress as the most popular open source CMS to date strongly recommends users to use the latest stable…
View On WordPress
0 notes
Text
Phpstorm ubuntu free

PHPSTORM UBUNTU FREE HOW TO
PHPSTORM UBUNTU FREE MAC OS
PHPSTORM UBUNTU FREE INSTALL
You can also follow us on Google+, Twitter or like our Facebook page.
PHPSTORM UBUNTU FREE INSTALL
I hope this article helped you to install PhpStorm on Ubuntu 16.04/17.04. As always, if you found this post useful, then subscribe to our free newsletter. If for any reason you want to uninstall PhpStorm, simply delete /opt/phpstorm/ directory and all subdirectories and files in it. Next time, you can start PhpStorm from Unity Dash. Next, you need to enter your password to create a launch script and desktop entry.Īfter that’s done, you can start a new project in PhpStorm. In the next window, select a theme, color, font and hit OK button. If you are not ready to purchase a license to use PhpStorm, you can select the 30 day free trial option. If you are new to PhpStorm, select the second option and hit the OK button. Now type phpstorm in the terminal to launch the application. sudo mv PhpStorm-145.1616.3/ /opt/phpstorm/Ĭreate a symlink sudo ln -s /opt/phpstorm/bin/phpstorm.sh /usr/local/bin/phpstorm It’s better to move this PhpStorm-145.1616.3 directory to /opt. tar.gz file with this command: tar xvf PhpStorm-2016.1.2.tar.gzĪ new folder called PhpStorm-145.1616.3 will be created within the current working directory. Once downloaded, open a terminal window and change your working directory to the download directory, then extract the. You may need to change the version number if you are reading this at a later time. The latest version is 2016.1.2 at the time of this writing. If you like command line, you can use wget to download. By default PHPStorm IDE should be installed to the path. Install PHPStorm using the following command: umake ide phpstorm. sudo apt update sudo apt upgrade sudo apt install ubuntu-make. Install phpstorm on Ubuntu 16.04/17.04įirst go the official website and download the tar archive. First, make sure all your system packages are up to date by running the following apt Commands in the terminal. The above two commands will set the correct Java environment variables. sudo apt-get install oracle-java8-set-default Once installed we need to set Java environment variables such as JAVA_HOME on Ubuntu 16.04/17.04. You can open existing project in PHPStorm. Basics of PHPStorm: You click on Create New Project to create a new PHP project and follow the instructions depending on your project requirements. Now, you can use PHPStorm for your web development projects. Sudo apt-get install java-common oracle-java8-installerĭuring the installation process you will need to accept the Oracle License agreement. You will get 30 days of free access to PHPStorm IDE. sudo add-apt-repository ppa:webupd8team/java Remove OpenJDK sudo apt-get remove openjdk*Īdd the PPA and install Oracle Java 8 with following 3 commands. Install Oracle Java 8 on Ubuntu 16.04/17.04īecause phpstorm is a Java program, so first we need to install Oracle Java on Ubuntu and the latest stable version is Oracle Java 8.
PHPSTORM UBUNTU FREE HOW TO
This tutorial will explain how to install Phpstorm on Ubuntu 16.04/17.04.
PHPSTORM UBUNTU FREE MAC OS
It’s a commercial and cross-platform product from Jetbrains and can run on Linux, Mac OS and Windows. For those of you who don’t know, PhpStorm is a cool, lightning-smart IDE for PHP developers.
0 notes
Text
Install openssh server ubuntu 20.04

Install openssh server ubuntu 20.04 install#
Install openssh server ubuntu 20.04 update#
Install openssh server ubuntu 20.04 password#
Install openssh server ubuntu 20.04 download#
Install openssh server ubuntu 20.04 download#
Go to the Download page of Roundcube’s official website, copy the URL, and download the complete package: wget At the moment of writing the article, it is version 1.4.6. We have all of our prerequisites configured on the server, so we can go ahead and download the most recent release of Roundcube. Save the file and run the following command to enable the virtual host: a2ensite įinally, reload the web server for the changes to take effect: systemctl reload apache2 Step 6. vim /etc/apache2/sites-available/ ĮrrorLog $/roundcube. Next, create Apache virtual host directory, so you can access Roundcube with a domain or subdomain, instead of your server’s IP address. Once the APT package manager completes the installation, start the web server and enable it to start upon a reboot systemctl start apache2
Install openssh server ubuntu 20.04 install#
It can be easily installed with the following command apt -y install apache2 It supports almost all of the major web servers, but in this tutorial we will use Apache. Roundcube is webmail solution, so we have to install web server to serve the Roundcube file. With Zend OPcache v7.4.3, Copyright (c), by Zend Technologies Step 5. Zend Engine v3.4.0, Copyright (c) Zend Technologies Once all packages are installed, you can check the installed PHP version with the following command: php -v PHP 7.4.3 (cli) (built: 12:24:22) ( NTS ) apt install php7.4 php7.4-gd php7.4-common php7.4-json php-imagick php7.4-imap php7.4-xml php7.4-opcache php7.4-mbstring php7.4-curl php7.4-zip php7.4-bz2 php7.4-intl Roundcube is a PHP-based application, therefore we need to install PHP along with some PHP extensions that are required by Roundcube. MariaDB > GRANT ALL PRIVILEGES ON roundcube.* TO IDENTIFIED BY ' PASSWORD' ĭon’t forget to replace ‘ PASSWORD‘ with an actual strong password. MariaDB > CREATE DATABASE IF NOT EXISTS `roundcube` DEFAULT CHARACTER SET `utf8` COLLATE `utf8_unicode_ci`
Install openssh server ubuntu 20.04 password#
Login to the database server as the root user, enter your password if you set one on the previous step, then run the following SQL commands: mysql -u root -p We have the database server up and running, so we can proceed and create a database and user for Roundcube. It’s optional, but we strongly recommend securing your database server properly. systemctl start mariadbĪdditionally, you can run the mysql_secure_installation post installation script, to strengthen the security of the MariaDB server as well as set a password for the MariaDB root user. Once the database server is installed, start it and enable it to automatically start after a server reboot. The MariaDB package is available in the official Ubuntu 20.04 repository, so the installation is pretty easy. MariaDB is an open-source variant of MySQL. So for this purpose we will install MariaDB server. Roundcube needs a database where it will store its preferences, users, contacts and email messages (if caching is enabled). We also suggest restarting your server so that all configuration files being used are the latest version.
Install openssh server ubuntu 20.04 update#
Now, the first thing we should do is to make sure that all installed packages are updated to the latest available version: apt update & apt upgrade Where IP_Address and Port_Number are the actual IP address of your server and SSH port number. Login to your Ubuntu 20.04 VPS via SSH as user root ssh -p Port_Number SMTP server and IMAP server with IMAP4 rev1 support.MariaDB, MySQL, PostgreSQL, SQLite, MSSQL or Oracle database server.Apache, Nginx, Lighttpd, Cherokee or Hiawatha web server.Built-in caching for fast mailbox access.Roundcube comes with lots of handy features out of the box, such as: With all of this, let’s start our installation process. It can also run on almost all web servers and database servers. The installation of Roundcube is pretty easy and it can run on any Linux server with either a LAMP or LEMP stack. Its excellent UX makes Roundcube one of the most popular webmail solutions in the world. Roundcube has an intuitive and user-friendly interface translated in more than 80 languages.
1 note
·
View note
Text
How can I install Docker CE on Linux Mint 19?, How can I install Docker Compose on Linux Mint 19?. This guide will answer above questions by showing you a step by step installation of Docker and Docker Compose on Linux Mint 19. Docker has been the defacto container engine since its arrival. It enables you to package and run your applications in isolated containers within a single host or cluster of Linux hosts. Docker Engine is available in Community Edition (CE) and Enterprise Edition (EE). In this guide, we will do the installation of Docker Community Edition on Linux Mint 19 using below steps. Step 1: Install Dependency packages Start the installation by ensuring that all the packages used by docker as dependencies are installed. sudo apt update sudo apt -y install apt-transport-https ca-certificates curl software-properties-common sudo apt -y remove docker docker-engine docker.io containerd runc Step 2: Add Docker’s official GPG key Import Docker GPG key used for signing Docker packages. curl -fsSL https://download.docker.com/linux/ubuntu/gpg | sudo gpg --dearmor -o /usr/share/keyrings/docker-archive-keyring.gpg Step 3: Add the Docker repository to Linux Mint 19 Add Docker upstream repository to your Linux Mint 19 so you can install the latest stable release of Docker. echo "deb [arch=$(dpkg --print-architecture) signed-by=/usr/share/keyrings/docker-archive-keyring.gpg] https://download.docker.com/linux/ubuntu bionic stable" | sudo tee /etc/apt/sources.list.d/docker.list > /dev/null The command above will add a new line to additional repositories file. $ cat /etc/apt/sources.list.d/docker.list deb [arch=amd64 signed-by=/usr/share/keyrings/docker-archive-keyring.gpg] https://download.docker.com/linux/ubuntu bionic stable Step 4: Install Docker Engine and Docker Compose in Linux Mint 19 Update the apt package index. $ sudo apt update Hit:1 http://ppa.launchpad.net/ondrej/php/ubuntu bionic InRelease Hit:2 http://archive.ubuntu.com/ubuntu bionic InRelease Hit:3 http://archive.canonical.com/ubuntu bionic InRelease Hit:4 http://security.ubuntu.com/ubuntu bionic-security InRelease Ign:5 http://packages.linuxmint.com tessa InRelease Hit:6 http://archive.ubuntu.com/ubuntu bionic-updates InRelease Get:7 https://download.docker.com/linux/ubuntu bionic InRelease [64.4 kB] Hit:8 http://archive.ubuntu.com/ubuntu bionic-backports InRelease Hit:9 http://packages.linuxmint.com tessa Release Get:11 https://download.docker.com/linux/ubuntu bionic/stable amd64 Packages [3,695 B] Fetched 68.1 kB in 2s (33.9 kB/s) Reading package lists… Done Then install the latest version of Docker CE and Docker Compose sudo apt update sudo apt install docker-ce docker-ce-cli containerd.io The docker group is created but no users are added. Add your normal user to the group to run docker commands as non-privileged user. sudo usermod -aG docker $USER newgrp docker Check the version of docker installed $ docker version Client: Docker Engine - Community Version: 20.10.11 API version: 1.41 Go version: go1.16.9 Git commit: dea9396 Built: Thu Nov 18 00:37:08 2021 OS/Arch: linux/amd64 Context: default Experimental: true Server: Docker Engine - Community Engine: Version: 20.10.11 API version: 1.41 (minimum version 1.12) Go version: go1.16.9 Git commit: 847da18 Built: Thu Nov 18 00:35:16 2021 OS/Arch: linux/amd64 Experimental: false containerd: Version: 1.4.12 GitCommit: 7b11cfaabd73bb80907dd23182b9347b4245eb5d runc: Version: 1.0.2 GitCommit: v1.0.2-0-g52b36a2 docker-init: Version: 0.19.0 GitCommit: de40ad0 Run a test docker container: $ docker run --rm -it --name test alpine:latest /bin/sh
Unable to find image 'alpine:latest' locally latest: Pulling from library/alpine cd784148e348: Pull complete Digest: sha256:46e71df1e5191ab8b8034c5189e325258ec44ea739bba1e5645cff83c9048ff1 Status: Downloaded newer image for alpine:latest / # cat /etc/os-release NAME="Alpine Linux" ID=alpine VERSION_ID=3.15.0 PRETTY_NAME="Alpine Linux v3.15" HOME_URL="http://alpinelinux.org" BUG_REPORT_URL="http://bugs.alpinelinux.org" / # exit Install Docker Compose on Linux Mint 19 On Linux Mint 19, Docker Compose can be installed with the following guide: How To Install Docker Compose on Linux You now have Docker Engine and Docker Compose installed on Linux Mint 19. Enjoy using containers to run your services. Also relevant is Top command for container metrics
0 notes
Text
Laravel 8 Generate PDF with Graph Tutorial

Laravel 8 – produce a PDF with an example graph We'll show you how to make a pdf with a graph in the Laravel 8 app in this tutorial. The term "graph" refers to a diagram that depicts a relationship between two or more things. Making a sequence of bars on graphing paper is an example of a graph. A graph is a diagram that depicts the relationships between two or more objects. Pie charts are one type of graphs. This tutorial will walk you through the process of creating a pdf with graph in a Laravel application, step by step.
Table of Content
- Install wkhtmltopdf Software - Install Laravel 8 App - Install mikehaertl/phpwkhtmltopdf - Add Routes - Create Controller by Command - Create Blade View - Run Development Server - Test This App
Step 1 – Install wkhtmltopdf Software
To begin, run the following command on your web server to install the wkhtmltopdf package. This programme will be installed on your webservers using the commands below: For Ubuntu: sudo apt install wkhtmltopdf For Windows: You must click on the below link and download the exe file. Then do the following https://wkhtmltopdf.org/
Step 2 – Install Laravel 8 App
To install the latest version of the Laravel application, use the following command. So, open your terminal OR command prompt and type in the following: composer create-project --prefer-dist laravel/laravel blog
Step 3 – Install mikehaertl/phpwkhtmltopdf
Install the mikehaertl/phpwkhtmltopdf package in this step. So, open your command prompt once more and type in the following command: composer require mikehaertl/phpwkhtmltopdf
Step 4 – Add Routes
Open the web.php file in this phase and add the following routes to it: routes/web.php use AppHttpControllersGraphPdfController; Route::get('graph', ); Route::get('download', )->name('download'); The very first route will display a graph on a web page, while the second will allow you to download a pdf file.
Step 5 – Create Controller by Command
Open your command prompt and type the following command to build a controller called GraphPDFcontroller: php artisan make:controller GraphPdfController This command will generate GraphPdfController.php as a controller. After that, navigate to app/Http/Controllers and open GraphPdfController.php. Then, in your controller file, update the following methods: Read the full article
0 notes
Text
Instalar una contabilidad de código abierto en Ubuntu 20.04
Este tutorial le mostrará cómo instalar Akaunting en Ubuntu 20.04 con un servidor web Apache o Nginx. Akaunting es un software de contabilidad de codigo abierto y gratuito que se puede alojar por sí mismo. Tiene un uso muy sencillo y puedes llevar un control de tus finanzas personales o de una pequeña empresa
Características de Akaunting
- Completamente gratuito y de código abierto. - Interfaz fácil de usar basada en la web. Tus finanzas en línea en cualquier momento y lugar en su Mac, PC, tableta o teléfono móvil. - Interfaz preparada para móviles y tabletas - Panel de administración y clientes multilingüe - Diseñado para pequeñas empresas - 100% de propiedad de los datos financieros - Actualizaciones GRATUITAS de por vida - Puedes crear clientes y enviarles facturas. También puedes establecer una contraseña para que puedan acceder al portal de clientes. - Envía facturas profesionales a los clientes y empieza a aceptar pagos en línea, sin comisiones/transacciones. - Añade depósitos y transferencias entre cuentas y mantenga activo el saldo de sus cuentas bancarias. - Crear proveedores para poder asignarles facturas y pagos y filtrar posteriormente sus transacciones de forma sencilla. - Crea y gestiona facturas para que tus finanzas sean siempre precisas y saludables. Saber qué y cuándo pagar. - Añade gastos no facturables como pagos para mantener los saldos de sus cuentas bancarias/efectivas al día. - Habilita el seguimiento del inventario y gestiona las mercancías a medida que entran y salen. Los artículos también agilizan la facturación. - Crea un número ilimitado de cuentas bancarias y de efectivo y haz un seguimiento de sus saldos iniciales y actuales. - Envía facturas y añade gastos en cualquier moneda y deje que el sistema los convierta en su moneda principal. - Gestiona las finanzas de múltiples empresas desde un solo panel de administración. Asigna usuarios a diferentes empresas. - Obten informes financieros detallados que te ayudan a visualizar mejor toda la información que necesitas para mejorar tu negocio. - Amplía Akaunting instalando aplicaciones desde la tienda de aplicaciones, puede instalar o comprar cualquier cosa. - Configura los permisos a nivel de rol para proteger y simplificar tu experiencia de gestión.
Requisitos previos para instalar Akaunting en Ubuntu 20.04
Primero, necesitas un servidor Ubuntu con al menos 512MB de RAM. Si estás buscando un VPS (servidor privado virtual), entonces puedes recurrir a contabo o ovh para contratar el tuyo (al rededor de 5€/mes), instala Ubuntu 20.04 en tu servidor y sigue las siguientes instrucciones. Akaunting requiere PHP y MySQL/MariaDB. Para seguir este tutorial, debería haber instalado una pila LAMP o una pila LEMP. Si prefieres usar el servidor web Apache, entonces instala la pila LAMP. - Cómo instalar la pila LAMP en Ubuntu 20.04 Si prefieres usar el servidor web Nginx, entonces configure la pila LEMP. - Cómo instalar la pila LEMP en Ubuntu 20.04 Cuando hayas terminado de configurar la pila LAMP o LEMP, vuelve aquí y sigue leyendo. Ahora vamos a instalar Akaunting.
Paso 1: Descargar el archivo Zip de instalación de Akaunting en el servidor Ubuntu 20.04
Inicia sesión en tu servidor Ubuntu 20.04 y utiliza el siguiente comando para descargar la última versión estable de Akaunting. wget -O Akaunting.zip https://akaunting.com/download.php?version=latest A continuación, crea un directorio bajo la raíz de la web para Akaunting. sudo mkdir -p /var/www/html/akaunting/ Extrae el archivo zip con unzip. sudo apt install unzip sudo unzip Akaunting.zip -d /var/www/akaunting/ La opción -d especifica el directorio de destino. Los archivos web de Akaunting se extraerán a /var/www/html/akaunting/. A continuación, tenemos que cambiar el propietario de este directorio a www-data para que el servidor web pueda escribir en este directorio. sudo chown www-data:www-data /var/www/html/akaunting/ -R
Paso 2: Crear una base de datos y un usuario en MariaDB
Inicia sesión en el servidor de bases de datos MariaDB con el siguiente comando. Dado que MariaDB utiliza ahora el plugin unix_socket para autenticar el inicio de sesión del usuario, no es necesario introducir la contraseña de root de MariaDB. Sólo tenemos que prefijar el comando mysql con sudo. sudo mysql -u root A continuación, crea una base de datos para Akaunting. Este tutorial nombra la base de datos akaunting. Puedes usar el nombre que quieras. create database akaunting; Cree el usuario de la base de datos. De nuevo, puedes utilizar el nombre que prefieras para este usuario. Reemplaza tu-contraseña con tu contraseña preferida. create user 'accountant'@'localhost' identified by 'tu-contraseña'; Concede a este usuario todos los privilegios en la base de datos akaunting. grant all privileges on akaunting.* to 'accountant'@'localhost'; Limpiar los privilegios y salir. flush privileges; exit;
Paso 3: Instalar los módulos PHP
Ejecuta los siguientes comandos para instalar los módulos de PHP requeridos o recomendados por Akaunting. sudo apt install php-imagick php7.4-common php7.4-mysql php7.4-gd php7.4-bcmath php7.4-json php7.4-curl php7.4-zip php7.4-xml php7.4-mbstring php7.4-bz2 php7.4-intl Luego reinicia Apache. (Si utilizas Nginx, no necesitas reiniciar Nginx). sudo systemctl restart apache2
Paso 4: Configuración del servidor web
Podemos utilizar el servidor web Apache o Nginx. Apache Si prefieres Apache, crea un archivo de host virtual para Akaunting con un editor de texto de línea de comandos como Nano. sudo nano /etc/apache2/sites-available/akaunting.conf Introduce el siguiente texto en el archivo. Sustituye akaunting.tu_dominio.com por tu subdominio real para Akaunting. No olvides establecer el registro DNS A para el nombre de dominio en el gestor de DNS de su registrador de dominios. ServerName akaunting.tu_dominio.com DocumentRoot /var/www/html/akaunting/ DirectoryIndex index.php Options +FollowSymLinks AllowOverride All Require all granted ErrorLog ${APACHE_LOG_DIR}/akaunting.error.log CustomLog ${APACHE_LOG_DIR}/akaunting.access.log combined Guarda y cierra el archivo. A continuación, habilita este host virtual. sudo a2ensite akaunting.conf Necesitamos habilitar el módulo de reescritura. sudo a2enmod rewrite Reinicia Apache para que los cambios surtan efecto. sudo systemctl restart apache2 Ahora visita akaunting.tu_dominio.com y serás redirigido a la página del asistente de configuración (akaunting.tu_dominio.com/install/language). Si ves la página de Apache por defecto en lugar del asistente de configuración, entonces tienes que desactivar el host virtual por defecto. sudo a2dissite 000-default.conf Y reiniciar Apache. Antes de introducir cualquier información en el asistente de configuración, tenemos que habilitar HTTPS. Nginx Si prefieres Nginx, crea un archivo akaunting.conf en el directorio /etc/nginx/conf.d/. sudo nano /etc/nginx/conf.d/akaunting.conf Ponga el siguiente texto en el archivo. Sustituya akaunting.tu_dominio.com por su subdominio real para Akaunting. No olvide establecer el registro DNS A para el nombre de dominio en el gestor de DNS de su registrador de dominios. server { listen 80; listen :80; server_name akaunting.tu_dominio.com; root /var/www/html/akaunting/; index index.php index.html index.htm; charset utf-8; error_log /var/log/nginx/akaunting.error; access_log /var/log/nginx/akaunting.access; add_header X-Frame-Options "SAMEORIGIN"; add_header X-XSS-Protection "1; mode=block"; add_header X-Content-Type-Options "nosniff"; location / { try_files $uri $uri/ /index.php?$query_string; } # Prevent Direct Access To Protected Files location ~ .(env|log) { deny all; } # Prevent Direct Access To Protected Folders location ~ ^/(^app$|bootstrap|config|database|resources|routes|storage|tests|artisan) { deny all; } # Prevent Direct Access To modules/vendor Folders Except Assets location ~ ^/(modules|vendor)/(.*).((?!ico|gif|jpg|jpeg|png|js|css|less|sass|font|woff|woff2|eot|ttf|svg).)*$ { deny all; } error_page 404 /index.php; location ~ .php$ { fastcgi_split_path_info ^(.+.php)(/.+)$; fastcgi_pass unix:/run/php/php7.4-fpm.sock; fastcgi_index index.php; include fastcgi_params; fastcgi_param SCRIPT_FILENAME $document_root$fastcgi_script_name; } location ~ /.(?!well-known).* { deny all; } } Guarda y cierra el archivo.A continuación, prueba la configuración de Nginx. sudo nginx -t Si la prueba es exitosa, recarga Nginx para que los cambios surtan efecto. sudo systemctl reload nginx Ahora visita akaunting.tu_dominio.com y serás redirigido a la página del asistente de configuración (akaunting.tu_dominio.com/setup). Antes de introducir cualquier información en el asistente de configuración, tenemos que habilitar HTTPS.
Paso 5: Habilitar HTTPS
Para cifrar el tráfico HTTP, podemos habilitar HTTPS instalando un certificado TLS gratuito emitido por Let's Encrypt. Ejecuta el siguiente comando para instalar el cliente Let's Encrypt (certbot) en el servidor Ubuntu 20.04. sudo apt install certbot Si usas Apache, también necesitas instalar el plugin de Certbot para Apache. sudo apt install python3-certbot-apache Y ejecuta este comando para obtener e instalar el certificado TLS. sudo certbot --apache --agree-tos --redirect --hsts --staple-ocsp --email [email protected] -d akaunting.tu_dominio.com Si utilizas Nginx, instala el plugin Certbot Nginx. sudo apt install python3-certbot-nginx A continuación, ejecuta el siguiente comando para obtener e instalar el certificado TLS. sudo certbot --nginx --agree-tos --redirect --hsts --staple-ocsp --email [email protected] -d akaunting.tu_dominio.com Dónde - --nginx: Utilizar el plugin nginx. - --apache: Utilizar el plugin de Apache. - --agree-tos: Aceptar las condiciones del servicio. - --redirect: Forzar HTTPS mediante una redirección 301. - --hsts: Añadir la cabecera Strict-Transport-Security a cada respuesta HTTP. Obliga al navegador a utilizar siempre TLS para el dominio. Defiende contra el ataque SSL/TLS Stripping. - --staple-ocsp: Activa el grapado OCSP. Una respuesta OCSP válida se grapa al certificado que el servidor ofrece durante TLS. El certificado debería obtenerse e instalarse automáticamente.

Paso 6: Finalizar la instalación con el asistente de instalación
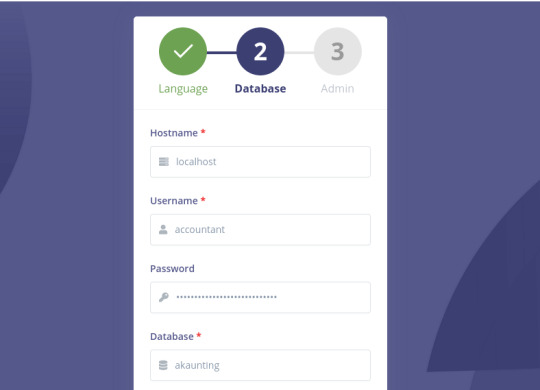
Ahora ve a akaunting.tu_dominio.com y aparecerá el asistente de configuración. En primer lugar, tienes que elegir tu idioma.

A continuación, introduce la información de la base de datos. Utilice el nombre de la base de datos y el usuario de la base de datos creados en el paso 2.
A continuación, introduzca el nombre de la empresa y cree una cuenta de administrador.
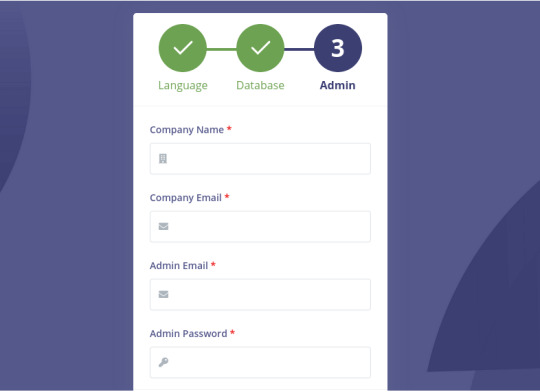
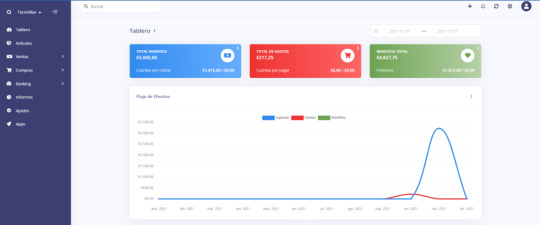
Una vez hecho esto, puedes entrar en el panel de administración.

Después de iniciar la sesión, debes seguir el asistente para crear tu primera empresa.
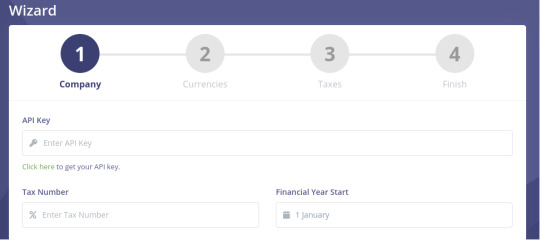
Ahora puede gestionar sus finanzas en el panel de administración basado en la web.
Paso 7: Configurar SMTP
Para enviar correos electrónicos (como el registro de cuentas, el restablecimiento de la contraseña, el envío de facturas a los clientes, etc.), es necesario configurar un servidor SMTP. La configuración de SMTP está disponible en Configuración -> Correo electrónico -> Protocolo. Utilice los siguientes ajustes. - Protocol: SMTP - SMTP host:el nombre de su servidor de correo como mail.tecnolitas.com - SMTP port: 587 - Cree una dirección de correo electrónico en su servidor de correo e introduce el nombre de usuario y la contraseña SMTP. - SMTP security: TLS

If you would like to use your own mail server to send emails to clients, please check out the following article to set up your own mail server. Note that I highly recommend running iRedMail mail server on a fresh clean OS. Installing iRedMail on an OS that has other web applications can fail, and likely break existing applications. - How to quickly set up an email server on Ubuntu 20.04 with iRedMail If you would like to use an SMTP relay service, I recommend Mailjet. You can follow the tutorial below to set up SMTP relay on your Akaunting server and you should be able to send invoice to clients. - How to Set Up Postfix SMTP relay on Ubuntu with Mailjet
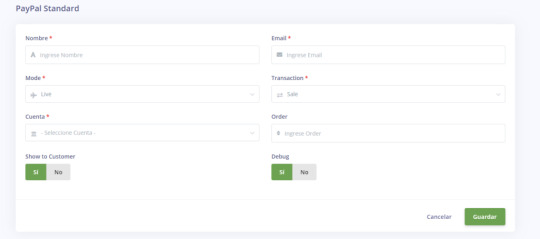
Enable Paypal Payment
You can enable Paypal payment option in Settings -> Paypal Standard.
Troubleshooting
If you encounter errors in Akaunting, you can check the logs under /var/www/akaunting/storage/logs/ directory to troubleshoot problems. Akaunting es un programa de contabilidad muy sencilla, te sirva para llevar el contro de ingresos/gastos de tus finanzas personales o de una pequeña empresa o proyecto, puedes expandirlo con módulos y ganar en funcionalidad. Coméntame si estas interesado en aplicaciones de este tipo y escribiré mas sobre ellas. Read the full article
0 notes
Text
Install php 7 iis windows 10 無料ダウンロード.Download and Install 7.4
Install php 7 iis windows 10 無料ダウンロード.PHPのダウンロードとインストール

MySQL5.6 を Windows10 で動作させる.Windows 10/8/7/Vista に IIS をインストール - クリエイティブWeb
Jan 10, · If you are using this version it is highly recommended that you make plans to upgrade to the latest version of PHP. Here are the methods available for downloading and installing PHP on a variety of different platforms. Latest Release: PHP (10 Jan ) Ubuntu / Debian. Docker. Windows IIS. Compile from Source PHP のダウンロード画面が表示されます。 年 6 月現在、 PHP 8 系、 PHP 系、 PHP 系がダウンロード可能です。今回は PHP をダウンロードします。「Current Stable PHP 」ブロックの中にある「Windows downloads」をクリックして下さい。 無料ダウンロード & セキュリティ (IIS) エクスプレスは、無料でシンプルな自己完結型の IIS のバージョンで、開発者向けに最適化されています。 Windows 10, Windows 7 Service Pack 1, Windows 8, Windows , Windows Server R2, Windows Server ,
Install php 7 iis windows 10 無料ダウンロード.PHP | PHPのダウンロードとインストール
Mar 05, · PHPのダウンロード. PHPのインストールプログラムは、Windows版PHP公式サイトのダウンロードページから入手します。 ページにアクセスした後、上部メニューの「Downloads」をク Jun 11, · 今回はWindows版をダウンロードしますので、[Windows downloads]のリンクをクリックします。 Windows版のダウンロードページが表示されます。必要なバージョンのPHPをダウンロードします。 今回はバージョン の Non Thread Safe 版をダウンロードします。Estimated Reading Time: 4 mins IIS のバージョンは、Windows 10 が IIS 、Windows が IIS 、Windows 8 が IIS 、Windows 7 が IIS 、Vista が IIS となっており、接続制限はあるものの機能的には、それぞれ Windows Server 、Windows Server R2 、Windows Server 、Windows Server R2 、Windows Server のものと同等であり、小規模なサイト
IIS のバージョンは、Windows 10 が IIS Windows 10 では、. NET Framework 4. NET 3. NET 4 以上が必要になるケースが多いので、最新の. NET Framework をインストールしておきましょう。もし、インストールしていない場合は、Microsoft のダウンロードセンターから Microsoft. NET Framework 4~4. また、実際に公開用として運用する場合には、ホスト名をリライトしたい場合がよくあるので、URL Rewrite をインストールしておく方がいいと思います。Microsoft の IIS のサイト の URL Rewrite ページ からダウンロードできます。. PC を 自宅サーバーで利用する場合には、IIS マネージャーやタスク スケジューラー等のシステム管理ツール���よく利用するので[スタート]メニューに[管理ツール]を表示させておくと便利です。[管理ツール]を[スタート]メニューに表示させたい場合は、「スタート」をクリックして、スタートメニューを表示させて、そこで右クリックをし、メニューに「プロパティ」が表示されるのでそれをクリックします。「タスクバーと [スタート」 メニューのプロパティ」のダイアログが表示されるので、そこで「[スタート]メニュー」タブをクリックすると以下の図の画面が表示されるので、「カスタマイズ」ボタンをクリックします。.
以下の図の画面が表示されるので、システム管理ツールで「 [すべてのプログラム] メニューと [スタート] メニューに表示する」を選択します。そして「OK」ボタンをクリックすると、スタートメニューに [管理ツール] が表示されるようになるので、「管理ツール」をクリックして、IIS マネージャを選択して起動させることができるようになります。. Wordpress、Umbraco、自分で作成した ASP. NET のアプリケーション等をインストールする時に、Webサイトやアプリケションののフォルダーのアクセス許可をどのように設定したらいいかというと、大抵の場合は設定をしなくても動作すると思います。それは、大抵の場合は、既定で Users 又は Authenticated Users に「読み取りと実行」の権限が与えられているためです。もし、権限が与えられていなくて、エラーになる場合は、Users 又は Authenticated Users に「読み取りと実行」の権限を与えるようにします。.
一方で、ファイルのアップロード等でファイルへの書き込みをする動作がある場合には、大抵の場合はエラーになったり、書き込みができないままだったりします。それは、大抵の場合は、Users 又は Authenticated Users に「変更の」の権限が与えられていないためです。書き込みする必要ファイルやフォルダーに対して、Users 又は Authenticated Users に「変更」の許可を与えれば正常に動作するようになります。. 以上の説明の操作でアプリケーションは動作するようになりますが、単純化しすぎているので、詳細については、 IIS 7 のアクセス許可 にメモをしました。. ファイアウォールの開放 既定の設定では、他のパソコンからはアクセスができないように Windows ファイアウォールが設定されています。アプリケーションの準備できたら、ファイアウォールでHTTP(ポート番号80)の受信を許可するように設定します。手順については、 Web ページを公開するには - ファイアウォールの設定 にメモをしておきました。.
中高生向けオンラインプログラミング教室 アプリを作ろう! 「習うより慣れろ」で、自分でテーマを考えて、人気の Python 又は Flutter でアプリケーションを作るところまで指導します。. Toggle navigation. オンライン教室 オンラインプログラミング教室 オンライン小論文教室 C ASP. Vista の場合、WebDav、FTPサーバーの機能は使用不可になっていますが、WevDav 7.
Windows 7 Home Premium の WebDav、FTPサーバーの機能は、マイクロソフトのページでは、使用不可になっていますが、実際は使用できます。. Twitter Facebook Pocket はてなブックマーク. 中高生向けオンラインプログラミング教室 アプリを作ろう! 「習うより慣れろ」で、自分でテーマを考えて、人気の Python 又は Flutter でアプリケーションを作るところまで指導します。 開く.
IP アドレス、ドメイン名、プロトコルとバインドされ外部から接続することができます。サイトは、1つ以上のアプリケーション及び仮想ディレクトリを含み、サイトを作成するとルートアプリケーションが作成されます。.
0 notes