#install tkinter in python
Explore tagged Tumblr posts
Visit Tumblr Blog
Explore Tumblr blogs with no restrictions, modern design and the best experience.
Last Seen Tumblr Blogs


Fun Fact
Forty percent of Tumblr users are between the ages of 18 to 25.
Text
turtle.undobufferentries() function in Python

The turtle module provides turtle graphics primitives, in both object-oriented and procedure-oriented ways. Because it uses Tkinter for the underlying graphics, it needs a version of Python installed with Tk support. turtle.undobufferentries() This function is used to return the count of entries in the undobuffer. It doesn’t require any argument. Syntax : turtle.undobufferentries() Below is the implementation of the above method with some examples : Example 1 : Python3 # import package import turtle # loop for motion for i in range(50): turtle.forward(20+2*i) turtle.right(90) # check the undo buffer size # it is loop iteration*turtle's statement # i.e; […]
0 notes
Text
Complete Python Tkinter Tutorial: Master GUI Programming Easily

If you want to create desktop applications using Python, then this Python Tkinter Tutorial is the perfect place to start. Tkinter is the built-in GUI (Graphical User Interface) library in Python that helps you design windows, buttons, labels, and more for your application. It is easy to use and does not require any additional installation, making it ideal for beginners.
In this tutorial, you will learn how to design a basic window, add useful elements like buttons and text boxes, and create interactive features for your app. Tkinter is great for building small tools like calculators, to-do lists, form applications, and even games with simple interfaces.
The best part of this Python Tkinter Tutorial is that it explains each step clearly so that even someone with no GUI experience can understand. You will learn how each part of the interface works and how to connect them with user actions. This knowledge is very helpful if you are planning to build user-friendly desktop software.
Many students, developers, and hobbyists choose Tkinter because of its simplicity and strong community support. Whether you are learning Python for fun or for your career, understanding Tkinter gives you the power to make your applications look professional.
Start your journey with this easy and practical guide. For more detailed information, visit the Python Tkinter Tutorial.
0 notes
Text
Python App Development Guide [2025]: Build Powerful Applications
Python is the third most popular programming language in 2025, especially for novice programmers and small business owners, and is known for its simplicity, versatility, and focus on code readability.
Python for app development allows developers to create scalable and efficient applications with minimal effort.

Why is Python So Popular for App Development?
Here are 8 key aspects of the popularity of Python for mobile app development.
1- Ease of Learning and Readability:
Python is often praised for its simple and readable syntax. Its code is easy to understand and write, making it an excellent choice for beginners and experienced developers. This ease of learning accelerates the development process and reduces the likelihood of errors.
2- Extensive Libraries and Frameworks:
It has a vast standard library that includes modules and packages for various functionalities. Additionally, numerous third-party libraries and frameworks simplify and speed up development. Popular frameworks such as Django and Flask are widely used for web development, while Kivy is popular for creating cross-platform mobile applications.
3- Versatility of Python App Development:
Python is a general-purpose programming language, making it versatile for different types of app development. Whether you’re working on web development, data analysis, machine learning, or artificial intelligence, Python has tools and Python libraries available to support your project.
4- Community Support:
Python has a large and active community of developers. This community support means that you can find solutions to problems, access documentation, and seek help easily. The collaborative nature of the Python community contributes to the language’s continuous improvement.
5- Cross-Platform Compatibility:
Python is a cross-platform language, meaning that applications developed in Python can run on various operating systems with minimal modifications. This flexibility is particularly beneficial for projects targeting multiple platforms such as Windows, macOS, and Linux.
Using Python for mobile app development involves several steps, and the approach can vary based on the type of application you want to build (web, mobile, desktop, etc.).
Below is a general guide on how to use Python for mobile app development:
Choose the Type of App
Web Development: For web applications, popular frameworks like Django and Flask are commonly used. Django is a high-level web framework that follows the Model-View-Controller (MVC) pattern, while Flask is a microframework that provides more flexibility.
# Example: Installing Django
pip install django
# Example: Creating a new Django project
django-admin startproject projectname
# Example: Running the development server
python manage.py runserver
Mobile Development: For mobile app development with Python, you can use frameworks like Kivy, BeeWare’s Toga, or tools like KivyMD (for material design).
These Python mobile development frameworks allow you to write Python code and deploy it to Android and iOS.
# Example: Installing Kivy
pip install kivy
# Example: Creating a basic Kivy app
python -m pip install kivy
Desktop Development: For desktop applications, frameworks like PyQt or Tkinter are commonly used. PyQt is a set of Python bindings for the Qt application framework, and Tkinter is the standard GUI toolkit included with Python.
# Example: Installing PyQt
pip install PyQt5
# Example: Creating a basic PyQt app
Below are the Simple Steps for Python App Development
Set Up the Development Environment: Install a code editor or Integrated Development Environment (IDE) suitable for Python development, such as VSCode, PyCharm, or Atom.
Learn the Basics of Python: If you’re new to Python, it’s essential to familiarize yourself with the basics of the language. Understand data types, control structures, functions, and object-oriented programming concepts.
Explore Framework Documentation: Depending on the framework you choose, explore the official documentation to understand its features, components, and best practices.
Write Code: Start writing the code for your application. Follow the structure and conventions of the chosen framework.
Test Your App: Write unit tests to ensure the functionality of your application. Use testing frameworks like unittest or pytest.
# Example: Installing pytest
pip install pytest
# Example: Running tests with pytest
pytest
Optimize and Debug: Optimize your code for performance and resolve any bugs or issues. Use debugging tools provided by your IDE or use print statements to troubleshoot.
Package and Distribute: Depending on the type of application, use tools like PyInstaller or cx_Freeze to package your application into executables for distribution.
# Example: Installing pyinstaller
pip install pyinstaller
# Example: Creating an executable with pyinstaller
pyinstaller your_script.py
Deploy: Deploy your application on the desired platform. For web applications, you might need to set up a server. For mobile apps, you can distribute them through app stores, and for desktop apps, users can download and install the executable.
Maintain and Update: Regularly maintain and update your application based on user feedback, feature requests, and bug reports. Remember that Python is a versatile language, and the specific steps may vary depending on the type of application and the chosen framework. Always refer to the official documentation for the tools and frameworks you are using.
Source of Content:Python App Development Guide
#PythonAppDevelopment#PythonApplicationDevelopment#PythonDevelopmentGuide#PythonforAppDevelopment#CustomPythonAppDevelopment#Pythonprogrammingforapps#Pythonmobileappdevelopment#Pythonwebappdevelopment#BenefitsofPythondevelopment
0 notes
Text
Desktop Application Development in Nagpur

Introduction: The Evolution of Desktop Applications in the Digital Age
Despite the rise of mobile and web apps, desktop applications remain crucial for industries requiring high performance, data security, offline capabilities, and advanced hardware integration. In Nagpur, the desktop application development landscape is flourishing, powered by a skilled IT workforce and cost-effective infrastructure. This comprehensive, SEO-optimized blog explores the scope, advantages, services, top developers, technology stacks, industries served, and the future of desktop software development in Nagpur.
What is Desktop Application Development?
Desktop application development involves creating software that runs on operating systems such as Windows, macOS, or Linux. These applications are installed directly on a computer and can work offline or online.
Key Characteristics:
High performance and speed
Offline functionality
Hardware integration (printers, scanners, sensors)
Secure local data storage
Platform-specific user interface (UI/UX)
Benefits of Desktop Applications for Nagpur-Based Businesses
Enhanced Performance: Ideal for computation-heavy or graphics-intensive tasks
Offline Access: Useful in logistics, warehouses, and manufacturing units
Data Security: Localized storage enhances data privacy
Tailored Functionality: Full control over features, behavior, and deployment
Reduced Internet Dependency: No reliance on constant connectivity
Industries Leveraging Desktop Apps in Nagpur
Manufacturing & Automation: Equipment control, ERP integration
Healthcare: EMR systems, diagnostic device control
Education: E-learning tools, testing software
Retail & POS: Billing systems, inventory control
Logistics: Shipment tracking, fleet monitoring
Finance: Accounting systems, portfolio management
Top Desktop Application Development Companies in Nagpur
1. Lambda Technologies
Focus: Custom desktop apps with hardware interface and BI dashboards
Tools: WPF, Electron, Qt, .NET, C#
Clients: Local manufacturing firms, medical device providers
2. TechnoBase IT Solutions Pvt. Ltd.
Expertise: Inventory management, ERP desktop apps
Platforms: Windows, cross-platform (Electron.js)
3. Biztraffics
Specialty: Retail billing systems, accounting apps
Features: GST compliance, barcode printing, local database support
4. LogicNext Software Solutions
Services: Desktop CRM and finance tools
Technologies: Java, JavaFX, Python PyQt
Clients: Finance consultants, small businesses
5. Neolite Infotech
Offerings: EdTech and LMS software for desktops
Tech Stack: C++, Electron.js, SQLite
Features Commonly Integrated in Desktop Apps
User Authentication
Database Management (MySQL, SQLite, PostgreSQL)
Barcode/QR Code Scanning Support
Multi-language Interface
Data Encryption & Backup
Print & Export (PDF/Excel)
Notifications and Alerts
System Tray Applications
Desktop App Development Technologies Used in Nagpur
Languages: C#, C++, Java, Python, Rust
Frameworks: .NET, Electron.js, Qt, JavaFX, Tkinter
Databases: SQLite, PostgreSQL, MySQL
UI Design Tools: WPF, WinForms, GTK
Cross-Platform Tools: Electron.js, NW.js, JavaFX
Version Control: Git, SVN
Windows vs Cross-Platform Development in Nagpur
Windows-Specific Apps:
Preferred by industries with Microsoft-based infrastructure
Developed using WPF, WinForms, .NET
Cross-Platform Apps:
Developed using Electron.js, JavaFX
Cost-effective, consistent UI/UX across macOS, Linux, Windows
SEO Strategy for Desktop Application Development Companies in Nagpur
Primary Keywords: Desktop application development Nagpur, desktop software developers Nagpur, custom desktop apps Nagpur, POS software Nagpur
Secondary Keywords: Windows app development Nagpur, inventory software Nagpur, ERP desktop app Nagpur
On-Page SEO:
Meta tags, image alt text, header tags
Keyword-rich titles and internal linking
Content Marketing:
Use cases, blogs, whitepapers, client stories
Local SEO:
Google Maps, business listings on IndiaMART, Sulekha, JustDial
Custom vs Off-the-Shelf Desktop Apps
Custom Desktop Apps
Designed to meet exact business requirements
Local development support
Better performance and security
Off-the-Shelf Software
Quick setup, lower initial cost
Limited customization and features
Dependency on third-party vendors
Testimonials from Clients in Nagpur
"TechnoBase built our billing desktop app, and it works flawlessly offline."
"Lambda created a custom desktop ERP that revolutionized our manufacturing unit."
"Biztraffics’ GST billing software helped streamline our retail operations."
Case Study: Desktop ERP for a Nagpur-Based Furniture Manufacturer
Challenge: Manual inventory, production tracking
Solution: Desktop ERP integrated with barcode printers, accounting tools
Results: 50% inventory accuracy improvement, 3x faster order processing
Future Trends in Desktop App Development in Nagpur
AI-Integrated Desktop Software: Smart assistants, auto-suggestions
Cloud Sync + Offline Mode: Hybrid functionality
Desktop SaaS Models: Licensing and subscription management
Hardware-Integrated Apps: IoT, USB device access, POS peripherals
Minimal UI Frameworks: Lightweight interfaces with rich UX
Why Choose Desktop Software Developers in Nagpur?
Affordable Development: Lower costs compared to metros
Highly Skilled Talent: Engineers from VNIT, IIIT, and RTMNU
Faster Turnaround Time: Agile and iterative models
Local Presence: Physical meetings, training, support
Domain Expertise: Manufacturing, education, healthcare, retail
Conclusion: The Strategic Role of Desktop Applications in Nagpur's Tech Future
Nagpur has become a hotspot for desktop application development, thanks to its cost-efficiency, technical talent, and industry alignment. Whether your business needs a custom POS, ERP, or inventory management tool, Nagpur’s desktop developers offer scalable, robust, and secure software tailored to local and global.
0 notes
Text
Getting Started with Desktop Application Development
While web and mobile apps dominate today’s tech scene, desktop applications are still essential in many industries — from productivity tools and games to system utilities and business software. This guide introduces the fundamentals of desktop application development and how to get started building your own apps.
What is a Desktop Application?
A desktop application is a software program that runs natively on an operating system like Windows, macOS, or Linux. Unlike web apps, desktop applications don’t rely on a browser and can offer greater access to system resources and offline functionality.
Why Build Desktop Apps?
Offline Capability: Desktop apps don’t need internet access to run.
Performance: Can take full advantage of system hardware.
Access to System Resources: File systems, printers, OS-level APIs.
Platform-Specific Design: Customize the experience for each OS.
Popular Frameworks for Desktop App Development
Electron (JavaScript): Build cross-platform desktop apps using web technologies.
JavaFX (Java): A robust framework for Java-based desktop apps.
Qt (C++ or Python via PyQt): A powerful cross-platform toolkit.
WPF (C#): For building Windows desktop apps using .NET.
Tkinter (Python): Simple GUI apps for learning and prototyping.
Example: Basic GUI with Python and Tkinter
import tkinter as tk def greet(): label.config(text="Hello, " + entry.get() + "!") app = tk.Tk() app.title("Simple App") entry = tk.Entry(app) entry.pack() button = tk.Button(app, text="Greet", command=greet) button.pack() label = tk.Label(app) label.pack() app.mainloop()
Example: Electron App (JavaScript/HTML/CSS)
// main.js const { app, BrowserWindow } = require('electron'); function createWindow() { const win = new BrowserWindow({ width: 800, height: 600 }); win.loadFile('index.html'); } app.whenReady().then(createWindow);
Best Practices for Desktop App Development
Keep the UI clean and responsive.
Ensure cross-platform compatibility (if targeting multiple OS).
Handle file I/O and system access carefully.
Use version control (e.g., Git) to manage development.
Test on real devices and environments.
Distribution Options
Windows: MSI/EXE installers, Microsoft Store.
macOS: DMG packages, Mac App Store (requires notarization).
Linux: DEB/RPM packages, Snap, Flatpak.
Cross-platform: Tools like Electron-builder or PyInstaller.
Conclusion
Desktop application development is a rewarding path that allows for rich, powerful software experiences. With frameworks like Electron, WPF, or Qt, you can create sleek and functional desktop apps suited to various platforms and needs. Start small, experiment with different tools, and bring your software ideas to life!
0 notes
Text
Boost Your Productivity with a Tkinter-Based Python IDE
In the world of Python GUI development, Tkinter remains a popular choice due to its simplicity and native support. However, traditional Tkinter development often involves manually coding UI elements, which can be time-consuming and error-prone. LabDeck’s Modern Tkinter GUI Designer, integrated with a specialized Python IDE, is changing the way developers approach Tkinter-based applications. By streamlining the design process and offering advanced development tools, this combination significantly enhances productivity for both beginners and professionals.
Why Use a Tkinter-Based Python IDE?
A dedicated Tkinter-based Python IDE, such as the one provided by LabDeck, eliminates the need for complex manual coding by integrating a drag-and-drop GUI designer with an intelligent development environment. Here’s why this approach is transforming Python GUI development:
1. Simplified GUI Design with Drag-and-Drop Functionality
Traditional Tkinter development requires extensive coding for layout design, widget placement, and styling. LabDeck’s Modern Tkinter GUI Designer solves this by allowing users to visually construct their interfaces. This means you can focus on functionality instead of getting lost in repetitive UI code.
2. Faster Development with Code Auto-Generation
Instead of writing every button, label, or frame manually, LabDeck’s Python IDE automatically generates the necessary Tkinter code. This ensures that your app remains structured and efficient while reducing the chances of syntax errors.
3. Professional Debugging and Code Assistance
One of the standout features of the MatDeck Python IDE is its built-in debugging tools. With features like breakpoints, real-time error detection, and code completion, developers can quickly identify issues and optimize their Tkinter applications without spending hours troubleshooting.
4. Cross-Platform Deployment Without Extra Work
A major advantage of using LabDeck’s Tkinter-based IDE is that applications can be deployed seamlessly across Windows, Linux, Raspberry Pi, and macOS. This ensures that developers don’t have to make multiple versions of their applications—one codebase works everywhere.
5. Better Project Management with Built-in Python Module Handling
Managing dependencies can be a hassle, especially when working on complex projects. LabDeck’s Python IDE for Tkinter simplifies this with easy installation, updating, and listing of Python modules—all through an intuitive interface. No need for manual package management or complex CLI commands.
The Future of Tkinter Development with LabDeck
As more developers seek efficient ways to build professional-looking Tkinter applications, LabDeck’s Modern Tkinter GUI Designer combined with its Python IDE is becoming an essential tool. Whether you’re a beginner looking to quickly prototype applications or an experienced developer aiming to reduce development time, this solution ensures faster, smoother, and more efficient Tkinter-based development.
0 notes
Text
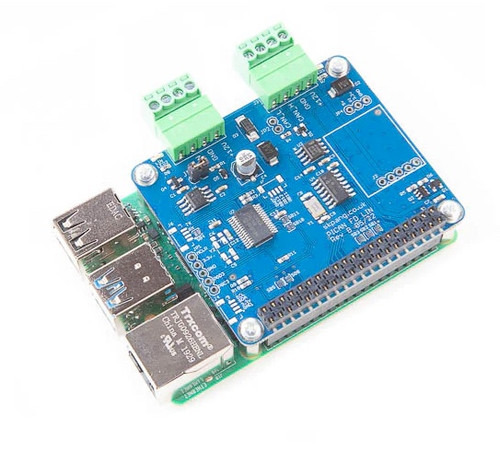
Raspberry Pi PiCAN FD HAT with LIN Bus Interface
This PiCAN FD board includes a LIN Bus interface, and the Microchip MCP2518FD IC offers classic CAN and CAN FD capabilities, while a dsPIC33 microcontroller facilitates the LIN Bus connection. Communication with the Pi occurs via UART on ttyS0 using ASCII text commands. A sample LIN-bus GUI application, developed in Python3 with tkinter, is available. The firmware can be updated through the Microchip UnifiedHost Java app, which requires the Raspberry Pi to operate in GUI mode. Installation of the SocketCAN driver is straightforward. Programming support is available in C or Python.
0 notes
Text
Python Tkinter TK Widgets
All the TK widgets available by default. You don't have to install anything to use them:


For more details:
1 note
·
View note
Text
Building Your First Python App: Step-by-Step Tkinter Tutorial

Welcome to our Python Tkinter tutorial! If you're curious about creating user-friendly graphical interfaces for your Python programs, you're in the right place. Tkinter is Python's standard library for building GUIs, making it easy for beginners and seasoned developers alike.
What is Tkinter?
Tkinter is a built-in Python library that allows you to create windows, buttons, text fields, and more. It's a great tool for adding a visual aspect to your programs, which can make them more intuitive and engaging to use.
Getting Started with Tkinter
Starting with Tkinter is simple. Since it comes with Python, you don’t need to install anything extra. You can directly start designing your application’s window and adding elements like buttons and text boxes.
Creating Your First Window
Imagine you're creating a small window that says "Hello, World!" on your screen. Tkinter lets you do this easily. You can set the size, title, and content of your window in just a few steps.
Adding Elements to Your Window
Tkinter allows you to add various widgets to your window. Widgets can be anything from text labels and buttons to input fields and checkboxes. These elements make your application interactive.
Why Use Tkinter?
User-Friendly: Tkinter is easy to learn and use, making it perfect for beginners.
Versatile: It can handle everything from simple applications to more complex ones with multiple windows and functionalities.
Cross-Platform: Tkinter works on Windows, macOS, and Linux, ensuring your application can run anywhere.
Benefits of Using Tkinter
Using Tkinter, you can turn your simple Python scripts into polished applications with a professional look and feel. This can be particularly useful if you're creating tools for others to use or if you want to enhance your coding projects with a visual component.
By following this Python Tkinter tutorial, you’ll start building your own interactive GUI applications with ease. For a deeper dive and more examples, explore this detailed guide.
0 notes
Text
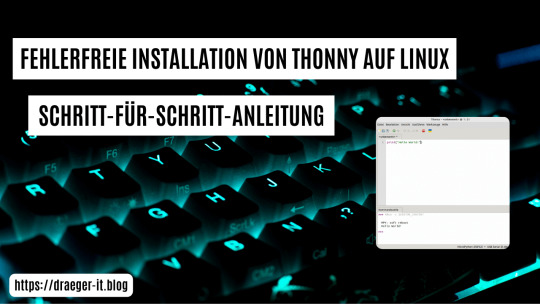
Fehlerfreie Installation von Thonny auf Linux: Schritt-für-Schritt-Anleitung
In diesem Beitrag möchte ich dir zeigen, wie du eine fehlerfreie Installation von Thonny auf einem Linux System durchführst. Dazu zeige ich dir dieses in eine Schritt-für-Schritt-Anleitung und wenn es besonders schnell gehen muss, dann biete ich dir das Shellscript an, welches diese Schritte automatisiert ausführt.

Fehlerfreie Installation von Thonny auf Linux: Schritt-für-Schritt-Anleitung Hintergrund: Zur Vorbereitung auf meinen MicroPython-Kurs im Jugendfreizeitzentrum Schöningen habe ich einige Laptops mit Linux Mint erhalten. Auf diesen Systemen musste ich zunächst ein Update durchführen, bevor ich Thonny installieren konnte. Dabei sind mir einige Fallstricke aufgefallen, die ich hier gerne inklusive der Lösungen vorstellen möchte. Im Beitrag Thonny IDE auf Linux einrichten für den Raspberry Pi Pico W habe ich dir bereits gezeigt wie du Thonny installierst, jedoch verlief dort die Installation sauber durch ohne irgendwelche Fehler. Für die nachfolgenden Schritte benötigst du root Rechte bzw. das Passwort für den Benutzer!
Schritt 1 - Aktualisieren des Linux Systems
Bevor wir Thonny installieren, aktualisieren wir das System. Damit stellen wir sicher das alle benötigten Pakete aktuell sind. sudo apt-get update sudo apt-get upgrade
Schritt 2 - Installieren vom Python Paketmanager pip
Damit wir die Python Pakete später installieren können, müssen wir pip installieren. (Ggf. wird dieses bei Thonny auch installiert, weil dort Python3 mit installiert wird.) sudo apt install pip
Schritt 3 - Installieren von Thonny
Das Tool Thonny kannst du im Anschluss mit dem nachfolgenden Befehl installieren. sudo apt install thonny Auf einem System musste ich das Modul tkinter manuell mit nachfolgendem Befehl installieren. sudo apt-get install python3-tk
Schritt 4 - Benutzer der Gruppe dialout hinzufügen
Damit der aktuelle Benutzer auf den seriellen Port zugreifen kann, muss dieser der Gruppe dialout hinzugefügt werden.
sudo usermod -a -G dialout $USER Im Anschluss muss der Rechner neu gestartet werden, erst damit werden diese Berechtigungen final gesetzt. Mit dem Befehl groups kann man sich die zugewiesenen Gruppen zum Benutzer anzeigen lassen. groups $USER

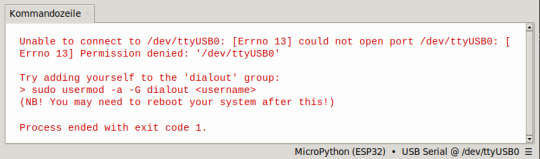
Schritt 5 - Entfernen von BRLTTY
In meinem Fall wurde kein Port in Thonny aufgeführt und ich musste zusätzlich noch das Dienstprogramm BRLTTY entfernen.
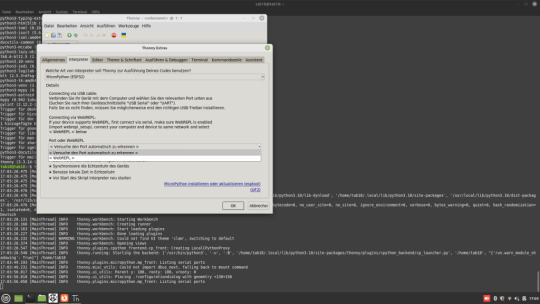
sudo apt remove brltty

BRLTTY ist ein Dienstprogramm im Hintergrund, das es blinden Personen ermöglicht, über eine Braillezeile auf die Textkonsole von Linux/Unix zuzugreifen. Es steuert die Braillezeile und bietet umfassende Funktionen zur Bildschirmüberprüfung.
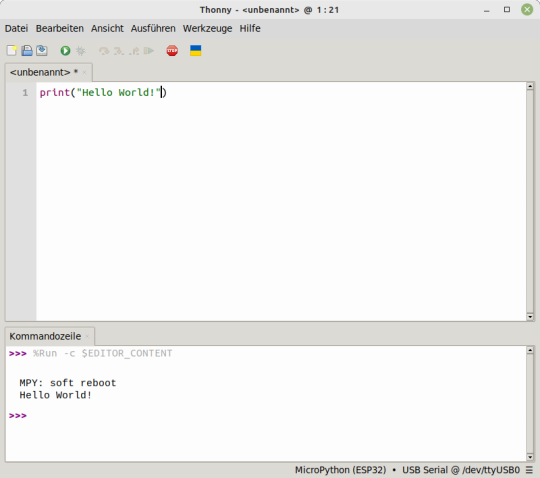
Schritt 7 - Testen der Installation
Wenn alle Schritte ausgeführt wurden, dann müssen wir noch kurz die Installation testen. Dazu stellen wir eine Verbindung her und geben im Editor ein kleines Script ein, welches "Hello World!" ausgibt. print("Hello World!") Wenn die grüne Playtaste aus der Toolbar betätigt wird, dann wird das kleine Programm ausgeführt und es sollte der Text "Hello World!" auf der Kommandozeile angezeigt werden.
Thonny fehlerfreie installation mit Shellyscript
Nachfolgend nun das kleine Shellyscript zum automatischen Installieren von Thonny. Shellscript zum automatischen installieren von ThonnyHerunterladen Die SH-Datei musst du auf der Konsole jedoch ausführbar machen, dazu gibst du nachfolgenden Befehl im Terminal ein: chmod +x install_thonny.sh Im Anschluss kannst du dieses Script dann mit dem nachfolgenden Befehl starten: ./install_thonny.sh Hier nun das kleine Shellscript zum automatischen Installieren von Thonny: #!/bin/bash sudo apt-get update sudo apt-get upgrade sudo apt install pip sudo apt install thonny sudo usermod -a -G dialout $USER sudo apt remove brltty groups $USER sleep 6 sudo reboot Read the full article
0 notes
Text
Build Real World Python Projects - GetFreeCourses

Build Real World Python Projects
Python Masterclass 2023: Build 19 Real World Python Projects Build Real World Python Projects course is designed for beginners who want to learn Python programming language from scratch. The course contains two parts: 1. Python Basics (Section 1 to Section 14) 2. Python Projects(Section 15 to Section 44 ) Here Is What You Get By Enrolling In This Course: Word-By-Word Explanation: In the entire course, I explain each line of code, without skipping a single line of code. High Quality Content: Over 55+ hours of HD(1080p) Videos. Well Structured & Easy To Learn: Course has been specially designed to make it easy for the students to learn Python, Django, Data Analysis, Flask, Tkinter, OpenCV, File Compression, Desktop App development with PostgreSQL & Web Scraping. 24 X 7 Support: I will always be there to guide you in your journey to become Python expert. _________________________________________________________________________ Here Is Everything You Will Learn In This Complete Course: In this hands-on course, you will learn Python right starting from scratch to the level where you can build almost anything with it, be it a fully functional database oriented web application or an automation tool. This course will teach you Python right from scratch from a very basic level and will gradually move you towards more advanced topics. We not just cover all the Python basics but also the most popular Python libraries such as Django, Flask, Tkinter & Selenium. The Complete Course is divided into 17 Major sections. Here is a brief description of what you will learn in each section. Section 1: Python basics. This section covers all the basics of Python, starting right from installing the required tools to covering topics like mathematical operators, strings, accepting user input, string operations, variables, conditionals like if, elif, control structures such as while & for loop, functions, modules & packages, lists, file handling, OOP in Python, regular expressions. Almost every basic Python concept is covered in this section. Section 2: Make GUI In Python Using Tkinter. Once done with the basics, we know learn the Tkinter library which allows us to create desktop based applications with Python. We learn how to create GUI apps using Tkinter & Python and also build a fully functional Desktop app i.e a calculator. Section 3: Making Database Oriented Desktop Apps With PostgreSQL. Making a simple desktop app alone isn’t sufficient, it needs a backend database to store some data. To do the same we learn how to connect our desktop apps to the backend. In this section we build a student management system software using Python, Tkinter to design the GUI & PostgreSQL database to store the data for our application in the backend. Section 4: File Compression & Encoding In Python. In this section we will learn how to perform file compression in Python to reduce file size. We also learn how to de-compress the compressed data and the methods used for it. We build a GUI based file compression tool using Python & Tkinter and a file compression library. Section 5: Text To Speech Converter Using Python. Text could be converted into speech/audio and that is exactly what is being covered in this specific section where we build a tool that generates audio from a given text. Not just that, we also learn how to convert an entire text file into mp3 which can be used to generate audiobooks from ebooks. We also learn how to convert the user input into speech. Section 6: QR Code Generator. We build a simple tool that can convert any link and convert it into a QR code that can be scanned via any smartphone that has a QR code reader. This tool creates QR code images that can be shared anywhere and the entire tool is built using Python & Tkinter. Build Real World Python Projects Section 7: Video Downloader App. In this section we built another tool to build our Python skills. This tool accepts a video URL, asks us to select the path where we want to download the specified video and then downloads that video to the specified path on our operating system. Not just that, this tool will also be able to convert video files into pure mp3 files as well. We build this tool from scratch right from architecting the code to designing the functionality to creating a user interface, all of it done using Python. Section 8: Building A Credit Card Validator Using Lhun’s Algorithm. In this section we will learn what is Lhun’s algorithm and how it is used to validate credit cards. We learn how Lhun’s algorithm can be implemented in Python and used to validate credit card numbers. This section is designed to teach algorithmic thinking and implementation in Python. Section 9: Data Analysis. Python is being widely used in the data science domain and hence it is important to learn how to use Python to analyse data. Hence in this section we learn how to use the tools and techniques used to perform data analysis. We start off by learning the Pandas library which is used to perform data analysis and all the basic concepts like DataFrames, Reindexing, Indexing, Broadcasting and also learn how to perform data plotting and visualisation with the Matplotlib library. In this section we also have a data science project which is based on analysing supermarket data to find insightful information which helps take better business decisions. We also learn how to represent data visually using multiple types of charts and bar graphs built using matplotlib. Section 10: Python Web Framework Django 3. This section will teach you how to build full-stack web applications with Python & Django 3. Django is one of the most popular web frameworks for Python and is used to program the back-end side of out web app. In this section we will learn Django right from basics and will build a simple book store web application. We will learn how to create models, how to route URL requests, how to create different views for our web app, how to integrate HTML templates and a lot more. In this section we also build a fully functional todo list application built using Django. This application performs all the basic CRUD operations which stands for Create, Read, Update & Delete data from the database. While building this application, we ensure that all the important concepts of Django are throughly covered and implemented. Section 11: Python Web Framework Flask. Flask is a micro web framework for Python used to build simpler web apps. If you want to develop some simple and small websites, you can do so using Flask. In this section we cover flask basics suck as Routing, Dynamic URLs, Templates, passing data to the server & site cookies. Section 12: REST APIs Using Django Rest Framework. In this section we learn how to build our own REST APIs using the Django Rest Framework. If you already have a Django web app built, you can create API endpoints for it using the Django Rest Framework. In this section we will build a fully functional REST API with features such as search, filtering & authentication. Section 13: Web Scraping in Python. Python can also be used to crawl websites and gather data from it. In this section we learn the same, we build a web crawler which crawls up any website of our choice and gathers links from it. Web crawlers are used by many search engines to rank websites and in this section we learn how to build a smaller version of it using Python. Section 14: Automation with Python & Selenium. Python is widely used for automation as well, especially for testing. Selenium web driver is one such tool which has been built for automating tests but the same can be used for automating other browser based tasks as well. In this section we learn how to automate tasks using Selenium and will also build a Facebook Bot that automatically posts status for us. Section 15: Best Practices: Writing Clean & Efficient Python Code. To be a good Python engineer/ developer you need to know how to write clean, concise and efficient Python code. In this section we learn some of the best practice that you must follow while writing Python code so. Section 16: Network Programming In Python Using Sockets: Building A Chat Application. Networking is an important concept in IT & Computer Science as it facilitates communication between devices or servers. Keeping this in mind, this section covers the basic networking concepts and we learn how to implement them using Python by building a simple desktop based chat application. In this section we learn what is an IP address, what are ports, sockets and buffers and how they could be used to implement a communication program. We lean how sockets can be used for communication between process on the same and on different devices. Section 17: Image Processing With Python & OpenCV. Python can also be used to process and manipulate images and videos. In this section we learn how to use OpenCV library with Python to manipulate images. We learn some interesting things like capturing webcam video, tracking images from a live video, different image thresholding techniques, image blurring, averaging and Gaussian filtering. _________________________________________________________________________ Build Real World Python Projects So let’s begin the journey of becoming an expert in Python. In addition to the Udemy 30-day money back guarantee, you have my personal guarantee that you will love what you learn in this course. If you ever have any questions please feel free to message me directly and I will do my best to get back to you as soon as possible! _________________________________________________________________________ Make sure to enrol in the course before the price changes. Take yourself one step closer towards becoming a professional Python developer by clicking the “take this course button” now! Join the journey. Sincerely, Ashutosh Pawar Read the full article
0 notes
Text
Make Python Bots, Browser Bots and do Web Automation
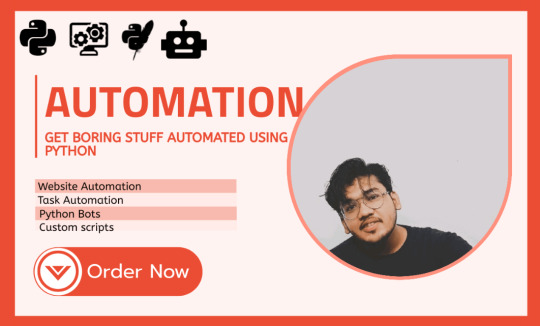
Make Python Bots, Browser Bots and do Web Automation
I make Python bots tailored for your need for task automation, web automation, or web scrapping using selenium and Python.
My name is Ishan Agrawal I hold a strong experience when it comes to building bots or automating the boring stuff with Python. For over 6 years now I have been creating automation bots that are :
Easy to install and use
- Secure
- Lightweight
- Tailored to your specific needs
Here Is what I offer :
- Task Automation
- Web Automation
- Browser Automation with Selenium
- Installable EXE that can be deployed in any system without any - pre-requisite
- Well-commented code
- Complete Documentation
- Scrapping Websites
- Data scrappers
- Easy to use UI with Tkinter
- On-time delivery
0 notes
Photo
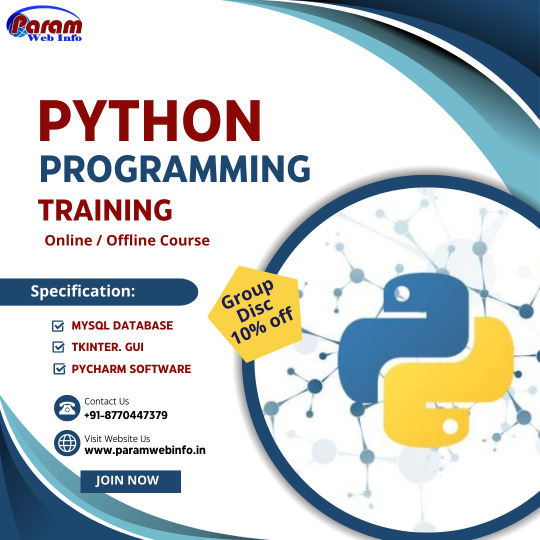
Python training in Raipur we are offering core python,django,advance python,tkinter,machin learning, data science where some special feature like high configured lab , 9 plus year of experience trainers, small strenth batches, fees installment facility,100% practical based ,live project ,interview calls ,jobs assistent. #pythontraining #python #pythontraininginraipur #datascience #machinelearning #traininginraipur #pythononlinetraining #pythonofflinetraining #paramsir #paramwebinfo
0 notes
Text
How to Install Tkinter in Python - with Example - in Windows 10 - Code Jana
How to Install Tkinter in Python – with Example – in Windows 10 – Code Jana
Hi there, wonderful coders. This article will serve as a transcript for my install tkinter in python video on Code Jana channel. It will also help you copy & paste the code directly to your code editor. If you haven’t yet subscribed to Code Jana, then please do so by following this subscribe now link. Here are the steps to Install Tkinter in Python: Tkinter is already included with Python…
youtube
View On WordPress
#code jana#codejana#how to install tkinter#how to install tkinter in python#install tkinter in python#install tkinter in python windows 10#Learn Python Codes#Learn Python Programming#pip install tkinter#python#Python for Beginners#python tutorial#Python Tutorial for Beginners#tkinter#Youtube
0 notes