#isometric exercises drawing
Explore tagged Tumblr posts
Visit Tumblr Blog
Explore Tumblr blogs with no restrictions, modern design and the best experience.
Last Seen Tumblr Blogs


Fun Fact
Tumblr has been providing a Korean-language service since 2013.
Text
Piping Isometric Drawings and symbols | How to read?
Piping isometric drawings are essential tools in the engineering and construction of pipeline systems. They provide a three-dimensional representation of pipelines in a two-dimensional format, helping engineers visualize complex layouts. Unlike other drawing styles, piping isometric drawings depict the height, width, and depth of the pipeline. This depiction allows for precise planning and…
#drawing of pipe#drawing reading#isometric drawing for pipeline#isometric drawing for piping#isometric drawing in piping#isometric drawing of pipeline#isometric drawing of piping#isometric drawing pipe#isometric drawing piping pdf#isometric drawing piping symbols#isometric drawing view#isometric exercise drawing#isometric exercises drawing#isometric pipe drawing pdf#isometric pipe drawing symbols#isometric piping drawing#isometric piping drawing pdf#isometric view meaning#pdf piping isometric drawing#pipe drawing isometric#pipe fitter drawing#pipe fittings drawing#pipe fittings drawings#pipe isometric drawing#pipe isometric drawing pdf#pipe isometric drawing symbols#piping drawing isometric#piping isometric drawing pdf#piping isometric drawing symbols#piping isometric symbols
0 notes
Text
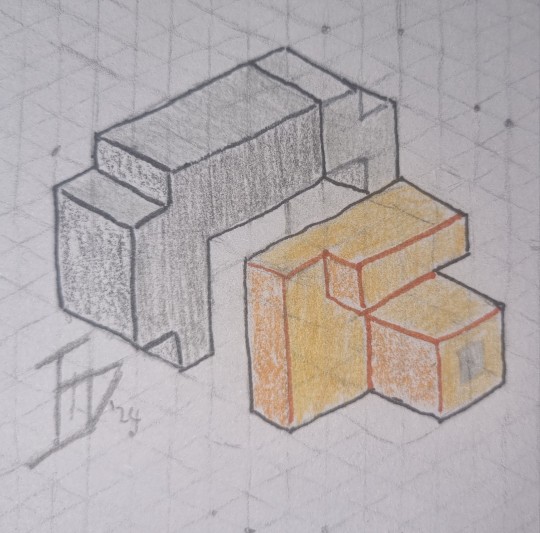
Day 344 - Hearing in Blocks
Just a block model of a hearing aid, inspired by Minecraft.
(Design sketches below)
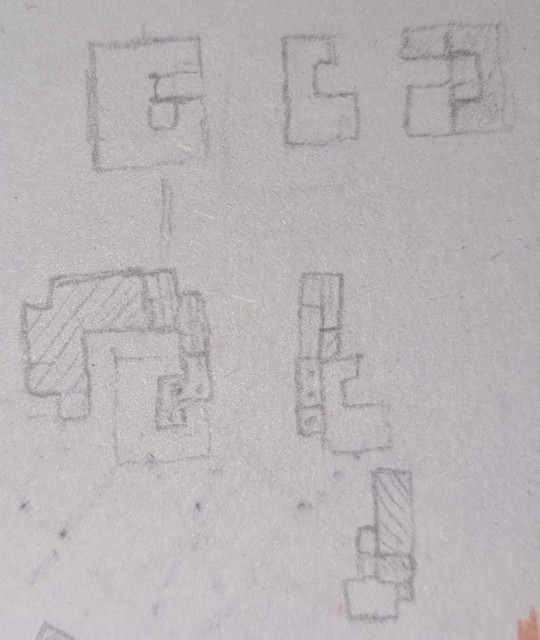
#minecraft#hearing aid#hearing aids#year 4#art#A friend suggested the idea and I decided to give it a go. It was a fun exercise~#Though having to draw my own isometric grid and having trouble with making the design work (thus having to erase often)?#I'll at least appreciate the fun of the designing~
3 notes
·
View notes
Text
🪷 Healing Astrology: Chakra Astrology 🪷
ᴄᴏɴɴᴇᴄᴛɪɴɢ ᴛʜᴇ ᴄʜᴀᴋʀᴀ ꜱʏꜱᴛᴇᴍ ᴛᴏ ᴀꜱᴛʀᴏʟᴏɢɪᴄᴀʟ ꜱɪɢɴꜱ
𝙐𝙨𝙚 𝙮𝙤𝙪𝙧 𝙎𝙪𝙣, 𝙈𝙤𝙤𝙣, 𝙖𝙣𝙙 𝙍𝙞𝙨𝙞𝙣𝙜 𝙥𝙡𝙖𝙘𝙚𝙢𝙚𝙣���𝙨. 𝙊𝙣𝙡𝙮 𝙪𝙨𝙚 𝙝𝙤𝙪𝙨𝙚 𝙥𝙡𝙖𝙘𝙚𝙢𝙚𝙣𝙩 𝙞𝙛 𝙮𝙤𝙪 𝙝𝙖𝙫𝙚 𝙖 𝙨𝙩𝙚𝙡𝙡𝙞𝙪𝙢.


Taurus/Capricorn 2nd/10th house
Root Chakra: Stability, security, grounding, survival, safety, belonging
Exercise: Weightlifting, Resistance Band, Body Weight Exercise, Isometric Exercises
Hobbies: Gardening, camping, foraging, pottery, painting or drawing, knitting, woodworking, cooking, baking, journaling, meditation, candle making, farming, fishing, musical instrument.
Yoga: Hatha, Yin, Restorative, Vinyasa Flow, Kundalini Yoga
Dance: Soul Motion, African Dance, Tai Chi Qigong, Barefoot Dance
Crystals: Black tourmaline, hematite, red jasper
Essential Oils: Cedarwood, patchouli, sandalwood, vetiver, frankincense, pine, cypress,
Colors: Red, brown, green, beige, grey
Music: Listen to 396hz sounds, ambient, classical music, nature sounds, meditative music, folk and acoustic music, world music, jazz and blue, chanting and mantras
Healing foods for you: sweet potatoes, onions, carrots, radishes, beans, eggs, nuts, lean meats, oats, apples, strawberries, tomatoes, pomegranate, dark leafy greens, brown rice, quinoa, avocado, bananas, dates, seaweed.
Teas and Supplements:Ginger, cayenne, dandelion root, ashwagandha, chamomile, lemon balm, passionflower, lavender, nettle, l-thetanine, gaba, CBD, lions mane, reishi mushroom, kava.
Key Components:
• Have a bedtime and a wake-up time
•Live below your means
• Create a savings for a rainy day
• Find ways to organize your space
•Carry a journal with you
• Make a list of your favorite foods so you can always have an idea of what you want to eat
• If you want to buy something make a goal before you can buy e.g do a ten minute run everyday for a week to be able to buy a new backpack.
• Go to spas, get a massage
Cancer/Scorpio 4th/8th
Sacral Chakra: Connection with others, pleasure, emotions, sexuality, sensuality, creativity
Exercise: Boxing, kick boxing, HIIT, Zumba, Running or sprinting, Weighted workouts, Plyometrics, Swimming
Hobbies: Writing fiction, poetry, journaling, painting or drawing, digital art, improvisational acting, music composition, jewelry making, filmmaking, podcasting, photography, mythology creation, cooking or baking, astrology or tarot, cosplay.
Yoga: Yin Yoga, Restorative Yoga, Tantric Yoga, Kundalini Yoga
Dance: Contemporary Dance, Argentine Tango, Salsa, Belly Dance, Bachata, Flamenco, Rumba, Pole Dance, Jazz Dance, Freestyle
Crystals: Amethyst, Rose Quartz, Moonstone, Black Turmaline, Smoky Quartz, Carnelian, Lepidolite, Citrine, Sodalite, Clear Quartz, Labradorite
Essential Oils: Rose, Ylang Ylang, Jasmine, Sandalwood, Lavender, Vanilla
Colors: Orange, Coral, Amber
Music: R&B, Soul, Jazz, Classical/Instrumental, Flamenco, Ambient/Chillout, World Music, Soft Pop, 582 hz, 639 hz, 432 hz, 852 hz
Healing Foods: Oranges, sweet potatoes, carrots, mangos, papayas, apricots, avocado, nuts and seeds, fatty fish, brown rice, oats, yogurt, kimchi, kefir, dark chocolate.
Tea’s and Supplements: Chamomile, rose, cinnamon, jasmine, hibiscus, ginger, lemon balm, holy basil, ashwagandha, maca, rhodiola rosea, vitamin D, l-thetanine, ginkgo biloba, St. John’s wort, 5-HTP
Key Componenets
• Giving yourself time to feel without judgment or rationalization
• Realizing that expressing yourself is not wrong and beginning to discern who can accept your expressive self
• Using creative outlets to express yourself
• Finding activities that is going to bring your focus and awareness
• Creating boundaries and values for relationships that enter your life
• Giving yourself time to self-love as well as express love
• Indulging in what you enjoy without guilt, enjoy your life
• Learning your manifestation technique
• Using your intuition and connecting to it more as a guide
• Learning to be instead of constant doing, learning your power is in being receptive to energies
• Nurturing yourself and others
Leo/Aries 1st/5th
Solar Plexus Chakra: Personal power, self-esteem, confidence, ability to take control of one’s life, identity, autonomy, inner strength
Exercise: Strength training, martial arts, HIIT, core focused workouts, functional fitness, group fitness class, adventure and outdoor activities, endurance training.
Hobbies: Public speaking, creative writing or journaling, diy projects or crafting, learning a new language, performance arts, volunteering or mentoring, gardening or sustainable, travel or outdoor adventures, music, learning a survival skill, networking.
Yoga: Power Yoga, Vinyasa Flow, Kundalini Yoga, Ashtanga Yoga, Hatha Yoga, Core Strengthening Yoga, Yin Yoga, Bhakti Yoga
Dance: Hip hop dance, contemporary dance, Latin dance, belly dance, jazz dance, ballet, freestyle dance, pole dance, Afro dance, burlesque dance, combat dance
Crystals: Citrine, Tigers Eye, Carnelian, Pyrite, Sunstone, Amber, Yellow Jasper, Garnet, Golden Topaz
Essential Oils: Bergamot, Lemon, Ginger, Peppermint, Rosemary, Clary Sage, Frankincense, Cedar-wood
Colors: Golden Yellow
Music: Pop music, hip hop and rap, rock and alternative rock, R&B, soul, EDM, reggae, heavy metal, inspirational, spiritual, Afro beats, 528 hz, 396 hz, 417 hz, 639 hz, 741 hz, 320 hz
Healing foods for you: Bananas, lemons, pineapples, yellow peppers, corn, brown rice, sweet potatoes, oats, ginger, turmeric, yogurt, kimchi, kombucha, nuts and seeds, eggs, lentils, chickpeas, oranges, mangoes
Teas and Supplements: Ginger, lemon balm, chamomile, peppermint, green matcha, rooibos, dandelion root, ashwagandha, rhodiola rosea, vitamin b complex, magnesium, turmeric, ginseng, probiotics, l-thetanine
Key Components
• Having self awareness and walking around with your head held high
•Living authentically to your true self, not conforming for others
• Taking action but also letting things be and relaxing
• Having trust and faith
• Leading with integrity and compassion
• Responding not reacting
• Aligning with your soul purpose
• The more you stay true to your values the easier success comes
• Being spiritual
Libra 7th
Heart Chakra: Love, compassion, forgiveness, emotional healing, relationships, unconditional love, empathy, inner peace.
Exercise: Fitness classes, walking, hiking.
Hobbies: Arts and crafts, cooking and baking, gardening, music and dance, reading and writing, animal companionship, sound therapy and singing, support groups
Yoga: Hatha Yoga, Restorative Yoga, Yin Yoga, Kundalini Yoga, Heart Opening
Dance: Contemporary, ballet, contact improvisation, tribal fusion belly dance, soul motion
Crystals: Rose Quartz, Rhodonite, Amazonite, Moonstone, Aquamarine
Essential Oils: Rose, Frankincense, Lavender, Ylang Ylang, Geranium
Colors: Green, Pink
Music: Classical music, pop music, ambient, folk, jazz, 639 hz, 528 hz
Healing foods: Kale, spinach, broccoli, avocado, kiwi, cucumber, nuts and seeds, blueberries, strawberries, raspberries, dark chocolate, salmon, sardines
Teas and supplements: Chamomile, rose petals, hibiscus, magnesium, zinc, b6, b12
Key Components
• Understanding of both yourself and others
• Staying humble and aware of both your strengths and weaknesses
• Healing from your past wounds
• Practicing forgiveness and giving others space to forgive
• Showing love unconditionally
• Practicing self love both on the physical and emotional level
• Discerning who is pouring love back into you
• Strive towards wholeness in your interpersonal relationships
• Seeing others as an extension of yourself
Gemini/Sagittarius 3rd/9th
Throat Chakra: Communication, self expression, speaking one’s truth, creativity, clear and authentic expression, verbal and non-verbal, honesty, open communication
Exercise: Strength training, team sports, Brazilian jiu-jitsu, Muay Thai.
Hobbies: Creative writing and journaling, blogging or vlogging, theater or improv classes, stand up comedy, painting and drawing, photography, public speaking groups, debate clubs, musical instrument, song writing, book club, volunteering
Yoga: Vinyasa Yoga, Kundalini Yoga, Bhakti Yoga, Hatha Vlog
Dance: Contemporary dance, salsa, ballroom, modern dance, ballet, contact improvisation, kizomba
Crystals: Sodalite, Aquamarine, Lapis Lazuli, Blue Lace Agate
Essential Oils: Peppermint, frankincense, eucalyptus, lavender
Colors: Blue, Turquoise, Light Blue, Lavender
Music: Indie, jazz, experimental rock, electronic music, post punk, folk, alternative rock, neo soul, acoustic, indie folk, 639 hz, 741 hz
Healing foods: Fresh herbs, vibrant vegetables, salmon, chia seeds, spinach, kale, pumpkin seeds, walnuts, dark chocolate, avocado
Teas and Supplements: Chamomile, peppermint, rosemary, omega-3-fatty acids, b -complex vitamins, l-thetanine, rhodiola rosea
Key Components
• Living authentically to who you are
• Being able to clearly communicate and also actively listen to others
• Actions and words align
• You allow your ideas to flow, write them down and execute
• Focused on personal growth
• You care only what you think of yourself
Pisces / 12th house
Third Eye Chakra: Intuition, perception, inner vision, spiritual insight, inner vision, spiritual connection, emotional awareness, visionary experiences
Exercise: Tai Chi, Qiong, Martial Arts
Hobbies: Journaling, Creative writing, poetry, nature observation, bird watching, art therapy or visual arts, meditation, reading, cooking or baking, gardening or plant care, traveling or exploring new places, listening to music or playing an instrument
Yoga: Yin Yoga, Restorative Yoga, Kirpalu Yoga, Bhakti Yoga, Yoga Nidra, Minful Vinyasa Yoga, Hatha Yoga
Dance: Ecstatic dance, belly dance, contemporary dance, qiong or tai chi inspired, sacred dance, trance dance, improvisational dance, chakra dance, butoh
Crystals: Amethyst, Lapis Luzuli, Labradorite, Moonstone, Clear Quartz, Sodalite, Fluorite, Lepidolite, Celestite, Lolite, Angelite, Kyanite, Selenite
Essential Oils: Frankincense, sandalwood, lavender, clary sage, patchouli, rosemary, geranium, juniper berry, myrrh, lemon, jasmine
Colors: Indigo Blue, Purple, Deep Blue, Violet, White
Music: Ambient music, new age, world music, chill wave, folk and acoustic, indie, electronic, classical music, chanting, binaural beats, 396 hz, 417 hz, 528 hz, 639 hz, 741 hz, 4-8hz, 8-12hz, 0.5-4 hz,
Healing Foods: Spinach, kale, Swiss chard, broccoli, arugula, nuts and seeds, blueberries, avocado, pineapple, bananas, oranges, apples, brown rice, oats
Teas and Supplements: Chamomile, holy basil, peppermint, green tea, Yerba mate, ashwagandha, omega 3 fatty acids, rhodiola rosea, b vitamins, DHA, l-thetanine
Key Components:
• Grounded in your intuition
• Writing down your insights
• Deeper connection to spirituality
• Living mindfully
• Take your time, slowing down
• Praying, talking to your spirit guide, connecting to your higher self
• Meditating
• Making peace within your life
• Spending time to yourself to nourish your vessel
• Affirming yourself
Virgo/Aquarius 6th/11th
Crown Chakra: Spiritual enlightenment, unity, higher consciousness, inner peace, non-attachment, meditation and contemplation, sense of purpose
Exercise: Tai Chi, Qiong, Martial Arts, Mindful Pilates
Hobbies: Journaling, art and painting, writing, music and sound healing, dance, hiking, gardening, nature photography, tide pool exploration, spiritual group, attending ceremonies, volunteering, reading, attending workshops and retreats
Yoga: Bhakti Yoga, Kirtan Yoga, Kundalani Yoga, Jnana Yoga, Raja Yoga, Vinyasa Yoga, Yin Yoga
Dance: Sacred Dance, Sufi Whirling, Gurdjieff Movements, Kathak, Bharatanatyam, Flamenco, Butoh
Crystals: Clear Quartz, Amethyst, Sodalite, Moonstone, Lapis Lazuli, Selenite, Citrine, Turquoise
Essential Oils: Frankincense, Sandalwood, Lavender, Rose, Patchouli, Myrrh, Bergamot
Colors: Violet, Purple, White, Silver, Gold, Lavender
Music: New age, ambient, world music, chanting, mantras, tribal, indigenous music, classical Indian music, ambient electronic, 432 hz, 528 hz, 639 hz, 741 hz, 852 hz, 963 hz
Healing Foods: Berries, coconut, apples, leafy greens, sweet potatoes, nuts and seeds, brown rice
Tea and Supplements: Holy Basil, chamomile, peppermint, green tea, lavender, omega 3 fatty acids, rhodiola rosea, ashwagandha, ginkgo biloba, vitamin d, melatonin
Key Components
• Clearing your mind through mediation
• Writing and journaling in order to empty your brain
• Using your wisdom in practical ways
• Writing down your spiritual insights
• Trusting your gut
• Learning the art of detachment
• Living in the present moment
• Spiritual connection that allows you to view life in multiple ways
• Healthy body and feel energized for the day
• An inner peace
• You practice gratitude
• You extend yourself to others in a helpful and compassionate way
#astroblr#astrology#astro notes#astro observations#astro placements#astro community#aries#cancer#capricorn#gemini#taurus#leo ♌️#virgo#libra#scorpio#saggitarius#aquarius#pisces#chakras#spirtuality
252 notes
·
View notes
Note
Draw Jiro pslsospslslslsslsls
my requests aren’t open !! but i’ve been thinking about jiro doing ctar isometric exercises a lot recently lol so here’s jiro w his ctar ball

#he’s sweating a bit bc i just made him do 10x 10s reps…#sorry jiro we gotta keep ur hyolaryngeal function up somehow!!#tokyo debunker#jiro kirisaki#lin doodles#lin answers#<- forgot I had that tag tbh I haven’t been tagging my asks lol
74 notes
·
View notes
Text

A fundamental part of traditional training the horse riding stance (Ma Bu in Chinese) is a popular yet painful exercise. Here we are going to look at the anatomy of Ma Bu and some of the benefits it produces.
Ma Bu is an Isometric exercise in which the muscles are contracted and held in a static position, what is great about Ma Bu though is that it performs two tasks simultaneously; it is both isometric strength training for the quads and glutes and isometric stretching for the inner thigh.
Muscles stretched:
Adductor longus, Adductor brevis, Adductor magus.
Gracilis, Pectineus, quadratus femoris
Isometric stretching can be uncomfortable, but holding tension in the muscles while they are lengthened will increase flexibility and improve the strength of the muscle fibers.
By pushing out the knees we will stretch the muscles of the inner thigh which are used to adduct the leg (pull it towards the centre of the body,) if you want to increase your hip flexibility, kicking range or do the box splits, isometric training of the adductors is of substantial help.
Muscles Working:
Quadriceps femoris (rectus femoris, vastus lateralis, vastus intermedius, vastus medialis,) Gluteus maximus (used to outwardly rotate the legs.)
The quads and glutes are some of the largest muscles in the body and used for things such as running, jumping and kicking.
Physical and mental endurance:
Holding Ma Bu for even two minutes is tough, (five minutes is great, going beyond this is said to have little impact on strength gains,) but by holding this high intensity position we are improving our muscular endurance and lactic threshold.
Importantly it isn’t the body that gives out first for a majority of people it’s the mind, we just give up. Holding through the pain when you really want to quit will increase your mental endurance and discipline.
Ankles knees and hips:
Because we are talking about a low horse stance with the feet facing forwards, we will increase the tension on the tendons and ligaments of the hips, knees and ankles, this is fantastic for drawing blood to these areas increasing their strength and health.
Ma Bu may be limited by its static training position when most of our training requires us to move, but it provides some unique benefits and can quite easily be added to your training regime if you have a few minutes spare, which let’s face it we all do at some point.
-Gary Matthews
#sifu kisu#atlab#lok#northern shaolin#northern shaolim#kung fu#jian#baguazhang#atlab lok#piandao#mabu
42 notes
·
View notes
Text
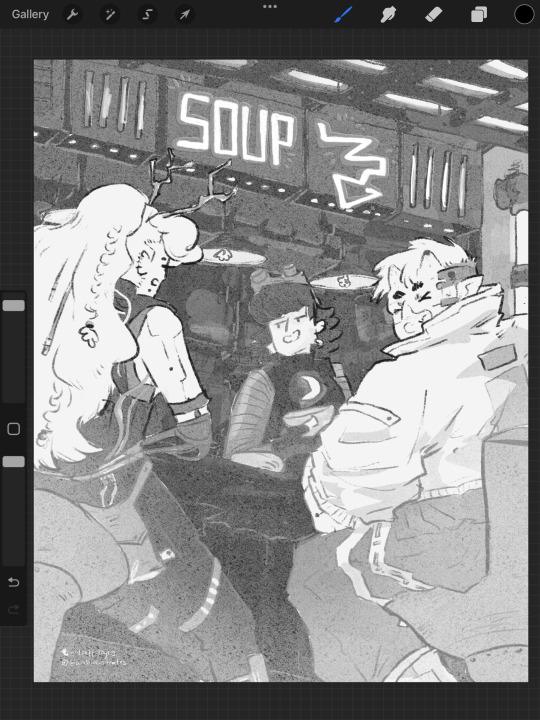
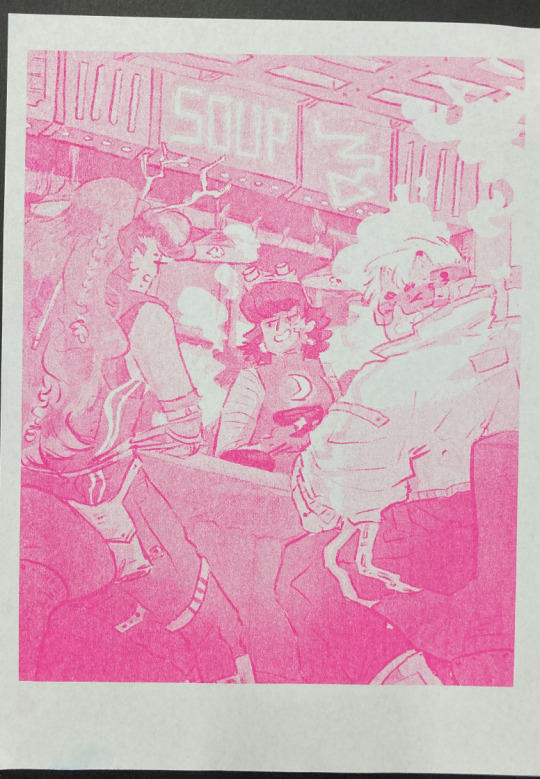
23rd Feb '24 - [arch] OH RISO my beloved!!!!!! ft. cyberpunk hermitcraft soup group
A cliffhanger!!!! And now I have to wait a month for you to upload the second half?? How will I cope :’’0
For real, it’s so awesome to see your process and the sheer amount of inspiration you take! In particular, I thought ‘Sit on Two Chairs’ and ‘This Was Our Pact’ were particularly yummy.
I think book covers are really hard. You have to sum up a book’s energy in one image, make it stand out and show just enough so people want more. Exploring the narrative through those full pages is really interesting - though this is something you did for fun, it could be a really useful technique for getting to know a narrative. When I’m designing my comic covers, I always do it last - that way I’ve had practice with the visual style and I’m thoroughly familiar with the themes, so I guess spending a bit of time with the characters and narrative in this way helps for standalone book covers too. Of course, it helps if you have the time for that XD
Okay!! Onto what I've been up to!!! [warning this is a beefy post I'm sorry for your poor reading brain]
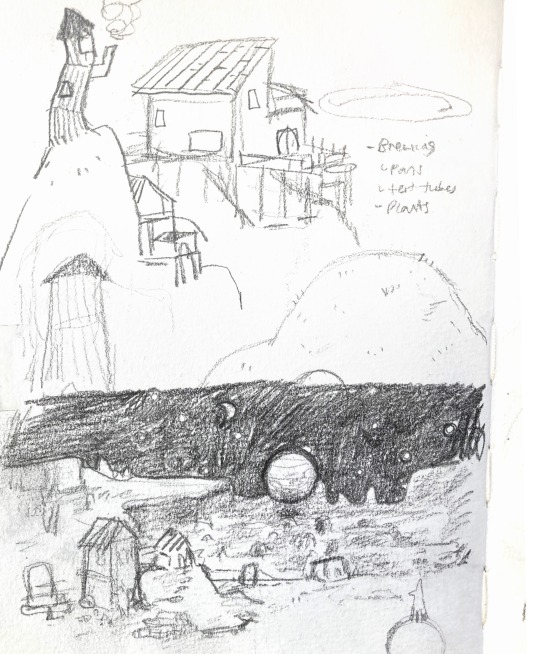
The past two weeks have been really enjoyable! I’ve been playing a lot with slow world-building, in sketchbooks, google documents, and voice notes to friends. Letting myself really sit with concepts, think about the characters, let them play in my head with no expectations. With this relaxation and lack of pressure, some beautiful narratives and interactions have been developing. I’m starting to need a name for a world/ the story. I’m not quite ready to give them a full introduction to the internet - I know it doesn’t but it feels like there’s some accountability to *produce something* and this slow development is really important for the quality and my skill building. It’s really hard to take on, but we actually don’t have to make the perfect thing now! In fact, it’s impossible. Pressure on ourselves makes it so hard to make something good if we’re always grasping at the final result. In the meantime, while those characters develop, I have been working hard on my basic skills. I wrote about characterization last post, but this week I focused on setting and colour. I was inspired (once again) by Hermitcraft. I’ve seen some really incredible illustrations of Minecraft builds in the fandom, and it seems like a great exercise.
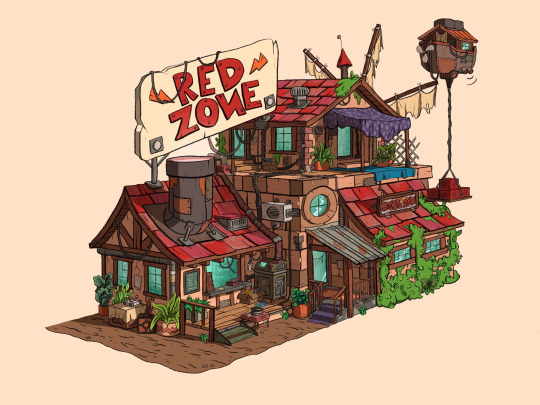
Bdouble0's Season 10 Base illustrated by @applestruda [source] and The Red Zone, built and illustrated by Bdouble0 [source]
One of the creators on Hermitcraft, ImpulseSV, created this build in a recent episode. It takes inspiration from the last season of Hermitcraft, where he was part of the ‘soup group’ with two other players, and his current base concept - a cyberpunk city. I also LOVE his new character design, so I wanted to place him in the scene.
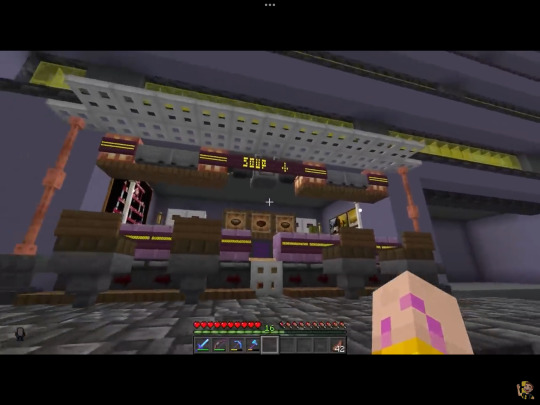
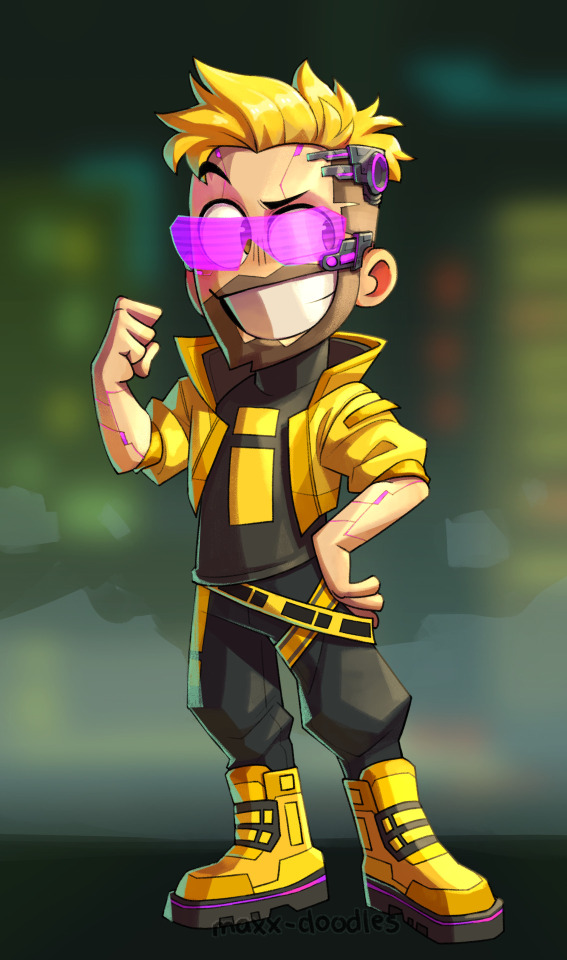
Screenshot from Impulse's video and new impulse design by @maxx-doodles
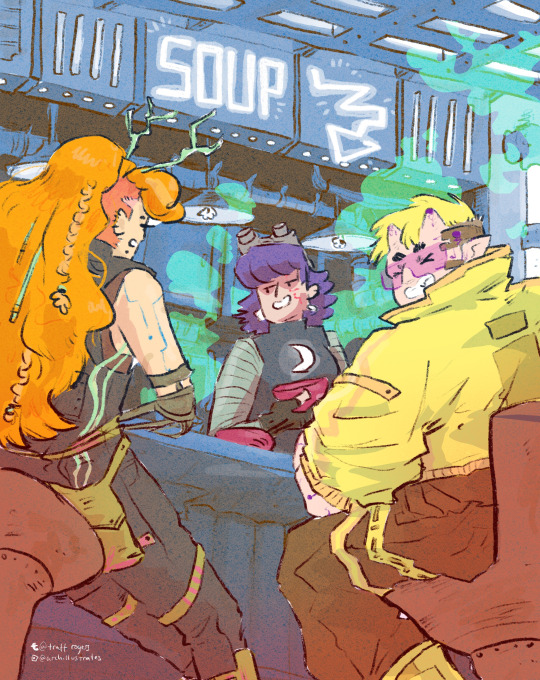
Here are some initial thumbnails I did, trying to figure out the composition. I wasn’t sure of the vibe yet, so I tried some rough thumbnailing, and drawing on an isometric grid and other perspective techniques. I’m going a bit mad for characters at the mo, so I wanted to place some in the scene. I found the angle of the isometric grid steep to place characters comfortably, so decided against that.
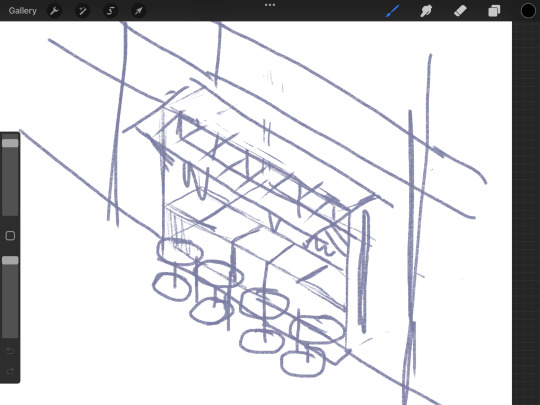
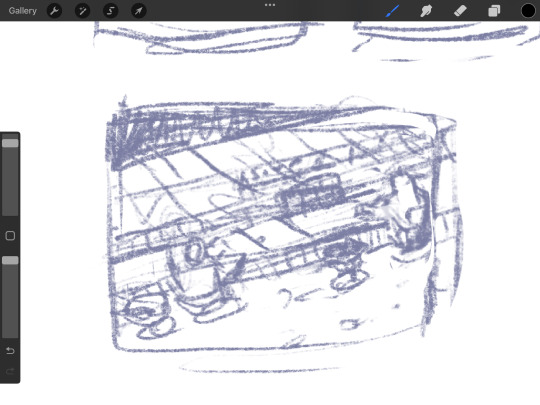
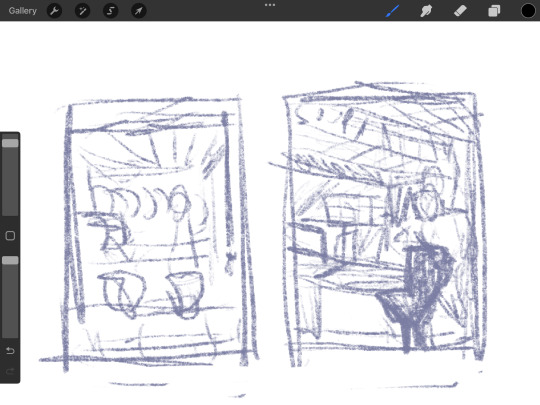
Looking back at it, I love the second! But I believe I was struggling with the perspective. I decided on the last one eventually.
Now, I absolutely adore all of the players in the Soup Group, and I am BIG fan of redesigning their notable characteristics to suit different settings. So yes, I decided to put all of the soup group in the image.

PearlescentMoon (left) from my comic and GeminiTay's Hermitcraft Season 10 design [from this thumbnail] (right)
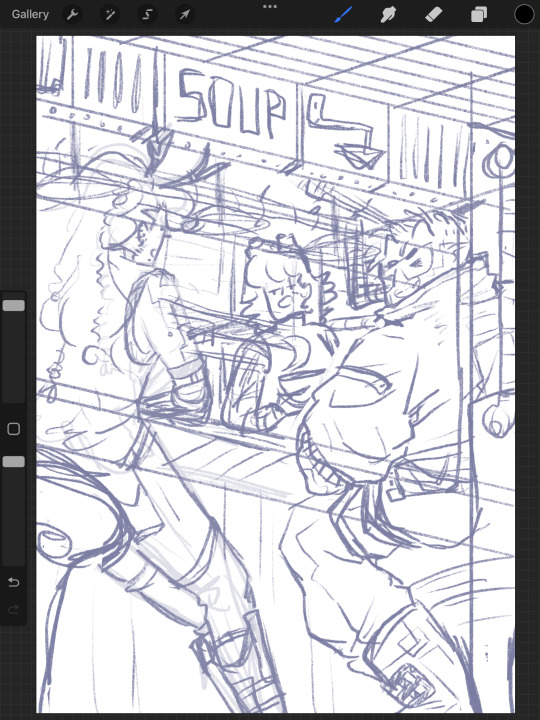
Here's the sketch of the final image. I really enjoyed coming up with cyberpunk versions of them all. I used the impulse design almost exactly, with a few extra interesting details since he's mostly viewed from the back. For PearlescentMoon (middle) I kept her fringe, dark hair and gave her a glowing moon symbol on her top. For GeminiTay, I kept her long ginger hair, antlers (but glowing!) and took inspiration from her new season 10 design - a dark blue jumpsuit to match her dark blue clothes in her new design, and the braids she is often drawn with. I also gave them edgy new hairstyles. And a robot arm. I don't have lore for that.
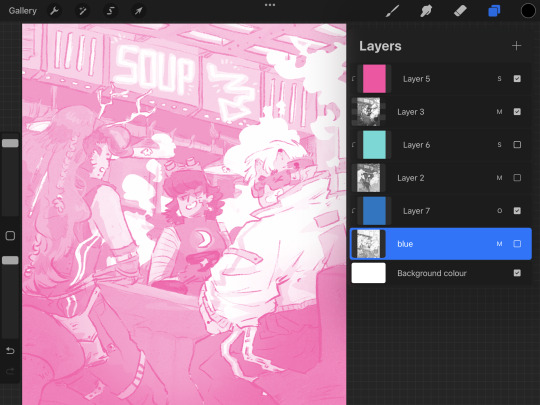
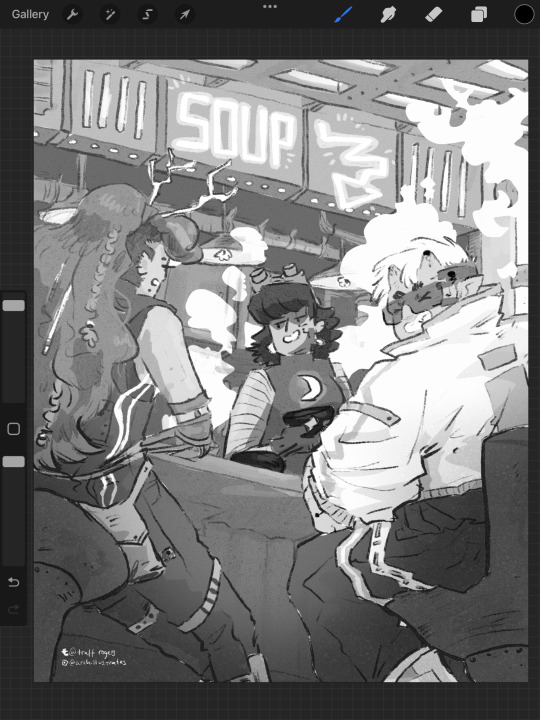
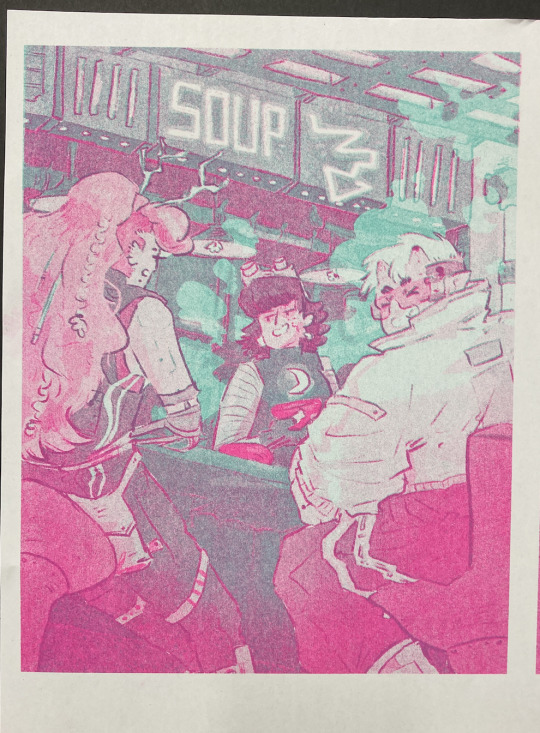
As usual, I filled each flat colour-to-be with black and lowered the opacity to play with the values. Then I added colours one at a time, aware might be riso printing it. Originally I stuck to trying to make it printable (making the colours out of ones I could make my layering 2-3 colours at different opacities), but as I went on, I decided to drop that and focus on the quality of the image in a digital format alone. I did keep the grayscale version above with all the separate layers in case I needed that if/when I came to riso printing it. Below are the main two digital colour schemes I tried out.
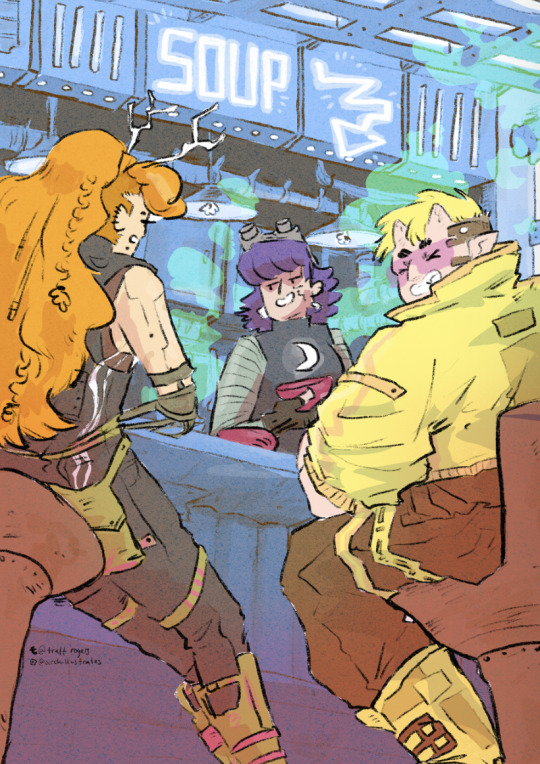
I settled on the one on the left, with the blue tones - the foreground characters really pop. I put a few details in Gem's hair, colour variations etc, and cropped it for Instagram. I actually much prefer the cropped version - it sits better in a rule of thirds.
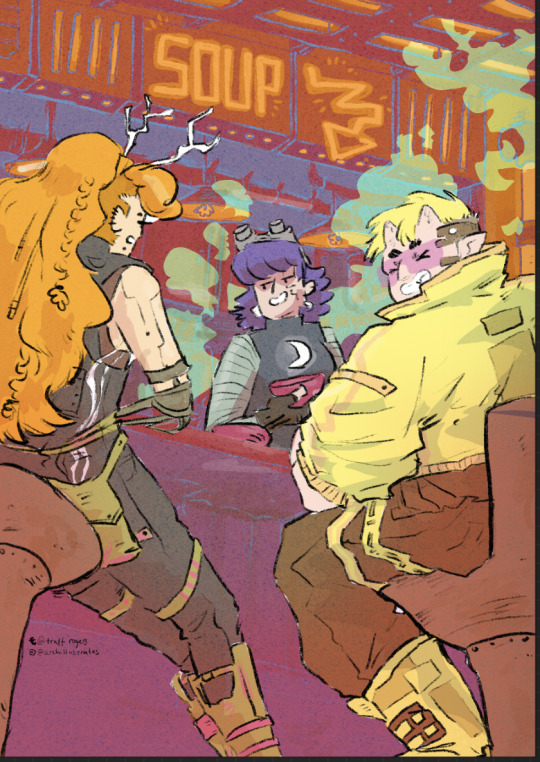
Now the moment we've all been waiting for :'')
RISO!!!!!!!!!!!
I returned to Cardiff after a couple of months away and was delighted to spend my first day back at The Printhaus, an awesome shared print studio where I have basically made my home. A few of my awesome friends happened to be there, so I spent the day playing around with this image with their help! (please check them out they're very cool - Gavin helped me a lot (we hung out at Thought Bubble, remember? and Rhi gave good crits too!!)
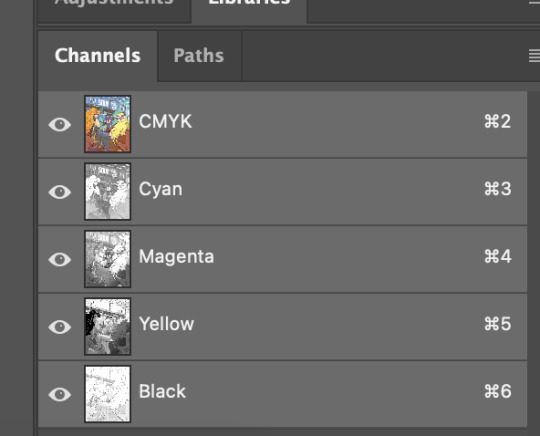
For those who don't know, risograph is basically a shitty photocopier that can only print one colour at a time. However, you can play with gradients and opacities, and layer colours really nicely to combine. I've done a lot of single-colour tonal work with riso but this is my first go really layering.
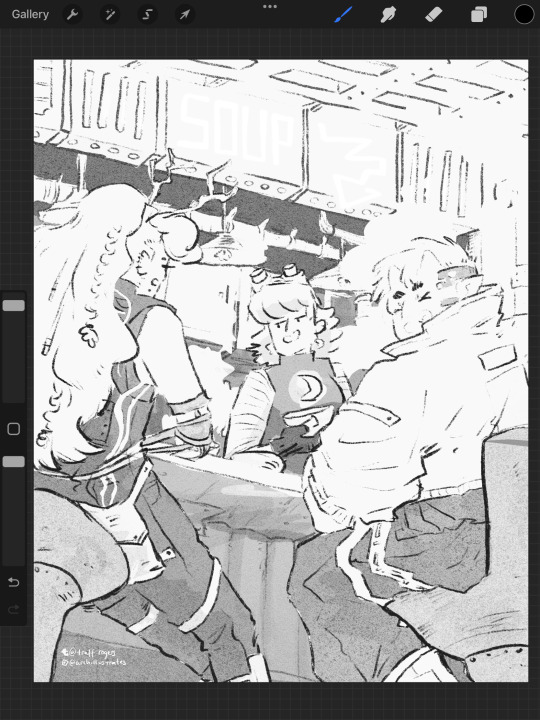
First, Gavin showed me how to separate the channels in Photoshop, using the flat image uploaded to the 'gram. We copied and pasted these layers in grayscale and added blending modes to each layer to replicate what they might look like when printed.
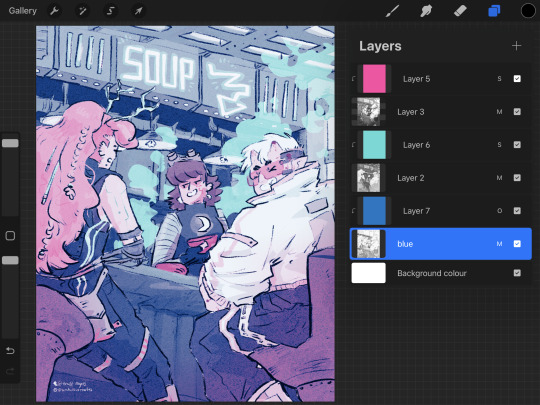
With blending modes, the digital mockup looked like this!!
This bit goes into technical details for replicating what the print might look like for those who might want it - feel free to skip :)))
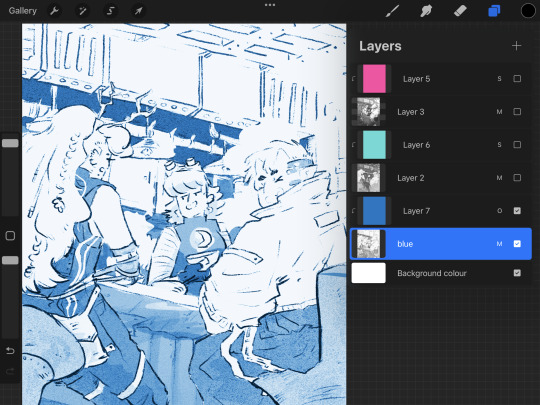
I copied and pasted the Cyan, Black and Magenta layers as greyscale (as you can see above)
I made all of the greyscale layers multiply layers since risograph ink is transparent and we wanted to see how it layers. The ink usually comes out a bit lighter than you think, so it's good to bear that in mind. I used a clipping mask over each greyscale layer and a blending mode. WHEN YOU PRINT, PRINT IN GREYSCALE, NOT COLOUR.
Here's how I split the colours from CMYK to the riso colours, their hex codes and the blending mode I used to replicate the colours:
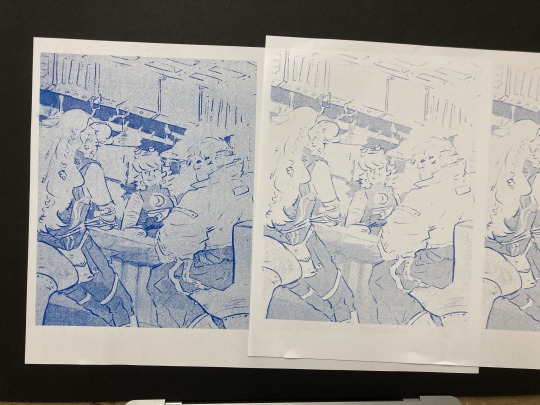
Cyan - Mint [HEX#82D8D5] Screen Magenta - Fluorescent Pink [HEX#FF48B0] Screen Black - Blue [HEX#0078BF] Overlay Yellow - scrapped for colour scheme purposes
Blue, Mint and Florencent Pink layers in greyscale in Procreate.
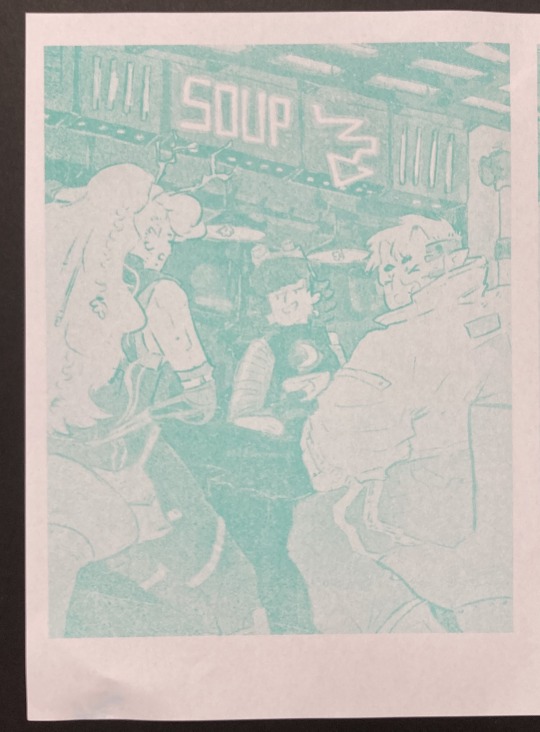
Riso printed Mint and Florescent Pink layers on separate paper, followed by the two layered together.
We always start with the lighter colour inks first, because sometimes the rollers can pick up the ink and cause extra marks where you don't want them. The first two colours came out great!
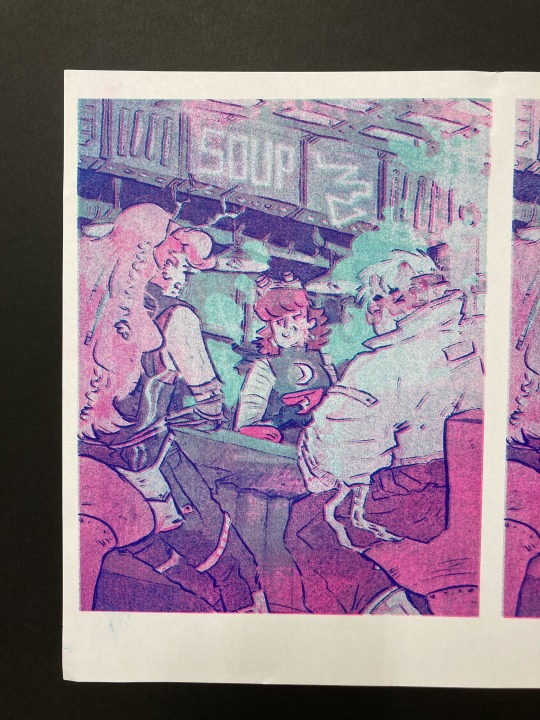
The first time we printed the blue, it came out very dark (left, first image). I have had this issue before - my last book, Winter Wellbeing, came out much darker than I wanted. Now I realise that the blue ink is super sensitive. All the 'white space' that is covered by a low-opacity blue on the left is only 2%, and yet it has come out pretty strong. We tried printing it on one of the misaligned images just to see, but it took all of the brightness out of the neon soup sign at the top of the image (second image). So I changed the values and pushed them way lighter, so it just pushed the values of the darker bits slightly, and brightened some of the lineart (right, first image)

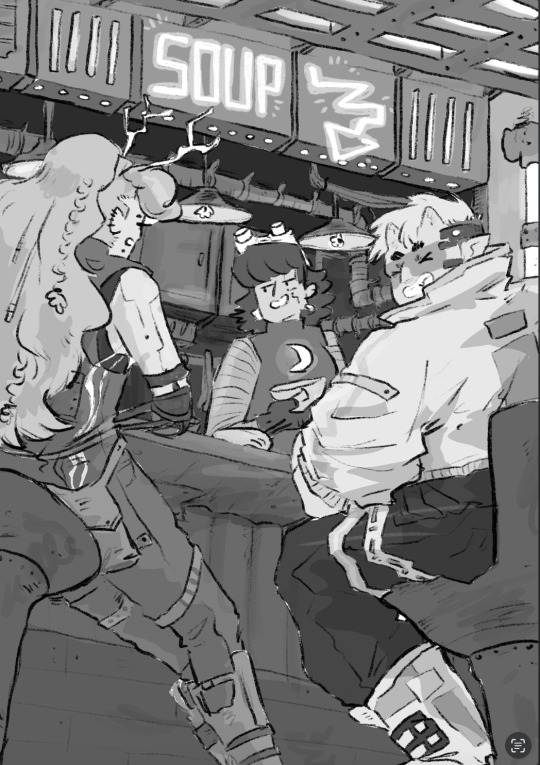
And this is the final riso printed version!! I'm so so happy with how this came out. It's so different from the original digital version, and I actually love that.
I didn't create new colours in the way that I intended to - I wanted to play with overlaying purposefully to create specific colours eg. orange for the hair etc. But!!! I'm really happy with how it came out. That will have to be a project for next time.
Also, many copies are slightly misaligned, so in future I think I'd do flat layers for the colours a more blobby style with the linework on one layer only so there's less of a chance for obvious misalignment. design for the riso, rather than riso the design.
Overall though, this feels like a super cool step up and a milestone for me. Super happy with how it came out!! And I'm excited to play with colour some more. Can't wait to see the rest of the Lionheart brothers! Enjoy your weekend :)))
Archie 🕺🕺🕺🕺🕺🕺🕺🕺🕺🕺🕺🕺 <3
#archillustrates#arch is learning#smileyshri#project development#art#art process#art resource#process#artists on tumblr#illustration#comic#picture book#small art blog#art blog#illustration blog#female artists on tumblr#queer artists on tumblr#illustrator#book illustrator#female illustrator#queer illustrator#comic artist#comic art#female artists on instagram#artists on instagram#procreate#digital artwork#digital artist#artist blog#artist on tumblr
22 notes
·
View notes
Text
NOMIA
Hi everyone, been a while! I'm making an isometric tactics game called NOMIA.
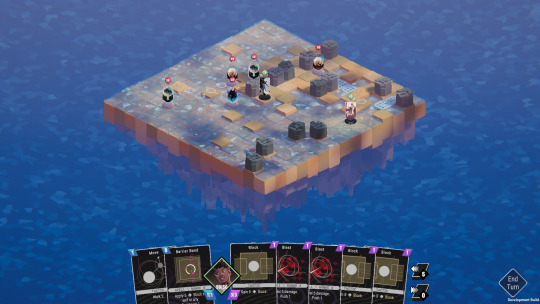
What's the summary?
It's Final Fantasy Tactics meets Slay the Spire.
It's about the characters I've been drawing, navigating a dreamlike world where things that fade from the collective memory coalesce into places and creatures. It's an exercise in making a cozy fantasy setting that explores lesser-seen worldbuilding elements.
What makes this unique?
I'm focusing on three things that I hope will make for a fun and unique experience.
1. Your hand has two halves. The left side of your hand represents your Actions, which persist between turns, but have charges and cooldowns. The right side of your hand represents your Gambits, which are drawn from a deck of cards each turn, and are discarded when played. You can add to both decks over the course of a run, expressing your playstyle through character building as well as deckbuilding.
youtube
2. Your party has two heroes. You'll always pick two at the start of each expedition -- a Mighty and a Magical. The Mighty has more Actions. The Magical has more Gambits.
youtube
Each has a unique deck of possible cards.
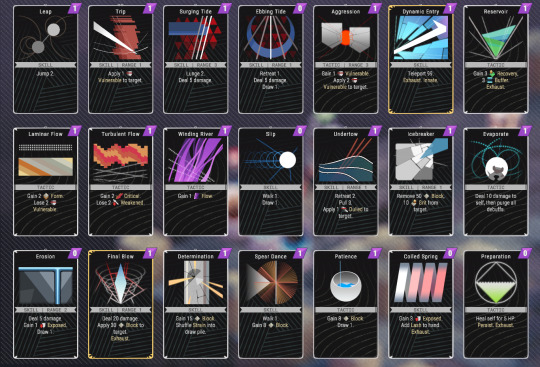
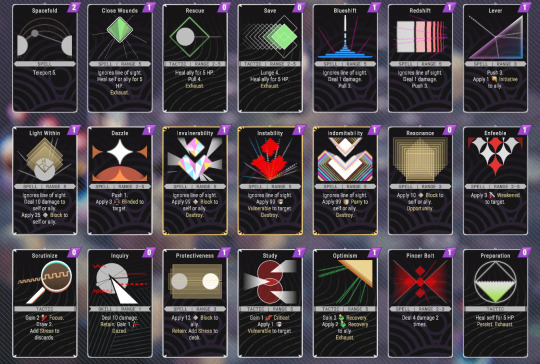
3. Your enemies have tells. Enemy intents are shown on your turn, rewarding clever defense. Intents are adjusted when you play cards, but not randomly; enemies have a goal in mind and will do their best to achieve it, allowing you to counterplay.
youtube
You can make enemies reconsider their target by attacking them. A character can play tank for their partner if they're in a pinch.
youtube
What am I working on?
I've spent roughly the last four months laying the groundwork for the card battle system, and figuring out a card creation pipeline and art style that would make it feasible for me, one (1) person, to make hundreds of unique and interesting cards.
I hope to achieve a sense of multiplicative game design -- that is, each aspect of the game creates synergies with the others, creating many possibilities and stories.
Next, I'll be working on run progression, and unique map/enemy generation for the different biomes I have in my head.
Thanks for taking the time to read my devlog!
---
(What does NOMIA stand for?
It stands for No One Makes It Alone. I am, ironically, making this alone. But I also like to think of it as a meditation on the fact that even in this situation, I'm benefiting from the work of countless people who have inspired me and laid the groundwork for what I'm trying to do.)
#indie games#gamedev#game development#nomia#oc: butterfly#oc: seagull#my art#my game development#Youtube
15 notes
·
View notes
Photo
May or may not have forgotten what I posted here myself months ago so the last post had a few repeats. oops.
Well I know for sure this one won’t because I stopped posting when I started the second semester, which is what this post is about. So the drawing above is the start of working with more complex shapes, using the ones we learned from last semester. This is also where things got interesting, since I could see the potential for architectural drawings.

There are a lot, and I mean A LOT of drawings like these in my sketchbook, I’m gonna show you only the ones I find interesting.
After that we went back a bit for cast shadows, which I have decided are my new mortal enemy in art. A long time ago it was rendering hair, but that’s nothing compared to this.

The amount of calculations you need to do for this and the different formulas for each shape make me wanna rip my hair off. And that’s before getting into more complex shapes.
They're not 100% correct but my teacher said the majority of people won’t notice anything wrong so I shouldn’t worry about it. I won’t until I need it for a personal project, then I’ll get very annoyed again.
After that nightmare I got rewarded with finally using colors to render for the first time!!! I love rendering with colors so I was very excited haha

The copper (right middle sphere) is my absolute favorite, and my teacher really liked it as well.
We also had a small lecture on arrows and ribbons/fabric and we got to render them with colors as well.

For all the colored drawings I used a combination of alcohol markers and colored pencils. The markers melted and blended the pencils and I could use this to mix colors I didn't have. For example, I didn’t have a red marker at all.
After that we had a fun exercise where we needed to either study an object or design our own. The purpose was to use the previous lessons about shapes in perspective, and the rendering of different materials. I went with a gun design, but not just any gun-this one is technically 3 guns, a pistol and an SMG that you can connect and form an assault rifle. So I designed each gun separately (somehow I managed to turn this exercise to designing 3 objects instead of one, leave it to me to make it harder on myself lmao), and thought about how they connect, making sure the chambers kinda align and stuff like that.
I don’t wanna brag but I got the highest grade in the class for this assignment. Mostly because I’m the only one that actually rendered the different materials (or tried to), but also because my teacher liked the idea and thought it was interesting, and something people would actually buy if it was real.

It’s not the best but I literally didn’t have a grey marker so I was pretty limited. I chose a stained-glass theme for some reason, I didn’t want to make it a normal looking gun. The scan made it a bit more contrast-y than it is irl.
After a huge break we came back and had one lesson of silhouettes, something I kinda knew but never went out and made studies of. The challenging part of this was the time limit, at the start we had a minute, but it went down to 30 seconds. We were allowed to go overtime but it wasn't considered good.


On the same lesson, we also had life drawing, using each other as models. We had to get the pose down in one minute, and then take that as a reference for a more detailed drawing. I chose to completely change the context at that point lol


The next lesson was about isometric perspective. I don’t think I’ve actually talked about this here, but I got scammed by a guy who asked me to make him a city island in isometric perspective, then when it came time to pay, he “took a vacation” for two weeks. Came back to tell me he’s definitely gonna pay me. Proceeded to disappear. Anyways I haven’t done isometric from that moment until this lesson, where we were given a prompt word and had to draw an environment following it. I used only colored pencils for this one because I forgot to bring my markers, but it was a nice restriction to only use 12 colors and try to combine them to make the rest. I really enjoyed this one since I got the freedom to make something cool.

(the prompts are top-to-bottom forest, COVID-19, underwater and space) my teacher walked up to my desk to see what I’m doing while I worked on the space one, and he said “you are crazy” every time he passed by. He showed everyone’s work around, and a lot of people liked mine :) The space one is based on a black hole btw, but if it was an eldritch horror.
The last lesson was a time for the teacher to review everyone’s work one by one, so most of the time we were waiting for our turn. He put up a pic of an old camera if any of us wanted to draw it, but I used it as a reference for a building because it reminded me of art deco architecture. After finishing that, I had an idea for a shrine kind of place, inspired by a spot I built for a friend’s minecraft server that we didn’t end up using. And I topped it off with Lykena and Eivrun sketches (that for Eivrun might turn into a full painting when it’s her turn)

The entire year my teacher was occasionally asking me if I’m not getting bored, because we were going through a lot of basics I was obviously proficient at already, but I always found something new to learn, no matter how small, even on topics I practiced a lot before. So I’d say this workshop was very useful for me. And besides, it’s always good to get critiques from a professional, and from people who are interested in art.
#original art#Art Studies#uni work#my teacher was pretty mean but he wasnt mean to me#probably bc i never gave him trouble but also i dont think i look like the person that can take his roasts lmao#i learned a lot about perspective from this year#which is good bc it was a weakpoint for me
5 notes
·
View notes
Text
Why Should You Enroll in a Piping Modeling Course in Chennai with Job Support?
A Piping Modeling Course in Chennai with Placement Assistance offers aspiring professionals an opportunity to develop industry-relevant skills in piping design, 3D modeling, Piping Modeling and Drafting Course in Chennai, drafting, and stress analysis. At Conserve Academy, students receive hands-on training with industry-standard software, preparing them for high-demand roles in Oil & Gas, Construction, and Manufacturing sectors.

Key Benefits of the Piping Modeling Course:
• Comprehensive Training: The course covers piping fundamentals, software expertise, drafting, and 3D modeling. • Industry-Standard Software: Master leading software like AutoCAD Plant 3D, Bentley OpenPlant 3D, and Caesar II. • Real-World Application: Learn through practical exercises, project-based learning, and case studies. • Experienced Instructors: Gain insights from industry experts with hands-on experience in piping design and engineering. • Placement Assistance: 100% job support with career guidance, resume workshops, and interview preparation. • Flexible Learning Options: Courses designed for both freshers and working professionals, with part-time and full-time schedules.
Why Choose Conserve Academy?
• Industry-Aligned Curriculum: The course structure ensures practical skills and real-world knowledge. • Hands-On Learning Approach: Training includes 3D modeling, isometric drawing generation, and clash detection. • Strong Career Prospects: Graduates can secure roles as Piping Design Engineers, Process Engineers, and CAD Technicians.
Conclusion
Enrolling in a Piping Modeling Course in Chennai with Placement Assistance at Conserve Academy equips you with the technical expertise and practical skills required for a rewarding career. With expert-led training, hands-on experience, and strong industry connections, this Piping Modeling Certification Course in Chennai enhances your employability and prepares you for opportunities in Oil & Gas, Construction, and Manufacturing sectors. Take the next step towards a successful career with industry-focused training.
#piping Modeling in chennai in chennai#piping Modeling and drafting course in chennai#piping Modeling certification course in chennai#piping Modeling courses in chennai in chennai
0 notes
Text
Ab Workouts For Boxing
Your abs keep your torso steady and straight, but they also help power your motions, particularly punches that entail twisting the torso and hips.
Any ab workout for boxing should include both exercises that enhance your ability to resist movement (such as planks) and routines that strengthen your core's ability to move (such as sit-ups). Try doing 2-3 rounds of these exercises for a 10-minute ab workout that you can do at the end of your other workouts a few times per week.
Russian twists: Boxers benefit from Russian twists, which strengthen the hips and upper body for twisting movements.
1.1. Sit on the floor, feet in front of you, knees bent, facing the ceiling.
1.2. Lean back until your upper body and thighs form a 90-degree angle, and your feet are off the floor.
1.3. Keeping your legs motionless, back straight, and core engaged, twist your chest such that you can place both hands on the floor on one side.
1.4. Return to the center and rotate to the opposite side.
1.5. Repeat for the appropriate number of reps.
2. Single-arm overhead kettlebell march: This workout strengthens the core, increases shoulder stability, and enhances coordination—an excellent choice for aspiring boxers!
2.1. Standing with feet hip-width apart and carrying a kettlebell in one hand.
2.2. Engage your core and press the kettlebell overhead, keeping your shoulders fully pulled up and your hand stacked over your shoulder.
2.3. Begin slowly marching on the spot, trying to keep your body and weight as stable as possible.
2.4. Repeat for the appropriate number of reps.
3. Inchworm: The inchworm works both the core and the stabilising muscles in your shoulders, hips, and legs, making it an excellent exercise for developing overall body stability. It also helps to stretch the posterior chain and can be used as a total-body warm-up exercise.
3.1. Stand with feet hip-width apart and core engaged.
3.2. Keep your legs as straight as possible, lean forward at the hips, and place your hands on the ground.
3.3. Walk your hands forward until you're in a full plank posture, with your body in a straight line from heels to head and shoulders, chest, core, and quads engaged.
3.4. Keeping your hands motionless, walk your feet towards your hands while keeping your legs as straight as possible, bringing your hips closer to the ceiling.
3.5. When your hands and feet are together, roll up through your spine to stand.
3.6. This is one rep
4. Deadbugs: Deadbugs teach the core to resist movement since you must maintain stability as your legs and arms move. It also improves coordination and balance. Lay with your back flat on the floor, arms stretched above your chest, and legs off the floor, knees bent at 90 degrees so your shins are parallel to the ground. Brace your core by drawing your belly button towards the spine until your back flattens on the floor. Slowly drop your right arm to the floor behind your head while simultaneously lowering your left leg to the floor. Pause before returning to the starting position and repeating on the opposite side.
4.1. Hollow holds the hollow hold is a difficult isometric exercise that is ideal for developing core strength.
4.2. Lay down on the floor, arms extended overhead.
4.3. Tuck your pelvis towards your ribs and drag the belly button in towards the spine, flattening your lower back into the floor. This will engage your core.
4.4. At the same moment, elevate your head, shoulders, arms, and legs off the floor, while keeping the mid and lower back and glutes flat on the floor.
4.5. Hold for as long as feasible or for the required time.
#Fitness#Health#gym#Workout#Exercise#FitnessGoals#GymLife#FitLife#Cardio#StrengthTraining#Yoga#Pilates#Running#FitFam#HealthyLiving#FitnessJourney#FitnessMotivation#Fitspo#Fitspiration#HealthyLifestyle#Sweat#TrainHard#NoPainNoGain#FitnessAddict#FitGirl#FitGuys#nutrition
0 notes


Text
These are some of the assignments that I first completed while studying Concept Art, aimed at practicing basic art skills. These assignments are not exactly portfolio-worthy, but I still liked their outcome.

Isometric asset designs for the mobile game Monster Legends.

Old, abandoned park for the animated series, Hilda, drawn in one-point perspective.

Bumper car for a theme park in Little Rodentia, a location in Zootopia, drawn in two-point perspective.

A "First Ones"-ruin, a temple dedicated to She-Ra, for She-Ra and the Princesses of Power. Drawn in three-point perspective.


Some human studies. These aren't very good, but they helped show me that it is possible for me to improve my human drawing skills.


Some basic painting exercises.
If you're interested in my work that made it to my portfolio, please check out this album on my ArtStation:
#artists on tumblr#art#perspective practice#traditional art#digital art#didgital painting#human studies
0 notes
Text


VISUAL DEVELOPMENT CLASS
This class was to help us get an understanding of the process of planning or starting something and forming an end result using the metamorphosis by Franz Kafka. the isometric sketches are a good exercise for visual awareness and spatial understanding. I liked the assignment because at first, I thought I had to do it in 2d or drawing which I'm not so good at. but I was told I could use my 3d skills and visualize what Franz Kafka's metamorphosis looked like. I became intrigued, now I'm looking into his works more regarding how he saw the world came up with these stories to inspire my own approach to story expression
0 notes
Text
youtube
Lesson 2: The Different Types of Perspective Drawing In this lesson I talk about the different types of perspective. 1,2,3,4 and Isometric perspective. Using simple box examples for now. I add few extra exercises afterward and end the lesson with 3D model of the perspective in motion so you can get a realistic dynamic idea of how perspective looks like in 3D.
I Hope you find it helpful and enjoyable to watch 🙂
1 note
·
View note
Text
Week four: perspective sketches
This week our learning was about perspective sketching. This helps visualise a concept for how it would look in real life, projected onto a 2D page. There are a number of different types of perspective sketching such as one, two, and three point perspective, as well as isometric perspective drawing. Each have their uses and purposes, however the scale of objects that industrial designers focus on lends itself to using a 2 point perspective drawing.
Our first exercise was to translate a view of a chamfered box to a perspective view. This involved gathering measurement distances from where we viewed the box in real life in relation to our eyes. My view point was about 150 mm down and 300 mm away from my eyes. These measurements were used to set the distance from the ground line to the horizon line, and the picture plane to the station point. Once these lines were established I went about constructing my drawing.
I realised that my first go didn’t look quite right, and I established that I had not referenced my vanishing points correctly. I had not properly followed the angle to the top of the PP line, then directly down to the HL (I had just gone straight from the ground line to the HL). This meant that my vanishing points were too close to the object to give the right perspective. I redrew my guides with the proper angles and vanishing point positions I fixed this my sketch came together.
I still don’t feel particularly confident in my understanding of all the different planes (HL, PP etc.) their names and different uses. However the more I construct accurate sketches the more I will become familiar with their functionality and usefulness.
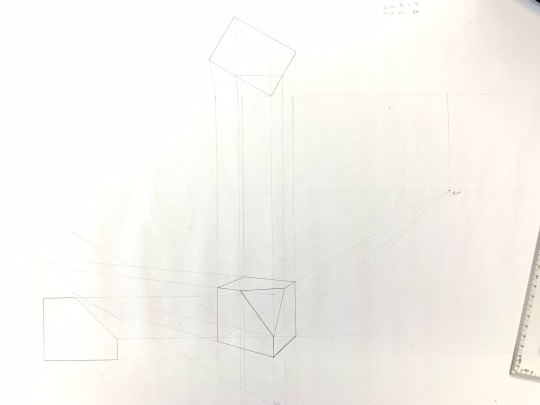
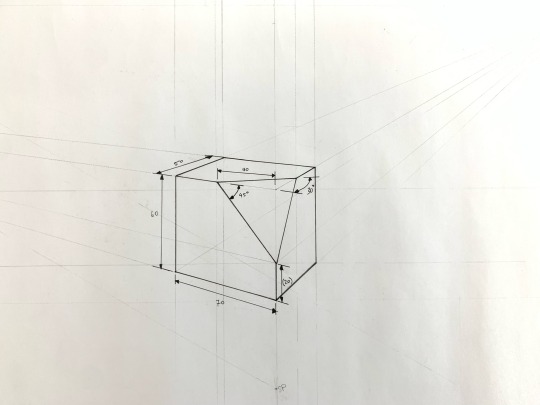
Adding boxes in the next exercise initially looked quite complicated — how do you establish the measurement points? I found using the centrepoint method to be a very neat and straightforward way of extending shapes in the desired direction. This is done by establishing the midpoint of the edge you wish to extend pass, and drawing an X extending from the corners below, through the midpoint, until they hit the vertical bounds of your box. This then gives the other corners with which you can establish a perspective box.
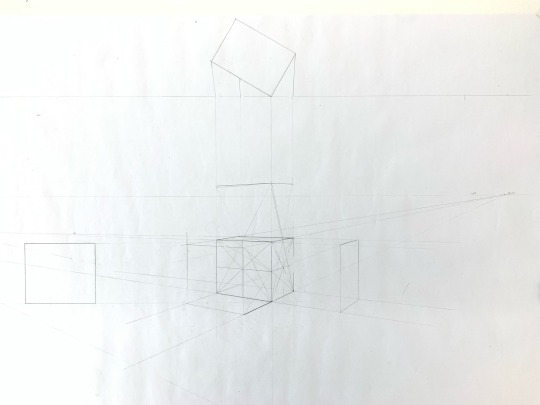
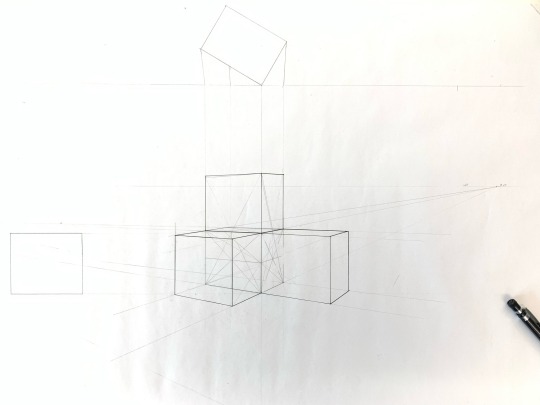
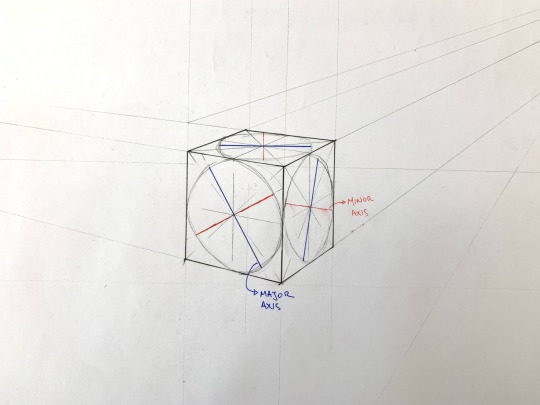
When it came to establishing ellipses on the faces of the cube, I found it difficult to draw nice curved lines. The end result was quite sketch like, and I’m wondering if anyone has a good technique to share to get a nicer drawing?
From this week’s exercises I feel a lot more comfortable establishing perspective sketches. I think adding a 30 degree rotation is an especially useful way of representing products and drawings. I think this will be useful for further sketching when representing other products to be able to set a global boundary, and hand sketch the designs within that.
I feel very confident drawing straight lines and angles to a high degree of accuracy, but my drawing of freehand curves still needs practice and improvement.
8 notes
·
View notes
Text
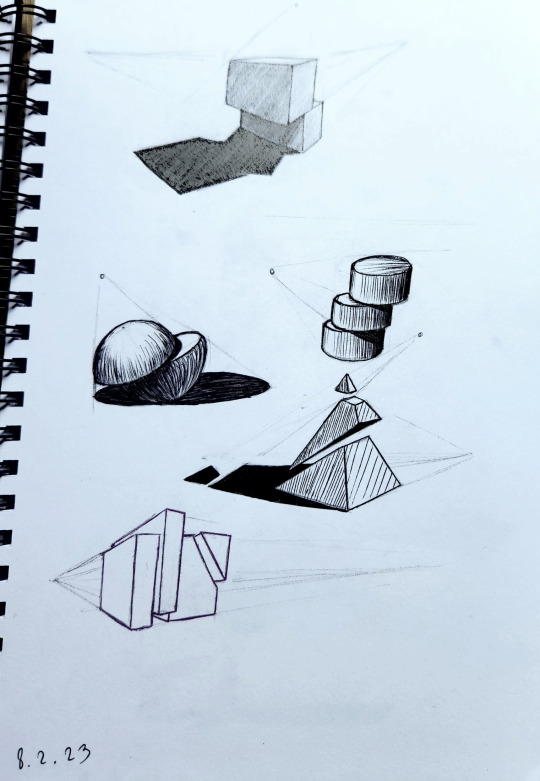
Week 3 - Section and Auxiliary Views
For this week's studio tutorial we were introduced to another type of orthographic view called the auxiliary view. It is an orthographic view that is perpendicular which helps show the true size and shape of the slanted surface of an object.
The exercise was to make a third-angle orthogonal drawing of a tapered block.
I began by doing a layout sketch to know where each of the views will go as well as where the title block will be positioned.

The pace I was going was slow at first as I had to find out some of the measurements which was a bit of a challenge but also really enjoyed a good challenge. I also like taking things slow and took my time understanding the isometric view of the tapered block before drawing the views to ensure I don't make a mistake. Despite my slow pace, I didn't have much trouble doing this task although it took me a while to understand the auxiliary view and how to approach it. However, in the end, I eventually got it. Since the auxiliary view is new to me I would like to further my understanding of this by practicing drawing more with different objects in my spare time.

Reflecting back on the errors I made from last week's tutorial I made sure to use a thinner pen for the dimension lines and used arrowheads to show the dimensions. Overall, I found this task very useful and genuinely quite fun. I also feel good with the finished work and would love any feedback to further improve!
5 notes
·
View notes