#it's a basic stitch with regular increases
Explore tagged Tumblr posts
Visit Tumblr Blog
Explore Tumblr blogs with no restrictions, modern design and the best experience.
Last Seen Tumblr Blogs


Fun Fact
Women make up for the other 50% of Tumblr’s audience.
Text

I learned to read patterns and for what? To spend half of an eternity making a garment out of sport-weight yarn.
#I'm actually kind of enjoying myself#except for the moments I'm absolutely confused because the pattern is in UK terms#and the yarn is DELICIOUSLY soft#there's a solid chance I'm not doing this QUITE right but it's close enough#hopefully it fits#I completed the back panel a while ago#there are two long front pieces and I'm maybe a third of the way through the first#it's a basic stitch with regular increases#once the front pieces are done I attach everything and then add borders and clean up the arm holes#but I really need to buckle down#I'm not going to be able to make half of what I wanted to make for Christmas this year and I'm learning to be ok with that#it's just been a weird year for me creativity-wise#I am sorely tempted to give knitting another try if only to (presumably) making garments work up more quickly#crochet#mine
33 notes
·
View notes
Text
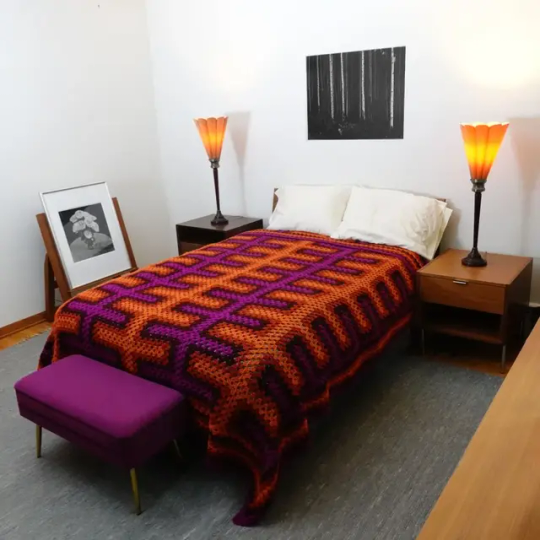
The Stacktangle Blanket Crochet Pattern will turn your expectations of the well known granny stitch on their head. This pattern uses stacked increases and decreases to turn simple stripes into complex looking colorwork. It isn't much harder than a regular granny stitch afghan, we've provided photo tutorials of the unusual stitches in the pattern.This project can be made in many sizes and is well suited for crocheters who are familiar with basic stitches and are ready to take on some new skills.
Patrick T. Stewart wrote the instructions and I ( Xandy Peters) made the charts. Whichever way you prefer to get your crochet patterns, you are covered.

Sizes: Baby (Throw, Twin*, Full*, Queen, King)
Finished Dimensions: 23" x 28" (57" x 50", 91" x 72", 91" x 94", 91" x 116", 108" x 116") / 58 x 71 cm (145 x 127 cm, 231 x 183 cm, 231 x 239 cm, 231 x 295 cm, 274 x 295 cm)
*Twin and Full size are turned 90* to fit on a bed.

Yarn: 4 Colors of worsted weight (#4 Medium) blanket yarn such as:
Loops & Threads Soft Classic, 354 yards (324 m) per 7 oz. 100% acrylic. Color A - Raspberry, Color B - Wine, Color C - Clay.
Red Heart Super Saver Solids, 364 yards (333 m) per 7 oz. 100% acrylic. Color D - Orange.
More yarn info is in the image below.
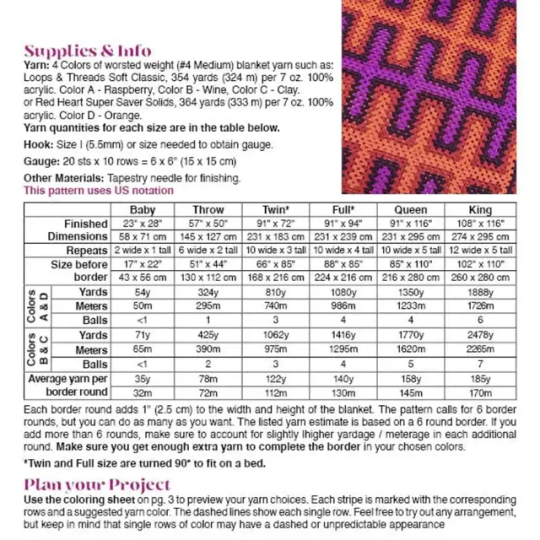
Hook: Size I (5.5mm) or size needed to obtain gauge.
Gauge: 20 sts x 10 rows = 6 x 6" (15 x 15 cm)
Other Materials: Tapestry needle for finishing.
This pattern uses US notation

Find the pattern on Ravelry or on xandypeters.com
422 notes
·
View notes
Text

GET CROCHETED YOU NERD (affectionate)
details below
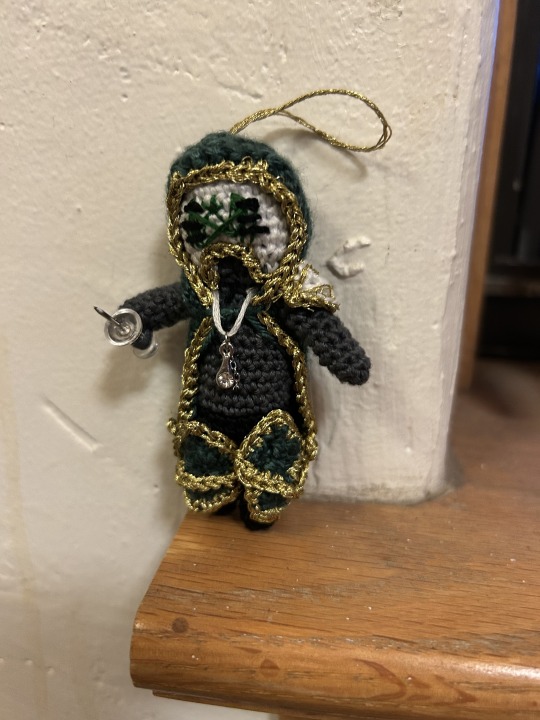
the little guy is about 3 1/2 inches tall and crocheted out of regular embroidery thread! no pattern just vibes, plus a lot of embroidery and edge crocheting (as a side note. metallic embroidery thread is of the devil and i never want to touch it again)
Legs and body were crocheted together, the head is all white with the mouth area done in tapestry crochet, then the eyes, logo, and gold detail were embroidered on when i was done. The cloak, leg things, and pauldron were all crocheted separately and sewed in place (although really only the pauldron is sewn in place, the cloak and leg things are kind of just tied on)
The arms were also sewn on lol
Then at the last minute I added the necklace and the little "sword" -- which is literally just sewn with a couple passes of thread onto the hand
The little loop is because he's meant to be a little backpack charm or ornament or something (if anyone makes one and hangs it on a christmas tree, PLEASE let me know!) but it could easily be taken off so he's just a little figurine
If you really really want a pattern, DM me and I'll try to remember what I did lol
the base body is really simple, both the legs are:
sc 6 in a magic ring. (inc, sc) around to get 9 stitches. work 8 more rows.
Then you join them together, work two or three rows in the torso and switch to dark grey. I think I did about 7 or 8 rounds just sc, then on the next one decreased to 12 st. at this point I stuffed it (with scrap fabric since i didnt actually have stuffing lmao) and then decreased to 6.
The head is just as simple, although there's a little colorwork involved that you can kind of just eyeball. I started with 6 in a magic ring, and increased to 12, then 18, then 24. I worked about 5 rounds of just white, then on the next round started on the colorwork. It was just 3 or 4 stitches of grey, which I then carried around the rest of the round. The next round of colorwork was worked along with decreases, but I essentially just added another grey stitch or two on each side of the section from the previous round. Then For the next round of decreases I just did all grey, same with the last round. Again, I stuffed it after decreasing to 12 stitches in the round.
The head and body are sewn together like any other stuffed creature. The arms are basically the same as the legs, except once finished they are flattened at the open end and sewn to the junction between the head and body after being stuffed.
The cloak was. annoying. but essentially i made a chain, and crocheted in a "c" shape (so i would go around one end, but at the other would stop and turn. The end where you go around becomes the hood. For the little sleeves, I just chained about 5 and skipped 3 stitches, eyeballing where they would go by holding the cloak up to the body.
The leg things and pauldron were a series of sc, hdc, dc, picot, hdc, sc worked flat, then going and doing the same thing in the back loop. For the leg things, since they have a point at the top of the knee, I went all the way around and did the same thing twice, once on each side of the cast on chain.
Then of course, everything is finished with sc around the edges in gold thread.
The pauldron i slip stitched around to prevent it from getting too bulky, really either one works depending what you prefer.
The mask like i said before is all embroidered, I used three strands for the logo and the full six for the eyes. the gold around the mouth of the mask is chain stitch, but you could also surface crochet i guess
thats about it, I haven't added the feathers yet but I imagine it'll just be a bunch of loops of black thread sewn to the back of the cloak, I'll probably reblog with how i did it.
Also, as a final note, I made this on the 12th but scheduled it a couple days later since its SOMEONE'S birthday gift!
#sleep token art#sleep token fanart#crochet#sleep token#vessel#crochetssel?#fiber arts#yall come look at the Little Guy i made!!!!
91 notes
·
View notes
Note
Can you recommend any full-scope resources for getting in to bookbinding, especially rebinding books and the different methods of stitching signatures/folios? I've had a really hard time finding comprehensive resources that kind of have all the information collected in one easy to read/watch place, but I really want to start binding my own books! Any resources for supply shops (I'm not in the USA so online might have to do) would be great too!
Ty 🩷
Full-scope in one place is unfortunately not exactly a thing in this hobby, given the very wide range of techniques & training styles. This is why I've found it helpful to be part of a community (even one that is mostly amatuers). @renegadeguild (the discord especially, but here is the website resource page too) is a great group of people that are always finding new tutorials, books, techniques, & material shops to share with each other - or creating them outright when none seem to exist. The discord hosts the bulk of the resources & is open to anyone 18+. Renegade also has regional servers you can join from the main, including outside the US (there are Renegade Europe, Australia, & Asia servers - I'm one of the Renegade Asia mods), which collect more region specific shops, online listings, & classes.
For traditional bookbinding (case bindings & some in-boards styles, plus explanations of adhesives & other basics), I recommend DAS Bookbinding. He has a lot of videos and focuses on technique. I recommend going through his videos by playlist, but he also has a guide to his video listings in his bio description on YouTube. This playlist talks about different sewing styles. Of the people putting out tutorials I would say he is the most comprehensive.
For exposed sewing styles, I'd recommend Bittermelon Bindery, who has a book called Handmade Books At Home that covers several different sewing styles.
r/bookbinding on reddit has a long list of links under the description's "see more."
There are of course other people out there, but there are also whole books on just endband styles or marbling, so to avoid sending you all over the place...
For rebinding, I probably have less useful information for you, as it's not something I do often, but here's a few notes. "Rebinding" in the colloquial sense currently refers to either of two different things: 1) taking a glued together paperback & recovering it to make it a prettier hardcover, or 2) completely taking apart a book (usually one that was sewn; if not sewn, gluing individual pages to "stubs" which are then sewn together), sewing the pages back together ("rebinding"), often with increased structural support, and either restoring the original cover or creating a new one.
#1 is debatable on whether it increases the longevity of the book (mostly because of paper quality & the glue binding), but it's nice for renovating your shelves. DAS also has a few videos on this type of rebinding, plus another here by Nik the Booksmith that I referenced the one time I've done this. Keep in mind they are using different techniques from each other, so you may need to do a little parsing between what different steps they are using. What a lot of people do too is use the square back bradel cover and act like the paperback is just a regular textblock, which does work for type #1 rebinding.
Type #2 rebinding requires some care in removing the glue & taking apart the original binding, because you want it off but not so much you damage the paper below. I have very little experience with this type of rebinding, but it results in a book that will last longer if you do it right. If you aren't concerned with keeping any of the original cover, once you've got the signatures clean & separated it seems pretty similar to starting from scratch.
I know there are a bunch of other rebinding resources out there, I just generally don't know what they are, so my knowledge is a bit lacking here! My ficbinding to-do list is too long for many rebinds to make it into the mix, lol.
Happy binding & best of luck in your future efforts!
44 notes
·
View notes
Text
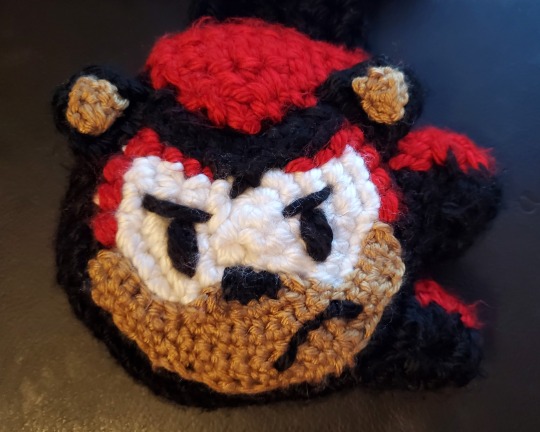
Shadow the Hedgehog Scarf Pattern
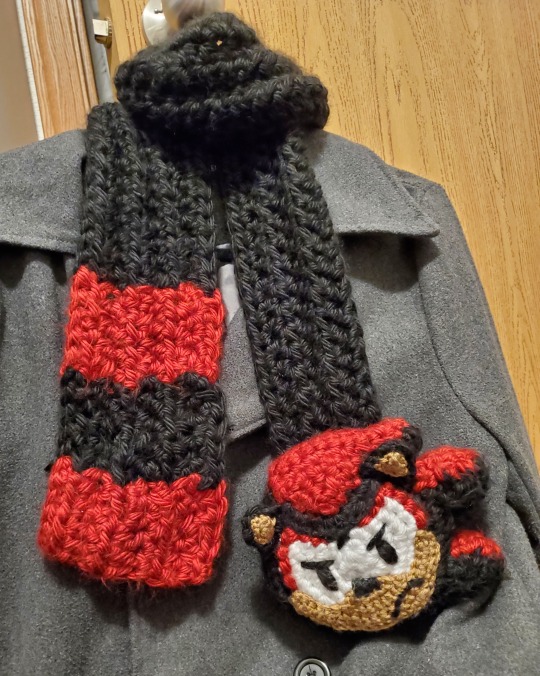
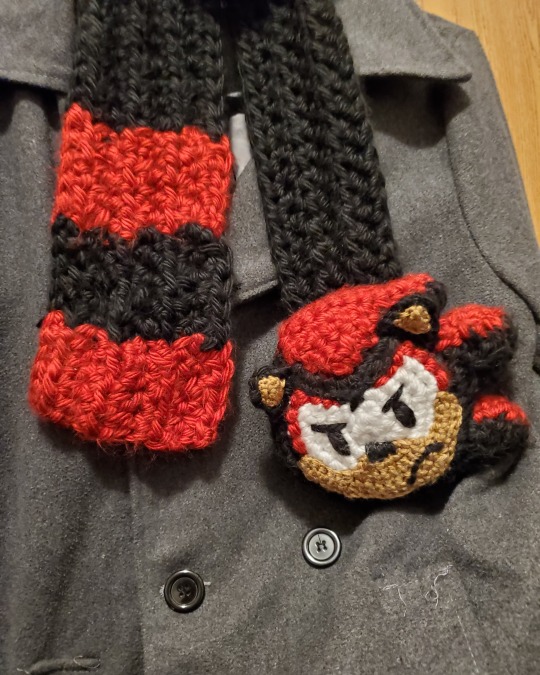
Some people said they wanted the Sonic Speed Simulator character scarves in real life, so I made the Shadow Scarf!
I wrote up the pattern below the cut, so you can create your own!
This is a crochet pattern based on the Shadow Scarf model designed by Gamefam. You may use anything you make from this however you like, but please credit me if you redistribute the pattern. You may not sell the pattern. I will not stop you from selling items created from the pattern, but you should check Gamefam’s and Sega’s policies for fanworks first to avoid copyright infringement. You may modify this pattern, and share modified versions of it. You may not sell modified versions of this pattern.
Tools and materials:
Crochet hooks in sizes N, K, and G
Yarn needle
Super bulky (6) weight yarn in your main color (black if you’re making Shadow). It took almost an entire 160 yard skein. I used Lion Hometown in South Dakota Black.
Super bulky (6) weight yarn in your secondary color (red if you’re making Shadow). I used Lion Hometown in Tampa Spice.
Super bulky (6) weight yarn in white. I used Lion Hometown in New York White.
Medium/worsted (4) weight yarn in brown/tan. I used Lion Basic Stitch Anti Pilling in Cedarwood.
Stuffing
Abbreviations:
R - Round
Sk - skip
Ch - Chain
Slp - slip stitch
Hdc - Half-double crochet
Fhdc - Foundation half-double crochet
Blo - Back loop only
Sc - Single crochet
Inc - increase (single crochet)
Dec - decrease (single crochet)
Inv-dec - invisible decrease (single crochet)
Sc3tog - single crochet 3 together
[something] * 6 - repeat “something” 6 times
Alternate techniques:
The listed stitches are the ones I used. However, as some of them are a bit tricky, there are substitutions that can be made. Any invisible decrease may be replaced by a standard decrease. A magic ring may be replaced by chaining 4, slip stitching to the farthest chain from the hook, then chaining one (for height) and working stitches into the center of the chain-ring like you would a magic ring; note that this will leave a hole in the center of your circle, which you may want to cover with the tail while weaving in the ends. Also, the foundation half-double crochets may be replaced by adding a starting chain as follows:
Row 0: Ch 5 in red; change to black, ch 5; change to red, ch 5; change to black, ch 77 (75 + 2 for height), turn.
Then simply use regular half-double crochets instead of the foundation stitches, beginning in the third chain from the hook.
I have tried to make this easy to follow, but if you have any questions, don’t hesitate to reach out to me, and I will do my best to answer them.
Pattern, scarf:
Starting with black yarn (N hook) Row 1: Fhdc 75 in black. Change to red, fhdc 5. Change to black, fhdc 5. Change to red, fhdc 5. Ch 2 and turn. Row 2: Hdc 5. Change to black, hdc 5. Change to red, hdc 5. Change to black, hdc 75. Ch 2 and turn. Row 3: Hdc-blo 75. Change to red, hdc-blo 5. Change to black, hdc-blo 5. Change to red, hdc-blo 5. Ch 2 and turn. Rows 4-5: Repeat Rows 2-3. Row 6: Hdc 75 in black. Change to red, hdc 5. Change to black, hdc 5. Change to red, hdc 5. Finish off and weave in ends
Head:
Starting with white yarn (K hook) R1: Make a magic ring, ch 1, then sc 6 in the ring. R2: Inc 6 R3: [sc 1, inc 1] * 6 R4: [sc 2, inc 1] * 6 R5: [sc 3, inc 1] * 6. Change to black R6: [sc 4, inc 1] * 6 R7: [sc 5, inc 1] * 6 R8-9: Sc 42 R10: [sc 5, dec 1] * 6 R11: [sc 4, dec 1] * 6 R12: [sc 3, dec 1] * 6 R13: [sc 2, dec 1] * 6. Finish off leaving a long tail for sewing.
Forehead/top of eyes:
With black yarn (K hook) R1: Sc 6 in MR R2: Inc 6 R3: [sc 1, inc] * 6 R4: [sc 2, inc] * 6 R5: [sc 3, inc] * 6. Finish off, leaving a long tail for sewing.
Large spikes (create 2):
With black yarn (K hook) Ch 8 Row 1: Ch 1 and turn, dec 1, sc 4, dec 1 Row 2: Ch 1 and turn, sc 1, dec 2, sc 1 Row 3: Ch 1 and turn, inc 1, dec 1, inc 1 Row 4: Ch 1 and turn, sc 1, sc3tog, sc 1 Without chaining, slp to the farthest stitch from the hook. Finish off, leaving a long tail for sewing.
Small spike:
With black yarn (K hook) Ch 6 Row 1: Ch 1 and turn, sc 1, dec 2, sc 1 Row 2: Ch 1 and turn, inc 1, dec 1, inc 1 Row 3: Ch 1 and turn, sc 1, sc3tog, sc 1 Without chaining, slp to the farthest stitch from the hook. Finish off, leaving a long tail for sewing.
Red, lower spike:
With red yarn (K hook) Row 1: Ch 2, 2 sc in second ch from hook Row 2: Ch 1 and turn, sc 1, inc 1 Row 3: Ch 1 and turn, sc 3 Row 4: Ch 1 and turn, sc 3. Finish off, leaving a long tail for sewing. Sew to one of the large spikes, attaching the first row of the red portion to the final row of the black portion.
Red, middle spike:
With red yarn (K hook) Row 1: Ch 2, 2 sc in second ch from hook Row 2: Ch 1 and turn, sc 1, inc 1 Row 3: Ch 1 and turn, sc 2, inc 1 Row 4: Ch 1 and turn, sc 4 Row 5: Ch 1 and turn, dec 2. Finish off, leaving a long tail for sewing. Sew to one of the large spikes, attaching the first row of the red portion to the final row of the black portion.
Red, forehead/upper spike:
With red yarn (K hook) Ch 10 Row 1: Ch 1 and turn, sc 10 Row 2: Ch 1 and turn, sc 10 Row 3: Ch 1 and turn, sc 6 Row 4: Ch 1 and turn, dec 1, sc 2, dec 1 Row 5: Ch 1 and turn, dec 2 Row 6: Ch 1 and turn, dec. Finish off, leaving a long tail for sewing.
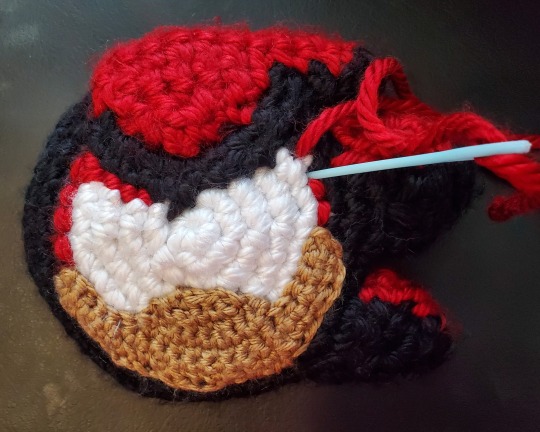
Face:
With tan yarn (G hook) Ch 26 Row 1: Ch 1 and turn, [sc 2, dec 1] * 6, sc 2. Ch 1 and turn Row 2: sc 20, finish off Row 3: Slp to join in 6th stitch, sc 8, slp 1 Row 4: Ch 1 and turn, sk 1, slp 1, sc 7, slp 1 Row 5: Ch 1 and turn, sk 1, slp 1, sc 1, dec 1, sc 1, dec 1, sc 1, slp 1 Row 6: Ch 1 and turn, sk 1, slp 1, sc 3, slp 1 Row 7: Ch 1 and turn, sk 1, slp 1, dec 1, slp 1. Finish off, leaving a long tail for sewing.
Ears (Create 2 in black and 2 in tan):
With black yarn (K hook) With tan yarn (G hook) Ch 3 Row 1: Ch 1 and turn, sc 3 Row 2: Ch 1 and turn, sc3tog. Finish off, leaving a long tail for sewing.
Assembly:
Start by sewing the forehead onto the main head. Next, sew the spikes to the right side of the head, starting from the bottom and attaching each right above the previous one; stuff the lower two spikes before finishing attachment. Add the upper red stripe with the large triangular portion in the center of the forehead and the side portion attached to the upper spike, stuffing the upper spike before closing it. Sew on the face (you may want to create the mouth before attaching the face if you dislike sewing through multiple layers).
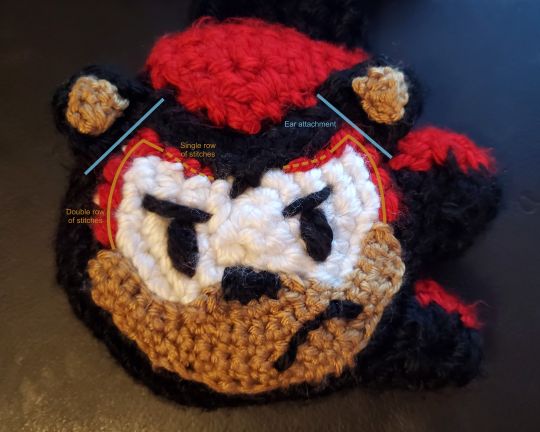
Using red yarn, embroider on the red “eyeliner” using a backstitch. Use one line of backstitching along the top of the eyes and two lines of backstitching along the sides of the eyes, trying to cover the join between the white and black. Use black yarn and a satin stitch to create the nose and the pupils; you can also cut ovals out of felt and sew them on if you prefer. Backstitch with the black yarn to make the mouth.
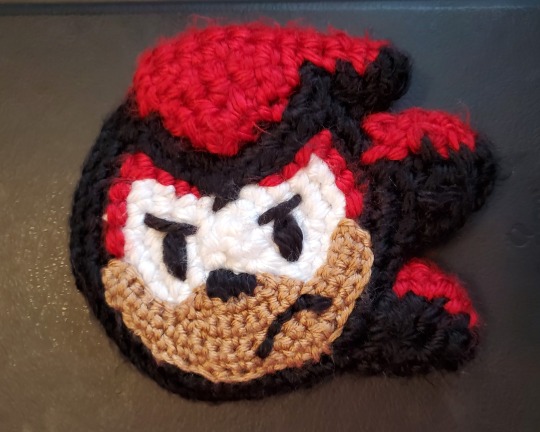
Sew the tan parts of the ears to the black parts, then attach the ears to the head. Finally, attach the head to the black end of the scarf, stuffing the head before closing the gap completely.
#sonic speed simulator#shadow scarf#shadow the hedgehog#sonic the hedgehog#crochet pattern#long post#crochet
137 notes
·
View notes
Text
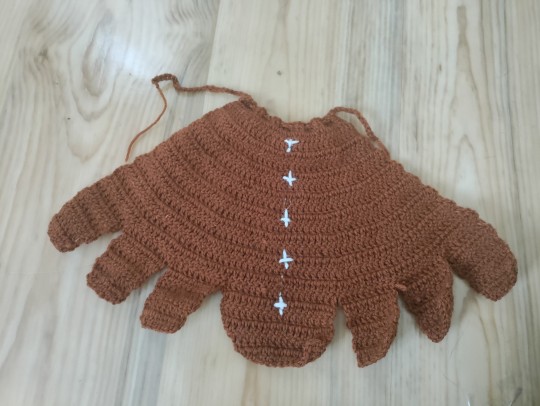
Moth outfit pattern
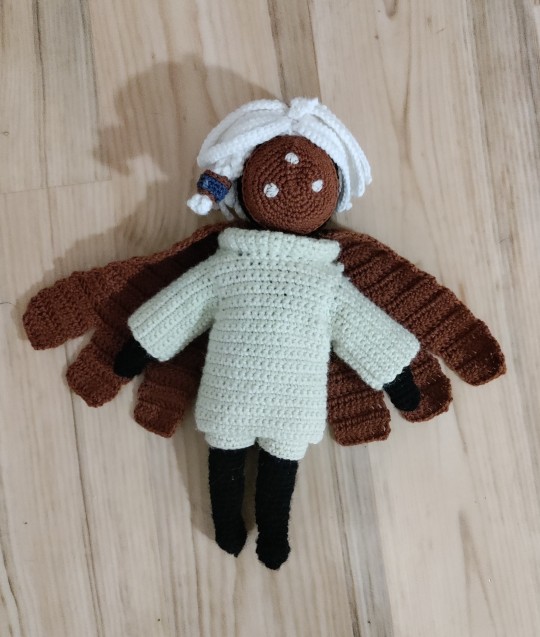
Hello, here's the pattern for the moth outfit. This post includes the basic cape pattern, basic mask pattern, moth hair pattern, base tunic pattern and the moth shorts! If you make something using my patterns, i would love to see it! Simply send me an ask, or tag me in a post! Now, here's the pattern!
Basic cape pattern
(This pattern is used for every base cape in game)
Materials: Yarn in the color of the cape you want, white yarn (for the stars), a 2.5 mm crochet hook, scissors, and a needle.
-Chain 26, and double crochet in the third chain from the hook. Double crochet in every stitch (24)
-Chain 2, *1 increase, 3 dc, repeat from * (30)
-Chain 2, dc in every stitch. (30)
-Ch 2, *1 inc, 4 dc, repeat from * (36)
-Ch 2, dc in every stitch (36)
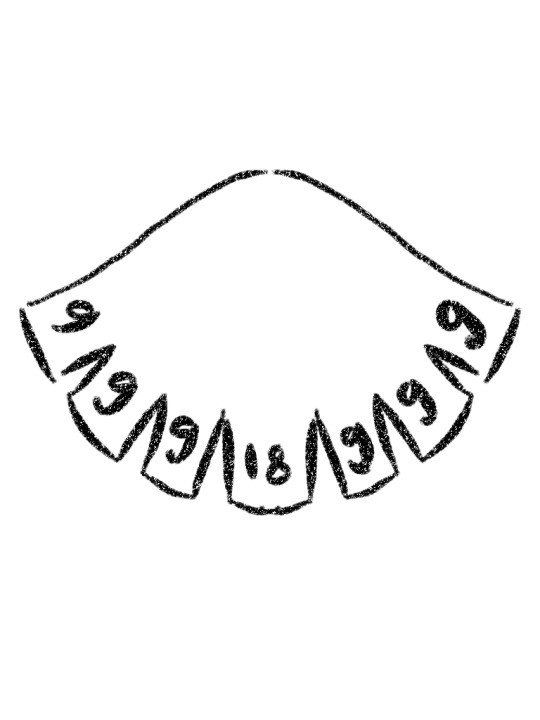
Now, i think you can see where this pattern is going. You will continue doing one row of increase, and one regular row for a total of 16 rows. When you're done, you should have 72 stitches.
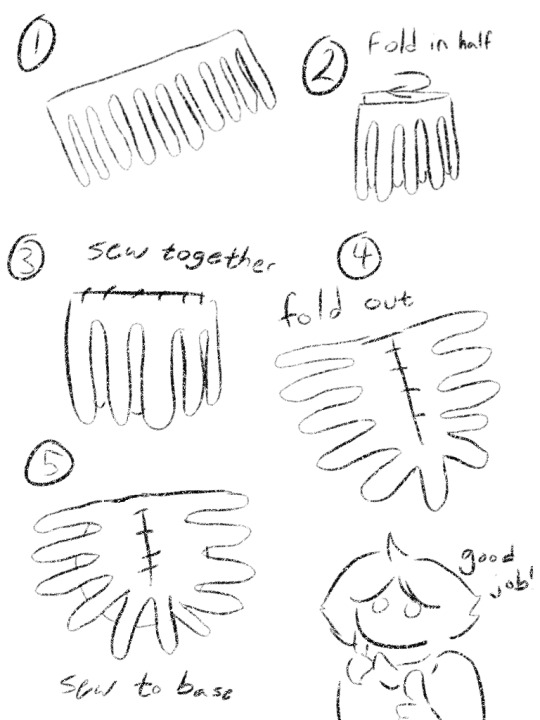
-(row 17) Chain 2, dc 9, then do 5 more rows with 9 dc each. Chain one, and fasten off.
This forms one part of the cape. This is how we will achieve the "cuts" in the cape. After you've fastened off, attach your yarn again, in the 10th stitch of the 16th row, continuing that same pattern again.
You will make 6 of these, 3 on each side of the middle. In the middle you instead make one with 18 stitches instead of 9. Here is a little guide for you:
When you're done, you can take your needle and some white yarn, and sew/embroider star shapes on the back, like the ones in game. You can make your skykid have as many wing levels as you want, but i only made the base 5 for simplicity.
Now, for the last part of the cape, the thing that will keep the cape on the skykid. I simply made a long chain, sewed it into the first row of the cape, and tied it around the neck. As simple as that!
Now, onto our next pattern!
Basic mask pattern
Materials: Yarn in the colors of the mask, a 2.5mm crochet hook, scissors, and a needle.
-Make 6 single crochet into a magic circle. Tighten the circle.
-Ch 1, increase in every stitch around, sl st in first sc (12)
-Ch 1, *1 inc, 1 sc, rep from *, sl st in first sc (18)
-Ch 1, *1 inc, 2 sc, rep from *, sl st in first sc (24)
-Ch 1, *1 inc, 3 sc, rep from *, sl st in first sc (30)
-Ch 1, *1 inc, 4 sc, rep from *, sl st in first sc (36)
Now, Make 5 rows of regular single crochet, 36 stitches each. Chain one, and fasten off. This is the base pattern, simple as that! Now, you can sew details onto it, like eyes, patterns, etc to match the mask you're trying to make.
But now you say, how will i attach this to my skykid without having to sew it onto it, because i might want to make more masks, and change them! Well i'll tell you!
If you're like me, you don't like weaving in loose ends. It's boring and takes a lot of time. Well don't you worry cause you won't have to do that! (for some at least, don't leave all your ends loose please) If you haven't weaved it in yet, you should have a thread of yarn in the middle of the back of your mask. This thread is very important. To attach the mask, you'll have to take your crochet hook, put it through the head in some way, making it come out of the middle of the face. Grab the thread with your hook, and pull it through the face.
It's a tedious process, and probably not the most practical way to do this, but hey, it works! It keeps the mask on the face fairly well, unless you're making your skykid headbang with all the energy in their tiny body. If you need to, you can attach more threads to the mask to secure it even more.
Moth hair pattern
Materials: White yarn, blue yarn, brown yarn, a 2.5 mm crochet hook, scissors, a needle, and you might end up needing an iron, to flatten the hair.
The hair can be split up in 5 parts. we will make on at a time.
1- the base (will be used to keep the hair better stuck on your skykids head)
This is a very simple pattern, and actually identical to the mask pattern. So technically you can just go look at that again.
2- The hair strands
-Ch 56, and single crochet in the second chain from the hook. Do 20 single crochet in total. Slip stitch in the next stitch. And chain 21. Single crochet in the second chain from the hook and make 20 in total. Slip stitch in the next stich of the base chain.
You will continue the pattern of chaining 21, making 20 single crochet, and slip stitching into the next chain of the base chain, until you've reached the end of the chain, and you should have 35 strands of hair in total.
When you're done, you might need to iron the hair strands, to match the in game look. Here's a guide for the next step, since i'm bad at explaining
3- The hair tuft
-Ch 2, sc one into first chain
-Ch 1, sc 2 into the same stitch.
-Ch 1, 2 sc
-Ch 1, 1 decrease
-Ch 1, 1 sc, ch 1, fasten off.
Sew this onto the top of the hair piece, somewhere in the middle.
4- The braid
This pattern is similar to the hair strands pattern, the only difference being that instead of 35 strands, we will only make 3. This means making a chain of 24, single crocheting 20, and slip stitching in the next chain, and making two more, so that you have 3 strands in total.
We will not braid it yet, because we need to make the last part first.
5- The hair tie
First, work with your blue yarn.
-Ch 10, sl st in first chain to make a circle
-Do 3 rows of sc, 10 stitches each. Chain one, and fasten off.
Now, take your brown yarn, and surface crochet around the first row and third row. And that's it!
6- The secret part (assembly)
Take the braid you've made, braid it, and pull it through the hair tie. Then, sew the braid onto the base piece (under the hair strands) and then you're done with the hair!
You attach it in the same way you attach the mask. I'd recommend one "fastening thread" in the front of the hair, and one in the back at least. add more if you need to.
Base tunic
Materials: White-ish yarn, a 2.5mm crochet hook, scissors, a needle.
This tunic will be used for every base outfit in the game, with the actual pants being a separate piece.
The tunic will also be separate pieces that are put together in the end.
1- Main piece(s)
-Ch 25, single crochet in every stitch (24)
-Make 18 rows of single crochet in total, with 24 stitches each
-Make 4 rows where you decrease in the beginning and end of every row. On the end of the 4th row you should have 18 stitches (if i've done the math correct)
-Make 9 rows of regular single crochet, with 18 stitches each.
-Ch 1, 3 sc, 1 dec
-Ch 1, 1 dec, 2sc, ch 1, fasten off.
-Attach your yarn on the last fourth stitch of the 31st row
-Ch 1, 1 dec, 3 sc
-Ch 1, 2 sc, 1 dec, ch 1, fasten off.
Now, make one more, so that you have 2.
2- Sleeves
-Ch 16, sc into every stitch (15)
-Make 26 rows of single crochet in total, with 15 stitches each.
Make 2 of these too.
3- Neck piece
-Ch 7, sc into every chain. (6)
-Make 50 rows of single crochet in total, with 6 stitches each
4- Assembly
Here, i've made a guide on how to assemble this. After that, you're done with the tunic!

Moth shorts
Materials: same yarn as the one you used for the tunic, a 2.5mm crochet hook, scissors.
-Ch 40, and sl st in the first chain to make a circle.
-Make 5 rows of regular single crochet, with 40 stitches each.
-Ch 1, 20 sc, sl st in the first sc.
-Attach the yarn again, and make another leg with 20 stitches. Both legs should have 5 rows each.
-Make 4 more rows of single crochet, with 20 stitches each. Fasten off.
And now you're done!
If you have any questions, or if anything was unclear, please do let me know how i can improve this. I am aware some parts may be oddly phrased but i hope you understood.
This is my first cosmetics pattern, please tell me if there's any cosmetics you'd like to see me make!
Here's the link to the body pattern/main post!
#sky cotl#sky children of the light#sky: cotl#thatskygame#that sky game#crochet#crochet skykid#skykid#moth
77 notes
·
View notes
Text
Chicken!
I messed up the beak a bit but its only the first try. I was originally going to make a hat with this yarn but there was slightly less than the necessary length and I didn't want to add another color since I don't have any with the same texture (as far as I know).
Also. Why do I have to find out by taking pictures with flash on that the landlord used a slightly different shade of off-white paint to fix small spots on the wall. Lol.
awwww no I missed the opportunity to name this Bill the Chicken. I should have used gold yarn.
Anyways here you go.


[ID: Five photos taken with flash, showing a hand-sized crochet chicken made with variegated black and white fluffy yarn, with a dark red comb, small black eyes, an orange beak, shown from all angles. It is 3D, shaped almost like a half circle, with the head a small dome above the body. It has no feet. The off-white wall in the background has slightly smaller dark spots where a different shade of paint was used. End ID.]
Basic instructions for people who know how to do all this already:
Act like you're making a ball, but instead of decreasing at the top, when you get it as tall as you want, start the new row like normal, go maybe 1/3rd of the way around, and join to the other side by pinching the top. Go around with slow decreases to make the head. Fasten off with a long tail and use that to sew the back together.
The comb is made with half-double and double crochets to form a general shell shape, but I'm sure someone else can make a squiggly one. I was just too lazy.
__
Actual pattern, which I made up as I went along:
(Slip stitch to close and then chain 1 between each row. Or work in the round. Doesn't really matter, do what you like better.)
Chain 2.
Row 1: Make 8 single crochets into the first chain.
Row 2: 2x single crochet in each stitch around. (VVV)
Row 3: 2x single crochet, then 1x, then 2x, then 1, (VIV)
Row 4: 2x single crochet, then 1x, 1x, then 2x, repeating (VIIV)
Continue in this fashion of adding 1 more regular single crochet between when you do 2x in each stitch (also known as an increase). (VIIIV) (VIIIIV) (VIIIIIV) (V[6]V)
After you get to six regular stitches between the increases, make the rest of the rows just one single crochet in each stitch.
When your chicken is as tall as you want it to be, start your next row like normal, but only go around a third of the way, or as wide as you want your chicken's head to be. Fold the chicken in half, and poke your hook through to the first stitch you made on this row, and slip stitch to close as though it's the end of a normal row.
Chain 1 to start the next row, and go a round, "decreasing" by either skipping every other stitch, OR "chaining two together", where you pull the yarn through the next stitch, then just go right into the one after that and complete the stitch like normal, pulling through both loops at once. This will make the circle start to get smaller instead of wider or staying the same.
Do a row or two of that until it's small enough to pinch shut at the top, and switch out for some red yarn.
With the red yarn, chain two, then make a half-double crochet, then a 2-3 double crochets, then a half-double crochet, and a single crochet to close.
For the beak and eyes, use a needle (or tiny hook, it's harder with a hook though) to wrap the yarn around a strand of the chicken's yarn to make eyes.
Or use safety eyes if you have them.
Fill the body and then sew or slip stitch / single crochet (it literally does not matter, do whatever you like better) to close the back.
6 notes
·
View notes
Text
@baboland, @nqds told me u wanted to learn to crochet right?? Well here u go
before u start, ur gonna need yarn and a crochet hook, u can watch this vid to like know everything abt that before u do start
youtube
right so this playlist on yt has everything u need to know, obviously u don't need to do the small projects in between or at the end
Heres how to do a slip knot (the way u start ANY crochet project) in an easy way and not in an overly complicated way like how everyone else does
youtube
Just watch the first part of the video on how to do the slip knot
And here's a vid that shows how to do a magic ring using the chain 2 method, which trust me, will make ur life SO much easier
youtube
U will also need to learn the magic knot, which is how u join 2 different yarns together but u can do that later or js watch a tutorial on yt when it comes to that. (U can watch Bella Coco's vid on that)
All right so these r the basic things ull need to know for now, and only rlly need to know the 6 main stitches (chain stitch, slip stitch, single crochet, half double crochet, double crochet, treble crochet) and how to increase and decrease (there r 2 types: regular decreases and invisible decreases) to crochet like any project. Obviously some projects will need a complex stitch here or there but it's not anything that u can't watch a tutorial for.
U will also eventually need to learn to read patterns, as there are abbreviations for the stitches. Theres also smth known as crocheting in the front and back loops but that's nothing to worry about since it's not a stitch, but just a loop in where to place ur stitch in. l'll putapicture of the abbreviations, since they're also used in yt tutorials
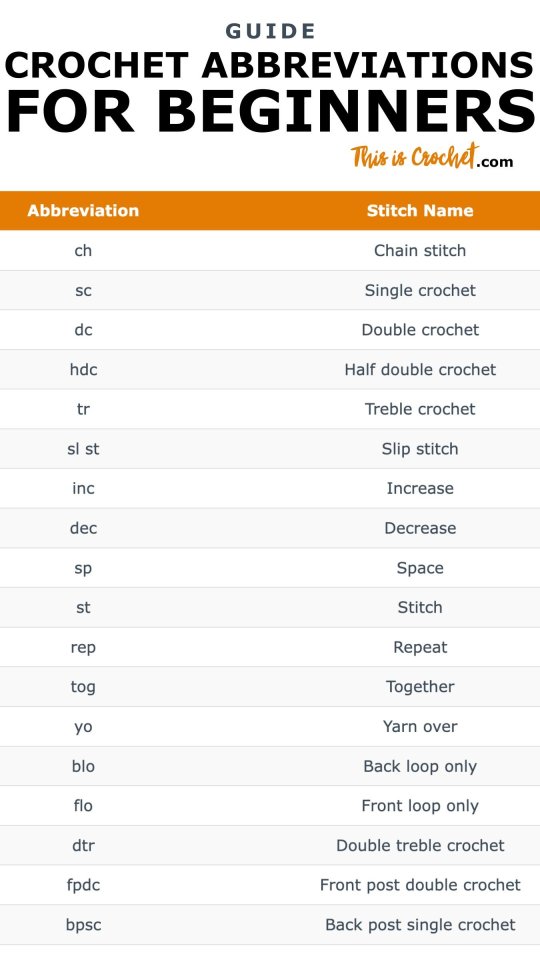
Some channels that I'd recommend for tutorials:
Club crochet (for amigurumi, which is the Japanese word for plushies)
Hooked by Robin (for amigurumi)
Mahumcrochets (for stuff like decor, bags, clothing and all, let's just say her channel and tutorials r a dream for a coquette girlie)
Bella coco
And thats all I have for now!
22 notes
·
View notes
Note
this is so random, but i read in your bio that you like to crochet and id love to learn, what are some of the basics and how did you start? 😭😭💞💞
YES okay so
my mom knew how to crochet and tried to teach me but i didnt really get it then
so then i kinda just watched a couple youtube videos (look up something like “how to crochet for beginners”)
youre gonna want to start with acrylic/cotton yarn (cotton is better but acrylic is usually easier to find so its really up to you)
do NOT start with any sort of fuzzy/fluffy yarn — it makes the stitches harder to see
i like using 2.5, 3.0, and 3.5 hooks — really anything in that range
hooks also might be labeled with letters so youll prob need to google the size if so
some basic stitches are: single crochet, double crochet, half double crochet, triple crochet, increase, decrease
learn how to do INVISIBLE DECREASES!! theyre really easy and you cannot see that they are there at all (usually you can see where you did a regular decrease)
single crochets are what you will use the most for amigurumi (stuffed animals basically), so if that is what you want to make, make sure you practice those a lot
speaking of stitches— there is a difference between US TERMS and UK TERMS— i dont really know how to explain it so i would look it up. make sure you know what terminology the creator of a pattern is using
do NOT buy pattern books unless theres a bunch in there you really want — look up free patterns, youtube tutorials, or even go to a craft store and find a book and take pictures of patterns you like
it took me a while to get the hang of crocheting, but after a bit i found it really easy!! it just takes a bit of practice. i was really frustrated at first, but i promise it gets wayyy easier
sorry that this was scattered😭 also theres prob some typos in here somewhere but idrc
if u wanna know anything else about crocheting ask me :D
3 notes
·
View notes
Text
If You're Gonna Update a Vintage Pattern, Put Your Whole Ass Into It
I was going through my scanned issues of Crochet Today (there's a bunch on the Internet Archive), and as I was looking through them, I remembered that the magazine used to take vintage patterns and update them to a more modern look. And sometimes you got stuff that evoked the original look but had the modern flair:
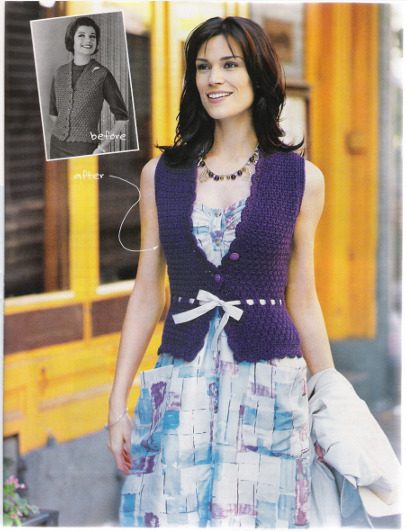
Like this vest. Which appears to have kept the same stitch pattern, scalloped edge, and length of the original while lowering the neckline and adding a bow. I like this. It's got that vintage feel while not being as boxy as the original.
But for every good update like this vest, you got three months of mid-at-best interpretations. Let us marvel at how wrong these all are as "updates" rather than just putting them in as regular fucking patterns:

I have a LOT of 1950s shrug patterns, and when I tell you the point was to fit them snug on the body, I know what I'm talking about. I can't quite tell, but I'm pretty sure that's not even the same motif, and I bet you the original was made in fingering weight or even thread, while this "reinterpretation" is Red Heart Soft, which is a heavy worsted. Add to the fact they couldn't even be arsed to add cuffs on the sleeves to give it some sort of shaping, and it's just a whole lot of nothing that does not evoke the sleek, 1950s vibe of the original. It also takes a flat-out awful picture. It looks like you cut holes in a worn out dish rag.
Moving on. We have this:
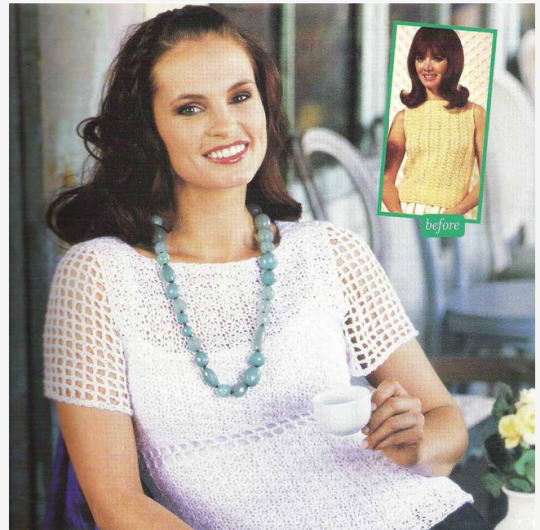
What even is the fucking point. You didn't even use a yarn that shows off the stripes made by the way the shells lay out. You made a version that has MORE coverage than a 1960s shell top. That's a fascinating choice. And the filet waistline and sleeves just don't fucking go. It looks like you had to make a hurried change to the top you're wearing to your weird family member's fundamentalist wedding. There's no vintage feel to this at all. And for god's sake, why would you make it in white. The 1960s was so colorful, and you went with popcorn ceiling white.
But now, we get to the one that really pissed me off:
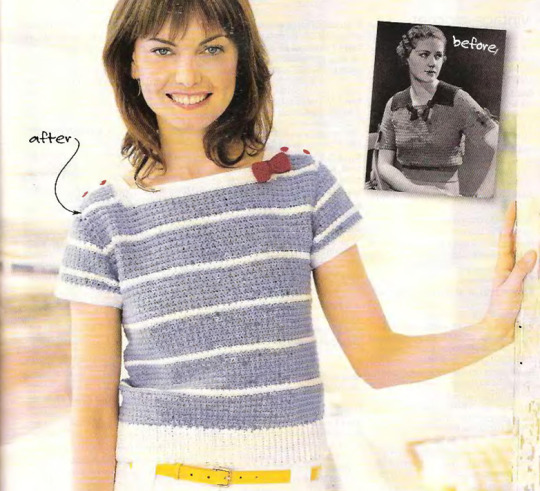
You took a very classic 1930s top and made a fucking T-shirt. It's a fucking T-shirt. You couldn't even give enough fucks to make a real waistband of the bottom portion and give the top the same basic shape as the original. You just made a fucking T-shirt. A tiny bow and little buttons does NOT a 1930s top make. But also, while the 1930s loved some shoulder buttons, this top doesn't fucking have them! And you didn't even have the fucking stones to put bows on the sleeves! Why am I here. Why is this here. Why did you add stripes. Why are you using a sportweight yarn for a redesign of something made in (at heaviest) size 10 thread.
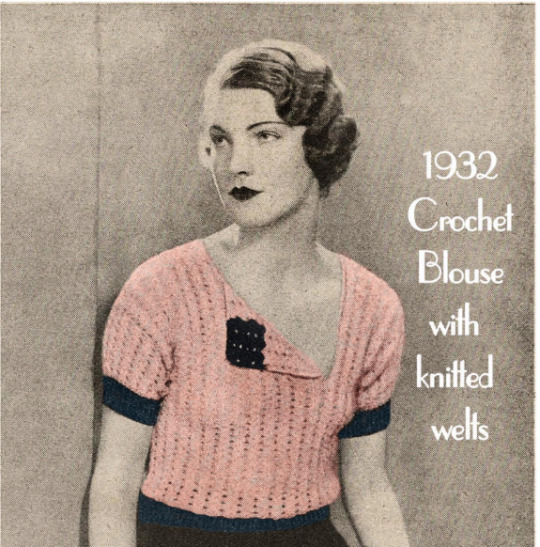
And why the fuck are you claiming it's from the 1940s:

When it is 100% from the 1930s. Likely the late 30s, but still the 1930s. You can tell by the hair, the flat shoulder (1940s shoulder went more structured due to the influence of military uniforms in fashion), and the way it's a fitted waist with a blousy top (1940s sweaters were fitted throughout) For fuck's sake, at least get the era right. There are plenty of 1940s blouses you could have ruined for this redo. But this is 1930s.
Here's a bunch of other 1930s tops I have to prove my point:


And here's one from 1938 that shows the beginning of the more structured look you'd expect from the 1940s:

Anyway, I'm making a mesh skirt from the 1930s but upping the hook size every time it tells me to increase on a row, and I promise you, however it ends up looking, it will still have more of the vintage flair than any of these shitty ones.
#crochet#crochetblr#vintage patterns#vintage fashion#retro fashion#don't fuck around with things you don't understand#stop using worsted weight for thread-based projects
4 notes
·
View notes
Text
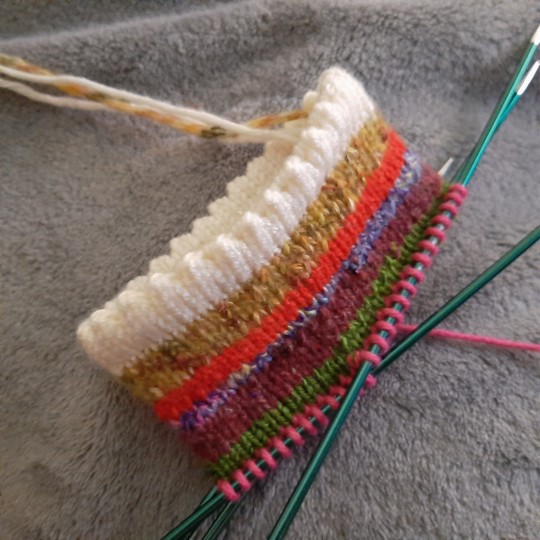
Estou a fazer umas luvinhas, que o tempo começa a virar mais para o frio. Fiz uma amostrinha e os meus cálculos, tudo direitinho (mas claro que me esqueci de calcular a altura da secção dos aumentos), e comecei.
I'm making myself some mittens since the weather is beginning to get quite chilly. I made a swatch and all my little calculations (except of course I forgot to calculate the height of the increase section) and got to knitting.
Decidi fazer uma bainha de bicos, que é basicamente fazer quatro voltas em liga, uma volta de laçada e minguado seguida de mais quatro voltas em liga; depois dobra-se a bainha ao meio e vai-se tricotando juntamente a última volta e a base da montagem, que se aconselha ser uma montagem simples, mas eu fiz uma diferente sobre a qual é mais fácil trabalhar, mas que depois deixa mais volume na transição entre a bainha e o resto do trabalho. A mim não me faz mossa.
I decided to do a picot edge, which is basically four rounds of purling, one round of yarn overs and purl two togethers, followed by another four rounds of purls; then you fold the edging in half and join the last round to the base of the cast on, which they say should be backwards loop, but I did a different one into which it's easier to knit, but which then leaves a bit of bulk in the transition from the edge to the rest of the knitting. Personally, I don't mind that.
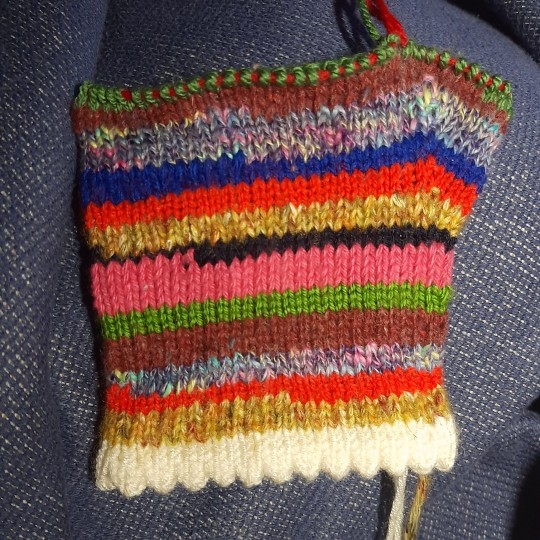
Considerei fazer desenhos em jacquard, mas acabei por optar por um padrão raiado e, para não ter de arrematar dezenas sobre dezenas de pontas, decidi ligar os fios "à russa" e não me importar muito com onde começam e acabam as riscas.
I considered doing stranded colourwork designs, but ended up going for a striped pattern and, so I won't have to weave in tens upon tens of ends, I've decided to use russian joins for the colour changes and to not be too fussy about where the stripes begin and end.
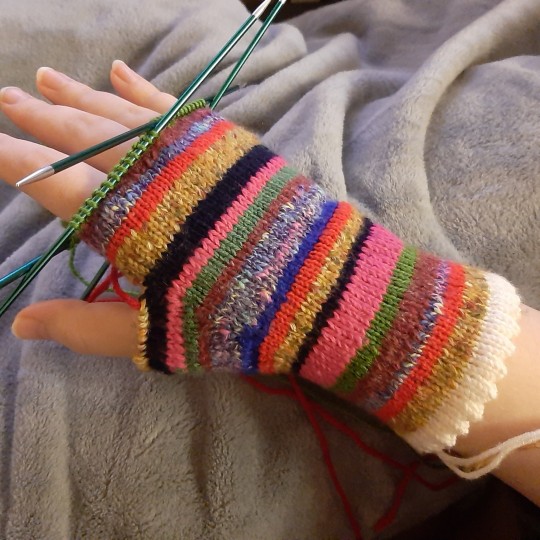
Da primeira vez que fiz os aumentos, não tinha comprimento suficiente para chegar ao polegar (primeira imagem abaixo), então desfiz o trabalho e recomecei os aumentos e desta vez fiz repetições de aumento+espaçamento×2 e assim consegui chegar ao polegar (segunda imagem abaixo foi um pouco antes).
The first time I did the increases I didn't obtain enough length to reach the thumb (first picture below), so I undid my work and started over on the increases and this time I did repeats of increase+spacing×2 and by doing that I was able to get to the thumb (second picture below was just before that).
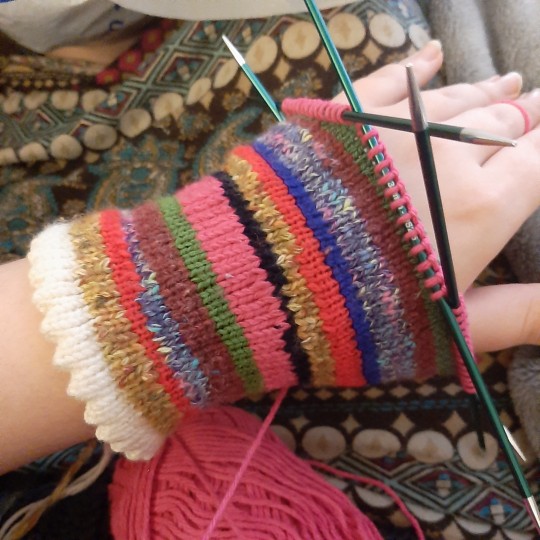
Agora o problema é que tenho demasiados pontos no polegar, mas acho que lhe vou simplesmente fazer uns minguados de modo regular e isso deve-me resolver o problema; e até fico com algum espacinho extra para o polegar ter mais mobilidade. Vamos ver como fica.
Now the problem is I've got too many thumb stitches, but I think I'll just do some decreases at regular intervals and that should take care of that; and I'll even have some extra room so the thumb has more mobility. We'll see how it turns out.
Separei o polegar da palma e agora é só continuar a trabalhar para cima. Esta luva não vai ter dedos à parte do polegar, então acho que quando chegar mais ou menos à unha do mindinho vou começar a estreitar a mão com minguados em pares de cada lado com uma volta de espaçamento; quando já só tiver metade dos pontos com que comecei, faço minguados a cada volta e arremato os dois lados juntos quando chegar aos oito pontos.
I've split the thumb from the palm and now I just have to continue knitting upward. Then when I get to about my pinky nail I'm going to begin narrowing the hand with double decreases on either side with one spacing round; when I only have half the stitches that I started with remaining, I'll do decreases every round and stitch together the front and the back when I get to eight stitches.
E é isso por agora!
And that's it for now!
#tricô#luvas#inverno#malha#knitting#winter#mittens#trabalhos manuais#textiles#yarn crafts#fiber art#fiber crafts#meu#mine#artes manuais#manualidades#crafts
5 notes
·
View notes
Text
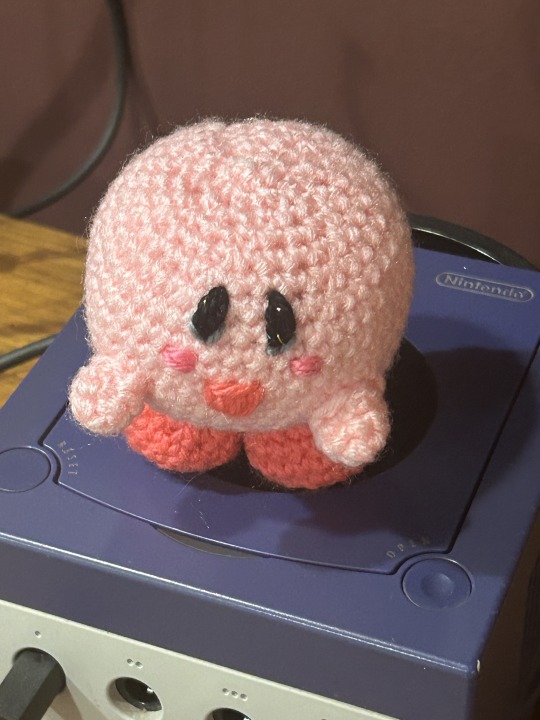
Kirbo, just kirbo💖
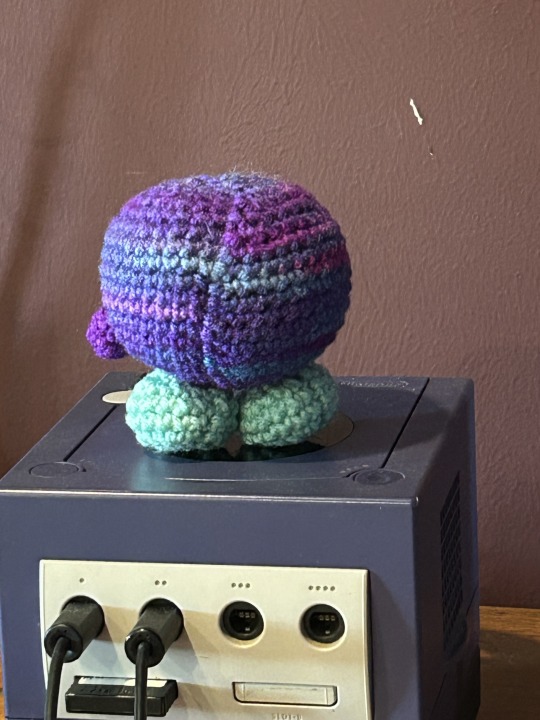


The purple one is the one I finished today for myself since I wanted to crochet with this purple yarn I’ve had for a while. Probably one of my personal favorites ✨
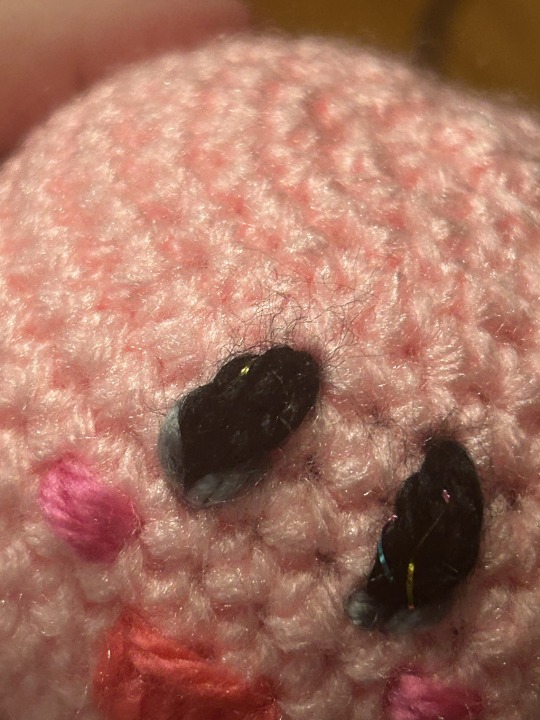
The regular one was given to bf for Valentine’s Day. His got some special stuff like sparkling yarn and an open smile! Went with pinks since fit the pattern better at the time.
It’s all basic shapes- feet are three rounds of increase by six (18) then 2 rounds of 18 before decreasing back and finishing off!
Arms are three rounds of six- leaven long tails for sewing later.
(Sew feet in the inside once you’ve half done with sphere and place arms where you feel it’s best! The face should be a row or two above the arms)
The body is just your basic sphere with 42 being the largest amount of stitches per rounds. The first 7 rounds are just increases by six- followed by 7 rounds of 42 stitches and you decrease before finishing off and sewing it up on the top.
Hope you have a wonderful day and enjoy this simple pattern
Kirby belongs to Nintendo
Art done by me, misskazehana
#crocheting#misskazehana#yarn crafts#yarn#crochet#kirby#kirbo#nintendo fanart#nintendo#crochet crafts#hoshii no kaabii#arigurumi
8 notes
·
View notes
Text
Understanding the Cost Structure of T-Shirt Manufacturing in Chennai

Factors Influencing the Cost of T-Shirt Manufacturing in Chennai
The cost structure for t-shirt manufacturers in Chennai is influenced by several key elements, which we will break down for you. From raw materials to labor, and production processes to overhead costs, knowing these factors will help you effectively plan your budget.
1. Raw Material Costs
Raw materials account for a significant portion of the total manufacturing cost. The primary materials used in t-shirt production include cotton, polyester, and blends of both. Cotton is the most commonly used fabric in t-shirt production and tends to be more expensive than polyester.
Cotton: Cotton prices fluctuate based on supply and demand, seasonality, and quality. Organic cotton or premium-grade cotton can increase the overall cost.
Polyester/Blends: Polyester is typically cheaper, and t-shirt manufacturers often mix cotton with polyester to reduce costs.
In Chennai, the cost of raw materials can vary depending on whether manufacturers source locally or import fabrics from other regions. The availability of raw materials like cotton in Tamil Nadu, where Chennai is located, often results in competitive pricing in the region.
2. Labor Costs
Labor is another significant cost factor when manufacturing t-shirts in Chennai. India, with its vast labor pool, generally enjoys lower labor costs compared to Western countries. However, labor costs can still vary depending on the skill level required for tasks such as sewing, stitching, and embroidery.
Skilled vs. Unskilled Labor: Skilled labor like designers or technicians may demand higher wages. On the other hand, unskilled workers involved in basic assembly or packaging may cost less.
Factory Size: Larger factories with more employees may benefit from economies of scale, leading to lower labor costs per unit.
For businesses looking to work with t-shirt manufacturers in Chennai, understanding the labor cost structure will allow you to anticipate the impact of wages on the overall price.
3. Production Volume
One of the key considerations when working with t-shirt manufacturers in Chennai is the volume of production. Bulk production generally leads to lower unit costs due to economies of scale.
Small Batches: If you’re ordering small quantities, the per-unit cost will be significantly higher. Small runs require more setup time and less efficient use of resources, increasing costs.
Large Batches: In contrast, larger orders reduce setup times and improve efficiency, bringing the per-unit cost down.
Understanding your production volume is critical in managing costs. If you have a large volume of t-shirts to manufacture, you may want to negotiate prices with t-shirt manufacturers in Chennai to secure better deals.
4. Printing and Embellishments
Custom printing and embellishments, like embroidery or screen printing, can substantially affect the price of a t-shirt. These processes add extra costs depending on:
Type of Printing: Methods like screen printing, heat transfer printing, and digital printing vary in cost. Screen printing, for example, requires the creation of screens, which increases the initial cost for small batches.
Complexity of Design: The more intricate the design, the higher the cost. Multi-color prints or detailed embroidery often require more time and resources.
When working with t-shirt manufacturers in Chennai, it’s essential to factor in the costs of customizations to ensure your budget aligns with your design expectations.
5. Overhead Costs
In addition to direct manufacturing costs, t-shirt manufacturers in Chennai face overhead expenses such as:
Factory Rent: The cost of renting or owning the factory premises plays a major role in overhead costs.
Utility Bills: Manufacturing plants consume significant amounts of electricity and water, and these costs can add up.
Maintenance and Equipment: Regular maintenance of machines and equipment also contributes to operational costs.
These overheads may vary depending on the size and location of the manufacturing facility in Chennai, and they can influence the final price of the t-shirts.
Conclusion
Understanding the cost structure of t-shirt manufacturing in Chennai is key to making well-informed decisions about production and pricing. By taking the time to analyze raw materials, labor costs, production volumes, and additional customization costs, you can ensure that your manufacturing process is both cost-effective and profitable.
As demand for customized apparel grows, partnering with reliable t-shirt manufacturers in Chennai can help you achieve the best balance between quality and affordability. Whether you are a small business or a large enterprise, keeping a close eye on the cost structure will allow you to maximize your investment in t-shirt production.
0 notes
Text
Starting Your School Uniform Store? Here’s What You Need to Know to Get it Right!
Opening a store specialising in school uniforms is an intelligent business decision for retailers who want to access a consistent, year-round customer base. Parents are constantly searching for trusted sources of wholesale school uniforms to get their children prepared for school. So, how do you differentiate your store in a competitive market? Let's explore some of the most important factors that will enable you to open and maintain a successful school uniform store.
Quality is the first consideration when it comes to school uniforms. Parents would rather have uniforms that can withstand playground play, repeated washing, and regular wear and tear. Note wholesale school uniform suppliers that provide quality fabric and strong stitching to provide parents with what they need.
Next, highlight a wide size range. Children grow very fast, and mothers need to fit their children well at every age. Having a size range of toddlers through pre-teens will make your store appealing to a diverse customer base. Don't forget to stock adjustable waistbands and other yielding fits that will accommodate growing kids.
Carrying basics is also an option to consider. While uniforms normally consist of shirts, slacks, and skirts, don't overlook accessories such as socks, ties, and belts. These may be purchased individually and will dramatically increase your store's revenue. Offering whole sets of school uniforms and accessories, as well as individual items, eliminates the need for your clients to go elsewhere.
Lastly, seasonality is important. Although school uniforms are needed throughout the year, there is more demand during the back-to-school season. Prepare for the peak months by dealing with wholesale school uniform suppliers who can offer bulk savings, so you're prepared for the demand.
Opening a school uniform company is all about ease, quality, and reliability. With the right mentality and a range of products, your firm will be the go-to choice for parents within your area.
0 notes
Text
snake pattern very basic. I was attempting to figure out how to make a pattern for a rabbit, but I made the nose too long and then I was like you know what it might as well be a snake.
I started out typing it out properly, but then I got tired of that and just started using keyboard symbols because I really hate having to type it all out and when I'm reading a pattern I would rather just have symbols.
You can definitely find a better pattern out there somewhere lol, this one was as I said, meant to be a rabbit and then I did it wrong lol.
Symbol key:
| = once per stitch.
V = increase AKA do two per stitch
& = decrease, either by skipping one or doing two together
At the end of each row, slip stitch to close and then chain 1 to start the next row
symbols:
chain two.
dc into 1st chain.
10 dc into center. Slip stitch to close.
Chain 1.
||||
||||
||VV|||VV
||||
||VV|||||||VV
VVVV
&&&&
||||
||||&||||&
||||&||||&
||||&||||&
||||
fill head.
continue with a single crochet in each stitch until desired length, filling as u go
then decrease once per row until tail is closed.
written out:
chain two.
dc into 1st chain.
10 dc into center. Slip stitch to close.
Chain 1.
One single crochet into each stitch around this row
One single crochet into each stitch around this row
Increase twice in a row two stitches after the start, and two stitches before the end of this row.
One single crochet into each stitch around this row
Increase twice in a row two stitches after the start, and two stitches before the end of this row
Increase for this whole row
Decrease for this whole row
One single crochet into each stitch around this row
Make four regular stitches, then decrease, then four more regular stitches, then another decrease
Make four regular stitches, then decrease, then four more regular stitches, then another decrease
Make four regular stitches, then decrease, then four more regular stitches, then another decrease
One single crochet into each stitch around this row
Fill head.
Continue with a single crochet in each stitch until desired length, filling as u go
then decrease once per row until tail is closed.
#Rjalker does crochet#Crochet patterns#crochet pattern#crochet snake#free crochet pattern#free crochet patterns#free pattern#crochet patterns
3 notes
·
View notes